
Knowledgebase (2370)
Children categories
Interactive forms in PDFs are valuable tools that allow users to fill in information, complete surveys, or sign documents electronically. However, these forms can also add layers of complexity to a PDF, impacting both file size and the overall user experience. When forms are no longer needed, or when a document needs to be simplified for distribution or archiving, removing these interactive elements can be beneficial. In this article, we will demonstrate how to remove forms from a PDF document in Python using Spire.PDF for Python.
Install Spire.PDF for Python
This scenario requires Spire.PDF for Python and plum-dispatch v1.7.4. They can be easily installed in your Windows through the following pip command.
pip install Spire.PDF
If you are unsure how to install, please refer to this tutorial: How to Install Spire.PDF for Python on Windows
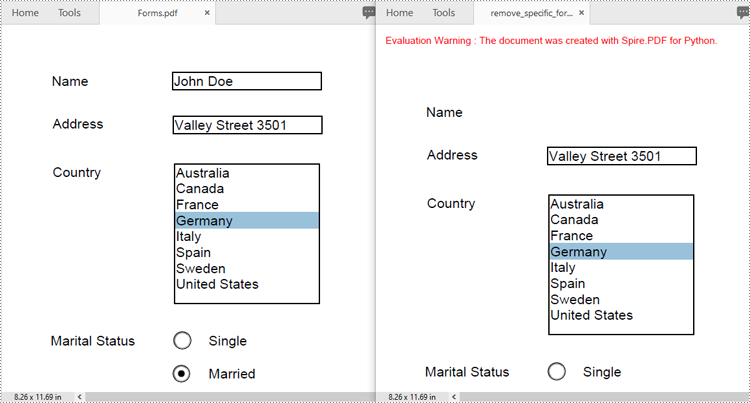
Remove a Specific Form from a PDF Document in Python
Spire.PDF for Python allows you to remove specific form fields from a PDF file by using either the indexes or the names of the form fields. The detailed steps are as follows.
- Create an instance of the PdfDocument class.
- Load a PDF document containing form fields using the PdfDocument.LoadFromFile() method.
- Get the form of the document using the PdfDocument.Form property.
- Get the form field collection using the PdfFormWidget.FieldsWidget property.
- Remove a specific form field by its index using the PdfFormFieldWidgetCollection.RemoveAt(index) method. Or retrieve a form field by its name using the PdfFormFieldWidgetCollection[name] property, and then remove it using the PdfFormFieldWidgetCollection.Remove(field) method.
- Save the resulting document using the PdfDocument.SaveToFile() method.
- Python
from spire.pdf.common import *
from spire.pdf import *

# Create an instance of the PdfDocument class
doc = PdfDocument()
# Load a PDF file
doc.LoadFromFile("Forms.pdf")

# Get the form of the document
pdfForm = doc.Form
formWidget = PdfFormWidget(pdfForm)

# Get the form field collection
field_collection = formWidget.FieldsWidget

# Remove a specific form field by its index
field_collection.RemoveAt(0)

# Or remove a specific form field by its name
# text_box = field_collection["Name"]
# field_collection.Remove(text_box)

# Save the resulting document
doc.SaveToFile("remove_specific_form.pdf")
doc.Close()
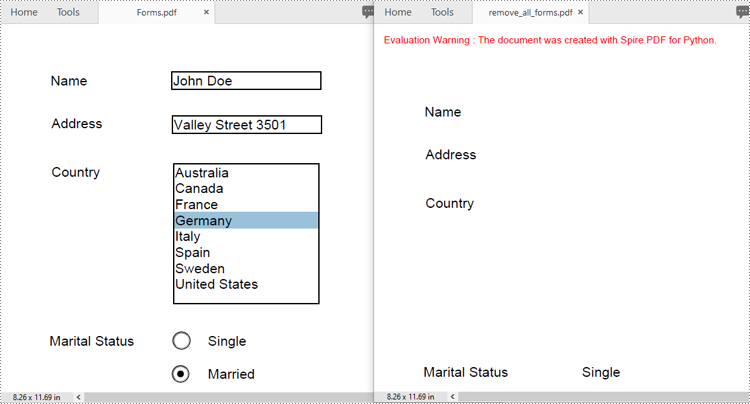
Remove All Forms from a PDF Document in Python
To remove all form fields from a PDF document, you need to iterate through the form field collection, and then remove each form field from the collection using the PdfFormFieldWidgetCollection.RemoveAt(index) method. The detailed steps are as follows.
- Create an instance of the PdfDocument class.
- Load a PDF document containing form fields using the PdfDocument.LoadFromFile() method.
- Get the form of the document using the PdfDocument.Form property.
- Get the form field collection using the PdfFormWidget.FieldsWidget property.
- Iterate through all form fields in the collection.
- Remove each form field from the collection using the PdfFormFieldWidgetCollection.RemoveAt(index) method.
- Save the resulting document using the PdfDocument.SaveToFile() method.
- Python
from spire.pdf.common import *
from spire.pdf import *

# Create an instance of the PdfDocument class
doc = PdfDocument()
# Load a PDF file
doc.LoadFromFile("Forms.pdf")

# Get the form of the document
pdfForm = doc.Form
formWidget = PdfFormWidget(pdfForm)

# Get the form field collection
field_collection = formWidget.FieldsWidget

# Check if there are any form fields in the collection
if field_collection.Count > 0:
    # Iterate through all form fields in the collection
    for i in range(field_collection.Count - 1, -1, -1):
        # Remove the current form field from the collection
        field_collection.RemoveAt(i)

# Save the resulting document
doc.SaveToFile("remove_all_forms.pdf")
doc.Close()
Apply for a Temporary License
If you'd like to remove the evaluation message from the generated documents, or to get rid of the function limitations, please request a 30-day trial license for yourself.
HTML files often contain valuable datasets embedded within tables. However, analyzing this data directly in HTML can be cumbersome and inefficient. Converting HTML tables to Excel format allows you to take advantage of Excel's powerful data manipulation and analysis tools, making it easier to sort, filter, and visualize the information. Whether you need to analyze data for a report, perform calculations, or simply organize it in a more user-friendly format, converting HTML to Excel streamlines the process. In this article, we will demonstrate how to convert HTML files to Excel format in Java using Spire.XLS for Java.
Install Spire.XLS for Java
First of all, you're required to add the Spire.Xls.jar file as a dependency in your Java program. The JAR file can be downloaded from this link. If you use Maven, you can easily import the JAR file in your application by adding the following code to your project's pom.xml file.
<repositories>
    <repository>
        <id>com.e-iceblue</id>
        <name>e-iceblue</name>
        <url>https://repo.e-iceblue.com/nexus/content/groups/public/</url>
    </repository>
</repositories>
<dependencies>
    <dependency>
        <groupId>e-iceblue</groupId>
        <artifactId>spire.xls</artifactId>
        <version>16.6.5</version>
    </dependency>
</dependencies>
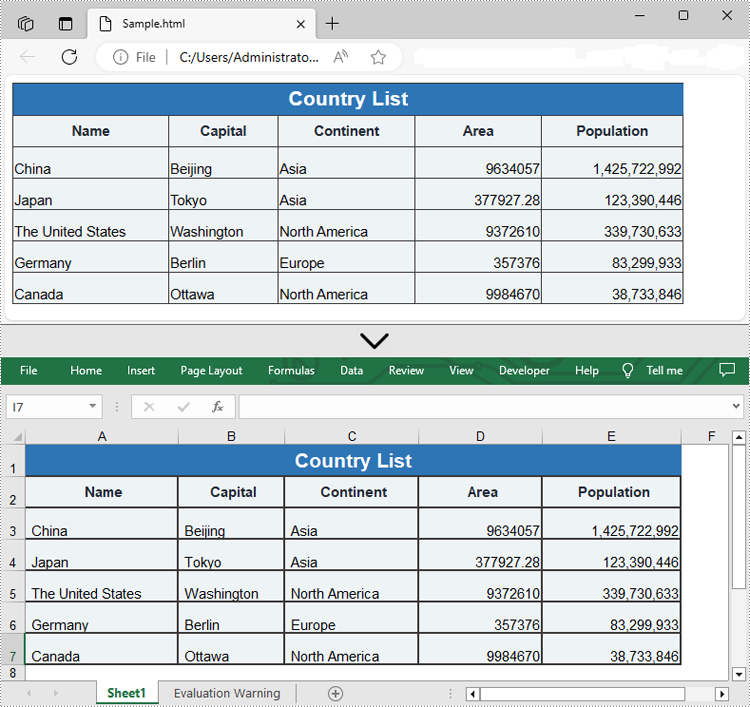
Convert HTML to Excel in Java
Spire.XLS for Java provides the Workbook.loadFromHtml() method for loading an HTML file. Once the HTML file is loaded, you can convert it to Excel format using the Workbook.saveToFile() method. The detailed steps are as follows.
- Create an object of the Workbook class.
- Load an HTML file using the Workbook.loadFromHtml() method.
- Save the HTML file in Excel format using the Workbook.saveToFile() method.
- Java
import com.spire.xls.ExcelVersion;
import com.spire.xls.Workbook;

public class ConvertHtmlToExcel {
    public static void main(String[] args) {
        // Specify the input HTML file path
        String filePath = "C:\\Users\\Administrator\\Desktop\\Sample.html";

        // Create an object of the workbook class
        Workbook workbook = new Workbook();
        // Load the HTML file
        workbook.loadFromHtml(filePath);

        // Save the HTML file in Excel XLSX format
        String result = "C:\\Users\\Administrator\\Desktop\\ToExcel.xlsx";
        workbook.saveToFile(result, ExcelVersion.Version2013);

        workbook.dispose();
    }
}
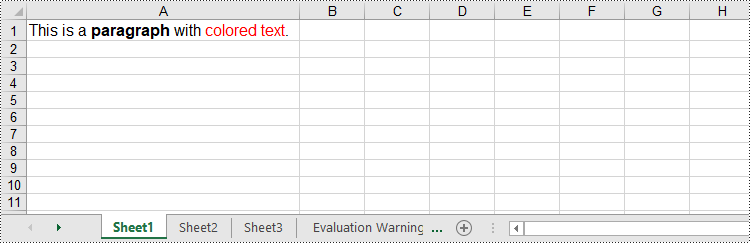
Insert HTML String into Excel in Java
In addition to converting HTML files to Excel, Spire.XLS for Java allows you to insert HTML strings directly into Excel cells using the CellRange.setHtmlString() method. The detailed steps are as follows.
- Create an object of the Workbook class.
- Get a specific worksheet by its index (0-based) using the Workbook.getWorksheets().get(index) method.
- Get the cell that you want to add an HTML string to using the Worksheet.getCellRange() method.
- Add an HTML sting to the cell using the CellRange.setHtmlString() method.
- Save the resulting workbook to a new file using the Workbook.saveToFile() method.
- Java
import com.spire.xls.CellRange;
import com.spire.xls.ExcelVersion;
import com.spire.xls.Workbook;
import com.spire.xls.Worksheet;

public class InsertHtmlStringInExcelCell {
    public static void main(String[] args) {
        // Create an object of the workbook class
        Workbook workbook = new Workbook();
        // Get the first sheet
        Worksheet sheet = workbook.getWorksheets().get(0);

        // Specify the HTML string
        String htmlCode = "<p><font size='12'>This is a <b>paragraph</b> with <span style='color: red;'>colored text</span>.</font></p>";

        // Get the cell that you want to add the HTML string to
        CellRange range = sheet.getCellRange("A1");
        // Add the HTML string to the cell
        range.setHtmlString(htmlCode);

        // Auto-adjust the width of the first column based on its content
        sheet.autoFitColumn(1);

        // Save the resulting workbook to a new file
        String result = "C:\\Users\\Administrator\\Desktop\\InsertHtmlStringIntoCell.xlsx";
        workbook.saveToFile(result, ExcelVersion.Version2013);

        workbook.dispose();
    }
}
Apply for a Temporary License
If you'd like to remove the evaluation message from the generated documents, or to get rid of the function limitations, please request a 30-day trial license for yourself.
One powerful feature that enhances the interactivity and utility of PDF documents is the actions in these documents. By embedding actions such as document jumping, navigation controls, or even media playing, users can transform static documents into dynamic tools that streamline workflows, improve user engagement, and automate routine tasks, making the use of PDFs more efficient and versatile than ever before. This article will show how to use Spire.PDF for Python to create actions in PDF documents with Python code effortlessly.
- Create a Navigation Action in PDF with Python
- Create a Sound Action in PDF with Python
- Create a File Open Action in PDF with Python
Install Spire.PDF for Python
This scenario requires Spire.PDF for Python and plum-dispatch v1.7.4. They can be easily installed in your Windows through the following pip command.
pip install Spire.PDF
If you are unsure how to install, please refer to: How to Install Spire.PDF for Python on Windows
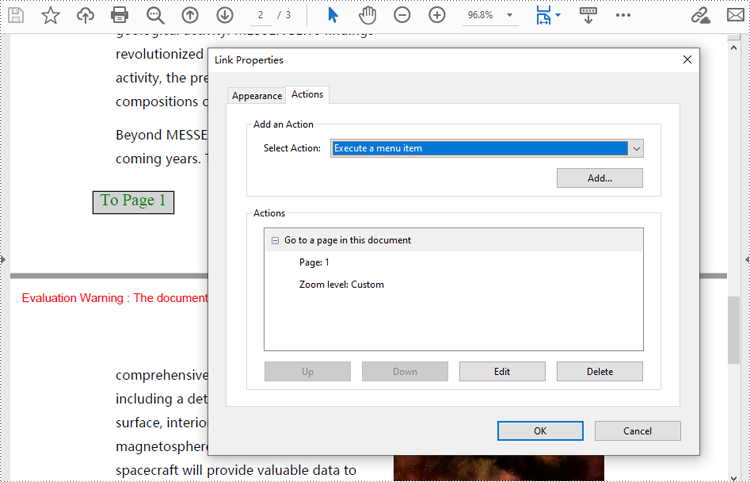
Create a Navigation Action in PDF with Python
A navigation button is an action that allows users to jump to a specified position on a designated page within a document. Developers can create a PdfDestination object, use it to create a PdfGoToAction, and then create an annotation based on this object and add it to the page to complete the creation of the navigation button. The following are the detailed steps:
- Create an object of PdfDocument class and load a PDF document using PdfDocument.LoadFromFile() method.
- Create a PdfDestination object and set its property.
- Create a PdfGoToAction object based on the destination.
- Draw a rectangle on a page using PdfPageBase.Canvas.DrawRectangle() method.
- Create a PdfActionAnnotation object based on the action and add it to the page using PdfPageBase.Annotations.Add() method.
- Save the document using PdfDocument.SaveToFile() method.
- Python
from spire.pdf import *

# Create an instance of PdfDocument class and load a PDF document
pdf = PdfDocument()
pdf.LoadFromFile("Sample.pdf")

# Create a PdfDestination instance and set its properties
destination = PdfDestination(pdf.Pages[0])
destination.Location = PointF(0.0, 0.0)
destination.Mode = PdfDestinationMode.Location
destination.Zoom = 0.8

# Create a rectangle
rect = RectangleF.FromLTRB(70, pdf.PageSettings.Size.Height - 120, 140, pdf.PageSettings.Size.Height - 100)

# Create a PdfGoToAction instance
action = PdfGoToAction(destination)

# Draw a rectangle on the second page
pdf.Pages.get_Item(1).Canvas.DrawRectangle(PdfBrushes.get_LightGray(), rect)

# Draw text of the button
font = PdfFont(PdfFontFamily.TimesRoman, 14.0)
stringFormat = PdfStringFormat(PdfTextAlignment.Center)
pdf.Pages.get_Item(1).Canvas.DrawString("To Page 1", font, PdfBrushes.get_Green(), rect, stringFormat)

# Create a PdfActionAnnotation instance
annotation = PdfActionAnnotation(rect, action)

# Add the annotation to the second page
pdf.Pages.get_Item(1).Annotations.Add(annotation)

# Save the document
pdf.SaveToFile("output/AddPDFNavigationButton.pdf")
pdf.Close()
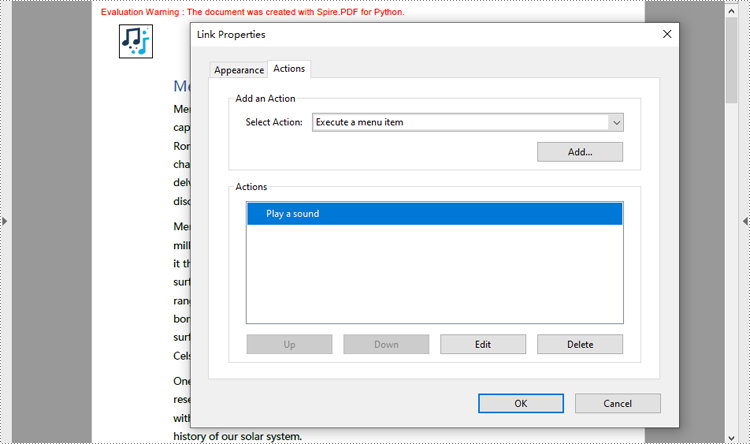
Create a Sound Action in PDF with Python
Developers can embed audio as actions in PDF documents, which allows the audio to play when the user performs a specified action, such as playing when the file opens or when a button is clicked. The following are the steps for creating a sound action:
- Create an instance of PdfDocument class.
- Load a PDF document using PdfDocument.LoadFromFile() method.
- Create an instance of PdfSoundAction class with an audio file.
- Set the audio parameters through properties under PdfSound class.
- Set the playing parameters through properties under PdfSoundAction class.
- Get a page using PdfDocument.Pgaes.get_Item(() method.
- Draw an image on the page using PdfPageBase.Canvas.Draw() method.
- Create a PdfActionAnnotation object with the sound action at the location of the image.
- Add the annotation to the page
- Or you can only set the sound action as the action performed after the document is opened through PdfDocument.AfterOpenAction property. This doesn’t need to add it as an annotation on a PDF page.
- Save the document using PdfDocument.SaveToFile() method.
- Python
from spire.pdf import *

# Create a PdfDocument instance and load a PDF file
pdf = PdfDocument()
pdf.LoadFromFile("Sample.pdf")

# Get the first page of the document
page = pdf.Pages.get_Item(0)

# Create an instance of PdfSoundAction with the sound file path
soundAction = PdfSoundAction("Wave.wav")

# Set the audio parameters
soundAction.Sound.Bits = 16
soundAction.Sound.Channels = PdfSoundChannels.Stereo
soundAction.Sound.Encoding = PdfSoundEncoding.Signed
soundAction.Sound.Rate = 44100

# Set the playing parameters
soundAction.Volume = 0.5
soundAction.Repeat = True
soundAction.Mix = True
soundAction.Synchronous = False

# Draw an image on the page
image = PdfImage.FromFile("Sound.png")
page.Canvas.DrawImage(image, PointF(30.0, 30.0))

# Create an instance of PdfActionAnnotation with the sound action
rect = RectangleF.FromLTRB(30.0, 30.0, image.GetBounds().Width + 30.0, image.GetBounds().Height + 30.0)
annotation = PdfActionAnnotation(rect, soundAction)

# Add the annotation to the page
page.Annotations.Add(annotation)

# Set the sound action to play after the document is opened
# pdf.AfterOpenAction = soundAction

# Save the document
pdf.SaveToFile("output/AddMusicPDF.pdf")
pdf.Close()
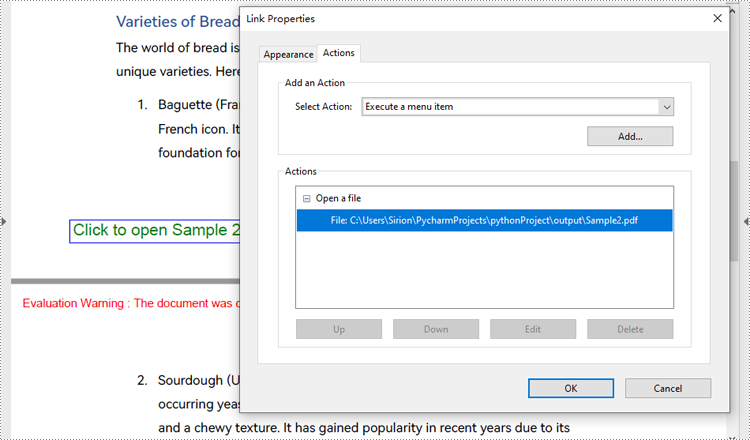
Create a File Open Action in PDF with Python
The PdfLaunchAction class represents a file open action in PDF that allows users to open the corresponding file by clicking on a button on a PDF page. Developers can specify the absolute or relative path of the file to be opened and whether to open in a new window when creating a file open action. The detailed steps for creating a file open action in a PDF document are as follows:
- Create an object of PdfDocument class and load a PDF document using PdfDocument.LoadFromFile() method.
- Get a page of the document using PdfDocument.Pages.get_Item() method.
- Draw a rectangle on the page using PdfPageBase.Canvas.DrawRectangle() method.
- Create an object of PdfLaunchAction class and specify the file path and path type.
- Set the opening mode to new window through PdfLaunchAction.IsNewWindow property.
- Create an object of PdfActionAnnotation class based on the action and set its color through PdfActionAnnotation.Color property.
- Add the annotation to the page using PdfPageBase.Annotations.Add() method.
- Save the document using PdfDocument.SaveToFile() method.
- Python
from spire.pdf import *

# Create an instance of PdfDocument class
pdf = PdfDocument()

# Load a PDF file
pdf.LoadFromFile("Sample.pdf")

# Get the first page of the document
page = pdf.Pages.get_Item(0)

# Draw a rectangle on the page
rect = RectangleF.FromLTRB(50, pdf.PageSettings.Size.Height - 100, 200, pdf.PageSettings.Size.Height - 80)
page.Canvas.DrawRectangle(PdfPens.get_LightGray(), rect)

# Draw text in the rectangle
page.Canvas.DrawString("Click to open Sample 2", PdfFont(PdfFontFamily.Helvetica, 14.0), PdfBrushes.get_Green(), rect, PdfStringFormat(PdfTextAlignment.Center))

# Create a PdfLaunchAction object
action = PdfLaunchAction("Sample2.pdf", PdfFilePathType.Relative)
action.IsNewWindow = True

# Create a PdfActionAnnotation object based on the action
annotation = PdfActionAnnotation(rect, action)
annotation.Color = PdfRGBColor(Color.get_Blue())

# Add the annotation to the page
page.Annotations.Add(annotation)

# Save the document
pdf.SaveToFile("output/CreatePDFLaunchAction.pdf")
pdf.Close()
Apply for a Temporary License
If you'd like to remove the evaluation message from the generated documents, or to get rid of the function limitations, please request a 30-day trial license for yourself.
