
Knowledgebase (2370)
Children categories
The inclusion of line numbers in Word documents serves as a critical tool for enhancing readability, facilitating reference, and streamlining collaborative editing processes. Whether you're a lawyer marking up contracts, a researcher annotating scientific papers, or a student revising a thesis, line numbers provide a precise way to cite specific lines, making discussions and revisions more efficient.
The powerful Python programming language enables users to batch add or remove line numbers in Word documents, providing a robust means to automate document preparation workflows. This article will demonstrate how to utilize Spire.Doc for Python to add or remove line numbers in Word documents with Python code.
Install Spire.Doc for Python
This scenario requires Spire.Doc for Python and plum-dispatch v1.7.4. They can be easily installed in your Windows through the following pip command.
pip install Spire.Doc
If you are unsure how to install, please refer to: How to Install Spire.Doc for Python on Windows
Add Line Numbers to Word Documents with Python
Spire.Doc for Python provides properties under PageSetup class for line number formatting. The properties and their functions are as follows:
- LineNumberingStep: Used to set the interval of the line number display.
- LineNumberingStartValue: Used to set the start number of the line number.
- LineNumberingDistanceFromText: Used to set the distance between the line number and the text.
- LineNumberingRestartMode: Used to set when the line number restarts, like every page, every section, or continuously without restarting.
It is important to note that line numbers will only be displayed when the PageSetup.LineNumberingStep property is set to a value greater than 0.
The detailed steps for adding line numbers to Word documents are as follows:
- Create an instance of Document class.
- Load a Word document using Document.LoadFromFile() method.
- Iterate through the sections in the document:
- Get the current section using Document.Sections.get_Item() method.
- Get the page setup of the section through Section.PageSetup property.
- Set the display interval of the line numbers through PageSetup.LineNumberingStep property.
- Set the start number of the line numbers through PageSetup.LineNumberingStartValue property.
- Set the distance between line numbers and text through PageSetup.LineNumberingDistanceFromText property.
- Set the restarting mode of the line numbers through PageSetup.LineNumberingRestartMode property.
- Save the document using Document.SaveToFile() method.
- Python
from spire.doc import *
from spire.doc.common import *

# Create an instance of Document class
doc = Document()

# Load a Word document
doc.LoadFromFile("Sample.docx")

# Iterate through the sections
for i in range(0, doc.Sections.Count):
    # Get the current section
    section = doc.Sections.get_Item(i)
    # Get the page setup of the section
    pageSetup = section.PageSetup
    # Set the interval of the line numbering
    pageSetup.LineNumberingStep = 2
    # Set the start number of the line numbering
    pageSetup.LineNumberingStartValue = 1
    # Set the distance between the line number and text
    pageSetup.LineNumberingDistanceFromText = 20
    # Set the restarting mode of the line number
    pageSetup.LineNumberingRestartMode = LineNumberingRestartMode.Continuous

# Save the document
doc.SaveToFile("output/AddLineNumberWord.docx", FileFormat.Docx)
doc.Close()

Remove Line Numbers from Word Documents with Python
Since the value of the PageSetup.LineNumberingStep property directly determines the display of line numbers, developers can simply set the value to 0 to remove the line numbers from Word documents.
The detailed steps for removing line numbers from a Word document are as follows:
- Create an instance of Document class.
- Load a Word document using Document.LoadFromFile() method.
- Iterate through the sections in the document:
- Get the current section using Document.Sections.get_Item() method.
- Set the display interval of the line numbers to 0 through Section.PageSetup.LineNumberingStep property to remove the line numbers.
- Save the document using Document.SaveToFile() method.
- Python
from spire.doc import *
from spire.doc.common import *

# Create an instance of Document class
doc = Document()

# Load a Word document
doc.LoadFromFile("output/AddLineNumberWord.docx")

# Iterate through the sections
for i in range(0, doc.Sections.Count):
    # Get the current section
    section = doc.Sections.get_Item(i)
    # Set the interval of the line numbering to 0 to remove the line numbering
    section.PageSetup.LineNumberingStep = 0

# Save the document
doc.SaveToFile("output/RemoveLineNumberWord.docx", FileFormat.Docx)
doc.Close()

Apply for a Temporary License
If you'd like to remove the evaluation message from the generated documents, or to get rid of the function limitations, please request a 30-day trial license for yourself.
PDF (Portable Document Format) files are widely used for sharing and distributing documents due to their consistent formatting and broad compatibility. However, when it comes to presentations, PowerPoint remains the preferred format for many users. PowerPoint offers a wide range of features and tools that enable the creation of dynamic, interactive, and visually appealing slideshows. Unlike static PDF documents, PowerPoint presentations allow for the incorporation of animations, transitions, multimedia elements, and other interactive components, making them more engaging and effective for delivering information to the audience.
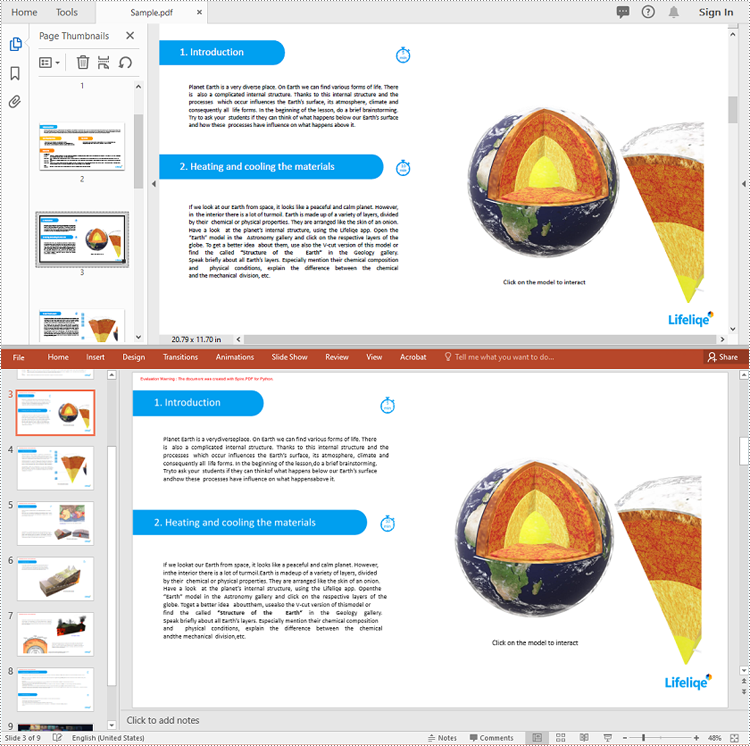
By converting PDF to PowerPoint, you can transform a static document into a captivating and impactful presentation that resonates with your audience and helps to achieve your communication goals. In this article, we will explain how to convert PDF files to PowerPoint format in Python using Spire.PDF for Python.
Install Spire.PDF for Python
This scenario requires Spire.PDF for Python and plum-dispatch v1.7.4. They can be easily installed in your Windows through the following pip command.
pip install Spire.PDF
If you are unsure how to install, please refer to this tutorial: How to Install Spire.PDF for Python on Windows
Convert PDF to PowerPoint in Python
Spire.PDF for Python provides the PdfDocument.SaveToFile(filename:str, FileFormat.PPTX) method to convert a PDF document into a PowerPoint presentation. With this method, each page of the original PDF document will be converted into a single slide in the output PPTX presentation.
The detailed steps to convert a PDF document to PowerPoint format are as follows:
- Create an object of the PdfDocument class.
- Load a sample PDF document using the PdfDocument.LoadFromFile() method.
- Save the PDF document as a PowerPoint PPTX file using the PdfDocument.SaveToFile(filename:str, FileFormat.PPTX) method.
- Python
from spire.pdf.common import *
from spire.pdf import *

# Create an object of the PdfDocument class
pdf = PdfDocument()
# Load a sample PDF document
pdf.LoadFromFile("Sample.pdf")

# Save the PDF document as a PowerPoint PPTX file
pdf.SaveToFile("PdfToPowerPoint.pptx", FileFormat.PPTX)
pdf.Close()
Apply for a Temporary License
If you'd like to remove the evaluation message from the generated documents, or to get rid of the function limitations, please request a 30-day trial license for yourself.
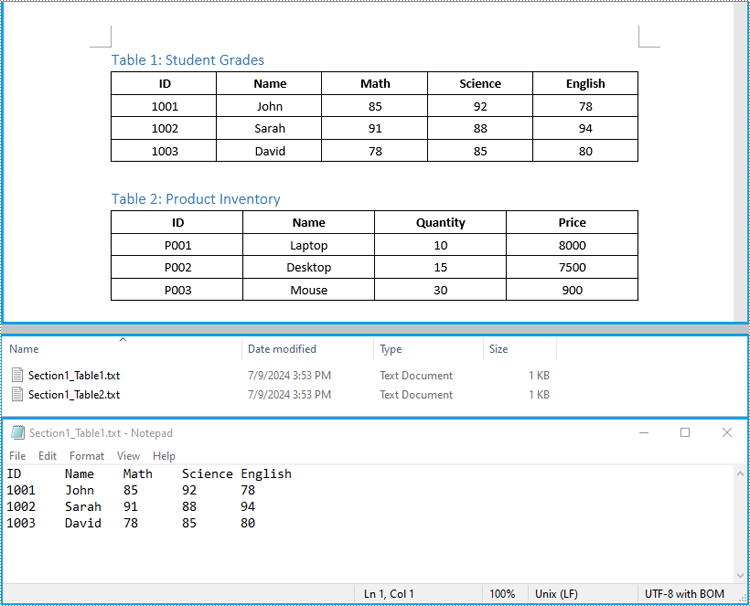
Tables in Word documents often contain valuable information, ranging from financial data and research results to survey results and statistical records. Extracting the data contained within these tables can unlock a wealth of opportunities, empowering you to leverage it for a variety of purposes, such as in-depth data analysis, trend identification, and seamless integration with other tools or databases. In this article, we will demonstrate how to extract tables from Word documents in C# using Spire.Doc for .NET.
Install Spire.Doc for .NET
To begin with, you need to add the DLL files included in the Spire.Doc for .NET package as references in your .NET project. The DLL files can be either downloaded from this link or installed via NuGet.
PM> Install-Package Spire.Doc
Extract Tables from Word in C#
In Spire.Doc for .NET, the Section.Tables property is used to access the tables contained within a section of a Word document. This property returns a collection of ITable objects, where each object represents a distinct table in the section. Once you have the ITable objects, you can iterate through their rows and cells, and then retrieve the textual content of each cell using cell.Paragraphs[index].Text property.
The detailed steps to extract tables from a Word document are as follows:
- Create an object of the Document class and load a Word document using Document.LoadFromFile() method.
- Iterate through the sections in the document and get the table collection of each section through Section.Tables property.
- Iterate through the tables in each section and create a string object for each table.
- Iterate through the rows in each table and the cells in each row, then get the text of each cell through TableCell.Paragraphs[index].Text property and add the cell text to the string.
- Save each string to a text file.
- C#
using Spire.Doc;
using Spire.Doc.Collections;
using Spire.Doc.Interface;
using System.IO;
using System.Text;

namespace ExtractWordTable
{
    internal class Program
    {
        static void Main(string[] args)
        {
            // Create an object of the Document class
            Document doc = new Document();
            // Load a Word document
            doc.LoadFromFile("Tables.docx");

            // Iterate through the sections in the document
            for (int sectionIndex = 0; sectionIndex < doc.Sections.Count; sectionIndex++)
            {
                // Get the current section
                Section section = doc.Sections[sectionIndex];

                // Get the table collection of the section
                TableCollection tables = section.Tables;

                // Iterate through the tables in the section
                for (int tableIndex = 0; tableIndex < tables.Count; tableIndex++)
                {
                    // Get the current table
                    ITable table = tables[tableIndex];

                    // Initialize a string to store the table data
                    string tableData = "";

                    // Iterate through the rows in the table
                    for (int rowIndex = 0; rowIndex < table.Rows.Count; rowIndex++)
                    {
                        // Get the current row
                        TableRow row = table.Rows[rowIndex];
                        // Iterate through the cells in the row
                        for (int cellIndex = 0; cellIndex < row.Cells.Count; cellIndex++)
                        {
                            // Get the current cell
                            TableCell cell = table.Rows[rowIndex].Cells[cellIndex];

                            // Get the text in the cell
                            string cellText = "";
                            for (int paraIndex = 0; paraIndex < cell.Paragraphs.Count; paraIndex++)
                            {
                                cellText += (cell.Paragraphs[paraIndex].Text.Trim() + " ");
                            }

                            // Add the text to the string
                            tableData += cellText.Trim();
                            if (cellIndex < table.Rows[rowIndex].Cells.Count - 1)
                            {
                                tableData += "\t";
                            }
                        }

                        // Add a new line
                        tableData += "\n";
                    }

                    // Save the table data to a text file
                    string filePath = Path.Combine("Tables", $"Section{sectionIndex + 1}_Table{tableIndex + 1}.txt");

                    File.WriteAllText(filePath, tableData, Encoding.UTF8);
                }
            }

            doc.Close();
        }
    }
}
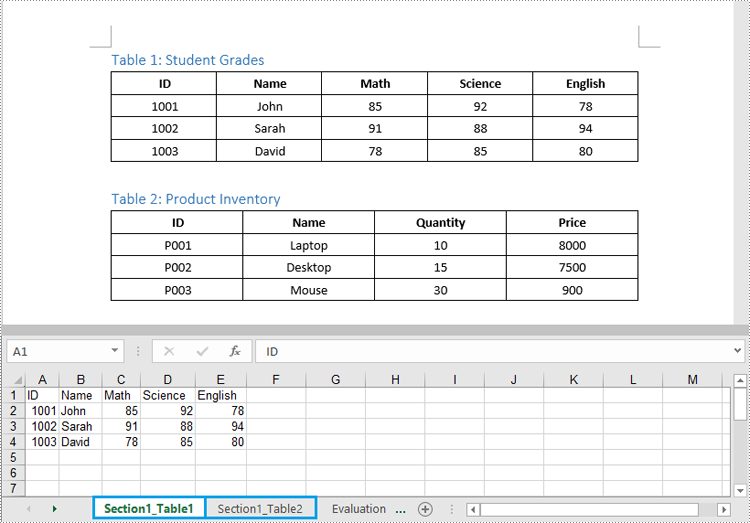
Extract Tables from Word to Excel in C#
In addition to saving the extracted table data to text files, you can also write the data directly into Excel worksheets by using the Spire.XLS for .NET library. However, before you can use Spire.XLS, you need to install it via NuGet:
Install-Package Spire.XLS
The detailed steps to extract tables from Word documents to Excel worksheets are as follows:
- Create an object of the Document class and load a Word document using the Document.LoadFromFile() method.
- Create an object of the Workbook class and clear the default worksheets using Workbook.Worksheets.Clear() method.
- Iterate through the sections in the document and get the table collection of each section through Section.Tables property.
- Iterate through the tables in the section and add a worksheet for each table to the workbook using Workbook.Worksheets.Add() method.
- Iterate through the rows in each table and the cells in each row, then get the text of each cell through TableCell.Paragraphs[index].Text property and write the text to the worksheet using Worksheet.SetCellValue() method.
- Save the workbook to an Excel file using Workbook.SaveToFile() method.
- C#
using Spire.Doc;
using Spire.Doc.Interface;
using Spire.Xls;

namespace ExtractWordTableToExcel
{
    internal class Program
    {
        static void Main(string[] args)
        {
            // Create an object of the Document class
            Document doc = new Document();
            // Load a Word document
            doc.LoadFromFile("Tables.docx");

            // Create an object of the Workbook class
            Workbook wb = new Workbook();
            // Remove the default worksheets
            wb.Worksheets.Clear();

            // Iterate through the sections in the document
            for (int sectionIndex = 0; sectionIndex < doc.Sections.Count; sectionIndex++)
            {
                // Get the current section
                Section section = doc.Sections[sectionIndex];
                // Iterate through the tables in the section
                for (int tableIndex = 0; tableIndex < section.Tables.Count; tableIndex++)
                {
                    // Get the current table
                    ITable table = section.Tables[tableIndex];
                    // Add a worksheet to the workbook
                    Worksheet ws = wb.Worksheets.Add($"Section{sectionIndex + 1}_Table{tableIndex + 1}");

                    // Iterate through the rows in the table
                    for (int rowIndex = 0; rowIndex < table.Rows.Count; rowIndex++)
                    {
                        // Get the current row
                        TableRow row = table.Rows[rowIndex];
                        // Iterate through the cells in the row
                        for (int cellIndex = 0; cellIndex < row.Cells.Count; cellIndex++)
                        {
                            // Get the current cell
                            TableCell cell = row.Cells[cellIndex];
                            // Get the text in the cell
                            string cellText = "";
                            for (int paraIndex = 0; paraIndex < cell.Paragraphs.Count; paraIndex++)
                            {
                                cellText += (cell.Paragraphs[paraIndex].Text.Trim() + " ");
                            }
                            // Write the cell text to the worksheet
                            ws.SetCellValue(rowIndex + 1, cellIndex + 1, cellText);
                        }
                        // Autofit the width of the columns in the worksheet
                        ws.Range.AutoFitColumns();
                    }
                }
            }

            // Save the workbook to an Excel file
            wb.SaveToFile("Tables/WordTableToExcel.xlsx", ExcelVersion.Version2016);
            doc.Close();
            wb.Dispose();
        }
    }
}
Apply for a Temporary License
If you'd like to remove the evaluation message from the generated documents, or to get rid of the function limitations, please request a 30-day trial license for yourself.
