
Python (365)
Moving and deleting worksheets in Excel are essential operations that allow you to organize and manage your workbook efficiently. Moving worksheets enables you to adjust the order of worksheets to match your specific needs or bring related information together. While deleting worksheets helps you eliminate unwanted or redundant sheets, creating a cleaner and more organized workspace. In this article, we will demonstrate how to move and delete worksheets in Excel in Python using Spire.XLS for Python.
Install Spire.XLS for Python
This scenario requires Spire.XLS for Python and plum-dispatch v1.7.4. They can be easily installed in your Windows through the following pip command.
pip install Spire.XLS
If you are unsure how to install, please refer to this tutorial: How to Install Spire.XLS for Python on Windows
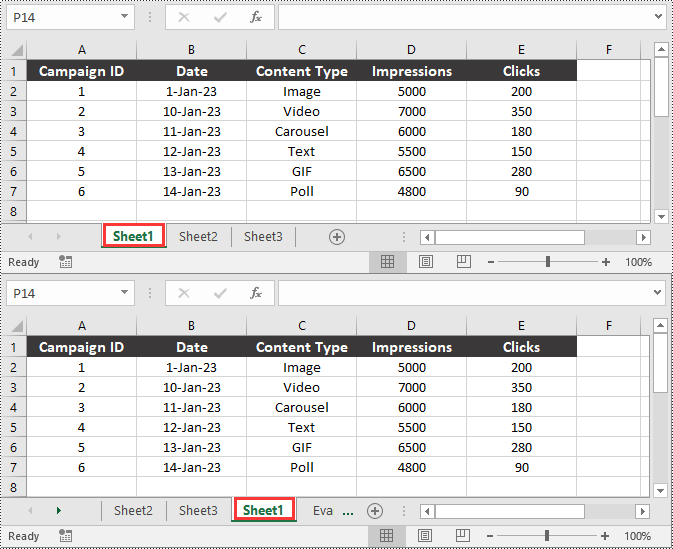
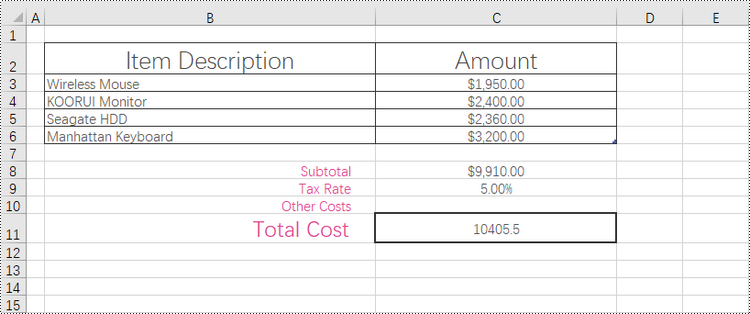
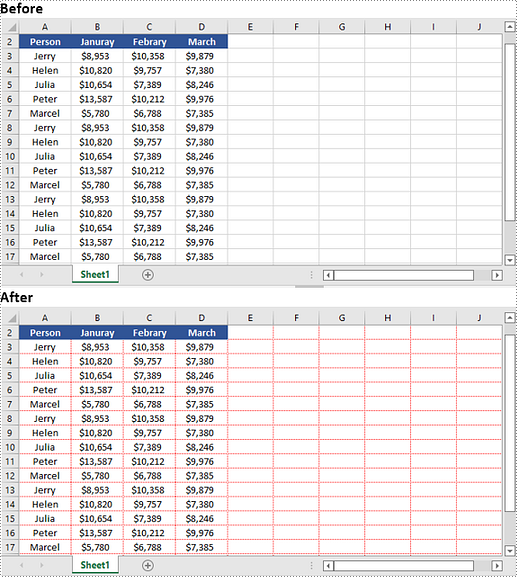
Move a Worksheet in Excel in Python
You can easily move a worksheet in an Excel file to another position by using the Worksheet.MoveWorksheet() method provided by Spire.XLS for Python. The detailed steps are as follows.
- Create an object of the Workbook class.
- Load an Excel file using the Workbook.LoadFromFile() method.
- Get a specific worksheet in the file using the Workbook.Worksheet[] property.
- Move the worksheet to another position in the file using the Worksheet.MoveWorksheet() method.
- Save the result file using the Workbook.SaveToFile() method.
- Python
from spire.xls import *
from spire.xls.common import *

# Create an object of the Workbook class
workbook = Workbook()
# Load a sample Excel file
workbook.LoadFromFile("Sample.xlsx")

# Get a specific worksheet in the file by its index
sheet = workbook.Worksheets[0]
# Or get a specific worksheet in the file by its name
# sheet = workbook.Worksheets["Sheet1"]

# Move the worksheet to the 3rd position in the file
sheet.MoveWorksheet(2)

# Save the result file
workbook.SaveToFile("MoveWorksheet.xlsx", ExcelVersion.Version2016)
workbook.Dispose()
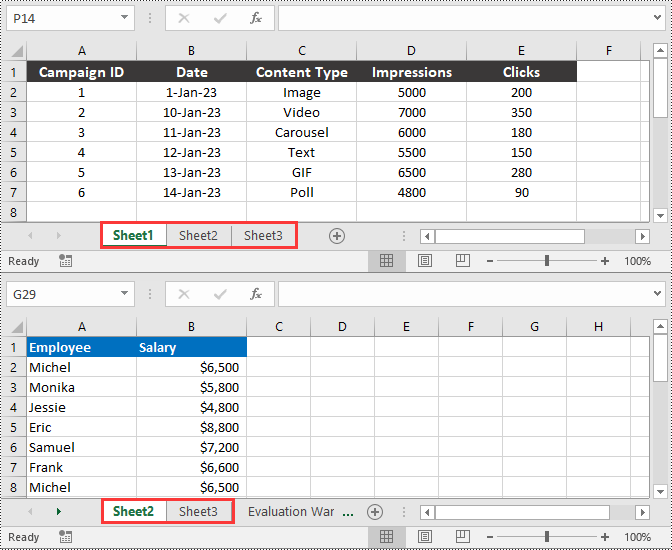
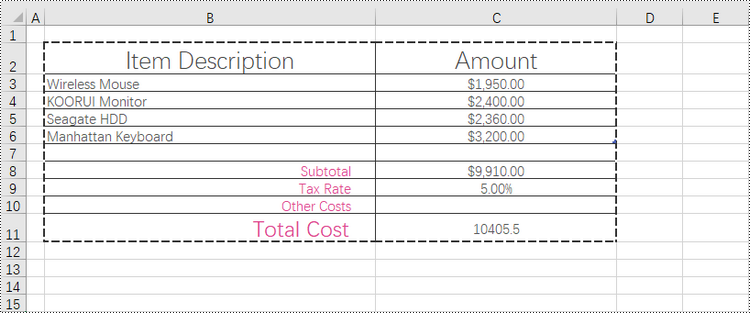
Delete a Worksheet in Excel in Python
You can delete a specific worksheet from an Excel file by using the Workbook.Worksheets.RemoveAt() or Workbook.Worksheets.Remove() method provided by Spire.XLS for Python. The detailed steps are as follows.
- Create an object of the Workbook class.
- Load an Excel file using the Workbook.LoadFromFile() method.
- Remove a specific worksheet from the file using the Workbook.Worksheets.RemoveAt() or Workbook.Worksheets.Remove() method.
- Save the result file using the Workbook.SaveToFile() method.
- Python
from spire.xls import *
from spire.xls.common import *

# Create an object of the Workbook class
workbook = Workbook()
# Load a sample Excel file
workbook.LoadFromFile("Sample.xlsx")

# Remove a specific worksheet in the file by its index
workbook.Worksheets.RemoveAt(0)

# Or get a specific worksheet in the file by its name and then remove it
# worksheet = workbook.Worksheets["Sheet1"]
# workbook.Worksheets.Remove(worksheet)

# Save the result file
workbook.SaveToFile("DeleteWorksheet.xlsx", ExcelVersion.Version2016)
workbook.Dispose()
Apply for a Temporary License
If you'd like to remove the evaluation message from the generated documents, or to get rid of the function limitations, please request a 30-day trial license for yourself.
Comparing two Word documents for differences is a crucial task when reviewing changes, ensuring accuracy, and collaborating on content. This process allows you to identify additions, deletions, and modifications made between different document iterations. By comparing versions, you can efficiently track alterations, verify updates, and maintain document integrity. In this article, you will learn how to compare two versions of a Word document in Python using the Spire.Doc for Python library.
- Compare Two Versions of a Word Document in Python
- Compare Two Versions of a Word Document While Ignoring Formatting in Python
Install Spire.Doc for Python
This scenario requires Spire.Doc for Python and plum-dispatch v1.7.4. They can be easily installed in your Windows through the following pip command.
pip install Spire.Doc
If you are unsure how to install, please refer to: How to Install Spire.Doc for Python on Windows
Compare Two Versions of a Word Document in Python
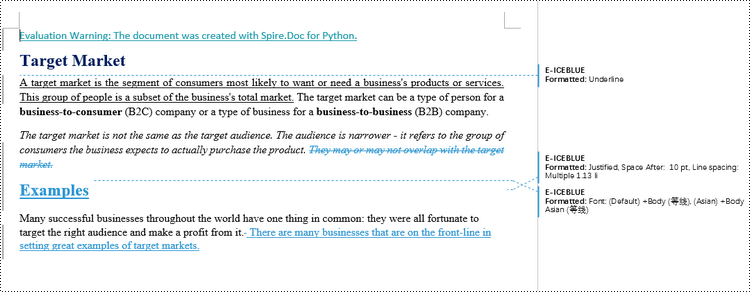
MS Word also offers a "Compare" feature that allows you to directly compare two versions of a document. This feature generates a new document that highlights the differences between the two versions.
To achieve similar results using Spire.Doc for Python, load the original and revised versions into two separate Document objects. Then, use the Compare() method to compare the revised version against the original. Finally, save the comparative document, which highlights the alterations, using the SaveToFile() method.
The steps to compare two version of a Word document using Python are as follows.
- Load the first document (original version) while initializing the Document object.
- Load the second document (revised version) while initializing the Document object.
- Call Compare() method of the first Document object to compare the revised version against the original version.
- Save the comparison results in a new Word document.
- Python
from spire.doc import *
from spire.doc.common import *

# Load the first document while initializing the Document object
firstDoc = Document("C:\\Users\\Administrator\\Desktop\\Original.docx")

# Load the second document while initializing the Document object
secondDoc = Document("C:\\Users\\Administrator\\Desktop\\Revised.docx")

# Compare two documents
firstDoc.Compare(secondDoc, "E-ICEBLUE")

# Save the comparison results in a new document
firstDoc.SaveToFile("Output/Differences.docx", FileFormat.Docx2016)

# Dispose resources
firstDoc.Dispose()
secondDoc.Dispose()
Compare Two Versions of a Word Document While Ignoring Formatting in Python
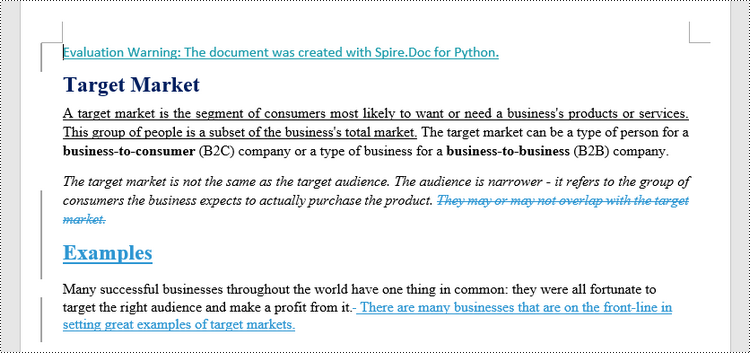
Comparing two versions of a Word document while ignoring formatting can be useful when you want to focus solely on the textual changes and disregard any formatting modifications.
To customize the comparison options in Spire.Doc for Python, use the CompareOptions class. If you want to exclude formatting from the comparison process, you can set the IgnoreFormatting property of the CompareOptions object to True. When you call the Compare() method, simply pass the CompareOptions object as an argument to achieve the desired comparison behavior.
The following are the steps to compare two versions of a Word document while ignoring formatting using Python.
- Load the first document (original version) while initializing the Document object.
- Load the second document (revised version) while initializing the Document object.
- Create a CompareOptions object and set its IgnoreFormatting property to True.
- Call Compare() method of the first Document object, passing the CompareOptions object as a parameter, to compare the revision against the original while ignoring formatting.
- Save the comparison results in a new Word document.
- Python
from spire.doc import *
from spire.doc.common import *

# Load the first document while initializing the Document object
firstDoc = Document("C:\\Users\\Administrator\\Desktop\\Original.docx")

# Load the second document while initializing the Document object
secondDoc = Document("C:\\Users\\Administrator\\Desktop\\Revised.docx")

# Set compare option to ignore formatting changes
compareOptions = CompareOptions()
compareOptions.IgnoreFormatting = True

# Compare the two Word documents with options
firstDoc.Compare(secondDoc, "E-ICEBLUE", compareOptions)

# Save the comparison results in a new document
firstDoc.SaveToFile("Output/DifferencesWithoutFormattingChanges.docx", FileFormat.Docx2016)

# Dispose resources
firstDoc.Dispose()
secondDoc.Dispose()
Apply for a Temporary License
If you'd like to remove the evaluation message from the generated documents, or to get rid of the function limitations, please request a 30-day trial license for yourself.
Cell borders play a crucial role in enhancing the visual clarity and organization of data in Excel spreadsheets. Adding borders to cells can help draw attention to specific data points, highlight headers, or create clear boundaries between different sections of your worksheet. On the other hand, removing borders can provide a sleek and seamless appearance, especially when you want to eliminate distractions and focus solely on the data itself.
In this comprehensive guide, we will walk you through the process of adding or removing cell borders in Excel by using the Spire.XLS for Python library.
- Add Borders to a Selected Cell or Cell Range in a Worksheet
- Add Borders to the Cell Range Containing Data in a Worksheet
- Add Left, Top, Right, Bottom, Diagonal Borders to a Cell
- Remove Borders of a Cell or Cell Range in a Worksheet
Install Spire.XLS for Python
This scenario requires Spire.XLS for Python and plum-dispatch v1.7.4. They can be easily installed in your Windows through the following pip command.
pip install Spire.XLS
If you are unsure how to install, please refer to this tutorial: How to Install Spire.XLS for Python on Windows
Add Borders to a Selected Cell or Cell Range in a Worksheet in Python
Borders can be applied to individual cells, groups of cells, or even entire ranges to create clear boundaries and make data stand out. By adding borders, you can effectively organize and structure your data, making it easier to analyze and understand.
With Spire.XLS for Python, accessing specific cells or cell ranges is made easy through the Worksheet.Range[name: str] property. Once you have obtained the desired cell or cell range, you can apply an outside border using the CellRange.BorderAround() method. Additionally, you can apply inside borders to a cell range using the CellRange.BorderInside() method.
To apply borders to a cell or cell range, follow the steps below.
- Create a Workbook object.
- Load an Excel document from the specified path.
- Get a specific worksheet from the workbook.
- Get a cell or cell range using Worksheet.Range[name: str] property.
- Apply outside borders to the cell or cell range using CellRange.BorderAround() method.
- Apply inside borders to the cell range using CellRange.BorderInside() method.
- Save the workbook to a new Excel file.
- Python
from spire.xls import *
from spire.xls.common import *

# Create a Workbook object
workbook = Workbook()

# Load an Excel document
workbook.LoadFromFile("C:\\Users\\Administrator\\Desktop\\sample.xlsx")

# Get the first worksheet
worksheet = workbook.Worksheets[0]

# Get a specific cell
cell = worksheet.Range["C11"]

# Apply borders to the cell
cell.BorderAround(LineStyleType.Medium, Color.get_Black())

# Get a cell range
cellRange = worksheet.Range["B2:C6"]

# Apply outside borders to the cell range
cellRange.BorderAround(LineStyleType.Thin, Color.get_Black())

# Apply inside borders to the cell range
cellRange.BorderInside(LineStyleType.Thin, Color.get_Black())

# Save the document
workbook.SaveToFile("Output/AddBordersToCellRange.xlsx", ExcelVersion.Version2016)

# Dispose resources
workbook.Dispose()
Add Borders to the Cell Range Containing Data in a Worksheet in Python
The range that contains data in a worksheet is commonly referred to as the "allocated range" or "used range". It represents the rectangular area that encompasses all the cells with data, including text, numbers, formulas, and other types of content.
To retrieve the cell range having data, use the Worksheet.AllocatedRange property. Then, you can easily apply borders to this range using the BorderAround() and BorderInside() methods.
The steps to add borders to the cell range containing data are as follows.
- Create a Workbook object.
- Load an Excel document from the specified path.
- Get a specific worksheet from the workbook.
- Get the cell range that contains data using Worksheet.AllocatedRange property.
- Apply outside borders to the cell or cell range using CellRange.BorderAround() method.
- Apply inside borders to the cell range using CellRange.BorderInside() method.
- Save the workbook to a new Excel file.
- Python
from spire.xls import *
from spire.xls.common import *

# Create a Workbook object
workbook = Workbook()

# Load an Excel document
workbook.LoadFromFile("C:\\Users\\Administrator\\Desktop\\sample.xlsx")

# Get the first worksheet
worksheet = workbook.Worksheets[0]

# Get the cell range that contains data
locatedRange = worksheet.AllocatedRange

# Apply outside borders to the cell range
locatedRange .BorderAround(LineStyleType.MediumDashed, Color.get_Black())

# Apply inside borders to the cell range
locatedRange .BorderInside(LineStyleType.Thin, Color.get_Black())

# Save the document
workbook.SaveToFile("Output/AddBordersToLocatedRange.xlsx", ExcelVersion.Version2016)

# Dispose resources
workbook.Dispose()
Add Left, Top, Right, Bottom, Diagonal Borders to a Cell in Python
In addition to applying outside and inside borders, you have the option to add left, top, right, bottom, and diagonal borders to individual cells or cell ranges. This feature allows you to go beyond basic border customization and provides additional flexibility to highlight important information, separate sections within your worksheet, or provide a visual structure to your data.
Spire.XLS provides convenient access to specific borders, including the left, right, top, bottom, and diagonal borders, through properties such as CellRange.Borders[BordersLineType.EdgeLeft]. Once you have obtained the desired border, you have the flexibility to customize its appearance by utilizing the IBorder.LineStyle property and the IBorder.Color property.
To add left, top, right, bottom, diagonal borders to a cell, follow the following steps.
- Create a Workbook object.
- Load an Excel document from the specified path.
- Get a specific worksheet from the workbook.
- Get a specific cell using Worksheet.Range property.
- Get the left, top, right, bottom and diagonal borders of the cell using the properties such as CellRange.Borders[BordersLineType.EdgeLeft].
- Set the line style of the border using IBorder.LineStyle property
- Set the color of the border using IBorder.Color property.
- Save the workbook to a new Excel file.
- Python
from spire.xls import *
from spire.xls.common import *

# Create a Workbook object
workbook = Workbook()

# Load an Excel document
workbook.LoadFromFile("C:\\Users\\Administrator\\Desktop\\sample.xlsx")

# Get the first worksheet
worksheet = workbook.Worksheets[0]

# Get a cell
cell = worksheet.Range["B11"]

# Get the left, top, right, bottom border of the cell
leftBorder = cell.Borders[BordersLineType.EdgeLeft]
topBorder = cell.Borders[BordersLineType.EdgeTop]
rightBorder = cell.Borders[BordersLineType.EdgeRight]
bottomBorder = cell.Borders[BordersLineType.EdgeBottom]

# Set the border type respectively
leftBorder.LineStyle = LineStyleType.Thick
topBorder.LineStyle = LineStyleType.Dotted
rightBorder.LineStyle = LineStyleType.SlantedDashDot
bottomBorder.LineStyle = LineStyleType.Double

# Set the border color respectively
leftBorder.Color = Color.get_Red()
topBorder.Color = Color.get_Brown()
rightBorder.Color = Color.get_DarkGray()
bottomBorder.Color = Color.get_OrangeRed()

# Get a specific cell
cell = worksheet.Range["C10"]

# Get the diagonal border of the cell
diagonalBorder = cell.Borders[BordersLineType.DiagonalDown]

# Set the border style
diagonalBorder.LineStyle = LineStyleType.Thin

# Save the document
workbook.SaveToFile("Output/BorderOfEdge.xlsx", ExcelVersion.Version2016)

# Dispose resources
workbook.Dispose()
Remove Borders of a Cell or Cell Range in a Worksheet in Python
Borders can be removed from individual cells, groups of cells, or even entire ranges, allowing you to reduce visual noise and clutter, making your data easier to interpret and analyze. Additionally, you can choose to remove borders from specific sides of a cell, such as the left, top, right, or bottom, which can alter the visual appearance and enhance the overall presentation.
To eliminate borders surrounding or within a cell or cell range, you can easily achieve this by setting the CellRange.Borders.LineStyle property to LineStyleType.none. Similarly, if you want to remove a border on a specific side, such as the left side, you can accomplish this by setting the CellRange.Borders[BordersLineType.EdgeLeft].LineStyle property to LineStyleType.none.
The steps to remove borders of a cell or cell range as follows.
- Create a Workbook object.
- Load an Excel document from the specified path.
- Get a specific worksheet from the workbook.
- Get a specific cell or cell range using Worksheet.Range property.
- Remove all borders of the cell or cell range by setting CellRange.Borders.LineStyle property to LineStyleType.none.
- Save the workbook to a new Excel file.
- Python
from spire.xls import *
from spire.xls.common import *

# Create a Workbook object
workbook = Workbook()

# Load an Excel document
workbook.LoadFromFile("C:\\Users\\Administrator\\Desktop\\BorderExample.xlsx")

# Get the first worksheet
worksheet = workbook.Worksheets[0]

# Get a cell
cell = worksheet.Range["C11"]

# Remove borders by setting line style to none
cell.Borders.LineStyle = LineStyleType.none

# Remove border on a specific side
# cell.Borders[BordersLineType.EdgeLeft].LineStyle = LineStyleType.none

# Get a cell range
cellRange = worksheet.Range["B2:C6"]

# Remove borders by setting line style to none
cellRange.Borders.LineStyle = LineStyleType.none

# Save the document
workbook.SaveToFile("Output/RemoveBorders.xlsx", ExcelVersion.Version2016)

# Dispose resources
workbook.Dispose()
Apply for a Temporary License
If you'd like to remove the evaluation message from the generated documents, or to get rid of the function limitations, please request a 30-day trial license for yourself.
Gridlines in Microsoft Excel provide a visual aid that helps users navigate through data and maintain a structured layout. By default, Excel displays gridlines in a light color to separate cells, making it easier to distinguish and locate specific data. However, there are instances when you may want to hide or even modify the appearance of gridlines to suit your specific needs. In this article, we will explore how to hide, show, and change gridlines in Excel in Python using Spire.XLS for Python.
Install Spire.XLS for Python
This scenario requires Spire.XLS for Python and plum-dispatch v1.7.4. They can be easily installed in your Windows through the following pip command.
pip install Spire.XLS
If you are unsure how to install, please refer to this tutorial: How to Install Spire.XLS for Python on Windows
Hide or Show Gridlines in Excel in Python
The Worksheet.GridLinesVisible property provided by Spire.XLS for Python is used to control the visibility of gridlines in an Excel worksheet. If you want to hide the gridlines in the worksheet, set this property to False. Conversely, if you wish to make the hidden gridlines visible again, set this property to True. The detailed steps are as follows.
- Create an object of the Workbook class.
- Load an Excel file using the Workbook.LoadFromFile() method.
- Get a specific worksheet by its index using the Workbook.Worksheets[index] property.
- Hide or show the gridlines in the worksheet by setting the Worksheet.GridLinesVisible property as False or True.
- Save the result file using the Workbook.SaveToFile() method.
- Python
from spire.xls import *
from spire.xls.common import *

# Create a Workbook object
workbook = Workbook()
# Load an Excel file
workbook.LoadFromFile("Input.xlsx")

# Get the first worksheet
sheet = workbook.Worksheets[0]

# Hide the gridlines in the worksheet
sheet.GridLinesVisible = False

# Show the hidden gridlines in the worksheet
# sheet.GridLinesVisible = True

# Save the result file
workbook.SaveToFile("HideGridlines.xlsx", ExcelVersion.Version2016)

workbook.Dispose()
Change Gridlines in Excel in Python
Spire.XLS for Python provides the Worksheet.GridLineColor property, which allows you to customize the color of gridlines in an Excel worksheet. By using this property, you can change the default color of gridlines to your desired choice. The detailed steps are as follows.
- Create an object of the Workbook class.
- Load an Excel file using the Workbook.LoadFromFile() method.
- Get a specific worksheet by its index using the Workbook.Worksheets[index] property.
- Change the color of the gridlines in the worksheet using the Worksheet.GridLineColor property.
- Save the result file using the Workbook.SaveToFile() method.
- Python
from spire.xls import *
from spire.xls.common import *

# Create a Workbook object
workbook = Workbook()
# Load an Excel file
workbook.LoadFromFile("Input.xlsx")

# Get the first worksheet
sheet = workbook.Worksheets[0]

# Change the color of the gridlines in the worksheet
sheet.GridLineColor = ExcelColors.Red

# Save the result file
workbook.SaveToFile("ChangeGridlineColor.xlsx", ExcelVersion.Version2016)

workbook.Dispose()
Apply for a Temporary License
If you'd like to remove the evaluation message from the generated documents, or to get rid of the function limitations, please request a 30-day trial license for yourself.
In PowerPoint, properly sized slides help make the document look professional. When giving presentations in different scenarios, adjusting slide sizes to match the aspect ratio of the projector or screen ensures an optimal viewing experience for all audience members, thus increasing engagement. In this article, you will learn how to change the slide size of a PowerPoint presentation in Python using Spire.Presentation for Python.
Install Spire.Presentation for Python
This scenario requires Spire.Presentation for Python and plum-dispatch v1.7.4. They can be easily installed in your Windows through the following pip command.
pip install Spire.Presentation
If you are unsure how to install, please refer to this tutorial: How to Install Spire.Presentation for Python on Windows
Change the Slide Size to a Preset Size in Python
Spire.Presentation for Python provides the Presentation.SlideSize.Type property to set or change the slide size to a preset size. The following are the detailed steps.
- Create a Presentation instance.
- Load a PowerPoint presentation using Presentation.LoadFromFile() method.
- Change the slide size of the presentation using Presentation.SlideSize.Type property.
- Save the result document using Presentation.SaveToFile() method.
- Python
from spire.presentation import *

# Create a Presentation instance
presentation = Presentation()

# Load a PowerPoint document
presentation.LoadFromFile("sample.pptx")

# Set or change the slide size
presentation.SlideSize.Type = SlideSizeType.Screen4x3

# Save the result document
presentation.SaveToFile("ChangeSlideSize.pptx", FileFormat.Pptx2016)
presentation.Dispose()
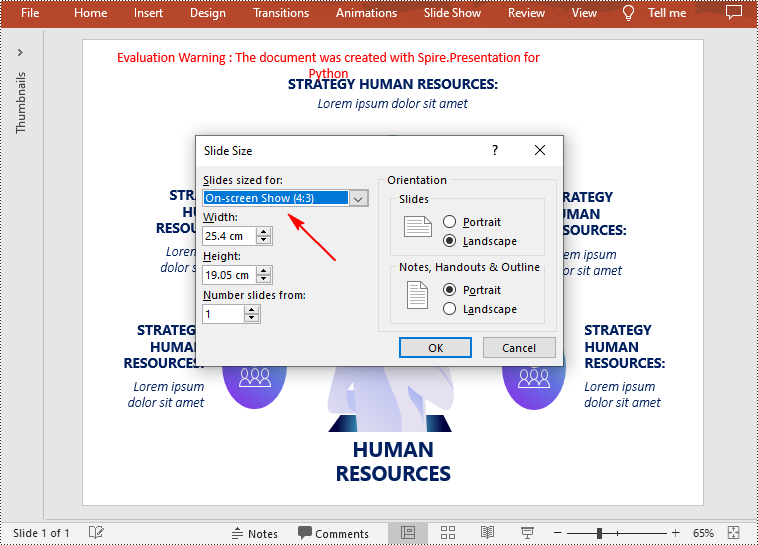
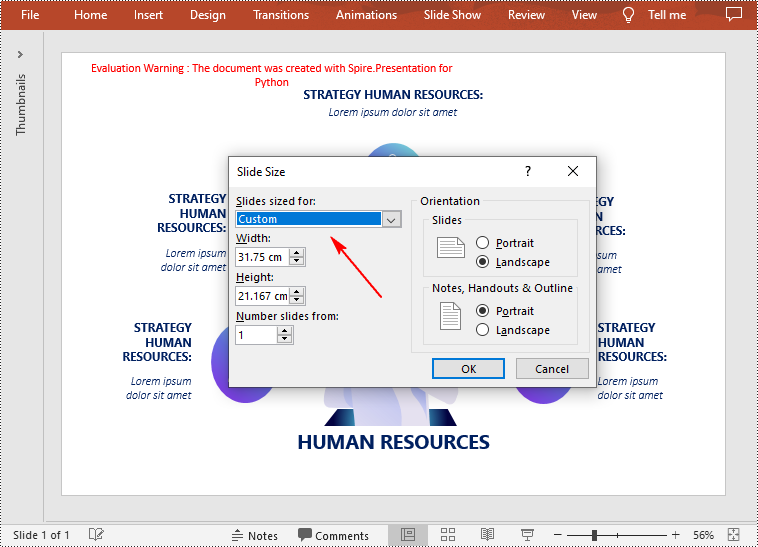
Change the Slide Size to a Custom Size in Python
Customizing the size of slides requires changing the slide size type to Custom first, and then you can set a desired size through the Presentation.SlideSize.Size property. The following are the detailed steps.
- Create a Presentation instance.
- Load a PowerPoint presentation using Presentation.LoadFromFile() method.
- Change the slide size type to custom using Presentation.SlideSize.Type property.
- Customize the slide size using Presentation.SlideSize.Size property.
- Save the result document using Presentation.SaveToFile() method.
- Python
from spire.presentation import *

# Create a Presentation instance
presentation = Presentation()

# Load a PowerPoint document
presentation.LoadFromFile("sample.pptx")

# Change the slide size type to custom
presentation.SlideSize.Type = SlideSizeType.Custom

# Set the slide size
presentation.SlideSize.Size = SizeF(900.0,600.0)

# Save the result document
presentation.SaveToFile("CustomSlideSize.pptx", FileFormat.Pptx2016)
presentation.Dispose()
Apply for a Temporary License
If you'd like to remove the evaluation message from the generated documents, or to get rid of the function limitations, please request a 30-day trial license for yourself.
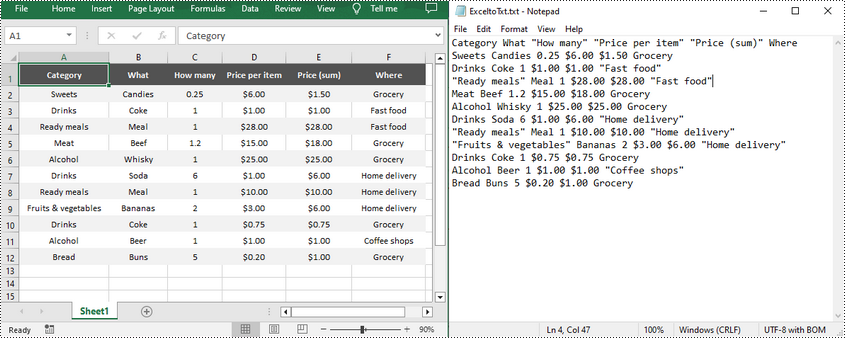
Text files have a distinct advantage over Excel spreadsheets in terms of simplicity as they don't contain complex formatting, macros or formulas. This streamlined nature not only enhances portability, but also reduces the possibility of file corruption. Consequently, converting Excel files to text files can greatly facilitates data parsing and ensures compatibility with various applications. In this article, you will learn how to convert Excel to TXT text file in Python using Spire.XLS for Python.
Install Spire.XLS for Python
This scenario requires Spire.XLS for Python and plum-dispatch v1.7.4. They can be easily installed in your Windows through the following pip command.
pip install Spire.XLS
If you are unsure how to install, please refer to this tutorial: How to Install Spire.XLS for Python on Windows
Convert Excel to TXT in Python
Spire.XLS for Python offers the Worksheet.SaveToFile(fileName: str, separator: str, encoding: Encoding) method to convert a specified worksheet to a TXT text file. The three parameters represent:
- fileName: Specifies the path and the name of the output text file.
- separator: Specifies the separator for the output text file. Common separators include commas (,), tabs, semicolons (;), etc.
- encoding: Specifies the encoding format of the file, e.g. UTF-8, Unicode, ASCII, etc. You need to use the correct encoding format to ensure that the text is represented and interpreted correctly.
The following are the detailed steps to convert Excel to text files in Python.
- Create a Workbook instance.
- Load a sample Excel file using Workbook.LoadFromFile() method.
- Get a specified worksheet by its index using Workbook.Worksheets[sheetIndex] property.
- Convert the Excel worksheet to a TXT file using Worksheet.SaveToFile() method.
- Python
import os
import sys
curPath = os.path.abspath(os.path.dirname(__file__))
rootPath = os.path.split(curPath)[0]
sys.path.append(rootPath)
from spire.xls import *
from spire.xls.common import *

inputFile = "Inventories.xlsx"
outputFile = "ExceltoTxt.txt"

# Create a Workbook instance
workbook = Workbook()

# Load an Excel document from disk
workbook.LoadFromFile(inputFile)

# Get the first worksheet
sheet = workbook.Worksheets[0]

# Save the worksheet as a txt file
sheet.SaveToFile(outputFile, " ", Encoding.get_UTF8())
workbook.Dispose()
Apply for a Temporary License
If you'd like to remove the evaluation message from the generated documents, or to get rid of the function limitations, please request a 30-day trial license for yourself.
In the realm of document management, the ability to add headers and footers to PDFs has become an essential feature. This functionality allows individuals and businesses to enhance the visual appeal, branding, and organization of their PDF documents.
By incorporating headers and footers, users can customize their PDFs with important contextual information, such as document titles, page numbers, logos, dates, copyright notices, or confidentiality disclaimers. This not only helps establish a professional look but also improves document navigation and ensures compliance with legal requirements.
In this article, we will delve into the process of seamlessly integrating headers and footers into existing PDF files by using the Spire.PDF for Python library.
Install Spire.PDF for Python
This scenario requires Spire.PDF for Python and plum-dispatch v1.7.4. They can be easily installed in your Windows through the following pip command.
pip install Spire.PDF
If you are unsure how to install, please refer to this tutorial: How to Install Spire.PDF for Python on Windows
Coordinate System in an Existing PDF
When using Spire.PDF for Python to manipulate an existing PDF document, the coordinate system's origin is positioned at the top left corner of the page. The x-axis extends to the right, while the y-axis extends downward.
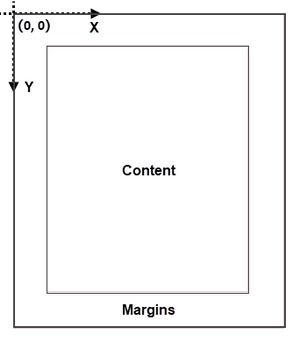
Understanding coordinate system is crucial for us, as nearly all newly added elements on a PDF page need to be positioned using specified coordinates. The process of creating headers and footers on PDF pages involves adding text, images, shapes, automatic fields, or other elements to the upper or lower margins of the page at designated coordinates.
Classes and Methods for Creating Header and Footer
In Spire.PDF for Python, there are several methods available for drawing elements on a PDF page. The PdfCanvas class provides the methods DrawString(), DrawImage(), and DrawLine(), which allow users to draw strings, images, and lines respectively, at specific coordinates on the page.
Additionally, Spire.PDF for Python offers specialized classes such as PdfPageNumberField, PdfPageCountField, and PdfSectionNumberField. These classes enable automatic access to the current page number, page count, and section number. Moreover, these classes include the Draw() method, which facilitates the easy addition of dynamic information to the header or footer section of the PDF document.
Add Header to an Existing PDF Document in Python
A header refers to a section that appears at the top of each page. The header typically contains information such as a logo, document title, date, or any other relevant details that provide context or branding to the document.
To add a header consisting of text, an image, a line and a section number to a PDF document, you can follow these steps:
- Create a PdfDocuemnt object.
- Load an existing PDF document from the specified path.
- Define the header content:
- Specify the text to be added to the header.
- Load an image for the header.
- Create a PdfSectionNumberField object to get the current section number, and create a PdfCompositeField object to combine text and the section number in a single field.
- Add the header to each page: Iterate through each page of the PDF document and add the header content at the designated position by using the Canvas.DrawString(), Canvas.DrawImage(), Canvas.DrawLine(), and PdfCompositeField.Draw() methods. When calling these methods, you need to consider the page size and margins when determining the position.
- Save the modified PDF to a new file or overwrite the existing file.
- Python
from spire.pdf.common import *
from spire.pdf import *

# Create a PdfDocument object
doc = PdfDocument()

# Load a PDF file
doc.LoadFromFile("C:\\Users\\Administrator\\Desktop\\Terms of service.pdf")

# Load an image
headerImage = PdfImage.FromFile("C:\\Users\\Administrator\\Desktop\\Logo-Small.png")

# Get the image width in pixel
width = headerImage.Width

# Get the image width in point
unitCvtr = PdfUnitConvertor()
pointWidth = unitCvtr.ConvertUnits(width, PdfGraphicsUnit.Pixel, PdfGraphicsUnit.Point)

# Create font, brush and pen
firstFont = PdfTrueTypeFont("Times New Roman", 18.0, PdfFontStyle.Bold, True)
secondFont = PdfTrueTypeFont("Times New Roman", 12.0, PdfFontStyle.Regular, True)
brush = PdfBrushes.get_DarkBlue()
pen = PdfPen(PdfBrushes.get_Black(), 1.5)

# Specify text to add to header
headerText = "TERMS OF SERVICE"

# Create a PdfSectionNumberField object
sectionField = PdfSectionNumberField(firstFont, brush)

# Create a PdfCompositeField object
compositeField = PdfCompositeField(secondFont, brush, "Section: [{0}]", [sectionField])

# Set the location of the composite field
compositeField.Location = PointF(72.0, 45.0)

# Iterate throuh the pages in the document
for i in range(doc.Pages.Count):

    # Get a specific page
    page = doc.Pages[i]

    # Draw an image at the specified position
    page.Canvas.DrawImage(headerImage, page.ActualSize.Width - pointWidth - 72.0, 20.0)

    # Draw a string at the specified position
    page.Canvas.DrawString(headerText, firstFont, brush, 72.0, 25.0)

    # Draw a line at the specified position
    page.Canvas.DrawLine(pen, 72.0, 65.0, page.ActualSize.Width - 72.0, 65.0)

    # Draw composite on the page
    compositeField.Draw(page.Canvas, 0.0, 0.0)

# Save the changes to a different PDF file
doc.SaveToFile("Output/AddHeader.pdf")

# Dispose resources
doc.Dispose()
Add Footer to an Existing PDF Document in Python
A footer refers to a section that appears at the bottom of each page. The footer may contain information such as page numbers, copyright information, author name, date, or any other relevant details that provide additional context or navigation aids to the reader.
To add a footer which includes a line and "Page X of Y" to a PDF document, follow the steps below.
- Create a PdfDocuemnt object.
- Load an existing PDF document from the specified path.
- Define the footer content: Create a PdfPageNumberField object to get the current page number, and a PdfPageCountField object to get the total page count. In order to create a "Page X of Y" format, you can utilize a PdfCompositeField object to combine text and these two automatic fields in a single field.
- Add the footer to each page: Iterate through each page of the PDF document and add a line using the Canvas.DrawLine() method. Add the page number and page count to the footer space using the PdfCompositeField.Draw() method. When calling these methods, you need to consider the page size and margins when determining the position.
- Save the modified PDF to a new file or overwrite the existing file.
- Python
from spire.pdf.common import *
from spire.pdf import *

# Create a PdfDocument object
doc = PdfDocument()

# Load a PDF file
doc.LoadFromFile("C:\\Users\\Administrator\\Desktop\\Terms of service.pdf")

# Create font, brush and pen
font = PdfTrueTypeFont("Times New Roman", 12.0, PdfFontStyle.Bold, True)
brush = PdfBrushes.get_Black()
pen = PdfPen(brush, 1.5)

# Create a PdfPageNumberField object and a PdfPageCountField object
pageNumberField = PdfPageNumberField()
pageCountField = PdfPageCountField()

# Create a PdfCompositeField object to combine page count field and page number field in a single string
compositeField = PdfCompositeField(font, brush, "Page {0} of {1}", [pageNumberField, pageCountField])

# Get the page size
pageSize = doc.Pages[0].Size

# Set the location of the composite field
compositeField.Location = PointF(72.0, pageSize.Height - 45.0)

# Iterate through the pages in the document
for i in range(doc.Pages.Count):

    # Get a specific page
    page = doc.Pages[i]

    # Draw a line at the specified position
    page.Canvas.DrawLine(pen, 72.0, pageSize.Height - 50.0, pageSize.Width - 72.0, pageSize.Height - 50.0)

    # Draw the composite field on the page
    compositeField.Draw(page.Canvas, 0.0, 0.0)

# Save to a different PDF file
doc.SaveToFile("Output/AddFooter.pdf")

# Dispose resources
doc.Dispose()
Apply for a Temporary License
If you'd like to remove the evaluation message from the generated documents, or to get rid of the function limitations, please request a 30-day trial license for yourself.
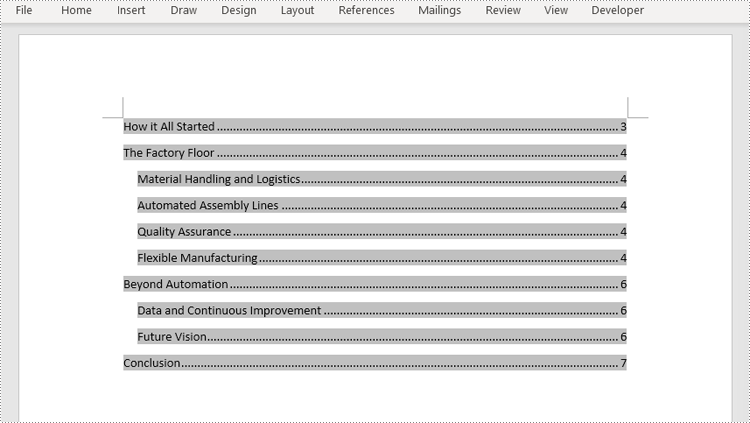
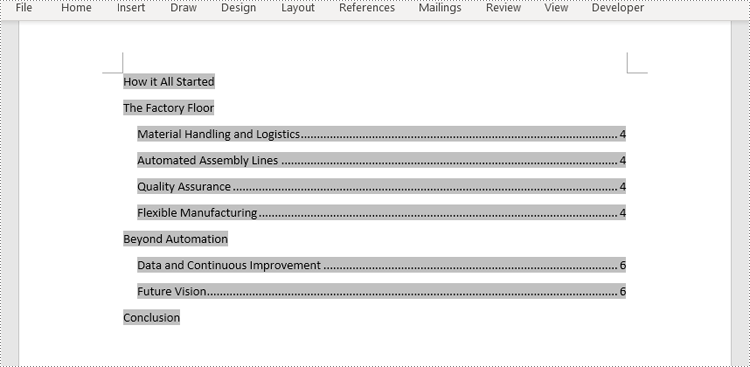
Efficient document organization and navigability are crucial for lengthy Word documents. One powerful way to streamline document readability and accessibility is by incorporating a table of contents (TOC) into a Word document, which allows readers to quickly locate specific sections and jump to relevant content. By harnessing the capabilities of Python, users can effortlessly generate a table of contents that dynamically updates as the document evolves. This article provides a step-by-step guide and code examples for inserting a table of contents into a Word document in Python programs using Spire.Doc for Python, empowering users to create professional-looking documents with ease.
- Insert the Default Table of Contents into a Word Document
- Insert a Custom Table of Contents into a Word Document
Install Spire.Doc for Python
This scenario requires Spire.Doc for Python and plum-dispatch v1.7.4. They can be easily installed in your Windows through the following pip command.
pip install Spire.Doc
If you are unsure how to install, please refer to: How to Install Spire.Doc for Python on Windows
Insert the Default Table of Contents into a Word Document
Spire.Doc for Python supports inserting a table of contents in a Word document based on the headings of different levels. If the document does not have heading levels set, developers can set the heading levels using the Paragraph.ApplyStyle(BuiltinStyle) method before inserting a table of contents.
By using the Paragraph.AppendTOC(lowerLevel: int, upperLevel: int) method, developers can insert a table of contents at any paragraph and specify the titles to be displayed. It is important to note that after inserting the table of contents, developers need to use the Document.UpdateTableOfContents() method to update the table of contents so that its contents are displayed correctly.
- Create an object of Document class and load a Word document using Document.LoadFromFile() method.
- Add a section using Document.AddSection() method, add a paragraph to the section using Section.AddParagraph() method, and insert the new section after the cover section using Document.Sections.Insert(index: int, entity: Section) method.
- Update the table of contents using Document.UpdateTableOfContents() method.
- Save the document using Document.SaveToFile() method.
- Python
from spire.doc import *
from spire.doc.common import *

# Create an object of Document class
doc = Document()

# Load a Word document
doc.LoadFromFile("Sample.docx")

# Create a section for the table of contents
section = doc.AddSection()

# Add a paragraph in the section
paragraph = section.AddParagraph()

# Append a table of contents in the paragraph
paragraph.AppendTOC(1, 2)

# Insert the section after the cover section
doc.Sections.Insert(1, section)

# Update the table of contents
doc.UpdateTableOfContents()

# Save the document
doc.SaveToFile("output/DefaultTOC.docx")
doc.Close()
Insert a Custom Table of Contents into a Word Document
Developers can also create a table of contents by initializing a TableOfContent object, and customize it through switches. For example, the switch "{\\o \"1-2\" \\n 1-1}" indicates showing headings from level one to level three in the table of contents and omitting the page numbers of level one headings. The detailed steps for inserting a customized table of contents into a Word document are as follows:
- Create an object of Document class and load a Word document using Document.LoadFromFile() method.
- Add a section to the document using Document.AddSecction() method, add a paragraph to the section using Section.AddParagraph() method, and insert the section after the cover section using Document.Sections.Insert() method.
- Create an object of TableOfContents class and insert it into the added paragraph using Paragraph.Items.Add() method.
- Append field separator and field end mark to end the TOC filed using Paragraph.AppendFieldMark() method.
- Set the created table of contents as the table of contents of the document through Document.TOC property.
- Save the document using Document.SaveToFile() method.
- Python
from spire.doc import *
from spire.doc.common import *

# Create an object of Document class and load a Word document
doc = Document()
doc.LoadFromFile("Sample.docx")

# Add a section and a paragraph and insert the section after the cover section
section = doc.AddSection()
paragraph = section.AddParagraph()
doc.Sections.Insert(1, section)

# Customize a table of contents with switches
toc = TableOfContent(doc, "{\\o \"1-2\" \\n 1-1}")

# Insert the TOC to the paragraph
paragraph.Items.Add(toc)

# Insert field separator and filed end mark to end the TOC field
paragraph.AppendFieldMark(FieldMarkType.FieldSeparator)
paragraph.AppendFieldMark(FieldMarkType.FieldEnd)

# Set the TOC field as the table of contents of the document
doc.TOC = toc

# Update the TOC
doc.UpdateTableOfContents()

# Save the document
doc.SaveToFile("output/CustomizedTOC.docx")
doc.Close()
Apply for a Temporary License
If you'd like to remove the evaluation message from the generated documents, or to get rid of the function limitations, please request a 30-day trial license for yourself.
Converting Word documents to XPS, PostScript, and OFD documents is of significant importance. Firstly, this conversion makes it easier to share and display documents across different platforms and applications, as these formats typically have broader compatibility.
Secondly, converting to these formats can preserve the document's formatting, layout, and content, ensuring consistent display across different systems.
Additionally, XPS and OFD formats support high-quality printing, helping to maintain the visual appearance and print quality of the document. The PostScript format is commonly used for printing and graphic processing, converting to PostScript can ensure that the document maintains high quality when printed.
In this article, you will learn how to convert Word to XPS, PostScript, or OFD with Python using Spire.Doc for Python.
Install Spire.Doc for Python
This scenario requires Spire.Doc for Python and plum-dispatch v1.7.4. They can be easily installed in your Windows through the following pip commands.
pip install Spire.Doc
If you are unsure how to install, please refer to this tutorial: How to Install Spire.Doc for Python on Windows
Convert Word to XPS in Python
The Document.SaveToFile(filename:str, FileFormat.XPS) method provided by Spire.Doc for Python can convert a Word document to XPS format. The detailed steps are as follows:
- Create an object of the Document class.
- Use the Document.LoadFromFile() method to load the Word document.
- Use the Document.SaveToFile(filename:str, FileFormat.XPS) method to convert the Word document to an XPS document.
- Python
from spire.doc import *
from spire.doc.common import *

# Create a Document object
doc = Document()

# Load a Word document
doc.LoadFromFile("Sample.docx")

# Save the loaded document as an XPS document
doc.SaveToFile("Result.xps", FileFormat.XPS)

# Close the document object and release the resources occupied by the document object
doc.Close()
doc.Dispose()
Convert Word to PostScript in Python
With Document.SaveToFile(filename:str, FileFormat.PostScript) method in Spire.Doc for Python, you can convert a Word document to PostScript format. The detailed steps are as follows:
- Create an object of the Document class.
- Use the Document.LoadFromFile() method to load the Word document.
- Use the Document.SaveToFile(filename:str, FileFormat.PostScript) method to convert the Word document to a PostScript document.
- Python
from spire.doc import *
from spire.doc.common import *

# Create a Document object
doc = Document()

# Load a Word document
doc.LoadFromFile("Sample.docx")

# # Save the loaded document as a PostScript document
doc.SaveToFile("Result.ps", FileFormat.PostScript)

# Close the document object and release the resources occupied by the document object
doc.Close()
doc.Dispose()
Convert Word to OFD in Python
By utilizing the Document.SaveToFile() method in the Spire.Doc for Python library and specifying the file format as FileFormat.OFD, you can save a Word document as an OFD file format. The detailed steps are as follows:
- Create an object of the Document class.
- Use the Document.LoadFromFile() method to load the Word document.
- Use the Document.SaveToFile(filename:str, FileFormat.OFD) method to convert the Word document to an OFD document.
- Python
from spire.doc import *
from spire.doc.common import *

# Create a Document object
doc = Document()

# Load a Word document
doc.LoadFromFile("Sample.docx")

# Save the loaded document as an OFD document
doc.SaveToFile("Result.ofd", FileFormat.OFD)

# Close the document object and release the resources occupied by the document object
doc.Close()
doc.Dispose()
Get a Free License
To fully experience the capabilities of Spire.Doc for Python without any evaluation limitations, you can request a free 30-day trial license.
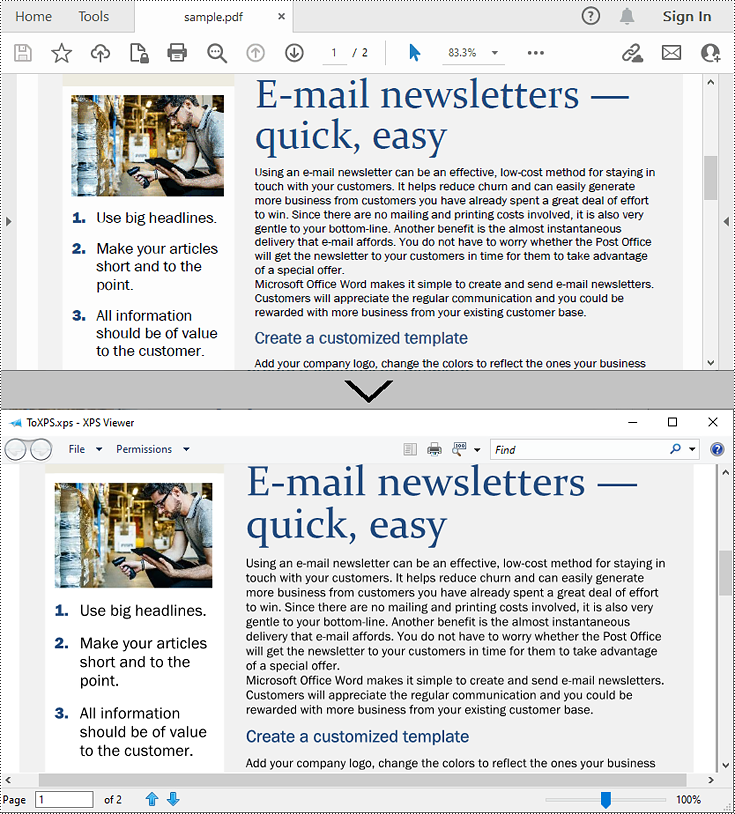
XPS, or XML Paper Specification, is a file format developed by Microsoft as an alternative to PDF (Portable Document Format). Similar to PDF, XPS is specifically designed to preserve the visual appearance and layout of documents across different platforms and devices, ensuring consistent viewing regardless of the software or hardware being used.
Converting PDF files to XPS format offers several notable benefits. Firstly, XPS files are fully supported within the Windows ecosystem. If you work in a Microsoft-centric environment that heavily relies on Windows operating systems and Microsoft applications, converting PDF files to XPS guarantees smooth compatibility and an optimized viewing experience tailored to the Windows platform.
Secondly, XPS files are optimized for printing, ensuring precise reproduction of the document on paper. This makes XPS the preferred format when high-quality printed copies of the document are required.
Lastly, XPS files are based on XML, a widely adopted standard for structured data representation. This XML foundation enables easy extraction and manipulation of content within the files, as well as seamless integration of file content with other XML-based workflows or systems.
In this article, we will demonstrate how to convert PDF files to XPS format in Python using Spire.PDF for Python.
Install Spire.PDF for Python
This scenario requires Spire.PDF for Python and plum-dispatch v1.7.4. They can be easily installed in your Windows through the following pip command.
pip install Spire.PDF
If you are unsure how to install, please refer to this tutorial: How to Install Spire.PDF for Python on Windows
Convert PDF to XPS in Python
Converting a PDF file to the XPS file format is very easy with Spire.PDF for Python. Simply load the PDF file using the PdfDocument.LoadFromFile() method, and then save the PDF file to the XPS file format using the PdfDocument.SaveToFile(filename:str, fileFormat:FileFormat) method. The detailed steps are as follows:
- Create an object of the PdfDocument class.
- Load the sample PDF file using the PdfDocument.LoadFromFile() method.
- Save the PDF file to the XPS file format using the PdfDocument.SaveToFile (filename:str, fileFormat:FileFormat) method.
- Python
from spire.pdf.common import *
from spire.pdf import *

# Specify the input and output file paths
inputFile = "sample.pdf"
outputFile = "ToXPS.xps"

# Create an object of the PdfDocument class
pdf = PdfDocument()
# Load the sample PDF file
pdf.LoadFromFile(inputFile)

# Save the PDF file to the XPS file format
pdf.SaveToFile(outputFile, FileFormat.XPS)
# Close the PdfDocument object
pdf.Close()
Apply for a Temporary License
If you'd like to remove the evaluation message from the generated documents, or to get rid of the function limitations, please request a 30-day trial license for yourself.
