
Python (365)
Sometimes, when dealing with PDF documents, there is a need to split a page into different sections based on content or layout. For instance, splitting a mixed-layout page with both horizontal and vertical content into two separate parts. This type of splitting is not commonly available in basic PDF management functions but can be important for academic papers, magazine ads, or mixed-layout designs. This article explains how to use Spire.PDF for Python to perform horizontal or vertical PDF page splitting.
Install Spire.PDF for Python
This scenario requires Spire.PDF for Python and plum-dispatch v1.7.4. They can be easily installed in your Windows through the following pip command.
pip install Spire.PDF
If you are unsure how to install, please refer to this tutorial: How to Install Spire.PDF for Python on Windows
Split PDF Page Horizontally or Vertically with Python
Spire.PDF for Python not only supports splitting a PDF document into multiple PDF documents, but also allows splitting a specific page within a PDF into two or more pages. Here are the detailed steps to split a page:
- Create an instance of the PdfDocument class.
- Load the source PDF document using the PdfDocument.LoadFromFile() method.
- Retrieve the page(s) to be split using PdfDocument.Pages[].
- Create a new PDF document and set its page margins to 0.
- Set the width or height of the new document to half of the source document.
- Add a page to the new PDF document using the PdfDocument.Pages.Add() method.
- Create a template for the source document's page using the PdfPageBase.CreateTemplate() method.
- Draw the content of the source page onto the new page using the PdfTemplate.Draw() method.
- Save the split document using the PdfDocument.SaveToFile() method.
- Python
from spire.pdf.common import *
from spire.pdf import *
# Create a PdfDocument object
pdf = PdfDocument()
# Load the PDF document
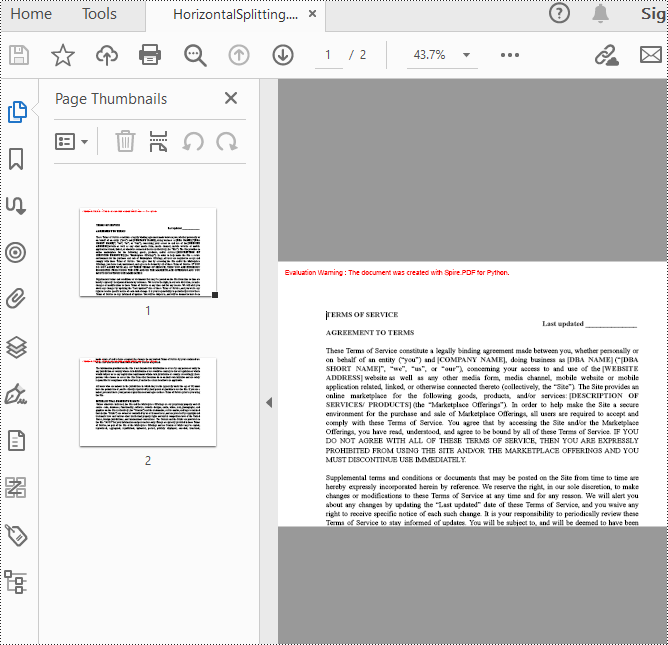
pdf.LoadFromFile("Terms of service.pdf")
# Get the first page
page = doc.Pages.get_Item(0)
# Create a new PDF document and remove the page margins
newpdf = PdfDocument()
newpdf.PageSettings.Margins.All=0
# Horizontal splitting: Set the width of the new document's page to be the same as the width of the first page of the original document, and the height to half of the first page's height
newpdf.PageSettings.Width=page.Size.Width
newpdf.PageSettings.Height=page.Size.Height/2
'''
# Vertical splitting: Set the width of the new document's page to be half of the width of the first page of the original document, and the height to the same as the first page's height
newpdf.PageSettings.Width=page.Size.Width/2
newpdf.PageSettings.Height=page.Size.Height
'''
# Add a new page to the new PDF document
newPage = newpdf.Pages.Add()
# Set the text layout format
format = PdfTextLayout()
format.Break=PdfLayoutBreakType.FitPage
format.Layout=PdfLayoutType.Paginate
# Create a template based on the first page of the original document and draw it onto the new page of the new document, automatically paginating when the page is filled
page.CreateTemplate().Draw(newPage, PointF(0.0, 0.0), format)
# Save the document
newpdf.SaveToFile("HorizontalSplitting.pdf")
# Close the objects
newpdf.Close()
pdf.Close()
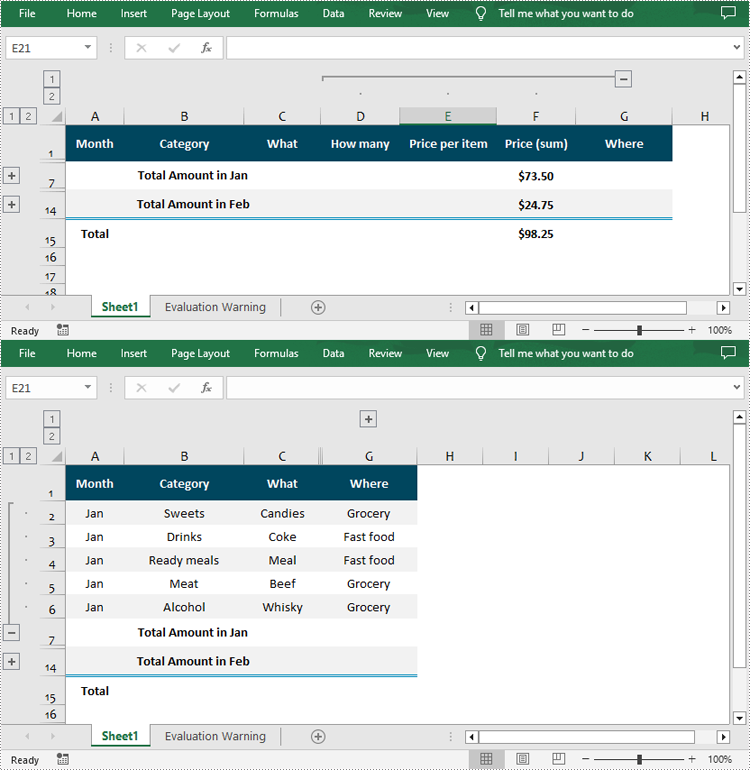
The result of horizontal splitting is as follows:
The result of vertical splitting is as follows:
Apply for a Temporary License
If you'd like to remove the evaluation message from the generated documents, or to get rid of the function limitations, please request a 30-day trial license for yourself.
Using lists in PowerPoint allows you to present information in a structured and visually appealing way. They help break down complex ideas into digestible points, making it easier for your audience to understand and retain key concepts. Whether you're creating a slide deck for a business presentation, educational workshop, or conference talk, incorporating lists can enhance the visual appeal and effectiveness of your content. In this article, we will demonstrate how to create numbered lists and bulleted lists in PowerPoint presentations in Python using Spire.Presentation for Python.
- Create a Numbered List in PowerPoint in Python
- Create a Bulleted List with Symbol Bullets in PowerPoint in Python
- Create a Bulleted List with Image Bullets in PowerPoint in Python
Install Spire.Presentation for Python
This scenario requires Spire.Presentation for Python and plum-dispatch v1.7.4. They can be easily installed in your Windows through the following pip command.
pip install Spire.Presentation
If you are unsure how to install, please refer to this tutorial: How to Install Spire.Presentation for Python on Windows
Create a Numbered List in PowerPoint in Python
Spire.Presentation supports adding numerals or bullet points in front of paragraphs to create a numbered or bulleted list. To specify the bullet type, you can use the ParagraphProperties.BulletType property. The following are the steps to create a numbered list in a PowerPoint slide using Spire.Presentation for Python.
- Create a Presentation object.
- Get the first slide using Presentation.Slides[0] property.
- Append a shape to the slide using ISlide.Shapes.AppendShape() method and set the shape style.
- Specify the items of the numbered list inside a list.
- Create paragraphs based on the list items, and set the bullet type of these paragraphs to Numbered using ParagraphProperties.BulletType property.
- Set the numbered bullet style of these paragraphs using ParagraphProperties.BulletStyle property.
- Add these paragraphs to the shape using IAutoShape.TextFrame.Paragraphs.Append() method.
- Save the document to a PowerPoint file using Presentation.SaveToFile() method.
- Python
from spire.presentation.common import *
from spire.presentation import *
# Create an object of the Presentation class
presentation = Presentation()
# Get the first slide
slide = presentation.Slides[0]
# Add a shape to the slide and set the shape style
shape = slide.Shapes.AppendShape(ShapeType.Rectangle, RectangleF(50.0, 50.0, 300.0, 200.0))
shape.Fill.FillType = FillFormatType.none
shape.Line.FillType= FillFormatType.none
# Add text to the default paragraph
paragraph = shape.TextFrame.Paragraphs[0]
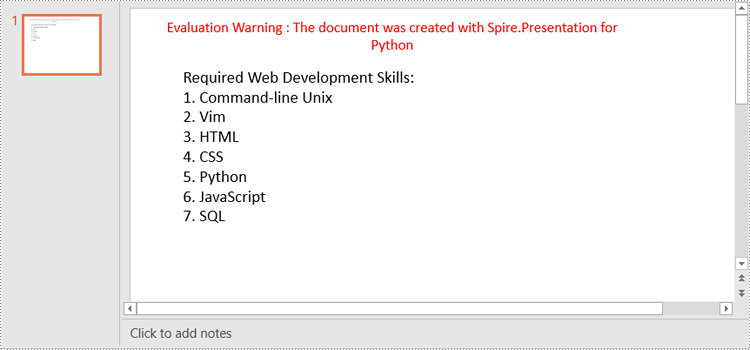
paragraph.Text = "Required Web Development Skills:"
paragraph.Alignment = TextAlignmentType.Left
paragraph.TextRanges[0].Fill.FillType = FillFormatType.Solid
paragraph.TextRanges[0].Fill.SolidColor.Color = Color.get_Black()
# Specify the list items
listItems = [
" Command-line Unix",
" Vim",
" HTML",
" CSS",
" Python",
" JavaScript",
" SQL"
]
# Create a numbered list
for item in listItems:
textParagraph = TextParagraph()
textParagraph.Text = item
textParagraph.Alignment = TextAlignmentType.Left
textParagraph.TextRanges[0].Fill.FillType = FillFormatType.Solid
textParagraph.TextRanges[0].Fill.SolidColor.Color = Color.get_Black()
textParagraph.BulletType = TextBulletType.Numbered
textParagraph.BulletStyle = NumberedBulletStyle.BulletArabicPeriod
shape.TextFrame.Paragraphs.Append(textParagraph)
# Save the result document
presentation.SaveToFile("NumberedList.pptx", FileFormat.Pptx2013)
presentation.Dispose()
Create a Bulleted List with Symbol Bullets in PowerPoint in Python
The process of creating a bulleted list with symbol bullets is very similar to that of creating a numbered list. The only difference is that you need to set the bullet type of the paragraphs to Symbol. The following are the steps.
- Create a Presentation object.
- Get the first slide using Presentation.Slides[0] property.
- Append a shape to the slide using ISlide.Shapes.AppendShape() method and set the shape style.
- Specify the items of the bulleted list inside a list.
- Create paragraphs based on the list items, and set the bullet type of these paragraphs to Symbol using ParagraphProperties.BulletType property.
- Add these paragraphs to the shape using IAutoShape.TextFrame.Paragraphs.Append() method.
- Save the document to a PowerPoint file using Presentation.SaveToFile() method.
- Python
from spire.presentation.common import *
from spire.presentation import *
# Create an object of the Presentation class
presentation = Presentation()
# Get the first slide
slide = presentation.Slides[0]
# Add a shape to the slide and set the shape style
shape = slide.Shapes.AppendShape(ShapeType.Rectangle, RectangleF(50.0, 50.0, 350.0, 200.0))
shape.Fill.FillType = FillFormatType.none
shape.Line.FillType = FillFormatType.none
# Add text to the default paragraph
paragraph = shape.TextFrame.Paragraphs[0]
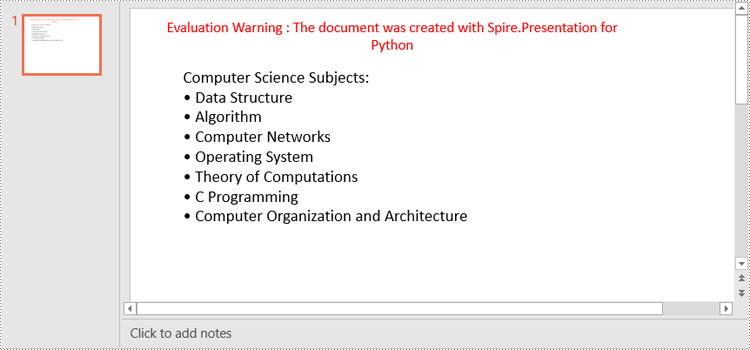
paragraph.Text = "Computer Science Subjects:"
paragraph.Alignment = TextAlignmentType.Left
paragraph.TextRanges[0].Fill.FillType = FillFormatType.Solid
paragraph.TextRanges[0].Fill.SolidColor.Color = Color.get_Black()
# Specify the list items
listItems = [
" Data Structure",
" Algorithm",
" Computer Networks",
" Operating System",
" Theory of Computations",
" C Programming",
" Computer Organization and Architecture"
]
# Create a symbol bulleted list
for item in listItems:
textParagraph = TextParagraph()
textParagraph.Text = item
textParagraph.Alignment = TextAlignmentType.Left
textParagraph.TextRanges[0].Fill.FillType = FillFormatType.Solid
textParagraph.TextRanges[0].Fill.SolidColor.Color = Color.get_Black()
textParagraph.BulletType = TextBulletType.Symbol
shape.TextFrame.Paragraphs.Append(textParagraph)
# Save the result document
presentation.SaveToFile("SymbolBulletedList.pptx", FileFormat.Pptx2013)
presentation.Dispose()
Create a Bulleted List with Image Bullets in PowerPoint in Python
To use an image as bullets, you need to set the bullet type of the paragraphs to Picture and then set the image as bullet points using the ParagraphProperties.BulletPicture.EmbedImage property. The following are the detailed steps.
- Create a Presentation object.
- Get the first slide using Presentation.Slides[0] property.
- Append a shape to the slide using ISlide.Shapes.AppendShape() method and set the shape style.
- Specify the items of the bulleted list inside a list.
- Create paragraphs based on the list items, and set the bullet type of these paragraphs to Picture using ParagraphProperties.BulletType property.
- Set an image as bullet points using ParagraphProperties.BulletPicture.EmbedImage property.
- Add these paragraphs to the shape using IAutoShape.TextFrame.Paragraphs.Append() method.
- Save the document to a PowerPoint file using Presentation.SaveToFile() method.
- Python
from spire.presentation.common import *
from spire.presentation import *
# Create an object of the Presentation class
presentation = Presentation()
# Get the first slide
slide = presentation.Slides[0]
# Add a shape to the slide and set the shape style
shape = slide.Shapes.AppendShape(ShapeType.Rectangle, RectangleF(50.0, 50.0, 400.0, 180.0))
shape.Fill.FillType = FillFormatType.none
shape.Line.FillType = FillFormatType.none
# Add text to the default paragraph
paragraph = shape.TextFrame.Paragraphs[0]
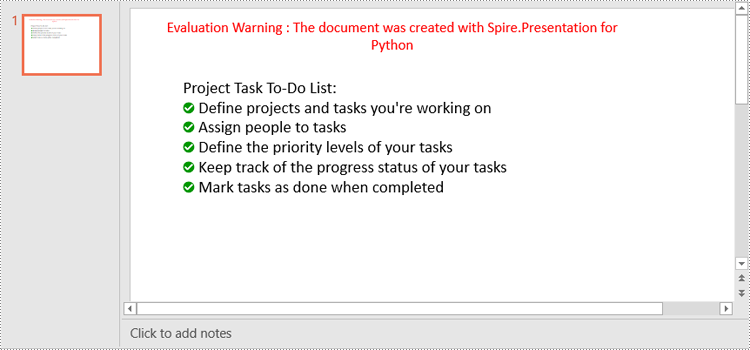
paragraph.Text = "Project Task To-Do List:"
paragraph.Alignment = TextAlignmentType.Left
paragraph.TextRanges[0].Fill.FillType = FillFormatType.Solid
paragraph.TextRanges[0].Fill.SolidColor.Color = Color.get_Black()
# Specify the list items
listItems = [
" Define projects and tasks you're working on",
" Assign people to tasks",
" Define the priority levels of your tasks",
" Keep track of the progress status of your tasks",
" Mark tasks as done when completed"
]
# Create an image bulleted list
for item in listItems:
textParagraph = TextParagraph()
textParagraph.Text = item
textParagraph.Alignment = TextAlignmentType.Left
textParagraph.TextRanges[0].Fill.FillType = FillFormatType.Solid
textParagraph.TextRanges[0].Fill.SolidColor.Color = Color.get_Black()
textParagraph.BulletType = TextBulletType.Picture
stream = Stream("icon.png")
imageData = presentation.Images.AppendStream(stream)
textParagraph.BulletPicture.EmbedImage = imageData
shape.TextFrame.Paragraphs.Append(textParagraph)
stream.Close()
# Save the result document
presentation.SaveToFile("ImageBulletedList.pptx", FileFormat.Pptx2013)
presentation.Dispose()
Apply for a Temporary License
If you'd like to remove the evaluation message from the generated documents, or to get rid of the function limitations, please request a 30-day trial license for yourself.
In Excel, document properties refer to the metadata or information associated with an Excel file. These properties provide details about the workbook itself, such as author, title, subject, keywords, and other descriptive information. Document properties are useful for organizing and categorizing Excel files, making it easier to search, sort, and manage a collection of workbooks. In this article, you will learn how to add document properties in Excel in Python using Spire.XLS for Python.
- Add Built-in Document Properties in Excel in Python
- Add Custom Document Properties in Excel in Python
Install Spire.XLS for Python
This scenario requires Spire.XLS for Python and plum-dispatch v1.7.4. They can be easily installed in your Windows through the following pip command.
pip install Spire.XLS
If you are unsure how to install, please refer to this tutorial: How to Install Spire.XLS for Python on Windows
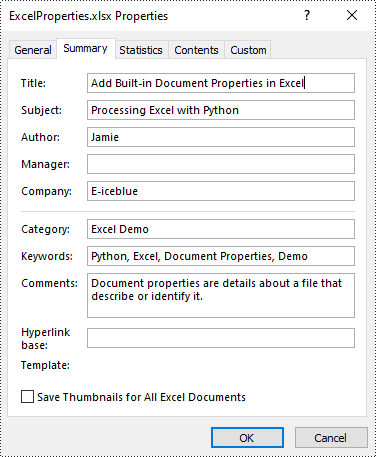
Add Built-in Document Properties in Excel in Python
Built-in document properties are basic information about a document such as title, subject, author, category, etc. The names of these properties are predefined that cannot be edited, but Spire.XLS for Python allows you to set specific values for these properties. The following are the detailed steps.
- Create a Workbook object.
- Load an Excel document using Workbook.LoadFromFile() method.
- Get the built-in document properties of the document using Workbook.DocumentProperties property.
- Set specific document properties such as title, author, keywords and comments using the properties of BuiltInDocumentProperties class.
- Save the result document using Workbook.SaveToFile() method.
- Python
from spire.xls import *
from spire.xls.common import *

inputFile = "sample.xlsx"
outputFile = "ExcelProperties.xlsx"

# Create a Workbook object
workbook = Workbook()

# Load a sample Excel document
workbook.LoadFromFile(inputFile)

# Set built-in document properties for the Excel workbook
workbook.DocumentProperties.Author = "Jamie"
workbook.DocumentProperties.Title = "Add Built-in Document Properties in Excel"
workbook.DocumentProperties.Subject = "Processing Excel with Python"
workbook.DocumentProperties.Keywords = "Python, Excel, Document Properties, Demo"
workbook.DocumentProperties.Category = "Excel Demo"
workbook.DocumentProperties.Company = "E-iceblue"
workbook.DocumentProperties.Comments = "Document properties are details about a file that describe or identify it."

# Save the result document
workbook.SaveToFile(outputFile, FileFormat.Version2016)
workbook.Dispose()
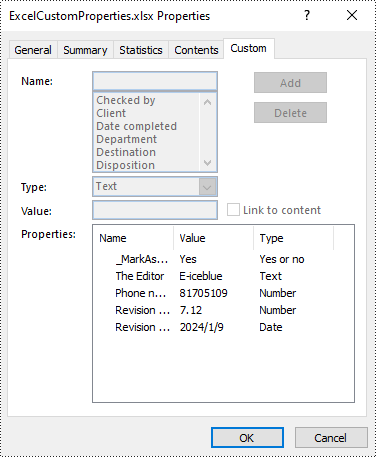
Add Custom Document Properties in Excel in Python
Custom document properties are additional properties that you can define for an Excel document. With Spire.XLS for Python, you can add custom properties with specified names and values through the ICustomDocumentProperties.Add() method. The following are the detailed steps.
- Create a Workbook object.
- Load an Excel document using Workbook.LoadFromFile() method.
- Get the custom document properties of the document using Workbook.CustomDocumentProperties property.
- Add custom document properties with different data types to the document using ICustomDocumentProperties.Add() method.
- Save the result document using Workbook.SaveToFile() method.
- Python
from spire.xls import *
from spire.xls.common import *

inputFile = "sample.xlsx"
outputFile = "ExcelCustomProperties.xlsx"

# Create a Workbook object
workbook = Workbook()

# Load a sample Excel document
workbook.LoadFromFile(inputFile)

# Add a custom property to make the document as final
workbook.CustomDocumentProperties.Add("_MarkAsFinal", True)

# Add other custom properties to the document
workbook.CustomDocumentProperties.Add("The Editor", "E-iceblue")
workbook.CustomDocumentProperties.Add("Phone number", 81705109)
workbook.CustomDocumentProperties.Add("Revision number", 7.12)
workbook.CustomDocumentProperties.Add("Revision date", DateTime.get_Now())

# Save the result document
workbook.SaveToFile(outputFile, FileFormat.Version2016)
workbook.Dispose()
Apply for a Temporary License
If you'd like to remove the evaluation message from the generated documents, or to get rid of the function limitations, please request a 30-day trial license for yourself.
PDF bookmarks are key tools for optimizing reading navigation. When expanded, users can click on the titles to jump to the corresponding chapters and display sub-level directories, enabling intuitive access and positioning within the document's deep structure. Collapsing bookmarks, on the other hand, allows users to hide all sub-bookmark information at the current level with a single click, simplifying the view and focusing on higher-level structure. These two operations work together to significantly enhance the efficiency and experience of reading complex, multi-level PDF documents. This article will introduce how to programmatically expand and collapse bookmarks in a PDF using Spire.PDF for Python.
Install Spire.PDF for Python
This scenario requires Spire.PDF for Python and plum-dispatch v1.7.4. They can be easily installed in your Windows through the following pip command.
pip install Spire.PDF
If you are unsure how to install, please refer to this tutorial: How to Install Spire.PDF for Python on Windows
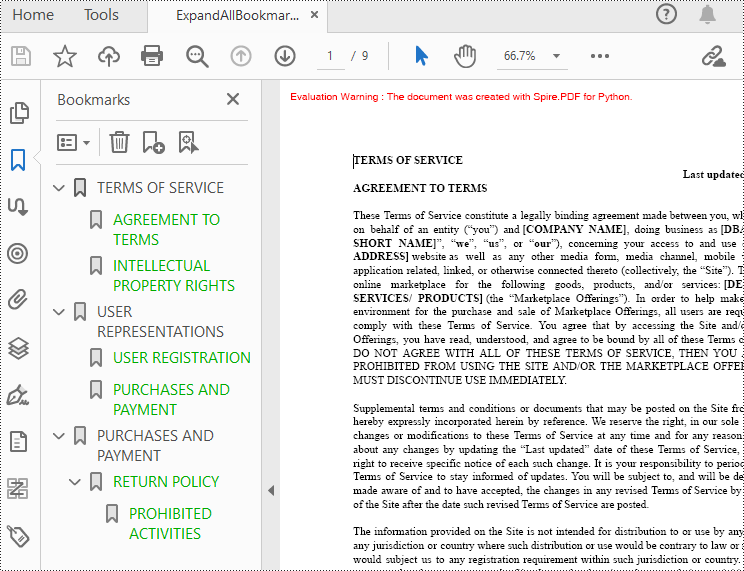
Expand or Collapse all Bookmarks in Python
Spire.PDF for Python provides the property BookMarkExpandOrCollapse to expand or collapse bookmarks, when set to True, it expands all bookmarks. Conversely, setting it to False will collapses all bookmarks. The following are the detailed steps for expanding bookmarks in a PDF document.
- Create a PdfDocument class instance.
- Load a PDF document using PdfDocument.LoadFromFile() method.
- Expand all bookmarks using BookMarkExpandOrCollapse property.
- Save the document using PdfDocument.SaveToFile() method.
- Python
from spire.pdf.common import *
from spire.pdf import *

# Create a PdfDocument object
doc = PdfDocument()

# Load a PDF file
doc.LoadFromFile("Terms of service.pdf")

# Set BookMarkExpandOrCollapse as True to expand all bookmarks, set False to collapse all bookmarks
doc.ViewerPreferences.BookMarkExpandOrCollapse = True

# Save the document
outputFile="ExpandAllBookmarks.pdf"
doc.SaveToFile(outputFile)

# Close the document
doc.Close()
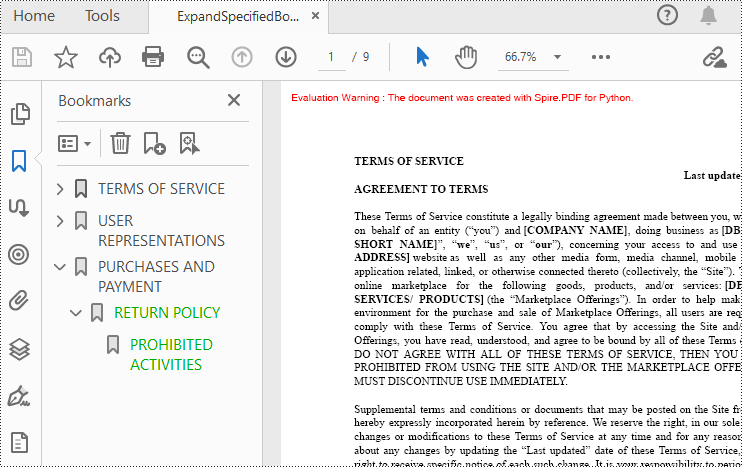
Expand or Collapse a specific Bookmark in Python
If you need to expand or collapse only a specific bookmark, you can use the property ExpandBookmark. The following are the detailed steps.
- Create a PdfDocument class instance.
- Load a PDF document using PdfDocument.LoadFromFile() method.
- Get a specific bookmark using PdfDocument.Bookmarks.get_Item() method.
- Expand the bookmark using ExpandBookmark property.
- Save the result document using PdfDocument.SaveToFile() method.
- Python
from spire.pdf.common import *
from spire.pdf import *

# Create a PdfDocument object
doc = PdfDocument()

# Load a PDF file
doc.LoadFromFile("Terms of service.pdf")

# Set ExpandBookmark as True for the third bookmark
doc.Bookmarks.get_Item(2).ExpandBookmark = True

# Save the document
outputFile="ExpandSpecifiedBookmarks.pdf"
doc.SaveToFile(outputFile)

# Close the document
doc.Close()
Apply for a Temporary License
If you'd like to remove the evaluation message from the generated documents, or to get rid of the function limitations, please request a 30-day trial license for yourself.
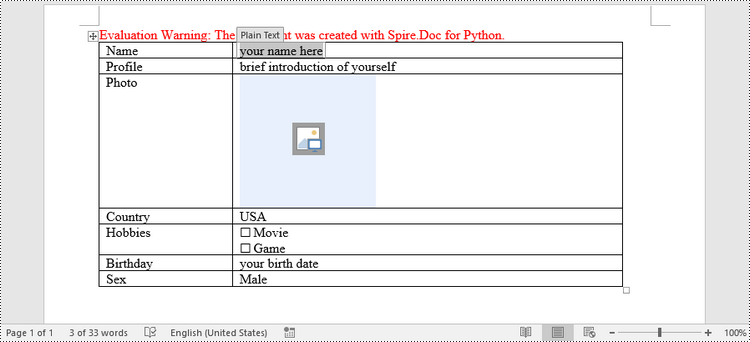
Creating a fillable form in Word allows you to design a document that can be easily completed and customized by others. Whether you need to collect information, gather feedback, or create an interactive document, fillable forms provide a convenient way to capture data electronically. By adding various elements such as text fields, checkboxes, dropdown menus, and more, you can tailor the form to your specific requirements.
To create a fillable form in Word, you probably need to use the following tools.
- Content Controls: The areas where users input information in a form.
- Tables: Tables are used in forms to align text and form fields, and to create borders and boxes.
- Protection: Allows users to populate fields but not to make changes to the rest of the document.
In Word, content controls serve as containers for structured documents, allowing users to organize content within a document. Word 2013 provides ten types of content controls. This article introduces how to create a fillable form in Word that includes the following seven commonly-used content controls using Spire.Doc for Python.
| Content Control | Description |
| Plain Text | A text field limited to plain text, so no formatting can be included. |
| Rich Text | A text field that can contain formatted text or other items, such as tables, pictures, or other content controls. |
| Picture | Accepts a single picture. |
| Drop-Down List | A drop-down list displays a predefined list of items for the user to choose from. |
| Combo Box | A combo box enables users to select a predefined value in a list or type their own value in the text box of the control. |
| Check Box | A check box provides a graphical widget that allows the user to make a binary choice: yes (checked) or no (not checked). |
| Date Picker | Contains a calendar control from which the user can select a date. |
Install Spire.Doc for Python
This scenario requires Spire.Doc for Python and plum-dispatch v1.7.4. They can be easily installed in your Windows through the following pip command.
pip install Spire.Doc
If you are unsure how to install, please refer to this tutorial: How to Install Spire.Doc for Python on Windows
Create a Fillable Form in Word in Python
Spire.Doc for Python offers the StructureDocumentTagInline class, which is utilized to generate structured document tags within a paragraph. By utilizing the SDTProperties property and SDTContent property of this class, one can define the properties and content of the current structured document tag. Below are the step-by-step instructions for creating a fill form in a Word document in Python.
- Create a Document object.
- Add a section using Document.AddSection() method.
- Add a table using Section.AddTable() method.
- Add a paragraph to a specific table cell using TableCell.AddParagraph() method.
- Create an instance of StructureDocumentTagInline class, and add it to the paragraph as a child object using Paragraph.ChildObjects.Add() method.
- Specify the type, content and other attributes of the structured document tag through the SDTProperties property and the SDTContent property of the StructureDocumentTagInline object.
- Prevent users from editing content outside form fields using Document.Protect() method.
- Save the document using Document.SaveToFile() method.
- Python
from spire.doc import *
from spire.doc.common import *

# Create a Document object
doc = Document()

# Add a section
section = doc.AddSection()

# Add a table
table = section.AddTable(True)
table.ResetCells(7, 2)
table.SetColumnWidth(0, 120, CellWidthType.Point)
table.SetColumnWidth(1, 350, CellWidthType.Point)

# Add text to the cells of the first column
paragraph = table.Rows.get_Item(0).Cells.get_Item(0).AddParagraph()
paragraph.AppendText("Name")
paragraph = table.Rows[1].Cells[0].AddParagraph()
paragraph.AppendText("Profile")
paragraph = table.Rows[2].Cells[0].AddParagraph()
paragraph.AppendText("Photo")
paragraph = table.Rows[3].Cells[0].AddParagraph()
paragraph.AppendText("Country")
paragraph = table.Rows[4].Cells[0].AddParagraph()
paragraph.AppendText("Hobbies")
paragraph = table.Rows[5].Cells[0].AddParagraph()
paragraph.AppendText("Birthday")
paragraph = table.Rows[6].Cells[0].AddParagraph()
paragraph.AppendText("Sex")

# Add a plain text content control to the cell (0,1)
paragraph = table.Rows[0].Cells[1].AddParagraph()
sdt = StructureDocumentTagInline(doc)
paragraph.ChildObjects.Add(sdt)
sdt.SDTProperties.SDTType = SdtType.Text
sdt.SDTProperties.Alias = "Plain Text"
sdt.SDTProperties.Tag = "Plain Text"
sdt.SDTProperties.IsShowingPlaceHolder = True
text = SdtText(True)
text.IsMultiline = False
sdt.SDTProperties.ControlProperties = text
textRange = TextRange(doc)
textRange.Text = "your name here"
sdt.SDTContent.ChildObjects.Add(textRange)

# Add a rich text content control to the cell (1,1)
paragraph = table.Rows[1].Cells[1].AddParagraph()
sdt = StructureDocumentTagInline(doc)
paragraph.ChildObjects.Add(sdt)
sdt.SDTProperties.SDTType = SdtType.RichText
sdt.SDTProperties.Alias = "Rich Text"
sdt.SDTProperties.Tag = "Rich Text"
sdt.SDTProperties.IsShowingPlaceHolder = True
text = SdtText(True)
text.IsMultiline = False
sdt.SDTProperties.ControlProperties = text
textRange = TextRange(doc)
textRange.Text = "brief introduction of yourself"
sdt.SDTContent.ChildObjects.Add(textRange )

# Add a picture content control to the cell (2,1)
paragraph = table.Rows[2].Cells[1].AddParagraph()
sdt = StructureDocumentTagInline(doc)
paragraph.ChildObjects.Add(sdt)
sdt.SDTProperties.SDTType = SdtType.Picture
sdt.SDTProperties.Alias = "Picture"
sdt.SDTProperties.Tag = "Picture"
sdtPicture = SdtPicture(True)
sdt.SDTProperties.ControlProperties = sdtPicture
pic = DocPicture(doc)
pic.LoadImage("C:\\Users\\Administrator\\Desktop\\placeHolder.png")
sdt.SDTContent.ChildObjects.Add(pic)

# Add a dropdown list content control to the cell (3,1)
paragraph = table.Rows[3].Cells[1].AddParagraph();
sdt = StructureDocumentTagInline(doc)
sdt.SDTProperties.SDTType = SdtType.DropDownList
sdt.SDTProperties.Alias = "Dropdown List"
sdt.SDTProperties.Tag = "Dropdown List"
paragraph.ChildObjects.Add(sdt)
stdList = SdtDropDownList()
stdList.ListItems.Add(SdtListItem("USA", "1"))
stdList.ListItems.Add(SdtListItem("China", "2"))
stdList.ListItems.Add(SdtListItem("Briza", "3"))
stdList.ListItems.Add(SdtListItem("Austrilia", "4"))
sdt.SDTProperties.ControlProperties = stdList;
textRange = TextRange(doc)
textRange .Text = stdList.ListItems[0].DisplayText
sdt.SDTContent.ChildObjects.Add(textRange )

# Add two check box content controls to the cell (4,1)
paragraph = table.Rows[4].Cells[1].AddParagraph()
sdt = StructureDocumentTagInline(doc)
paragraph.ChildObjects.Add(sdt)
sdt.SDTProperties.SDTType = SdtType.CheckBox
sdtCheckBox = SdtCheckBox()
sdt.SDTProperties.ControlProperties = sdtCheckBox
textRange = TextRange(doc)
sdt.ChildObjects.Add(textRange)
sdtCheckBox.Checked = False
paragraph.AppendText(" Movie")

paragraph = table.Rows[4].Cells[1].AddParagraph();
sdt = StructureDocumentTagInline(doc)
paragraph.ChildObjects.Add(sdt)
sdt.SDTProperties.SDTType = SdtType.CheckBox
sdtCheckBox = SdtCheckBox()
sdt.SDTProperties.ControlProperties = sdtCheckBox
textRange = TextRange(doc)
sdt.ChildObjects.Add(textRange)
sdtCheckBox.Checked = False
paragraph.AppendText(" Game")

# Add a date picker content control to the cell (5,1)
paragraph = table.Rows[5].Cells[1].AddParagraph()
sdt = StructureDocumentTagInline(doc)
paragraph.ChildObjects.Add(sdt)
sdt.SDTProperties.SDTType = SdtType.DatePicker
sdt.SDTProperties.Alias = "Date Picker"
sdt.SDTProperties.Tag = "Date Picker"
stdDate = SdtDate()
stdDate.CalendarType = CalendarType.Default
stdDate.DateFormat = "yyyy.MM.dd"
stdDate.FullDate = DateTime.get_Now()
sdt.SDTProperties.ControlProperties = stdDate
textRange = TextRange(doc)
textRange.Text = "your birth date"
sdt.SDTContent.ChildObjects.Add(textRange)

# Add a combo box content control to the cell (6,1)
paragraph = table.Rows[6].Cells[1].AddParagraph()
sdt = StructureDocumentTagInline(doc)
paragraph.ChildObjects.Add(sdt)
sdt.SDTProperties.SDTType = SdtType.ComboBox
sdt.SDTProperties.Alias = "Combo Box"
sdt.SDTProperties.Tag = "Combo Box"
stdComboBox = SdtComboBox()
stdComboBox.ListItems.Add(SdtListItem("Male"))
stdComboBox.ListItems.Add(SdtListItem("Female"))
sdt.SDTProperties.ControlProperties = stdComboBox
textRange = TextRange(doc)
textRange.Text = stdComboBox.ListItems[0].DisplayText
sdt.SDTContent.ChildObjects.Add(textRange)

# Allow users to edit the form fields only
doc.Protect(ProtectionType.AllowOnlyFormFields, "permission-psd")

# Save to file
doc.SaveToFile("output/Form.docx", FileFormat.Docx2013)
Apply for a Temporary License
If you'd like to remove the evaluation message from the generated documents, or to get rid of the function limitations, please request a 30-day trial license for yourself.
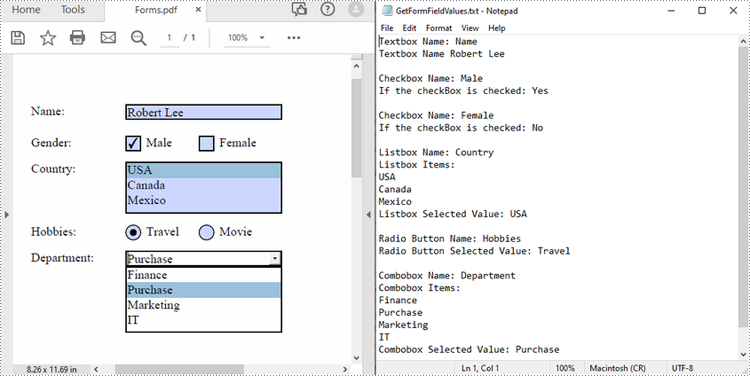
PDF forms are commonly used to collect user information, and extracting form values programmatically allows for automated processing of submitted data, ensuring accurate data collection and analysis. After extraction, you can generate reports based on form field values or migrate them to other systems or databases. In this article, you will learn how to extract form field values from PDF with Python using Spire.PDF for Python.
Install Spire.PDF for Python
This scenario requires Spire.PDF for Python and plum-dispatch v1.7.4. They can be easily installed in your Windows through the following pip command.
pip install Spire.PDF
If you are unsure how to install, please refer to this tutorial: How to Install Spire.PDF for Python on Windows
Extract Form Field Values from PDF with Python
Spire.PDF for Python supports various types of PDF form fields, including:
- Text box field (represented by the PdfTextBoxFieldWidget class)
- Check box field (represented by the PdfCheckBoxWidgetFieldWidget class)
- Radio button field (represented by the PdfRadioButtonListFieldWidget class)
- List box field (represented by the PdfListBoxWidgetFieldWidget class)
- Combo box field (represented by the PdfComboBoxWidgetFieldWidget class)
Before extracting data from the PDF forms, it is necessary to determine the specific type of each form field first, and then you can use the properties of the corresponding form field class to extract their values accurately. The following are the detailed steps.
- Initialize an instance of the PdfDocument class.
- Load a PDF document using PdfDocument.LoadFromFile() method.
- Get the form in the PDF document using PdfDocument.Form property.
- Create a list to store the extracted form field values.
- Iterate through all fields in the PDF form.
- Determine the types of the form fields, then get the names and values of the form fields using the corresponding properties.
- Write the results to a text file.
- Python
from spire.pdf.common import *
from spire.pdf import *

inputFile = "Forms.pdf"
outputFile = "GetFormFieldValues.txt"

# Create a PdfDocument instance
pdf = PdfDocument()

# Load a PDF document
pdf.LoadFromFile(inputFile)

# Get PDF forms
pdfform = pdf.Form
formWidget = PdfFormWidget(pdfform)
sb = []

# Iterate through all fields in the form
if formWidget.FieldsWidget.Count > 0:
    for i in range(formWidget.FieldsWidget.Count):
        field = formWidget.FieldsWidget.get_Item(i)

        # Get the name and value of the textbox field
        if isinstance(field, PdfTextBoxFieldWidget):
            textBoxField = field if isinstance(field, PdfTextBoxFieldWidget) else None
            name = textBoxField.Name
            value = textBoxField.Text
            sb.append("Textbox Name: " + name + "\r")
            sb.append("Textbox Name " + value + "\r\n")

        # Get the name of the listbox field
        if isinstance(field, PdfListBoxWidgetFieldWidget):
            listBoxField = field if isinstance(field, PdfListBoxWidgetFieldWidget) else None
            name = listBoxField.Name
            sb.append("Listbox Name: " + name + "\r")

            # Get the items of the listbox field
            sb.append("Listbox Items: \r")
            items = listBoxField.Values
            for i in range(items.Count):
                item = items.get_Item(i)
                sb.append(item.Value + "\r")

            # Get the selected item of the listbox field
            selectedValue = listBoxField.SelectedValue
            sb.append("Listbox Selected Value: " + selectedValue + "\r\n")

        # Get the name of the combo box field
        if isinstance(field, PdfComboBoxWidgetFieldWidget):
            comBoxField = field if isinstance(field, PdfComboBoxWidgetFieldWidget) else None
            name = comBoxField.Name
            sb.append("Combobox Name: " + name + "\r");

            # Get the items of the combo box field
            sb.append("Combobox Items: \r");
            items = comBoxField.Values
            for i in range(items.Count):
                item = items.get_Item(i)
                sb.append(item.Value + "\r")

            # Get the selected item of the combo box field
            selectedValue = comBoxField.SelectedValue
            sb.append("Combobox Selected Value: " + selectedValue + "\r\n")

        # Get the name and selected item of the radio button field
        if isinstance(field, PdfRadioButtonListFieldWidget):
            radioBtnField = field if isinstance(field, PdfRadioButtonListFieldWidget) else None
            name = radioBtnField.Name
            selectedValue = radioBtnField.SelectedValue
            sb.append("Radio Button Name: " + name + "\r");
            sb.append("Radio Button Selected Value: " + selectedValue + "\r\n")

       # Get the name and status of the checkbox field
        if isinstance(field, PdfCheckBoxWidgetFieldWidget):
            checkBoxField = field if isinstance(field, PdfCheckBoxWidgetFieldWidget) else None
            name = checkBoxField.Name
            sb.append("Checkbox Name: " + name + "\r")

            state = checkBoxField.Checked
            stateValue = "Yes" if state else "No"
            sb.append("If the checkBox is checked: " + stateValue + "\r\n")

# Write the results to a text file
f2=open(outputFile,'w', encoding='UTF-8')
for item in sb:
        f2.write(item)
f2.close()
pdf.Close()
Apply for a Temporary License
If you'd like to remove the evaluation message from the generated documents, or to get rid of the function limitations, please request a 30-day trial license for yourself.
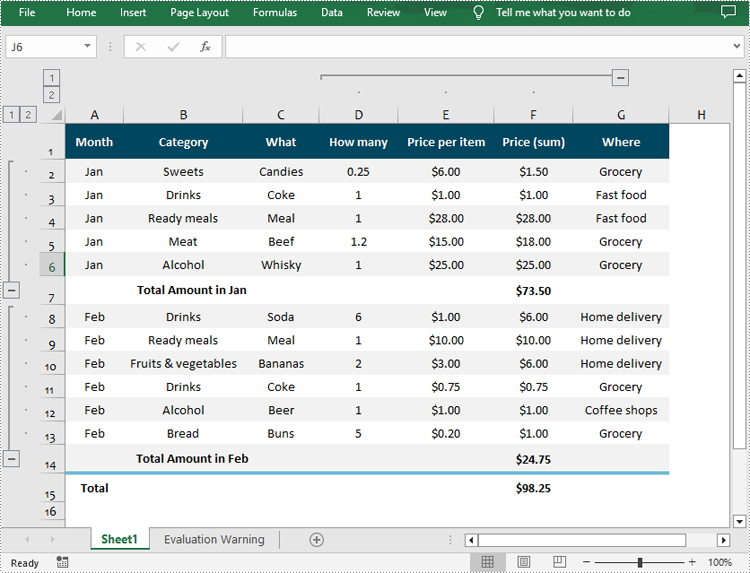
Grouping rows and columns in Excel provides a more organized and structured view of data, making it easier to analyze and understand complex datasets. After grouping related rows or columns, you can collapse or expand them as needed to focus on specific subsets of information while hiding details. In this article, you will learn how to group or ungroup rows and columns , as well as how to collapse or expand groups in Excel in Python using Spire.XLS for Python.
- Group Rows and Columns in Excel in Python
- Ungroup Rows and Columns in Excel in Python
- Expand or Collapse Groups in Excel in Python
Install Spire.XLS for Python
This scenario requires Spire.XLS for Python and plum-dispatch v1.7.4. They can be easily installed in your Windows through the following pip command.
pip install Spire.XLS
If you are unsure how to install, please refer to this tutorial: How to Install Spire.XLS for Python on Windows
Group Rows and Columns in Excel in Python
Spire.XLS for Python provides the Worksheet.GroupByRows() and Worksheet.GroupByColumns() methods to group specific rows and columns in an Excel worksheet. The following are the detailed steps:
- Create a Workbook object.
- Load a sample Excel file using Workbook.LoadFromFile() method.
- Get the specified worksheet using Workbook.Worksheets[] property.
- Group rows using Worksheet.GroupByRows() method.
- Group columns using Worksheet.GroupByColumns() method.
- Save the result file using Workbook.SaveToFile() method.
- Python
from spire.xls import *
from spire.xls.common import *

inputFile = "Data.xlsx"
outputFile = "GroupRowsAndColumns.xlsx"

# Create a Workbook object
workbook = Workbook()

# Load a sample Excel file
workbook.LoadFromFile(inputFile)

# Get the first worksheet
sheet = workbook.Worksheets[0]

# Group rows
sheet.GroupByRows(2, 6, False)
sheet.GroupByRows(8, 13, False)

# Group columns
sheet.GroupByColumns(4, 6, False)

# Save the result file
workbook.SaveToFile(outputFile, ExcelVersion.Version2016)
workbook.Dispose()
Ungroup Rows and Columns in Excel in Python
Ungrouping rows and columns in Excel refer to the process of reversing the grouping operation and restoring the individual rows or columns to their original state.
To ungroup rows and columns in an Excel worksheet, you can use the Worksheet.UngroupByRows() and Worksheet.UngroupByColumns() methods. The following are the detailed steps:
- Create a Workbook object.
- Load a sample Excel file using Workbook.LoadFromFile() method.
- Get the specified worksheet using Workbook.Worksheets[] property.
- Ungroup rows using Worksheet.UngroupByRows() method.
- Ungroup columns using Worksheet.UngroupByColumns() method.
- Save the result file using Workbook.SaveToFile() method.
- Python
from spire.xls import *
from spire.xls.common import *

inputFile = "GroupRowsAndColumns.xlsx"
outputFile = "UnGroupRowsAndColumns.xlsx"

# Create a Workbook object
workbook = Workbook()

# Load a sample Excel file
workbook.LoadFromFile(inputFile)

# Get the first worksheet
sheet = workbook.Worksheets[0]

# UnGroup rows
sheet.UngroupByRows(2, 6)
sheet.UngroupByRows(8, 13)

# UnGroup columns
sheet.UngroupByColumns(4, 6)

# Save the result file
workbook.SaveToFile(outputFile, ExcelVersion.Version2016)
workbook.Dispose()
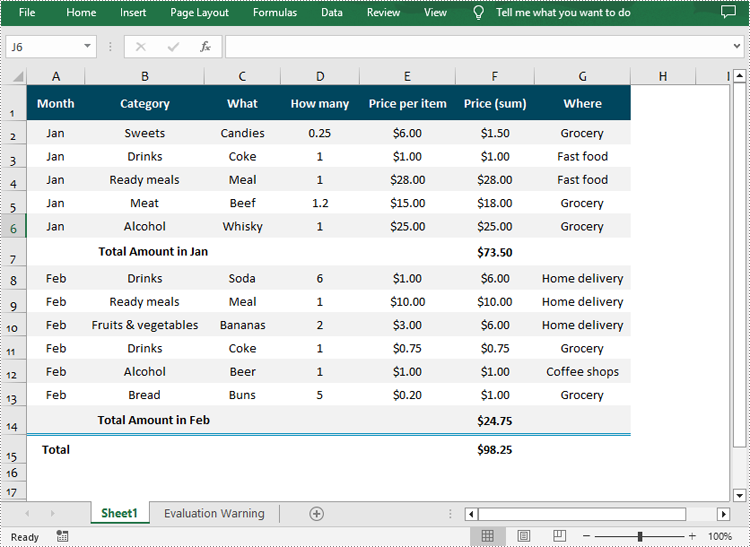
Expand or Collapse Groups in Excel in Python
Expanding or collapsing groups in Excel refers to the action of showing or hiding the detailed information within a grouped section. With Spire.XLS for Python, you can expand or collapse groups through the Worksheet.Range[].ExpandGroup() or Worksheet.Range[].CollapseGroup() methods. The following are the detailed steps:
- Create a Workbook object.
- Load a sample Excel file using Workbook.LoadFromFile() method.
- Get the specified worksheet using Workbook.Worksheets[] property.
- Expand a specific group using the Worksheet.Range[].ExpandGroup() method.
- Collapse a specific group using the Worksheet.Range[].CollapseGroup() method.
- Save the result file using Workbook.SaveToFile() method.
- Python
from spire.xls import *
from spire.xls.common import *

inputFile = "Grouped.xlsx"
outputFile = "ExpandOrCollapseGroups.xlsx"

# Create a Workbook object
workbook = Workbook()

# Load a sample Excel file
workbook.LoadFromFile(inputFile)

# Get the first worksheet
sheet = workbook.Worksheets[0]

# Expand a group
sheet.Range["A2:G6"].ExpandGroup(GroupByType.ByRows)

# Collapse a group
sheet.Range["D1:F15"].CollapseGroup(GroupByType.ByColumns)

# Save the result file
workbook.SaveToFile(outputFile, ExcelVersion.Version2016)
workbook.Dispose()
Apply for a Temporary License
If you'd like to remove the evaluation message from the generated documents, or to get rid of the function limitations, please request a 30-day trial license for yourself.
PDF bookmarks are navigational aids that allow users to quickly locate and jump to specific sections or pages in a PDF document. Through a simple click, users can arrive at the target location, which eliminates the need to manually scroll or search for specific content in a lengthy document. In this article, you will learn how to programmatically add, modify and delete bookmarks in PDF files using Spire.PDF for Python.
- Add Bookmarks to a PDF Document
- Edit Bookmarks in a PDF Document
- Delete Bookmarks from a PDF Document
Install Spire.PDF for Python
This scenario requires Spire.PDF for Python and plum-dispatch v1.7.4. They can be easily installed in your Windows through the following pip command.
pip install Spire.PDF
If you are unsure how to install, please refer to this tutorial: How to Install Spire.PDF for Python on Windows
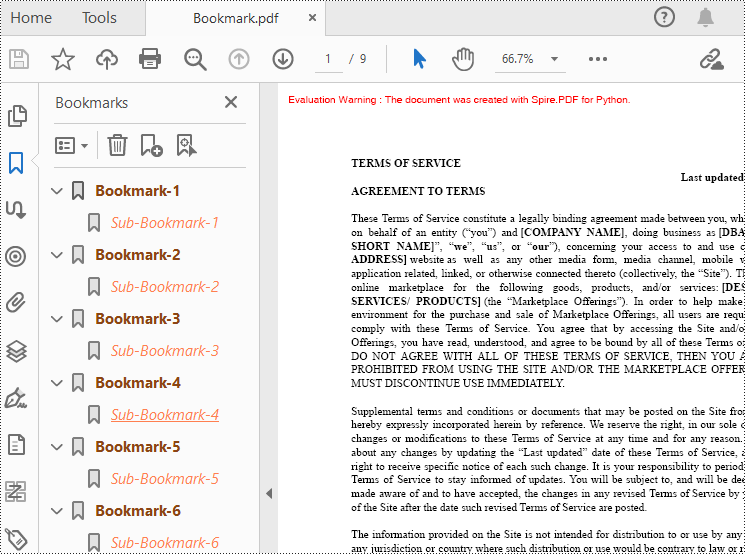
Add Bookmarks to a PDF Document in Python
Spire.PDF for Python provides a method to add bookmarks to a PDF document: PdfDocument. Bookmarks.Add(). You can use this method to create primary bookmarks for the PDF document and use the PdfBookmarkCollection.Add() method to add sub-bookmarks to the primary bookmarks. Additionally, the PdfBookmark class offers other methods to set properties such as destination, text color, and text style for the bookmarks. The following are the detailed steps for adding bookmarks to a PDF document.
- Create a PdfDocument class instance.
- Load a PDF document using PdfDocument.LoadFromFile() method.
- Add a parent bookmark to the document using PdfDocument.Bookmarks.Add() method.
- Create a PdfDestination class object and set the destination of the parent bookmark using PdfBookmark.Action property.
- Set the text color and style of the parent bookmark.
- Create a PdfBookmarkCollection class object to add sub-bookmark to the parent bookmark using PdfBookmarkCollection.Add() method.
- Use the above methods to set the destination, text color, and text style of the sub-bookmark.
- Save the document using PdfDocument.SaveToFile() method.
- Python
from spire.pdf.common import *
from spire.pdf import *

# Create a PdfDocument object
doc = PdfDocument()

# Load a PDF file
doc.LoadFromFile("Terms of service.pdf")

# Loop through the pages in the PDF file
for i in range(doc.Pages.Count):
     page = doc.Pages.get_Item(i)

    # Set the title and destination for the bookmark
    bookmarkTitle = "Bookmark-{0}".format(i+1)
    bookmarkDest = PdfDestination(page, PointF(0.0, 0.0))

    # Create and configure the bookmark
    bookmark = doc.Bookmarks.Add(bookmarkTitle)
    bookmark.Color = PdfRGBColor(Color.get_SaddleBrown())
    bookmark.DisplayStyle = PdfTextStyle.Bold
    bookmark.Action = PdfGoToAction(bookmarkDest)

    # Create a collection to hold child bookmarks
    bookmarkColletion = PdfBookmarkCollection(bookmark)

    # Set the title and destination for the child bookmark
    childBookmarkTitle = "Sub-Bookmark-{0}".format(i+1)
    childBookmarkDest = PdfDestination(page, PointF(0.0, 100.0))

    # Create and configure the child bookmark
    childBookmark = bookmarkColletion.Add(childBookmarkTitle)
    childBookmark.Color = PdfRGBColor(Color.get_Coral())
    childBookmark.DisplayStyle = PdfTextStyle.Italic
    childBookmark.Action = PdfGoToAction(childBookmarkDest)

# Save the PDF file
outputFile = "Bookmark.pdf"
doc.SaveToFile(outputFile)

# Close the document
doc.Close()
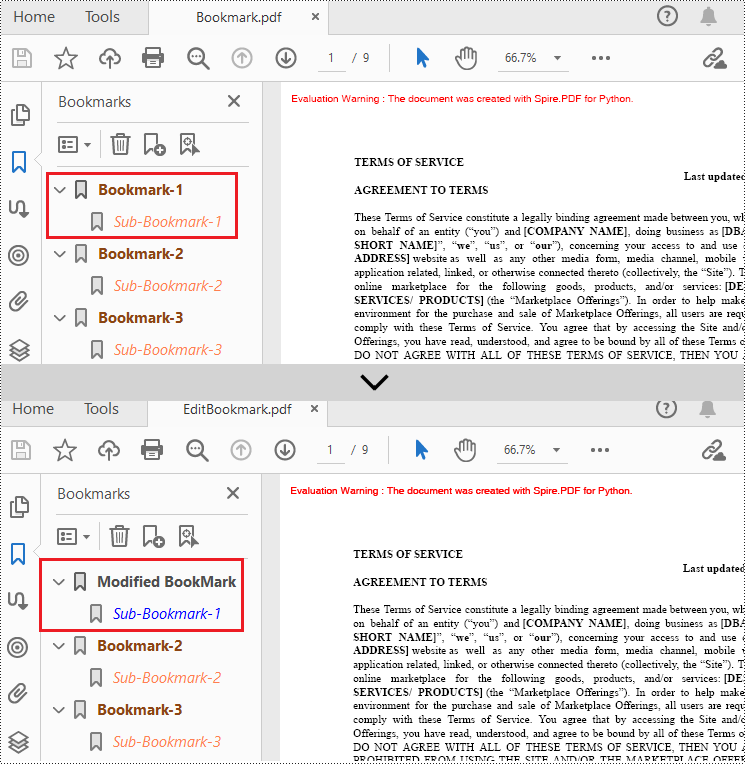
Edit Bookmarks in a PDF Document
If you need to update the existing bookmarks, you can use the methods of PdfBookmark class to rename the bookmarks and change their text color, text style. The following are the detailed steps.
- Create a PdfDocument class instance.
- Load a PDF document using PdfDocument.LoadFromFile() method.
- Get a specified bookmark using PdfDocument.Bookmarks[] property.
- Change the title of the bookmark using PdfBookmark.Title property.
- Change the font color of the bookmark using PdfBookmark.Color property.
- Change the text style of the bookmark using PdfBookmark.DisplayStyle property.
- Change the text color and style of the sub-bookmark using the above methods.
- Save the result document using PdfDocument.SaveToFile() method.
- Python
from spire.pdf.common import *
from spire.pdf import *

# Create a PdfDocument object
doc = PdfDocument()

# Load a PDF file
doc.LoadFromFile("Bookmark.pdf")

# Get the first bookmark
bookmark = doc.Bookmarks.get_Item(0)

# Change the title of the bookmark
bookmark.Title = "Modified BookMark"

# Set the color of the bookmark
bookmark.Color = PdfRGBColor(Color.get_Black())

# Set the outline text style of the bookmark
bookmark.DisplayStyle = PdfTextStyle.Bold

# Edit child bookmarks of the parent bookmark
pBookmark = PdfBookmarkCollection(bookmark)
for i in range(pBookmark.Count):
    childBookmark = pBookmark.get_Item(i)
    childBookmark.Color = PdfRGBColor(Color.get_Blue())
    childBookmark.DisplayStyle = PdfTextStyle.Regular

# Save the PDF document
outputFile = "EditBookmark.pdf"

# Close the document
doc.SaveToFile(outputFile)
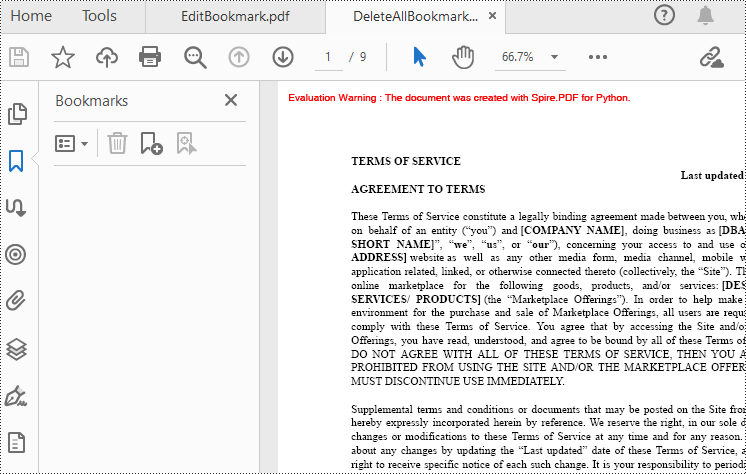
Delete Bookmarks from a PDF Document
Spire.PDF for Python also provides methods to delete any bookmark in a PDF document. PdfDocument.Bookmarks.RemoveAt() method is used to remove a specific primary bookmark, PdfDocument.Bookmarks.Clear() method is used to remove all bookmarks, and PdfBookmarkCollection.RemoveAt() method is used to remove a specific sub-bookmark of a primary bookmark. The detailed steps of removing bookmarks form a PDF document are as follows.
- Create a PdfDocument class instance.
- Load a PDF document using PdfDocument.LoadFromFile() method.
- Get the first bookmark using PdfDocument.Bookmarks[] property.
- Remove a specified sub-bookmark of the first bookmark using PdfBookmarkCollection.RemoveAt() method.
- Remove a specified bookmark including its sub-bookmarks using PdfDocument.Bookmarks.RemoveAt() method.
- Remove all bookmarks in the PDF file using PdfDocument.Bookmarks.Clear() method.
- Save the document using PdfDocument.SaveToFile() method.
- Python
from spire.pdf.common import *
from spire.pdf import *

# Create a PdfDocument object
doc = PdfDocument()

# Load a PDF file
doc.LoadFromFile("Bookmark.pdf")

# # Delete the first bookmark
# doc.Bookmarks.RemoveAt(0)

# # Get the first bookmark
# bookmark = doc.Bookmarks.get_Item(0)

# # Remove the first child bookmark from first parent bookmark
# pBookmark = PdfBookmarkCollection(bookmark)
# pBookmark.RemoveAt(0)

#Remove all bookmarks
doc.Bookmarks.Clear()

# Save the PDF document
output = "DeleteAllBookmarks.pdf"
doc.SaveToFile(output)

# Close the document
doc.Close()
Apply for a Temporary License
If you'd like to remove the evaluation message from the generated documents, or to get rid of the function limitations, please request a 30-day trial license for yourself.
The conversion from HTML to image allows you to capture the appearance and layout of the HTML content as a static image file. It can be useful for various purposes, such as generating website previews, creating screenshots, archiving web pages, or integrating HTML content into applications that primarily deal with images. In this article, you will learn how to convert an HTML file or an HTML string to an image in Python using Spire.Doc for Python.
Install Spire.Doc for Python
This scenario requires Spire.Doc for Python and plum-dispatch v1.7.4. They can be easily installed in your Windows through the following pip command.
pip install Spire.Doc
If you are unsure how to install, please refer to this tutorial: How to Install Spire.Doc for Python on Windows
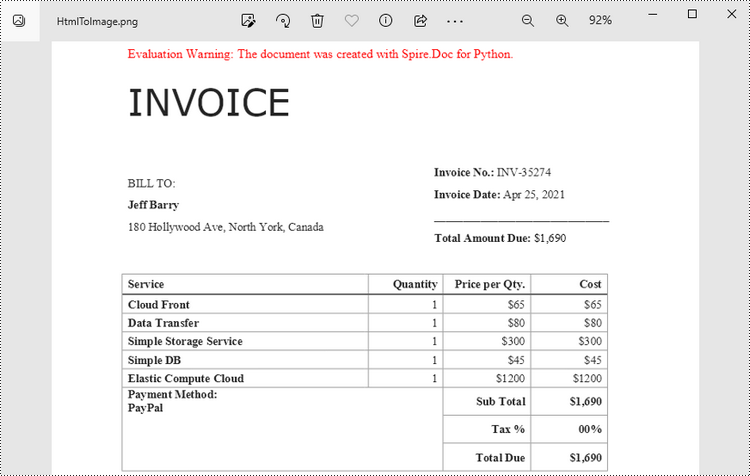
Convert an HTML File to an Image in Python
When an HTML file is loaded into the Document object using the Document.LoadFromFile() method, its contents are automatically rendered as the contents of a Word page. Then, a specific page can be saved as an image stream using the Document.SaveImageToStreams() method.
The following are the steps to convert an HTML file to an image with Python.
- Create a Document object.
- Load a HTML file using Document.LoadFromFile() method.
- Convert a specific page to an image stream using Document.SaveImageToStreams() method.
- Save the image stream as a PNG file using BufferedWriter.write() method.
- Python
from spire.doc import *
from spire.doc.common import *

# Create a Document object
document = Document()

# Load an HTML file
document.LoadFromFile("C:\\Users\\Administrator\\Desktop\\Sample.html", FileFormat.Html, XHTMLValidationType.none)

# Save the first page as an image stream
imageStream = document.SaveImageToStreams(0, ImageType.Bitmap)

# Convert the image stream as a PNG file
with open("output/HtmlToImage.png",'wb') as imageFile:
imageFile.write(imageStream.ToArray())
document.Close()
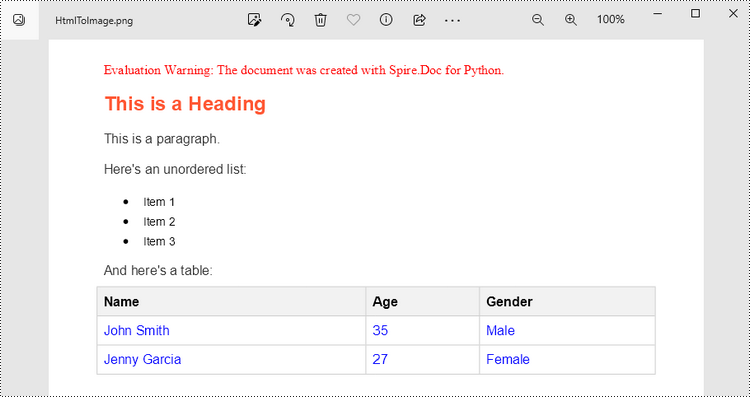
Convert an HTML String to an Image in Python
To render uncomplicated HTML strings (typically text and its formatting) as a Word page, you can utilize the Paragraph.AppendHTML() method. Afterwards, you can convert it to an image stream using the Document.SaveImageToStreams() method.
The following are the steps to convert an HTML string to an image in Python.
- Create a Document object.
- Add a section using Document.AddSection() method.
- Add a paragraph using Section.AddParagraph() method.
- Specify the HTML string, and add the it to the paragraph using Paragraph.AppendHTML() method.
- Convert a specific page to an image stream using Document.SaveImageToStreams() method.
- Save the image stream as a PNG file using BufferedWriter.write() method.
- Python
from spire.doc import *
from spire.doc.common import *

# Create a Document object
document = Document()

# Add a section to the document
sec = document.AddSection()

# Add a paragraph to the section
paragraph = sec.AddParagraph()

# Specify the HTML string
htmlString = """
<html>
<head>
    <title>HTML to Word Example</title>
    <style>
        body {
            font-family: Arial, sans-serif;
        }
        h1 {
            color: #FF5733;
            font-size: 24px;
            margin-bottom: 20px;
        }
        p {
            color: #333333;
            font-size: 16px;
            margin-bottom: 10px;
        }
        ul {
            list-style-type: disc;
            margin-left: 20px;
            margin-bottom: 15px;
        }
        li {
            font-size: 14px;
            margin-bottom: 5px;
        }
        table {
            border-collapse: collapse;
            width: 100%;
            margin-bottom: 20px;
        }
        th, td {
            border: 1px solid #CCCCCC;
            padding: 8px;
            text-align: left;
        }
        th {
            background-color: #F2F2F2;
            font-weight: bold;
        }
        td {
            color: #0000FF;
        }
    </style>
</head>
<body>
    <h1>This is a Heading</h1>
    <p>This is a paragraph.</p>
    <p>Here's an unordered list:</p>
    <ul>
        <li>Item 1</li>
        <li>Item 2</li>
        <li>Item 3</li>
    </ul>
    <p>And here's a table:</p>
    <table>
        <tr>
            <th>Name</th>
            <th>Age</th>
            <th>Gender</th>
        </tr>
        <tr>
            <td>John Smith</td>
            <td>35</td>
            <td>Male</td>
        </tr>
        <tr>
            <td>Jenny Garcia</td>
            <td>27</td>
            <td>Female</td>
        </tr>
    </table>
</body>
</html>
"""

# Append the HTML string to the paragraph
paragraph.AppendHTML(htmlString)

# Save the first page as an image stream
imageStream = document.SaveImageToStreams(0, ImageType.Bitmap)

# Convert the image stream as a PNG file
with open("output/HtmlToImage2.png",'wb') as imageFile:
    imageFile.write(imageStream.ToArray())
document.Close()
Get a Free License
To fully experience the capabilities of Spire.Doc for Python without any evaluation limitations, you can request a free 30-day trial license.
Captions play a significant role in Word documents by serving as markers, explanations, navigation aids, and accessibility features. They are crucial elements for creating professional, accurate, and user-friendly documents. Captions help improve the readability, usability, and accessibility of the document and are essential for understanding and effectively processing the document's content. This article will explain how to use Spire.Doc for Python to add or remove captions in Word documents using Python programs.
- Add Image Captions to a Word document in Python
- Add Table Captions to a Word document in Python
- Remove Captions from a Word document in Python
Install Spire.Doc for Python
This scenario requires Spire.Doc for Python and plum-dispatch v1.7.4. They can be easily installed in your Windows through the following pip command.
pip install Spire.Doc
If you are unsure how to install, please refer to this tutorial: How to Install Spire.Doc for Python on Windows
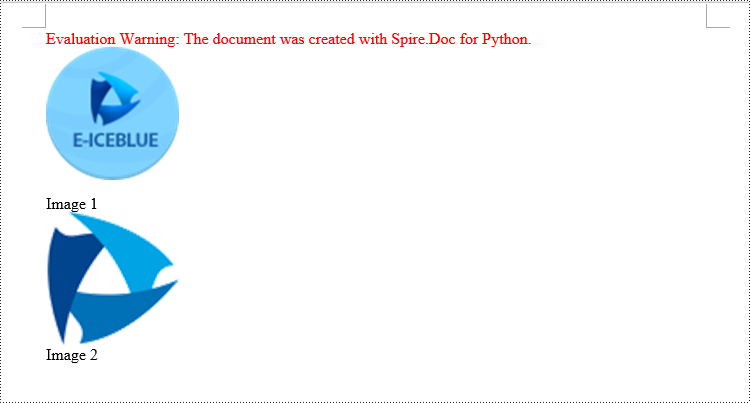
Add Image Captions to a Word document in Python
Spire.Doc for Python provides a convenient method to add captions to images. Simply call the DocPicture.AddCaption(self, name: str, numberingFormat: 'CaptionNumberingFormat', captionPosition: 'CaptionPosition') method to add a caption for the image. The detailed steps are as follows:
- Create an object of the Document class.
- Use the Document.AddSection() method to add a section.
- Add a paragraph using Section.AddParagraph() method.
- Use the Paragraph.AppendPicture(self ,imgFile:str) method to add a DocPicture image object to the paragraph.
- Use the DocPicture.AddCaption(self ,name:str,numberingFormat:'CaptionNumberingFormat',captionPosition:'CaptionPosition') method to add a caption with numbering format as CaptionNumberingFormat.Number.
- Set the Document.IsUpdateFields property to true to update all fields.
- Use the Document.SaveToFile() method to save the resulting document.
- Python
from spire.doc import *
from spire.doc.common import *

# Create a Word document object
document = Document()

# Add a section
section = document.AddSection()

# Add a new paragraph and add an image to it
pictureParagraphCaption = section.AddParagraph()
pictureParagraphCaption.Format.AfterSpacing = 10
pic1 = pictureParagraphCaption.AppendPicture("Data\\1.png")
pic1.Height = 100
pic1.Width = 100

# Add a caption to the image
format = CaptionNumberingFormat.Number
pic1.AddCaption("Image", format, CaptionPosition.BelowItem)

# Add another new paragraph and add an image to it
pictureParagraphCaption = section.AddParagraph()
pic2 = pictureParagraphCaption.AppendPicture("Data\\2.png")
pic2.Height = 100
pic2.Width = 100

# Add a caption to the image
pic2.AddCaption("Image", format, CaptionPosition.BelowItem)

# Update all fields in the document
document.IsUpdateFields = True

# Save the document as a docx file
result = "AddImageCaption.docx"
document.SaveToFile(result, FileFormat.Docx2016)

# Close the document object and release resources
document.Close()
document.Dispose()
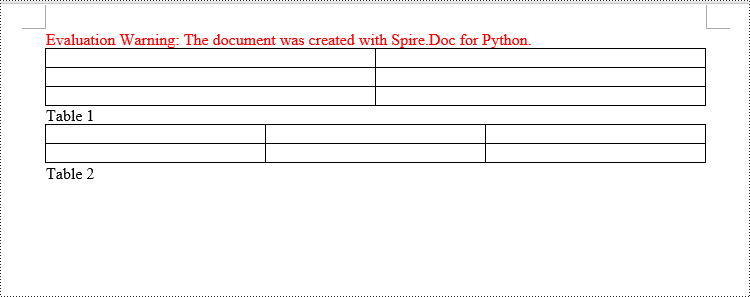
Add Table Captions to a Word document in Python
To facilitate the addition of captions to tables, Spire.Doc for Python also provides a convenient method similar to adding captions to images. You can use the Table.AddCaption(self, name:str, format:'CaptionNumberingFormat', captionPosition:'CaptionPosition') method to create a caption for the table. The following are the detailed steps:
- Create an object of the Document class.
- Use the Document.AddSection() method to add a section.
- Create a Table object and add it to the specified section in the document.
- Use the Table.ResetCells(self ,rowsNum:int,columnsNum:int) method to set the number of rows and columns in the table.
- Add a caption to the table using the Table.AddCaption(self ,name:str,format:'CaptionNumberingFormat',captionPosition:'CaptionPosition') method, specifying the caption numbering format as CaptionNumberingFormat.Number.
- Set the Document.IsUpdateFields property to true to update all fields.
- Use the Document.SaveToFile() method to save the resulting document.
- Python
from spire.doc import *
from spire.doc.common import *

# Create a Word document object
document = Document()

# Add a section
section = document.AddSection()

# Add a table
tableCaption = section.AddTable(True)
tableCaption.ResetCells(3, 2)

# Add a caption to the table
tableCaption.AddCaption("Table", CaptionNumberingFormat.Number, CaptionPosition.BelowItem)

# Add another table and caption to it
tableCaption = section.AddTable(True)
tableCaption.ResetCells(2, 3)
tableCaption.AddCaption("Table", CaptionNumberingFormat.Number, CaptionPosition.BelowItem)

# Update all fields in the document
document.IsUpdateFields = True

# Save the document as a docx file
result = "AddTableCaption.docx"
document.SaveToFile(result, FileFormat.Docx2016)

# Close the document object and release resources
document.Close()
document.Dispose()
Remove Captions from a Word document in Python
Spire.Doc for Python also supports removing captions from Word documents. Here are the detailed steps:
- Create an object of the Document class.
- Use the Document.LoadFromFile() method to load a Word document.
- Create a custom method, named detect_caption_paragraph(paragraph), to determine if a paragraph contains a caption.
- Iterate through all the Paragraph objects in the document using a loop and utilize the custom method, detect_caption_paragraph(paragraph), to identify and delete paragraphs that contain captions.
- Use the Document.SaveToFile() method to save the resulting document.
- Python
from spire.doc import *
from spire.doc.common import *

# Method to detect if a paragraph is a caption paragraph
def detect_caption_paragraph(paragraph):
    tag = False
    field = None

# Iterate through the child objects in the paragraph
    for i in range(len(paragraph.ChildObjects)):
        if paragraph.ChildObjects[i].DocumentObjectType == DocumentObjectType.Field:
            # Check if the child object is of Field type
            field = paragraph.ChildObjects[i]
            if field.Type == FieldType.FieldSequence:
                # Check if the Field type is FieldSequence, indicating a caption field type
                return True

    return tag

# Create a Word document object
document = Document()
# Load the sample.docx file
document.LoadFromFile("Data/sample.docx")

# Iterate through all sections
for i in range(len(document.Sections)):
    section = document.Sections.get_Item(i)

    # Iterate through paragraphs in reverse order within the section
    for j in range(len(section.Body.Paragraphs) - 1, -1, -1):
        # Check if the paragraph is a caption paragraph
        if detect_caption_paragraph(section.Body.Paragraphs[j]):
            # If it's a caption paragraph, remove it
            section.Body.Paragraphs.RemoveAt(j)

# Save the document after removing captions
result = "DeleteCaptions.docx"
document.SaveToFile(result, FileFormat.Docx2016)

# Close the document object and release resources
document.Close()
document.Dispose()
Apply for a Temporary License
If you'd like to remove the evaluation message from the generated documents, or to get rid of the function limitations, please request a 30-day trial license for yourself.
