
Python (365)
Spire.XLS for Python is a high-performance library for reading and writing Excel spreadsheets in Python. With Spire.XLS, you can create, read, edit, and convert XLS and XLSX files without the need for Microsoft Excel to be installed on your system.
This article demonstrates how to install Spire.XLS for Python on Mac.
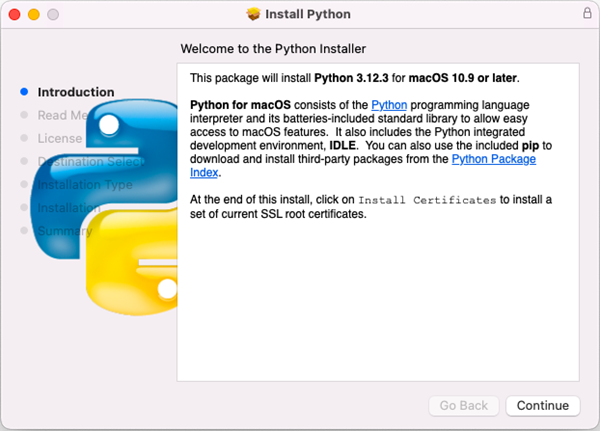
Step 1
Download the most recent version of Python for macOS and install it on your Mac. If you have already completed this step, proceed directly to step 2.
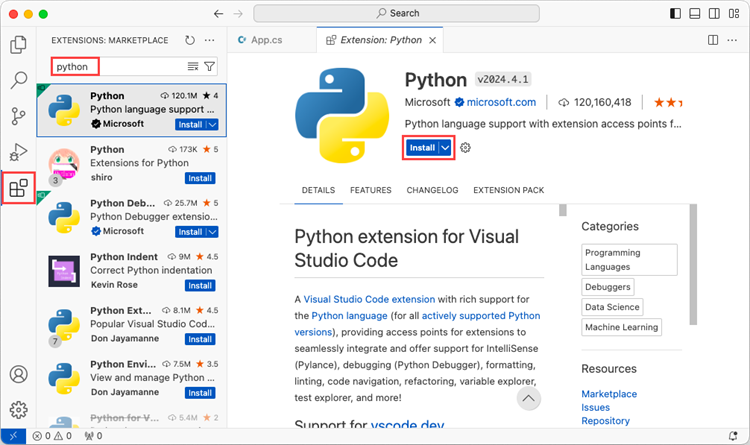
Step 2
Open VS Code and search for 'Python' in the Extensions panel. Click 'Install' to add support for Python in your VS Code.
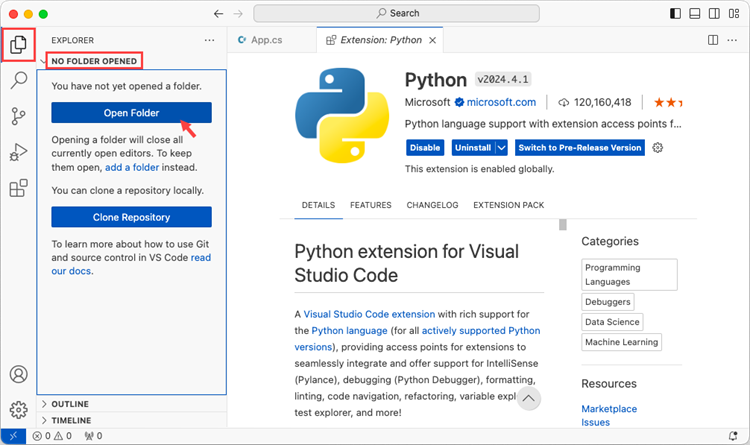
Step 3
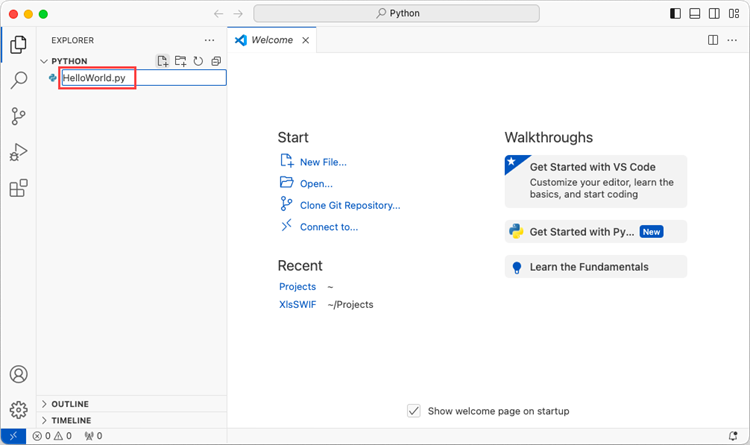
Click 'Explorer' > 'NO FOLRDER OPENED' > 'Open Folder'.
Choose an existing folder as the workspace, or you can create a new folder and then open it.
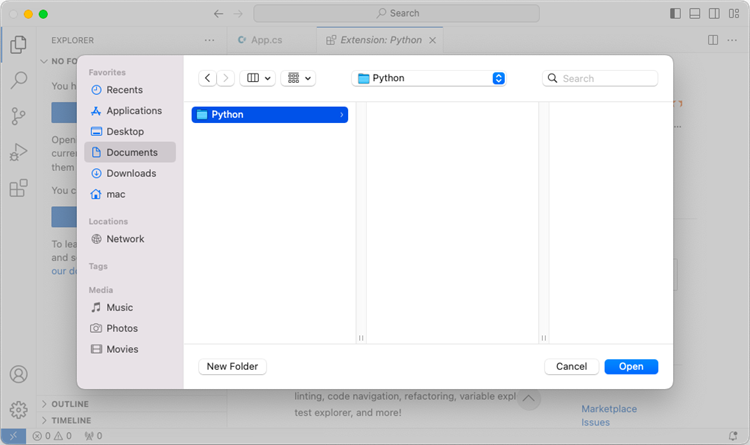
Add a .py file to the folder you just opened and name it whatever you want (in this case, HelloWorld.py).
Step 4
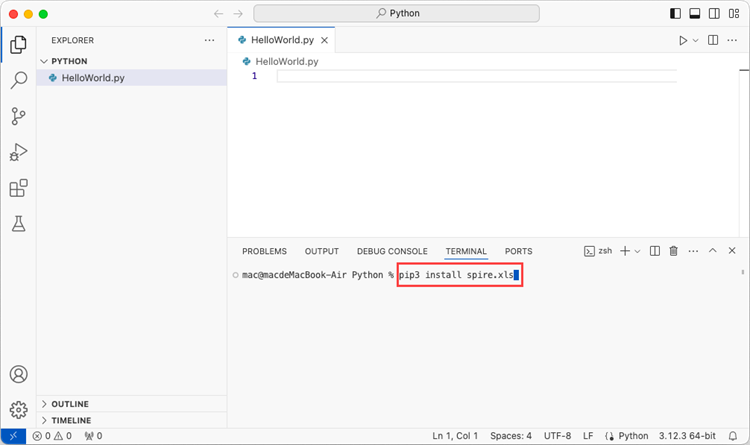
Use the keyboard shortcut Ctrl + ` to open the Terminal. Then, install Spire.XLS for Python by entering the following command line in the terminal.
pip3 install spire.xls
Note that pip3 is a package installer specifically designed for Python 3.x versions, while pip is a package installer for Python 2.x versions. If you are working with Python 2.x, you can use the pip command.
Step 5
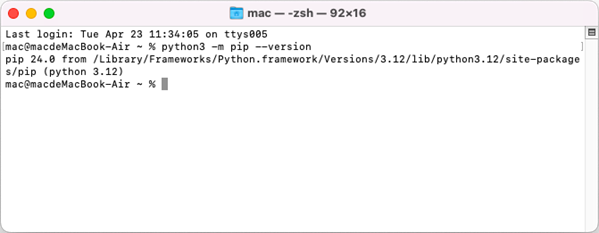
Open a Terminal window on your Mac, and type the following command to obtain the installation path of Python on your system.
python3 -m pip --version
Step 6
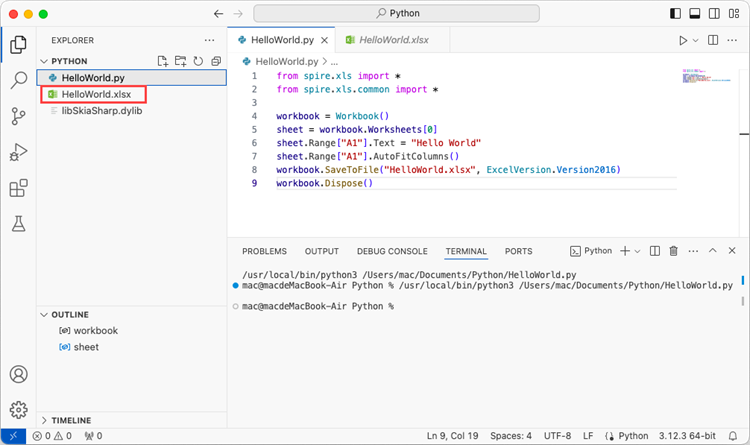
Add the following code snippet to the 'HelloWorld.py' file.
- Python
from spire.xls.common import *
from spire.xls import *

workbook = Workbook()
sheet = workbook.Worksheets[0]
sheet.Range["A1"].Text = "Hello World"
sheet.Range["A1"].AutoFitColumns()
workbook.SaveToFile("HelloWorld.xlsx", ExcelVersion.Version2010)
workbook.Dispose()
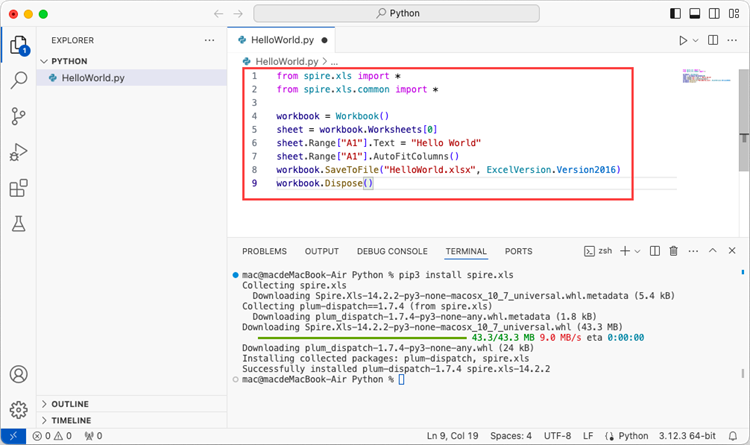
After executing the Python file, you will find the resulting Excel document displayed in the 'EXPLORER' panel.
Mail merge is a powerful tool that allows users to efficiently create personalized documents for a large number of recipients. By using mail merge, users can streamline the document-creating process by automatically merging a template document with a data source, resulting in personalized and professional-looking documents that are tailored to each recipient, which is especially useful for tasks like sending out personalized emails, generating invoices, or creating customized marketing materials. This article demonstrates how to create and execute mail merge in Word documents with Spire.Doc for Python through Python code.
Install Spire.Doc for Python
This scenario requires Spire.Doc for Python and plum-dispatch v1.7.4. They can be easily installed in your Windows through the following pip command.
pip install Spire.Doc
If you are unsure how to install, please refer to: How to Install Spire.Doc for Python on Windows
Create Mail Merge in Word Documents with Python
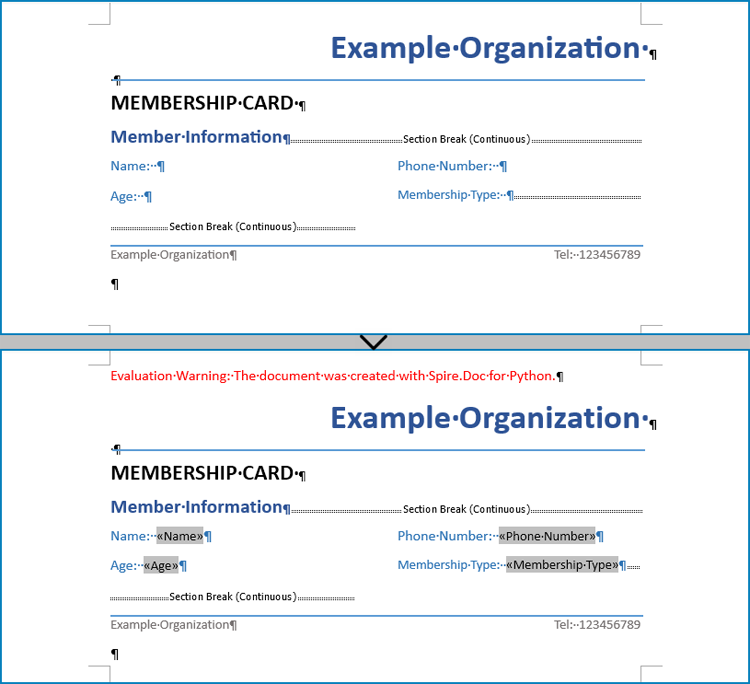
Mail merging in Word documents involves the utilization of mail merge fields. Spire.Doc for Python offers the Paragraph.AppendField(str: fieldName, FieldType.FieldMergeField) method, which allows users to efficiently create mail merge fields within a designated paragraph of a document. This feature enables users to easily generate a set of documents tailored to specific recipients by swiftly inputting personalized information at a later stage.
The detailed steps for creating mail merge fields in Word documents are as follows:
- Create an object of Document class and load a Word document using Document.LoadFromFile() method.
- Get a section using Document.Sections.get_Item() method.
- Get the paragraphs to insert mail merge fields using Section.Paragraphs.get_Item() method.
- Append mail merge fields to the paragraphs using Paragraph.AppendField() method.
- Save the document using Document.SaveToFile() method.
- Python
from spire.doc import *
from spire.doc.common import *

# Create an object of Document class
doc = Document()

# Load a Word document
doc.LoadFromFile("Sample.docx")

# Get a section
section = doc.Sections.get_Item(1)

# Get the paragraphs to append the mail merge fields
para1 = section.Paragraphs.get_Item(0)
para2 = section.Paragraphs.get_Item(1)
para3 = section.Paragraphs.get_Item(2)
para4 = section.Paragraphs.get_Item(3)

# Append the mail merge fields and specify the field names
para1.AppendField("Name", FieldType.FieldMergeField)
para2.AppendField("Age", FieldType.FieldMergeField)
para3.AppendField("Phone Number", FieldType.FieldMergeField)
para4.AppendField("Membership Type", FieldType.FieldMergeField)

# Save the document
doc.SaveToFile("output/MailMergeFields.docx", FileFormat.Docx)
doc.Close()
Perform Mail Merge in Word Documents with Python
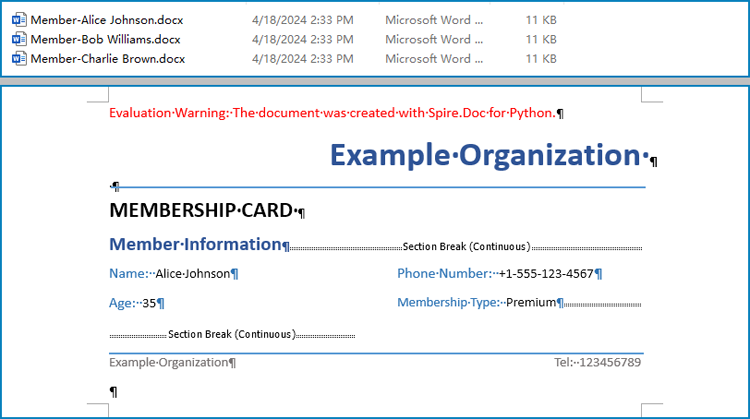
Once the mail merge has been created, the MailMerge.Execute(List: fieldNames, List: dataSource) method can be employed to execute the mail merge within the document. This enables the swift generation of multiple Word documents, each containing unique content as per the specified data source.
The detailed steps for performing mail merge and generate personalized documents are as follows:
- Specify the data source
- Loop through the data source:
- Create an object of Document class and load a Word document using Document.LoadFromFile() method.
- Get the mail merge field names as a list using Document.MailMerge.GetMergeFieldNames() method.
- Execute mail merge with specified data using Document.MailMerge.Execute() method.
- Save the document using Document.SaveToFile() method.
- Python
from spire.doc import Document

# Specify the data source
dataSource = member_data = [
    ["Alice Johnson", "35", "+1-555-123-4567", "Premium"],
    ["Bob Williams", "42", "+1-555-765-4321", "Standard"],
    ["Charlie Brown", "28", "+44-1234-567890", "Basic"],
]

# Loop through the data source
for i in range(len(dataSource)):
    # Create an instance of Document
    doc = Document()
    # Load a Word document with mail merge fields
    doc.LoadFromFile("output/MailMergeFields.docx")
    # Get the merge field names
    fieldNames = doc.MailMerge.GetMergeFieldNames()
    # Execute mail merge
    doc.MailMerge.Execute(fieldNames, dataSource[i])
    # Save the document
    doc.SaveToFile(f"output/Members/Member-{dataSource[i][0]}.docx")
doc.Close()
Apply for a Temporary License
If you'd like to remove the evaluation message from the generated documents, or to get rid of the function limitations, please request a 30-day trial license for yourself.
Paragraph indentations determine the horizontal space between the page margins and the text of paragraphs. They are an important formatting tool used in various types of written documents, such as essays, reports, and articles, to improve readability and create a visual distinction between paragraphs. In this article, we will demonstrate how to set paragraph indentations in Word documents in Python using Spire.Doc for Python.
Install Spire.Doc for Python
This scenario requires Spire.Doc for Python and plum-dispatch v1.7.4. They can be easily installed in your Windows through the following pip command.
pip install Spire.Doc
If you are unsure how to install, please refer to this tutorial: How to Install Spire.Doc for Python on Windows
Set Paragraph Indentations in Word in Python
Microsoft Word provides four types of paragraph indent options that enable you to format your document efficiently. These options are as follows:
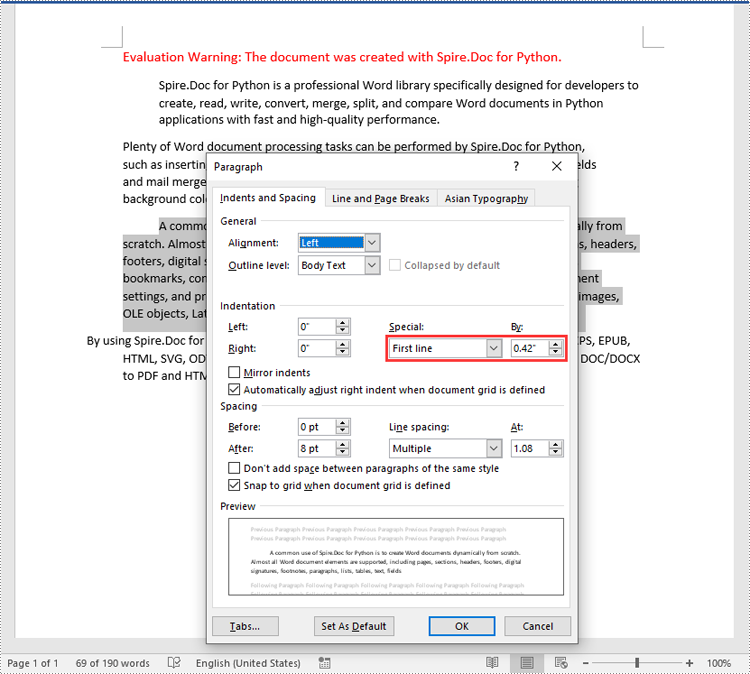
- First Line Indent: The first line indent refers to the horizontal space between the left margin and the beginning of the first line of a paragraph. It indents only the first line while keeping the subsequent lines aligned with the left margin.
- Left Indent: The left indent, also known as the paragraph indent or the left margin indent, determines the horizontal distance between the left margin and the entire paragraph. It uniformly indents the entire paragraph from the left margin.
- Right Indent: The right indent sets the horizontal distance between the right margin and the entire paragraph. It indents the paragraph from the right side, shifting the text towards the left.
- Hanging Indent: The hanging indent is a unique indentation style where the first line remains aligned with the left margin, while all subsequent lines of the paragraph are indented inward. This creates a "hanging" effect, commonly used for bibliographies, references, or citations.
Spire.Doc for Python supports all these types of indents. The table below lists some of the core classes and methods that are used to set different paragraph indents in Word with Spire.Doc for Python:
| Name | Description |
| ParagraphFormat Class | Represents the format of a paragraph. |
| ParagraphFormat.SetLeftIndent() Method | Sets the left indent value for paragraph. |
| ParagraphFormat.SetRightIndent() Method | Sets the right indent value for paragraph. |
| ParagraphFormat.SetFirstLineIndent() Method | Sets the first line or hanging indent value. Positive value represents first-line indent, and negative value represents hanging indent. |
The steps below explain how to set paragraph indents in a Word document using Spire.Doc for Python:
- Create a Document instance.
- Load a sample Word document using Document.LoadFromFile() method.
- Get a specific section using Document.Sections[] property.
- Get a specific paragraph using Section.Paragraphs[] property.
- Get the paragraph format using Paragraph.Format property, and then set the paragraph indent using the above listed methods of ParagraphFormat class.
- Save the document to another file using Document.SaveToFile() method.
- Python
from spire.doc import *
from spire.doc.common import *

# Create a Document instance
doc = Document()
# Load a sample Word document
doc.LoadFromFile(""Sample6.docx"")

# Get the first section
section = doc.Sections.get_Item(0)

# Get the first paragraph and set the left indent
para1 = section.Paragraphs.get_Item(0)
para1.Format.SetLeftIndent(30)

# Get the second paragraph and set the right indent
para2 = section.Paragraphs.get_Item(1)
para2.Format.SetRightIndent(30)

# Get the third paragraph and set the first line indent
para3 = section.Paragraphs.get_Item(2)
para3.Format.SetFirstLineIndent(30)

# Get the fourth paragraph and set the hanging indent
para4 = section.Paragraphs.get_Item(3)
para4.Format.SetFirstLineIndent(-30)

# Save the document to file
doc.SaveToFile(""SetIndents.docx"", FileFormat.Docx2013)
doc.Close()
Apply for a Temporary License
If you'd like to remove the evaluation message from the generated documents, or to get rid of the function limitations, please request a 30-day trial license for yourself.
Python: Add, Modify, or Remove Footers from PowerPoint Documents
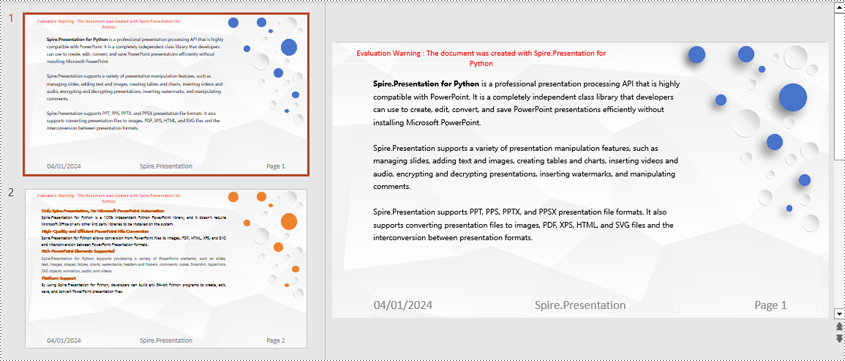
2024-04-18 01:08:25 Written by KoohjiIn a PowerPoint document, the footer is an area located at the bottom of each slide, typically containing textual information such as page numbers, dates, authors, and more. By adding a footer, you can give your slides a professional look and provide important information. Modifying the footer allows you to adjust the displayed content, style, and position to meet specific needs or styles. Removing the footer can clear the bottom content when extra information is not needed or to maintain a clean appearance. This article will introduce how to use Spire.Presentation for Python to add, modify, or remove footers in PowerPoint documents within a Python project.
- Python Add Footers in PowerPoint Documents
- Python Modify Footers in PowerPoint Documents
- Python Remove Footers in PowerPoint Documents
Install Spire.Presentation for Python
This scenario requires Spire.Presentation for Python and plum-dispatch v1.7.4. They can be easily installed in your Windows through the following pip command.
pip install Spire.Presentation
If you are unsure how to install, please refer to this tutorial: How to Install Spire.Presentation for Python on Windows
Python Add Footers in PowerPoint Documents
Using Spire.Presentation, you can add footers, page numbers, and time information to the bottom of each page in a PowerPoint document, ensuring consistent footer content across all pages. Here are the detailed steps:
- Create a Presentation object.
- Load a PowerPoint document using the Presentation.LoadFromFile() method.
- Set the footer visible using Presentation.FooterVisible = true and set the footer text.
- Set the slide number visible using Presentation.SlideNumberVisible = true, iterate through each slide, check for the lisence of a page number placeholder, and modify the text to the "Page X" format if found.
- Set the date visible using Presentation.DateTimeVisible = true.
- Set the format of the date using the Presentation.SetDateTime() method.
- Save the document using the Presentation.SaveToFile() method.
- Python
from spire.presentation.common import *
from spire.presentation import *

# Create a Presentation object
presentation = Presentation()

# Load the presentation from a file
presentation.LoadFromFile("Sample1.pptx")

# Set the footer visible
presentation.FooterVisible = True

# Set the footer text to "Spire.Presentation"
presentation.SetFooterText("Spire.Presentation")

# Set the slide number visible
presentation.SlideNumberVisible = True

# Iterate through each slide in the presentation
for slide in presentation.Slides:
    for shape in slide.Shapes:
        if shape.IsPlaceholder:
            # If it is a slide number placeholder
            if shape.Placeholder.Type == PlaceholderType.SlideNumber:
                autoShape = shape if isinstance(shape, IAutoShape) else None
                if autoShape is not None:
                    text = autoShape.TextFrame.TextRange.Paragraph.Text

                    # Modify the slide number text to "Page X"
                    autoShape.TextFrame.TextRange.Paragraph.Text = "Page " + text

# Set the date and time visible
presentation.DateTimeVisible = True

# Set the date and time format
presentation.SetDateTime(DateTime.get_Now(), "MM/dd/yyyy")

# Save the modified presentation to a file
presentation.SaveToFile("AddFooter.pptx", FileFormat.Pptx2016)

# Dispose of the Presentation object resources
presentation.Dispose()
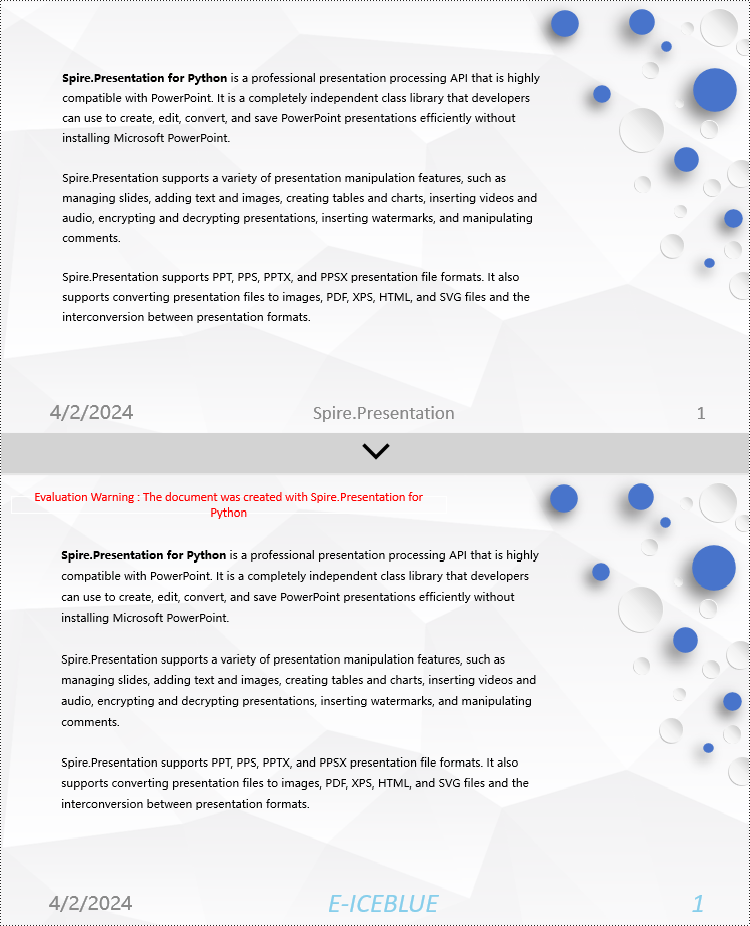
Python Modify Footers in PowerPoint Documents
To modify the footer in a PowerPoint document, you first need to inspect the elements of each slide to locate footer and page number placeholders. Then, for each type of placeholder, set the desired content and format to ensure consistent and compliant footers throughout the document. Here are the detailed steps:
- Create a Presentation object.
- Load a PowerPoint document using the Presentation.LoadFromFile() method.
- Use the Presentation.Slides[index] property to retrieve a slide.
- Iterate through the shapes in the slide using a for loop, check each shape to determine if it is a placeholder such as a footer or page number placeholder, and then modify its content or format accordingly.
- Save the document using the Presentation.SaveToFile() method.
- Python
from spire.presentation.common import *
from spire.presentation import *

def change_font(paragraph):
    for textRange in paragraph.TextRanges:
        # Set the text style to italic
        textRange.IsItalic = TriState.TTrue

        # Set the text font
        textRange.EastAsianFont = TextFont("Times New Roman")

        # Set the text font size to 12
        textRange.FontHeight = 34

        # Set the text color
        textRange.Fill.FillType = FillFormatType.Solid
        textRange.Fill.SolidColor.Color = Color.get_SkyBlue()

# Create a Presentation object
presentation = Presentation()

# Load a presentation from a file
presentation.LoadFromFile("Sample2.pptx")

# Get the first slide
slide = presentation.Slides[0]

# Iterate through the shapes on the slide
for shape in slide.Shapes:
   # Check if the shape is a placeholder
   if shape.Placeholder is not None:
       # Get the placeholder type
       type = shape.Placeholder.Type

       # If it is a footer placeholder
       if type == PlaceholderType.Footer:
           # Convert the shape to IAutoShape type
            autoShape = shape if isinstance(shape, IAutoShape) else None
            if autoShape is not None:
                # Set the text content to "E-ICEBLUE"
                autoShape.TextFrame.Text = "E-ICEBLUE"

                # Modify the text font
                change_font(autoShape.TextFrame.Paragraphs[0])

       # If it is a slide number placeholder
       if type == PlaceholderType.SlideNumber:
            # Convert the shape to IAutoShape type
            autoShape = shape if isinstance(shape, IAutoShape) else None
            if autoShape is not None:
                # Modify the text font
                change_font(autoShape.TextFrame.Paragraphs[0])

# Save the modified presentation to a file
presentation.SaveToFile("ModifiedFooter.pptx", FileFormat.Pptx2016)

# Release the resources of the Presentation object
presentation.Dispose()
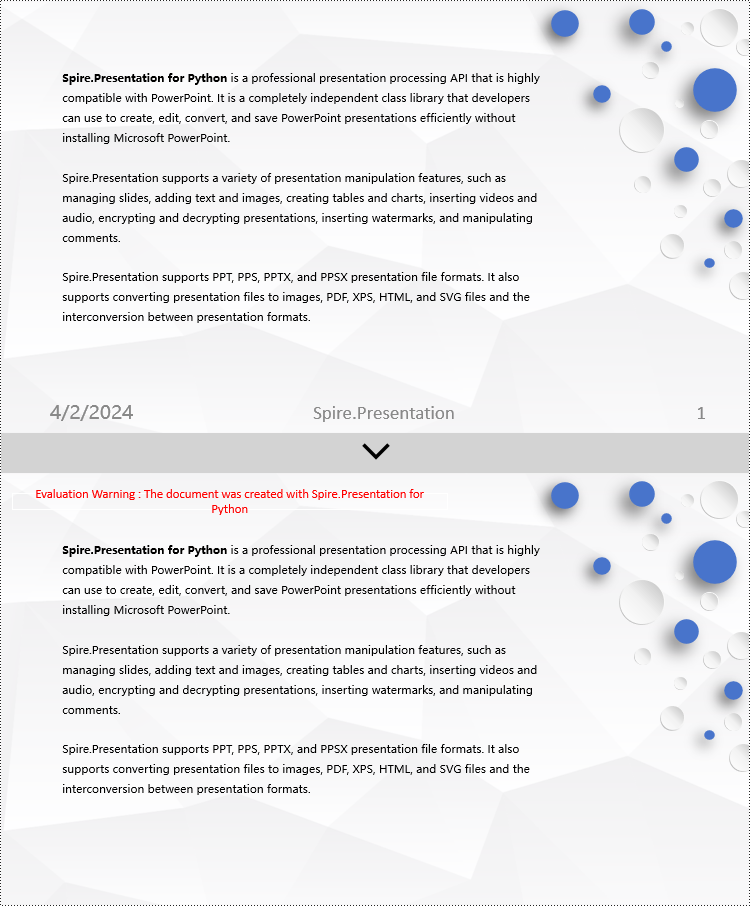
Python Remove Footers in PowerPoint Documents
To delete footers in a PowerPoint document, you first need to locate placeholders such as footers, page numbers, and time in the slides, and then remove them from the collection of shapes in the slide to ensure complete removal of footer content. Here are the detailed steps:
- Create a Presentation object.
- Load a PowerPoint document using the Presentation.LoadFromFile() method.
- Use the Presentation.Slides[index] property to retrieve a slide.
- Iterate through the shapes in the slide using a for loop, check if they are placeholders, and if they are footer placeholders, page number placeholders, or time placeholders, remove them from the slide.
- Save the document using the Presentation.SaveToFile() method.
- Python
from spire.presentation.common import *
from spire.presentation import *

# Create a Presentation object
presentation = Presentation()

# Load a presentation from a file
presentation.LoadFromFile("Sample2.pptx")

# Get the first slide
slide = presentation.Slides[0]

# Iterate through the shapes on the slide
for i in range(len(slide.Shapes) - 1, -1, -1):
    # Check if the shape is a placeholder
    if slide.Shapes[i].Placeholder is not None:
        # Get the placeholder type
        type = slide.Shapes[i].Placeholder.Type

        # If it is a footer placeholder
        if type == PlaceholderType.Footer:
            # Remove it from the slide
            slide.Shapes.RemoveAt(i)

        # If it is a slide number placeholder
        if type == PlaceholderType.SlideNumber:
            # Remove it from the slide
            slide.Shapes.RemoveAt(i)

        # If it is a date and time placeholder
        if type == PlaceholderType.DateAndTime:
            # Remove it from the slide
            slide.Shapes.RemoveAt(i)

# Save the modified presentation to a file
presentation.SaveToFile("RemovedFooter.pptx", FileFormat.Pptx2016)

# Release the resources of the Presentation object
presentation.Dispose()
Apply for a Temporary License
If you'd like to remove the evaluation message from the generated documents, or to get rid of the function limitations, please request a 30-day trial license for yourself.
The AutoFit feature in Microsoft Excel is a handy tool that allows you to automatically adjust the height of rows or the width of columns in an Excel spreadsheet to fit the content within them. This feature is particularly useful when you have data that may vary in length or when you want to ensure that all the content is visible without having to manually adjust the column widths or row heights. In this article, we will explain how to AutoFit rows and columns in Excel in Python using Spire.XLS for Python.
Install Spire.XLS for Python
This scenario requires Spire.XLS for Python and plum-dispatch v1.7.4. They can be easily installed in your Windows through the following pip command.
pip install Spire.XLS
If you are unsure how to install, please refer to this tutorial: How to Install Spire.XLS for Python on Windows
AutoFit a Specific Row and Column in Python
To AutoFit a specific row and column in an Excel worksheet, you can use the Worksheet.AutoFitRow() and Worksheet.AutoFitColumn() methods. The detailed steps are as follows.
- Create an object of the Workbook class.
- Load an Excel file using Workbook.LoadFromFile() method.
- Get a specific worksheet using Workbook.Worksheets[index] property.
- AutoFit a specific row and column in the worksheet by its index (1-based) using Worksheet.AutoFitRow(rowIndex) and Worksheet.AutoFitColumn(columnIndex) methods.
- Save the result file using Workbook.SaveToFile() method.
- Python
from spire.xls import *
from spire.xls.common import *

# Create an object of the Workbook class
workbook = Workbook()
# Load an Excel file
workbook.LoadFromFile("Sample.xlsx")

# Get the first worksheet
sheet = workbook.Worksheets[0]

# Automatically adjust the height of the 3rd row in the worksheet
sheet.AutoFitRow(3)
# Automatically adjust the width of the 4th column in the worksheet
sheet.AutoFitColumn(4)

# Save the resulting file
workbook.SaveToFile("AutoFitSpecificRowAndColumn.xlsx", ExcelVersion.Version2016)
workbook.Dispose()
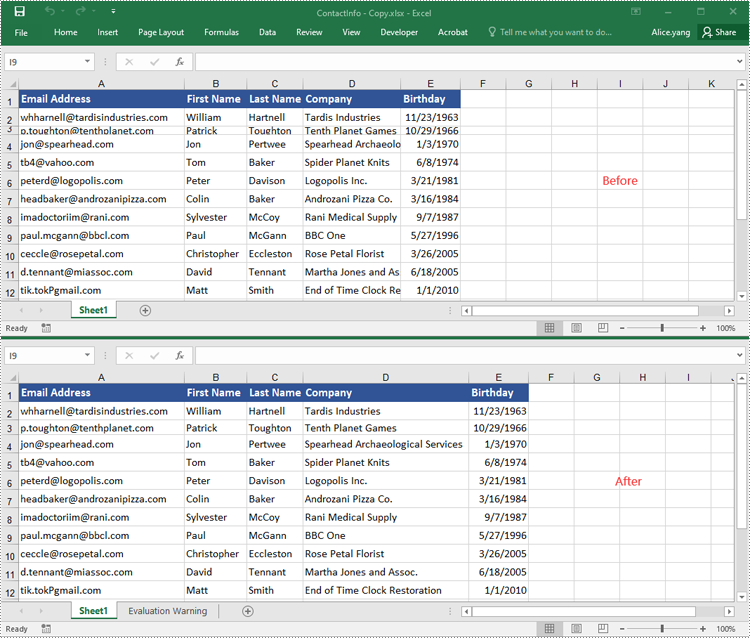
AutoFit Multiple Rows and Columns in Excel in Python
To AutoFit multiple rows and columns within a cell range, you can use the CellRange.AutoFitRows() and CellRange.AutoFitColumns() methods. The following are the detailed steps.
- Create an object of the Workbook class.
- Load an Excel file using Workbook.LoadFroFmFile() method.
- Get a specific worksheet using Workbook.Worksheets[index] property.
- Get a specific cell range in the worksheet using Worksheet.Range[] property.
- AutoFit the rows and columns in the cell range using CellRange.AutoFitRows() and CellRange.AutoFitColumns() methods.
- Save the result file using Workbook.SaveToFile() method.
- Python
from spire.xls import *
from spire.xls.common import *

# Create an object of the Workbook class
workbook = Workbook()
# Load an Excel file
workbook.LoadFromFile("Sample.xlsx")

# Get the first worksheet
sheet = workbook.Worksheets[0]

# Get a specific cell range in the worksheet
range = sheet.Range["A1:E14"]
# Or get the used cell range in the worksheet
# range = sheet.AllocatedRange

# Automatically adjust the heights of all rows in the cell range
range.AutoFitRows()
# Automatically adjust the widths of all columns in the cell range
range.AutoFitColumns()

# Save the resulting file
workbook.SaveToFile("AutoFitMultipleRowsAndColumns.xlsx", ExcelVersion.Version2016)
workbook.Dispose()
Apply for a Temporary License
If you'd like to remove the evaluation message from the generated documents, or to get rid of the function limitations, please request a 30-day trial license for yourself.
Text Alignment in Python | Left, Right, Center Align & More
2024-04-11 05:59:15 Written by hayes Liu
In the world of document automation, proper text alignment is crucial for creating professional, readable, and visually appealing documents. For developers and data professionals building reports, drafting letters, or designing invoices, mastering text alignment in Python is essential to producing polished, consistent documents without manual editing.
This guide delivers a step-by-step walkthrough on how to align text in Python using Spire.Doc for Python, a library that enables effortless control over Word document formatting.
- Why Choose Spire.Doc for Python to Align Text?
- Core Text Alignment Types in Spire.Doc
- Step-by-Step: Align Text in Word in Python
- FAQs About Python Text Alignment
- Conclusion
Why Choose Spire.Doc for Python to Align Text?
Before diving into code, let’s clarify why Spire.Doc is a top choice for text alignment tasks:
- Full Alignment Support: Natively supports all standard alignment types (Left, Right, Center, Justify) for paragraphs.
- No Microsoft Word Dependency: Runs independently - no need to install Word on your machine.
- High Compatibility: Works with .docx, .doc, and other Word formats, ensuring your aligned documents open correctly across devices.
- Fine-Grained Control: Adjust alignment for entire paragraphs or table cells.
Core Text Alignment Types in Spire.Doc
Spire.Doc uses the HorizontalAlignment enum to define text alignment. The most common values are:
- HorizontalAlignment.Left: Aligns text to the left margin (default).
- HorizontalAlignment.Right: Aligns text to the right margin.
- HorizontalAlignment.Center: Centers text horizontally between margins.
- HorizontalAlignment.Justify: Adjusts text spacing so both left and right edges align with margins.
- HorizontalAlignment.Distribute: Adjusts character spacing (adds space between letters) and word spacing to fill the line.
Below, we’ll cover how to programmatically set paragraph alignment (left, right, center, justified, and distributed) in Word using Python
Step-by-Step: Align Text in Word in Python
Here are the actionable steps to generate a Word document with 5 paragraphs, each using a different alignment style.
Step 1: Install Spire.Doc for Python
Open your terminal/command prompt, and then run the following command to install the latest version:
pip install Spire.Doc
Step 2: Import Required Modules
Import the core classes from Spire.Doc. These modules let you create documents, sections, paragraphs, and configure formatting:
from spire.doc import *
from spire.doc.common import *
Step 3: Create a New Word Document
Initialize a Document instance that represents your empty Word file:
# Create a Document instance
doc = Document()
Step 4: Add a Section to the Document
Word documents organize content into sections (each section can have its own margins, page size, etc.). We’ll add one section to hold our paragraphs:
# Add a section to the document
section = doc.AddSection()
Step 5: Add Paragraphs with Different Alignments
A section contains paragraphs, and each paragraph’s alignment is controlled via the HorizontalAlignment enum. We’ll create 5 paragraphs, one for each alignment type.
Left alignment is the default for most text (text aligns to the left margin).
# Left aligned text
paragraph1 = section.AddParagraph()
paragraph1.AppendText("This is left-aligned text.")
paragraph1.Format.HorizontalAlignment = HorizontalAlignment.Left
Right alignment is useful for dates, signatures, or page numbers (text aligns to the right margin).
# Right aligned text
paragraph2 = section.AddParagraph()
paragraph2.AppendText("This is right-aligned text.")
paragraph2.Format.HorizontalAlignment = HorizontalAlignment.Right
Center alignment works well for titles or headings (text centers between left and right margins). Use to center text in Python:
# Center aligned text
paragraph3 = section.AddParagraph()
paragraph3.AppendText("This is center-aligned text.")
paragraph3.Format.HorizontalAlignment = HorizontalAlignment.Center
Justified text aligns both left and right margins (spaces between words are adjusted for consistency). Ideal for formal documents like essays or reports.
# Justified
paragraph4 = section.AddParagraph()
paragraph4.AppendText("This is justified text.")
paragraph4.Format.HorizontalAlignment = HorizontalAlignment.Justify
Note: Justified alignment is more visible with longer text - short phrases may not show the spacing adjustment.
Distributed alignment is similar to justified, but evenly distributes single-line text (e.g., unevenly spaced words or short phrases).
# Distributed
Paragraph5 = section.AddParagraph()
Paragraph5.AppendText("This is evenly distributed text.")
Paragraph5.Format.HorizontalAlignment = HorizontalAlignment.Distribute
Step 6: Save and Close the Document
Finally, save the document to a specified path and close the Document instance to free resources:
# Save the document
document.SaveToFile("TextAlignment.docx", FileFormat.Docx2016)
# Close the document to release memory
document.Close()
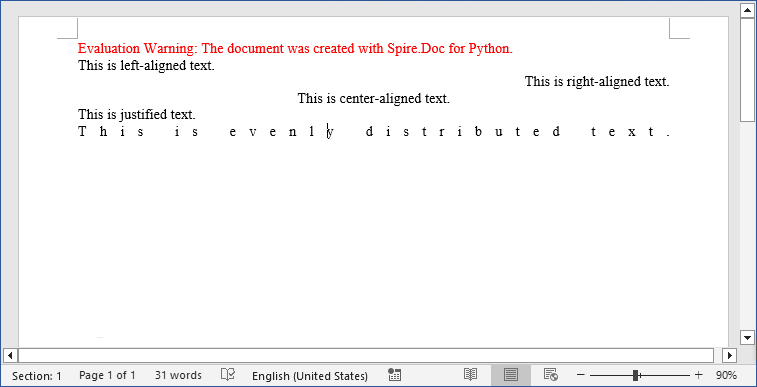
Output:
Pro Tip: Spire.Doc for Python also provides interfaces to align tables in Word or align text in table cells.
FAQs About Python Text Alignment
Q1: Is Spire.Doc for Python free?
A: Spire.Doc offers a free version with limitations. For full functionality, you can request a 30-day trial license here.
Q2: Can I set text alignment for existing Word documents
A: Yes. Spire.Doc lets you load existing documents and modify text alignment for specific paragraphs. Here’s a quick example:
from spire.doc import *

# Load an existing document
doc = Document()
doc.LoadFromFile("ExistingDocument.docx")

# Get the first section and first paragraph
section = doc.Sections[0]
paragraph = section.Paragraphs[0]

# Change alignment to center
paragraph.Format.HorizontalAlignment = HorizontalAlignment.Center

# Save the modified document
doc.SaveToFile("UpdatedDocument.docx", FileFormat.Docx2016)
doc.Close()
Q3: Can I apply different alignments to different parts of the same paragraph?
A: No. Text alignment is a paragraph-level setting in Word, not a character-level setting. This means all text within a single paragraph must share the same alignment (left, right, center, etc.).
If you need mixed alignment in the same line, you’ll need to use a table with invisible borders.
Q4: Can Spire.Doc for Python handle other text formatting?
A: Absolutely! Spire.Doc lets you combine alignment with other formatting like fonts, line spacing, bullet points, and more.
Conclusion
Automating Word text alignment with Python and Spire.Doc saves time, reduces human error, and ensures consistency across documents. The code example provided offers a clear template for implementing left, right, center, justified, and distributed alignment, and adapting it to your needs is as simple as modifying the text or adding more formatting rules.
Try experimenting with different alignment combinations, and explore Spire.Doc’s online documentation to unlock more formatting possibilities.
Python: Enable Track Changes, Accept or Reject Tracked Changes in Word
2024-04-07 01:31:37 Written by KoohjiTrack changes in Microsoft Word is a powerful feature that facilitates document collaboration and review processes. When track changes is enabled, any modifications made to the document, such as text additions or deletions, formatting changes, and comments, are visually highlighted. This makes it easier for document editors or collaborators to identify and review the changes made by themselves or others. In this article, we will explain how to enable track changes, as well as accept or reject the tracked changes in Word documents in Python using Spire.Doc for Python.
- Enable Track Changes in Word in Python
- Accept Tracked Changes in Word in Python
- Reject Tracked Changes in Word in Python
Install Spire.Doc for Python
This scenario requires Spire.Doc for Python and plum-dispatch v1.7.4. They can be easily installed in your Windows through the following pip commands.
pip install Spire.Doc
If you are unsure how to install, please refer to this tutorial: How to Install Spire.Doc for Python on Windows
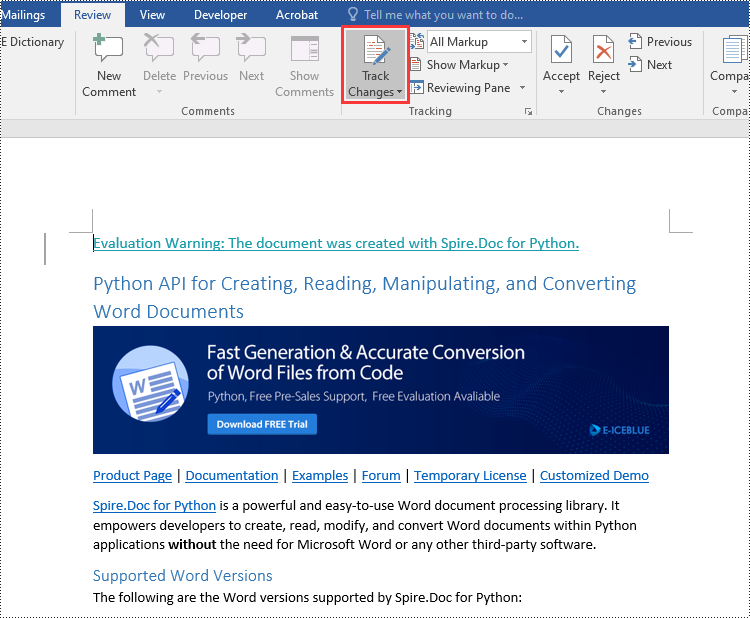
Enable Track Changes in Word in Python
Spire.Doc for Python offers the Document.TrackChanges property to enable the track changes mode for a Word document. The detailed steps are as follows.
- Create an object of the Document class.
- Load a Word document using Document.LoadFromFile() method.
- Enable the track changes mode for the document by setting the Document.TrackChanges property to True.
- Save the result document using Document.SaveToFile() method.
- Python
from spire.doc import *
from spire.doc.common import *

# Create an object of the Document class
doc = Document()
# Load a Word document
doc.LoadFromFile("Sample.docx")

# Enable the track changes mode for the document
doc.TrackChanges = True

# Save the result document
doc.SaveToFile("EnableTrackChanges.docx", FileFormat.Docx2016)
doc.Close()
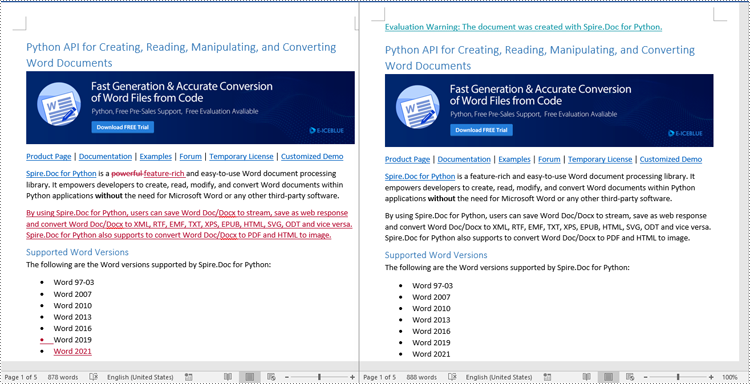
Accept Tracked Changes in Word in Python
Accepting tracked changes allows you to incorporate the suggested modifications permanently into the document. By using the Document.AcceptChanges() method provided by Spire.Doc for Python, you can easily accept all tracked changes in a Word document. The detailed steps are as follows.
- Create an object of the Document class.
- Load a Word document using Document.LoadFromFile() method.
- Check if the document has tracked changes using Document.HasChanges property.
- Accept the tracked changes in the document using Document.AcceptChanges() method.
- Save the result document using Document.SaveToFile() method.
- Python
from spire.doc import *
from spire.doc.common import *

# Create an object of the Document class
doc = Document()
# Load a Word document
doc.LoadFromFile("Sample.docx")

# Check if the document has tracked changes
if(doc.HasChanges):
    # Accept the tracked changes in the document
    doc.AcceptChanges()

# Save the result document
doc.SaveToFile("AcceptChanges.docx", FileFormat.Docx2016)
doc.Close()
Reject Tracked Changes in Word in Python
Sometimes, suggested modifications may not align with your vision or requirements for the document. In such cases, rejecting these changes becomes essential to ensure that the document accurately reflects your intended content and formatting choices.
Spire.Doc for Python offers the Document.RejectChanges() method to reject the tracked changes in a Word document. The detailed steps are as follows.
- Create an object of the Document class.
- Load a Word document using Document.LoadFromFile() method.
- Check if the document has tracked changes using Document.HasChanges property.
- Reject the tracked changes in the document using Document.RejectChanges() method.
- Save the result document using Document.SaveToFile() method.
- Python
from spire.doc import *
from spire.doc.common import *

# Create an object of the Document class
doc = Document()
# Load a Word document
doc.LoadFromFile("Sample.docx")

# Check if the document has tracked changes
if(doc.HasChanges):
    # Reject the tracked changes in the document
    doc.RejectChanges()

# Save the result document
doc.SaveToFile("RejectChanges.docx", FileFormat.Docx2016)
doc.Close()
Apply for a Temporary License
If you'd like to remove the evaluation message from the generated documents, or to get rid of the function limitations, please request a 30-day trial license for yourself.
PDF files often contain bookmarks, which are clickable links that make navigating lengthy documents easier. Extracting these bookmarks can be beneficial for creating an outline of the document, analyzing document structure, or identifying key topics or sections. In this article, you will learn how to extract PDF bookmarks with Python using Spire.PDF for Python.
Install Spire.PDF for Python
This scenario requires Spire.PDF for Python and plum-dispatch v1.7.4. They can be easily installed in your Windows through the following pip command.
pip install Spire.PDF
If you are unsure how to install, please refer to this tutorial: How to Install Spire.PDF for Python on Windows
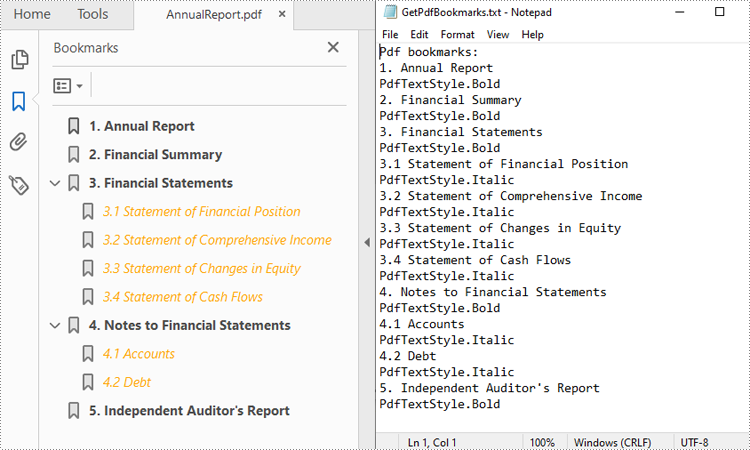
Extract Bookmarks from PDF Using Python
With Spire.PDF for Python, you can create custom methods GetBookmarks() and GetChildBookmark() to get the title and text styles of both parent and child bookmarks in a PDF file, then export them to a TXT file. The following are the detailed steps.
- Create a PdfDocument instance.
- Load a PDF file using PdfDocument.LoadFromFile() method.
- Get bookmarks collection in the PDF file using PdfDocument.Bookmarks property.
- Call custom methods GetBookmarks() and GetChildBookmark() to get the text content and text style of parent and child bookmarks.
- Export the extracted PDF bookmarks to a TXT file.
- Python
from spire.pdf.common import *
from spire.pdf import *

inputFile = "AnnualReport.pdf"
result = "GetPdfBookmarks.txt"

def GetChildBookmark(parentBookmark, content):
    if parentBookmark.Count > 0:
        # Iterate through each child bookmark in the parent bookmarks
        for i in range(parentBookmark.Count):
            childBookmark = parentBookmark.get_Item(i)
            # Get the title
            content.append(childBookmark.Title)
            # Get the text style
            textStyle = str(childBookmark.DisplayStyle)
            content.append(textStyle)
            cldBk = PdfBookmarkCollection(childBookmark)
            GetChildBookmark(cldBk, content)

def GetBookmarks(bookmarks, result):
    # Create an object of StringBuilder
    content = []
    # Get PDF bookmarks information
    if bookmarks.Count > 0:
        content.append("Pdf bookmarks:")
        # Iterate through each parent bookmark
        for i in range(bookmarks.Count):
            parentBookmark = bookmarks.get_Item(i)
            # Get the title
            content.append(parentBookmark.Title)
            # Get the text style
            textStyle = str(parentBookmark.DisplayStyle)
            content.append(textStyle)
            cldBk = PdfBookmarkCollection(parentBookmark)
            GetChildBookmark(cldBk, content)

    # Save to a TXT file
    with open(result, "w") as file:
        file.write("\n".join(content))

# Create a PdfDocument instance
pdf = PdfDocument()

# Load a PDF file from disk.
pdf.LoadFromFile(inputFile)

# Get bookmarks collection of the PDF file
bookmarks = pdf.Bookmarks

# Get the contents of bookmarks and save them to a TXT file
GetBookmarks(bookmarks, result)
pdf.Close()
Apply for a Temporary License
If you'd like to remove the evaluation message from the generated documents, or to get rid of the function limitations, please request a 30-day trial license for yourself.
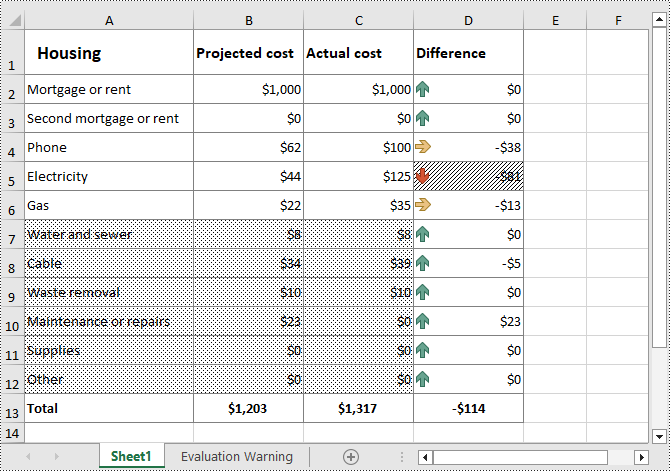
Excel is a powerful tool for organizing and analyzing data, but the default black-and-white spreadsheet can make it difficult to interpret information at a glance. By adding fill colors, gradients, or patterns to specific cells, you can highlight important data, separate different categories of information, and make the spreadsheet more visually appealing. In this article, you will learn how to set a fill color, gradient or pattern in Excel cells using Spire.XLS for Python.
- Add Fill Color to Excel Cells with Python
- Add Gradient Fill to Excel Cells with Python
- Add Fill Pattern to Excel Cells with Python
Install Spire.XLS for Python
This scenario requires Spire.XLS for Python and plum-dispatch v1.7.4. They can be easily installed in your Windows through the following pip command.
pip install Spire.XLS
If you are unsure how to install, please refer to this tutorial: How to Install Spire.XLS for Python on Windows
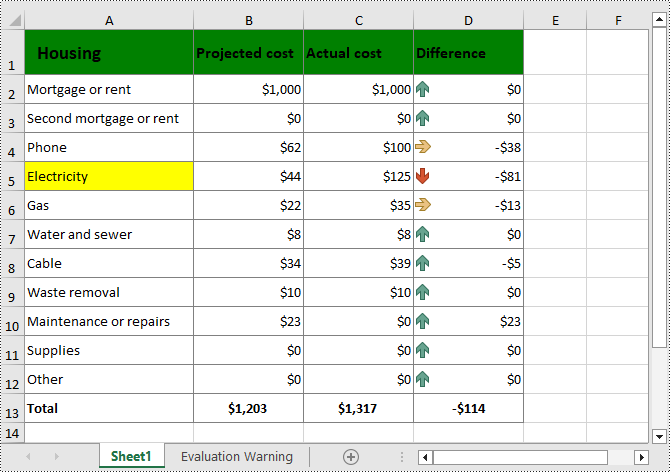
Add Fill Color to Excel Cells with Python
The CellRange.Style.Color property provided by Spire.XLS for Python allows to add a solid background color to Excel cells. The following are detailed steps.
- Create a Workbook instance.
- Load a sample Excel file using Workbook.LoadFromFile() method.
- Get a specified worksheet using Workbook.Worksheets[] property.
- Get a specified cell or cell range using Worksheet.Range[] property.
- Add a background color to the cells using CellRange.Style.Color property.
- Save the result file using Workbook.SaveToFile() method.
- Python
from spire.xls import *
from spire.xls.common import *

inputFile = "Cost.xlsx"
outputFile = "CellFillColor.xlsx"

# Create a Workbook instance
workbook = Workbook()

# Load an Excel file from disk
workbook.LoadFromFile(inputFile)

# Get the first worksheet
worksheet = workbook.Worksheets[0]

# Set fill color for a cell or cell range
worksheet.Range["A1:D1"].Style.Color = Color.get_Green()
worksheet.Range["A5"].Style.Color = Color.get_Yellow()

# Save the result file
workbook.SaveToFile(outputFile, ExcelVersion.Version2016)
workbook.Dispose()
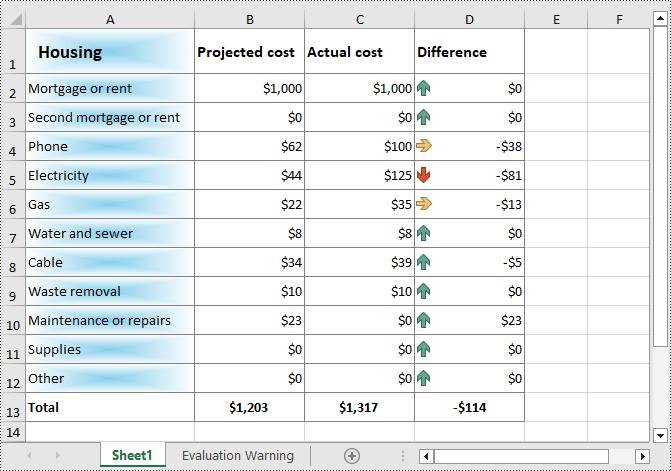
Add Gradient Fill to Excel Cells with Python
To apply gradient fill in Excel, you first need to set the cell fill pattern type to gradient, and then specify two colors and the shading style of the gradient fill. The following are detailed steps.
- Create a Workbook instance.
- Load a sample Excel file using Workbook.LoadFromFile() method.
- Get a specified worksheet using Workbook.Worksheets[] property.
- Get the cell style of a specified cell or cell range using Worksheet.Range[].Style property.
- Get the interior cell style using CellStyle.Interior property.
- Set cell fill effect to gradient through ExcelInterior.FillPattern property.
- Set the background and foreground colors of the gradient fill using ExcelInterior.Gradient.BackColor and ExcelInterior.Gradient.ForeColor properties.
- Set the gradient shading style using ExcelInterior.Gradient.GradientStyle property.
- Save the result file using Workbook.SaveToFile() method.
- Python
from spire.xls import *
from spire.xls.common import *

inputFile = "Cost.xlsx"
outputFile = "CellGradientFill.xlsx"

# Create a Workbook instance
workbook = Workbook()

# Load an Excel file from disk
workbook.LoadFromFile(inputFile)

# Get the first worksheet
worksheet = workbook.Worksheets[0]

# Get the cell style of a specified range
cellStyle = worksheet.Range["A1:A12"].Style

# Set cell fill pattern type to gradient
cellStyle.Interior.FillPattern  = ExcelPatternType.Gradient

# Set the background and foreground colors of the gradient fill
cellStyle.Interior.Gradient.BackColor = Color.get_SkyBlue()
cellStyle.Interior.Gradient.ForeColor = Color.get_White()

# Set the gradient shading style
cellStyle.Interior.Gradient.GradientStyle = GradientStyleType.From_Center

# Save the result file
workbook.SaveToFile(outputFile, ExcelVersion.Version2016)
workbook.Dispose()
Add Fill Pattern to Excel Cells with Python
You can also add predefined patterns such as different styles of stripes, dots, and crosshatch to specific cells through the CellRange.Style.FillPattern property. The following are the detailed steps:
- Create a Workbook instance.
- Load a sample Excel file using Workbook.LoadFromFile() method.
- Get a specified worksheet using Workbook.Worksheets[] property.
- Get a specified cell or cell range using Worksheet.Range[] property.
- Add a background pattern to the cells using CellRange.Style.FillPattern property.
- Save the result file using Workbook.SaveToFile() method.
- Python
from spire.xls import *
from spire.xls.common import *

inputFile = "Cost.xlsx"
outputFile = "CellFillPattern.xlsx"

# Create a Workbook instance
workbook = Workbook()

# Load an Excel file from disk
workbook.LoadFromFile(inputFile)

# Get the first worksheet
worksheet = workbook.Worksheets[0]

#Set cell fill pattern for a cell or cell range
worksheet.Range["A7:C12"].Style.FillPattern = ExcelPatternType.Percent125Gray
worksheet.Range["D5"].Style.FillPattern = ExcelPatternType.ThinDiagonalStripe

# Save the result file
workbook.SaveToFile(outputFile, ExcelVersion.Version2016)
workbook.Dispose()
Apply for a Temporary License
If you'd like to remove the evaluation message from the generated documents, or to get rid of the function limitations, please request a 30-day trial license for yourself.
Slide titles play a crucial role in PowerPoint presentations because they can assist the audience in quickly grasping the topics or key points of each slide. When working with PowerPoint documents, users often encounter the need to update or extract slide titles for various purposes. For example, they may need to modify titles to reflect new content or extract titles to perform tasks such as summarizing or analyzing presentation content. Knowing how to programmatically update or extract slide titles can greatly save time and effort, particularly when dealing with extensive presentations. In this article, we will demonstrate how to update and extract slide titles in PowerPoint PPTX or PPT documents in Python using Spire.Presentation for Python.
Install Spire.Presentation for Python
This scenario requires Spire.Presentation for Python and plum-dispatch v1.7.4. They can be easily installed in your Windows through the following pip command.
pip install Spire.Presentation
If you are unsure how to install, please refer to this tutorial: How to Install Spire.Presentation for Python on Windows
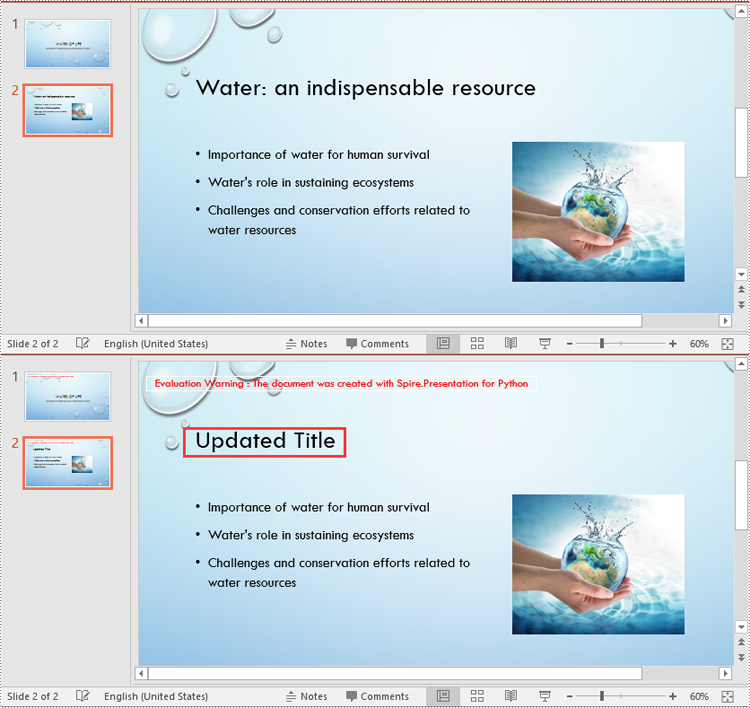
Update Slide Titles in PowerPoint in Python
The title of a slide can be updated using the ISlide.Title property. The detailed steps are as follows.
- Create a Presentation instance.
- Load a PowerPoint PPTX or PPT document using Presentation.LoadFromFile() method.
- Get a specific slide of the document using Presentation.Slides[index] property.
- Update the title of the slide using ISlide.Title property.
- Save the result document using Presentation.SaveToFile() method.
- Python
from spire.presentation.common import *
from spire.presentation import *

# Create a Presentation object
ppt = Presentation()
# Load a PowerPoint document
ppt.LoadFromFile("Water Of Life.pptx")

# Get the second slide
slide = ppt.Slides[1]

# Update the title of the second slide
slide.Title = "Updated Title"

# Save the result document
ppt.SaveToFile("UpdateSlideTitle.pptx", FileFormat.Pptx2016)
ppt.Dispose()
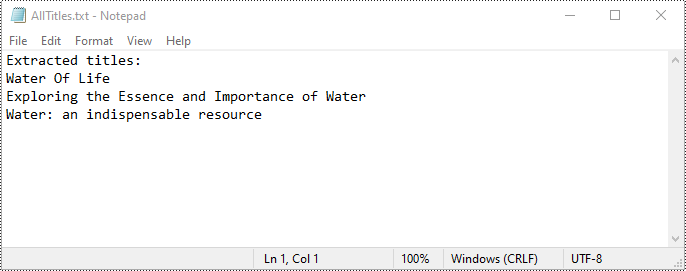
Extract All Slide Titles from PowerPoint in Python
To extract all slide titles from a PowerPoint document, you first need to iterate through all slides in the document and all shapes on each slide. Then identify shapes with placeholder types like Title, CenteredTitle, or Subtitle. After that retrieve the text content from the identified shapes using the IAutoShape.TextFrame.Text property. The detailed steps are as follows.
- Create a Presentation instance.
- Load a PowerPoint PPTX or PPT document using Presentation.LoadFromFile() method.
- Create a list to store the extracted titles.
- Iterate through all slides in the document.
- For each slide, iterate through all shapes on it.
- Identify shapes with placeholder types such as Title, CenteredTitle, or Subtitle.
- Typecast the identified shapes to IAutoShape object.
- Retrieve the text content of the identified shapes using the IAutoShape.TextFrame.Text property and append them to the list.
- Save the content of the list to a text file.
- Python
from spire.presentation.common import *
from spire.presentation import *

# Load a PowerPoint document
ppt = Presentation()
ppt.LoadFromFile("Water of Life.pptx")

# Create a list to store the extracted slide titles
titles = []

# Iterate through all slides in the document
for slide in ppt.Slides:
    # Iterate through all shapes on each slide
    for shape in slide.Shapes:
        # Find the shapes with placeholder types such as Title, CenteredTitle, or Subtitle
        if shape.Placeholder is not None and shape.Placeholder.Type in [PlaceholderType.Title, PlaceholderType.CenteredTitle, PlaceholderType.Subtitle]:
            # Typecast the shape to IautoShape object
            auto_shape = shape if isinstance(shape, IAutoShape) else None
            if auto_shape is not None:
                # Add the text of the shape to the titles list
                titles.append(auto_shape.TextFrame.Text)

# Save the extracted slide titles to a text file
with open("AllTitles.txt", "w") as file:
    file.write("Extracted titles:\n")
    file.write("\n".join(titles))

ppt.Dispose()
Apply for a Temporary License
If you'd like to remove the evaluation message from the generated documents, or to get rid of the function limitations, please request a 30-day trial license for yourself.
