
Python (365)
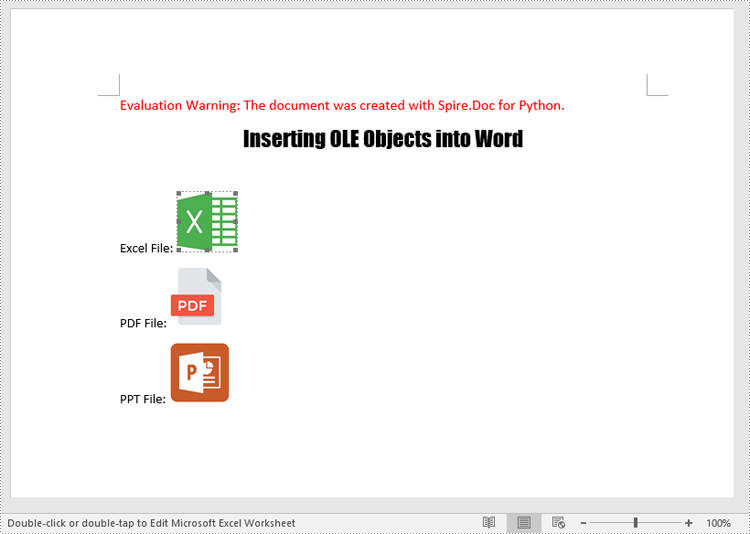
OLE (Object Linking and Embedding) objects in Word are files or data from other applications that can be inserted into a document. These objects can be edited and updated within Word, allowing you to seamlessly integrate content from various programs, such as Excel spreadsheets, PowerPoint presentations, or even multimedia files like images, audio, or video. In this article, we will introduce how to insert and extract OLE objects in a Word document in Python using Spire.Doc for Python.
Install Spire.Doc for Python
This scenario requires Spire.Doc for Python and plum-dispatch v1.7.4. They can be easily installed in your Windows through the following pip command.
pip install Spire.Doc
If you are unsure how to install, please refer to this tutorial: How to Install Spire.Doc for Python on Windows
Insert OLE Objects in Word in Python
Spire.Doc for Python provides the Paragraph.AppendOleObject(pathToFile:str, olePicture:DocPicture, type:OleObjectType) method to embed OLE objects in a Word document. The detailed steps are as follows.
- Create an object of the Document class.
- Load a Word document using the Document.LoadFromFile() method.
- Get a specific section using the Document.Sections.get_Item(index) method.
- Add a paragraph to the section using the Section.AddParagraph() method.
- Create an object of the DocPicture class.
- Load an image that will be used as the icon of the OLE object using the DocPicture.LoadImage() method and then set image width and height.
- Append an OLE object to the paragraph using the Paragraph.AppendOleObject(pathToFile:str, olePicture:DocPicture, type:OleObjectType) method.
- Save the result file using the Document.SaveToFile() method.
The following code example shows how to embed an Excel spreadsheet, a PDF file, and a PowerPoint presentation in a Word document using Spire.Doc for Python:
- Python
from spire.doc import *
from spire.doc.common import *

# Create an object of the Document class
doc = Document()
# Load a Word document
doc.LoadFromFile("Example.docx")

# Get the first section
section = doc.Sections.get_Item(0)

# Add a paragraph to the section
para1 = section.AddParagraph()
para1.AppendText("Excel File: ")
# Load an image which will be used as the icon of the OLE object
picture1 = DocPicture(doc)
picture1.LoadImage("Excel-Icon.png")
picture1.Width = 50
picture1.Height = 50
# Append an OLE object (an Excel spreadsheet) to the paragraph
para1.AppendOleObject("Budget.xlsx", picture1, OleObjectType.ExcelWorksheet)

# Add a paragraph to the section
para2 = section.AddParagraph()
para2.AppendText("PDF File: ")
# Load an image which will be used as the icon of the OLE object
picture2 = DocPicture(doc)
picture2.LoadImage("PDF-Icon.png")
picture2.Width = 50
picture2.Height = 50
# Append an OLE object (a PDF file) to the paragraph
para2.AppendOleObject("Report.pdf", picture2, OleObjectType.AdobeAcrobatDocument)

# Add a paragraph to the section
para3 = section.AddParagraph()
para3.AppendText("PPT File: ")
# Load an image which will be used as the icon of the OLE object
picture3 = DocPicture(doc)
picture3.LoadImage("PPT-Icon.png")
picture3.Width = 50
picture3.Height = 50
# Append an OLE object (a PowerPoint presentation) to the paragraph
para3.AppendOleObject("Plan.pptx", picture3, OleObjectType.PowerPointPresentation)

doc.SaveToFile("InsertOLE.docx", FileFormat.Docx2013)
doc.Close()
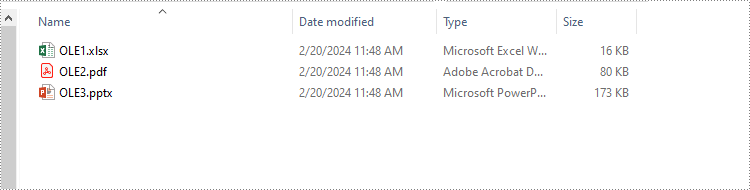
Extract OLE Objects from Word in Python
To extract OLE objects from a Word document, you first need to locate the OLE objects within the document. Once located, you can determine the file format of each OLE object. Finally, you can save the data of each OLE object to a file in its native file format. The detailed steps are as follows.
- Create an instance of the Document class.
- Load a Word document using the Document.LoadFromFile() method.
- Iterate through all sections of the document.
- Iterate through all child objects in the body of each section.
- Identify the paragraphs within each section.
- Iterate through the child objects in each paragraph.
- Locate the OLE object within the paragraph.
- Determine the file format of the OLE object.
- Save the data of the OLE object to a file in its native file format.
The following code example shows how to extract the embedded Excel spreadsheet, PDF file, and PowerPoint presentation from a Word document using Spire.Doc for Python:
- Python
from spire.doc import *
from spire.doc.common import *

# Create an object of the Document class
doc = Document()
# Load a Word document
doc.LoadFromFile("InsertOLE.docx")

i = 1
# Iterate through all sections of the Word document
for k in range(doc.Sections.Count):
    sec = doc.Sections.get_Item(k)
    # Iterate through all child objects in the body of each section
    for j in range(sec.Body.ChildObjects.Count):
        obj = sec.Body.ChildObjects.get_Item(j)
        # Check if the child object is a paragraph
        if isinstance(obj, Paragraph):
            par = obj if isinstance(obj, Paragraph) else None
            # Iterate through the child objects in the paragraph
            for m in range(par.ChildObjects.Count):
                o = par.ChildObjects.get_Item(m)
                # Check if the child object is an OLE object
                if o.DocumentObjectType == DocumentObjectType.OleObject:
                    ole = o if isinstance(o, DocOleObject) else None
                    s = ole.ObjectType
                    # Check if the OLE object is a PDF file
                    if s.startswith("AcroExch.Document"):
                        ext = ".pdf"
                    # Check if the OLE object is an Excel spreadsheet
                    elif s.startswith("Excel.Sheet"):
                        ext = ".xlsx"
                    # Check if the OLE object is a PowerPoint presentation
                    elif s.startswith("PowerPoint.Show"):
                        ext = ".pptx"
                    else:
                        continue
                    # Write the data of OLE into a file in its native format
                    with open(f"Output/OLE{i}{ext}", "wb") as file:
                            file.write(ole.NativeData)
                    i += 1

doc.Close()
Apply for a Temporary License
If you'd like to remove the evaluation message from the generated documents, or to get rid of the function limitations, please request a 30-day trial license for yourself.
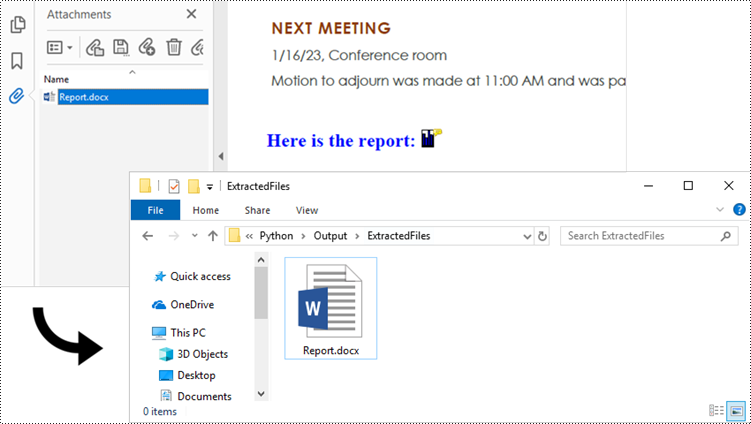
In addition to text and images, PDF files can also contain various types of attachments, such as documents, images, audio files, or other multimedia elements. Extracting attachments from PDF files allows users to retrieve and save the embedded content, enabling easy access and manipulation outside of the PDF environment. This process proves especially useful when dealing with PDFs that contain important supplementary materials, such as reports, spreadsheets, or legal documents.
In this article, you will learn how to extract attachments from a PDF document in Python using Spire.PDF for Python.
- Extract Document-Level Attachments from PDF in Python
- Extract Annotation Attachments from PDF in Python
Install Spire.PDF for Python
This scenario requires Spire.PDF for Python and plum-dispatch v1.7.4. They can be easily installed in your Windows through the following pip command.
pip install Spire.PDF
If you are unsure how to install, please refer to this tutorial: How to Install Spire.PDF for Python on Windows
Prerequisite Knowledge
There are generally two categories of attachments in PDF files: document-level attachments and annotation attachments. Below, you can find a table outlining the disparities between these two types of attachments and how they are represented in Spire.PDF.
| Attachment type | Represented by | Definition |
| Document level attachment | PdfAttachment class | A file attached to a PDF at the document level won't appear on a page, but can be viewed in the "Attachments" panel of a PDF reader. |
| Annotation attachment | PdfAnnotationAttachment class | A file attached as an annotation can be found on a page or in the "Attachments" panel. An annotation attachment is shown as a paper clip icon on the page; reviewers can double-click the icon to open the file. |
Extract Document-Level Attachments from PDF in Python
To retrieve document-level attachments in a PDF document, you can use the PdfDocument.Attachments property. Each attachment has a PdfAttachment.FileName property, which provides the name of the specific attachment, including the file extension. Additionally, the PdfAttachment.Data property allows you to access the attachment's data. To save the attachment to a specific folder, you can utilize the PdfAttachment.Data.Save() method.
The steps to extract document-level attachments from a PDF using Python are as follows.
- Create a PdfDocument object.
- Load a PDF file using PdfDocument.LoadFromFile() method.
- Get a collection of attachments using PdfDocument.Attachments property.
- Iterate through the attachments in the collection.
- Get a specific attachment from the collection, and get the file name and data of the attachment using PdfAttachment.FileName property and PdfAttachment.Data property.
- Save the attachment to a specified folder using PdfAttachment.Data.Save() method.
- Python
from spire.pdf import *
from spire.pdf.common import *

# Create a PdfDocument object
doc = PdfDocument()

# Load a PDF file
doc.LoadFromFile("C:\\Users\\Administrator\\Desktop\\Attachments.pdf")

# Get the attachment collection from the document
collection = doc.Attachments

# Loop through the collection
if collection.Count > 0:
    for i in range(collection.Count):

        # Get a specific attachment
        attactment = collection.get_Item(i)

        # Get the file name and data of the attachment
        fileName= attactment.FileName
        data = attactment.Data

        # Save it to a specified folder
        data.Save("Output\\ExtractedFiles\\" + fileName)

doc.Close()

Extract Annotation Attachments from PDF in Python
The Annotations attachment is a page-based element. To retrieve annotations from a specific page, use the PdfPageBase.AnnotationsWidget property. You then need to determine if a particular annotation is an attachment. If it is, save it to the specified folder while retaining its original filename.
The following are the steps to extract annotation attachments from a PDF using Python.
- Create a PdfDocument object.
- Load a PDF file using PdfDocument.LoadFromFile() method.
- Iterate though the pages in the document.
- Get the annotations from a particular page using PdfPageBase.AnnotationsWidget property.
- Iterate though the annotations, and determine if a specific annotation is an attachment annotation.
- If it is, get the file name and data of the annotation using PdfAttachmentAnnotation.FileName property and PdfAttachmentAnnotation.Data property.
- Save the annotated attachment to a specified folder.
- Python
from spire.pdf import *
from spire.pdf.common import *

# Create a PdfDocument object
doc = PdfDocument()

# Load a PDF file
doc.LoadFromFile("C:\\Users\\Administrator\\Desktop\\AnnotationAttachment.pdf")

# Iterate through the pages in the document
for i in range(doc.Pages.Count):

    # Get a specific page
    page = doc.Pages.get_Item(i)

    # Get the annotation collection of the page
    annotationCollection = page.AnnotationsWidget

    # If the page has annotations
    if annotationCollection.Count > 0:

        # Iterate through the annotations
        for j in range(annotationCollection.Count):

            # Get a specific annotation
            annotation = annotationCollection.get_Item(j)

            # Determine if the annotation is an attachment annotation
            if isinstance(annotation, PdfAttachmentAnnotationWidget):

                # Get the file name and data of the attachment
                fileName = annotation.FileName
                byteData = annotation.Data
                streamMs = Stream(byteData)

                # Save the attachment into a specified folder
                streamMs.Save("Output\\ExtractedFiles\\" + fileName)
Apply for a Temporary License
If you'd like to remove the evaluation message from the generated documents, or to get rid of the function limitations, please request a 30-day trial license for yourself.
Shapes play a vital role in PDF documents. By drawing graphics, defining outlines, filling colors, setting border styles, and applying geometric transformations, shapes provide rich visual effects and design options for documents. The properties of shapes such as color, line type, and fill effects can be customized according to requirements to meet personalized design needs. They can be used to create charts, decorations, logos, and other elements that enhance the readability and appeal of the document. This article will introduce how to use Spire.PDF for Python to draw shapes into PDF documents from Python.
- Draw Lines in PDF Documents in Python
- Draw Pies in PDF Documents in Python
- Draw Rectangles in PDF Documents in Python
- Draw Ellipses in PDF Documents in Python
Install Spire.PDF for Python
This scenario requires Spire.PDF for Python and plum-dispatch v1.7.4. They can be easily installed in your Windows through the following pip command.
pip install Spire.PDF
If you are unsure how to install, please refer to this tutorial: How to Install Spire.PDF for Python on Windows
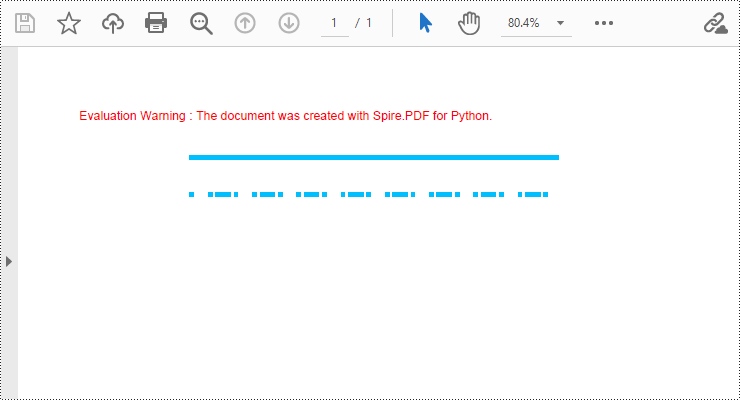
Draw Lines in PDF Documents in Python
Spire.PDF for Python provides the PdfPageBase.Canvas.DrawLine() method to draw lines by specifying the coordinates of the starting point and end point and a brush object. Here is a detailed step-by-step guide on how to draw lines:
- Create a PdfDocument object.
- Use the PdfDocument.Pages.Add() method to add a blank page to the PDF document.
- Save the current drawing state using the PdfPageBase.Canvas.Save() method so it can be restored later.
- Define the start point coordinate (x, y) and the length of a solid line segment.
- Create a PdfPen object.
- Draw a solid line segment using the PdfPageBase.Canvas.DrawLine() method with the previously created pen object.
- Set the DashStyle property of the pen to PdfDashStyle.Dash to create a dashed line style.
- Draw a dashed line segment using the pen with a dashed line style via the PdfPageBase.Canvas.DrawLine() method.
- Restore the previous drawing state using the PdfPageBase.Canvas.Restore(state) method.
- Save the document to a file using the PdfDocument.SaveToFile() method.
- Python
from spire.pdf.common import *
from spire.pdf import *

# Create PDF Document Object
doc = PdfDocument()

# Add a Page
page = doc.Pages.Add()

# Save the current drawing state
state = page.Canvas.Save()

# The starting X coordinate of the line
x = 100.0

# The starting Y coordinate of the line
y = 50.0

# The length of the line
width = 300.0

# Create a pen object with deep sky blue color and a line width of 3.0
pen = PdfPen(PdfRGBColor(Color.get_DeepSkyBlue()), 3.0)

# Draw a solid line
page.Canvas.DrawLine(pen, x, y, x + width, y)

# Set the pen style to dashed
pen.DashStyle = PdfDashStyle.Dash

# Set the dashed pattern to [1, 4, 1]
pen.DashPattern = [1, 4, 1]

# The Y coordinate for the start of the dashed line
y = 80.0

# Draw a dashed line
page.Canvas.DrawLine(pen, x, y, x + width, y)

# Restore the previously saved drawing state
page.Canvas.Restore(state)

# Save the document to a file
doc.SaveToFile("Drawing Lines.pdf")

# Close the document and release resources
doc.Close()
doc.Dispose()
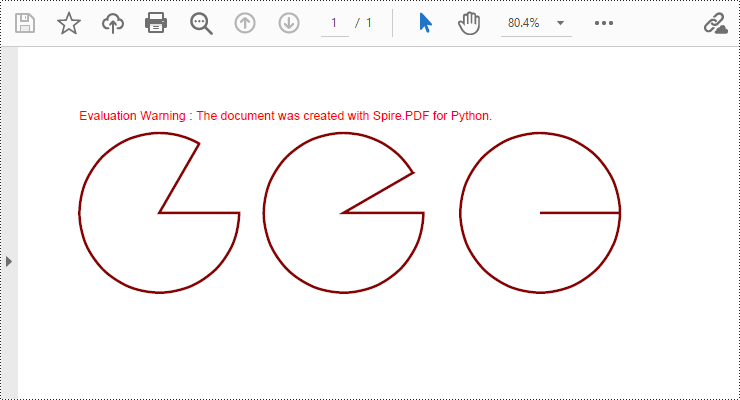
Draw Pies in PDF Documents in Python
To draw pie charts with different positions, sizes, and angles on a specified page, call the PdfPageBase.Canvas.DrawPie() method and pass appropriate parameters. The detailed steps are as follows:
- Create a PdfDocument object.
- Add a blank page to the PDF document using the PdfDocument.Pages.Add() method.
- Save the current drawing state using the PdfPageBase.Canvas.Save() method so it can be restored later.
- Create a PdfPen object.
- Call the PdfPageBase.Canvas.DrawPie() method and pass various position, size, and angle parameters to draw three pie charts.
- Restore the previous drawing state using the PdfPageBase.Canvas.Restore(state) method.
- Save the document to a file using the PdfDocument.SaveToFile() method.
- Python
from spire.pdf.common import *
from spire.pdf import *

# Create PDF Document Object
doc = PdfDocument()

# Add a Page
page = doc.Pages.Add()

# Save the current drawing state
state = page.Canvas.Save()

# Create a pen object with dark red color and a line width of 2.0
pen = PdfPen(PdfRGBColor(Color.get_DarkRed()), 2.0)

# Draw the first pie chart
page.Canvas.DrawPie(pen, 10.0, 30.0, 130.0, 130.0, 360.0, 300.0)

# Draw the second pie chart
page.Canvas.DrawPie(pen, 160.0, 30.0, 130.0, 130.0, 360.0, 330.0)

# Draw the third pie chart
page.Canvas.DrawPie(pen, 320.0, 30.0, 130.0, 130.0, 360.0, 360.0)

# Restore the previously saved drawing state
page.Canvas.Restore(state)

# Save the document to a file
doc.SaveToFile("Drawing Pie Charts.pdf")

# Close the document and release resources
doc.Close()
doc.Dispose()
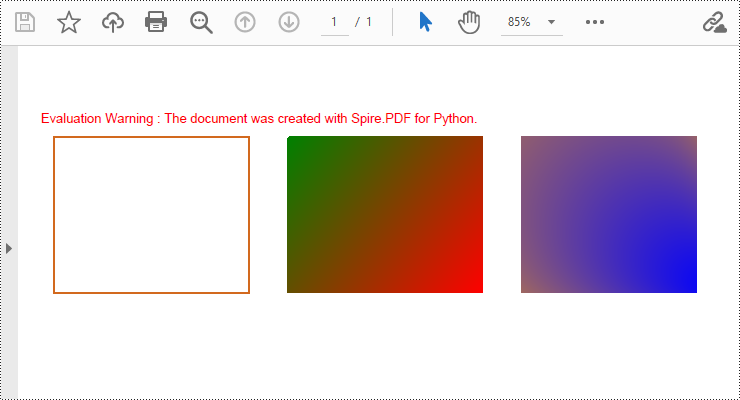
Draw Rectangles in PDF Documents in Python
Spire.PDF for Python provides the PdfPageBase.Canvas.DrawRectangle() method to draw rectangular shapes. By passing position and size parameters, you can define the position and dimensions of the rectangle. Here are the detailed steps for drawing a rectangle:
- Create a PdfDocument object.
- Use the PdfDocument.Pages.Add() method to add a blank page to the PDF document.
- Use the PdfPageBase.Canvas.Save() method to save the current drawing state for later restoration.
- Create a PdfPen object.
- Use the PdfPageBase.Canvas.DrawRectangle() method with the pen to draw the outline of a rectangle.
- Create a PdfLinearGradientBrush object for linear gradient filling.
- Use the PdfPageBase.Canvas.DrawRectangle() method with the linear gradient brush to draw a filled rectangle.
- Create a PdfRadialGradientBrush object for radial gradient filling.
- Use the PdfPageBase.Canvas.DrawRectangle() method with the radial gradient brush to draw a filled rectangle.
- Use the PdfPageBase.Canvas.Restore(state) method to restore the previously saved drawing state.
- Use the PdfDocument.SaveToFile() method to save the document to a file.
- Python
from spire.pdf.common import *
from spire.pdf import *

# Create PDF Document Object
doc = PdfDocument()

# Add a Page
page = doc.Pages.Add()

# Save the current drawing state
state = page.Canvas.Save()

# Create a Pen object with chocolate color and line width of 1.5
pen = PdfPen(PdfRGBColor(Color.get_Chocolate()), 1.5)

# Draw the outline of a rectangle using the pen
page.Canvas.DrawRectangle(pen, RectangleF(PointF(20.0, 30.0), SizeF(150.0, 120.0)))

# Create a linear gradient brush
linearGradientBrush = PdfLinearGradientBrush(PointF(200.0, 30.0), PointF(350.0, 150.0), PdfRGBColor(Color.get_Green()), PdfRGBColor(Color.get_Red()))

# Draw a filled rectangle using the linear gradient brush
page.Canvas.DrawRectangle(linearGradientBrush, RectangleF(PointF(200.0, 30.0), SizeF(150.0, 120.0)))

# Create a radial gradient brush
radialGradientBrush = PdfRadialGradientBrush(PointF(380.0, 30.0), 150.0, PointF(530.0, 150.0), 150.0, PdfRGBColor(Color.get_Orange()) , PdfRGBColor(Color.get_Blue()))

# Draw a filled rectangle using the radial gradient brush
page.Canvas.DrawRectangle(radialGradientBrush, RectangleF(PointF(380.0, 30.0), SizeF(150.0, 120.0)))

# Restore the previously saved drawing state
page.Canvas.Restore(state)

# Save the document to a file
doc.SaveToFile("Drawing Rectangle Shapes.pdf")

# Close the document and release resources
doc.Close()
doc.Dispose()
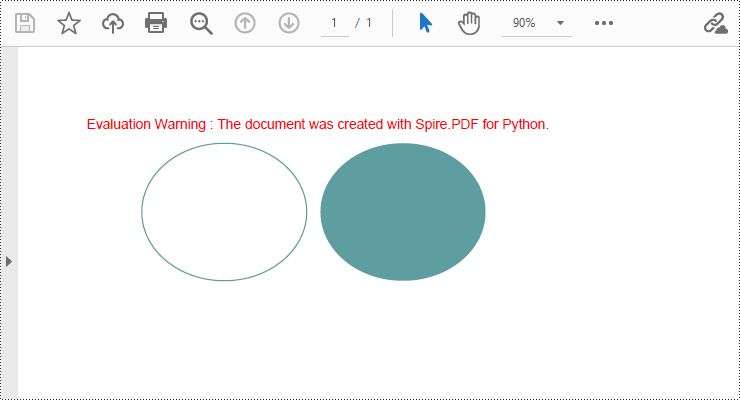
Draw Ellipses in PDF Documents in Python
Spire.PDF for Python provides the PdfPageBase.Canvas.DrawEllipse() method to draw elliptical shapes. You can use either a pen or a fill brush to draw ellipses in different styles. Here are the detailed steps for drawing an ellipse:
- Create a PdfDocument object.
- Use the PdfDocument.Pages.Add() method to add a blank page to the PDF document.
- Use the PdfPageBase.Canvas.Save() method to save the current drawing state for later restoration.
- Create a PdfPen object.
- Use the PdfPageBase.Canvas.DrawEllipse() method with the pen object to draw the outline of an ellipse, specifying the position and size of the ellipse.
- Create a PdfSolidBrush object.
- Use the PdfPageBase.Canvas.DrawEllipse() method with the fill brush object to draw a filled ellipse, specifying the position and size of the ellipse.
- Use the PdfPageBase.Canvas.Restore(state) method to restore the previously saved drawing state.
- Use the PdfDocument.SaveToFile() method to save the document to a file.
- Python
from spire.pdf.common import *
from spire.pdf import *

# Create PDF Document Object
doc = PdfDocument()

# Add a Page
page = doc.Pages.Add()

# Save the current drawing state
state = page.Canvas.Save()

# Create a Pen object
pen = PdfPens.get_CadetBlue()

# Draw the outline of an ellipse shape
page.Canvas.DrawEllipse(pen, 50.0, 30.0, 120.0, 100.0)

# Create a Brush object for filling
brush = PdfSolidBrush(PdfRGBColor(Color.get_CadetBlue()))

# Draw the filled ellipse shape
page.Canvas.DrawEllipse(brush, 180.0, 30.0, 120.0, 100.0)

# Restore the previously saved drawing state
page.Canvas.Restore(state)

# Save the document to a file
doc.SaveToFile("Drawing Ellipse Shape.pdf")

# Close the document and release resources
doc.Close()
doc.Dispose()
Apply for a Temporary License
If you'd like to remove the evaluation message from the generated documents, or to get rid of the function limitations, please request a 30-day trial license for yourself.
Finding and replacing text is a common need in document editing, as it helps users correct minor errors or make adjustments to terms appearing in the document. Although PDF documents have a fixed layout and editing can be challenging, users can still perform small modifications such as replacing text with Python, and achieve a satisfactory editing result. In this article, we will explore how to utilize Spire.PDF for Python to find and replace text in PDF documents within a Python program.
- Find Text and Replace the First Match in PDF with Python
- Find Text and Replace All Matches in PDF with Python
Install Spire.PDF for Python
This scenario requires Spire.PDF for Python and plum-dispatch v1.7.4. They can be easily installed in your Windows through the following pip commands.
pip install Spire.PDF
If you are unsure how to install, please refer to: How to Install Spire.PDF for Python on Windows
Find Text and Replace the First Match in PDF with Python
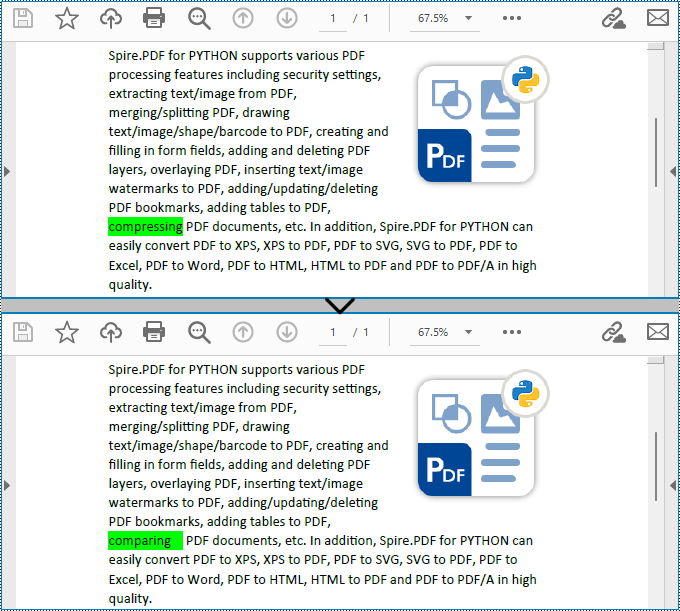
Spire.PDF for Python enables users to find text and replace the first match in PDF documents with the PdfTextReplacer.ReplaceText(string originalText, string newText) method. This replacement method is great for making simple replacements for words or phrases that only appear once on a single page of a document.
The detailed steps for finding text and replacing the first match are as follows:
- Create an object of PdfDocument class and load a PDF document using PdfDocument.LoadFromFile() method.
- Get a page of the document using PdfDocument.Pages.get_Item() method.
- Create an object of PdfTextReplacer class based on the page.
- Find specific text and replace the first match on the page using PdfTextReplacer.ReplaceText() method.
- Save the document using PdfDocument.SaveToFile() method.
- Python
from spire.pdf import *
from spire.pdf.common import *

# Create an object of PdfDocument
pdf = PdfDocument()

# Load a PDF document
pdf.LoadFromFile("Sample.pdf")

# Get a page
page = pdf.Pages.get_Item(0)

# Create an object of PdfTextReplacer class
replacer = PdfTextReplacer(page)

# Find and replace the first matched text
replacer.ReplaceText("compressing", "comparing")

# Save the document
pdf.SaveToFile("output/ReplaceFirstMatch.pdf")
pdf.Close()
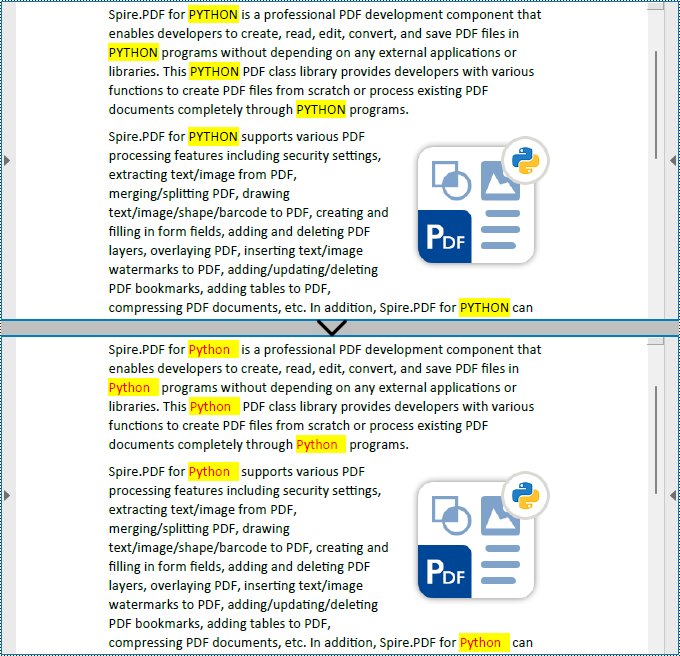
Find Text and Replace All Matches in PDF with Python
Spire.PDF for Python also provides the PdfTextReplacer.ReplaceAllText(string originalText, string newText, Color textColor) method to find specific text and replace all matches with new text (optionally resetting the text color). The detailed steps are as follows:
- Create an object of PdfDocument class and load a PDF document using PdfDocument.LoadFromFile() method.
- Loop through the pages in the document.
- Get a page using PdfDocument.Pages.get_Item() method.
- Create an object of PdfTextReplacer class based on the page.
- Find specific text and replace all the matches with new text in a new color using PdfTextReplacer.ReplaceAllText() method.
- Save the document using PdfDocument.SaveToFile() method.
- Python
from spire.pdf import *
from spire.pdf.common import *

# Create an object of PdfDocument
pdf = PdfDocument()

# Load a PDF document
pdf.LoadFromFile("Sample.pdf")

# Loop through the pages in the document
for i in range(pdf.Pages.Count):
    # Get a page
    page = pdf.Pages.get_Item(0)
    # Create an object of PdfTextReplacer class based on the page
    replacer = PdfTextReplacer(page)
    # Find and replace all matched text with a new color
    replacer.ReplaceAllText("PYTHON", "Python", Color.get_Red())

# Save the document
pdf.SaveToFile("output/ReplaceAllMatches.pdf")
pdf.Close()
Apply for a Temporary License
If you'd like to remove the evaluation message from the generated documents, or to get rid of the function limitations, please request a 30-day trial license for yourself.
Merging and splitting table cells in PowerPoint are essential features that enable users to effectively organize and present data. By merging cells, users can create larger cells to accommodate more information or establish header rows for better categorization. On the other hand, splitting cells allows users to divide a cell into smaller units to showcase specific details, such as individual data points or subcategories. These operations enhance the visual appeal and clarity of slides, helping the audience better understand and analyze the presented data. In this article, we will demonstrate how to merge and split table cells in PowerPoint in Python using Spire.Presentation for Python.
Install Spire.Presentation for Python
This scenario requires Spire.Presentation for Python and plum-dispatch v1.7.4. They can be easily installed in your Windows through the following pip command.
pip install Spire.Presentation
If you are unsure how to install, please refer to this tutorial: How to Install Spire.Presentation for Python on Windows
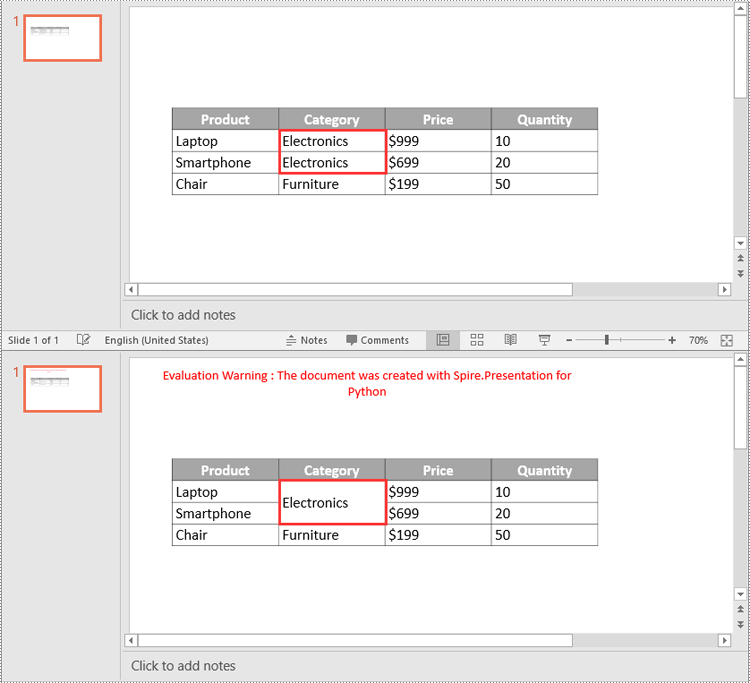
Merge Table Cells in PowerPoint in Python
Spire.Presentation for Python offers the ITable[columnIndex, rowIndex] property to access specific table cells. Once accessed, you can use the ITable.MergeCells(startCell, endCell, allowSplitting) method to merge them into a larger cell. The detailed steps are as follows.
- Create an object of the Presentation class.
- Load a PowerPoint presentation using Presentation.LoadFromFile() method.
- Get a specific slide using Presentation.Slides[index] property.
- Find the table on the slide by looping through all shapes.
- Get the cells you want to merge using ITable[columnIndex, rowIndex] property.
- Merge the cells using ITable.MergeCells(startCell, endCell, allowSplitting) method.
- Save the result presentation using Presentation.SaveToFile() method.
- Python
from spire.presentation.common import *
from spire.presentation import *

# Create a Presentation object
ppt = Presentation()

# Load a PowerPoint presentation
ppt.LoadFromFile("Table1.pptx")

# Get the first slide
slide = ppt.Slides[0]

# Find the table on the first slide
table = None
for shape in slide.Shapes:
    if isinstance(shape, ITable):
        table = shape
        # Get the cell at column 2, row 2
        cell1 = table[1, 1]
        # Get the cell at column 2, row 3
        cell2 = table[1, 2]
        # Check if the content of the cells is the same
        if cell1.TextFrame.Text == cell2.TextFrame.Text:
            # Clear the text in the second cell
            cell2.TextFrame.Paragraphs.Clear()
        # Merge the cells
        table.MergeCells(cell1, cell2, True)

# Save the result presentation to a new file
ppt.SaveToFile("MergeCells.pptx", FileFormat.Pptx2016)
ppt.Dispose()
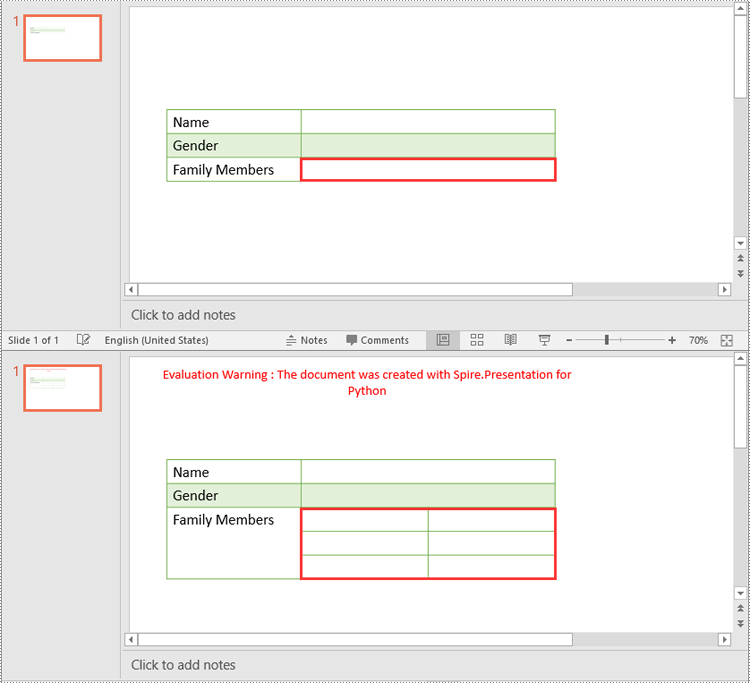
Split Table Cells in PowerPoint in Python
In addition to merging specific table cells, Spire.Presentation for Python also empowers you to split a specific table cell into smaller cells by using the Cell.Split(rowCount, colunmCount) method. The detailed steps are as follows.
- Create an object of the Presentation class.
- Load a PowerPoint presentation using Presentation.LoadFromFile() method.
- Get a specific slide using Presentation.Slides[index] property.
- Find the table on the slide by looping through all shapes.
- Get the cell you want to split using ITable[columnIndex, rowIndex] property.
- Split the cell into smaller cells using Cell.Split(rowCount, columnCount) method.
- Save the result presentation using Presentation.SaveToFile() method.
- Python
from spire.presentation.common import *
from spire.presentation import *

# Create a Presentation object
ppt = Presentation()

# Load a PowerPoint presentation
ppt.LoadFromFile("Table2.pptx")

# Get the first slide
slide = ppt.Slides[0]

# Find the table on the first slide
table = None
for shape in slide.Shapes:
    if isinstance(shape, ITable):
        table = shape
        # Get the cell at column 2, row 3
        cell = table[1, 2]
        # Split the cell into 3 rows and 2 columns
        cell.Split(3, 2)

# Save the result presentation to a new file
ppt.SaveToFile("SplitCells.pptx", FileFormat.Pptx2016)
ppt.Dispose()
Apply for a Temporary License
If you'd like to remove the evaluation message from the generated documents, or to get rid of the function limitations, please request a 30-day trial license for yourself.
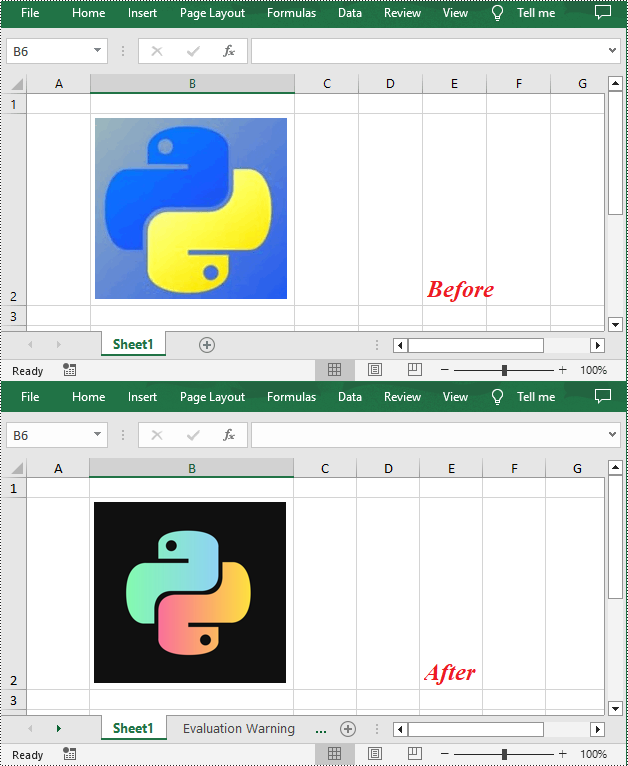
Images in Excel can enhance data visualization and help convey information effectively. Apart from inserting/deleting images in Excel with Spire.XLS for Python, you can also use the library to replace existing images with new ones, or extract images for reuse or backup. This article will demonstrate how to replace or extract images in Excel in Python.
Install Spire.XLS for Python
This scenario requires Spire.XLS for Python and plum-dispatch v1.7.4. They can be easily installed in your Windows through the following pip command.
pip install Spire.XLS
If you are unsure how to install, please refer to this tutorial: How to Install Spire.XLS for Python on Windows
Replace Images in Excel with Python
To replace a picture in Excel, you can load a new picture and then set it as the value of the ExcelPicture.Picture property. The following are the detailed steps to replace an Excel image with another one.
- Create a Workbook instance.
- Load an Excel file using Workbook.LoadFromFile() method.
- Get a specified worksheet using Workbook.Worksheets[] property.
- Get a specified picture from the worksheet using Worksheet.Pictures[] property.
- Load an image and then replace the original picture with it using ExcelPicture.Picture property.
- Save the result file using Workbook.SaveToFile() method.
- Python
from spire.xls import *
from spire.xls.common import *

# Create a Workbook instance
workbook = Workbook()

# Load an Excel file
workbook.LoadFromFile ("ExcelImg.xlsx")

# Get the first worksheet
sheet = workbook.Worksheets[0]

# Get the first picture from the worksheet
excelPicture = sheet.Pictures[0]

# Replace the picture with another one
excelPicture.Picture = Image.FromFile("logo.png")

# Save the result file
workbook.SaveToFile("ReplaceImage.xlsx", ExcelVersion.Version2016)
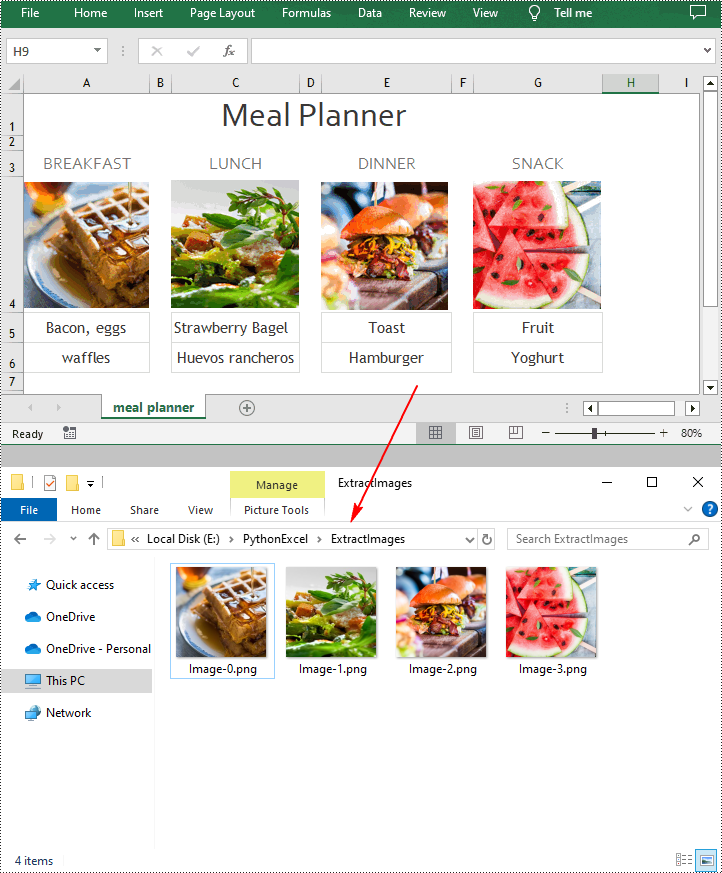
Extract Images from Excel with Python
Spire.XLS for Python provides the ExcelPicture.Picture.Save() method to save the images in Excel to a specified file path. The following are the detailed steps to extract all images in an Excel worksheet at once.
- Create a Workbook instance.
- Load an Excel file using Workbook.LoadFromFile() method.
- Get a specified worksheet using Workbook.Worksheets[] property.
- Loop through to get all pictures in the worksheet using Worksheet.Pictures property.
- Extract pictures and save them to a specified file path using ExcelPicture.Picture.Save() method.
- Python
from spire.xls import *
from spire.xls.common import *

# Create a Workbook instance
workbook = Workbook()

# Load an Excel file
workbook.LoadFromFile("Test.xlsx")

# Get the first worksheet
sheet = workbook.Worksheets[0]

# Get all images in the worksheet
for i in range(sheet.Pictures.Count - 1, -1, -1):
    pic = sheet.Pictures[i]

    # Save each image as a PNG file
    pic.Picture.Save("ExtractImages\\Image-{0:d}.png".format(i), ImageFormat.get_Png())

workbook.Dispose()
Apply for a Temporary License
If you'd like to remove the evaluation message from the generated documents, or to get rid of the function limitations, please request a 30-day trial license for yourself.
A column chart in PowerPoint is a graphical representation of data that uses bars or columns to show comparisons between categories. It is commonly used to display financial data, statistics, and other quantitative information. Each column represents a category, and the height of the column corresponds to the value associated with that category. Column charts are easy to create and customize within PowerPoint, allowing users to quickly visualize their data.
In this article, you will learn how to programmatically create column charts in a PowerPoint document using Spire.Presentation for Python.
- Create a Clustered Column Chart in PowerPoint in Python
- Create a Stacked Column Chart in PowerPoint in Python
Install Spire.Presentation for Python
This scenario requires Spire.Presentation for Python and plum-dispatch v1.7.4. They can be easily installed in your Windows through the following pip command.
pip install Spire.Presentation
If you are unsure how to install, please refer to this tutorial: How to Install Spire.Presentation for Python on Windows
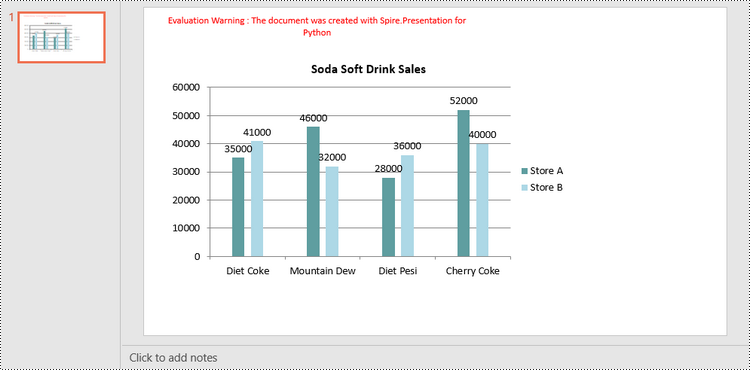
Create a Clustered Column Chart in PowerPoint in Python
A clustered column chart is a type of bar graph where the bars (or columns) are grouped together in clusters or segments, with each cluster representing a category and the height of the columns within the cluster reflecting the value of a data point for that category.
To add a clustered column chart in PowerPoint using Spire.Prensetion for Python, you can use the ISlide.Shapes.AppendChartInit(type: ChartType, rectangle RectangleF, init bool) method and specify the chart type as ColumnClustered. This method returns an object of IChart class, which you can use to set the chart data, title, series labels, category labels, series values and other attributes.
The following are the steps to create a clustered column chart in PowerPoint in Python.
- Create a Presentation object.
- Get the first slide using Prenstion.Slides[] property.
- Add a clustered column chart to the side using ISlide.Shapes.AppendChartInit(type: ChartType, rectangle RectangleF, init bool).
- Add text and numbers to the chart sheet as chart data using IChart.ChartData property.
- Set series labels, category labels, series values and other attributes using the properties of the IChart class.
- Save the document to a PowerPoint file using Presentation.SaveToFile() method.
- Python
from spire.presentation.common import *
from spire.presentation import *

# Create a Presentation object
presentation = Presentation()

# Set slide size type
presentation.SlideSize.Type = SlideSizeType.Screen16x9

# Get the first slide
slide = presentation.Slides[0]

# Add clustered column chart
rect = RectangleF.FromLTRB(40, 80, 700, 450)
chart = slide.Shapes.AppendChartInit(ChartType.ColumnClustered, rect, False)

# Set chart title
chart.ChartTitle.TextProperties.Text = "Soda Soft Drink Sales"
chart.ChartTitle.TextProperties.IsCentered = True
chart.ChartTitle.Height = 25
chart.HasTitle = True

# Insert text to chart as series labels
chart.ChartData[0,0].Text = "Product"
chart.ChartData[0,1].Text = "Store A"
chart.ChartData[0,2].Text = "Store B"

# Insert text to chart as category labels
chart.ChartData[1,0].Text = "Diet Coke"
chart.ChartData[2,0].Text = "Mountain Dew"
chart.ChartData[3,0].Text = "Diet Pesi"
chart.ChartData[4,0].Text = "Cherry Coke"

# Insert numbers to chart as values of series
Series1 = [35000, 46000, 28000, 52000]
Series2 = [41000, 32000, 36000, 40000]
i = 0
while i < len(Series1):
    chart.ChartData[i + 1,1].NumberValue = Series1[i]
    chart.ChartData[i + 1,2].NumberValue = Series2[i]
    i += 1

# Set series labels
chart.Series.SeriesLabel = chart.ChartData["B1","C1"]

# Set category labels
chart.Categories.CategoryLabels = chart.ChartData["A2","A5"]

# Set values for series
chart.Series[0].Values = chart.ChartData["B2","B5"]
chart.Series[1].Values = chart.ChartData["C2","C5"]

# Set gap width
chart.GapWidth = 350

# Set overlap
chart.OverLap = -50

# Set fill color of each series
chart.Series[0].Fill.FillType = FillFormatType.Solid
chart.Series[0].Fill.SolidColor.Color = Color.get_CadetBlue()
chart.Series[1].Fill.FillType = FillFormatType.Solid
chart.Series[1].Fill.SolidColor.Color = Color.get_LightBlue()

# Add data labels
for i in range(len(Series1)):
    chart.Series[0].DataLabels.Add()
    chart.Series[1].DataLabels.Add()

# Save the document
presentation.SaveToFile("output/ClusteredColumnChart.pptx", FileFormat.Pptx2019)
presentation.Dispose()
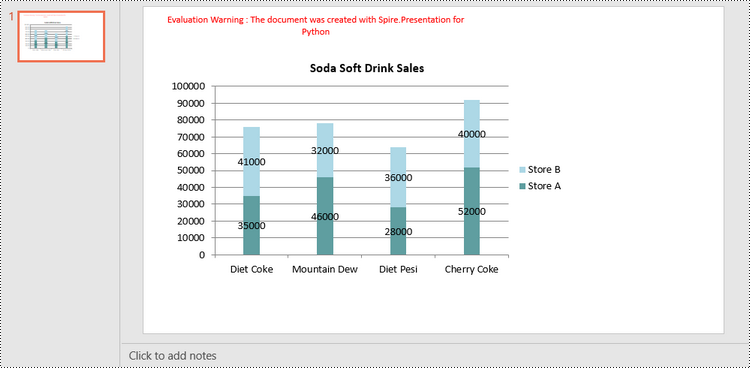
Create a Stacked Column Chart in PowerPoint in Python
A stacked column chart is a variation of the standard column chart where each column represents a category, and the height of the column corresponds to the total value of the category.
To add a stacked column chart in PowerPoint using Spire.Prensetion for Python, you use the ISlide.Shapes.AppendChartInit(type: ChartType, rectangle RectangleF, init bool) method and specify the chart type as ColumnStacked. Then, you can use to set the chart data, title, series labels, category labels, series values and other attributes using the properties of the IChart class.
The following are the steps to create a stacked column chart in PowerPoint in Python.
- Create a Presentation object.
- Get the first slide using Prenstion.Slides[] property.
- Add a stacked column chart to the side using ISlide.Shapes.AppendChartInit(type: ChartType, rectangle RectangleF, init bool).
- Add text and numbers to the chart sheet as chart data using IChart.ChartData property.
- Set series labels, category labels, series values and other attributes using the properties of the IChart class.
- Save the document to a PowerPoint file using Presentation.SaveToFile() method.
- Python
from spire.presentation.common import *
from spire.presentation import *

# Create a Presentation object
presentation = Presentation()

# Set slide size type
presentation.SlideSize.Type = SlideSizeType.Screen16x9

# Get the first slide
slide = presentation.Slides[0]

# Add a stacked column chart
rect = RectangleF.FromLTRB(40, 80, 700, 450)
chart = slide.Shapes.AppendChartInit(ChartType.ColumnStacked, rect, False)

# Set chart title
chart.ChartTitle.TextProperties.Text = "Soda Soft Drink Sales"
chart.ChartTitle.TextProperties.IsCentered = True
chart.ChartTitle.Height = 25
chart.HasTitle = True

# Insert text to chart as series labels
chart.ChartData[0,0].Text = "Product"
chart.ChartData[0,1].Text = "Store A"
chart.ChartData[0,2].Text = "Store B"

# Insert text to chart as category labels
chart.ChartData[1,0].Text = "Diet Coke"
chart.ChartData[2,0].Text = "Mountain Dew"
chart.ChartData[3,0].Text = "Diet Pesi"
chart.ChartData[4,0].Text = "Cherry Coke"

# Insert numbers to chart as values of series
Series1 = [35000, 46000, 28000, 52000]
Series2 = [41000, 32000, 36000, 40000]
i = 0
while i < len(Series1):
    chart.ChartData[i + 1,1].NumberValue = Series1[i]
    chart.ChartData[i + 1,2].NumberValue = Series2[i]
    i += 1

# Set series labels
chart.Series.SeriesLabel = chart.ChartData["B1","C1"]

# Set category labels
chart.Categories.CategoryLabels = chart.ChartData["A2","A5"]

# Set values for series
chart.Series[0].Values = chart.ChartData["B2","B5"]
chart.Series[1].Values = chart.ChartData["C2","C5"]

# Set gap width
chart.GapWidth = 350

# Set fill color of each series
chart.Series[0].Fill.FillType = FillFormatType.Solid
chart.Series[0].Fill.SolidColor.Color = Color.get_CadetBlue()
chart.Series[1].Fill.FillType = FillFormatType.Solid
chart.Series[1].Fill.SolidColor.Color = Color.get_LightBlue()

# Add data labels
for i in range(len(Series1)):
    chart.Series[0].DataLabels.Add()
    chart.Series[1].DataLabels.Add()

# Save the document
presentation.SaveToFile("output/StackedColumnChart.pptx", FileFormat.Pptx2019)
presentation.Dispose()
Apply for a Temporary License
If you'd like to remove the evaluation message from the generated documents, or to get rid of the function limitations, please request a 30-day trial license for yourself.
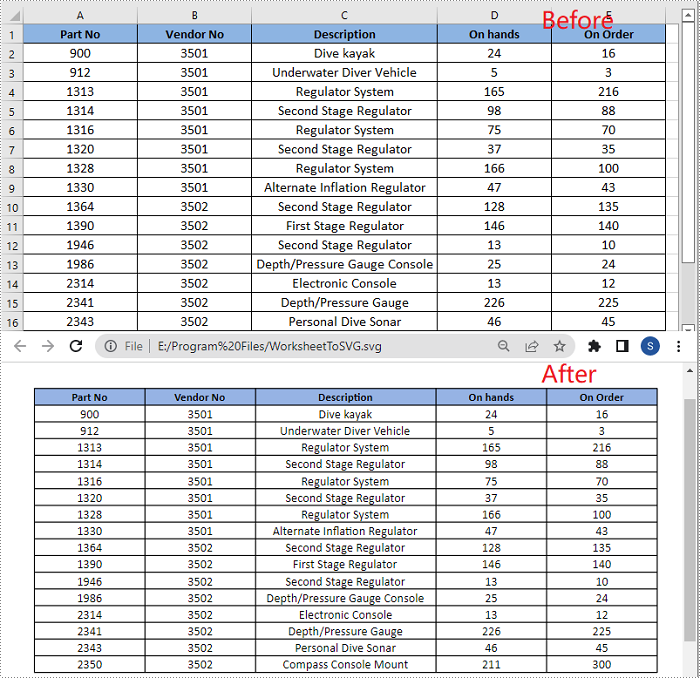
SVG (Scalable Vector Graphics) is a flexible file format widely used on the web. Unlike traditional image formats, SVG files are not based on pixels. Instead, they use mathematical equations to define shapes, lines, and colors. This unique characteristic allows SVG files to be scaled up or down without any loss of quality, making them an excellent choice for creating interactive and visually appealing graphics. By converting Excel files to SVG, you can seamlessly embed the resulting SVG files into web pages, ensuring smooth integration and display of your Excel data on the web. In this article, we will demonstrate how to convert Excel to SVG format in Python using Spire.XLS for Python.
Install Spire.XLS for Python
This scenario requires Spire.XLS for Python and plum-dispatch v1.7.4. They can be easily installed in your Windows through the following pip command.
pip install Spire.XLS
If you are unsure how to install, please refer to this tutorial: How to Install Spire.XLS for Python on Windows
Convert a Worksheet in Excel to SVG in Python
Spire.XLS for Python provides the Worksheet.ToSVGStream() method to convert an Excel worksheet to SVG. The detailed steps are as follows:
- Create an object of the Workbook class.
- Load an Excel file using Workbook.LoadFromFile() method.
- Get a specific worksheet by its index through Workbook.Worksheets[] property.
- Create an object of the Stream class.
- Save the worksheet to an SVG using Worksheet.ToSVGStream() method.
- Python
from spire.xls.common import *
from spire.xls import *

# Create a Workbook object
workbook = Workbook()
# Load an Excel file
workbook.LoadFromFile("Sample1.xlsx")

# Get the first worksheet
worksheet = workbook.Worksheets[0]

# Save the worksheet to an SVG
stream = Stream("WorksheetToSVG.svg")
worksheet.ToSVGStream(stream, 0, 0, 0, 0)
stream.Flush()
stream.Close()

workbook.Dispose()
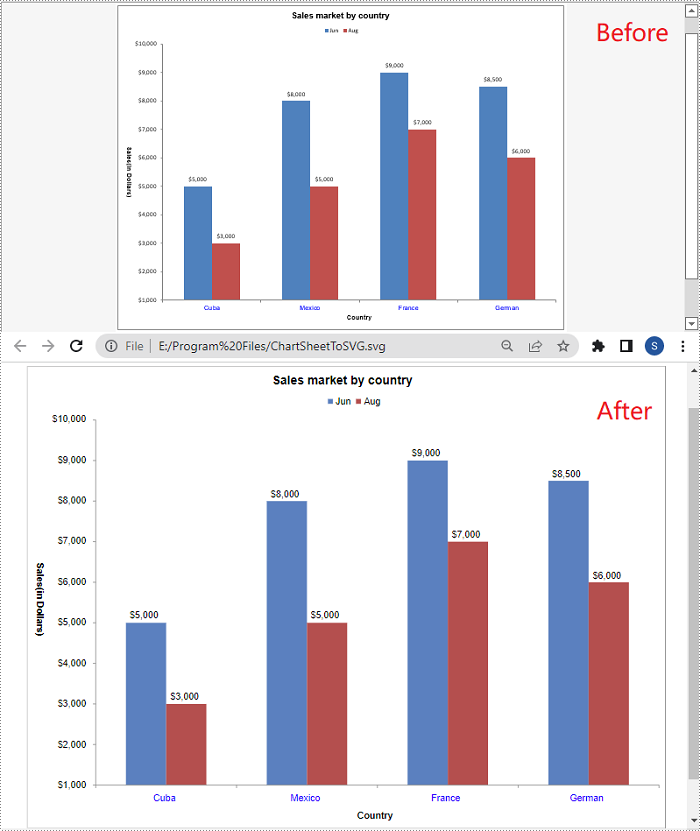
Convert a Chart Sheet in Excel to SVG in Python
A chart sheet in Excel is a separate sheet within an Excel workbook that is dedicated to displaying a chart. Spire.XLS for Python allows you to convert a chart sheet to SVG by using the ChartSheet.ToSVGStream() method. The detailed steps are as follows:
- Create an object of the Workbook class.
- Load an Excel file using Workbook.LoadFromFile() method.
- Get a specific chart sheet using Workbook.GetChartSheetByName() method.
- Create an object of the Stream class.
- Save the chart sheet to an SVG using ChartSheet.ToSVGStream() method.
- Python
from spire.xls.common import *
from spire.xls import *

# Create a Workbook object
workbook = Workbook()
# Load an Excel file
workbook.LoadFromFile("Sample2.xlsx")

# Get a specific chart sheet
chartSheet = workbook.GetChartSheetByName("Chart1")

# Save the chart sheet to an SVG
stream = Stream("ChartSheetToSVG.svg")
chartSheet.ToSVGStream(stream)
stream.Flush()
stream.Close()

workbook.Dispose()
Apply for a Temporary License
If you'd like to remove the evaluation message from the generated documents, or to get rid of the function limitations, please request a 30-day trial license for yourself.
Accepting and rejecting tracked changes in Excel are essential features that empower users to effectively manage and control modifications made by multiple contributors. Accepting changes allows users to include modifications in the spreadsheet, facilitating collaboration and ensuring that the final version reflects collective input. Conversely, rejecting changes enables users to maintain the original content and avoid incorporating incorrect or unnecessary modifications. These functions provide users with the ability to maintain data integrity, ensure document accuracy, and streamline the collaborative process in Excel. In this article, we will demonstrate how to accept and reject tracked changes in Excel in Python using Spire.XLS for Python.
Install Spire.XLS for Python
This scenario requires Spire.XLS for Python and plum-dispatch v1.7.4. They can be easily installed in your Windows through the following pip command.
pip install Spire.XLS
If you are unsure how to install, please refer to this tutorial: How to Install Spire.XLS for Python on Windows
Accept Tracked Changes in Excel in Python
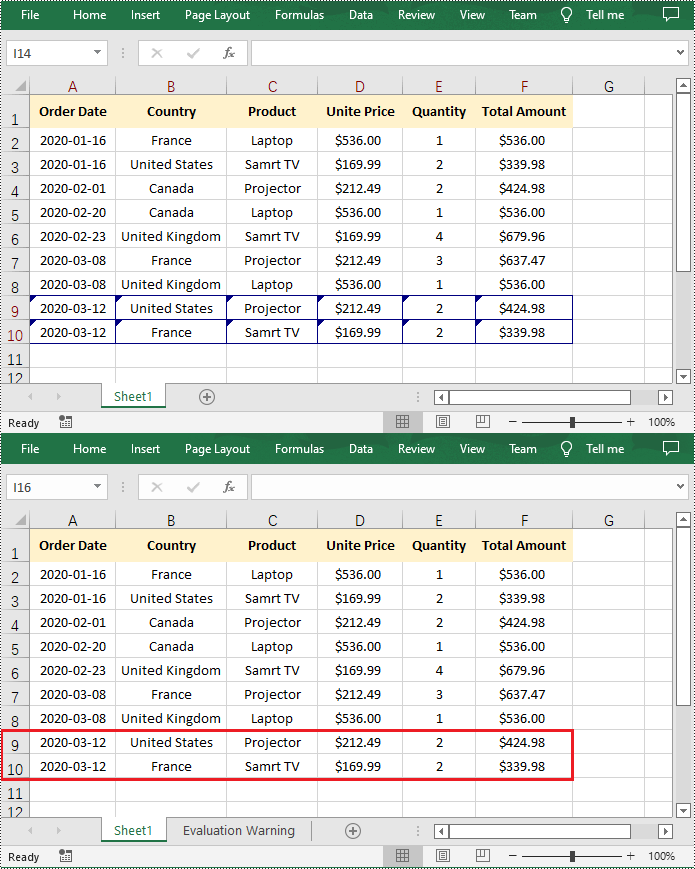
Spire.XLS for Python provides the Workbook.HasTrackedChanges property to determine whether an Excel workbook has tracked changes or not. If the property returns True, you can use the Workbook.AcceptAllTrackedChanges() method to accept these changes at once.
The following steps explain how to accept all tracked changes in an Excel workbook using Spire.XLS for Python:
- Create a Workbook object.
- Load a sample Excel workbook using Workbook.LoadFromFile() method.
- Check if the workbook has tracked changes using Workbook.HasTrackedChanges property.
- Accept all tracked changes in the workbook using Workbook.AcceptAllTrackedChanges() method.
- Save the result workbook using Workbook.SaveToFile() method.
- Python
from spire.xls.common import *
from spire.xls import *

# Specify the input and output file paths
inputFile = "Sample.xlsx"
outputFile = "AcceptChanges.xlsx"

# Create a Workbook object
workbook = Workbook()
# Load an Excel file
workbook.LoadFromFile(inputFile)

# Check if the file has tracked changes
if workbook.HasTrackedChanges:
    # Accept all tracked changes in the file
    workbook.AcceptAllTrackedChanges()

# Save the result file
workbook.SaveToFile(outputFile, FileFormat.Version2013)
workbook.Dispose()
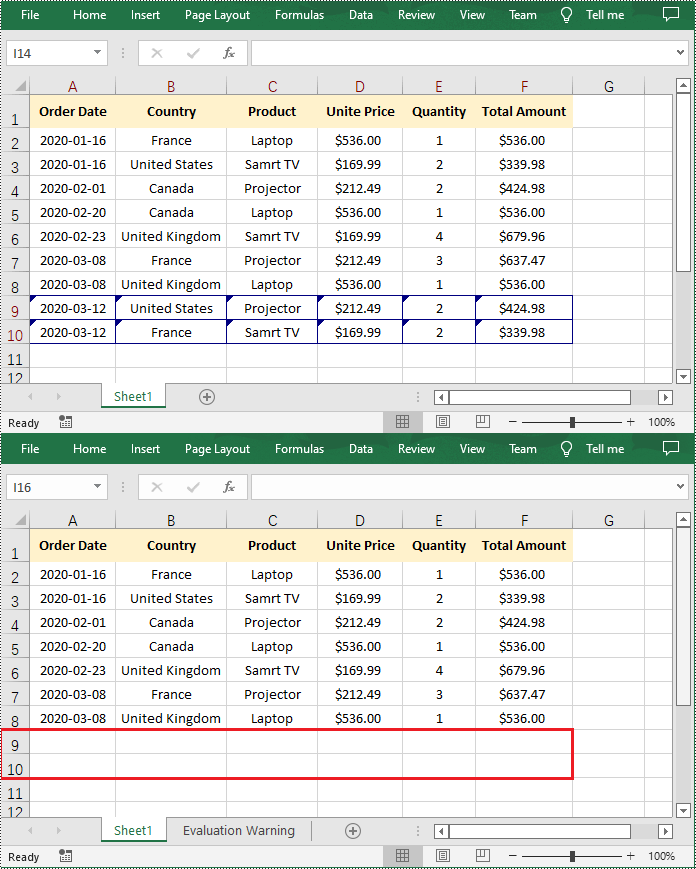
Reject Tracked Changes in Excel in Python
If the changes made to a workbook compromise the integrity of the data, such as introducing errors, inconsistencies, or inaccuracies, you can reject these changes by using the Workbook.RejectAllTrackedChanges() method.
The following steps explain how to reject all tracked changes in an Excel workbook using Spire.XLS for Python:
- Create a Workbook object.
- Load a sample Excel workbook using Workbook.LoadFromFile() method.
- Check if the workbook has tracked changes using Workbook.HasTrackedChanges property.
- Reject all tracked changes in the workbook using Workbook.RejectAllTrackedChanges() method.
- Save the result workbook using Workbook.SaveToFile() method.
- Python
from spire.xls.common import *
from spire.xls import *

# Specify the input and output file paths
inputFile = "Sample.xlsx"
outputFile = "RejectChanges.xlsx"

# Create a Workbook object
workbook = Workbook()
# Load an Excel file
workbook.LoadFromFile(inputFile)

# Check if the file has tracked changes
if workbook.HasTrackedChanges:
    # Reject all tracked changes in the file
    workbook.RejectAllTrackedChanges()

# Save the result file
workbook.SaveToFile(outputFile, FileFormat.Version2013)
workbook.Dispose()
Apply for a Temporary License
If you'd like to remove the evaluation message from the generated documents, or to get rid of the function limitations, please request a 30-day trial license for yourself.
The inclusion of attachments in a PDF can be useful for sharing related files or providing additional context and resources alongside the main document. However, there may be instances when you need to remove attachments from a PDF for reasons like reducing file size, protecting sensitive information, or simply decluttering the document. In this article, you will learn how to remove attachments from a PDF document in Python using Spire.PDF for Python.
- Remove Document-Level Attachments from PDF in Python
- Remove Annotation Attachments from PDF in Python
Install Spire.PDF for Python
This scenario requires Spire.PDF for Python and plum-dispatch v1.7.4. They can be easily installed in your Windows through the following pip command.
pip install Spire.PDF
If you are unsure how to install, please refer to this tutorial: How to Install Spire.PDF for Python on Windows
Prerequisite Knowledge
There are typically two types of attachments in PDF, document-level attachments and annotation attachments. The following table lists the differences between them and their representations in Spire.PDF.
| Attachment type | Represented by | Definition |
| Document level attachment | PdfAttachment class | A file attached to a PDF at the document level won't appear on a page, but can be viewed in the "Attachments" panel of a PDF reader. |
| Annotation attachment | PdfAnnotationAttachment class | A file attached as an annotation can be found on a page or in the "Attachment" panel. An annotation attachment is shown as a paper clip icon on the page; reviewers can double-click the icon to open the file. |
Remove Document-Level Attachments from PDF in Python
To obtain all document-level attachments of a PDF document, use the PdfDocument.Attachments property. Then, you can remove all of them using the Clear() method or selectively remove a specific attachment using the RemoveAt() method. The following are the steps to remove document-level attachments from PDF in Python.
- Create a PdfDocument object.
- Load a PDF document using PdfDocument.LoadFromFile() method.
- Get the attachment collection from the document using PdfDocument.Attachments property.
- Remove all attachments using PdfAttachmentCollection.Clear() method. To remove a specific attachment, use PdfAttachmentCollection.RemoveAt() method.
- Save the changes to a different PDF file using PdfDocument.SaveToFile() method.
- Python
from spire.pdf import *
from spire.pdf.common import *

# Create a PdfDocument object
doc = PdfDocument()

# Load a PDF file
doc.LoadFromFile("C:\\Users\\Administrator\\Desktop\\Attachments.pdf")

# Get the attachment collection from the document
attachments = doc.Attachments

# Remove all attachments
attachments.Clear()

# Remove a specific attachment
# attachments.RemoveAt(0)

# Save the changes to file
doc.SaveToFile("output/DeleteAttachments.pdf")

# Close the document
doc.Close()
Remove Annotation Attachments from PDF in Python
Annotations are page-based elements, and to retrieve all annotations from a document, you need to iterate through the pages and obtain the annotations from each page. Next, identify if a particular annotation is an attachment annotation, and finally remove it from the annotation collection using the RemoveAt() method.
The following are the steps to remove annotation attachments from PDF in Python.
- Create a PdfDocument object.
- Load a PDF document using PdfDocument.LoadFromFile() method.
- Iterate through the pages in the document
- Get the annotation collection from a specific page through PdfPageBase.AnnotationsWidget property.
- Iterate through the annotations in the collection.
- Determine if a specific annotation is an instance of PdfAttachmentAnnotationWidget.
- Remove the attachment annotation using PdfAnnotationCollection.RemoveAt() method.
- Save the changes to a different PDF file using PdfDocument.SaveToFile() method.
- Python
from spire.pdf import *
from spire.pdf.common import *

# Create a PdfDocument object
doc = PdfDocument()

# Load a PDF file
doc.LoadFromFile("C:\\Users\\Administrator\\Desktop\\AnnotationAttachment.pdf")

# Iterate through the pages in the document
for i in range(doc.Pages.Count):

    # Get annotation collection from a certain page
    annotationCollection = doc.Pages.get_Item(i).AnnotationsWidget

    if annotationCollection.Count > 0:

        # Iterate through the annotation in the collection
        for j in range(annotationCollection.Count):

            # Get a specific annotation
            annotation = annotationCollection.get_Item(j)

            # Determine if it is an attachment annotation
            if isinstance(annotation, PdfAttachmentAnnotationWidget):

                # Remove the annotation
                annotationCollection.RemoveAt(j)

# Save the changes to file
doc.SaveToFile("output/DeleteAnnotationAttachment.pdf")

# Close the document
doc.Close()
Apply for a Temporary License
If you'd like to remove the evaluation message from the generated documents, or to get rid of the function limitations, please request a 30-day trial license for yourself.
