
Python (365)
Creating a form in PDF not only ensures a professional appearance but also allows users to fill out and submit data electronically, streamlining data entry processes. Whether you are collecting survey responses, gathering client information, or creating employment applications, the ability to generate interactive PDF forms offers a seamless and organized way to capture, store, and manage valuable data. In this article, you will learn how to create a fillable PDF form as well as how to fill in a PDF form using Spire.PDF for Python.
Install Spire.PDF for Python
This scenario requires Spire.PDF for Python and plum-dispatch v1.7.4. They can be easily installed in your Windows through the following pip command.
pip install Spire.PDF
If you are unsure how to install, please refer to this tutorial: How to Install Spire.PDF for Python on Windows
Create a Fillable Form in PDF in Python
Spire.PDF for Python provides a range of helpful classes that enable programmers to generate and modify different types of form fields in PDF files. These include text boxes, check boxes, combo boxes, list boxes, and radio buttons. The table below lists some of the classes involved in this tutorial.
| Class | Description |
| PdfForm | Represents interactive form of the PDF document. |
| PdfField | Represents field of the PDF document's interactive form. |
| PdfTextBoxField | Represents text box field in the PDF form. |
| PdfCheckBoxField | Represents check box field in the PDF form. |
| PdfComboBoxField | Represents combo box field in the PDF Form. |
| PdfListBoxField | Represents list box field of the PDF form. |
| PdfListFieldItem | Represents an item of a list field. |
| PdfRadioButtonListField | Represents radio button field in the PDF form. |
| PdfRadioButtonListItem | Represents an item of a radio button list. |
| PdfButtonField | Represents button field in the PDF form. |
To generate a PDF form, start by creating an instance of the respective field class. Set the field's size and position in the document using the Bounds property, and finally, add it to the PDF using the PdfFormFieldCollection.Add() method. The following are the main steps to create various types of form fields in a PDF document using Spire.PDF for Python.
- Create a PdfDocument object.
- Add a page using PdfDocuemnt.Pages.Add() method.
- Create a PdfTextBoxField object, set the properties of the field including Bounds, Font and Text, and then add it to the document using PdfFormFieldCollection.Add() method.
- Repeat the step 3 to add check box, combo box, list box, radio button, and button to the document.
- Save the document to a PDF file using PdfDocument.SaveToFile() method.
- Python
from spire.pdf.common import *
from spire.pdf import *
# Create a PdfDocument object
doc = PdfDocument()
# Add a page
page = doc.Pages.Add()
# Initialize x and y coordinates
baseX = 100.0
baseY = 30.0
# Create two brush objects
brush1 = PdfSolidBrush(PdfRGBColor(Color.get_Blue()))
brush2 = PdfSolidBrush(PdfRGBColor(Color.get_Black()))
# Create a font
font = PdfFont(PdfFontFamily.TimesRoman, 12.0, PdfFontStyle.Regular)
# Add a textbox
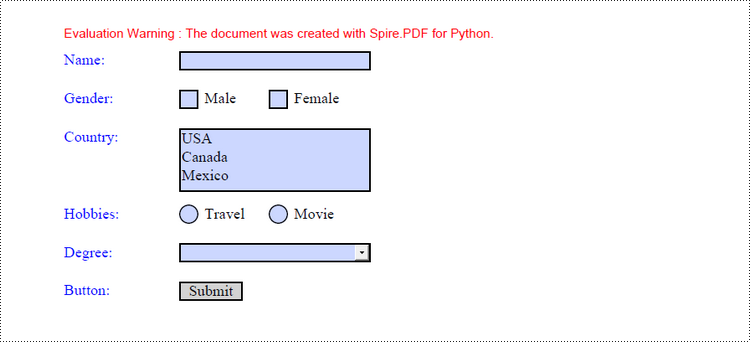
page.Canvas.DrawString("Name:", font, brush1, PointF(10.0, baseY))
tbxBounds = RectangleF(baseX, baseY, 150.0, 15.0)
textBox = PdfTextBoxField(page, "name")
textBox.Bounds = tbxBounds
textBox.Font = font
doc.Form.Fields.Add(textBox)
baseY += 30.0
# add two checkboxes
page.Canvas.DrawString("Gender:", font, brush1, PointF(10.0, baseY));
checkboxBound1 = RectangleF(baseX, baseY, 15.0, 15.0)
checkBoxField1 = PdfCheckBoxField(page, "male")
checkBoxField1.Bounds = checkboxBound1
checkBoxField1.Checked = False
page.Canvas.DrawString("Male", font, brush2, PointF(baseX + 20.0, baseY))
checkboxBound2 = RectangleF(baseX + 70.0, baseY, 15.0, 15.0)
checkBoxField2 = PdfCheckBoxField(page, "female")
checkBoxField2.Bounds = checkboxBound2
checkBoxField2.Checked = False
page.Canvas.DrawString("Female", font, brush2, PointF(baseX + 90.0, baseY))
doc.Form.Fields.Add(checkBoxField1)
doc.Form.Fields.Add(checkBoxField2)
baseY += 30.0
# Add a listbox
page.Canvas.DrawString("Country:", font, brush1, PointF(10.0, baseY))
listboxBound = RectangleF(baseX, baseY, 150.0, 50.0)
listBoxField = PdfListBoxField(page, "country")
listBoxField.Items.Add(PdfListFieldItem("USA", "usa"))
listBoxField.Items.Add(PdfListFieldItem("Canada", "canada"))
listBoxField.Items.Add(PdfListFieldItem("Mexico", "mexico"))
listBoxField.Bounds = listboxBound
listBoxField.Font = font
doc.Form.Fields.Add(listBoxField)
baseY += 60.0
# Add two radio buttons
page.Canvas.DrawString("Hobbies:", font, brush1, PointF(10.0, baseY))
radioButtonListField = PdfRadioButtonListField(page, "hobbies")
radioItem1 = PdfRadioButtonListItem("travel")
radioBound1 = RectangleF(baseX, baseY, 15.0, 15.0)
radioItem1.Bounds = radioBound1
page.Canvas.DrawString("Travel", font, brush2, PointF(baseX + 20.0, baseY))
radioItem2 = PdfRadioButtonListItem("movie")
radioBound2 = RectangleF(baseX + 70.0, baseY, 15.0, 15.0)
radioItem2.Bounds = radioBound2
page.Canvas.DrawString("Movie", font, brush2, PointF(baseX + 90.0, baseY))
radioButtonListField.Items.Add(radioItem1)
radioButtonListField.Items.Add(radioItem2)
doc.Form.Fields.Add(radioButtonListField)
baseY += 30.0
# Add a combobox
page.Canvas.DrawString("Degree:", font, brush1, PointF(10.0, baseY))
cmbBounds = RectangleF(baseX, baseY, 150.0, 15.0)
comboBoxField = PdfComboBoxField(page, "degree")
comboBoxField.Bounds = cmbBounds
comboBoxField.Items.Add(PdfListFieldItem("Bachelor", "bachelor"))
comboBoxField.Items.Add(PdfListFieldItem("Master", "master"))
comboBoxField.Items.Add(PdfListFieldItem("Doctor", "doctor"))
comboBoxField.Font = font
doc.Form.Fields.Add(comboBoxField)
baseY += 30.0
# Add a button
page.Canvas.DrawString("Button:", font, brush1, PointF(10.0, baseY))
btnBounds = RectangleF(baseX, baseY, 50.0, 15.0)
buttonField = PdfButtonField(page, "button")
buttonField.Bounds = btnBounds
buttonField.Text = "Submit"
buttonField.Font = font
submitAction = PdfSubmitAction("https://www.e-iceblue.com/getformvalues.php")
buttonField.Actions.MouseDown = submitAction
doc.Form.Fields.Add(buttonField)
# Save to file
doc.SaveToFile("output/Form.pdf", FileFormat.PDF)
Fill in a PDF Form in Python
In order to fill in a form, the necessary steps include obtaining all form fields from the PDF document, locating a specific field based on its type and name, and subsequently entering or selecting a value from a predetermined list. The following are the detailed steps.
- Create a PdfDocument object.
- Load a sample PDF document using PdfDocument.LoadFromFile() method.
- Get the form from the document through PdfDocument.Form property.
- Get the form widget collection through PdfFormWidget.FieldsWidget property.
- Get a specific form field by its type and name.
- Enter a value or select a value from the predefined list for the field.
- Save the document to a PDF file using PdfDocument.SaveToFile() method.
- Python
from spire.pdf.common import *
from spire.pdf import *

# Create a PdfDocument object
doc = PdfDocument()

# Load a PDF document contaning form fields
doc.LoadFromFile("C:\\Users\\Administrator\\Desktop\\Form.pdf")

# Get form from the document
form = doc.Form
formWidget = PdfFormWidget(form)

# Get form widget collection
formWidgetCollection = formWidget.FieldsWidget

# If the collection is nut null
if formWidgetCollection.Count > 0:

    # Loop through the elements in the form widget collection
    for i in range(formWidgetCollection.Count):

        # Get a specific field
        field = formWidgetCollection.get_Item(i)

        # Determine if a field is a textbox
        if isinstance(field, PdfTextBoxFieldWidget):
            textBoxField = field if isinstance(field, PdfTextBoxFieldWidget) else None

            # Determine if the name of the text box is "name"
            if textBoxField.Name == "name":

                # Add text to the text box
                textBoxField.Text = "Jackson Green"

        # Choose an item from the list box
        if isinstance(field, PdfListBoxWidgetFieldWidget):
            listBoxField = field if isinstance(field, PdfListBoxWidgetFieldWidget) else None
            if listBoxField.Name == "country":
                index = [1]
                listBoxField.SelectedIndex = index

        # Choose an item from the combo box
        if isinstance(field, PdfComboBoxWidgetFieldWidget):
            comBoxField = field if isinstance(field, PdfComboBoxWidgetFieldWidget) else None
            if comBoxField.Name == "degree":
                items = [0]
                comBoxField.SelectedIndex = items

        # Select an item in the radio buttons
        if isinstance(field, PdfRadioButtonListFieldWidget):
            radioBtnField = field if isinstance(field, PdfRadioButtonListFieldWidget) else None
            if radioBtnField.Name == "hobbies":
                radioBtnField.SelectedIndex = 1

        # Check the specified check box
        if isinstance(field, PdfCheckBoxWidgetFieldWidget):
            checkBoxField = field if isinstance(field, PdfCheckBoxWidgetFieldWidget) else None
            if checkBoxField.Name == "male":
                checkBoxField.Checked = True

# Save the document
doc.SaveToFile("output/FillForm.pdf")
doc.Close()
Apply for a Temporary License
If you'd like to remove the evaluation message from the generated documents, or to get rid of the function limitations, please request a 30-day trial license for yourself.
Lists are a fundamental data structure in PDF documents as they allow users to efficiently store and arrange collections of items. The three most commonly utilized list types in PDFs are ordered lists, unordered lists (also known as bulleted lists), and nested lists. These lists facilitate the presentation of information in a well-organized and visually appealing manner within PDF documents. In this article, we will explore how to use Spire.PDF for Python to create ordered, unordered, and nested lists in PDF documents for generating professional-looking PDF documents.
- Create Ordered Lists in PDF with Python
- Create Unordered Lists with Symbol Markers in PDF Using Python
- Create Unordered Lists with Image Markers in PDF Using Python
- Create Nested Lists in PDF with Python
In Spire.PDF for Python, the PdfSortedList class and PdfList class are available for generating various types of lists in PDF documents, such as ordered lists, unordered lists, and nested lists. By utilizing the functionalities provided by Spire.PDF for Python, developers can easily format and incorporate these lists into their PDF pages. The following are the key classes and properties that are particularly useful for creating lists within PDF documents:
| Class or property | Description |
| PdfSortedList class | Represents an ordered list in a PDF document. |
| PdfList class | Represents an unordered list in a PDF document. |
| Brush property | Gets or sets a list's brush. |
| Font property | Gets or sets a list's font. |
| Indent property | Gets or sets a list's indent. |
| TextIndent property | Gets or sets the indent from the marker to the list item text. |
| Items property | Gets items of a list. |
| Marker property | Gets or sets the marker of a list. |
| Draw() method | Draw list on the canvas of a page at the specified location. |
| PdfOrderedMarker class | Represents the marker style of an ordered list, such as numbers, letters, and roman numerals. |
| PdfMarker class | Represents bullet style for an unordered list. |
Install Spire.PDF for Python
This scenario requires Spire.PDF for Python and plum-dispatch v1.7.4. They can be easily installed in your Windows through the following pip commands.
pip install Spire.PDF
If you are unsure how to install, please refer to this tutorial: How to Install Spire.PDF for Python on Windows
Create Ordered Lists in PDF with Python
Developers can use the PdfSortedList class in Spire.PDF for Python to create ordered lists and format them using the properties available under this class. Afterwards, the list can be drawn on a PDF page using the PdfSortedList.Draw() method. Here is a detailed step-by-step guide for how to create ordered lists in PDF documents:
- Create an object of PdfDocument class and load a PDF document using PdfDocument.LoadFromFile() method.
- Add a page to the document using PdfDocument.Pages.Add() method.
- Create fonts and the brush for the title and the list and draw the list title on the page using PdfPageBase.Canvas.DrawString() method.
- Initialize an instance of PdfSortedList class to create an ordered list with specified items.
- Initialize an instance of PdfOrderedMarker class to create an ordered marker for the list.
- Set the font, item indent, text-indent, brush, and marker for the list using properties under PdfSortedList class.
- Draw the list on the page using PdfSortedList.Draw() method.
- Save the document using PdfDocument.SaveToFile() method.
- Python
from spire.pdf import *
from spire.pdf.common import *
# Create an object of PdfDocument class
pdf = PdfDocument()
# Add a page to the document with specified page size and margins
page = pdf.Pages.Add()
# Create tile font and list font
titleFont = PdfTrueTypeFont("HarmonyOS Sans SC", 14.0, 1, True)
listFont = PdfTrueTypeFont("HarmonyOS Sans SC", 12.0, 0, True)
# Create a brush to draw the list
brush = PdfBrushes.get_Black()
# Specify the initial coordinate
x = 10.0
y = 20.0
# Draw the title
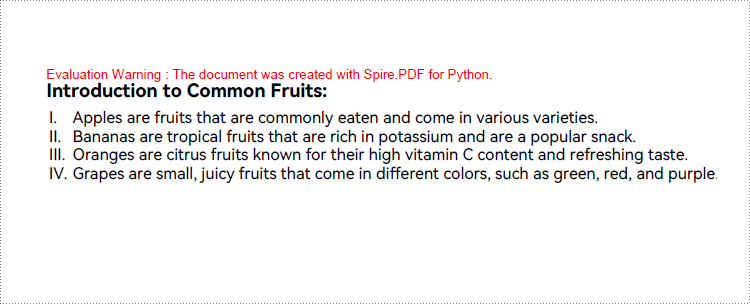
title = "Introduction to Common Fruits:"
page.Canvas.DrawString(title, titleFont, brush, x, y)
# Create a numbered list
listItems = "Apples are fruits that are commonly eaten and come in various varieties.\n" \
+ "Bananas are tropical fruits that are rich in potassium and are a popular snack.\n" \
+ "Oranges are citrus fruits known for their high vitamin C content and refreshing taste.\n"\
+ "Grapes are small, juicy fruits that come in different colors, such as green, red, and purple."
list = PdfSortedList(listItems)
# Create a marker for the list
marker = PdfOrderedMarker(PdfNumberStyle.UpperRoman, listFont)
# Format the list
list.Font = listFont
list.Indent = 2
list.TextIndent = 4
list.Brush = brush
list.Marker = marker
# Draw the list on the page
list.Draw(page.Canvas, x, y + float(titleFont.MeasureString(title).Height + 5))
# Save the document
pdf.SaveToFile("output/CreateNumberedList.pdf")
pdf.Close()
Create Unordered Lists with Symbol Markers in PDF Using Python
Creating an unordered list in a PDF document with Spire.PDF for Python involves PdfList class and the properties under this class. When creating an unordered list, developers need to set the marker style and font for the unordered list using the PdfList.Marker.Style and PdfList.Marker.Font properties. The detailed steps are as follows:
- Create an object of PdfDocument class and load a PDF document using PdfDocument.LoadFromFile() method.
- Add a page to the document using PdfDocument.Pages.Add() method.
- Create fonts and the brush for the title, the marker, and the list, and draw the list title on the page using PdfPageBase.Canvas.DrawString() method.
- Initialize an instance of PdfList class to create an unordered list with specified items.
- Set the font, item indent, text indent, and brush for the list using properties under PdfList class.
- Set the marker style and font through PdfList.Marker.Style property and PdfList.Marker.Font property.
- Draw the list on the page using PdfList.Draw() method.
- Save the document using PdfDocument.SaveToFile() method.
- Python
from spire.pdf import *
from spire.pdf.common import *
# Create an object of PdfDocument class
pdf = PdfDocument()
# Add a page to the document with specified page size and margins
page = pdf.Pages.Add()
# Create tile font and list font
titleFont = PdfTrueTypeFont("HarmonyOS Sans SC", 14.0, 1, True)
listFont = PdfTrueTypeFont("HarmonyOS Sans SC", 12.0, 0, True)
markerFont = PdfTrueTypeFont("HarmonyOS Sans SC", 8.0, 0, True)
# Create a brush to draw the list
brush = PdfBrushes.get_Black()
# Specify the initial coordinate
x = 10.0
y = 20.0
# Draw the title
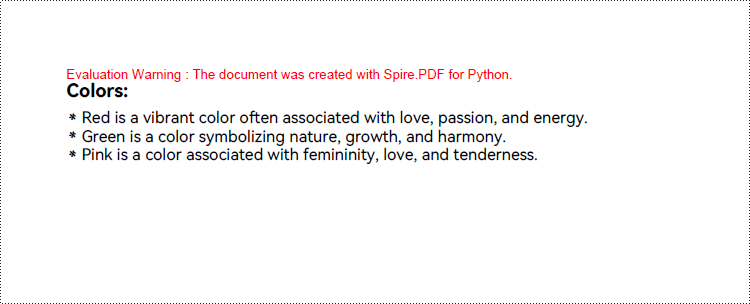
title = "Colors:"
page.Canvas.DrawString(title, titleFont, brush, x, y)
# Create an unordered list
listContent = "Red is a vibrant color often associated with love, passion, and energy.\n" \
+ "Green is a color symbolizing nature, growth, and harmony.\n" \
+ "Pink is a color associated with femininity, love, and tenderness."
list = PdfList(listContent)
# Format the list
list.Font = listFont
list.Indent = 2
list.TextIndent = 4
list.Brush = brush
# Format the marker
list.Marker.Style = PdfUnorderedMarkerStyle.Asterisk
list.Marker.Font = markerFont
# Draw the list on the page
list.Draw(page.Canvas, x, float(y + titleFont.MeasureString(title).Height + 5))
# Save the document
pdf.SaveToFile("output/CreateSymbolBulletedList.pdf")
pdf.Close()
Create Unordered Lists with Image Markers in PDF Using Python
Creating an unordered list with image markers follows similar steps to creating a list with symbol markers. Developers just need to set the item marker style to an image through PdfList.Marker.Style property. Here are the detailed steps:
- Create an object of PdfDocument class and load a PDF document using PdfDocument.LoadFromFile() method.
- Add a page to the document using PdfDocument.Pages.Add() method.
- Create fonts and the brush for the title, the marker, and the list, and draw the list title on the page using PdfPageBase.Canvas.DrawString() method.
- Initialize an instance of PdfList class to create an unordered list with specified items.
- Set the font, item indent, text-indent, and brush for the list using properties under PdfList class.
- Load an image using PdfImage.LoadFromFile() method.
- Set the marker style as PdfUnorderedMarkerStyle.CustomImage through PdfList.Marker.Style property and set the loaded image as the marker through PdfList.Marker.Image property.
- Draw the list on the page using PdfList.Draw() method.
- Save the document using PdfDocument.SaveToFile() method.
- Python
from spire.pdf import *
from spire.pdf.common import *
# Create an object of PdfDocument class
pdf = PdfDocument()
# Add a page to the document with specified page size and margins
page = pdf.Pages.Add()
# Create tile font and list font
titleFont = PdfFont(PdfFontFamily.Helvetica, 14.0, PdfFontStyle.Bold)
listFont = PdfFont(PdfFontFamily.Helvetica, 12.0, PdfFontStyle.Regular)
# Create a brush to draw the list
brush = PdfBrushes.get_Black()
# Specify the initial coordinate
x = 10.0
y = 20.0
# Draw the title
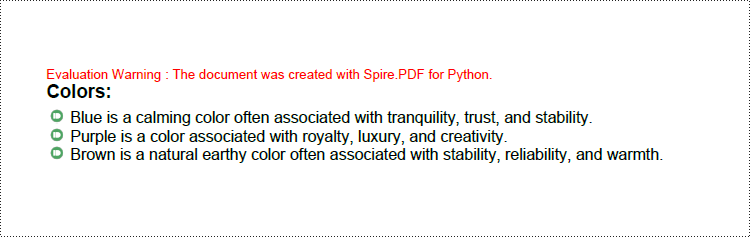
title = "Colors:"
page.Canvas.DrawString(title, titleFont, brush, x, y)
# Create an unordered list
listContent = "Blue is a calming color often associated with tranquility, trust, and stability.\n" \
+ "Purple is a color associated with royalty, luxury, and creativity.\n" \
+ "Brown is a natural earthy color often associated with stability, reliability, and warmth."
list = PdfList(listContent)
# Format the list
list.Font = listFont
list.Indent = 2
list.TextIndent = 4
list.Brush = brush
# Load an image
image = PdfImage.FromFile("Marker.png")
# Set the marker as a custom image
list.Marker.Style = PdfUnorderedMarkerStyle.CustomImage
list.Marker.Image = image
# Draw the list on the page
list.Draw(page.Canvas, x, float(y + titleFont.MeasureString(title).Height + 5))
# Save the document
pdf.SaveToFile("output/CreateImageBulletedList.pdf")
pdf.Close()
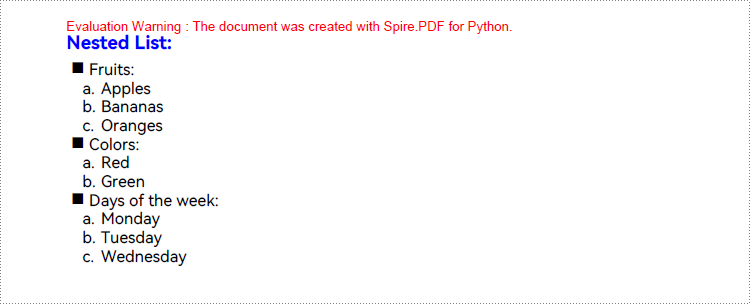
Create Nested Lists in PDF with Python
When creating a nested list, both the parent list and each level of sublists can be created as either unordered or ordered lists. Once the lists at each level are created, the PdfListItem.Sublist property can be used to set a list as the sublist of a corresponding item in the parent list. Here are the steps to create a nested list:
- Create an object of PdfDocument class and load a PDF document using PdfDocument.LoadFromFile() method.
- Add a page to the document using PdfDocument.Pages.Add() method.
- Create fonts and the brush for the title, the marker, and the list, and draw the list title on the page using PdfPageBase.Canvas.DrawString() method.
- Create an unordered list as the parent list and format the list and the marker.
- Create three sublists for the items in the parent list and format the list.
- Get an item in the parent list using PdfList.Items.get_Item() method.
- Set a specified list as the sublist of the item through PdfListItem.SubList property.
- Draw the list on the page using PdfList.Draw() method.
- Save the document using PdfDocument.SaveToFile() method.
- Python
from spire.pdf import *
from spire.pdf.common import *

# Create an object of PdfDocument class
pdf = PdfDocument()

# Add a page to the document with specified page size and margins
page = pdf.Pages.Add()

# Create tile font and list font
titleFont = PdfTrueTypeFont("HarmonyOS Sans SC", 14.0, 1, True)
listFont = PdfTrueTypeFont("HarmonyOS Sans SC", 12.0, 0, True)
markerFont = PdfTrueTypeFont("HarmonyOS Sans SC", 12.0, 0, True)

# Create brushs to draw the title and lists
titleBrush = PdfBrushes.get_Blue()
firstListBrush = PdfBrushes.get_Purple()
secondListBrush = PdfBrushes.get_Black()

# Specify the initial coordinate
x = 10.0
y = 20.0

# Draw the title
title = "Nested List:"
page.Canvas.DrawString(title, titleFont, titleBrush, x, y)

# Create a parent list
parentListContent = "Fruits:\n" + "Colors:\n" + "Days of the week:"
parentList = PdfList(parentListContent)

# Format the parent list
indent = 4
textIndent = 4
parentList.Font = listFont
parentList.Indent = indent
parentList.TextIndent = textIndent
# Set the parent list marker
parentList.Marker.Style = PdfUnorderedMarkerStyle.Square
parentList.Marker.Font = markerFont

# Create nested sublists and format them
subListMarker = PdfOrderedMarker(PdfNumberStyle.LowerLatin, markerFont)
subList1Content = "Apples\n" + "Bananas\n" + "Oranges"
subList1 = PdfSortedList(subList1Content, subListMarker)
subList1.Font = listFont
subList1.Indent = indent * 2
subList1.TextIndent = textIndent

subList2Content = "Red\n" + "Green"
subList2 = PdfSortedList(subList2Content, subListMarker)
subList2.Font = listFont
subList2.Indent = indent * 2
subList2.TextIndent = textIndent

subList3Content = "Monday\n" + "Tuesday\n" + "Wednesday"
subList3 = PdfSortedList(subList3Content, subListMarker)
subList3.Font = listFont
subList3.Indent = indent * 2
subList3.TextIndent = textIndent

# Set the created list as the nested sublist of each item in the parent list
item1 = parentList.Items.get_Item(0)
item1.SubList = subList1

item2 = parentList.Items.get_Item(1)
item2.SubList = subList2

item3 = parentList.Items.get_Item(2)
item3.SubList = subList3

# Draw the list
parentList.Draw(page.Canvas, x, float(y + titleFont.MeasureString(title).Height + 5))

# Save the document
pdf.SaveToFile("output/CreateNestedList.pdf")
pdf.Close()
Apply for a Temporary License
If you'd like to remove the evaluation message from the generated documents, or to get rid of the function limitations, please request a 30-day trial license for yourself.
The Find and Replace feature in Excel allows you to quickly find specific values and perform targeted replacements based on specific requirements. With it, all occurrences of a specific value can be updated at once, which can significantly improve productivity when working with large data sets. In this article, you will learn how to programmatically find and replace data in Excel in Python using Spire.XLS for Python.
- Find and Replace Data in a Worksheet in Excel
- Find and Replace Data in a Specific Cell Range in Excel
Install Spire.XLS for Python
This scenario requires Spire.XLS for Python and plum-dispatch v1.7.4. They can be easily installed in your Windows through the following pip command.
pip install Spire.XLS
If you are unsure how to install, please refer to this tutorial: How to Install Spire.XLS for Python on Windows
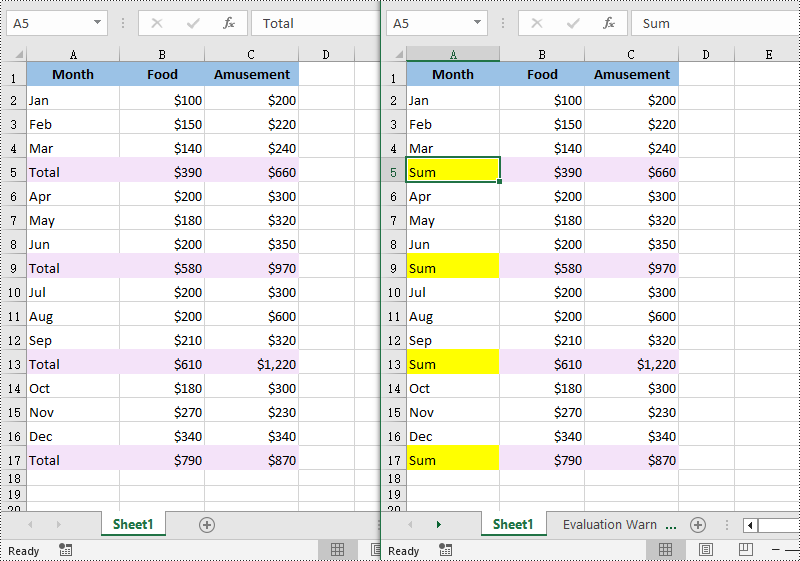
Find and Replace Data in an Excel Worksheet in Python
Spire.XLS for Python offers the Worksheet.FindAllString() method to find the cells containing specific data values in an Excel worksheet. Once the cells are found, you can use the CellRange.Text property to update their values with new values. The detailed steps are as follows:
- Create a Workbook object.
- Load an Excel file using Workbook.LoadFromFile() method.
- Get a specific worksheet using Workbook.Worksheets[] property.
- Find the cells containing a specific value in the worksheet using Worksheet.FindAllString() method.
- Iterate through the found cells.
- Replace the value of each found cell with another value using CellRange.Text property.
- Set a background color to highlight the cell using CellRange.Style.Color property.
- Save the result file using Workbook.SaveToFile() method.
- Python
from spire.xls import *
from spire.xls.common import *

# Create a Workbook object
workbook = Workbook()

# Load an Excel document from disk
workbook.LoadFromFile("input.xlsx")

# Get the first worksheet
worksheet = workbook.Worksheets[0]

# Find the cells with the specific string value “Total” in the worksheet
ranges = worksheet.FindAllString("Total", False, False)

# Iterate through the found cells
for range in ranges:
    # Replace the value of the cell with another value
    range.Text = "Sum"

    # Set a background color for the cell
    range.Style.Color = Color.get_Yellow()

# Save the result file
workbook.SaveToFile("FindAndReplaceData.xlsx", ExcelVersion.Version2016)
workbook.Dispose()
Find and Replace Data in a Specific Cell Range in Excel in Python
Spire.XLS for Python also allows you to find the cells containing a specific value in a cell range through the CellRange.FindAllString() method. Then you can update the value of each found cell with another value using the CellRange.Text property. The detailed steps are as follows:
- Create a Workbook object.
- Load an Excel file using Workbook.LoadFromFile() method.
- Get a specific worksheet using Workbook.Worksheets[] property.
- Get a specific cell range of the worksheet using Worksheet.Range[] property.
- Find the cells with a specific value in the cell range using CellRange.FindAllString() method.
- Iterate through the found cells.
- Replace the value of each found cell with another value using CellRange.Text property.
- Set a background color to highlight the cell using CellRange.Style.Color property.
- Save the result file using Workbook.SaveToFile() method.
- Python
from spire.xls import *
from spire.xls.common import *

# Create a Workbook object
workbook = Workbook()

# Load an Excel document from disk
workbook.LoadFromFile("input.xlsx")

# Get the first worksheet
sheet = workbook.Worksheets[0]

# Get a specific cell range
range = sheet.Range["A6:C13"]

# Find the cells with the specific value "Total" in the cell range
cells = range.FindAllString("Total", False, False)

# Iterate through the found cells
for cell in cells:

    # Replace the value of the cell with another value
    cell.Text = "Sum"

    # Set a background color for the cell
    cell.Style.Color = Color.get_Yellow()

# Save the result file
workbook.SaveToFile("ReplaceDataInCellRange.xlsx", ExcelVersion.Version2016)
workbook.Dispose()

Apply for a Temporary License
If you'd like to remove the evaluation message from the generated documents, or to get rid of the function limitations, please request a 30-day trial license for yourself.
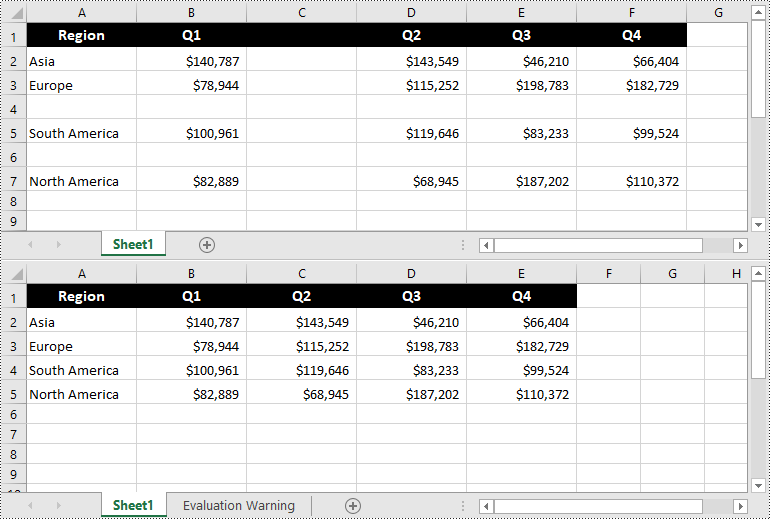
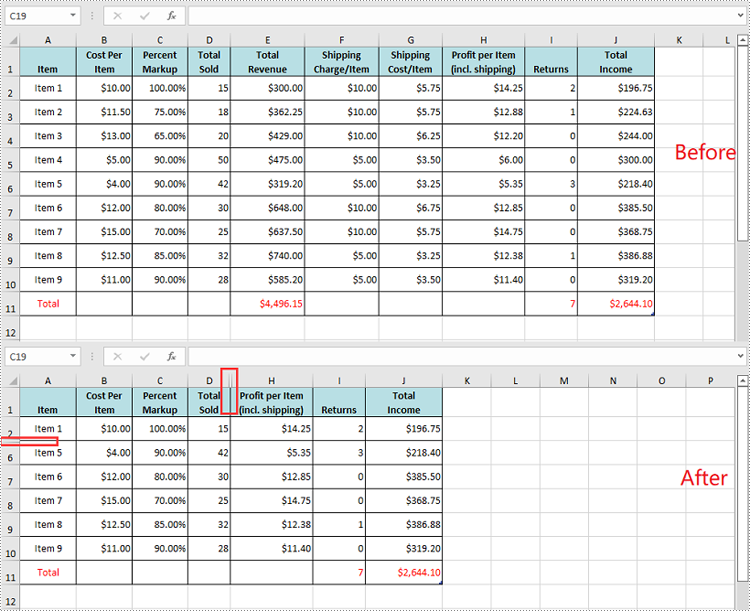
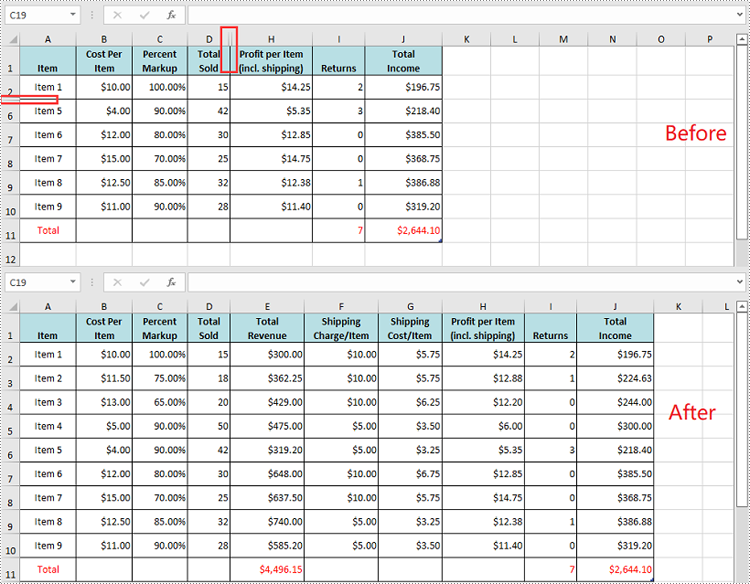
Deleting rows and columns from Excel is crucial for maintaining clean and organized data. For example, when a worksheet accumulates blank rows or columns that serve no purpose and clutter the data, removing them becomes necessary. By deleting these blank rows and columns, you can effectively reduce the file size and enhance the spreadsheet's readability. In this article, we will explain how to delete rows and columns from Excel in Python using Spire.XLS for Python.
- Delete a Specific Row and Column from Excel in Python
- Delete Multiple Rows and Columns from Excel in Python
- Delete Blank Rows and Columns from Excel in Python
Install Spire.XLS for Python
This scenario requires Spire.XLS for Python and plum-dispatch v1.7.4. They can be easily installed in your Windows through the following pip command.
pip install Spire.XLS
If you are unsure how to install, please refer to this tutorial: How to Install Spire.XLS for Python on Windows
Delete a Specific Row and Column from Excel in Python
The Worksheet.DeleteRow(rowIndex) and Worksheet.DeleteColumn(columnIndex) methods provided by Spire.XLS for Python enable you to delete a specific row and column from an Excel worksheet. The detailed steps are as follows.
- Create an object of the Workbook class.
- Load an Excel file using Workbook.LoadFromFile() method.
- Get the desired worksheet using Workbook.Worksheets[sheetIndex] property.
- Delete the desired row from the worksheet by its index (1-based) using Worksheet.DeleteRow(rowIndex) method.
- Delete the desired column from the worksheet by its index (1-based) using Worksheet.DeleteColumn(columnIndex) method.
- Save the result file using Workbook.SaveToFile() method.
- Python
from spire.xls import *
from spire.xls.common import *

# Create a Workbook object
workbook = Workbook()
# Load an Excel file
workbook.LoadFromFile("Input.xlsx")

# Get the first worksheet
sheet = workbook.Worksheets[0]

# Delete the 9th row
sheet.DeleteRow(9)
# Delete the 3rd column
sheet.DeleteColumn(3)

# Save the result file
workbook.SaveToFile("DeleteSpecificRowAndColumn.xlsx", ExcelVersion.Version2016)
workbook.Dispose()

Delete Multiple Rows and Columns from Excel in Python
Spire.XLS for Python enables you to delete multiple adjacent rows and columns from an Excel worksheet at once by using the Worksheet.DeleteRow(startRowIndex, rowCount) and Worksheet.DeleteColumn(startColumnIndex, columnCount) methods. The detailed steps are as follows.
- Create an object of the Workbook class.
- Load an Excel file using Workbook.LoadFromFile() method.
- Get the desired worksheet using Workbook.Worksheets[sheetIndex] property.
- Delete the desired rows from the worksheet using Worksheet.DeleteRow(startRowIndex, rowCount) method.
- Delete the desired columns from the worksheet using Worksheet.DeleteColumn(startColumnIndex, columnCount) method.
- Save the result file using Workbook.SaveToFile() method.
- Python
from spire.xls import *
from spire.xls.common import *

# Create a Workbook object
workbook = Workbook()
# Load an Excel file
workbook.LoadFromFile("Input.xlsx")

# Get the first worksheet
sheet = workbook.Worksheets[0]

# Delete the 5th, 6th and 7th rows
sheet.DeleteRow(5, 3)
# Delete the 3rd and 4th columns
sheet.DeleteColumn(3, 2)

# Save the result file
workbook.SaveToFile("DeleteMultipleRowsAndColumns.xlsx", ExcelVersion.Version2016)
workbook.Dispose()

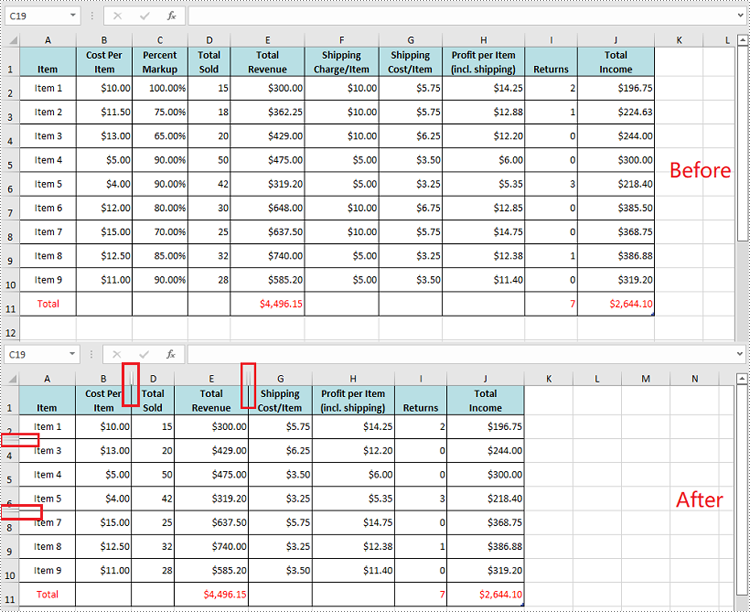
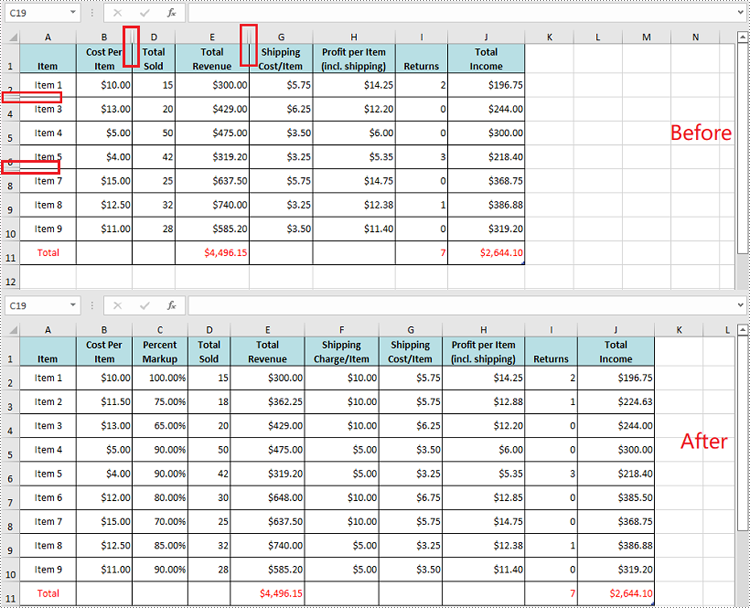
Delete Blank Rows and Columns from Excel in Python
You can use the Worksheet.Row[rowIndex].IsBlank and Worksheet.Column[columnIndex].IsBlank properties to detect whether a specific row and column are blank or not. If the result is True, you can remove them from your woeksheet using the Worksheet.DeleteRow(rowIndex) and Worksheet.DeleteColumn(columnIndex) methods.
The following steps show how to delete the blank rows and columns from an Excel worksheet.
- Create an object of the Workbook class.
- Load an Excel file using Workbook.LoadFromFile() method.
- Get the desired worksheet using Workbook.Worksheets[sheetIndex] property.
- Loop through the used rows in the worksheet.
- Find the blank rows using Worksheet.Row[rowIndex].IsBlank property and then delete them from the worksheet using Worksheet.DeleteRow(rowIndex) method.
- Loop through the used columns in the worksheet.
- Find the blank columns using Worksheet.Column[columnIndex].IsBlank property and then delete them from the worksheet using Worksheet.DeleteColumn(columnIndex) method.
- Save the result file using Workbook.SaveToFile() method.
- Python
from spire.xls import *
from spire.xls.common import *

# Create a Workbook object
workbook = Workbook()
# Load an Excel file
workbook.LoadFromFile("Input1.xlsx")

# Get the first worksheet
sheet = workbook.Worksheets[0]

# Delete blank rows from the worksheet
for i in range(sheet.Rows.Length - 1, -1, -1):
    if sheet.Rows[i].IsBlank:
        sheet.DeleteRow(i + 1)

# Delete blank columns from the worksheet
for j in range(sheet.Columns.Length - 1, -1, -1):
    if sheet.Columns[j].IsBlank:
        sheet.DeleteColumn(j + 1)

# Save the result file
workbook.SaveToFile("DeleteBlankRowsAndColumns.xlsx", ExcelVersion.Version2016)
workbook.Dispose()
Apply for a Temporary License
If you'd like to remove the evaluation message from the generated documents, or to get rid of the function limitations, please request a 30-day trial license for yourself.
If you need to display or interact with the contents of an Excel spreadsheet on a web page, converting Excel to HTML is a good choice. This conversion allows users to view and manipulate the table data directly on the web page without having to download the Excel file, providing a more convenient way to share and display the data. When needed, you can also convert the HTML file back to Excel format for better data editing. In this article, we will show you how to convert Excel to HTML and HTML to Excel in Python by using Spire.XLS for Python.
- Convert Excel to HTML in Python
- Convert Excel to HTML with Images Embedded in Python
- Convert HTML to Excel in Python
Install Spire.XLS for Python
This scenario requires Spire.XLS for Python and plum-dispatch v1.7.4. They can be easily installed in your Windows through the following pip commands.
pip install Spire.XLS
If you are unsure how to install, please refer to this tutorial: How to Install Spire.XLS for Python on Windows
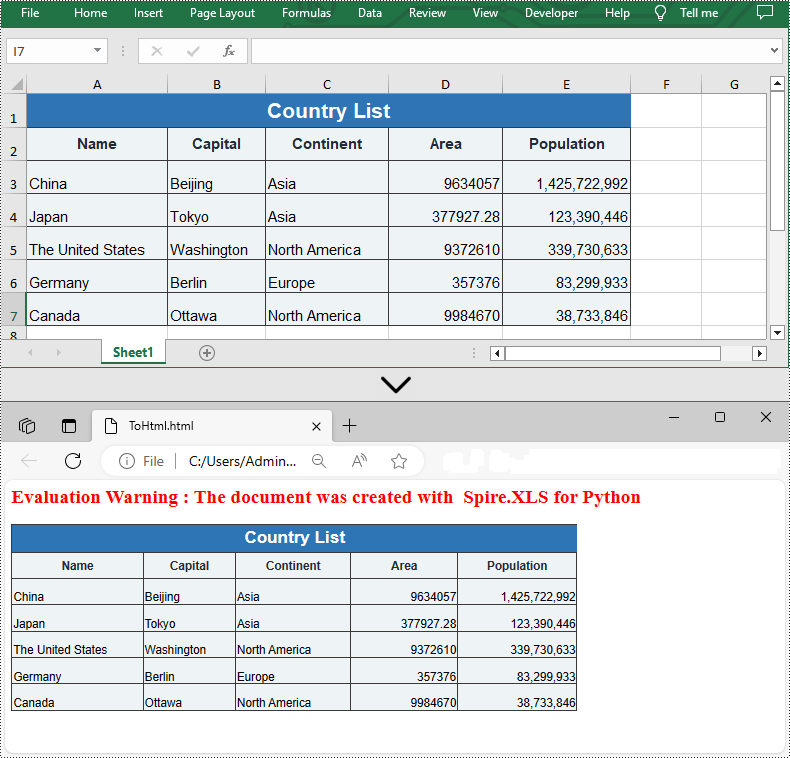
Convert Excel to HTML in Python
Spire.XLS for Python supports converting a specific Excel worksheet to HTML using Worksheet.SaveToHtml() method. Detailed steps are listed below.
- Create a Workbook instance.
- Load a sample Excel file using Workbook.LoadFromFile() method.
- Get a specific worksheet using Workbook.Worksheets[] property.
- Save the worksheet as an HTML file using Worksheet.SaveToHtml() method.
- Python
from spire.xls import *
from spire.xls.common import *

inputFile = "C:/Users/Administrator/Desktop/Sample_1.xlsx"
outputFile = "C:/Users/Administrator/Desktop/ToHtml.html"

# Create a Workbook instance
workbook = Workbook()

# Load a sample Excel file
workbook.LoadFromFile(inputFile)

# Get the first sheet of this file
sheet = workbook.Worksheets[0]

# Save the worksheet to HTML
sheet.SaveToHtml(outputFile)
workbook.Dispose()
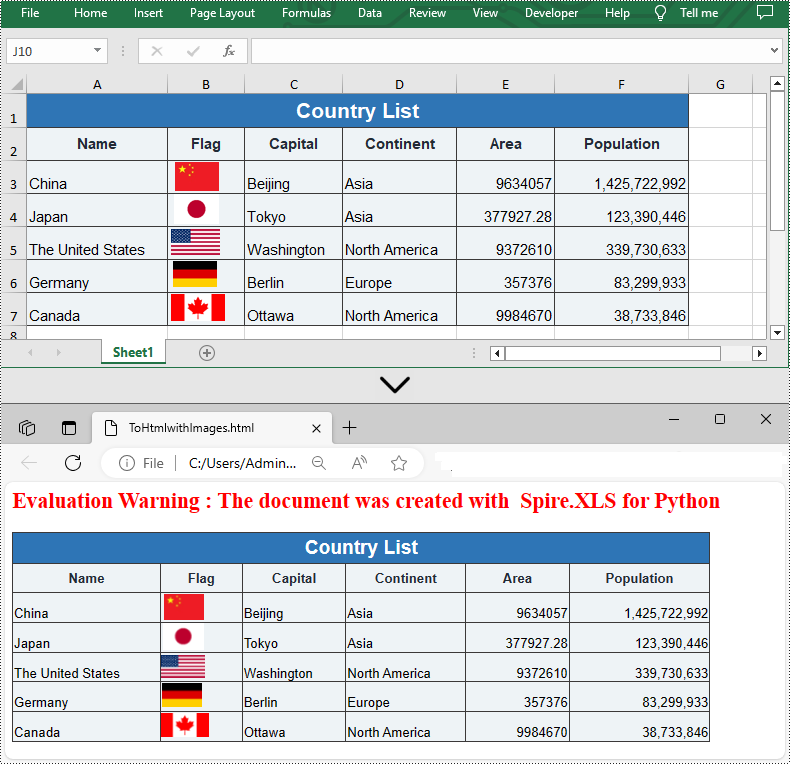
Convert Excel to HTML with Images Embedded in Python
If the Excel file you want to convert contains images, you can embed the images into the HTML file by setting the ImageEmbedded property to "True". Detailed steps are listed below.
- Create a Workbook instance.
- Load a sample Excel file using Workbook.LoadFromFile() method.
- Get a specific worksheet using Workbook.Worksheets[] property.
- Create an HTMLOptions instance.
- Set the ImageEmbedded as “True” to embed images to HTML.
- Save the worksheet as an HTML file using Worksheet.SaveToHtml() method.
- Python
from spire.xls import *
from spire.xls.common import *

inputFile = "C:/Users/Administrator/Desktop/Sample_2.xlsx"
outputFile = "C:/Users/Administrator/Desktop/ToHtmlwithImages.html"

# Create a Workbook instance
workbook = Workbook()

# Load a sample Excel file
workbook.LoadFromFile(inputFile)

# Get the first sheet of this file
sheet = workbook.Worksheets[0]

# Create an HTMLOptions instance
options = HTMLOptions()

# Embed images to HTML
options.ImageEmbedded = True

# Save the worksheet to HTML
sheet.SaveToHtml(outputFile, options)
workbook.Dispose()
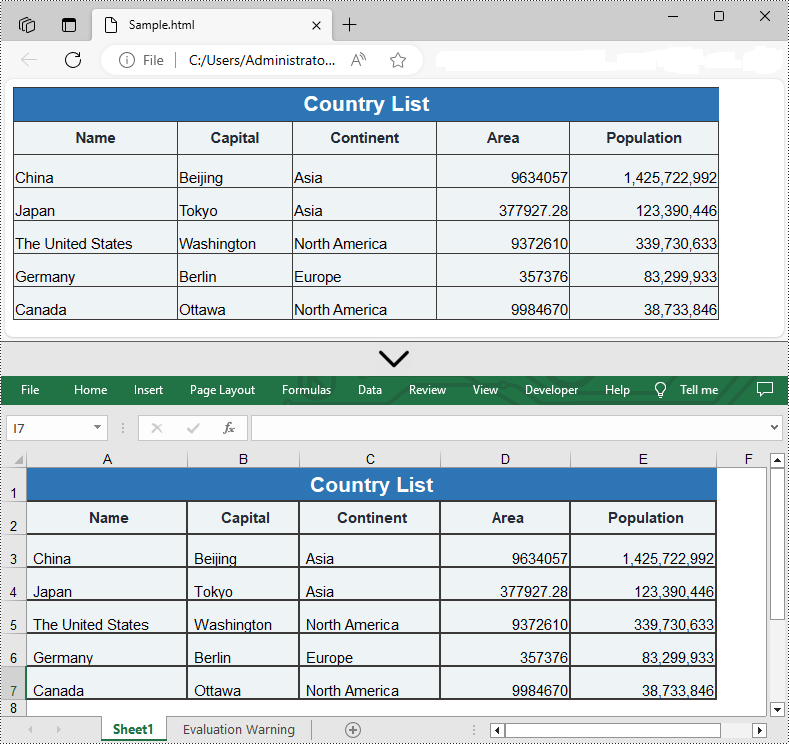
Convert HTML to Excel in Python
You are also allowed to convert an HTML back to an Excel file by calling the Workbook.SaveToFile() method provided by Spire.XLS for Python. Detailed steps are listed below.
- Create a Workbook instance.
- Load an HTML file from disk using Workbook.LoadFromFile() method.
- Save the HTML file to an Excel file by using Workbook.SaveToFile() method.
- Python
from spire.xls import *
from spire.xls.common import *

inputFile = "C:/Users/Administrator/Desktop/Sample.html"
outputFile = "C:/Users/Administrator/Desktop/ToExcel.xlsx"

# Create a Workbook instance
workbook = Workbook()

# Load an HTML file from disk
workbook.LoadFromHtml(inputFile)

# Save the HTML file to an Excel file
workbook.SaveToFile(outputFile, ExcelVersion.Version2013)
workbook.Dispose()
Apply for a Temporary License
If you'd like to remove the evaluation message from the generated documents, or to get rid of the function limitations, please request a 30-day trial license for yourself.
Hiding or unhiding rows and columns in Excel gives you precise control over the visibility of specific data within a worksheet. By hiding rows or columns, you can temporarily remove irrelevant information from view, reducing visual clutter and creating a cleaner workspace. This makes it easier to work with the data that truly matters and enhances your productivity. On the other hand, unhiding rows or columns allows you to restore visibility and regain access to previously hidden information whenever you need it. This is advantageous when you have hidden data that requires further review, modification, or analysis. In this article, we will explain how to hide or unhide rows and columns in Excel in Python using Spire.XLS for Python.
- Hide Specific Rows and Columns in Excel in Python
- Unhide Specific Hidden Rows and Columns in Excel in Python
- Hide Multiple Rows and Columns at Once in Excel in Python
- Unhide All Hidden Rows and Columns in Excel in Python
Install Spire.XLS for Python
This scenario requires Spire.XLS for Python and plum-dispatch v1.7.4. They can be easily installed in your Windows through the following pip command.
pip install Spire.XLS
If you are unsure how to install, please refer to this tutorial: How to Install Spire.XLS for Python on Windows
Hide Specific Rows and Columns in Excel in Python
Spire.XLS for Python offers the Worksheet.HideRow(rowIndex) and Worksheet.HideColumn(columnIndex) methods to hide a specific row and column in an Excel worksheet. The detailed steps are as follows.
- Create an object of the Workbook class.
- Load an Excel file using Workbook.LoadFromFile() method.
- Get a specific worksheet through Workbook.Worksheets[sheetIndex] property.
- Hide specific rows in the worksheet using Worksheet.HideRow(rowIndex) method.
- Hide Specific columns in the worksheet using Worksheet.HideColumn(columnIndex) method.
- Save the result file using Workbook.SaveToFile() method.
- Python
from spire.xls import *
from spire.xls.common import *

# Create a Workbook object
workbook = Workbook()
# Load an Excel file
workbook.LoadFromFile("Input.xlsx")

# Get the first worksheet
sheet = workbook.Worksheets[0]

# Hide the 3rd and the 7th rows
sheet.HideRow(3)
sheet.HideRow(7)

# Hide the 3rd and the 6th columns
sheet.HideColumn(3)
sheet.HideColumn(6)

# Save the result file
workbook.SaveToFile("HideRowsAndColumns.xlsx", ExcelVersion.Version2016)
workbook.Dispose()
Unhide Specific Hidden Rows and Columns in Excel in Python
You can use the Worksheet.ShowRow(rowIndex) and Worksheet.ShowColumn(columnIndex) methods to unhide a specific hidden row and column. The detailed steps are as follows.
- Create an object of the Workbook class.
- Load an Excel file using Workbook.LoadFromFile() method.
- Get a specific worksheet through Workbook.Worksheets[sheetIndex] property.
- Unhide specific hidden rows in the worksheet using Worksheet.ShowRow(rowIndex) method.
- Unhide specific hidden columns in the worksheet using Worksheet.ShowColumn(columnIndex) method.
- Save the result file using Workbook.SaveToFile() method.
- Python
from spire.xls import *
from spire.xls.common import *

# Create a Workbook object
workbook = Workbook()
# Load an Excel file
workbook.LoadFromFile("HideRowsAndColumns.xlsx")

# Get the first worksheet
sheet = workbook.Worksheets[0]

# Unhide the 3rd and the 7th rows
sheet.ShowRow(3)
sheet.ShowRow(7)

# Unhide the 3rd and the 6th columns
sheet.ShowColumn(3)
sheet.ShowColumn(6)

# Save the result file
workbook.SaveToFile("ShowRowsAndColumns.xlsx", ExcelVersion.Version2016)
workbook.Dispose()
Hide Multiple Rows and Columns at Once in Excel in Python
To hide multiple rows and columns at once, you can use the Worksheet.HideRows(startRowIndex, rowCount) and Worksheet.HideColumns(startColumnIndex, columnCount) methods. The detailed steps are as follows.
- Create an object of the Workbook class.
- Load an Excel file using Workbook.LoadFromFile() method.
- Get a specific worksheet through Workbook.Worksheets[sheetIndex] property.
- Hide multiple rows in the worksheet using the Worksheet.HideRows(startRowIndex, rowCount) method.
- Hide multiple columns in the worksheet using Worksheet.HideColumns(startColumnIndex, columnCount) method.
- Save the result file using Workbook.SaveToFile() method.
- Python
from spire.xls import *
from spire.xls.common import *

# Create a Workbook object
workbook = Workbook()
# Load an Excel file
workbook.LoadFromFile("Input.xlsx")

# Get the first worksheet
sheet = workbook.Worksheets[0]

# Hide 3, 4 and 5 rows
sheet.HideRows(3, 3)

# Hide 5, 6 and 7 columns
sheet.HideColumns(5, 3)

# Save the result file
workbook.SaveToFile("HideMultipleRowsAndColumns.xlsx", ExcelVersion.Version2016)
workbook.Dispose()
Unhide All Hidden Rows and Columns in Excel in Python
To unhide all hidden rows and columns, you first need to loop through the used rows and columns in the worksheet. Next, find the hidden rows and columns using Worksheet.GetRowIsHide(rowIndex) and Worksheet.GetColumnIsHide(columnIndex) methods, and then unhide them using Worksheet.ShowRow(rowIndex) and Worksheet.ShowColumn(columnIndex) methods. The detailed steps are as follows.
- Create an object of the Workbook class.
- Load an Excel file using Workbook.LoadFromFile() method.
- Get a specific worksheet through Workbook.Worksheets[sheetIndex] property.
- Iterate through the used rows in the worksheet and find the hidden rows using Worksheet.GetRowIsHide(rowIndex) method.
- Unhide every hidden row using Worksheet.ShowRow(rowIndex) method.
- Iterate through the used columns in the worksheet and find the hidden columns using Worksheet.GetColumnIsHide(columnIndex) method.
- Unhide every hidden column using Worksheet.ShowColumn(columnIndex) method.
- Save the result file using Workbook.SaveToFile() method.
- Python
from spire.xls import *
from spire.xls.common import *

# Create a Workbook object
workbook = Workbook()
# Load an Excel file
workbook.LoadFromFile("HideMultipleRowsAndColumns.xlsx")

# Get the first worksheet
sheet = workbook.Worksheets[0]

# Iterate through the used rows in the worksheet
for i in range(1, sheet.LastRow + 1):
    # Check if the current row is hidden
    if sheet.GetRowIsHide(i):
        # Unhide the hidden row
        sheet.ShowRow(i)

# Iterate through the used columns in the worksheet
for j in range(1, sheet.LastColumn + 1):
    # Check if the current column is hidden
    if sheet.GetColumnIsHide(j):
        # Unhide the hidden column
        sheet.ShowColumn(j)

# Save the result file
workbook.SaveToFile("ShowAllHiddenRowsAndColumns.xlsx", ExcelVersion.Version2016)
workbook.Dispose()
Apply for a Temporary License
If you'd like to remove the evaluation message from the generated documents, or to get rid of the function limitations, please request a 30-day trial license for yourself.
Hyperlinks are a useful tool for connecting and navigating between different sections of your document or external resources such as websites or files. However, there may be instances where you need to modify the hyperlinks in your Word document. For example, you may need to update the text or URL of a hyperlink to ensure accuracy, or change the appearance of a hyperlink to improve visibility. In this article, you will learn how to update or change hyperlinks in a Word document in Python using Spire.Doc for Python.
- Update a Hyperlink in a Word Document in Python
- Change the Appearance of a Hyperlink in a Word Document in Python
Install Spire.Doc for Python
This scenario requires Spire.Doc for Python and plum-dispatch v1.7.4. They can be easily installed in your Windows through the following pip command.
pip install Spire.Doc
If you are unsure how to install, please refer to this tutorial: How to Install Spire.Doc for Python on Windows
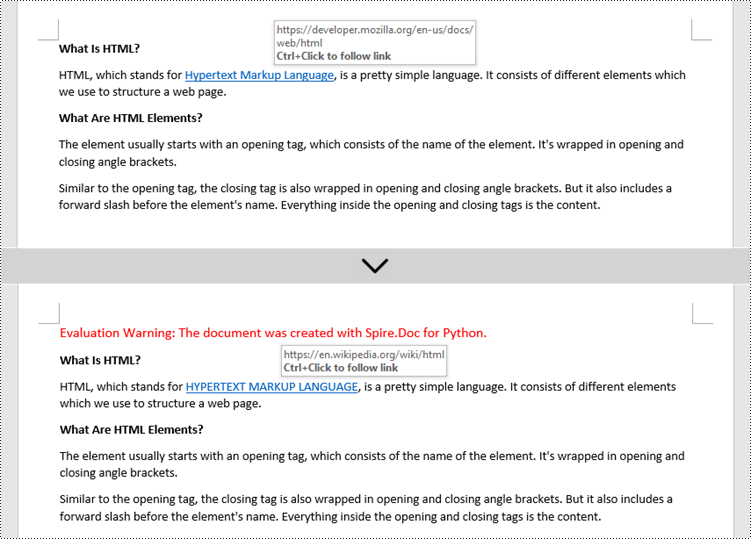
Update a Hyperlink in a Word Document in Python
A hyperlink is recognized as a FormField object by Spire.Doc for Python. In order to modify a specific hyperlink, we need to retrieve all hyperlinks in the document and get the desired one by its index. The display text and URL of a hyperlink can be reset by the FormField.Text property and the FormField.Code property. The following are the steps to update a hyperlink in a Word document using Spire.Doc for Python.
- Create a Document object.
- Load a Word file using Document.LoadFromFile() method.
- Loop through the elements in the document to find all hyperlinks.
- Get a specific hyperlink from the hyperlink collection.
- Update the display text of the hyperlink through FormField.FieldText property.
- Update the URL of the hyperlink through FormField.Code property.
- Save the document to a different Word file using Document.SaveToFile() method.
- Python
from spire.doc import *
from spire.doc.common import *

# Create a Document object
doc = Document()

# Load a Word file
doc.LoadFromFile("C:/Users/Administrator/Desktop/input.docx")

# Find all hyperlinks in the document
hyperlinks = []
for i in range(doc.Sections.Count):
    section = doc.Sections.get_Item(i)
    for j in range(section.Body.ChildObjects.Count):
        sec = section.Body.ChildObjects.get_Item(j)
        if sec.DocumentObjectType == DocumentObjectType.Paragraph:
            for k in range((sec if isinstance(sec, Paragraph) else None).ChildObjects.Count):
                para = (sec if isinstance(sec, Paragraph)
                        else None).ChildObjects.get_Item(k)
                if para.DocumentObjectType == DocumentObjectType.Field:
                    field = para if isinstance(para, Field) else None
                    if field.Type == FieldType.FieldHyperlink:
                        hyperlinks.append(field)

# Get a specific hyperlink
hyperlink = hyperlinks[0]

# Update the display text of the hyperlink
hyperlink.FieldText = "HYPERTEXT MARKUP LANGUAGE"

# Update the URL of the hyperlink
hyperlink.Code ="HYPERLINK \"" + "https://en.wikipedia.org/wiki/HTML" + "\""

# Save the document to a docx file
doc.SaveToFile("output/UpdateHyperlink.docx", FileFormat.Docx)
doc.Close()
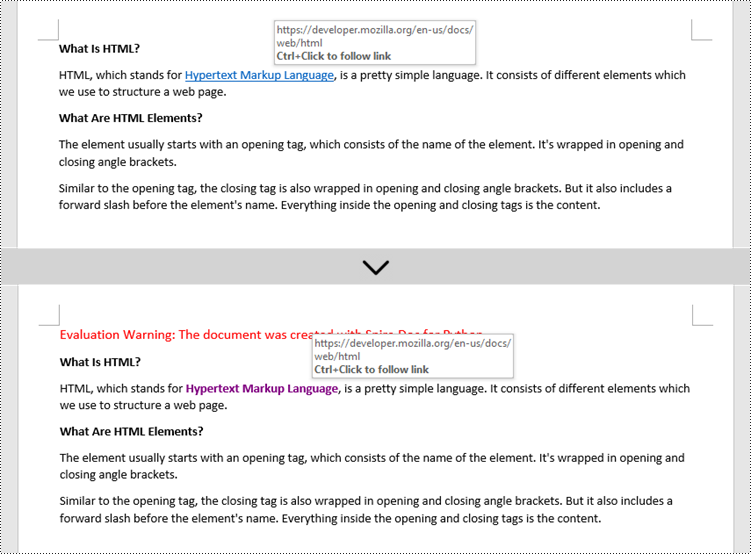
Change the Appearance of a Hyperlink in a Word Document in Python
After a hyperlink is obtained, it's easy to change the appearance of it through the FormField.CharacterFormat object. Specifically, the CharacterFormat object offers the properties such as TextColor, FontName, FontSize, UnderlineStyle to change the style of the characters of a hyperlink. The following are the detailed steps.
- Create a Document object.
- Load a Word file using Document.LoadFromFile() method.
- Loop through the elements in the document to find all hyperlinks.
- Get a specific hyperlink from the hyperlink collection.
- Change the appearance of the hyperlink through the properties under FormField.CharacterFormat object.
- Save the document to a different Word file using Document.SaveToFile() method.
- Python
from spire.doc import *
from spire.doc.common import *

# Create a Document object
doc = Document()

# Load a Word file
doc.LoadFromFile("C:/Users/Administrator/Desktop/input.docx")

# Find all hyperlinks in the Word document
hyperlinks = []
for i in range(doc.Sections.Count):
    section = doc.Sections.get_Item(i)
    for j in range(section.Body.ChildObjects.Count):
        sec = section.Body.ChildObjects.get_Item(j)
        if sec.DocumentObjectType == DocumentObjectType.Paragraph:
            for k in range((sec if isinstance(sec, Paragraph) else None).ChildObjects.Count):
                para = (sec if isinstance(sec, Paragraph)
                        else None).ChildObjects.get_Item(k)
                if para.DocumentObjectType == DocumentObjectType.Field:
                    field = para if isinstance(para, Field) else None
                    if field.Type == FieldType.FieldHyperlink:
                        hyperlinks.append(field)

# Get a specific hyperlink
hyperlink = hyperlinks[0]

# Change the appearance of the hyperlink
hyperlink.CharacterFormat.UnderlineStyle = UnderlineStyle.none
hyperlink.CharacterFormat.TextColor = Color.get_Purple()
hyperlink.CharacterFormat.Bold = True

# Save the document to a docx file
doc.SaveToFile("output/ChangeAppearance.docx", FileFormat.Docx)
doc.Close()
Apply for a Temporary License
If you'd like to remove the evaluation message from the generated documents, or to get rid of the function limitations, please request a 30-day trial license for yourself.
Headers and footers in Word are sections at the top and bottom margins of each page. They can contain additional information such as page numbers, document titles, dates, author names, and other identifying details. By default, the headers or footers on all pages are the same, but in certain scenarios, you can also insert different headers or footers on the first page, odd pages, or even pages. This article will demonstrate how to insert headers and footers into a Word document in Python using Spire.Doc for Python.
- Insert Headers and Footers into a Word Document
- Add Different Headers and Footers for the First Page and Other Pages
- Add Different Headers and Footers for Odd and Even Pages
Install Spire.Doc for Python
This scenario requires Spire.Doc for Python and plum-dispatch v1.7.4. They can be easily installed in your Windows through the following pip commands.
pip install Spire.Doc
If you are unsure how to install, please refer to this tutorial: How to Install Spire.Doc for Python on Windows
Insert Headers and Footers into a Word Document in Python
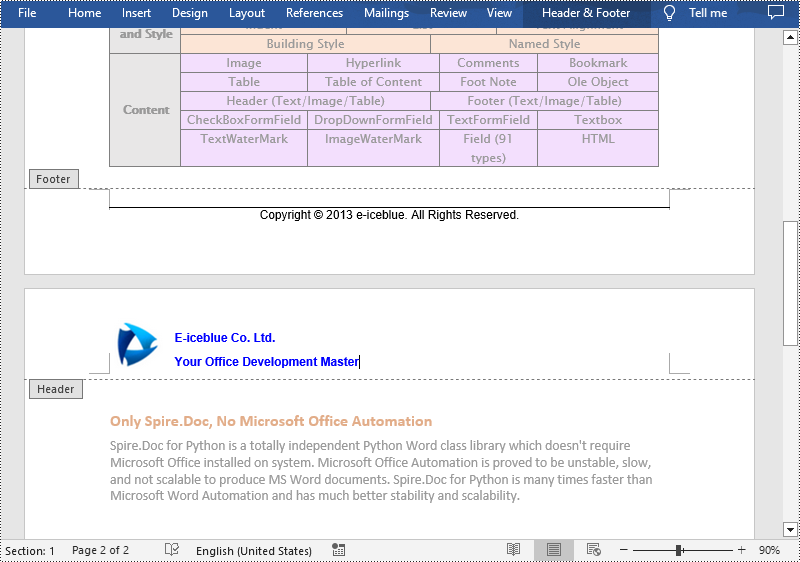
To insert a header or a footer into a Word document, you first need to get them through the Section.HeadersFooters.Header and Section.HeadersFooters.Footer properties, and then add paragraphs to them to insert pictures, text, page numbers, dates, or other information.
The following are steps to add headers and footers in Word:
- Create a Document object.
- Load a Word document using Document.LoadFromFile() method.
- Get a specified section using Document.Sections[] property.
- Add Header
- Get header using Section.HeadersFooters.Header property.
- Add a paragraph to the header using HeaderFooter.AddParagraph() method and set paragraph alignment.
- Add an image to the header paragraph using Paragraph.AppendPicture() method, and then set the text wrapping style and position of the image.
- Add text to the header paragraph using Paragraph.AppendText() method, and then set the font name, size, color, etc.
- Add Footer
- Get footer using Section.HeadersFooters.Footer property.
- Add a paragraph to the footer and then add text to the footer paragraph.
- Get the borders of the footer paragraph using Paragraph.Format.Borders property, and then set the top border style and space.
- Save the result document using Document.SaveToFile() method.
- Python
from spire.doc import *
from spire.doc.common import *

# Create a Document object
document = Document()

# Load a Word document
document.LoadFromFile("Sample.docx")

# Get a specific section
section = document.Sections.get_Item(0)

# Get header
header = section.HeadersFooters.Header

# Add a paragraph to the header and set its alignment style
headerParagraph = header.AddParagraph()
headerParagraph.Format.HorizontalAlignment = HorizontalAlignment.Left

# Add an image to the header paragraph and set its text wrapping style, position
headerPicture = headerParagraph.AppendPicture("Logo.png")
headerPicture.TextWrappingStyle = TextWrappingStyle.Square
headerPicture.VerticalOrigin = VerticalOrigin.Line
headerPicture.VerticalAlignment = ShapeVerticalAlignment.Center

# Add text to the header paragraph and set its font style
text = headerParagraph.AppendText("E-iceblue Co. Ltd."+ "\nYour Office Development Master")
text.CharacterFormat.FontName = "Arial"
text.CharacterFormat.FontSize = 10
text.CharacterFormat.Bold = True
text.CharacterFormat.TextColor = Color.get_Blue()

# Get footer
footer = section.HeadersFooters.Footer

# Add a paragraph to the footer paragraph and set its alignment style
footerParagraph = footer.AddParagraph()
footerParagraph.Format.HorizontalAlignment = HorizontalAlignment.Center

# Add text to the footer paragraph and set its font style
text = footerParagraph.AppendText("Copyright © 2013 e-iceblue. All Rights Reserved.")
text.CharacterFormat.FontName = "Arial"
text.CharacterFormat.FontSize = 10

# Set the border of the footer paragraph
footerParagraph.Format.Borders.Top.BorderType = BorderStyle.Single
footerParagraph.Format.Borders.Top.Space = 0.05

# Save the result file
document.SaveToFile("HeaderAndFooter.docx", FileFormat.Docx)
document.Close()
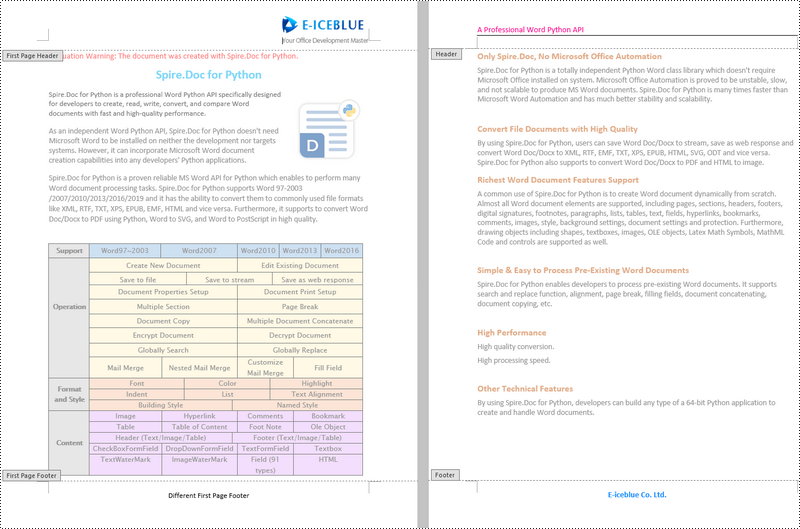
Add Different Headers and Footers for the First Page and Other Pages in Word in Python
Sometimes you may need to insert a header and footer only on the first page, or you may want the header and footer on the first page different from other pages.
Spire.Doc for Python offers the Section.PageSetup.DifferentFirstPageHeaderFooter property to enable a different first page header or footer. The following are the detailed steps to accomplish the task.
- Create a Document object.
- Load a Word document using Document.LoadFromFile() method.
- Get a specified section using Document.Sections[] property.
- Enable different headers and footers for the first page and other pages by setting the Section.PageSetup.DifferentFirstPageHeaderFooter property to True.
- Get the first page header using Section.HeadersFooters.FirstPageHeader property.
- Add a paragraph to the first page header and then add an image to the header paragraph.
- Get the first page footer using Section.HeadersFooters.FirstPageFooter property.
- Add a paragraph to the first page footer and then add text to the footer paragraph.
- Set headers and footers for other pages. (There's no need to set this if you only need the header & footer for the first page.)
- Save the result document using Document.SaveToFile() method.
- Python
from spire.doc import *
from spire.doc.common import *

# Create a Document object
doc = Document()

# Load a Word document
doc.LoadFromFile("Sample.docx")

# Get a specific section
section = document.Sections.get_Item(0)

# Enable different headers and footers for the first page and other pages
section.PageSetup.DifferentFirstPageHeaderFooter = True

# Add a paragraph to the first page header and set its alignment style
headerParagraph = section.HeadersFooters.FirstPageHeader.AddParagraph()
headerParagraph.Format.HorizontalAlignment = HorizontalAlignment.Right

# Add an image to the header paragraph
headerimage = headerParagraph.AppendPicture("E-iceblue.png")

# Add a paragraph to the first page footer and set its alignment style
footerParagraph = section.HeadersFooters.FirstPageFooter.AddParagraph()
footerParagraph.Format.HorizontalAlignment = HorizontalAlignment.Center

# Add text to the footer paragraph and set its font style
text = footerParagraph.AppendText("Different First Page Footer")
text.CharacterFormat.FontSize = 11

# Set the header & footer for other pages. If you only headers & footers for the first page, don't set this.
para = section.HeadersFooters.Header.AddParagraph()
para.Format.HorizontalAlignment = HorizontalAlignment.Left
paraText = para.AppendText("A Professional Word Python API")
paraText.CharacterFormat.FontSize = 12
paraText.CharacterFormat.TextColor = Color.get_DeepPink()
para.Format.Borders.Bottom.BorderType = BorderStyle.Single
para.Format.Borders.Bottom.Space = 0.05

paragraph = section.HeadersFooters.Footer.AddParagraph()
paragraph.Format.HorizontalAlignment = HorizontalAlignment.Center
paraText = paragraph.AppendText("E-iceblue Co. Ltd.")
paraText.CharacterFormat.FontSize = 12
paraText.CharacterFormat.Bold = True
paraText.CharacterFormat.TextColor = Color.get_DodgerBlue()

# Save the result document
doc.SaveToFile("DifferentFirstPage.docx", FileFormat.Docx)
doc.Close()
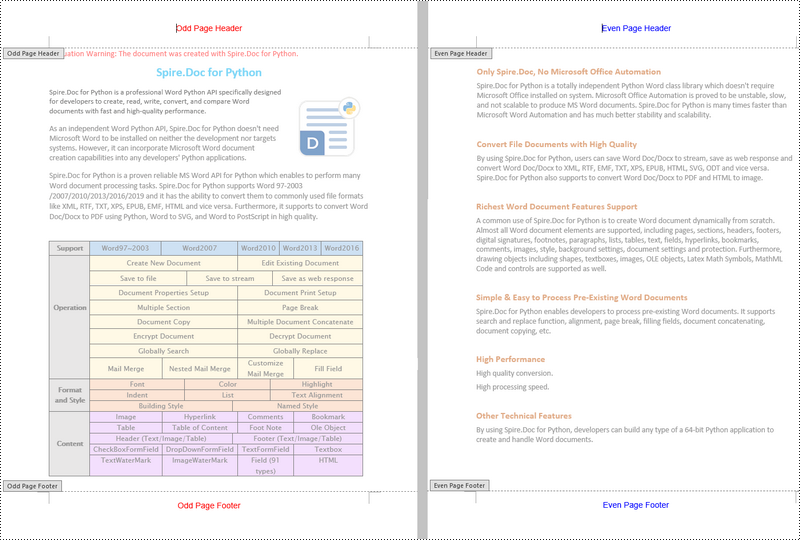
Add Different Headers and Footers for Odd and Even Pages in Word in Python
To have different headers and footers on odd and even pages, Spire.Doc for Python provides the Section.PageSetup.DifferentOddAndEvenPagesHeaderFooter property. The following are the detailed steps.
- Create a Document object.
- Load a Word document using Document.LoadFromFile() method.
- Get a specified section using Document.Sections[] property.
- Enable different headers and footers for the odd and even pages by setting the Section.PageSetup.DifferentOddAndEvenPagesHeaderFooter property to True.
- Get the header and footer of odd pages using Section.HeadersFooters.OddHeader and Section.HeadersFooters.OddFooter properties.
- Add paragraphs to the header and footer of odd pages and then add text to them.
- Get the header and footer of even pages using Section.HeadersFooters.EvenHeader and Section.HeadersFooters.EvenFooter properties.
- Add paragraphs to the header and footer of even pages and then add text to them.
- Save the result document using Document.SaveToFile() method.
- Python
from spire.doc import *
from spire.doc.common import *

# Create a Document object
doc = Document()

# Load a Word document
doc.LoadFromFile("Sample.docx")

# Get a specific section
section = document.Sections.get_Item(0)

# Enable different headers and footers for the odd and even pages
section.PageSetup.DifferentOddAndEvenPagesHeaderFooter = True

# Add headers and footers to odd pages
OHpara = section.HeadersFooters.OddHeader.AddParagraph()
OHtext = OHpara.AppendText("Odd Page Header")
OHpara.Format.HorizontalAlignment = HorizontalAlignment.Center
OHtext.CharacterFormat.FontName = "Arial"
OHtext.CharacterFormat.FontSize = 12
OHtext.CharacterFormat.TextColor = Color.get_Red()

OFpara = section.HeadersFooters.OddFooter.AddParagraph()
OFtext = OFpara.AppendText("Odd Page Footer")
OFpara.Format.HorizontalAlignment = HorizontalAlignment.Center
OFtext.CharacterFormat.FontName = "Arial"
OFtext.CharacterFormat.FontSize = 12
OFtext.CharacterFormat.TextColor = Color.get_Red()

# Add headers and footers to even pages
EHpara = section.HeadersFooters.EvenHeader.AddParagraph()
EHtext = EHpara.AppendText("Even Page Header")
EHpara.Format.HorizontalAlignment = HorizontalAlignment.Center
EHtext.CharacterFormat.FontName = "Arial"
EHtext.CharacterFormat.FontSize = 12
EHtext.CharacterFormat.TextColor = Color.get_Blue()

EFpara = section.HeadersFooters.EvenFooter.AddParagraph()
EFtext = EFpara.AppendText("Even Page Footer")
EFpara.Format.HorizontalAlignment = HorizontalAlignment.Center
EFtext.CharacterFormat.FontName = "Arial"
EFtext.CharacterFormat.FontSize = 12
EFtext.CharacterFormat.TextColor = Color.get_Blue()

# Save the result document
doc.SaveToFile("OddAndEvenHeaderFooter.docx", FileFormat.Docx)
doc.Close()
Apply for a Temporary License
If you'd like to remove the evaluation message from the generated documents, or to get rid of the function limitations, please request a 30-day trial license for yourself.
Setting an appropriate background is a crucial step when creating visually captivating and impactful PowerPoint presentations. The background serves as the foundation upon which your content is displayed, and choosing the right background can greatly enhance the overall aesthetic and effectiveness of your slides. Whether you are presenting at a business meeting, educational seminar, or social event, a well-designed background can engage your audience and effectively convey your message. In this article, we will explain how to set background color or picture for PowerPoint slides in Python using Spire.Presentation for Python.
- Set a Background Color for a PowerPoint Slide in Python
- Set a Gradient Background for a PowerPoint Slide in Python
- Set a Background Picture for a PowerPoint Slide in Python
- Set a Background for a Slide Master in PowerPoint in Python
Install Spire.Presentation for Python
This scenario requires Spire.Presentation for Python and plum-dispatch v1.7.4. They can be easily installed in your Windows through the following pip command.
pip install Spire.Presentation
If you are unsure how to install, please refer to this tutorial: How to Install Spire.Presentation for Python on Windows
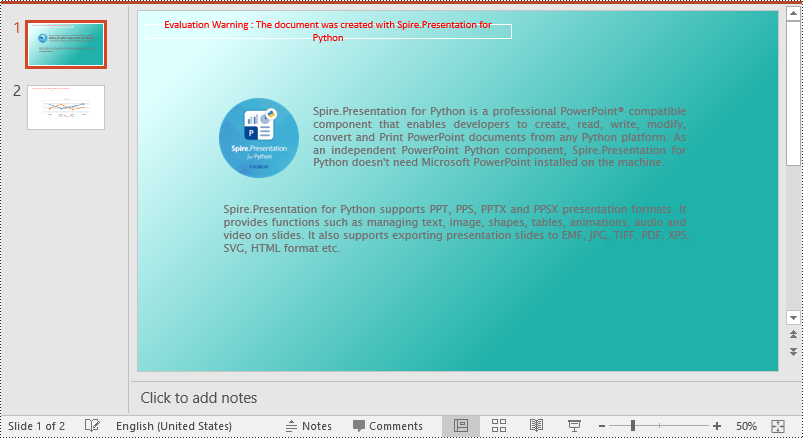
Set a Background Color for a PowerPoint Slide in Python
Adding a background color for a PowerPoint slide is very simple. You just need to set the fill mode of the slide's background as a solid fill and then set a color for the slide’s background. The detailed steps are as follows.
- Create an object of the Presentation class.
- Load a PowerPoint presentation using Presentation.LoadFromFile() method.
- Get a specific slide using Presentation.Slides[index] property.
- Access the background of the slide using ISlide.SlideBackground property.
- Set the type of the slide's background as a custom type using SlideBackground.Type property.
- Set the fill mode of the slide’s background as a solid fill using SlideBackground.Fill.FillType property.
- Set a color for the slide’s background using SlideBackground.Fill.SolidColor.Color property.
- Save the result presentation using Presentation.SaveToFile() method.
- Python
from spire.presentation import *

# Create a Presentation object
ppt = Presentation()
# Load a PowerPoint presentation
ppt.LoadFromFile("Input.pptx")

# Get the first slide
slide = ppt.Slides[0]

# Access the background of the slide
background = slide.SlideBackground

# Set the type of the slide's background as a custom type
background.Type = BackgroundType.Custom
# Set the fill mode of the slide's background as a solid fill
background.Fill.FillType = FillFormatType.Solid
# Set a color for the slide's background
background.Fill.SolidColor.Color = Color.get_PaleTurquoise()

# Save the result presentation
ppt.SaveToFile("Solidbackground.pptx", FileFormat.Pptx2013)
ppt.Dispose()
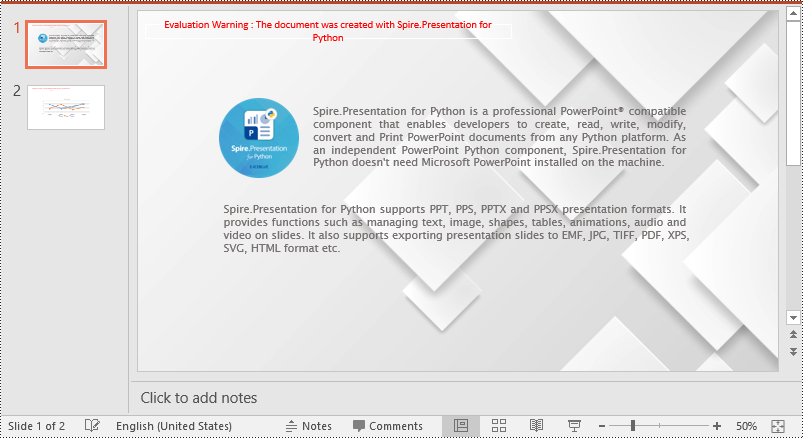
Set a Gradient Background for a PowerPoint Slide in Python
Adding a gradient background is a little complex. You need to set the fill mode of the slide’s background as a gradient fill and then set the gradient stops and colors. The detailed steps are as follows.
- Create an object of the Presentation class.
- Load a PowerPoint presentation using Presentation.LoadFromFile() method.
- Get a specific slide using Presentation.Slides[index] property.
- Access the background of the slide using ISlide.SlideBackground property.
- Set the type of the slide's background as a custom type using SlideBackground.Type property.
- Set the fill mode of the slide’s background as a gradient fill using SlideBackground.Fill.FillType property.
- Set gradient stops and colors for the slide’s background using SlideBackground.Fill.Gradient.GradientStops.AppendByColor() method.
- Set the shape type and angle for the gradient fill.
- Save the result presentation using Presentation.SaveToFile() method.
- Python
from spire.presentation import *

# Create a Presentation object
ppt = Presentation()
# Load a PowerPoint presentation
ppt.LoadFromFile("Input.pptx")

# Get the first slide
slide = ppt.Slides[0]

# Access the background of the slide
background = slide.SlideBackground

# Set the type of the slide's background as a custom type
background.Type = BackgroundType.Custom

# Set the fill mode of the slide's background as a gradient fill
background.Fill.FillType = FillFormatType.Gradient

# Set gradient stops and colors
background.Fill.Gradient.GradientStops.AppendByColor(0.1, Color.get_LightCyan())
background.Fill.Gradient.GradientStops.AppendByColor(0.7, Color.get_LightSeaGreen())

# Set the shape type of the gradient fill
background.Fill.Gradient.GradientShape = GradientShapeType.Linear
# Set the angle of the gradient fill
background.Fill.Gradient.LinearGradientFill.Angle = 45

# Save the result presentation
ppt.SaveToFile("Gradientbackground.pptx", FileFormat.Pptx2013)
ppt.Dispose()
Set a Background Picture for a PowerPoint Slide in Python
To add a background picture for a PowerPoint slide, you need to set the fill mode of the slide's background as a picture fill, then add a picture to the image collection of the presentation and set it as the slide’s background. The detailed steps are as follows:
- Create an object of the Presentation class.
- Load a PowerPoint presentation using Presentation.LoadFromFile() method.
- Get a specific slide using Presentation.Slides[index] property.
- Access the background of the slide using ISlide.SlideBackground property.
- Set the type of the slide's background as a custom type using SlideBackground.Type property.
- Set the fill mode of the slide’s background as a picture fill using SlideBackground.Fill.FillType property.
- Add an image to the image collection of the presentation using Presentation.Images.AppendStream() method.
- Set the image as the slide’s background using SlideBackground.Fill.PictureFill.Picture.EmbedImage property.
- Save the result presentation using Presentation.SaveToFile() method.
- Python
from spire.presentation import *

# Create a Presentation object
ppt = Presentation()
# Load a PowerPoint presentation
ppt.LoadFromFile("Input.pptx")

# Get the first slide
slide = ppt.Slides[0]

# Access the background of the slide
background = slide.SlideBackground

# Set the type of the slide's background as a custom type
background.Type = BackgroundType.Custom

# Set the fill mode of the slide's background as a picture fill
background.Fill.FillType = FillFormatType.Picture

# Add an image to the image collection of the presentation
stream = Stream("background.jpg")
imageData = ppt.Images.AppendStream(stream)
# Set the image as the slide's background
background.Fill.PictureFill.FillType = PictureFillType.Stretch
background.Fill.PictureFill.Picture.EmbedImage = imageData

# Save the result presentation
ppt.SaveToFile("Picturebackground.pptx", FileFormat.Pptx2013)
ppt.Dispose()
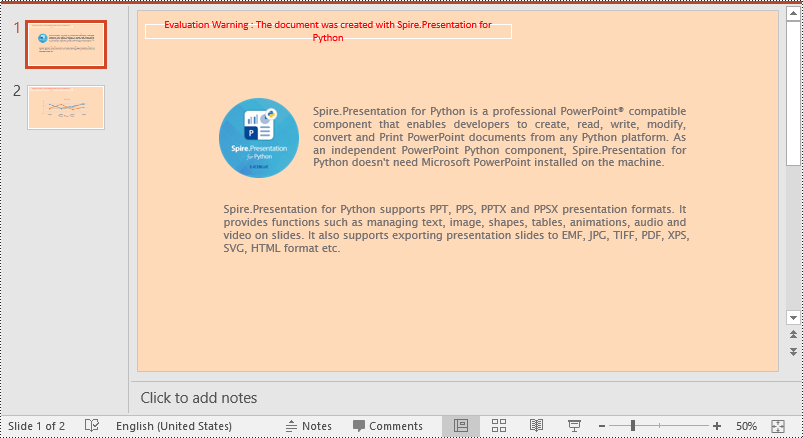
Set a Background for a Slide Master in PowerPoint in Python
If you don't wish to set backgrounds for slides one by one, you can set a background for the slide master, then all slides using the same slide master will be applied with the background automatically. The following steps show how to set a solid background color for a slide master.
- Create an object of the Presentation class.
- Load a PowerPoint presentation using Presentation.LoadFromFile() method.
- Get a specific slide master using Presentation.Masters[index] property.
- Access the background of the slide master using IMasterSlide.SlideBackground property.
- Set the type of the slide master's background as a custom type using SlideBackground.Type property.
- Set the fill mode of the slide master's background as a solid fill using SlideBackground.Fill.FillType property.
- Set a color for the slide master's background using SlideBackground.Fill.SolidColor.Color property.
- Save the result presentation using Presentation.SaveToFile() method.
- Python
from spire.presentation import *

# Create a Presentation object
ppt = Presentation()
# Load a PowerPoint presentation
ppt.LoadFromFile("Input.pptx")

# Get the first slide master
slideMaster = ppt.Masters[0]

# Access the background of the slide master
background = slideMaster.SlideBackground

# Set the type of the slide master's background as a custom type
background.Type = BackgroundType.Custom

# Set the fill mode of the slide master's background as a solid fill
background.Fill.FillType = FillFormatType.Solid
# Set a color for the slide master's background
background.Fill.SolidColor.Color = Color.get_PeachPuff()

# Save the result presentation
ppt.SaveToFile("AddBackgroundToSlideMaster.pptx", FileFormat.Pptx2013)
ppt.Dispose()
Apply for a Temporary License
If you'd like to remove the evaluation message from the generated documents, or to get rid of the function limitations, please request a 30-day trial license for yourself.
Comments in Microsoft PowerPoint allow users to add additional information to specific slides or elements of a slide to improve collaboration and communication when sharing presentations. These comments can be related content, suggestions for changes, and so on. This feature is very useful when several people are working on a presentation together. In this article, you will learn how to use Spire.Presentation for Python to add, remove or replace comments on slides in Python programs.
- Add Comments to a Presentation Slide in Python
- Remove Comments from a Presentation Slide in Python
- Replace Comments on a Presentation Slide in Python
Install Spire.Presentation for Python
This scenario requires Spire.Presentation for Python and plum-dispatch v1.7.4. They can be easily installed in your Windows through the following pip commands.
pip install Spire.Presentation
If you are unsure how to install, please refer to this tutorial: How to Install Spire.Presentation for Python on Windows
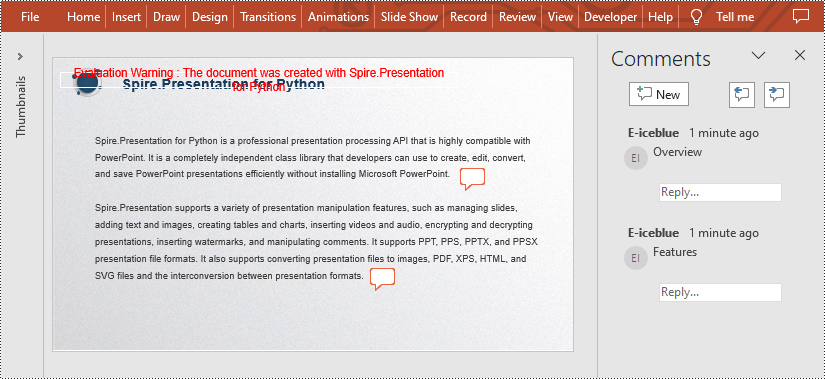
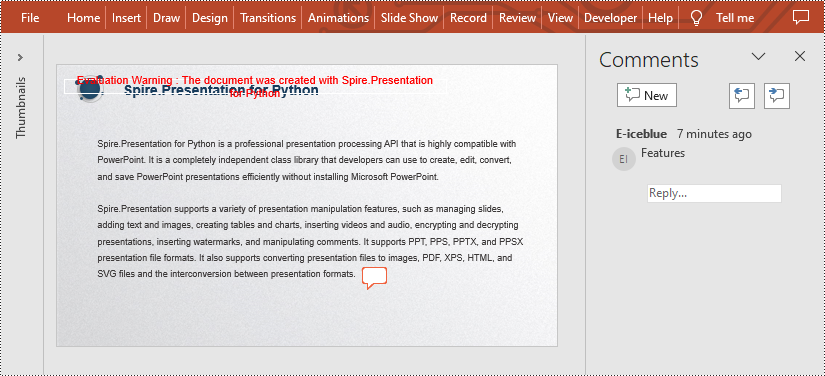
Add Comments to a Presentation Slide in Python
Spire.Presentation for Python provides the Presentation.CommentAuthors.AddAuthor() and Presentation.Slides[].AddComment(author:ICommentAuthor,text:str,position:PointF,dateTime:DateTime) methods to support adding comments to a slide. The detailed steps are as follows.
- Create a new PowerPoint presentation.
- Load a PowerPoint presentation using Presentation.LoadFromFile() method.
- Add the author of the comment by using Presentation.CommentAuthors.AddAuthor() method.
- Then add a comment to the first slide using Presentation.Slides[].AddComment(author:ICommentAuthor,text:str,position:PointF,dateTime:DateTime) method.
- Add another comment using the same method.
- Save the result file using Presentation.SaveToFile() method.
- Python
from spire.presentation.common import *
from spire.presentation import *

inputFile = "C:/Users/Administrator/Desktop/Sample.pptx"
outputFile = "C:/Users/Administrator/Desktop/AddComment.pptx"

# Create a Presentation instance
presentation = Presentation()

# Load a presentation from disk
presentation.LoadFromFile(inputFile)

# Add the author of the comment
author = presentation.CommentAuthors.AddAuthor("E-iceblue", "comment:")

# Add a comment to the first slide
point = PointF(45.0,12.0)
presentation.Slides[0].AddComment(author, "Overview", point, DateTime.get_Now())

# Add another comment to this slide
author = presentation.CommentAuthors.AddAuthor("E-iceblue", "comment:")
point = PointF(35.0,23.0)
presentation.Slides[0].AddComment(author, "Features", point, DateTime.get_Now())

# Save the result file
presentation.SaveToFile(outputFile, FileFormat.Pptx2010)
presentation.Dispose()
Remove Comments from a Presentation Slide in Python
You can also remove the specific comment from the slides by using Presentation.Slides[].DeleteComment(Comment) method. The detailed steps are as follows.
- Create a Presentation instance.
- Load a PowerPoint presentation using Presentation.LoadFromFile() method.
- Remove the first comment from the specified slide using Presentation.Slides[].DeleteComment(Comment) method.
- Save the result file using Presentation.SaveToFile() method.
- Python
from spire.presentation.common import *
from spire.presentation import *

inputFile = "C:/Users/Administrator/Desktop/AddComment.pptx"
outputFile = "C:/Users/Administrator/Desktop/DeleteComment.pptx"

# Create a Presentation instance
presentation = Presentation()

# Load a presentation from disk
presentation.LoadFromFile(inputFile)

# Delete the first comment from the first slide
presentation.Slides[0].DeleteComment(presentation.Slides[0].Comments[0])

# Save the result file
presentation.SaveToFile(outputFile, FileFormat.Pptx2010)
presentation.Dispose()
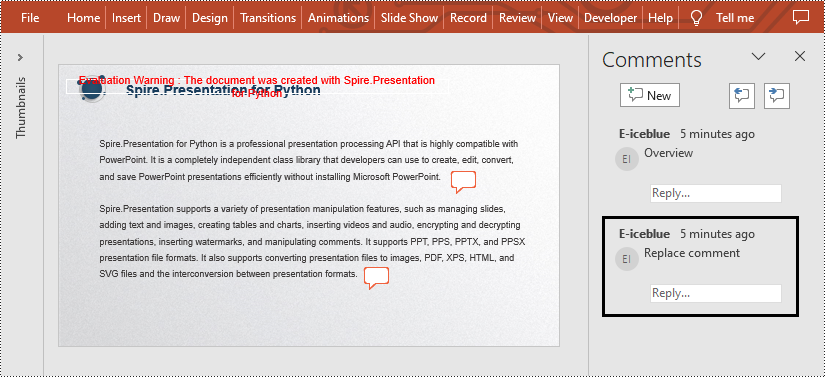
Replace Comments on a Presentation Slide in Python
If you want to replace the comment content with new text, please use the Presentation.Slides[].Comments[].Text property. The detailed steps are as follows.
- Create a Presentation instance.
- Load a PowerPoint presentation using Presentation.LoadFromFile() method.
- Replace the content of the second comment with new text by Presentation.Slides[].Comments[].Text property.
- Save the result file using Presentation.SaveToFile() method.
- Python
from spire.presentation.common import *
from spire.presentation import *

inputFile = "C:/Users/Administrator/Desktop/AddComment.pptx"
outputFile = "C:/Users/Administrator/Desktop/ReplaceComment.pptx"

# Create a Presentation instance
presentation = Presentation()

# Load a presentation from disk
presentation.LoadFromFile(inputFile)

# Replace the content of the second comment with new text
presentation.Slides[0].Comments[1].Text = "Replace comment"

# Save the result file
presentation.SaveToFile(outputFile, FileFormat.Pptx2010)
presentation.Dispose()
Apply for a Temporary License
If you'd like to remove the evaluation message from the generated documents, or to get rid of the function limitations, please request a 30-day trial license for yourself.
