
Python (365)
Reordering columns or rows in Excel is a simple process that allows you to change the arrangement of data within your spreadsheet. This can be useful for better organizing your data or aligning it with other columns or rows. You can reorder by using drag-and-drop, cut and paste, or keyboard shortcuts depending on the version of Excel you are using.
This article focus on introducing how to programmatically reorder columns or rows in an Excel worksheet in Python using Spire.XLS for Python.
Install Spire.XLS for Python
This scenario requires Spire.XLS for Python and plum-dispatch v1.7.4. They can be easily installed in your system through the following pip command.
pip install Spire.XLS
If you are unsure how to install, please refer to this tutorial: How to Install Spire.XLS for Python on Windows
Reorder Columns in Excel in Python
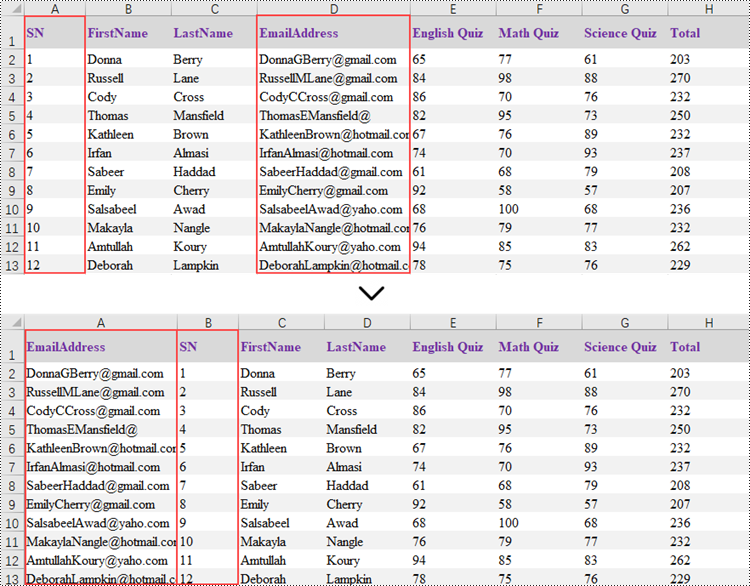
Spire.XLS does not provide a straightforward way to reorganize the order of columns or rows within an Excel worksheet. The solution requires creating a duplicate of the target worksheet. Then, you can copy the columns or rows from the copied worksheet and paste them into the original worksheet in the new preferred column or row sequence.
The following are the steps to reorder columns in an Excel worksheet using Python.
- Create a Workbook object.
- Load an Excel document from the specified file path.
- Get the target worksheet using Workbook.Worksheets[index] property.
- Specify the new column order within a list.
- Create a temporary sheet and copy the data from the target sheet into it.
- Copy the columns from the temporary worksheet to the target worksheet in the desired order using Worksheet.Columns[index].Copy() method.
- Remove the temporary sheet.
- Save the workbook to a different Excel document.
- Python
from spire.xls import *
from spire.xls.common import *

# Create a Workbook object
workbook = Workbook()

# Load the Excel document
workbook.LoadFromFile("C:\\Users\\Administrator\\Desktop\\Input.xlsx")

# Get a specific worksheet
targetSheet = workbook.Worksheets[0]

# Specify the new column order in a list (the column index starts from 0)
newColumnOrder = [3, 0, 1, 2, 4, 5 ,6, 7]

# Add a temporary worksheet
tempSheet = workbook.Worksheets.Add("temp")

# Copy data from the target worksheet to the temporary sheet
tempSheet.CopyFrom(targetSheet)

# Iterate through the newColumnOrder list
for i in range(len(newColumnOrder)):

    # Copy the column from the temporary sheet to the target sheet in the new order
    tempSheet.Columns[newColumnOrder[i]].Copy(targetSheet.Columns[i], True, True)

    # Reset the column width in the target sheet
    targetSheet.Columns[i].ColumnWidth = tempSheet.Columns[newColumnOrder[i]].ColumnWidth

# Remove the temporary sheet
workbook.Worksheets.Remove(tempSheet)

# Save the workbook to another Excel file
workbook.SaveToFile("output/ReorderColumns.xlsx", FileFormat.Version2016)

# Dispose resources
workbook.Dispose()
Reorder Rows in Excel in Python
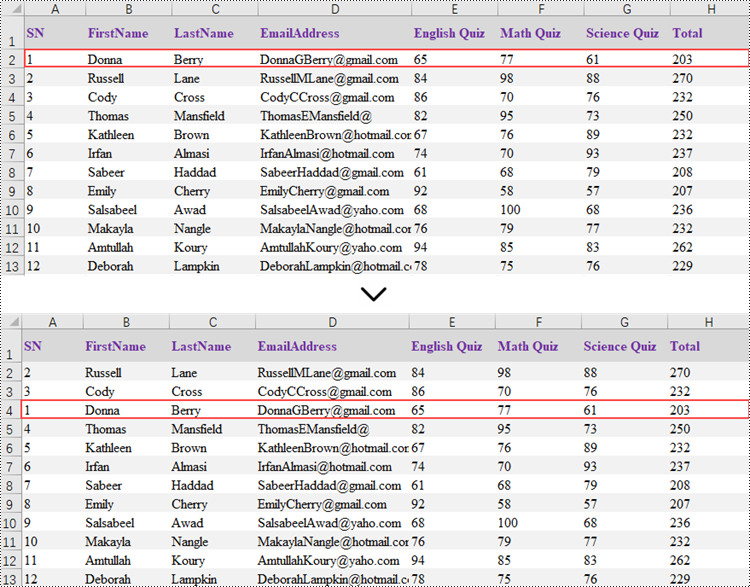
Rearranging the rows in an Excel spreadsheet follows a similar approach to reorganizing the columns. The steps to reorder the rows within an Excel worksheet are as outlined below.
- Create a Workbook object.
- Load an Excel document from the specified file path.
- Get the target worksheet using Workbook.Worksheets[index] property.
- Specify the new row order within a list.
- Create a temporary sheet and copy the data from the target sheet into it.
- Copy the rows from the temporary worksheet to the target worksheet in the desired order using Worksheet.Rows[index].Copy() method.
- Remove the temporary sheet.
- Save the workbook to a different Excel document.
- Python
from spire.xls import *
from spire.xls.common import *

# Create a Workbook object
workbook = Workbook()

# Load the Excel document
workbook.LoadFromFile("C:\\Users\\Administrator\\Desktop\\Input.xlsx")

# Get a specific worksheet
targetSheet = workbook.Worksheets[0]

# Specify the new row order in a list (the row index starts from 0)
newRowOrder = [0, 2, 3, 1, 4, 5 ,6, 7, 8, 9, 10, 11, 12]

# Add a temporary worksheet
tempSheet = workbook.Worksheets.Add("temp")

# Copy data from the first worksheet to the temporary sheet
tempSheet.CopyFrom(targetSheet)

# Iterate through the newRowOrder list
for i in range(len(newRowOrder)):

    # Copy the row from the temporary sheet to the target sheet in the new order
    tempSheet.Rows[newRowOrder[i]].Copy(targetSheet.Rows[i], True, True)

    # Reset the row height in the target sheet
    targetSheet.Rows[i].RowHeight = tempSheet.Rows[newRowOrder[i]].RowHeight

# Remove the temporary sheet
workbook.Worksheets.Remove(tempSheet)

# Save the workbook to another Excel file
workbook.SaveToFile("output/ReorderRows.xlsx", FileFormat.Version2016)

# Dispose resources
workbook.Dispose()
Apply for a Temporary License
If you'd like to remove the evaluation message from the generated documents, or to get rid of the function limitations, please request a 30-day trial license for yourself.
Document properties provide additional information about an Excel file, such as author, title, subject, and other metadata associated with the file. Retrieving these properties from Excel can help users gain insight into the file content and history, enabling better organization and management of files. At times, users may also need to remove document properties to protect the privacy and confidentiality of the information contained in the file. In this article, you will learn how to read or remove document properties in Excel in Python using Spire.XLS for Python.
- Read Standard and Custom Document Properties in Excel
- Remove Standard and Custom Document Properties in Excel
Install Spire.XLS for Python
This scenario requires Spire.XLS for Python and plum-dispatch v1.7.4. They can be easily installed in your Windows through the following pip command.
pip install Spire.XLS
If you are unsure how to install, please refer to this tutorial: How to Install Spire.XLS for Python on Windows
Read Standard and Custom Document Properties in Excel in Python
Excel properties are divided into two main categories:
- Standard Properties: These are predefined properties that are built into Excel files. They typically include basic details about the file such as title, subject, author, keywords, etc.
- Custom Properties: These are user-defined attributes that can be added to Excel to track additional information about the file based on your specific needs.
Spire.XLS for Python allows to read both the standard and custom document properties of an Excel file. The following are the detailed steps:
- Create a Workbook instance.
- Load an Excel file using Workbook.LoadFromFile() method.
- Create a StringBuilder instance.
- Get a collection of all standard document properties using Workbook.DocumentProperties property.
- Get specific standard document properties using the properties of the BuiltInDocumentProperties class and append them to the StringBuilder instance.
- Get a collection of all custom document properties using Workbook.CustomDocumentProperties property.
- Iterate through the collection.
- Get the name, type, and value of each custom document property using ICustomDocumentProperties[].Name, ICustomDocumentProperties[].PropertyType and ICustomDocumentProperties[].Value properties.
- Determine the specific property type, and then convert the property value to the value of the corresponding data type.
- Append the property name and converted property value to the StringBuilder instance using StringBuilde.append() method.
- Write the content of the StringBuilder instance into a txt file.
- Python
from spire.xls import *
from spire.xls.common import *
def AppendAllText(fname: str, text: List[str]):
fp = open(fname, "w")
for s in text:
fp.write(s + "\n")
fp.close()
inputFile = "Budget Template.xlsx"
outputFile = "GetExcelProperties.txt"
# Create a Workbook instance
workbook = Workbook()
# Load an Excel document from disk
workbook.LoadFromFile(inputFile)
# Create a StringBuilder instance
builder = []
# Get a collection of all standard document properties
standardProperties = workbook.DocumentProperties
# Get specific standard properties and append them to the StringBuilder instance
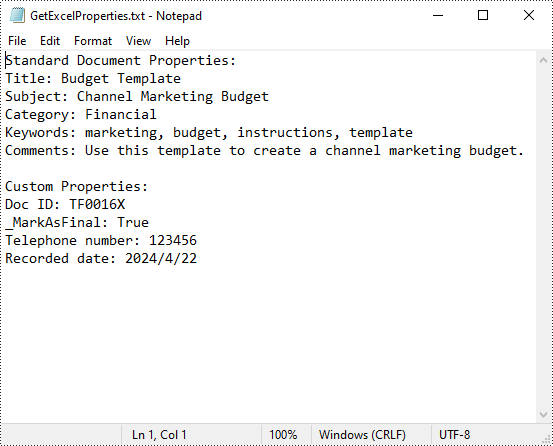
builder.append("Standard Document Properties:")
builder.append("Title: " + standardProperties.Title)
builder.append("Subject: " + standardProperties.Subject)
builder.append("Category: " + standardProperties.Category)
builder.append("Keywords: " + standardProperties.Keywords)
builder.append("Comments: " + standardProperties.Comments)
builder.append("")
# Get a collection of all custom document properties
customProperties = workbook.CustomDocumentProperties
builder.append("Custom Properties:")
# Iterate through the collection
for i in range(len(customProperties)):
# Get the name, type, and value of each custom document property
name = customProperties[i].Name
type = customProperties[i].PropertyType
obj = customProperties[i].Value
# Determine the specific property type, and then convert the property value to the value of the corresponding data type
value = None
if type == PropertyType.Double:
value = Double(obj).Value
elif type == PropertyType.DateTime:
value = DateTime(obj).ToShortDateString()
elif type == PropertyType.Bool:
value = Boolean(obj).Value
elif type == PropertyType.Int:
value = Int32(obj).Value
elif type == PropertyType.Int32:
value = Int32(obj).Value
else:
value = String(obj).Value
# Append the property name and converted property value to the StringBuilder instance
builder.append(name + ": " + str(value))
# Write the content of the StringBuilder instance into a text file
AppendAllText(outputFile, builder)
workbook.Dispose()
Remove Standard and Custom Document Properties in Excel in Python
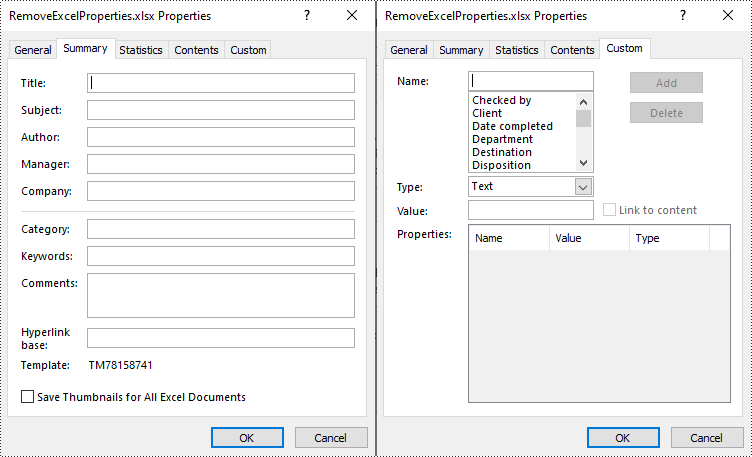
You can easily delete standard document properties from an Excel file by setting their values as empty. For custom document properties, you can use the ICustomDocumentProperties.Remove() method to delete them. The following are the detailed steps:
- Create a Workbook instance.
- Load a sample Excel file using Workbook.LoadFromFile() method.
- Get a collection of all standard document properties using Workbook.DocumentProperties property.
- Set the values of specific standard document properties as empty through the corresponding properties of the BuiltInDocumentProperties class.
- Get a collection of all custom document properties using Workbook.CustomDocumentProperties property.
- Iterate through the collection.
- Delete each custom property from the collection by its name using ICustomDocumentProperties.Remove() method.
- Save the result file using Workbook.SaveToFile() method.
- Python
from spire.xls import *
from spire.xls.common import *

inputFile = "Budget Template.xlsx"
outputFile = "RemoveExcelProperties.xlsx"

# Create a Workbook instance
workbook = Workbook()

# Load an Excel document from disk
workbook.LoadFromFile(inputFile)

# Get a collection of all standard document properties
standardProperties = workbook.DocumentProperties

# Set the value of each standard document property as empty
standardProperties.Title = ""
standardProperties.Subject = ""
standardProperties.Category = ""
standardProperties.Keywords = ""
standardProperties.Comments = ""

# Get a collection of all custom document properties
customProperties = workbook.CustomDocumentProperties

# Iterate through the collection
for i in range(len(customProperties) - 1, -1, -1):
    # Delete each custom document property from the collection by its name
    customProperties.Remove(customProperties[i].Name)

# Save the result file
workbook.SaveToFile(outputFile, ExcelVersion.Version2016)
workbook.Dispose()
Apply for a Temporary License
If you'd like to remove the evaluation message from the generated documents, or to get rid of the function limitations, please request a 30-day trial license for yourself.
Proper alignment of tables and text in Microsoft Word is crucial for creating visually appealing and easy-to-read documents. By aligning table headers, numeric data, and text appropriately, you can enhance the organization and clarity of your information, making it more accessible to your readers. In this article, we will demonstrate how to align tables and the text in table cells in Microsoft Word in Python using Spire.Doc for Python.
Install Spire.Doc for Python
This scenario requires Spire.Doc for Python and plum-dispatch v1.7.4. They can be easily installed in your Windows through the following pip commands.
pip install Spire.Doc
If you are unsure how to install, please refer to this tutorial: How to Install Spire.Doc for Python on Windows
Align Tables in Word in Python
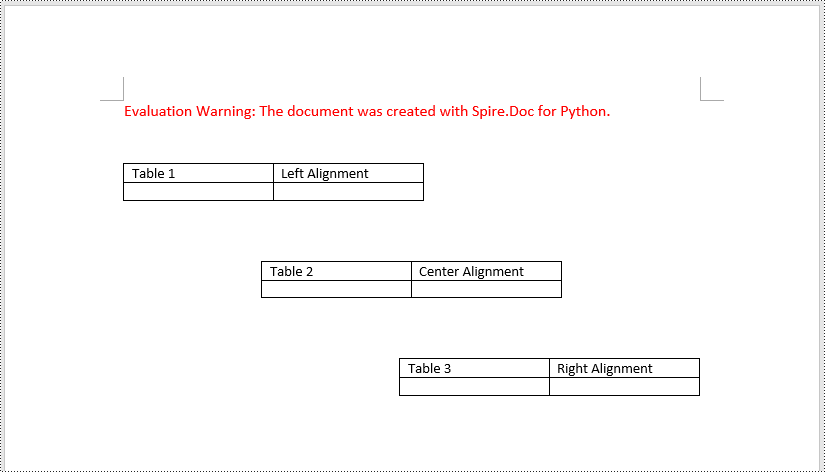
A table in a Word document can be aligned to the left, center, or right side by using the Table.TableFormat.HorizontalAlignment property. The detailed steps are as follows.
- Create an instance of the Document class.
- Load a Word document using Document.LoadFromFile() method.
- Get a specific section in the document using Document.Sections[index] property.
- Get a specific table in the section using Section.Tables[index] property.
- Set the alignment for the table using Table.TableFormat.HorizontalAlignment property.
- Save the result document using Document.SaveToFile() method.
- Python
from spire.doc import *
from spire.doc.common import *

# Create an instance of the Document class
document = Document()
# Load a Word document
document.LoadFromFile("Tables.docx")

# Get the first section in the document
section = document.Sections[0]

# Get the first, second, and third tables in the section
table1 = section.Tables[0]
table2 = section.Tables[1]
table3 = section.Tables[2]

# Align the first table to the left
table1.TableFormat.HorizontalAlignment = RowAlignment.Left
# Align the second table to the center
table2.TableFormat.HorizontalAlignment = RowAlignment.Center
# Align the third table to the right
table3.TableFormat.HorizontalAlignment = RowAlignment.Right

# Save the result document
document.SaveToFile("AlignTable.docx", FileFormat.Docx2013)
document.Close()
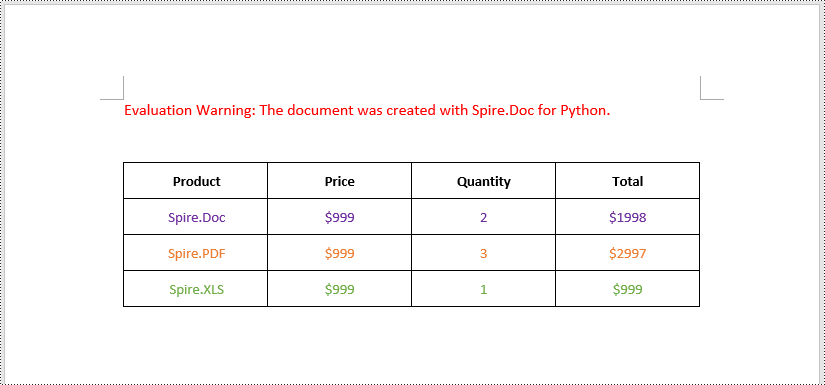
Align the Text in Table Cells in Word in Python
The text within a table cell can be horizontally aligned to the left, center, or right side using the TableCell.Paragraphs[index].Format.HorizontalAlignment property. Additionally, they can also be vertically aligned to the top, center, or bottom of the cell using the TableCell.CellFormat.VerticalAlignment property. The detailed steps are as follows.
- Create an instance of the Document class.
- Load a Word document using Document.LoadFromFile() method.
- Get a specific section in the document using Document.Sections[index] property.
- Get a specific table in the section using Section.Tables[index] property.
- Loop through the rows in the table.
- Loop through the cells in each row.
- Set the vertical alignment for the text in each cell using TableCell.CellFormat.VerticalAlignment property.
- Loop through the paragraphs in each cell.
- Set the horizontal alignment for each paragraph using TableCell.Paragraphs[index].Format.HorizontalAlignment property.
- Save the result document using Document.SaveToFile() method.
- Python
from spire.doc import *
from spire.doc.common import *

# Create an instance of the Document class
document = Document()
# Load a Word document
document.LoadFromFile("Table.docx")

# Get the first section in the document
section = document.Sections[0]

# Get the first tables in the section
table = section.Tables[0]

# Loop through the rows in the table
for row_index in range(table.Rows.Count):
    row = table.Rows[row_index]
    # Loop through the cells in the row
    for cell_Index in range(row.Cells.Count):
        cell = row.Cells[cell_Index]
        # Vertically align the text in the cell to the center
        cell.CellFormat.VerticalAlignment = VerticalAlignment.Middle
        # Horizontally align the text in the cell to the center
        for para_index in range(cell.Paragraphs.Count):
            paragraph = cell.Paragraphs[para_index]
            paragraph.Format.HorizontalAlignment = HorizontalAlignment.Center

# Save the result document
document.SaveToFile("AlignTableText.docx", FileFormat.Docx2013)
document.Close()
Apply for a Temporary License
If you'd like to remove the evaluation message from the generated documents, or to get rid of the function limitations, please request a 30-day trial license for yourself.
QR codes are a type of two-dimensional barcode that can store a variety of information, including URLs, contact details, and even payment information. QR codes have become increasingly popular, allowing for quick and convenient access to digital content, making them a useful tool in our modern, technology-driven world.
In this article, you will learn how to create and scan QR codes in Python using Spire.Barcode for Python.
Get a Free Trial License
The trial version of Spire.Barcode for Python does not support scanning QR code images without a valid license being applied. Additionally, it displays an evaluation message on any QR code images that are generated.
To remove these limitations, you can get a 30-day trial license for free.
Create a QR Code in Python
Spire.Barcode for Python offers the BarcodeSettings class, which enables you to configure the settings for generating a barcode. These settings encompass the barcode type, the data to be encoded, the color, the margins, and the horizontal and vertical resolution.
After you have set up the desired settings, you can create a BarcodeGenerator instance using those configurations. Subsequently, you can invoke the GenerateImage() method of the generator to produce the barcode image.
The following are the steps to create a QR code in Python.
- Create a BarcodeSettings object.
- Set the barcode type to QR code using BarcodeSettings.Type property.
- Set the data of the 2D barcode using BarcodeSettings.Data2D property.
- Set other attributes of the barcode using the properties under the BarcodeSettings object.
- Create a BarCodeGenerator object based on the settings.
- Create a QR code image using BarCodeGenerator.GenerateImage() method.
- Python
from spire.barcode import *

# Write all bytes to a file
def WriteAllBytes(fname: str, data):
    with open(fname, "wb") as fp:
        fp.write(data)
    fp.close()

# Apply license key
License.SetLicenseKey("license key")

# Create a BarcodeSettings object
barcodeSettings = BarcodeSettings()

# Set the type of barcode to QR code
barcodeSettings.Type = BarCodeType.QRCode

# Set the data for the 2D barcode
barcodeSettings.Data2D = "Hello, World"

# Set margins
barcodeSettings.LeftMargin = 0.2
barcodeSettings.RightMargin = 0.2
barcodeSettings.TopMargin = 0.2
barcodeSettings.BottomMargin = 0.2

# Set the horizontal resolution
barcodeSettings.DpiX = 500

# Set the vertical resolution
barcodeSettings.DpiY = 500

# Set error correction level
barcodeSettings.QRCodeECL = QRCodeECL.M

# Do not display text on barcode
barcodeSettings.ShowText = False

# Add a logo at the center of the QR code
barcodeSettings.SetQRCodeLogoImage("C:\\Users\\Administrator\\Desktop\\logo.png")

# Create an instance of BarCodeGenerator with the specified settings
barCodeGenerator = BarCodeGenerator(barcodeSettings)

# Generate the image for the barcode
image = barCodeGenerator.GenerateImage()

# Write the PNG image to disk
WriteAllBytes("output/QRCode.png", image)

Scan a QR Code Image in Python
Spire.Barcode provides the BarcodeScanner class, which is responsible for barcode image recognition. This class offers several methods to extract data from barcodes, including:
- ScanOneFile(): Scans a single barcode image file and returns the extracted data.
- ScanFile(): Scans all barcodes present in a specified image file and returns the extracted data.
- ScanStream(): Scans barcodes from a stream of image data and returns the extracted information.
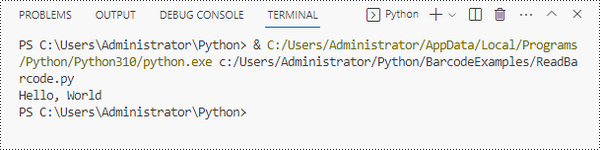
The following code demonstrates how to scan a QR code image using it.
- Python
from spire.barcode import *

# Apply license key
License.SetLicenseKey("license key")

# Scan an image file that contains one barcode
result = BarcodeScanner.ScanOneFile("C:\\Users\\Administrator\\Desktop\\QRCode.png")

# Scan an image file that contains multiple barcodes
# results = BarcodeScanner.ScanFile("C:\\Users\\Administrator\\Desktop\\Image.png")

# Print the result
print(result)
Highlighting important text in your PowerPoint slides can be an effective way to draw your audience's attention and emphasize key points. Whether you are presenting complex information or delivering a persuasive pitch, using text highlighting can make your slides more visually engaging and help your message stand out. In this article, we will demonstrate how to highlight text in a PowerPoint presentation in Python using Spire.Presentation for Python.
Install Spire.Presentation for Python
This scenario requires Spire.Presentation for Python. It can be easily installed in your Windows through the following pip command.
pip install Spire.Presentation
If you are unsure how to install, please refer to this tutorial: How to Install Spire.Presentation for Python on Windows
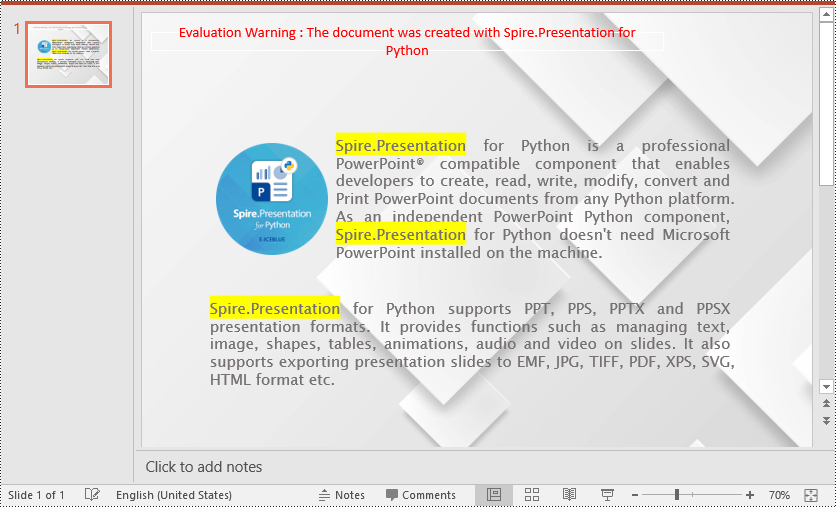
Highlight Text in PowerPoint Presentation in Python
Spire.Presentation for Python provides a method called IAutoShape.TextFrame.HighLightText(text: str, color: Color, options: TextHighLightingOptions) to highlight specific text within the shapes of a PowerPoint presentation.
Follow the steps below to highlight specified text in your presentation using Spire.Presentation for Python:
- Create an instance of the Presentation class.
- Load a PowerPoint presentation using the Presentation.LoadFromFile() method.
- Create an instance of the TextHighLightingOptions class, and set the text highlighting options such as whole words only and case sensitive through the TextHighLightingOptions.WholeWordsOnly and TextHighLightingOptions.CaseSensitive properties.
- Loop through the slides in the presentation and the shapes on each slide.
- Check if the current shape is of IAutoShape type.
- If the result is true, typecast it to an IAutoShape object.
- Highlight all matches of specific text in the shape using the IAutoShape.TextFrame.HighLightText(text: str, color: Color, options: TextHighLightingOptions) method.
- Save the result presentation to a new file using the Presentation.SaveToFile() method.
- Python
from spire.presentation.common import *
from spire.presentation import *

# Specify the input and output file paths
input_file = "Example.pptx"
output_file = "HighlightText.pptx"

# Create an instance of the Presentation class
ppt = Presentation()
# Load the PowerPoint presentation
ppt.LoadFromFile(input_file)

# Specify the text to highlight
text_to_highlight = "Spire.Presentation"
# Specify the highlight color
highlight_color = Color.get_Yellow()

# Create an instance of the TextHighLightingOptions class
options = TextHighLightingOptions()
# Set the highlight options (case sensitivity and whole word highlighting)
options.WholeWordsOnly = True
options.CaseSensitive = True

# Loop through the slides in the presentation
for slide in ppt.Slides:
    # Loop through the shapes on each slide
    for shape in slide.Shapes:
            # Check if the shape is of IAutoShape type
            if isinstance (shape, IAutoShape):
                # Typecast the shape to an IAutoShape object
                auto_shape = IAutoShape(shape)
                # Search and highlight specified text within the shape
                auto_shape.TextFrame.HighLightText(text_to_highlight, highlight_color, options)

# Save the result presentation to a new PPTX file
ppt.SaveToFile(output_file, FileFormat.Pptx2013)
ppt.Dispose()
Apply for a Temporary License
If you'd like to remove the evaluation message from the generated documents, or to get rid of the function limitations, please request a 30-day trial license for yourself.
Python: Get Coordinates of the Specified Text or Image in PDF
2024-05-21 01:58:08 Written by AdministratorRetrieving the coordinates of text or images within a PDF document can quickly locate specific elements, which is valuable for extracting content from PDFs. This capability also enables adding annotations, marks, or stamps to the desired locations in a PDF, allowing for more advanced document processing and manipulation.
In this article, you will learn how to get coordinates of the specified text or image in a PDF document using Spire.PDF for Python.
- Get Coordinates of the Specified Text in PDF in Python
- Get Coordinates of the Specified Image in PDF in Python
Install Spire.PDF for Python
This scenario requires Spire.PDF for Python and plum-dispatch v1.7.4. They can be easily installed in your Windows through the following pip command.
pip install Spire.PDF
If you are unsure how to install, please refer to this tutorial: How to Install Spire.PDF for Python on Windows
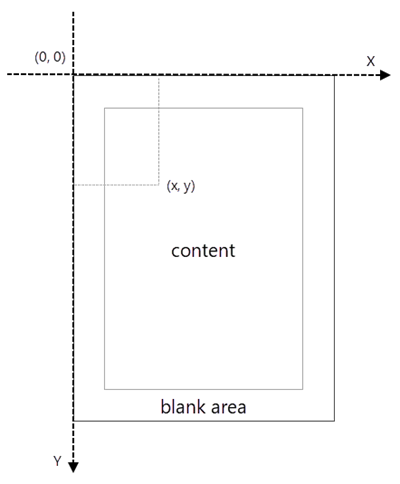
Coordinate System in Spire.PDF
When using Spire.PDF to process an existing PDF document, the origin of the coordinate system is located at the top left corner of the page. The X-axis extends horizontally from the origin to the right, and the Y-axis extends vertically downward from the origin (shown as below).
Get Coordinates of the Specified Text in PDF in Python
To find the coordinates of a specific piece of text within a PDF document, you must first use the PdfTextFinder.Find() method to locate all instances of the target text on a particular page. Once you have found these instances, you can then access the PdfTextFragment.Positions property to retrieve the precise (X, Y) coordinates for each instance of the text.
The steps to get coordinates of the specified text in PDF are as follows.
- Create a PdfDocument object.
- Load a PDF document from a specified path.
- Get a specific page from the document.
- Create a PdfTextFinder object.
- Specify find options through PdfTextFinder.Options property.
- Search for a string within the page using PdfTextFinder.Find() method.
- Get a specific instance of the search results.
- Get X and Y coordinates of the text through PdfTextFragment.Positions[0].X and PdfTextFragment.Positions[0].Y properties.
- Python
from spire.pdf.common import *
from spire.pdf import *
# Create a PdfDocument object
doc = PdfDocument()
# Load a PDF document
doc.LoadFromFile("C:\\Users\\Administrator\\Desktop\\Privacy Policy.pdf")
# Get a specific page
page = doc.Pages.get_Item(0)
# Create a PdfTextFinder object
textFinder = PdfTextFinder(page)
# Specify find options
findOptions = PdfTextFindOptions()
findOptions.Parameter = TextFindParameter.IgnoreCase
findOptions.Parameter = TextFindParameter.WholeWord
textFinder.Options = findOptions
# Search for the string "PRIVACY POLICY" within the page
findResults = textFinder.Find("PRIVACY POLICY")
# Get the first instance of the results
result = findResults[0]
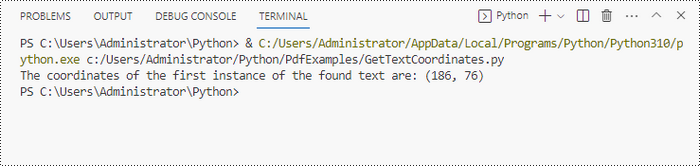
# Get X/Y coordinates of the found text
x = int(result.Positions[0].X)
y = int(result.Positions[0].Y)
print("The coordinates of the first instance of the found text are:", (x, y))
# Dispose resources
doc.Dispose()
Get Coordinates of the Specified Image in PDF in Python
Spire.PDF for Python provides the PdfImageHelper class, which allows users to extract image details from a specific page within a PDF file. By doing so, you can leverage the PdfImageInfo.Bounds property to retrieve the (X, Y) coordinates of an individual image.
The steps to get coordinates of the specified image in PDF are as follows.
- Create a PdfDocument object.
- Load a PDF document from a specified path.
- Get a specific page from the document.
- Create a PdfImageHelper object.
- Get the image information from the page using PdfImageHelper.GetImagesInfo() method.
- Get X and Y coordinates of a specific image through PdfImageInfo.Bounds property.
- Python
from spire.pdf.common import *
from spire.pdf import *
# Create a PdfDocument object
doc = PdfDocument()
# Load a PDF document
doc.LoadFromFile("C:\\Users\\Administrator\\Desktop\\Privacy Policy.pdf")
# Get a specific page
page = doc.Pages.get_Item(0)
# Create a PdfImageHelper object
imageHelper = PdfImageHelper()
# Get image information from the page
imageInformation = imageHelper.GetImagesInfo(page)
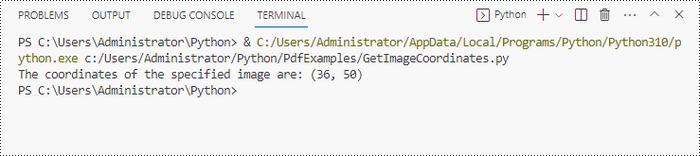
# Get X/Y coordinates of a specific image
x = int(imageInformation[0].Bounds.X)
y = int(imageInformation[0].Bounds.Y)
print("The coordinates of the specified image are:", (x, y))
# Dispose resources
doc.Dispose()
Apply for a Temporary License
If you'd like to remove the evaluation message from the generated documents, or to get rid of the function limitations, please request a 30-day trial license for yourself.

Large PDF files can slow down email delivery, break upload limits, and consume unnecessary storage. This is especially common in PDFs that include high-resolution scans, images, or embedded fonts. If you're working with Python and need to automate PDF compression without compromising quality, this guide will help you get started.
In this tutorial, you’ll learn how to compress PDF files in Python using the Spire.PDF for Python library. We'll cover several effective techniques, including image recompression, font optimization, metadata removal, and batch compression—perfect for web, backend, or desktop applications.
Table of Contents
- Common Scenarios Requiring PDF Compression
- Prerequisites
- Practical PDF Compression Techniques in Python
- Summary
Common Scenarios Requiring PDF Compression
Reducing the size of PDF documents is often essential in the following situations:
| Use Case | Benefit |
|---|---|
| Email Attachments | Avoid size limits and improve deliverability |
| Web Uploads | Reduce upload time and server storage |
| Mobile Access | Faster loading and less data consumption |
| Cloud Archiving | Lower storage cost for backups |
| App Submissions | Meet strict file size limits |
Prerequisites
Before you begin compressing PDFs with Python, make sure the following requirements are met:
- Python 3.7 or above
Ensure that Python (version 3.7 or later) is installed on your system. You can download it from the official Python website. - Spire.PDF for Python
This is a powerful PDF library that allows you to programmatically create, manipulate, and compress PDF documents—without relying on external software like Adobe Acrobat.
To install Spire.PDF for Python, run the following command in your terminal or command prompt:
pip install spire.pdf
Need help with the installation? See our step-by-step guide: How to Install Spire.PDF for Python on Windows_
Practical PDF Compression Techniques in Python
In this section, you'll explore five practical techniques for reducing PDF file size:
- Font compression and unembedding
- Image compression
- Full-document compression
- Metadata and attachment removal
- Batch compressing multiple PDFs
Font Compression and Unembedding
Fonts embedded in a PDF—especially those from large font libraries or multilingual character sets—can significantly increase the file size. Spire.PDF allows you to:
- Compress embedded fonts to minimize space usage
- Unembed fonts that are not essential for rendering
from spire.pdf import *

# Create a PdfCompressor object and load the PDF file
compressor = PdfCompressor("C:/Users/Administrator/Documents/Example.pdf")

# Get the OptimizationOptions object
compression_options = compressor.OptimizationOptions

# Enable font compression
compression_options.SetIsCompressFonts(True)

# Optional: unembed fonts to further reduce size
# compression_options.SetIsUnembedFonts(True)

# Compress the PDF and save the result
compressor.CompressToFile("CompressFonts.pdf")
Image Compression
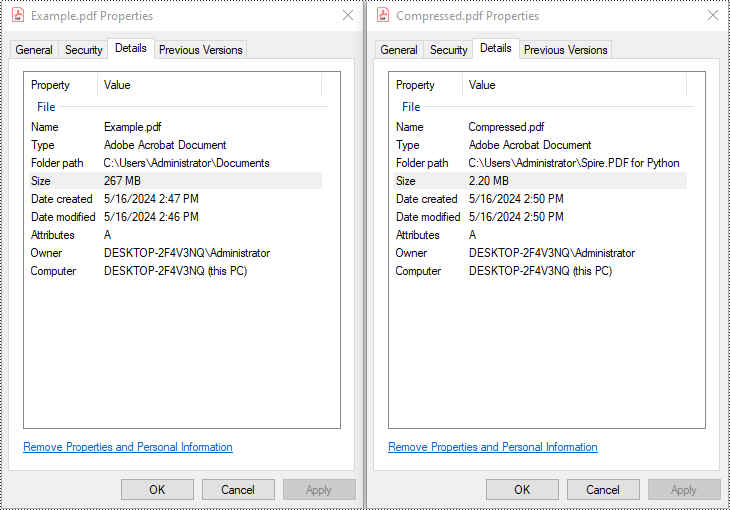
Spire.PDF lets you reduce the size of all images in a PDF by creating a PdfCompressor instance, enabling the image resizing and compression options, and specifying the image quality level. This approach applies compression uniformly across the entire document.
from spire.pdf import *

# Create a PdfCompressor object and load the PDF file
compressor = PdfCompressor("C:/Users/Administrator/Documents/Example.pdf")

# Get the OptimizationOptions object
compression_options = compressor.OptimizationOptions

# Enable image resizing
compression_options.SetResizeImages(True)

# Enable image compression
compression_options.SetIsCompressImage(True)

# Set image quality (available options: Low, Medium, High)
compression_options.SetImageQuality(ImageQuality.Medium)

# Compress and save the PDF file
compressor.CompressToFile("Compressed.pdf")
Full Document Compression
Beyond optimizing individual elements, Spire.PDF also supports full-document compression. By adjusting the document's CompressionLevel and disabling incremental updates, you can apply comprehensive optimization to reduce overall file size.
from spire.pdf import *

# Create a PdfDocument object
pdf = PdfDocument()

# Load the PDF file
pdf.LoadFromFile("C:/Users/Administrator/Documents/Example.pdf")

# Disable incremental update
pdf.FileInfo.IncrementalUpdate = False

# Set the compression level to the highest
pdf.CompressionLevel = PdfCompressionLevel.Best

# Save the optimized PDF
pdf.SaveToFile("OptimizeDocumentContent.pdf")
pdf.Close()
Removing Metadata and Attachments
Cleaning up metadata and removing embedded attachments is a quick way to reduce PDF size. Spire.PDF lets you remove unnecessary information like author/title fields and attached files:
from spire.pdf import *

# Load the PDF
pdf = PdfDocument()
pdf.LoadFromFile("Example.pdf")

# Disable the incremental update
pdf.FileInfo.IncrementalUpdate = False

# Remove metadata
pdf.DocumentInformation.Author = ""
pdf.DocumentInformation.Title = ""

# Remove attachments
pdf.Attachments.Clear()

# Save the optimized PDF
pdf.SaveToFile("Cleaned.pdf")
pdf.Close()
Batch Compressing Multiple PDFs
You can compress multiple PDFs at once by looping through files in a folder and applying the same optimization settings:
import os
from spire.pdf import *

# Folder containing the PDF files to compress
input_folder = "C:/PDFs/"

# Loop through all files in the input folder
for file in os.listdir(input_folder):
    # Process only PDF files
    if file.endswith(".pdf"):
        # Create a PdfCompressor instance and load the file
        compressor = PdfCompressor(os.path.join(input_folder, file))

        # Access compression options
        opt = compressor.OptimizationOptions
        # Enable image resizing
        opt.SetResizeImages(True)
        # Enable image compression
        opt.SetIsCompressImage(True)
        # Set image quality to medium (options: Low, Medium, High)
        opt.SetImageQuality(ImageQuality.Medium)

        # Define output file path with "compressed_" prefix
        output_path = os.path.join(input_folder, "compressed_" + file)
        # Perform compression and save the result
        compressor.CompressToFile(output_path)
Summary
Reducing the size of PDF files is a practical step toward faster workflows, especially when dealing with email sharing, web uploads, and large-scale archiving. With Spire.PDF for Python, developers can implement smart compression techniques—ranging from optimizing images and fonts to stripping unnecessary elements like metadata and attachments.
Whether you're building automation scripts, integrating PDF handling into backend services, or preparing documents for long-term storage, these tools give you the flexibility to control file size without losing visual quality. By combining multiple strategies—like full-document compression and batch processing—you can keep your PDFs lightweight, efficient, and ready for distribution across platforms.
Want to explore more ways to work with PDFs in Python? Explore the full range of Spire.PDF for Python tutorials to learn how to merge/split PDFs, convert PDF to PDF/A, add password protection, and more.
Frequently Asked Questions
Q1: Can I use Spire.PDF for Python on Linux or macOS?
A1: Yes. Spire.PDF for Python is compatible with Windows, Linux, and macOS.
Q2: Is Spire.PDF for Python free?
A2: Spire.PDF for Python offers a free version suitable for small-scale and non-commercial use. For full functionality, including unrestricted use in commercial applications, a commercial version is available. You can request a free 30-day trial license to explore all its premium features.
Q3: Will compressing the PDF reduce the visual quality?
A3: Not necessarily. Spire.PDF’s compression methods are designed to preserve visual fidelity while optimizing file size. You can fine-tune image quality or leave it to the default settings.
Python: Add, Read, and Remove Built-in Document Properties in Word Documents
2024-05-16 01:17:49 Written by KoohjiWord documents often contain metadata known as document properties, which include information like title, author, subject, and keywords. Manipulating these properties is invaluable for maintaining organized documentation, enhancing searchability, and ensuring proper attribution in collaborative environments. With Spire.Doc for Python, developers can automate the tasks of adding, reading, and removing document properties in Word documents to streamline document management workflows and enable the integration of these processes into larger automated systems. This article provides detailed steps and code examples that demonstrate how to utilize Spire.Doc for Python to effectively manage document properties within Word files.
- Add Built-in Document Properties to Word Documents with Python
- Read Built-in Document Properties from Word Documents with Python
- Remove Built-in Document Properties from Word Documents with Python
Install Spire.Doc for Python
This scenario requires Spire.Doc for Python and plum-dispatch v1.7.4. They can be easily installed in your Windows through the following pip commands.
pip install Spire.Doc
If you are unsure how to install, please refer to: How to Install Spire.Doc for Python on Windows
Add Built-in Document Properties to Word Documents with Python
Spire.Doc for Python provides developers with the Document.BuiltinDocumentProperties property to access the built-in properties of Word documents. The value of these properties can be set using the corresponding properties under the BuiltinDocumentProperties class.
The following steps show how to add the main built-in properties in Word documents:
- Create an object of Document class.
- Load a Word document using Document.LoadFromFile() method.
- Get the built-in properties through Document.BuiltinDocumentProperties property.
- Add values to the properties with properties under BuiltinDocumentProperties property.
- Save the document using Document.SaveToFile() method.
- Python
from spire.doc import *
from spire.doc.common import *
# Create an object of Document
doc = Document()
# Load a Word document
doc.LoadFromFile("Sample.docx")
# Set the built-in property
builtinProperty = doc.BuiltinDocumentProperties
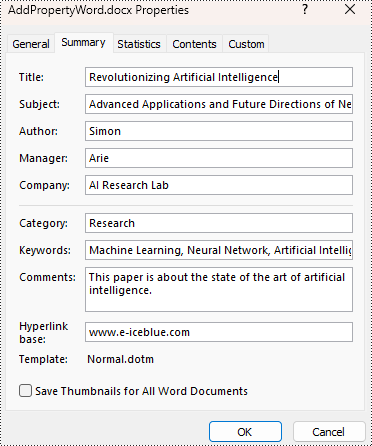
builtinProperty.Title = "Revolutionizing Artificial Intelligence"
builtinProperty.Subject = "Advanced Applications and Future Directions of Neural Networks in Artificial Intelligence"
builtinProperty.Author = "Simon"
builtinProperty.Manager = "Arie"
builtinProperty.Company = "AI Research Lab"
builtinProperty.Category = "Research"
builtinProperty.Keywords = "Machine Learning, Neural Network, Artificial Intelligence"
builtinProperty.Comments = "This paper is about the state of the art of artificial intelligence."
builtinProperty.HyperLinkBase = "www.e-iceblue.com"
# Save the document
doc.SaveToFile("output/AddPropertyWord.docx", FileFormat.Docx2019)
doc.Close()
Read Built-in Document Properties from Word Documents with Python
Besides adding values, the properties under the BuiltinDocumentProperties class also empower developers to read existing built-in properties of Word documents. This enables various functionalities like document search, information extraction, and document analysis.
The detailed steps for reading document built-in properties using Spire.Doc for Python are as follows:
- Create an object of Document class.
- Load a Word document using Document.LoadFromFile() method.
- Get the built-in properties of Document using Document.BuiltinDocumentProperties property.
- Get the value of the properties using properties under BuiltinDocumentProperties class.
- Output the built-in properties of the document.
- Python
from spire.doc import *
from spire.doc.common import *
# Create an object of Document
doc = Document()
# Load a Word document
doc.LoadFromFile("output/AddPropertyWord.docx")
# Get the built-in properties of the document
builtinProperties = doc.BuiltinDocumentProperties
# Get the value of the built-in properties
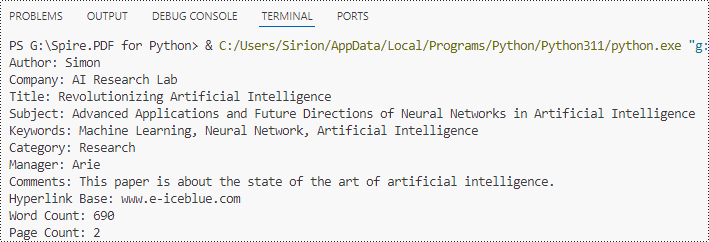
properties = [
"Author: " + builtinProperties.Author,
"Company: " + builtinProperties.Company,
"Title: " + builtinProperties.Title,
"Subject: " + builtinProperties.Subject,
"Keywords: " + builtinProperties.Keywords,
"Category: " + builtinProperties.Category,
"Manager: " + builtinProperties.Manager,
"Comments: " + builtinProperties.Comments,
"Hyperlink Base: " + builtinProperties.HyperLinkBase,
"Word Count: " + str(builtinProperties.WordCount),
"Page Count: " + str(builtinProperties.PageCount),
]
# Output the built-in properties
for i in range(0, len(properties)):
print(properties[i])
doc.Close()
Remove Built-in Document Properties from Word Documents with Python
The built-in document properties of a Word document that contain specific content can be removed by setting them to null values. This protects private information while retaining necessary details.
The detailed steps for removing specific built-in document properties from Word documents are as follows:
- Create an object of Document class.
- Load a Word document using Document.LoadFromFile() method.
- Get the built-in properties of the document through Document.BuiltinDocumentProperties property.
- Set the value of some properties to none to remove the properties with properties under BuiltinDocumentProperties class.
- Save the document using Document.SaveToFile() method.
- Python
from spire.doc import *
from spire.doc.common import *
# Create an instance of the Document class
doc = Document()
# Load the Word document
doc.LoadFromFile("output/AddPropertyWord.docx")
# Get the document's built-in properties
builtinProperties = doc.BuiltinDocumentProperties
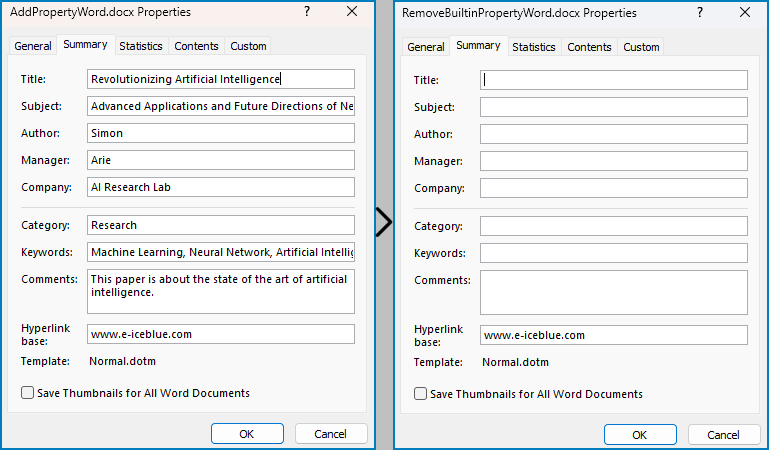
# Remove the built-in properties by setting them to None
builtinProperties.Author = None
builtinProperties.Company = None
builtinProperties.Title = None
builtinProperties.Subject = None
builtinProperties.Keywords = None
builtinProperties.Comments = None
builtinProperties.Category = None
builtinProperties.Manager = None
# Save the document
doc.SaveToFile("output/RemovePropertyWord.docx", FileFormat.Docx)
doc.Close()
Apply for a Temporary License
If you'd like to remove the evaluation message from the generated documents, or to get rid of the function limitations, please request a 30-day trial license for yourself.
Extract Tables from PDF Using Python - Easy Table Parsing Guide
2024-05-15 01:10:42 Written by Koohji
Extracting tables from PDF using Python typically involves understanding how content is visually laid out in rows and columns. Many PDF tables are defined using cell borders, making them easier to detect programmatically. In such cases, a layout-aware library that reads content positioning—rather than just raw text—is essential for accurate PDF table extraction in Python.
In this tutorial, you’ll learn a reliable method to extract tables from PDF using Python, no OCR or machine learning required. Whether your PDF contains clean grids or complex layouts, we'll show how to turn table data into structured formats like Excel or pandas DataFrames for further analysis.
Table of Contents
- Install and Set Up Spire.PDF for Python
- Extract Tables from PDF
- Tips for Better Accuracy
- Common Questions (FAQ)
- Conclusion
Handling Table Extraction from PDF in Python
Unlike Excel or CSV files, PDF documents don’t store tables as structured data. To extract tables from PDF files using Python, you need a library that can analyze the layout and detect tabular structures.
Spire.PDF for Python simplifies this process by providing built-in methods to extract tables page by page. It works best with clearly formatted tables and helps developers convert PDF content into usable data formats like Excel or CSV.
You can install the library with:
pip install Spire.PDF
Or install the free version for smaller PDF table extraction tasks:
pip install spire.pdf.free
Extracting Tables from PDF – Step-by-Step
To extract tables from a PDF file using Python, we start by loading the document and analyzing each page individually. With Spire.PDF for Python, you can detect tables based on their layout structure and extract them programmatically—even from multi-page documents.
Load PDF and Extract Tables
Here's a basic example that shows how to read tables from a PDF using Python. This method uses Spire.PDF to extract each table from the document page by page, making it ideal for developers who want to programmatically extract tabular data from PDFs.
from spire.pdf import PdfDocument, PdfTableExtractor
# Load PDF document
pdf = PdfDocument()
pdf.LoadFromFile("Sample.pdf")
# Create a PdfTableExtractor object
table_extractor = PdfTableExtractor(pdf)
# Extract tables from each page
for i in range(pdf.Pages.Count):
tables = table_extractor.ExtractTable(i)
for table_index, table in enumerate(tables):
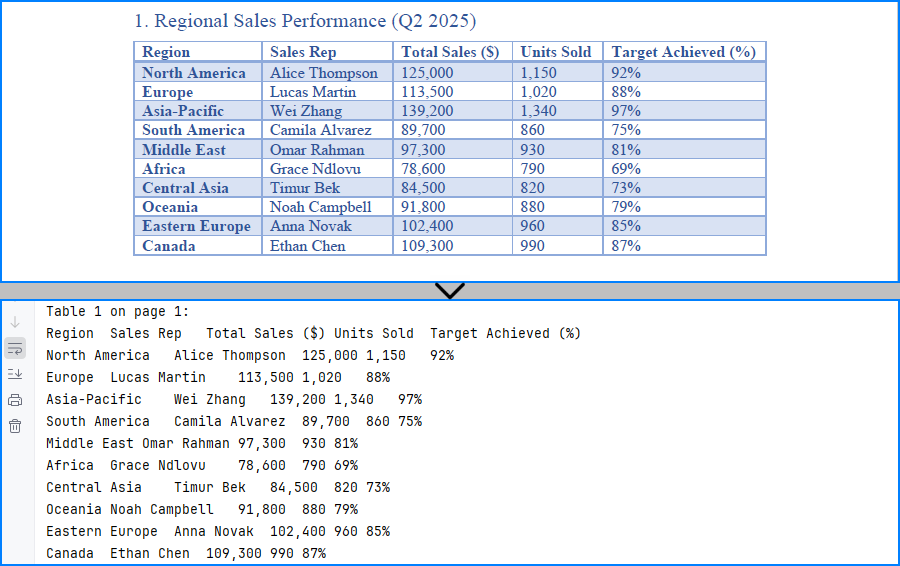
print(f"Table {table_index + 1} on page {i + 1}:")
for row in range(table.GetRowCount()):
row_data = []
for col in range(table.GetColumnCount()):
text = table.GetText(row, col).replace("\n", " ")
row_data.append(text.strip())
print("\t".join(row_data))
This method works reliably for bordered tables. However, for tables without visible borders—especially those with multi-line cells or unmarked headers—the extractor may fail to detect the tabular structure.
The result of extracting table data from a PDF using Python and Spire.PDF is shown below:
Export Tables to Excel and CSV
If you want to analyze or store the extracted PDF tables, you can convert them to Excel and CSV formats using Python. In this example, we use Spire.XLS for Python to create a spreadsheet for each table, allowing easy data processing or sharing. You can install the library from pip: pip install spire.xls.
from spire.pdf import PdfDocument, PdfTableExtractor
from spire.xls import Workbook, FileFormat

# Load PDF document
pdf = PdfDocument()
pdf.LoadFromFile("G:/Documents/Sample101.pdf")

# Set up extractor and Excel workbook
extractor = PdfTableExtractor(pdf)
workbook = Workbook()
workbook.Worksheets.Clear()

# Extract tables page by page
for page_index in range(pdf.Pages.Count):
    tables = extractor.ExtractTable(page_index)
    for t_index, table in enumerate(tables):
        sheet = workbook.Worksheets.Add(f"Page{page_index+1}_Table{t_index+1}")
        for row in range(table.GetRowCount()):
            for col in range(table.GetColumnCount()):
                text = table.GetText(row, col).replace("\n", " ").strip()
                sheet.Range.get_Item(row + 1, col + 1).Value = text
                sheet.AutoFitColumn(col + 1)

# Save all tables to one Excel file
workbook.SaveToFile("output/Sample.xlsx", FileFormat.Version2016)
As shown below, the extracted PDF tables are converted to Excel and CSV using Spire.XLS for Python.
You may also like: How to Insert Data into Excel Files in Python
Tips to Improve PDF Table Extraction Accuracy in Python
Extracting tables from PDFs can sometimes yield imperfect results—especially when dealing with complex layouts, page breaks, or inconsistent formatting. Below are a few practical techniques to help improve table extraction accuracy in Python and get cleaner, more structured output.
1. Merging Multi-Page Tables
Spire.PDF extracts tables on a per-page basis. If a table spans multiple pages, you can combine them manually by appending the rows:
Example:
# Extract and combine tables
combined_rows = []
for i in range(start_page, end_page + 1):
    tables = table_extractor.ExtractTable(i)
    if tables:
        table = tables[0]  # Assuming one table per page
        for row in range(table.GetRowCount()):
            cells = [table.GetText(row, col).strip().replace("\n", " ") for col in range(table.GetColumnCount())]
            combined_rows.append(cells)
You can then convert combined_rows into Excel or CSV if you prefer analysis via these formats.
2. Filtering Out Empty or Invalid Rows
Tables may contain empty rows or columns, or the extractor may return blank rows depending on layout. You can filter them out before exporting.
Example:
# Step 1: Filter out empty rows
filtered_rows = []
for row in range(table.GetRowCount()):
    row_data = [table.GetText(row, col).strip().replace("\n", " ") for col in range(table.GetColumnCount())]
    if any(cell for cell in row_data):  # Skip completely empty rows
        filtered_rows.append(row_data)

# Step 2: Transpose and filter out empty columns
transposed = list(zip(*filtered_rows))
filtered_columns = [col for col in transposed if any(cell.strip() for cell in col)]

# Step 3: Transpose back to original row-column format
filtered_data = list(zip(*filtered_columns))
This helps improve accuracy when working with noisy or inconsistent layouts.
Common Questions (FAQ)
Q: Can I extract both text and tables from a PDF?
Yes, use PdfTextExtractor to retrieve the full page text and PdfTableExtractor to extract structured tables.
Q: Why aren't my tables detected?
Make sure the PDF is text-based (not scanned images) and that the layout follows a logical row-column format. Spire.PDF for Python detects only bordered tables; unbordered tables are often not recognized.
If you are handling an image-based PDF document, you can use Spire.OCR for Python to extract table data. Please refer to: How to Extract Text from Images Using Python.
Q: How to extract tables without borders from PDF documents?
Spire.PDF may have difficulty extracting tables without visible borders. If the tables are not extracted correctly, consider the following approaches:
- Using
PdfTextExtractorto extract raw text and then writing custom logic to identify rows and columns. - Using a large language model API (e.g., GPT) to interpret the structure from extracted plain text and return only structured table data.
- Consider adding visible borders to tables in the original document before generating the PDF, as this makes it easier to extract them using Python code.
Q: How do I convert extracted tables to a pandas DataFrame?
While Spire.PDF doesn’t provide native DataFrame output, you can collect cell values into a list of lists and then convert:
import pandas as pd
df = pd.DataFrame(table_data)
This lets you convert PDF tables into pandas DataFrames using Python for data analysis.
Q: Is Spire.PDF for Python free to use?
Yes, there are two options available:
- Free Spire.PDF for Python – a permanently free version with limited features (e.g., page count limits). You can install it via pip or download it from the official Free Spire.PDF for Python page.
- Temporary Free License – to unlock all features of the commercial version for evaluation or internal use, you can apply for a temporary free license here.
Conclusion
Whether you're working with structured reports, financial data, or standardized forms, extracting tables from PDFs in Python can streamline your workflow. With a layout-aware parser like Spire.PDF for Python, you can reliably detect and export tables—no OCR or manual formatting needed. By converting tables to Excel, CSV, or DataFrame, you unlock their full potential for automation and analysis.
In summary, extracting tables from PDFs in Python becomes much easier with Spire.PDF, especially when converting them into structured formats like Excel and CSV for analysis.
Adding page numbers to a Word document is a fundamental feature that enhances readability and navigation, especially in lengthy documents. It allows readers to find specific content more easily and helps authors organize their work. Word offers flexible options for adding page numbers, including choosing the location (header, footer, or body) and customizing the format and appearance to match your document's design needs.
In this article, you will learn how to add pager numbers to a Word document, as well as customizing their appearance using Spire.Doc for Python.
- Add Page Numbers to a Word Document
- Add Page Numbers to a Specific Section
- Add Discontinuous Page Numbers to Different Sections
Install Spire.Doc for Python
This scenario requires Spire.Doc for Python and plum-dispatch v1.7.4. They can be easily installed in your Windows through the following pip command.
pip install Spire.Doc
Add Page Numbers to a Word Document in Python
To dynamically add page numbers to a Word document using Spire.Doc, you can leverage various fields such as FieldPage, FieldNumPages, and FieldSection. These fields serve as placeholders for the current page number, total page count, and section number, enabling you to customize and automate the pagination process.
You can embed these placeholders in the header or footer of your document by calling the Paragraph.AppendField() method.
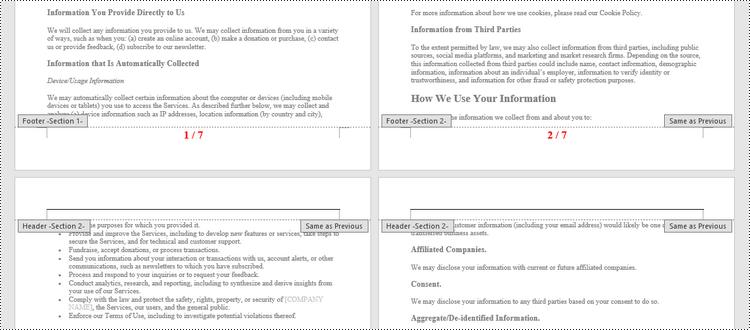
Here's a step-by-step guide on how to insert a FieldPage and FieldNumPages field in the footer, which will display the page number in the format "X / Y":
- Create a Document object.
- Load a Word document from a specified file path.
- Get the first section using Document.Sections[index] property
- Get the footer of the first section using Section.HeadersFooters.Footer property.
- Add a paragraph to the footer using HeaderFooter.AddParagraph() method.
- Insert a FieldPage field, and a FieldNumPages field to the paragraph using Paragraph.AppendField() method.
- Save the document to a different Word file.
- Python
from spire.doc import *
from spire.doc.common import *

# Create a Document object
document = Document()

# Load a Word file
document.LoadFromFile("C:\\Users\\Administrator\\Desktop\\Input.docx")

# Get the first section
section = document.Sections[0]

# Get the footer of the section
footer = section.HeadersFooters.Footer

# Add "page number / page count" to the footer
footerParagraph = footer.AddParagraph()
footerParagraph.AppendField("page number", FieldType.FieldPage)
footerParagraph.AppendText(" / ")
footerParagraph.AppendField("page count", FieldType.FieldNumPages)
footerParagraph.Format.HorizontalAlignment = HorizontalAlignment.Center

# Apply formatting to the page number
style = ParagraphStyle(document)
style.CharacterFormat.Bold = True
style.CharacterFormat.FontName = "Times New Roman"
style.CharacterFormat.FontSize = 18
style.CharacterFormat.TextColor = Color.get_Red()
document.Styles.Add(style)
footerParagraph.ApplyStyle(style)

# Save the document
document.SaveToFile("Output/AddPageNumbersToDocument.docx")

# Dispose resources
document.Dispose()
Add Page Numbers to a Specific Section in Python
By default, when you add page numbers to the footer of a section, they are automatically linked to the preceding section, maintaining a continuous sequence of page numbers. This behavior is convenient for most documents but may not be ideal when you want to start numbering from a certain section without affecting the numbering in other parts of the document.
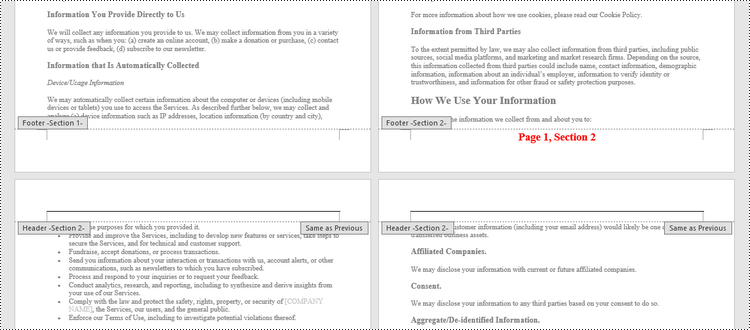
If you need to add page numbers to a specific section without them being linked to the previous section, you must unlink the subsequent sections and clear the contents of their footers. Here's how you can do it using Spire.Doc for Python.
- Create a Document object.
- Load a Word document from a specified file path.
- Get a specific section using Document.Sections[index] property
- Get the footer of the section using Section.HeadersFooters.Footer property.
- Restart page numbering from 1 by setting Section.PageSetup.RestartPageNumbering property to true and Section.PageSetup.PageStartingNumber property to 1.
- Insert a FieldPage field and a FieldSection field to the footer using Paragraph.AppendField() method.
- Disable "Link to previous" by setting HeadersFooters.Footer.LinkToPrevious propety to false.
- Delete the content of the footers in the subsequent sections
- Save the document to a different Word file.
- Python
from spire.doc import *
from spire.doc.common import *

# Create a Document object
document = Document()

# Load a Word file
document.LoadFromFile("C:\\Users\\Administrator\\Desktop\\Input.docx")

# Get a specific section
sectionIndex = 1
section = document.Sections[sectionIndex]

# Restart page numbering from 1
section.PageSetup.RestartPageNumbering = True
section.PageSetup.PageStartingNumber = 1

# Get the footer of the section
footer = section.HeadersFooters.Footer

# Add "Page X, Section Y" to the footer
footerParagraph = footer.AddParagraph()
footerParagraph.AppendText("Page ")
footerParagraph.AppendField("page number", FieldType.FieldPage)
footerParagraph.AppendText(", Section ")
footerParagraph.AppendField("section number", FieldType.FieldSection)
footerParagraph.Format.HorizontalAlignment = HorizontalAlignment.Center

# Apply formatting to the page number
style = ParagraphStyle(document);
style.CharacterFormat.Bold = True
style.CharacterFormat.FontName = "Times New Roman"
style.CharacterFormat.FontSize = 18
style.CharacterFormat.TextColor = Color.get_Red()
document.Styles.Add(style)
footerParagraph.ApplyStyle(style)

# Disable "Link to previous" in the subsequent section
document.Sections[sectionIndex + 1].HeadersFooters.Footer.LinkToPrevious = False

# Delete the content of the footers in the subsequent sections
for i in range(sectionIndex +1, document.Sections.Count, 1):
    document.Sections[i].HeadersFooters.Footer.ChildObjects.Clear()
    document.Sections[i].HeadersFooters.Footer.AddParagraph()

# Save the document
document.SaveToFile("Output/AddPageNumbersToSection.docx")

# Dispose resources
document.Dispose()
Add Discontinuous Page Numbers to Different Sections in Python
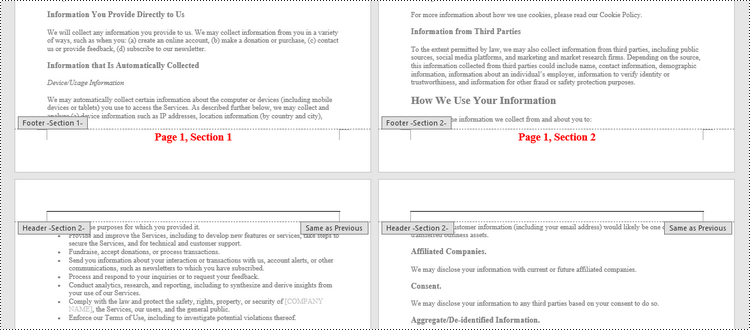
When working with documents that contain multiple sections, you might want to start page numbering anew for each section to clearly distinguish between them. To achieve this, you must go through each section individually, add page numbers, and then reset the page numbering for the next section.
The following are the steps to add discontinuous page numbers to different sections using Spire.Doc for Python.
- Create a Document object.
- Load a Word document from a specified file path.
- Iterate through the sections in the document.
- Get a specific section using Document.Sections[index] property
- Get the footer of the section using Section.HeadersFooters.Footer property.
- Restart page numbering from 1 by setting Section.PageSetup.RestartPageNumbering property to true and Section.PageSetup.PageStartingNumber property to 1.
- Insert a FieldPage field and a FieldSection field to the footer using Paragraph.AppendField() method.
- Save the document to a different Word file.
- Python
from spire.doc import *
from spire.doc.common import *

# Create a Document object
document = Document()

# Load a Word file
document.LoadFromFile("C:\\Users\\Administrator\\Desktop\\Input.docx")

# Iterate through the sections in the document
for i in range(document.Sections.Count):

    # Get a specific section
    section = document.Sections[i]

    # Restart page numbering from 1
    section.PageSetup.RestartPageNumbering = True
    section.PageSetup.PageStartingNumber = 1

    # Get the footer of the section
    footer = section.HeadersFooters.Footer

    # Add "Page X, Section Y" to the footer
    footerParagraph = footer.AddParagraph()
    footerParagraph.AppendText("Page ")
    footerParagraph.AppendField("page number", FieldType.FieldPage)
    footerParagraph.AppendText(", Section ")
    footerParagraph.AppendField("section number", FieldType.FieldSection)
    footerParagraph.Format.HorizontalAlignment = HorizontalAlignment.Center

    # Apply formatting to the page number
    style = ParagraphStyle(document)
    style.CharacterFormat.Bold = True
    style.CharacterFormat.FontName = "Times New Roman";
    style.CharacterFormat.FontSize = 18;
    style.CharacterFormat.TextColor = Color.get_Red()
    document.Styles.Add(style)
    footerParagraph.ApplyStyle(style)

# Save the document
document.SaveToFile("Output/AddDifferentPageNumbersToSections.docx")

# Dispose resources
document.Dispose()
Apply for a Temporary License
If you'd like to remove the evaluation message from the generated documents, or to get rid of the function limitations, please request a 30-day trial license for yourself.
