
Knowledgebase (2609)
Children categories
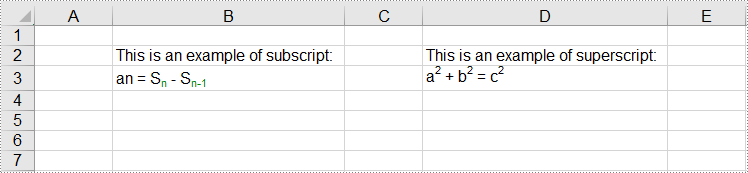
Superscript and subscript are formatting styles that allow you to display characters or numerals above or below the regular text baseline respectively. By utilizing these formatting styles, you can emphasize certain elements, denote exponents, powers, chemical formulas, or mathematical equations, and present data in a more visually appealing and informative manner. In this article, we will demonstrate how to apply superscript and subscript styles in Excel in C# and VB.NET using Spire.XLS for .NET.
Install Spire.XLS for .NET
To begin with, you need to add the DLL files included in the Spire.XLS for .NET package as references in your .NET project. The DLL files can be either downloaded from this link or installed via NuGet.
PM> Install-Package Spire.XLS
Apply Superscript and Subscript in Excel in C# and VB.NET
To apply the superscript or subscript style to specific characters in a cell, you need to create a custom font, enable the superscript or subscript property of the font, and then assign the custom font to the specific characters within the cell. The detailed steps are as follows:
- Create a Workbook object.
- Get a specific worksheet using Workbook.Worksheets[int index] property.
- Get a specific cell using Worksheet.Range[string name] property and add rich text to the cell using CellRange.RichText.Text property.
- Create a custom font using Workbook.CreateFont() method.
- Enable the subscript property of the font by setting ExcelFont.IsSubscript property to true.
- Assign the custom font to specific characters of the rich text in the cell using CellRange.RichText.SetFont() method.
- Get a specific cell using Worksheet.Range[string name] property and add rich text to the cell using CellRange.RichText.Text property.
- Create a custom font using Workbook.CreateFont() method.
- Enable the superscript property of the font by setting ExcelFont.IsSuperscript property to true.
- Assign the custom font to specific characters of the rich text in the cell using CellRange.RichText.SetFont() method.
- Save the result file using Workbook.SaveToFile() method.
- C#
- VB.NET
using Spire.Xls;
using System.Drawing;

namespace ApplySuperscriptAndSubscript
{
    internal class Program
    {
        static void Main(string[] args)
        {
            //Create a Workbook object
            Workbook workbook = new Workbook();

            //Get the first worksheet
            Worksheet sheet = workbook.Worksheets[0];

            //Add text to specific cells
            sheet.Range["B2"].Text = "This is an example of subscript:";
            sheet.Range["D2"].Text = "This is an example of superscript:";

            //Add rich text to a specific cell
            CellRange range = sheet.Range["B3"];
            range.RichText.Text = "an = Sn - Sn-1";

            //Create a custom font
            ExcelFont font = workbook.CreateFont();
            //Enable the subscript property of the font
            font.IsSubscript = true;
            //Set font color
            font.Color = Color.Green;
            //Assign the font to specific characters of the rich text in the cell
            range.RichText.SetFont(6, 6, font);
            range.RichText.SetFont(11, 13, font);

            //Add rich text to a specific cell
            range = sheet.Range["D3"];
            range.RichText.Text = "a2 + b2 = c2";

            //Create a custom font
            font = workbook.CreateFont();
            //Enable the superscript property of the font
            font.IsSuperscript = true;
            //Assign the font to specific characters of the rich text in the cell
            range.RichText.SetFont(1, 1, font);
            range.RichText.SetFont(6, 6, font);
            range.RichText.SetFont(11, 11, font);

            //Auto-fit column widths
            sheet.AllocatedRange.AutoFitColumns();

            //Save the result file
            workbook.SaveToFile("ApplySubscriptAndSuperscript.xlsx", ExcelVersion.Version2013);
            workbook.Dispose();
        }
    }
}
Apply for a Temporary License
If you'd like to remove the evaluation message from the generated documents, or to get rid of the function limitations, please request a 30-day trial license for yourself.
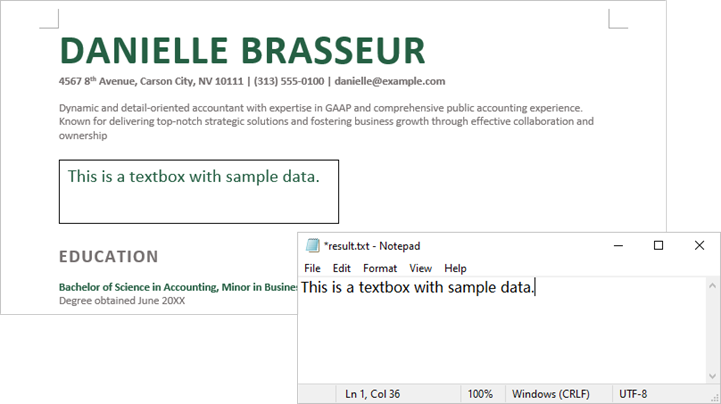
Textboxes in Microsoft Word are versatile tools that enhance document layout and design. They allow users to position text independently of the main text flow, making it easier to create visually appealing documents. In some cases, you may need to extract text from textboxes for repurposing, or update the text inside a textbox to ensure clarity and relevance.
In this article, you will learn how to extract or update text in a textbox in a Word document using C# with Spire.Doc for .NET.
Install Spire.Doc for .NET
To begin with, you need to add the DLL files included in the Spire.Doc for .NET package as references in your .NET project. The DLL files can be either downloaded from this link or installed via NuGet.
PM> Install-Package Spire.Doc
Extract Text from Textbox in a Word Document
Using Spire.Doc for .NET, you can access a specific text box in a document with the Document.TextBoxes[index] property. Iterate through the text box's child objects to check if each one is a paragraph or a table. For paragraphs, retrieve the text using the Paragraph.Text property. For tables, loop through the cells to extract text from each cell.
The steps to extract text from a textbox in a Word document are as follows:
- Create a Document object.
- Load a Word file using Document.LoadFromFile() method.
- Get a specific textbox using Document.TextBoxes[index] property
- Iterate through the child objects of the textbox.
- Determine if a child object if a paragraph. If yes, get the text from the paragraph using Paragraph.Text property.
- Determine if a child object if a table. If yes, get the text from the table using ExtractTextFromTable() method.
- C#
using Spire.Doc;
using Spire.Doc.Documents;
using Spire.Doc.Fields;

namespace ExtractTextFromTextbox
{
    class Program
    {
        static void Main(string[] args)
        {
            // Create a Document object
            Document document = new Document();

            // Load a Word file
            document.LoadFromFile("C:\\Users\\Administrator\\Desktop\\Input.docx");

            // Get a specific textbox
            TextBox textBox = document.TextBoxes[0];

            // Create a StreamWriter to write extracted text to a txt file
            using (StreamWriter sw = File.CreateText("result.txt"))
            {
                // Iterate though child objects of the textbox
                foreach (DocumentObject objt in textBox.ChildObjects)
                {
                    // Determine if the child object is a paragraph
                    if (objt.DocumentObjectType == DocumentObjectType.Paragraph)
                    {
                        // Write paragraph text to the txt file
                        sw.Write((objt as Paragraph).Text);
                    }

                    // Determine if the child object is a table
                    if (objt.DocumentObjectType == DocumentObjectType.Table)
                    {
                        // Extract text from table to the txt file
                        ExtractTextFromTable(objt as Table, sw);
                    }
                }

            }

        }

        // Extract text from a table
        static void ExtractTextFromTable(Table table, StreamWriter sw)
        {
            for (int i = 0; i < table.Rows.Count; i++)
            {
                TableRow row = table.Rows[i];
                for (int j = 0; j < row.Cells.Count; j++)
                {
                    TableCell cell = row.Cells[j];
                    foreach (Paragraph paragraph in cell.Paragraphs)
                    {
                        sw.Write(paragraph.Text);
                    }
                }
            }
        }
    }
}
Update a Textbox in a Word Document
To update a text box, first clear its existing content using the TextBox.ChildObjects.Clear() method. Then, add a new paragraph and set its text.
The steps to update a textbox in a Word document are as follows:
- Create a Document object.
- Load a Word file using Document.LoadFromFile() method.
- Get a specific textbox using Document.TextBoxes[index] property
- Remove existing content of the textbox using TextBox.ChildObjects.Clear() method.
- Add a paragraph to the textbox using TextBox.Body.AddParagraph() method.
- Add text to the paragraph using Paragraph.AppendText() method.
- Save the document to a different Word file.
- C#
using Spire.Doc;
using Spire.Doc.Documents;
using Spire.Doc.Fields;

namespace UpdateTextbox
{
    class Program
    {
        static void Main(string[] args)
        {
            // Create a Document object
            Document document = new Document();

            // Load a Word file
            document.LoadFromFile("C:\\Users\\Administrator\\Desktop\\Input.docx");

            // Get a specific textbox
            TextBox textBox = document.TextBoxes[0];

            // Remove child objects of the textbox
            textBox.ChildObjects.Clear();

            // Add a new paragraph to the textbox
            Paragraph paragraph = textBox.Body.AddParagraph();

            // Set line spacing
            paragraph.Format.LineSpacing = 15f;

            // Add text to the paragraph
            TextRange textRange = paragraph.AppendText("The text in this textbox has been updated.");

            // Set font size
            textRange.CharacterFormat.FontSize = 15f;

            // Save the document to a different Word file
            document.SaveToFile("UpdateTextbox.docx", FileFormat.Docx2019);

            // Dispose resources
            document.Dispose();
        }

    }

}

Apply for a Temporary License
If you'd like to remove the evaluation message from the generated documents, or to get rid of the function limitations, please request a 30-day trial license for yourself.
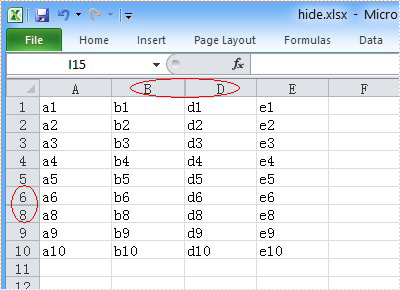
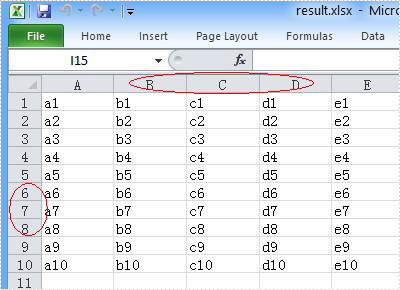
You can hide the Excel row or column by using the c# code, but a row or column also becomes hidden when you want to show the full Excel worksheet. You can unhide the Excel row and column by using the c# code. This article aims at introducing the method sheet.ShowRow and sheet.ShowColumn in the Excel .NET component Spire.Xls to show the hidden row and column.
First, let’s preview the hidden row and column.
Here comes to the steps of the process.
Step 1: Create an instance of Spire.XLS.Workbook.
Workbook workbook = new Workbook();
Step 2: Load the existing Excel file that hidden the row and column in the specified path.
workbook.LoadFromFile("hide.xlsx");
Step 3: Get the first worksheet of the Excel file.
Worksheet sheet = workbook.Worksheets[0];
Step 4: Unhide the hidden row and column.
sheet.ShowRow(7);
sheet.ShowColumn(3);
Step 5: Generate the new Excel file.
workbook.SaveToFile("result.xlsx", ExcelVersion.Version2010);
Now let's preview the effect screenshot.
Here is the full code.
using Spire.Xls;
namespace UnhideExcelRow
{
    class Program
    {
        static void Main(string[] args)
        {
            Workbook workbook = new Workbook();
            workbook.LoadFromFile("hide.xlsx");
            Worksheet sheet = workbook.Worksheets[0];
            // unhide the hidden row and column of the worksheet.
            sheet.ShowRow(7);
            sheet.ShowColumn(3);
            workbook.SaveToFile("result.xlsx", ExcelVersion.Version2010);
        }
    }
}
