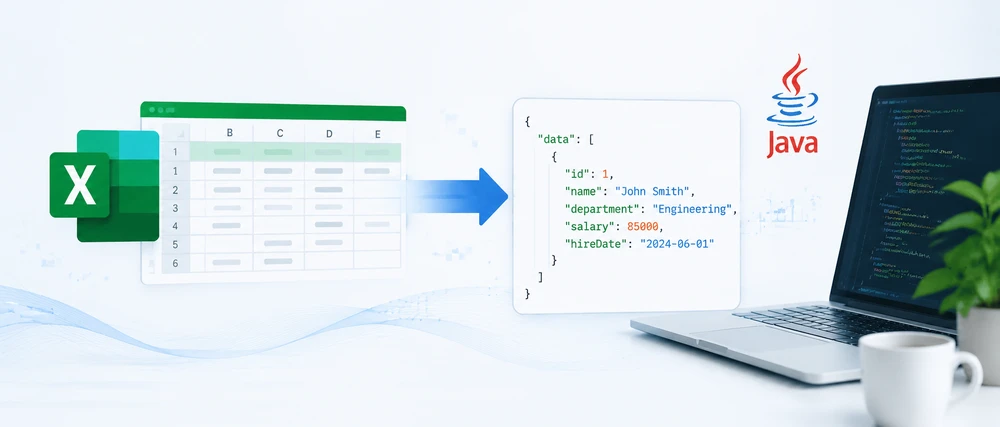
Convert JSON Data to Excel in Java (JSON to XLSX Guide)
JSON is widely used for data exchange in REST APIs, web services, and enterprise applications. However, business users often prefer Excel for reporting, filtering, and data analysis. As a result, developers frequently need to convert JSON to Excel in Java when exporting API responses, generating reports, or sharing structured data with non-technical users.
While Java provides several JSON libraries, transforming data into a well-structured Excel file requires handling column headers, cell types, row iteration, and output formats — all of which become tedious without the right tool. Spire.XLS for Java simplifies this with a clean API that creates Excel workbooks without relying on Microsoft Office.
In this article, you'll learn how to convert JSON to Excel in Java using Spire.XLS for Java and Jackson. We'll cover JSON array conversion, nested JSON handling, JSON file processing, XLSX and XLS export, auto-fitting, formatting, and best practices for working with large datasets.
Quick Navigation
- Why Convert JSON to Excel in Java
- Install Spire.XLS for Java
- Prepare JSON Data
- Convert JSON to Excel in Java — Step by Step
- Complete Java Code to Convert JSON to Excel
- Export JSON to XLSX in Java
- Convert Nested JSON to Excel in Java
- Convert a JSON File to Excel
- Auto-Fit Rows and Columns in Excel
- Apply Formatting to the Exported Excel File
- Common Challenges When Converting JSON to Excel
- Why Use Spire.XLS for Java
- Conclusion
- FAQ
1. Why Convert JSON to Excel in Java
JSON is widely used for data exchange in REST APIs, web services, and enterprise applications because it is lightweight and easy for machines to process. However, business users often need Excel files for reporting, filtering, visualization, and further analysis.
Converting JSON to Excel in Java helps bridge the gap between backend systems and business workflows. Common use cases include:
Export API Data
Many REST APIs return JSON responses. Converting these responses into Excel allows users to review, filter, and analyze data without manually processing raw JSON.
Generate Reports
Java applications can transform JSON data from APIs, databases, or other sources into structured Excel reports with headers, formatting, and organized tables.
Share Structured Data
Excel files are easier to distribute and analyze using tools such as charts, formulas, and pivot tables. Exporting JSON data to Excel gives non-technical users direct access to these features.
2. Install Spire.XLS for Java
Before converting JSON to Excel in Java, set up the following dependencies in your project.
Maven Dependency
Spire.XLS for Java is available through the e-iceblue Maven repository. Add the repository and dependency to your pom.xml:
<repositories>
    <repository>
        <id>com.e-iceblue</id>
        <name>e-iceblue</name>
        <url>https://repo.e-iceblue.com/nexus/content/groups/public/</url>
    </repository>
</repositories>

<dependency>
    <groupId>e-iceblue</groupId>
    <artifactId>spire.xls</artifactId>
    <version>16.6.5</version>
</dependency>
You can also download Spire.XLS for Java and add the JAR to your project manually.
Add a JSON Library
Java does not include built-in JSON support. This guide uses Jackson, the most widely adopted JSON processing library in the Java ecosystem:
<dependency>
    <groupId>com.fasterxml.jackson.core</groupId>
    <artifactId>jackson-databind</artifactId>
    <version>2.17.2</version>
</dependency>
Import Required Classes
Include the following imports in your Java source file:
import com.spire.xls.*;
import com.spire.xls.core.spreadsheet.collections.AutoFitType;
import com.fasterxml.jackson.databind.JsonNode;
import com.fasterxml.jackson.databind.ObjectMapper;
import com.fasterxml.jackson.databind.node.ArrayNode;
import com.fasterxml.jackson.databind.node.ObjectNode;
import java.io.File;
import java.io.IOException;
import java.util.Iterator;
import java.util.Map;
3. Prepare JSON Data
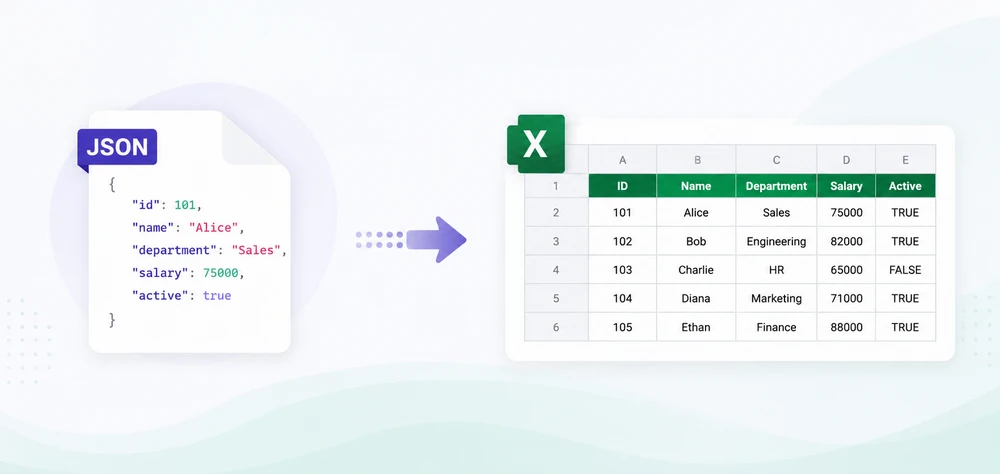
To illustrate the conversion process, we will use a simple JSON array where each object represents a row and each property represents a column. This is the most common JSON structure encountered in REST API responses and data export workflows.
Example: Simple JSON Array
[
  {
    "ID": 1,
    "Name": "Alice",
    "Department": "Sales",
    "Salary": 75000,
    "HireDate": "2022-03-15"
  },
  {
    "ID": 2,
    "Name": "Bob",
    "Department": "Marketing",
    "Salary": 68000,
    "HireDate": "2021-07-01"
  },
  {
    "ID": 3,
    "Name": "Carol",
    "Department": "Engineering",
    "Salary": 92000,
    "HireDate": "2023-01-10"
  }
]
The mapping between JSON and Excel is straightforward:
- Each JSON object becomes a row in the spreadsheet
- Each property key becomes a column header
- Each property value becomes a cell value in the corresponding row and column
Understanding this mapping is essential for following the code examples in the next sections.
4. Convert JSON to Excel in Java — Step by Step
The conversion process involves five steps: creating a workbook, accessing a worksheet, parsing JSON data, writing column headers, and populating cell values. This section walks through each step individually before presenting the complete code.
Step 1: Create a Workbook
The Workbook class represents an Excel file. Instantiate it to create a new, empty workbook:
Workbook workbook = new Workbook();
Step 2: Create a Worksheet
A workbook contains one or more worksheets. Access the first worksheet (created by default) and optionally rename it:
Worksheet sheet = workbook.getWorksheets().get(0);
sheet.setName("EmployeeData");
Step 3: Read JSON Data
Use Jackson's ObjectMapper to parse the JSON string into a JsonNode tree. If the root element is a JSON array, cast it to ArrayNode for iteration:
ObjectMapper mapper = new ObjectMapper();
JsonNode rootNode = mapper.readTree(jsonString);

if (!rootNode.isArray()) {
    throw new IllegalArgumentException("Expected a JSON array at the root level");
}
ArrayNode jsonArray = (ArrayNode) rootNode;
Step 4: Write JSON Keys as Column Headers
Extract the field names from the first JSON object and write them to the first row of the worksheet. Spire.XLS uses 1-based row and column indices:
JsonNode firstObject = jsonArray.get(0);
int col = 1;
for (Iterator<Map.Entry<String, JsonNode>> it = firstObject.fields(); it.hasNext(); ) {
    Map.Entry<String, JsonNode> entry = it.next();
    sheet.get(1, col).setValue(entry.getKey());
    col++;
}
Step 5: Write JSON Values to Excel Cells
Iterate through each JSON object in the array and write its values to the corresponding row. Start from row 2 since row 1 contains the headers:
for (int i = 0; i < jsonArray.size(); i++) {
    JsonNode record = jsonArray.get(i);
    int dataRow = i + 2;
    int dataCol = 1;
    for (Iterator<Map.Entry<String, JsonNode>> it = record.fields(); it.hasNext(); ) {
        Map.Entry<String, JsonNode> entry = it.next();
        JsonNode value = entry.getValue();
        if (value.isNumber()) {
            sheet.get(dataRow, dataCol).setNumberValue(value.doubleValue());
        } else if (value.isBoolean()) {
            sheet.get(dataRow, dataCol).setBooleanValue(value.booleanValue());
        } else {
            sheet.get(dataRow, dataCol).setValue(value.asText());
        }
        dataCol++;
    }
}
This approach preserves data types — numbers and booleans are written as typed cell values rather than strings, which ensures that numeric sorting, filtering, and formula calculations work correctly in the generated Excel file.
5. Complete Java Code to Convert JSON to Excel
Here is the full, runnable program that reads a JSON string and converts it to an Excel file. This example demonstrates the complete Java code to convert JSON to Excel from start to finish:
import com.spire.xls.*;
import com.fasterxml.jackson.databind.JsonNode;
import com.fasterxml.jackson.databind.ObjectMapper;
import com.fasterxml.jackson.databind.node.ArrayNode;
import java.io.File;
import java.util.Iterator;
import java.util.Map;

public class JsonToExcelConverter {

    public static void main(String[] args) {

        // Sample JSON data — an array of employee records
        String jsonString = "["
            + "{\"ID\":1,\"Name\":\"Alice\",\"Department\":\"Sales\",\"Salary\":75000,\"HireDate\":\"2022-03-15\"},"
            + "{\"ID\":2,\"Name\":\"Bob\",\"Department\":\"Marketing\",\"Salary\":68000,\"HireDate\":\"2021-07-01\"},"
            + "{\"ID\":3,\"Name\":\"Carol\",\"Department\":\"Engineering\",\"Salary\":92000,\"HireDate\":\"2023-01-10\"}"
            + "]";

        try {
            // Parse the JSON string into a JsonNode tree
            ObjectMapper mapper = new ObjectMapper();
            JsonNode rootNode = mapper.readTree(jsonString);

            if (!rootNode.isArray()) {
                throw new IllegalArgumentException("Expected a JSON array at the root level");
            }
            ArrayNode jsonArray = (ArrayNode) rootNode;

            // Create a new workbook and access the first worksheet
            Workbook workbook = new Workbook();
            Worksheet sheet = workbook.getWorksheets().get(0);
            sheet.setName("EmployeeData");

            // Write column headers from the first JSON object's keys
            JsonNode firstObject = jsonArray.get(0);
            int col = 1;
            for (Iterator<Map.Entry<String, JsonNode>> it = firstObject.fields(); it.hasNext(); ) {
                Map.Entry<String, JsonNode> entry = it.next();
                sheet.get(1, col).setValue(entry.getKey());
                col++;
            }

            // Write data rows from JSON values
            for (int i = 0; i < jsonArray.size(); i++) {
                JsonNode record = jsonArray.get(i);
                int dataRow = i + 2;
                int dataCol = 1;

                for (Iterator<Map.Entry<String, JsonNode>> it = record.fields(); it.hasNext(); ) {
                    Map.Entry<String, JsonNode> entry = it.next();
                    JsonNode value = entry.getValue();

                    // Preserve data types: numbers and booleans as typed cells
                    if (value.isNumber()) {
                        sheet.get(dataRow, dataCol).setNumberValue(value.doubleValue());
                    } else if (value.isBoolean()) {
                        sheet.get(dataRow, dataCol).setBooleanValue(value.booleanValue());
                    } else {
                        sheet.get(dataRow, dataCol).setValue(value.asText());
                    }
                    dataCol++;
                }
            }

            // Auto-fit columns for readability
            sheet.getAllocatedRange().autoFitColumns();

            // Save the workbook as an XLSX file
            workbook.saveToFile("EmployeeData.xlsx", ExcelVersion.Version2016);
            System.out.println("JSON converted to Excel successfully.");

            // Release resources
            workbook.dispose();

        } catch (Exception e) {
            System.err.println("Error during JSON to Excel conversion: " + e.getMessage());
            e.printStackTrace();
        }
    }
}
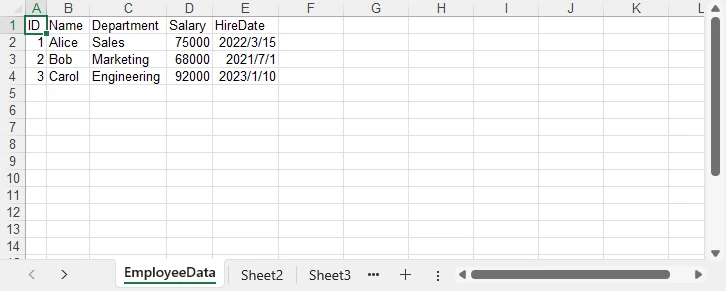
After running the program, the JSON data is converted into an Excel worksheet. The generated EmployeeData.xlsx file contains the employee records with preserved data types and automatically adjusted column widths:
Key Spire.XLS Classes and Methods
- Workbook — Represents an Excel file. Handles creation, worksheet management, and file saving.
- Worksheet — Represents a single sheet within a workbook. Provides access to cells, rows, and columns.
get(int row, int column)— Returns aCellRangeobject for the specified cell. Row and column indices are 1-based.setValue(String)— Sets a cell's value as a string. Used for text and headers.setNumberValue(double)— Sets a cell's value as a number, preserving numeric type for calculations.setBooleanValue(boolean)— Sets a cell's value as a boolean (TRUE/FALSE).saveToFile(String, ExcelVersion)— Saves the workbook to a file in the specified Excel format.dispose()— Releases unmanaged resources held by the workbook.
If you also need to convert Excel files back to JSON format, see our guide on how to convert Excel to JSON in Java using Spire.XLS for Java.
6. Export JSON to XLSX in Java
Spire.XLS for Java supports both the modern XLSX format (Excel 2007 and later) and the legacy XLS format (Excel 97–2003). You can control the output format by passing the appropriate ExcelVersion enum to saveToFile().
Save as XLSX
// Export to modern Excel format (.xlsx)
workbook.saveToFile("EmployeeData.xlsx", ExcelVersion.Version2016);
Save as XLS
// Export to legacy Excel format (.xls)
workbook.saveToFile("EmployeeData.xls", ExcelVersion.Version97to2003);
| Format | Description | Use Case |
|---|---|---|
| XLSX | Modern Excel format (Excel 2007+) | Default choice; smaller file, full features |
| XLS | Legacy Excel format (Excel 97–2003) | Compatibility with older systems |
The same workbook object can be saved to either format — no code changes are needed beyond the file extension and version parameter. This is particularly useful when your application needs to support both modern and legacy environments.
You can also learn how to convert between XLS and XLSX formats in Java for scenarios where format migration or legacy upgrade is required.
7. Convert Nested JSON to Excel in Java
Real-world JSON data often contains nested objects and arrays. To write nested JSON to Excel, you need to flatten the hierarchical structure into a tabular format where each nested field becomes its own column.
Consider the following JSON containing employee records with nested contact information:
[
  {
    "ID": 1,
    "Name": "Alice",
    "Department": "Sales",
    "Contact": {
      "Email": "alice@company.com",
      "Phone": "555-0101"
    }
  },
  {
    "ID": 2,
    "Name": "Bob",
    "Department": "Marketing",
    "Contact": {
      "Email": "bob@company.com",
      "Phone": "555-0102"
    }
  }
]
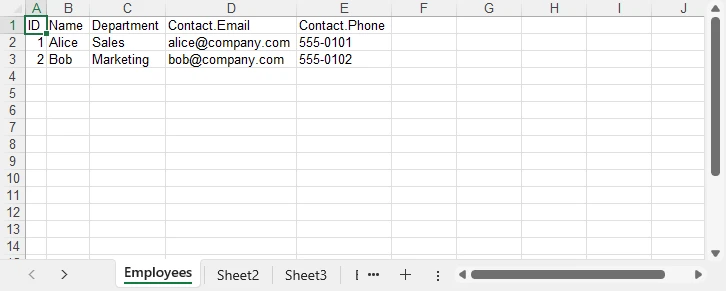
The goal is to flatten the Contact object so that Email and Phone become individual columns:
| ID | Name | Department | Contact.Email | Contact.Phone |
|---|---|---|---|---|
| 1 | Alice | Sales | alice@company.com | 555-0101 |
| 2 | Bob | Marketing | bob@company.com | 555-0102 |
The following code uses a recursive flattening approach to handle arbitrary nesting depth:
import com.spire.xls.*;
import com.fasterxml.jackson.databind.JsonNode;
import com.fasterxml.jackson.databind.ObjectMapper;
import com.fasterxml.jackson.databind.node.ArrayNode;
import java.util.Iterator;
import java.util.LinkedHashMap;
import java.util.Map;

public class NestedJsonToExcel {

    public static void main(String[] args) {

        String jsonString = "["
            + "{\"ID\":1,\"Name\":\"Alice\",\"Department\":\"Sales\","
            + "\"Contact\":{\"Email\":\"alice@company.com\",\"Phone\":\"555-0101\"}},"
            + "{\"ID\":2,\"Name\":\"Bob\",\"Department\":\"Marketing\","
            + "\"Contact\":{\"Email\":\"bob@company.com\",\"Phone\":\"555-0102\"}}"
            + "]";

        try {
            ObjectMapper mapper = new ObjectMapper();
            ArrayNode jsonArray = (ArrayNode) mapper.readTree(jsonString);

            Workbook workbook = new Workbook();
            Worksheet sheet = workbook.getWorksheets().get(0);
            sheet.setName("Employees");

            // Flatten the first object to extract all column headers (including nested keys)
            LinkedHashMap<String, String> firstFlat = flattenJson(jsonArray.get(0), "");
            int col = 1;
            for (String key : firstFlat.keySet()) {
                sheet.get(1, col).setValue(key);
                col++;
            }

            // Write data rows
            for (int i = 0; i < jsonArray.size(); i++) {
                LinkedHashMap<String, String> flat = flattenJson(jsonArray.get(i), "");
                int dataRow = i + 2;
                int dataCol = 1;
                for (String key : firstFlat.keySet()) {
                    String value = flat.getOrDefault(key, "");
                    sheet.get(dataRow, dataCol).setValue(value);
                    dataCol++;
                }
            }

            sheet.getAllocatedRange().autoFitColumns();
            workbook.saveToFile("NestedEmployees.xlsx", ExcelVersion.Version2016);
            System.out.println("Nested JSON converted to Excel successfully.");
            workbook.dispose();

        } catch (Exception e) {
            System.err.println("Error: " + e.getMessage());
        }
    }

    /**
     * Recursively flattens a JSON object into key-value pairs.
     * Nested keys are joined with a dot (e.g., "Contact.Email").
     */
    private static LinkedHashMap<String, String> flattenJson(JsonNode node, String prefix) {
        LinkedHashMap<String, String> flat = new LinkedHashMap<>();
        if (node.isObject()) {
            for (Iterator<Map.Entry<String, JsonNode>> it = node.fields(); it.hasNext(); ) {
                Map.Entry<String, JsonNode> entry = it.next();
                String newPrefix = prefix.isEmpty() ? entry.getKey() : prefix + "." + entry.getKey();
                flat.putAll(flattenJson(entry.getValue(), newPrefix));
            }
        } else {
            flat.put(prefix, node.asText());
        }
        return flat;
    }
}
The flattenJson method recursively traverses each JSON object. When it encounters a nested object, it prepends the parent key with a dot separator (e.g., Contact.Email). When it reaches a leaf value, it stores the full dotted key and its value in the map. This ensures that all fields — at any nesting depth — are represented as columns in the resulting Excel sheet.
8. Convert a JSON File to Excel
In production applications, JSON data typically comes from a file on disk rather than an inline string. The conversion steps remain the same — only the JSON source changes. Jackson's ObjectMapper can read directly from a File object:
import com.spire.xls.*;
import com.fasterxml.jackson.databind.JsonNode;
import com.fasterxml.jackson.databind.ObjectMapper;
import com.fasterxml.jackson.databind.node.ArrayNode;
import java.io.File;
import java.util.Iterator;
import java.util.Map;

public class JsonFileToExcel {

    public static void main(String[] args) {

        try {
            // Step 1: Read and parse the JSON file
            ObjectMapper mapper = new ObjectMapper();
            JsonNode rootNode = mapper.readTree(new File("employees.json"));

            if (!rootNode.isArray()) {
                throw new IllegalArgumentException("Expected a JSON array at the root level");
            }
            ArrayNode jsonArray = (ArrayNode) rootNode;

            // Step 2: Create a workbook
            Workbook workbook = new Workbook();
            Worksheet sheet = workbook.getWorksheets().get(0);
            sheet.setName("Employees");

            // Step 3: Write headers from the first object
            JsonNode firstObject = jsonArray.get(0);
            int col = 1;
            for (Iterator<Map.Entry<String, JsonNode>> it = firstObject.fields(); it.hasNext(); ) {
                Map.Entry<String, JsonNode> entry = it.next();
                sheet.get(1, col).setValue(entry.getKey());
                col++;
            }

            // Step 4: Write data rows
            for (int i = 0; i < jsonArray.size(); i++) {
                JsonNode record = jsonArray.get(i);
                int dataRow = i + 2;
                int dataCol = 1;
                for (Iterator<Map.Entry<String, JsonNode>> it = record.fields(); it.hasNext(); ) {
                    Map.Entry<String, JsonNode> entry = it.next();
                    JsonNode value = entry.getValue();
                    if (value.isNumber()) {
                        sheet.get(dataRow, dataCol).setNumberValue(value.doubleValue());
                    } else if (value.isBoolean()) {
                        sheet.get(dataRow, dataCol).setBooleanValue(value.booleanValue());
                    } else {
                        sheet.get(dataRow, dataCol).setValue(value.asText());
                    }
                    dataCol++;
                }
            }

            // Step 5: Export to Excel
            sheet.getAllocatedRange().autoFitColumns();
            workbook.saveToFile("EmployeesFromJson.xlsx", ExcelVersion.Version2016);
            System.out.println("JSON file converted to Excel successfully.");
            workbook.dispose();

        } catch (Exception e) {
            System.err.println("Error reading JSON file: " + e.getMessage());
            e.printStackTrace();
        }
    }
}
This approach handles large JSON files efficiently because Jackson processes the file as a streaming tree model. For very large JSON files (hundreds of megabytes), consider using Jackson's JsonParser in streaming mode to read records incrementally rather than loading the entire tree into memory at once.
9. Auto-Fit Rows and Columns in Excel
When JSON data is written to Excel cells, the default column width may not be wide enough to display all content. Text values such as email addresses, URLs, or long descriptions get truncated visually. Spire.XLS provides auto-fit methods that adjust column widths and row heights to match their content:
// Auto-fit all columns and rows in the used range
sheet.getAllocatedRange().autoFitColumns();
sheet.getAllocatedRange().autoFitRows();
Add these lines after writing all data but before saving the workbook. The getAllocatedRange() method returns the range of cells that contain data, so only populated cells are affected.
For more granular control, you can auto-fit individual columns:
// Auto-fit a specific column (e.g., column 3)
sheet.getAllocatedRange().getColumns()[2].autoFitColumns();
Auto-fitting produces a more professional, readable spreadsheet — especially when the JSON data contains variable-length text fields. The screenshot below shows the difference between a raw export and one with auto-fit applied.
10. Apply Formatting to the Exported Excel File
Raw data exports often need formatting to meet business reporting standards. Spire.XLS for Java provides a rich set of cell formatting APIs that let you style the header row, format numbers, and apply date formats — all programmatically.
Format the Header Row
Apply bold text and a background color to the first row to distinguish headers from data:
import com.spire.xls.core.spreadsheet.styles.CellStyle;
import java.awt.Color;

// Apply formatting to the header row
CellRange headerRange = sheet.getAllocatedRange().getRows()[0];
headerRange.getStyle().setFont(new ExcelFont(true));
headerRange.getStyle().setColor(Color.decode("#4472C4"));
headerRange.getStyle().getFont().setColor(Color.WHITE);
headerRange.setStyle(headerRange.getStyle());
Format Numbers
Apply currency or percentage formatting to numeric columns:
// Format the Salary column (column 4) as currency
CellRange salaryColumn = sheet.getAllocatedRange().getColumns()[3];
salaryColumn.setNumberFormat("$#,##0.00");
Format Dates
If your JSON contains date strings, you can format the corresponding column to display them in a consistent format:
// Format the HireDate column (column 5) as a date
CellRange dateColumn = sheet.getAllocatedRange().getColumns()[4];
dateColumn.setNumberFormat("yyyy-mm-dd");
The formatting techniques above can be combined to create professional Excel reports. For a complete Java example covering advanced Excel formatting features, refer to How to Create and Format Excel Files in Java Using Spire.XLS.
11. Common Challenges When Converting JSON to Excel
Real-world JSON data is rarely as clean as tutorial examples. Here are the most common challenges developers face when converting JSON to Excel, along with practical solutions.
Missing Fields Across Objects
Different JSON objects in the same array may have inconsistent fields. One record might include a Phone field while another omits it entirely. If your code assumes all objects share the same keys, missing fields cause index misalignment in the Excel output.
Solution: Collect all unique keys across all objects first, then write each object's values using the unified key list:
// Collect all unique keys from all JSON objects
LinkedHashSet<String> allKeys = new LinkedHashSet<>();
for (JsonNode record : jsonArray) {
    record.fieldNames().forEachRemaining(allKeys::add);
}

// Write headers from the complete key set
int col = 1;
for (String key : allKeys) {
    sheet.get(1, col).setValue(key);
    col++;
}

// Write values, using empty string for missing fields
for (int i = 0; i < jsonArray.size(); i++) {
    JsonNode record = jsonArray.get(i);
    int dataRow = i + 2;
    int dataCol = 1;
    for (String key : allKeys) {
        JsonNode value = record.get(key);
        String cellValue = (value != null && !value.isNull()) ? value.asText() : "";
        sheet.get(dataRow, dataCol).setValue(cellValue);
        dataCol++;
    }
}
Nested Objects
JSON objects can contain arbitrarily deep nesting. Writing nested objects directly to cells produces unreadable output like [object Object] or serialized JSON strings.
Solution: Use the recursive flattening approach demonstrated in Section 7. The flattenJson method traverses the entire object tree and produces flat key-value pairs where nested keys are joined with dot notation.
Large JSON Files
Parsing very large JSON files (hundreds of megabytes or more) into a single in-memory tree can cause OutOfMemoryError in Java. Additionally, writing tens of thousands of rows one cell at a time can be slow.
Solution: Use Jackson's streaming API (JsonParser) to read JSON records one at a time, and write each record to Excel immediately before moving to the next. This keeps memory usage constant regardless of file size:
import com.fasterxml.jackson.core.JsonFactory;
import com.fasterxml.jackson.core.JsonParser;
import com.fasterxml.jackson.core.JsonToken;

JsonFactory factory = new JsonFactory();
try (JsonParser parser = factory.createParser(new File("large_data.json"))) {
    int dataRow = 2;
    while (parser.nextToken() != JsonToken.END_ARRAY) {
        // Parse one object at a time
        JsonNode record = mapper.readTree(parser);
        // Write to Excel...
        dataRow++;
    }
}
Data Type Conversion
JSON supports strings, numbers, booleans, null values, arrays, and objects. Excel cells support text, numbers, booleans, dates, and errors. Mismatched types — for example, storing a numeric value as a string — prevent Excel sorting and formulas from working correctly.
Solution: Check each JSON value's type before writing it to a cell. Use setNumberValue() for numbers, setBooleanValue() for booleans, and setValue() for text. Handle null values by writing an empty string or a placeholder. For date strings, parse them into Date objects and use setDateTimeValue() to write them as Excel date cells:
if (value == null || value.isNull()) {
    sheet.get(dataRow, dataCol).setValue("");
} else if (value.isNumber()) {
    sheet.get(dataRow, dataCol).setNumberValue(value.doubleValue());
} else if (value.isBoolean()) {
    sheet.get(dataRow, dataCol).setBooleanValue(value.booleanValue());
} else {
    sheet.get(dataRow, dataCol).setValue(value.asText());
}
12. Why Use Spire.XLS for Java for JSON-to-Excel Conversion
Several characteristics make Spire.XLS for Java well-suited for JSON-to-Excel conversion in enterprise Java applications.
No Microsoft Excel Required
Spire.XLS for Java is a standalone library that does not depend on Microsoft Office or any other external software. It runs on any system with a Java Runtime Environment, including Linux servers, Docker containers, and cloud platforms where Office is not available.
Supports XLS and XLSX
The library handles both the legacy XLS format (Excel 97–2003) and the modern XLSX format (Excel 2007+). You can export to either format by changing a single parameter, making it easy to support diverse downstream environments.
Rich Formatting Features
Beyond basic cell value writing, Spire.XLS provides comprehensive formatting capabilities — cell styles, number formats, fonts, colors, borders, conditional formatting, charts, and pivot tables. This allows you to generate professional-grade Excel files directly from JSON data without any post-processing in Excel.
Easy API
The API follows an intuitive object model: Workbook contains Worksheets, each Worksheet contains CellRanges, and each CellRange supports value setting, styling, and formatting. Developers familiar with the Excel object model can become productive quickly.
Suitable for Enterprise Applications
Spire.XLS for Java is designed for server-side and enterprise use cases. It handles large files efficiently, supports multi-threaded access patterns, and integrates cleanly with Spring Boot, Jakarta EE, and other Java frameworks commonly used in enterprise environments.
You can apply for a 30-day free license to evaluate all features in your projects.
13. Conclusion
In this article, we explored how to convert JSON to Excel in Java using Spire.XLS for Java and Jackson. By parsing JSON data, writing values into Excel worksheets, and exporting the workbook as XLSX or XLS files, developers can efficiently transform structured JSON data into readable spreadsheets.
Spire.XLS for Java provides a simple and flexible way to generate Excel files from JSON data without requiring Microsoft Office or external dependencies. It also supports advanced features such as formatting, auto-fitting, and handling complex data structures for professional Excel reports.
14. FAQ
How do I convert JSON to Excel in Java?
Parse the JSON data using Jackson's ObjectMapper, create a Workbook and Worksheet using Spire.XLS for Java, write the JSON keys as column headers in the first row, then iterate through the JSON array to populate each data row. Save the workbook using saveToFile() with the desired ExcelVersion. The complete code example is shown in Section 5.
Can I convert JSON to XLSX in Java without Microsoft Excel installed?
Yes. Spire.XLS for Java is a standalone library that does not require Microsoft Office or any other software. It can create, read, and write XLSX files entirely in Java, making it suitable for server-side applications running on Linux, Docker, or cloud platforms.
How do I handle nested JSON objects when converting to Excel?
Use a recursive flattening function that traverses the JSON object tree and produces flat key-value pairs. Nested keys are joined with a dot separator (e.g., Contact.Email). The flattened keys become column headers in the Excel sheet. See Section 7 for the complete implementation.
What is the difference between setValue() and setNumberValue() in Spire.XLS?
setValue(String) writes a string value to a cell, while setNumberValue(double) writes a numeric value that Excel treats as a number. Using setNumberValue() for numeric JSON fields ensures that sorting, filtering, and formula calculations work correctly. Similarly, setBooleanValue(boolean) writes typed boolean values.
How do I convert a large JSON file to Excel without running out of memory?
For large JSON files, use Jackson's streaming API (JsonParser) to read and process one JSON record at a time instead of loading the entire file into memory. Write each record to the Excel worksheet immediately after parsing it. This keeps memory usage constant regardless of the file size.
Is Spire.XLS for Java free?
Spire.XLS for Java is a commercial library. A free version, Free Spire.XLS for Java, is available with limitations on worksheet count and features. You can also apply for a 30-day free license to evaluate the full feature set before purchasing.
Convert Excel to JSON in Java (Multi-Sheet & Nested JSON)
Converting Excel to JSON in Java is a common requirement in backend development, especially when building APIs, ETL pipelines, or data integration workflows. In this guide, you will learn how to convert Excel to JSON in Java using Spire.XLS, a powerful library that supports both XLS and XLSX formats with minimal code.
Excel files are widely used for data storage and reporting, while JSON has become the standard format for data exchange in modern applications. However, converting Excel to JSON in Java is not trivial if done manually — developers need to handle file parsing, data type conversion, empty cells, and multi-sheet structures, which can quickly become complex and error-prone.
Using Spire.XLS for Java together with Jackson, developers can easily transform Excel spreadsheets into structured JSON data with clean and maintainable code. This article provides a complete step-by-step tutorial on Java Excel to JSON conversion, including single-sheet conversion, multi-sheet processing, and nested JSON structures.
Quick Navigation
- Why Convert Excel to JSON in Java
- Prerequisites
- Convert Excel to JSON in Java — Step by Step
- Convert XLS and XLSX Files to JSON
- Handling Multi-Sheet Workbooks and Nested JSON
- Handling Empty Cells and Data Types
- Common Pitfalls
- Conclusion
- FAQ
1. Why Convert Excel to JSON in Java
Excel and JSON are widely used in modern software systems but serve very different roles. Excel is designed for structured data entry, analysis, and reporting with support for formulas, formatting, and multi-sheet workbooks. JSON (JavaScript Object Notation), in contrast, is a lightweight data format used for machine-to-machine communication, REST APIs, configuration files, and NoSQL databases.
Because of this difference, Java developers often need to convert Excel to JSON when integrating spreadsheet-based data into backend systems.
Common use cases include:
- REST API integration — Converting Excel data uploaded by users into JSON for API responses
- ETL workflows — Extracting spreadsheet data and transforming it into JSON for databases or data lakes
- Configuration migration — Moving legacy Excel-based configs into JSON-based microservice systems
- Automated reporting — Turning Excel templates into structured JSON for downstream processing
In Java applications, converting Excel to JSON is more than just reading rows and mapping columns. Real-world files often include inconsistent data types, empty cells, date formatting issues, and multi-sheet structures, which make manual parsing complex and error-prone.
Spire.XLS for Java simplifies this process by providing a unified API for both XLS and XLSX formats. It allows developers to directly access cell values, data types, and formatting information, enabling clean and reliable Excel to JSON conversion logic without dealing with low-level file parsing.
2. Prerequisites
Before converting Excel to JSON in Java, set up the following dependencies in your project.
Install Spire.XLS for Java via Maven (Recommended)
Spire.XLS for Java is available through the e-iceblue Maven repository. Add the repository and dependency to your pom.xml:
<repositories>
    <repository>
        <id>com.e-iceblue</id>
        <name>e-iceblue</name>
        <url>https://repo.e-iceblue.com/nexus/content/groups/public/</url>
    </repository>
</repositories>

<dependency>
    <groupId>e-iceblue</groupId>
    <artifactId>spire.xls</artifactId>
    <version>16.6.5</version>
</dependency>
You can also download Spire.XLS for Java and add it to your project manually.
Add a JSON Library
Java does not include built-in JSON support. This guide uses Jackson, the most widely adopted JSON processing library in the Java ecosystem:
<dependency>
    <groupId>com.fasterxml.jackson.core</groupId>
    <artifactId>jackson-databind</artifactId>
    <version>2.17.2</version>
</dependency>
Import Required Classes
Include the following imports in your Java source file:
import com.spire.xls.*;
import com.fasterxml.jackson.databind.ObjectMapper;
import com.fasterxml.jackson.databind.node.ObjectNode;
import com.fasterxml.jackson.databind.node.ArrayNode;
import java.io.File;
import java.io.IOException;
If you prefer manual installation, download the Spire.XLS for Java JAR from the e-iceblue website and add it to your project's classpath.
3. Convert Excel to JSON in Java — Step by Step
The conversion process involves four steps: loading the workbook, reading the header row, iterating through data rows, and assembling the JSON output. This section walks through each step and then presents the complete code.
Step 1: Load the Excel File
Use the Workbook class to open an Excel file. Then retrieve the target worksheet by index:
Workbook workbook = new Workbook();
workbook.loadFromFile("EmployeeData.xlsx");
Worksheet worksheet = workbook.getWorksheets().get(0);
Step 2: Read the Header Row
The first row of the spreadsheet typically contains column headers. These headers become the JSON keys for each record. Read them into a String array:
int columnCount = worksheet.getLastColumn();
String[] headers = new String[columnCount];
for (int col = 1; col <= columnCount; col++) {
    headers[col - 1] = worksheet.get(1, col).getValue();
}
Step 3: Iterate Data Rows and Build JSON Objects
Starting from row 2, loop through each row and create an ObjectNode for every record. Each cell value is mapped to the corresponding header key:
ObjectMapper mapper = new ObjectMapper();
ArrayNode arrayNode = mapper.createArrayNode();
for (int row = 2; row <= worksheet.getLastRow(); row++) {
    ObjectNode record = mapper.createObjectNode();
    for (int col = 1; col <= columnCount; col++) {
        record.put(headers[col - 1], worksheet.get(row, col).getValue());
    }
    arrayNode.add(record);
}
Step 4: Export JSON Output
Use Jackson's ObjectMapper to write the ArrayNode to a file with pretty-print formatting:
try {
    mapper.writerWithDefaultPrettyPrinter().writeValue(new File("EmployeeData.json"), arrayNode);
    System.out.println("JSON exported successfully.");
} catch (IOException e) {
    System.err.println("Failed to write JSON file: " + e.getMessage());
}
workbook.dispose();
Complete Code Example
Here is the full program that reads an Excel file and converts it to JSON:
import com.spire.xls.*;
import com.fasterxml.jackson.databind.ObjectMapper;
import com.fasterxml.jackson.databind.node.ObjectNode;
import com.fasterxml.jackson.databind.node.ArrayNode;
import java.io.File;
import java.io.IOException;

public class ExcelToJsonConverter {

    public static void main(String[] args) {

        // Load the Excel workbook
        Workbook workbook = new Workbook();
        workbook.loadFromFile("EmployeeData.xlsx");

        // Access the first worksheet
        Worksheet worksheet = workbook.getWorksheets().get(0);

        // Read column headers from the first row
        int columnCount = worksheet.getLastColumn();
        String[] headers = new String[columnCount];
        for (int col = 1; col <= columnCount; col++) {
            headers[col - 1] = worksheet.get(1, col).getValue();
        }

        // Create Jackson ObjectMapper and ArrayNode
        ObjectMapper mapper = new ObjectMapper();
        ArrayNode arrayNode = mapper.createArrayNode();

        // Convert each data row to a JSON object
        for (int row = 2; row <= worksheet.getLastRow(); row++) {
            ObjectNode record = mapper.createObjectNode();
            for (int col = 1; col <= columnCount; col++) {
                record.put(headers[col - 1], worksheet.get(row, col).getValue());
            }
            arrayNode.add(record);
        }

        // Write JSON output to file with pretty-print formatting
        try {
            mapper.writerWithDefaultPrettyPrinter().writeValue(new File("EmployeeData.json"), arrayNode);
            System.out.println("Excel data converted to JSON successfully.");
        } catch (IOException e) {
            System.err.println("Error writing JSON file: " + e.getMessage());
        }

        // Release workbook resources
        workbook.dispose();
    }
}
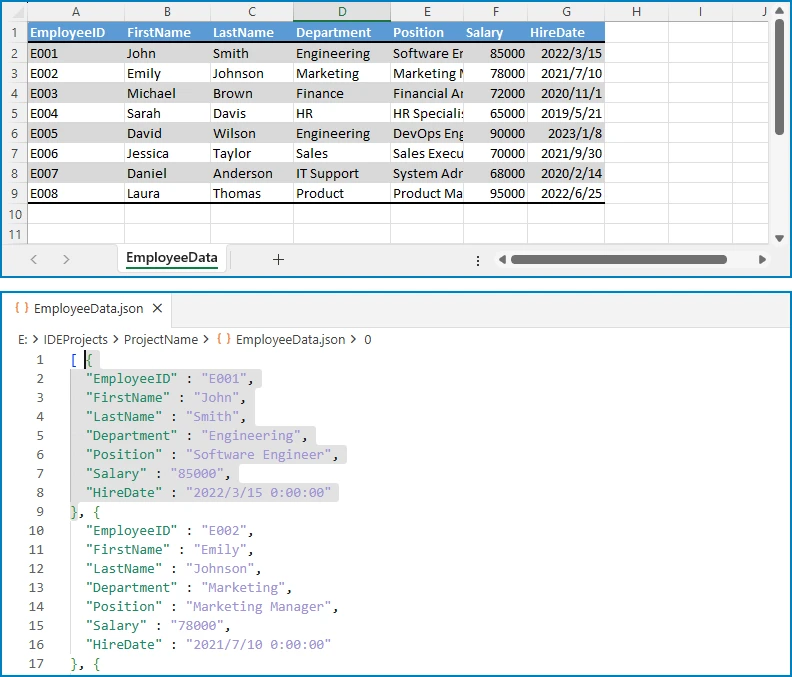
Expected JSON output (for an Excel file with Name, Department, Email, and Salary columns):
[ {
  "EmployeeID" : "E001",
  "FirstName" : "John",
  "LastName" : "Smith",
  "Department" : "Engineering",
  "Position" : "Software Engineer",
  "Salary" : "85000",
  "HireDate" : "2022/3/15 0:00:00"
} ]
The following diagram shows a visual comparison between the original Excel data and the converted JSON output for better understanding.
Key Spire.XLS Classes and Methods
- Workbook — Represents an Excel file. Handles loading, saving, and managing worksheets.
- Worksheet — Represents a single sheet within a workbook. Provides access to rows, columns, and cells.
get(int row, int column)— Returns aCellRangeobject for the specified cell. Row and column indices are 1-based.getValue()— Returns the cell's display value. UnlikegetText(), it correctly retrieves the value regardless of the cell's data type (text, number, date, etc.).getLastRow()/getLastColumn()— Return the last row and column numbers that contain data.
You can also learn how to convert Excel to CSV in Java for scenarios where a lightweight, tabular format is preferred for data exchange and storage.
4. Convert XLS and XLSX Files to JSON
Spire.XLS for Java supports both the legacy XLS format (Excel 97–2003) and the modern XLSX format (Excel 2007 and later). The library detects the file format automatically when you call loadFromFile(), so the same Java code converts XLS to JSON and XLSX to JSON without any modifications.
// Convert XLSX to JSON (modern format)
Workbook xlsxWorkbook = new Workbook();
xlsxWorkbook.loadFromFile("SalesReport.xlsx");

// Convert XLS to JSON (legacy format)
Workbook xlsWorkbook = new Workbook();
xlsWorkbook.loadFromFile("SalesReport.xls");

// Both workbooks are processed identically
Worksheet sheet = xlsxWorkbook.getWorksheets().get(0);
int rowCount = sheet.getLastRow();
int colCount = sheet.getLastColumn();
// ... same conversion logic as the basic example
No additional configuration, format flags, or separate code paths are needed. Whether you receive .xls files from legacy systems or .xlsx files from modern applications, Spire.XLS handles the parsing transparently. This is particularly useful in enterprise environments where Excel files may come from different sources and span multiple format generations.
You can also learn how to convert between XLS and XLSX formats in Java for scenarios where file format migration or legacy upgrade is required.
5. Handling Multi-Sheet Workbooks and Nested JSON
Real-world Excel workbooks often contain multiple worksheets. Converting each sheet to a separate JSON array produces a structured output that preserves the workbook's organization. In some cases, developers also need to build nested JSON objects that reflect hierarchical relationships within the data.
Convert Multiple Sheets to JSON
The following example reads all worksheets in a workbook and creates a JSON object where each key is the sheet name and each value is an array of records from that sheet:
import com.spire.xls.*;
import com.fasterxml.jackson.databind.ObjectMapper;
import com.fasterxml.jackson.databind.node.ObjectNode;
import com.fasterxml.jackson.databind.node.ArrayNode;
import java.io.File;
import java.io.IOException;

public class MultiSheetExcelToJson {

    public static void main(String[] args) {

        Workbook workbook = new Workbook();
        workbook.loadFromFile("SalesReport.xlsx");

        ObjectMapper mapper = new ObjectMapper();
        ObjectNode fullReport = mapper.createObjectNode();

        // Iterate through every worksheet in the workbook
        for (int s = 0; s < workbook.getWorksheets().getCount(); s++) {
            Worksheet worksheet = workbook.getWorksheets().get(s);
            String sheetName = worksheet.getName();

            // Read headers from the first row
            int columnCount = worksheet.getLastColumn();
            String[] headers = new String[columnCount];
            for (int col = 1; col <= columnCount; col++) {
                headers[col - 1] = worksheet.get(1, col).getValue();
            }

            // Convert data rows to JSON objects
            ArrayNode sheetData = mapper.createArrayNode();
            for (int row = 2; row <= worksheet.getLastRow(); row++) {
                ObjectNode record = mapper.createObjectNode();
                for (int col = 1; col <= columnCount; col++) {
                    record.put(headers[col - 1], worksheet.get(row, col).getValue());
                }
                sheetData.add(record);
            }

            // Add this sheet's data to the final output
            fullReport.set(sheetName, sheetData);
        }

        // Write the combined JSON to file with pretty-print formatting
        try {
            mapper.writerWithDefaultPrettyPrinter().writeValue(new File("SalesReport.json"), fullReport);
            System.out.println("Multi-sheet workbook converted to JSON.");
        } catch (IOException e) {
            System.err.println("Error writing JSON: " + e.getMessage());
        }

        workbook.dispose();
    }
}
Output (for a workbook with "East Region" and "West Region" sheets):
{
  "East Region": [
    {"Employee": "Alice", "Product": "Laptop", "Amount": "1200"},
    {"Employee": "Bob", "Product": "Monitor", "Amount": "450"}
  ],
  "West Region": [
    {"Employee": "Carol", "Product": "Keyboard", "Amount": "150"},
    {"Employee": "Dave", "Product": "Mouse", "Amount": "75"}
  ]
}
The diagram below illustrates how multiple Excel sheets are mapped into a single JSON object structure.

Build Nested JSON from Excel Data
Some scenarios require nested JSON structures rather than flat arrays. For example, a project management spreadsheet might list projects and their tasks in adjacent columns. The following code groups tasks under their parent projects:
import com.spire.xls.*;
import com.fasterxml.jackson.databind.ObjectMapper;
import com.fasterxml.jackson.databind.node.ObjectNode;
import com.fasterxml.jackson.databind.node.ArrayNode;
import java.util.LinkedHashMap;
import java.util.Map;
import java.io.File;
import java.io.IOException;

public class NestedExcelToJson {

    public static void main(String[] args) {

        Workbook workbook = new Workbook();
        workbook.loadFromFile("ProjectTasks.xlsx");
        Worksheet worksheet = workbook.getWorksheets().get(0);

        ObjectMapper mapper = new ObjectMapper();

        // Use a LinkedHashMap to preserve project insertion order
        Map<String, ObjectNode> projectMap = new LinkedHashMap<>();

        for (int row = 2; row <= worksheet.getLastRow(); row++) {
            String projectName = worksheet.get(row, 1).getValue();
            String taskName = worksheet.get(row, 2).getValue();
            String assignee = worksheet.get(row, 3).getValue();
            String status = worksheet.get(row, 4).getValue();

            // Create project entry on first encounter
            if (!projectMap.containsKey(projectName)) {
                ObjectNode project = mapper.createObjectNode();
                project.put("name", projectName);
                project.set("tasks", mapper.createArrayNode());
                projectMap.put(projectName, project);
            }

            // Build task object and add to the project's task array
            ObjectNode task = mapper.createObjectNode();
            task.put("task", taskName);
            task.put("assignee", assignee);
            task.put("status", status);
            ((ArrayNode) projectMap.get(projectName).get("tasks")).add(task);
        }

        // Assemble final JSON array
        ArrayNode projectsJson = mapper.createArrayNode();
        for (ObjectNode project : projectMap.values()) {
            projectsJson.add(project);
        }

        try {
            mapper.writerWithDefaultPrettyPrinter()
                    .writeValue(new File("ProjectTasks.json"), projectsJson);

            System.out.println("Nested JSON file generated successfully.");
        } catch (IOException e) {
            System.err.println("Error writing JSON file: " + e.getMessage());
        }

        workbook.dispose();
    }
}
Output (for a project-task spreadsheet):
[
  {
    "name": "Website Redesign",
    "tasks": [
      {"task": "Design mockups", "assignee": "Alice", "status": "Complete"},
      {"task": "Frontend implementation", "assignee": "Bob", "status": "In Progress"}
    ]
  },
  {
    "name": "Mobile App",
    "tasks": [
      {"task": "API integration", "assignee": "Carol", "status": "Pending"},
      {"task": "UI testing", "assignee": "Dave", "status": "Not Started"}
    ]
  }
]
The following diagram shows how flat Excel rows are transformed into a nested JSON structure grouped by project.

This pattern is useful when Excel data needs to be restructured into a hierarchical format that matches an API schema or a database document model.
You can also explore how to parse Excel files in Java for scenarios where you need to extract and process raw spreadsheet data before transformation.
6. Handling Empty Cells and Data Types
Production Excel files rarely contain clean, complete data. Empty cells, mixed data types, and formatting inconsistencies are common. A robust Java program to convert Excel to JSON must account for these variations.
Detect and Handle Empty Cells
Use CellRange.getType() to check whether a cell is empty before reading its value. Provide a default value to prevent null entries in the JSON output:
CellRange cell = worksheet.get(row, col);
String value;

if (cell.getType() == CellValueType.Empty) {
    value = "";  // or a default value like "N/A"
} else {
    value = cell.getValue();
}
record.put(headers[col - 1], value);
Note: In Jackson,
ObjectNode.put(String, String)is used for string values. For other types, useput(String, double),put(String, boolean), etc.
Preserve Data Types in JSON Output
The getValue() method returns the cell's display value as a string. For numeric data, use getNumberValue() to preserve the original type in the JSON output:
CellRange cell = worksheet.get(row, col);

if (cell.getType() == CellValueType.Number) {
    record.put(headers[col - 1], cell.getNumberValue().doubleValue());
} else if (cell.getType() == CellValueType.Boolean) {
    record.put(headers[col - 1], cell.getBooleanValue());
} else {
    record.put(headers[col - 1], cell.getValue());
}
Handle Date-Formatted Cells
Excel stores dates as serial numbers internally. To output dates as ISO 8601 strings in JSON, detect date formatting and convert accordingly:
CellRange cell = worksheet.get(row, col);

if (cell.getType() == CellValueType.DateTime) {
    java.util.Date date = cell.getDateTimeValue();
    java.text.SimpleDateFormat iso = new java.text.SimpleDateFormat("yyyy-MM-dd");
    record.put(headers[col - 1], iso.format(date));
} else {
    record.put(headers[col - 1], cell.getValue());
}
This approach ensures that dates appear in a standard format (e.g., "2026-07-02") rather than Excel's internal numeric representation.
7. Common Pitfalls
Skipping the Header Row
One of the most frequent mistakes is starting the data loop from row 1 instead of row 2. When the first row contains column headers, including it in the data loop produces a JSON object where the keys are duplicated as values.
Solution: Always read headers from row 1 first, then start the data loop from row 2.
Hardcoding Column Indices
Hardcoding column positions (e.g., worksheet.get(row, 1) for "Name") makes the code fragile. If the Excel template changes and columns are reordered, the JSON keys no longer match the intended data.
Solution: Read headers dynamically from the first row and use the header array to assign JSON keys. This way, column reordering does not break the conversion.
Number Precision Loss
Excel stores numbers as double-precision floating-point values. Using getValue() returns the display content of the cell, but the result is always a string. If the JSON output should contain raw numeric values (rather than strings), additional type conversion is needed.
Solution: Check the cell type with getType() and use getNumberValue() for numeric cells to get the actual numeric value instead of a string representation.
Ignoring Date Formatting
Excel represents dates as serial numbers (e.g., 45109 for June 15, 2023). While getValue() returns the display content of a date cell, the exact format depends on the cell's number format and may not be consistent across different workbooks.
Solution: Use getDateTimeValue() for cells with date formatting and convert the result to a standard ISO 8601 string (yyyy-MM-dd or yyyy-MM-dd'T'HH:mm:ss) for consistent JSON output.
Memory Leaks from Undisposed Workbooks
Spire.XLS workbook objects hold unmanaged resources. Failing to call dispose() after processing can lead to memory leaks, especially when converting multiple files in a batch.
Solution: Always call workbook.dispose() after the conversion is complete. Use a try-finally block to guarantee cleanup even if an exception occurs:
Workbook workbook = new Workbook();
try {
    workbook.loadFromFile("EmployeeData.xlsx");
    // ... conversion logic ...
} finally {
    workbook.dispose();
}
8. Conclusion
In this article, we demonstrated how to convert Excel to JSON in Java using Spire.XLS for Java. Starting from a basic single-sheet conversion, we covered step-by-step workbook loading, header-based key mapping, and JSON output generation. We then extended the approach to handle XLS and XLSX formats, multi-sheet workbooks, nested JSON structures, empty cells, and data type preservation.
Spire.XLS for Java simplifies the entire process with a clean API that requires no Microsoft Office installation. Beyond Excel-to-JSON conversion, the library provides comprehensive spreadsheet capabilities including PDF export, chart creation, formula calculation, and data validation. You can apply for a 30-day free license to evaluate all features in your projects.
9. FAQ
How do I convert Excel to JSON in Java?
Load the Excel file using Spire.XLS for Java, read the header row to determine JSON keys, iterate through the data rows starting from row 2, and map each cell value to its corresponding key in a Jackson ObjectNode. Collect all objects into an ArrayNode and use ObjectMapper to write the result to a file or return it as a string. The complete code example is shown in Section 3.
Which Java library is best for Excel to JSON conversion?
Spire.XLS for Java provides a comprehensive API for reading Excel data with support for both XLS and XLSX formats. It handles cell types, formulas, and formatting natively, making it straightforward to extract structured data for JSON conversion without requiring Microsoft Office or any other external dependency.
Can Spire.XLS handle both XLS and XLSX formats?
Yes. Spire.XLS for Java automatically detects whether a file is in the legacy XLS format (Excel 97–2003) or the modern XLSX format (Excel 2007 and later). The same code works for both formats without any additional configuration. See Section 4 for details.
What is the difference between getValue() and getCellValue() in Spire.XLS?
getValue() returns the cell's display value — it works for all data types (text, number, date, boolean, etc.) and returns what the user sees in the cell. getCellValue() returns the raw underlying value as an Object. Use getValue() when the JSON output should match what users see in Excel, and use getNumberValue() or getBooleanValue() when you need typed values for numeric or boolean data.
How do I handle empty cells when converting Excel to JSON?
Check the cell type using CellRange.getType() before reading a value. If the type is CellValueType.Empty, assign a default value such as an empty string or "N/A". This prevents null entries and ensures consistent JSON structure across all records. See Section 6 for code examples.
Is Spire.XLS for Java free?
Spire.XLS for Java is a commercial library. A free version, Free Spire.XLS for Java, is available with limitations on worksheet count and features. You can also apply for a 30-day free license to evaluate the full feature set before purchasing.
Convert PDF to JSON in C#: Text, Tables, Forms & OCR
Your application receives a PDF invoice. You need the invoice number, vendor name, and line items — not as text on a page, but as structured JSON your API can consume. That is the real problem behind PDF to JSON conversion.
Unlike CSV or XML, a PDF file has no inherent data structure — no fields, no rows, no schema. Extracting usable JSON requires different approaches depending on what the document actually contains: plain text with key-value patterns, tables with rows and columns, fillable form fields, or scanned images that need OCR.
This article covers all four scenarios with runnable C# code using Spire.PDF for .NET. We build a real invoice-to-JSON converter, handle common table extraction problems like merged cells and missing headers, and package everything into a reusable PdfToJsonConverter class you can drop into any .NET project.
Quick Navigation
- What "PDF to JSON" Actually Means
- Install Spire.PDF for .NET
- Convert PDF Text to JSON in C#
- Convert PDF Tables to JSON in C#
- Convert PDF Form Fields to JSON
- Invoice PDF to JSON: A Real-World Example
- Convert Multiple PDFs to JSON in Batch
- Build a PDF to JSON Converter in C#
- Convert OCR Output to JSON in C#
- Performance Considerations
- FAQ
1. What "PDF to JSON" Actually Means
There is no built-in "PDF to JSON" conversion in the way you might convert a CSV to JSON. A PDF has no JSON structure. What developers actually need is: extract content from a PDF, then shape that content into a JSON format that matches their use case.
Depending on the PDF type and business requirement, the target JSON falls into one of three categories.
Raw Text JSON
Pull all text from each page and wrap it in a JSON envelope. Works for search indexing, RAG pipelines, and document archival.
{
  "sourceFile": "Contract.pdf",
  "pages": [
    { "pageNumber": 1, "text": "SERVICE AGREEMENT\nBetween Contoso Ltd and..." }
  ]
}
Key-Value JSON
Many PDFs follow a Label: Value pattern — employee records, registration forms, simple invoices. The goal here is to parse those pairs into a flat JSON object:
{
  "name": "John Smith",
  "email": "john@contoso.com",
  "department": "Engineering",
  "employeeId": "EMP-2026-0142"
}
Structured Business JSON
Real business documents have nested data: an invoice has a header, line items, tax breakdowns, and payment terms. The JSON output needs to mirror that structure:
{
  "invoiceNumber": "INV-2026-0042",
  "vendor": "Contoso Ltd",
  "date": "2026-06-15",
  "lineItems": [
    { "description": "Widget A", "quantity": 150, "unitPrice": 24.50, "total": 3675.00 }
  ],
  "subtotal": 3675.00,
  "tax": 294.00,
  "total": 3969.00
}
This distinction matters. When you search for "convert PDF to JSON," you need to decide which output format your application requires. The rest of this article shows how to build each one using Spire.PDF in C#.
2. Install Spire.PDF for .NET
Install via NuGet Package Manager Console:
Install-Package Spire.PDF
Or add to your .csproj:
<PackageReference Include="Spire.PDF" Version="*" />
Include these namespaces in your project:
using Spire.Pdf;
using Spire.Pdf.Texts;
using Spire.Pdf.Utilities;
using Spire.Pdf.Fields;
using Spire.Pdf.Widget;
using System.Text.Json;
using System.Text.Json.Serialization;
Spire.PDF supports .NET Framework, .NET Core, and .NET 6/7/8/9+.
3. Convert PDF Text to JSON in C#
The most common starting point: extract text from a PDF and produce JSON output.
Extract Text from PDF
using Spire.Pdf;
using Spire.Pdf.Texts;
using System.Collections.Generic;

using (PdfDocument pdf = new PdfDocument())
{
    pdf.LoadFromFile("EmployeeRecord.pdf");

    var pages = new List<Dictionary<string, string>>();

    for (int i = 0; i < pdf.Pages.Count; i++)
    {
        PdfPageBase page = pdf.Pages[i];

        PdfTextExtractOptions options = new PdfTextExtractOptions();
        options.IsExtractAllText = true;

        PdfTextExtractor extractor = new PdfTextExtractor(page);
        string pageText = extractor.ExtractText(options);

        pages.Add(new Dictionary<string, string>
        {
            { "pageNumber", (i + 1).ToString() },
            { "text", pageText.Trim() }
        });
    }
}
Parse Key-Value Pairs into JSON
If your PDF follows a Label: Value pattern, parse the extracted text into structured fields:
using System.Text.Json;

var parsedFields = new Dictionary<string, string>();

foreach (var page in pages)
{
    string[] lines = page["text"].Split('\n');
    foreach (string line in lines)
    {
        int colonIndex = line.IndexOf(':');
        if (colonIndex > 0)
        {
            string key = line.Substring(0, colonIndex).Trim();
            string value = line.Substring(colonIndex + 1).Trim();
            parsedFields[key] = value;
        }
    }
}

var jsonOptions = new JsonSerializerOptions
{
    WriteIndented = true,
    PropertyNamingPolicy = JsonNamingPolicy.CamelCase
};

string jsonOutput = JsonSerializer.Serialize(parsedFields, jsonOptions);
File.WriteAllText("EmployeeRecord.json", jsonOutput);
Key API Calls
PdfDocument.LoadFromFile()— opens the PDF filePdfTextExtractor.ExtractText()— extracts text content from a pagePdfTextExtractOptions.IsExtractAllText— preserves whitespace and formatting
Output
The following example shows the structured JSON generated from the extracted employee record.
{
  "name": "John Smith",
  "email": "john.smith@contoso.com",
  "department": "Engineering",
  "employeeId": "EMP-2026-0142",
  "startDate": "2024-03-15"
}
The following screenshot shows the actual JSON file generated after running the example.
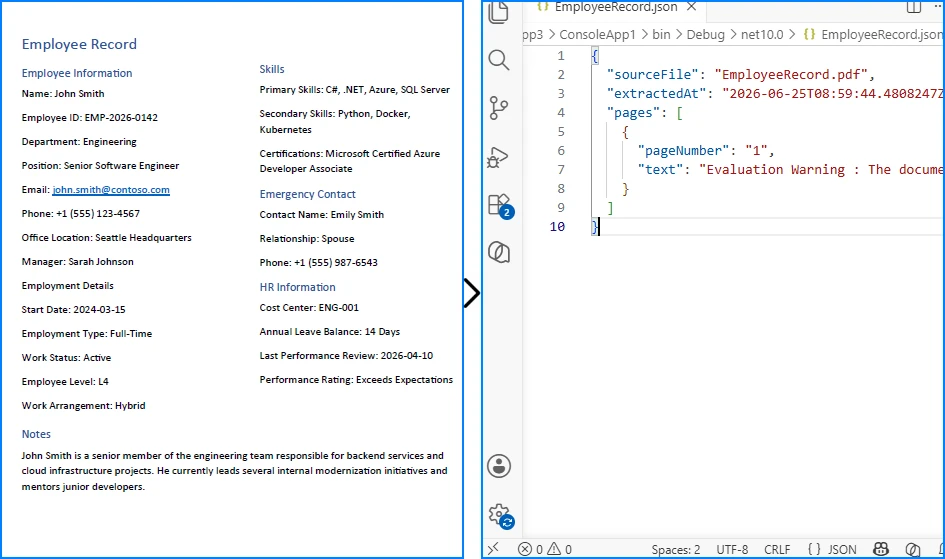
This approach works well for forms, records, and documents with consistent key-value layouts. For unstructured text, skip the parsing step and serialize the raw pages directly.
If you need a deeper look at PDF text extraction, see our dedicated guide on extracting text from PDFs in C# using Spire.PDF for .NET.
4. Convert PDF Tables to JSON in C#
The previous section focused on extracting plain text from PDFs. While that works well for paragraphs and simple records, many business documents organize their most valuable information in tables, such as invoice line items, sales reports, and financial statements. To preserve rows, columns, and relationships between cells, table data must be extracted differently before it can be converted into structured JSON.
Why Table Extraction Is Different from Text Extraction
Text extraction returns a flat stream of characters in reading order. Although a table may appear perfectly organized on the page, the extracted text often loses its row-and-column structure, making it difficult to identify which values belong together.
To preserve the table layout, you need a dedicated table extraction engine. PdfTableExtractor analyzes the page layout, detects table boundaries, and returns PdfTable objects that you can iterate row by row and cell by cell. Instead of producing a flat string such as:
Widget A 150 $24.50 $3,675.00
it enables you to generate structured JSON like:
{
  "Product": "Widget A",
  "Quantity": "150",
  "Unit Price": "$24.50",
  "Total": "$3,675.00"
}
The following example demonstrates how to extract tables from a PDF and serialize them into JSON.
Extract Tables from PDF
using Spire.Pdf;
using Spire.Pdf.Utilities;
using System.Collections.Generic;

using (PdfDocument pdf = new PdfDocument())
{
    pdf.LoadFromFile("SalesReport.pdf");

    PdfTableExtractor tableExtractor = new PdfTableExtractor(pdf);
    var allTables = new List<List<List<string>>>();

    for (int pageIndex = 0; pageIndex < pdf.Pages.Count; pageIndex++)
    {
        PdfTable[] tables = tableExtractor.ExtractTable(pageIndex);

        if (tables != null && tables.Length > 0)
        {
            foreach (PdfTable table in tables)
            {
                int rowCount = table.GetRowCount();
                int colCount = table.GetColumnCount();
                var tableData = new List<List<string>>();

                for (int row = 0; row < rowCount; row++)
                {
                    var rowData = new List<string>();
                    for (int col = 0; col < colCount; col++)
                    {
                        rowData.Add(table.GetText(row, col).Trim());
                    }
                    tableData.Add(rowData);
                }

                allTables.Add(tableData);
            }
        }
    }
}
Serialize Table Data to JSON
var jsonTables = new List<object>();

foreach (var tableData in allTables)
{
    if (tableData.Count < 2) continue;

    var headers = tableData[0];
    var rows = new List<Dictionary<string, string>>();

    for (int i = 1; i < tableData.Count; i++)
    {
        var rowObj = new Dictionary<string, string>();
        for (int j = 0; j < headers.Count && j < tableData[i].Count; j++)
        {
            rowObj[headers[j]] = tableData[i][j];
        }
        rows.Add(rowObj);
    }

    jsonTables.Add(new
    {
        tableIndex = allTables.IndexOf(tableData) + 1,
        headers = headers,
        data = rows
    });
}

string tableJson = JsonSerializer.Serialize(new
{
    sourceFile = "SalesReport.pdf",
    tables = jsonTables
}, new JsonSerializerOptions { WriteIndented = true });

File.WriteAllText("SalesReport_Tables.json", tableJson);
Key API Calls
PdfTableExtractor(PdfDocument)— initializes the table extraction enginePdfTableExtractor.ExtractTable(pageIndex)— detects and extracts tables from a pagePdfTable.GetRowCount()/GetColumnCount()— returns table dimensionsPdfTable.GetText(row, col)— reads cell content
Sample JSON Output
The resulting JSON preserves the original table structure by organizing each row into key-value pairs based on the detected column headers.
{
  "sourceFile": "SalesReport.pdf",
  "tables": [
    {
      "tableIndex": 1,
      "headers": ["Product", "Quantity", "Unit Price", "Total"],
      "data": [
        { "Product": "Widget A", "Quantity": "150", "Unit Price": "$24.50", "Total": "$3,675.00" },
        { "Product": "Widget B", "Quantity": "80", "Unit Price": "$39.90", "Total": "$3,192.00" }
      ]
    }
  ]
}
The following screenshot shows the actual JSON file generated after running the example.
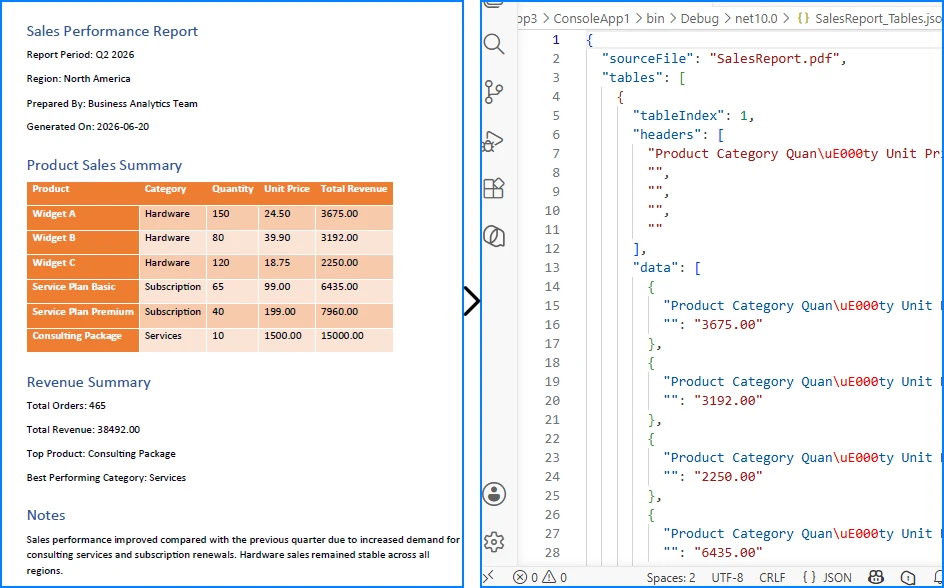
This approach works well for invoices, reports, and other PDFs with well-defined table structures. For documents containing merged cells, missing headers, or multi-page tables, additional post-processing may be required.
If you need a deeper look at PDF table extraction, see our dedicated guide on extracting tables from PDFs in C# using Spire.PDF for .NET.
Common Table Extraction Problems
Real-world PDF tables are messy. Here are the three problems you will hit most often, and how to handle them.
Problem 1: Missing Headers
Many invoices and reports have tables without explicit header rows. The data starts immediately:
Apple      10    $2.99    $29.90
Orange     5     $1.50    $7.50
When the first row is data rather than headers, assign column names manually based on your known schema:
// Define headers when the PDF table has no header row
string[] defaultHeaders = { "Product", "Quantity", "UnitPrice", "Total" };

var rows = new List<Dictionary<string, string>>();
for (int i = 0; i < tableData.Count; i++)  // Start from 0, not 1
{
    var rowObj = new Dictionary<string, string>();
    for (int j = 0; j < defaultHeaders.Length && j < tableData[i].Count; j++)
    {
        rowObj[defaultHeaders[j]] = tableData[i][j];
    }
    rows.Add(rowObj);
}
Problem 2: Merged Cells
Tables in financial reports often have merged cells for grouping:
Quarter    Revenue     Expenses
Q1         $120,000    $95,000
           $115,000    $88,000
Q2         $140,000    $102,000
The extractor returns empty strings for merged cells. Fill them forward from the last non-empty value:
// Fill merged cells with the previous row's value
for (int col = 0; col < headers.Count; col++)
{
    string lastValue = "";
    for (int row = 1; row < tableData.Count; row++)
    {
        if (col < tableData[row].Count && !string.IsNullOrWhiteSpace(tableData[row][col]))
        {
            lastValue = tableData[row][col];
        }
        else if (col < tableData[row].Count)
        {
            tableData[row][col] = lastValue;
        }
    }
}
Problem 3: Multi-Page Tables
Enterprise reports often have a single table spanning multiple pages, with the header row repeated on each page. Handle this by deduplicating headers during serialization:
var combinedRows = new List<Dictionary<string, string>>();
string[] expectedHeaders = null;

for (int pageIndex = 0; pageIndex < pdf.Pages.Count; pageIndex++)
{
    PdfTable[] tables = tableExtractor.ExtractTable(pageIndex);
    if (tables == null) continue;

    foreach (PdfTable table in tables)
    {
        for (int r = 0; r < table.GetRowCount(); r++)
        {
            var cells = new List<string>();
            for (int c = 0; c < table.GetColumnCount(); c++)
            {
                cells.Add(table.GetText(r, c).Trim());
            }

            // First row of first page becomes the headers
            if (expectedHeaders == null && r == 0)
            {
                expectedHeaders = cells.ToArray();
                continue;
            }

            // Skip repeated header rows on subsequent pages
            if (r == 0 && cells.SequenceEqual(expectedHeaders))
                continue;

            var rowDict = new Dictionary<string, string>();
            for (int c = 0; c < expectedHeaders.Length && c < cells.Count; c++)
            {
                rowDict[expectedHeaders[c]] = cells[c];
            }
            combinedRows.Add(rowDict);
        }
    }
}
5. Convert PDF Form Fields to JSON
Unlike plain text or tables, fillable PDF forms already store data as named fields. Applications, surveys, and registration forms contain field names and values that can be mapped directly to JSON key-value pairs, making form data one of the easiest types of PDF content to serialize.
Read and Export Form Fields
using Spire.Pdf;
using Spire.Pdf.Fields;
using Spire.Pdf.Widget;
using System.Collections.Generic;

using (PdfDocument pdf = new PdfDocument())
{
    pdf.LoadFromFile("RegistrationForm.pdf");

    PdfFormWidget formWidget = pdf.Form as PdfFormWidget;
    var formData = new Dictionary<string, object>();

    if (formWidget != null)
    {
        for (int i = 0; i < formWidget.FieldsWidget.List.Count; i++)
        {
            PdfField field = formWidget.FieldsWidget.List[i] as PdfField;

            if (field is PdfTextBoxFieldWidget textBox)
                formData[textBox.Name] = textBox.Text;
            else if (field is PdfCheckBoxWidgetFieldWidget checkBox)
                formData[checkBox.Name] = checkBox.Checked;
            else if (field is PdfRadioButtonListFieldWidget radioButton)
                formData[radioButton.Name] = radioButton.Value;
            else if (field is PdfComboBoxWidgetFieldWidget comboBox)
                formData[comboBox.Name] = comboBox.SelectedValue;
            else if (field is PdfListBoxWidgetFieldWidget listBox)
            {
                var selectedItems = new List<string>();
                foreach (PdfListWidgetItem item in listBox.Values)
                    selectedItems.Add(item.Value);
                formData[listBox.Name] = selectedItems;
            }
        }
    }

    var formOutput = new
    {
        sourceFile = "RegistrationForm.pdf",
        fieldCount = formData.Count,
        fields = formData
    };

    string json = JsonSerializer.Serialize(formOutput, new JsonSerializerOptions
    {
        WriteIndented = true
    });

    File.WriteAllText("RegistrationForm_Data.json", json);
}
Key API Calls
PdfFormWidget— provides access to the document's interactive formPdfTextBoxFieldWidget.Text— reads text input valuesPdfCheckBoxWidgetFieldWidget.Checked— reads checkbox statePdfRadioButtonListFieldWidget.Value— reads selected radio buttonPdfComboBoxWidgetFieldWidget.SelectedValue— reads combo box selection
Output
The following example shows how the extracted form fields are represented as structured JSON.
{
  "sourceFile": "RegistrationForm.pdf",
  "fieldCount": 6,
  "fields": {
    "FullName": "John Smith",
    "Email": "john.smith@contoso.com",
    "Department": "Sales",
    "AgreeTerms": true,
    "SubscriptionPlan": "Enterprise",
    "Skills": ["C#", "SQL", "Azure"]
  }
}
The following screenshot shows the actual JSON file generated after exporting the form data.
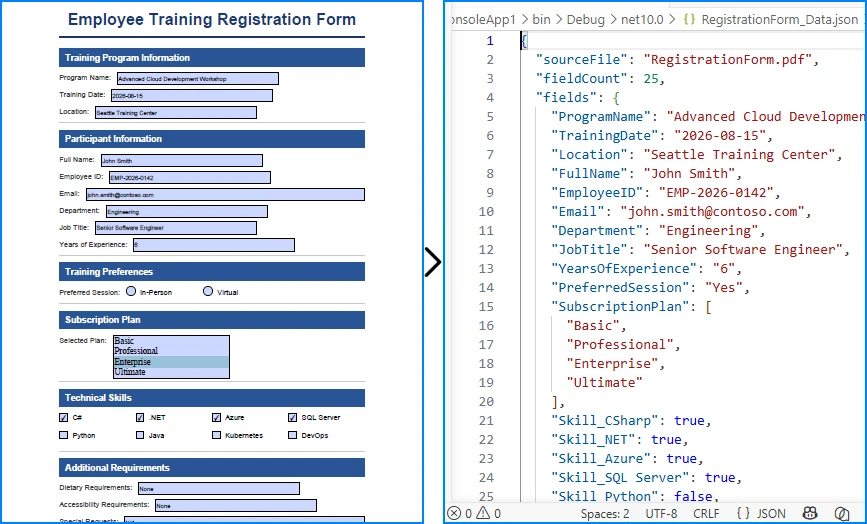
This approach works well for interactive PDF forms that contain structured fields such as text boxes, check boxes, radio buttons, and drop-down lists. Because each field already has a unique name, the extracted data can be serialized directly into JSON without additional parsing.
If you need a deeper look at importing and exporting PDF form field data in C#, see our dedicated guide on working with PDF form fields using Spire.PDF for .NET.
6. Invoice PDF to JSON: A Real-World Example
Invoice processing is one of the most common business use cases for PDF to JSON conversion. Instead of presenting a full parser implementation, this section demonstrates how the extraction techniques from Sections 3 and 4 come together to solve a real problem.
Target JSON Structure
Before writing any extraction code, define your target schema. For a typical invoice, the JSON output might look like this:
{
  "invoiceNumber": "INV-2026-0042",
  "date": "2026-06-15",
  "vendor": "Contoso Ltd",
  "paymentTerms": "Net 30",
  "lineItems": [
    { "description": "Widget A", "quantity": 150, "unitPrice": 24.50, "total": 3675.00 },
    { "description": "Widget B", "quantity": 80, "unitPrice": 39.90, "total": 3192.00 }
  ],
  "subtotal": 8367.00,
  "tax": 669.36,
  "total": 9036.36
}
Extraction Pattern
Use text extraction (Section 3) to parse header fields via regex, and table extraction (Section 4) to pull line items:
// Parse header fields from extracted text using regex
invoice["invoiceNumber"] = Regex.Match(fullText, @"Invoice Number:\s*(\S+)").Groups[1].Value;
invoice["date"] = Regex.Match(fullText, @"Date:\s*(\S+)").Groups[1].Value;
invoice["vendor"] = Regex.Match(fullText, @"Vendor:\s*(.+)").Groups[1].Value;

// Extract line items from table data (Section 4 pattern)
for (int r = 1; r < table.GetRowCount(); r++)
{
    lineItems.Add(new
    {
        description = table.GetText(r, 0).Trim(),
        quantity = int.Parse(table.GetText(r, 1).Trim()),
        unitPrice = ParseCurrency(table.GetText(r, 2)),
        total = ParseCurrency(table.GetText(r, 3))
    });
}
The implementation combines the text extraction introduced in Section 3 with the table extraction introduced in Section 4. Regex is used only for simple field matching — the core PDF processing relies entirely on Spire.PDF APIs.
Handling Different Invoice Layouts
In production, you rarely deal with a single invoice format:
- Fixed template + regex — works when you control the source or process invoices from a known vendor
- Template matching — maintain a set of regex patterns, one per vendor
- AI-assisted extraction — for unknown or highly variable layouts, combine OCR output with an LLM
Regex-based parsing is fast and reliable for known formats. For a production-ready implementation, extend the PdfToJsonConverter class from Section 8 to build a dedicated invoice parser that reuses the same extraction patterns.
7. Convert Multiple PDFs to JSON in Batch
Production workflows process hundreds or thousands of PDFs at once. This batch processor handles errors gracefully and logs results:
using Spire.Pdf;
using Spire.Pdf.Texts;
using System.Collections.Generic;
using System.IO;
using System.Text.Json;

string inputDir = @"C:\PDFs\Invoices";
string outputDir = @"C:\Output\JSON";
Directory.CreateDirectory(outputDir);

string[] pdfFiles = Directory.GetFiles(inputDir, "*.pdf");
var results = new List<object>();

foreach (string pdfPath in pdfFiles)
{
    string fileName = Path.GetFileNameWithoutExtension(pdfPath);
    string outputPath = Path.Combine(outputDir, $"{fileName}.json");

    try
    {
        using (PdfDocument pdf = new PdfDocument())
        {
            pdf.LoadFromFile(pdfPath);
            var pageTexts = new List<string>();

            for (int i = 0; i < pdf.Pages.Count; i++)
            {
                var extractor = new PdfTextExtractor(pdf.Pages[i]);
                var options = new PdfTextExtractOptions { IsExtractAllText = true };
                pageTexts.Add(extractor.ExtractText(options).Trim());
            }

            var doc = new
            {
                sourceFile = Path.GetFileName(pdfPath),
                pageCount = pdf.Pages.Count,
                processedAt = DateTime.UtcNow,
                content = pageTexts
            };

            File.WriteAllText(outputPath, JsonSerializer.Serialize(doc,
                new JsonSerializerOptions { WriteIndented = true }));

            results.Add(new { file = fileName, status = "success" });
        }
    }
    catch (Exception ex)
    {
        results.Add(new { file = fileName, status = "error", error = ex.Message });
    }
}

File.WriteAllText(Path.Combine(outputDir, "_log.json"),
    JsonSerializer.Serialize(results, new JsonSerializerOptions { WriteIndented = true }));
Swap the text-only extraction with the invoice JSON extraction pattern from Section 6 if your batch consists of invoices, or with the PdfToJsonConverter class from Section 8 for general-purpose conversion.
8. Build a PDF to JSON Converter in C#
For production applications, encapsulate all extraction logic into a single class. The PdfToJsonConverter below combines text, table, and form field extraction into one reusable PDF to JSON converter:
using Spire.Pdf;
using Spire.Pdf.Texts;
using Spire.Pdf.Utilities;
using Spire.Pdf.Fields;
using Spire.Pdf.Widget;
using System;
using System.Collections.Generic;
using System.IO;
using System.Text.Json;

public class PdfToJsonConverter
{
    private readonly JsonSerializerOptions _jsonOptions = new()
    {
        WriteIndented = true,
        PropertyNamingPolicy = JsonNamingPolicy.CamelCase,
        DefaultIgnoreCondition = System.Text.Json.Serialization.JsonIgnoreCondition.WhenWritingNull
    };

    public string ConvertToJson(string pdfPath)
    {
        using (PdfDocument pdf = new PdfDocument())
        {
            pdf.LoadFromFile(pdfPath);

            var result = new
            {
                sourceFile = Path.GetFileName(pdfPath),
                processedAt = DateTime.UtcNow,
                text = ExtractText(pdf),
                tables = ExtractTables(pdf),
                formFields = ExtractFormFields(pdf)
            };

            return JsonSerializer.Serialize(result, _jsonOptions);
        }
    }

    public void ConvertAndSave(string pdfPath, string outputPath)
    {
        File.WriteAllText(outputPath, ConvertToJson(pdfPath));
    }

    // Reuses the text extraction technique from Section 3 (PdfTextExtractor + PdfTextExtractOptions)
    private List<PageText> ExtractText(PdfDocument pdf) { return new List<PageText>(); }

    // Reuses the table extraction technique from Section 4 (PdfTableExtractor + ExtractTable)
    private List<TableData> ExtractTables(PdfDocument pdf) { return new List<TableData>(); }

    // Reuses the form field extraction technique from Section 5 (PdfFormWidget + field type checking)
    private Dictionary<string, object> ExtractFormFields(PdfDocument pdf) { return new Dictionary<string, object>(); }
}

public class PageText
{
    public int PageNumber { get; set; }
    public string Text { get; set; }
}

public class TableData
{
    public int PageNumber { get; set; }
    public int RowCount { get; set; }
    public List<List<string>> Rows { get; set; }
}
Usage
var converter = new PdfToJsonConverter();

// Single file
converter.ConvertAndSave("InvoiceReport.pdf", "InvoiceReport.json");

// Use inside an ASP.NET controller
[HttpPost("api/pdf-to-json")]
public IActionResult ConvertPdf(IFormFile file)
{
    var tempPath = Path.GetTempFileName();
    file.CopyTo(new FileStream(tempPath, FileMode.Create));
    var converter = new PdfToJsonConverter();
    string json = converter.ConvertToJson(tempPath);
    return Content(json, "application/json");
}
The helper methods (ExtractText, ExtractTables, ExtractFormFields) reuse the extraction techniques introduced in Sections 3–5. Refer to those sections for the full implementations.
Best Practices for Production Pipelines
When building PDF to JSON conversion into a production system:
- Define your JSON schema first. Map each PDF element to a target field before writing extraction code.
- Validate extracted data. Currency strings, dates, and IDs should be parsed and verified before serialization.
- Handle missing values. Use
JsonIgnoreCondition.WhenWritingNullto omit null fields from output. - Include metadata. Always record source file name, page numbers, and extraction timestamp for auditing.
- Clean text artifacts. Trim whitespace, normalize line breaks, and handle encoding issues in extracted strings.
9. Convert OCR Output to JSON in C#
Scanned PDFs contain images rather than selectable text, so they must be processed with an OCR engine before they can be converted to JSON. Spire.PDF handles PDF rendering and page processing, while text recognition should be performed by an OCR solution such as Tesseract or Azure AI Vision.
For a complete walkthrough, see How to Extract Text from Scanned PDFs in C#.
Once OCR returns the recognized text, you can parse it using the same techniques shown earlier in this article.
Parse OCR Text into JSON
string recognizedText = ocrEngine.Recognize(imagePath);

// Parse recognized text using the same helper methods demonstrated in previous examples.
var parsedData = ParseRecognizedText(recognizedText);

string json = JsonSerializer.Serialize(parsedData, new JsonSerializerOptions
{
    WriteIndented = true
});
Best Practices
- Scan documents at 300 DPI or higher for better OCR accuracy.
- Validate important fields such as invoice numbers, dates, and currency values before serialization.
- Reuse the parsing patterns introduced earlier in this article to build consistent JSON structures.
10. Performance Considerations
PDF to JSON conversion works fine for a single 5-page document. In production, you are processing hundreds of files with hundreds of pages each. These are the issues you will actually hit.
Large PDFs (100+ Pages)
Avoid loading all page text into a List<string> before serialization. Process and write each page incrementally:
using (var stream = File.Create("output.json"))
using (var writer = new Utf8JsonWriter(stream, new JsonWriterOptions { Indented = true }))
{
    writer.WriteStartObject();
    writer.WriteString("sourceFile", Path.GetFileName(pdfPath));
    writer.WriteStartArray("pages");

    for (int i = 0; i < pdf.Pages.Count; i++)
    {
        var extractor = new PdfTextExtractor(pdf.Pages[i]);
        var options = new PdfTextExtractOptions { IsExtractAllText = true };
        string text = extractor.ExtractText(options).Trim();

        writer.WriteStartObject();
        writer.WriteNumber("pageNumber", i + 1);
        writer.WriteString("text", text);
        writer.WriteEndObject();
    }

    writer.WriteEndArray();
    writer.WriteEndObject();
}
Utf8JsonWriter writes directly to the stream instead of building a string in memory. For a 500-page document, this can cut peak memory usage by 60-70% compared to JsonSerializer.Serialize().
Memory Usage
PdfDocument holds parsed page trees, fonts, and image references in memory. Two rules:
- Always wrap
PdfDocumentinusing— it releases unmanaged resources on dispose - Process one document at a time — do not keep multiple
PdfDocumentinstances open simultaneously unless you have the RAM for it
For batch jobs processing 1000+ files, the using pattern inside the loop ensures each document is fully released before the next one loads.
Parallel Processing
Batch conversion is CPU-bound and parallelizes well:
var pdfFiles = Directory.GetFiles(inputDir, "*.pdf");

Parallel.ForEach(pdfFiles,
    new ParallelOptions { MaxDegreeOfParallelism = Environment.ProcessorCount },
    pdfPath =>
{
    string outputPath = Path.Combine(outputDir,
        Path.GetFileNameWithoutExtension(pdfPath) + ".json");
    var converter = new PdfToJsonConverter();
    converter.ConvertAndSave(pdfPath, outputPath);
});
Each thread creates its own PdfToJsonConverter and PdfDocument instance. PdfDocument is not thread-safe — never share a single instance across threads.
When to Use Streaming JSON
Use Utf8JsonWriter over JsonSerializer.Serialize() when:
- Output JSON exceeds 50 MB
- You are processing PDFs with 200+ pages
- Running in a memory-constrained environment (container with 512 MB limit)
For smaller documents, JsonSerializer is simpler and the memory difference is negligible.
11. FAQ
Can I convert PDF to JSON in C# for free?
Spire.PDF for .NET offers a free evaluation version with a page limit. For production use, you can apply for a 30-day free license or purchase a commercial license. The System.Text.Json serializer is built into .NET and free.
Can scanned PDFs be converted to JSON?
Yes, but you need an external OCR engine. Spire.PDF renders PDF pages as images via SaveAsImage(), which you then pass to Tesseract, Azure Computer Vision, or Amazon Textract for text recognition. The recognized text is then parsed and serialized to JSON. See Section 9 for the integration pattern.
Can I convert PDF tables to JSON automatically?
Yes. PdfTableExtractor automatically detects table structures on each page without manual configuration. It handles both properly structured tables (created in Word or Excel) and visual tables (text aligned to look like rows and columns). For multi-page tables or tables without headers, see the handling patterns in Section 4.
Can I batch convert multiple PDFs to JSON?
Yes. Iterate through a directory using Directory.GetFiles(), process each PDF with Spire.PDF extraction APIs, and save individual JSON files. Include error handling so one failed file does not stop the batch. See Section 7 for a complete example.
How can I convert large PDF files to JSON in C#?
Process the PDF page-by-page rather than loading all content into memory at once. For very large files (100+ pages), use Utf8JsonWriter to write JSON incrementally to a stream instead of building the entire output in memory. See Section 10 for the streaming JSON pattern and parallel processing approach.
Can I convert PDF to JSON using an API?
Yes. You can wrap the PdfToJsonConverter class from this article in an ASP.NET Web API endpoint. Accept a PDF upload, run the extraction, and return the JSON response. Spire.PDF works in any .NET hosting environment — ASP.NET Core, Azure Functions, AWS Lambda, or a self-hosted console app. See the ASP.NET controller example in Section 8.
Conclusion
PDF to JSON is not a single operation. Depending on your document, you are solving one of three different problems: wrapping raw text in a JSON envelope, parsing key-value patterns into flat objects, or building structured business JSON from text and table extraction.
This article covered all three, plus the complications that break naive implementations: tables without headers, merged cells, multi-page tables, fillable form fields, varying invoice layouts, batch processing, memory management for large documents, and OCR integration boundaries.
The PdfToJsonConverter class is a starting point you can adapt to your document types. The invoice extraction pattern shown in Section 6 demonstrates how to combine these techniques for real business documents. Both use Spire.PDF for .NET, which handles all PDF reading locally without external dependencies.
To get started:
- Install via NuGet:
Install-Package Spire.PDF - Apply for a 30-day free license to evaluate without page limits
- Explore the Spire.PDF documentation for additional extraction scenarios
How to Convert Word to JSON in Python (DOCX to JSON)
Converting Word documents to JSON is a common requirement when building automated document processing pipelines, feeding content into AI models, or migrating structured data from DOCX files into databases and APIs. Unlike CSV or XML, JSON provides a flexible, hierarchical format that can represent paragraphs, tables, and nested document structures in a single output.
However, Word files do not have a native JSON export format. A .docx file is a rich-text document composed of sections, paragraphs, styles, and tables—not a structured data source. Converting it to JSON requires deciding how to map that content into a meaningful schema.
This tutorial demonstrates how to convert Word to JSON in Python using Spire.Doc for Python. You will learn three progressively advanced methods: extracting plain paragraph text, converting Word tables to JSON arrays, and preserving the full document structure—including headings, paragraphs, and tables—in a hierarchical JSON output. The examples in this tutorial work with both DOCX and legacy DOC files supported by Spire.Doc.
Quick Navigation
- How Is Word Converted into JSON?
- Install the Required Library
- Method 1 – Convert Word Text to JSON
- Method 2 – Convert Word Tables to JSON
- Method 3 – Preserve Document Structure in JSON
- When to Use Word to JSON Conversion
- Limitations and Best Practices
- FAQ
- Conclusion
1. How Is Word Converted into JSON?
A Word document is a rich-text format organized into sections, paragraphs, and tables—not a structured data format. When you convert Word to JSON, there is no single standard for how the content should be represented. The right schema depends on how the JSON will be used:
| Goal | Recommended Schema | Key Characteristics |
|---|---|---|
| AI embedding / semantic search | Paragraph array | Flat list of text strings, one per paragraph |
| Full-text search indexing | Text blocks with metadata | Paragraphs with section index and style info |
| Database import from tables | Table row objects | Header-keyed dictionaries, one per row |
| RAG pipeline / knowledge base | Hierarchical structure | Nested sections with headings, paragraphs, and tables |
| Document archival / interchange | Full document model | Sections, styles, metadata, and all content types |
For example, a Word document containing a heading and a paragraph could be represented in JSON as:
{
  "document": [
    {"type": "heading", "level": 1, "text": "Project Overview"},
    {"type": "paragraph", "text": "This report summarizes the quarterly results."}
  ]
}
The three methods in this tutorial correspond directly to these schema choices:
- Method 1 produces a paragraph array (AI embedding, search indexing)
- Method 2 produces table row objects (database import, data extraction)
- Method 3 produces a hierarchical structure (RAG, knowledge base, document understanding)
Choose the method that matches your goal, or combine elements from multiple methods to build a custom schema.
2. Install the Required Library
This tutorial uses Spire.Doc for Python to read and parse DOC/DOCX files. Install it via pip:
pip install spire.doc
Alternatively, you can download Spire.Doc for Python and integrate it manually.
After installation, import the library in your Python script:
from spire.doc import Document, FileFormat
from spire.doc.common import *
Spire.Doc provides APIs to load Word documents, iterate through sections, paragraphs, and tables, and extract text content—everything needed to build a Word-to-JSON pipeline.
3. Method 1 – Convert Word Text to JSON
The simplest way to convert Word to JSON is to extract all paragraph text from the document and store it in a JSON array. This approach works well when you need the full text content without structural metadata—such as for full-text search, AI text embedding, or simple content export.
3.1 Read Paragraphs from a Word Document
Spire.Doc represents a Word document as a collection of Sections, each containing Paragraphs. To extract all text, you iterate through every section and every paragraph within it.
from spire.doc import Document
from spire.doc.common import *

input_file = "ProjectReport.docx"

document = Document()
document.LoadFromFile(input_file)

paragraphs = []
for i in range(document.Sections.Count):
    section = document.Sections.get_Item(i)
    for j in range(section.Paragraphs.Count):
        paragraph = section.Paragraphs.get_Item(j)
        text = paragraph.Text
        if text.strip():
            paragraphs.append(text)

document.Close()
Each paragraph's .Text property returns the plain text content, stripping away formatting. The if text.strip() check filters out empty paragraphs that exist as spacing or layout elements in Word.
3.2 Serialize the Extracted Text to JSON
Assuming the paragraph data extracted in the previous step is stored in the paragraphs list, you can serialize it to JSON and save it to a file as follows:
import json

output_file = "paragraphs.json"

result = {
    "source": input_file,
    "paragraph_count": len(paragraphs),
    "paragraphs": paragraphs
}

with open(output_file, "w", encoding="utf-8") as f:
    json.dump(result, f, indent=2, ensure_ascii=False)
Output Example
The following JSON snippet shows the structure of the generated output file:
{
  "source": "ProjectReport.docx",
  "paragraph_count": 3,
  "paragraphs": [
    "Quarterly Sales Report",
    "This document provides an overview of sales performance across all regions."
  ]
}
Conversion Result
The image below shows the source Word document and the JSON file generated after extracting paragraph text.
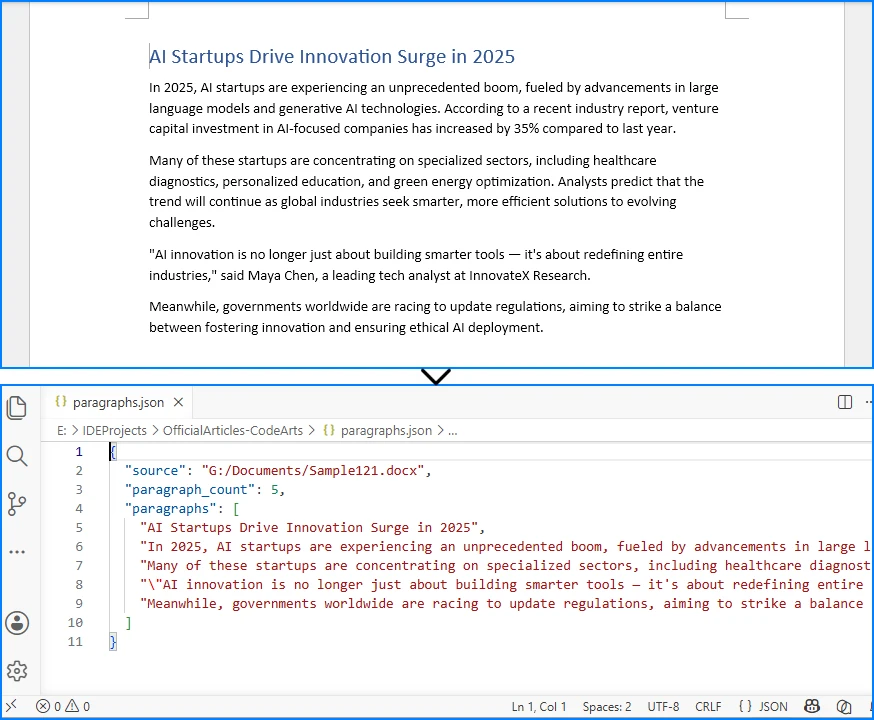
3.3 Explanation
Why iterate through Sections and Paragraphs instead of extracting all text at once? Because Word documents are organized hierarchically. A document contains one or more sections (each with its own page layout), and each section contains paragraphs. Iterating at this level gives you control over which content to include or skip—such as filtering empty paragraphs or limiting extraction to specific sections.
Storing paragraphs as a JSON array is the most straightforward structure. Each element is a string, making the output easy to consume in downstream systems. This approach is well-suited for:
- Full-text indexing – feed paragraph text into search engines like Elasticsearch
- AI text embedding – convert paragraphs into vector representations for semantic search
- Simple content export – extract readable text from Word files without formatting
However, this method loses structural information. Headings, body text, and list items are all treated the same way. If you need to distinguish between them, see Method 3.
If your goal is simply to extract text content from Word documents without converting it to JSON, you may also be interested in our guide on extracting text from Word documents in Python.
4. Method 2 – Convert Word Tables to JSON
In many Word documents—reports, invoices, product lists, configuration tables—the most valuable content lives inside tables, not in paragraphs. Converting Word tables to JSON allows you to extract structured row-and-column data that can be directly loaded into databases, APIs, or data analysis tools.
Why Tables Need Special Handling
Tables in Word are stored as a grid of rows and cells, where each cell contains its own paragraphs. Unlike paragraph text, table data has an inherent two-dimensional structure that maps naturally to JSON objects. The first row often contains column headers, and subsequent rows contain data records.
Extracting Tables from a Word Document
The following code reads all tables from a Word document, uses the first row as column headers, and converts each subsequent row into a JSON object:
import json
from spire.doc import Document
from spire.doc.common import *

input_file = "SalesData.docx"
output_file = "tables.json"

document = Document()
document.LoadFromFile(input_file)

all_tables = []

for i in range(document.Sections.Count):
    section = document.Sections.get_Item(i)
    for t in range(section.Tables.Count):
        table = section.Tables.get_Item(t)
        rows_data = []

        if table.Rows.Count < 2:
            continue

        header_row = table.Rows[0]
        headers = []
        for c in range(header_row.Cells.Count):
            cell_text = header_row.Cells[c].Paragraphs[0].Text.strip()
            headers.append(cell_text)

        for r in range(1, table.Rows.Count):
            row = table.Rows[r]
            row_dict = {}
            for c in range(row.Cells.Count):
                cell_text = row.Cells[c].Paragraphs[0].Text.strip()
                row_dict[headers[c] if c < len(headers) else f"Column_{c}"] = cell_text
            rows_data.append(row_dict)

        all_tables.append({
            "table_index": t,
            "headers": headers,
            "row_count": len(rows_data),
            "rows": rows_data
        })

document.Close()

result = {
    "source": input_file,
    "table_count": len(all_tables),
    "tables": all_tables
}

with open(output_file, "w", encoding="utf-8") as f:
    json.dump(result, f, indent=2, ensure_ascii=False)
Output Example
The following JSON snippet shows the structure of the generated output file, with each table row mapped to a JSON object using the header row as keys:
{
  "source": "SalesData.docx",
  "table_count": 1,
  "tables": [
    {
      "table_index": 0,
      "headers": ["Region", "Product", "Units Sold", "Revenue"],
      "row_count": 3,
      "rows": [
        {"Region": "North", "Product": "Laptop", "Units Sold": "120", "Revenue": "114000"},
        {"Region": "South", "Product": "Laptop", "Units Sold": "80", "Revenue": "76000"}
      ]
    }
  ]
}
Conversion Result
The image below demonstrates how table data from a Word document is converted into structured JSON records.
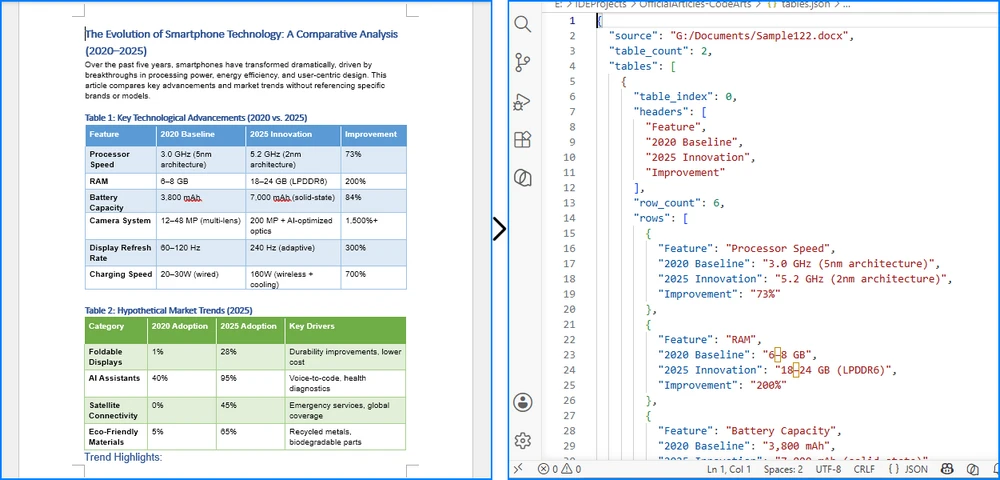
Explanation
The code treats the first row as a header row and maps each cell in subsequent rows to the corresponding header key. This produces a JSON array of objects, which is the most common and useful format for tabular data.
Key considerations:
table.Rows.Count < 2skips tables that have only a header row or are emptyrow.Cells[c].Paragraphs[0].Textextracts text from the first paragraph in each cell. For simplicity, the example reads only the first paragraph. If a cell contains multiple paragraphs, iterate through the entireParagraphscollection and concatenate the results:
cell_text = "\n".join(
    row.Cells[c].Paragraphs[p].Text.strip()
    for p in range(row.Cells[c].Paragraphs.Count)
    if row.Cells[c].Paragraphs[p].Text.strip()
)
headers[c] if c < len(headers) else f"Column_{c}"handles cases where a data row has more cells than the header row
This method is ideal for extracting structured data from reports, invoices, product catalogs, and configuration tables stored in Word documents. The resulting JSON can be directly loaded into databases, used in web APIs, or processed by data analysis tools.
If you need to generate Word documents from structured JSON data, see our tutorial on converting JSON to Word in Python, which covers creating Word content and tables directly from JSON objects and arrays.
5. Method 3 – Preserve Document Structure in JSON
Methods 1 and 2 treat paragraphs and tables as separate, isolated elements. In practice, Word documents have a meaningful hierarchy: headings introduce sections, paragraphs provide detail, and tables present structured data within a specific context.
Preserving this hierarchy in JSON produces output that is far more useful for knowledge base construction, RAG (Retrieval-Augmented Generation) pipelines, and document understanding systems. Instead of a flat list of text, you get a structured representation that maintains the logical flow of the original document.
How to Preserve Headings, Paragraphs, and Tables in a Hierarchical JSON Structure
The approach is to iterate through all child objects in each section's body, determine the type of each object (paragraph or table), and build a structured JSON representation accordingly. For paragraphs, you can detect headings by checking the StyleName property.
import json
from spire.doc import Document
from spire.doc.common import *

input_file = "ProjectReport.docx"
output_file = "structured_output.json"

HEADING_STYLES = {
    "Heading1": 1,
    "Heading2": 2,
    "Heading3": 3,
    "Heading4": 4,
}

def get_heading_level(style_name):
    return HEADING_STYLES.get(style_name, None)

def extract_table_data(table):
    rows_data = []
    if table.Rows.Count < 1:
        return {"headers": [], "rows": []}

    header_row = table.Rows[0]
    headers = []
    for c in range(header_row.Cells.Count):
        headers.append(header_row.Cells[c].Paragraphs[0].Text.strip())

    for r in range(1, table.Rows.Count):
        row = table.Rows[r]
        row_dict = {}
        for c in range(row.Cells.Count):
            cell_text = row.Cells[c].Paragraphs[0].Text.strip()
            row_dict[headers[c] if c < len(headers) else f"Column_{c}"] = cell_text
        rows_data.append(row_dict)

    return {"headers": headers, "rows": rows_data}

document = Document()
document.LoadFromFile(input_file)

sections_data = []

for i in range(document.Sections.Count):
    section = document.Sections.get_Item(i)
    content_items = []

    for j in range(section.Body.ChildObjects.Count):
        obj = section.Body.ChildObjects.get_Item(j)

        if isinstance(obj, Paragraph):
            text = obj.Text.strip()
            if not text:
                continue

            heading_level = get_heading_level(obj.StyleName)
            if heading_level:
                content_items.append({
                    "type": "heading",
                    "level": heading_level,
                    "text": text
                })
            else:
                content_items.append({
                    "type": "paragraph",
                    "text": text
                })

        elif isinstance(obj, Table):
            table_data = extract_table_data(obj)
            content_items.append({
                "type": "table",
                "row_count": len(table_data["rows"]),
                "data": table_data
            })

    sections_data.append({
        "section_index": i,
        "content": content_items
    })

document.Close()

result = {
    "source": input_file,
    "section_count": len(sections_data),
    "sections": sections_data
}

with open(output_file, "w", encoding="utf-8") as f:
    json.dump(result, f, indent=2, ensure_ascii=False)
Output Example
The following JSON snippet shows how headings, paragraphs, and tables are represented in the hierarchical output structure:
{
  "source": "ProjectReport.docx",
  "section_count": 1,
  "sections": [
    {
      "section_index": 0,
      "content": [
        {
          "type": "heading",
          "level": 1,
          "text": "Quarterly Sales Report"
        },
        {
          "type": "paragraph",
          "text": "This report provides an overview of sales performance across all regions."
        },
        {
          "type": "heading",
          "level": 2,
          "text": "Regional Breakdown"
        },
        {
          "type": "table",
          "row_count": 3,
          "data": {
            "headers": ["Region", "Product", "Units Sold", "Revenue"],
            "rows": [
              {"Region": "North", "Product": "Laptop", "Units Sold": "120", "Revenue": "114000"}
            ]
          }
        }
      ]
    }
  ]
}
Conversion Result
The image below illustrates how headings, paragraphs, and tables are preserved in a hierarchical JSON structure.
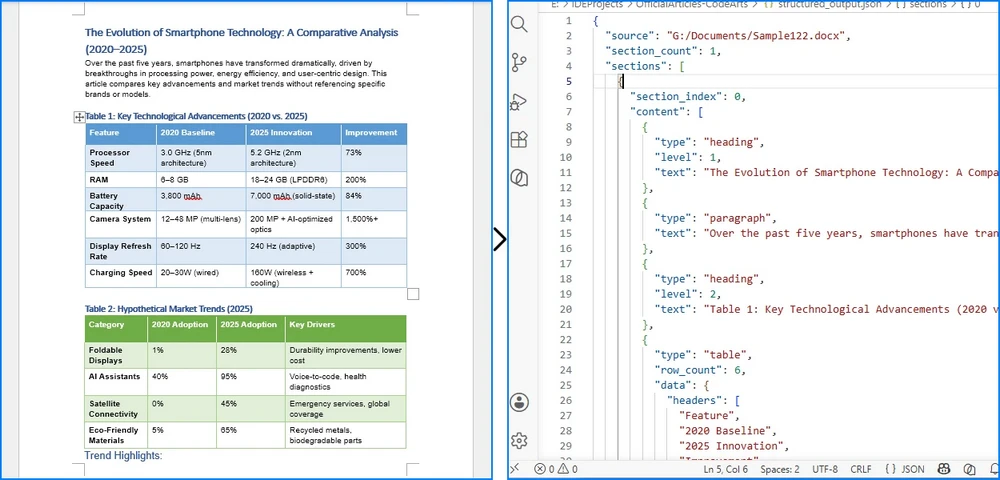
Explanation
This method differs from the previous two in a fundamental way: it uses section.Body.ChildObjects to iterate through all content elements in document order, rather than separately iterating paragraphs and tables. This preserves the original sequence and interleaving of headings, paragraphs, and tables.
Key design decisions:
- Heading detection via
StyleName– Word headings are paragraphs styled with "Heading1", "Heading2", etc. Checking the style name allows you to distinguish headings from body text and record the heading level. Note that the exact heading style names may vary depending on the Word template or language settings (e.g., "Heading 1" with a space, or localized names like "标题 1" in Chinese). To handle these variations, normalize the style name before lookup:
def get_heading_level(style_name):
    normalized = style_name.lower().replace(" ", "")
    heading_map = {"heading1": 1, "heading2": 2, "heading3": 3, "heading4": 4}
    return heading_map.get(normalized, None)
ChildObjectsiteration – Unlikesection.Paragraphs(which only returns paragraphs) orsection.Tables(which only returns tables),ChildObjectsreturns all elements in their original order. This is essential for preserving the document's logical structure.- Structured JSON output – Each content item includes a
typefield (heading,paragraph, ortable), making it easy for downstream systems to process different content types appropriately.
This approach is particularly valuable for:
- RAG and AI pipelines – the heading structure enables chunking documents by section, improving retrieval accuracy
- Knowledge base construction – hierarchical JSON maps directly to tree-structured knowledge graphs
- Document understanding – preserving the relationship between headings and their associated content allows semantic analysis of document sections
If you need to extract specific content types from Word documents, such as headings, paragraphs, or tables, see our tutorial on reading Word documents in Python, which covers content extraction techniques in more detail.
6. When to Use Word to JSON Conversion
Word to JSON conversion is useful in any scenario where structured data needs to be extracted from Word documents at scale. Common use cases include:
- AI and RAG document processing – Convert Word documents into JSON chunks for embedding and retrieval in LLM-based applications. The hierarchical structure from Method 3 enables section-level chunking, which produces better retrieval results than flat text splitting.
- Knowledge base construction – Build structured knowledge bases from technical documentation, policy documents, or manuals stored as .docx files.
- Batch data extraction – Extract data from hundreds of Word reports, invoices, or forms and load the results into a database or data warehouse.
- Contract and resume parsing – Convert legal contracts, HR documents, or resumes into structured JSON for automated analysis and comparison.
- API and web application data exchange – Serve Word document content through REST APIs as JSON, enabling web and mobile applications to consume document data without handling .docx files directly.
7. Limitations and Best Practices
Limitations
- No standard JSON schema for Word – Unlike CSV or XML, there is no universally accepted format for representing Word content in JSON. The structure you choose must be designed for your specific use case.
- Complex formatting is not captured – The methods in this tutorial extract text content and basic structural metadata (heading levels, table data). They do not capture fonts, colors, images, page layout, headers/footers, or footnotes. If your application requires these elements, additional extraction logic is needed.
- Merged table cells require special handling – Word tables can contain merged cells (both horizontal and vertical). The simple row-by-row extraction in Method 2 assumes a regular grid. Documents with merged cells may produce unexpected results.
- Large documents may need chunked processing – For documents with hundreds of pages or dozens of tables, consider processing sections or tables individually to manage memory usage.
Best Practices
- Design your JSON schema before writing code – Decide what you need (text only? headings? tables? full structure?) and choose the appropriate extraction method.
- Validate output against sample documents – Word documents vary widely in structure and formatting. Test your conversion logic against representative samples from your actual document set.
- Handle encoding explicitly – Always specify
encoding="utf-8"when writing JSON files to avoid character encoding issues with non-ASCII text. - Use
ensure_ascii=Falseinjson.dump– This preserves Unicode characters in the output rather than escaping them, which is important for documents containing non-English text.
8. FAQ
Can I convert DOCX to JSON in Python?
Yes. Using Spire.Doc for Python, you can load any .docx file, iterate through its sections, paragraphs, and tables, and serialize the extracted content to JSON using Python's built-in json module. This tutorial demonstrates three methods for doing so, from simple text extraction to full structural preservation.
What is the best Word to JSON converter for developers?
For developers who need batch processing, automation, or custom JSON schemas, a Python-based approach using Spire.Doc is more flexible than online converters. Online tools work for one-off conversions but cannot handle large-scale processing, custom output formats, or integration into automated pipelines.
Can I convert Word tables to JSON?
Yes. By iterating through the tables in a Word document and extracting cell text row by row, you can convert table data into a JSON array of objects. Method 2 in this tutorial demonstrates this with header-based key mapping.
Does Word have a native JSON export option?
No. Microsoft Word does not provide a built-in JSON export format. Word files can be saved as DOCX, PDF, HTML, RTF, and plain text, but converting to JSON requires a programmatic approach that reads the document structure and maps it to a JSON schema.
Can I preserve headings and structure when converting Word to JSON?
Yes. By iterating through all child objects in each section's body and checking paragraph style names, you can detect headings, body paragraphs, and tables, then build a hierarchical JSON structure that preserves the document's logical organization. Method 3 in this tutorial provides a complete implementation.
Can I convert Word to JSON online?
Yes, there are online Word to JSON converters that can handle one-off conversions. However, online tools are limited to single-file processing and do not allow customization of the JSON schema. For batch processing, automated pipelines, or custom output structures, a Python-based approach using Spire.Doc is more practical and scalable.
9. Conclusion
In this article, we demonstrated how to convert Word documents to JSON in Python using Spire.Doc for Python. We covered three methods of increasing complexity: extracting paragraph text as a flat JSON array, converting Word tables to structured JSON objects, and preserving the full document hierarchy—including headings, paragraphs, and tables—in a single JSON output.
Each method serves a different purpose. Plain text extraction works for indexing and embedding. Table extraction is ideal for data migration and report parsing. Full structural preservation enables knowledge base construction and RAG pipelines. Choose the approach that matches your requirements, and extend the JSON schema as needed for your specific use case.
Spire.Doc for Python provides comprehensive Word document processing capabilities beyond JSON conversion, including document creation, formatting, mail merge, and format conversion. You can apply for a 30-day free license to evaluate all features.
How to Convert JSON to Word in Python (JSON to DOCX)
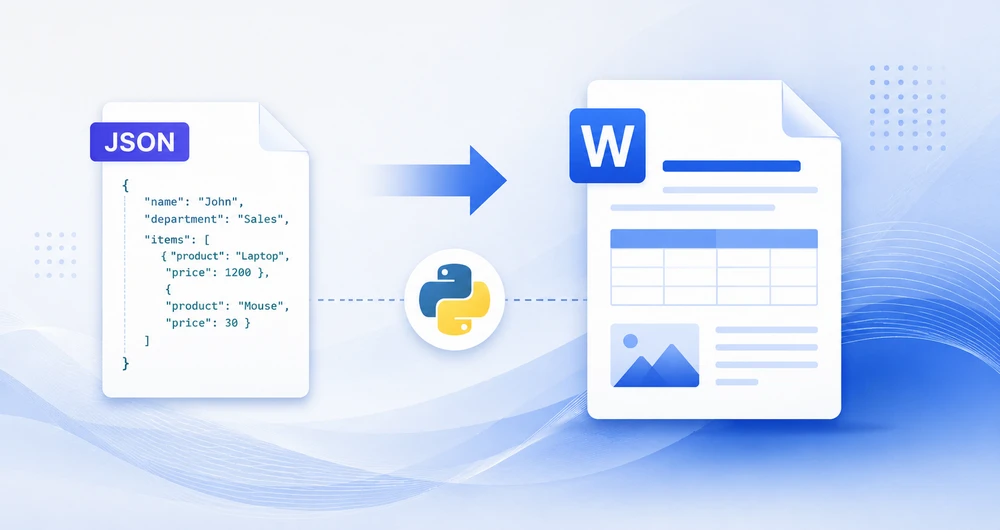
JSON is one of the most common formats for exchanging structured data between applications, APIs, and databases. In many business scenarios, however, JSON data needs to be transformed into human-readable Word documents such as reports, invoices, summaries, contracts, or exported records.
Converting JSON to Word is not a simple file format conversion. JSON has no inherent Word structure, so the process requires parsing the JSON data and mapping its elements to appropriate Word document components such as paragraphs, tables, and headings.
This article demonstrates how to convert JSON data into Word documents in Python using Spire.Doc for Python. We'll cover multiple approaches, including exporting JSON as formatted text, creating Word tables from JSON arrays, and generating structured reports from nested JSON data.
Content Overview
- Understanding JSON-to-Word Conversion
- Install Spire.Doc for Python
- Method 1: Convert JSON to Word as Formatted Text
- Method 2: Convert JSON Arrays to Word Tables
- Method 3: Generate Structured Word Reports from JSON
- Handle Nested JSON Objects
- Handle Missing or Optional Fields
- Convert JSON Files to Word Documents
- Why Use Spire.Doc for JSON-to-Word Conversion
- FAQ
- Conclusion
1. Understanding JSON-to-Word Conversion
JSON and Word documents serve fundamentally different purposes. JSON is a structured data format designed for data exchange and machine processing, while Word documents are intended for human consumption with rich formatting, visual hierarchy, and page layout.
As a result, converting JSON to Word is not a direct format transformation. The JSON data must first be parsed and mapped to appropriate document elements before a Word document can be generated.
The conversion process typically follows this workflow:
JSON Data
      ↓
Parse JSON (json.loads)
      ↓
Map Data Structure
      ↓
Spire.Doc for Python
      ↓
Paragraphs / Tables / Headings
      ↓
DOCX Document
In Python, the built-in json module is commonly used to parse JSON data, while Spire.Doc for Python handles document generation. After the JSON structure is analyzed and mapped, Spire.Doc can create paragraphs, tables, headings, images, and other Word elements programmatically, producing a fully formatted DOCX document.
The table below shows common mappings between JSON structures and Word elements:
| JSON Structure | Word Element | Example |
|---|---|---|
| Key-Value Pair | Paragraph | "Name": "John" → Name: John |
| Array | Table | [{...}, {...}] → rows and columns |
| Object | Section | Nested object → grouped content |
| Title Field | Heading | "title": "Report" → Heading 1 |
| URL/Image Path | Image | "logo": "img.png" → embedded image |
Understanding these mappings is important because the same JSON data can be presented in different ways depending on the document's purpose. For example, simple key-value data may be exported as paragraphs, while collections of records are usually easier to read when rendered as tables. With Spire.Doc for Python, these mappings can be implemented programmatically to generate professional Word documents from structured JSON data.
2. Install Spire.Doc for Python
Before converting JSON to Word, you need to install Spire.Doc for Python in your development environment.
Install via pip (Recommended)
pip install spire.doc
Alternatively, you can download Spire.Doc for Python and integrate it manually.
After installation, import the library in your project:
from spire.doc import *
from spire.doc.common import *
3. Method 1: Convert JSON to Word as Formatted Text
This method is the simplest approach for converting JSON to Word. It works well for API responses, configuration files, and simple JSON exports where each key-value pair maps to a paragraph.
Sample JSON
{
  "Name": "John Smith",
  "Department": "Sales",
  "Country": "USA"
}
Python Code
import json
from spire.doc import Document, FileFormat, HorizontalAlignment

json_data = '{"Name": "John Smith", "Department": "Sales", "Country": "USA"}'
data = json.loads(json_data)

document = Document()
section = document.AddSection()

for key, value in data.items():
    paragraph = section.AddParagraph()
    text_range = paragraph.AppendText(f"{key}: {value}")
    text_range.CharacterFormat.FontSize = 12
    paragraph.Format.AfterSpacing = 6

document.SaveToFile("json_to_text.docx", FileFormat.Docx)
document.Close()
Output
The following Word document shows how JSON key-value pairs can be converted into formatted paragraphs.

When to Use This Approach
This method is best suited for:
- Simple key-value JSON objects
- API response exports
- Configuration file documentation
- Quick data snapshots
It is not ideal for large datasets or tabular data, where Method 2 (tables) provides better readability.
If your goal is to analyze, filter, or manipulate structured JSON data in a spreadsheet, you may also be interested in our guide on converting JSON to Excel in Python.
4. Method 2: Convert JSON Arrays to Word Tables
When JSON data contains arrays of objects, tables provide the most effective way to present the data in a Word document. This is the most common scenario for converting JSON to Word, as many APIs and databases return data as JSON arrays.
Sample JSON
[
  {"Product": "Laptop", "Price": 1200, "Stock": 45},
  {"Product": "Mouse", "Price": 30, "Stock": 200},
  {"Product": "Keyboard", "Price": 85, "Stock": 120}
]
Python Code
import json
from spire.doc import (
    Document, FileFormat, HorizontalAlignment,
    VerticalAlignment, TableRowHeightType, Color
)

json_data = '''[
  {"Product": "Laptop", "Price": 1200, "Stock": 45},
  {"Product": "Mouse", "Price": 30, "Stock": 200},
  {"Product": "Keyboard", "Price": 85, "Stock": 120}
]'''
data = json.loads(json_data)

document = Document()
section = document.AddSection()

if data:
    headers = list(data[0].keys())
    table = section.AddTable(True)
    table.ResetCells(len(data) + 1, len(headers))

    header_row = table.Rows[0]
    header_row.IsHeader = True
    header_row.Height = 20
    header_row.HeightType = TableRowHeightType.Exactly

    for col_index, header in enumerate(headers):
        header_row.Cells[col_index].CellFormat.Shading.BackgroundPatternColor = Color.get_Gray()
        header_row.Cells[col_index].CellFormat.VerticalAlignment = VerticalAlignment.Middle
        paragraph = header_row.Cells[col_index].AddParagraph()
        paragraph.Format.HorizontalAlignment = HorizontalAlignment.Center
        text_range = paragraph.AppendText(header)
        text_range.CharacterFormat.Bold = True
        text_range.CharacterFormat.FontSize = 12

    for row_index, record in enumerate(data):
        data_row = table.Rows[row_index + 1]
        data_row.Height = 20
        data_row.HeightType = TableRowHeightType.Exactly
        for col_index, key in enumerate(headers):
            data_row.Cells[col_index].CellFormat.VerticalAlignment = VerticalAlignment.Middle
            paragraph = data_row.Cells[col_index].AddParagraph()
            paragraph.Format.HorizontalAlignment = HorizontalAlignment.Center
            text_range = paragraph.AppendText(str(record.get(key, "")))
            text_range.CharacterFormat.FontSize = 11

document.SaveToFile("json_to_table.docx", FileFormat.Docx)
document.Close()
Output
The following screenshot shows the generated Word table created from the JSON array.
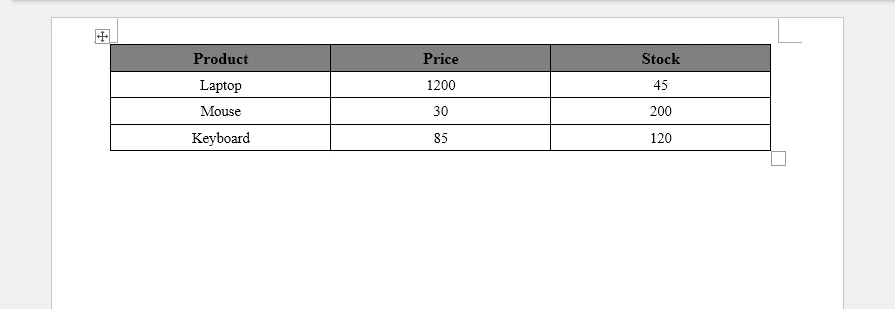
Why Use Tables for JSON Arrays
Tables are the natural fit for JSON array data because:
- Each JSON object maps to a table row
- Each key maps to a column header
- Data is aligned for easy scanning and comparison
- Tables are the standard format for reports, inventory lists, and exported database records
Enhancing JSON Tables with Formatting
Unlike plain text exports, Spire.Doc allows JSON data to be rendered as professionally formatted Word tables. Beyond basic table creation, you can apply:
- Table styles – Use
DefaultTableStyleorApplyStylefor consistent, polished table appearances - Borders and shading – Control cell borders, background colors, and alternating row colors
- Alignment – Set horizontal and vertical alignment at the cell, row, or table level
- Custom formatting – Apply font size, bold, and color to individual cells or ranges
- Auto-fit behavior – Use
AutoFitto adjust column widths to content or window size
These formatting capabilities transform raw JSON data into professional report layouts suitable for business documents, client deliverables, and automated reporting pipelines.
If you need to create more sophisticated Word tables, such as merged cells, custom table layouts, or advanced formatting, see our guide on creating and formatting tables in Word documents using Python.
5. Method 3: Generate Structured Word Reports from JSON
Real-world JSON data often contains a mix of metadata, summary text, and tabular data. This method combines headings, paragraphs, and tables to generate a complete structured Word report from JSON.
Sample JSON
{
  "title": "Monthly Sales Report",
  "period": "June 2026",
  "summary": "Total revenue reached $580,000 this month, representing a 12% increase over the previous period. All regions showed positive growth.",
  "sales": [
    {"Region": "North", "Revenue": 150000, "Units": 320},
    {"Region": "South", "Revenue": 120000, "Units": 280},
    {"Region": "East", "Revenue": 180000, "Units": 410},
    {"Region": "West", "Revenue": 130000, "Units": 290}
  ]
}
Python Code
import json
from spire.doc import (
    Document, FileFormat, HorizontalAlignment,
    VerticalAlignment, TableRowHeightType, Color,
    BuiltinStyle
)

json_data = '''{
  "title": "Monthly Sales Report",
  "period": "June 2026",
  "summary": "Total revenue reached $580,000 this month, representing a 12% increase over the previous period. All regions showed positive growth.",
  "sales": [
    {"Region": "North", "Revenue": 150000, "Units": 320},
    {"Region": "South", "Revenue": 120000, "Units": 280},
    {"Region": "East", "Revenue": 180000, "Units": 410},
    {"Region": "West", "Revenue": 130000, "Units": 290}
  ]
}'''
data = json.loads(json_data)

document = Document()
section = document.AddSection()

heading_style = document.AddStyle(BuiltinStyle.Heading1)
subheading_style = document.AddStyle(BuiltinStyle.Heading2)

title_para = section.AddParagraph()
title_para.ApplyStyle(heading_style.Name)
title_para.AppendText(data.get("title", "Report"))

period_para = section.AddParagraph()
period_para.AppendText(f"Period: {data.get('period', 'N/A')}")
period_para.Format.AfterSpacing = 12

summary_heading = section.AddParagraph()
summary_heading.ApplyStyle(subheading_style.Name)
summary_heading.AppendText("Executive Summary")

summary_para = section.AddParagraph()
summary_para.AppendText(data.get("summary", ""))
summary_para.Format.AfterSpacing = 12

sales_heading = section.AddParagraph()
sales_heading.ApplyStyle(subheading_style.Name)
sales_heading.AppendText("Sales Data")

sales = data.get("sales", [])
if sales:
    headers = list(sales[0].keys())
    table = section.AddTable(True)
    table.ResetCells(len(sales) + 1, len(headers))

    header_row = table.Rows[0]
    header_row.IsHeader = True
    header_row.Height = 20
    header_row.HeightType = TableRowHeightType.Exactly

    for col_index, header in enumerate(headers):
        header_row.Cells[col_index].CellFormat.Shading.BackgroundPatternColor = Color.get_Gray()
        header_row.Cells[col_index].CellFormat.VerticalAlignment = VerticalAlignment.Middle
        paragraph = header_row.Cells[col_index].AddParagraph()
        paragraph.Format.HorizontalAlignment = HorizontalAlignment.Center
        text_range = paragraph.AppendText(header)
        text_range.CharacterFormat.Bold = True

    for row_index, record in enumerate(sales):
        data_row = table.Rows[row_index + 1]
        data_row.Height = 20
        data_row.HeightType = TableRowHeightType.Exactly
        for col_index, key in enumerate(headers):
            data_row.Cells[col_index].CellFormat.VerticalAlignment = VerticalAlignment.Middle
            paragraph = data_row.Cells[col_index].AddParagraph()
            paragraph.Format.HorizontalAlignment = HorizontalAlignment.Center
            paragraph.AppendText(str(record.get(key, "")))

document.SaveToFile("json_report.docx", FileFormat.Docx)
document.Close()
Output
The generated Word document combines headings, descriptive text, and tabular data into a structured report, making the JSON data easier to read and share.
Key Techniques
This example demonstrates several important techniques for generating Word reports from JSON:
- Headings – Use
BuiltinStyle.Heading1andHeading2for document structure and table-of-contents compatibility - Paragraphs – Add summary and descriptive text between headings
- Tables – Render JSON arrays as tabular data within the report
- Combinations – Mix multiple Word element types in a single document
Why Structured Reports Matter
In business environments, JSON data rarely exists in isolation. It typically comes from APIs, databases, or reporting systems and needs to be transformed into documents that decision-makers can read, share, and archive. Common scenarios include:
- Sales reports – Revenue, units, and regional breakdowns from CRM or ERP systems
- Inventory reports – Stock levels, reorder alerts, and warehouse summaries
- Customer summaries – Contact details, order history, and account status
- Compliance reports – Audit logs, access records, and policy status
- Automated reporting systems – Scheduled jobs that generate documents from JSON data and distribute them via email or document management systems
Spire.Doc makes it possible to transform structured JSON data into polished business documents automatically, combining headings, paragraphs, and tables in a single output.
If you need to build more sophisticated document layouts, such as multi-section reports, cover pages, tables of contents, headers, footers, or custom document templates, see our guide on creating structured Word documents in Python.
6. Handle Nested JSON Objects
Many real-world JSON responses contain nested objects. For example, a customer record may include an address object with its own fields. Handling these nested structures is essential for complete JSON-to-Word conversion.
Example JSON
{
  "customer": {
    "name": "Tom Wilson",
    "email": "tom@example.com",
    "address": {
      "street": "123 Main St",
      "city": "Springfield",
      "state": "IL"
    }
  }
}
Python Code
import json
from spire.doc import Document, FileFormat, HorizontalAlignment

def add_nested_object(section, obj, indent_level=0):
    for key, value in obj.items():
        if isinstance(value, dict):
            heading_para = section.AddParagraph()
            heading_text = "  " * indent_level + key.capitalize()
            text_range = heading_para.AppendText(heading_text)
            text_range.CharacterFormat.Bold = True
            text_range.CharacterFormat.FontSize = 12 - indent_level
            heading_para.Format.AfterSpacing = 4
            add_nested_object(section, value, indent_level + 1)
        else:
            paragraph = section.AddParagraph()
            label = "  " * indent_level + f"{key}: {value}"
            text_range = paragraph.AppendText(label)
            text_range.CharacterFormat.FontSize = 11
            paragraph.Format.AfterSpacing = 2

json_data = '''{
  "customer": {
    "name": "Tom Wilson",
    "email": "tom@example.com",
    "address": {
      "street": "123 Main St",
      "city": "Springfield",
      "state": "IL"
    }
  }
}'''
data = json.loads(json_data)

document = Document()
section = document.AddSection()

add_nested_object(section, data)

document.SaveToFile("json_nested.docx", FileFormat.Docx)
document.Close()
Output
The following screenshot shows the hierarchical Word document generated from the nested JSON structure.
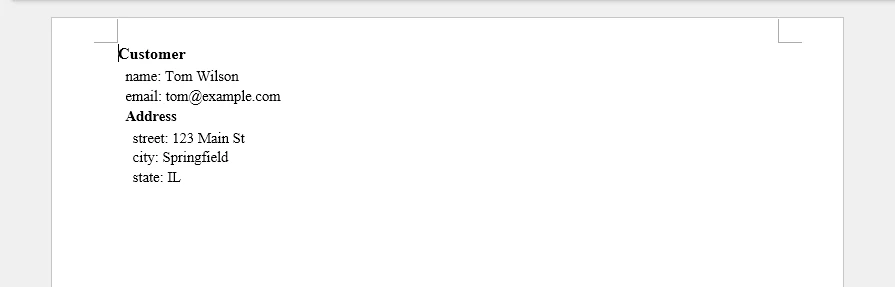
Nested JSON objects can be represented as hierarchical sections in a Word document, making complex data structures easier to read and navigate.
How It Works
The add_nested_object function recursively traverses the JSON structure:
- When it encounters a dict value, it creates a bold heading for the key and recurses into the nested object
- When it encounters a scalar value, it creates a paragraph with the key-value pair
- The
indent_levelparameter controls indentation and font size to create a visual hierarchy
This recursive approach handles arbitrarily deep nesting and produces a readable hierarchical layout in the Word document.
7. Handle Missing or Optional JSON Fields
In real-world applications, JSON data from APIs and databases often contains missing or optional fields. Records may have inconsistent keys, and some fields may be absent entirely. Handling these cases gracefully prevents errors and ensures the generated Word document remains complete.
Example JSON with Missing Fields
[
  {"Name": "Tom Wilson", "Email": "tom@example.com", "Phone": "555-0100"},
  {"Name": "Jane Doe", "Email": "jane@example.com"},
  {"Name": "Bob Brown", "Phone": "555-0300"}
]
Python Code
import json
from spire.doc import (
    Document, FileFormat, HorizontalAlignment,
    VerticalAlignment, TableRowHeightType, Color
)

json_data = '''[
  {"Name": "Tom Wilson", "Email": "tom@example.com", "Phone": "555-0100"},
  {"Name": "Jane Doe", "Email": "jane@example.com"},
  {"Name": "Bob Brown", "Phone": "555-0300"}
]'''
data = json.loads(json_data)

document = Document()
section = document.AddSection()

if data:
    all_keys = []
    for record in data:
        for key in record.keys():
            if key not in all_keys:
                all_keys.append(key)

    table = section.AddTable(True)
    table.ResetCells(len(data) + 1, len(all_keys))

    header_row = table.Rows[0]
    header_row.IsHeader = True
    header_row.Height = 20
    header_row.HeightType = TableRowHeightType.Exactly

    for col_index, header in enumerate(all_keys):
        header_row.Cells[col_index].CellFormat.Shading.BackgroundPatternColor = Color.get_Gray()
        header_row.Cells[col_index].CellFormat.VerticalAlignment = VerticalAlignment.Middle
        paragraph = header_row.Cells[col_index].AddParagraph()
        paragraph.Format.HorizontalAlignment = HorizontalAlignment.Center
        text_range = paragraph.AppendText(header)
        text_range.CharacterFormat.Bold = True

    for row_index, record in enumerate(data):
        data_row = table.Rows[row_index + 1]
        data_row.Height = 20
        data_row.HeightType = TableRowHeightType.Exactly
        for col_index, key in enumerate(all_keys):
            data_row.Cells[col_index].CellFormat.VerticalAlignment = VerticalAlignment.Middle
            paragraph = data_row.Cells[col_index].AddParagraph()
            paragraph.Format.HorizontalAlignment = HorizontalAlignment.Center
            paragraph.AppendText(str(record.get(key, "N/A")))

document.SaveToFile("json_missing_fields.docx", FileFormat.Docx)
document.Close()
Output
The following screenshot shows the generated Word table, where missing fields are automatically filled with placeholder values to maintain a consistent document structure.
Key Techniques
dict.get(key, "N/A")– Returns a default value when a key is missing, preventingKeyErrorexceptions- Dynamic column collection – Iterates all records to build a complete set of column headers, ensuring no field is missed even when it appears in only some records
- Consistent table structure – All rows have the same number of columns regardless of which fields are present in each record
This approach is essential for production use cases where API responses may vary in structure across different records or over time.
8. Convert JSON Files to Word Documents
In practice, JSON data often originates from files rather than inline strings. API export results, configuration files, database dumps, data exchange files, and log data are all commonly stored as .json files that need to be converted to Word documents.
The conversion process for JSON files follows this workflow:
JSON File (.json)
        ↓
Load JSON (json.load)
        ↓
Generate Word Document (Spire.Doc)
        ↓
DOCX Document
Python Code
import json
from spire.doc import Document, FileFormat

with open("data.json", "r", encoding="utf-8") as f:
    data = json.load(f)

document = Document()
section = document.AddSection()

# Process the loaded JSON data
# using any of the techniques shown in Methods 1–3
# (formatted text, tables, or structured reports)

document.SaveToFile("data_report.docx", FileFormat.Docx)
document.Close()
Key Points
json.load()reads and parses a JSON file directly, unlikejson.loads()which parses a stringencoding="utf-8"ensures proper handling of non-ASCII characters in JSON files- Once the JSON file is loaded into a Python dictionary or list, Spire.Doc for Python can generate paragraphs, tables, or structured reports from the parsed data using any of the methods described earlier in this article
For complete examples of processing the loaded data, refer to Method 1 for formatted text, Method 2 for tables, or Method 3 for structured reports.
9. Why Use Spire.Doc for JSON-to-Word Conversion
Converting JSON to Word involves several practical challenges that go beyond simple data parsing. Generating properly formatted tables, applying consistent styles, creating structured reports with headings and paragraphs, and handling nested or incomplete data all require a capable document generation API.
Challenges of JSON-to-Word Conversion
- Table generation – JSON arrays must be mapped to Word tables with headers, rows, and cell formatting
- Document formatting – Raw data exports lack the visual hierarchy that makes Word documents readable
- Structured reports – Combining headings, paragraphs, and tables in a single document requires coordinating multiple element types
- Nested data – Deeply nested JSON objects need recursive traversal and hierarchical layout
- Large documents – Generating multi-page reports from large JSON datasets demands efficient resource management
Benefits of Spire.Doc for Python
Spire.Doc for Python addresses these challenges with a straightforward API:
- Create Word documents without Microsoft Word – No Office installation or Interop dependencies required
- Generate paragraphs, tables, images, headers, and footers – Full coverage of Word document elements
- Apply built-in and custom styles – Consistent formatting across documents using
BuiltinStyleandParagraphStyle - Automate report generation – Programmatically build structured reports from any JSON data source
- Export to DOCX and other formats – Save to DOCX, PDF, HTML, RTF, and more using
FileFormat
With Spire.Doc, the JSON-to-Word conversion process becomes a structured mapping from parsed data to Word elements, rather than manual string formatting or template manipulation.
10. FAQ
How do I convert JSON to Word in Python?
Parse the JSON data using Python's built-in json module, then use Spire.Doc for Python to create a Word document. Map JSON key-value pairs to paragraphs, JSON arrays to tables, and use headings for structure. See Method 1 for a basic example and Method 3 for a complete report.
Can JSON arrays be converted into Word tables?
Yes. JSON arrays of objects map naturally to Word tables, where each object becomes a row and each key becomes a column. See Method 2 for a complete code example that creates a formatted table from a JSON array.
How do I create a DOCX report from API JSON responses?
Fetch the API response as JSON, parse it, and use Spire.Doc for Python to generate the report. Combine headings for titles, paragraphs for summaries, and tables for data arrays. See Method 3 for a structured report example.
Can nested JSON objects be exported to Word?
Yes. Use a recursive function to traverse nested JSON objects, creating headings for object keys and paragraphs for scalar values. See Section 6 for a detailed example of handling nested structures with visual hierarchy.
How do I convert a JSON file to a Word document?
Use Python's json.load() to read the JSON file, then process the parsed data with Spire.Doc for Python. See Section 8 for a code example.
What is the best way to generate Word documents from JSON data?
The best approach depends on the JSON structure. For simple key-value data, use formatted paragraphs. For arrays, use tables. For complex nested data with mixed content, combine headings, paragraphs, and tables as shown in Method 3.
11. Conclusion
Generating Word documents from JSON data is a common requirement in reporting, document automation, and data export workflows. With Spire.Doc for Python, you can create paragraphs, tables, and structured document layouts directly from JSON, making it easier to produce professional DOCX files from application data.
The same approach can be extended to API responses, database records, configuration files, and other structured data sources, helping automate document generation in both small projects and enterprise systems.
For scenarios involving large documents or document conversion requirements, a licensed version is required.
How to Convert Word Tables to CSV (DOC/DOCX to CSV)
CSV (Comma-Separated Values) is a lightweight, universally compatible format for tabular data. Word documents (DOC and DOCX), on the other hand, are rich-text documents that contain paragraphs, images, headers, formatting, and tables. Because CSV only supports rows and columns, converting Word to CSV or DOCX to CSV almost always means extracting table data from the document.
Organizations often need to convert Word or DOCX tables to CSV when moving structured data into spreadsheets, databases, CRM systems, analytics tools, or automated workflows.
This guide covers two practical methods to convert Word tables to CSV, plus important context on why Word cannot export CSV directly and when online converters are appropriate.
Quick Navigation
- Why Word Cannot Be Saved Directly as CSV
- Method 1 – Convert Word Tables to CSV Using Spreadsheet Software
- Can You Use an Online Word to CSV Converter?
- Method 2 – Convert Word Tables to CSV Automatically with Python
- FAQ
Which Method Should You Choose?
| Method | Ease of Use | Batch Processing | Privacy | Best For |
|---|---|---|---|---|
| Spreadsheet Software | High | No | High | Occasional conversions, manual review |
| Python (Spire.Doc) | Medium | Yes | High | Automation, batch processing, recurring tasks |
1. Why Word Cannot Be Saved Directly as CSV
Microsoft Word does not offer a "Save as CSV" option. This is not an oversight — it reflects a fundamental format mismatch:
- Word documents contain mixed content: paragraphs, images, headers, footers, styled text, and tables. A single document can have multiple sections, columns, and nested elements.
- CSV files contain only flat tabular data: rows and columns of plain text separated by commas.
Word cannot automatically determine how to flatten a rich-text document into a tabular layout. A document with three paragraphs, an image, and a table does not map cleanly to rows and columns. The only part of a Word document that has a natural CSV representation is structured table data.
This is why every practical approach to convert Word to CSV focuses on extracting tables from the document — whether through spreadsheet software, online tools, or programmatic methods.
2. Method 1 – Convert Word Tables to CSV Using Spreadsheet Software
The most straightforward way to convert Word tables to CSV is to copy the table into a spreadsheet application and export it. Both Microsoft Excel and Google Sheets support this workflow.
The Workflow
- Copy the Word table into a spreadsheet — Select the table in Word, copy it, and paste it into a new spreadsheet
- Verify the imported data — Check that rows, columns, and cell values are correctly separated. Watch for merged cells, which may cause misalignment
- Export as CSV — Save or download the spreadsheet in CSV format
Option A – Microsoft Office
- Open the Word document and copy the table you want to export.
- Paste the table into an Excel worksheet and verify that rows and columns are imported correctly.
- Review merged cells, line breaks, or other formatting issues that could affect the CSV structure.
- Choose File > Save As and save the worksheet as a CSV file.
Excel preserves Word table structure well — rows and columns map correctly in most cases. If your document contains multiple tables, you can paste each one onto a separate worksheet and save each as an individual CSV file.
Considerations:
- Merged cells in the Word table may cause misalignment after pasting
- Excel runs locally, so your data stays on your machine
- The process is manual and not practical for frequent or large-scale conversions
Option B – Google Sheets
- Copy the table from the Word document (in Google Docs or other documet viewers).
- Paste it into a new Google Sheets spreadsheet.
- Verify the imported table structure and adjust any misaligned data.
- Download the spreadsheet as a CSV file using File > Download > Comma Separated Values (.csv).
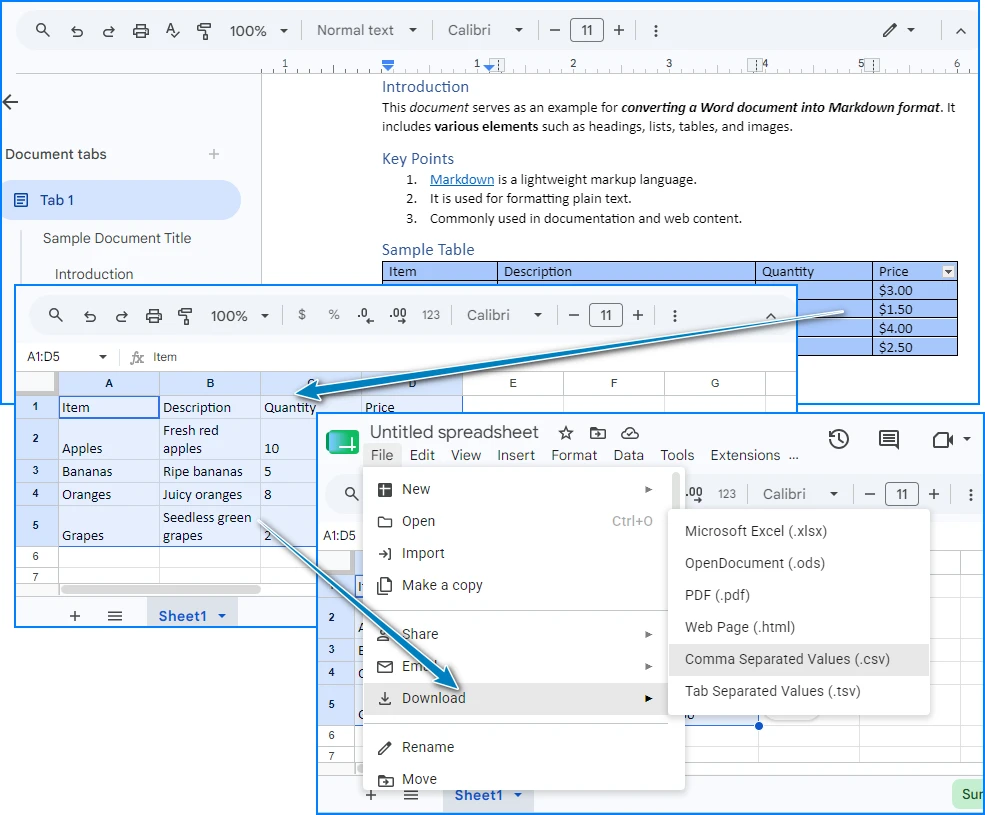
Google Sheets is free and requires only a Google account. It also makes it easy to share and review data with collaborators before exporting to CSV.
Considerations:
- Data is stored on Google's servers during editing — consider this for sensitive information
- No software installation required
- Like Excel, this is a manual process with no automation support
When to Use This Method
Spreadsheet-based conversion works well when you occasionally need to export Word table data to CSV and want to review the data before saving. For recurring conversions, multiple documents, or automated workflows, the Python method below is more efficient.
If you also need to convert DOCX (Word documents) to XLSX, you can refer to our Docx to XLSX conversion guide for a structured spreadsheet workflow.
3. Can You Use an Online Word to CSV Converter?
Yes. Several websites offer Word to CSV converter tools that let you upload a DOC or DOCX file and download a CSV file. These are suitable for quick, one-time conversions when you don't want to install any software.
However, online converters have notable limitations:
- Privacy — Your document is uploaded to a third-party server, which may not be acceptable for sensitive or proprietary data
- File size limits — Most free tools restrict uploads to 5–10 MB
- Table recognition — Some converters extract only the first table; others may misinterpret document structure
- No batch processing — You can convert only one file at a time
For sensitive data, recurring conversions, or batch processing, local methods (spreadsheet software or Python) are preferable.
4. Method 2 – Convert Word Tables to CSV Automatically with Python
If you need to convert Word files to CSV regularly, automate document processing, or handle large numbers of files, Python provides a more efficient solution. With Spire.Doc for Python, you can read Word documents, extract table data, and export it directly to CSV format — all without Microsoft Word installed.
Install Spire.Doc for Python
Install the library via pip:
pip install spire.doc
Import the required classes in your Python script:
from spire.doc import *
from spire.doc.common import *
Alternatively, you can download Spire.Doc for Python and integrate it manually.
Convert a Word Table to CSV
The following example loads a Word document, extracts the first table, reads its rows and cells, and writes the data to a CSV file.
import csv
from spire.doc import *
from spire.doc.common import *

document = Document()
document.LoadFromFile("Sample.docx")

section = document.Sections.get_Item(0)

for t in range(section.Tables.Count):

    table = section.Tables.get_Item(t)
    csv_data = []

    for r in range(table.Rows.Count):

        row = table.Rows.get_Item(r)
        row_data = []

        for c in range(row.Cells.Count):

            cell = row.Cells.get_Item(c)

            paragraphs = []

            for p in range(cell.Paragraphs.Count):

                text = cell.Paragraphs.get_Item(p).Text.strip()

                if text:
                    paragraphs.append(text)

            row_data.append(" ".join(paragraphs))

        csv_data.append(row_data)

    csv_path = f"table_{t + 1}.csv"

    with open(csv_path, "w", newline="", encoding="utf-8-sig") as f:
        csv.writer(f).writerows(csv_data)

document.Close()
How It Works
Document.LoadFromFile()loads the Word document into memory.section.Tables.get_Item(table_index)selects the table to export.- The script loops through every row and cell in the table using the Rows and Cells collections.
- Each table cell may contain one or more paragraphs. The script reads all paragraphs using
cell.Paragraphsand extracts their text content. - The extracted paragraph text is cleaned with
.strip()and combined into a single string for the CSV cell value. csv.writer()exports the collected table data to a standard CSV file that can be opened in Excel, Google Sheets, databases, or other data-processing tools.
Output Result
Below is a preview of the Word table and the generated CSV file:
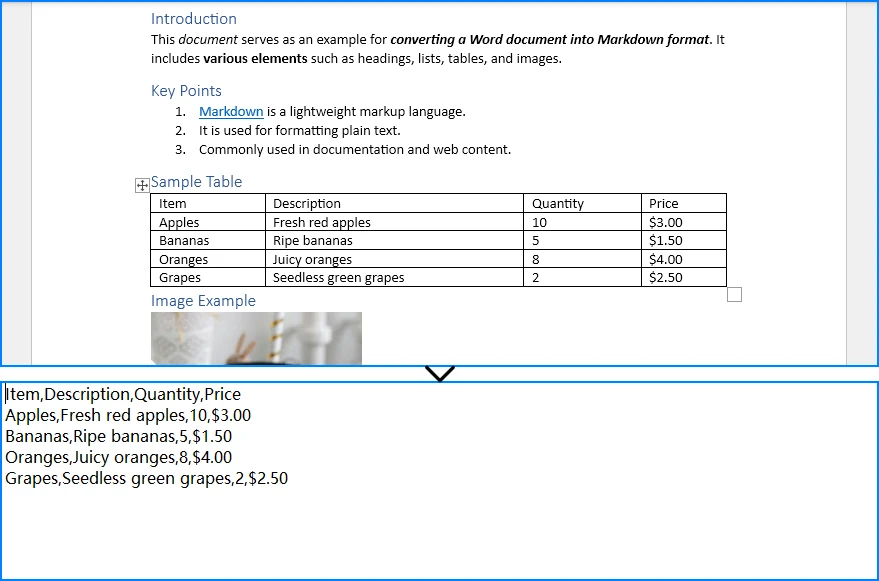
The output is a properly formatted .csv file containing the Word table data, ready for import into Excel, databases, or any system that accepts CSV input.
Extract Multiple Tables from a Word Document
If your Word document contains multiple tables, iterate through section.Tables and save each one as a separate CSV file:
for t in range(section.Tables.Count):
    word_table_to_csv(
        word_path,
        f"table_{t + 1}.csv",
        table_index=t
    )
Batch Convert Multiple Word Files
To process an entire folder of Word documents, loop through the files and extract the first table from each:
for filename in os.listdir(input_folder):
    if filename.lower().endswith((".doc", ".docx")):
        word_table_to_csv(
            os.path.join(input_folder, filename),
            os.path.join(
                output_folder,
                os.path.splitext(filename)[0] + ".csv"
            )
        )
Why Use Python for Word to CSV Conversion?
Python automation with Spire.Doc for Python offers clear advantages when you need to convert Word tables to CSV at scale:
| Advantage | Details |
|---|---|
| Batch conversion | Process dozens or hundreds of Word files in a single script |
| Automation | Schedule conversions to run automatically — daily, weekly, or on demand |
| Large datasets | Handle Word documents with large tables that are impractical to convert manually |
| Workflow integration | Integrate Word-to-CSV conversion into data pipelines, ETL processes, or CI/CD workflows |
| No Microsoft Word dependency | Spire.Doc for Python works without Microsoft Word installed |
| Data accuracy | Programmatic extraction eliminates copy-paste errors and ensures consistent results |
For more advanced usage, you can also check our guide on extracting tables from Word documents using Python.
5. FAQ
Can I convert Word to CSV directly?
No. Microsoft Word does not have a built-in option to save or export documents as CSV. Word's "Save As" dialog supports formats like DOCX, PDF, RTF, HTML, and plain text — but not CSV. To convert Word to CSV, you need to extract table data from the document and write it to a CSV file using spreadsheet software or Python automation.
Why can't Word save directly as CSV?
Word is a rich-text document format that supports paragraphs, images, headers, styles, and mixed content. CSV is a flat tabular format that stores only rows and columns of text separated by commas. Word cannot automatically determine how to flatten a complex document structure into a tabular layout, so it does not offer CSV as an export option. Only structured data — typically data in Word tables — can be meaningfully converted to CSV.
How do I convert a Word table to CSV?
You have two main options: (1) Spreadsheet software — Copy the Word table into Excel or Google Sheets, verify the data, and save or download as CSV. This is the most common approach for occasional use. (2) Python — Use Spire.Doc for Python to read the Word document, access the table programmatically, extract cell values, and write them to a CSV file. This is ideal for automation, batch processing, and recurring conversions.
Can I convert DOCX to CSV without Excel?
Yes. You can convert DOCX to CSV without Excel using: (1) Google Sheets — Paste the Word table data into a Google Sheets spreadsheet and download as CSV. (2) Online tools — Upload your DOCX file to a Word-to-CSV converter website and download the result. (3) Python — Use Spire.Doc for Python to read the DOCX file, extract table data, and write it to CSV. This works without any Microsoft Office software installed.
Is there a free Word to CSV converter?
Yes. There are free options in two categories: (1) Online converters — Many websites offer free Word-to-CSV conversion, though they typically have file size limits and raise privacy concerns since your data is uploaded to a third-party server. (2) Python scripts — You can write a free, local conversion script using Spire.Doc for Python (which offers a free version) and Python's built-in csv module. This keeps your data private and has no file size restrictions.
How do I extract data from a Word document to CSV in Python?
Use Spire.Doc for Python to load the Word document, access the table through the Sections and Tables collections, iterate through rows and cells to read each cell's text, and write the data to a CSV file using Python's standard csv.writer. The complete code example is provided in Method 2 above.
Does Spire.Doc for Python require Microsoft Word to be installed?
No. Spire.Doc for Python is a standalone library that creates, reads, and manipulates Word documents independently. It does not require Microsoft Word or any Office component to be installed on your system. This makes it suitable for server environments, automated workflows, and machines where Office is not available.
Conclusion
Converting Word to CSV means extracting structured table data from DOC or DOCX documents and saving it in a tabular format. Spreadsheet software (Excel or Google Sheets) provides a simple manual approach — copy the Word table, verify the data, and export as CSV. This works well for occasional conversions but does not scale to batch processing or recurring workflows.
Python automation with Spire.Doc for Python provides a reliable solution for converting Word tables to CSV programmatically. It reads DOC and DOCX files, extracts table data accurately, and writes CSV output — all without requiring Microsoft Word. For developers and organizations that regularly convert DOC or DOCX files to CSV, Spire.Doc for Python offers a reliable way to automate the entire process while preserving table data accurately.
You can apply for a 30-day free license to evaluate all features of Spire.Doc for Python.
See Also
How to Convert CSV to Word (Manual & Python Methods)
Table of Contents
- Why Convert CSV to Word?
- Method 1 – Copy and Paste CSV Data into Word
- Method 2 – Convert CSV to a Word Table Using Text-to-Table
- Method 3 – Use an Online CSV to Word Converter
- Limitations of Manual and Online CSV-to-Word Conversion
- Method 4 – Convert CSV to Word Automatically with Python
- Complete CSV to Word Python Example
- Why Use Spire.Doc for CSV-to-Word Conversion?
- CSV to Word Conversion Methods Compared
- FAQ
CSV files are widely used for storing and exchanging tabular data, but they aren't always the best format for sharing information. When you need to include spreadsheet data in a report, proposal, project document, or client deliverable, converting a CSV file to a Word document often provides better presentation and formatting options.
There are several ways to convert CSV to Word, ranging from simple manual techniques to dedicated CSV-to-Word converters and automated solutions. The best method depends on your workflow, the size of your data, and how often you need to perform the conversion.
In this guide, you'll learn four practical ways to convert CSV to Word documents, including manual methods, online CSV-to-Word converters, and a Python-based approach for converting CSV data into DOCX documents automatically. Whether you need a quick one-time conversion or a scalable solution for recurring tasks, you'll find an option that fits your needs.
Quick Navigation
- Why Convert CSV to Word?
- Method 1 – Copy and Paste CSV Data into Word
- Method 2 – Convert CSV to a Word Table Using Text-to-Table
- Method 3 – Use an Online CSV to Word Converter
- Limitations of Manual and Online CSV-to-Word Conversion
- Method 4 – Convert CSV to Word Automatically with Python
- Complete CSV to Word Python Example
- Why Use Spire.Doc for CSV-to-Word Conversion?
- CSV to Word Conversion Methods Compared
- FAQ
1. Why Convert CSV to Word?
You might wonder: why not just use Excel? After all, CSV files open natively in spreadsheet applications. While Excel is great for data analysis and calculations, Word documents serve different purposes. Word provides superior formatting for narrative reports, client deliverables, and print-ready documents where data needs to appear alongside explanatory text, headers, and styled layouts.
Common Use Cases
| Use Case | Why Word Over Excel |
|---|---|
| Business reports | Combine data tables with narrative analysis and executive summaries |
| Project documentation | Embed data within structured documents that include instructions and context |
| Client deliverables | Present data in branded, professionally formatted documents |
| Academic papers | Follow specific formatting guidelines (APA, MLA) with data integrated into the text |
| Mail merge preparation | Use CSV data as the source for personalized letters and labels in Word |
When you need to convert a CSV file to a Word document, the right method depends on how often you do it and how much formatting control you need.
2. Method 1 – Copy and Paste CSV Data into Word
The simplest way to bring CSV data into Word is to copy it from a spreadsheet and paste it directly. This method works well for small datasets and one-time tasks.
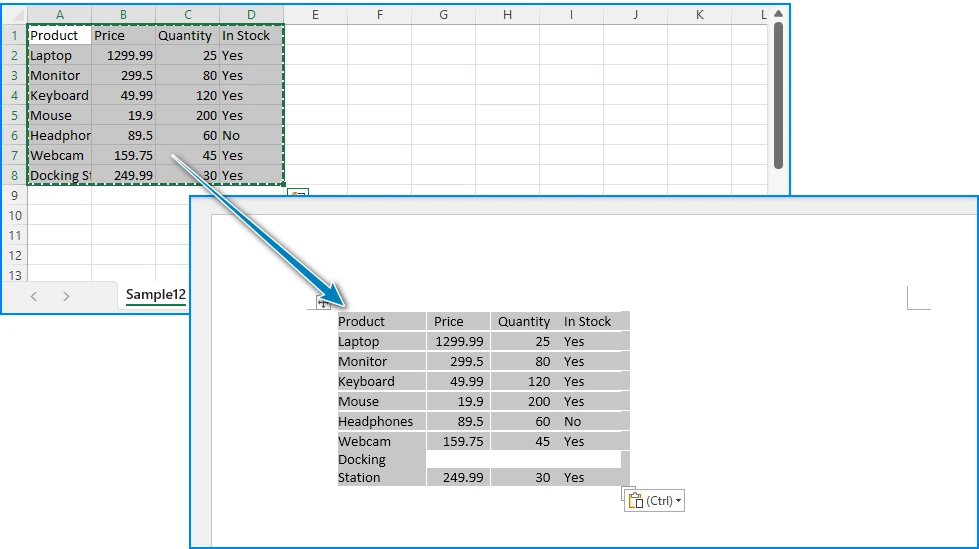
Step 1: Open the CSV File in Excel
Double-click your .csv file, or open Excel and use File > Open to load the CSV. Excel will automatically parse the comma-separated values into columns.
Step 2: Select the Data
Highlight the cells you want to include in your Word document. You can select the entire sheet by pressing Ctrl + A, or select a specific range.
Step 3: Paste into Word
Open Microsoft Word, place your cursor where you want the data, and press Ctrl + V. Word will automatically convert the tabular data into a Word table.
Step 4: Apply Table Formatting
Use Word's Table Design tab to apply a style, adjust column widths, and format headers.
Pros and Cons
| Aspect | Evaluation |
|---|---|
| Ease of use | Very easy — no special tools required |
| Speed | Fast for small datasets |
| Formatting control | Limited — formatting may break with large data |
| Scalability | Not suitable for files with hundreds or thousands of rows |
| Reproducibility | Manual process — hard to repeat consistently |
If you're also working with spreadsheet workflows, you may find our guide on converting CSV files to Excel helpful.
3. Method 2 – Convert CSV to a Word Table Using Text-to-Table
Word has a built-in feature that can convert delimited text directly into a table — no Excel required. This method is particularly relevant if you're searching for how to convert CSV to a Word table, since it uses Word's native Text-to-Table conversion.
Step 1: Open the CSV File in a Text Editor
Open your .csv file in Notepad, Notepad++, or any plain text editor. You'll see the raw comma-separated values.
Step 2: Copy the CSV Content
Select all the text (Ctrl + A) and copy it (Ctrl + C).
Step 3: Paste into Word as Plain Text
In Word, paste the content. It will appear as plain text with commas separating the values.
Step 4: Use Text-to-Table Conversion
Select the pasted text, then go to Insert > Table > Convert Text to Table. In the dialog box:
- Set Separate text at to Commas
- Adjust the number of columns if needed
- Click OK
Word will convert the comma-separated text into a properly structured table.
Step 5: Format the Table
Apply a table style from the Table Design tab, format the header row, and adjust column widths as needed.
Pros and Cons
| Aspect | Evaluation |
|---|---|
| Ease of use | Easy — no Excel needed, works entirely within Word |
| Formatting control | Medium — Word handles the table structure automatically |
| Scalability | Works for moderate-sized files; very large files may be slow |
| Accuracy | Good — Word correctly parses comma delimiters in most cases |
| Limitation | May misinterpret commas inside quoted fields (e.g., "Smith, John") |
If your data is already stored in Excel workbooks rather than CSV files, see our guide on converting Excel sheets to Word documents.
4. Method 3 – Use an Online CSV to Word Converter
If you don't have Excel or Word installed, or you just need a quick one-off conversion, an online CSV to Word converter can get the job done in seconds. Several free tools allow you to upload a CSV file and download a Word document.
How It Works
- Search for "CSV to Word converter online" in your browser
- Upload your
.csvfile to the converter website - Wait for the conversion to complete
- Download the generated
.docxfile
What to Look for in an Online Converter
When choosing an online CSV-to-Word converter, consider:
- File size limits
- Supported output formats (DOC vs DOCX)
- Data privacy policies
- Table formatting quality
- Batch conversion support
Pros and Cons
| Aspect | Evaluation |
|---|---|
| Ease of use | Very easy — no software installation required |
| Speed | Fast for small to medium files |
| Formatting control | Low — you get what the tool produces |
| Privacy | Concern — your data is uploaded to a third-party server |
| File size limits | Most tools impose upload size restrictions |
| Batch processing | Not supported — one file at a time |
When to Use an Online Converter
Online converters are a reasonable choice when you have a single, non-sensitive CSV file and just need a quick conversion. However, if your data contains personal information, financial records, or business-critical content, uploading it to a third-party service may not be appropriate.
If you need repeatable or large-scale conversions, automation is usually a better long-term solution.
5. Limitations of Manual and Online CSV-to-Word Conversion
Manual methods and online tools work for occasional use, but they break down when you need to process CSV files regularly or at scale. Here are the common challenges:
Common Challenges
- Repetitive work — If you convert CSV to Word every week or every day, manual copy-paste becomes tedious and error-prone.
- Large datasets — Word struggles to handle tables with thousands of rows pasted from Excel. Performance degrades and formatting breaks.
- Batch processing — When you need to convert multiple CSV files to Word documents, doing them one by one is impractical.
- Formatting consistency — Manual formatting varies each time. Headers, fonts, and table styles may look different across documents.
- Privacy concerns — Online converters require uploading your data to external servers, which may not be acceptable for sensitive information.
- Automated report generation — If reports need to be generated on a schedule (daily, weekly), manual conversion cannot keep up.
For these situations, Python automation provides a practical path forward — and the next section shows exactly how to implement it.
6. Method 4 – Convert CSV to Word Automatically with Python
Python is a natural choice for automating CSV-to-Word conversion. It has a built-in csv module for reading data, and with Spire.Doc for Python, you can create and format Word documents without requiring Microsoft Word to be installed.
This section walks through the complete implementation: installing the library, reading CSV data, building a Word table, and saving the result as DOCX.
Install Spire.Doc for Python
Install the library via pip:
pip install spire.doc
Import the required classes in your Python script:
from spire.doc import *
from spire.doc.common import *
Step 1: Read CSV Data
Python's built-in csv module reads CSV files into a list of rows:
import csv

csv_data = []
with open("sales_data.csv", "r", encoding="utf-8-sig") as file:
    reader = csv.reader(file)
    for row in reader:
        csv_data.append(row)
The first row typically contains column headers, and subsequent rows contain the data.
Step 2: Create a Word Document and Table
Create a new Word document, add a section, and initialize a table with the dimensions of your CSV data:
document = Document()
section = document.AddSection()

num_rows = len(csv_data)
num_cols = len(csv_data[0]) if csv_data else 0

table = section.AddTable(True)
table.ResetCells(num_rows, num_cols)
table.PreferredWidth = PreferredWidth(WidthType.Percentage, 100)
Step 3: Populate the Table with CSV Data
Iterate through the CSV rows and write each value into the corresponding cell. Format the header row with a distinct style:
for r in range(num_rows):
    row = table.Rows[r]
    row.Height = 22
    row.HeightType = TableRowHeightType.Exactly

    for c in range(num_cols):
        cell = row.Cells[c]
        paragraph = cell.AddParagraph()
        text_range = paragraph.AppendText(csv_data[r][c])
        cell.CellFormat.VerticalAlignment = VerticalAlignment.Middle

        if r == 0:
            row.IsHeader = True
            cell.CellFormat.Shading.BackgroundPatternColor = Color.get_DarkBlue()
            text_range.CharacterFormat.Bold = True
            text_range.CharacterFormat.TextColor = Color.get_White()
            text_range.CharacterFormat.FontSize = 11
            paragraph.Format.HorizontalAlignment = HorizontalAlignment.Center
        else:
            text_range.CharacterFormat.FontSize = 10
            if r % 2 == 0:
                cell.CellFormat.Shading.BackgroundPatternColor = Color.get_LightGray()
            else:
                cell.CellFormat.Shading.BackgroundPatternColor = Color.Empty()
This code formats the first row as a header with a dark blue background and white bold text, and applies alternating row colors for readability.
Step 4: Save as DOCX
Save the generated Word document:
document.SaveToFile("SalesReport.docx", FileFormat.Docx)
document.Close()
Below is a preview of the CSV data and the generated Word document:
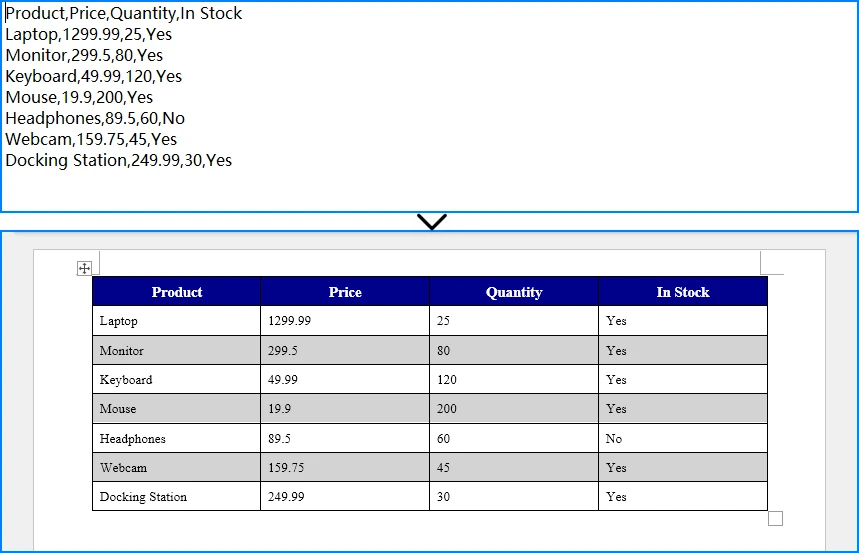
The output is a properly formatted .docx file containing your CSV data in a Word table.
For more advanced table customization options, check out our guide on creating and formatting Word tables with Python.
7. Complete CSV to Word Python Example
Here is the complete, runnable script that reads a CSV file and converts it to a Word document with a title, formatted table, alternating row colors, and table borders.
import csv
from spire.doc import *
from spire.doc.common import *

def csv_to_word(csv_path, output_path, title="Data Report"):
    csv_data = []
    with open(csv_path, "r", encoding="utf-8-sig") as file:
        reader = csv.reader(file)
        for row in reader:
            csv_data.append(row)

    if not csv_data:
        print("CSV file is empty.")
        return

    num_rows = len(csv_data)
    num_cols = len(csv_data[0])

    document = Document()
    section = document.AddSection()

    title_para = section.AddParagraph()
    title_range = title_para.AppendText(title)
    title_range.CharacterFormat.FontSize = 18
    title_range.CharacterFormat.Bold = True
    title_para.Format.HorizontalAlignment = HorizontalAlignment.Center
    title_para.Format.AfterSpacing = 12

    table = section.AddTable(True)
    table.ResetCells(num_rows, num_cols)
    table.PreferredWidth = PreferredWidth(WidthType.Percentage, 100)

    for r in range(num_rows):
        row = table.Rows[r]
        row.Height = 22
        row.HeightType = TableRowHeightType.Exactly

        for c in range(num_cols):
            cell = row.Cells[c]
            paragraph = cell.AddParagraph()
            text_range = paragraph.AppendText(csv_data[r][c])
            cell.CellFormat.VerticalAlignment = VerticalAlignment.Middle

            if r == 0:
                row.IsHeader = True
                cell.CellFormat.Shading.BackgroundPatternColor = Color.get_DarkBlue()
                text_range.CharacterFormat.Bold = True
                text_range.CharacterFormat.TextColor = Color.get_White()
                text_range.CharacterFormat.FontSize = 11
                paragraph.Format.HorizontalAlignment = HorizontalAlignment.Center
            else:
                text_range.CharacterFormat.FontSize = 10
                if r % 2 == 0:
                    cell.CellFormat.Shading.BackgroundPatternColor = Color.get_LightGray()
                else:
                    cell.CellFormat.Shading.BackgroundPatternColor = Color.Empty()

    table.Format.Borders.Vertical.BorderType = BorderStyle.Single
    table.Format.Borders.Vertical.LineWidth = 0.5
    table.Format.Borders.Horizontal.BorderType = BorderStyle.Single
    table.Format.Borders.Horizontal.LineWidth = 0.5

    document.SaveToFile(output_path, FileFormat.Docx)
    document.Close()
    print(f"Word document saved to: {output_path}")

csv_to_word("sales_data.csv", "SalesReport.docx", "Q4 Sales Report")
How It Works
csv.readerreads the CSV file row by row, handling different encodings viautf-8-sig(which handles BOM markers).Document()creates a blank Word document.AddSection()adds a section (page) to the document.AddTable(True)creates a new table with auto-fit enabled.ResetCells()sets the exact dimensions.AppendText()writes each CSV value into the corresponding cell as a text range.- Header formatting applies a dark blue background, white bold text, and center alignment to the first row.
- Alternating row colors use light gray for even rows and no fill for odd rows, improving readability.
SaveToFile()exports the document as a.docxfile.
8. Why Use Spire.Doc for CSV-to-Word Conversion?
Spire.Doc for Python offers several technical advantages for developers who need to generate Word documents from CSV data programmatically.
Advantages
| Advantage | Details |
|---|---|
| No Microsoft Word dependency | Create and manipulate DOCX files without installing Microsoft Word on the server or machine |
| Comprehensive table formatting | Control cell shading, borders, alignment, row heights, column widths, and table styles |
| Automated report generation | Build scripts that convert CSV to Word on a schedule, integrating with data pipelines |
| Batch document processing | Process multiple CSV files in a loop, generating separate Word documents for each |
| Python integration | Works seamlessly with Python's standard csv module and other data processing libraries |
| Full DOCX support | Generate documents compatible with Microsoft Word, LibreOffice, and Google Docs |
Key API Classes
Document— Represents a Word document. Use it to create new documents or load existing ones.Section— Represents a section (page) within a document. Contains paragraphs, tables, and other content.Table— Represents a table in a Word document. Supports row/column manipulation, styling, and borders.TableRow/TableCell— Provide access to individual rows and cells for formatting and content insertion.Paragraph/TextRange— Handle text content within cells, including font, size, color, and alignment.
9. CSV to Word Conversion Methods Compared
| Method | Ease of Use | Batch Processing | Formatting Control | Privacy | Best For |
|---|---|---|---|---|---|
| Copy & Paste | ★★★★★ | ✗ | Low | ✓ | One-time, small datasets |
| Text-to-Table | ★★★★☆ | ✗ | Medium | ✓ | No-Excel workflows, moderate data |
| Online Converter | ★★★★★ | ✗ | Low | ✗ | Quick one-off conversions |
| Python + Spire.Doc | ★★★☆☆ | ✓ | High | ✓ | Recurring tasks, batch processing, automation |
Summary: Manual methods and online tools are quick and accessible but don't scale. Python automation with Spire.Doc requires a small setup investment but pays off when you need consistent, repeatable, or batch CSV-to-Word conversion.
10. FAQ
How do I convert a CSV file to a Word document?
You can convert a CSV file to a Word document using several methods: (1) Open the CSV in Excel, copy the data, and paste it into Word; (2) Use Word's Text-to-Table feature to convert comma-separated text directly into a table; (3) Use an online CSV to Word converter for a quick one-off conversion; (4) Use Python with Spire.Doc for Python to automate the conversion programmatically. The Python approach is best for recurring tasks or batch processing.
Can I convert CSV to DOCX automatically?
Yes. You can automate CSV-to-DOCX conversion using Python. Read the CSV data with Python's built-in csv module, then use Spire.Doc for Python to create a Word document, populate a table with the CSV data, and save it as a .docx file. This approach works without Microsoft Word installed and can be scheduled to run automatically.
How do I insert CSV data into a Word table?
To insert CSV data into a Word table manually, you can use Word's Insert > Table > Convert Text to Table feature — paste the CSV text, then convert it using commas as the delimiter. For programmatic insertion, use Python: read the CSV with the csv module, create a table in a Word document using Spire.Doc for Python, and iterate through the CSV rows to populate each cell.
Is there a free CSV to Word converter online?
Yes, several websites offer free CSV-to-Word conversion. However, online converters have limitations: file size restrictions, limited formatting control, and privacy concerns since your data is uploaded to a third-party server. For sensitive data or recurring conversions, a local Python solution with Spire.Doc for Python is a more reliable and private alternative.
Can Python convert CSV files to Word documents?
Yes, Python can convert CSV files to Word documents. Using Spire.Doc for Python, you can read CSV data with the standard csv module, create a Word document, add a formatted table, populate it with the CSV content, and save the result as a DOCX file. This works without Microsoft Word and supports batch processing of multiple CSV files.
Does Spire.Doc for Python require Microsoft Word to be installed?
No. Spire.Doc for Python is a standalone library that creates and manipulates Word documents independently. It does not require Microsoft Word or any Office component to be installed on your system. This makes it suitable for server environments and automated workflows.
Conclusion
Converting CSV to Word is a common task with multiple approaches. Manual methods — copy-and-paste and Word's Text-to-Table feature — work well for occasional use with small datasets. Online converters offer convenience for quick, one-off tasks but raise privacy concerns and lack formatting control. None of these options scale to batch processing, scheduled report generation, or scenarios requiring consistent formatting across many documents.
Python automation with Spire.Doc for Python provides a reliable solution for converting CSV to DOCX programmatically. It reads CSV data, creates formatted Word tables, and generates professional documents without requiring Microsoft Word — making it ideal for automated workflows, batch processing, and server-side document generation.
You can apply for a 30-day free license to evaluate all features of Spire.Doc for Python.
See Also
How to Export Excel to JSON: Online Tools & Python
Table of Contents
If you've ever needed to upload spreadsheet data to a web application, build a REST API, or migrate data into a NoSQL database, you've probably encountered a common problem: Excel doesn't provide a built-in way to save data as JSON.
Fortunately, there are several ways to export Excel to JSON, ranging from quick online converters to programmatic solutions in Python. The best method depends on your file size, security requirements, and whether you need to preserve workbook structures such as multiple worksheets or formula results.
In this guide, we'll compare the most practical approaches and help you choose the right solution for your scenario.
Quick Navigation
- Why Export Excel to JSON?
- What Does Excel Data Look Like in JSON?
- Method 1: Export Excel to JSON Online
- Method 2: Export Excel to JSON in Python with Pandas
- Method 3: Export Excel to JSON in Python with Spire.XLS
- Common Challenges When Converting Excel to JSON
- Which Method Should You Choose?
- FAQ
Why Export Excel to JSON?
Excel is the most widely used tool for storing structured data, but modern applications communicate in JSON. Converting between these formats is essential whenever spreadsheet data needs to move into a web context.
Common use cases include:
- Sending spreadsheet data to web applications
- Importing data into REST APIs
- Working with JavaScript frameworks like React, Vue, or Angular
- Migrating data into NoSQL databases like MongoDB
- Exchanging data between systems in integration pipelines
Excel has no native "Save as JSON" option, so you need an external tool or library to bridge this gap.
What Does Excel Data Look Like in JSON?
Excel rows are typically converted into JSON objects, while column headers become object keys.
Excel Data:
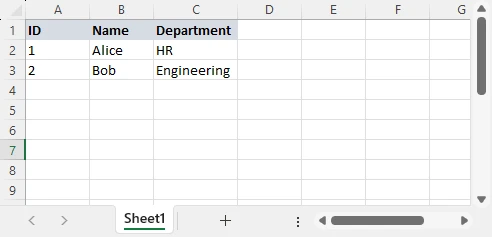
JSON Output:
[
  {"ID": 1, "Name": "Alice", "Department": "HR"},
  {"ID": 2, "Name": "Bob", "Department": "Engineering"}
]
Each row becomes a JSON object, each column header becomes a key, and the entire worksheet becomes an array. Both XLS and XLSX files follow the same mapping pattern.
Method 1: Export Excel to JSON Online
Online Excel-to-JSON converters provide the fastest solution for one-time conversions without requiring software installation or programming knowledge.
Steps to Convert Excel to JSON Online
-
Upload the Excel file: Select your .xlsx or .xls file from local storage. Most platforms support drag-and-drop.
-
Configure options: Specify whether to include headers, select specific worksheets, or customize output formatting.
-
Convert and download: The server processes your file and generates JSON output. Retrieve the converted file or copy the result.
Recommended Online Excel to JSON Converters
Different tools excel at different scenarios:
| Tool | Best For | File Size Limit | Special Features |
|---|---|---|---|
| TableConvert | Table-based JSON structures | 10MB | Custom JSON formatting, nested objects |
| Data Formatter Pro | Quick conversion in the browser | 5MB | Browser-side conversion, no upload required |
| JSON Editor Online | Visual editing after conversion | 5MB | Built-in JSON validator and formatter |
Advantages and Limitations
Advantages:
- No installation required — access from any browser
- Fast for small files under 5MB
- Beginner-friendly with graphical interfaces
Limitations:
- File size limits: Most free converters restrict uploads to 5-10MB
- Privacy concerns: Uploading business data to external servers introduces compliance risks
- Formula handling: Online converters export formula results as static values
- Multiple worksheets: Many tools export only the active worksheet or lose sheet structure
Online converters work well for quick, non-sensitive conversions. For anything involving large files, confidential data, or complex workbooks, you need a programmatic solution.
Method 2: Export Excel to JSON in Python with Pandas
Pandas is Python's most popular data analysis library, offering straightforward Excel-to-JSON conversion through its DataFrame API. This method suits data scientists and analysts who already use Pandas for data manipulation.
Install Pandas and Dependencies
pip install pandas openpyxl
For legacy .xls files, also install xlrd:
pip install xlrd
Read Excel and Export JSON
import pandas as pd

# Load Excel file into DataFrame
df = pd.read_excel("sales_report.xlsx")

# Export DataFrame to JSON
df.to_json(
    "sales_report.json",
    orient="records",
    indent=4
)

print("Excel data exported to JSON successfully")
Below is an example of the Excel worksheet and JSON output:
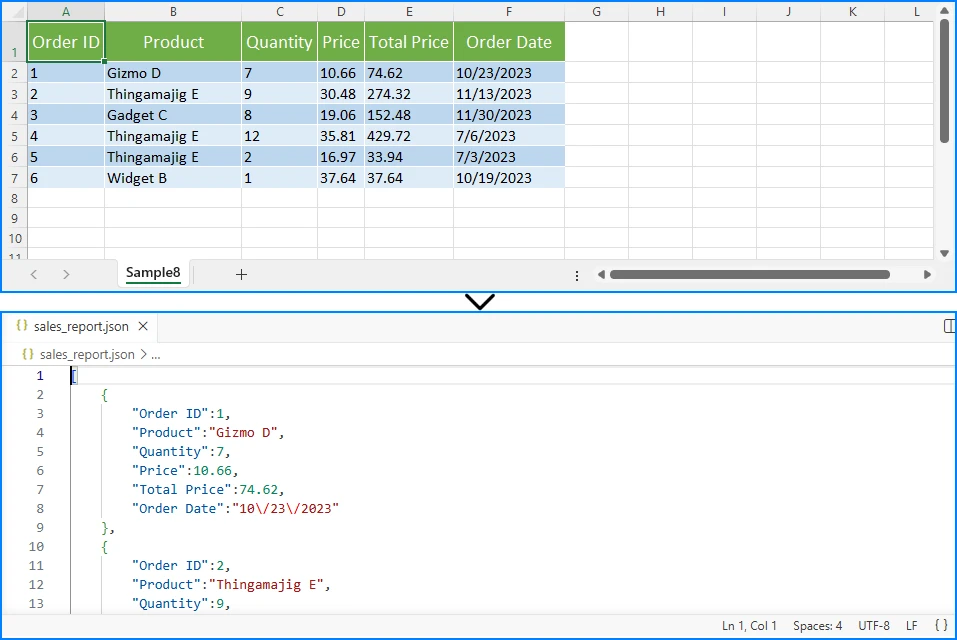
Key Parameters:
orient="records": Structures output as an array of objects (most common format)indent=4: Pretty-prints JSON with 4-space indentation
Understanding JSON Output Options
Pandas provides multiple output orientations through the orient parameter:
orient="records" (Recommended for APIs):
[
  {"ID": 1, "Name": "Alice", "Department": "HR"},
  {"ID": 2, "Name": "Bob", "Department": "Engineering"}
]
orient="index":
{
  "0": {"ID": 1, "Name": "Alice", "Department": "HR"},
  "1": {"ID": 2, "Name": "Bob", "Department": "Engineering"}
}
orient="split":
{
  "columns": ["ID", "Name", "Department"],
  "index": [0, 1],
  "data": [[1, "Alice", "HR"], [2, "Bob", "Engineering"]]
}
The records orientation is the most widely compatible format for REST APIs and JavaScript applications.
Handling Specific Worksheets
import pandas as pd

# Read specific worksheet by name
df = pd.read_excel("workbook.xlsx", sheet_name="Q4_Sales")

# Read specific worksheet by index (0-based)
df = pd.read_excel("workbook.xlsx", sheet_name=0)

df.to_json("q4_sales.json", orient="records", indent=4)
Pandas excels for data analysis where you need to filter, aggregate, or transform data before export. However, it loads entire files into memory and cannot preserve formula logic, making it less suitable for large files or enterprise scenarios.
Excel-to-JSON conversion is often only one step in a data workflow. If you need to import JSON data back into spreadsheets, see our tutorial on converting JSON to Excel for a complete two-way data exchange solution.
Method 3: Export Excel to JSON in Python with Spire.XLS
Spire.XLS for Python provides a professional Excel processing library designed for scenarios where Pandas falls short. It handles complex workbook structures, preserves formula calculations, and processes large files efficiently without loading entire datasets into memory.
Install Spire.XLS for Python
pip install Spire.XLS
Export Excel Data to JSON
from spire.xls import Workbook
import json

# Create workbook instance
workbook = Workbook()
workbook.LoadFromFile("sales_data.xlsx")

# Get the first worksheet
sheet = workbook.Worksheets[0]

# Extract data into structured format
data = []
headers = []

# Read headers from first row
for col in range(sheet.AllocatedRange.Columns.Count):
    cell = sheet.AllocatedRange.Rows[0].Cells[col]
    headers.append(cell.Value)

# Read data rows
for row_idx in range(1, sheet.AllocatedRange.Rows.Count):
    row_data = {}
    row = sheet.AllocatedRange.Rows[row_idx]

    for col_idx in range(len(headers)):
        cell = row.Cells[col_idx]
        row_data[headers[col_idx]] = cell.Value

    data.append(row_data)

# Export to JSON file
with open("sales_data.json", "w", encoding="utf-8") as f:
    json.dump(data, f, indent=4, ensure_ascii=False)

print(f"Exported {len(data)} records to JSON")
workbook.Dispose()
The conversion result is shown below:
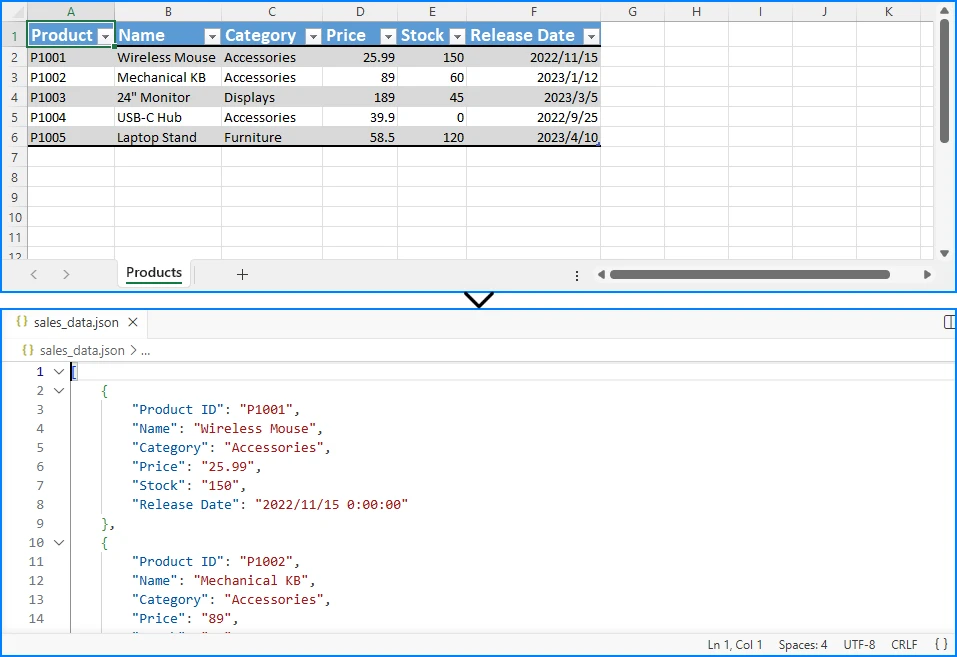
Key Points
-
Load Workbook: Use
Workbook.LoadFromFile()to load the Excel file into memory. This method supports both XLS and XLSX formats. -
Access Worksheet: Retrieve a specific worksheet using
workbook.Worksheets[index], where index 0 refers to the first sheet. -
Extract Headers: Iterate through the first row of the allocated range (
sheet.AllocatedRange.Rows[0]) to collect column headers, which will serve as JSON object keys. -
Read Data Rows: Loop through remaining rows (starting from index 1) and extract cell values. For each row, create a dictionary mapping headers to cell values.
-
Export to JSON: Use Python's built-in
json.dump()function to write the data structure to a JSON file with proper formatting (indent=4) and Unicode support (ensure_ascii=False).
JSON is not the only format used for data exchange. If you need a simpler, tabular format for reporting or system integration, see our guide on converting Excel to CSV in Python.
Export Multiple Worksheets to JSON
One of Spire.XLS's key advantages is handling multi-sheet workbooks while preserving structure:
from spire.xls import Workbook
import json

workbook = Workbook()
workbook.LoadFromFile("quarterly_reports.xlsx")

workbook_data = {}

for sheet_index in range(workbook.Worksheets.Count):
    sheet = workbook.Worksheets[sheet_index]
    sheet_name = sheet.Name

    sheet_data = []
    headers = []

    last_row = sheet.LastRow
    last_col = sheet.LastColumn

    if last_row > 0 and last_col > 0:
        # Read headers
        for col in range(1, last_col + 1):
            cell_value = sheet.Range[1, col].Value
            headers.append(cell_value if cell_value else f"Column{col}")

        # Read data rows
        for row in range(2, last_row + 1):
            row_data = {}
            has_data = False

            for col in range(1, last_col + 1):
                cell = sheet.Range[row, col]
                value = cell.Value

                # Handle formula cells - export calculated results
                if cell.HasFormula:
                    value = cell.FormulaValue

                row_data[headers[col - 1]] = value
                if value is not None and str(value).strip():
                    has_data = True

            if has_data:
                sheet_data.append(row_data)

    workbook_data[sheet_name] = sheet_data
    print(f"Processed: {sheet_name} ({len(sheet_data)} rows)")

with open("quarterly_reports.json", "w", encoding="utf-8") as f:
    json.dump(workbook_data, f, indent=4, ensure_ascii=False)

print(f"Exported {workbook.Worksheets.Count} worksheets to JSON")
workbook.Dispose()
Output Structure:
{
  "Q1_Sales": [
    {"Product": "Widget A", "Revenue": 15000, "Units": 500},
    {"Product": "Widget B", "Revenue": 22000, "Units": 730}
  ],
  "Q2_Sales": [
    {"Product": "Widget A", "Revenue": 18000, "Units": 600},
    {"Product": "Widget B", "Revenue": 25000, "Units": 830}
  ]
}
Benefits of Using Spire.XLS
- Preserve workbook structure: Maintain worksheet organization in the JSON output
- Handle formulas correctly: Export calculated values from formula cells
- Memory-efficient processing: Handle large workbooks without loading entire files into memory
- No Excel dependency: Process files without requiring Microsoft Excel installation
- Cross-platform: Run on Windows, Linux, and macOS
Pandas vs Spire.XLS Comparison
| Feature | Pandas | Spire.XLS |
|---|---|---|
| Open Source | ✓ | ✗ |
| Data Analysis | ✓ | ✓ |
| Formula Results | Limited | ✓ |
| Multiple Worksheets | Basic | ✓ |
| Enterprise Automation | Limited | ✓ |
| Memory Efficiency | Moderate | ✓ |
| Large File Support | Limited | ✓ |
For systems that require hierarchical or schema-based data exchange, you can also learn how to convert Excel to XML in Python.
Common Challenges When Converting Excel to JSON
Multiple Worksheets
Workbooks often contain multiple related worksheets. Exporting all sheets as a single flat array loses organizational structure. Use a library like Spire.XLS to preserve worksheet names as top-level keys in your JSON output.
Formula Cells
Excel formulas calculate values dynamically. When exporting to JSON, you typically want the calculated result, not the formula string. Spire.XLS provides the FormulaValue property to export computed values, while Pandas reads displayed values by default.
Date Formatting
Excel stores dates as numeric serial dates. Without explicit handling, dates may export as meaningless numbers like 45662 instead of "2026-05-01". Convert date columns to ISO 8601 strings for JSON compatibility.
Empty Cells and Null Values
Empty cells can be represented as null, omitted entirely, or exported as empty strings. Use null for missing values and empty strings for explicitly empty cells to preserve data intent.
Which Method Should You Choose?
| Scenario | Recommended Method | Rationale |
|---|---|---|
| Quick one-time conversion | Online converter | No setup, fastest for occasional use |
| Data analysis workflows | Pandas | Integrates with analysis pipelines |
| Complex workbooks with multiple sheets | Spire.XLS | Preserves structure, handles formulas |
| Large files (>100MB) | Spire.XLS | Memory-efficient processing |
| Sensitive/confidential data | Spire.XLS (local) | No external server transmission |
FAQ
Can Excel save directly as JSON?
No. Excel's Save As dialog supports XLSX, XLS, CSV, PDF, and XML, but not JSON. You need an online converter, a Python library, or a custom script to export Excel data to JSON.
How do I export Excel data to a JSON file?
Choose your tool, load the Excel file, extract the worksheet data, transform rows to JSON objects with column headers as keys, and write the output to a .json file.
With Pandas:
import pandas as pd
df = pd.read_excel("data.xlsx")
df.to_json("data.json", orient="records", indent=4)
What is the best Python library for converting Excel to JSON?
- Pandas: Best for data analysis workflows with powerful transformations, but loads entire files into memory and cannot preserve formulas.
- Spire.XLS: Best for enterprise scenarios with large files, multiple worksheets, and formula handling.
How can I export multiple worksheets to JSON?
Use Spire.XLS to iterate through worksheets and organize them in a dictionary with sheet names as keys:
from spire.xls import Workbook
import json

workbook = Workbook()
workbook.LoadFromFile("multi_sheet.xlsx")

result = {}
for sheet in workbook.Worksheets:
    sheet_data = []  # Extract sheet data
    # ... extraction logic ...
    result[sheet.Name] = sheet_data

with open("output.json", "w") as f:
    json.dump(result, f, indent=4)
Can formulas be preserved during Excel-to-JSON conversion?
Formulas themselves cannot be preserved in JSON since JSON is a static data format. However, you can export the calculated results of formulas. Use Spire.XLS's FormulaValue property to get computed values instead of formula strings.
How do I handle large Excel files when exporting to JSON?
Avoid Pandas for large files — it loads everything into memory. Use Spire.XLS for memory-efficient cell-by-cell access. For very large datasets, consider line-delimited JSON (JSONL) format, where each line is a separate JSON object, enabling streaming processing.
Conclusion
Exporting Excel to JSON bridges the gap between spreadsheet data and modern applications. For quick conversions, online tools get the job done without any setup. When you need data analysis capabilities, Pandas provides powerful transformations. For enterprise scenarios with large files, multiple worksheets, or formula handling, Spire.XLS delivers the control and precision you need. Choose based on your file size, complexity, and workflow requirements.
Further Reading:
How to Download / Export Excel Files in JavaScript & React
Modern web applications often need to generate downloadable Excel reports directly in the browser without relying on backend services. Whether you're building dashboards, reporting tools, or data-heavy business applications, browser-based spreadsheet export has become a common frontend requirement.
The challenge lies in creating Excel files that work across different browsers while maintaining formatting, supporting multiple output formats, and ensuring fast downloads—all without sending sensitive data to a server. Traditional approaches often require complex server-side processing or rely on limited client-side libraries.
Spire.XLS for JavaScript enables developers to generate, export, and download Excel files using JS entirely in the browser using WebAssembly technology. This approach provides true client-side Excel generation with support for multiple formats including XLS, XLSX, XLSB, ODS, PDF, XML, and XPS.
This article demonstrates how to generate and download Excel files in modern JavaScript and React applications using browser-side processing with Spire.XLS for JavaScript. We'll cover basic file generation, stream-based exports, React integration, and HTML table conversion with practical code examples.
Quick Navigation
- Why Export Excel in Browser
- Install Spire.XLS for JavaScript
- Download Excel File in JavaScript
- Export HTML Table to Excel
- React JS Export Excel Example
- About Client-Side Excel Export
- Troubleshooting
- Conclusion
- FAQ
Why Export Excel in Browser
Browser-side Excel export provides significant advantages over traditional server-side approaches:
- Enhanced Privacy – Sensitive data never leaves the client device, reducing security risks and compliance concerns
- Faster Downloads – Eliminating server round-trips reduces latency and improves user experience
- No Server-Side Processing – Reduces backend infrastructure costs and eliminates server bottlenecks
- Works Offline – Client-side generation functions even without network connectivity
- Scalable Architecture – Each user's browser handles their own export, distributing computational load
- Framework Agnostic – Works seamlessly with React, Vue, Angular, and vanilla JavaScript applications
By implementing Excel export functionality in the browser, developers can create responsive, secure, and cost-effective solutions that scale naturally with user demand.
Install Spire.XLS for JavaScript
Before generating and downloading Excel files in JavaScript, you need to install Spire.XLS for JavaScript and configure it in your development environment.
Installation via npm
Spire.XLS for JavaScript can be installed via npm:
npm i spire.xls
After installation, include the library in your project:
import { Workbook } from '@e-iceblue/spire.xls';
Note: The current WebAssembly runtime is provided through the spire.office package structure internally, even when installing spire.xls from npm. This is why initialization imports reference /node_modules/spire.office/.
Manual Installation
Alternatively, you can download the package from the e-iceblue website and copy the dependencies to your project directory.
For detailed setup instructions, refer to the Getting Started with Spire.XLS for JavaScript.
Initialize the WASM Module
Before using Spire.XLS, you must initialize the WebAssembly module. The initialization process loads required resources and sets up the runtime:
// Import and initialize the common module first
import('/node_modules/spire.office/spire.common.js').then(async (commonModule) => {
    // Initialize the WASM runtime
    await commonModule.initializeWasm();

    // Load the XLS module
    await import('/node_modules/spire.office/spire.xls.js');

    console.log('Spire.XLS ready');
});
Important Notes:
- Initialization is required before accessing
window.spirexlsorwindow.xlswasm - The browser downloads required WebAssembly resources during first load
- Always verify the module exists before performing Excel operations
Version Note: This article uses spire.office v11.4.1+. The module is accessed via window.spirexls or window.xlswasm. Older examples using window.wasmModule.spirexls may require updates.
Spire.XLS for JavaScript integrates seamlessly with all major frontend frameworks and build tools:
- React – Use with hooks (
useState,useEffect) for state-driven Excel export components - Vue.js – Integrate with Vue's reactive data system and lifecycle methods
- Angular – Compatible with Angular services and dependency injection patterns
- Next.js – Works in client-side components for server-rendered React applications
The WebAssembly module loads once at application initialization and can be shared across components, making it efficient for multi-page applications regardless of the framework choice.
Download Excel File in JavaScript
The following example demonstrates how to generate an Excel file with Spire.XLS for JavaScript and download it directly in the browser.
Create and Download an XLSX File
// Ensure the WASM module has been initialized
if (!window.spirexls && !window.xlswasm) {
    console.error("Spire.XLS is not initialized.");
    return;
}

// Get the initialized WebAssembly module
const wasmModule = window.spirexls || window.xlswasm;

// Create a new workbook
const workbook = new wasmModule.Workbook();
const worksheet = workbook.Worksheets.get(0);

// Create sample data
const products = [
    ["Product", "Quantity", "Price"],
    ["Laptop", 10, 999.99]
    ["Mouse", 50, 24.99]
]

// Insert data into the worksheet
for (let i = 0; i < products.length; i++) {
    for (let j = 0; j < products[i].length; j++) {
        if (typeof products[i][j] === "string") {
            worksheet.Range.get({ row: i + 1, column: j + 1 }).Text = products[i][j];
        }
        else {
            worksheet.Range.get({ row: i + 1, column: j + 1 }).NumberValue = products[i][j];
        }
    }
}

// Add a total column
worksheet.Range.get({ row: 1, column: products[0].length + 1 }).Text = "Total";
worksheet.Range.get({ row: 2, column: products[0].length + 1 }).Formula = "=B2*C2";
worksheet.Range.get({ row: 3, column: products[0].length + 1 }).Formula = "=B3*C3";

// Save the workbook to the virtual file system (VFS)
const outputFileName = "Report.xlsx";

workbook.SaveToFile({
    fileName: outputFileName,
    version: wasmModule.ExcelVersion.Version2016
});

// Release workbook resources
workbook.Dispose();

// Read the generated file from VFS
const fileArray =
    window.dotnetRuntime.Module.FS.readFile(outputFileName);

// Create a Blob object
const excelBlob = new Blob(
    [fileArray],
    {
        type: "application/vnd.openxmlformats-officedocument.spreadsheetml.sheet"
    }
);

// Trigger browser download
const url = URL.createObjectURL(excelBlob);
const a = document.createElement("a");
a.href = url;
a.download = outputFileName;
document.body.appendChild(a);
a.click();
document.body.removeChild(a);
URL.revokeObjectURL(url);
Below is a preview of the generated XLSX file:
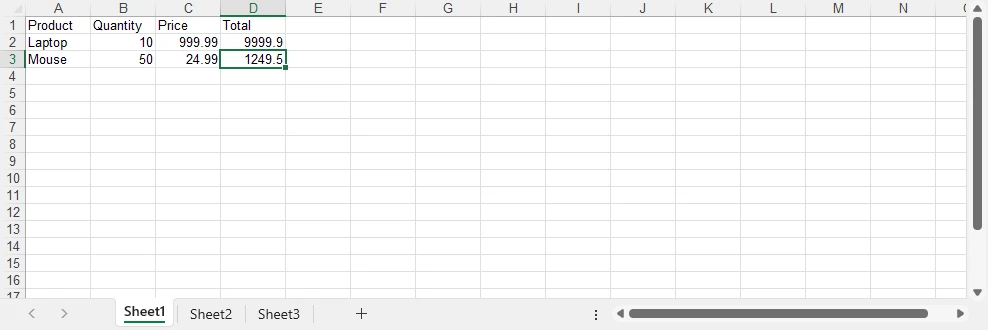
How the Export Process Works
- Create a workbook and populate worksheet data
- Save the workbook into the WebAssembly virtual file system (VFS)
- Read the generated XLSX file from VFS
- Convert the file data into a Blob object
- Trigger the browser download using a temporary URL
About the Virtual File System (VFS)
The file generated by SaveToFile() is stored in the WebAssembly virtual file system rather than the user's physical disk. This in-memory file system allows Spire.XLS to perform standard file operations securely inside the browser environment. The downloaded XLSX file is created after reading the generated file data from VFS and converting it into a browser Blob object.
Advantages of This Approach
- Works entirely in the browser
- No server-side processing required
- Uses standard browser Blob download APIs
- Supports direct XLSX file generation with Spire.XLS
If you also need to work with lightweight data exchange formats, you can further explore how to convert Excel files to CSV and import CSV data into Excel using JavaScript.
Export HTML Tables to Excel in JavaScript
In dashboard and reporting applications, business data is often displayed as HTML tables. Instead of rebuilding spreadsheet structures manually, you can directly convert existing frontend tables into Excel workbooks using Spire.XLS for JavaScript.
The following example demonstrates a complete browser-side workflow that:
- Reads an existing HTML table from the page
- Converts the HTML table into an Excel workbook
- Applies Excel-native formatting
- Downloads the generated XLSX file directly in the browser
HTML Table Export Example
async function exportTableToExcel() {

    if (!window.spirexls && !window.xlswasm) {
        alert("Spire.XLS module not loaded yet.");
        return;
    }

    const button = document.getElementById("exportBtn");

    button.disabled = true;
    button.innerText = "Exporting...";

    const wasmModule = window.spirexls || window.xlswasm;

    try {

        // Get HTML table
        const tableHtml =
            document.getElementById("salesTable").outerHTML;

        // Remove inline styles
        const safeTableHtml =
            tableHtml.replace(/style="[^"]*"/g, '');

        const htmlContent = `
            <!DOCTYPE html>
            <html>
            <head>
                <meta charset="UTF-8">
            </head>
            <body>
                ${safeTableHtml}
            </body>
            </html>
        `;

        const htmlFileName = "Table.html";

        window.dotnetRuntime.Module.FS.writeFile(
            htmlFileName,
            htmlContent
        );

        const workbook = new wasmModule.Workbook();

        workbook.LoadFromHtml(htmlFileName);

        const sheet = workbook.Worksheets.get(0);

        const lastRow = Number(sheet.LastRow);
        const lastCol = Number(sheet.LastColumn);

        const headerRow =
            sheet.Range.get_Item(1, 1, 1, lastCol);

        headerRow.BuiltInStyle =
            wasmModule.BuiltInStyles.Heading3;

        for (let i = 2; i <= lastRow; i++) {

            const row =
                sheet.Range.get_Item(i, 1, i, lastCol);

            row.BuiltInStyle =
                i % 2 === 0
                    ? wasmModule.BuiltInStyles.Accent3_20
                    : wasmModule.BuiltInStyles.Accent3_60;
        }

        for (let j = 1; j <= lastCol; j++) {
            sheet.AutoFitColumn(j);
        }

        const outputFileName = "SalesReport.xlsx";

        workbook.SaveToFile({
            fileName: outputFileName,
            version: wasmModule.ExcelVersion.Version2016
        });

        workbook.Dispose();

        const fileData =
            window.dotnetRuntime.Module.FS.readFile(outputFileName);

        const blob = new Blob([fileData], {
            type:
                "application/vnd.openxmlformats-officedocument.spreadsheetml.sheet"
        });

        const url = URL.createObjectURL(blob);

        const a = document.createElement("a");

        a.href = url;
        a.download = outputFileName;

        document.body.appendChild(a);
        a.click();

        document.body.removeChild(a);

        URL.revokeObjectURL(url);

    } catch (error) {

        alert("Export failed: " + error.message);

    } finally {

        button.disabled = false;
        button.innerText = "Export Excel";
    }
}
The following screenshot shows the HTML-based sales report table example displayed in the browser before export.
After exporting, the generated Excel workbook preserves the tabular structure and applies additional Excel-native formatting.
Why Use HTML-based Excel Export
Using HTML-based export provides several advantages for modern web applications:
- Reuse existing frontend tables without rebuilding spreadsheet layouts
- Reduce duplicate data formatting and export logic
- Apply Excel-native styles after importing HTML tables
- Export business reports directly from dashboard pages
With Spire.XLS for JavaScript, you can quickly convert browser-rendered HTML tables into downloadable Excel files while keeping the entire export workflow on the client side.
For scenarios that require rendering Excel spreadsheets as browser-based HTML tables, you can also refer to our article about converting Excel to HTML in JavaScript.
Export Excel in React with JavaScript
Integrating Excel export into React applications is straightforward. The key is initializing the WebAssembly runtime before rendering React components and properly releasing workbook resources after export operations.
Initialize Spire.XLS in React
Before creating export components, initialize the WebAssembly module in your app entry file (main.jsx or index.js):
import { StrictMode } from 'react';
import { createRoot } from 'react-dom/client';
import App from './App.jsx';

// Initialize Spire.XLS before mounting React
const initializeSpire = async () => {

    // Load the common runtime
    const commonModule = await import(
        '/node_modules/spire.office/spire.common.js'
    );

    // Initialize WebAssembly runtime
    await commonModule.initializeWasm();

    // Load Spire.XLS module
    await import(
        '/node_modules/spire.office/spire.xls.js'
    );

    // Optional: preload fonts if needed
    // await window.spire.FetchFileToVFS(
    //     'ARIAL.TTF',
    //     '/Library/Fonts/',
    //     '/'
    // );
};

// Start React app after initialization
initializeSpire().then(() => {

    createRoot(document.getElementById('root')).render(
        <StrictMode>
            <App />
        </StrictMode>
    );

});
Then use the React export component below in your application.
Simplified React Excel Export Component
Here's a minimal React component that demonstrates the core export pattern:
import { useState } from 'react'

const ExcelExportButton = () => {
    const [isProcessing, setIsProcessing] = useState(false);

    const handleExport = async () => {
        if ((!window.spirexls && !window.xlswasm) || isProcessing) return;

        setIsProcessing(true);
        const wasmModule = window.spirexls || window.xlswasm;

        try {
            // Create a new workbook and get the first default worksheet
            const workbook = new wasmModule.Workbook();
            const worksheet = workbook.Worksheets.get(0);

            // Insert data into the worksheet
            worksheet.Range.get("A1").Text = "Product";
            worksheet.Range.get("B1").Text = "Revenue";
            worksheet.Range.get("A2").Text = "Laptop";
            worksheet.Range.get("B2").NumberValue = 9999.90;
            worksheet.Range.get("A3").Text = "Smartphone";
            worksheet.Range.get("B3").NumberValue = 4999.99;

            const outputFileName = "Report.xlsx";

            // Save the workbook to a file in the VFS
            workbook.SaveToFile({
                fileName: outputFileName,
                version: wasmModule.ExcelVersion.Version2016
            });

            workbook.Dispose();

            const fileArray = window.dotnetRuntime.Module.FS.readFile(outputFileName);

            const excelBlob = new Blob([fileArray], {
                type: "application/vnd.openxmlformats-officedocument.spreadsheetml.sheet"
            });

            const url = URL.createObjectURL(excelBlob);

            const a = document.createElement('a');
            a.href = url;
            a.download = outputFileName;
            document.body.appendChild(a);
            a.click();
            document.body.removeChild(a);

            URL.revokeObjectURL(url);

        } catch (error) {
            console.error("Excel export failed:", error);
        } finally {
            setIsProcessing(false);
        }
    };

    return (
        <button onClick={handleExport} disabled={isProcessing}>
            {isProcessing ? "Generating..." : "Export to Excel"}
        </button>
    );
}

export default function App() {
    return (
        <div>
            <h1>Spire.XLS Demo</h1>
            <ExcelExportButton />
        </div>
    );
}
Key Implementation Details:
- Minimal state – Only track
isProcessingto disable the button during export - Direct download – Trigger download immediately without storing URLs in state
- Resource cleanup – Always call
Dispose()on workbook objects to prevent memory leaks - Error handling – Wrap export logic in try-catch blocks for robust error management
- Loading states – Disable buttons during processing to prevent duplicate exports
Usage in Your App:
import { ExcelExportButton } from './ExcelExportButton';

function App() {
    return (
        <div>
            <h1>Sales Dashboard</h1>
            <ExcelExportButton />
        </div>
    );
}
This simplified approach focuses on the essential export flow without unnecessary complexity. For more advanced scenarios like loading external files or fonts, refer to the complete documentation.
If you also need browser-side document distribution workflows, you can further explore how to convert Excel files to PDF in JavaScript and React applications.
Client-Side Excel Generation in JavaScript Without Backend
Modern web applications increasingly generate Excel files directly in the browser instead of relying on backend services. With Spire.XLS for JavaScript, spreadsheet creation, formatting, and export operations run entirely on the client side using WebAssembly.
Why No Backend Server Is Needed
Traditional Excel export workflows usually require a server to:
- Receive frontend data
- Generate spreadsheet files
- Return downloadable files to the browser
With WebAssembly-based processing, these steps happen entirely inside the browser runtime instead.
Benefits of Browser-side Excel Export
Compared with traditional server-side export workflows, client-side Excel generation provides several advantages:
| Feature | Browser-side Export | Server-side Export |
|---|---|---|
| Data Processing | Runs locally in browser | Requires backend server |
| Privacy | Data stays on client device | Data sent over network |
| Response Speed | Instant local processing | Depends on network latency |
| Infrastructure Cost | No export server required | Requires backend resources |
| Offline Support | Supported | Usually unavailable |
| Scalability | Handled by client devices | Limited by server capacity |
How Browser-side Export Works
When using Spire.XLS for JavaScript:
- The WebAssembly runtime loads in the browser
- Spreadsheet processing runs locally in memory
- Files are temporarily stored in the browser virtual file system (VFS)
- JavaScript converts the generated file into a downloadable Blob
- The browser triggers the download directly
This architecture makes browser-based Excel export especially suitable for dashboards, reporting systems, internal business tools, and privacy-sensitive applications.
Troubleshooting and Best Practices
When using Spire.XLS for JavaScript in browser environments, the following issues are commonly encountered.
WASM Module Not Initialized
If window.spirexls or window.xlswasm is undefined, ensure the WebAssembly runtime is fully initialized before using the API:
await commonModule.initializeWasm();
await import('/node_modules/spire.office/spire.xls.js');
Missing Resource or ZIP Loading Errors
If the browser console shows 404 errors or WebAssembly loading failures:
- Ensure ZIP and WASM resources are placed in the correct static directory
- Vite projects should place assets in the
public/folder - Verify the browser can successfully load
.zipand.wasmfiles
Font-related Warnings
Some environments may display warnings such as:
"Arial font is not installed"
You can preload fonts before creating workbooks:
await window.spire.FetchFileToVFS(
    'ARIAL.TTF',
    '/Library/Fonts/',
    '/'
);
Invalid or Corrupted XLSX Files
If Excel opens with repair warnings, explicitly specify the Excel version during export:
workbook.SaveToFile({
    fileName: outputFileName,
    version: wasmModule.ExcelVersion.Version2016
});
Memory Management
Always release workbook resources after export to avoid memory leaks in long-running applications:
const workbook = new wasmModule.Workbook();

try {
    // Excel operations
} finally {
    workbook.Dispose();
}
Browser-side Performance Considerations
For very large datasets, browser-side processing may become slow or memory-intensive. In such scenarios:
- Show loading indicators during export
- Avoid exporting extremely large datasets in a single operation
- Consider server-side processing for enterprise-scale reports
Conclusion
Spire.XLS for JavaScript provides a practical way to generate and export Excel files directly in modern web applications using JavaScript and WebAssembly. Its browser-based architecture makes it suitable for dashboards, reporting systems, and frontend applications that require downloadable spreadsheet generation without relying on backend services.
The examples in this article demonstrate how to build browser-based Excel export workflows using JavaScript, React, and WebAssembly while keeping spreadsheet processing entirely on the client side. You can apply for a 30-day free license to evaluate all features before purchasing.
FAQ
Q1: Can I download Excel files in JavaScript without a backend server?
A1: Yes. Spire.XLS for JavaScript uses WebAssembly technology to generate and download Excel files entirely in the browser. The workbook is created in browser memory and downloaded directly without requiring any backend API or server-side processing.
Q2: How do I export HTML tables to Excel in JavaScript?
A2: You can extract an existing HTML table from the DOM, write the HTML into the WebAssembly virtual file system, and load it into a workbook using LoadFromHtml(). This approach allows you to reuse browser-rendered tables without rebuilding spreadsheet layouts manually.
Q3: Can I use Spire.XLS for JavaScript in React applications?
A3: Yes. Spire.XLS for JavaScript works with React, Vite, and other modern frontend frameworks. You only need to initialize the WebAssembly module before rendering components and then perform Excel operations directly inside React components or utility functions.
Q4: Why does Excel show a repair warning when opening exported files?
A4: This usually happens when the Excel version is not explicitly specified during export. To avoid compatibility issues, specify the output version when calling SaveToFile():
workbook.SaveToFile({
    fileName: outputFileName,
    version: wasmModule.ExcelVersion.Version2016
});
Inserting Equations into Word in Python (LaTeX & MathML)

Inserting mathematical equations into Word documents programmatically is essential for developers building scientific document generators, academic reporting systems, educational platforms, or engineering automation tools. Whether you're generating research papers, technical documentation, or mathematics worksheets, automating equation insertion greatly improves efficiency and consistency.
However, manually formatting equations in Microsoft Word is time-consuming, and building a mathematical rendering engine from scratch can be extremely complex. Developers often need a reliable way to add equations in Word while supporting standard mathematical formats such as LaTeX and MathML.
With Spire.Doc for Python, developers can insert mathematical equations into Word documents directly from LaTeX and MathML code using a straightforward API. This article demonstrates how to create Word equations in Python, including how to insert formulas, convert equations between LaTeX, MathML, and Office MathML (OMML), and export Word equations into different mathematical formats.
Quick Navigation
- Understanding Mathematical Equations in Word Documents
- Install Spire.Doc for Python
- Insert Equations into Word from LaTeX in Python
- Add MathML Equations to Word Documents in Python
- Convert Word Equations to LaTeX or MathML
- Render Equation as Image
- Complete Example: Multi-Format Equation Processing
- Common Pitfalls
- FAQ
1. Understanding Mathematical Equations in Word Documents
Microsoft Word uses Office Math Markup Language (OMML) as its internal format for mathematical equations. OMML is an XML-based structure that controls equation layout, symbols, fractions, matrices, and other mathematical elements in Word documents. However, directly creating or editing OMML is cumbersome for most developers.
In real-world applications, mathematical content is more commonly written in LaTeX or MathML:
- LaTeX is widely used in academia and scientific publishing because of its concise syntax and powerful mathematical typesetting capabilities.
- MathML is an XML-based standard designed for mathematical content on the web and in educational systems.
To generate editable Word equations programmatically, developers often need to convert between these formats and Word's native equation objects.
Why Choose Spire.Doc for Python?
Spire.Doc for Python provides native support for Word equation processing through the OfficeMath class. Instead of manually generating OMML or relying on image-based workarounds, developers can directly create editable Word equations from LaTeX or MathML code.
Key capabilities include:
| Capability | Supported |
|---|---|
| Insert equations from LaTeX | ✓ |
| Insert equations from MathML | ✓ |
| Export Word equations to LaTeX | ✓ |
| Export Word equations to MathML | ✓ |
| Access native OMML content | ✓ |
| Render equations as images | ✓ |
These capabilities are particularly useful for academic report generation, educational platforms, MathML-to-Word conversion workflows, LaTeX publishing pipelines, and other automated document generation scenarios involving mathematical content.
2. Install Spire.Doc for Python
Install Spire.Doc for Python via pip:
pip install spire.doc
Import the required classes in your Python script:
from spire.doc import *
Alternatively, you can manually install the library from the Spire.Doc for Python download page.
3. Insert Equations into Word from LaTeX in Python
LaTeX is the most widely used format for writing mathematical equations in academic and scientific documents. With Spire.Doc for Python, you can convert LaTeX expressions into native Word equation objects and insert these equations directly into DOCX files.
The following example demonstrates how to insert multiple LaTeX equations into a Word document using the OfficeMath class.
from spire.doc import *

def insert_latex_equations():
    # Create a new Word document
    doc = Document()
    section = doc.AddSection()

    # Add a title paragraph
    title_para = section.AddParagraph()
    title_para.AppendText("Mathematical Equations from LaTeX")
    title_para.Format.HorizontalAlignment = HorizontalAlignment.Left

    # Define LaTeX equations to insert
    latex_equations = [
    r"x = \frac{-b \pm \sqrt{b^2 - 4ac}}{2a}",  # Quadratic formula
    r"e^{i\pi} + 1 = 0",  # Euler's identity
    r"\int_0^\infty e^{-x} \, dx = 1",  # Definite integral
    # Summation formula
    r"\sum_{i=1}^{n} i = \frac{n(n+1)}{2}",
    r"\sum_{i=1}^{n} i = \frac{n(n+1)}{2}",  # Summation formula
    r"A = \begin{pmatrix} 1 & 2 \\ 3 & 4 \end{pmatrix}",  # Matrix
    r"P(A \mid B) = \frac{P(B \mid A)P(A)}{P(B)}",  # Probability formula
    r"\sin^2\theta + \cos^2\theta = 1",  # Trigonometric identity
    ]

    # Insert each LaTeX equation as a separate paragraph
    for latex_code in latex_equations:
        # Create an OfficeMath object from LaTeX code
        office_math = OfficeMath(doc)
        office_math.FromLatexMathCode(latex_code)

        # Add the equation to a new paragraph
        para = section.AddParagraph()
        para.Items.Add(office_math)

    # Save the document
    doc.SaveToFile("latex_equations.docx", FileFormat.Docx2019)
    doc.Close()
    print("LaTeX equations inserted successfully!")

if __name__ == "__main__":
    insert_latex_equations()
The following screenshot shows the generated Word document with equations converted from LaTeX code.
Key API Methods
- Document – Represents the Word document container used to create sections and paragraphs
- OfficeMath – Represents a mathematical equation object in Word documents
- FromLatexMathCode() – Converts LaTeX mathematical code into an Office Math object that Word can render natively
- Items.Add() – Adds the OfficeMath object to a paragraph's content collection
- SaveToFile() – Saves the document to disk in DOCX format using FileFormat.Docx2019
This approach supports complex LaTeX constructs such as fractions, integrals, matrices, Greek letters, and other mathematical operators while preserving native Word equation formatting.
Adding Inline Equations
In addition to standalone equations, you can insert inline equations within text paragraphs. This is useful for embedding mathematical expressions within sentences or explanations.
from spire.doc import *

def insert_inline_equation():
    # Create a new Word document
    doc = Document()
    section = doc.AddSection()

    # Add introductory text
    para = section.AddParagraph()
    para.AppendText("The quadratic formula is ")

    # Insert inline equation
    office_math = OfficeMath(doc)
    office_math.FromLatexMathCode(r"x = \frac{-b \pm \sqrt{b^2 - 4ac}}{2a}")
    para.Items.Add(office_math)

    para.AppendText(", where a ≠ 0.")

    # Save the document
    doc.SaveToFile("inline_equation.docx", FileFormat.Docx2019)
    doc.Close()

if __name__ == "__main__":
    insert_inline_equation()
The inserted equation appears inline within the text:
This approach makes it easy to embed mathematical expressions directly within regular text content, which is useful for educational materials, research papers, and technical documentation.
If you need to combine equations with formatted text, headings, tables, and other structured document elements, you can also refer to our tutorial on creating structured Word documents in Python.
4. Add MathML Equations to Word Documents in Python
MathML (Mathematical Markup Language) is an XML-based standard for representing mathematical expressions on the web and in digital documents. It's commonly used in online education platforms, scientific databases, and content management systems. The following example shows how to convert MathML to Word equations using Spire.Doc for Python.
from spire.doc import *

def insert_mathml_equations():
    # Create a new Word document
    doc = Document()
    section = doc.AddSection()

    # Add a title paragraph
    title_para = section.AddParagraph()
    title_para.AppendText("Mathematical Equations from MathML")

    # Define MathML equations to insert
    mathml_equations = [
    # Euler's identity
    r'<math xmlns="http://www.w3.org/1998/Math/MathML">'
    r'<msup><mi>e</mi><mrow><mi>i</mi><mi>π</mi></mrow></msup>'
    r'<mo>+</mo><mn>1</mn><mo>=</mo><mn>0</mn>'
    r'</math>',
    # Pythagorean theorem
    r'<math xmlns="http://www.w3.org/1998/Math/MathML">'
    r'<msup><mi>a</mi><mn>2</mn></msup>'
    r'<mo>+</mo>'
    r'<msup><mi>b</mi><mn>2</mn></msup>'
    r'<mo>=</mo>'
    r'<msup><mi>c</mi><mn>2</mn></msup>'
    r'</math>',
    # Fraction expression
    r'<math xmlns="http://www.w3.org/1998/Math/MathML">'
    r'<mfrac>'
    r'<mrow><mi>x</mi><mo>+</mo><mi>y</mi></mrow>'
    r'<mrow><mi>z</mi><mo>−</mo><mn>1</mn></mrow>'
    r'</mfrac>'
    r'</math>',
    # Integral equation
    r'<math xmlns="http://www.w3.org/1998/Math/MathML">'
    r'<msubsup><mo>∫</mo><mn>0</mn><mn>1</mn></msubsup>'
    r'<msup><mi>x</mi><mn>2</mn></msup>'
    r'<mi>d</mi><mi>x</mi>'
    r'<mo>=</mo>'
    r'<mfrac><mn>1</mn><mn>3</mn></mfrac>'
    r'</math>'
    ]

    # Insert each MathML equation as a separate paragraph
    for mathml_code in mathml_equations:
        # Create an OfficeMath object from MathML code
        office_math = OfficeMath(doc)
        office_math.FromMathMLCode(mathml_code)

        # Add the equation to a new paragraph
        para = section.AddParagraph()
        para.Items.Add(office_math)

    # Save the document
    doc.SaveToFile("mathml_equations.docx", FileFormat.Docx2019)
    doc.Close()
    print("MathML equations inserted successfully!")

if __name__ == "__main__":
    insert_mathml_equations()
The following screenshot shows the generated Word document with equations converted from MathML code.
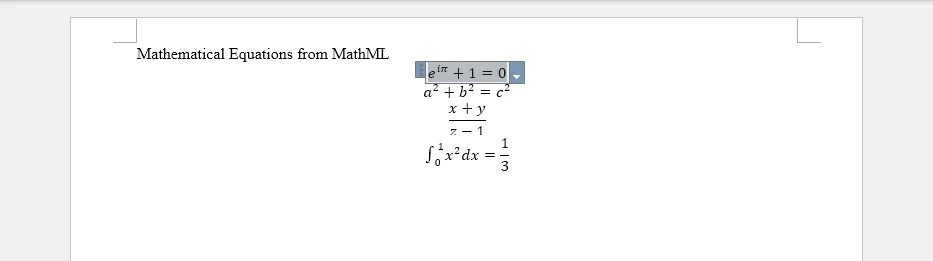
Key API Method
- FromMathMLCode() – Parses MathML markup and converts it into a native Word equation object.
MathML support is especially useful when working with XML-based educational content, web-based equation systems, and STEM learning platforms that store mathematical expressions in MathML format.
Combining LaTeX and MathML in One Document
You can mix both LaTeX and MathML equations within the same document, allowing flexibility in content sources:
from spire.doc import *

def insert_mixed_equations():
    # Create a new Word document
    doc = Document()
    section = doc.AddSection()

    # Insert LaTeX equation
    latex_para = section.AddParagraph()
    latex_math = OfficeMath(doc)
    latex_math.FromLatexMathCode(r"E = mc^2")
    latex_para.Items.Add(latex_math)

    # Insert MathML equation
    mathml_para = section.AddParagraph()
    mathml_math = OfficeMath(doc)
    mathml_math.FromMathMLCode(
        r'<math xmlns="http://www.w3.org/1998/Math/MathML">'
        r'<mi>F</mi><mo>=</mo><mi>m</mi><mi>a</mi>'
        r'</math>'
    )
    mathml_para.Items.Add(mathml_math)

    # Save the document
    doc.SaveToFile("mixed_equations.docx", FileFormat.Docx2019)
    doc.Close()

if __name__ == "__main__":
    insert_mixed_equations()
This approach is useful when mathematical content comes from different sources, such as LaTeX-based publishing systems and MathML-based web applications.
If your mathematical content originates from web pages or HTML-based systems, you can also refer to our tutorial on converting HTML content to Word documents in Python.
5. Convert Word Equations to LaTeX, MathML, and OMML
Besides inserting equations into Word documents, Spire.Doc for Python also supports exporting Word equations to multiple mathematical markup formats. This is useful for interoperability between Word, LaTeX publishing systems, web-based MathML platforms, and custom XML workflows.
The following example demonstrates how to extract equations from a Word document and export them as LaTeX, MathML, and Office MathML (OMML).
from spire.doc import *

def export_equation_formats():
    # Load a Word document containing equations
    doc = Document()
    doc.LoadFromFile("equations.docx")

    # Access the first paragraph
    section = doc.Sections[0]
    para = section.Paragraphs[0]

    # Find OfficeMath objects
    for item in para.ChildObjects:
        if isinstance(item, OfficeMath):

            # Export to LaTeX
            latex_code = item.ToLaTexMathCode()
            print("LaTeX:")
            print(latex_code)
            print()

            # Export to MathML
            mathml_code = item.ToMathMLCode()
            print("MathML:")
            print(mathml_code)
            print()

            # Export to Office MathML (OMML)
            omml_code = item.ToOfficeMathMLCode()
            print("OMML:")
            print(omml_code)

            # Save outputs to files
            with open("equation.tex", "w", encoding="utf-8") as f:
                f.write(latex_code)

            with open("equation.xml", "w", encoding="utf-8") as f:
                f.write(mathml_code)

            with open("equation.omml", "w", encoding="utf-8") as f:
                f.write(omml_code)

            break

    doc.Close()

if __name__ == "__main__":
    export_equation_formats()
The following screenshot shows the exported equation formats printed in the Python console.
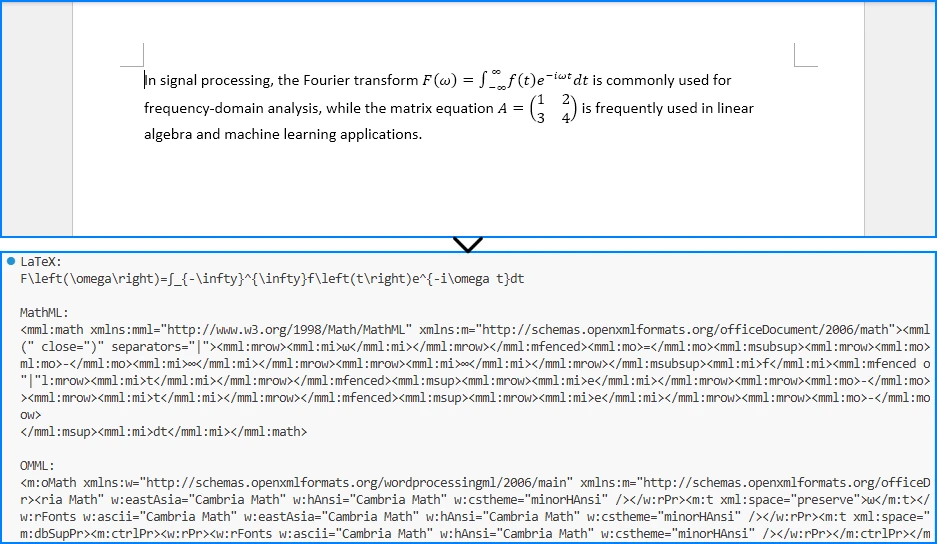
Supported Export Formats
| Format | Primary Use Case | Characteristics |
|---|---|---|
| LaTeX | Academic publishing and scientific papers | Compact syntax widely used in academia |
| MathML | Web-based mathematical content | XML-based format designed for browsers and educational systems |
| OMML | Microsoft Word integration | Native Office equation format with full Word compatibility |
These export capabilities make it easier to:
- Convert Word equations into LaTeX publishing workflows
- Publish equations on websites using MathML
- Integrate Word documents with XML-based systems
- Inspect and debug Word equation structures using OMML
6. Render Office Math Equations to Images
In some scenarios, you may need to export equations as image files for use in presentations, web pages, or other non-editable contexts. Spire.Doc for Python allows you to render Office Math equations into image streams that can be saved as image files.
from spire.doc import *

def render_equation_as_image():
    # Create a new Word document with an equation
    doc = Document()
    section = doc.AddSection()
    para = section.AddParagraph()

    # Insert an equation
    office_math = OfficeMath(doc)
    office_math.FromLatexMathCode(
        r"\int_0^\infty e^{-x^2} dx = \frac{\sqrt{\pi}}{2}"
    )
    para.Items.Add(office_math)

    # Render the equation as an image stream
    image_stream = office_math.SaveImageToStream(ImageType.Bitmap)

    # Save the image to file
    with open("equations/equation.png", "wb") as f:
        f.write(image_stream.ToArray())

    # Release unmanaged resources
    image_stream.Dispose()
    doc.Close()

    print("Equation rendered as image successfully!")

if __name__ == "__main__":
    render_equation_as_image()
The following screenshot shows the equation rendered as an image file.
This feature is particularly useful for:
- Embedding equations in presentations
- Displaying formulas on web pages
- Generating static previews for document systems
If you want to render complete Word documents as images rather than exporting individual equations, check out our tutorial on converting Word documents to images in Python.
7. Complete Example: Multi-Format Equation Processing
The following comprehensive example demonstrates a complete workflow that combines multiple equation operations: inserting equations from different sources, exporting to various formats, and rendering as images.
from spire.doc import *

def complete_equation_workflow():
    """
    Demonstrates a complete workflow for equation processing:
    - Create equations from LaTeX and MathML
    - Export equations to LaTeX and MathML
    - Render equations as images
    """

    # Create a new Word document
    doc = Document()
    section = doc.AddSection()

    # Add document title
    title_para = section.AddParagraph()
    title_text = title_para.AppendText("Complete Equation Processing Workflow")
    title_text.CharacterFormat.FontSize = 16
    title_text.CharacterFormat.Bold = True
    title_para.Format.HorizontalAlignment = HorizontalAlignment.Center

    # Insert equations from LaTeX
    latex_section_title = section.AddParagraph()
    latex_title_text = latex_section_title.AppendText("\nEquations from LaTeX:")
    latex_title_text.CharacterFormat.Bold = True

    latex_examples = [
        (r"E = mc^2", "Einstein's Mass-Energy Equivalence"),
        (r"\sum_{i=1}^{n} i = \frac{n(n+1)}{2}", "Sum of First n Integers"),
        (r"\frac{d}{dx}\left(\int_a^x f(t)dt\right) = f(x)", "Fundamental Theorem of Calculus")
    ]

    first_equation = None

    for latex_code, description in latex_examples:
        # Add description
        desc_para = section.AddParagraph()
        desc_para.AppendText(f"{description}:")

        # Insert equation
        office_math = OfficeMath(doc)
        office_math.FromLatexMathCode(latex_code)

        eq_para = section.AddParagraph()
        eq_para.Items.Add(office_math)

        if first_equation is None:
            first_equation = office_math

    # Insert equations from MathML
    mathml_section_title = section.AddParagraph()
    mathml_title_text = mathml_section_title.AppendText("\nEquations from MathML:")
    mathml_title_text.CharacterFormat.Bold = True

    mathml_examples = [
        (
            r'<math xmlns="http://www.w3.org/1998/Math/MathML"><mi>a</mi><mo>+</mo><mi>b</mi><mo>=</mo><mi>c</mi></math>',
            "Simple Addition"
        ),
        (
            r'<math xmlns="http://www.w3.org/1998/Math/MathML"><msup><mi>e</mi><mrow><mi>i</mi><mi>π</mi></mrow></msup><mo>+</mo><mn>1</mn><mo>=</mo><mn>0</mn></math>',
            "Euler's Identity"
        )
    ]

    for mathml_code, description in mathml_examples:
        # Add description
        desc_para = section.AddParagraph()
        desc_para.AppendText(f"{description}:")

        # Insert equation
        office_math = OfficeMath(doc)
        office_math.FromMathMLCode(mathml_code)

        eq_para = section.AddParagraph()
        eq_para.Items.Add(office_math)

    # Save the Word document
    output_docx = "complete_equations.docx"
    doc.SaveToFile(output_docx, FileFormat.Docx2019)
    print(f"Word document saved: {output_docx}")

    # Export the first equation to LaTeX
    latex_export = first_equation.ToLaTexMathCode()

    with open("exported_equation.tex", "w", encoding="utf-8") as f:
        f.write(latex_export)

    print(f"Exported to LaTeX: {latex_export}")

    # Export the first equation to MathML
    mathml_export = first_equation.ToMathMLCode()

    with open("exported_equation.xml", "w", encoding="utf-8") as f:
        f.write(mathml_export)

    print("Exported to MathML")

    # Render the first equation as an image
    image_stream = first_equation.SaveImageToStream(ImageType.Bitmap)

    with open("equation_render.png", "wb") as f:
        f.write(image_stream.ToArray())

    # Release unmanaged resources
    image_stream.Dispose()

    print("Equation rendered as image successfully!")

    # Clean up
    doc.Close()

    print("\nWorkflow completed successfully!")

if __name__ == "__main__":
    complete_equation_workflow()
The generated Word document will look like this:
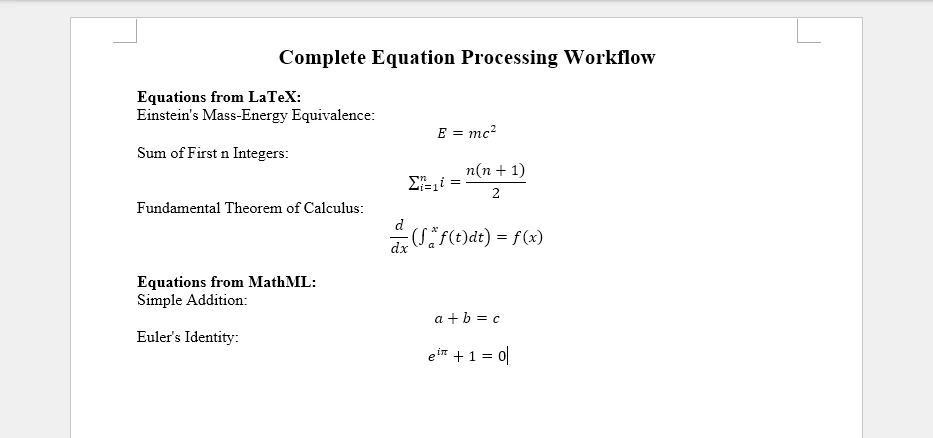
This complete example demonstrates:
- Multi-source equation insertion – Combining LaTeX and MathML inputs
- Descriptive labeling – Adding context to each equation
- Format conversion – Exporting to LaTeX and MathML
- Image rendering – Creating visual representations
- Resource management – Proper cleanup of document objects
The resulting Word document contains well-formatted equations with descriptions, while the exported files provide alternative formats for different use cases.
8. Common Pitfalls
Raw String Literals for LaTeX
When writing LaTeX code in Python strings, always use raw strings (prefix with r) to prevent escape sequence interpretation:
# Correct: Use raw string
latex_code = r"\int_0^\infty e^{-x} dx"

# Incorrect: Backslashes will be interpreted as escape sequences
latex_code = "\int_0^\infty e^{-x} dx"
Unsupported LaTeX Commands
Not all LaTeX commands are supported by Word's equation engine. Some advanced LaTeX constructs may not render correctly. Stick to standard mathematical notation whenever possible:
# Supported: Standard mathematical notation
office_math.FromLatexMathCode(r"\alpha + \beta = \gamma")

# Some advanced LaTeX constructs may not be supported
# office_math.FromLatexMathCode(r"\begin{align} ... \end{align}")
MathML Namespace Requirements
MathML code must include the proper namespace declaration to parse correctly:
# Correct: Include namespace
mathml = r'<math xmlns="http://www.w3.org/1998/Math/MathML"><mi>x</mi></math>'

# Incorrect: Missing namespace may fail
mathml = r'<math><mi>x</mi></math>'
Memory Management
Always close documents after processing to release resources, especially in batch operations:
doc = Document()

try:
    # Process equations
    doc.SaveToFile("output.docx", FileFormat.Docx2019)

finally:
    doc.Close()  # Ensure cleanup even if errors occur
Character Encoding
When saving exported LaTeX or MathML to files, ensure proper UTF-8 encoding for special characters:
with open("equation.tex", "w", encoding="utf-8") as f:
    f.write(latex_code)
Image Stream Disposal
Always dispose of image streams after use to properly release resources:
image_stream = office_math.SaveImageToStream(ImageType.Bitmap)

try:
    with open("equation.png", "wb") as f:
        f.write(image_stream.ToArray())

finally:
    image_stream.Dispose()
Conclusion
In this article, we demonstrated how to insert mathematical equations into Word documents in Python using Spire.Doc for Python. By leveraging the Spire API, developers can create Word equations from LaTeX and MathML code, convert between LaTeX, MathML, and Word’s native OMML format, and render equations as images. This capability is essential for automating scientific document generation, educational content creation, and mathematical publishing workflows.
Spire.Doc for Python provides comprehensive equation processing capabilities beyond basic insertion, including conversion between LaTeX and MathML into Word’s native OMML format, as well as exporting Word equations back to LaTeX, MathML, and OMML. The library simplifies complex mathematical typesetting while maintaining compatibility with Microsoft Word’s native equation engine.
If you want to evaluate the full capabilities of Spire.Doc for Python, you can apply for a 30-day free license.
9. FAQ
How do I insert equations into Word using Python?
Use the OfficeMath class from Spire.Doc for Python. Create an OfficeMath object, call FromLatexMathCode() or FromMathMLCode() with your equation code, then add it to a paragraph using para.Items.Add(office_math). Finally, save the document using doc.SaveToFile().
Can I add LaTeX equations to Word documents in Python?
Yes. Spire.Doc for Python supports inserting equations from LaTeX code using the FromLatexMathCode() method. Standard mathematical notation such as fractions, integrals, superscripts, subscripts, and Greek letters can be converted into Word-compatible equations.
Does Spire.Doc support MathML equations?
Yes. You can create Word equations from MathML using the FromMathMLCode() method. Make sure the MathML content includes the correct namespace declaration:
<math xmlns="http://www.w3.org/1998/Math/MathML">
Can I export Word equations back to LaTeX or MathML?
Yes. Spire.Doc for Python provides methods such as ToLaTexMathCode() and ToMathMLCode() to export Office Math equations into LaTeX or MathML formats. This is useful for content migration, storage, or integration with other mathematical systems.
How can I render equations as images?
Use the SaveImageToStream() method on an OfficeMath object to render the equation as an image stream. You can then save the stream as an image file and use it in presentations, web pages, or preview systems.