Newsletters, bulletins and manuals often split the body into two or three columns: the layout is more compact, and long text is easier to scan. A divider between the columns makes the visual boundary clearer. Section breaks solve a different problem: within a single document, different parts may need a different paper size, margins, headers and footers, or column count.
This article uses Spire.Doc for JavaScript to do three things in the browser: set multiple columns for the body section, show the divider between the columns, and insert a section break and configure each section separately. The whole process runs on WebAssembly on the client side, requires no Office installation and depends on no backend service; the document always stays on the user's device.
This article covers three features:
- Set Multiple Columns for a Word Document
- Show the Divider Between Columns
- Insert Section Breaks and Configure Each Section
How Sections and Columns Relate
Columns are a property of a section, not of the whole document. A section can have its own column count, column width and column spacing, and different sections can use different column layouts. Decide which section to change first, then set the columns; the order cannot be reversed.
| Concept | Corresponding object | Scope |
|---|---|---|
| Section | Section |
Page setup, headers and footers, columns |
| Column | Section.Columns |
How the body text is arranged within the section |
| Section break | SectionBreakType |
Marks the section boundary and how the new section starts |
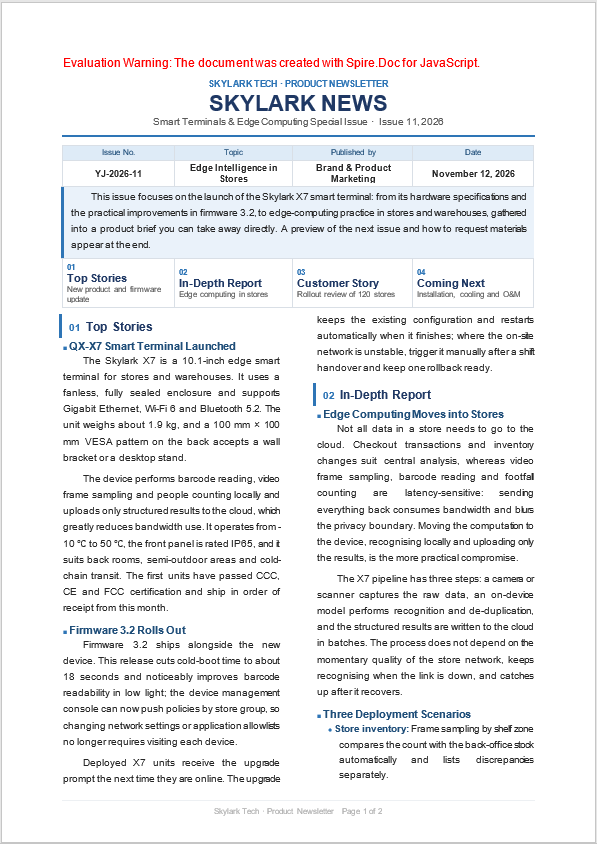
The sample document Newsletter.docx used in this article has two sections: section 1 is the masthead, and section 2 is the body. The masthead stays single-column, and all three examples modify only the body section, so the code takes doc.Sections.get_Item(1).
For installation and project setup, refer to Integrating Spire.Doc for JavaScript in a React Project. The examples below assume that Spire.Doc is installed and the WebAssembly module is initialized.
Set Multiple Columns for a Word Document
To set multiple columns for a Word document, first confirm how many columns the target section currently has. A section in a new document has one column by default; changing the body to two columns means setting the section's column count to 2. Section.Columns.Populate(count, spacing) sets the total column count and the column spacing in one call, and Word divides the available page width evenly.
The unit of column spacing is the point; one inch equals 72 points, so 36 points is 0.5 inch. The example uses 36 points, which matches Word's default column spacing.
The steps are:
- Get the Spire.Doc WebAssembly module and confirm that it is ready.
- Load the sample document
Newsletter.docx. - Create a
Documentobject and load the document. - Take the body section and call
Columns.Populate(2, 36)to set two columns. - Save the result, read the file from the VFS and trigger a browser download.
The code for setting multiple columns for a Word document is:
function App() {
  const setColumns = async () => {
    // Get the Spire.Doc WASM module
    const docModule = window.wasmModule?.spiredoc;

    if (!docModule) {
      alert('Spire.Doc is not ready yet');
      return;
    }

    // Load the sample document
    await window.spire.FetchFileToVFS('Newsletter.docx', '', `${process.env.PUBLIC_URL}/data/`);

    const doc = new docModule.Document();
    doc.LoadFromFile('Newsletter.docx');

    // Section 1 is the masthead; section 2 (index 1) is the body
    const section = doc.Sections.get_Item(1);

    // Set two columns with 36 pt (0.5 inch) spacing
    section.Columns.Populate(2, 36);

    const outputFileName = 'NewsletterTwoColumns.docx';
    doc.SaveToFile({ fileName: outputFileName, fileFormat: docModule.FileFormat.Docx2013 });
    doc.Dispose();

    // Read the generated file from the VFS and trigger the download
    const fileArray = window.dotnetRuntime.Module.FS.readFile(outputFileName);
    const blob = new Blob([fileArray], {
      type: 'application/vnd.openxmlformats-officedocument.wordprocessingml.document',
    });
    const url = URL.createObjectURL(blob);
    const a = document.createElement('a');
    a.href = url;
    a.download = outputFileName;
    a.click();
    URL.revokeObjectURL(url);
  };

  return (
    <div style={{ textAlign: 'center', height: '300px' }}>
      <h1>Set Columns</h1>
      <button onClick={setColumns}>Generate</button>
    </div>
  );
}

export default App;
The newsletter after the body section is set to two columns; the masthead stays single-column:
What is the difference between Populate and AddColumn
count in Columns.Populate(count, spacing) is the total number of columns: 2 means two columns and 3 means three columns, and calling it again does not accumulate.
Section.AddColumn(width, spacing), by contrast, appends one column: going from the default single column to two columns takes one call, and going to three columns takes two calls. It takes the width and spacing of the new column but does not automatically narrow the original first column. After appending, call MakeColumnsSameWidth() once so that Word divides the columns evenly by page width:
// Append a second column to the default single column
section.AddColumn(240, 36);

// Make the columns equal width so the first column is not still laid out at full page width
section.MakeColumnsSameWidth();
When only the column count has to be set and exact per-column widths are not needed, Populate is more direct; when columns have to be appended to the existing count, use AddColumn.
How column widths and spacing are allocated
The available body width equals the paper width minus the left and right margins. With two equal columns, each column is about (available width - column spacing) / 2 wide. If the sum of the column widths exceeds the available width, Word compresses the columns or pushes the content into the next column, which does not look as expected.
Both Populate and MakeColumnsSameWidth() divide the available width evenly, so there is generally no need to calculate by hand. Only when unequal columns are required, or when there are many columns and the spacing is narrow, is it worth estimating from the margins first and then adjusting column by column.
Show the Divider Between Columns
To show the divider between columns, set the section-level property PageSetup.ColumnsLineBetween to true. Once enabled, a vertical line appears between every pair of columns in that section; when it is disabled, only blank space separates them. The divider does not change the column width or spacing; it only affects the visual boundary.
The steps are:
- Get the Spire.Doc WebAssembly module and confirm that it is ready.
- Load the sample document
Newsletter.docx. - Create a
Documentobject and load the document. - Take the body section, set two columns, then set
ColumnsLineBetweentotrue. - Save the result, read the file from the VFS and trigger a browser download.
The code for showing the divider between columns is:
function App() {
  const showColumnLine = async () => {
    // Get the Spire.Doc WASM module
    const docModule = window.wasmModule?.spiredoc;

    if (!docModule) {
      alert('Spire.Doc is not ready yet');
      return;
    }

    await window.spire.FetchFileToVFS('Newsletter.docx', '', `${process.env.PUBLIC_URL}/data/`);

    const doc = new docModule.Document();
    doc.LoadFromFile('Newsletter.docx');

    const section = doc.Sections.get_Item(1);

    // Set the columns first, then turn on the divider between them
    section.Columns.Populate(2, 36);
    section.PageSetup.ColumnsLineBetween = true;

    const outputFileName = 'NewsletterColumnLine.docx';
    doc.SaveToFile({ fileName: outputFileName, fileFormat: docModule.FileFormat.Docx2013 });
    doc.Dispose();

    const fileArray = window.dotnetRuntime.Module.FS.readFile(outputFileName);
    const blob = new Blob([fileArray], {
      type: 'application/vnd.openxmlformats-officedocument.wordprocessingml.document',
    });
    const url = URL.createObjectURL(blob);
    const a = document.createElement('a');
    a.href = url;
    a.download = outputFileName;
    a.click();
    URL.revokeObjectURL(url);
  };

  return (
    <div style={{ textAlign: 'center', height: '300px' }}>
      <h1>Show Column Divider</h1>
      <button onClick={showColumnLine}>Generate</button>
    </div>
  );
}

export default App;
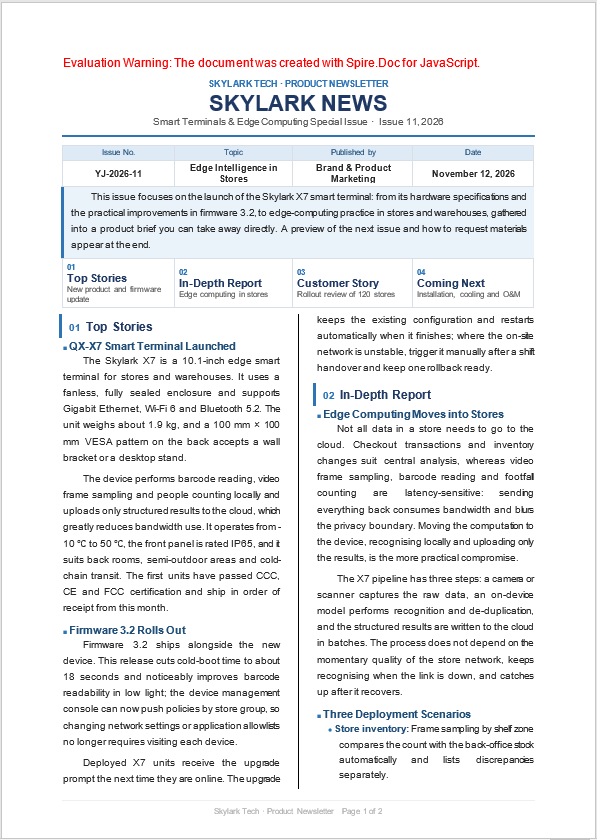
A vertical divider appears between the two columns:
What decides the height of the divider
The divider is as tall as the taller of the two columns in the body area of the page, not a fixed rule that runs the full height of the page. If only one column has content on a page, the divider usually covers only the height that has content. The wider the column spacing, the greater the distance between the divider and the text; that distance is controlled by the column spacing and has nothing to do with the line width.
How to turn the divider off
Set ColumnsLineBetween back to false; there is no need to delete the section or rebuild the columns:
section.PageSetup.ColumnsLineBetween = false;
If only some sections in the same document need the divider, set it section by section rather than handling it at document level. A new section inherits the page setup of the previous section, so after inserting a section break, remember to turn the divider off explicitly on the new section if it is not needed.
Insert Section Breaks and Configure Each Section
Inserting section breaks and configuring each section separately suits requirements such as "the first part single-column and the second part in two columns", or "a cover page without a header and a body with one". A section break marks the start of a new section; the new section inherits the page setup of the previous section, and its column count, margins, headers and footers can then be changed independently.
SectionBreakType determines where the new section starts:
| Value | Where the new section starts |
|---|---|
NewPage |
On a new page |
NewColumn |
At the next column |
EvenPage |
On the next even page |
Oddpage |
On the next odd page |
NoBreak |
No page break; continues directly after the current content |
The steps are:
- Get the Spire.Doc WebAssembly module and confirm that it is ready.
- Load
Newsletter.docxand take the body section. - Walk the paragraphs of the body section and find the position of the "In-Depth Report" heading.
- Call
InsertSectionBreakon the paragraph before the heading to insert the section break. - Take the new section, set two columns and show the divider, then save and download.
The code for inserting section breaks and configuring each section is:
function App() {
  const insertSectionBreak = async () => {
    // Get the Spire.Doc WASM module
    const docModule = window.wasmModule?.spiredoc;

    if (!docModule) {
      alert('Spire.Doc is not ready yet');
      return;
    }
    await window.spire.FetchFileToVFS('Newsletter.docx', '', `${process.env.PUBLIC_URL}/data/`);

    const doc = new docModule.Document();
    doc.LoadFromFile('Newsletter.docx');

    const section = doc.Sections.get_Item(1);
    const paragraphs = section.Paragraphs;

    // Find the paragraph that holds the "In-Depth Report" heading
    let markerIndex = -1;
    for (let i = 0; i < paragraphs.Count; i++) {
      const text = String(paragraphs.get_Item(i).Text || '');
      if (text.includes('In-Depth Report')) {
        markerIndex = i;
        break;
      }
    }

    if (markerIndex <= 0) {
      alert('Insert position not found');
      return;
    }

    // Insert the break on the paragraph before the heading, so the heading and what follows enter the new section
    paragraphs.get_Item(markerIndex - 1).InsertSectionBreak(docModule.SectionBreakType.NoBreak);

    // New section: two columns plus the divider
    const newSection = doc.Sections.get_Item(2);
    newSection.Columns.Populate(2, 36);
    newSection.PageSetup.ColumnsLineBetween = true;

    const outputFileName = 'NewsletterSectionBreak.docx';
    doc.SaveToFile({ fileName: outputFileName, fileFormat: docModule.FileFormat.Docx2013 });
    doc.Dispose();

    const fileArray = window.dotnetRuntime.Module.FS.readFile(outputFileName);
    const blob = new Blob([fileArray], {
      type: 'application/vnd.openxmlformats-officedocument.wordprocessingml.document',
    });
    const url = URL.createObjectURL(blob);
    const a = document.createElement('a');
    a.href = url;
    a.download = outputFileName;
    a.click();
    URL.revokeObjectURL(url);
  };

  return (
    <div style={{ textAlign: 'center', height: '300px' }}>
      <h1>Insert Section Break</h1>
      <button onClick={insertSectionBreak}>Generate</button>
    </div>
  );
}

export default App;
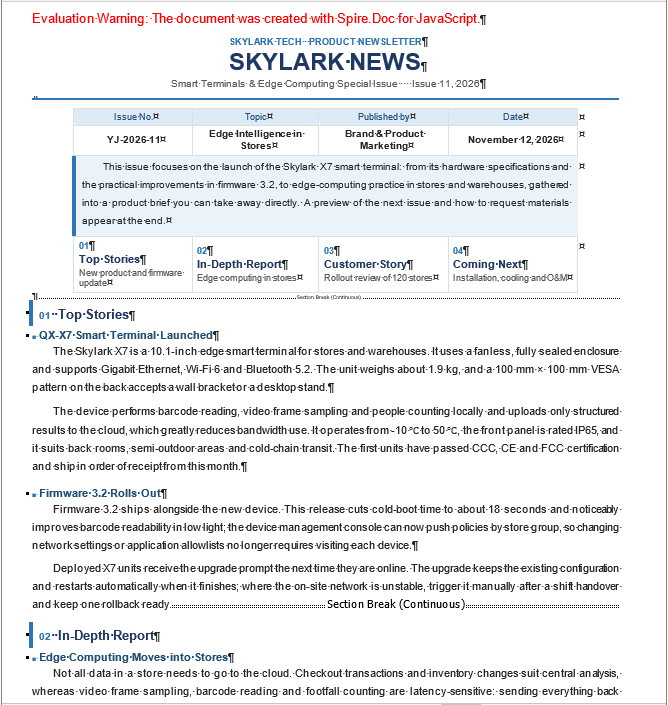
After a section break is inserted before "In-Depth Report", the first part stays single-column and the second part is in two columns with a divider:
Why the example chooses NoBreak
NoBreak means the new section continues directly after the current content and does not force a page break. The example uses it to keep the single-column "Top Stories" and the two-column "In-Depth Report" on the same page for comparison. To have the new section start on a new page, replace the argument with SectionBreakType.NewPage; the rest of the code is unchanged.
The type of section break only determines where the new section starts; it does not affect the subsequent column and divider settings.
Where the section break is inserted
InsertSectionBreak acts on the paragraph that calls it and moves the content after that paragraph into the new section. The example calls it on the paragraph before the "In-Depth Report" heading, so the heading and the body after it enter the new section.
If it is inserted after the last paragraph of the document, the new section contains only the section break itself and no content, which looks like "an extra blank page". Choose a position between the two paragraphs that really need to be separated, and confirm that the index is valid before the call.
Why the page setup changes along with the new section
A new section inherits the page setup of the previous section, including the paper, margins, headers and footers. The example changes only the column count and the divider of the new section and leaves the other properties unchanged. To make the new section single-column, set the column count on the new section explicitly instead of relying on the default.
Headers and footers are linked to the previous section through LinkToPrevious. To give each section its own header and footer, break the link first and then change the content.
The call order of the three features
| Step | Call | Scope |
|---|---|---|
| Divide sections | paragraph.InsertSectionBreak(type) |
Document structure |
| Set columns | section.Columns.Populate(count, spacing) |
Current section |
| Show the divider | section.PageSetup.ColumnsLineBetween = true |
Current section |
| Append a column | section.AddColumn(width, spacing) |
Current section |
Dividing sections first and setting columns afterwards is the safer order. If the columns are set before the section break is inserted, the new section inherits the old section's column count and has to be adjusted again. When AddColumn is used to append columns, remember to call MakeColumnsSameWidth() afterwards to unify the widths.
FAQ
Why does the document still look single-column after two columns are set
First confirm that the target section was modified. The sample document has a masthead section and a body section; Populate is called only on the body section, and the masthead remains single-column. Then check the column argument: the 2 in Populate(2, 36) is the total number of columns, not the number of new columns. If AddColumn is used instead, it appends one column per call, so one call takes the section from one column to two; after the call, run MakeColumnsSameWidth(), otherwise the original first column may still be laid out at full page width.
After setting columns, the right column starts in the middle of a sentence. Is that normal
It is normal. Content flows continuously between Word's columns: once the left column is full, the remaining text continues from the top of the right column, so the right column may start in the middle of a sentence. If a break across columns is not wanted, insert a column break at the end of a suitable paragraph, or use a section break to move the content into a new section; it also helps to adjust the column spacing and font size so that the break falls near a paragraph boundary.
How do I turn off the column divider
Set PageSetup.ColumnsLineBetween of that section to false; there is no need to delete the columns or rebuild the section. If the document has several sections, check the ones that need it one by one; a new section inherits the settings of the previous section, so after inserting a section break, turn the divider off explicitly on the new section if it is not needed.
What is the difference between a section break and a page break
A page break only pushes the following content onto the next page, and the page setup remains the same as in the current section. A section break creates a new section, and the new section can have its own paper size, margins, headers and footers, and column count. Use section breaks when the same document needs different layouts; a page break is enough when only a new page is needed.
Do headers and footers follow the body when it is split into columns
Usually not. Headers and footers are set per section and span the page width; they are not split into columns along with the body. After a section break, the header and footer of the new section are linked to the previous section by default; to use different content, break LinkToPrevious first and then edit them separately.
Get a Free License
Spire.Doc for JavaScript offers a 30-day full-featured free trial license with no functional limitations. Apply here to evaluate before purchasing.
