Convertir ODP en PDF : 5 méthodes fiables (ordinateur, en ligne et C#)
Table des matières
- Méthode 1 - LibreOffice / OpenOffice (Conversion de bureau haute précision)
- Méthode 2 - Microsoft PowerPoint (Conversion basée sur Office)
- Méthode 3 - Outils en ligne (Aucune installation requise)
- Méthode 4 - Outils en ligne de commande (Automatisation et script)
- Méthode 5 - Traitement par lots C# (Solution développeur)
Les fichiers ODP (OpenDocument Presentation) sont largement utilisés dans les environnements open-source pour créer et collaborer sur des présentations. Cependant, le partage de fichiers ODP peut être délicat, car tout le monde ne dispose pas du logiciel nécessaire pour les visualiser. La conversion de ODP en PDF garantit que vos diapositives sont visualisables partout et prêtes à être partagées, imprimées ou archivées.
Dans ce guide, nous allons vous présenter 5 méthodes éprouvées et fiables pour convertir ODP en PDF tout en préservant la mise en forme, allant des applications de bureau et des outils en ligne au traitement par lots automatisé à l'aide de C#.
Aperçu des méthodes de conversion ODP en PDF
- Méthode 1 - LibreOffice / OpenOffice (Conversion de bureau haute précision)
- Méthode 2 - Microsoft PowerPoint (Conversion basée sur Office)
- Méthode 3 - Outils en ligne (Aucune installation requise)
- Méthode 4 - Outils en ligne de commande (Automatisation et script)
- Méthode 5 - Traitement par lots C# (Solution développeur)
Qu'est-ce qu'un fichier ODP ?
Un fichier ODP est un format de présentation modifiable qui appartient à la norme OpenDocument. Il est principalement créé et édité à l'aide de suites bureautiques ouvertes telles que :
- LibreOffice Impress
- Apache OpenOffice Impress
Contrairement au format PDF universel, qui fige le contenu pour la distribution, les fichiers ODP sont conçus pour une modification continue et nécessitent un visualiseur ou un éditeur compatible pour être ouverts.
Pourquoi convertir ODP en PDF ?
La conversion d'ODP en PDF aide à résoudre plusieurs problèmes pratiques dans l'utilisation réelle :
- Assurez-vous que vos diapositives s'affichent de manière cohérente sous Windows, macOS, Linux et les appareils mobiles.
- Ouvrez des présentations sans installer LibreOffice ou OpenOffice.
- Évitez les décalages de mise en page lors de l'ouverture sur différents appareils.
- Créez des présentations professionnelles et prêtes à imprimer avec une mise en forme cohérente.
- Stockez les présentations dans un format stable et non modifiable pour l'archivage ou la documentation.
Avec ces avantages à l'esprit, explorons les méthodes les plus fiables pour réaliser cette conversion.
Méthode 1 - Convertir ODP en PDF via LibreOffice / OpenOffice (Conversion de bureau haute précision)
Si vous souhaitez convertir ODP en PDF sans problèmes de mise en forme, l'utilisation de LibreOffice ou OpenOffice est l'approche la plus fiable. Ces applications prennent en charge nativement le format OpenDocument, ce qui signifie qu'elles peuvent rendre vos diapositives exactement comme elles ont été conçues, évitant ainsi les décalages de mise en page ou les erreurs de police souvent rencontrées avec les convertisseurs tiers.
Guide étape par étape (En utilisant LibreOffice Impress comme exemple) :
-
Ouvrez votre fichier ODP dans LibreOffice Impress.
-
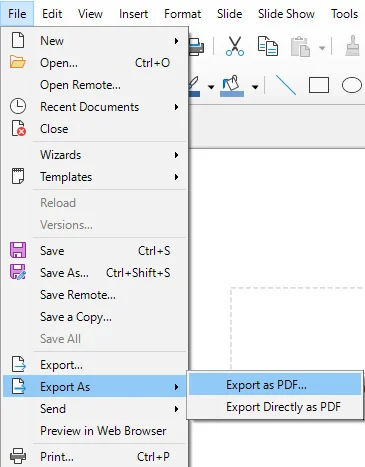
Accédez au menu supérieur et sélectionnez Fichier > Exporter sous > Exporter au format PDF.
-
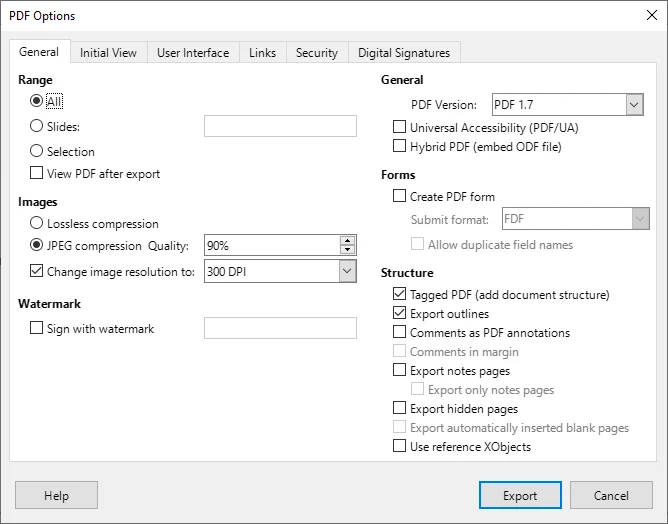
Dans la boîte de dialogue qui apparaît, personnalisez les paramètres PDF tels que la compression des images, les filigranes et la plage de pages.
-
Cliquez sur Exporter, choisissez un dossier de destination et cliquez sur Enregistrer.
Conseils de pro :
- Utilisez Fichier > Exporter sous > Exporter directement au format PDF pour une conversion plus rapide si aucune personnalisation n'est nécessaire.
- Cette méthode fonctionne de manière identique sous Windows, macOS et Linux.
Quand l'utiliser :
Idéal dans les cas où la précision de la mise en page est essentielle, comme pour les présentations professionnelles, les rapports ou les documents destinés aux clients.
Méthode 2 - Exporter ODP en PDF avec Microsoft PowerPoint (Conversion basée sur Office)
Si vous êtes un utilisateur d'Office, Microsoft PowerPoint offre une solution simple pour exporter des fichiers ODP au format PDF. Cette méthode est disponible dans PowerPoint 2010 et les versions ultérieures, ainsi que dans Microsoft PowerPoint 365. C'est un excellent choix pour ceux qui utilisent fréquemment PowerPoint et souhaitent convertir des fichiers ODP sans outils externes.
Étapes :
-
Lancez Microsoft PowerPoint, allez dans Fichier > Ouvrir et sélectionnez votre fichier .odp.
- Conseil de pro : Si le fichier n'est pas visible, basculez le filtre de type de fichier sur Tous les fichiers.
-
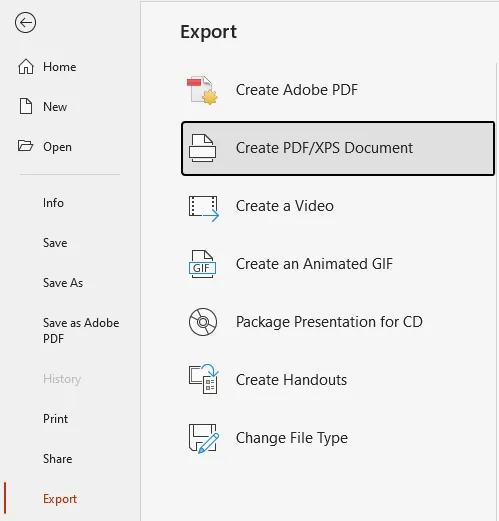
Allez dans Fichier > Exporter > Créer un document PDF/XPS.
- Alternative : Appuyez sur F12, puis sélectionnez PDF (*.pdf) pour un enregistrement plus rapide.
-
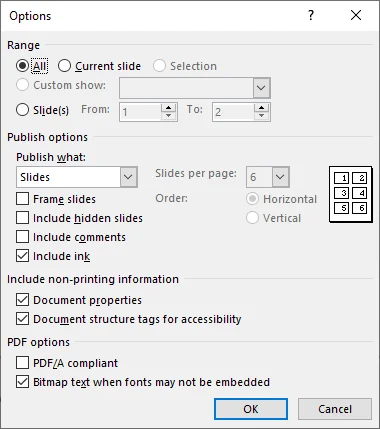
Cliquez sur le bouton Options... pour configurer les paramètres tels que :
- Inclure les informations non imprimables (conserver les propriétés du document ou les balises de structure)
- Mettre en bitmap le texte lorsque les polices ne peuvent pas être incorporées (cela garantit que le PDF s'affiche de manière cohérente sur tous les appareils).
-
Choisissez le dossier de destination et cliquez sur Publier pour exporter votre présentation au format PDF.
Conseils et notes :
- Les styles avancés ou les formes spécifiques à l'ODF peuvent nécessiter des ajustements manuels mineurs après l'ouverture dans PowerPoint.
- PowerPoint 2024 et Microsoft 365 prennent en charge ODF 1.4, tandis que PowerPoint 2013-2019 prend en charge ODF 1.2. Les versions plus anciennes comme PowerPoint 2010 ne prennent en charge que ODF 1.1, qui offre une compatibilité limitée avec les fichiers ODP plus récents.
Quand l'utiliser :
Lorsque vous préférez l'interface PowerPoint pour la conversion et que vous n'avez pas besoin d'une précision de mise en page parfaite.
Vous souhaitez convertir ODP en PPTX ? Lisez notre guide de conversion.
Méthode 3 - Convertir ODP en PDF à l'aide d'outils en ligne (Aucune installation requise)
Pour les utilisateurs qui souhaitent une solution sans logiciel, les convertisseurs en ligne ODP vers PDF sont une option rapide et pratique. Ils fonctionnent sur tous les appareils et ne nécessitent aucune configuration.
Convertisseurs en ligne recommandés :
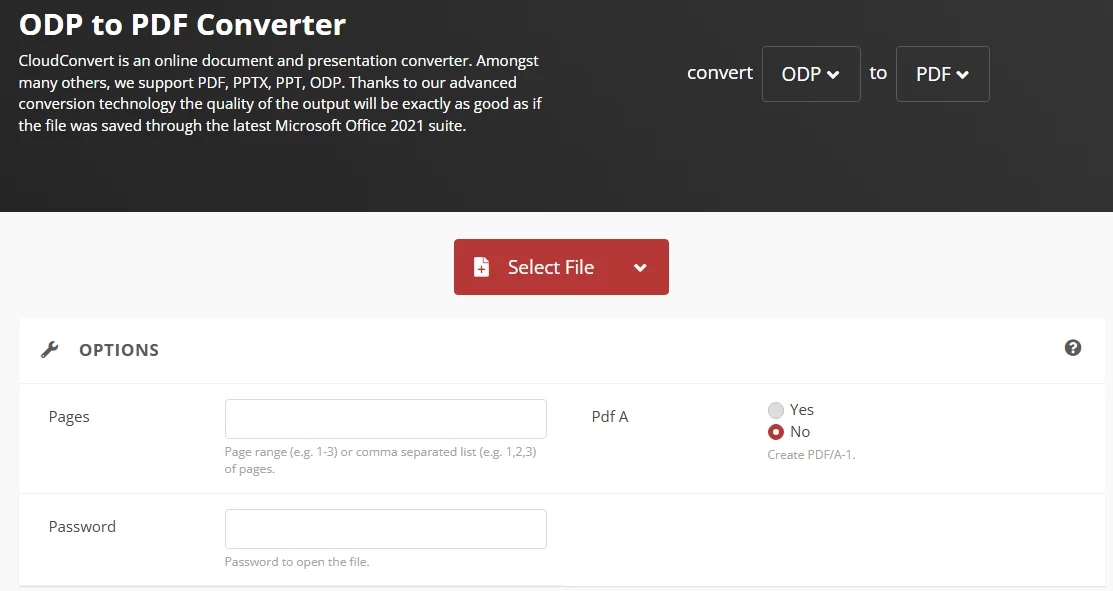
- CloudConvert - Prend en charge la conversion ODP en PDF ainsi qu'une large gamme d'autres formats de fichiers. Offre des options de personnalisation telles que la plage de pages et le chiffrement par mot de passe.
- Google Slides - Une plateforme basée sur le cloud qui peut ouvrir des fichiers ODP et les exporter en PDF, en conservant la plupart des mises en page et des polices.
- Zamzar - Un convertisseur en ligne convivial qui convertit facilement des présentations, y compris des fichiers ODP, en PDF. Aucune installation requise.
Étapes pour convertir ODP en PDF en ligne :
-
Accédez au site Web du convertisseur en ligne de votre choix (par exemple, CloudConvert).
-
Téléchargez votre fichier ODP.
-
Sélectionnez PDF comme format de sortie.
-
Cliquez sur Convertir et attendez que le processus soit terminé.
-
Téléchargez votre PDF converti une fois le processus terminé.
Avertissement de sécurité et conseils :
- Bien que pratiques, les outils en ligne ne conviennent pas aux contenus sensibles ou propriétaires. Vérifiez toujours les politiques de confidentialité de la plateforme avant de télécharger vos fichiers.
- Certains convertisseurs en ligne ont des limites de taille de fichier (généralement 50-100 Mo). Si nécessaire, divisez les grandes présentations PowerPoint avant de les télécharger.
Quand l'utiliser :
Idéal pour des conversions rapides et occasionnelles, surtout lorsque vous êtes en déplacement et que vous avez besoin de convertir des fichiers depuis n'importe quel appareil.
Méthode 4 - Automatiser la conversion de fichiers ODP en PDF avec des outils en ligne de commande
Pour les utilisateurs qui souhaitent automatiser la conversion ODP en PDF dans des scripts ou des flux de travail planifiés, LibreOffice fournit une interface en ligne de commande qui s'exécute en mode sans interface graphique. Cela permet au processus de conversion de s'exécuter en arrière-plan sans ouvrir l'application, ce qui le rend adapté à l'intégration dans des systèmes automatisés et des tâches planifiées.
Étapes :
-
Installer LibreOffice :
Assurez-vous que LibreOffice est installé et accessible depuis la ligne de commande.
-
Ouvrir le terminal / l'invite de commande :
Naviguez jusqu'au dossier où se trouve votre fichier ODP.
-
Exécuter la commande de conversion :
Utilisez LibreOffice en mode sans interface graphique pour convertir votre fichier ODP :
soffice --headless --convert-to pdf "votre_fichier.odp" -
Intégrer dans des scripts d'automatisation :
Vous pouvez inclure cette commande dans des scripts Bash, des scripts PowerShell ou des tâches planifiées pour déclencher automatiquement la conversion en fonction de l'heure ou des événements système. -
Vérifier la sortie PDF :
Après l'exécution, vérifiez le PDF généré pour vous assurer que la mise en forme et la mise en page sont correctement conservées.
Quand l'utiliser :
Idéal pour les développeurs et les professionnels de l'informatique qui ont besoin d'une conversion automatisée dans des environnements basés sur des scripts ou planifiés.
Méthode 5 - Convertir par lots ODP en PDF à l'aide de C# (Solution développeur)
Pour les développeurs et les équipes techniques gérant de grands volumes de fichiers ODP, la conversion manuelle est inefficace. En utilisant C# avec une bibliothèque de présentation indépendante comme Spire.Presentation pour .NET, vous pouvez gérer des conversions ODP vers PDF en masse rapidement et sans problème, sans installer LibreOffice ou PowerPoint.
Étapes :
-
Installer Spire.Presentation pour .NET :
Installez Spire.Presentation depuis NuGet via la commande suivante, ou téléchargez-le depuis le site Web officiel.
Install-Package Spire.Presentation -
Écrire du code C# pour la conversion par lots :
Voici un exemple de la façon de convertir plusieurs fichiers ODP en PDF en une seule fois :
using Spire.Presentation;
using System.IO;

class Program
{
    static void Main()
    {
        string[] files = Directory.GetFiles(@"C:\Chemin\Vers\Dossier_ODP", "*.odp"); // Remplacez le chemin par le chemin de votre dossier
        foreach (string file in files)
        {
            Presentation presentation = new Presentation();
            presentation.LoadFromFile(file);
            string pdfOutput = Path.ChangeExtension(file, ".pdf");
            presentation.SaveToFile(pdfOutput, FileFormat.PDF);
        }
    }
}
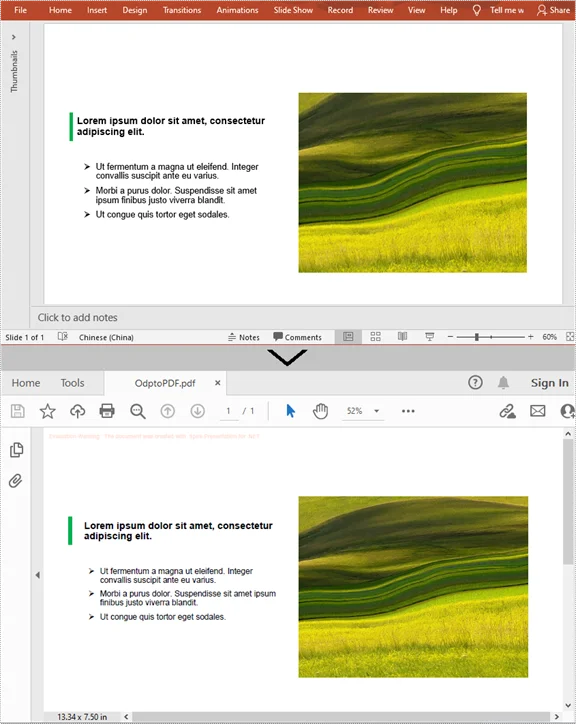
Ce script traite tous les fichiers ODP du dossier spécifié et les enregistre en tant que PDF dans le même dossier. Placez simplement vos fichiers ODP dans un répertoire, et le programme s'occupera de la conversion.
Sortie :
Conseil :
Vous pouvez personnaliser davantage le script pour inclure la gestion des erreurs, la journalisation ou le traitement de fichiers supplémentaire selon vos besoins.
Quand l'utiliser :
Idéal pour les développeurs ou les équipes qui ont besoin d'effectuer des conversions ODP vers PDF en masse, en particulier lors du traitement de grands volumes de fichiers sur un serveur.
Comparaison de toutes les méthodes de conversion ODP en PDF
| Méthode | Idéal pour | Facilité d'utilisation | Précision | Automatisation |
|---|---|---|---|---|
| LibreOffice/OpenOffice | Conversion de haute qualité | Facile | ★★★★★ | Faible |
| PowerPoint | Utilisateurs d'Office | Facile | ★★★☆ | Faible |
| Outils en ligne | Conversion rapide | Très facile | ★★★ | Aucune |
| Outils en ligne de commande | Utilisateurs avancés | Moyen | ★★★★ | Élevée |
| Automatisation C# | Développeurs / traitement par lots | Avancé | ★★★★ | Très élevée |
Quelle méthode devriez-vous choisir ?
Choisissez la bonne méthode ODP vers PDF en fonction de vos besoins et de votre flux de travail :
- Pour la précision, les applications de bureau comme LibreOffice sont idéales.
- Pour une utilisation rapide, les outils en ligne suffisent.
- Pour l'automatisation ou le traitement par lots, les solutions en ligne de commande et C# offrent le plus de flexibilité.
Conseils pour une meilleure conversion ODP en PDF
- Testez la sortie sur différents appareils pour assurer l'intégrité de la mise en page.
- Évitez les animations trop complexes si vous visez une compatibilité universelle.
- Pour l'automatisation, validez les fichiers d'entrée pour éviter les plantages lors du traitement par lots.
- Supprimez les fichiers téléchargés des services en ligne après le téléchargement pour maintenir la sécurité.
Problèmes de conversion courants et solutions
- Les polices ne s'affichent pas correctement : Intégrez ou vectorisez les polices dans LibreOffice/OpenOffice. Dans PowerPoint, activez "Mettre en bitmap le texte lorsque les polices ne peuvent pas être incorporées".
- Tailles de fichier volumineuses après conversion : Utilisez la compression d'image pendant l'exportation ou configurez les paramètres de compression dans les convertisseurs en ligne.
- Décalages de mise en page PDF : Utilisez des convertisseurs ODP natifs (LibreOffice/OpenOffice) et évitez les animations avancées ou les formes spécifiques à l'ODF dans PowerPoint.
- Impossible d'ouvrir le fichier ODP dans PowerPoint : Assurez-vous que votre version de PowerPoint prend en charge ODP 1.4+. Sinon, enregistrez d'abord en PPTX dans LibreOffice/OpenOffice.
- La conversion par lots échoue ou ignore des fichiers : Vérifiez les chemins et les extensions de fichiers. Incluez la gestion des erreurs dans les scripts.
- Échec du téléchargement du convertisseur en ligne : Divisez les fichiers volumineux ou utilisez un outil de bureau. Assurez une connexion Internet stable.
Questions fréquemment posées
Q1 : Puis-je convertir ODP en PDF gratuitement ?
R1 : Oui, les convertisseurs en ligne comme CloudConvert, Zamzar et Online2PDF proposent des services gratuits pour convertir des fichiers ODP en PDF. Cependant, certains outils gratuits peuvent avoir des limitations de taille de fichier.
Q2 : Les animations ou les transitions seront-elles conservées lors de la conversion d'ODP en PDF ?
R2 : Non. Le format PDF ne prend pas en charge les animations. Utilisez des notes ou des exportations vidéo si les animations sont importantes.
Q3 : Puis-je convertir plusieurs fichiers ODP en PDF à la fois ?
R3 : Oui. Pour la conversion par lots, utilisez l'automatisation C#. Les convertisseurs en ligne ne prennent généralement en charge qu'un seul fichier à la fois ou limitent les tailles de lots.
Q4 : Pourquoi certains éléments ODP semblent-ils différents dans PowerPoint ?
R4 : PowerPoint ne prend pas entièrement en charge toutes les fonctionnalités spécifiques à OpenDocument, telles que les formes personnalisées ou les styles avancés. Utilisez LibreOffice/OpenOffice pour une conversion plus précise.
Q5 : Comment puis-je réduire la taille du PDF lors de la conversion ?
R5 : Réduisez la résolution des images, supprimez les objets inutiles ou activez les options de compression dans la boîte de dialogue d'exportation PDF. Certains convertisseurs en ligne proposent également des paramètres d'optimisation PDF.
Voir aussi
Convertir ODP a PDF: 5 formas confiables (escritorio, en línea y C#)
Tabla de Contenidos
- Método 1 - LibreOffice / OpenOffice (Conversión de Escritorio de Alta Precisión)
- Método 2 - Microsoft PowerPoint (Conversión Basada en Office)
- Método 3 - Herramientas en Línea (No Requiere Instalación)
- Método 4 - Herramientas de Línea de Comandos (Automatización y Scripting)
- Método 5 - Procesamiento por Lotes en C# (Solución para Desarrolladores)
Los archivos ODP (OpenDocument Presentation) se utilizan ampliamente en entornos de código abierto para crear y colaborar en presentaciones. Sin embargo, compartir archivos ODP puede ser complicado, ya que no todo el mundo tiene el software necesario para verlos. Convertir ODP a PDF asegura que tus diapositivas sean visibles en todas partes y estén listas para compartir, imprimir o archivar.
En esta guía, te mostraremos 5 métodos probados y confiables para convertir ODP a PDF conservando el formato, desde aplicaciones de escritorio y herramientas en línea hasta el procesamiento por lotes automatizado usando C#.
Resumen de Métodos de ODP a PDF
- Método 1 - LibreOffice / OpenOffice (Conversión de Escritorio de Alta Precisión)
- Método 2 - Microsoft PowerPoint (Conversión Basada en Office)
- Método 3 - Herramientas en Línea (No Requiere Instalación)
- Método 4 - Herramientas de Línea de Comandos (Automatización y Scripting)
- Método 5 - Procesamiento por Lotes en C# (Solución para Desarrolladores)
¿Qué es un Archivo ODP?
Un archivo ODP es un formato de presentación editable que pertenece al estándar OpenDocument. Se crea y edita principalmente utilizando suites ofimáticas abiertas como:
- LibreOffice Impress
- Apache OpenOffice Impress
A diferencia del formato PDF universal, que congela el contenido para su distribución, los archivos ODP están diseñados para la modificación continua y requieren un visor o editor compatible para abrirlos.
¿Por qué Convertir ODP a PDF?
Convertir ODP a PDF ayuda a resolver varios problemas prácticos en el uso real:
- Asegura que tus diapositivas se vean de manera consistente en Windows, macOS, Linux y dispositivos móviles.
- Abre presentaciones sin instalar LibreOffice u OpenOffice.
- Evita cambios de diseño al abrir en diferentes dispositivos.
- Crea presentaciones profesionales listas para imprimir con formato consistente.
- Almacena presentaciones en un formato estable y no editable para archivo o documentación.
Con estos beneficios en mente, exploremos los métodos más confiables para lograr esta conversión.
Método 1 - Convertir ODP a PDF a través de LibreOffice / OpenOffice (Conversión de Escritorio de Alta Precisión)
Si deseas convertir ODP a PDF sin problemas de formato, usar LibreOffice u OpenOffice es el enfoque más confiable. Estas aplicaciones admiten de forma nativa el formato OpenDocument, lo que significa que pueden renderizar tus diapositivas exactamente como fueron diseñadas, evitando los cambios de diseño o errores de fuente que a menudo se encuentran en convertidores de terceros.
Guía Paso a Paso (Usando LibreOffice Impress como ejemplo):
-
Abre tu archivo ODP en LibreOffice Impress.
-
Navega al menú superior y selecciona Archivo > Exportar como > Exportar como PDF.
-
En el cuadro de diálogo emergente, personaliza la configuración de PDF como compresión de imágenes, marcas de agua y rango de páginas.
-
Haz clic en Exportar, elige una carpeta de destino y presiona Guardar.
Consejos Profesionales:
- Usa Archivo > Exportar como > Exportar Directamente como PDF para una conversión más rápida si no se necesita personalización.
- Este método funciona de manera idéntica en Windows, macOS y Linux.
Cuándo Usar:
Mejor para casos donde la precisión del diseño es crítica, como presentaciones de negocios, informes o documentos dirigidos a clientes.
Método 2 - Exportar ODP como PDF con Microsoft PowerPoint (Conversión Basada en Office)
Si eres usuario de Office, Microsoft PowerPoint ofrece una solución fácil para exportar archivos ODP a PDF. Este método está disponible en PowerPoint 2010 y versiones más recientes, así como en Microsoft PowerPoint 365. Es una excelente opción para aquellos que usan PowerPoint con frecuencia y desean convertir archivos ODP sin herramientas externas.
Pasos:
-
Inicia Microsoft PowerPoint, ve a Archivo > Abrir y selecciona tu archivo .odp.
- Consejo Profesional: Si el archivo no es visible, cambia el filtro de tipo de archivo a Todos los Archivos.
-
Ve a Archivo > Exportar > Crear documento PDF/XPS.
- Alternativa: Presiona F12, luego selecciona PDF (*.pdf) para un guardado más rápido.
-
Haz clic en el botón Opciones... para configurar ajustes como:
- Incluir información no imprimible (conservar propiedades del documento o etiquetas de estructura)
- Mapear texto como mapa de bits cuando las fuentes no se puedan incrustar (esto asegura que el PDF se vea consistente en todos los dispositivos).
-
Elige la carpeta de destino y haz clic en Publicar para exportar tu presentación como PDF.
Consejos y Notas:
- Los estilos avanzados o las formas exclusivas de ODF podrían requerir un ajuste manual menor después de abrirlos en PowerPoint.
- PowerPoint 2024 y Microsoft 365 admiten ODF 1.4, mientras que PowerPoint 2013–2019 admiten ODF 1.2. Versiones más antiguas como PowerPoint 2010 solo admiten ODF 1.1, lo que ofrece compatibilidad limitada con archivos ODP más nuevos.
Cuándo Usar:
Cuando prefieres la interfaz de PowerPoint para la conversión y no necesitas una precisión de diseño perfecta.
¿Quieres convertir ODP a PPTX? Lee nuestra guía de conversión.
Método 3 - Convertir ODP a PDF Usando Herramientas en Línea (No Requiere Instalación)
Para los usuarios que desean una solución sin software, los convertidores en línea de ODP a PDF son una opción rápida y conveniente. Funcionan en varios dispositivos y no requieren configuración.
Convertidores en Línea Recomendados:
- CloudConvert - Admite la conversión de ODP a PDF junto con una amplia gama de otros formatos de archivo. Ofrece opciones de personalización como rango de páginas y cifrado con contraseña.
- Google Slides - Una plataforma basada en la nube que puede abrir archivos ODP y exportarlos como PDF, manteniendo la mayor parte del diseño y el formato de fuente.
- Zamzar - Un convertidor en línea fácil de usar que convierte fácilmente presentaciones, incluidos archivos ODP, a PDF. No requiere instalación.
Pasos para Convertir ODP a PDF en Línea:
-
Ve al sitio web de tu convertidor en línea elegido (por ejemplo, CloudConvert).
-
Sube tu archivo ODP.
-
Selecciona PDF como formato de salida.
-
Haz clic en Convertir y espera a que el proceso se complete.
-
Descarga tu PDF convertido una vez que el proceso finalice.
Advertencia de Seguridad y Consejos:
- Aunque son convenientes, las herramientas en línea no son ideales para contenido sensible o propietario. Siempre verifica las políticas de privacidad de la plataforma antes de subir tus archivos.
- Algunos convertidores en línea tienen límites de tamaño de archivo (generalmente 50-100M). Si es necesario, divide presentaciones grandes de PowerPoint antes de subir.
Cuándo Usar:
Ideal para conversiones rápidas y ocasionales, especialmente cuando estás en movimiento y necesitas convertir archivos desde cualquier dispositivo.
Método 4 - Automatizar la Conversión de Archivos ODP a PDF con Herramientas de Línea de Comandos
Para los usuarios que desean automatizar la conversión de ODP a PDF en scripts o flujos de trabajo programados, LibreOffice proporciona una interfaz de línea de comandos que se ejecuta en modo sin cabeza. Esto permite que el proceso de conversión se ejecute en segundo plano sin abrir la aplicación, lo que lo hace adecuado para la integración en sistemas automatizados y tareas programadas.
Pasos:
-
Instalar LibreOffice:
Asegúrate de que LibreOffice esté instalado y sea accesible desde la línea de comandos.
-
Abrir Terminal / Símbolo del Sistema:
Navega a la carpeta donde se encuentra tu archivo ODP.
-
Ejecutar el comando de conversión:
Usa LibreOffice en modo sin cabeza para convertir tu archivo ODP:
soffice --headless --convert-to pdf "tuarchivo.odp" -
Integrar en scripts de automatización:
Puedes incluir este comando en scripts Bash, scripts de PowerShell o tareas programadas para activar la conversión automáticamente según la hora o eventos del sistema. -
Verificar la salida PDF:
Después de la ejecución, revisa el PDF generado para asegurarte de que el formato y el diseño se conserven correctamente.
Cuándo Usar:
Ideal para desarrolladores y profesionales de TI que necesitan conversión automatizada en entornos basados en scripts o programados.
Método 5 - Convertir por Lotes ODP a PDF Usando C# (Solución para Desarrolladores)
Para desarrolladores y equipos técnicos que gestionan grandes volúmenes de archivos ODP, la conversión manual es ineficiente. Usando C# con una biblioteca de presentación independiente como Spire.Presentation para .NET, puedes manejar conversiones masivas de ODP a PDF de manera rápida y fluida sin instalar LibreOffice o PowerPoint.
Pasos:
-
Instalar Spire.Presentation para .NET:
Instala Spire.Presentation desde NuGet a través del siguiente comando, o descárgalo desde el sitio web oficial.
Install-Package Spire.Presentation -
Escribir Código C# para Conversión por Lotes:
A continuación, se muestra un ejemplo de cómo convertir varios archivos ODP a PDF en un solo paso:
using Spire.Presentation;
using System.IO;

class Program
{
    static void Main()
    {
        string[] files = Directory.GetFiles(@"C:\Path\To\ODP_Folder", "*.odp"); // Reemplaza la ruta con la de tu carpeta
        foreach (string file in files)
        {
            Presentation presentation = new Presentation();
            presentation.LoadFromFile(file);
            string pdfOutput = Path.ChangeExtension(file, ".pdf");
            presentation.SaveToFile(pdfOutput, FileFormat.PDF);
        }
    }
}
Este script procesa todos los archivos ODP en la carpeta especificada y los guarda como PDF en la misma carpeta. Simplemente coloca tus archivos ODP en un directorio y el programa se encargará de la conversión.
Salida:
Consejo:
Puedes personalizar aún más el script para incluir manejo de errores, registro o procesamiento de archivos adicional según sea necesario.
Cuándo Usar:
Ideal para desarrolladores o equipos que necesitan realizar conversiones masivas de ODP a PDF, especialmente al manejar grandes volúmenes de archivos en un servidor.
Comparación de Todos los Métodos de ODP a PDF
| Método | Mejor Para | Facilidad de Uso | Precisión | Automatización |
|---|---|---|---|---|
| LibreOffice/OpenOffice | Conversión de alta calidad | Fácil | ★★★★★ | Baja |
| PowerPoint | Usuarios de Office | Fácil | ★★★☆ | Baja |
| Herramientas en Línea | Conversión rápida | Muy fácil | ★★★ | Ninguna |
| Herramientas de Línea de Comandos | Usuarios avanzados | Media | ★★★★ | Alta |
| Automatización C# | Desarrolladores / procesamiento por lotes | Avanzado | ★★★★ | Muy Alta |
¿Qué método deberías elegir?
Elige el método adecuado de ODP a PDF según tus necesidades y flujo de trabajo:
- Para precisión, las aplicaciones de escritorio como LibreOffice son ideales.
- Para uso rápido, las herramientas en línea son suficientes.
- Para automatización o procesamiento por lotes, las soluciones de línea de comandos y C# ofrecen la mayor flexibilidad.
Consejos para una Mejor Conversión de ODP a PDF
- Prueba la salida en diferentes dispositivos para asegurar la integridad del diseño.
- Evita animaciones excesivamente complejas si buscas compatibilidad universal.
- Para la automatización, valida los archivos de entrada para evitar fallos durante el procesamiento por lotes.
- Elimina los archivos subidos de los servicios en línea después de descargarlos para mantener la seguridad.
Problemas Comunes de Conversión y Soluciones
- Fuentes No Se Muestran Correctamente: Incrusta o contornea fuentes en LibreOffice/OpenOffice. En PowerPoint, habilita "Mapear texto como mapa de bits cuando las fuentes no se puedan incrustar".
- Archivos PDF Grandes Después de la Conversión: Usa compresión de imágenes durante la exportación o configura las opciones de compresión en los convertidores en línea.
- Cambios de Diseño en PDF: Usa convertidores ODP nativos (LibreOffice/OpenOffice) y evita animaciones avanzadas o formas exclusivas de ODF en PowerPoint.
- No se Puede Abrir Archivo ODP en PowerPoint: Asegúrate de que tu versión de PowerPoint admita ODP 1.4+. De lo contrario, guarda como PPTX en LibreOffice/OpenOffice primero.
- Falla o Omite Archivos la Conversión por Lotes: Verifica las rutas y extensiones de los archivos. Incluye manejo de errores en los scripts.
- Falla la Subida del Convertidor en Línea: Divide archivos grandes o usa una herramienta de escritorio. Asegura una conexión a Internet estable.
Preguntas Frecuentes
P1: ¿Puedo convertir ODP a PDF gratis?
R1: Sí, los convertidores en línea como CloudConvert, Zamzar y Online2PDF ofrecen servicios gratuitos para convertir archivos ODP a PDF. Sin embargo, algunas herramientas gratuitas pueden tener limitaciones de tamaño de archivo.
P2: ¿Se conservarán las animaciones o transiciones al convertir ODP a PDF?
R2: No. El formato PDF no admite animaciones. Usa notas o exportaciones de video si las animaciones son importantes.
P3: ¿Puedo convertir varios archivos ODP a PDF a la vez?
R3: Sí. Para la conversión masiva, usa la automatización C#. Los convertidores en línea generalmente solo admiten un archivo a la vez o limitan los tamaños de lote.
P4: ¿Por qué algunos elementos ODP se ven diferentes en PowerPoint?
R4: PowerPoint no admite completamente todas las características específicas de OpenDocument, como formas personalizadas o estilos avanzados. Usa LibreOffice/OpenOffice para la conversión más precisa.
P5: ¿Cómo puedo reducir el tamaño del PDF durante la conversión?
R5: Reduce la resolución de la imagen, elimina objetos innecesarios o habilita las opciones de compresión en el cuadro de diálogo de exportación de PDF. Algunos convertidores en línea también ofrecen configuraciones de optimización de PDF.
Ver También
ODP in PDF konvertieren: 5 zuverlässige Wege (Desktop, Online & C#)
Inhaltsverzeichnis
- Methode 1 - LibreOffice / OpenOffice (Hochpräzise Desktop-Konvertierung)
- Methode 2 - Microsoft PowerPoint (Office-basierte Konvertierung)
- Methode 3 - Online-Tools (Keine Installation erforderlich)
- Methode 4 - Befehlszeilen-Tools (Automatisierung & Skripterstellung)
- Methode 5 - C#-Stapelverarbeitung (Entwicklerlösung)
ODP (OpenDocument Presentation)-Dateien werden in Open-Source-Umgebungen häufig zum Erstellen und Zusammenarbeiten an Präsentationen verwendet. Das Teilen von ODP-Dateien kann jedoch schwierig sein, da nicht jeder über die erforderliche Software zum Anzeigen verfügt. Die Konvertierung von ODP in PDF stellt sicher, dass Ihre Folien überall angezeigt werden können und zum Teilen, Drucken oder Archivieren bereit sind.
In dieser Anleitung führen wir Sie durch 5 bewährte und zuverlässige Methoden zur Konvertierung von ODP in PDF unter Beibehaltung der Formatierung, von Desktop-Anwendungen und Online-Tools bis hin zur automatisierten Stapelverarbeitung mit C#.
Übersicht der ODP-zu-PDF-Methoden
- Methode 1 - LibreOffice / OpenOffice (Hochpräzise Desktop-Konvertierung)
- Methode 2 - Microsoft PowerPoint (Office-basierte Konvertierung)
- Methode 3 - Online-Tools (Keine Installation erforderlich)
- Methode 4 - Befehlszeilen-Tools (Automatisierung & Skripterstellung)
- Methode 5 - C#-Stapelverarbeitung (Entwicklerlösung)
Was ist eine ODP-Datei?
Eine ODP-Datei ist ein bearbeitbares Präsentationsformat, das zum OpenDocument-Standard gehört. Sie wird hauptsächlich mit Open-Office-Suiten wie den folgenden erstellt und bearbeitet:
- LibreOffice Impress
- Apache OpenOffice Impress
Im Gegensatz zum universellen PDF-Format, das Inhalte für die Verteilung einfriert, sind ODP-Dateien für die fortlaufende Bearbeitung konzipiert und erfordern einen kompatiblen Betrachter oder Editor zum Öffnen.
Warum ODP in PDF konvertieren?
Die Konvertierung von ODP in PDF hilft bei der Lösung mehrerer praktischer Probleme im realen Einsatz:
- Stellen Sie sicher, dass Ihre Folien auf Windows, macOS, Linux und mobilen Geräten konsistent aussehen.
- Öffnen Sie Präsentationen, ohne LibreOffice oder OpenOffice installieren zu müssen.
- Verhindern Sie Layoutverschiebungen beim Öffnen auf verschiedenen Geräten.
- Erstellen Sie professionelle, druckfertige Präsentationen mit konsistenter Formatierung.
- Speichern Sie Präsentationen in einem stabilen, nicht bearbeitbaren Format zur Archivierung oder Dokumentation.
Mit diesen Vorteilen im Hinterkopf wollen wir nun die zuverlässigsten Methoden für diese Konvertierung untersuchen.
Methode 1 - ODP in PDF über LibreOffice / OpenOffice konvertieren (Hochpräzise Desktop-Konvertierung)
Wenn Sie ODP ohne Formatierungsprobleme in PDF konvertieren möchten, ist die Verwendung von LibreOffice oder OpenOffice der zuverlässigste Ansatz. Diese Anwendungen unterstützen das OpenDocument-Format nativ, was bedeutet, dass sie Ihre Folien genau so rendern können, wie sie entworfen wurden – und so Layoutverschiebungen oder Schriftfehler vermeiden, die bei Drittanbieter-Konvertern häufig auftreten.
Schritt-für-Schritt-Anleitung (Beispiel mit LibreOffice Impress):
-
Öffnen Sie Ihre ODP-Datei in LibreOffice Impress.
-
Navigieren Sie zum oberen Menü und wählen Sie Datei > Exportieren als > Als PDF exportieren.
-
Passen Sie im Pop-up-Dialogfeld PDF-Einstellungen wie Bildkomprimierung, Wasserzeichen und Seitenbereich an.
-
Klicken Sie auf Exportieren, wählen Sie einen Zielordner und klicken Sie auf Speichern.
Profi-Tipps:
- Verwenden Sie Datei > Exportieren als > Direkt als PDF exportieren für eine schnellere Konvertierung, wenn keine Anpassung erforderlich ist.
- Diese Methode funktioniert identisch unter Windows, macOS und Linux.
Wann verwenden:
Am besten für Fälle, in denen die Layoutgenauigkeit entscheidend ist, z. B. für Geschäftspräsentationen, Berichte oder kundenorientierte Dokumente.
Methode 2 - ODP als PDF mit Microsoft PowerPoint exportieren (Office-basierte Konvertierung)
Wenn Sie ein Office-Benutzer sind, bietet Microsoft PowerPoint eine einfache Lösung zum Exportieren von ODP-Dateien in PDFs. Diese Methode ist in PowerPoint 2010 und neueren Versionen sowie in Microsoft PowerPoint 365 verfügbar. Sie ist eine großartige Wahl für diejenigen, die PowerPoint häufig verwenden und ODP-Dateien ohne externe Tools konvertieren möchten.
Schritte:
-
Starten Sie Microsoft PowerPoint, gehen Sie zu Datei > Öffnen und wählen Sie Ihre .odp-Datei aus.
- Profi-Tipp: Wenn die Datei nicht sichtbar ist, wechseln Sie den Dateitypfilter auf Alle Dateien.
-
Gehen Sie zu Datei > Exportieren > PDF-/XPS-Dokument erstellen.
- Alternative: Drücken Sie F12 und wählen Sie dann PDF (*.pdf) für ein schnelleres Speichern.
-
Klicken Sie auf die Schaltfläche Optionen..., um Einstellungen zu konfigurieren, wie z. B.:
- Nicht druckbare Informationen einschließen (Dokumenteigenschaften oder Struktur-Tags beibehalten)
- Text als Bitmap, wenn Schriftarten möglicherweise nicht eingebettet sind (dies stellt sicher, dass das PDF auf allen Geräten konsistent aussieht).
-
Wählen Sie den Zielordner und klicken Sie auf Veröffentlichen, um Ihre Präsentation als PDF zu exportieren.
Tipps und Hinweise:
- Erweiterte Stile oder ODF-spezifische Formen erfordern möglicherweise nach dem Öffnen in PowerPoint geringfügige manuelle Anpassungen.
- PowerPoint 2024 und Microsoft 365 unterstützen ODF 1.4, während PowerPoint 2013–2019 ODF 1.2 unterstützt. Ältere Versionen wie PowerPoint 2010 unterstützen nur ODF 1.1, das eine eingeschränkte Kompatibilität mit neueren ODP-Dateien bietet.
Wann verwenden:
Wenn Sie die PowerPoint-Oberfläche für die Konvertierung bevorzugen und keine perfekte Layoutgenauigkeit benötigen.
Möchten Sie ODP in PPTX konvertieren? Lesen Sie unsere Konvertierungsanleitung.
Methode 3 - ODP mit Online-Tools in PDF konvertieren (Keine Installation erforderlich)
Für Benutzer, die eine softwarefreie Lösung wünschen, sind Online-ODP-zu-PDF-Konverter eine schnelle und bequeme Option. Sie funktionieren geräteübergreifend und erfordern keine Einrichtung.
Empfohlene Online-Konverter:
- CloudConvert - Unterstützt die ODP-zu-PDF-Konvertierung zusammen mit einer Vielzahl anderer Dateiformate. Bietet Anpassungsoptionen wie Seitenbereich und Passwortverschlüsselung.
- Google Slides - Eine cloudbasierte Plattform, die ODP-Dateien öffnen und als PDFs exportieren kann, wobei die meisten Layout- und Schriftformatierungen beibehalten werden.
- Zamzar - Ein benutzerfreundlicher Online-Konverter, der Präsentationen, einschließlich ODP-Dateien, einfach in PDFs konvertiert. Keine Installation erforderlich.
Schritte zur Online-Konvertierung von ODP in PDF:
-
Rufen Sie die Website Ihres gewählten Online-Konverters auf (z. B. CloudConvert).
-
Laden Sie Ihre ODP-Datei hoch.
-
Wählen Sie PDF als Ausgabeformat.
-
Klicken Sie auf Konvertieren und warten Sie, bis der Vorgang abgeschlossen ist.
-
Laden Sie Ihr konvertiertes PDF herunter, sobald der Vorgang abgeschlossen ist.
Sicherheitshinweis und Tipps:
- Obwohl praktisch, sind Online-Tools nicht ideal für sensible oder proprietäre Inhalte. Überprüfen Sie immer die Datenschutzrichtlinien der Plattform, bevor Sie Ihre Dateien hochladen.
- Einige Online-Konverter haben Dateigrößenbeschränkungen (normalerweise 50-100 MB). Teilen Sie bei Bedarf große PowerPoint-Präsentationen vor dem Hochladen auf.
Wann verwenden:
Ideal für schnelle, gelegentliche Konvertierungen, insbesondere wenn Sie unterwegs sind und Dateien von jedem Gerät aus konvertieren müssen.
Methode 4 - Automatisierte ODP-Datei-zu-PDF-Konvertierung mit Befehlszeilen-Tools
Für Benutzer, die die ODP-zu-PDF-Konvertierung in Skripten oder geplanten Arbeitsabläufen automatisieren möchten, bietet LibreOffice eine Befehlszeilenschnittstelle, die im Headless-Modus ausgeführt wird. Dies ermöglicht die Ausführung des Konvertierungsprozesses im Hintergrund, ohne die Anwendung zu öffnen, und eignet sich daher für die Integration in automatisierte Systeme und geplante Aufgaben.
Schritte:
-
LibreOffice installieren:
Stellen Sie sicher, dass LibreOffice installiert und von der Befehlszeile aus zugänglich ist.
-
Terminal / Eingabeaufforderung öffnen:
Navigieren Sie zu dem Ordner, in dem sich Ihre ODP-Datei befindet.
-
Befehl zur Konvertierung ausführen:
Verwenden Sie LibreOffice im Headless-Modus, um Ihre ODP-Datei zu konvertieren:
soffice --headless --convert-to pdf "IhreDatei.odp" -
In Automatisierungsskripte integrieren:
Sie können diesen Befehl in Bash-Skripte, PowerShell-Skripte oder geplante Aufgaben aufnehmen, um die Konvertierung automatisch nach Zeit oder Systemereignissen auszulösen. -
PDF-Ausgabe überprüfen:
Überprüfen Sie nach der Ausführung die generierte PDF-Datei, um sicherzustellen, dass Formatierung und Layout korrekt beibehalten wurden.
Wann verwenden:
Ideal für Entwickler und IT-Profis, die eine automatisierte Konvertierung in skriptbasierten oder geplanten Umgebungen benötigen.
Methode 5 - ODP-Stapelverarbeitung in PDF mit C# (Entwicklerlösung)
Für Entwickler und technische Teams, die große Mengen von ODP-Dateien verwalten, ist die manuelle Konvertierung ineffizient. Mit C# und einer unabhängigen Präsentationsbibliothek wie Spire.Presentation for .NET können Sie Massenkonvertierungen von ODP in PDF schnell und nahtlos durchführen, ohne LibreOffice oder PowerPoint installieren zu müssen.
Schritte:
-
Spire.Presentation für .NET installieren:
Installieren Sie Spire.Presentation über NuGet mit dem folgenden Befehl oder laden Sie es von der offiziellen Website herunter.
Install-Package Spire.Presentation -
C#-Code für die Stapelverarbeitung schreiben:
Das folgende Beispiel zeigt, wie Sie mehrere ODP-Dateien auf einmal in PDFs konvertieren:
using Spire.Presentation;
using System.IO;

class Program
{
    static void Main()
    {
        string[] files = Directory.GetFiles(@"C:\Pfad\Zum\ODP_Ordner", "*.odp"); // Ersetzen Sie den Pfad durch Ihren Ordnerpfad
        foreach (string file in files)
        {
            Presentation presentation = new Presentation();
            presentation.LoadFromFile(file);
            string pdfOutput = Path.ChangeExtension(file, ".pdf");
            presentation.SaveToFile(pdfOutput, FileFormat.PDF);
        }
    }
}
Dieses Skript verarbeitet alle ODP-Dateien im angegebenen Ordner und speichert sie als PDFs im selben Ordner. Platzieren Sie einfach Ihre ODP-Dateien in einem Verzeichnis, und das Programm kümmert sich um die Konvertierung.
Ausgabe:
Tipp:
Sie können das Skript weiter anpassen, um Fehlerbehandlung, Protokollierung oder zusätzliche Dateiverarbeitung nach Bedarf einzuschließen.
Wann verwenden:
Ideal für Entwickler oder Teams, die Massenkonvertierungen von ODP in PDF durchführen müssen, insbesondere bei der Verarbeitung großer Dateimengen auf einem Server.
Vergleich aller ODP-zu-PDF-Methoden
| Methode | Am besten geeignet für | Benutzerfreundlichkeit | Genauigkeit | Automatisierung |
|---|---|---|---|---|
| LibreOffice/OpenOffice | Hochwertige Konvertierung | Einfach | ★★★★★ | Gering |
| PowerPoint | Office-Benutzer | Einfach | ★★★☆ | Gering |
| Online-Tools | Schnelle Konvertierung | Sehr einfach | ★★★ | Keine |
| Befehlszeilen-Tools | Power-User | Mittel | ★★★★ | Hoch |
| C#-Automatisierung | Entwickler / Stapelverarbeitung | Fortgeschritten | ★★★★ | Sehr hoch |
Welche Methode sollten Sie wählen?
Wählen Sie die richtige ODP-zu-PDF-Methode entsprechend Ihren Bedürfnissen und Ihrem Workflow:
- Für Genauigkeit sind Desktop-Anwendungen wie LibreOffice ideal.
- Für die schnelle Nutzung sind Online-Tools ausreichend.
- Für Automatisierung oder Stapelverarbeitung bieten Befehlszeilen- und C#-Lösungen die größte Flexibilität.
Tipps für eine bessere ODP-zu-PDF-Konvertierung
- Testen Sie die Ausgabe auf verschiedenen Geräten, um die Layoutintegrität zu gewährleisten.
- Vermeiden Sie übermäßig komplexe Animationen, wenn Sie eine universelle Kompatibilität anstreben.
- Validieren Sie bei der Automatisierung Eingabedateien, um Abstürze während der Stapelverarbeitung zu verhindern.
- Löschen Sie hochgeladene Dateien nach dem Download von Online-Diensten, um die Sicherheit zu gewährleisten.
Häufige Konvertierungsprobleme & Lösungen
- Schriftarten werden nicht korrekt angezeigt: Betten Sie Schriftarten in LibreOffice/OpenOffice ein oder konturieren Sie sie. Aktivieren Sie in PowerPoint "Text als Bitmap, wenn Schriftarten möglicherweise nicht eingebettet sind".
- Große Dateigrößen nach der Konvertierung: Verwenden Sie die Bildkomprimierung beim Export oder konfigurieren Sie die Komprimierungseinstellungen in Online-Konvertern.
- Layoutverschiebungen in PDF: Verwenden Sie native ODP-Konverter (LibreOffice/OpenOffice) und vermeiden Sie erweiterte Animationen oder ODF-spezifische Formen in PowerPoint.
- ODP-Datei kann nicht in PowerPoint geöffnet werden: Stellen Sie sicher, dass Ihre PowerPoint-Version ODP 1.4+ unterstützt. Andernfalls speichern Sie zuerst als PPTX in LibreOffice/OpenOffice.
- Stapelverarbeitung schlägt fehl oder überspringt Dateien: Überprüfen Sie Dateipfade und Erweiterungen. Fügen Sie Fehlerbehandlung in Skripte ein.
- Upload bei Online-Konvertern schlägt fehl: Teilen Sie große Dateien auf oder verwenden Sie ein Desktop-Tool. Stellen Sie eine stabile Internetverbindung sicher.
Häufig gestellte Fragen
F1: Kann ich ODP kostenlos in PDF konvertieren?
A1: Ja, Online-Konverter wie CloudConvert, Zamzar und Online2PDF bieten kostenlose Dienste zur Konvertierung von ODP-Dateien in PDF. Einige kostenlose Tools können jedoch Beschränkungen hinsichtlich der Dateigröße haben.
F2: Werden Animationen oder Übergänge bei der Konvertierung von ODP in PDF beibehalten?
A2: Nein. Das PDF-Format unterstützt keine Animationen. Verwenden Sie Notizen oder Videoexporte, wenn Animationen wichtig sind.
F3: Kann ich mehrere ODP-Dateien auf einmal in PDF konvertieren?
A3: Ja. Für die Massenkonvertierung nutzen Sie die C#-Automatisierung. Online-Konverter unterstützen in der Regel nur eine Datei gleichzeitig oder begrenzen die Stapelgrößen.
F4: Warum sehen einige ODP-Elemente in PowerPoint anders aus?
A4: PowerPoint unterstützt nicht alle OpenDocument-spezifischen Funktionen, wie z. B. benutzerdefinierte Formen oder erweiterte Stile, vollständig. Verwenden Sie LibreOffice/OpenOffice für die genaueste Konvertierung.
F5: Wie kann ich die PDF-Größe während der Konvertierung reduzieren?
A5: Reduzieren Sie die Bildauflösung, entfernen Sie unnötige Objekte oder aktivieren Sie Komprimierungsoptionen im PDF-Exportdialog. Einige Online-Konverter bieten auch PDF-Optimierungseinstellungen.
Siehe auch
Конвертировать ODP в PDF: 5 надежных способов (настольные ПК, онлайн и C#)
Оглавление
- Метод 1 - LibreOffice / OpenOffice (Настольное преобразование с высокой точностью)
- Метод 2 - Microsoft PowerPoint (Преобразование в Office)
- Метод 3 - Онлайн-инструменты (Установка не требуется)
- Метод 4 - Инструменты командной строки (Автоматизация и скриптинг)
- Метод 5 - Пакетная обработка C# (Решение для разработчиков)
Файлы ODP (OpenDocument Presentation) широко используются в средах с открытым исходным кодом для создания презентаций и совместной работы над ними. Однако обмен файлами ODP может быть затруднительным, поскольку не у всех есть программное обеспечение, необходимое для их просмотра. Преобразование ODP в PDF гарантирует, что ваши слайды будут доступны для просмотра везде и готовы к обмену, печати или архивированию.
В этом руководстве мы рассмотрим 5 проверенных и надежных методов преобразования ODP в PDF с сохранением форматирования, от настольных приложений и онлайн-инструментов до автоматизированной пакетной обработки с использованием C#.
Обзор методов преобразования ODP в PDF
- Метод 1 - LibreOffice / OpenOffice (Настольное преобразование с высокой точностью)
- Метод 2 - Microsoft PowerPoint (Преобразование в Office)
- Метод 3 - Онлайн-инструменты (Установка не требуется)
- Метод 4 - Инструменты командной строки (Автоматизация и скриптинг)
- Метод 5 - Пакетная обработка C# (Решение для разработчиков)
Что такое файл ODP?
Файл ODP — это редактируемый формат презентации, который относится к стандарту OpenDocument. Он в основном создается и редактируется с помощью офисных пакетов с открытым исходным кодом, таких как:
- LibreOffice Impress
- Apache OpenOffice Impress
В отличие от универсального формата PDF, который фиксирует содержимое для распространения, файлы ODP созданы для постоянного изменения и требуют совместимого просмотрщика или редактора для открытия.
Зачем преобразовывать ODP в PDF?
Преобразование ODP в PDF помогает решить ряд практических проблем в реальном использовании:
- Убедитесь, что ваши слайды выглядят одинаково на Windows, macOS, Linux и мобильных устройствах.
- Открывайте презентации без установки LibreOffice или OpenOffice.
- Предотвратите смещение макета при открытии на разных устройствах.
- Создавайте профессиональные, готовые к печати презентации с единообразным форматированием.
- Храните презентации в стабильном, нередактируемом формате для архивирования или документации.
Учитывая эти преимущества, давайте рассмотрим самые надежные методы для достижения этого преобразования.
Метод 1 - Преобразование ODP в PDF через LibreOffice / OpenOffice (Настольное преобразование с высокой точностью)
Если вы хотите преобразовать ODP в PDF без проблем с форматированием, использование LibreOffice или OpenOffice — самый надежный подход. Эти приложения изначально поддерживают формат OpenDocument, что означает, что они могут отображать ваши слайды точно так, как они были разработаны, избегая смещений макета или ошибок шрифтов, часто встречающихся в сторонних конвертерах.
Пошаговое руководство (на примере LibreOffice Impress):
-
Откройте файл ODP в LibreOffice Impress.
-
Перейдите в верхнее меню и выберите Файл > Экспорт как > Экспорт как PDF.
-
Во всплывающем диалоговом окне настройте параметры PDF, такие как сжатие изображений, водяные знаки и диапазон страниц.
-
Нажмите Экспорт, выберите папку назначения и нажмите Сохранить.
Советы:
- Используйте Файл > Экспорт как > Экспортировать напрямую как PDF для более быстрого преобразования, если настройка не требуется.
- Этот метод работает одинаково на Windows, macOS и Linux.
Когда использовать:
Лучше всего подходит для случаев, когда точность макета имеет решающее значение, например, для деловых презентаций, отчетов или документов, предназначенных для клиентов.
Метод 2 - Экспорт ODP как PDF с помощью Microsoft PowerPoint (Преобразование в Office)
Если вы являетесь пользователем Office, Microsoft PowerPoint предлагает простое решение для экспорта файлов ODP в PDF. Этот метод доступен в PowerPoint 2010 и более поздних версиях, а также в Microsoft PowerPoint 365. Это отличный выбор для тех, кто часто использует PowerPoint и хочет преобразовывать файлы ODP без внешних инструментов.
Шаги:
-
Запустите Microsoft PowerPoint, перейдите в меню Файл > Открыть и выберите файл .odp.
- Совет: Если файл не отображается, переключите фильтр типа файла на Все файлы.
-
Перейдите в меню Файл > Экспорт > Создать документ PDF/XPS.
- Альтернатива: Нажмите F12, затем выберите PDF (*.pdf) для более быстрого сохранения.
-
Нажмите кнопку Параметры..., чтобы настроить такие параметры, как:
- Включить непечатаемую информацию (сохранить свойства документа или теги структуры)
- Растрировать текст, если шрифты не могут быть встроены (это гарантирует, что PDF будет выглядеть одинаково на всех устройствах).
-
Выберите папку назначения и нажмите Опубликовать, чтобы экспортировать презентацию в формате PDF.
Советы и примечания:
- Расширенные стили или фигуры, специфичные только для ODF, могут потребовать небольшой ручной корректировки после открытия в PowerPoint.
- PowerPoint 2024 и Microsoft 365 поддерживают ODF 1.4, в то время как PowerPoint 2013–2019 поддерживают ODF 1.2. Более старые версии, такие как PowerPoint 2010, поддерживают только ODF 1.1, который имеет ограниченную совместимость с более новыми файлами ODP.
Когда использовать:
Когда вы предпочитаете интерфейс PowerPoint для преобразования и вам не нужна идеальная точность макета.
Хотите преобразовать ODP в PPTX? Прочитайте наше руководство по преобразованию.
Метод 3 - Преобразование ODP в PDF с помощью онлайн-инструментов (Установка не требуется)
Для пользователей, которым требуется решение без установки программного обеспечения, онлайн-конвертеры ODP в PDF являются быстрым и удобным вариантом. Они работают на разных устройствах и не требуют настройки.
Рекомендуемые онлайн-конвертеры:
- CloudConvert - Поддерживает преобразование ODP в PDF наряду с широким спектром других форматов файлов. Предлагает параметры настройки, такие как диапазон страниц и шифрование паролем.
- Google Slides - Облачная платформа, которая может открывать файлы ODP и экспортировать их в PDF, сохраняя большую часть макета и форматирования шрифтов.
- Zamzar - Удобный онлайн-конвертер, который легко преобразует презентации, включая файлы ODP, в PDF. Установка не требуется.
Шаги по преобразованию ODP в PDF онлайн:
-
Перейдите на веб-сайт выбранного вами онлайн-конвертера (например, CloudConvert).
-
Загрузите файл ODP.
-
Выберите PDF в качестве выходного формата.
-
Нажмите Конвертировать и дождитесь завершения процесса.
-
Загрузите преобразованный PDF после завершения процесса.
Предупреждение о безопасности и советы:
- Хотя онлайн-инструменты удобны, они не идеальны для конфиденциального или проприетарного контента. Всегда проверяйте политику конфиденциальности платформы перед загрузкой файлов.
- Некоторые онлайн-конвертеры имеют ограничения по размеру файла (обычно 50-100 МБ). При необходимости разделите большие презентации PowerPoint перед загрузкой.
Когда использовать:
Идеально подходит для быстрых, периодических преобразований, особенно когда вы в пути и вам нужно преобразовывать файлы с любого устройства.
Метод 4 - Автоматизация преобразования файлов ODP в PDF с помощью инструментов командной строки
Для пользователей, которые хотят автоматизировать преобразование ODP в PDF в скриптах или запланированных рабочих процессах, LibreOffice предоставляет интерфейс командной строки, который работает в безголовом режиме. Это позволяет процессу преобразования работать в фоновом режиме без открытия приложения, что делает его подходящим для интеграции в автоматизированные системы и запланированные задачи.
Шаги:
-
Установите LibreOffice:
Убедитесь, что LibreOffice установлен и доступен из командной строки.
-
Откройте Терминал / Командную строку:
Перейдите в папку, где находится ваш файл ODP.
-
Выполните команду преобразования:
Используйте LibreOffice в безголовом режиме для преобразования файла ODP:
soffice --headless --convert-to pdf "yourfile.odp" -
Интеграция в скрипты автоматизации:
Вы можете включить эту команду в скрипты Bash, скрипты PowerShell или запланированные задачи для автоматического запуска преобразования в зависимости от времени или системных событий. -
Проверьте вывод PDF:
После выполнения проверьте сгенерированный PDF, чтобы убедиться, что форматирование и макет сохранены правильно.
Когда использовать:
Идеально подходит для разработчиков и ИТ-специалистов, которым требуется автоматизированное преобразование в скриптовых или запланированных средах.
Метод 5 - Пакетное преобразование ODP в PDF с помощью C# (Решение для разработчиков)
Для разработчиков и технических команд, управляющих большими объемами файлов ODP, ручное преобразование неэффективно. Используя C# с независимой библиотекой презентаций, такой как Spire.Presentation for .NET, вы можете быстро и беспрепятственно выполнять пакетное преобразование ODP в PDF без установки LibreOffice или PowerPoint.
Шаги:
-
Установите Spire.Presentation for .NET:
Установите Spire.Presentation из NuGet с помощью следующей команды или загрузите ее с официального сайта.
Install-Package Spire.Presentation -
Напишите код C# для пакетного преобразования:
Ниже приведен пример того, как преобразовать несколько файлов ODP в PDF за один раз:
using Spire.Presentation;
using System.IO;

class Program
{
    static void Main()
    {
        string[] files = Directory.GetFiles(@"C:\Path\To\ODP_Folder", "*.odp"); // Замените путь на путь к вашей папке
        foreach (string file in files)
        {
            Presentation presentation = new Presentation();
            presentation.LoadFromFile(file);
            string pdfOutput = Path.ChangeExtension(file, ".pdf");
            presentation.SaveToFile(pdfOutput, FileFormat.PDF);
        }
    }
}
Этот скрипт обрабатывает все файлы ODP в указанной папке и сохраняет их как PDF в той же папке. Просто поместите ваши файлы ODP в один каталог, и программа выполнит преобразование.
Вывод:
Совет:
Вы можете дополнительно настроить скрипт, чтобы включить обработку ошибок, ведение журнала или дополнительную обработку файлов по мере необходимости.
Когда использовать:
Идеально подходит для разработчиков или команд, которым необходимо выполнять пакетное преобразование ODP в PDF, особенно при работе с большими объемами файлов на сервере.
Сравнение всех методов преобразования ODP в PDF
| Метод | Лучше всего подходит для | Простота использования | Точность | Автоматизация |
|---|---|---|---|---|
| LibreOffice/OpenOffice | Высококачественное преобразование | Легко | ★★★★★ | Низкая |
| PowerPoint | Пользователи Office | Легко | ★★★☆ | Низкая |
| Онлайн-инструменты | Быстрое преобразование | Очень легко | ★★★ | Нет |
| Инструменты командной строки | Продвинутые пользователи | Средняя | ★★★★ | Высокая |
| Автоматизация C# | Разработчики / пакетная обработка | Продвинутый | ★★★★ | Очень высокая |
Какой метод выбрать?
Выберите подходящий метод преобразования ODP в PDF в соответствии с вашими потребностями и рабочим процессом:
- Для точности идеально подходят настольные приложения, такие как LibreOffice.
- Для быстрого использования достаточно онлайн-инструментов.
- Для автоматизации или пакетной обработки решения командной строки и C# обеспечивают максимальную гибкость.
Советы по лучшему преобразованию ODP в PDF
- Протестируйте вывод на разных устройствах, чтобы убедиться в целостности макета.
- Избегайте чрезмерно сложных анимаций, если стремитесь к универсальной совместимости.
- Для автоматизации проверяйте входные файлы, чтобы предотвратить сбои во время пакетной обработки.
- Удаляйте загруженные файлы из онлайн-сервисов после скачивания для обеспечения безопасности.
Распространенные проблемы преобразования и их решения
- Неправильное отображение шрифтов: Встраивайте или преобразуйте шрифты в контуры в LibreOffice/OpenOffice. В PowerPoint включите опцию «Растрировать текст, если шрифты не могут быть встроены».
- Большие размеры файлов после преобразования: Используйте сжатие изображений при экспорте или настройте параметры сжатия в онлайн-конвертерах.
- Смещение макета PDF: Используйте нативные конвертеры ODP (LibreOffice/OpenOffice) и избегайте сложных анимаций или фигур, специфичных для ODF, в PowerPoint.
- Невозможность открыть файл ODP в PowerPoint: Убедитесь, что ваша версия PowerPoint поддерживает ODP 1.4+. В противном случае сначала сохраните как PPTX в LibreOffice/OpenOffice.
- Сбой пакетного преобразования или пропуск файлов: Проверьте пути к файлам и расширения. Включите обработку ошибок в скриптах.
- Сбой загрузки в онлайн-конвертер: Разделите большие файлы или используйте настольный инструмент. Обеспечьте стабильное интернет-соединение.
Часто задаваемые вопросы
В1: Могу ли я преобразовать ODP в PDF бесплатно?
О1: Да, онлайн-конвертеры, такие как CloudConvert, Zamzar и Online2PDF, предлагают бесплатные услуги по преобразованию файлов ODP в PDF. Однако некоторые бесплатные инструменты могут иметь ограничения по размеру файла.
В2: Будут ли анимации или переходы сохранены при преобразовании ODP в PDF?
О2: Нет. Формат PDF не поддерживает анимацию. Используйте заметки или экспорт видео, если анимация важна.
В3: Могу ли я преобразовать несколько файлов ODP в PDF одновременно?
О3: Да. Для пакетного преобразования используйте автоматизацию C#. Онлайн-конвертеры обычно поддерживают только один файл за раз или ограничивают размеры пакетов.
В4: Почему некоторые элементы ODP выглядят по-разному в PowerPoint?
О4: PowerPoint не полностью поддерживает все функции, специфичные для OpenDocument, такие как пользовательские фигуры или расширенные стили. Используйте LibreOffice/OpenOffice для наиболее точного преобразования.
В5: Как уменьшить размер PDF во время преобразования?
О5: Уменьшите разрешение изображений, удалите ненужные объекты или включите параметры сжатия в диалоговом окне экспорта PDF. Некоторые онлайн-конвертеры также предоставляют настройки оптимизации PDF.
См. также
Extrair tabelas de PDF: 4 métodos simples e avançados
Sumário
Os PDFs são ótimos para preservar layouts de documentos, mas extrair dados tabulares deles pode ser frustrante. A principal razão é que os PDFs são projetados para renderização visual consistente em diferentes dispositivos, não para extração de dados estruturados. Como resultado, as tabelas podem existir como texto selecionável em PDFs digitais ou como imagens em arquivos digitalizados, com estruturas variando amplamente.
Felizmente, existem várias maneiras práticas de extrair tabelas de PDFs, dependendo de suas necessidades e nível de conforto técnico. Neste guia, abordaremos quatro métodos eficazes, desde ferramentas simples sem código como Excel e Google Docs até uma poderosa solução baseada em Python para controle total e automação.
Visão geral dos métodos:
- Método 1: Microsoft Excel (Importação de PDF Integrada)
- Método 2: Google Docs (Gratuito e Simples)
- Método 3: Adobe Acrobat Pro (Funcionalidade de Exportação)
- Método 4: Python (Controle Total e Automação)
Método 1: Microsoft Excel (Importação de PDF Integrada)
Ideal para: Usuários do Windows com Microsoft Office 365 ou Excel 2016+ (apenas Windows).
O Microsoft Excel possui um recurso nativo de importação de PDF que funciona surpreendentemente bem para PDFs digitais. Ele se conecta diretamente ao arquivo e tenta detectar e converter tabelas.
Instruções Passo a Passo
- Abra o Microsoft Excel.
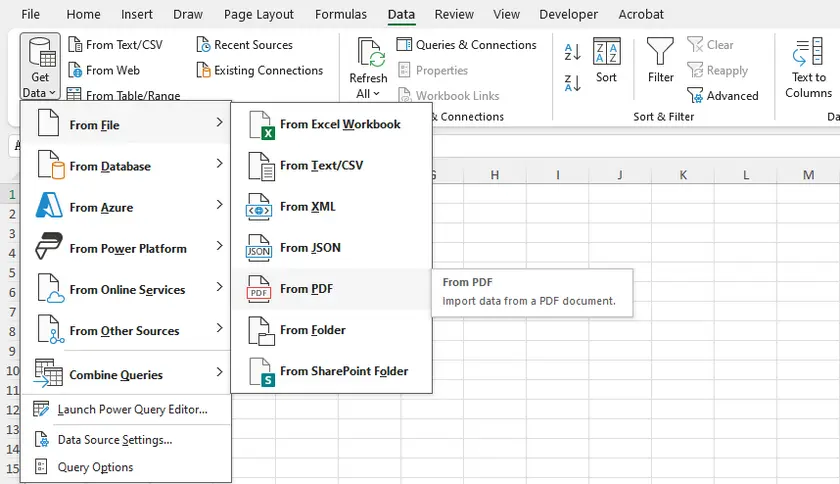
- Vá para Dados → Obter Dados → De Arquivo → De PDF.
- Navegue e selecione seu arquivo PDF.
- Uma janela do navegador aparecerá mostrando todas as tabelas e páginas detectadas.
- Selecione as tabelas que você deseja e clique em Carregar (para importar diretamente) ou Transformar Dados (para limpar antes de carregar).
- O Excel importará a tabela para uma planilha, preservando a estrutura de linha/coluna razoavelmente bem.
Prós e Contras
| Prós | Contras |
|---|---|
| Não é necessário software adicional (com Office) | Apenas para Windows |
| Preserva formatos numéricos | Dificuldade com células mescladas |
| Bom para PDFs digitais baseados em texto | Sem OCR para PDFs digitalizados |
| Pode atualizar dados se o PDF for atualizado | Pode ser lento em PDFs grandes |
Método 2: Google Docs (Gratuito e Simples)
Ideal para: Extrações rápidas e pontuais quando você não tem Excel ou ferramentas pagas.
O Google Docs oferece um método oculto, mas gratuito, para extrair tabelas de PDFs. Ele funciona convertendo todo o PDF em um Google Doc editável, onde as tabelas se tornam grades baseadas em texto.
Instruções Passo a Passo
- Carregue o PDF no Google Drive.
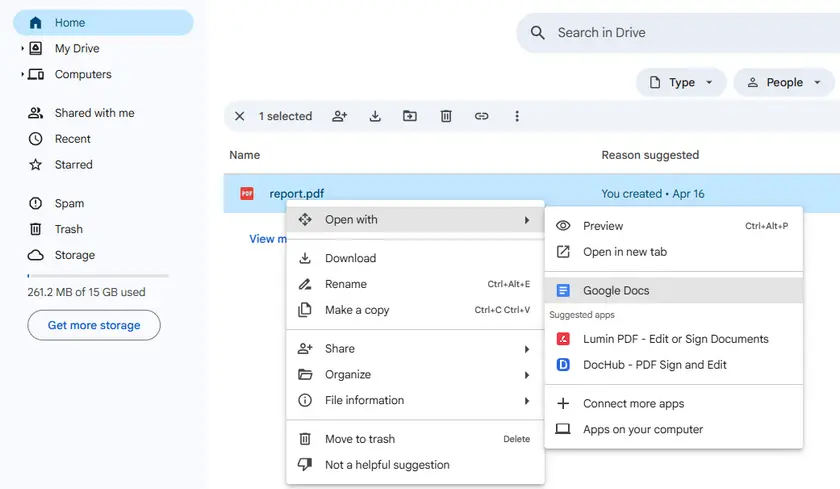
- Clique com o botão direito no PDF → Abrir com → Google Docs.
- Aguarde o Google Docs processar o arquivo.
- Role para encontrar a tabela. Ela aparecerá como uma grade baseada em texto (linhas e colunas separadas por espaços ou tabulações).
- Copie a área da tabela e cole-a no Google Sheets ou Microsoft Excel.
Prós e Contras
| Prós | Contras |
|---|---|
| Completamente gratuito | Sem detecção real de tabela (apenas alinhamento de texto) |
| Sem instalação de software | Resultados confusos com tabelas complexas |
| Funciona em qualquer sistema operacional com um navegador | Mau manuseio de células mescladas ou células de várias linhas |
| Lida com tabelas simples de forma confiável | Sem OCR (PDFs digitalizados aparecem como imagens) |
Método 3: Adobe Acrobat Pro (Funcionalidade de Exportação)
Ideal para: Profissionais que já possuem o Acrobat Pro e precisam de exportações confiáveis de PDFs digitais.
Adobe Acrobat Pro (não o Reader gratuito) possui uma função de exportação integrada que converte tabelas de PDF diretamente para Excel ou CSV. Ele preserva mais formatação do que ferramentas gratuitas.
Instruções Passo a Passo
- Abra o PDF no Adobe Acrobat Pro.
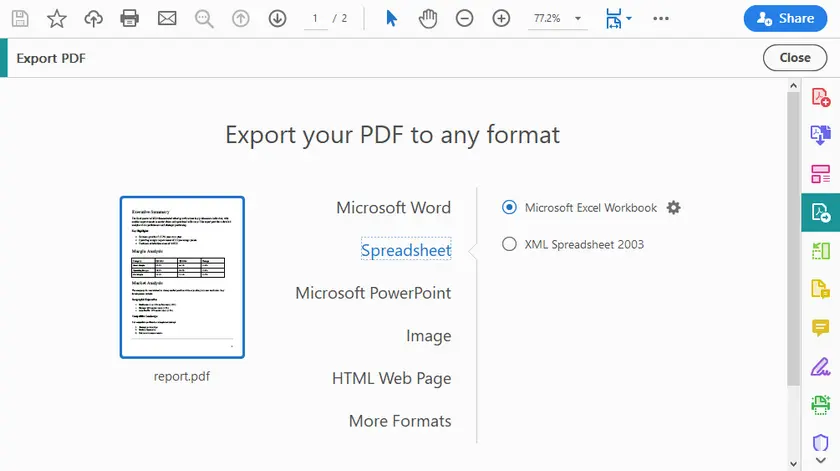
- Clique em Exportar PDF (barra lateral direita).
- Selecione Planilha → Pasta de Trabalho do Microsoft Excel (ou CSV).
- Clique em Exportar.
- Escolha um local e salve.
- Abra o arquivo Excel gerado e verifique as tabelas.
Dicas Adicionais
- Use a opção Reconhecer Texto (OCR) primeiro se estiver lidando com PDFs digitalizados.
- Para tabelas de várias páginas, o Acrobat geralmente as concatena de forma inteligente.
- Você pode exportar apenas páginas selecionadas para economizar tempo.
Prós e Contras
| Prós | Contras |
|---|---|
| Alta precisão para PDFs digitais | Caro (assinatura necessária) |
| Lida bem com tabelas de várias páginas | Sem controle granular sobre a extração |
| Preserva fórmulas e números | Ainda tem dificuldade com tabelas aninhadas muito complexas |
| Processamento em lote disponível | Apenas Windows/macOS (sem versão web) |
Método 4: Python (Controle Total e Automação)
Ideal para: Desenvolvedores, cientistas de dados e usuários avançados que precisam de flexibilidade máxima, lidam com PDFs digitalizados ou processam arquivos em lote.
O Python oferece controle total sobre o processo de extração. Você pode lidar com PDFs digitais com bibliotecas como pdfplumber, camelot ou Spire.PDF for Python (uma biblioteca comercial com uma versão gratuita disponível). Abaixo está um exemplo prático usando Spire.PDF para extrair tabelas e salvá-las como arquivos de texto limpos.
Instalação
pip install spire.pdf
Exemplo de Código Completo (Extrair Tabelas para Arquivos TXT)
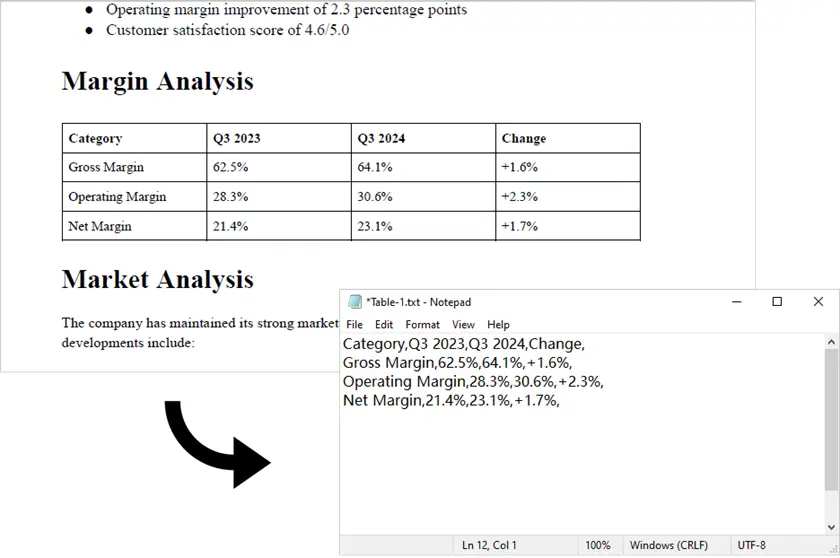
O código a seguir extrai todas as tabelas de uma página PDF específica e salva cada tabela como um arquivo de texto separado em formato semelhante a CSV:
from spire.pdf.common import *
from spire.pdf import *

# Criar um objeto PdfDocument
doc = PdfDocument()

# Carregar um arquivo PDF
doc.LoadFromFile("report.pdf")

# Criar um objeto PdfTableExtractor
extractor = PdfTableExtractor(doc)

# Extrair tabelas de uma página específica (o índice da página começa em 0)
tableList = extractor.ExtractTable(0)

# Determinar se a lista de tabelas não está vazia
if tableList is not None:

    # Loop através das tabelas na página
    for i in range(len(tableList)):

        # Criar uma nova lista para armazenar dados desta tabela
        builder = []

        # Obter uma tabela específica
        table = tableList[i]

        # Obter o número de linhas e colunas
        row = table.GetRowCount()
        column = table.GetColumnCount()

        # Loop através de cada linha e coluna
        for m in range(row):
            for n in range(column):

                # Obter texto da célula específica
                text = table.GetText(m, n)

                # Adicionar o texto seguido por uma vírgula (estilo CSV)
                builder.append(text + ",")
            builder.append("\n")  # Fim da linha
        builder.append("\n")      # Linha em branco entre as tabelas

        # Escrever o conteúdo em um arquivo de texto
        with open(f"output/Table-{i + 1}.txt", "w", encoding="utf-8") as file:
            file.write("".join(builder))

# Fechar o documento
doc.Close()
Saída:
Observação: Este script funciona apenas com PDFs gerados digitalmente (baseados em texto). Para PDFs digitalizados, o Spire.PDF sozinho não é suficiente. Nesses casos, você pode primeiro converter o PDF em imagens usando Spire.PDF, depois aplicar um mecanismo de OCR como pytesseract junto com lógica de processamento adicional para detectar e extrair dados de tabelas.
Por que Python?
- Lida com PDFs digitais e digitalizados (com integração de OCR)
- Processamento em lote de centenas de arquivos
- Pós-processamento personalizável (limpeza, mesclagem, validação)
- Pode ser integrado em aplicativos web, APIs ou pipelines ETL
- Você controla exatamente como as tabelas são formatadas e salvas
Como uma biblioteca PDF abrangente, o Spire.PDF for Python não apenas extrai tabelas de PDFs, mas também suporta a extração de imagens, metadados e anexos. Além disso, ele pode exportar documentos inteiros para formatos como Word, Excel e TXT.
Prós e Contras
| Prós | Contras |
|---|---|
| Controle total sobre a lógica de extração | Requer conhecimento de programação |
| Lida com tabelas complexas e de várias páginas | Curva de aprendizado mais acentuada |
| Processamento em lote de milhares de arquivos | Spire.PDF requer uma licença para uso comercial (gratuito para uso pessoal) |
| Resultados limpos e reproduzíveis | A detecção de tabelas não é perfeita em todos os PDFs |
| Fácil de integrar com pandas, Excel ou bancos de dados |
Tabela Comparativa: Escolhendo o Método Certo
| Método | Facilidade de Uso | Lida com PDFs Digitalizados | Processamento em Lote | Custo | Ideal Para |
|---|---|---|---|---|---|
| Excel | Médio | x | x | Requer Office | Tabelas digitais rápidas e pontuais |
| Google Docs | Alto | x | x | Gratuito | Tabelas simples, sem software |
| Adobe Acrobat Pro | Alto | √ | x | Pago | Usuários profissionais não técnicos |
| Python | Baixo | √ | √ | Gratuito / Pago | Flexibilidade máxima, larga escala, PDFs digitalizados |
Conclusão
Extrair tabelas de PDFs não precisa ser uma dor de cabeça. O método certo depende inteiramente da sua situação específica:
- Para uma tabela simples e única → Tente o Google Docs ou uma ferramenta online primeiro.
- Para resultados profissionais e polidos → Use Excel ou Adobe Acrobat Pro se tiver acesso.
- Para controle máximo, tabelas complexas ou documentos digitalizados → Python é sua melhor opção.
Comece com o método mais simples que atenda às suas necessidades. À medida que seus requisitos aumentam (mais arquivos, documentos digitalizados, limpeza personalizada), você sempre pode migrar para ferramentas mais poderosas como Python. A chave é reconhecer que a extração de tabelas não é um problema único para todos – e agora você tem quatro maneiras de resolvê-lo.
Perguntas Frequentes
P1. Por que é difícil extrair tabelas de PDFs?
Porque os PDFs armazenam conteúdo como texto posicionado em vez de tabelas de dados estruturadas, tornando a extração menos direta.
P2. Qual método oferece os resultados mais precisos?
O Adobe Acrobat Pro geralmente oferece a melhor precisão para tabelas complexas.
P3. Posso extrair tabelas de PDFs digitalizados?
Sim, mas requer OCR (Reconhecimento Óptico de Caracteres). Ferramentas como Adobe Acrobat ou Spire.PDF (com um componente de OCR) podem converter imagens digitalizadas em texto legível por máquina, após o qual os dados da tabela podem ser detectados e extraídos.
P4. Python é melhor do que outros métodos?
Depende. Python é melhor para automação e processamento em larga escala, mas excessivo para tarefas pontuais.
P5. Posso converter tabelas extraídas diretamente para o Excel?
Sim. A maioria das ferramentas (Excel, Acrobat) suporta exportação direta para .xlsx, enquanto Python pode ser estendido para fazer o mesmo.
Veja Também
Estrarre tabelle da PDF: 4 metodi semplici e avanzati
Indice
I PDF sono ottimi per preservare il layout dei documenti, ma estrarre dati tabellari da essi può essere frustrante. Il motivo principale è che i PDF sono progettati per una visualizzazione coerente su diversi dispositivi, non per l'estrazione di dati strutturati. Di conseguenza, le tabelle possono esistere come testo selezionabile nei PDF digitali o come immagini nei file scansionati, con strutture che variano ampiamente.
Fortunatamente, ci sono diversi modi pratici per estrarre tabelle dai PDF, a seconda delle tue esigenze e del tuo livello di comfort tecnico. In questa guida, ti illustreremo quattro metodi efficaci, da strumenti semplici senza codice come Excel e Google Documenti a una potente soluzione basata su Python per un controllo completo e l'automazione.
Panoramica dei metodi:
- Metodo 1: Microsoft Excel (Importazione PDF integrata)
- Metodo 2: Google Documenti (Gratuito e Semplice)
- Metodo 3: Adobe Acrobat Pro (Funzione di Esportazione)
- Metodo 4: Python (Controllo Completo e Automazione)
Metodo 1: Microsoft Excel (Importazione PDF integrata)
Ideale per: Utenti Windows con Microsoft Office 365 o Excel 2016+ (solo Windows).
Microsoft Excel dispone di una funzione di importazione PDF nativa che funziona sorprendentemente bene per i PDF digitali. Si collega direttamente al file e tenta di rilevare e convertire le tabelle.
Istruzioni Passo-Passo
- Apri Microsoft Excel.
- Vai su Dati → Recupera dati → Da file → Da PDF.
- Sfoglia e seleziona il tuo file PDF.
- Apparirà una finestra di navigazione che mostra tutte le tabelle e le pagine rilevate.
- Seleziona le tabelle che desideri e fai clic su Carica (per importare direttamente) o Trasforma dati (per pulire prima del caricamento).
- Excel importerà la tabella in un foglio di lavoro, preservando la struttura di righe/colonne in modo ragionevolmente buono.
Pro e Contro
| Pro | Contro |
|---|---|
| Nessun software aggiuntivo necessario (con Office) | Solo per Windows |
| Preserva i formati numerici | Difficoltà con celle unite |
| Buono per PDF digitali basati su testo | Nessun OCR per PDF scansionati |
| Può aggiornare i dati se il PDF viene modificato | Può essere lento con PDF di grandi dimensioni |
Metodo 2: Google Documenti (Gratuito e Semplice)
Ideale per: Estrazioni rapide e occasionali quando non si dispone di Excel o di strumenti a pagamento.
Google Documenti offre un metodo nascosto ma gratuito per estrarre tabelle dai PDF. Funziona convertendo l'intero PDF in un Google Document modificabile, dove le tabelle diventano griglie basate su testo.
Istruzioni Passo-Passo
- Carica il PDF su Google Drive.
- Fai clic con il pulsante destro del mouse sul PDF → Apri con → Google Documenti.
- Attendi che Google Documenti elabori il file.
- Scorri per trovare la tabella. Apparirà come una griglia basata su testo (righe e colonne separate da spazi o tabulazioni).
- Copia l'area della tabella e incollala in Google Fogli o Microsoft Excel.
Pro e Contro
| Pro | Contro |
|---|---|
| Completamente gratuito | Nessun rilevamento di tabelle reale (solo allineamento del testo) |
| Nessuna installazione di software | Risultati disordinati con tabelle complesse |
| Funziona su qualsiasi sistema operativo con un browser | Scarsa gestione di celle unite o celle multilinea |
| Gestisce tabelle semplici in modo affidabile | Nessun OCR (i PDF scansionati appaiono come immagini) |
Metodo 3: Adobe Acrobat Pro (Funzione di Esportazione)
Ideale per: Professionisti che dispongono già di Acrobat Pro e necessitano di esportazioni affidabili da PDF digitali.
Adobe Acrobat Pro (non il Reader gratuito) dispone di una funzione di esportazione integrata che converte le tabelle PDF direttamente in Excel o CSV. Preserva più formattazione rispetto agli strumenti gratuiti.
Istruzioni Passo-Passo
- Apri il PDF in Adobe Acrobat Pro.
- Fai clic su Esporta PDF (barra degli strumenti a destra).
- Seleziona Foglio di calcolo → Cartella di lavoro Microsoft Excel (o CSV).
- Fai clic su Esporta.
- Scegli una posizione e salva.
- Apri il file Excel generato e verifica le tabelle.
Suggerimenti Aggiuntivi
- Utilizza prima l'opzione Riconosci testo (OCR) se stai lavorando con PDF scansionati.
- Per tabelle multipagina, Acrobat spesso le concatena in modo intelligente.
- Puoi esportare solo pagine selezionate per risparmiare tempo.
Pro e Contro
| Pro | Contro |
|---|---|
| Elevata accuratezza per PDF digitali | Costoso (richiede abbonamento) |
| Gestisce bene tabelle multipagina | Nessun controllo granulare sull'estrazione |
| Preserva formule e numeri | Ancora difficoltà con tabelle nidificate molto complesse |
| Elaborazione batch disponibile | Solo Windows/macOS (nessuna versione web) |
Metodo 4: Python (Controllo Completo e Automazione)
Ideale per: Sviluppatori, data scientist e utenti avanzati che necessitano della massima flessibilità, gestiscono PDF scansionati o elaborano file batch.
Python ti offre il controllo completo sul processo di estrazione. Puoi gestire PDF digitali con librerie come pdfplumber, camelot o Spire.PDF per Python (una libreria commerciale con una versione gratuita disponibile). Di seguito un esempio pratico che utilizza Spire.PDF per estrarre tabelle e salvarle come file di testo puliti.
Installazione
pip install spire.pdf
Esempio di Codice Completo (Estrai Tabelle in File TXT)
Il seguente codice estrae tutte le tabelle da una pagina PDF specifica e salva ogni tabella come un file di testo separato in formato simile a CSV:
from spire.pdf.common import *
from spire.pdf import *

# Crea un oggetto PdfDocument
doc = PdfDocument()

# Carica un file PDF
doc.LoadFromFile("report.pdf")

# Crea un oggetto PdfTableExtractor
extractor = PdfTableExtractor(doc)

# Estrai tabelle da una pagina specifica (l'indice della pagina parte da 0)
tableList = extractor.ExtractTable(0)

# Determina se la lista di tabelle non è vuota
if tableList is not None:

    # Cicla attraverso le tabelle nella pagina
    for i in range(len(tableList)):

        # Crea una nuova lista per memorizzare i dati di questa tabella
        builder = []

        # Ottieni una tabella specifica
        table = tableList[i]

        # Ottieni il numero di righe e colonne
        row = table.GetRowCount()
        column = table.GetColumnCount()

        # Cicla attraverso ogni riga e colonna
        for m in range(row):
            for n in range(column):

                # Ottieni il testo dalla cella specifica
                text = table.GetText(m, n)

                # Aggiungi il testo seguito da una virgola (stile CSV)
                builder.append(text + ",")
            builder.append("\n")  # Fine riga
        builder.append("\n")      # Riga vuota tra le tabelle

        # Scrivi il contenuto in un file di testo
        with open(f"output/Table-{i + 1}.txt", "w", encoding="utf-8") as file:
            file.write("".join(builder))

# Chiudi il documento
doc.Close()
Output:
Nota: Questo script funziona solo con PDF generati digitalmente (basati su testo). Per i PDF scansionati, Spire.PDF da solo non è sufficiente. In tali casi, puoi prima convertire il PDF in immagini usando Spire.PDF, quindi applicare un motore OCR come pytesseract insieme a logica di elaborazione aggiuntiva per rilevare ed estrarre i dati tabellari.
Perché Python?
- Gestisce sia PDF digitali che scansionati (con integrazione OCR)
- Elaborazione batch di centinaia di file
- Post-elaborazione personalizzabile (pulizia, unione, validazione)
- Può essere integrato in applicazioni web, API o pipeline ETL
- Controlli esattamente come le tabelle vengono formattate e salvate
Come libreria PDF completa, Spire.PDF per Python non solo estrae tabelle dai PDF, ma supporta anche l'estrazione di immagini, metadati e allegati. Inoltre, può esportare interi documenti in formati come Word, Excel e TXT.
Pro e Contro
| Pro | Contro |
|---|---|
| Controllo completo sulla logica di estrazione | Richiede conoscenze di programmazione |
| Gestisce tabelle complesse e multipagina | Curva di apprendimento più ripida |
| Elaborazione batch di migliaia di file | Spire.PDF richiede una licenza per uso commerciale (gratuito per uso personale) |
| Risultati puliti e riproducibili | Il rilevamento delle tabelle non è perfetto su tutti i PDF |
| Facile da integrare con pandas, Excel o database |
Tabella Comparativa: Scegliere il Metodo Giusto
| Metodo | Facilità d'uso | Gestisce PDF Scansionati | Elaborazione Batch | Costo | Ideale per |
|---|---|---|---|---|---|
| Excel | Medio | x | x | Richiede Office | Tabelle digitali rapide e occasionali |
| Google Documenti | Alto | x | x | Gratuito | Tabelle semplici, nessun software |
| Adobe Acrobat Pro | Alto | √ | x | A pagamento | Utenti professionali, non tecnici |
| Python | Basso | √ | √ | Gratuito / A pagamento | Massima flessibilità, su larga scala, PDF scansionati |
Conclusione
Estrarre tabelle dai PDF non deve essere un mal di testa. Il metodo giusto dipende interamente dalla tua situazione specifica:
- Per una tabella semplice e una tantum → Prova prima Google Documenti o uno strumento online.
- Per risultati professionali e curati → Usa Excel o Adobe Acrobat Pro se hai accesso.
- Per il massimo controllo, tabelle complesse o documenti scansionati → Python è la tua migliore opzione.
Inizia con il metodo più semplice che soddisfa le tue esigenze. Man mano che i tuoi requisiti aumentano (più file, documenti scansionati, pulizia personalizzata), puoi sempre passare a strumenti più potenti come Python. La chiave è riconoscere che l'estrazione di tabelle non è un problema "taglia unica" e ora hai quattro modi per risolverlo.
FAQ
D1. Perché è difficile estrarre tabelle dai PDF?
Perché i PDF memorizzano il contenuto come testo posizionato anziché tabelle di dati strutturati, rendendo l'estrazione meno diretta.
D2. Quale metodo fornisce i risultati più accurati?
Adobe Acrobat Pro generalmente fornisce la migliore accuratezza per tabelle complesse.
D3. Posso estrarre tabelle da PDF scansionati?
Sì, ma richiede OCR (Optical Character Recognition). Strumenti come Adobe Acrobat o Spire.PDF (con un componente OCR) possono convertire immagini scansionate in testo leggibile dalla macchina, dopodiché i dati tabellari possono essere rilevati ed estratti.
D4. Python è migliore di altri metodi?
Dipende. Python è il migliore per l'automazione e l'elaborazione su larga scala, ma è eccessivo per attività una tantum.
D5. Posso convertire tabelle estratte direttamente in Excel?
Sì. La maggior parte degli strumenti (Excel, Acrobat) supporta l'esportazione diretta in .xlsx, mentre Python può essere esteso per fare lo stesso.
Vedi Anche
PDF에서 표 추출하기: 4가지 간단하고 고급 방법
PDF는 문서 레이아웃을 보존하는 데 뛰어나지만, 거기서 표 형식의 데이터를 추출하는 것은 좌절스러울 수 있습니다. 주된 이유는 PDF가 장치 간 일관된 시각적 렌더링을 위해 설계되었지, 구조화된 데이터 추출을 위해 설계되지 않았기 때문입니다. 결과적으로 표는 디지털 PDF에서는 선택 가능한 텍스트로 존재하거나 스캔된 파일에서는 이미지로 존재할 수 있으며, 구조는 매우 다양합니다.
다행히도 필요와 기술적 숙련도에 따라 PDF에서 표를 추출하는 몇 가지 실용적인 방법이 있습니다. 이 가이드에서는 간단한 노코드 도구인 Excel 및 Google Docs부터 완전한 제어 및 자동화를 위한 강력한 Python 기반 솔루션까지 네 가지 효과적인 방법을 안내해 드립니다.
방법 개요:
- 방법 1: Microsoft Excel (내장 PDF 가져오기)
- 방법 2: Google Docs (무료 및 간단)
- 방법 3: Adobe Acrobat Pro (내보내기 기능)
- 방법 4: Python (완전한 제어 및 자동화)
방법 1: Microsoft Excel (내장 PDF 가져오기)
최적: Microsoft Office 365 또는 Excel 2016+ (Windows만 해당)를 사용하는 Windows 사용자.
Microsoft Excel에는 디지털 PDF에 대해 놀라울 정도로 잘 작동하는 기본 PDF 가져오기 기능이 있습니다. 파일에 직접 연결하여 표를 감지하고 변환하려고 시도합니다.
단계별 지침
- Microsoft Excel을 엽니다.
- 데이터 → 데이터 가져오기 → 파일에서 → PDF에서로 이동합니다.
- PDF 파일을 찾아 선택합니다.
- 감지된 모든 표와 페이지를 보여주는 탐색기 창이 나타납니다.
- 원하는 표를 선택하고 로드 (직접 가져오기) 또는 데이터 변환 (로드 전 정리)을 클릭합니다.
- Excel은 표를 워크시트로 가져오며 행/열 구조를 합리적으로 잘 유지합니다.
장점 및 단점
| 장점 | 단점 |
|---|---|
| 추가 소프트웨어 불필요 (Office 포함) | Windows 전용 |
| 숫자 형식 유지 | 병합된 셀에 어려움 |
| 디지털, 텍스트 기반 PDF에 적합 | 스캔된 PDF용 OCR 없음 |
| PDF 업데이트 시 데이터 새로 고침 가능 | 대용량 PDF에서 느릴 수 있음 |
방법 2: Google Docs (무료 및 간단)
최적: Excel이나 유료 도구가 없을 때 빠르고 일회성으로 추출해야 하는 경우.
Google Docs는 PDF에서 표를 추출하는 숨겨진 무료 방법을 제공합니다. 전체 PDF를 편집 가능한 Google 문서로 변환하여 표가 텍스트 기반 그리드로 표시됩니다.
단계별 지침
- PDF를 Google Drive에 업로드합니다.
- PDF를 마우스 오른쪽 버튼으로 클릭 → 다음으로 열기 → Google Docs를 선택합니다.
- Google Docs가 파일을 처리할 때까지 기다립니다.
- 스크롤하여 표를 찾습니다. 표는 텍스트 기반 그리드 (공백 또는 탭으로 구분된 행과 열)로 표시됩니다.
- 표 영역을 복사하여 Google Sheets 또는 Microsoft Excel에 붙여넣습니다.
장점 및 단점
| 장점 | 단점 |
|---|---|
| 완전히 무료 | 진정한 표 감지 없음 (텍스트 정렬만) |
| 소프트웨어 설치 불필요 | 복잡한 표의 경우 결과가 지저분함 |
| 브라우저가 있는 모든 OS에서 작동 | 병합된 셀 또는 여러 줄 셀 처리 능력 부족 |
| 간단한 표를 안정적으로 처리 | OCR 없음 (스캔된 PDF는 이미지로 표시됨) |
방법 3: Adobe Acrobat Pro (내보내기 기능)
최적: 이미 Acrobat Pro를 사용 중이며 디지털 PDF에서 안정적인 내보내기가 필요한 전문가.
Adobe Acrobat Pro (무료 Reader 아님)에는 PDF 표를 Excel 또는 CSV로 직접 변환하는 내장 내보내기 기능이 있습니다. 무료 도구보다 더 많은 서식을 유지합니다.
단계별 지침
- Adobe Acrobat Pro에서 PDF를 엽니다.
- PDF 내보내기 (오른쪽 도구 모음)를 클릭합니다.
- 스프레드시트 → Microsoft Excel 통합 문서 (또는 CSV)를 선택합니다.
- 내보내기를 클릭합니다.
- 위치를 선택하고 저장합니다.
- 생성된 Excel 파일을 열고 표를 확인합니다.
추가 팁
- 스캔된 PDF를 다루는 경우 먼저 텍스트 인식 (OCR) 옵션을 사용하십시오.
- 여러 페이지에 걸친 표의 경우 Acrobat은 종종 지능적으로 연결합니다.
- 시간을 절약하기 위해 선택한 페이지만 내보낼 수 있습니다.
장점 및 단점
| 장점 | 단점 |
|---|---|
| 디지털 PDF에 대한 높은 정확도 | 비쌈 (구독 필요) |
| 여러 페이지 표를 잘 처리 | 추출에 대한 세부적인 제어 없음 |
| 수식 및 숫자 유지 | 매우 복잡한 중첩 표에는 여전히 어려움 |
| 배치 처리 가능 | Windows/macOS 전용 (웹 버전 없음) |
방법 4: Python (완전한 제어 및 자동화)
최적: 최대의 유연성이 필요하고, 스캔된 PDF를 처리하거나, 배치 파일을 처리해야 하는 개발자, 데이터 과학자 및 고급 사용자.
Python은 추출 프로세스를 완벽하게 제어할 수 있게 해줍니다. pdfplumber, camelot 또는 Spire.PDF for Python (무료 버전도 제공되는 상용 라이브러리)과 같은 라이브러리를 사용하여 디지털 PDF를 처리할 수 있습니다. 아래는 Spire.PDF를 사용하여 표를 추출하고 깔끔한 텍스트 파일로 저장하는 실용적인 예입니다.
설치
pip install spire.pdf
전체 코드 예제 (표를 TXT 파일로 추출)
다음 코드는 특정 PDF 페이지에서 모든 표를 추출하여 각 표를 별도의 텍스트 파일로 CSV와 유사한 형식으로 저장합니다.
from spire.pdf.common import *
from spire.pdf import *

# PdfDocument 객체 생성
doc = PdfDocument()

# PDF 파일 로드
doc.LoadFromFile("report.pdf")

# PdfTableExtractor 객체 생성
extractor = PdfTableExtractor(doc)

# 특정 페이지에서 표 추출 (페이지 인덱스는 0부터 시작)
tableList = extractor.ExtractTable(0)

# 표 목록이 비어 있지 않은지 확인
if tableList is not None:

    # 페이지의 표들을 반복
    for i in range(len(tableList)):

        # 이 표의 데이터를 저장할 새 목록 생성
        builder = []

        # 특정 표 가져오기
        table = tableList[i]

        # 행 수와 열 수 가져오기
        row = table.GetRowCount()
        column = table.GetColumnCount()

        # 각 행과 열을 반복
        for m in range(row):
            for n in range(column):

                # 특정 셀에서 텍스트 가져오기
                text = table.GetText(m, n)

                # 텍스트 뒤에 쉼표 추가 (CSV 스타일)
                builder.append(text + ",")
            builder.append("\n")  # 행 끝
        builder.append("\n")      # 표 간 빈 줄

        # 내용을 텍스트 파일에 쓰기
        with open(f"output/Table-{i + 1}.txt", "w", encoding="utf-8") as file:
            file.write("".join(builder))

# 문서 닫기
doc.Close()
출력:
참고: 이 스크립트는 디지털로 생성된 PDF (텍스트 기반)에서만 작동합니다. 스캔된 PDF의 경우 Spire.PDF만으로는 충분하지 않습니다. 이러한 경우 Spire.PDF를 사용하여 PDF를 이미지로 먼저 변환한 다음, pytesseract와 같은 OCR 엔진과 추가 처리 로직을 적용하여 표 데이터를 감지하고 추출할 수 있습니다.
Python을 사용하는 이유?
- 디지털 및 스캔된 PDF 모두 처리 (OCR 통합 포함)
- 수백 개의 파일을 배치 처리
- 사용자 정의 가능한 후처리 (정리, 병합, 검증)
- 웹 앱, API 또는 ETL 파이프라인에 통합 가능
- 표가 어떻게 형식화되고 저장되는지 정확하게 제어
포괄적인 PDF 라이브러리인 Spire.PDF for Python은 PDF에서 표를 추출할 뿐만 아니라 이미지, 메타데이터 및 첨부 파일 추출도 지원합니다. 또한 전체 문서를 Word, Excel 및 TXT와 같은 형식으로 내보낼 수 있습니다.
장점 및 단점
| 장점 | 단점 |
|---|---|
| 추출 로직에 대한 완전한 제어 | 프로그래밍 지식 필요 |
| 복잡하고 여러 페이지에 걸친 표 처리 | 가파른 학습 곡선 |
| 수천 개의 파일을 배치 처리 | Spire.PDF는 상업적 사용 시 라이선스가 필요합니다 (개인용 무료). |
| 깔끔하고 재현 가능한 결과 | 모든 PDF에서 표 감지가 완벽하지는 않음 |
| pandas, Excel 또는 데이터베이스와 쉽게 통합 가능 |
비교표: 적합한 방법 선택
| 방법 | 사용 편의성 | 스캔된 PDF 처리 | 배치 처리 | 비용 | 최적 |
|---|---|---|---|---|---|
| Excel | 중간 | x | x | Office 필요 | 빠르고 일회성 디지털 표 |
| Google Docs | 높음 | x | x | 무료 | 간단한 표, 소프트웨어 불필요 |
| Adobe Acrobat Pro | 높음 | √ | x | 유료 | 전문가, 비기술 사용자 |
| Python | 낮음 | √ | √ | 무료 / 유료 | 최대 유연성, 대규모, 스캔된 PDF |
결론
PDF에서 표를 추출하는 것이 더 이상 골칫거리가 될 필요는 없습니다. 적합한 방법은 전적으로 특정 상황에 따라 달라집니다.
- 일회성의 간단한 표의 경우 → 먼저 Google Docs 또는 온라인 도구를 사용해 보세요.
- 전문적이고 세련된 결과를 얻으려면 → 액세스할 수 있다면 Excel 또는 Adobe Acrobat Pro를 사용하십시오.
- 최대 제어, 복잡한 표 또는 스캔된 문서의 경우 → Python이 가장 좋습니다.
필요에 맞는 가장 간단한 방법부터 시작하세요. 요구 사항이 늘어남에 따라 (더 많은 파일, 스캔된 문서, 사용자 정의 정리) 더 강력한 도구인 Python으로 전환할 수 있습니다. 핵심은 표 추출이 모든 경우에 적용되는 단일 문제가 아니라는 것을 인식하는 것입니다. 이제 이를 해결할 네 가지 방법을 알게 되었습니다.
자주 묻는 질문
Q1. PDF에서 표를 추출하기 어려운 이유는 무엇인가요?
PDF는 구조화된 데이터 표가 아닌 위치 지정된 텍스트로 콘텐츠를 저장하기 때문에 추출이 덜 간단합니다.
Q2. 어떤 방법이 가장 정확한 결과를 제공하나요?
Adobe Acrobat Pro는 일반적으로 복잡한 표에 대해 가장 좋은 정확도를 제공합니다.
Q3. 스캔된 PDF에서 표를 추출할 수 있나요?
예, 하지만 OCR (광학 문자 인식)이 필요합니다. Adobe Acrobat 또는 Spire.PDF (OCR 구성 요소 포함)와 같은 도구는 스캔된 이미지를 기계가 읽을 수 있는 텍스트로 변환할 수 있으며, 그 후 표 데이터를 감지하고 추출할 수 있습니다.
Q4. Python이 다른 방법보다 더 나은가요?
상황에 따라 다릅니다. Python은 자동화 및 대규모 처리에 가장 적합하지만, 일회성 작업에는 과도할 수 있습니다.
Q5. 추출된 표를 Excel로 직접 변환할 수 있나요?
예. 대부분의 도구 (Excel, Acrobat)는 .xlsx로 직접 내보내기를 지원하며, Python은 이를 수행하도록 확장할 수 있습니다.
참고 자료
Extraire des tableaux d'un PDF : 4 méthodes simples et avancées
Table des matières
Les PDF sont parfaits pour préserver la mise en page des documents, mais l'extraction de données tabulaires à partir d'eux peut être frustrante. La raison principale est que les PDF sont conçus pour un rendu visuel cohérent sur différents appareils, et non pour l'extraction de données structurées. Par conséquent, les tableaux peuvent exister sous forme de texte sélectionnable dans les PDF numériques ou sous forme d'images dans les fichiers numérisés, avec des structures très variables.
Heureusement, il existe plusieurs façons pratiques d'extraire des tableaux de PDF, en fonction de vos besoins et de votre niveau de confort technique. Dans ce guide, nous allons passer en revue quatre méthodes efficaces, des outils simples sans code comme Excel et Google Docs à une solution puissante basée sur Python pour un contrôle total et une automatisation.
Aperçu des méthodes :
- Méthode 1 : Microsoft Excel (Importation PDF intégrée)
- Méthode 2 : Google Docs (Gratuit et simple)
- Méthode 3 : Adobe Acrobat Pro (Fonction d'exportation)
- Méthode 4 : Python (Contrôle total et automatisation)
Méthode 1 : Microsoft Excel (Importation PDF intégrée)
Idéal pour : Les utilisateurs Windows disposant de Microsoft Office 365 ou Excel 2016+ (Windows uniquement).
Microsoft Excel dispose d'une fonctionnalité d'importation PDF native qui fonctionne étonnamment bien pour les PDF numériques. Elle se connecte directement au fichier et tente de détecter et de convertir les tableaux.
Instructions étape par étape
- Ouvrez Microsoft Excel.
- Allez dans Données → Obtenir les données → À partir d'un fichier → À partir d'un PDF.
- Parcourez et sélectionnez votre fichier PDF.
- Une fenêtre de navigateur apparaîtra, montrant tous les tableaux et pages détectés.
- Sélectionnez les tableaux que vous souhaitez et cliquez sur Charger (pour importer directement) ou sur Transformer les données (pour nettoyer avant de charger).
- Excel importera le tableau dans une feuille de calcul, en préservant raisonnablement bien la structure des lignes/colonnes.
Avantages et inconvénients
| Avantages | Inconvénients |
|---|---|
| Aucun logiciel supplémentaire requis (avec Office) | Windows uniquement |
| Préserve les formats numériques | Difficultés avec les cellules fusionnées |
| Bon pour les PDF numériques basés sur du texte | Pas d'OCR pour les PDF numérisés |
| Peut actualiser les données si le PDF est mis à jour | Peut être lent sur les PDF volumineux |
Méthode 2 : Google Docs (Gratuit et simple)
Idéal pour : Les extractions rapides et ponctuelles lorsque vous n'avez pas Excel ou d'outils payants.
Google Docs offre une méthode cachée mais gratuite pour extraire des tableaux de PDF. Elle fonctionne en convertissant l'intégralité du PDF en un Google Doc modifiable, où les tableaux deviennent des grilles textuelles.
Instructions étape par étape
- Téléchargez le PDF sur Google Drive.
- Cliquez avec le bouton droit sur le PDF → Ouvrir avec → Google Docs.
- Attendez que Google Docs traite le fichier.
- Faites défiler pour trouver le tableau. Il apparaîtra sous forme de grille textuelle (lignes et colonnes séparées par des espaces ou des tabulations).
- Copiez la zone du tableau et collez-la dans Google Sheets ou Microsoft Excel.
Avantages et inconvénients
| Avantages | Inconvénients |
|---|---|
| Entièrement gratuit | Pas de détection de tableau réelle (juste alignement du texte) |
| Aucune installation de logiciel | Résultats désordonnés avec des tableaux complexes |
| Fonctionne sur n'importe quel système d'exploitation avec un navigateur | Mauvaise gestion des cellules fusionnées ou des cellules multi-lignes |
| Gère de manière fiable les tableaux simples | Pas d'OCR (les PDF numérisés apparaissent comme des images) |
Méthode 3 : Adobe Acrobat Pro (Fonction d'exportation)
Idéal pour : Les professionnels qui possèdent déjà Acrobat Pro et ont besoin d'exportations fiables à partir de PDF numériques.
Adobe Acrobat Pro (pas le lecteur gratuit) dispose d'une fonction d'exportation intégrée qui convertit les tableaux PDF directement en Excel ou CSV. Il préserve plus de formatage que les outils gratuits.
Instructions étape par étape
- Ouvrez le PDF dans Adobe Acrobat Pro.
- Cliquez sur Exporter le PDF (barre d'outils de droite).
- Sélectionnez Feuille de calcul → Classeur Microsoft Excel (ou CSV).
- Cliquez sur Exporter.
- Choisissez un emplacement et enregistrez.
- Ouvrez le fichier Excel généré et vérifiez les tableaux.
Conseils supplémentaires
- Utilisez d'abord l'option Reconnaître le texte (OCR) si vous traitez des PDF numérisés.
- Pour les tableaux multi-pages, Acrobat les concatène souvent intelligemment.
- Vous pouvez exporter uniquement des pages sélectionnées pour gagner du temps.
Avantages et inconvénients
| Avantages | Inconvénients |
|---|---|
| Haute précision pour les PDF numériques | Coûteux (abonnement requis) |
| Gère bien les tableaux multi-pages | Pas de contrôle granulaire sur l'extraction |
| Préserve les formules et les nombres | Rencontre toujours des difficultés avec les tableaux imbriqués très complexes |
| Traitement par lots disponible | Windows/macOS uniquement (pas de version web) |
Méthode 4 : Python (Contrôle total et automatisation)
Idéal pour : Les développeurs, les scientifiques des données et les utilisateurs avancés qui ont besoin d'une flexibilité maximale, traitent des PDF numérisés ou traitent des fichiers par lots.
Python vous donne un contrôle total sur le processus d'extraction. Vous pouvez traiter des PDF numériques avec des bibliothèques comme pdfplumber, camelot ou Spire.PDF pour Python (une bibliothèque commerciale avec une version gratuite disponible). Vous trouverez ci-dessous un exemple pratique utilisant Spire.PDF pour extraire des tableaux et les enregistrer sous forme de fichiers texte propres.
Installation
pip install spire.pdf
Exemple de code complet (Extraction de tableaux vers des fichiers TXT)
Le code suivant extrait tous les tableaux d'une page PDF spécifique et enregistre chaque tableau sous forme de fichier texte distinct au format CSV :
from spire.pdf.common import *
from spire.pdf import *

# Créer un objet PdfDocument
doc = PdfDocument()

# Charger un fichier PDF
doc.LoadFromFile("report.pdf")

# Créer un objet PdfTableExtractor
extractor = PdfTableExtractor(doc)

# Extraire les tableaux d'une page spécifique (l'index de page commence à 0)
tableList = extractor.ExtractTable(0)

# Déterminer si la liste de tableaux n'est pas vide
if tableList is not None:

    # Parcourir les tableaux de la page
    for i in range(len(tableList)):

        # Créer une nouvelle liste pour stocker les données de ce tableau
        builder = []

        # Obtenir un tableau spécifique
        table = tableList[i]

        # Obtenir le nombre de lignes et le nombre de colonnes
        row = table.GetRowCount()
        column = table.GetColumnCount()

        # Parcourir chaque ligne et colonne
        for m in range(row):
            for n in range(column):

                # Obtenir le texte de la cellule spécifique
                text = table.GetText(m, n)

                # Ajouter le texte suivi d'une virgule (style CSV)
                builder.append(text + ",")
            builder.append("\n")  # Fin de ligne
        builder.append("\n")      # Ligne vide entre les tableaux

        # Écrire le contenu dans un fichier texte
        with open(f"output/Table-{i + 1}.txt", "w", encoding="utf-8") as file:
            file.write("".join(builder))

# Fermer le document
doc.Close()
Sortie :
Remarque : Ce script ne fonctionne qu'avec les PDF générés numériquement (basés sur du texte). Pour les PDF numérisés, Spire.PDF seul n'est pas suffisant. Dans de tels cas, vous pouvez d'abord convertir le PDF en images à l'aide de Spire.PDF, puis appliquer un moteur OCR comme pytesseract ainsi qu'une logique de traitement supplémentaire pour détecter et extraire les données tabulaires.
Pourquoi Python ?
- Gère les PDF numériques et numérisés (avec intégration OCR)
- Traitement par lots de centaines de fichiers
- Post-traitement personnalisable (nettoyage, fusion, validation)
- Peut être intégré dans des applications web, des API ou des pipelines ETL
- Vous contrôlez exactement comment les tableaux sont formatés et enregistrés
En tant que bibliothèque PDF complète, Spire.PDF pour Python n'extrait pas seulement des tableaux de PDF, mais prend également en charge l'extraction d'images, de métadonnées et de pièces jointes. De plus, il peut exporter des documents entiers vers des formats tels que Word, Excel et TXT.
Avantages et inconvénients
| Avantages | Inconvénients |
|---|---|
| Contrôle total sur la logique d'extraction | Nécessite des connaissances en programmation |
| Gère les tableaux complexes et multi-pages | Courbe d'apprentissage plus raide |
| Traitement par lots de milliers de fichiers | Spire.PDF nécessite une licence pour un usage commercial (gratuit pour un usage personnel) |
| Résultats propres et reproductibles | La détection de tableaux n'est pas parfaite sur tous les PDF |
| Facile à intégrer avec pandas, Excel ou des bases de données |
Tableau comparatif : Choisir la bonne méthode
| Méthode | Facilité d'utilisation | Gère les PDF numérisés | Traitement par lots | Coût | Idéal pour |
|---|---|---|---|---|---|
| Excel | Moyen | x | x | Nécessite Office | Tableaux numériques rapides et ponctuels |
| Google Docs | Élevé | x | x | Gratuit | Tableaux simples, sans logiciel |
| Adobe Acrobat Pro | Élevé | √ | x | Payant | Utilisateurs professionnels non techniques |
| Python | Faible | √ | √ | Gratuit / Payant | Flexibilité maximale, à grande échelle, PDF numérisés |
Conclusion
L'extraction de tableaux de PDF ne doit pas être un casse-tête. La bonne méthode dépend entièrement de votre situation spécifique :
- Pour un tableau simple et unique → Essayez d'abord Google Docs ou un outil en ligne.
- Pour des résultats professionnels et soignés → Utilisez Excel ou Adobe Acrobat Pro si vous y avez accès.
- Pour un contrôle maximal, des tableaux complexes ou des documents numérisés → Python est votre meilleure option.
Commencez par la méthode la plus simple qui répond à vos besoins. À mesure que vos exigences augmentent (plus de fichiers, documents numérisés, nettoyage personnalisé), vous pouvez toujours passer à des outils plus puissants comme Python. L'essentiel est de reconnaître que l'extraction de tableaux n'est pas un problème universel, et vous disposez maintenant de quatre façons de le résoudre.
FAQ
Q1. Pourquoi est-il difficile d'extraire des tableaux de PDF ?
Parce que les PDF stockent le contenu sous forme de texte positionné plutôt que de tableaux de données structurées, ce qui rend l'extraction moins simple.
Q2. Quelle méthode donne les résultats les plus précis ?
Adobe Acrobat Pro offre généralement la meilleure précision pour les tableaux complexes.
Q3. Puis-je extraire des tableaux de PDF numérisés ?
Oui, mais cela nécessite l'OCR (reconnaissance optique de caractères). Des outils comme Adobe Acrobat ou Spire.PDF (avec un composant OCR) peuvent convertir des images numérisées en texte lisible par machine, après quoi les données tabulaires peuvent être détectées et extraites.
Q4. Python est-il meilleur que les autres méthodes ?
Cela dépend. Python est idéal pour l'automatisation et le traitement à grande échelle, mais excessif pour les tâches uniques.
Q5. Puis-je convertir directement les tableaux extraits en Excel ?
Oui. La plupart des outils (Excel, Acrobat) prennent en charge l'exportation directe au format .xlsx, et Python peut être étendu pour faire de même.
Voir aussi
Extraer tablas de PDF: 4 métodos simples y avanzados
Tabla de Contenidos
Los PDF son excelentes para preservar el diseño de los documentos, pero extraer datos tabulares de ellos puede ser frustrante. La razón principal es que los PDF están diseñados para una representación visual consistente en diferentes dispositivos, no para la extracción de datos estructurados. Como resultado, las tablas pueden existir como texto seleccionable en PDF digitales o como imágenes en archivos escaneados, con estructuras que varían ampliamente.
Afortunadamente, existen varias formas prácticas de extraer tablas de PDF, dependiendo de tus necesidades y nivel de comodidad técnica. En esta guía, recorreremos cuatro métodos efectivos, desde herramientas sencillas sin código como Excel y Google Docs hasta una potente solución basada en Python para un control total y automatización.
Resumen de métodos:
- Método 1: Microsoft Excel (Importación de PDF integrada)
- Método 2: Google Docs (Gratis y Sencillo)
- Método 3: Adobe Acrobat Pro (Función de Exportación)
- Método 4: Python (Control Total y Automatización)
Método 1: Microsoft Excel (Importación de PDF integrada)
Ideal para: Usuarios de Windows con Microsoft Office 365 o Excel 2016+ (solo Windows).
Microsoft Excel tiene una función de importación de PDF nativa que funciona sorprendentemente bien para PDF digitales. Se conecta directamente al archivo e intenta detectar y convertir tablas.
Instrucciones Paso a Paso
- Abre Microsoft Excel.
- Ve a Datos → Obtener datos → Desde archivo → Desde PDF.
- Busca y selecciona tu archivo PDF.
- Aparecerá una ventana del navegador que muestra todas las tablas y páginas detectadas.
- Selecciona las tablas que deseas y haz clic en Cargar (para importar directamente) o Transformar datos (para limpiar antes de cargar).
- Excel importará la tabla a una hoja de cálculo, conservando la estructura de filas/columnas de manera razonable.
Pros y Contras
| Pros | Contras |
|---|---|
| No se necesita software adicional (con Office) | Solo para Windows |
| Conserva formatos numéricos | Lucha con celdas combinadas |
| Bueno para PDF digitales basados en texto | Sin OCR para PDF escaneados |
| Puede actualizar datos si el PDF cambia | Puede ser lento en PDF grandes |
Método 2: Google Docs (Gratis y Sencillo)
Ideal para: Extracciones rápidas y únicas cuando no tienes Excel o herramientas de pago.
Google Docs ofrece un método oculto pero gratuito para extraer tablas de PDF. Funciona convirtiendo todo el PDF en un Google Doc editable, donde las tablas se convierten en cuadrículas basadas en texto.
Instrucciones Paso a Paso
- Sube el PDF a Google Drive.
- Haz clic derecho en el PDF → Abrir con → Google Docs.
- Espera a que Google Docs procese el archivo.
- Desplázate para encontrar la tabla. Aparecerá como una cuadrícula basada en texto (filas y columnas separadas por espacios o tabulaciones).
- Copia el área de la tabla y pégala en Google Sheets o Microsoft Excel.
Pros y Contras
| Pros | Contras |
|---|---|
| Completamente gratis | Sin detección real de tablas (solo alineación de texto) |
| Sin instalación de software | Resultados desordenados con tablas complejas |
| Funciona en cualquier SO con un navegador | Manejo deficiente de celdas combinadas o celdas multilínea |
| Maneja tablas simples de manera confiable | Sin OCR (los PDF escaneados aparecen como imágenes) |
Método 3: Adobe Acrobat Pro (Función de Exportación)
Ideal para: Profesionales que ya tienen Acrobat Pro y necesitan exportaciones confiables de PDF digitales.
Adobe Acrobat Pro (no el Reader gratuito) tiene una función de exportación integrada que convierte tablas de PDF directamente a Excel o CSV. Conserva más formato que las herramientas gratuitas.
Instrucciones Paso a Paso
- Abre el PDF en Adobe Acrobat Pro.
- Haz clic en Exportar PDF (barra de herramientas derecha).
- Selecciona Hoja de cálculo → Libro de Microsoft Excel (o CSV).
- Haz clic en Exportar.
- Elige una ubicación y guarda.
- Abre el archivo Excel generado y verifica las tablas.
Consejos Adicionales
- Usa la opción Reconocer texto (OCR) primero si trabajas con PDF escaneados.
- Para tablas de varias páginas, Acrobat a menudo las concatena de forma inteligente.
- Puedes exportar solo páginas seleccionadas para ahorrar tiempo.
Pros y Contras
| Pros | Contras |
|---|---|
| Alta precisión para PDF digitales | Caro (se requiere suscripción) |
| Maneja bien tablas de varias páginas | Sin control detallado sobre la extracción |
| Conserva fórmulas y números | Todavía tiene problemas con tablas anidadas muy complejas |
| Procesamiento por lotes disponible | Solo Windows/macOS (sin versión web) |
Método 4: Python (Control Total y Automatización)
Ideal para: Desarrolladores, científicos de datos y usuarios avanzados que necesitan la máxima flexibilidad, manejan PDF escaneados o procesan archivos por lotes.
Python te da control total sobre el proceso de extracción. Puedes manejar PDF digitales con bibliotecas como pdfplumber, camelot o Spire.PDF para Python (una biblioteca comercial con una versión gratuita disponible). A continuación, se muestra un ejemplo práctico utilizando Spire.PDF para extraer tablas y guardarlas como archivos de texto limpios.
Instalación
pip install spire.pdf
Ejemplo de Código Completo (Extraer Tablas a Archivos TXT)
El siguiente código extrae todas las tablas de una página PDF específica y guarda cada tabla como un archivo de texto separado en formato similar a CSV:
from spire.pdf.common import *
from spire.pdf import *

# Crear un objeto PdfDocument
doc = PdfDocument()

# Cargar un archivo PDF
doc.LoadFromFile("report.pdf")

# Crear un objeto PdfTableExtractor
extractor = PdfTableExtractor(doc)

# Extraer tablas de una página específica (el índice de página comienza en 0)
tableList = extractor.ExtractTable(0)

# Determinar si la lista de tablas no está vacía
if tableList is not None:

    # Recorrer las tablas de la página
    for i in range(len(tableList)):

        # Crear una nueva lista para almacenar datos de esta tabla
        builder = []

        # Obtener una tabla específica
        table = tableList[i]

        # Obtener el número de filas y columnas
        row = table.GetRowCount()
        column = table.GetColumnCount()

        # Recorrer cada fila y columna
        for m in range(row):
            for n in range(column):

                # Obtener texto de la celda específica
                text = table.GetText(m, n)

                # Agregar el texto seguido de una coma (estilo CSV)
                builder.append(text + ",")
            builder.append("\n")  # Fin de fila
        builder.append("\n")      # Línea en blanco entre tablas

        # Escribir el contenido en un archivo de texto
        with open(f"output/Table-{i + 1}.txt", "w", encoding="utf-8") as file:
            file.write("".join(builder))

# Cerrar el documento
doc.Close()
Salida:
Nota: Este script solo funciona con PDF generados digitalmente (basados en texto). Para PDF escaneados, Spire.PDF por sí solo no es suficiente. En tales casos, primero puedes convertir el PDF a imágenes usando Spire.PDF, luego aplicar un motor OCR como pytesseract junto con lógica de procesamiento adicional para detectar y extraer datos de tablas.
¿Por qué Python?
- Maneja PDF digitales y escaneados (con integración OCR)
- Procesamiento por lotes de cientos de archivos
- Post-procesamiento personalizable (limpieza, fusión, validación)
- Se puede integrar en aplicaciones web, API o pipelines ETL
- Controlas exactamente cómo se formatean y guardan las tablas
Como biblioteca PDF completa, Spire.PDF para Python no solo extrae tablas de PDF, sino que también admite la extracción de imágenes, metadatos y adjuntos. Además, puede exportar documentos completos a formatos como Word, Excel y TXT.
Pros y Contras
| Pros | Contras |
|---|---|
| Control total sobre la lógica de extracción | Requiere conocimientos de programación |
| Maneja tablas complejas y de varias páginas | Curva de aprendizaje más pronunciada |
| Procesamiento por lotes de miles de archivos | Spire.PDF requiere una licencia para uso comercial (gratis para uso personal) |
| Resultados limpios y reproducibles | La detección de tablas no es perfecta en todos los PDF |
| Fácil de integrar con pandas, Excel o bases de datos |
Tabla Comparativa: Eligiendo el Método Adecuado
| Método | Facilidad de Uso | Maneja PDF Escaneados | Procesamiento por Lotes | Costo | Ideal para |
|---|---|---|---|---|---|
| Excel | Medio | x | x | Requiere Office | Tablas digitales rápidas y únicas |
| Google Docs | Alto | x | x | Gratis | Tablas simples, sin software |
| Adobe Acrobat Pro | Alto | √ | x | De pago | Usuarios profesionales no técnicos |
| Python | Bajo | √ | √ | Gratis / De pago | Máxima flexibilidad, a gran escala, PDF escaneados |
Conclusión
Extraer tablas de PDF no tiene por qué ser un dolor de cabeza. El método adecuado depende completamente de tu situación específica:
- Para una tabla simple y única → Prueba Google Docs o una herramienta en línea primero.
- Para resultados profesionales y pulidos → Usa Excel o Adobe Acrobat Pro si tienes acceso.
- Para máximo control, tablas complejas o documentos escaneados → Python es tu mejor opción.
Comienza con el método más sencillo que satisfaga tus necesidades. A medida que tus requisitos crezcan (más archivos, documentos escaneados, limpieza personalizada), siempre puedes pasar a herramientas más potentes como Python. La clave es reconocer que la extracción de tablas no es un problema único para todos, ¡y ahora tienes cuatro formas de resolverlo!
Preguntas Frecuentes
P1. ¿Por qué es difícil extraer tablas de los PDF?
Porque los PDF almacenan el contenido como texto posicionado en lugar de tablas de datos estructuradas, lo que hace que la extracción sea menos sencilla.
P2. ¿Qué método ofrece los resultados más precisos?
Adobe Acrobat Pro generalmente ofrece la mejor precisión para tablas complejas.
P3. ¿Puedo extraer tablas de PDF escaneados?
Sí, pero requiere OCR (Reconocimiento Óptico de Caracteres). Herramientas como Adobe Acrobat o Spire.PDF (con un componente OCR) pueden convertir imágenes escaneadas en texto legible por máquina, después de lo cual los datos de la tabla pueden ser detectados y extraídos.
P4. ¿Es Python mejor que otros métodos?
Depende. Python es mejor para la automatización y el procesamiento a gran escala, pero es excesivo para tareas únicas.
P5. ¿Puedo convertir tablas extraídas directamente a Excel?
Sí. La mayoría de las herramientas (Excel, Acrobat) admiten la exportación directa a .xlsx, y Python se puede extender para hacer lo mismo.
Ver También
Tabellen aus PDF extrahieren: 4 einfache und fortgeschrittene Methoden
Inhaltsverzeichnis
PDFs sind großartig, um Dokumentenlayouts zu erhalten, aber das Extrahieren von tabellarischen Daten daraus kann frustrierend sein. Der Hauptgrund dafür ist, dass PDFs für eine konsistente visuelle Darstellung über verschiedene Geräte hinweg konzipiert sind und nicht für die Extraktion strukturierter Daten. Infolgedessen können Tabellen in digitalen PDFs als auswählbarer Text oder in gescannten Dateien als Bilder vorliegen, wobei die Strukturen stark variieren.
Glücklicherweise gibt es mehrere praktische Möglichkeiten, Tabellen aus PDFs zu extrahieren, abhängig von Ihren Bedürfnissen und Ihrem technischen Komfortniveau. In diesem Leitfaden führen wir Sie durch vier effektive Methoden, von einfachen No-Code-Tools wie Excel und Google Docs bis hin zu einer leistungsstarken Python-basierten Lösung für volle Kontrolle und Automatisierung.
Methodenübersicht:
- Methode 1: Microsoft Excel (Integrierter PDF-Import)
- Methode 2: Google Docs (Kostenlos & Einfach)
- Methode 3: Adobe Acrobat Pro (Exportfunktion)
- Methode 4: Python (Volle Kontrolle & Automatisierung)
Methode 1: Microsoft Excel (Integrierter PDF-Import)
Am besten geeignet für: Windows-Benutzer mit Microsoft Office 365 oder Excel 2016+ (nur Windows).
Microsoft Excel verfügt über eine native PDF-Importfunktion, die für digitale PDFs überraschend gut funktioniert. Sie verbindet sich direkt mit der Datei und versucht, Tabellen zu erkennen und zu konvertieren.
Schritt-für-Schritt-Anleitung
- Öffnen Sie Microsoft Excel.
- Gehen Sie zu Daten → Daten abrufen → Aus Datei → Aus PDF.
- Durchsuchen und wählen Sie Ihre PDF-Datei aus.
- Ein Navigator-Fenster wird angezeigt, das alle erkannten Tabellen und Seiten auflistet.
- Wählen Sie die gewünschte(n) Tabelle(n) aus und klicken Sie auf Laden (zum direkten Import) oder Daten transformieren (zum Bereinigen vor dem Laden).
- Excel importiert die Tabelle in ein Arbeitsblatt und behält die Zeilen-/Spaltenstruktur einigermaßen gut bei.
Vorteile & Nachteile
| Vorteile | Nachteile |
|---|---|
| Keine zusätzliche Software erforderlich (mit Office) | Nur Windows |
| Numerische Formate werden beibehalten | Schwierigkeiten mit verbundenen Zellen |
| Gut für digitale, textbasierte PDFs | Kein OCR für gescannte PDFs |
| Daten können aktualisiert werden, wenn sich das PDF ändert | Kann bei großen PDFs langsam sein |
Methode 2: Google Docs (Kostenlos & Einfach)
Am besten geeignet für: Schnelle, einmalige Extraktionen, wenn Sie kein Excel oder kostenpflichtige Tools haben.
Google Docs bietet eine versteckte, aber kostenlose Methode zum Extrahieren von Tabellen aus PDFs. Es funktioniert, indem das gesamte PDF in ein bearbeitbares Google Doc konvertiert wird, wo Tabellen zu textbasierten Gittern werden.
Schritt-für-Schritt-Anleitung
- Laden Sie das PDF in Google Drive hoch.
- Klicken Sie mit der rechten Maustaste auf das PDF → Öffnen mit → Google Docs.
- Warten Sie, bis Google Docs die Datei verarbeitet hat.
- Scrollen Sie, um die Tabelle zu finden. Sie wird als textbasiertes Gitter angezeigt (Zeilen und Spalten, getrennt durch Leerzeichen oder Tabulatoren).
- Kopieren Sie den Tabellenbereich und fügen Sie ihn in Google Sheets oder Microsoft Excel ein.
Vorteile & Nachteile
| Vorteile | Nachteile |
|---|---|
| Völlig kostenlos | Keine echte Tabellenerkennung (nur Textausrichtung) |
| Keine Softwareinstallation | Unordentliche Ergebnisse bei komplexen Tabellen |
| Funktioniert auf jedem Betriebssystem mit einem Browser | Schlechte Handhabung von verbundenen Zellen oder mehrzeiligen Zellen |
| Verarbeitet einfache Tabellen zuverlässig | Kein OCR (gescannte PDFs erscheinen als Bilder) |
Methode 3: Adobe Acrobat Pro (Exportfunktion)
Am besten geeignet für: Profis, die bereits Acrobat Pro besitzen und zuverlässige Exporte aus digitalen PDFs benötigen.
Adobe Acrobat Pro (nicht der kostenlose Reader) verfügt über eine integrierte Exportfunktion, die PDF-Tabellen direkt in Excel oder CSV konvertiert. Sie behält mehr Formatierungen bei als kostenlose Tools.
Schritt-für-Schritt-Anleitung
- Öffnen Sie das PDF in Adobe Acrobat Pro.
- Klicken Sie auf PDF exportieren (rechte Werkzeugleiste).
- Wählen Sie Tabellenkalkulation → Microsoft Excel-Arbeitsmappe (oder CSV).
- Klicken Sie auf Exportieren.
- Wählen Sie einen Speicherort und speichern Sie.
- Öffnen Sie die generierte Excel-Datei und überprüfen Sie die Tabellen.
Zusätzliche Tipps
- Verwenden Sie zuerst die Option Text erkennen (OCR), wenn Sie mit gescannten PDFs arbeiten.
- Bei mehrseitigen Tabellen fasst Acrobat diese oft intelligent zusammen.
- Sie können nur ausgewählte Seiten exportieren, um Zeit zu sparen.
Vorteile & Nachteile
| Vorteile | Nachteile |
|---|---|
| Hohe Genauigkeit für digitale PDFs | Teuer (Abonnement erforderlich) |
| Verarbeitet mehrseitige Tabellen gut | Keine feingranulare Kontrolle über die Extraktion |
| Behält Formeln und Zahlen bei | Schwierigkeiten mit sehr komplexen verschachtelten Tabellen |
| Stapelverarbeitung verfügbar | Nur Windows/macOS (keine Webversion) |
Methode 4: Python (Volle Kontrolle & Automatisierung)
Am besten geeignet für: Entwickler, Datenwissenschaftler und fortgeschrittene Benutzer, die maximale Flexibilität benötigen, gescannte PDFs verarbeiten oder Stapeldateien verarbeiten müssen.
Python gibt Ihnen die vollständige Kontrolle über den Extraktionsprozess. Sie können digitale PDFs mit Bibliotheken wie pdfplumber, camelot oder Spire.PDF for Python (eine kommerzielle Bibliothek mit einer kostenlosen Version) verarbeiten. Nachfolgend finden Sie ein praktisches Beispiel mit Spire.PDF zum Extrahieren von Tabellen und deren Speichern als saubere Textdateien.
Installation
pip install spire.pdf
Vollständiges Codebeispiel (Tabellen in TXT-Dateien extrahieren)
Der folgende Code extrahiert alle Tabellen von einer bestimmten PDF-Seite und speichert jede Tabelle als separate Textdatei im CSV-ähnlichen Format:
from spire.pdf.common import *
from spire.pdf import *

# Erstellen Sie ein PdfDocument-Objekt
doc = PdfDocument()

# Laden Sie eine PDF-Datei
doc.LoadFromFile("report.pdf")

# Erstellen Sie ein PdfTableExtractor-Objekt
extractor = PdfTableExtractor(doc)

# Extrahieren Sie Tabellen von einer bestimmten Seite (Seitenindex beginnt bei 0)
tableList = extractor.ExtractTable(0)

# Bestimmen Sie, ob die Tabellenliste nicht leer ist
if tableList is not None:

    # Schleife durch die Tabellen auf der Seite
    for i in range(len(tableList)):

        # Erstellen Sie eine neue Liste, um Daten für diese Tabelle zu speichern
        builder = []

        # Holen Sie sich eine bestimmte Tabelle
        table = tableList[i]

        # Holen Sie sich die Zeilen- und Spaltenanzahl
        row = table.GetRowCount()
        column = table.GetColumnCount()

        # Schleife durch jede Zeile und Spalte
        for m in range(row):
            for n in range(column):

                # Holen Sie sich den Text aus der spezifischen Zelle
                text = table.GetText(m, n)

                # Fügen Sie den Text gefolgt von einem Komma (CSV-Stil) hinzu
                builder.append(text + ",")
            builder.append("\n")  # Ende der Zeile
        builder.append("\n")      # Leerzeile zwischen den Tabellen

        # Schreiben Sie den Inhalt in eine Textdatei
        with open(f"output/Table-{i + 1}.txt", "w", encoding="utf-8") as file:
            file.write("".join(builder))

# Schließen Sie das Dokument
doc.Close()
Ausgabe:
Hinweis: Dieses Skript funktioniert nur mit digital generierten PDFs (textbasiert). Für gescannte PDFs reicht Spire.PDF allein nicht aus. In solchen Fällen können Sie das PDF zuerst mit Spire.PDF in Bilder konvertieren und dann eine OCR-Engine wie pytesseract zusammen mit zusätzlicher Verarbeitungslogik anwenden, um Tabellendaten zu erkennen und zu extrahieren.
Warum Python?
- Verarbeitet sowohl digitale als auch gescannte PDFs (mit OCR-Integration)
- Stapelverarbeitung von Hunderten von Dateien
- Anpassbare Nachbearbeitung (Bereinigung, Zusammenführung, Validierung)
- Kann in Web-Apps, APIs oder ETL-Pipelines integriert werden
- Sie kontrollieren genau, wie Tabellen formatiert und gespeichert werden
Als umfassende PDF-Bibliothek extrahiert Spire.PDF for Python nicht nur Tabellen aus PDFs, sondern unterstützt auch das Extrahieren von Bildern, Metadaten und Anhängen. Darüber hinaus kann es ganze Dokumente in Formate wie Word, Excel und TXT exportieren.
Vorteile & Nachteile
| Vorteile | Nachteile |
|---|---|
| Volle Kontrolle über die Extraktionslogik | Erfordert Programmierkenntnisse |
| Verarbeitet komplexe und mehrseitige Tabellen | Steilere Lernkurve |
| Stapelverarbeitung von Tausenden von Dateien | Spire.PDF erfordert eine Lizenz für die kommerzielle Nutzung (kostenlos für private Zwecke) |
| Saubere, reproduzierbare Ergebnisse | Die Tabellenerkennung ist nicht bei allen PDFs perfekt |
| Einfache Integration mit pandas, Excel oder Datenbanken |
Vergleichstabelle: Die richtige Methode wählen
| Methode | Benutzerfreundlichkeit | Verarbeitet gescannte PDFs | Stapelverarbeitung | Kosten | Am besten geeignet für |
|---|---|---|---|---|---|
| Excel | Mittel | x | x | Erfordert Office | Schnelle, einmalige digitale Tabellen |
| Google Docs | Hoch | x | x | Kostenlos | Einfache Tabellen, keine Software |
| Adobe Acrobat Pro | Hoch | √ | x | Kostenpflichtig | Professionelle, nicht-technische Benutzer |
| Python | Niedrig | √ | √ | Kostenlos / Kostenpflichtig | Maximale Flexibilität, groß angelegte, gescannte PDFs |
Fazit
Das Extrahieren von Tabellen aus PDFs muss kein Kopfzerbrechen bereiten. Die richtige Methode hängt vollständig von Ihrer spezifischen Situation ab:
- Für eine einmalige, einfache Tabelle → Versuchen Sie zuerst Google Docs oder ein Online-Tool.
- Für professionelle, polierte Ergebnisse → Verwenden Sie Excel oder Adobe Acrobat Pro, wenn Sie Zugriff darauf haben.
- Für maximale Kontrolle, komplexe Tabellen oder gescannte Dokumente → Python ist Ihre beste Wahl.
Beginnen Sie mit der einfachsten Methode, die Ihren Anforderungen entspricht. Wenn Ihre Anforderungen wachsen (mehr Dateien, gescannte Dokumente, benutzerdefinierte Bereinigung), können Sie jederzeit zu leistungsfähigeren Tools wie Python wechseln. Der Schlüssel ist zu erkennen, dass Tabellenextraktion kein Einheits problem ist – und jetzt haben Sie vier Möglichkeiten, es zu lösen.
FAQs
F1. Warum ist es schwierig, Tabellen aus PDFs zu extrahieren?
Da PDFs Inhalte als positionierten Text und nicht als strukturierte Datentabellen speichern, ist die Extraktion weniger einfach.
F2. Welche Methode liefert die genauesten Ergebnisse?
Adobe Acrobat Pro bietet im Allgemeinen die beste Genauigkeit für komplexe Tabellen.
F3. Kann ich Tabellen aus gescannten PDFs extrahieren?
Ja, aber es erfordert OCR (Optical Character Recognition). Tools wie Adobe Acrobat oder Spire.PDF (mit einer OCR-Komponente) können gescannte Bilder in maschinenlesbaren Text umwandeln, danach können Tabellendaten erkannt und extrahiert werden.
F4. Ist Python besser als andere Methoden?
Das kommt darauf an. Python ist am besten für Automatisierung und groß angelegte Verarbeitung, aber für einmalige Aufgaben übertrieben.
F5. Kann ich extrahierte Tabellen direkt in Excel konvertieren?
Ja. Die meisten Tools (Excel, Acrobat) unterstützen den direkten Export nach .xlsx, und Python kann erweitert werden, um dasselbe zu tun.