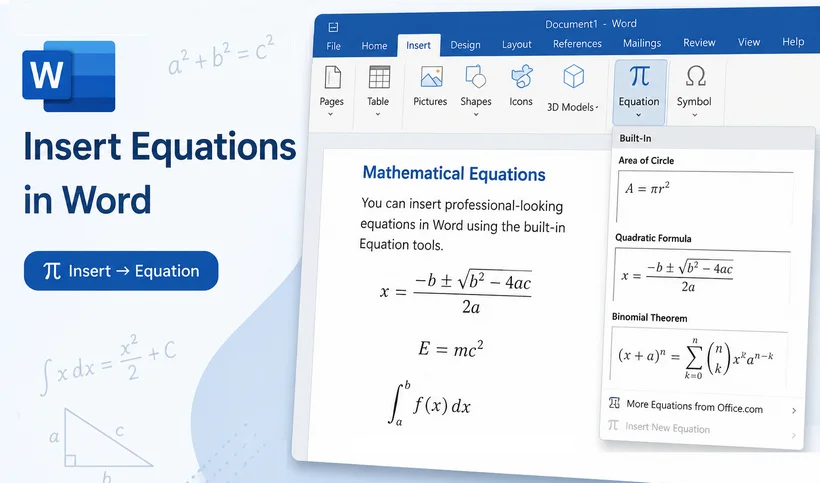
For students writing math papers, researchers preparing scientific reports, or educators creating instructional materials, knowing how to insert equations in Word is an essential skill. A single misaligned fraction or broken matrix doesn't just look unprofessional; it introduces ambiguity, undermines your document's credibility, and often triggers costly delays in peer review or client sign-off.
To help you avoid these pitfalls, this guide covers every practical method for adding equations in Word. From the intuitive built-in editor to advanced LaTeX syntax for power users and fully automated C# scripting for developers, we have a solution tailored to every skill level.
- What a Word Equation Really Is?
- Part 1: Native Word Built-In Methods
- Part 2: AI-Powered No-Code Workflow
- Part 3: Programmatic Automation for Developers
- Frequently Asked Questions (FAQs)
What a Word Equation Really Is?
When you insert equation in Word, you're not just adding styled characters. Word creates an equation object (Office Math / OMML) that has an actual mathematical structure (numerators, denominators, matrix rows, radical content, and limits).
Why this matters:
- Editing stays semantic — changing variables doesn't require re-spacing everything
- Layout is more stable — Word can reflow equations across lines and pages
- Copy/paste is safer — equations remain intact across different machines
- Accessibility improves — screen readers can interpret the content
- Collaboration is easier — reviewers can comment on specific symbols
Part 1: Native Word Built-In Methods
All methods in this section use Word’s default equation editing features. No extra software or add-ins are required, and all outputs are native, fully editable OMML equation objects.
1. Built-In Equation Editor in Word
The most straightforward way to add an equation in Word is through the Equation tool on the Insert tab. This point-and-click interface is ideal for beginners and for users who prefer to build complex structures visually without memorizing syntax.
Here’s how to add equations in Word:
- Place your cursor where you want the equation to appear in the document.
- Click the “Insert” tab on the top ribbon.
- In the “Symbols” group, click “Equation” (keyboard shortcuts: “Alt + =”).
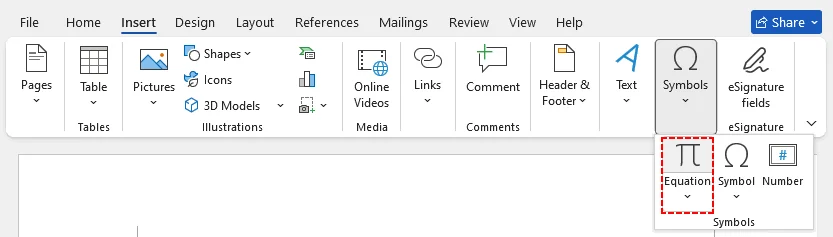
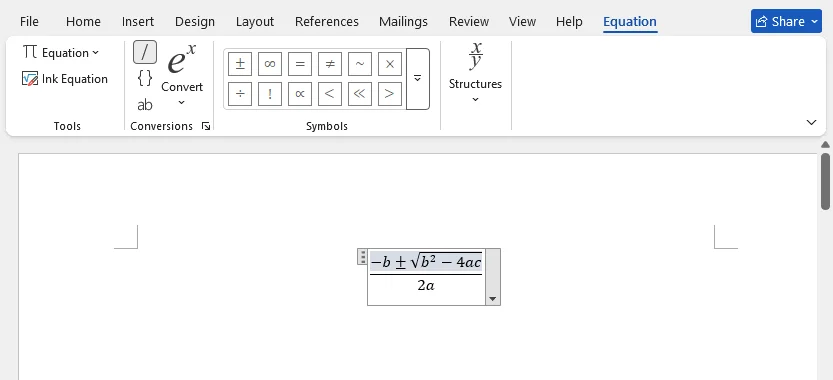
- A new Equation tab will appear, and a blank equation box will be inserted at your cursor.
- Use the “Structures” group (Fractions, Scripts, Radicals, Integrals, etc.) to select the template you need.
- Click inside each placeholder box and type your numbers or variables.
- Click outside the equation box when you're finished.
Tip: With all equations in place, mark the Word file as read-only before sharing to lock your math formatting and avoid accidental changes.
2. Direct LaTeX Input
If you already know LaTeX syntax, you can type equations in Word directly using LaTeX input mode (available in Word 2016 or later and Microsoft 365). This is by far the fastest method for anyone comfortable with LaTeX notation, and it works for everything from simple fractions to complex matrix expressions.
To insert LaTeX in Word:
- Insert a new equation box (“Insert → Equation” or “Alt + =”).
- Navigate to the “Conversions” group under the **“**Equation” tab.
- Click the “{} LaTeX” button to switch to LaTeX input mode.
- Type or paste your LaTeX code directly into the equation box.
- Press “Enter”. Word converts it into a formatted equation automatically.
Example: Typing \frac{-b \pm \sqrt{b^2-4ac}}{2a} produces the full quadratic formula.
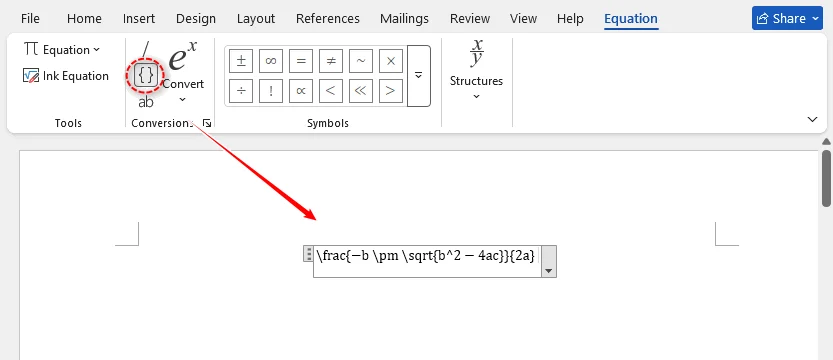
⚠️ Important LaTeX notes:
- Word supports a wide range of LaTeX commands for fractions, roots, superscripts, subscripts, delimiters, and Greek letters (\alpha, \beta, \Gamma).
- If you paste LaTeX directly into body text (not inside an equation box), it will only be auto-converted if enclosed in delimiter pairs like $...$ or [...].
- Avoid line breaks, tabs, or hidden characters in your LaTeX code.
After finalizing your document and verifying all equations, you can print the Word document out to share with colleagues, submit to publishers, or keep a hard-copy archive
3. Handwriting Ink Equation
For touchscreen devices or users who prefer writing by hand, Word's Ink Equation tool converts your handwriting into a clean, typed formula.
How to use Ink Equation
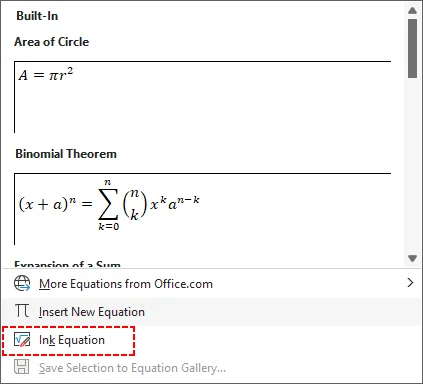
- Go to “Insert” → “Equation” → click the dropdown arrow.
- Select "Ink Equation" at the bottom of the equation gallery.
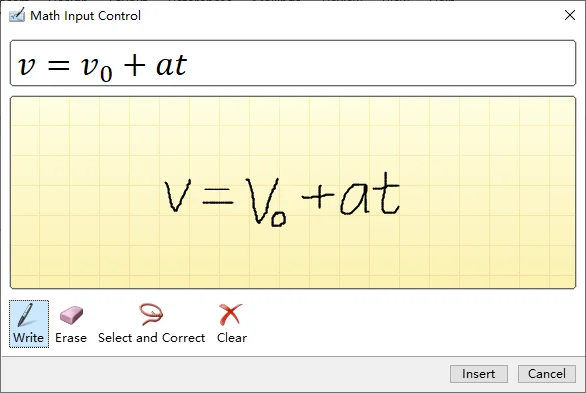
- A "Math Input Control" window will open.
- Use your mouse, stylus, or finger to write the equation in the yellow area.
- Word recognizes your handwriting in real time and shows a preview at the top.
- If a character is misrecognized, use the “Select and Correct” tool to fix it.
- Click “Insert” to place the equation into your document.
Alternatively, you can also access this tool from the “Draw” tab by clicking the “Ink to Math” button.
Part 2: AI-Powered No-Code Workflow
For users who want to avoid manual equation building entirely or need to process multiple equations across long documents, an AI-powered workflow offers a faster, no-code alternative.
The CloudXDocs AI Document Agent generates and inserts equations from natural language descriptions, with no LaTeX knowledge required. This method is especially useful for users who don’t know the exact syntax or want to convert plain-text math descriptions into properly formatted Word equations automatically.
Insert Equations with CloudXDocs AI Agent:
- Open the CloudXDocs AI Agent in your browser and upload your Word document.
- In the chat input, describe the equation you need in plain English. For example:
- "Insert the quadratic formula after the second paragraph"
- "Add a 3x3 matrix equation at the end of section 2.1"
- "Convert all inline math expressions on page 4 to proper equation format"

- The AI agent parses your request, generates the correct equation structure, and inserts it into the document at the specified location.
- Download the updated .docx file. All equations remain fully editable in Word's native equation format.
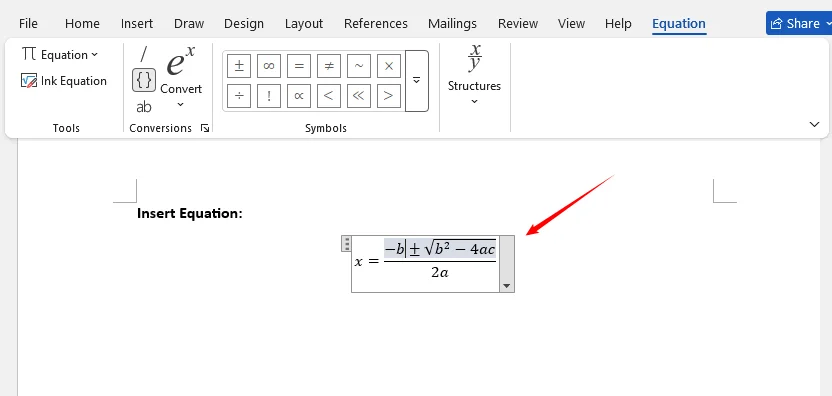
The added quadratic formula:
✅ Key advantages
- No LaTeX knowledge required — describe equations in plain language
- Batch processing — insert dozens of equations across a document in one request
- Context-aware placement — the AI understands document structure (headings, paragraphs, sections)
- Consistent formatting — all equations use uniform font sizing and alignment
This method bridges the gap between manual editing and full programming, making professional equation formatting accessible to non-technical users.
Part 3: Programmatic Automation for Developers
For teams building automated document pipelines, batch report generation, or large-scale document processing, a programmatic approach delivers the highest scalability and consistency.
Free Spire.Doc for .NET provides a robust API for automated equation insertion. The OfficeMath class creates equations directly from LaTeX code and embeds them as native Word OMML (Office Math Markup Language) objects, with no Microsoft Office installation required.
Complete C# Code to Add Equations in Word
using Spire.Doc;
using Spire.Doc.Documents;
using Spire.Doc.Fields.OMath;

namespace AddMathEquations
{
    internal class Program
    {
        static void Main(string[] args)
        {
            // Create a string array from LaTeX code
            string[] latexMathCode = {
                "x^{2}+\\sqrt{x^{2}+1}=2",
                "\\cos (2\\theta) = \\cos^2 \\theta - \\sin^2 \\theta",
                "k_{n+1} = n^2 + k_n^2 - k_{n-1}",
                "\\frac {\\frac {1}{x}+ \\frac {1}{y}}{y-z}",
                "\\int_0^ \\infty \\mathrm {e}^{-x} \\, \\mathrm {d}x",
                "\\forall x \\in X, \\quad \\exists y \\leq \\epsilon",
                "\\alpha, \\beta, \\gamma, \\Gamma, \\pi, \\Pi, \\phi, \\varphi, \\mu, \\Phi",
                "A_{m,n} = \\begin{pmatrix} a_{1,1} & a_{1,2} & \\cdots & a_{1,n} \\\\ a_{2,1} & a_{2,2} & \\cdots & a_{2,n} \\\\ \\vdots  & \\vdots  & \\ddots & \\vdots  \\\\ a_{m,1} & a_{m,2} & \\cdots & a_{m,n} \\end{pmatrix}",
            };

            // Create a Document instance
            Document doc = new Document();

            // Add a section
            Section section = doc.AddSection();

            // Add a paragraph to the section
            Paragraph textPara = section.AddParagraph();
            textPara.AppendText("Creating Equations from LaTeX Code");
            textPara.ApplyStyle(BuiltinStyle.Heading1);
            textPara.Format.HorizontalAlignment = HorizontalAlignment.Center;

            // Iterate through each LaTeX code in the string array
            for (int i = 0; i < latexMathCode.Length; i++)
            {
                // Create a math equation from the LaTeX code
                OfficeMath officeMath = new OfficeMath(doc);
                officeMath.FromLatexMathCode(latexMathCode[i]);
                // Add the math equation to the section
                Paragraph paragraph = section.AddParagraph();
                paragraph.Items.Add(officeMath);
                section.AddParagraph();
            }

            // Save the result document
            doc.SaveToFile("AddMathEquations.docx", FileFormat.Docx2013);
            doc.Dispose();
        }
    }
}
The example defines eight LaTeX expressions in the array, each converted into a native OfficeMath object via the FromLatexMathCode() method.
The result document:
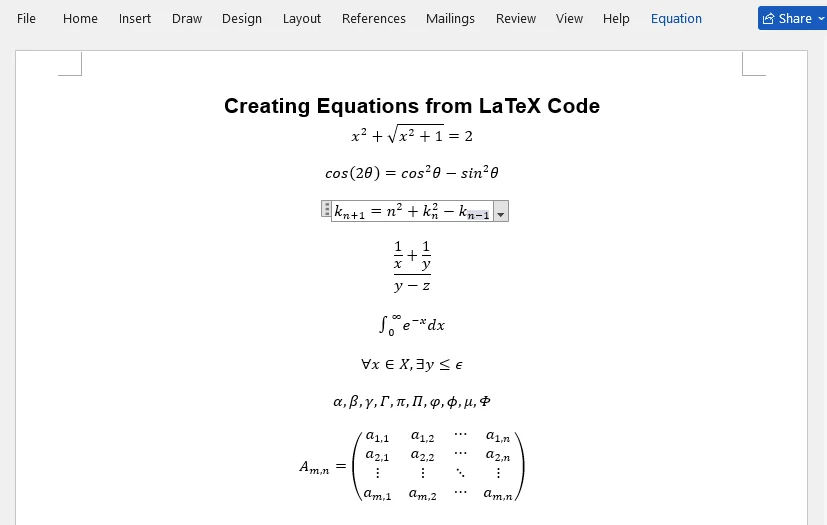
Additional methods: Spire.Doc also provides FromMathMLCode() for inserting equations from MathML format, giving you flexibility depending on your input data source.
Final Thoughts
The best method for inserting equations in Word depends on your use case, technical background, and document volume. To help you select the optimal approach at a glance, the table below compares all five methods across four core dimensions:
| Method | Best For | Speed | Learning Curve | Accessibility |
|---|---|---|---|---|
| Built-in Editor | Beginners, visual editing | Medium | Low | All users |
| LaTeX Input | Experienced users, complex equations | Very Fast | Medium | All users |
| Ink Equation | Touchscreen devices, handwriting | Fast | Low | Touchscreen / stylus users |
| AI-Powered | Natural language, batch processing | Fast | None | All users |
| Programmatic | Automation, batch processing | Very Fast | Medium | Developers |
By referring to this table alongside the detailed walkthroughs in this guide, you can confidently tailor Word's robust equation engine to precisely match the demands of different workflows.
Frequently Asked Questions (FAQs)
Q: Can I convert existing text to an equation?
A: Yes. Select the text and press "Alt + =" to place it inside an equation box, then convert and refine it with the Equation Tools
Q: How do I align equations in Word?
A: Use the alignment options in the Equation Tools Design tab, or use standard paragraph alignment buttons to center, left-align, or right-align equations. For programmatic control with Free Spire.Doc in C#, set alignment via the paragraph.Format.HorizontalAlignment property.
Q: Why isn't my LaTeX code converting correctly?
A: Common issues include: not being in LaTeX input mode, using unsupported commands, having hidden line breaks or extra spaces, mismatched braces, or (when pasting into regular text) missing delimiters like $...$.
Q: Does Word support all LaTeX commands?
A: No, Word's native LaTeX support covers most common math notation but does not support full LaTeX packages, custom macros, or complex environments. For advanced LaTeX workflows, use a dedicated LaTeX editor and export to Word format.