Comment dupliquer une page dans un PDF facilement et efficacement (3 méthodes)
Table des matières

Lors de la préparation d'un modèle de contrat, pouvoir dupliquer une page dans un PDF peut faire gagner beaucoup de temps et d'efforts. Cependant, cette tâche est souvent plus difficile qu'il n'y paraît, et de nombreuses personnes ne savent pas comment copier efficacement une page dans un PDF. Dans ce guide, nous vous présenterons trois méthodes pratiques — en utilisant Adobe Acrobat, une bibliothèque de programmation gratuite et des outils en ligne simples — afin que vous puissiez choisir l'approche qui correspond le mieux à votre flux de travail.
- Dupliquer une page avec Adobe Acrobat
- Dupliquer des pages avec Free Spire.PDF
- Dupliquer une page d'un PDF en ligne
- Quelle méthode choisir
- FAQ
1. Dupliquer une page avec Adobe Acrobat DC (version payante)
Si vous utilisez régulièrement les outils d'Adobe, c'est la solution la plus directe. Elle est particulièrement adaptée aux personnes qui manipulent fréquemment des PDF et n'ont aucune expérience en programmation. Si vous avez simplement besoin d'un moyen simple de copier des pages dans un PDF dans le cadre de votre travail de bureau quotidien, Acrobat DC offre l'expérience la plus familière et la plus conviviale.
Comment dupliquer une page dans Adobe Acrobat DC
- Ouvrez votre PDF dans Adobe Acrobat DC.
- Allez dans Outil et trouvez l'outil Organiser les pages.
- Sélectionnez la page que vous souhaitez dupliquer.
- Maintenez la touche Ctrl enfoncée, puis faites glisser la page sélectionnée à l'endroit où vous souhaitez que la copie apparaisse.
- Relâchez la souris, et Acrobat créera automatiquement une copie de cette page.
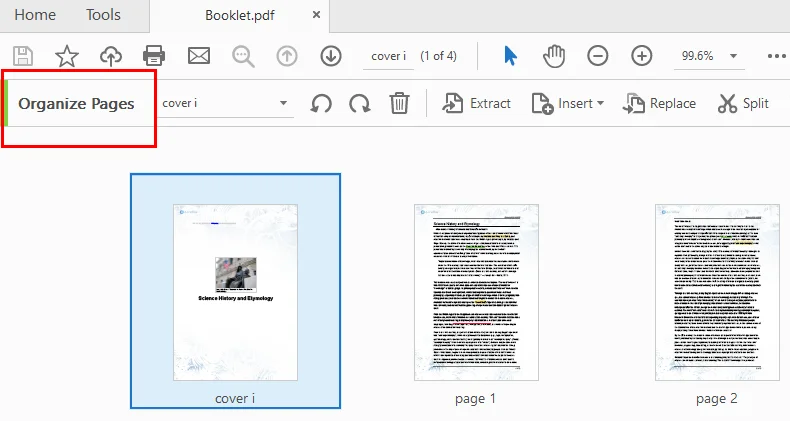
Cette simple action de glisser-copier est souvent le moyen le plus rapide de dupliquer une page sans utiliser les menus.
Remarques :
- Seule la version payante prend en charge la duplication de pages PDF.
- Acrobat est fiable mais peut sembler lourd pour des tâches occasionnelles.
- Le traitement des PDF volumineux peut prendre un certain temps.
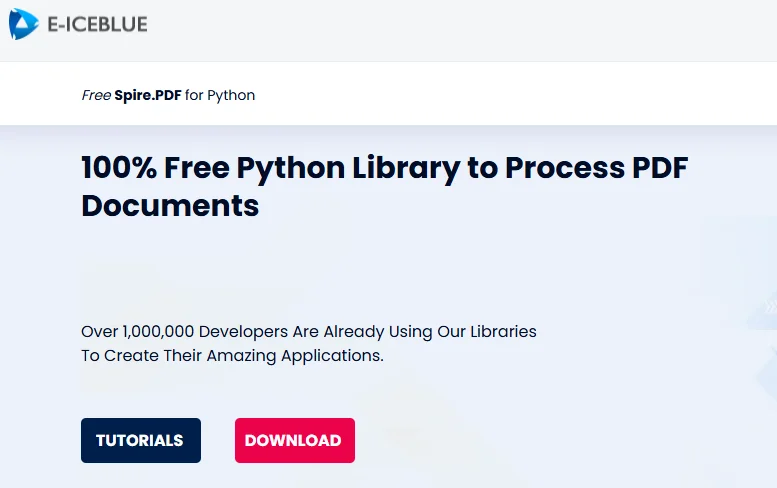
2. Dupliquer des pages avec Free Spire.PDF
Lorsque vous devez dupliquer de nombreuses pages ou intégrer la tâche dans un flux de travail automatisé, Free Spire.PDF devient un bien meilleur choix. Cette bibliothèque gratuite permet aux développeurs de copier des pages dans des fichiers PDF par programmation, éliminant ainsi le besoin d'édition manuelle. Elle vous donne également un contrôle total sur l'endroit où les pages dupliquées sont insérées, ce qui rend les opérations à grande échelle ou répétées plus efficaces.
Instructions pour dupliquer une page dans un PDF avec Free Spire.PDF
- Installez Free Spire.PDF et importez les modules pertinents.
- Créez une instance PdfDocument et chargez un document PDF.
- Sélectionnez la page que vous souhaitez dupliquer.
- Créez un modèle basé sur la page en utilisant PdfPageBase.CreateTemplate().
- Insérez une nouvelle page avec PdfDocument.Pages.Insert et dessinez le modèle sur la page avec PdfPageBase.Canvas.DrawTemplate.
- Enregistrez le PDF modifié.
Le code Python ci-dessous montre comment dupliquer la première page d'un PDF et l'insérer en tant que deuxième page dans le fichier d'origine.
from spire.pdf.common import *
from spire.pdf import *

# Create a PdfDocument object
pdf = PdfDocument()

# Load a PDF file from disk
pdf.LoadFromFile("/input/sample.pdf")

# Get the first page
page = pdf.Pages[0]

# Get the size of the page
size = page.Size

# Create a template based on the page
template = page.CreateTemplate()

# Add a new page of the same size at the end
#page = pdf.Pages.Add(size, PdfMargins(0.0))
# Insert a new page at the specified location
page = pdf.Pages.Insert(1, size, PdfMargins(0.0))

# Draw the template on the newly added page
page.Canvas.DrawTemplate(template, PointF(0.0, 0.0))

# Save the PDF file
pdf.SaveToFile("/output/CopyPDFPages.pdf");
pdf.Close()
Voici l'aperçu du fichier PDF de sortie : 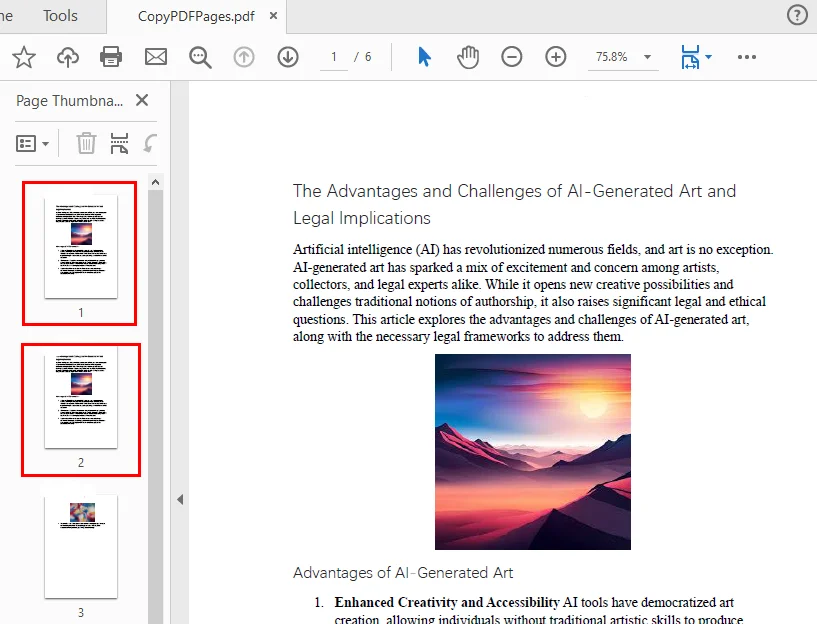
Ce style de flux de travail est parfait pour générer des pages de formulaire répétées, produire de grands lots de documents ou prendre en charge l'automatisation côté serveur.
3. Dupliquer des pages dans un PDF en ligne (outils gratuits)
Les outils en ligne fonctionnent mieux lorsque vous n'avez besoin de dupliquer une page qu'occasionnellement et que vous préférez ne pas installer de logiciel supplémentaire. Ils sont particulièrement pratiques lorsque vous travaillez sur un appareil mobile ou un ordinateur partagé, ou si vous voulez simplement le moyen le plus rapide d'apporter une modification rapide. Tant que votre document ne contient pas d'informations sensibles ou confidentielles, l'utilisation d'un outil PDF basé sur un navigateur est l'option la plus simple et la plus accessible.
Au cours de nos recherches, nous avons constaté que certains outils en ligne accomplissent cette tâche en extrayant une page, puis en l'insérant via un outil distinct « ajouter une page », comme PDFgear. D'autres fournissent un éditeur de PDF en ligne où vous pouvez simplement dupliquer une page directement, comme DocHub. Dans cette section, nous nous concentrerons sur le flux de travail de cette dernière approche.
Comment copier des pages d'un document PDF à l'aide d'outils en ligne
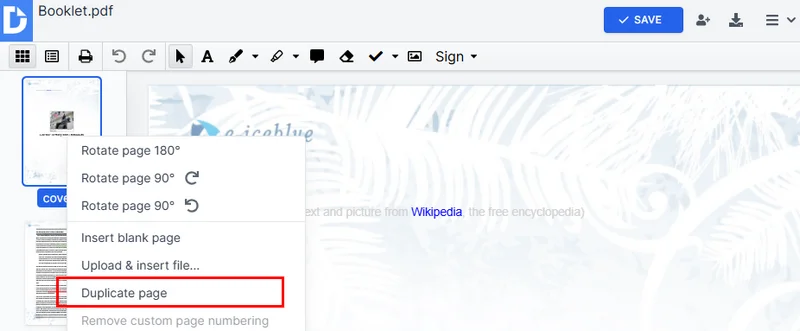
- Allez sur DocHub et ouvrez l'outil Duplicate Pages in a PDF.
- Téléchargez votre PDF et attendez qu'il soit traité.
- Dans les vignettes de page sur le côté gauche, trouvez la page que vous souhaitez copier.
- Faites un clic droit sur la page et sélectionnez Dupliquer la page dans le menu.
- Cliquez sur Enregistrer à droite, puis téléchargez le PDF mis à jour sur votre ordinateur.
Avantages
- Rapide et gratuit
- Aucune installation requise
- Fonctionne sur n'importe quel appareil
Inconvénients
- Non idéal pour les documents confidentiels
- Les limites de taille de fichier varient
- Ne convient pas aux tâches en masse ou à l'automatisation
4. Quelle méthode choisir ?
Cette section fournit un tableau comparatif des trois méthodes, montrant leurs avantages, les utilisateurs appropriés et les coûts, vous aidant à identifier rapidement l'approche qui correspond le mieux à vos besoins actuels.
| Méthode | Idéal pour | Coût | Points forts | Limites |
|---|---|---|---|---|
| Adobe Acrobat DC | Utilisateurs de bureau réguliers | Payant | Fiable, facile à utiliser | Le lecteur ne prend pas en charge la duplication |
| Free Spire.PDF | Développeurs / automatisation | Gratuit | Opérations par lots, flexible | Nécessite des connaissances en programmation |
| Outils en ligne | Tâches occasionnelles | Gratuit | Rapide, sans installation | Problèmes de confidentialité, limites de fichiers |
Si vous travaillez quotidiennement avec des PDF, Acrobat DC est l'option la plus aboutie. Si vous avez besoin d'automatisation ou de copie de pages PDF par lots, Free Spire.PDF est la meilleure solution. Pour les petites modifications ponctuelles, les outils en ligne offrent la solution la plus rapide.
Conclusion
Dupliquer une page dans un PDF ne doit pas être compliqué. Que vous copiez un formulaire, répétiez une feuille de calcul ou prépariez des modèles de documents cohérents, le bon outil peut vous faire gagner du temps et réduire vos efforts. Acrobat DC offre l'interface la plus fluide, Free Spire.PDF excelle dans l'automatisation et les outils en ligne sont parfaits pour des modifications rapides et simples. Choisissez la méthode qui correspond à votre flux de travail, et vous pourrez copier des pages PDF en toute simplicité chaque fois que vous en aurez besoin.
FAQ sur la duplication de pages dans un PDF
1. Comment dupliquer une page dans un PDF ?
Vous pouvez dupliquer une page dans un PDF en utilisant Adobe Acrobat, des outils en ligne gratuits ou une bibliothèque de programmation comme Free Spire.PDF. Les outils en ligne vous permettent de copier des pages rapidement sans installer de logiciel, tandis qu'Acrobat offre une interface plus professionnelle. Pour l'automatisation ou les tâches par lots, Free Spire.PDF est idéal.
2. Puis-je copier une seule page d'un document PDF ?
Oui, la plupart des éditeurs de PDF vous permettent de sélectionner et de dupliquer une seule page. Dans Adobe Acrobat, utilisez l'outil Organiser les pages. Dans les éditeurs en ligne comme DocHub, vous pouvez sélectionner une vignette de page et la dupliquer. Les bibliothèques de programmation permettent également un contrôle précis sur la copie de pages individuelles.
3. Comment dupliquer une page PDF plusieurs fois ?
La duplication d'une page plusieurs fois peut être effectuée manuellement ou par programmation. Dans Acrobat, vous pouvez répéter le processus de glisser-copier. Avec Free Spire.PDF, vous pouvez cloner une page plusieurs fois dans une boucle et l'insérer où vous le souhaitez.
4. Puis-je copier une page PDF dans Word ou un autre format ?
Oui, vous pouvez extraire une page PDF et l'enregistrer en tant que document Word ou dans un autre format. De nombreux outils en ligne prennent en charge la conversion de pages spécifiques en Word. Pour plus de contrôle, les bibliothèques PDF vous permettent d'extraire des pages et de les exporter par programmation.
À lire également :
Cómo duplicar una página en un PDF fácil y efectivamente (3 formas)
Tabla de Contenidos
Al preparar una plantilla de contrato, poder duplicar una página en un PDF puede ahorrar mucho tiempo y esfuerzo. Sin embargo, esta tarea suele ser más difícil de lo que parece, y muchas personas no están seguras de cómo copiar una página en un PDF de manera efectiva. En esta guía, te mostraremos tres métodos prácticos —usando Adobe Acrobat, una biblioteca de programación gratuita y herramientas en línea sencillas— para que puedas elegir el enfoque que mejor se adapte a tu flujo de trabajo.
- Duplicar una Página Usando Adobe Acrobat
- Duplicar Páginas Usando Free Spire.PDF
- Duplicar una Página en un PDF en Línea
- ¿Qué Método Deberías Elegir?
- Preguntas Frecuentes
1. Duplicar una Página Usando Adobe Acrobat DC (Versión de Pago)
Si usas las herramientas de Adobe con regularidad, esta es la solución más directa. Es especialmente adecuada para personas que manejan PDFs con frecuencia y no tienen experiencia en programación. Si simplemente necesitas una forma sencilla de copiar páginas en un PDF durante el trabajo diario de oficina, Acrobat DC ofrece la experiencia más familiar y fácil de usar.
Cómo duplicar una página en Adobe Acrobat DC
- Abre tu PDF en Adobe Acrobat DC.
- Ve a Herramientas y busca la herramienta Organizar páginas.
- Selecciona la página que quieres duplicar.
- Mantén presionada la tecla Ctrl, luego arrastra la página seleccionada a la posición donde quieres que aparezca la copia.
- Suelta el ratón y Acrobat creará un duplicado de esa página automáticamente.
Esta sencilla acción de arrastrar y copiar suele ser la forma más rápida de duplicar una página sin usar menús.
Notas:
- Solo la versión de pago admite la duplicación de páginas PDF.
- Acrobat es fiable pero puede resultar pesado para tareas ocasionales.
- Los PDF grandes pueden tardar un momento en procesarse.
2. Duplicar Páginas Usando Free Spire.PDF
Cuando necesitas duplicar muchas páginas o integrar la tarea en un flujo de trabajo automatizado, Free Spire.PDF se convierte en una opción mucho mejor. Esta biblioteca gratuita permite a los desarrolladores copiar páginas en archivos PDF de forma programática, eliminando la necesidad de edición manual. También te da control total sobre dónde se insertan las páginas duplicadas, lo que hace que las operaciones a gran escala o repetidas sean más eficientes.
Instrucciones para duplicar una página en PDF con Free Spire.PDF
- Instala Free Spire.PDF e importa los módulos relevantes.
- Crea una instancia de PdfDocument y carga un documento PDF.
- Selecciona la página que quieres duplicar.
- Crea una plantilla basada en la página usando PdfPageBase.CreateTemplate().
- Inserta una nueva página con PdfDocument.Pages.Insert y dibuja la plantilla en la página con PdfPageBase.Canvas.DrawTemplate.
- Guarda el PDF modificado.
El siguiente código de Python muestra cómo duplicar la primera página de un PDF e insertarla como la segunda página en el archivo original.
from spire.pdf.common import *
from spire.pdf import *

# Create a PdfDocument object
pdf = PdfDocument()

# Load a PDF file from disk
pdf.LoadFromFile("/input/sample.pdf")

# Get the first page
page = pdf.Pages[0]

# Get the size of the page
size = page.Size

# Create a template based on the page
template = page.CreateTemplate()

# Add a new page of the same size at the end
#page = pdf.Pages.Add(size, PdfMargins(0.0))
# Insert a new page at the specified location
page = pdf.Pages.Insert(1, size, PdfMargins(0.0))

# Draw the template on the newly added page
page.Canvas.DrawTemplate(template, PointF(0.0, 0.0))

# Save the PDF file
pdf.SaveToFile("/output/CopyPDFPages.pdf");
pdf.Close()
Aquí está la vista previa del archivo PDF de salida:
Este estilo de flujo de trabajo es perfecto para generar páginas de formularios repetidas, producir grandes lotes de documentos o admitir la automatización del lado del servidor.
3. Duplicar Páginas en PDF en Línea (Herramientas Gratuitas)
Las herramientas en línea funcionan mejor cuando solo necesitas duplicar una página ocasionalmente y prefieres no instalar software adicional. Son especialmente convenientes cuando trabajas en un dispositivo móvil o en un ordenador compartido, o simplemente quieres la forma más rápida de hacer un cambio rápido. Siempre que tu documento no contenga información sensible o confidencial, usar una herramienta de PDF basada en el navegador es la opción más simple y accesible.
Durante la investigación, descubrimos que algunas herramientas en línea completan esta tarea extrayendo una página y luego insertándola a través de una herramienta separada de "agregar página", como PDFgear. Otras proporcionan un editor de PDF en línea donde puedes simplemente duplicar una página directamente, como DocHub. En esta sección, nos centraremos en el flujo de trabajo de este último enfoque.
Cómo copiar páginas de un documento PDF usando herramientas en línea
- Ve a DocHub y abre la herramienta Duplicar Páginas en un PDF.
- Sube tu PDF y espera a que se procese.
- En las miniaturas de página del lado izquierdo, busca la página que quieres copiar.
- Haz clic derecho en la página y selecciona Duplicar página en el menú.
- Haz clic en Guardar a la derecha, luego descarga el PDF actualizado a tu ordenador.
Ventajas
- Rápido y gratuito
- No requiere instalación
- Funciona en cualquier dispositivo
Desventajas
- No es ideal para documentos confidenciales
- Los límites de tamaño de archivo varían
- No es adecuado para tareas masivas o automatización
4. ¿Qué Método Deberías Elegir?
Esta sección proporciona una tabla comparativa de los tres métodos, mostrando sus ventajas, usuarios adecuados y costos, ayudándote a identificar rápidamente el enfoque que mejor se adapte a tus necesidades actuales.
| Método | Ideal Para | Costo | Fortalezas | Limitaciones |
|---|---|---|---|---|
| Adobe Acrobat DC | Usuarios de oficina habituales | De pago | Fiable, fácil de usar | El lector no admite la duplicación |
| Free Spire.PDF | Desarrolladores / automatización | Gratis | Operaciones por lotes, flexible | Requiere conocimientos de programación |
| Herramientas en línea | Tareas ocasionales | Gratis | Rápido, sin instalación | Preocupaciones de privacidad, límites de archivo |
Si trabajas con PDFs a diario, Acrobat DC es la opción más pulida. Si necesitas automatización o copiado de páginas PDF por lotes, Free Spire.PDF es la mejor manera. Para pequeñas ediciones puntuales, las herramientas en línea ofrecen la solución más rápida.
Conclusión
Duplicar una página en un PDF no tiene por qué ser complicado. Ya sea que estés copiando un formulario, repitiendo una hoja de trabajo o preparando plantillas de documentos consistentes, la herramienta adecuada puede ahorrar tiempo y reducir el esfuerzo. Acrobat DC ofrece la interfaz más fluida, Free Spire.PDF sobresale en la automatización y las herramientas en línea son perfectas para ediciones rápidas y sencillas. Elige el método que se ajuste a tu flujo de trabajo y podrás copiar páginas de PDF con facilidad siempre que lo necesites.
Preguntas Frecuentes sobre la Duplicación de Páginas en PDF
1. ¿Cómo duplico una página en un PDF?
Puedes duplicar una página en un PDF usando Adobe Acrobat, herramientas en línea gratuitas o una biblioteca de programación como Free Spire.PDF. Las herramientas en línea te permiten copiar páginas rápidamente sin instalar software, mientras que Acrobat proporciona una interfaz más profesional. Para tareas de automatización o por lotes, Free Spire.PDF es ideal.
2. ¿Puedo copiar solo una página de un documento PDF?
Sí, la mayoría de los editores de PDF te permiten seleccionar y duplicar una sola página. En Adobe Acrobat, usa la herramienta Organizar páginas. En editores en línea como DocHub, puedes seleccionar la miniatura de una página y duplicarla. Las bibliotecas de programación también permiten un control preciso sobre la copia de páginas individuales.
3. ¿Cómo duplico una página de PDF varias veces?
Duplicar una página varias veces se puede hacer manual o programáticamente. En Acrobat, puedes repetir el proceso de arrastrar y copiar. Con Free Spire.PDF, puedes clonar una página varias veces en un bucle e insertarla donde sea necesario.
4. ¿Puedo copiar una página de PDF a Word u otro formato?
Sí, puedes extraer una página de PDF y guardarla como un documento de Word u otro formato. Muchas herramientas en línea admiten la conversión de páginas específicas a Word. Para un mayor control, las bibliotecas de PDF te permiten extraer páginas y exportarlas de forma programática.
También te puede interesar:
So duplizieren Sie eine Seite in einer PDF-Datei einfach und effektiv (3 Wege)
Beim Erstellen einer Vertragsvorlage kann das Duplizieren einer Seite in einem PDF viel Zeit und Mühe sparen. Diese Aufgabe ist jedoch oft schwieriger, als es klingt, und viele Leute sind sich nicht sicher, wie man eine Seite in einem PDF effektiv kopiert. In diesem Leitfaden führen wir Sie durch drei praktische Methoden – mit Adobe Acrobat, einer kostenlosen Programmierbibliothek und einfachen Online-Tools – damit Sie den Ansatz wählen können, der am besten zu Ihrem Arbeitsablauf passt.
- Eine Seite mit Adobe Acrobat duplizieren
- Seiten mit Free Spire.PDF duplizieren
- Eine Seite in einem PDF online duplizieren
- Welche Methode sollten Sie wählen
- Häufig gestellte Fragen
1. Eine Seite mit Adobe Acrobat DC duplizieren (kostenpflichtige Version)
Wenn Sie die Tools von Adobe regelmäßig verwenden, ist dies die direkteste Lösung. Sie eignet sich besonders für Personen, die häufig mit PDFs arbeiten und keine Programmiererfahrung haben. Wenn Sie einfach eine unkomplizierte Möglichkeit benötigen, Seiten in einem PDF während der täglichen Büroarbeit zu kopieren, bietet Acrobat DC die vertrauteste und benutzerfreundlichste Erfahrung.
So duplizieren Sie eine Seite in Adobe Acrobat DC
- Öffnen Sie Ihr PDF in Adobe Acrobat DC.
- Gehen Sie zu Werkzeuge und suchen Sie das Werkzeug Seiten organisieren.
- Wählen Sie die Seite aus, die Sie duplizieren möchten.
- Halten Sie die Strg-Taste gedrückt und ziehen Sie die ausgewählte Seite an die Position, an der die Kopie erscheinen soll.
- Lassen Sie die Maustaste los, und Acrobat erstellt automatisch ein Duplikat dieser Seite.
Diese einfache Drag-and-Copy-Aktion ist oft der schnellste Weg, eine Seite ohne Verwendung von Menüs zu duplizieren.
Hinweise:
- Nur die kostenpflichtige Version unterstützt die Duplizierung von PDF-Seiten.
- Acrobat ist zuverlässig, kann aber für gelegentliche Aufgaben schwerfällig wirken.
- Große PDFs können einen Moment zur Verarbeitung benötigen.
2. Seiten mit Free Spire.PDF duplizieren
Wenn Sie viele Seiten duplizieren oder die Aufgabe in einen automatisierten Arbeitsablauf integrieren müssen, ist Free Spire.PDF eine viel bessere Wahl. Diese kostenlose Bibliothek ermöglicht es Entwicklern, Seiten in PDF-Dateien programmgesteuert zu kopieren, wodurch die manuelle Bearbeitung entfällt. Sie gibt Ihnen auch die volle Kontrolle darüber, wo die duplizierten Seiten eingefügt werden, was groß angelegte oder wiederholte Operationen effizienter macht.
Anweisungen zum Duplizieren einer Seite in PDF mit Free Spire.PDF
- Installieren Sie Free Spire.PDF und importieren Sie die relevanten Module.
- Erstellen Sie eine PdfDocument-Instanz und laden Sie ein PDF-Dokument.
- Wählen Sie die Seite aus, die Sie duplizieren möchten.
- Erstellen Sie eine Vorlage basierend auf der Seite mit PdfPageBase.CreateTemplate().
- Fügen Sie eine neue Seite mit PdfDocument.Pages.Insert ein und zeichnen Sie die Vorlage mit PdfPageBase.Canvas.DrawTemplate auf die Seite.
- Speichern Sie das geänderte PDF.
Der folgende Python-Code zeigt, wie die erste Seite eines PDFs dupliziert und als zweite Seite in die Originaldatei eingefügt wird.
from spire.pdf.common import *
from spire.pdf import *

# Create a PdfDocument object
pdf = PdfDocument()

# Load a PDF file from disk
pdf.LoadFromFile("/input/sample.pdf")

# Get the first page
page = pdf.Pages[0]

# Get the size of the page
size = page.Size

# Create a template based on the page
template = page.CreateTemplate()

# Add a new page of the same size at the end
#page = pdf.Pages.Add(size, PdfMargins(0.0))
# Insert a new page at the specified location
page = pdf.Pages.Insert(1, size, PdfMargins(0.0))

# Draw the template on the newly added page
page.Canvas.DrawTemplate(template, PointF(0.0, 0.0))

# Save the PDF file
pdf.SaveToFile("/output/CopyPDFPages.pdf");
pdf.Close()
Hier ist die Vorschau der ausgegebenen PDF-Datei:
Dieser Arbeitsablaufstil eignet sich perfekt zum Erstellen wiederholter Formularseiten, zur Erstellung großer Dokumentenchargen oder zur Unterstützung der serverseitigen Automatisierung.
3. Seiten in PDF online duplizieren (kostenlose Tools)
Online-Tools eignen sich am besten, wenn Sie nur gelegentlich eine Seite duplizieren müssen und keine zusätzliche Software installieren möchten. Sie sind besonders praktisch, wenn Sie auf einem mobilen Gerät oder einem gemeinsam genutzten Computer arbeiten oder einfach nur den schnellsten Weg für eine schnelle Änderung suchen. Solange Ihr Dokument keine sensiblen oder vertraulichen Informationen enthält, ist die Verwendung eines browserbasierten PDF-Tools die einfachste und zugänglichste Option.
Während der Recherche haben wir festgestellt, dass einige Online-Tools diese Aufgabe erledigen, indem sie eine Seite extrahieren und sie dann über ein separates „Seite hinzufügen“-Tool, wie z. B. PDFgear, einfügen. Andere bieten einen Online-PDF-Editor, in dem Sie eine Seite einfach direkt duplizieren können, wie z. B. DocHub. In diesem Abschnitt konzentrieren wir uns auf den Arbeitsablauf des letzteren Ansatzes.
So kopieren Sie Seiten aus einem PDF-Dokument mit Online-Tools
- Gehen Sie zu DocHub und öffnen Sie das Werkzeug Seiten in einem PDF duplizieren.
- Laden Sie Ihr PDF hoch und warten Sie, bis es verarbeitet ist.
- Suchen Sie in den Seiten-Miniaturansichten auf der linken Seite die Seite, die Sie kopieren möchten.
- Klicken Sie mit der rechten Maustaste auf die Seite und wählen Sie Seite duplizieren aus dem Menü.
- Klicken Sie rechts auf Speichern und laden Sie dann das aktualisierte PDF auf Ihren Computer herunter.
Vorteile
- Schnell und kostenlos
- Keine Installation erforderlich
- Funktioniert auf jedem Gerät
Nachteile
- Nicht ideal für vertrauliche Dokumente
- Dateigrößenbeschränkungen variieren
- Nicht für Massenaufgaben oder Automatisierung geeignet
4. Welche Methode sollten Sie wählen?
Dieser Abschnitt enthält eine Vergleichstabelle der drei Methoden, die ihre Vorteile, geeigneten Benutzer und Kosten aufzeigt und Ihnen hilft, schnell den Ansatz zu finden, der Ihren aktuellen Anforderungen am besten entspricht.
| Methode | Am besten für | Kosten | Stärken | Einschränkungen |
|---|---|---|---|---|
| Adobe Acrobat DC | Reguläre Büronutzer | Kostenpflichtig | Zuverlässig, einfach zu bedienen | Reader unterstützt keine Duplizierung |
| Free Spire.PDF | Entwickler / Automatisierung | Kostenlos | Batch-Operationen, flexibel | Erfordert Programmierkenntnisse |
| Online-Tools | Gelegentliche Aufgaben | Kostenlos | Schnell, keine Installation | Datenschutzbedenken, Dateibeschränkungen |
Wenn Sie täglich mit PDFs arbeiten, ist Acrobat DC die ausgefeilteste Option. Wenn Sie Automatisierung oder das Stapelkopieren von PDF-Seiten benötigen, ist Free Spire.PDF der bessere Weg. Für kleine einmalige Bearbeitungen bieten Online-Tools die schnellste Lösung.
Fazit
Das Duplizieren einer Seite in einem PDF muss nicht kompliziert sein. Ob Sie ein Formular kopieren, ein Arbeitsblatt wiederholen oder konsistente Dokumentvorlagen vorbereiten, das richtige Werkzeug kann Zeit sparen und den Aufwand reduzieren. Acrobat DC bietet die reibungsloseste Benutzeroberfläche, Free Spire.PDF zeichnet sich durch Automatisierung aus, und Online-Tools sind perfekt für schnelle, einfache Bearbeitungen. Wählen Sie die Methode, die zu Ihrem Arbeitsablauf passt, und Sie können PDF-Seiten bei Bedarf problemlos kopieren.
Häufig gestellte Fragen zum Duplizieren von Seiten in PDF
1. Wie dupliziere ich eine Seite in einem PDF?
Sie können eine Seite in einem PDF mit Adobe Acrobat, kostenlosen Online-Tools oder einer Programmierbibliothek wie Free Spire.PDF duplizieren. Mit Online-Tools können Sie Seiten schnell kopieren, ohne Software zu installieren, während Acrobat eine professionellere Benutzeroberfläche bietet. Für Automatisierungs- oder Stapelaufgaben ist Free Spire.PDF ideal.
2. Kann ich nur eine Seite aus einem PDF-Dokument kopieren?
Ja, die meisten PDF-Editoren ermöglichen es Ihnen, eine einzelne Seite auszuwählen und zu duplizieren. In Adobe Acrobat verwenden Sie das Werkzeug Seiten organisieren. In Online-Editoren wie DocHub können Sie eine Seiten-Miniaturansicht auswählen und duplizieren. Programmierbibliotheken ermöglichen ebenfalls eine präzise Kontrolle über das Kopieren einzelner Seiten.
3. Wie dupliziere ich eine PDF-Seite mehrmals?
Das mehrfache Duplizieren einer Seite kann manuell oder programmgesteuert erfolgen. In Acrobat können Sie den Drag-and-Copy-Vorgang wiederholen. Mit Free Spire.PDF können Sie eine Seite in einer Schleife mehrmals klonen und an beliebiger Stelle einfügen.
4. Kann ich eine PDF-Seite in Word oder ein anderes Format kopieren?
Ja, Sie können eine PDF-Seite extrahieren und als Word-Dokument oder in einem anderen Format speichern. Viele Online-Tools unterstützen die Konvertierung bestimmter Seiten in Word. Für mehr Kontrolle ermöglichen PDF-Bibliotheken das programmgesteuerte Extrahieren und Exportieren von Seiten.
Lesen Sie auch:
Как легко и эффективно дублировать страницу в PDF (3 способа)
При подготовке шаблона договора возможность дублировать страницу в PDF может сэкономить много времени и усилий. Однако эта задача часто оказывается сложнее, чем кажется, и многие не знают, как эффективно скопировать страницу в PDF. В этом руководстве мы рассмотрим три практических метода — с использованием Adobe Acrobat, бесплатной программной библиотеки и простых онлайн-инструментов — чтобы вы могли выбрать подход, который лучше всего подходит для вашего рабочего процесса.
- Дублирование страницы с помощью Adobe Acrobat
- Дублирование страниц с помощью Free Spire.PDF
- Дублирование страницы в PDF онлайн
- Какой метод выбрать
- Часто задаваемые вопросы
1. Дублирование страницы с помощью Adobe Acrobat DC (платная версия)
Если вы регулярно пользуетесь инструментами Adobe, это самое прямое решение. Оно особенно подходит для людей, которые часто работают с PDF-файлами и не имеют опыта в программировании. Если вам просто нужен простой способ копировать страницы в PDF в повседневной офисной работе — Acrobat DC предоставляет самый привычный и удобный интерфейс.
Как дублировать страницу в Adobe Acrobat DC
- Откройте ваш PDF в Adobe Acrobat DC.
- Перейдите в Инструменты и найдите инструмент Организовать страницы.
- Выберите страницу, которую хотите дублировать.
- Удерживая клавишу Ctrl, перетащите выбранную страницу на позицию, где должна появиться копия.
- Отпустите кнопку мыши, и Acrobat автоматически создаст дубликат этой страницы.
Это простое действие перетаскивания и копирования часто является самым быстрым способом дублировать страницу без использования меню.
Примечания:
- Только платная версия поддерживает дублирование страниц PDF.
- Acrobat надежен, но может показаться громоздким для редких задач.
- Обработка больших PDF-файлов может занять некоторое время.
2. Дублирование страниц с помощью Free Spire.PDF
Когда вам нужно дублировать много страниц или интегрировать задачу в автоматизированный рабочий процесс, Free Spire.PDF становится гораздо лучшим выбором. Эта бесплатная библиотека позволяет разработчикам программно копировать страницы в PDF, устраняя необходимость в ручном редактировании. Она также дает вам полный контроль над тем, куда вставляются дублированные страницы, что делает крупномасштабные или повторяющиеся операции более эффективными.
Инструкции по дублированию страницы в PDF с помощью Free Spire.PDF
- Установите Free Spire.PDF и импортируйте соответствующие модули.
- Создайте экземпляр PdfDocument и загрузите PDF-документ.
- Выберите страницу, которую хотите дублировать.
- Создайте шаблон на основе страницы с помощью PdfPageBase.CreateTemplate().
- Вставьте новую страницу с помощью PdfDocument.Pages.Insert и нарисуйте шаблон на странице с помощью PdfPageBase.Canvas.DrawTemplate.
- Сохраните измененный PDF.
Приведенный ниже код Python показывает, как дублировать первую страницу PDF и вставить ее как вторую страницу в исходный файл.
from spire.pdf.common import *
from spire.pdf import *

# Create a PdfDocument object
pdf = PdfDocument()

# Load a PDF file from disk
pdf.LoadFromFile("/input/sample.pdf")

# Get the first page
page = pdf.Pages[0]

# Get the size of the page
size = page.Size

# Create a template based on the page
template = page.CreateTemplate()

# Add a new page of the same size at the end
#page = pdf.Pages.Add(size, PdfMargins(0.0))
# Insert a new page at the specified location
page = pdf.Pages.Insert(1, size, PdfMargins(0.0))

# Draw the template on the newly added page
page.Canvas.DrawTemplate(template, PointF(0.0, 0.0))

# Save the PDF file
pdf.SaveToFile("/output/CopyPDFPages.pdf");
pdf.Close()
Вот предварительный просмотр выходного PDF-файла:
Этот стиль рабочего процесса идеально подходит для создания повторяющихся страниц форм, производства больших партий документов или поддержки автоматизации на стороне сервера.
3. Дублирование страниц в PDF онлайн (бесплатные инструменты)
Онлайн-инструменты лучше всего подходят, когда вам нужно лишь изредка дублировать страницу и вы предпочитаете не устанавливать дополнительное программное обеспечение. Они особенно удобны, когда вы работаете на мобильном устройстве или общем компьютере, или просто хотите самый быстрый способ внести быстрое изменение. Пока ваш документ не содержит конфиденциальной информации, использование браузерного инструмента для PDF является самым простым и доступным вариантом.
В ходе исследования мы обнаружили, что некоторые онлайн-инструменты выполняют эту задачу, извлекая страницу, а затем вставляя ее с помощью отдельного инструмента «добавить страницу», такого как PDFgear. Другие предоставляют онлайн-редактор PDF, где вы можете просто дублировать страницу напрямую, например, DocHub. В этом разделе мы сосредоточимся на рабочем процессе последнего подхода.
Как копировать страницы из PDF-документа с помощью онлайн-инструментов
- Перейдите в DocHub и откройте инструмент Дублировать страницы в PDF.
- Загрузите ваш PDF и подождите, пока он будет обработан.
- В миниатюрах страниц слева найдите страницу, которую хотите скопировать.
- Щелкните правой кнопкой мыши по странице и выберите Дублировать страницу в меню.
- Нажмите Сохранить справа, затем загрузите обновленный PDF на свой компьютер.
Плюсы
- Быстро и бесплатно
- Не требует установки
- Работает на любом устройстве
Минусы
- Не подходит для конфиденциальных документов
- Ограничения на размер файла различаются
- Не подходит для массовых задач или автоматизации
4. Какой метод выбрать?
В этом разделе представлена сравнительная таблица трех методов, показывающая их преимущества, подходящих пользователей и затраты, что поможет вам быстро определить подход, который наилучшим образом соответствует вашим текущим потребностям.
| Метод | Лучше всего подходит для | Стоимость | Преимущества | Ограничения |
|---|---|---|---|---|
| Adobe Acrobat DC | Обычные офисные пользователи | Платно | Надежный, простой в использовании | Reader не поддерживает дублирование |
| Free Spire.PDF | Разработчики / автоматизация | Бесплатно | Пакетные операции, гибкость | Требуются знания в программировании |
| Онлайн-инструменты | Редкие задачи | Бесплатно | Быстро, без установки | Проблемы с конфиденциальностью, ограничения по файлам |
Если вы работаете с PDF ежедневно, Acrobat DC — самый отточенный вариант. Если вам нужна автоматизация или пакетное копирование страниц PDF, Free Spire.PDF — лучший способ. Для небольших разовых правок онлайн-инструменты предлагают самое быстрое решение.
Заключение
Дублирование страницы в PDF не должно быть сложным. Независимо от того, копируете ли вы форму, повторяете рабочий лист или готовите согласованные шаблоны документов, правильный инструмент может сэкономить время и уменьшить усилия. Acrobat DC предлагает самый плавный интерфейс, Free Spire.PDF превосходен в автоматизации, а онлайн-инструменты идеально подходят для быстрых и простых правок. Выберите метод, который соответствует вашему рабочему процессу, и вы сможете с легкостью копировать страницы PDF, когда вам это понадобится.
Часто задаваемые вопросы о дублировании страниц в PDF
1. Как дублировать страницу в PDF?
Вы можете дублировать страницу в PDF с помощью Adobe Acrobat, бесплатных онлайн-инструментов или программной библиотеки, такой как Free Spire.PDF. Онлайн-инструменты позволяют быстро копировать страницы без установки программного обеспечения, в то время как Acrobat предоставляет более профессиональный интерфейс. Для автоматизации или пакетных задач Free Spire.PDF является идеальным решением.
2. Могу ли я скопировать только одну страницу из PDF-документа?
Да, большинство редакторов PDF позволяют выбрать и дублировать одну страницу. В Adobe Acrobat используйте инструмент Организовать страницы. В онлайн-редакторах, таких как DocHub, вы можете выбрать миниатюру страницы и дублировать ее. Программные библиотеки также позволяют точно контролировать копирование отдельных страниц.
3. Как дублировать страницу PDF несколько раз?
Дублирование страницы несколько раз можно выполнить вручную или программно. В Acrobat вы можете повторить процесс перетаскивания и копирования. С помощью Free Spire.PDF вы можете клонировать страницу несколько раз в цикле и вставлять ее в нужное место.
4. Могу ли я скопировать страницу PDF в Word или другой формат?
Да, вы можете извлечь страницу PDF и сохранить ее как документ Word или в другом формате. Многие онлайн-инструменты поддерживают преобразование определенных страниц в Word. Для большего контроля библиотеки PDF позволяют извлекать страницы и экспортировать их программно.
Читайте также:
Converter Rapidamente Dados XML Aninhados para Excel Sem Erros
Converter XML para XLSX é um requisito comum no processamento de dados, fluxos de trabalho de relatórios e tarefas de integração de sistemas. O XML continua a ser um dos formatos mais utilizados para dados estruturados ou semiestruturados, mas o formato XLSX do Excel é muito mais conveniente para análise, filtragem, visualização e partilha com utilizadores não técnicos.
Embora a ideia básica de transformar arquivos XML em arquivos XLSX pareça simples, os arquivos XML do mundo real variam muito em estrutura. Alguns assemelham-se a tabelas de bases de dados limpas, enquanto outros contêm nós profundamente aninhados, atributos ou conteúdo misto.
Este guia fornece uma explicação detalhada e prática de como converter XML para XLSX usando ferramentas online, Microsoft Excel e automação com Python. Ele também discute como lidar com cenários complexos, como grandes conjuntos de dados, elementos aninhados, campos opcionais e a conversão inversa de XLSX de volta para XML.
Visão Geral dos Métodos:
- Conversores Online de XML para XLSX
- Recursos de Importação de XML do Excel
- Converter XML para XLSX Usando Automação com Python
- Scripts Personalizados ou APIs para Fluxos de Trabalho Empresariais
1. Entendendo a Conversão de XML para XLSX
XML (Extensible Markup Language) é um formato de texto simples que armazena dados usando tags, formando uma estrutura em árvore onde os elementos pais contêm filhos, e a informação pode aparecer como elementos ou atributos. O XLSX, por outro lado, é estritamente baseado em linhas e colunas, então converter XML para XLSX significa achatar essa árvore numa tabela, mantendo os dados significativos.
Para XML simples — por exemplo, um arquivo com nós <item> repetidos — cada nó torna-se naturalmente uma linha e os seus filhos tornam-se colunas. Mas o XML do mundo real contém frequentemente:
- detalhes aninhados
- nós que aparecem apenas em alguns registos
- dados armazenados em atributos
- namespaces usados em sistemas empresariais
Tais variações exigem decisões sobre como achatar a hierarquia. Algumas ferramentas fazem isso automaticamente, enquanto outras precisam de mapeamento manual. Este guia abrange casos simples e complexos, incluindo como converter XML para XLSX sem abrir o Excel, o que é comum em fluxos de trabalho automatizados.
2. Método 1: Converter XML para XLSX Online
Conversores online de XML para XLSX — como Convertion Tools, AConvert ou DataConverter.io — são convenientes quando você precisa de uma transformação rápida sem instalar software. O processo é geralmente muito simples:
-
Visite um site que suporte a conversão de XML para XLSX (como DataConverter.io).
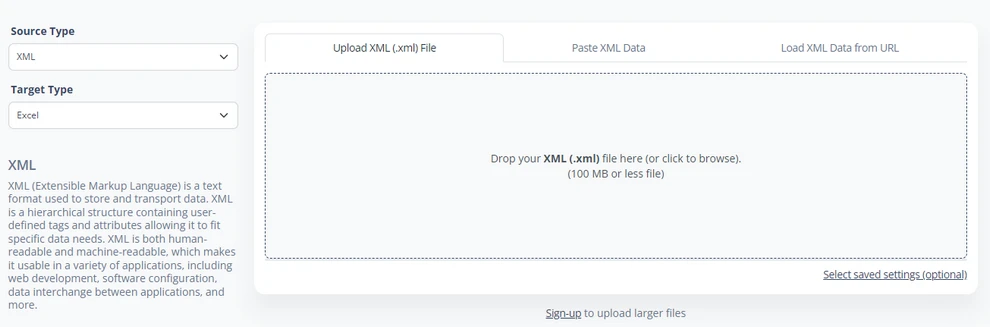
-
Carregue o seu ficheiro XML ou cole a string XML.
-
Alguns conversores permitem que você edite o mapeamento antes da conversão.
-
Clique em Baixar para baixar o arquivo .xlsx gerado.
Este método funciona bem para tarefas únicas e para arquivos XML com estruturas simples, onde o mapeamento automático geralmente é preciso.
Vantagens
- Rápido, sem necessidade de instalação.
- Adequado para estruturas XML simples ou moderadas.
- Ideal para conversões únicas ou ocasionais.
Limitações
- Compreensão limitada de esquemas, namespaces e hierarquias aninhadas.
- XML profundo pode ser achatado incorretamente, produzir nomes de coluna genéricos ou perder campos opcionais.
- Limites de tamanho de upload e possíveis congelamentos do navegador com arquivos grandes.
Apesar dessas restrições, as ferramentas online continuam a ser uma escolha prática para conversões rápidas e de pequena escala de XML para XLSX.
Você também pode gostar: Como Converter Arquivos CSV para Excel.
3. Método 2: Converter XML para XLSX no Excel
O Excel oferece suporte nativo para importação de XML e, para muitos utilizadores, este é o método mais transparente e controlável. Quando usado corretamente, o Excel pode ler estruturas XML, aplicar mapeamentos personalizáveis e salvar o resultado convertido diretamente como um arquivo XLSX.
3.1 Abrindo XML Diretamente no Excel
Quando você abre um arquivo XML através de Arquivo → Abrir, o Excel tenta inferir um esquema e converter os dados em uma tabela. A sequência correta para este método é:
-
Vá para Arquivo → Abrir e selecione o arquivo XML.
-
Quando solicitado, escolha “Como uma tabela XML”.

-
O Excel carrega o XML e mapeia automaticamente os nós filhos para as colunas.
Isso funciona bem para estruturas XML "planas", onde cada elemento repetido corresponde perfeitamente a uma linha. No entanto, o XML hierárquico geralmente causa problemas: nós aninhados podem ser expandidos em colunas repetidas, ou o Excel pode solicitar que você defina uma tabela XML manualmente se não conseguir determinar um mapeamento claro.
Este método de abertura direta continua útil quando o XML se assemelha a uma lista de registros no estilo de banco de dados e você precisa de uma maneira rápida de inspecionar ou trabalhar com os dados.
3.2 Importando XML através da Aba de Dados do Excel
Para arquivos XML estruturados — especialmente aqueles baseados em esquemas XSD — o Excel fornece um método de importação mais amigável através da aba Dados. Essa abordagem oferece controle sobre como os elementos XML são mapeados para a planilha sem usar manualmente o painel Origem XML.
Passos:
-
Abra uma pasta de trabalho do Excel ou crie uma nova.
-
Vá para Dados → Obter Dados → Do Arquivo → Do XML.
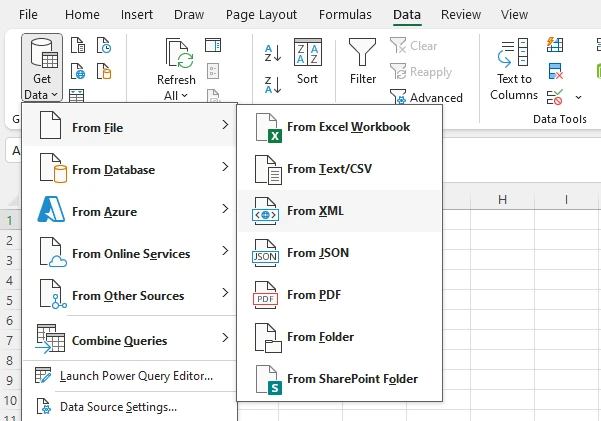
-
Selecione o seu arquivo XML e clique em Importar.
-
Clique em Transformar Dados na janela pop-up.
-
Na janela do Editor do Power Query, selecione os elementos ou tabelas que deseja carregar.
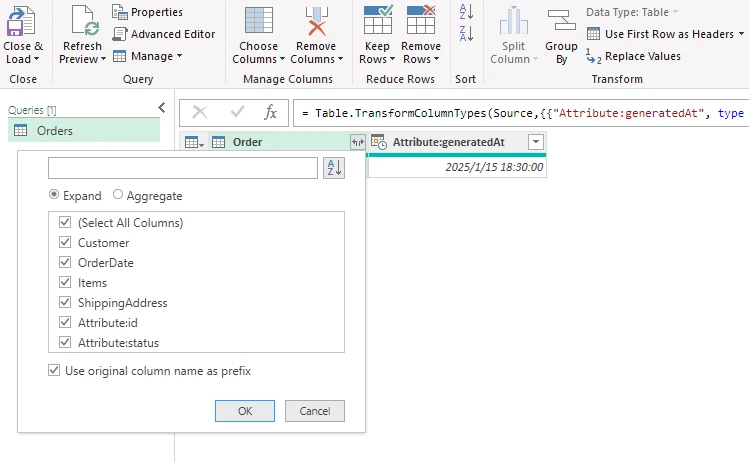
-
Clique em Fechar e Carregar para salvar as alterações, e os dados convertidos aparecerão em uma nova planilha.
Este método permite que o Excel interprete automaticamente a estrutura XML e a mapeie para uma tabela. Funciona bem para XML hierárquico porque você pode selecionar quais seções carregar, mantendo campos opcionais e relacionamentos intactos.
Esta abordagem é especialmente útil para:
- Importar dados de formulários eletrônicos do governo
- Trabalhar com XML exportado de ERP/CRM
- Lidar com padrões específicos da indústria, como UBL ou HL7
Ao usar este fluxo de trabalho, você pode controlar eficientemente como os dados XML são representados no Excel, minimizando as etapas de mapeamento manual.
3.3 Salvando os Dados XML Importados como um Arquivo XLSX
Uma vez que os dados XML tenham sido importados com sucesso — seja abrindo diretamente o arquivo XML ou usando Dados → Obter Dados → Do XML — o passo final é simplesmente salvar a pasta de trabalho no formato nativo do Excel .xlsx. Nesta fase, os dados comportam-se como qualquer outra tabela do Excel, o que significa que pode ajustar livremente a largura das colunas, aplicar filtros, formatar células ou adicionar fórmulas.
Para salvar o XML convertido como um arquivo XLSX:
- Vá para Arquivo → Salvar Como.
- Escolha Pasta de Trabalho do Excel (*.xlsx) como o tipo de arquivo.
- Especifique um local e clique em Salvar.
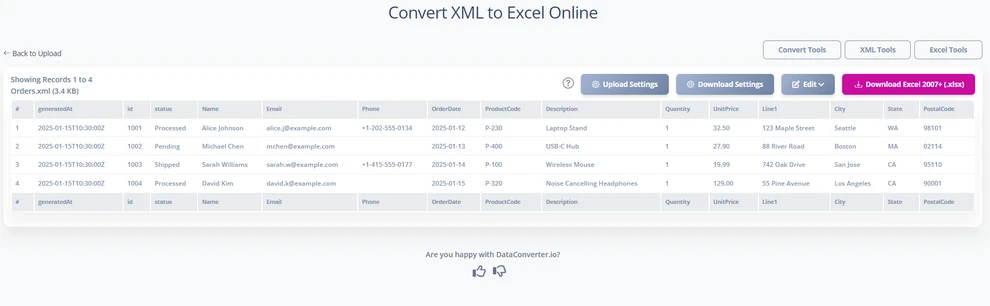
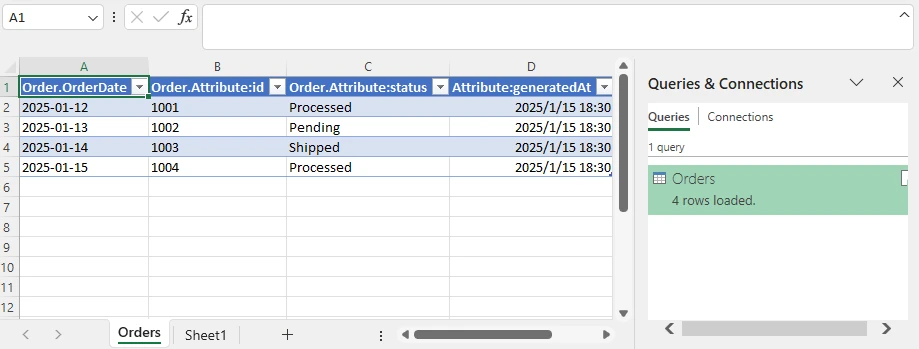
Abaixo está uma pré-visualização da tabela do Excel importada do XML:
Se o arquivo XML for baseado em um esquema XSD e o mapeamento for preservado, o Excel pode até mesmo exportar a planilha modificada de volta para XML. No entanto, para estruturas XML profundamente aninhadas, algum pré-processamento ou ajustes manuais ainda podem ser necessários antes da exportação.
4. Método 3: Converter XML para XLSX Usando Python
O Python é uma excelente escolha para converter XML para XLSX quando você precisa de automação, processamento em larga escala ou a capacidade de realizar a conversão de XML para XLSX sem abrir o Excel. Scripts Python podem ser executados em servidores, agendar tarefas e lidar com centenas ou milhares de arquivos XML de forma consistente.
4.1 Analisando XML em Python
A análise de XML é o primeiro passo no fluxo de trabalho. As bibliotecas xml.etree.ElementTree ou lxml do Python fornecem análise baseada em eventos ou em árvore. Elas permitem que você percorra cada nó, extraia atributos, lide com namespaces e processe dados profundamente aninhados.
O principal desafio é definir como cada nó XML mapeia para uma linha do Excel. A maioria dos fluxos de trabalho usa:
- um mapeamento predefinido (por exemplo, um "esquema" definido no código), ou
- uma lógica de achatamento automático que converte recursivamente os nós em colunas.
Exemplo de Análise de XML Principal:
O código Python a seguir demonstra como analisar um arquivo XML e achatá-lo em uma lista de dicionários, que pode ser usada para gerar um arquivo XLSX.
import xml.etree.ElementTree as ET

xml_file = "Orders.xml"

# Achata recursivamente um elemento XML num dicionário plano
def flatten(e, prefix=""):
    r = {}
    # Adicionar atributos
    for k, v in e.attrib.items():
        r[prefix + k] = v
    # Adicionar filhos
    for c in e:
        key = prefix + c.tag
        # Nó escalar (sem filhos, tem texto)
        if len(c) == 0 and c.text and c.text.strip():
            r[key] = c.text.strip()
        else:
            # Nó aninhado → recursão
            r.update(flatten(c, key + "_"))
    return r

# Analisar XML
root = ET.parse(xml_file).getroot()

# Achatar todos os elementos <Order>
rows = [flatten(order) for order in root.iter("Order")]

# Coletar cabeçalhos
headers = sorted({k for row in rows for k in row})
Este trecho de código ilustra como achatar recursivamente nós e atributos XML em uma estrutura adequada para o Excel. Para XML complexo, isso garante que nenhum dado seja perdido e que cada nó seja mapeado para a coluna correta.
4.2 Gerando Arquivos XLSX a partir de XML Analisado
Uma vez que o XML é analisado e achatado, o próximo passo é escrever os dados em um arquivo Excel .xlsx. Bibliotecas Python como Free Spire.XLS for Python permitem a criação completa de planilhas sem a necessidade de ter o Excel instalado, o que é ideal para servidores Linux ou ambientes em nuvem.
Instalar o Free Spire.XLS para Python:
pip install spire.xls.free
Passos para gerar XLSX:
- Crie uma nova pasta de trabalho.
- Escreva cabeçalhos e linhas a partir dos dados achatados.
- Opcionalmente, aplique estilos para melhor legibilidade.
- Salve a pasta de trabalho como
.xlsx.
Exemplo em Python:
Este exemplo demonstra como gerar um arquivo XLSX a partir dos dados XML analisados.
from spire.xls import Workbook, BuiltInStyles

xlsx_output = "output/XMLToExcel1.xlsx"

wb = Workbook()
ws = wb.Worksheets.get_Item(0)

# Linha de cabeçalho
for col, h in enumerate(headers, 1):
    ws.Range.get_Item(1, col).Value = h

# Linhas de dados
for row_idx, row in enumerate(rows, 2):
    for col_idx, h in enumerate(headers, 1):
        ws.Range.get_Item(row_idx, col_idx).Value = row.get(h, "")

# Aplicar estilos (opcional)
ws.AllocatedRange.Rows.get_Item(0).BuiltInStyle = BuiltInStyles.Heading2
for row in range(1, ws.AllocatedRange.Rows.Count):
    if row % 2 == 0:
        ws.AllocatedRange.Rows.get_Item(row).BuiltInStyle = BuiltInStyles.Accent2_20
    else:
        ws.AllocatedRange.Rows.get_Item(row).BuiltInStyle = BuiltInStyles.Accent2_40

# Salvar em XLSX
wb.SaveToFile(xlsx_output)
print("Feito!")
Após executar o script, cada nó XML é achatado em linhas, com colunas representando atributos e elementos filhos. Essa abordagem suporta várias planilhas, nomes de coluna personalizados e integração com transformações de dados adicionais.
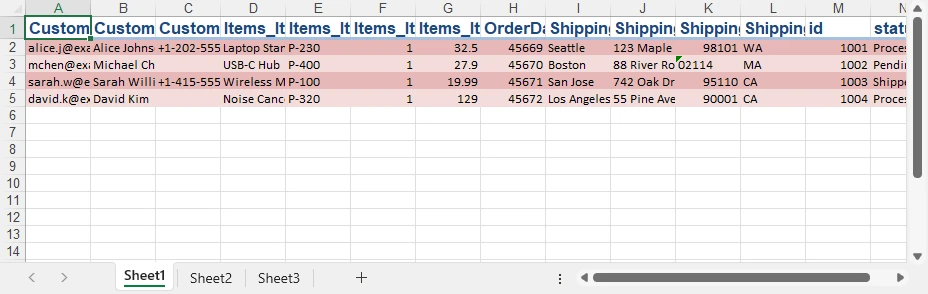
Abaixo está a pré-visualização do arquivo XLSX gerado:
Para mais exemplos de escrita de diferentes tipos de dados em arquivos Excel usando Python, consulte nosso guia de escrita de dados em Excel com Python.
4.3 Lidando com XML Complexo
O XML de negócios geralmente contém padrões irregulares. Usando Python, você pode:
- achatar recursivamente elementos aninhados
- promover atributos para colunas normais
- ignorar elementos irrelevantes
- criar várias planilhas para seções hierárquicas
- lidar com campos ausentes ou opcionais atribuindo padrões
O exemplo acima mostra um único arquivo XML; a mesma lógica pode ser estendida para lidar com estruturas complexas sem perda de dados.
Se você está trabalhando com arquivos Office Open XML (OOXML), também pode carregá-los diretamente e salvá-los como arquivos XLSX usando o Free Spire.XLS para Python. Confira Como Converter OOXML para XLSX com Python.
4.4 Conversão em Lote
A força do Python torna-se especialmente clara ao converter grandes pastas de arquivos XML. Um script pode:
- verificar diretórios,
- analisar cada arquivo usando a mesma lógica de achatamento,
- gerar arquivos XLSX consistentes automaticamente.
Isso elimina o trabalho manual e garante uma conversão confiável e sem erros em projetos ou conjuntos de dados.
O trecho a seguir ilustra uma abordagem simples para converter vários arquivos XML em XLSX em lote.
import os

input_dir = "xml_folder"
output_dir = "xlsx_folder"

for file_name in os.listdir(input_dir):
    if file_name.endswith(".xml"):
        xml_path = os.path.join(input_dir, file_name)

        # Analisar XML e gerar XLSX (usando a lógica definida anteriormente)
        convert_xml_to_xlsx(xml_path, output_dir)
5. Método 4: Scripts Personalizados ou APIs para Fluxos de Trabalho Empresariais
Embora os métodos anteriores sejam adequados para conversões únicas ou em lote, os ambientes empresariais geralmente exigem soluções automatizadas, padronizadas e escaláveis para a conversão de XML para XLSX. Muitos formatos XML de negócios seguem padrões da indústria, envolvem esquemas complexos com campos obrigatórios e opcionais e são integrados em pipelines de dados mais amplos.
Nestes casos, as empresas normalmente desenvolvem scripts personalizados ou fluxos de trabalho baseados em API para lidar com as conversões de forma confiável. Por exemplo:
- Exportações de ERP ou CRM: Exportações diárias de XML contendo faturas ou pedidos são convertidas automaticamente para XLSX e alimentadas em painéis de relatórios.
- Pipelines de ETL: Dados XML de múltiplos sistemas são validados, normalizados e convertidos durante os processos de Extração-Transformação-Carga.
- Integração na nuvem: Scripts ou APIs são executados em plataformas de nuvem (AWS Lambda, Azure Functions) para processar arquivos XML em grande escala sem intervenção manual.
Os principais benefícios desta abordagem incluem:
- Garantir a conformidade do esquema através da validação XSD.
- Manter regras de mapeamento consistentes em múltiplos sistemas.
- Automatizar conversões como parte dos processos de negócio regulares.
- Integrar-se perfeitamente com serviços em nuvem e plataformas de automação de fluxo de trabalho.
Este fluxo de trabalho é ideal para cenários onde a conversão de XML é uma tarefa recorrente, parte de um sistema de relatórios empresariais ou necessária para conformidade com os padrões de dados da indústria.
Ferramentas como Spire.XLS for Python também podem ser integradas nesses fluxos de trabalho para gerar arquivos XLSX programaticamente em servidores ou funções na nuvem, permitindo uma conversão confiável e sem Excel dentro de pipelines empresariais automatizados.
6. Solução de Problemas na Conversão de XML para XLSX
Dependendo do método que você escolher — ferramentas online, Excel ou Python — diferentes problemas podem surgir durante a conversão de XML. Entender esses problemas comuns ajuda a garantir que seu arquivo XLSX final esteja completo e preciso.
XML Profundamente Aninhado ou Irregular
Estruturas aninhadas podem ser difíceis de achatar em uma única planilha.
- O Excel pode exigir mapeamento manual ou divisão em várias planilhas.
- O Python permite o achatamento recursivo ou a criação de várias planilhas programaticamente.
Elementos Ausentes ou Opcionais
Nem todos os nós XML aparecem em todos os registros. Garanta a consistência das colunas usando células em branco para campos ausentes, em vez de pulá-los, para evitar dados desalinhados.
Atributos vs. Elementos
Decida quais atributos devem se tornar colunas e quais podem permanecer internos.
- O Excel pode solicitar o mapeamento.
- O Python pode extrair todos os atributos de forma flexível usando análise recursiva.
Erros de Codificação
A codificação de caracteres incorreta pode causar falhas na análise.
- Certifique-se de que o XML declara a codificação corretamente (
UTF-8,UTF-16, etc.). - Dica de Python:
ET.parse(xml_file, parser=ET.XMLParser(encoding='utf-8'))ajuda a lidar com a codificação explicitamente.
Arquivos XML Grandes
Arquivos XML muito grandes podem exceder os limites do navegador ou do Excel.
- As ferramentas online podem falhar ou congelar.
- O Excel pode deixar de responder.
- O Python pode usar analisadores de streaming como
iterparsepara processar arquivos grandes com uso mínimo de memória.
7. Perguntas Frequentes
Aqui estão algumas perguntas frequentes sobre a conversão de XML para XLSX:
1. Como converter um arquivo XML para XLSX?
Você pode converter XML para XLSX usando Excel, ferramentas online ou automação com Python, dependendo de suas necessidades.
- Para arquivos rápidos e simples, as ferramentas online são convenientes (veja a Seção 2).
- Para arquivos com XML estruturado ou aninhado, a importação de dados do Excel oferece controle (veja a Seção 3).
- Para processamento em larga escala ou automatizado, o Python oferece total flexibilidade (veja a Seção 4).
2. Como abro um arquivo XML no Excel?
O Excel pode importar XML como uma tabela. XML simples abre diretamente, enquanto XML complexo ou hierárquico pode exigir mapeamento através do fluxo de trabalho Aba Dados → Obter Dados → Do XML (veja a Seção 3.2).
3. Como posso converter XML para outros formatos?
Além de XLSX, o XML pode ser convertido para CSV, JSON ou bancos de dados usando scripts Python ou ferramentas especializadas. Bibliotecas Python como xml.etree.ElementTree ou lxml permitem analisar e transformar XML em vários formatos programaticamente.
4. Como converter XML para Excel online gratuitamente?
Conversores online gratuitos podem lidar com conversões diretas de XML para XLSX sem a necessidade de instalar software. Eles são ideais para arquivos pequenos ou moderados, mas podem ter dificuldades com XML profundamente aninhado ou grandes conjuntos de dados (veja a Seção 2).
8. Conclusão
A conversão de XML para XLSX assume várias formas, dependendo da estrutura dos seus dados e das ferramentas disponíveis. Os conversores online oferecem conveniência para tarefas rápidas, enquanto o Excel oferece maior controle com mapeamento de XML e suporte a esquemas. Quando são necessárias automação, grandes conjuntos de dados ou regras de mapeamento personalizadas, o Python é a solução mais flexível e robusta.
Se o seu fluxo de trabalho envolve listas XML simples, dados de negócios profundamente aninhados ou processamento em lote em grande escala, os métodos neste guia oferecem maneiras práticas e confiáveis de converter XML para XLSX e gerenciar os dados de forma eficaz em todos os sistemas.
Veja Também
중첩된 XML 데이터를 오류 없이 Excel로 빠르게 변환
XML을 XLSX로 변환하는 것은 데이터 처리, 보고 워크플로우 및 시스템 통합 작업에서 일반적인 요구 사항입니다. XML은 구조화되거나 반구조화된 데이터에 가장 일반적으로 사용되는 형식 중 하나이지만, Excel의 XLSX 형식은 비기술적 사용자와의 분석, 필터링, 시각화 및 공유에 훨씬 더 편리합니다.
XML 파일을 XLSX 파일로 변환하는 기본 아이디어는 간단하게 들릴 수 있지만, 실제 XML 파일은 구조가 매우 다양합니다. 일부는 깨끗한 데이터베이스 테이블과 유사하지만, 다른 일부는 깊이 중첩된 노드, 속성 또는 혼합된 콘텐츠를 포함합니다.
이 가이드는 온라인 도구, Microsoft Excel 및 Python 자동화를 사용하여 XML을 XLSX로 변환하는 방법에 대한 상세하고 실용적인 설명을 제공합니다. 또한 대용량 데이터 세트, 중첩된 요소, 선택적 필드 및 XLSX에서 XML로의 역변환과 같은 복잡한 시나리오를 처리하는 방법도 논의합니다.
방법 개요:
- 온라인 XML을 XLSX로 변환기
- Excel XML 가져오기 기능
- Python 자동화를 사용하여 XML을 XLSX로 변환
- 엔터프라이즈 워크플로우를 위한 사용자 지정 스크립트 또는 API
1. XML에서 XLSX로의 변환 이해하기
XML(Extensible Markup Language)은 태그를 사용하여 데이터를 저장하는 간단한 텍스트 형식으로, 부모 요소가 자식 요소를 포함하고 정보가 요소 또는 속성으로 나타날 수 있는 트리 구조를 형성합니다. 반면 XLSX는 엄격하게 행과 열 기반이므로 XML을 XLSX로 변환하는 것은 데이터를 의미 있게 유지하면서 이 트리를 테이블로 평탄화하는 것을 의미합니다.
예를 들어, 반복되는 <item> 노드가 있는 파일과 같은 간단한 XML의 경우 각 노드는 자연스럽게 행이 되고 그 자식은 열이 됩니다. 그러나 실제 XML에는 종종 다음이 포함됩니다.
- 중첩된 세부 정보
- 일부 레코드에만 나타나는 노드
- 속성에 저장된 데이터
- 엔터프라이즈 시스템에서 사용되는 네임스페이스
이러한 변형은 계층 구조를 평탄화하는 방법에 대한 결정이 필요합니다. 일부 도구는 이를 자동으로 수행하지만 다른 도구는 수동 매핑이 필요합니다. 이 가이드는 자동화된 워크플로우에서 일반적인 Excel을 열지 않고 XML을 XLSX로 변환하는 방법을 포함하여 간단하고 복잡한 경우를 모두 다룹니다.
2. 방법 1: 온라인에서 XML을 XLSX로 변환
Convertion Tools, AConvert 또는 DataConverter.io와 같은 온라인 XML-to-XLSX 변환기는 소프트웨어를 설치하지 않고 빠른 변환이 필요할 때 편리합니다. 프로세스는 일반적으로 매우 간단합니다.
-
XML-to-XLSX 변환을 지원하는 웹사이트(DataConverter.io 등)를 방문하십시오.
-
XML 파일을 업로드하거나 XML 문자열을 붙여넣습니다.
-
일부 변환기는 변환 전에 매핑을 편집할 수 있도록 허용합니다.
-
생성된 .xlsx 파일을 다운로드하려면 다운로드를 클릭하십시오.
이 방법은 일회성 작업과 자동 매핑이 일반적으로 정확한 간단한 구조의 XML 파일에 적합합니다.
장점
- 빠르고 설치가 필요 없습니다.
- 간단하거나 중간 정도의 XML 구조에 적합합니다.
- 일회성 또는 가끔 변환에 이상적입니다.
제한 사항
- 스키마, 네임스페이스 및 중첩된 계층에 대한 이해가 제한적입니다.
- 깊은 XML이 잘못 평탄화되거나, 일반적인 열 이름이 생성되거나, 선택적 필드가 손실될 수 있습니다.
- 대용량 파일의 경우 업로드 크기 제한 및 브라우저 정지 가능성이 있습니다.
이러한 제약에도 불구하고 온라인 도구는 빠르고 소규모의 XML-to-XLSX 변환에 실용적인 선택입니다.
관심 있을 만한 다른 글: CSV를 Excel 파일로 변환하는 방법.
3. 방법 2: Excel에서 XML을 XLSX로 변환
Excel은 XML 가져오기를 기본적으로 지원하며, 많은 사용자에게 이것이 가장 투명하고 제어 가능한 방법입니다. 올바르게 사용하면 Excel은 XML 구조를 읽고, 사용자 지정 가능한 매핑을 적용하고, 변환된 결과를 XLSX 파일로 직접 저장할 수 있습니다.
3.1 Excel에서 직접 XML 열기
파일 → 열기를 통해 XML 파일을 열면 Excel은 스키마를 유추하고 데이터를 테이블로 변환하려고 시도합니다. 이 방법에 대한 올바른 순서는 다음과 같습니다.
-
파일 → 열기로 이동하여 XML 파일을 선택합니다.
-
메시지가 표시되면 "XML 테이블로"를 선택합니다.
-
Excel이 XML을 로드하고 자식 노드를 열에 자동으로 매핑합니다.
이것은 각 반복 요소가 행에 깔끔하게 해당하는 "평평한" XML 구조에 잘 작동합니다. 그러나 계층적 XML은 종종 문제를 일으킵니다. 중첩된 노드가 반복되는 열로 확장되거나 Excel이 명확한 매핑을 결정할 수 없는 경우 XML 테이블을 수동으로 정의하라는 메시지가 표시될 수 있습니다.
이 직접 열기 방법은 XML이 데이터베이스 스타일의 레코드 목록과 유사하고 데이터를 빠르게 검사하거나 작업해야 할 때 유용합니다.
3.2 Excel의 데이터 탭을 통해 XML 가져오기
구조화된 XML 파일, 특히 XSD 스키마를 기반으로 하는 파일의 경우 Excel은 데이터 탭을 통해 더 사용자 친화적인 가져오기 방법을 제공합니다. 이 접근 방식을 사용하면 XML 원본 창을 수동으로 사용하지 않고도 XML 요소가 워크시트에 매핑되는 방식을 제어할 수 있습니다.
단계:
-
Excel 통합 문서를 열거나 새로 만듭니다.
-
데이터 → 데이터 가져오기 → 파일에서 → XML에서로 이동합니다.
-
XML 파일을 선택하고 가져오기를 클릭합니다.
-
팝업 창에서 데이터 변환을 클릭합니다.
-
파워 쿼리 편집기 창에서 로드할 요소 또는 테이블을 선택합니다.
-
변경 사항을 저장하려면 닫기 및 로드를 클릭하면 변환된 데이터가 새 워크시트에 나타납니다.
이 방법을 사용하면 Excel이 XML 구조를 자동으로 해석하고 테이블에 매핑할 수 있습니다. 로드할 섹션을 선택하여 선택적 필드와 관계를 그대로 유지할 수 있으므로 계층적 XML에 잘 작동합니다.
이 접근 방식은 특히 다음에 유용합니다.
- 정부 전자 양식 데이터 가져오기
- ERP/CRM에서 내보낸 XML 작업
- UBL 또는 HL7과 같은 산업별 표준 처리
이 워크플로우를 사용하면 수동 매핑 단계를 최소화하면서 Excel에서 XML 데이터가 표시되는 방식을 효율적으로 제어할 수 있습니다.
3.3 가져온 XML 데이터를 XLSX 파일로 저장
XML 파일을 직접 열거나 데이터 → 데이터 가져오기 → XML에서를 사용하여 XML 데이터를 성공적으로 가져온 후 마지막 단계는 통합 문서를 Excel의 기본 .xlsx 형식으로 저장하는 것입니다. 이 단계에서 데이터는 다른 Excel 테이블처럼 작동하므로 열 너비를 자유롭게 조정하고, 필터를 적용하고, 셀 서식을 지정하거나, 수식을 추가할 수 있습니다.
변환된 XML을 XLSX 파일로 저장하려면:
- 파일 → 다른 이름으로 저장으로 이동합니다.
- 파일 형식으로 Excel 통합 문서(*.xlsx)를 선택합니다.
- 위치를 지정하고 저장을 클릭합니다.
아래는 XML에서 가져온 Excel 테이블의 미리보기입니다.
XML 파일이 XSD 스키마를 기반으로 하고 매핑이 유지되는 경우 Excel은 수정된 워크시트를 다시 XML로 내보낼 수도 있습니다. 그러나 깊이 중첩된 XML 구조의 경우 내보내기 전에 일부 전처리 또는 수동 조정이 여전히 필요할 수 있습니다.
4. 방법 3: Python을 사용하여 XML을 XLSX로 변환
Python은 자동화, 대규모 처리 또는 Excel을 열지 않고 XML을 XLSX로 변환하는 기능이 필요할 때 XML을 XLSX로 변환하는 데 탁월한 선택입니다. Python 스크립트는 서버에서 실행하고, 작업을 예약하고, 수백 또는 수천 개의 XML 파일을 일관되게 처리할 수 있습니다.
4.1 Python에서 XML 구문 분석
XML 구문 분석은 워크플로우의 첫 번째 단계입니다. Python의 xml.etree.ElementTree 또는 lxml 라이브러리는 이벤트 기반 또는 트리 기반 구문 분석을 제공합니다. 이를 통해 각 노드를 탐색하고, 속성을 추출하고, 네임스페이스를 처리하고, 깊이 중첩된 데이터를 처리할 수 있습니다.
주요 과제는 각 XML 노드가 Excel 행에 매핑되는 방식을 정의하는 것입니다. 대부분의 워크플로우는 다음 중 하나를 사용합니다.
- 사전 정의된 매핑(예: 코드에 정의된 "스키마") 또는
- 노드를 열로 재귀적으로 변환하는 자동 평탄화 논리.
핵심 XML 구문 분석 예제:
다음 Python 코드는 XML 파일을 구문 분석하고 XLSX 파일을 생성하는 데 사용할 수 있는 사전 목록으로 평탄화하는 방법을 보여줍니다.
import xml.etree.ElementTree as ET

xml_file = "Orders.xml"

# XML 요소를 평평한 사전으로 재귀적으로 평탄화
def flatten(e, prefix=""):
    r = {}
    # 속성 추가
    for k, v in e.attrib.items():
        r[prefix + k] = v
    # 자식 추가
    for c in e:
        key = prefix + c.tag
        # 스칼라 노드 (자식 없음, 텍스트 있음)
        if len(c) == 0 and c.text and c.text.strip():
            r[key] = c.text.strip()
        else:
            # 중첩된 노드 → 재귀
            r.update(flatten(c, key + "_"))
    return r

# XML 구문 분석
root = ET.parse(xml_file).getroot()

# 모든 <Order> 요소 평탄화
rows = [flatten(order) for order in root.iter("Order")]

# 헤더 수집
headers = sorted({k for row in rows for k in row})
이 스니펫은 XML 노드와 속성을 Excel에 적합한 구조로 재귀적으로 평탄화하는 방법을 보여줍니다. 복잡한 XML의 경우 데이터가 손실되지 않고 각 노드가 올바른 열에 매핑되도록 합니다.
4.2 구문 분석된 XML에서 XLSX 파일 생성
XML을 구문 분석하고 평탄화한 후 다음 단계는 데이터를 Excel .xlsx 파일에 쓰는 것입니다. Free Spire.XLS for Python과 같은 Python 라이브러리를 사용하면 Excel을 설치할 필요 없이 전체 스프레드시트를 생성할 수 있으므로 Linux 서버나 클라우드 환경에 이상적입니다.
Free Spire.XLS for Python 설치:
pip install spire.xls.free
XLSX 생성 단계:
- 새 통합 문서를 만듭니다.
- 평탄화된 데이터에서 헤더와 행을 씁니다.
- 선택적으로 가독성을 높이기 위해 스타일을 적용합니다.
- 통합 문서를
.xlsx로 저장합니다.
Python 예제:
이 예제는 구문 분석된 XML 데이터에서 XLSX 파일을 생성하는 방법을 보여줍니다.
from spire.xls import Workbook, BuiltInStyles

xlsx_output = "output/XMLToExcel1.xlsx"

wb = Workbook()
ws = wb.Worksheets.get_Item(0)

# 헤더 행
for col, h in enumerate(headers, 1):
    ws.Range.get_Item(1, col).Value = h

# 데이터 행
for row_idx, row in enumerate(rows, 2):
    for col_idx, h in enumerate(headers, 1):
        ws.Range.get_Item(row_idx, col_idx).Value = row.get(h, "")

# 스타일 적용 (선택 사항)
ws.AllocatedRange.Rows.get_Item(0).BuiltInStyle = BuiltInStyles.Heading2
for row in range(1, ws.AllocatedRange.Rows.Count):
    if row % 2 == 0:
        ws.AllocatedRange.Rows.get_Item(row).BuiltInStyle = BuiltInStyles.Accent2_20
    else:
        ws.AllocatedRange.Rows.get_Item(row).BuiltInStyle = BuiltInStyles.Accent2_40

# XLSX로 저장
wb.SaveToFile(xlsx_output)
print("완료!")
스크립트를 실행하면 각 XML 노드가 행으로 평탄화되고 열은 속성과 자식 요소를 나타냅니다. 이 접근 방식은 여러 워크시트, 사용자 지정 열 이름 및 추가 데이터 변환과의 통합을 지원합니다.
아래는 생성된 XLSX 파일의 미리보기입니다.
Python을 사용하여 다양한 유형의 데이터를 Excel 파일에 쓰는 방법에 대한 더 많은 예제는 Python으로 Excel에 데이터 쓰기 가이드를 참조하십시오.
4.3 복잡한 XML 처리
비즈니스 XML에는 종종 불규칙한 패턴이 포함됩니다. Python을 사용하면 다음을 수행할 수 있습니다.
- 중첩된 요소를 재귀적으로 평탄화
- 속성을 일반 열로 승격
- 관련 없는 요소 건너뛰기
- 계층적 섹션에 대해 여러 시트 만들기
- 기본값을 할당하여 누락되거나 선택적인 필드 처리
위의 예는 단일 XML 파일을 보여줍니다. 동일한 논리를 데이터 손실 없이 복잡한 구조를 처리하도록 확장할 수 있습니다.
Office Open XML(OOXML) 파일로 작업하는 경우 Free Spire.XLS for Python을 사용하여 직접 로드하고 XLSX 파일로 저장할 수도 있습니다. Python으로 OOXML을 XLSX로 변환하는 방법을 확인하십시오.
4.4 일괄 변환
Python의 강점은 대량의 XML 파일 폴더를 변환할 때 특히 분명해집니다. 스크립트는 다음을 수행할 수 있습니다.
- 디렉토리 스캔,
- 동일한 평탄화 논리를 사용하여 각 파일 구문 분석,
- 일관된 XLSX 파일을 자동으로 생성합니다.
이렇게 하면 수동 작업이 제거되고 프로젝트 또는 데이터 세트 전반에 걸쳐 안정적이고 오류 없는 변환이 보장됩니다.
다음 스니펫은 여러 XML 파일을 XLSX로 일괄 변환하는 간단한 접근 방식을 보여줍니다.
import os

input_dir = "xml_folder"
output_dir = "xlsx_folder"

for file_name in os.listdir(input_dir):
    if file_name.endswith(".xml"):
        xml_path = os.path.join(input_dir, file_name)

        # XML 구문 분석 및 XLSX 생성 (이전에 정의된 논리 사용)
        convert_xml_to_xlsx(xml_path, output_dir)
5. 방법 4: 엔터프라이즈 워크플로우를 위한 사용자 지정 스크립트 또는 API
이전 방법은 일회성 또는 일괄 변환에 적합하지만 엔터프라이즈 환경에서는 종종 XML에서 XLSX로의 변환을 위해 자동화되고 표준화되며 확장 가능한 솔루션이 필요합니다. 많은 비즈니스 XML 형식은 산업 표준을 따르고, 필수 및 선택적 필드가 있는 복잡한 스키마를 포함하며, 더 넓은 데이터 파이프라인에 통합됩니다.
이러한 경우 회사는 일반적으로 변환을 안정적으로 처리하기 위해 사용자 지정 스크립트 또는 API 기반 워크플로우를 개발합니다. 예를 들어:
- ERP 또는 CRM 내보내기: 송장 또는 주문이 포함된 일일 XML 내보내기는 자동으로 XLSX로 변환되어 보고 대시보드에 제공됩니다.
- ETL 파이프라인: 여러 시스템의 XML 데이터는 추출-변환-로드 프로세스 중에 유효성이 검사되고, 정규화되고, 변환됩니다.
- 클라우드 통합: 스크립트 또는 API는 클라우드 플랫폼(AWS Lambda, Azure Functions)에서 실행되어 수동 개입 없이 대규모 XML 파일을 처리합니다.
이 접근 방식의 주요 이점은 다음과 같습니다.
- XSD 유효성 검사를 통해 스키마 준수 보장.
- 여러 시스템에서 일관된 매핑 규칙 유지.
- 정기적인 비즈니스 프로세스의 일부로 변환 자동화.
- 클라우드 서비스 및 워크플로우 자동화 플랫폼과 원활하게 통합.
이 워크플로우는 XML 변환이 반복적인 작업이거나, 엔터프라이즈 보고 시스템의 일부이거나, 산업 데이터 표준 준수를 위해 필요한 시나리오에 이상적입니다.
Spire.XLS for Python과 같은 도구는 이러한 워크플로우에 통합되어 서버 또는 클라우드 기능에서 프로그래밍 방식으로 XLSX 파일을 생성하여 자동화된 엔터프라이즈 파이프라인 내에서 안정적인 Excel 없는 변환을 가능하게 할 수도 있습니다.
6. XML에서 XLSX로의 변환 문제 해결
선택한 방법(온라인 도구, Excel 또는 Python)에 따라 XML 변환 중에 다른 문제가 발생할 수 있습니다. 이러한 일반적인 문제를 이해하면 최종 XLSX 파일이 완전하고 정확하도록 보장하는 데 도움이 됩니다.
깊이 중첩되거나 불규칙한 XML
중첩된 구조는 단일 시트로 평탄화하기 어려울 수 있습니다.
- Excel은 수동 매핑 또는 여러 시트로 분할해야 할 수 있습니다.
- Python은 재귀적 평탄화 또는 프로그래밍 방식으로 여러 시트 생성을 허용합니다.
누락되거나 선택적인 요소
모든 XML 노드가 모든 레코드에 나타나는 것은 아닙니다. 데이터가 잘못 정렬되는 것을 방지하기 위해 누락된 필드를 건너뛰는 대신 빈 셀을 사용하여 열 일관성을 보장하십시오.
속성 대 요소
어떤 속성이 열이 되어야 하고 어떤 속성이 내부적으로 유지될 수 있는지 결정하십시오.
- Excel은 매핑을 요청할 수 있습니다.
- Python은 재귀적 구문 분석을 사용하여 모든 속성을 유연하게 추출할 수 있습니다.
인코딩 오류
잘못된 문자 인코딩은 구문 분석 실패를 유발할 수 있습니다.
- XML이 인코딩을 올바르게 선언했는지 확인하십시오(
UTF-8,UTF-16등). - Python 팁:
ET.parse(xml_file, parser=ET.XMLParser(encoding='utf-8'))는 인코딩을 명시적으로 처리하는 데 도움이 됩니다.
대용량 XML 파일
매우 큰 XML 파일은 브라우저 또는 Excel 제한을 초과할 수 있습니다.
- 온라인 도구는 실패하거나 정지될 수 있습니다.
- Excel은 응답하지 않을 수 있습니다.
- Python은
iterparse와 같은 스트리밍 파서를 사용하여 최소한의 메모리 사용으로 대용량 파일을 처리할 수 있습니다.
7. 자주 묻는 질문
다음은 XML에서 XLSX로의 변환에 대해 자주 묻는 질문입니다.
1. XML 파일을 XLSX로 변환하는 방법은 무엇입니까?
필요에 따라 Excel, 온라인 도구 또는 Python 자동화를 사용하여 XML을 XLSX로 변환할 수 있습니다.
- 빠르고 간단한 파일의 경우 온라인 도구가 편리합니다(섹션 2 참조).
- 구조화되거나 중첩된 XML이 있는 파일의 경우 Excel의 데이터 가져오기가 제어를 제공합니다(섹션 3 참조).
- 대규모 또는 자동화된 처리의 경우 Python이 완전한 유연성을 제공합니다(섹션 4 참조).
2. Excel에서 XML 파일을 어떻게 여나요?
Excel은 XML을 테이블로 가져올 수 있습니다. 간단한 XML은 직접 열리지만 복잡하거나 계층적인 XML은 데이터 탭 → 데이터 가져오기 → XML에서 워크플로우를 통해 매핑해야 할 수 있습니다(섹션 3.2 참조).
3. XML을 다른 형식으로 어떻게 변환할 수 있나요?
XLSX 외에도 XML은 Python 스크립트 또는 특수 도구를 사용하여 CSV, JSON 또는 데이터베이스로 변환할 수 있습니다. xml.etree.ElementTree 또는 lxml과 같은 Python 라이브러리를 사용하면 프로그래밍 방식으로 XML을 다양한 형식으로 구문 분석하고 변환할 수 있습니다.
4. 온라인에서 무료로 XML을 Excel로 변환하는 방법은 무엇입니까?
무료 온라인 변환기는 소프트웨어를 설치하지 않고도 간단한 XML-to-XLSX 변환을 처리할 수 있습니다. 작거나 중간 크기의 파일에 이상적이지만 깊이 중첩된 XML이나 대용량 데이터 세트에는 어려움을 겪을 수 있습니다(섹션 2 참조).
8. 결론
XML에서 XLSX로의 변환은 데이터 구조와 사용 가능한 도구에 따라 여러 형태를 취합니다. 온라인 변환기는 빠른 작업을 위한 편의성을 제공하는 반면, Excel은 XML 매핑 및 스키마 지원으로 더 큰 제어 기능을 제공합니다. 자동화, 대용량 데이터 세트 또는 사용자 지정 매핑 규칙이 필요한 경우 Python이 가장 유연하고 강력한 솔루션입니다.
워크플로우에 간단한 XML 목록, 깊이 중첩된 비즈니스 데이터 또는 대규모 일괄 처리가 포함되든, 이 가이드의 방법은 XML을 XLSX로 변환하고 시스템 전반에서 데이터를 효과적으로 관리하는 실용적이고 신뢰할 수 있는 방법을 제공합니다.
참고 항목
Converti rapidamente i dati XML annidati in Excel senza errori
La conversione da XML a XLSX è un requisito comune nell'elaborazione dei dati, nei flussi di lavoro di reporting e nelle attività di integrazione dei sistemi. XML rimane uno dei formati più comunemente usati per dati strutturati o semi-strutturati, ma il formato XLSX di Excel è molto più comodo per l'analisi, il filtraggio, la visualizzazione e la condivisione con utenti non tecnici.
Sebbene l'idea di base di trasformare i file XML in file XLSX sembri semplice, i file XML del mondo reale variano ampiamente nella struttura. Alcuni assomigliano a tabelle di database pulite, mentre altri contengono nodi profondamente nidificati, attributi o contenuti misti.
Questa guida fornisce una spiegazione dettagliata e pratica su come convertire XML in XLSX utilizzando strumenti online, Microsoft Excel e l'automazione con Python. Discute anche come gestire scenari complessi come grandi set di dati, elementi nidificati, campi opzionali e la conversione inversa da XLSX a XML.
Panoramica dei Metodi:
- Convertitori Online da XML a XLSX
- Funzionalità di Importazione XML di Excel
- Convertire XML in XLSX Usando l'Automazione con Python
- Script Personalizzati o API per Flussi di Lavoro Aziendali
1. Comprendere la Conversione da XML a XLSX
XML (Extensible Markup Language) è un semplice formato di testo che memorizza i dati utilizzando tag, formando una struttura ad albero in cui gli elementi genitore contengono figli e le informazioni possono apparire come elementi o attributi. XLSX, al contrario, è strettamente basato su righe e colonne, quindi convertire XML in XLSX significa appiattire questo albero in una tabella mantenendo i dati significativi.
Per un XML semplice—ad esempio, un file con nodi <item> ripetuti—ogni nodo diventa naturalmente una riga e i suoi figli diventano colonne. Ma l'XML del mondo reale contiene spesso:
- dettagli nidificati
- nodi che appaiono solo in alcuni record
- dati memorizzati negli attributi
- spazi dei nomi utilizzati nei sistemi aziendali
Tali variazioni richiedono decisioni su come appiattire la gerarchia. Alcuni strumenti lo fanno automatically, mentre altri necessitano di una mappatura manuale. Questa guida copre sia i casi semplici che quelli complessi, incluso come convertire XML in XLSX senza aprire Excel, cosa comune nei flussi di lavoro automatizzati.
2. Metodo 1: Convertire XML in XLSX Online
I convertitori online da XML a XLSX—come Convertion Tools, AConvert, o DataConverter.io—sono comodi quando hai bisogno di una trasformazione rapida senza installare software. Il processo è in genere molto semplice:
-
Visita un sito web che supporta la conversione da XML a XLSX (come DataConverter.io).
-
Carica il tuo file XML o incolla la stringa XML.
-
Alcuni convertitori ti permettono di modificare la mappatura prima della conversione.
-
Fai clic su Scarica per scaricare il file .xlsx generato.
Questo metodo funziona bene per attività una tantum e per file XML con strutture semplici in cui la mappatura automatica è solitamente accurata.
Vantaggi
- Veloce, nessuna installazione richiesta.
- Adatto per strutture XML semplici o moderate.
- Ideale per conversioni una tantum o occasionali.
Limitazioni
- Comprensione limitata di schemi, spazi dei nomi e gerarchie nidificate.
- Un XML profondo potrebbe essere appiattito in modo errato, produrre nomi di colonna generici o perdere campi opzionali.
- Limiti di dimensione per il caricamento e possibili blocchi del browser con file di grandi dimensioni.
Nonostante questi vincoli, gli strumenti online rimangono una scelta pratica per conversioni rapide e su piccola scala da XML a XLSX.
Potrebbe piacerti anche: Come Convertire File CSV in Excel.
3. Metodo 2: Convertire XML in XLSX in Excel
Excel fornisce supporto nativo per l'importazione di XML, e per molti utenti, questo è il metodo più trasparente e controllabile. Se usato correttamente, Excel può leggere le strutture XML, applicare mappature personalizzabili e salvare il risultato convertito directly come file XLSX.
3.1 Aprire XML Direttamente in Excel
Quando apri un file XML tramite File → Apri, Excel tenta di dedurre uno schema e convertire i dati in una tabella. La sequenza corretta per questo metodo è:
-
Vai su File → Apri e seleziona il file XML.
-
Quando richiesto, scegli “Come tabella XML”.
-
Excel carica l'XML e mappa automaticamente i nodi figli alle colonne.
Questo funziona bene per le strutture XML "piatte", in cui ogni elemento ripetuto corrisponde ordinatamente a una riga. Tuttavia, l'XML gerarchico causa spesso problemi: i nodi nidificati possono essere espansi in colonne ripetute, oppure Excel potrebbe chiederti di definire manualmente una tabella XML se non riesce a determinare una mappatura chiara.
Questo metodo di apertura diretta rimane utile quando l'XML assomiglia a un elenco di record in stile database e hai bisogno di un modo rapido per ispezionare o lavorare con i dati.
3.2 Importare XML tramite la Scheda Dati di Excel
Per i file XML strutturati—specialmente quelli basati su schemi XSD—Excel fornisce un metodo di importazione più intuitivo tramite la scheda Dati. Questo approccio ti dà il controllo su come gli elementi XML vengono mappati al foglio di lavoro senza utilizzare manualmente il riquadro Origine XML.
Passaggi:
-
Apri una cartella di lavoro di Excel o creane una nuova.
-
Vai su Dati → Recupera dati → Da file → Da XML.
-
Seleziona il tuo file XML e fai clic su Importa.
-
Fai clic su Trasforma dati nella finestra pop-up.
-
Nella finestra dell'Editor di Power Query, seleziona gli elementi o le tabelle che desideri caricare.
-
Fai clic su Chiudi e carica per salvare le modifiche, e i dati convertiti appariranno in un nuovo foglio di lavoro.
Questo metodo consente a Excel di interpretare automaticamente la struttura XML e mapparla in una tabella. Funziona bene per l'XML gerarchico perché puoi selezionare quali sezioni caricare, mantenendo intatti i campi opzionali e le relazioni.
Questo approccio è particolarmente utile per:
- Importare dati da moduli elettronici governativi
- Lavorare con XML esportato da ERP/CRM
- Gestire standard specifici del settore come UBL o HL7
Utilizzando questo flusso di lavoro, puoi controllare in modo efficiente come i dati XML vengono rappresentati in Excel, riducendo al minimo i passaggi di mappatura manuale.
3.3 Salvare i Dati XML Importati come File XLSX
Una volta che i dati XML sono stati importati con successo—sia aprendo direttamente il file XML sia utilizzando Dati → Recupera dati → Da XML—il passaggio finale consiste semplicemente nel salvare la cartella di lavoro nel formato nativo .xlsx di Excel. A questo punto, i dati si comportano come qualsiasi altra tabella di Excel, il che significa che puoi regolare liberamente la larghezza delle colonne, applicare filtri, formattare le celle o aggiungere formule.
Per salvare l'XML convertito come file XLSX:
- Vai su File → Salva con nome.
- Scegli Cartella di lavoro di Excel (*.xlsx) come tipo di file.
- Specifica una posizione e fai clic su Salva.
Di seguito è riportata un'anteprima della tabella di Excel importata da XML:
Se il file XML si basa su uno schema XSD e la mappatura viene preservata, Excel può persino esportare nuovamente il foglio di lavoro modificato in XML. Tuttavia, per strutture XML profondamente nidificate, potrebbe essere ancora necessaria una pre-elaborazione o delle regolazioni manuali prima dell'esportazione.
4. Metodo 3: Convertire XML in XLSX Usando Python
Python è una scelta eccellente per convertire XML in XLSX when you require automation, large-scale processing, or the ability to perform XML to XLSX conversion without opening Excel. Python scripts can run on servers, schedule tasks, and handle hundreds or thousands of XML files consistently.
4.1 Parsing di XML in Python
Il parsing di XML è il primo passo nel flusso di lavoro. Le librerie di Python xml.etree.ElementTree o lxml forniscono un parsing basato su eventi o ad albero. Ti permettono di scorrere ogni nodo, estrarre attributi, gestire spazi dei nomi ed elaborare dati profondamente nidificati.
La sfida principale è definire come ogni nodo XML si mappa a una riga di Excel. La maggior parte dei flussi di lavoro utilizza:
- una mappatura predefinita (ad es. uno “schema” definito nel codice), o
- una logica di appiattimento automatico che converte ricorsivamente i nodi in colonne.
Esempio di Parsing XML di Base:
Il seguente codice Python dimostra come eseguire il parsing di un file XML e appiattirlo in un elenco di dizionari, che può essere utilizzato per generare un file XLSX.
import xml.etree.ElementTree as ET

xml_file = "Orders.xml"

# Recursively flatten an XML element into a flat dictionary
def flatten(e, prefix=""):
    r = {}
    # Add attributes
    for k, v in e.attrib.items():
        r[prefix + k] = v
    # Add children
    for c in e:
        key = prefix + c.tag
        # Scalar node (no children, has text)
        if len(c) == 0 and c.text and c.text.strip():
            r[key] = c.text.strip()
        else:
            # Nested node → recurse
            r.update(flatten(c, key + "_"))
    return r

# Parse XML
root = ET.parse(xml_file).getroot()

# Flatten all <Order> elements
rows = [flatten(order) for order in root.iter("Order")]

# Collect headers
headers = sorted({k for row in rows for k in row})
Questo frammento di codice illustra come appiattire ricorsivamente i nodi e gli attributi XML in una struttura adatta per Excel. Per XML complessi, ciò garantisce che nessun dato venga perso e che ogni nodo si mappi alla colonna corretta.
4.2 Generare File XLSX da XML Analizzato
Una volta che l'XML è stato analizzato e appiattito, il passo successivo è scrivere i dati in un file Excel .xlsx. Librerie Python come Free Spire.XLS for Python enable full spreadsheet creation without needing Excel installed, which is ideal for Linux servers or cloud environments.
Installa Free Spire.XLS for Python:
pip install spire.xls.free
Passaggi per generare XLSX:
- Crea una nuova cartella di lavoro.
- Scrivi intestazioni e righe dai dati appiattiti.
- Facoltativamente, applica stili per una migliore leggibilità.
- Salva la cartella di lavoro come
.xlsx.
Esempio Python:
Questo esempio dimostra come generare un file XLSX dai dati XML analizzati.
from spire.xls import Workbook, BuiltInStyles

xlsx_output = "output/XMLToExcel1.xlsx"

wb = Workbook()
ws = wb.Worksheets.get_Item(0)

# Header row
for col, h in enumerate(headers, 1):
    ws.Range.get_Item(1, col).Value = h

# Data rows
for row_idx, row in enumerate(rows, 2):
    for col_idx, h in enumerate(headers, 1):
        ws.Range.get_Item(row_idx, col_idx).Value = row.get(h, "")

# Apply styles (optional)
ws.AllocatedRange.Rows.get_Item(0).BuiltInStyle = BuiltInStyles.Heading2
for row in range(1, ws.AllocatedRange.Rows.Count):
    if row % 2 == 0:
        ws.AllocatedRange.Rows.get_Item(row).BuiltInStyle = BuiltInStyles.Accent2_20
    else:
        ws.AllocatedRange.Rows.get_Item(row).BuiltInStyle = BuiltInStyles.Accent2_40

# Save to XLSX
wb.SaveToFile(xlsx_output)
print("Done!")
Dopo aver eseguito lo script, ogni nodo XML viene appiattito in righe, con colonne che rappresentano attributi ed elementi figli. Questo approccio supporta più fogli di lavoro, nomi di colonna personalizzati e l'integrazione con ulteriori trasformazioni dei dati.
Di seguito è riportata l'anteprima del file XLSX generato:
Per ulteriori esempi su come scrivere diversi tipi di dati in file Excel utilizzando Python, consulta la nostra guida Python write data to Excel.
4.3 Gestione di XML Complessi
L'XML aziendale contiene spesso modelli irregolari. Usando Python, puoi:
- appiattire ricorsivamente elementi nidificati
- promuovere gli attributi a colonne normali
- saltare elementi irrilevanti
- creare più fogli per sezioni gerarchiche
- gestire campi mancanti o opzionali assegnando valori predefiniti
L'esempio sopra mostra un singolo file XML; la stessa logica può essere estesa per gestire strutture complesse senza perdita di dati.
Se stai lavorando con file Office Open XML (OOXML), puoi anche caricarli direttamente e salvarli come file XLSX utilizzando Free Spire.XLS for Python. Dai un'occhiata a Come convertire OOXML in XLSX con Python.
4.4 Conversione in Blocco
La forza di Python diventa particolarmente evidente quando si convertono grandi cartelle di file XML. Uno script può:
- scansionare directory,
- analizzare ogni file utilizzando la stessa logica di appiattimento,
- generare file XLSX coerenti automaticamente.
Ciò elimina il lavoro manuale e garantisce una conversione affidabile e priva di errori tra progetti o set di dati.
Il seguente frammento di codice illustra un approccio semplice per la conversione in blocco di più file XML in XLSX.
import os

input_dir = "xml_folder"
output_dir = "xlsx_folder"

for file_name in os.listdir(input_dir):
    if file_name.endswith(".xml"):
        xml_path = os.path.join(input_dir, file_name)

        # Parse XML and generate XLSX (using previously defined logic)
        convert_xml_to_xlsx(xml_path, output_dir)
5. Metodo 4: Script Personalizzati o API per Flussi di Lavoro Aziendali
Mentre i metodi precedenti sono adatti per conversioni una tantum o in blocco, gli ambienti aziendali richiedono spesso soluzioni automatizzate, standardizzate e scalabili per la conversione da XML a XLSX. Molti formati XML aziendali seguono standard di settore, coinvolgono schemi complessi con campi obbligatori e facoltativi e sono integrati in pipeline di dati più ampie.
In questi casi, le aziende sviluppano tipicamente script personalizzati o flussi di lavoro basati su API per gestire le conversioni in modo affidabile. Per esempio:
- Esportazioni ERP o CRM: le esportazioni XML giornaliere contenenti fatture o ordini vengono convertite automaticamente in XLSX e inserite nei dashboard di reporting.
- Pipeline ETL: i dati XML da più sistemi vengono convalidati, normalizzati e convertiti durante i processi di Estrazione-Trasformazione-Caricamento.
- Integrazione cloud: script o API vengono eseguiti su piattaforme cloud (AWS Lambda, Azure Functions) per elaborare file XML su larga scala senza intervento manuale.
I principali vantaggi di questo approccio includono:
- Garantire la conformità dello schema tramite la convalida XSD.
- Mantenere regole di mappatura coerenti tra più sistemi.
- Automatizzare le conversioni come parte dei normali processi aziendali.
- Integrazione perfetta con servizi cloud e piattaforme di automazione del flusso di lavoro.
Questo flusso di lavoro è ideale per scenari in cui la conversione XML è un'attività ricorrente, parte di un sistema di reporting aziendale o richiesta per la conformità con gli standard di dati del settore.
Strumenti come Spire.XLS for Python can also be integrated into these workflows to generate XLSX files programmatically on servers or cloud functions, enabling reliable, Excel-free conversion within automated enterprise pipelines.
6. Risoluzione dei Problemi della Conversione da XML a XLSX
A seconda del metodo scelto—strumenti online, Excel o Python—possono sorgere problemi diversi durante la conversione XML. Comprendere questi problemi comuni aiuta a garantire che il file XLSX finale sia completo e accurato.
XML Profondamente Nidificato o Irregolare
Le strutture nidificate possono essere difficili da appiattire in un unico foglio.
- Excel potrebbe richiedere una mappatura manuale o la suddivisione in più fogli.
- Python consente l'appiattimento ricorsivo o la creazione di più fogli programmaticamente.
Elementi Mancanti o Facoltativi
Non tutti i nodi XML compaiono in ogni record. Garantire la coerenza delle colonne utilizzando celle vuote per i campi mancanti, anziché saltarli, per evitare dati disallineati.
Attributi vs. Elementi
Decidi quali attributi dovrebbero diventare colonne e quali possono rimanere interni.
- Excel potrebbe richiedere la mappatura.
- Python può estrarre tutti gli attributi in modo flessibile utilizzando il parsing ricorsivo.
Errori di Codifica
Una codifica dei caratteri errata può causare errori di analisi.
- Assicurati che l'XML dichiari correttamente la codifica (
UTF-8,UTF-16, ecc.). - Suggerimento Python:
ET.parse(xml_file, parser=ET.XMLParser(encoding='utf-8'))aiuta a gestire la codifica in modo esplicito.
File XML di Grandi Dimensioni
File XML molto grandi possono superare i limiti del browser o di Excel.
- Gli strumenti online potrebbero fallire o bloccarsi.
- Excel potrebbe non rispondere.
- Python può utilizzare parser di streaming come
iterparseper elaborare file di grandi dimensioni con un utilizzo minimo della memoria.
7. Domande Frequenti
Ecco alcune domande frequenti sulla conversione da XML a XLSX:
1. Come convertire un file XML in XLSX?
Puoi convertire XML in XLSX usando Excel, strumenti online, o l'automazione con Python, a seconda delle tue esigenze.
- Per file semplici e veloci, gli strumenti online sono convenienti (vedi Sezione 2).
- Per file con XML strutturato o nidificato, l'importazione dati di Excel offre controllo (vedi Sezione 3).
- Per l'elaborazione su larga scala o automatizzata, Python offre piena flessibilità (vedi Sezione 4).
2. Come apro un file XML in Excel?
Excel può importare XML come tabella. L'XML semplice si apre direttamente, mentre l'XML complesso o gerarchico può richiedere la mappatura tramite il flusso di lavoro Scheda Dati → Recupera dati → Da XML (vedi Sezione 3.2).
3. Come posso convertire XML in altri formati?
Oltre a XLSX, l'XML può essere convertito in CSV, JSON o database utilizzando script Python o strumenti specializzati. Le librerie Python come xml.etree.ElementTree o lxml consentono di analizzare e trasformare l'XML in vari formati programmaticamente.
4. Come convertire XML in Excel online gratuitamente?
I convertitori online gratuiti possono gestire semplici conversioni da XML a XLSX senza installare software. Sono ideali per file di piccole o moderate dimensioni ma possono avere difficoltà con XML profondamente nidificato o grandi set di dati (vedi Sezione 2).
8. Conclusione
La conversione da XML a XLSX assume molteplici forme a seconda della struttura dei dati e degli strumenti disponibili. I convertitori online offrono comodità per attività rapide, mentre Excel fornisce un maggiore controllo con la mappatura XML e il supporto degli schemi. Quando sono richieste automazione, grandi set di dati o regole di mappatura personalizzate, Python è la soluzione più flessibile e robusta.
Che il tuo flusso di lavoro coinvolga semplici elenchi XML, dati aziendali profondamente nidificati o elaborazione in blocco su larga scala, i metodi in questa guida offrono modi pratici e affidabili per convertire XML in XLSX e gestire i dati in modo efficace tra i sistemi.
Vedi Anche
Convertir rápidamente datos XML anidados a Excel sin errores
Tabla de Contenidos
Convertir XML a XLSX es un requisito común en el procesamiento de datos, flujos de trabajo de informes y tareas de integración de sistemas. XML sigue siendo uno de los formatos más utilizados para datos estructurados o semiestructurados, pero el formato XLSX de Excel es mucho más conveniente para el análisis, filtrado, visualización y para compartir con usuarios no técnicos.
Aunque la idea básica de transformar archivos XML en archivos XLSX parece simple, los archivos XML del mundo real varían mucho en su estructura. Algunos se asemejan a tablas de bases de datos limpias, mientras que otros contienen nodos profundamente anidados, atributos o contenido mixto.
Esta guía proporciona una explicación detallada y práctica de cómo convertir XML a XLSX utilizando herramientas en línea, Microsoft Excel y la automatización con Python. También se analiza cómo manejar escenarios complejos como grandes conjuntos de datos, elementos anidados, campos opcionales y la conversión inversa de XLSX a XML.
Resumen de Métodos:
- Conversores de XML a XLSX en Línea
- Funciones de Importación de XML en Excel
- Convertir XML a XLSX Usando Automatización con Python
- Scripts Personalizados o API para Flujos de Trabajo Empresariales
1. Entendiendo la Conversión de XML a XLSX
XML (Lenguaje de Marcado Extensible) es un formato de texto simple que almacena datos usando etiquetas, formando una estructura en forma de árbol donde los elementos padres contienen hijos, y la información puede aparecer como elementos o atributos. XLSX, por el contrario, se basa estrictamente en filas y columnas, por lo que convertir XML a XLSX significa aplanar este árbol en una tabla manteniendo los datos significativos.
Para XML sencillos, por ejemplo, un archivo con nodos <item> repetidos, cada nodo se convierte naturalmente en una fila y sus hijos en columnas. Pero el XML del mundo real a menudo contiene:
- detalles anidados
- nodos que solo aparecen en algunos registros
- datos almacenados en atributos
- espacios de nombres utilizados en sistemas empresariales
Tales variaciones requieren decisiones sobre cómo aplanar la jerarquía. Algunas herramientas lo hacen automáticamente, mientras que otras necesitan un mapeo manual. Esta guía cubre tanto casos simples como complejos, incluyendo cómo convertir XML a XLSX sin abrir Excel, lo cual es común en flujos de trabajo automatizados.
2. Método 1: Convertir XML a XLSX en Línea
Los conversores de XML a XLSX en línea, como Convertion Tools, AConvert o DataConverter.io, son convenientes cuando se necesita una transformación rápida sin instalar software. El proceso suele ser muy simple:
-
Visite un sitio web que admita la conversión de XML a XLSX (como DataConverter.io).
-
Suba su archivo XML o pegue la cadena XML.
-
Algunos conversores le permiten editar el mapeo antes de la conversión.
-
Haga clic en Descargar para bajar el archivo .xlsx generado.
Este método funciona bien para tareas únicas y para archivos XML con estructuras sencillas donde el mapeo automático suele ser preciso.
Ventajas
- Rápido, no requiere instalación.
- Adecuado para estructuras XML simples o moderadas.
- Ideal para conversiones únicas u ocasionales.
Limitaciones
- Comprensión limitada de esquemas, espacios de nombres y jerarquías anidadas.
- El XML profundo puede aplanarse incorrectamente, producir nombres de columna genéricos o perder campos opcionales.
- Límites de tamaño de carga y posibles bloqueos del navegador con archivos grandes.
A pesar de estas limitaciones, las herramientas en línea siguen siendo una opción práctica para conversiones rápidas y a pequeña escala de XML a XLSX.
También te puede interesar: Cómo Convertir Archivos CSV a Excel.
3. Método 2: Convertir XML a XLSX en Excel
Excel proporciona soporte nativo para la importación de XML, y para muchos usuarios, este es el método más transparente y controlable. Cuando se usa correctamente, Excel puede leer estructuras XML, aplicar mapeos personalizables y guardar el resultado convertido directamente como un archivo XLSX.
3.1 Abriendo XML Directamente en Excel
Cuando abre un archivo XML a través de Archivo → Abrir, Excel intenta inferir un esquema y convertir los datos en una tabla. La secuencia correcta para este método es:
-
Vaya a Archivo → Abrir y seleccione el archivo XML.
-
Cuando se le solicite, elija “Como una tabla XML”.
-
Excel carga el XML y mapea automáticamente los nodos hijos a las columnas.
Esto funciona bien para estructuras XML "planas", donde cada elemento repetido corresponde nítidamente a una fila. Sin embargo, el XML jerárquico a menudo causa problemas: los nodos anidados pueden expandirse en columnas repetidas, o Excel puede pedirle que defina una tabla XML manually si no puede determinar un mapeo claro.
Este método de apertura directa sigue siendo útil cuando el XML se asemeja a una lista de registros de estilo de base de datos y necesita una forma rápida de inspeccionar o trabajar con los datos.
3.2 Importando XML a través de la Pestaña de Datos de Excel
Para archivos XML estructurados, especialmente aquellos basados en esquemas XSD, Excel proporciona un método de importación más fácil de usar a través de la pestaña Datos. Este enfoque le da control sobre cómo se mapean los elementos XML a la hoja de trabajo sin usar manualmente el panel Origen XML.
Pasos:
-
Abra un libro de Excel o cree uno nuevo.
-
Vaya a Datos → Obtener Datos → Desde Archivo → Desde XML.
-
Seleccione su archivo XML y haga clic en Importar.
-
Haga clic en Transformar Datos en la ventana emergente.
-
En la ventana del Editor de Power Query, seleccione los elementos o tablas que desea cargar.
-
Haga clic en Cerrar y Cargar para guardar los cambios, y los datos convertidos aparecerán en una nueva hoja de trabajo.
Este método permite a Excel interpretar automáticamente la estructura XML y mapearla en una tabla. Funciona bien para XML jerárquico porque puede seleccionar qué secciones cargar, manteniendo intactos los campos opcionales y las relaciones.
Este enfoque es especialmente útil para:
- Importar datos de formularios electrónicos del gobierno
- Trabajar con XML exportado de ERP/CRM
- Manejar estándares específicos de la industria como UBL o HL7
Al utilizar este flujo de trabajo, puede controlar de manera eficiente cómo se representan los datos XML en Excel, minimizando los pasos de mapeo manual.
3.3 Guardando los Datos XML Importados como un Archivo XLSX
Una vez que los datos XML se han importado con éxito, ya sea abriendo directamente el archivo XML o usando Datos → Obtener Datos → Desde XML, el paso final es simplemente guardar el libro en el formato nativo .xlsx de Excel. En esta etapa, los datos se comportan como cualquier otra tabla de Excel, lo que significa que puede ajustar libremente el ancho de las columnas, aplicar filtros, formatear celdas o agregar fórmulas.
Para guardar el XML convertido como un archivo XLSX:
- Vaya a Archivo → Guardar como.
- Elija Libro de Excel (*.xlsx) como el tipo de archivo.
- Especifique una ubicación y haga clic en Guardar.
A continuación se muestra una vista previa de la tabla de Excel importada desde XML:
Si el archivo XML se basa en un esquema XSD y se conserva el mapeo, Excel puede incluso exportar la hoja de trabajo modificada de nuevo a XML. Sin embargo, para estructuras XML profundamente anidadas, aún podrían ser necesarios algunos ajustes de preprocesamiento o manuales antes de la exportación.
4. Método 3: Convertir XML a XLSX Usando Python
Python es una excelente opción para convertir XML a XLSX cuando se requiere automatización, procesamiento a gran escala o la capacidad de realizar la conversión de XML a XLSX sin abrir Excel. Los scripts de Python pueden ejecutarse en servidores, programar tareas y manejar cientos o miles de archivos XML de manera consistente.
4.1 Analizando XML en Python
El análisis de XML es el primer paso en el flujo de trabajo. Las bibliotecas de Python xml.etree.ElementTree o lxml proporcionan un análisis basado en eventos o en árboles. Le permiten recorrer cada nodo, extraer atributos, manejar espacios de nombres y procesar datos profundamente anidados.
El principal desafío es definir cómo cada nodo XML se asigna a una fila de Excel. La mayoría de los flujos de trabajo utilizan:
- un mapeo predefinido (por ejemplo, un “esquema” definido en el código), o
- una lógica de aplanamiento automático que convierte recursivamente los nodos en columnas.
Ejemplo Básico de Análisis XML:
El siguiente código de Python demuestra cómo analizar un archivo XML y aplanarlo en una lista de diccionarios, que se puede usar para generar un archivo XLSX.
import xml.etree.ElementTree as ET

xml_file = "Orders.xml"

# Recursively flatten an XML element into a flat dictionary
def flatten(e, prefix=""):
    r = {}
    # Add attributes
    for k, v in e.attrib.items():
        r[prefix + k] = v
    # Add children
    for c in e:
        key = prefix + c.tag
        # Scalar node (no children, has text)
        if len(c) == 0 and c.text and c.text.strip():
            r[key] = c.text.strip()
        else:
            # Nested node → recurse
            r.update(flatten(c, key + "_"))
    return r

# Parse XML
root = ET.parse(xml_file).getroot()

# Flatten all <Order> elements
rows = [flatten(order) for order in root.iter("Order")]

# Collect headers
headers = sorted({k for row in rows for k in row})
Este fragmento de código ilustra cómo aplanar recursivamente los nodos y atributos XML en una estructura adecuada para Excel. Para XML complejo, esto asegura que no se pierdan datos y que cada nodo se asigne a la columna correcta.
4.2 Generando Archivos XLSX a partir de XML Analizado
Una vez que el XML se analiza y se aplana, el siguiente paso es escribir los datos en un archivo .xlsx de Excel. Las bibliotecas de Python como Free Spire.XLS for Python permiten la creación completa de hojas de cálculo sin necesidad de tener Excel instalado, lo cual es ideal para servidores Linux o entornos en la nube.
Instalar Free Spire.XLS for Python:
pip install spire.xls.free
Pasos para generar XLSX:
- Crear un nuevo libro de trabajo.
- Escribir encabezados y filas a partir de los datos aplanados.
- Opcionalmente, aplicar estilos para una mejor legibilidad.
- Guardar el libro como
.xlsx.
Ejemplo de Python:
Este ejemplo demuestra cómo generar un archivo XLSX a partir de los datos XML analizados.
from spire.xls import Workbook, BuiltInStyles

xlsx_output = "output/XMLToExcel1.xlsx"

wb = Workbook()
ws = wb.Worksheets.get_Item(0)

# Header row
for col, h in enumerate(headers, 1):
    ws.Range.get_Item(1, col).Value = h

# Data rows
for row_idx, row in enumerate(rows, 2):
    for col_idx, h in enumerate(headers, 1):
        ws.Range.get_Item(row_idx, col_idx).Value = row.get(h, "")

# Apply styles (optional)
ws.AllocatedRange.Rows.get_Item(0).BuiltInStyle = BuiltInStyles.Heading2
for row in range(1, ws.AllocatedRange.Rows.Count):
    if row % 2 == 0:
        ws.AllocatedRange.Rows.get_Item(row).BuiltInStyle = BuiltInStyles.Accent2_20
    else:
        ws.AllocatedRange.Rows.get_Item(row).BuiltInStyle = BuiltInStyles.Accent2_40

# Save to XLSX
wb.SaveToFile(xlsx_output)
print("Done!")
Después de ejecutar el script, cada nodo XML se aplana en filas, con columnas que representan atributos y elementos hijos. Este enfoque admite múltiples hojas de trabajo, nombres de columna personalizados e integración con transformaciones de datos adicionales.
A continuación se muestra la vista previa del archivo XLSX generado:
Para más ejemplos de cómo escribir diferentes tipos de datos en archivos de Excel usando Python, consulte nuestra guía para escribir datos en Excel con Python.
4.3 Manejo de XML Complejo
El XML empresarial a menudo contiene patrones irregulares. Usando Python, puede:
- aplanar recursivamente elementos anidados
- promover atributos a columnas normales
- omitir elementos irrelevantes
- crear múltiples hojas para secciones jerárquicas
- manejar campos faltantes u opcionales asignando valores predeterminados
El ejemplo anterior muestra un solo archivo XML; la misma lógica se puede extender para manejar estructuras complejas sin pérdida de datos.
Si está trabajando con archivos Office Open XML (OOXML), también puede cargarlos directamente y guardarlos como archivos XLSX usando Free Spire.XLS for Python. Consulte Cómo convertir OOXML a XLSX con Python.
4.4 Conversión por Lotes
La fortaleza de Python se vuelve especialmente clara al convertir grandes carpetas de archivos XML. Un script puede:
- escanear directorios,
- analizar cada archivo usando la misma lógica de aplanamiento,
- generar archivos XLSX consistentes automáticamente.
Esto elimina el trabajo manual y garantiza una conversión confiable y sin errores en todos los proyectos o conjuntos de datos.
El siguiente fragmento de código ilustra un enfoque simple para la conversión por lotes de múltiples archivos XML a XLSX.
import os

input_dir = "xml_folder"
output_dir = "xlsx_folder"

for file_name in os.listdir(input_dir):
    if file_name.endswith(".xml"):
        xml_path = os.path.join(input_dir, file_name)

        # Parse XML and generate XLSX (using previously defined logic)
        convert_xml_to_xlsx(xml_path, output_dir)
5. Método 4: Scripts Personalizados o API para Flujos de Trabajo Empresariales
Si bien los métodos anteriores son adecuados para conversiones únicas o por lotes, los entornos empresariales a menudo requieren soluciones automatizadas, estandarizadas y escalables para la conversión de XML a XLSX. Muchos formatos XML empresariales siguen estándares de la industria, involucran esquemas complejos con campos obligatorios y opcionales, y están integrados en canalizaciones de datos más amplias.
En estos casos, las empresas suelen desarrollar scripts personalizados o flujos de trabajo basados en API para manejar las conversiones de manera confiable. Por ejemplo:
- Exportaciones de ERP o CRM: las exportaciones diarias de XML que contienen facturas o pedidos se convierten automáticamente a XLSX y se introducen en los paneles de informes.
- Canalizaciones ETL: los datos XML de múltiples sistemas se validan, normalizan y convierten durante los procesos de Extracción-Transformación-Carga.
- Integración en la nube: los scripts o las API se ejecutan en plataformas en la nube (AWS Lambda, Azure Functions) para procesar archivos XML a gran escala sin intervención manual.
Los beneficios clave de este enfoque incluyen:
- Asegurar el cumplimiento del esquema mediante la validación XSD.
- Mantener reglas de mapeo consistentes en múltiples sistemas.
- Automatizar las conversiones como parte de los procesos comerciales regulares.
- Integración perfecta con servicios en la nube y plataformas de automatización de flujos de trabajo.
Este flujo de trabajo es ideal para escenarios donde la conversión de XML es una tarea recurrente, parte de un sistema de informes empresarial o requerida para el cumplimiento de los estándares de datos de la industria.
Herramientas como Spire.XLS for Python también se pueden integrar en estos flujos de trabajo para generar archivos XLSX mediante programación en servidores o funciones en la nube, lo que permite una conversión confiable y sin Excel dentro de las canalizaciones empresariales automatizadas.
6. Solución de Problemas en la Conversión de XML a XLSX
Dependiendo del método que elija (herramientas en línea, Excel o Python), pueden surgir diferentes problemas durante la conversión de XML. Comprender estos problemas comunes ayuda a garantizar que su archivo XLSX final esté completo y sea preciso.
XML Profundamente Anidado o Irregular
Las estructuras anidadas pueden ser difíciles de aplanar en una sola hoja.
- Excel puede requerir un mapeo manual o la división en múltiples hojas.
- Python permite el aplanamiento recursivo o la creación de múltiples hojas mediante programación.
Elementos Faltantes u Opcionales
No todos los nodos XML aparecen en cada registro. Asegure la consistencia de las columnas usando celdas en blanco para los campos faltantes, en lugar de omitirlos, para evitar datos desalineados.
Atributos vs. Elementos
Decida qué atributos deben convertirse en columnas y cuáles pueden permanecer internos.
- Excel puede solicitar un mapeo.
- Python puede extraer todos los atributos de forma flexible utilizando el análisis recursivo.
Errores de Codificación
Una codificación de caracteres incorrecta puede causar fallas en el análisis.
- Asegúrese de que el XML declare la codificación correctly (
UTF-8,UTF-16, etc.). - Consejo de Python:
ET.parse(xml_file, parser=ET.XMLParser(encoding='utf-8'))ayuda a manejar la codificación explícitamente.
Archivos XML Grandes
Los archivos XML muy grandes pueden exceder los límites del navegador o de Excel.
- Las herramientas en línea pueden fallar o congelarse.
- Excel puede dejar de responder.
- Python puede usar analizadores de transmisión como
iterparsepara procesar archivos grandes con un uso mínimo de memoria.
7. Preguntas Frecuentes
Aquí hay algunas preguntas frecuentes sobre la conversión de XML a XLSX:
1. ¿Cómo convertir un archivo XML a XLSX?
Puede convertir XML a XLSX usando Excel, herramientas en línea o automatización con Python, según sus necesidades.
- Para archivos rápidos y simples, las herramientas en línea son convenientes (ver Sección 2).
- Para archivos con XML estructurado o anidado, la importación de datos de Excel ofrece control (ver Sección 3).
- Para el procesamiento a gran escala o automatizado, Python proporciona una flexibilidad total (ver Sección 4).
2. ¿Cómo abro un archivo XML en Excel?
Excel puede importar XML como una tabla. El XML simple se abre directamente, mientras que el XML complejo o jerárquico puede requerir un mapeo a través del flujo de trabajo Pestaña de Datos → Obtener Datos → Desde XML (ver Sección 3.2).
3. ¿Cómo puedo convertir XML a otros formatos?
Además de XLSX, el XML se puede convertir a CSV, JSON o bases de datos utilizando scripts de Python o herramientas especializadas. Las bibliotecas de Python como xml.etree.ElementTree o lxml permiten analizar y transformar XML en varios formatos mediante programación.
4. ¿Cómo convertir XML a Excel en línea de forma gratuita?
Los conversores en línea gratuitos pueden manejar conversiones sencillas de XML a XLSX sin instalar software. Son ideales para archivos pequeños o moderados, pero pueden tener dificultades con XML profundamente anidado o grandes conjuntos de datos (ver Sección 2).
8. Conclusión
La conversión de XML a XLSX toma múltiples formas dependiendo de la estructura de sus datos y las herramientas disponibles. Los conversores en línea ofrecen comodidad para tareas rápidas, mientras que Excel proporciona un mayor control con el mapeo de XML y el soporte de esquemas. Cuando se requiere automatización, grandes conjuntos de datos o reglas de mapeo personalizadas, Python es la solución más flexible y robusta.
Ya sea que su flujo de trabajo implique listas XML simples, datos comerciales profundamente anidados o procesamiento por lotes a gran escala, los métodos de esta guía ofrecen formas prácticas y confiables de convertir XML a XLSX y administrar los datos de manera efectiva en todos los sistemas.
Ver También
Verschachtelte XML-Daten schnell und fehlerfrei in Excel konvertieren
Inhaltsverzeichnis
Die Konvertierung von XML in XLSX ist eine häufige Anforderung bei der Datenverarbeitung, in Berichtsworkflows und bei Systemintegrationsaufgaben. XML ist nach wie vor eines der am häufigsten verwendeten Formate für strukturierte oder semistrukturierte Daten, aber das XLSX-Format von Excel ist weitaus praktischer für die Analyse, Filterung, Visualisierung und den Austausch mit nicht-technischen Benutzern.
Obwohl die Grundidee der Umwandlung von XML-Dateien in XLSX-Dateien einfach klingt, variieren reale XML-Dateien stark in ihrer Struktur. Einige ähneln sauberen Datenbanktabellen, während andere tief verschachtelte Knoten, Attribute oder gemischten Inhalt enthalten.
Diese Anleitung bietet eine detaillierte, praktische Erklärung, wie man XML in XLSX konvertiert, indem man Online-Tools, Microsoft Excel und Python-Automatisierung verwendet. Sie erörtert auch, wie man komplexe Szenarien wie große Datensätze, verschachtelte Elemente, optionale Felder und die umgekehrte Konvertierung von XLSX zurück in XML handhabt.
Methodenübersicht:
- Online-XML-zu-XLSX-Konverter
- Excel-XML-Importfunktionen
- XML mit Python-Automatisierung in XLSX konvertieren
- Benutzerdefinierte Skripte oder APIs für Unternehmens-Workflows
1. Die XML-zu-XLSX-Konvertierung verstehen
XML (Extensible Markup Language) ist ein einfaches Textformat, das Daten mithilfe von Tags speichert und eine baumartige Struktur bildet, in der übergeordnete Elemente untergeordnete Elemente enthalten und Informationen entweder als Elemente oder als Attribute erscheinen können. XLSX hingegen ist streng zeilen- und spaltenbasiert, sodass die Konvertierung von XML in XLSX bedeutet, diesen Baum in eine Tabelle zu glätten und dabei die Daten aussagekräftig zu halten.
Bei einfachem XML – zum Beispiel einer Datei mit wiederholten <item>-Knoten – wird jeder Knoten natürlich zu einer Zeile und seine untergeordneten Elemente zu Spalten. Aber reale XML-Dateien enthalten oft:
- verschachtelte Details
- Knoten, die nur in einigen Datensätzen vorkommen
- in Attributen gespeicherte Daten
- in Unternehmenssystemen verwendete Namensräume
Solche Variationen erfordern Entscheidungen darüber, wie die Hierarchie abgeflacht werden soll. Einige Tools tun dies automatisch, während andere eine manuelle Zuordnung erfordern. Diese Anleitung behandelt sowohl einfache als auch komplexe Fälle, einschließlich der Konvertierung von XML in XLSX, ohne Excel zu öffnen, was in automatisierten Workflows üblich ist.
2. Methode 1: XML online in XLSX konvertieren
Online-XML-zu-XLSX-Konverter – wie Convertion Tools, AConvert oder DataConverter.io – sind praktisch, wenn Sie eine schnelle Umwandlung ohne Softwareinstallation benötigen. Der Prozess ist normalerweise sehr einfach:
-
Besuchen Sie eine Website, die die XML-zu-XLSX-Konvertierung unterstützt (z. B. DataConverter.io).
-
Laden Sie Ihre XML-Datei hoch oder fügen Sie den XML-String ein.
-
Einige Konverter ermöglichen es Ihnen, die Zuordnung vor der Konvertierung zu bearbeiten.
-
Klicken Sie auf Herunterladen, um die generierte .xlsx-Datei herunterzuladen.
Diese Methode eignet sich gut für einmalige Aufgaben und für XML-Dateien mit einfachen Strukturen, bei denen die automatische Zuordnung normalerweise korrekt ist.
Vorteile
- Schnell, keine Installation erforderlich.
- Geeignet für einfache oder moderate XML-Strukturen.
- Ideal für einmalige oder gelegentliche Konvertierungen.
Einschränkungen
- Begrenztes Verständnis von Schemas, Namensräumen und verschachtelten Hierarchien.
- Tief verschachteltes XML kann falsch abgeflacht werden, generische Spaltennamen erzeugen oder optionale Felder verlieren.
- Upload-Größenbeschränkungen und mögliche Browser-Abstürze bei großen Dateien.
Trotz dieser Einschränkungen bleiben Online-Tools eine praktische Wahl für schnelle, kleine XML-zu-XLSX-Konvertierungen.
Das könnte Ihnen auch gefallen: Wie man CSV-Dateien in Excel-Dateien konvertiert.
3. Methode 2: XML in Excel in XLSX konvertieren
Excel bietet native Unterstützung für den XML-Import, und für viele Benutzer ist dies die transparenteste und kontrollierbarste Methode. Bei richtiger Anwendung kann Excel XML-Strukturen lesen, anpassbare Zuordnungen anwenden und das konvertierte Ergebnis direkt als XLSX-Datei speichern.
3.1 XML direkt in Excel öffnen
Wenn Sie eine XML-Datei über Datei → Öffnen öffnen, versucht Excel, ein Schema abzuleiten und die Daten in eine Tabelle zu konvertieren. Die richtige Reihenfolge für diese Methode ist:
-
Gehen Sie zu Datei → Öffnen und wählen Sie die XML-Datei aus.
-
Wenn Sie dazu aufgefordert werden, wählen Sie „Als XML-Tabelle“.
-
Excel lädt die XML-Datei und ordnet untergeordnete Knoten automatisch Spalten zu.
Dies funktioniert gut für „flache“ XML-Strukturen, bei denen jedes sich wiederholende Element sauber einer Zeile entspricht. Hierarchisches XML verursacht jedoch oft Probleme: Verschachtelte Knoten können zu wiederholten Spalten erweitert werden, oder Excel fordert Sie möglicherweise auf, eine XML-Tabelle manuell zu definieren, wenn es keine klare Zuordnung ermitteln kann.
Diese direkte Öffnungsmethode bleibt nützlich, wenn die XML-Datei einer datenbankähnlichen Liste von Datensätzen ähnelt und Sie eine schnelle Möglichkeit benötigen, die Daten zu überprüfen oder damit zu arbeiten.
3.2 XML über die Registerkarte „Daten“ in Excel importieren
Für strukturierte XML-Dateien – insbesondere solche, die auf XSD-Schemas basieren – bietet Excel eine benutzerfreundlichere Importmethode über die Registerkarte „Daten“. Dieser Ansatz gibt Ihnen die Kontrolle darüber, wie XML-Elemente dem Arbeitsblatt zugeordnet werden, ohne den XML-Quellbereich manuell zu verwenden.
Schritte:
-
Öffnen Sie eine Excel-Arbeitsmappe oder erstellen Sie eine neue.
-
Gehen Sie zu Daten → Daten abrufen → Aus Datei → Aus XML.
-
Wählen Sie Ihre XML-Datei aus und klicken Sie auf Importieren.
-
Klicken Sie im Popup-Fenster auf Daten transformieren.
-
Wählen Sie im Power Query-Editor-Fenster die Elemente oder Tabellen aus, die Sie laden möchten.
-
Klicken Sie auf Schließen & Laden, um die Änderungen zu speichern, und die konvertierten Daten werden in einem neuen Arbeitsblatt angezeigt.
Diese Methode ermöglicht es Excel, die XML-Struktur automatisch zu interpretieren und in eine Tabelle zuzuordnen. Sie funktioniert gut für hierarchisches XML, da Sie auswählen können, welche Abschnitte geladen werden sollen, wobei optionale Felder und Beziehungen erhalten bleiben.
Dieser Ansatz ist besonders nützlich für:
- Importieren von Daten aus E-Formularen von Behörden
- Arbeiten mit aus ERP/CRM exportiertem XML
- Umgang mit branchenspezifischen Standards wie UBL oder HL7
Durch die Verwendung dieses Workflows können Sie effizient steuern, wie XML-Daten in Excel dargestellt werden, und gleichzeitig manuelle Zuordnungsschritte minimieren.
3.3 Speichern der importierten XML-Daten als XLSX-Datei
Sobald die XML-Daten erfolgreich importiert wurden – sei es durch direktes Öffnen der XML-Datei oder über Daten → Daten abrufen → Aus XML – besteht der letzte Schritt einfach darin, die Arbeitsmappe im nativen .xlsx-Format von Excel zu speichern. In diesem Stadium verhalten sich die Daten wie jede andere Excel-Tabelle, was bedeutet, dass Sie die Spaltenbreiten frei anpassen, Filter anwenden, Zellen formatieren oder Formeln hinzufügen können.
So speichern Sie die konvertierte XML-Datei als XLSX-Datei:
- Gehen Sie zu Datei → Speichern unter.
- Wählen Sie Excel-Arbeitsmappe (*.xlsx) als Dateityp.
- Geben Sie einen Speicherort an und klicken Sie auf Speichern.
Unten sehen Sie eine Vorschau der aus XML importierten Excel-Tabelle:
Wenn die XML-Datei auf einem XSD-Schema basiert und die Zuordnung beibehalten wird, kann Excel das geänderte Arbeitsblatt sogar wieder nach XML exportieren. Bei tief verschachtelten XML-Strukturen können jedoch vor dem Export noch einige Vorverarbeitungen oder manuelle Anpassungen erforderlich sein.
4. Methode 3: XML mit Python in XLSX konvertieren
Python ist eine ausgezeichnete Wahl für die Konvertierung von XML in XLSX, wenn Sie Automatisierung, groß angelegte Verarbeitung oder die Möglichkeit benötigen, die XML-zu-XLSX-Konvertierung ohne Excel zu öffnen durchzuführen. Python-Skripte können auf Servern ausgeführt werden, Aufgaben planen und Hunderte oder Tausende von XML-Dateien konsistent verarbeiten.
4.1 Parsen von XML in Python
Das Parsen von XML ist der erste Schritt im Workflow. Die Python-Bibliotheken xml.etree.ElementTree oder lxml bieten ereignisbasiertes oder baumbasiertes Parsen. Sie ermöglichen es Ihnen, jeden Knoten zu durchlaufen, Attribute zu extrahieren, Namensräume zu behandeln und tief verschachtelte Daten zu verarbeiten.
Die größte Herausforderung besteht darin, zu definieren, wie jeder XML-Knoten einer Excel-Zeile zugeordnet wird. Die meisten Workflows verwenden entweder:
- eine vordefinierte Zuordnung (z. B. ein im Code definiertes „Schema“) oder
- eine Logik zum automatischen Abflachen, die Knoten rekursiv in Spalten umwandelt.
Beispiel für das Parsen von Kern-XML:
Der folgende Python-Code zeigt, wie eine XML-Datei geparst und in eine Liste von Wörterbüchern abgeflacht wird, die zur Generierung einer XLSX-Datei verwendet werden kann.
import xml.etree.ElementTree as ET

xml_file = "Orders.xml"

# Recursively flatten an XML element into a flat dictionary
def flatten(e, prefix=""):
    r = {}
    # Add attributes
    for k, v in e.attrib.items():
        r[prefix + k] = v
    # Add children
    for c in e:
        key = prefix + c.tag
        # Scalar node (no children, has text)
        if len(c) == 0 and c.text and c.text.strip():
            r[key] = c.text.strip()
        else:
            # Nested node → recurse
            r.update(flatten(c, key + "_"))
    return r

# Parse XML
root = ET.parse(xml_file).getroot()

# Flatten all <Order> elements
rows = [flatten(order) for order in root.iter("Order")]

# Collect headers
headers = sorted({k for row in rows for k in row})
Dieser Ausschnitt veranschaulicht, wie XML-Knoten und -Attribute rekursiv in eine für Excel geeignete Struktur abgeflacht werden. Bei komplexem XML wird so sichergestellt, dass keine Daten verloren gehen und jeder Knoten der richtigen Spalte zugeordnet wird.
4.2 Generieren von XLSX-Dateien aus geparstem XML
Sobald die XML-Datei geparst und abgeflacht ist, besteht der nächste Schritt darin, die Daten in eine Excel-.xlsx-Datei zu schreiben. Python-Bibliotheken wie Free Spire.XLS for Python ermöglichen die vollständige Erstellung von Tabellenkalkulationen, ohne dass Excel installiert sein muss, was ideal für Linux-Server oder Cloud-Umgebungen ist.
Installieren Sie Free Spire.XLS for Python:
pip install spire.xls.free
Schritte zum Generieren von XLSX:
- Erstellen Sie eine neue Arbeitsmappe.
- Schreiben Sie Kopfzeilen und Zeilen aus den abgeflachten Daten.
- Wenden Sie optional Stile für eine bessere Lesbarkeit an.
- Speichern Sie die Arbeitsmappe als
.xlsx.
Python-Beispiel:
Dieses Beispiel zeigt, wie eine XLSX-Datei aus den geparsten XML-Daten generiert wird.
from spire.xls import Workbook, BuiltInStyles

xlsx_output = "output/XMLToExcel1.xlsx"

wb = Workbook()
ws = wb.Worksheets.get_Item(0)

# Header row
for col, h in enumerate(headers, 1):
    ws.Range.get_Item(1, col).Value = h

# Data rows
for row_idx, row in enumerate(rows, 2):
    for col_idx, h in enumerate(headers, 1):
        ws.Range.get_Item(row_idx, col_idx).Value = row.get(h, "")

# Apply styles (optional)
ws.AllocatedRange.Rows.get_Item(0).BuiltInStyle = BuiltInStyles.Heading2
for row in range(1, ws.AllocatedRange.Rows.Count):
    if row % 2 == 0:
        ws.AllocatedRange.Rows.get_Item(row).BuiltInStyle = BuiltInStyles.Accent2_20
    else:
        ws.AllocatedRange.Rows.get_Item(row).BuiltInStyle = BuiltInStyles.Accent2_40

# Save to XLSX
wb.SaveToFile(xlsx_output)
print("Done!")
Nach dem Ausführen des Skripts wird jeder XML-Knoten in Zeilen abgeflacht, wobei die Spalten Attribute und untergeordnete Elemente darstellen. Dieser Ansatz unterstützt mehrere Arbeitsblätter, benutzerdefinierte Spaltennamen und die Integration mit weiteren Datentransformationen.
Unten sehen Sie die Vorschau der generierten XLSX-Datei:
Weitere Beispiele zum Schreiben verschiedener Datentypen in Excel-Dateien mit Python finden Sie in unserer Anleitung zum Schreiben von Daten in Excel mit Python.
4.3 Umgang mit komplexem XML
Geschäfts-XML enthält oft unregelmäßige Muster. Mit Python können Sie:
- verschachtelte Elemente rekursiv abflachen
- Attribute zu normalen Spalten hochstufen
- irrelevante Elemente überspringen
- mehrere Blätter für hierarchische Abschnitte erstellen
- fehlende oder optionale Felder durch Zuweisung von Standardwerten behandeln
Das obige Beispiel zeigt eine einzelne XML-Datei; die gleiche Logik kann erweitert werden, um komplexe Strukturen ohne Datenverlust zu behandeln.
Wenn Sie mit Office Open XML (OOXML)-Dateien arbeiten, können Sie diese auch direkt laden und als XLSX-Dateien mit Free Spire.XLS for Python speichern. Sehen Sie sich an, wie man OOXML mit Python in XLSX konvertiert.
4.4 Stapelkonvertierung
Die Stärke von Python wird besonders deutlich bei der Konvertierung großer Ordner mit XML-Dateien. Ein Skript kann:
- Verzeichnisse durchsuchen,
- jede Datei mit der gleichen Abflachungslogik parsen,
- automatisch konsistente XLSX-Dateien generieren.
Dies eliminiert manuelle Arbeit und gewährleistet eine zuverlässige, fehlerfreie Konvertierung über Projekte oder Datensätze hinweg.
Der folgende Ausschnitt veranschaulicht einen einfachen Ansatz zur Stapelkonvertierung mehrerer XML-Dateien in XLSX.
import os

input_dir = "xml_folder"
output_dir = "xlsx_folder"

for file_name in os.listdir(input_dir):
    if file_name.endswith(".xml"):
        xml_path = os.path.join(input_dir, file_name)

        # Parse XML and generate XLSX (using previously defined logic)
        convert_xml_to_xlsx(xml_path, output_dir)
5. Methode 4: Benutzerdefinierte Skripte oder APIs für Unternehmens-Workflows
Während die vorherigen Methoden für einmalige oder Stapelkonvertierungen geeignet sind, erfordern Unternehmensumgebungen oft automatisierte, standardisierte und skalierbare Lösungen für die XML-zu-XLSX-Konvertierung. Viele Geschäfts-XML-Formate folgen Industriestandards, beinhalten komplexe Schemas mit obligatorischen und optionalen Feldern und sind in breitere Datenpipelines integriert.
In diesen Fällen entwickeln Unternehmen typischerweise benutzerdefinierte Skripte oder API-basierte Workflows, um Konvertierungen zuverlässig zu handhaben. Zum Beispiel:
- ERP- oder CRM-Exporte: Tägliche XML-Exporte, die Rechnungen oder Bestellungen enthalten, werden automatisch in XLSX konvertiert und in Reporting-Dashboards eingespeist.
- ETL-Pipelines: XML-Daten aus mehreren Systemen werden während der Extract-Transform-Load-Prozesse validiert, normalisiert und konvertiert.
- Cloud-Integration: Skripte oder APIs laufen auf Cloud-Plattformen (AWS Lambda, Azure Functions), um große XML-Dateien ohne manuellen Eingriff zu verarbeiten.
Die Hauptvorteile dieses Ansatzes sind:
- Sicherstellung der Schema-Konformität durch XSD-Validierung.
- Aufrechterhaltung konsistenter Zuordnungsregeln über mehrere Systeme hinweg.
- Automatisierung von Konvertierungen als Teil regulärer Geschäftsprozesse.
- Nahtlose Integration mit Cloud-Diensten und Workflow-Automatisierungsplattformen.
Dieser Workflow ist ideal für Szenarien, in denen die XML-Konvertierung eine wiederkehrende Aufgabe ist, Teil eines Unternehmensberichtssystems ist oder zur Einhaltung von Branchendatenstandards erforderlich ist.
Tools wie Spire.XLS for Python können auch in diese Workflows integriert werden, um XLSX-Dateien programmatisch auf Servern oder in Cloud-Funktionen zu generieren, was eine zuverlässige, Excel-freie Konvertierung innerhalb automatisierter Unternehmenspipelines ermöglicht.
6. Fehlerbehebung bei der XML-zu-XLSX-Konvertierung
Abhängig von der gewählten Methode – Online-Tools, Excel oder Python – können während der XML-Konvertierung unterschiedliche Probleme auftreten. Das Verständnis dieser häufigen Probleme hilft sicherzustellen, dass Ihre endgültige XLSX-Datei vollständig und korrekt ist.
Tief verschachteltes oder unregelmäßiges XML
Verschachtelte Strukturen können schwierig in ein einziges Blatt abzuflachen sein.
- Excel erfordert möglicherweise eine manuelle Zuordnung oder Aufteilung in mehrere Blätter.
- Python ermöglicht rekursives Abflachen oder das programmgesteuerte Erstellen mehrerer Blätter.
Fehlende oder optionale Elemente
Nicht alle XML-Knoten erscheinen in jedem Datensatz. Stellen Sie die Spaltenkonsistenz sicher, indem Sie leere Zellen für fehlende Felder verwenden, anstatt sie zu überspringen, um falsch ausgerichtete Daten zu vermeiden.
Attribute vs. Elemente
Entscheiden Sie, welche Attribute zu Spalten werden sollen und welche intern bleiben können.
- Excel fordert möglicherweise zur Zuordnung auf.
- Python kann alle Attribute flexibel mithilfe von rekursivem Parsen extrahieren.
Kodierungsfehler
Falsche Zeichenkodierung kann zu Parsing-Fehlern führen.
- Stellen Sie sicher, dass die XML-Datei die Kodierung korrekt deklariert (
UTF-8,UTF-16, etc.). - Python-Tipp:
ET.parse(xml_file, parser=ET.XMLParser(encoding='utf-8'))hilft, die Kodierung explizit zu behandeln.
Große XML-Dateien
Sehr große XML-Dateien können die Grenzen von Browsern oder Excel überschreiten.
- Online-Tools können fehlschlagen oder einfrieren.
- Excel reagiert möglicherweise nicht mehr.
- Python kann Streaming-Parser wie
iterparseverwenden, um große Dateien mit minimalem Speicherverbrauch zu verarbeiten.
7. Häufig gestellte Fragen
Hier sind einige häufig gestellte Fragen zur XML-zu-XLSX-Konvertierung:
1. Wie konvertiert man eine XML-Datei in XLSX?
Sie können XML je nach Bedarf mit Excel, Online-Tools oder Python-Automatisierung in XLSX konvertieren.
- Für schnelle, einfache Dateien sind Online-Tools praktisch (siehe Abschnitt 2).
- Für Dateien mit strukturiertem oder verschachteltem XML bietet der Datenimport von Excel Kontrolle (siehe Abschnitt 3).
- Für groß angelegte oder automatisierte Verarbeitung bietet Python volle Flexibilität (siehe Abschnitt 4).
2. Wie öffne ich eine XML-Datei in Excel?
Excel kann XML als Tabelle importieren. Einfaches XML wird direkt geöffnet, während komplexes oder hierarchisches XML möglicherweise eine Zuordnung über den Workflow Registerkarte „Daten“ → „Daten abrufen“ → „Aus XML“ erfordert (siehe Abschnitt 3.2).
3. Wie kann ich XML in andere Formate konvertieren?
Neben XLSX kann XML mit Python-Skripten oder speziellen Tools in CSV, JSON oder Datenbanken konvertiert werden. Python-Bibliotheken wie xml.etree.ElementTree oder lxml ermöglichen das Parsen und Umwandeln von XML in verschiedene Formate programmgesteuert.
4. Wie konvertiert man XML kostenlos online in Excel?
Kostenlose Online-Konverter können unkomplizierte XML-zu-XLSX-Konvertierungen ohne Softwareinstallation durchführen. Sie sind ideal für kleine oder moderate Dateien, können aber bei tief verschachteltem XML oder großen Datensätzen Schwierigkeiten haben (siehe Abschnitt 2).
8. Fazit
Die XML-zu-XLSX-Konvertierung kann je nach Struktur Ihrer Daten und den verfügbaren Tools verschiedene Formen annehmen. Online-Konverter bieten Komfort für schnelle Aufgaben, während Excel eine größere Kontrolle mit XML-Zuordnung und Schema-Unterstützung bietet. Wenn Automatisierung, große Datensätze oder benutzerdefinierte Zuordnungsregeln erforderlich sind, ist Python die flexibelste und robusteste Lösung.
Unabhängig davon, ob Ihr Workflow einfache XML-Listen, tief verschachtelte Geschäftsdaten oder eine groß angelegte Stapelverarbeitung umfasst, bieten die Methoden in dieser Anleitung praktische und zuverlässige Möglichkeiten, XML in XLSX zu konvertieren und die Daten systemübergreifend effektiv zu verwalten.
Siehe auch
Convertir rapidement des données XML imbriquées en Excel sans erreurs
Table des matières
La conversion de XML en XLSX est une exigence courante dans le traitement des données, les flux de travail de reporting et les tâches d'intégration de systèmes. Le XML reste l'un des formats les plus utilisés pour les données structurées ou semi-structurées, mais le format XLSX d'Excel est beaucoup plus pratique pour l'analyse, le filtrage, la visualisation et le partage avec des utilisateurs non techniques.
Bien que l'idée de base de transformer des fichiers XML en fichiers XLSX semble simple, les fichiers XML du monde réel varient considérablement dans leur structure. Certains ressemblent à des tables de base de données propres, tandis que d'autres contiennent des nœuds profondément imbriqués, des attributs ou du contenu mixte.
Ce guide fournit une explication détaillée et pratique sur la façon de convertir XML en XLSX en utilisant des outils en ligne, Microsoft Excel et l'automatisation avec Python. Il aborde également la manière de gérer des scénarios complexes tels que les grands ensembles de données, les éléments imbriqués, les champs optionnels et la conversion inverse de XLSX vers XML.
Aperçu des méthodes :
- Convertisseurs XML en XLSX en ligne
- Fonctionnalités d'importation XML d'Excel
- Convertir XML en XLSX avec l'automatisation Python
- Scripts personnalisés ou API pour les flux de travail d'entreprise
1. Comprendre la conversion de XML en XLSX
XML (Extensible Markup Language) est un format de texte simple qui stocke des données à l'aide de balises, formant une structure arborescente où les éléments parents contiennent des enfants, et les informations peuvent apparaître sous forme d'éléments ou d'attributs. XLSX, en revanche, est strictement basé sur des lignes et des colonnes, donc convertir du XML en XLSX signifie aplatir cette arborescence en une table tout en conservant la signification des données.
Pour un XML simple — par exemple, un fichier avec des nœuds <item> répétés — chaque nœud devient naturellement une ligne et ses enfants deviennent des colonnes. Mais le XML du monde réel contient souvent :
- des détails imbriqués
- des nœuds qui n'apparaissent que dans certains enregistrements
- des données stockées dans des attributs
- des espaces de noms utilisés dans les systèmes d'entreprise
De telles variations nécessitent de prendre des décisions sur la manière d'aplatir la hiérarchie. Certains outils le font automatiquement, tandis que d'autres nécessitent un mappage manuel. Ce guide couvre à la fois les cas simples et complexes, y compris comment convertir du XML en XLSX sans ouvrir Excel, ce qui est courant dans les flux de travail automatisés.
2. Méthode 1 : Convertir XML en XLSX en ligne
Les convertisseurs XML vers XLSX en ligne — tels que Convertion Tools, AConvert ou DataConverter.io — sont pratiques lorsque vous avez besoin d'une transformation rapide sans installer de logiciel. Le processus est généralement très simple :
-
Visitez un site web qui prend en charge la conversion XML vers XLSX (comme DataConverter.io).
-
Téléchargez votre fichier XML ou collez la chaîne XML.
-
Certains convertisseurs vous permettent de modifier le mappage avant la conversion.
-
Cliquez sur Télécharger pour télécharger le fichier .xlsx généré.
Cette méthode fonctionne bien pour les tâches ponctuelles et pour les fichiers XML avec des structures simples où le mappage automatique est généralement précis.
Avantages
- Rapide, aucune installation requise.
- Convient aux structures XML simples ou modérées.
- Idéal pour les conversions ponctuelles ou occasionnelles.
Limites
- Compréhension limitée des schémas, des espaces de noms et des hiérarchies imbriquées.
- Le XML profond peut être aplati incorrectement, produire des noms de colonnes génériques ou perdre des champs optionnels.
- Limites de taille de téléversement et gels possibles du navigateur avec des fichiers volumineux.
Malgré ces contraintes, les outils en ligne restent un choix pratique pour les conversions XML vers XLSX rapides et à petite échelle.
Vous aimerez peut-être aussi : Comment convertir des fichiers CSV en fichiers Excel.
3. Méthode 2 : Convertir XML en XLSX dans Excel
Excel offre un support natif pour l'importation XML, et pour de nombreux utilisateurs, c'est la méthode la plus transparente et la plus contrôlable. Lorsqu'il est utilisé correctement, Excel peut lire les structures XML, appliquer des mappages personnalisables et enregistrer le résultat converti directement en tant que fichier XLSX.
3.1 Ouvrir un XML directement dans Excel
Lorsque vous ouvrez un fichier XML via Fichier → Ouvrir, Excel tente d'inférer un schéma et de convertir les données en une table. La séquence correcte pour cette méthode est :
-
Allez dans Fichier → Ouvrir et sélectionnez le fichier XML.
-
Lorsque vous y êtes invité, choisissez « En tant que table XML ».
-
Excel charge le XML et mappe automatiquement les nœuds enfants aux colonnes.
Cela fonctionne bien pour les structures XML « plates », où chaque élément répétitif correspond parfaitement à une ligne. Cependant, le XML hiérarchique pose souvent des problèmes : les nœuds imbriqués peuvent être développés en colonnes répétées, ou Excel peut vous inviter à définir manuellement une table XML s'il ne peut pas déterminer un mappage clair.
Cette méthode d'ouverture directe reste utile lorsque le XML ressemble à une liste d'enregistrements de style base de données et que vous avez besoin d'un moyen rapide d'inspecter ou de travailler avec les données.
3.2 Importer un XML via l'onglet Données d'Excel
Pour les fichiers XML structurés — en particulier ceux basés sur des schémas XSD — Excel propose une méthode d'importation plus conviviale via l'onglet Données. Cette approche vous donne le contrôle sur la manière dont les éléments XML sont mappés à la feuille de calcul sans utiliser manuellement le volet Source XML.
Étapes :
-
Ouvrez un classeur Excel ou créez-en un nouveau.
-
Allez dans Données → Obtenir des données → À partir d'un fichier → À partir de XML.
-
Sélectionnez votre fichier XML et cliquez sur Importer.
-
Cliquez sur Transformer les données dans la fenêtre contextuelle.
-
Dans la fenêtre de l'Éditeur Power Query, sélectionnez les éléments ou les tables que vous souhaitez charger.
-
Cliquez sur Fermer & Charger pour enregistrer les modifications, et les données converties apparaîtront dans une nouvelle feuille de calcul.
Cette méthode permet à Excel d'interpréter automatiquement la structure XML et de la mapper dans une table. Elle fonctionne bien pour le XML hiérarchique car vous pouvez sélectionner les sections à charger, en conservant intacts les champs optionnels et les relations.
Cette approche est particulièrement utile pour :
- Importer des données de formulaires électroniques gouvernementaux
- Travailler avec des XML exportés d'ERP/CRM
- Gérer des normes spécifiques à l'industrie telles que UBL ou HL7
En utilisant ce flux de travail, vous pouvez contrôler efficacement la manière dont les données XML sont représentées dans Excel tout en minimisant les étapes de mappage manuel.
3.3 Enregistrer les données XML importées en tant que fichier XLSX
Une fois les données XML importées avec succès — que ce soit en ouvrant directement le fichier XML ou en utilisant Données → Obtenir des données → À partir de XML — l'étape finale consiste simplement à enregistrer le classeur au format natif d'Excel .xlsx. À ce stade, les données se comportent comme n'importe quelle autre table Excel, ce qui signifie que vous pouvez librement ajuster la largeur des colonnes, appliquer des filtres, formater des cellules ou ajouter des formules.
Pour enregistrer le XML converti en tant que fichier XLSX :
- Allez dans Fichier → Enregistrer sous.
- Choisissez Classeur Excel (*.xlsx) comme type de fichier.
- Spécifiez un emplacement et cliquez sur Enregistrer.
Voici un aperçu de la table Excel importée à partir du XML :
Si le fichier XML est basé sur un schéma XSD et que le mappage est préservé, Excel peut même exporter la feuille de calcul modifiée vers XML. Cependant, pour les structures XML profondément imbriquées, un certain prétraitement ou des ajustements manuels peuvent encore être nécessaires avant l'exportation.
4. Méthode 3 : Convertir XML en XLSX avec Python
Python est un excellent choix pour convertir du XML en XLSX lorsque vous avez besoin d'automatisation, de traitement à grande échelle ou de la capacité d'effectuer une conversion XML vers XLSX sans ouvrir Excel. Les scripts Python peuvent s'exécuter sur des serveurs, planifier des tâches et gérer des centaines ou des milliers de fichiers XML de manière cohérente.
4.1 Analyse (Parsing) du XML en Python
L'analyse (parsing) du XML est la première étape du flux de travail. Les bibliothèques Python xml.etree.ElementTree ou lxml fournissent une analyse basée sur les événements ou sur une arborescence. Elles vous permettent de parcourir chaque nœud, d'extraire des attributs, de gérer les espaces de noms et de traiter des données profondément imbriquées.
Le principal défi consiste à définir comment chaque nœud XML correspond à une ligne Excel. La plupart des flux de travail utilisent soit :
- un mappage prédéfini (par exemple, un « schéma » défini dans le code), ou
- une logique d'aplatissement automatique qui convertit récursivement les nœuds en colonnes.
Exemple d'analyse XML de base :
Le code Python suivant montre comment analyser un fichier XML et l'aplatir en une liste de dictionnaires, qui peut être utilisée pour générer un fichier XLSX.
import xml.etree.ElementTree as ET

xml_file = "Orders.xml"

# Recursively flatten an XML element into a flat dictionary
def flatten(e, prefix=""):
    r = {}
    # Add attributes
    for k, v in e.attrib.items():
        r[prefix + k] = v
    # Add children
    for c in e:
        key = prefix + c.tag
        # Scalar node (no children, has text)
        if len(c) == 0 and c.text and c.text.strip():
            r[key] = c.text.strip()
        else:
            # Nested node → recurse
            r.update(flatten(c, key + "_"))
    return r

# Parse XML
root = ET.parse(xml_file).getroot()

# Flatten all <Order> elements
rows = [flatten(order) for order in root.iter("Order")]

# Collect headers
headers = sorted({k for row in rows for k in row})
Cet extrait illustre comment aplatir récursivement les nœuds et attributs XML en une structure adaptée à Excel. Pour un XML complexe, cela garantit qu'aucune donnée n'est perdue et que chaque nœud correspond à la bonne colonne.
4.2 Générer des fichiers XLSX à partir du XML analysé
Une fois le XML analysé et aplati, l'étape suivante consiste à écrire les données dans un fichier Excel .xlsx. Des bibliothèques Python telles que Free Spire.XLS for Python permettent la création complète de feuilles de calcul sans avoir besoin d'installer Excel, ce qui est idéal pour les serveurs Linux ou les environnements cloud.
Installer Free Spire.XLS for Python :
pip install spire.xls.free
Étapes pour générer un XLSX :
- Créer un nouveau classeur.
- Écrire les en-têtes et les lignes à partir des données aplaties.
- Optionnellement, appliquer des styles pour une meilleure lisibilité.
- Enregistrer le classeur en tant que
.xlsx.
Exemple Python :
Cet exemple montre comment générer un fichier XLSX à partir des données XML analysées.
from spire.xls import Workbook, BuiltInStyles

xlsx_output = "output/XMLToExcel1.xlsx"

wb = Workbook()
ws = wb.Worksheets.get_Item(0)

# Header row
for col, h in enumerate(headers, 1):
    ws.Range.get_Item(1, col).Value = h

# Data rows
for row_idx, row in enumerate(rows, 2):
    for col_idx, h in enumerate(headers, 1):
        ws.Range.get_Item(row_idx, col_idx).Value = row.get(h, "")

# Apply styles (optional)
ws.AllocatedRange.Rows.get_Item(0).BuiltInStyle = BuiltInStyles.Heading2
for row in range(1, ws.AllocatedRange.Rows.Count):
    if row % 2 == 0:
        ws.AllocatedRange.Rows.get_Item(row).BuiltInStyle = BuiltInStyles.Accent2_20
    else:
        ws.AllocatedRange.Rows.get_Item(row).BuiltInStyle = BuiltInStyles.Accent2_40

# Save to XLSX
wb.SaveToFile(xlsx_output)
print("Done!")
Après l'exécution du script, chaque nœud XML est aplati en lignes, avec des colonnes représentant les attributs et les éléments enfants. Cette approche prend en charge plusieurs feuilles de calcul, des noms de colonnes personnalisés et l'intégration avec d'autres transformations de données.
Voici un aperçu du fichier XLSX généré :
Pour plus d'exemples sur l'écriture de différents types de données dans des fichiers Excel avec Python, consultez notre guide sur l'écriture de données dans Excel avec Python.
4.3 Gérer le XML complexe
Le XML commercial contient souvent des motifs irréguliers. En utilisant Python, vous pouvez :
- aplatir récursivement les éléments imbriqués
- promouvoir les attributs en colonnes normales
- ignorer les éléments non pertinents
- créer plusieurs feuilles pour les sections hiérarchiques
- gérer les champs manquants ou optionnels en attribuant des valeurs par défaut
L'exemple ci-dessus montre un seul fichier XML ; la même logique peut être étendue pour gérer des structures complexes sans perte de données.
Si vous travaillez avec des fichiers Office Open XML (OOXML), vous pouvez également les charger directement et les enregistrer en tant que fichiers XLSX en utilisant Free Spire.XLS for Python. Consultez Comment convertir OOXML en XLSX avec Python.
4.4 Conversion par lots
La force de Python devient particulièrement évidente lors de la conversion de grands dossiers de fichiers XML. Un script peut :
- scanner les répertoires,
- analyser chaque fichier en utilisant la même logique d'aplatissement,
- générer automatiquement des fichiers XLSX cohérents.
Cela élimine le travail manuel et garantit une conversion fiable et sans erreur sur l'ensemble des projets ou des ensembles de données.
L'extrait suivant illustre une approche simple pour la conversion par lots de plusieurs fichiers XML en XLSX.
import os

input_dir = "xml_folder"
output_dir = "xlsx_folder"

for file_name in os.listdir(input_dir):
    if file_name.endswith(".xml"):
        xml_path = os.path.join(input_dir, file_name)

        # Parse XML and generate XLSX (using previously defined logic)
        convert_xml_to_xlsx(xml_path, output_dir)
5. Méthode 4 : Scripts personnalisés ou API pour les flux de travail d'entreprise
Alors que les méthodes précédentes conviennent aux conversions ponctuelles ou par lots, les environnements d'entreprise nécessitent souvent des solutions automatisées, standardisées et évolutives pour la conversion de XML en XLSX. De nombreux formats XML commerciaux suivent des normes industrielles, impliquent des schémas complexes avec des champs obligatoires et optionnels, et sont intégrés dans des pipelines de données plus larges.
Dans ces cas, les entreprises développent généralement des scripts personnalisés ou des flux de travail basés sur des API pour gérer les conversions de manière fiable. Par exemple :
- Exportations ERP ou CRM : Les exportations XML quotidiennes contenant des factures ou des commandes sont automatiquement converties en XLSX et intégrées dans des tableaux de bord de reporting.
- Pipelines ETL : Les données XML de plusieurs systèmes sont validées, normalisées et converties pendant les processus d'extraction, de transformation et de chargement (ETL).
- Intégration cloud : Des scripts ou des API s'exécutent sur des plateformes cloud (AWS Lambda, Azure Functions) pour traiter des fichiers XML à grande échelle sans intervention manuelle.
Les principaux avantages de cette approche incluent :
- Assurer la conformité au schéma par la validation XSD.
- Maintenir des règles de mappage cohérentes sur plusieurs systèmes.
- Automatiser les conversions dans le cadre des processus métier réguliers.
- S'intégrer de manière transparente avec les services cloud et les plateformes d'automatisation des flux de travail.
Ce flux de travail est idéal pour les scénarios où la conversion XML est une tâche récurrente, fait partie d'un système de reporting d'entreprise ou est requise pour la conformité avec les normes de données de l'industrie.
Des outils comme Spire.XLS for Python peuvent également être intégrés dans ces flux de travail pour générer des fichiers XLSX par programmation sur des serveurs ou des fonctions cloud, permettant une conversion fiable et sans Excel au sein des pipelines d'entreprise automatisés.
6. Dépannage de la conversion XML en XLSX
Selon la méthode que vous choisissez — outils en ligne, Excel ou Python — différents problèmes peuvent survenir lors de la conversion XML. Comprendre ces problèmes courants aide à garantir que votre fichier XLSX final est complet et précis.
XML profondément imbriqué ou irrégulier
Les structures imbriquées peuvent être difficiles à aplatir en une seule feuille.
- Excel peut nécessiter un mappage manuel ou une division en plusieurs feuilles.
- Python permet l'aplatissement récursif ou la création de plusieurs feuilles par programmation.
Éléments manquants ou optionnels
Tous les nœuds XML n'apparaissent pas dans chaque enregistrement. Assurez la cohérence des colonnes en utilisant des cellules vides pour les champs manquants, plutôt que de les sauter, pour éviter les données mal alignées.
Attributs vs Éléments
Décidez quels attributs doivent devenir des colonnes et lesquels peuvent rester internes.
- Excel peut demander un mappage.
- Python peut extraire tous les attributs de manière flexible en utilisant une analyse récursive.
Erreurs d'encodage
Un encodage de caractères incorrect peut provoquer des échecs d'analyse.
- Assurez-vous que le XML déclare correctement l'encodage (
UTF-8,UTF-16, etc.). - Astuce Python :
ET.parse(xml_file, parser=ET.XMLParser(encoding='utf-8'))aide à gérer explicitement l'encodage.
Fichiers XML volumineux
Les fichiers XML très volumineux peuvent dépasser les limites du navigateur ou d'Excel.
- Les outils en ligne peuvent échouer ou se bloquer.
- Excel peut ne plus répondre.
- Python peut utiliser des analyseurs en flux comme
iterparsepour traiter de gros fichiers avec une utilisation minimale de la mémoire.
7. Questions fréquemment posées
Voici quelques questions fréquemment posées sur la conversion de XML en XLSX :
1. Comment convertir un fichier XML en XLSX ?
Vous pouvez convertir du XML en XLSX en utilisant Excel, des outils en ligne ou l'automatisation avec Python, selon vos besoins.
- Pour les fichiers simples et rapides, les outils en ligne sont pratiques (voir la section 2).
- Pour les fichiers avec du XML structuré ou imbriqué, l'importation de données d'Excel offre un contrôle (voir la section 3).
- Pour le traitement à grande échelle ou automatisé, Python offre une flexibilité totale (voir la section 4).
2. Comment ouvrir un fichier XML dans Excel ?
Excel peut importer du XML en tant que table. Le XML simple s'ouvre directement, tandis que le XML complexe ou hiérarchique peut nécessiter un mappage via le flux de travail Données → Obtenir des données → À partir de XML (voir la section 3.2).
3. Comment puis-je convertir du XML en d'autres formats ?
Outre XLSX, le XML peut être converti en CSV, JSON ou bases de données à l'aide de scripts Python ou d'outils spécialisés. Des bibliothèques Python telles que xml.etree.ElementTree ou lxml permettent d'analyser et de transformer le XML en divers formats par programmation.
4. Comment convertir du XML en Excel en ligne gratuitement ?
Les convertisseurs en ligne gratuits peuvent gérer des conversions XML vers XLSX simples sans installer de logiciel. Ils sont idéaux pour les fichiers de petite ou moyenne taille mais peuvent avoir des difficultés avec le XML profondément imbriqué ou les grands ensembles de données (voir la section 2).
8. Conclusion
La conversion de XML en XLSX prend plusieurs formes en fonction de la structure de vos données et des outils disponibles. Les convertisseurs en ligne offrent une commodité pour les tâches rapides, tandis qu'Excel offre un plus grand contrôle avec le mappage XML et le support des schémas. Lorsque l'automatisation, les grands ensembles de données ou les règles de mappage personnalisées sont nécessaires, Python est la solution la plus flexible et la plus robuste.
Que votre flux de travail implique de simples listes XML, des données commerciales profondément imbriquées ou un traitement par lots à grande échelle, les méthodes de ce guide offrent des moyens pratiques et fiables de convertir du XML en XLSX et de gérer efficacement les données sur plusieurs systèmes.