JSON a PDF en Python: aplanar y exportar como tablas
Tabla de Contenidos
- Por Qué Convertir JSON a PDF No Siempre es Sencillo
- Paso 1 — Cargar Datos JSON
- Paso 2 — Detectar Automáticamente el Conjunto de Datos a Exportar
- Paso 3 — Aplanar y Normalizar JSON
- Paso 4 — Exportar a PDF a través de Excel
- Paso 5 — Ejemplo: Exportar Productos desde un Archivo JSON Complejo
- Ejemplo Completo de Python: JSON a PDF
- Conclusión
- Preguntas Frecuentes

En las aplicaciones modernas, JSON es uno de los formatos de datos más comunes para API, archivos de configuración e intercambio de datos. Sin embargo, aunque JSON es ideal para las máquinas, no siempre es legible por humanos. Exportar JSON a una tabla PDF puede ayudar a presentar información estructurada de forma clara en informes, paneles o documentación interna.
En este tutorial, aprenderá a convertir JSON a una tabla PDF bien formateada usando Python y Spire.XLS, incluyendo:
- Detección automática de conjuntos de datos para exportación a tablas
- Aplanamiento de campos JSON anidados
- Generación de PDF con aspecto profesional
También cubriremos la extracción manual de conjuntos de datos para estructuras profundamente anidadas, dándole control total sobre archivos JSON complejos.
Por Qué Convertir JSON a PDF No Siempre es Sencillo
JSON viene en todas las formas y tamaños:
- Arreglos planos: fáciles de convertir directamente en filas
- Objetos anidados: p. ej., un diccionario de especificaciones dentro de cada producto
- Arreglos dentro de arreglos: p. ej., una lista de productos dentro de un departamento
- Claves inconsistentes: algunos objetos tienen campos adicionales o faltantes
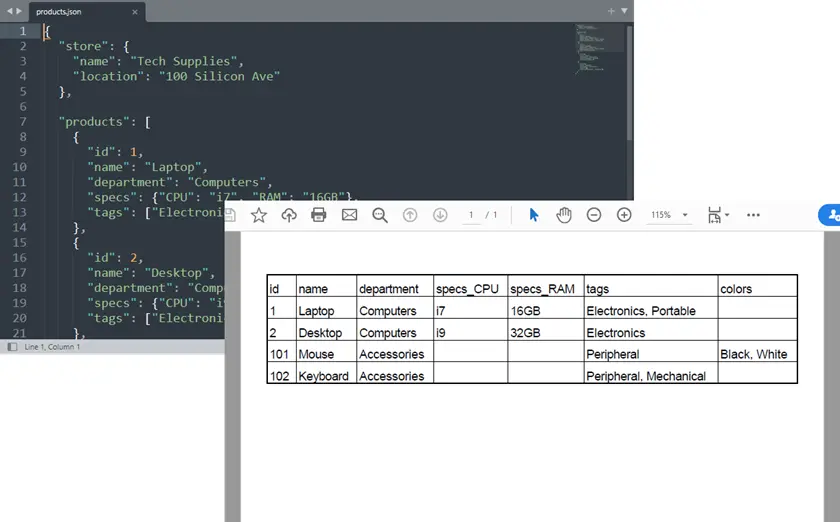
Por ejemplo, considere esta estructura para el inventario de una tienda:
{
  "store": {
    "departments": [
      {
        "name": "Computers",
        "products": [{"id": 1, "name": "Laptop", "specs": {"CPU": "i7"}}]
      },
      {
        "name": "Accessories",
        "products": [{"id": 101, "name": "Mouse", "colors": ["Black", "White"]}]
      }
    ]
  }
}
Aplanar esto en una tabla no es trivial, porque los campos anidados deben convertirse en columnas, y los arreglos pueden necesitar ser expandidos o unidos en cadenas. Nuestra solución proporciona un manejo robusto para la mayoría de las estructuras JSON, al tiempo que ofrece una opción para la extracción manual en casos inusualmente complejos.
Para un repaso rápido sobre la sintaxis y estructura de JSON, consulte: Introducción a JSON
Paso 1 — Cargar Datos JSON
Antes de procesar, cargue su archivo JSON en Python. Usar el módulo incorporado json asegura que el contenido se analice en diccionarios y listas nativas de Python:
import json

file_path = r"C:\Users\Administrator\Desktop\Products.json"

with open(file_path, "r", encoding="utf-8") as f:
    data = json.load(f)
Lo que hace este paso:
- Lee un archivo JSON del disco
- Lo convierte en objetos de Python (dict y list) para su posterior procesamiento
Consejo: Siempre especifique encoding="utf-8" para evitar problemas con caracteres que no son ASCII.
Paso 2 — Detectar Automáticamente el Conjunto de Datos a Exportar
Muchos archivos JSON contienen múltiples listas anidadas. A menudo, necesitamos la lista de objetos que representa la “tabla principal”, generalmente la lista más grande de diccionarios. La siguiente función busca automáticamente el conjunto de datos más parecido a una tabla:
def find_dataset(obj):
    """Busca recursivamente en el JSON y devuelve el conjunto de datos más parecido a una tabla."""
    candidates = []

    def search(node):
        if isinstance(node, list):
            if node and all(isinstance(i, dict) for i in node):
                keys = set()
                for item in node:
                    keys.update(item.keys())
                score = len(keys) * len(node)
                candidates.append((score, node))
            for item in node:
                search(item)
        elif isinstance(node, dict):
            for value in node.values():
                search(value)

    search(obj)
    if not candidates:
        raise ValueError("No se encontró ningún conjunto de datos adecuado.")
    candidates.sort(key=lambda x: x[0], reverse=True)
    return candidates[0][1]

# Uso
dataset = find_dataset(data)
Cómo funciona:
- Recorre recursivamente la estructura JSON
- Puntúa las listas candidatas según el número de claves × el número de elementos
- Elige el conjunto de datos más rico como la tabla principal
Limitaciones:
- No fusionará automáticamente listas profundamente anidadas (p. ej., productos de múltiples departamentos)
- Algunos campos pueden requerir extracción manual para una visibilidad completa
Opcional — Extracción Manual del Conjunto de Datos
Para conjuntos de datos profundamente anidados o personalizados, extraiga los datos manualmente:
dataset = []
for dept in data["store"]["departments"]:
    for prod in dept["products"]:
        prod["department"] = dept["name"]
        dataset.append(prod)
Este enfoque garantiza que capture los campos exactos que necesita, incluida la adición de contexto como el departamento para cada producto.
Paso 3 — Aplanar y Normalizar JSON
Para convertir JSON a una tabla, las estructuras anidadas deben aplanarse:
def flatten_json(obj, parent_key="", sep="_"):
    items = {}
    if isinstance(obj, dict):
        for key, value in obj.items():
            new_key = f"{parent_key}{sep}{key}" if parent_key else key
            if isinstance(value, dict):
                items.update(flatten_json(value, new_key, sep))
            elif isinstance(value, list):
                if not value:
                    items[new_key] = ""
                elif all(not isinstance(i, (dict, list)) for i in value):
                    items[new_key] = ", ".join(map(str, value))
                else:
                    for index, item in enumerate(value):
                        indexed_key = f"{new_key}{sep}{index}"
                        items.update(flatten_json(item, indexed_key, sep))
            else:
                items[new_key] = value
    elif isinstance(obj, list):
        for index, item in enumerate(obj):
            indexed_key = f"{parent_key}{sep}{index}" if parent_key else str(index)
            items.update(flatten_json(item, indexed_key, sep))
    else:
        items[parent_key] = obj
    return items

def normalize_json(data):
    flattened_rows = [flatten_json(item) for item in data]
    all_keys_ordered, seen_keys = [], set()
    for row in flattened_rows:
        for key in row.keys():
            if key not in seen_keys:
                seen_keys.add(key)
                all_keys_ordered.append(key)
    aligned_rows = [{key: str(row.get(key, "")) for key in all_keys_ordered} for row in flattened_rows]
    return aligned_rows, all_keys_ordered

rows, headers = normalize_json(dataset)
Lo que hace este paso:
- Convierte diccionarios anidados en nombres de columna como especs_CPU, especs_RAM
- Convierte listas de primitivos en cadenas separadas por comas
- Conserva la primera clave vista como la primera columna
Paso 4 — Exportar a PDF a través de Excel
Una vez que los datos están aplanados, expórtelos como PDF usando Spire.XLS para Python. En lugar de renderizar el PDF directamente, usamos Excel como una capa de diseño intermedia. Este enfoque proporciona un control total sobre la estructura de la tabla, el formato, los márgenes y el escalado antes de exportar a PDF.
Instalar dependencia:
pip install spire.xls
Exportar JSON a PDF usando Spire.XLS:
from spire.xls import Workbook
import os

def export_to_pdf(data_rows, headers, output_path):
    workbook = Workbook()
    sheet = workbook.Worksheets[0]

    # Escribir encabezados
    for col, header in enumerate(headers):
        sheet.Range[1, col + 1].Text = header

    # Escribir filas de datos
    for row_idx, row in enumerate(data_rows, start=2):
        for col_idx, header in enumerate(headers):
            sheet.Range[row_idx, col_idx + 1].Text = row[header]

    # Formato
    workbook.ConverterSetting.SheetFitToPageRetainPaperSize = True
    workbook.ConverterSetting.SheetFitToWidth = True
    for i in range(1, sheet.Range.ColumnCount + 1):
        sheet.AutoFitColumn(i)
    sheet.PageSetup.LeftMargin = 0.3
    sheet.PageSetup.RightMargin = 0.3
    sheet.PageSetup.TopMargin = 0.5
    sheet.PageSetup.BottomMargin = 0.5
    sheet.PageSetup.IsPrintGridlines = True
    sheet.DefaultRowHeight = 18

    os.makedirs(os.path.dirname(output_path), exist_ok=True)
    sheet.SaveToPdf(output_path)
    workbook.Dispose()
    print(f"PDF guardado: {output_path}")
Consejos para el formato de PDF:
- Ajustar automáticamente las columnas al contenido
- Establecer márgenes para la legibilidad
- Habilitar líneas de cuadrícula para una mejor visualización de la tabla
También te puede interesar: Convertir Excel a PDF en Python
Paso 5 — Ejemplo: Exportar Productos desde un Archivo JSON Complejo
Combine los pasos anteriores:
file_path = r"C:\Users\Administrator\Desktop\Products.json"
with open(file_path, "r", encoding="utf-8") as f:
    data = json.load(f)

# Opción 1: Detección automática
dataset = find_dataset(data)
rows, headers = normalize_json(dataset)

# Opción 2: Extracción manual para estructura anidada
# dataset = []
# for dept in data["store"]["departments"]:
#     for prod in dept["products"]:
#         prod["department"] = dept["name"]
#         dataset.append(prod)
# rows, headers = normalize_json(dataset)

export_to_pdf(rows, headers, "output/Products.pdf")
Puntos clave:
- La detección automática funciona para la mayoría de los arreglos JSON
- La extracción manual asegura el control sobre conjuntos de datos anidados y jerárquicos
Salida:
Ejemplo Completo de Python: JSON a PDF
from spire.xls import Workbook
import json
import os

# ---------------------------
# Detectar Automáticamente el Conjunto de Datos
# ---------------------------
def find_dataset(obj):
    """
    Busca recursivamente en el JSON y devuelve el conjunto de datos más parecido a una tabla.

    Estrategia:
    - Encontrar listas que contienen diccionarios
    - Puntuar conjuntos de datos según el número de campos
    - Elegir el conjunto de datos con la estructura más rica
    """

    candidates = []

    def search(node):
        if isinstance(node, list):

            if node and all(isinstance(i, dict) for i in node):

                # Contar claves únicas en todos los objetos
                keys = set()
                for item in node:
                    keys.update(item.keys())

                score = len(keys) * len(node)
                candidates.append((score, node))

            for item in node:
                search(item)

        elif isinstance(node, dict):
            for value in node.values():
                search(value)

    search(obj)

    if not candidates:
        raise ValueError("No se encontró ningún conjunto de datos adecuado.")

    # elegir el conjunto de datos con la mejor puntuación
    candidates.sort(key=lambda x: x[0], reverse=True)

    return candidates[0][1]

# ---------------------------
# Aplanador JSON Recursivo Robusto
# ---------------------------
def flatten_json(obj, parent_key="", sep="_"):
    """
    Aplana recursivamente diccionarios y listas anidados.

    Reglas:
    - Dict anidado → clave_subclave
    - Lista de primitivos → cadena separada por comas
    - Lista de dicts → columnas indexadas (clave_0_nombre, clave_1_nombre)
    - Listas mixtas / arreglos de arreglos → indexados recursivamente (clave_0_0, clave_0_1)
    """
    items = {}

    if isinstance(obj, dict):
        for key, value in obj.items():
            new_key = f"{parent_key}{sep}{key}" if parent_key else key

            if isinstance(value, dict):
                items.update(flatten_json(value, new_key, sep))

            elif isinstance(value, list):
                # Lista vacía
                if not value:
                    items[new_key] = ""

                # Lista de primitivos
                elif all(not isinstance(i, (dict, list)) for i in value):
                    items[new_key] = ", ".join(map(str, value))

                # Listas mixtas o anidadas
                else:
                    for index, item in enumerate(value):
                        indexed_key = f"{new_key}{sep}{index}"
                        items.update(flatten_json(item, indexed_key, sep))

            else:
                items[new_key] = value

    # Listas de nivel superior
    elif isinstance(obj, list):
        for index, item in enumerate(obj):
            indexed_key = f"{parent_key}{sep}{index}" if parent_key else str(index)
            items.update(flatten_json(item, indexed_key, sep))

    else:
        items[parent_key] = obj

    return items

# ---------------------------
# Normalizar Datos JSON (Orden de Columnas según Primera Aparición)
# ---------------------------
def normalize_json(data):
    """
    Aplanar objetos JSON y alinear encabezados, conservando el orden de la primera aparición.
    La primera clave en el primer objeto JSON será la primera columna.
    """
    if not isinstance(data, list):
        raise ValueError("Los datos deben ser una lista de objetos.")

    flattened_rows = [flatten_json(item) for item in data]

    # Rastrear encabezados en el orden de primera aparición
    all_keys_ordered = []
    seen_keys = set()
    for row in flattened_rows:
        for key in row.keys():
            if key not in seen_keys:
                seen_keys.add(key)
                all_keys_ordered.append(key)

    # Alinear todas las filas para incluir todas las claves
    aligned_rows = [{key: str(row.get(key, "")) for key in all_keys_ordered} for row in flattened_rows]

    return aligned_rows, all_keys_ordered

# ---------------------------
# Exportar a PDF a través de Excel
# ---------------------------
def export_to_pdf(data_rows, headers, output_path):
    workbook = Workbook()
    sheet = workbook.Worksheets[0]

    # Escribir encabezado
    for col, header in enumerate(headers):
        sheet.Range[1, col + 1].Text = header

    # Escribir filas de datos
    for row_idx, row in enumerate(data_rows, start=2):
        for col_idx, header in enumerate(headers):
            sheet.Range[row_idx, col_idx + 1].Text = row[header]

    # Formato
    workbook.ConverterSetting.SheetFitToPageRetainPaperSize = True
    workbook.ConverterSetting.SheetFitToWidth = True
    for i in range(1, sheet.Range.ColumnCount + 1):
        sheet.AutoFitColumn(i)
    sheet.PageSetup.LeftMargin = 0.3
    sheet.PageSetup.RightMargin = 0.3
    sheet.PageSetup.TopMargin = 0.5
    sheet.PageSetup.BottomMargin = 0.5
    sheet.PageSetup.IsPrintGridlines = True
    sheet.DefaultRowHeight = 18

    os.makedirs(os.path.dirname(output_path), exist_ok=True)
    sheet.SaveToPdf(output_path)
    workbook.Dispose()
    print(f"PDF guardado: {output_path}")

# ===========================
# Ejemplo: Conjunto de Datos JSON Complejo
# ===========================

# Cargar JSON desde archivo
with open(r"C:\Users\Administrator\Desktop\Products.json", "r", encoding="utf-8") as f:
    data = json.load(f)

# Opción 1. Detectar automáticamente el conjunto de datos (funciona para la mayoría de los casos)
dataset = find_dataset(data)

'''
# Opción 2. Extraer manualmente el conjunto de datos (funciona para estructuras complejas e inusuales)
dataset = []
for dept in data["store"]["departments"]:
    for prod in dept["products"]:
        prod["department"] = dept["name"]
        dataset.append(prod)
'''

# Normalizar (la primera clave vista se convierte en la primera columna)
rows, headers = normalize_json(dataset)

# Exportar a PDF
export_to_pdf(rows, headers, "output/Products.pdf")
Conclusión
Convertir JSON a una tabla PDF puede ser complicado, especialmente con estructuras anidadas o claves inconsistentes. Usando Python y Spire.XLS, puede aplanar automáticamente JSON y preservar un orden lógico de columnas, convirtiendo conjuntos de datos complejos en tablas limpias y legibles adecuadas para informes o documentación.
La detección automática de conjuntos de datos maneja la mayoría de los archivos JSON, mientras que la extracción manual permite capturar datos anidados específicos cuando es necesario. Este enfoque ofrece una forma flexible y confiable de convertir JSON en tablas PDF profesionales sin perder estructura ni contexto.
Preguntas Frecuentes
¿Puede manejar cualquier archivo JSON?
La detección automática funciona para la mayoría, pero puede ser necesaria la extracción manual para datos profundamente anidados.
¿Cómo se determina el orden de las columnas?
Las columnas aparecen en el orden de su primera aparición en los objetos JSON.
¿Se pueden fusionar múltiples conjuntos de datos?
Sí, puede concatenar conjuntos de datos antes de aplanarlos.
¿Cómo manejar los campos faltantes?
Los valores faltantes se representan automáticamente como celdas vacías.
¿Puedo personalizar el diseño del PDF?
Sí, los márgenes, las líneas de cuadrícula y las opciones de autoajuste son totalmente configurables a través de Spire.XLS.
Ver También
JSON in PDF mit Python: Flatten & Export als Tabellen
Inhaltsverzeichnis
- Warum die Konvertierung von JSON in PDF nicht immer einfach ist
- Schritt 1 — JSON-Daten laden
- Schritt 2 — Den zu exportierenden Datensatz automatisch erkennen
- Schritt 3 — JSON abflachen und normalisieren
- Schritt 4 — Über Excel in PDF exportieren
- Schritt 5 — Beispiel: Produkte aus einer komplexen JSON-Datei exportieren
- Vollständiges Python-Beispiel: JSON zu PDF
- Fazit
- Häufig gestellte Fragen
In modernen Anwendungen ist JSON eines der gebräuchlichsten Datenformate für APIs, Konfigurationsdateien und den Datenaustausch. Obwohl JSON ideal für Maschinen ist, ist es nicht immer für Menschen lesbar. Der Export von JSON in eine PDF-Tabelle kann helfen, strukturierte Informationen in Berichten, Dashboards oder interner Dokumentation klar darzustellen.
In diesem Tutorial erfahren Sie, wie Sie mit Python und Spire.XLS JSON in eine gut formatierte PDF-Tabelle konvertieren, einschließlich:
- Automatisches Erkennen von Datensätzen für den Tabellenexport
- Abflachen verschachtelter JSON-Felder
- Erstellen professionell aussehender PDFs
Wir werden auch die manuelle Datensatzextraktion für tief verschachtelte Strukturen behandeln, die Ihnen die volle Kontrolle über komplexe JSON-Dateien gibt.
Warum die Konvertierung von JSON in PDF nicht immer einfach ist
JSON gibt es in allen Formen und Größen:
- Flache Arrays: einfach direkt in Zeilen zu konvertieren
- Verschachtelte Objekte: z. B. ein Spezifikationswörterbuch in jedem Produkt
- Arrays in Arrays: z. B. eine Liste von Produkten innerhalb einer Abteilung
- Inkonsistente Schlüssel: Einige Objekte haben zusätzliche oder fehlende Felder
Betrachten Sie zum Beispiel diese Struktur für das Inventar eines Geschäfts:
{
  "store": {
    "departments": [
      {
        "name": "Computers",
        "products": [{"id": 1, "name": "Laptop", "specs": {"CPU": "i7"}}]
      },
      {
        "name": "Accessories",
        "products": [{"id": 101, "name": "Mouse", "colors": ["Black", "White"]}]
      }
    ]
  }
}
Dies in eine Tabelle abzuflachen ist nicht trivial, da verschachtelte Felder in Spalten umgewandelt und Arrays möglicherweise erweitert oder zu Zeichenfolgen zusammengefügt werden müssen. Unsere Lösung bietet eine robuste Handhabung für die meisten JSON-Strukturen und bietet gleichzeitig eine Option zur manuellen Extraktion für ungewöhnlich komplexe Fälle.
Für eine schnelle Auffrischung der JSON-Syntax und -Struktur siehe: Einführung in JSON
Schritt 1 — JSON-Daten laden
Laden Sie vor der Verarbeitung Ihre JSON-Datei in Python. Die Verwendung des integrierten json-Moduls stellt sicher, dass der Inhalt in native Python-Wörterbücher und -Listen geparst wird:
import json

file_path = r"C:\Users\Administrator\Desktop\Products.json"

with open(file_path, "r", encoding="utf-8") as f:
    data = json.load(f)
Was dieser Schritt bewirkt:
- Liest eine JSON-Datei von der Festplatte
- Konvertiert sie zur weiteren Verarbeitung in Python-Objekte (dict und list)
Tipp: Geben Sie immer encoding="utf-8" an, um Probleme mit Nicht-ASCII-Zeichen zu vermeiden.
Schritt 2 — Den zu exportierenden Datensatz automatisch erkennen
Viele JSON-Dateien enthalten mehrere verschachtelte Listen. Oft benötigen wir die Liste der Objekte, die die „Haupttabelle“ darstellt – normalerweise die größte Liste von Wörterbüchern. Die folgende Funktion sucht automatisch nach dem tabellenähnlichsten Datensatz:
def find_dataset(obj):
    """Durchsuchen Sie JSON rekursiv und geben Sie den tabellenähnlichsten Datensatz zurück."""
    candidates = []

    def search(node):
        if isinstance(node, list):
            if node and all(isinstance(i, dict) for i in node):
                keys = set()
                for item in node:
                    keys.update(item.keys())
                score = len(keys) * len(node)
                candidates.append((score, node))
            for item in node:
                search(item)
        elif isinstance(node, dict):
            for value in node.values():
                search(value)

    search(obj)
    if not candidates:
        raise ValueError("Kein passender Datensatz gefunden.")
    candidates.sort(key=lambda x: x[0], reverse=True)
    return candidates[0][1]

# Usage
dataset = find_dataset(data)
Wie es funktioniert:
- Durchläuft rekursiv die JSON-Struktur
- Bewertet Kandidatenlisten basierend auf der Anzahl der Schlüssel × der Anzahl der Elemente
- Wählt den reichhaltigsten Datensatz als Haupttabelle aus
Einschränkungen:
- Verschmilzt nicht automatisch tief verschachtelte Listen (z. B. Produkte mehrerer Abteilungen)
- Einige Felder erfordern möglicherweise eine manuelle Extraktion für volle Sichtbarkeit
Optional — Manuelle Datensatzextraktion
Extrahieren Sie für tief verschachtelte oder benutzerdefinierte Datensätze die Daten manuell:
dataset = []
for dept in data["store"]["departments"]:
    for prod in dept["products"]:
        prod["department"] = dept["name"]
        dataset.append(prod)
Dieser Ansatz garantiert, dass Sie genau die Felder erfassen, die Sie benötigen, einschließlich des Hinzufügens von Kontext wie der Abteilung für jedes Produkt.
Schritt 3 — JSON abflachen und normalisieren
Um JSON in eine Tabelle zu konvertieren, müssen verschachtelte Strukturen abgeflacht werden:
def flatten_json(obj, parent_key="", sep="_"):
    items = {}
    if isinstance(obj, dict):
        for key, value in obj.items():
            new_key = f"{parent_key}{sep}{key}" if parent_key else key
            if isinstance(value, dict):
                items.update(flatten_json(value, new_key, sep))
            elif isinstance(value, list):
                if not value:
                    items[new_key] = ""
                elif all(not isinstance(i, (dict, list)) for i in value):
                    items[new_key] = ", ".join(map(str, value))
                else:
                    for index, item in enumerate(value):
                        indexed_key = f"{new_key}{sep}{index}"
                        items.update(flatten_json(item, indexed_key, sep))
            else:
                items[new_key] = value
    elif isinstance(obj, list):
        for index, item in enumerate(obj):
            indexed_key = f"{parent_key}{sep}{index}" if parent_key else str(index)
            items.update(flatten_json(item, indexed_key, sep))
    else:
        items[parent_key] = obj
    return items

def normalize_json(data):
    flattened_rows = [flatten_json(item) for item in data]
    all_keys_ordered, seen_keys = [], set()
    for row in flattened_rows:
        for key in row.keys():
            if key not in seen_keys:
                seen_keys.add(key)
                all_keys_ordered.append(key)
    aligned_rows = [{key: str(row.get(key, "")) for key in all_keys_ordered} for row in flattened_rows]
    return aligned_rows, all_keys_ordered

rows, headers = normalize_json(dataset)
Was dieser Schritt bewirkt:
- Konvertiert verschachtelte Wörterbücher in Spaltennamen wie specs_CPU, specs_RAM
- Konvertiert Listen von Primitiven in durch Kommas getrennte Zeichenfolgen
- Behält den zuerst gesehenen Schlüssel als erste Spalte bei
Schritt 4 — Über Excel in PDF exportieren
Sobald die Daten abgeflacht sind, exportieren Sie sie als PDF mit Spire.XLS for Python. Anstatt PDF direkt zu rendern, verwenden wir Excel als zwischengeschaltete Layout-Ebene. Dieser Ansatz bietet die volle Kontrolle über Tabellenstruktur, Formatierung, Ränder und Skalierung vor dem Export in PDF.
Abhängigkeit installieren:
pip install spire.xls
JSON mit Spire.XLS in PDF exportieren:
from spire.xls import Workbook
import os

def export_to_pdf(data_rows, headers, output_path):
    workbook = Workbook()
    sheet = workbook.Worksheets[0]

    # Write headers
    for col, header in enumerate(headers):
        sheet.Range[1, col + 1].Text = header

    # Write data rows
    for row_idx, row in enumerate(data_rows, start=2):
        for col_idx, header in enumerate(headers):
            sheet.Range[row_idx, col_idx + 1].Text = row[header]

    # Formatting
    workbook.ConverterSetting.SheetFitToPageRetainPaperSize = True
    workbook.ConverterSetting.SheetFitToWidth = True
    for i in range(1, sheet.Range.ColumnCount + 1):
        sheet.AutoFitColumn(i)
    sheet.PageSetup.LeftMargin = 0.3
    sheet.PageSetup.RightMargin = 0.3
    sheet.PageSetup.TopMargin = 0.5
    sheet.PageSetup.BottomMargin = 0.5
    sheet.PageSetup.IsPrintGridlines = True
    sheet.DefaultRowHeight = 18

    os.makedirs(os.path.dirname(output_path), exist_ok=True)
    sheet.SaveToPdf(output_path)
    workbook.Dispose()
    print(f"PDF gespeichert: {output_path}")
Tipps zur PDF-Formatierung:
- Spalten automatisch an den Inhalt anpassen
- Ränder für die Lesbarkeit festlegen
- Gitternetzlinien für eine bessere Tabellenvisualisierung aktivieren
Das könnte Ihnen auch gefallen: Excel in Python in PDF konvertieren
Schritt 5 — Beispiel: Produkte aus einer komplexen JSON-Datei exportieren
Kombinieren Sie die vorherigen Schritte:
file_path = r"C:\Users\Administrator\Desktop\Products.json"
with open(file_path, "r", encoding="utf-8") as f:
    data = json.load(f)

# Option 1: Automatische Erkennung
dataset = find_dataset(data)
rows, headers = normalize_json(dataset)

# Option 2: Manuelle Extraktion für verschachtelte Strukturen
# dataset = []
# for dept in data["store"]["departments"]:
#     for prod in dept["products"]:
#         prod["department"] = dept["name"]
#         dataset.append(prod)
# rows, headers = normalize_json(dataset)

export_to_pdf(rows, headers, "output/Products.pdf")
Wichtige Punkte:
- Die automatische Erkennung funktioniert für die meisten JSON-Arrays
- Die manuelle Extraktion gewährleistet die Kontrolle über verschachtelte und hierarchische Datensätze
Ausgabe:
Vollständiges Python-Beispiel: JSON zu PDF
from spire.xls import Workbook
import json
import os

# ---------------------------
# Datensatz automatisch erkennen
# ---------------------------
def find_dataset(obj):
    """
    Durchsuchen Sie JSON rekursiv und geben Sie den tabellenähnlichsten Datensatz zurück.

    Strategie:
    - Listen finden, die Wörterbücher enthalten
    - Datensätze basierend auf der Anzahl der Felder bewerten
    - Wählen Sie den Datensatz mit der reichhaltigsten Struktur
    """

    candidates = []

    def search(node):
        if isinstance(node, list):

            if node and all(isinstance(i, dict) for i in node):

                # Eindeutige Schlüssel über Objekte hinweg zählen
                keys = set()
                for item in node:
                    keys.update(item.keys())

                score = len(keys) * len(node)
                candidates.append((score, node))

            for item in node:
                search(item)

        elif isinstance(node, dict):
            for value in node.values():
                search(value)

    search(obj)

    if not candidates:
        raise ValueError("Kein passender Datensatz gefunden.")

    # bestbewerteten Datensatz auswählen
    candidates.sort(key=lambda x: x[0], reverse=True)

    return candidates[0][1]

# ---------------------------
# Robuster rekursiver JSON-Abflacher
# ---------------------------
def flatten_json(obj, parent_key="", sep="_"):
    """
    Flacht verschachtelte Wörterbücher und Listen rekursiv ab.

    Regeln:
    - Verschachteltes dict → key_subkey
    - Liste von Primitiven → durch Kommas getrennte Zeichenfolge
    - Liste von dicts → indizierte Spalten (key_0_name, key_1_name)
    - Gemischte Listen / Arrays-von-Arrays → rekursiv indiziert (key_0_0, key_0_1)
    """
    items = {}

    if isinstance(obj, dict):
        for key, value in obj.items():
            new_key = f"{parent_key}{sep}{key}" if parent_key else key

            if isinstance(value, dict):
                items.update(flatten_json(value, new_key, sep))

            elif isinstance(value, list):
                # Leere Liste
                if not value:
                    items[new_key] = ""

                # Liste von Primitiven
                elif all(not isinstance(i, (dict, list)) for i in value):
                    items[new_key] = ", ".join(map(str, value))

                # Gemischte oder verschachtelte Listen
                else:
                    for index, item in enumerate(value):
                        indexed_key = f"{new_key}{sep}{index}"
                        items.update(flatten_json(item, indexed_key, sep))

            else:
                items[new_key] = value

    # Listen der obersten Ebene
    elif isinstance(obj, list):
        for index, item in enumerate(obj):
            indexed_key = f"{parent_key}{sep}{index}" if parent_key else str(index)
            items.update(flatten_json(item, indexed_key, sep))

    else:
        items[parent_key] = obj

    return items

# ---------------------------
# JSON-Daten normalisieren (Spaltenreihenfolge nach erstem Auftreten)
# ---------------------------
def normalize_json(data):
    """
    JSON-Objekte abflachen und Kopfzeilen ausrichten, wobei die Reihenfolge des ersten Auftretens beibehalten wird.
    Der erste Schlüssel im ersten JSON-Objekt wird die erste Spalte sein.
    """
    if not isinstance(data, list):
        raise ValueError("Daten müssen eine Liste von Objekten sein.")

    flattened_rows = [flatten_json(item) for item in data]

    # Kopfzeilen in der Reihenfolge des ersten Auftretens verfolgen
    all_keys_ordered = []
    seen_keys = set()
    for row in flattened_rows:
        for key in row.keys():
            if key not in seen_keys:
                seen_keys.add(key)
                all_keys_ordered.append(key)

    # Alle Zeilen ausrichten, um alle Schlüssel einzuschließen
    aligned_rows = [{key: str(row.get(key, "")) for key in all_keys_ordered} for row in flattened_rows]

    return aligned_rows, all_keys_ordered

# ---------------------------
# Über Excel in PDF exportieren
# ---------------------------
def export_to_pdf(data_rows, headers, output_path):
    workbook = Workbook()
    sheet = workbook.Worksheets[0]

    # Kopfzeile schreiben
    for col, header in enumerate(headers):
        sheet.Range[1, col + 1].Text = header

    # Datenzeilen schreiben
    for row_idx, row in enumerate(data_rows, start=2):
        for col_idx, header in enumerate(headers):
            sheet.Range[row_idx, col_idx + 1].Text = row[header]

    # Formatierung
    workbook.ConverterSetting.SheetFitToPageRetainPaperSize = True
    workbook.ConverterSetting.SheetFitToWidth = True
    for i in range(1, sheet.Range.ColumnCount + 1):
        sheet.AutoFitColumn(i)
    sheet.PageSetup.LeftMargin = 0.3
    sheet.PageSetup.RightMargin = 0.3
    sheet.PageSetup.TopMargin = 0.5
    sheet.PageSetup.BottomMargin = 0.5
    sheet.PageSetup.IsPrintGridlines = True
    sheet.DefaultRowHeight = 18

    os.makedirs(os.path.dirname(output_path), exist_ok=True)
    sheet.SaveToPdf(output_path)
    workbook.Dispose()
    print(f"PDF gespeichert: {output_path}")

# ===========================
# Beispiel: Komplexer JSON-Datensatz
# ===========================

# JSON aus Datei laden
with open(r"C:\Users\Administrator\Desktop\Products.json", "r", encoding="utf-8") as f:
    data = json.load(f)

# Option 1. Datensatz automatisch erkennen (funktioniert in den meisten Fällen)
dataset = find_dataset(data)

'''
# Option 2. Datensatz manuell extrahieren (funktioniert für komplexe ungewöhnliche Strukturen)
dataset = []
for dept in data["store"]["departments"]:
    for prod in dept["products"]:
        prod["department"] = dept["name"]
        dataset.append(prod)
'''

# Normalisieren (der zuerst gesehene Schlüssel wird zur ersten Spalte)
rows, headers = normalize_json(dataset)

# In PDF exportieren
export_to_pdf(rows, headers, "output/Products.pdf")
Fazit
Die Konvertierung von JSON in eine PDF-Tabelle kann schwierig sein, insbesondere bei verschachtelten Strukturen oder inkonsistenten Schlüsseln. Mit Python und Spire.XLS können Sie JSON automatisch abflachen und eine logische Spaltenreihenfolge beibehalten, wodurch komplexe Datensätze in saubere, lesbare Tabellen umgewandelt werden, die für Berichte oder Dokumentationen geeignet sind.
Die automatische Datensatzerkennung verarbeitet die meisten JSON-Dateien, während die manuelle Extraktion bei Bedarf das Erfassen spezifischer verschachtelter Daten ermöglicht. Dieser Ansatz bietet eine flexible und zuverlässige Möglichkeit, JSON in professionelle PDF-Tabellen zu konvertieren, ohne Struktur oder Kontext zu verlieren.
Häufig gestellte Fragen
Kann dies jede JSON-Datei verarbeiten?
Die automatische Erkennung funktioniert für die meisten, aber für tief verschachtelte Daten kann eine manuelle Extraktion erforderlich sein.
Wie wird die Spaltenreihenfolge bestimmt?
Die Spalten erscheinen in der Reihenfolge ihres ersten Auftretens in den JSON-Objekten.
Können mehrere Datensätze zusammengeführt werden?
Ja, Sie können Datensätze vor dem Abflachen verketten.
Wie werden fehlende Felder behandelt?
Fehlende Werte werden automatisch als leere Zellen dargestellt.
Kann ich das PDF-Layout anpassen?
Ja, Ränder, Gitternetzlinien und Auto-Fit-Optionen sind über Spire.XLS vollständig konfigurierbar.
Siehe auch
JSON в PDF на Python: выравнивание и экспорт в виде таблиц
Содержание
- Почему преобразование JSON в PDF не всегда просто
- Шаг 1 — Загрузка данных JSON
- Шаг 2 — Автоматическое определение набора данных для экспорта
- Шаг 3 — Выравнивание и нормализация JSON
- Шаг 4 — Экспорт в PDF через Excel
- Шаг 5 — Пример: Экспорт продуктов из сложного файла JSON
- Полный пример на Python: JSON в PDF
- Заключение
- Часто задаваемые вопросы
В современных приложениях JSON является одним из самых распространенных форматов данных для API, файлов конфигурации и обмена данными. Однако, хотя JSON идеально подходит для машин, он не всегда удобен для чтения человеком. Экспорт JSON в таблицу PDF может помочь четко представить структурированную информацию в отчетах, панелях мониторинга или внутренней документации.
В этом руководстве вы узнаете, как преобразовать JSON в хорошо отформатированную таблицу PDF с помощью Python и Spire.XLS, включая:
- Автоматическое определение наборов данных для экспорта в таблицу
- Выравнивание вложенных полей JSON
- Создание профессионально выглядящих PDF-файлов
Мы также рассмотрим ручное извлечение наборов данных для глубоко вложенных структур, что даст вам полный контроль над сложными файлами JSON.
Почему преобразование JSON в PDF не всегда просто
JSON бывает всех форм и размеров:
- Плоские массивы: легко конвертировать непосредственно в строки
- Вложенные объекты: например, словарь спецификаций внутри каждого продукта
- Массивы внутри массивов: например, список продуктов внутри отдела
- Несогласованные ключи: некоторые объекты имеют дополнительные или отсутствующие поля
Например, рассмотрим эту структуру для инвентаря магазина:
{
  "store": {
    "departments": [
      {
        "name": "Computers",
        "products": [{"id": 1, "name": "Laptop", "specs": {"CPU": "i7"}}]
      },
      {
        "name": "Accessories",
        "products": [{"id": 101, "name": "Mouse", "colors": ["Black", "White"]}]
      }
    ]
  }
}
Выровнять это в таблицу непросто, потому что вложенные поля необходимо преобразовать в столбцы, а массивы, возможно, потребуется расширить или объединить в строки. Наше решение обеспечивает надежную обработку большинства структур JSON, предлагая при этом возможность ручного извлечения для особо сложных случаев.
Для краткого обзора синтаксиса и структуры JSON см.: Введение в JSON
Шаг 1 — Загрузка данных JSON
Перед обработкой загрузите ваш файл JSON в Python. Использование встроенного модуля json гарантирует, что содержимое будет проанализировано в нативные словари и списки Python:
import json

file_path = r"C:\Users\Administrator\Desktop\Products.json"

with open(file_path, "r", encoding="utf-8") as f:
    data = json.load(f)
Что делает этот шаг:
- Читает файл JSON с диска
- Преобразует его в объекты Python (dict и list) для дальнейшей обработки
Совет: Всегда указывайте encoding="utf-8", чтобы избежать проблем с символами, не относящимися к ASCII.
Шаг 2 — Автоматическое определение набора данных для экспорта
Многие файлы JSON содержат несколько вложенных списков. Часто нам нужен список объектов, который представляет «основную таблицу» — обычно это самый большой список словарей. Следующая функция автоматически ищет наиболее похожий на таблицу набор данных:
def find_dataset(obj):
    """Recursively search JSON and return the most table-like dataset."""
    candidates = []

    def search(node):
        if isinstance(node, list):
            if node and all(isinstance(i, dict) for i in node):
                keys = set()
                for item in node:
                    keys.update(item.keys())
                score = len(keys) * len(node)
                candidates.append((score, node))
            for item in node:
                search(item)
        elif isinstance(node, dict):
            for value in node.values():
                search(value)

    search(obj)
    if not candidates:
        raise ValueError("No suitable dataset found.")
    candidates.sort(key=lambda x: x[0], reverse=True)
    return candidates[0][1]

# Usage
dataset = find_dataset(data)
Как это работает:
- Рекурсивно обходит структуру JSON
- Оценивает списки-кандидаты на основе количества ключей × количества элементов
- Выбирает самый богатый набор данных в качестве основной таблицы
Ограничения:
- Не будет автоматически объединять глубоко вложенные списки (например, продукты нескольких отделов)
- Некоторые поля могут потребовать ручного извлечения для полной видимости
Необязательно — Ручное извлечение набора данных
Для глубоко вложенных или настраиваемых наборов данных извлекайте данные вручную:
dataset = []
for dept in data["store"]["departments"]:
    for prod in dept["products"]:
        prod["department"] = dept["name"]
        dataset.append(prod)
Этот подход гарантирует, что вы захватите именно те поля, которые вам нужны, включая добавление контекста, такого как отдел для каждого продукта.
Шаг 3 — Выравнивание и нормализация JSON
Чтобы преобразовать JSON в таблицу, вложенные структуры должны быть выровнены:
def flatten_json(obj, parent_key="", sep="_"):
    items = {}
    if isinstance(obj, dict):
        for key, value in obj.items():
            new_key = f"{parent_key}{sep}{key}" if parent_key else key
            if isinstance(value, dict):
                items.update(flatten_json(value, new_key, sep))
            elif isinstance(value, list):
                if not value:
                    items[new_key] = ""
                elif all(not isinstance(i, (dict, list)) for i in value):
                    items[new_key] = ", ".join(map(str, value))
                else:
                    for index, item in enumerate(value):
                        indexed_key = f"{new_key}{sep}{index}"
                        items.update(flatten_json(item, indexed_key, sep))
            else:
                items[new_key] = value
    elif isinstance(obj, list):
        for index, item in enumerate(obj):
            indexed_key = f"{parent_key}{sep}{index}" if parent_key else str(index)
            items.update(flatten_json(item, indexed_key, sep))
    else:
        items[parent_key] = obj
    return items

def normalize_json(data):
    flattened_rows = [flatten_json(item) for item in data]
    all_keys_ordered, seen_keys = [], set()
    for row in flattened_rows:
        for key in row.keys():
            if key not in seen_keys:
                seen_keys.add(key)
                all_keys_ordered.append(key)
    aligned_rows = [{key: str(row.get(key, "")) for key in all_keys_ordered} for row in flattened_rows]
    return aligned_rows, all_keys_ordered

rows, headers = normalize_json(dataset)
Что делает этот шаг:
- Преобразует вложенные словари в имена столбцов, такие как specs_CPU, specs_RAM
- Преобразует списки примитивов в строки, разделенные запятыми
- Сохраняет первый встреченный ключ в качестве первого столбца
Шаг 4 — Экспорт в PDF через Excel
После того, как данные выровнены, экспортируйте их в PDF с помощью Spire.XLS for Python. Вместо того, чтобы рендерить PDF напрямую, мы используем Excel в качестве промежуточного слоя макета. Этот подход обеспечивает полный контроль над структурой таблицы, форматированием, полями и масштабированием перед экспортом в PDF.
Установить зависимость:
pip install spire.xls
Экспорт JSON в PDF с помощью Spire.XLS:
from spire.xls import Workbook
import os

def export_to_pdf(data_rows, headers, output_path):
    workbook = Workbook()
    sheet = workbook.Worksheets[0]

    # Write headers
    for col, header in enumerate(headers):
        sheet.Range[1, col + 1].Text = header

    # Write data rows
    for row_idx, row in enumerate(data_rows, start=2):
        for col_idx, header in enumerate(headers):
            sheet.Range[row_idx, col_idx + 1].Text = row[header]

    # Formatting
    workbook.ConverterSetting.SheetFitToPageRetainPaperSize = True
    workbook.ConverterSetting.SheetFitToWidth = True
    for i in range(1, sheet.Range.ColumnCount + 1):
        sheet.AutoFitColumn(i)
    sheet.PageSetup.LeftMargin = 0.3
    sheet.PageSetup.RightMargin = 0.3
    sheet.PageSetup.TopMargin = 0.5
    sheet.PageSetup.BottomMargin = 0.5
    sheet.PageSetup.IsPrintGridlines = True
    sheet.DefaultRowHeight = 18

    os.makedirs(os.path.dirname(output_path), exist_ok=True)
    sheet.SaveToPdf(output_path)
    workbook.Dispose()
    print(f"PDF saved: {output_path}")
Советы по форматированию PDF:
- Автоподбор ширины столбцов по содержимому
- Установите поля для удобства чтения
- Включите линии сетки для лучшей визуализации таблицы
Вам также может понравиться: Преобразование Excel в PDF на Python
Шаг 5 — Пример: Экспорт продуктов из сложного файла JSON
Объедините предыдущие шаги:
file_path = r"C:\Users\Administrator\Desktop\Products.json"
with open(file_path, "r", encoding="utf-8") as f:
    data = json.load(f)

# Option 1: Automatic detection
dataset = find_dataset(data)
rows, headers = normalize_json(dataset)

# Option 2: Manual extraction for nested structure
# dataset = []
# for dept in data["store"]["departments"]:
#     for prod in dept["products"]:
#         prod["department"] = dept["name"]
#         dataset.append(prod)
# rows, headers = normalize_json(dataset)

export_to_pdf(rows, headers, "output/Products.pdf")
Ключевые моменты:
- Автоматическое определение работает для большинства массивов JSON
- Ручное извлечение обеспечивает контроль над вложенными и иерархическими наборами данных
Вывод:
Полный пример на Python: JSON в PDF
from spire.xls import Workbook
import json
import os

# ---------------------------
# Atoumatically Detect dataset
# ---------------------------
def find_dataset(obj):
    """
    Recursively search JSON and return the most table-like dataset.

    Strategy:
    - Find lists containing dictionaries
    - Score datasets based on number of fields
    - Choose the dataset with the richest structure
    """

    candidates = []

    def search(node):
        if isinstance(node, list):

            if node and all(isinstance(i, dict) for i in node):

                # Count unique keys across objects
                keys = set()
                for item in node:
                    keys.update(item.keys())

                score = len(keys) * len(node)
                candidates.append((score, node))

            for item in node:
                search(item)

        elif isinstance(node, dict):
            for value in node.values():
                search(value)

    search(obj)

    if not candidates:
        raise ValueError("No suitable dataset found.")

    # choose best scored dataset
    candidates.sort(key=lambda x: x[0], reverse=True)

    return candidates[0][1]

# ---------------------------
# Robust Recursive JSON Flattener
# ---------------------------
def flatten_json(obj, parent_key="", sep="_"):
    """
    Recursively flattens nested dictionaries and lists.

    Rules:
    - Nested dict → key_subkey
    - List of primitives → comma-separated string
    - List of dicts → indexed columns (key_0_name, key_1_name)
    - Mixed lists / arrays-of-arrays → recursively indexed (key_0_0, key_0_1)
    """
    items = {}

    if isinstance(obj, dict):
        for key, value in obj.items():
            new_key = f"{parent_key}{sep}{key}" if parent_key else key

            if isinstance(value, dict):
                items.update(flatten_json(value, new_key, sep))

            elif isinstance(value, list):
                # Empty list
                if not value:
                    items[new_key] = ""

                # List of primitives
                elif all(not isinstance(i, (dict, list)) for i in value):
                    items[new_key] = ", ".join(map(str, value))

                # Mixed or nested lists
                else:
                    for index, item in enumerate(value):
                        indexed_key = f"{new_key}{sep}{index}"
                        items.update(flatten_json(item, indexed_key, sep))

            else:
                items[new_key] = value

    # Top-level lists
    elif isinstance(obj, list):
        for index, item in enumerate(obj):
            indexed_key = f"{parent_key}{sep}{index}" if parent_key else str(index)
            items.update(flatten_json(item, indexed_key, sep))

    else:
        items[parent_key] = obj

    return items

# ---------------------------
# Normalize JSON Data (First-Seen Column Order)
# ---------------------------
def normalize_json(data):
    """
    Flatten JSON objects and align headers, preserving the first-seen order.
    The first key in the first JSON object will be the first column.
    """
    if not isinstance(data, list):
        raise ValueError("Data must be a list of objects.")

    flattened_rows = [flatten_json(item) for item in data]

    # Track headers in first-seen order
    all_keys_ordered = []
    seen_keys = set()
    for row in flattened_rows:
        for key in row.keys():
            if key not in seen_keys:
                seen_keys.add(key)
                all_keys_ordered.append(key)

    # Align all rows to include all keys
    aligned_rows = [{key: str(row.get(key, "")) for key in all_keys_ordered} for row in flattened_rows]

    return aligned_rows, all_keys_ordered

# ---------------------------
# Export to PDF via Excel
# ---------------------------
def export_to_pdf(data_rows, headers, output_path):
    workbook = Workbook()
    sheet = workbook.Worksheets[0]

    # Write header
    for col, header in enumerate(headers):
        sheet.Range[1, col + 1].Text = header

    # Write data rows
    for row_idx, row in enumerate(data_rows, start=2):
        for col_idx, header in enumerate(headers):
            sheet.Range[row_idx, col_idx + 1].Text = row[header]

    # Formatting
    workbook.ConverterSetting.SheetFitToPageRetainPaperSize = True
    workbook.ConverterSetting.SheetFitToWidth = True
    for i in range(1, sheet.Range.ColumnCount + 1):
        sheet.AutoFitColumn(i)
    sheet.PageSetup.LeftMargin = 0.3
    sheet.PageSetup.RightMargin = 0.3
    sheet.PageSetup.TopMargin = 0.5
    sheet.PageSetup.BottomMargin = 0.5
    sheet.PageSetup.IsPrintGridlines = True
    sheet.DefaultRowHeight = 18

    os.makedirs(os.path.dirname(output_path), exist_ok=True)
    sheet.SaveToPdf(output_path)
    workbook.Dispose()
    print(f"PDF saved: {output_path}")

# ===========================
# Example: Complex JSON Dataset
# ===========================

# Load JSON from file
with open(r"C:\Users\Administrator\Desktop\Products.json", "r", encoding="utf-8") as f:
    data = json.load(f)

# Option 1. Automatically detect dataset (work for most cases)
dataset = find_dataset(data)

'''
# Option 2. Manually extract dataset (work for complex unusual structures)
dataset = []
for dept in data["store"]["departments"]:
    for prod in dept["products"]:
        prod["department"] = dept["name"]
        dataset.append(prod)
'''

# Normalize (first-seen key becomes first column)
rows, headers = normalize_json(dataset)

# Export to PDF
export_to_pdf(rows, headers, "output/Products.pdf")
Заключение
Преобразование JSON в таблицу PDF может быть сложным, особенно при наличии вложенных структур или несогласованных ключей. Используя Python и Spire.XLS, вы можете автоматически выравнивать JSON и сохранять логический порядок столбцов, превращая сложные наборы данных в чистые, читаемые таблицы, подходящие для отчетов или документации.
Автоматическое определение набора данных обрабатывает большинство файлов JSON, в то время как ручное извлечение позволяет при необходимости захватывать определенные вложенные данные. Этот подход предлагает гибкий и надежный способ преобразования JSON в профессиональные таблицы PDF без потери структуры или контекста.
Часто задаваемые вопросы
Может ли это обрабатывать любой файл JSON?
Автоматическое определение работает для большинства, но для глубоко вложенных данных может потребоваться ручное извлечение.
Как определяется порядок столбцов?
Столбцы появляются в порядке их первого появления в объектах JSON.
Можно ли объединить несколько наборов данных?
Да, вы можете объединить наборы данных перед выравниванием.
Как обрабатывать отсутствующие поля?
Отсутствующие значения автоматически представляются как пустые ячейки.
Могу ли я настроить макет PDF?
Да, поля, линии сетки и параметры автоподбора полностью настраиваются через Spire.XLS.
Смотрите также
Como inserir vídeo no PowerPoint: guia completo (2026)

Adicionar vídeo a uma apresentação é uma das maneiras mais eficazes de aumentar o engajamento. Esteja você criando um material de treinamento, demonstração de produto, apresentação de marketing ou material educacional, o vídeo pode tornar seus slides mais dinâmicos e persuasivos.
Este guia completo explica métodos confiáveis para inserir vídeo em apresentações do PowerPoint. Você aprenderá abordagens manuais para arquivos locais, vídeos online, arquivos vinculados e soluções programáticas de alta precisão. Se você precisa inserir vídeo no PowerPoint, incorporar vídeo na apresentação do PowerPoint ou automatizar todo o processo para processamento em lote, este artigo fornece o conhecimento prático e as informações técnicas de que você precisa.
1. Por que Adicionar Vídeo a Apresentações do PowerPoint
Antes de explorar os métodos de inserção, é importante entender por que a integração de vídeo é importante e quais desafios você pode encontrar.
1.1 Benefícios do Vídeo em Apresentações
O conteúdo em vídeo oferece várias vantagens:
- Maior engajamento – Conteúdo visual e auditivo captura a atenção de forma mais eficaz do que slides estáticos
- Demonstrações complexas – Mostre processos, produtos ou procedimentos difíceis de explicar em texto
- Conexão emocional – O vídeo pode criar um impacto emocional mais forte do que apenas imagens
- Acabamento profissional – Conteúdo de vídeo de alta qualidade eleva a qualidade da apresentação
1.2 Desafios Comuns
No entanto, a inserção de vídeo apresenta vários desafios técnicos:
- Preocupações com o tamanho do arquivo – Vídeos incorporados podem aumentar drasticamente o tamanho do arquivo PPT
- Compatibilidade de formato – Nem todos os formatos de vídeo funcionam em diferentes versões do PowerPoint
- Problemas de reprodução – Problemas de codec podem impedir que os vídeos sejam reproduzidos corretamente
- Portabilidade – Vídeos vinculados podem quebrar ao compartilhar apresentações
Entender esses desafios ajuda você a selecionar o método de inserção correto para seu caso de uso específico.
2. Visão Geral dos Métodos Confiáveis
Este guia aborda quatro maneiras práticas de inserir vídeo em apresentações do PowerPoint:
- Inserir arquivo de vídeo local – método mais comum, funciona offline
- Incorporar vídeo online – mantém o tamanho do arquivo pequeno, requer internet
- Vincular a arquivo de vídeo externo – equilibra tamanho e controle
- Inserção programática – automação e processamento em lote
Dica: A maioria dos métodos manuais insere vídeos em slides individuais. Se você precisar inserir vídeos em várias apresentações ou automatizar o processo, a abordagem programática é a mais eficiente.
O método mais flexível é usar a automação com Python, que permite processamento em lote, geração no lado do servidor e integração com fluxos de trabalho de negócios.
3. Método 1: Inserir Vídeo do Seu Computador (Arquivo Local)
A maneira mais simples de inserir vídeo em um slide do PowerPoint é adicionando um arquivo de vídeo local armazenado em seu computador.
Instruções Passo a Passo
Dica: Certifique-se de que seu arquivo de vídeo esteja em um formato compatível antes de começar. MP4 com codificação H.264 funciona melhor.
-
Abra sua apresentação do PowerPoint - Inicie o PowerPoint e abra a apresentação onde deseja adicionar o vídeo.
-
Navegue até o slide de destino - Vá para o slide específico onde o vídeo deve aparecer.
-
Clique na guia Inserir - Localizada na faixa de opções do menu superior.
-
Selecione Vídeo - No grupo Mídia, clique no botão Vídeo.
-
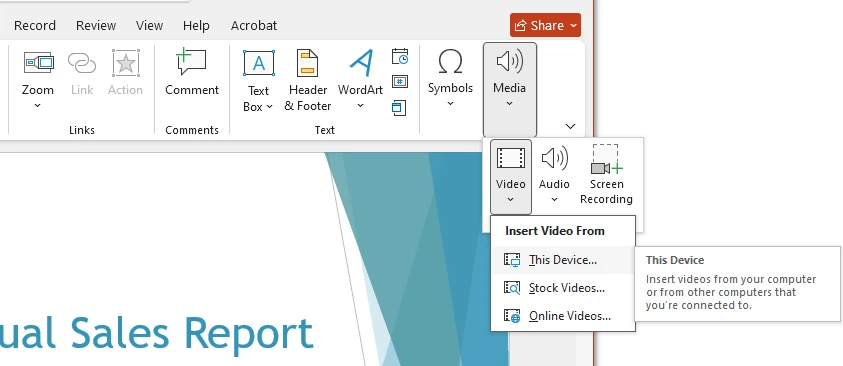
Escolha Este Dispositivo - Selecione "Este Dispositivo" no menu suspenso.
-
Selecione e insira - Navegue até o seu arquivo de vídeo, selecione-o e clique em Inserir.
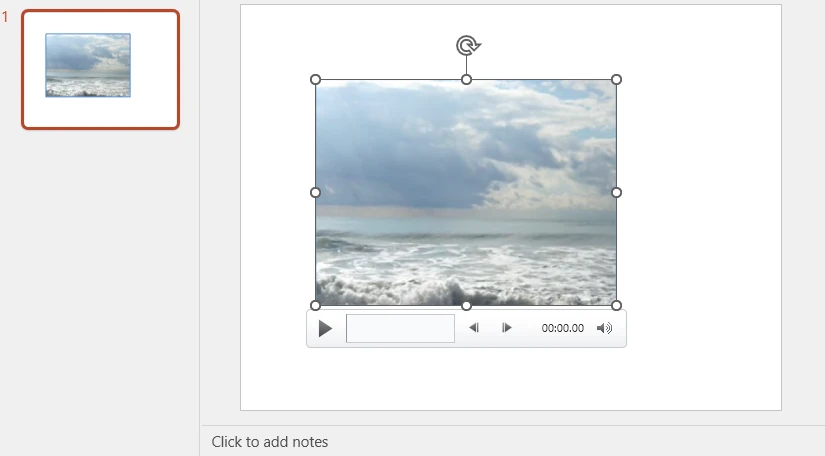
O vídeo aparecerá no slide como um objeto de mídia. Você pode:
- Redimensionar arrastando os cantos
- Reposicionar clicando e arrastando
- Girar usando a alça de rotação
Esta é a maneira mais direta de inserir vídeo em slides do PowerPoint e funciona totalmente offline.
Formatos de Vídeo Suportados
O PowerPoint suporta vários formatos de vídeo, incluindo:
- MP4 (recomendado para compatibilidade)
- MOV
- M4V
- WEBM
Para obter melhores resultados, use MP4 codificado com vídeo H.264 e áudio AAC.
Você pode encontrar a lista completa de formatos de mídia suportados no guia oficial da Microsoft sobre formatos de vídeo e áudio suportados no PowerPoint.
Ajustando as Configurações de Reprodução
Após inserir o vídeo, você pode personalizar as opções de reprodução:
- Iniciar Automaticamente ou Ao Clicar
- Reproduzir em Tela Cheia
- Repetir até Parar
- Cortar Vídeo
- Aparecimento Gradual / Desaparecimento Gradual
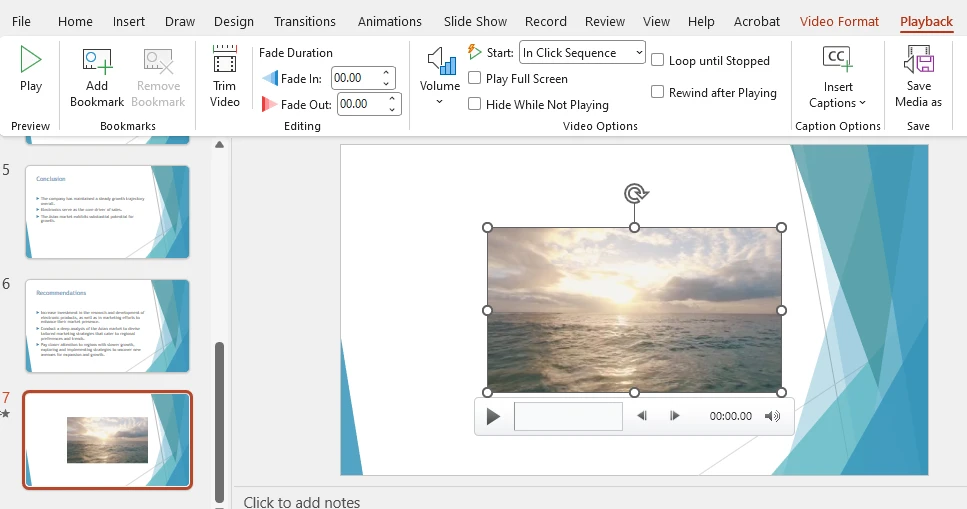
Essas opções estão disponíveis na guia Reprodução assim que o vídeo é selecionado.
Vantagens e Desvantagens da Inserção de Vídeo Local
Vantagens
- Fácil de usar
- Funciona offline
- Controle total da reprodução
Desvantagens
- Aumenta o tamanho do arquivo PPT
- Pode causar problemas de compartilhamento se o arquivo ficar muito grande
A inserção local é melhor para apresentações que precisam ser portáteis e funcionar offline.
Nota: Vídeos incorporados são suportados em apresentações PPTX modernas. Se você estiver trabalhando com um arquivo PPT mais antigo, considere convertê-lo para o formato PPTX primeiro. Consulte nosso guia sobre como converter PPT para PPTX.
4. Método 2: Incorporar Vídeo em Apresentação do PowerPoint (Vídeo Online)
Outra abordagem popular é incorporar vídeo na apresentação do PowerPoint diretamente de uma fonte online, como o YouTube.
Este método mantém o tamanho do seu arquivo pequeno porque o vídeo é transmitido em vez de armazenado dentro da apresentação.
Como Incorporar um Vídeo do YouTube
-
Vá para o slide onde você quer o vídeo.
-
Clique em Inserir → Vídeo → Vídeo Online.
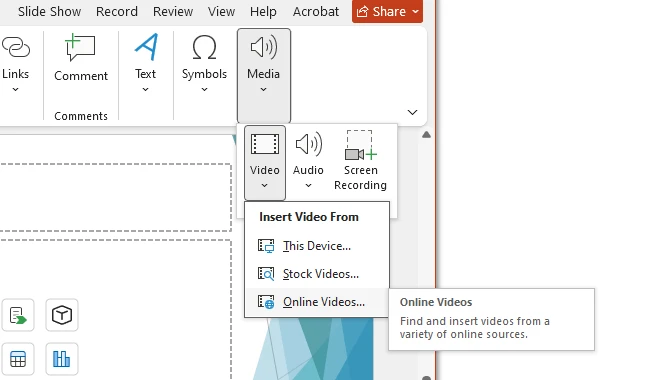
-
Cole a URL do vídeo ou o código de incorporação.
-
Clique em Inserir.
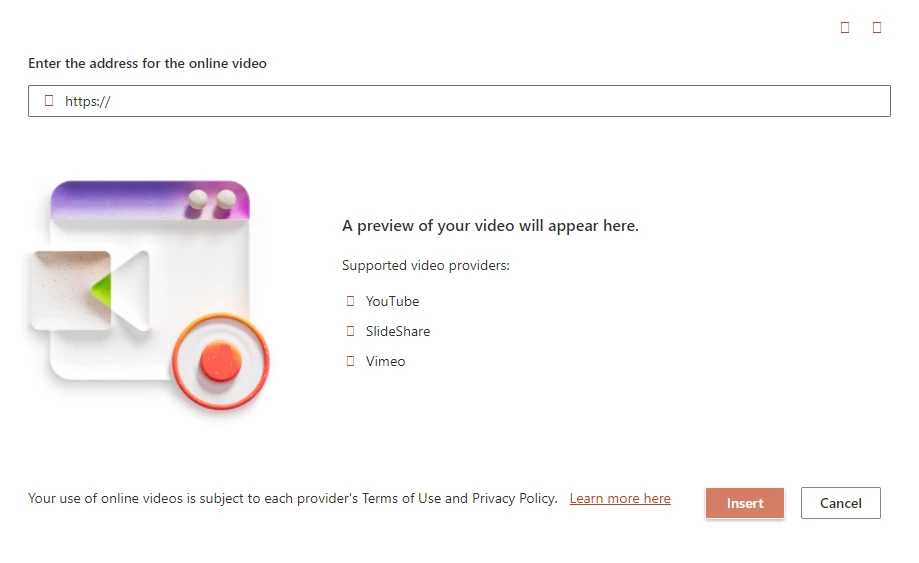
O PowerPoint criará um quadro de vídeo incorporado no slide.
Quando Usar a Incorporação
A incorporação é ideal quando:
- Você quer reduzir o tamanho do arquivo PPT
- O vídeo está hospedado publicamente online
- Você precisa de conteúdo atualizado com frequência
Limitações de Vídeos Incorporados
No entanto, existem algumas considerações importantes:
- Requer uma conexão com a internet durante a apresentação
- Pode não funcionar atrás de firewalls corporativos
- O vídeo pode se tornar indisponível se for removido online
- Plataformas de vídeo podem exigir login antes da reprodução
Se a confiabilidade for crítica, a inserção local pode ser mais segura.
5. Método 3: Como Anexar um Vídeo no PPT (Vincular em Vez de Incorporar)
Alguns usuários perguntam como anexar vídeo no PPT em vez de incorporá-lo totalmente.
Este método vincula a um arquivo de vídeo externo em vez de armazená-lo dentro da apresentação.
Incorporar vs. Anexar: Qual é a Diferença?
| Recurso | Incorporar Vídeo | Anexar (Vincular) Vídeo |
|---|---|---|
| Armazenado dentro do PPT | Sim | Não |
| Tamanho do arquivo | Maior | Menor |
| Internet necessária | Não | Não (se local) |
| Risco de link quebrado | Não | Sim |
Como Vincular um Arquivo de Vídeo
-
Vá para Inserir → Vídeo → Este Dispositivo.
-
Selecione o arquivo de vídeo.
-
Clique na seta suspensa ao lado de Inserir.
-
Escolha Vincular ao Arquivo em vez de Inserir.
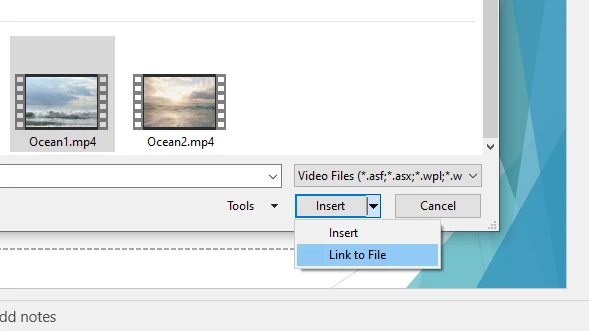
Agora o PPT fará referência ao vídeo externamente.
Quando Vincular Faz Sentido
- Arquivos de vídeo muito grandes
- Ambientes de armazenamento em rede compartilhada
- Gerenciamento centralizado de mídia
Tenha cuidado ao compartilhar a apresentação — você deve enviar o arquivo de vídeo junto.
Se você também está adicionando visualizações de dados aos seus slides, pode querer aprender como inserir um gráfico no PowerPoint.
6. Problemas Comuns ao Inserir Vídeo no PowerPoint
Mesmo quando você sabe como adicionar vídeo a uma apresentação do PowerPoint, problemas ainda podem ocorrer.
Aqui estão alguns problemas comuns e suas soluções:
6.1 Vídeo Não Reproduzindo
Muitas vezes causado por codecs não suportados.
Solução: Converta o vídeo para MP4 (H.264 + AAC).
6.2 Arquivo Muito Grande
Incorporar vídeos de alta resolução pode aumentar drasticamente o tamanho do PPT.
Solução: Comprima a mídia usando Arquivo → Informações → Comprimir Mídia.
6.3 Problemas de Compatibilidade (Mac vs. Windows)
Alguns formatos se comportam de maneira diferente entre sistemas.
Solução: Use MP4 para máxima compatibilidade.
6.4 Atraso Durante a Reprodução
Vídeos grandes ou hardware lento podem causar travamentos.
Solução: Otimize a resolução do vídeo ou use um arquivo vinculado.
7. Método 4: Inserir Vídeo no PowerPoint Usando Python (Solução Automatizada)
Para desenvolvedores e empresas, o Python oferece uma maneira poderosa de automatizar a criação de PowerPoint e a inserção de vídeos.
Usando o Spire.Presentation for Python, você pode inserir vídeos em slides sem a necessidade do Microsoft Office.
Por que Usar Python para Automação do PowerPoint?
- Processamento em lote de apresentações
- Integração com sistemas de backend
- Geração de documentos no lado do servidor
- Sem interação manual com a interface do usuário
- Fluxos de trabalho repetíveis
Instale a Biblioteca
pip install Spire.Presentation
Exemplo Rápido: Inserir Vídeo no PowerPoint com Python
Se você precisa apenas de um exemplo mínimo, o código a seguir insere um vídeo no primeiro slide de uma nova apresentação do PowerPoint.
from spire.presentation import *

# Create presentation
presentation = Presentation()

# Add video to first slide
slide = presentation.Slides[0]

video_rect = RectangleF.FromLTRB(100, 100, 500, 400)
slide.Shapes.AppendVideoMedia("demo_video.mp4", video_rect)

# Save presentation
presentation.SaveToFile("video_demo.pptx", FileFormat.Pptx2019)
presentation.Dispose()
Este exemplo mínimo mostra como criar uma nova apresentação do PowerPoint e insere um vídeo no primeiro slide na posição especificada com código Python.
### Exemplo Avançado: Inserir ou Vincular Vídeo no PowerPoint Usando Python
Abaixo está um exemplo aprimorado com tratamento de erros e opções adicionais:
from spire.presentation import *
import os
from pathlib import Path


def insert_video_to_powerpoint(video_path, output_path, slide_index=0, position=(100, 100), size=(400, 300),
                               poster_image_path=None, embed_video=True):
    """
    Inserir um vídeo em uma apresentação do PowerPoint programaticamente

    Args:
        video_path: Caminho para o arquivo de vídeo (MP4, MOV, WMV, AVI)
        output_path: Caminho do arquivo de saída do PowerPoint (.pptx)
        slide_index: Número do slide (base 0) onde o vídeo deve ser inserido
        position: Tupla de coordenadas (x, y) para o posicionamento do vídeo
        size: Tupla (largura, altura) para as dimensões do vídeo
        poster_image_path: Caminho opcional para a imagem de pôster/miniatura do vídeo
        embed_video: Valor booleano indicando se deve incorporar o vídeo (True)
                     ou vincular ao arquivo de vídeo (False)
    """
    try:
        # Validar arquivo de entrada
        if not os.path.exists(video_path):
            raise FileNotFoundError(f"Arquivo de vídeo não encontrado: {video_path}")

        # Verificar extensão do arquivo
        valid_extensions = {'.mp4', '.mov', '.wmv', '.avi'}
        file_ext = Path(video_path).suffix.lower()
        if file_ext not in valid_extensions:
            print(f"Aviso: {file_ext} pode não ser totalmente suportado. MP4 é recomendado.")

        # Criar objeto de apresentação
        presentation = Presentation()

        # Garantir que temos slides suficientes
        while presentation.Slides.Count <= slide_index:
            presentation.Slides.Append()

        # Obter slide de destino
        slide = presentation.Slides[slide_index]

        # Criar retângulo para posição e tamanho do vídeo
        video_rect = RectangleF.FromLTRB(
            position[0],
            position[1],
            position[0] + size[0],
            position[1] + size[1]
        )

        # Inserir vídeo com base no modo de incorporação
        if embed_video:
            # Incorporar o vídeo na apresentação
            video = slide.Shapes.AppendVideoMedia(video_path, video_rect)
        else:
            # Inserir o vídeo como um link (referência de arquivo externo)
            video = slide.Shapes.AppendVideoMediaLink(video_path, video_rect, False)

        # Definir imagem de pôster se fornecida
        if poster_image_path and os.path.exists(poster_image_path):
            video.PictureFill.Picture.Url = poster_image_path

        # Salvar a apresentação
        presentation.SaveToFile(output_path, FileFormat.Pptx2019)
        print(f"Criado com sucesso: {output_path}")
        print(f"   - Vídeo inserido no slide {slide_index + 1}")
        print(f"   - Modo: {'Incorporado' if embed_video else 'Vinculado'}")
        print(f"   - Posição: {position}")
        print(f"   - Tamanho: {size}")

        return True

    except Exception as e:
        print(f"Erro ao inserir vídeo: {e}")
        return False

    finally:
        # Limpar recursos
        if 'presentation' in locals():
            presentation.Dispose()


# Exemplos de uso
if __name__ == "__main__":

    # Exemplo 1: Uso básico (incorporar vídeo)
    insert_video_to_powerpoint(
        video_path="presentation_video.mp4",
        output_path="presentation_with_video.pptx"
    )

    # Exemplo 2: Inserir vídeo vinculado
    insert_video_to_powerpoint(
        video_path="demo_video.mp4",
        output_path="linked_video_slide.pptx",
        embed_video=False
    )

    # Exemplo 3: Posição e tamanho personalizados
    insert_video_to_powerpoint(
        video_path="demo_video.mp4",
        output_path="custom_video_slide.pptx",
        slide_index=2,  # Terceiro slide
        position=(150, 100),
        size=(500, 300)
    )

    # Exemplo 4: Com imagem de pôster
    if os.path.exists("video_thumbnail.png"):
        insert_video_to_powerpoint(
            video_path="demo_video.mp4",
            output_path="video_with_poster.pptx",
            poster_image_path="video_thumbnail.png"
        )

    # Exemplo 5: Processamento em lote de vários vídeos
    videos = [
        ("intro.mp4", 0, (100, 100)),
        ("tutorial.mp4", 1, (100, 100)),
        ("conclusion.mp4", 2, (100, 100))
    ]

    for video_file, slide_num, pos in videos:
        if os.path.exists(video_file):
            insert_video_to_powerpoint(
                video_path=video_file,
                output_path=f"batch_output_slide{slide_num}.pptx",
                slide_index=slide_num,
                position=pos
            )
Abaixo está uma prévia do arquivo PowerPoint gerado 'video_with_poster.pptx' com a inserção de vídeo:
O que Este Código Faz
Este exemplo demonstra como inserir programaticamente um vídeo em uma apresentação do PowerPoint usando Python. O script inclui vários recursos práticos que o tornam adequado para cenários de automação do mundo real.
A função realiza as seguintes operações:
- Cria uma apresentação do PowerPoint se uma não existir.
- Adiciona slides automaticamente quando o índice de slide especificado não existe.
- Insere um vídeo em um slide específico usando parâmetros de posição e tamanho personalizáveis.
- Suporta dois modos de inserção:
- Vídeo incorporado – armazena o vídeo dentro do arquivo PPT.
- Vídeo vinculado – referencia o vídeo como um arquivo externo para manter a apresentação menor.
- Opcionalmente, define uma imagem de pôster que aparece antes do início da reprodução do vídeo.
- Inclui tratamento de erros para evitar falhas quando os arquivos estão ausentes.
- Salva a apresentação gerada como um arquivo PPTX.
Os exemplos fornecidos demonstram vários cenários comuns:
- Inserção básica de vídeo
- Vincular um vídeo em vez de incorporá-lo
- Personalizando a posição e o tamanho do vídeo
- Adicionando uma miniatura de imagem de pôster
- Inserindo em lote vários vídeos em slides
Vantagens de Usar o Spire.Presentation
- Sem dependência do Microsoft Office
- Funciona em ambientes de servidor
- Suporta elementos multimídia
- Adequado para automação empresarial
Para equipes que geram um grande número de apresentações, essa abordagem oferece uma escalabilidade muito maior do que os métodos manuais.
Se você precisar gerenciar ainda mais arquivos de mídia usando Python, também pode aprender como inserir ou extrair vídeo e áudio em apresentações do PowerPoint.
8. Comparação de Precisão de Todos os Métodos
| Método | Facilidade de Uso | Tamanho do Arquivo | Internet Necessária | Automação | Melhor Para |
|---|---|---|---|---|---|
| Inserir Vídeo Local | Fácil | Grande | Não | Não | Apresentações portáteis |
| Incorporar Vídeo Online | Fácil | Pequeno | Sim | Não | Apresentações conectadas à internet |
| Anexar (Vincular) Vídeo | Médio | Pequeno | Não | Não | Arquivos grandes, armazenamento compartilhado |
| Automação com Python | Avançado | Flexível | Não | Sim | Fluxos de trabalho de automação de negócios |
9. Melhores Práticas para Inserção de Vídeo de Alta Qualidade
Para garantir os melhores resultados, siga estas melhores práticas:
Preparação do Vídeo
- Use o formato MP4 com vídeo H.264 e áudio AAC
- Otimize a resolução do vídeo (1080p ou inferior para apresentações)
- Comprima vídeos grandes antes de incorporar
- Teste a reprodução nos dispositivos de destino
Gerenciamento de Arquivos
- Mantenha os vídeos na mesma pasta da sua apresentação
- Use nomes de arquivo descritivos
- Mantenha cópias de backup dos arquivos de vídeo originais
- Considere o armazenamento em nuvem para vídeos vinculados
Recomendações Técnicas
- Use a inserção programática para fluxos de trabalho em lote
- Teste em sistemas Windows e Mac
- Valide a reprodução do vídeo antes das apresentações
- Considere o acesso à internet do público para vídeos incorporados
10. Perguntas Frequentes
1. Como insiro um vídeo no PowerPoint sem aumentar o tamanho do arquivo?
Sim. Você pode incorporar um vídeo online ou vincular a um arquivo local em vez de incorporá-lo. A vinculação mantém o arquivo PPT menor, mas requer acesso ao arquivo externo.
2. Como insiro um vídeo em um slide específico?
Simplesmente navegue até o slide de destino antes de usar Inserir → Vídeo. Em cenários de automação, você pode especificar o índice do slide programaticamente.
3. Qual é o melhor formato de vídeo para o PowerPoint?
MP4 com vídeo H.264 e áudio AAC é o formato mais compatível entre os sistemas Windows e Mac.
4. Por que meu vídeo não está sendo reproduzido no PowerPoint?
As razões comuns incluem codecs não suportados, arquivos corrompidos ou problemas de incorporação. Converter o vídeo para MP4 geralmente resolve o problema.
5. Posso inserir vídeos automaticamente no PowerPoint?
Sim. Usando bibliotecas Python como o Spire.Presentation, você pode inserir vídeos programaticamente em slides do PowerPoint, tornando-o ideal para processamento em lote e automação de backend.
11. Conclusão
Agora você sabe como inserir vídeo no PowerPoint usando várias abordagens:
- Inserir um arquivo de vídeo local
- Incorporar vídeo na apresentação do PowerPoint de fontes online
- Anexar um arquivo de vídeo vinculado
- Automatizar a inserção de vídeo usando Python
Para usuários individuais que criam apresentações ocasionais, as ferramentas integradas do PowerPoint são mais do que suficientes.
No entanto, para desenvolvedores, empresas e fluxos de trabalho empresariais que exigem geração de documentos escalável, a automação oferece uma solução muito mais eficiente e flexível.
A escolha do método certo depende inteiramente do seu caso de uso — simplicidade para edição manual ou escalabilidade para produção automatizada.
Para explorar todas as capacidades do Spire.Presentation for Python sem limitações, você pode solicitar uma licença temporária gratuita.
Veja Também
PowerPoint에 비디오 삽입하는 방법: 전체 가이드 (2026)
프레젠테이션에 비디오를 추가하는 것은 참여도를 높이는 가장 효과적인 방법 중 하나입니다. 교육 자료, 제품 데모, 마케팅 홍보 자료 또는 교육 자료를 만들 때 비디오를 사용하면 슬라이드를 더욱 역동적이고 설득력 있게 만들 수 있습니다.
이 전체 가이드에서는 PowerPoint 프레젠테이션에 비디오를 삽입하는 신뢰할 수 있는 방법을 설명합니다. 로컬 파일, 온라인 비디오, 연결된 파일에 대한 수동 접근 방식과 매우 정확한 프로그래밍 방식 솔루션을 배우게 됩니다. PowerPoint에 비디오를 삽입하거나, PowerPoint 프레젠테이션에 비디오를 포함하거나, 일괄 처리를 위해 전체 프로세스를 자동화해야 하는 경우 이 문서에서 필요한 실용적인 지식과 기술적 통찰력을 얻을 수 있습니다.
1. PowerPoint 프레젠테이션에 비디오를 추가해야 하는 이유
삽입 방법을 살펴보기 전에 비디오 통합이 왜 중요하며 어떤 문제에 직면할 수 있는지 이해하는 것이 중요합니다.
1.1 프레젠테이션에서 비디오의 이점
비디오 콘텐츠는 여러 가지 이점을 제공합니다.
- 참여도 증가 – 시청각 콘텐츠는 정적인 슬라이드보다 더 효과적으로 주의를 사로잡습니다.
- 복잡한 시연 – 텍스트로 설명하기 어려운 프로세스, 제품 또는 절차를 보여줍니다.
- 정서적 연결 – 비디오는 이미지 단독보다 더 강한 정서적 영향을 줄 수 있습니다.
- 전문적인 완성도 – 고품질 비디오 콘텐츠는 프레젠테이션 품질을 높입니다.
1.2 일반적인 과제
그러나 비디오를 삽입하는 데에는 몇 가지 기술적인 문제가 있습니다.
- 파일 크기 문제 – 포함된 비디오는 PPT 파일 크기를 크게 늘릴 수 있습니다.
- 형식 호환성 – 모든 비디오 형식이 다른 PowerPoint 버전에서 작동하는 것은 아닙니다.
- 재생 문제 – 코덱 문제로 인해 비디오가 올바르게 재생되지 않을 수 있습니다.
- 이식성 – 프레젠테이션을 공유할 때 연결된 비디오가 깨질 수 있습니다.
이러한 과제를 이해하면 특정 사용 사례에 적합한 삽입 방법을 선택하는 데 도움이 됩니다.
2. 신뢰할 수 있는 방법 개요
이 가이드에서는 PowerPoint 프레젠테이션에 비디오를 삽입하는 네 가지 실용적인 방법을 다룹니다.
- 로컬 비디오 파일 삽입 – 가장 일반적인 방법, 오프라인에서 작동
- 온라인 비디오 포함 – 파일 크기를 작게 유지, 인터넷 필요
- 외부 비디오 파일에 링크 – 크기와 제어의 균형
- 프로그래밍 방식 삽입 – 자동화 및 일괄 처리
팁: 대부분의 수동 방법은 개별 슬라이드에 비디오를 삽입합니다. 여러 프레젠테이션에 비디오를 삽입하거나 프로세스를 자동화해야 하는 경우 프로그래밍 방식이 가장 효율적입니다.
가장 유연한 방법은 Python 자동화를 사용하는 것입니다. 이를 통해 일괄 처리, 서버 측 생성 및 비즈니스 워크플로와의 통합이 가능합니다.
3. 방법 1: 컴퓨터에서 비디오 삽입 (로컬 파일)
PowerPoint 슬라이드에 비디오를 삽입하는 가장 간단한 방법은 컴퓨터에 저장된 로컬 비디오 파일을 추가하는 것입니다.
단계별 지침
팁: 시작하기 전에 비디오 파일이 지원되는 형식인지 확인하십시오. H.264 인코딩이 적용된 MP4가 가장 잘 작동합니다.
-
PowerPoint 프레젠테이션 열기 - PowerPoint를 시작하고 비디오를 추가할 프레젠테이션을 엽니다.
-
대상 슬라이드로 이동 - 비디오가 나타나야 할 특정 슬라이드로 이동합니다.
-
삽입 탭 클릭 - 상단 메뉴 리본에 있습니다.
-
비디오 선택 - 미디어 그룹에서 비디오 버튼을 클릭합니다.
-
이 장치 선택 - 드롭다운 메뉴에서 "이 장치"를 선택합니다.
-
선택 및 삽입 - 비디오 파일을 찾아 선택하고 삽입을 클릭합니다.
비디오가 슬라이드에 미디어 개체로 나타납니다. 다음을 수행할 수 있습니다.
- 모서리를 드래그하여 크기 조정
- 클릭하고 드래그하여 위치 변경
- 회전 핸들을 사용하여 회전
이것은 PowerPoint 슬라이드에 비디오를 삽입하는 가장 간단한 방법이며 완전히 오프라인으로 작동합니다.
지원되는 비디오 형식
PowerPoint는 다음을 포함한 여러 비디오 형식을 지원합니다.
- MP4 (호환성을 위해 권장)
- MOV
- M4V
- WEBM
최상의 결과를 얻으려면 H.264 비디오 및 AAC 오디오로 인코딩된 MP4를 사용하십시오.
지원되는 미디어 형식의 전체 목록은 PowerPoint에서 지원되는 비디오 및 오디오 파일 형식에 대한 공식 Microsoft 가이드에서 찾을 수 있습니다.
재생 설정 조정
비디오를 삽입한 후 재생 옵션을 사용자 지정할 수 있습니다.
- 자동 시작 또는 클릭 시
- 전체 화면 재생
- 중지할 때까지 반복
- 비디오 자르기
- 페이드 인 / 페이드 아웃
이러한 옵션은 비디오를 선택하면 재생 탭에서 사용할 수 있습니다.
로컬 비디오 삽입의 장단점
장점
- 사용하기 쉬움
- 오프라인에서 작동
- 전체 재생 제어
단점
- PPT 파일 크기 증가
- 파일이 너무 커지면 공유 문제가 발생할 수 있음
로컬 삽입은 휴대 가능하고 오프라인에서 작동해야 하는 프레젠테이션에 가장 적합합니다.
참고: 포함된 비디오는 최신 PPTX 프레젠테이션에서 지원됩니다. 이전 PPT 파일로 작업하는 경우 먼저 PPTX 형식으로 변환하는 것을 고려하십시오. PPT를 PPTX로 변환하는 방법에 대한 가이드를 참조하십시오.
4. 방법 2: PowerPoint 프레젠테이션에 비디오 포함 (온라인 비디오)
또 다른 인기 있는 접근 방식은 YouTube와 같은 온라인 소스에서 직접 PowerPoint 프레젠테이션에 비디오를 포함하는 것입니다.
이 방법은 비디오가 프레젠테이션 내부에 저장되는 대신 스트리밍되기 때문에 파일 크기를 작게 유지합니다.
YouTube 비디오를 포함하는 방법
-
비디오를 원하는 슬라이드로 이동합니다.
-
삽입 → 비디오 → 온라인 비디오를 클릭합니다.
-
비디오 URL 또는 포함 코드를 붙여넣습니다.
-
삽입을 클릭합니다.
PowerPoint는 슬라이드에 포함된 비디오 프레임을 만듭니다.
포함 기능을 사용해야 하는 경우
포함 기능은 다음과 같은 경우에 이상적입니다.
- PPT 파일 크기를 줄이고 싶을 때
- 비디오가 온라인에 공개적으로 호스팅될 때
- 자주 업데이트되는 콘텐츠가 필요할 때
포함된 비디오의 제한 사항
그러나 몇 가지 중요한 고려 사항이 있습니다.
- 프레젠테이션 중에 인터넷 연결이 필요합니다.
- 회사 방화벽 뒤에서는 작동하지 않을 수 있습니다.
- 온라인에서 제거되면 비디오를 사용할 수 없게 될 수 있습니다.
- 비디오 플랫폼은 재생 전에 로그인이 필요할 수 있습니다.
안정성이 중요한 경우 로컬 삽입이 더 안전할 수 있습니다.
5. 방법 3: PPT에 비디오 첨부하는 방법 (포함 대신 링크)
일부 사용자는 비디오를 완전히 포함하는 대신 PPT에 비디오를 첨부하는 방법을 묻습니다.
이 방법은 프레젠테이션 내부에 저장하는 대신 외부 비디오 파일에 연결합니다.
포함 대 첨부: 차이점은 무엇입니까?
| 기능 | 비디오 포함 | 비디오 첨부(링크) |
|---|---|---|
| PPT 내부에 저장됨 | 예 | 아니요 |
| 파일 크기 | 더 큼 | 더 작음 |
| 인터넷 필요 | 아니요 | 아니요 (로컬인 경우) |
| 깨진 링크의 위험 | 아니요 | 예 |
비디오 파일을 연결하는 방법
-
삽입 → 비디오 → 이 장치로 이동합니다.
-
비디오 파일을 선택합니다.
-
삽입 옆에 있는 드롭다운 화살표를 클릭합니다.
-
삽입 대신 파일에 연결을 선택합니다.
이제 PPT는 외부에서 비디오를 참조합니다.
연결이 합리적인 경우
- 매우 큰 비디오 파일
- 공유 네트워크 스토리지 환경
- 중앙 집중식 미디어 관리
프레젠테이션을 공유할 때 주의하십시오 — 비디오 파일을 함께 보내야 합니다.
슬라이드에 데이터 시각화를 추가하는 경우 PowerPoint에 차트를 삽입하는 방법을 배우고 싶을 수 있습니다.
6. PowerPoint에 비디오를 삽입할 때 발생하는 일반적인 문제
PowerPoint 프레젠테이션에 비디오를 추가하는 방법을 알고 있더라도 문제가 발생할 수 있습니다.
다음은 몇 가지 일반적인 문제와 해결 방법입니다.
6.1 비디오가 재생되지 않음
지원되지 않는 코덱으로 인해 종종 발생합니다.
해결책: 비디오를 MP4(H.264 + AAC)로 변환합니다.
6.2 파일이 너무 큼
고해상도 비디오를 포함하면 PPT 크기가 크게 늘어날 수 있습니다.
해결책: 파일 → 정보 → 미디어 압축을 사용하여 미디어를 압축합니다.
6.3 호환성 문제 (Mac 대 Windows)
일부 형식은 시스템마다 다르게 작동합니다.
해결책: 최대 호환성을 위해 MP4를 사용합니다.
6.4 재생 중 지연
큰 비디오나 느린 하드웨어로 인해 끊김 현상이 발생할 수 있습니다.
해결책: 비디오 해상도를 최적화하거나 연결된 파일을 사용합니다.
7. 방법 4: Python을 사용하여 PowerPoint에 비디오 삽입 (자동화된 솔루션)
개발자와 기업을 위해 Python은 PowerPoint 생성 및 비디오 삽입을 자동화하는 강력한 방법을 제공합니다.
Spire.Presentation for Python을 사용하면 Microsoft Office 없이 슬라이드에 비디오를 삽입할 수 있습니다.
PowerPoint 자동화에 Python을 사용하는 이유
- 프레젠테이션 일괄 처리
- 백엔드 시스템과의 통합
- 서버 측 문서 생성
- 수동 UI 상호 작용 없음
- 반복 가능한 워크플로
라이브러리 설치
pip install Spire.Presentation
빠른 예제: Python으로 PowerPoint에 비디오 삽입
최소한의 예제만 필요한 경우 다음 코드는 새 PowerPoint 프레젠테이션의 첫 번째 슬라이드에 비디오를 삽입합니다.
from spire.presentation import *

# 프레젠테이션 만들기
presentation = Presentation()

# 첫 번째 슬라이드에 비디오 추가
slide = presentation.Slides[0]

video_rect = RectangleF.FromLTRB(100, 100, 500, 400)
slide.Shapes.AppendVideoMedia("demo_video.mp4", video_rect)

# 프레젠테이션 저장
presentation.SaveToFile("video_demo.pptx", FileFormat.Pptx2019)
presentation.Dispose()
이 최소한의 예제는 새 PowerPoint 프레젠테이션을 만들고 Python 코드를 사용하여 지정된 위치의 첫 번째 슬라이드에 비디오를 삽입하는 방법을 보여줍니다.
### 고급 예제: Python을 사용하여 PowerPoint에 비디오 삽입 또는 연결
다음은 오류 처리 및 추가 옵션이 포함된 향상된 예제입니다.
from spire.presentation import *
import os
from pathlib import Path


def insert_video_to_powerpoint(video_path, output_path, slide_index=0, position=(100, 100), size=(400, 300),
                               poster_image_path=None, embed_video=True):
    """
    프로그래밍 방식으로 PowerPoint 프레젠테이션에 비디오 삽입

    Args:
        video_path: 비디오 파일 경로 (MP4, MOV, WMV, AVI)
        output_path: 출력 PowerPoint 파일 경로 (.pptx)
        slide_index: 비디오를 삽입해야 하는 슬라이드 번호 (0부터 시작)
        position: 비디오 배치를 위한 튜플 (x, y) 좌표
        size: 비디오 크기를 위한 튜플 (너비, 높이)
        poster_image_path: 비디오의 포스터/썸네일 이미지에 대한 선택적 경로
        embed_video: 비디오를 포함할지(True) 또는 비디오 파일에 연결할지(False)를 나타내는 부울 값
    """
    try:
        # 입력 파일 유효성 검사
        if not os.path.exists(video_path):
            raise FileNotFoundError(f"비디오 파일을 찾을 수 없음: {video_path}")

        # 파일 확장자 확인
        valid_extensions = {'.mp4', '.mov', '.wmv', '.avi'}
        file_ext = Path(video_path).suffix.lower()
        if file_ext not in valid_extensions:
            print(f"경고: {file_ext}는 완전히 지원되지 않을 수 있습니다. MP4를 권장합니다.")

        # 프레젠테이션 개체 만들기
        presentation = Presentation()

        # 슬라이드가 충분한지 확인
        while presentation.Slides.Count <= slide_index:
            presentation.Slides.Append()

        # 대상 슬라이드 가져오기
        slide = presentation.Slides[slide_index]

        # 비디오 위치 및 크기에 대한 사각형 만들기
        video_rect = RectangleF.FromLTRB(
            position[0],
            position[1],
            position[0] + size[0],
            position[1] + size[1]
        )

        # 포함 모드에 따라 비디오 삽입
        if embed_video:
            # 프레젠테이션에 비디오 포함
            video = slide.Shapes.AppendVideoMedia(video_path, video_rect)
        else:
            # 비디오를 링크로 삽입 (외부 파일 참조)
            video = slide.Shapes.AppendVideoMediaLink(video_path, video_rect, False)

        # 제공된 경우 포스터 이미지 설정
        if poster_image_path and os.path.exists(poster_image_path):
            video.PictureFill.Picture.Url = poster_image_path

        # 프레젠테이션 저장
        presentation.SaveToFile(output_path, FileFormat.Pptx2019)
        print(f"성공적으로 생성됨: {output_path}")
        print(f"   - 슬라이드 {slide_index + 1}에 비디오 삽입됨")
        print(f"   - 모드: {'포함됨' if embed_video else '연결됨'}")
        print(f"   - 위치: {position}")
        print(f"   - 크기: {size}")

        return True

    except Exception as e:
        print(f"비디오 삽입 오류: {e}")
        return False

    finally:
        # 리소스 정리
        if 'presentation' in locals():
            presentation.Dispose()


# 사용 예
if __name__ == "__main__":

    # 예 1: 기본 사용법 (비디오 포함)
    insert_video_to_powerpoint(
        video_path="presentation_video.mp4",
        output_path="presentation_with_video.pptx"
    )

    # 예 2: 연결된 비디오 삽입
    insert_video_to_powerpoint(
        video_path="demo_video.mp4",
        output_path="linked_video_slide.pptx",
        embed_video=False
    )

    # 예 3: 사용자 지정 위치 및 크기
    insert_video_to_powerpoint(
        video_path="demo_video.mp4",
        output_path="custom_video_slide.pptx",
        slide_index=2,  # 세 번째 슬라이드
        position=(150, 100),
        size=(500, 300)
    )

    # 예 4: 포스터 이미지 포함
    if os.path.exists("video_thumbnail.png"):
        insert_video_to_powerpoint(
            video_path="demo_video.mp4",
            output_path="video_with_poster.pptx",
            poster_image_path="video_thumbnail.png"
        )

    # 예 5: 여러 비디오 일괄 처리
    videos = [
        ("intro.mp4", 0, (100, 100)),
        ("tutorial.mp4", 1, (100, 100)),
        ("conclusion.mp4", 2, (100, 100))
    ]

    for video_file, slide_num, pos in videos:
        if os.path.exists(video_file):
            insert_video_to_powerpoint(
                video_path=video_file,
                output_path=f"batch_output_slide{slide_num}.pptx",
                slide_index=slide_num,
                position=pos
            )
다음은 비디오가 삽입된 생성된 PowerPoint 파일 'video_with_poster.pptx'의 미리보기입니다.
이 코드의 기능
이 예제는 Python을 사용하여 프로그래밍 방식으로 PowerPoint 프레젠테이션에 비디오를 삽입하는 방법을 보여줍니다. 이 스크립트에는 실제 자동화 시나리오에 적합한 몇 가지 실용적인 기능이 포함되어 있습니다.
이 함수는 다음 작업을 수행합니다.
- 아직 없는 경우 PowerPoint 프레젠테이션을 만듭니다.
- 지정된 슬라이드 인덱스가 존재하지 않을 때 자동으로 슬라이드를 추가합니다.
- 사용자 지정 가능한 위치 및 크기 매개변수를 사용하여 특정 슬라이드에 비디오를 삽입합니다.
- 두 가지 삽입 모드를 지원합니다:
- 포함된 비디오 – PPT 파일 내부에 비디오를 저장합니다.
- 연결된 비디오 – 프레젠테이션을 더 작게 유지하기 위해 비디오를 외부 파일로 참조합니다.
- 비디오 재생이 시작되기 전에 나타나는 포스터 이미지를 선택적으로 설정합니다.
- 파일이 누락되었을 때 실패를 방지하기 위해 오류 처리를 포함합니다.
- 생성된 프레젠테이션을 PPTX 파일로 저장합니다.
제공된 예제는 몇 가지 일반적인 시나리오를 보여줍니다.
- 기본 비디오 삽입
- 비디오를 포함하는 대신 연결
- 비디오 위치 및 크기 사용자 지정
- 포스터 이미지 썸네일 추가
- 여러 슬라이드에 걸쳐 여러 비디오 일괄 삽입
Spire.Presentation 사용의 이점
- Microsoft Office에 대한 종속성 없음
- 서버 환경에서 작동
- 멀티미디어 요소 지원
- 엔터프라이즈 자동화에 적합
많은 수의 프레젠테이션을 생성하는 팀의 경우 이 접근 방식은 수동 방법보다 훨씬 뛰어난 확장성을 제공합니다.
Python을 사용하여 미디어 파일을 추가로 관리해야 하는 경우 PowerPoint 프레젠테이션에서 비디오 및 오디오를 삽입하거나 추출하는 방법도 배울 수 있습니다.
8. 모든 방법의 정확도 비교
| 방법 | 사용 용이성 | 파일 크기 | 인터넷 필요 | 자동화 | 최적 대상 |
|---|---|---|---|---|---|
| 로컬 비디오 삽입 | 쉬움 | 큼 | 아니요 | 아니요 | 휴대용 프레젠테이션 |
| 온라인 비디오 포함 | 쉬움 | 작음 | 예 | 아니요 | 인터넷 연결 프레젠테이션 |
| 비디오 첨부(링크) | 중간 | 작음 | 아니요 | 아니요 | 대용량 파일, 공유 스토리지 |
| Python 자동화 | 고급 | 유연함 | 아니요 | 예 | 비즈니스 자동화 워크플로 |
9. 고품질 비디오 삽입을 위한 모범 사례
최상의 결과를 보장하려면 다음 모범 사례를 따르십시오.
비디오 준비
- H.264 비디오 및 AAC 오디오가 포함된 MP4 형식 사용
- 비디오 해상도 최적화 (프레젠테이션의 경우 1080p 이하)
- 포함하기 전에 대용량 비디오 압축
- 대상 장치에서 재생 테스트
파일 관리
- 비디오를 프레젠테이션과 동일한 폴더에 보관
- 설명적인 파일 이름 사용
- 원본 비디오 파일의 백업 사본 유지
- 연결된 비디오에 대한 클라우드 스토리지 고려
기술 권장 사항
- 일괄 워크플로에 프로그래밍 방식 삽입 사용
- Windows 및 Mac 시스템 모두에서 테스트
- 프레젠테이션 전에 비디오 재생 확인
- 포함된 비디오에 대한 청중의 인터넷 액세스 고려
10. 자주 묻는 질문
1. 파일 크기를 늘리지 않고 PowerPoint에 비디오를 삽입하려면 어떻게 해야 합니까?
예. 온라인 비디오를 포함하거나 로컬 파일에 연결하여 포함하는 대신 사용할 수 있습니다. 연결하면 PPT 파일이 더 작아지지만 외부 파일에 액세스해야 합니다.
2. 특정 슬라이드에 비디오를 삽입하려면 어떻게 해야 합니까?
삽입 → 비디오를 사용하기 전에 대상 슬라이드로 이동하기만 하면 됩니다. 자동화 시나리오에서는 프로그래밍 방식으로 슬라이드 인덱스를 지정할 수 있습니다.
3. PowerPoint에 가장 적합한 비디오 형식은 무엇입니까?
H.264 비디오 및 AAC 오디오가 포함된 MP4는 Windows 및 Mac 시스템에서 가장 호환되는 형식입니다.
4. PowerPoint에서 비디오가 재생되지 않는 이유는 무엇입니까?
일반적인 원인으로는 지원되지 않는 코덱, 손상된 파일 또는 포함 문제가 있습니다. 비디오를 MP4로 변환하면 일반적으로 문제가 해결됩니다.
5. PowerPoint에 비디오를 자동으로 삽입할 수 있습니까?
예. Spire.Presentation과 같은 Python 라이브러리를 사용하면 프로그래밍 방식으로 PowerPoint 슬라이드에 비디오를 삽입할 수 있으므로 일괄 처리 및 백엔드 자동화에 이상적입니다.
11. 결론
이제 여러 가지 방법을 사용하여 PowerPoint에 비디오를 삽입하는 방법을 알게 되었습니다.
- 로컬 비디오 파일 삽입
- 온라인 소스에서 PowerPoint 프레젠테이션에 비디오 포함
- 연결된 비디오 파일 첨부
- Python을 사용하여 비디오 삽입 자동화
가끔 프레젠테이션을 만드는 개인 사용자의 경우 PowerPoint의 기본 제공 도구만으로도 충분합니다.
그러나 확장 가능한 문서 생성이 필요한 개발자, 기업 및 엔터프라이즈 워크플로의 경우 자동화는 훨씬 더 효율적이고 유연한 솔루션을 제공합니다.
올바른 방법을 선택하는 것은 전적으로 사용 사례에 따라 다릅니다. 수동 편집의 단순성 또는 자동화된 생산의 확장성입니다.
제한 없이 Spire.Presentation for Python의 전체 기능을 탐색하려면 무료 임시 라이선스를 신청할 수 있습니다.
참고 항목
Come inserire video in PowerPoint: guida completa (2026)
Aggiungere video a una presentazione è uno dei modi più efficaci per aumentare il coinvolgimento. Che tu stia creando una presentazione di formazione, una demo di prodotto, una proposta di marketing o materiale didattico, il video può rendere le tue diapositive più dinamiche e persuasive.
Questa guida completa spiega metodi affidabili per inserire video nelle presentazioni di PowerPoint. Imparerai approcci manuali per file locali, video online, file collegati e soluzioni programmatiche altamente accurate. Se hai bisogno di inserire video in PowerPoint, incorporare video in una presentazione di PowerPoint o automatizzare l'intero processo per l'elaborazione in batch, questo articolo fornisce le conoscenze pratiche e le intuizioni tecniche di cui hai bisogno.
1. Perché Aggiungere Video alle Presentazioni di PowerPoint
Prima di esplorare i metodi di inserimento, è importante capire perché l'integrazione video è importante e quali sfide potresti incontrare.
1.1 Vantaggi dei Video nelle Presentazioni
I contenuti video offrono diversi vantaggi:
- Maggiore coinvolgimento – I contenuti visivi e uditivi catturano l'attenzione in modo più efficace rispetto alle diapositive statiche
- Dimostrazioni complesse – Mostra processi, prodotti o procedure difficili da spiegare con il testo
- Connessione emotiva – I video possono creare un impatto emotivo più forte rispetto alle sole immagini
- Tocco professionale – Contenuti video di alta qualità elevano la qualità della presentazione
1.2 Sfide Comuni
Tuttavia, l'inserimento di video presenta diverse sfide tecniche:
- Preoccupazioni per le dimensioni del file – I video incorporati possono aumentare notevolmente le dimensioni del file PPT
- Compatibilità dei formati – Non tutti i formati video funzionano su diverse versioni di PowerPoint
- Problemi di riproduzione – Problemi con i codec possono impedire la riproduzione corretta dei video
- Portabilità – I video collegati potrebbero non funzionare quando si condividono le presentazioni
Comprendere queste sfide ti aiuta a selezionare il metodo di inserimento giusto per il tuo caso d'uso specifico.
2. Panoramica dei Metodi Affidabili
Questa guida copre quattro modi pratici per inserire video nelle presentazioni di PowerPoint:
- Inserisci file video locale – metodo più comune, funziona offline
- Incorpora video online – mantiene ridotte le dimensioni del file, richiede internet
- Collega a file video esterno – bilancia dimensioni e controllo
- Inserimento programmatico – automazione ed elaborazione in batch
Suggerimento: La maggior parte dei metodi manuali inserisce video in singole diapositive. Se hai bisogno di inserire video in più presentazioni o di automatizzare il processo, l'approccio programmatico è il più efficiente.
Il metodo più flessibile è l'utilizzo dell'automazione con Python, che consente l'elaborazione in batch, la generazione lato server e l'integrazione con i flussi di lavoro aziendali.
3. Metodo 1: Inserisci Video dal Tuo Computer (File Locale)
Il modo più semplice per inserire un video in una diapositiva di PowerPoint è aggiungere un file video locale memorizzato sul tuo computer.
Istruzioni Passo-Passo
Suggerimento: Assicurati che il tuo file video sia in un formato supportato prima di iniziare. MP4 con codifica H.264 funziona meglio.
-
Apri la tua presentazione di PowerPoint - Avvia PowerPoint e apri la presentazione in cui desideri aggiungere il video.
-
Vai alla diapositiva di destinazione - Vai alla diapositiva specifica in cui dovrebbe apparire il video.
-
Fai clic sulla scheda Inserisci - Situata nella barra dei menu in alto.
-
Seleziona Video - Nel gruppo Media, fai clic sul pulsante Video.
-
Scegli Questo dispositivo - Seleziona "Questo dispositivo" dal menu a discesa.
-
Seleziona e inserisci - Cerca il tuo file video, selezionalo e fai clic su Inserisci.
Il video apparirà sulla diapositiva come un oggetto multimediale. Puoi:
- Ridimensionare trascinando gli angoli
- Riposizionare facendo clic e trascinando
- Ruotare usando la maniglia di rotazione
Questo è il modo più diretto per inserire video nelle diapositive di PowerPoint e funziona interamente offline.
Formati Video Supportati
PowerPoint supporta diversi formati video, tra cui:
- MP4 (consigliato per la compatibilità)
- MOV
- M4V
- WEBM
Per ottenere i migliori risultati, utilizza MP4 codificato con video H.264 e audio AAC.
Puoi trovare l'elenco completo dei formati multimediali supportati nella guida ufficiale di Microsoft sui formati di file video e audio supportati in PowerPoint.
Regolazione delle Impostazioni di Riproduzione
Dopo aver inserito il video, puoi personalizzare le opzioni di riproduzione:
- Avvia automaticamente o Al clic del mouse
- Riproduci a schermo intero
- Esegui ciclo continuo fino a interruzione
- Taglia video
- Dissolvenza in entrata / Dissolvenza in uscita
Queste opzioni sono disponibili nella scheda Riproduzione una volta selezionato il video.
Vantaggi e Svantaggi dell'Inserimento di Video Locali
Vantaggi
- Facile da usare
- Funziona offline
- Controllo completo della riproduzione
Svantaggi
- Aumenta le dimensioni del file PPT
- Può causare problemi di condivisione se il file diventa troppo grande
L'inserimento locale è ideale per le presentazioni che devono essere portatili e funzionare offline.
Nota: I video incorporati sono supportati nelle moderne presentazioni PPTX. Se stai lavorando con un file PPT più vecchio, considera prima di convertirlo in formato PPTX. Consulta la nostra guida su come convertire PPT in PPTX.
4. Metodo 2: Incorpora Video in una Presentazione di PowerPoint (Video Online)
Un altro approccio popolare è incorporare video in una presentazione di PowerPoint direttamente da una fonte online come YouTube.
Questo metodo mantiene ridotte le dimensioni del file perché il video viene trasmesso in streaming anziché essere memorizzato all'interno della presentazione.
Come Incorporare un Video di YouTube
-
Vai alla diapositiva in cui desideri il video.
-
Fai clic su Inserisci → Video → Video online.
-
Incolla l'URL del video o il codice di incorporamento.
-
Fai clic su Inserisci.
PowerPoint creerà un riquadro video incorporato sulla diapositiva.
Quando Usare l'Incorporamento
L'incorporamento è ideale quando:
- Vuoi ridurre le dimensioni del file PPT
- Il video è ospitato pubblicamente online
- Hai bisogno di contenuti aggiornati di frequente
Limitazioni dei Video Incorporati
Tuttavia, ci sono alcune considerazioni importanti:
- Richiede una connessione a Internet durante la presentazione
- Potrebbe non funzionare dietro i firewall aziendali
- Il video potrebbe diventare non disponibile se rimosso online
- Le piattaforme video potrebbero richiedere l'accesso prima della riproduzione
Se l'affidabilità è fondamentale, l'inserimento locale potrebbe essere più sicuro.
5. Metodo 3: Come Allegare un Video in PPT (Collegamento Invece di Incorporamento)
Alcuni utenti chiedono come allegare un video in PPT anziché incorporarlo completamente.
Questo metodo si collega a un file video esterno invece di memorizzarlo all'interno della presentazione.
Incorpora vs Allega: Qual è la Differenza?
| Caratteristica | Incorpora Video | Allega (Collega) Video |
|---|---|---|
| Memorizzato nel PPT | Sì | No |
| Dimensione del file | Più grande | Più piccolo |
| Internet richiesto | No | No (se locale) |
| Rischio di collegamento interrotto | No | Sì |
Come Collegare un File Video
-
Vai a Inserisci → Video → Questo dispositivo.
-
Seleziona il file video.
-
Fai clic sulla freccia a discesa accanto a Inserisci.
-
Scegli Collega al file invece di Inserisci.
Ora il PPT farà riferimento al video esternamente.
Quando il Collegamento ha Senso
- File video molto grandi
- Ambienti di archiviazione di rete condivisi
- Gestione centralizzata dei media
Fai attenzione quando condividi la presentazione — devi inviare anche il file video.
Se stai anche aggiungendo visualizzazioni di dati alle tue diapositive, potresti voler imparare come inserire un grafico in PowerPoint.
6. Problemi Comuni Durante l'Inserimento di Video in PowerPoint
Anche quando sai come aggiungere un video in una presentazione di PowerPoint, possono comunque verificarsi problemi.
Ecco alcuni problemi comuni e le loro soluzioni:
6.1 Il Video Non Viene Riprodoto
Spesso causato da codec non supportati.
Soluzione: Converti il video in MP4 (H.264 + AAC).
6.2 File Troppo Grande
L'incorporamento di video ad alta risoluzione può aumentare notevolmente le dimensioni del PPT.
Soluzione: Comprimi i media usando File → Informazioni → Comprimi media.
6.3 Problemi di Compatibilità (Mac vs Windows)
Alcuni formati si comportano in modo diverso su sistemi diversi.
Soluzione: Usa MP4 per la massima compatibilità.
6.4 Ritardo Durante la Riproduzione
Video di grandi dimensioni o hardware lento possono causare interruzioni.
Soluzione: Ottimizza la risoluzione del video o usa un file collegato.
7. Metodo 4: Inserire Video in PowerPoint Usando Python (Soluzione Automatizzata)
Per sviluppatori e aziende, Python offre un modo potente per automatizzare la creazione di PowerPoint e l'inserimento di video.
Usando Spire.Presentation for Python, puoi inserire video nelle diapositive senza richiedere Microsoft Office.
Perché Usare Python per l'Automazione di PowerPoint?
- Elaborazione in batch delle presentazioni
- Integrazione con i sistemi backend
- Generazione di documenti lato server
- Nessuna interazione manuale con l'interfaccia utente
- Flussi di lavoro ripetibili
Installa la Libreria
pip install Spire.Presentation
Esempio Rapido: Inserire Video in PowerPoint con Python
Se hai solo bisogno di un esempio minimo, il seguente codice inserisce un video nella prima diapositiva di una nuova presentazione di PowerPoint.
from spire.presentation import *

# Create presentation
presentation = Presentation()

# Add video to first slide
slide = presentation.Slides[0]

video_rect = RectangleF.FromLTRB(100, 100, 500, 400)
slide.Shapes.AppendVideoMedia("demo_video.mp4", video_rect)

# Save presentation
presentation.SaveToFile("video_demo.pptx", FileFormat.Pptx2019)
presentation.Dispose()
Questo esempio minimo mostra come creare una nuova presentazione di PowerPoint e inserisce un video nella prima diapositiva nella posizione specificata con il codice Python.
### Esempio Avanzato: Inserire o Collegare Video in PowerPoint Usando Python
Di seguito è riportato un esempio avanzato con gestione degli errori e opzioni aggiuntive:
from spire.presentation import *
import os
from pathlib import Path


def insert_video_to_powerpoint(video_path, output_path, slide_index=0, position=(100, 100), size=(400, 300),
                               poster_image_path=None, embed_video=True):
    """
    Inserisci un video in una presentazione di PowerPoint programmaticamente

    Args:
        video_path: Percorso del file video (MP4, MOV, WMV, AVI)
        output_path: Percorso del file PowerPoint di output (.pptx)
        slide_index: Numero della diapositiva (base 0) in cui inserire il video
        position: Coordinate (x, y) per il posizionamento del video
        size: Tupla (larghezza, altezza) per le dimensioni del video
        poster_image_path: Percorso opzionale dell'immagine poster/miniatura per il video
        embed_video: Valore booleano che indica se incorporare il video (True) o collegare al file video (False)
    """
    try:
        # Validate input file
        if not os.path.exists(video_path):
            raise FileNotFoundError(f"Video file not found: {video_path}")

        # Check file extension
        valid_extensions = {'.mp4', '.mov', '.wmv', '.avi'}
        file_ext = Path(video_path).suffix.lower()
        if file_ext not in valid_extensions:
            print(f"Warning: {file_ext} may not be fully supported. MP4 is recommended.")

        # Create presentation object
        presentation = Presentation()

        # Ensure we have enough slides
        while presentation.Slides.Count <= slide_index:
            presentation.Slides.Append()

        # Get target slide
        slide = presentation.Slides[slide_index]

        # Create rectangle for video position and size
        video_rect = RectangleF.FromLTRB(
            position[0],
            position[1],
            position[0] + size[0],
            position[1] + size[1]
        )

        # Insert video based on embedding mode
        if embed_video:
            # Embed the video into the presentation
            video = slide.Shapes.AppendVideoMedia(video_path, video_rect)
        else:
            # Insert the video as a link (external file reference)
            video = slide.Shapes.AppendVideoMediaLink(video_path, video_rect, False)

        # Set poster image if provided
        if poster_image_path and os.path.exists(poster_image_path):
            video.PictureFill.Picture.Url = poster_image_path

        # Save the presentation
        presentation.SaveToFile(output_path, FileFormat.Pptx2019)
        print(f"Successfully created: {output_path}")
        print(f"   - Video inserted at slide {slide_index + 1}")
        print(f"   - Mode: {'Embedded' if embed_video else 'Linked'}")
        print(f"   - Position: {position}")
        print(f"   - Size: {size}")

        return True

    except Exception as e:
        print(f"Error inserting video: {e}")
        return False

    finally:
        # Clean up resources
        if 'presentation' in locals():
            presentation.Dispose()


# Usage examples
if __name__ == "__main__":

    # Example 1: Basic usage (embed video)
    insert_video_to_powerpoint(
        video_path="presentation_video.mp4",
        output_path="presentation_with_video.pptx"
    )

    # Example 2: Insert linked video
    insert_video_to_powerpoint(
        video_path="demo_video.mp4",
        output_path="linked_video_slide.pptx",
        embed_video=False
    )

    # Example 3: Custom position and size
    insert_video_to_powerpoint(
        video_path="demo_video.mp4",
        output_path="custom_video_slide.pptx",
        slide_index=2,  # Third slide
        position=(150, 100),
        size=(500, 300)
    )

    # Example 4: With poster image
    if os.path.exists("video_thumbnail.png"):
        insert_video_to_powerpoint(
            video_path="demo_video.mp4",
            output_path="video_with_poster.pptx",
            poster_image_path="video_thumbnail.png"
        )

    # Example 5: Batch processing multiple videos
    videos = [
        ("intro.mp4", 0, (100, 100)),
        ("tutorial.mp4", 1, (100, 100)),
        ("conclusion.mp4", 2, (100, 100))
    ]

    for video_file, slide_num, pos in videos:
        if os.path.exists(video_file):
            insert_video_to_powerpoint(
                video_path=video_file,
                output_path=f"batch_output_slide{slide_num}.pptx",
                slide_index=slide_num,
                position=pos
            )
Di seguito è riportata un'anteprima del file PowerPoint generato 'video_with_poster.pptx' con l'inserimento del video:
Cosa Fa Questo Codice
Questo esempio dimostra come inserire programmaticamente un video in una presentazione di PowerPoint utilizzando Python. Lo script include diverse funzionalità pratiche che lo rendono adatto a scenari di automazione del mondo reale.
La funzione esegue le seguenti operazioni:
- Crea una presentazione di PowerPoint se non ne esiste già una.
- Aggiunge automaticamente diapositive quando l'indice della diapositiva specificato non esiste.
- Inserisce un video in una diapositiva specifica utilizzando parametri di posizione e dimensione personalizzabili.
- Supporta due modalità di inserimento:
- Video incorporato – memorizza il video all'interno del file PPT.
- Video collegato – fa riferimento al video come file esterno per mantenere la presentazione più piccola.
- Imposta facoltativamente un'immagine poster che appare prima dell'inizio della riproduzione del video.
- Include la gestione degli errori per prevenire fallimenti quando i file sono mancanti.
- Salva la presentazione generata come file PPTX.
Gli esempi forniti dimostrano diversi scenari comuni:
- Inserimento video di base
- Collegamento di un video invece di incorporarlo
- Personalizzazione della posizione e delle dimensioni del video
- Aggiunta di una miniatura dell'immagine poster
- Inserimento in batch di più video su più diapositive
Vantaggi dell'Utilizzo di Spire.Presentation
- Nessuna dipendenza da Microsoft Office
- Funziona in ambienti server
- Supporta elementi multimediali
- Adatto per l'automazione aziendale
Per i team che generano un gran numero di presentazioni, questo approccio offre una scalabilità molto maggiore rispetto ai metodi manuali.
Se hai bisogno di gestire ulteriormente i file multimediali usando Python, puoi anche imparare come inserire o estrarre video e audio nelle presentazioni di PowerPoint.
8. Confronto dell'Accuratezza di Tutti i Metodi
| Metodo | Facilità d'Uso | Dimensione del File | Internet Richiesto | Automazione | Ideale Per |
|---|---|---|---|---|---|
| Inserisci Video Locale | Facile | Grande | No | No | Presentazioni portatili |
| Incorpora Video Online | Facile | Piccolo | Sì | No | Presentazioni connesse a Internet |
| Allega (Collega) Video | Medio | Piccolo | No | No | File di grandi dimensioni, archiviazione condivisa |
| Automazione con Python | Avanzato | Flessibile | No | Sì | Flussi di lavoro di automazione aziendale |
9. Migliori Pratiche per l'Inserimento di Video di Alta Qualità
Per garantire i migliori risultati, segui queste migliori pratiche:
Preparazione del Video
- Usa il formato MP4 con video H.264 e audio AAC
- Ottimizza la risoluzione del video (1080p o inferiore per le presentazioni)
- Comprimi i video di grandi dimensioni prima di incorporarli
- Testa la riproduzione sui dispositivi di destinazione
Gestione dei File
- Conserva i video nella stessa cartella della presentazione
- Usa nomi di file descrittivi
- Conserva copie di backup dei file video originali
- Considera l'archiviazione cloud per i video collegati
Raccomandazioni Tecniche
- Usa l'inserimento programmatico per i flussi di lavoro in batch
- Testa su sistemi Windows e Mac
- Convalida la riproduzione del video prima delle presentazioni
- Considera l'accesso a Internet del pubblico per i video incorporati
10. Domande Frequenti
1. Come posso inserire un video in PowerPoint senza aumentare le dimensioni del file?
Sì. Puoi incorporare un video online o collegarti a un file locale invece di incorporarlo. Il collegamento mantiene il file PPT più piccolo ma richiede l'accesso al file esterno.
2. Come posso inserire un video in una diapositiva specifica?
Basta andare alla diapositiva di destinazione prima di usare Inserisci → Video. Negli scenari di automazione, puoi specificare l'indice della diapositiva programmaticamente.
3. Qual è il miglior formato video per PowerPoint?
MP4 con video H.264 e audio AAC è il formato più compatibile su sistemi Windows e Mac.
4. Perché il mio video non viene riprodotto in PowerPoint?
I motivi comuni includono codec non supportati, file danneggiati o problemi di incorporamento. La conversione del video in MP4 di solito risolve il problema.
5. Posso inserire automaticamente video in PowerPoint?
Sì. Utilizzando librerie Python come Spire.Presentation, puoi inserire programmaticamente video nelle diapositive di PowerPoint, rendendolo ideale per l'elaborazione in batch e l'automazione del backend.
11. Conclusione
Ora sai come inserire video in PowerPoint utilizzando più approcci:
- Inserisci un file video locale
- Incorpora video in una presentazione di PowerPoint da fonti online
- Allega un file video collegato
- Automatizza l'inserimento di video usando Python
Per gli utenti individuali che creano presentazioni occasionali, gli strumenti integrati di PowerPoint sono più che sufficienti.
Tuttavia, per sviluppatori, aziende e flussi di lavoro aziendali che richiedono la generazione di documenti scalabile, l'automazione offre una soluzione molto più efficiente e flessibile.
La scelta del metodo giusto dipende interamente dal tuo caso d'uso — semplicità per la modifica manuale o scalabilità per la produzione automatizzata.
Per esplorare tutte le funzionalità di Spire.Presentation for Python senza limitazioni, puoi richiedere una licenza temporanea gratuita.
Vedi Anche
Comment insérer une vidéo dans PowerPoint : guide complet (2026)
Table des matières
L'ajout d'une vidéo à une présentation est l'un des moyens les plus efficaces pour augmenter l'engagement. Que vous créiez un support de formation, une démo de produit, un argumentaire marketing ou du matériel pédagogique, la vidéo peut rendre vos diapositives plus dynamiques et persuasives.
Ce guide complet explique des méthodes fiables pour insérer une vidéo dans des présentations PowerPoint. Vous apprendrez des approches manuelles pour les fichiers locaux, les vidéos en ligne, les fichiers liés et des solutions programmatiques très précises. Si vous avez besoin d'insérer une vidéo dans PowerPoint, d'intégrer une vidéo dans une présentation PowerPoint ou d'automatiser l'ensemble du processus pour un traitement par lots, cet article fournit les connaissances pratiques et les informations techniques dont vous avez besoin.
1. Pourquoi ajouter une vidéo aux présentations PowerPoint
Avant d'explorer les méthodes d'insertion, il est important de comprendre pourquoi l'intégration vidéo est importante et quels défis vous pourriez rencontrer.
1.1 Avantages de la vidéo dans les présentations
Le contenu vidéo offre plusieurs avantages :
- Engagement accru – Le contenu visuel et auditif capte l'attention plus efficacement que les diapositives statiques
- Démonstrations complexes – Montrez des processus, des produits ou des procédures difficiles à expliquer par du texte
- Connexion émotionnelle – La vidéo peut créer un impact émotionnel plus fort que les images seules
- Finition professionnelle – Un contenu vidéo de haute qualité élève la qualité de la présentation
1.2 Défis courants
Cependant, l'insertion de vidéo présente plusieurs défis techniques :
- Problèmes de taille de fichier – Les vidéos intégrées peuvent augmenter considérablement la taille du fichier PPT
- Compatibilité des formats – Tous les formats vidéo ne fonctionnent pas sur les différentes versions de PowerPoint
- Problèmes de lecture – Des problèmes de codec peuvent empêcher la lecture correcte des vidéos
- Portabilité – Les liens vers les vidéos peuvent être rompus lors du partage des présentations
Comprendre ces défis vous aide à choisir la bonne méthode d'insertion pour votre cas d'utilisation spécifique.
2. Aperçu des méthodes fiables
Ce guide couvre quatre manières pratiques d'insérer une vidéo dans des présentations PowerPoint :
- Insérer un fichier vidéo local – méthode la plus courante, fonctionne hors ligne
- Intégrer une vidéo en ligne – maintient la taille du fichier petite, nécessite Internet
- Lier à un fichier vidéo externe – équilibre la taille et le contrôle
- Insertion programmatique – automatisation et traitement par lots
Conseil : La plupart des méthodes manuelles insèrent des vidéos dans des diapositives individuelles. Si vous devez insérer des vidéos dans plusieurs présentations ou automatiser le processus, l'approche programmatique est la plus efficace.
La méthode la plus flexible est l'automatisation avec Python, qui permet le traitement par lots, la génération côté serveur et l'intégration avec les flux de travail métier.
3. Méthode 1 : Insérer une vidéo depuis votre ordinateur (fichier local)
La manière la plus simple d'insérer une vidéo dans une diapositive PowerPoint est d'ajouter un fichier vidéo local stocké sur votre ordinateur.
Instructions étape par étape
Conseil : Assurez-vous que votre fichier vidéo est dans un format pris en charge avant de commencer. Le format MP4 avec encodage H.264 fonctionne le mieux.
-
Ouvrez votre présentation PowerPoint - Lancez PowerPoint et ouvrez la présentation où vous souhaitez ajouter la vidéo.
-
Accédez à la diapositive cible - Allez à la diapositive spécifique où la vidéo doit apparaître.
-
Cliquez sur l'onglet Insertion - Situé dans le ruban du menu supérieur.
-
Sélectionnez Vidéo - Dans le groupe Média, cliquez sur le bouton Vidéo.
-
Choisissez Cet appareil - Sélectionnez "Cet appareil" dans le menu déroulant.
-
Sélectionnez et insérez - Accédez à votre fichier vidéo, sélectionnez-le et cliquez sur Insérer.
La vidéo apparaîtra sur la diapositive comme un objet multimédia. Vous pouvez :
- Redimensionner en faisant glisser les coins
- Repositionner en cliquant et en faisant glisser
- Faire pivoter à l'aide de la poignée de rotation
C'est la manière la plus simple d'insérer une vidéo dans des diapositives PowerPoint, et cela fonctionne entièrement hors ligne.
Formats vidéo pris en charge
PowerPoint prend en charge plusieurs formats vidéo, notamment :
- MP4 (recommandé pour la compatibilité)
- MOV
- M4V
- WEBM
Pour de meilleurs résultats, utilisez le format MP4 encodé avec la vidéo H.264 et l'audio AAC.
Vous pouvez trouver la liste complète des formats multimédias pris en charge dans le guide officiel de Microsoft sur les formats de fichiers vidéo et audio pris en charge dans PowerPoint.
Ajustement des paramètres de lecture
Après avoir inséré la vidéo, vous pouvez personnaliser les options de lecture :
- Démarrer automatiquement ou Au clic
- Lire en plein écran
- Répéter jusqu'à l'arrêt
- Rogner la vidéo
- Fondu d'entrée / Fondu de sortie
Ces options sont disponibles sous l'onglet Lecture une fois la vidéo sélectionnée.
Avantages et inconvénients de l'insertion de vidéo locale
Avantages
- Facile à utiliser
- Fonctionne hors ligne
- Contrôle total de la lecture
Inconvénients
- Augmente la taille du fichier PPT
- Peut causer des problèmes de partage si le fichier devient trop volumineux
L'insertion locale est idéale pour les présentations qui doivent être portables et fonctionner hors ligne.
Remarque : Les vidéos intégrées sont prises en charge dans les présentations PPTX modernes. Si vous travaillez avec un ancien fichier PPT, envisagez de le convertir d'abord au format PPTX. Consultez notre guide sur comment convertir PPT en PPTX.
4. Méthode 2 : Intégrer une vidéo dans une présentation PowerPoint (vidéo en ligne)
Une autre approche populaire consiste à intégrer une vidéo dans une présentation PowerPoint directement à partir d'une source en ligne telle que YouTube.
Cette méthode maintient la taille de votre fichier petite car la vidéo est diffusée en continu plutôt que stockée à l'intérieur de la présentation.
Comment intégrer une vidéo YouTube
-
Allez à la diapositive où vous voulez la vidéo.
-
Cliquez sur Insertion → Vidéo → Vidéo en ligne.
-
Collez l'URL de la vidéo ou le code d'intégration.
-
Cliquez sur Insérer.
PowerPoint créera un cadre vidéo intégré sur la diapositive.
Quand utiliser l'intégration
L'intégration est idéale lorsque :
- Vous voulez réduire la taille du fichier PPT
- La vidéo est hébergée publiquement en ligne
- Vous avez besoin de contenu fréquemment mis à jour
Limites des vidéos intégrées
Cependant, il y a quelques considérations importantes :
- Nécessite une connexion Internet pendant la présentation
- Peut ne pas fonctionner derrière les pare-feu d'entreprise
- La vidéo pourrait devenir indisponible si elle est supprimée en ligne
- Les plateformes vidéo peuvent nécessiter une connexion avant la lecture
Si la fiabilité est essentielle, l'insertion locale peut être plus sûre.
5. Méthode 3 : Comment joindre une vidéo dans un PPT (Lier au lieu d'intégrer)
Certains utilisateurs demandent comment joindre une vidéo dans un PPT plutôt que de l'intégrer complètement.
Cette méthode crée un lien vers un fichier vidéo externe au lieu de le stocker à l'intérieur de la présentation.
Intégrer ou joindre : Quelle est la différence ?
| Caractéristique | Intégrer la vidéo | Joindre (Lier) la vidéo |
|---|---|---|
| Stocké dans le PPT | Oui | Non |
| Taille du fichier | Plus grande | Plus petite |
| Internet requis | Non | Non (si local) |
| Risque de lien rompu | Non | Oui |
Comment lier un fichier vidéo
-
Allez dans Insertion → Vidéo → Cet appareil.
-
Sélectionnez le fichier vidéo.
-
Cliquez sur la flèche déroulante à côté de Insérer.
-
Choisissez Lier au fichier au lieu d'Insérer.
Maintenant, le PPT référencera la vidéo de manière externe.
Quand la liaison est judicieuse
- Fichiers vidéo très volumineux
- Environnements de stockage en réseau partagé
- Gestion centralisée des médias
Soyez prudent lors du partage de la présentation — vous devez envoyer le fichier vidéo avec.
Si vous ajoutez également des visualisations de données à vos diapositives, vous voudrez peut-être apprendre à insérer un graphique dans PowerPoint.
6. Problèmes courants lors de l'insertion de vidéo dans PowerPoint
Même lorsque vous savez comment ajouter une vidéo dans une présentation PowerPoint, des problèmes peuvent toujours survenir.
Voici quelques problèmes courants et leurs solutions :
6.1 La vidéo ne se lit pas
Souvent causé par des codecs non pris en charge.
Solution : Convertissez la vidéo en MP4 (H.264 + AAC).
6.2 Fichier trop volumineux
L'intégration de vidéos haute résolution peut augmenter considérablement la taille du PPT.
Solution : Compressez les médias en utilisant Fichier → Informations → Compresser le média.
6.3 Problèmes de compatibilité (Mac vs Windows)
Certains formats se comportent différemment d'un système à l'autre.
Solution : Utilisez le MP4 pour une compatibilité maximale.
6.4 Décalage pendant la lecture
Des vidéos volumineuses ou un matériel lent peuvent provoquer des saccades.
Solution : Optimisez la résolution de la vidéo ou utilisez un fichier lié.
7. Méthode 4 : Insérer une vidéo dans PowerPoint en utilisant Python (Solution automatisée)
Pour les développeurs et les entreprises, Python offre un moyen puissant d'automatiser la création de PowerPoint et l'insertion de vidéos.
En utilisant Spire.Presentation for Python, vous pouvez insérer des vidéos dans des diapositives sans nécessiter Microsoft Office.
Pourquoi utiliser Python pour l'automatisation de PowerPoint ?
- Traitement par lots des présentations
- Intégration avec les systèmes backend
- Génération de documents côté serveur
- Aucune interaction manuelle avec l'interface utilisateur
- Flux de travail reproductibles
Installer la bibliothèque
pip install Spire.Presentation
Exemple rapide : Insérer une vidéo dans PowerPoint avec Python
Si vous n'avez besoin que d'un exemple minimal, le code suivant insère une vidéo dans la première diapositive d'une nouvelle présentation PowerPoint.
from spire.presentation import *

# Create presentation
presentation = Presentation()

# Add video to first slide
slide = presentation.Slides[0]

video_rect = RectangleF.FromLTRB(100, 100, 500, 400)
slide.Shapes.AppendVideoMedia("demo_video.mp4", video_rect)

# Save presentation
presentation.SaveToFile("video_demo.pptx", FileFormat.Pptx2019)
presentation.Dispose()
Cet exemple minimal montre comment créer une nouvelle présentation PowerPoint et insère une vidéo dans la première diapositive à la position spécifiée avec du code Python.
### Exemple avancé : Insérer ou lier une vidéo dans PowerPoint en utilisant Python
Voici un exemple amélioré avec gestion des erreurs et options supplémentaires :
from spire.presentation import *
import os
from pathlib import Path


def insert_video_to_powerpoint(video_path, output_path, slide_index=0, position=(100, 100), size=(400, 300),
                               poster_image_path=None, embed_video=True):
    """
    Insérer une vidéo dans une présentation PowerPoint par programmation

    Args:
        video_path: Chemin vers le fichier vidéo (MP4, MOV, WMV, AVI)
        output_path: Chemin du fichier PowerPoint de sortie (.pptx)
        slide_index: Numéro de diapositive (base 0) où la vidéo doit être insérée
        position: Tuple de coordonnées (x, y) pour le placement de la vidéo
        size: Tuple (largeur, hauteur) pour les dimensions de la vidéo
        poster_image_path: Chemin facultatif vers l'image d'affiche/miniature pour la vidéo
        embed_video: Valeur booléenne indiquant s'il faut intégrer la vidéo (True)
                     ou lier au fichier vidéo (False)
    """
    try:
        # Valider le fichier d'entrée
        if not os.path.exists(video_path):
            raise FileNotFoundError(f"Fichier vidéo non trouvé: {video_path}")

        # Vérifier l'extension du fichier
        valid_extensions = {'.mp4', '.mov', '.wmv', '.avi'}
        file_ext = Path(video_path).suffix.lower()
        if file_ext not in valid_extensions:
            print(f"Avertissement: {file_ext} peut ne pas être entièrement pris en charge. MP4 est recommandé.")

        # Créer un objet de présentation
        presentation = Presentation()

        # S'assurer que nous avons assez de diapositives
        while presentation.Slides.Count <= slide_index:
            presentation.Slides.Append()

        # Obtenir la diapositive cible
        slide = presentation.Slides[slide_index]

        # Créer un rectangle pour la position et la taille de la vidéo
        video_rect = RectangleF.FromLTRB(
            position[0],
            position[1],
            position[0] + size[0],
            position[1] + size[1]
        )

        # Insérer la vidéo en fonction du mode d'intégration
        if embed_video:
            # Intégrer la vidéo dans la présentation
            video = slide.Shapes.AppendVideoMedia(video_path, video_rect)
        else:
            # Insérer la vidéo en tant que lien (référence de fichier externe)
            video = slide.Shapes.AppendVideoMediaLink(video_path, video_rect, False)

        # Définir l'image d'affiche si fournie
        if poster_image_path and os.path.exists(poster_image_path):
            video.PictureFill.Picture.Url = poster_image_path

        # Enregistrer la présentation
        presentation.SaveToFile(output_path, FileFormat.Pptx2019)
        print(f"Créé avec succès: {output_path}")
        print(f"   - Vidéo insérée à la diapositive {slide_index + 1}")
        print(f"   - Mode: {'Intégrée' if embed_video else 'Liée'}")
        print(f"   - Position: {position}")
        print(f"   - Taille: {size}")

        return True

    except Exception as e:
        print(f"Erreur lors de l'insertion de la vidéo: {e}")
        return False

    finally:
        # Nettoyer les ressources
        if 'presentation' in locals():
            presentation.Dispose()


# Exemples d'utilisation
if __name__ == "__main__":

    # Exemple 1 : Utilisation de base (intégrer la vidéo)
    insert_video_to_powerpoint(
        video_path="presentation_video.mp4",
        output_path="presentation_with_video.pptx"
    )

    # Exemple 2 : Insérer une vidéo liée
    insert_video_to_powerpoint(
        video_path="demo_video.mp4",
        output_path="linked_video_slide.pptx",
        embed_video=False
    )

    # Exemple 3 : Position et taille personnalisées
    insert_video_to_powerpoint(
        video_path="demo_video.mp4",
        output_path="custom_video_slide.pptx",
        slide_index=2,  # Troisième diapositive
        position=(150, 100),
        size=(500, 300)
    )

    # Exemple 4 : Avec une image d'affiche
    if os.path.exists("video_thumbnail.png"):
        insert_video_to_powerpoint(
            video_path="demo_video.mp4",
            output_path="video_with_poster.pptx",
            poster_image_path="video_thumbnail.png"
        )

    # Exemple 5 : Traitement par lots de plusieurs vidéos
    videos = [
        ("intro.mp4", 0, (100, 100)),
        ("tutorial.mp4", 1, (100, 100)),
        ("conclusion.mp4", 2, (100, 100))
    ]

    for video_file, slide_num, pos in videos:
        if os.path.exists(video_file):
            insert_video_to_powerpoint(
                video_path=video_file,
                output_path=f"batch_output_slide{slide_num}.pptx",
                slide_index=slide_num,
                position=pos
            )
Voici un aperçu du fichier PowerPoint généré 'video_with_poster.pptx' avec l'insertion de la vidéo :
Ce que fait ce code
Cet exemple montre comment insérer par programmation une vidéo dans une présentation PowerPoint en utilisant Python. Le script inclut plusieurs fonctionnalités pratiques qui le rendent adapté aux scénarios d'automatisation du monde réel.
La fonction effectue les opérations suivantes :
- Crée une présentation PowerPoint si elle n'existe pas déjà.
- Ajoute automatiquement des diapositives lorsque l'index de diapositive spécifié n'existe pas.
- Insère une vidéo dans une diapositive spécifique en utilisant des paramètres de position et de taille personnalisables.
- Prend en charge deux modes d'insertion:
- Vidéo intégrée – stocke la vidéo à l'intérieur du fichier PPT.
- Vidéo liée – référence la vidéo en tant que fichier externe pour garder la présentation plus petite.
- Définit éventuellement une image d'affiche qui apparaît avant le début de la lecture de la vidéo.
- Inclut la gestion des erreurs pour éviter les échecs lorsque des fichiers sont manquants.
- Enregistre la présentation générée en tant que fichier PPTX.
Les exemples fournis illustrent plusieurs scénarios courants :
- Insertion vidéo de base
- Lier une vidéo au lieu de l'intégrer
- Personnalisation de la position et de la taille de la vidéo
- Ajout d'une miniature d'image d'affiche
- Insertion par lots de plusieurs vidéos sur plusieurs diapositives
Avantages de l'utilisation de Spire.Presentation
- Aucune dépendance à Microsoft Office
- Fonctionne dans les environnements serveur
- Prend en charge les éléments multimédias
- Convient à l'automatisation d'entreprise
Pour les équipes générant un grand nombre de présentations, cette approche offre une évolutivité bien plus grande que les méthodes manuelles.
Si vous avez besoin de gérer davantage les fichiers multimédias en utilisant Python, vous pouvez également apprendre comment insérer ou extraire de la vidéo et de l'audio dans des présentations PowerPoint.
8. Comparaison de la précision de toutes les méthodes
| Méthode | Facilité d'utilisation | Taille du fichier | Internet requis | Automatisation | Idéal pour |
|---|---|---|---|---|---|
| Insérer une vidéo locale | Facile | Grande | Non | Non | Présentations portables |
| Intégrer une vidéo en ligne | Facile | Petite | Oui | Non | Présentations connectées à Internet |
| Joindre (Lier) la vidéo | Moyenne | Petite | Non | Non | Fichiers volumineux, stockage partagé |
| Automatisation Python | Avancé | Flexible | Non | Oui | Flux de travail d'automatisation d'entreprise |
9. Meilleures pratiques pour une insertion vidéo de haute qualité
Pour garantir les meilleurs résultats, suivez ces meilleures pratiques :
Préparation de la vidéo
- Utilisez le format MP4 avec vidéo H.264 et audio AAC
- Optimisez la résolution vidéo (1080p ou moins pour les présentations)
- Compressez les vidéos volumineuses avant de les intégrer
- Testez la lecture sur les appareils cibles
Gestion de fichiers
- Conservez les vidéos dans le même dossier que votre présentation
- Utilisez des noms de fichiers descriptifs
- Conservez des copies de sauvegarde des fichiers vidéo originaux
- Envisagez le stockage en nuage pour les vidéos liées
Recommandations techniques
- Utilisez l'insertion programmatique pour les flux de travail par lots
- Testez sur les systèmes Windows et Mac
- Validez la lecture de la vidéo avant les présentations
- Tenez compte de l'accès Internet du public pour les vidéos intégrées
10. Foire aux questions
1. Comment insérer une vidéo dans PowerPoint sans augmenter la taille du fichier ?
Oui. Vous pouvez soit intégrer une vidéo en ligne, soit créer un lien vers un fichier local au lieu de l'intégrer. La liaison maintient la taille du fichier PPT plus petite mais nécessite l'accès au fichier externe.
2. Comment insérer une vidéo dans une diapositive spécifique ?
Naviguez simplement vers la diapositive cible avant d'utiliser Insertion → Vidéo. Dans les scénarios d'automatisation, vous pouvez spécifier l'index de la diapositive par programmation.
3. Quel est le meilleur format vidéo pour PowerPoint ?
Le MP4 avec vidéo H.264 et audio AAC est le format le plus compatible sur les systèmes Windows et Mac.
4. Pourquoi ma vidéo ne se lit-elle pas dans PowerPoint ?
Les raisons courantes incluent des codecs non pris en charge, des fichiers corrompus ou des problèmes d'intégration. La conversion de la vidéo en MP4 résout généralement le problème.
5. Puis-je insérer automatiquement des vidéos dans PowerPoint ?
Oui. En utilisant des bibliothèques Python telles que Spire.Presentation, vous pouvez insérer par programmation des vidéos dans des diapositives PowerPoint, ce qui est idéal pour le traitement par lots et l'automatisation backend.
11. Conclusion
Vous savez maintenant comment insérer une vidéo dans PowerPoint en utilisant plusieurs approches :
- Insérer un fichier vidéo local
- Intégrer une vidéo dans une présentation PowerPoint à partir de sources en ligne
- Joindre un fichier vidéo lié
- Automatiser l'insertion de vidéo en utilisant Python
Pour les utilisateurs individuels créant des présentations occasionnelles, les outils intégrés de PowerPoint sont plus que suffisants.
Cependant, pour les développeurs, les entreprises et les flux de travail d'entreprise qui nécessitent une génération de documents évolutive, l'automatisation offre une solution beaucoup plus efficace et flexible.
Le choix de la bonne méthode dépend entièrement de votre cas d'utilisation — la simplicité pour l'édition manuelle, ou l'évolutivité pour la production automatisée.
Pour explorer toutes les capacités de Spire.Presentation for Python sans limitations, vous pouvez demander une licence temporaire gratuite.
Voir aussi
Cómo insertar un video en PowerPoint: guía completa (2026)
Tabla de Contenidos
Añadir vídeo a una presentación es una de las formas más efectivas de aumentar la participación. Ya sea que estés creando una presentación de formación, una demostración de producto, un discurso de marketing o material educativo, el vídeo puede hacer que tus diapositivas sean más dinámicas y persuasivas.
Esta guía completa explica métodos fiables para insertar vídeo en presentaciones de PowerPoint. Aprenderás enfoques manuales para archivos locales, vídeos en línea, archivos vinculados y soluciones programáticas de alta precisión. Si necesitas insertar vídeo en PowerPoint, incrustar vídeo en una presentación de PowerPoint o automatizar todo el proceso para el procesamiento por lotes, este artículo proporciona el conocimiento práctico y los conocimientos técnicos que necesitas.
1. Por Qué Añadir Vídeo a las Presentaciones de PowerPoint
Antes de explorar los métodos de inserción, es importante entender por qué la integración de vídeo es importante y qué desafíos podrías encontrar.
1.1 Beneficios del Vídeo en las Presentaciones
El contenido de vídeo ofrece varias ventajas:
- Mayor participación – El contenido visual y auditivo capta la atención de manera más efectiva que las diapositivas estáticas
- Demostraciones complejas – Muestra procesos, productos o procedimientos que son difíciles de explicar con texto
- Conexión emocional – El vídeo puede crear un impacto emocional más fuerte que las imágenes por sí solas
- Acabado profesional – El contenido de vídeo de alta calidad eleva la calidad de la presentación
1.2 Desafíos Comunes
Sin embargo, insertar vídeo presenta varios desafíos técnicos:
- Preocupaciones por el tamaño del archivo – Los vídeos incrustados pueden aumentar drásticamente el tamaño del archivo PPT
- Compatibilidad de formato – No todos los formatos de vídeo funcionan en las diferentes versiones de PowerPoint
- Problemas de reproducción – Los problemas con los códecs pueden impedir que los vídeos se reproduzcan correctamente
- Portabilidad – Los vídeos vinculados pueden romperse al compartir presentaciones
Comprender estos desafíos te ayuda a seleccionar el método de inserción adecuado para tu caso de uso específico.
2. Resumen de Métodos Fiables
Esta guía cubre cuatro formas prácticas de insertar vídeo en presentaciones de PowerPoint:
- Insertar archivo de vídeo local – método más común, funciona sin conexión
- Incrustar vídeo en línea – mantiene el tamaño del archivo pequeño, requiere internet
- Vincular a un archivo de vídeo externo – equilibra tamaño y control
- Inserción programática – automatización y procesamiento por lotes
Consejo: La mayoría de los métodos manuales insertan vídeos en diapositivas individuales. Si necesitas insertar vídeos en múltiples presentaciones o automatizar el proceso, el enfoque programático es el más eficiente.
El método más flexible es usar la automatización con Python, que permite el procesamiento por lotes, la generación del lado del servidor y la integración con los flujos de trabajo empresariales.
3. Método 1: Insertar Vídeo desde tu Ordenador (Archivo Local)
La forma más sencilla de insertar vídeo en una diapositiva de PowerPoint es añadiendo un archivo de vídeo local almacenado en tu ordenador.
Instrucciones Paso a Paso
Consejo: Asegúrate de que tu archivo de vídeo esté en un formato compatible antes de empezar. MP4 con codificación H.264 funciona mejor.
-
Abre tu presentación de PowerPoint - Inicia PowerPoint y abre la presentación donde quieres añadir el vídeo.
-
Navega a la diapositiva de destino - Ve a la diapositiva específica donde debe aparecer el vídeo.
-
Haz clic en la pestaña Insertar - Ubicada en la cinta de menú superior.
-
Selecciona Vídeo - En el grupo Medios, haz clic en el botón Vídeo.
-
Elige Este Dispositivo - Selecciona "Este Dispositivo" en el menú desplegable.
-
Selecciona e inserta - Busca tu archivo de vídeo, selecciónalo y haz clic en Insertar.
El vídeo aparecerá en la diapositiva como un objeto multimedia. Puedes:
- Cambiar el tamaño arrastrando las esquinas
- Reposicionar haciendo clic y arrastrando
- Girar usando el manejador de rotación
Esta es la forma más directa de insertar vídeo en diapositivas de PowerPoint, y funciona completamente sin conexión.
Formatos de Vídeo Compatibles
PowerPoint admite varios formatos de vídeo, incluyendo:
- MP4 (recomendado por compatibilidad)
- MOV
- M4V
- WEBM
Para obtener los mejores resultados, utiliza MP4 codificado con vídeo H.264 y audio AAC.
Puedes encontrar la lista completa de formatos multimedia compatibles en la guía oficial de Microsoft sobre formatos de archivo de vídeo y audio compatibles con PowerPoint.
Ajustar la Configuración de Reproducción
Después de insertar el vídeo, puedes personalizar las opciones de reproducción:
- Iniciar Automáticamente o Al Hacer Clic
- Reproducir en Pantalla Completa
- Repetir hasta Detener
- Recortar Vídeo
- Aparecer / Desvanecer
Estas opciones están disponibles en la pestaña Reproducción una vez que se selecciona el vídeo.
Ventajas y Desventajas de la Inserción de Vídeo Local
Ventajas
- Fácil de usar
- Funciona sin conexión
- Control total de la reproducción
Desventajas
- Aumenta el tamaño del archivo PPT
- Puede causar problemas al compartir si el archivo se vuelve demasiado grande
La inserción local es la mejor opción para presentaciones que necesitan ser portátiles y funcionar sin conexión.
Nota: Los vídeos incrustados son compatibles con las presentaciones PPTX modernas. Si estás trabajando con un archivo PPT antiguo, considera convertirlo primero al formato PPTX. Consulta nuestra guía sobre cómo convertir PPT a PPTX.
4. Método 2: Incrustar Vídeo en una Presentación de PowerPoint (Vídeo en Línea)
Otro enfoque popular es incrustar vídeo en una presentación de PowerPoint directamente desde una fuente en línea como YouTube.
Este método mantiene el tamaño de tu archivo pequeño porque el vídeo se transmite en lugar de almacenarse dentro de la presentación.
Cómo Incrustar un Vídeo de YouTube
-
Ve a la diapositiva donde quieres el vídeo.
-
Haz clic en Insertar → Vídeo → Vídeo en línea.
-
Pega la URL del vídeo o el código de inserción.
-
Haz clic en Insertar.
PowerPoint creará un marco de vídeo incrustado en la diapositiva.
Cuándo Usar la Incrustación
La incrustación es ideal cuando:
- Quieres reducir el tamaño del archivo PPT
- El vídeo está alojado públicamente en línea
- Necesitas contenido actualizado con frecuencia
Limitaciones de los Vídeos Incrustados
Sin embargo, hay algunas consideraciones importantes:
- Requiere una conexión a internet durante la presentación
- Puede que no funcione detrás de los cortafuegos corporativos
- El vídeo podría no estar disponible si se elimina de la web
- Las plataformas de vídeo pueden requerir inicio de sesión antes de la reproducción
Si la fiabilidad es crítica, la inserción local puede ser más segura.
5. Método 3: Cómo Adjuntar un Vídeo en PPT (Vincular en Lugar de Incrustar)
Algunos usuarios preguntan cómo adjuntar un vídeo en PPT en lugar de incrustarlo por completo.
Este método vincula a un archivo de vídeo externo en lugar de almacenarlo dentro de la presentación.
Incrustar vs Adjuntar: ¿Cuál es la Diferencia?
| Característica | Incrustar Vídeo | Adjuntar (Vincular) Vídeo |
|---|---|---|
| Almacenado dentro de PPT | Sí | No |
| Tamaño del archivo | Más grande | Más pequeño |
| Requiere Internet | No | No (si es local) |
| Riesgo de enlace roto | No | Sí |
Cómo Vincular un Archivo de Vídeo
-
Ve a Insertar → Vídeo → Este Dispositivo.
-
Selecciona el archivo de vídeo.
-
Haz clic en la flecha desplegable junto a Insertar.
-
Elige Vincular a archivo en lugar de Insertar.
Ahora el PPT hará referencia al vídeo externamente.
Cuándo Tiene Sentido Vincular
- Archivos de vídeo muy grandes
- Entornos de almacenamiento en red compartidos
- Gestión centralizada de medios
Ten cuidado al compartir la presentación: debes enviar el archivo de vídeo junto.
Si también estás añadiendo visualizaciones de datos a tus diapositivas, quizás quieras aprender a insertar un gráfico en PowerPoint.
6. Problemas Comunes al Insertar Vídeo en PowerPoint
Incluso cuando sabes cómo añadir vídeo a una presentación de PowerPoint, todavía pueden ocurrir problemas.
Aquí hay algunos problemas comunes y sus soluciones:
6.1 El Vídeo no se Reproduce
A menudo causado por códecs no compatibles.
Solución: Convierte el vídeo a MP4 (H.264 + AAC).
6.2 Archivo Demasiado Grande
Incrustar vídeos de alta resolución puede aumentar drásticamente el tamaño del PPT.
Solución: Comprime los medios usando Archivo → Información → Comprimir medios.
6.3 Problemas de Compatibilidad (Mac vs Windows)
Algunos formatos se comportan de manera diferente en distintos sistemas.
Solución: Usa MP4 para una máxima compatibilidad.
6.4 Retraso Durante la Reproducción
Vídeos grandes o hardware lento pueden causar tartamudeo.
Solución: Optimiza la resolución del vídeo o usa un archivo vinculado.
7. Método 4: Insertar Vídeo en PowerPoint Usando Python (Solución Automatizada)
Para desarrolladores y empresas, Python proporciona una forma poderosa de automatizar la creación de PowerPoint y la inserción de vídeos.
Usando Spire.Presentation for Python, puedes insertar vídeos en diapositivas sin necesidad de Microsoft Office.
¿Por Qué Usar Python para la Automatización de PowerPoint?
- Procesamiento por lotes de presentaciones
- Integración con sistemas backend
- Generación de documentos del lado del servidor
- Sin interacción manual con la interfaz de usuario
- Flujos de trabajo repetibles
Instalar la Biblioteca
pip install Spire.Presentation
Ejemplo Rápido: Insertar Vídeo en PowerPoint con Python
Si solo necesitas un ejemplo mínimo, el siguiente código inserta un vídeo en la primera diapositiva de una nueva presentación de PowerPoint.
from spire.presentation import *

# Create presentation
presentation = Presentation()

# Add video to first slide
slide = presentation.Slides[0]

video_rect = RectangleF.FromLTRB(100, 100, 500, 400)
slide.Shapes.AppendVideoMedia("demo_video.mp4", video_rect)

# Save presentation
presentation.SaveToFile("video_demo.pptx", FileFormat.Pptx2019)
presentation.Dispose()
Este ejemplo mínimo muestra cómo crear una nueva presentación de PowerPoint e inserta un vídeo en la primera diapositiva en la posición especificada con código Python.
### Ejemplo Avanzado: Insertar o Vincular Vídeo en PowerPoint Usando Python
A continuación se muestra un ejemplo mejorado con manejo de errores y opciones adicionales:
from spire.presentation import *
import os
from pathlib import Path


def insert_video_to_powerpoint(video_path, output_path, slide_index=0, position=(100, 100), size=(400, 300),
                               poster_image_path=None, embed_video=True):
    """
    Insertar un vídeo en una presentación de PowerPoint mediante programación

    Args:
        video_path: Ruta al archivo de vídeo (MP4, MOV, WMV, AVI)
        output_path: Ruta del archivo de PowerPoint de salida (.pptx)
        slide_index: Número de diapositiva (base 0) donde se debe insertar el vídeo
        position: Tupla de coordenadas (x, y) para la colocación del vídeo
        size: Tupla (ancho, alto) para las dimensiones del vídeo
        poster_image_path: Ruta opcional a la imagen de póster/miniatura para el vídeo
        embed_video: Valor booleano que indica si se debe incrustar el vídeo (True)
                     o vincular al archivo de vídeo (False)
    """
    try:
        # Validar archivo de entrada
        if not os.path.exists(video_path):
            raise FileNotFoundError(f"Archivo de vídeo no encontrado: {video_path}")

        # Comprobar extensión de archivo
        valid_extensions = {'.mp4', '.mov', '.wmv', '.avi'}
        file_ext = Path(video_path).suffix.lower()
        if file_ext not in valid_extensions:
            print(f"Advertencia: {file_ext} puede no ser totalmente compatible. Se recomienda MP4.")

        # Crear objeto de presentación
        presentation = Presentation()

        # Asegurarse de que tenemos suficientes diapositivas
        while presentation.Slides.Count <= slide_index:
            presentation.Slides.Append()

        # Obtener diapositiva de destino
        slide = presentation.Slides[slide_index]

        # Crear rectángulo para la posición y el tamaño del vídeo
        video_rect = RectangleF.FromLTRB(
            position[0],
            position[1],
            position[0] + size[0],
            position[1] + size[1]
        )

        # Insertar vídeo según el modo de incrustación
        if embed_video:
            # Incrustar el vídeo en la presentación
            video = slide.Shapes.AppendVideoMedia(video_path, video_rect)
        else:
            # Insertar el vídeo como un enlace (referencia a archivo externo)
            video = slide.Shapes.AppendVideoMediaLink(video_path, video_rect, False)

        # Establecer imagen de póster si se proporciona
        if poster_image_path and os.path.exists(poster_image_path):
            video.PictureFill.Picture.Url = poster_image_path

        # Guardar la presentación
        presentation.SaveToFile(output_path, FileFormat.Pptx2019)
        print(f"Creado con éxito: {output_path}")
        print(f"   - Vídeo insertado en la diapositiva {slide_index + 1}")
        print(f"   - Modo: {'Incrustado' if embed_video else 'Vinculado'}")
        print(f"   - Posición: {position}")
        print(f"   - Tamaño: {size}")

        return True

    except Exception as e:
        print(f"Error al insertar el vídeo: {e}")
        return False

    finally:
        # Limpiar recursos
        if 'presentation' in locals():
            presentation.Dispose()


# Ejemplos de uso
if __name__ == "__main__":

    # Ejemplo 1: Uso básico (incrustar vídeo)
    insert_video_to_powerpoint(
        video_path="presentation_video.mp4",
        output_path="presentation_with_video.pptx"
    )

    # Ejemplo 2: Insertar vídeo vinculado
    insert_video_to_powerpoint(
        video_path="demo_video.mp4",
        output_path="linked_video_slide.pptx",
        embed_video=False
    )

    # Ejemplo 3: Posición y tamaño personalizados
    insert_video_to_powerpoint(
        video_path="demo_video.mp4",
        output_path="custom_video_slide.pptx",
        slide_index=2,  # Tercera diapositiva
        position=(150, 100),
        size=(500, 300)
    )

    # Ejemplo 4: Con imagen de póster
    if os.path.exists("video_thumbnail.png"):
        insert_video_to_powerpoint(
            video_path="demo_video.mp4",
            output_path="video_with_poster.pptx",
            poster_image_path="video_thumbnail.png"
        )

    # Ejemplo 5: Procesamiento por lotes de múltiples vídeos
    videos = [
        ("intro.mp4", 0, (100, 100)),
        ("tutorial.mp4", 1, (100, 100)),
        ("conclusion.mp4", 2, (100, 100))
    ]

    for video_file, slide_num, pos in videos:
        if os.path.exists(video_file):
            insert_video_to_powerpoint(
                video_path=video_file,
                output_path=f"batch_output_slide{slide_num}.pptx",
                slide_index=slide_num,
                position=pos
            )
A continuación se muestra una vista previa del archivo de PowerPoint generado 'video_with_poster.pptx' con la inserción de vídeo:
Qué Hace Este Código
Este ejemplo demuestra cómo insertar mediante programación un vídeo en una presentación de PowerPoint usando Python. El script incluye varias características prácticas que lo hacen adecuado para escenarios de automatización del mundo real.
La función realiza las siguientes operaciones:
- Crea una presentación de PowerPoint si no existe una.
- Añade diapositivas automáticamente cuando el índice de diapositiva especificado no existe.
- Inserta un vídeo en una diapositiva específica usando parámetros de posición y tamaño personalizables.
- Admite dos modos de inserción:
- Vídeo incrustado – almacena el vídeo dentro del archivo PPT.
- Vídeo vinculado – hace referencia al vídeo como un archivo externo para mantener la presentación más pequeña.
- Opcionalmente establece una imagen de póster que aparece antes de que el vídeo comience a reproducirse.
- Incluye manejo de errores para evitar fallos cuando faltan archivos.
- Guarda la presentación generada como un archivo PPTX.
Los ejemplos proporcionados demuestran varios escenarios comunes:
- Inserción básica de vídeo
- Vincular un vídeo en lugar de incrustarlo
- Personalizar la posición y el tamaño del vídeo
- Añadir una miniatura de imagen de póster
- Inserción por lotes de múltiples vídeos en varias diapositivas
Ventajas de Usar Spire.Presentation
- Sin dependencia de Microsoft Office
- Funciona en entornos de servidor
- Admite elementos multimedia
- Adecuado para la automatización empresarial
Para los equipos que generan un gran número de presentaciones, este enfoque proporciona una escalabilidad mucho mayor que los métodos manuales.
Si necesitas gestionar más archivos multimedia usando Python, también puedes aprender cómo insertar o extraer vídeo y audio en presentaciones de PowerPoint.
8. Comparación de Precisión de Todos los Métodos
| Método | Facilidad de Uso | Tamaño del Archivo | Requiere Internet | Automatización | Mejor Para |
|---|---|---|---|---|---|
| Insertar Vídeo Local | Fácil | Grande | No | No | Presentaciones portátiles |
| Incrustar Vídeo en Línea | Fácil | Pequeño | Sí | No | Presentaciones conectadas a Internet |
| Adjuntar (Vincular) Vídeo | Medio | Pequeño | No | No | Archivos grandes, almacenamiento compartido |
| Automatización con Python | Avanzado | Flexible | No | Sí | Flujos de trabajo de automatización empresarial |
9. Mejores Prácticas para la Inserción de Vídeo de Alta Calidad
Para garantizar los mejores resultados, sigue estas mejores prácticas:
Preparación del Vídeo
- Usa el formato MP4 con vídeo H.264 y audio AAC
- Optimiza la resolución del vídeo (1080p o inferior para presentaciones)
- Comprime vídeos grandes antes de incrustarlos
- Prueba la reproducción en los dispositivos de destino
Gestión de Archivos
- Mantén los vídeos en la misma carpeta que tu presentación
- Usa nombres de archivo descriptivos
- Mantén copias de seguridad de los archivos de vídeo originales
- Considera el almacenamiento en la nube para los vídeos vinculados
Recomendaciones Técnicas
- Usa la inserción programática para flujos de trabajo por lotes
- Prueba en sistemas Windows y Mac
- Valida la reproducción del vídeo antes de las presentaciones
- Considera el acceso a internet de la audiencia para los vídeos incrustados
10. Preguntas Frecuentes
1. ¿Cómo inserto un vídeo en PowerPoint sin aumentar el tamaño del archivo?
Sí. Puedes incrustar un vídeo en línea o vincular a un archivo local en lugar de incrustarlo. La vinculación mantiene el archivo PPT más pequeño pero requiere acceso al archivo externo.
2. ¿Cómo inserto un vídeo en una diapositiva específica?
Simplemente navega a la diapositiva de destino antes de usar Insertar → Vídeo. En escenarios de automatización, puedes especificar el índice de la diapositiva mediante programación.
3. ¿Cuál es el mejor formato de vídeo para PowerPoint?
MP4 con vídeo H.264 y audio AAC es el formato más compatible en los sistemas Windows y Mac.
4. ¿Por qué mi vídeo no se reproduce en PowerPoint?
Las razones comunes incluyen códecs no compatibles, archivos corruptos o problemas de incrustación. Convertir el vídeo a MP4 generalmente resuelve el problema.
5. ¿Puedo insertar vídeos automáticamente en PowerPoint?
Sí. Usando bibliotecas de Python como Spire.Presentation, puedes insertar vídeos mediante programación en diapositivas de PowerPoint, lo que lo hace ideal para el procesamiento por lotes y la automatización de backend.
11. Conclusión
Ahora sabes cómo insertar vídeo en PowerPoint usando múltiples enfoques:
- Insertar un archivo de vídeo local
- Incrustar vídeo en una presentación de PowerPoint desde fuentes en línea
- Adjuntar un archivo de vídeo vinculado
- Automatizar la inserción de vídeo usando Python
Para usuarios individuales que crean presentaciones ocasionales, las herramientas integradas de PowerPoint son más que suficientes.
Sin embargo, para desarrolladores, empresas y flujos de trabajo empresariales que requieren una generación de documentos escalable, la automatización proporciona una solución mucho más eficiente y flexible.
Elegir el método correcto depende completamente de tu caso de uso: simplicidad para la edición manual o escalabilidad para la producción automatizada.
Para explorar todas las capacidades de Spire.Presentation for Python sin limitaciones, puedes solicitar una licencia temporal gratuita.
Ver También
Video in PowerPoint einfügen: Das komplette Handbuch (2026)
Das Hinzufügen von Videos zu einer Präsentation ist eine der effektivsten Möglichkeiten, das Engagement zu steigern. Egal, ob Sie eine Schulungsunterlage, eine Produktdemo, einen Marketing-Pitch oder Lehrmaterial erstellen, Videos können Ihre Folien dynamischer und überzeugender machen.
Diese vollständige Anleitung erklärt zuverlässige Methoden zum Einfügen von Videos in PowerPoint-Präsentationen. Sie lernen manuelle Ansätze für lokale Dateien, Online-Videos, verknüpfte Dateien und hochpräzise programmatische Lösungen. Wenn Sie Videos in PowerPoint einfügen, Videos in eine PowerPoint-Präsentation einbetten oder den gesamten Prozess für die Stapelverarbeitung automatisieren müssen, bietet dieser Artikel das praktische Wissen und die technischen Einblicke, die Sie benötigen.
1. Warum Videos zu PowerPoint-Präsentationen hinzufügen
Bevor wir die Einfügemethoden untersuchen, ist es wichtig zu verstehen, warum die Videointegration wichtig ist und auf welche Herausforderungen Sie stoßen könnten.
1.1 Vorteile von Videos in Präsentationen
Videoinhalte bieten mehrere Vorteile:
- Gesteigertes Engagement – Visuelle und auditive Inhalte fesseln die Aufmerksamkeit effektiver als statische Folien
- Komplexe Demonstrationen – Zeigen Sie Prozesse, Produkte oder Verfahren, die in Text schwer zu erklären sind
- Emotionale Verbindung – Videos können eine stärkere emotionale Wirkung erzielen als Bilder allein
- Professioneller Schliff – Hochwertige Videoinhalte heben die Präsentationsqualität
1.2 Häufige Herausforderungen
Das Einfügen von Videos birgt jedoch mehrere technische Herausforderungen:
- Bedenken hinsichtlich der Dateigröße – Eingebettete Videos können die Dateigröße von PPT drastisch erhöhen
- Formatkompatibilität – Nicht alle Videoformate funktionieren in verschiedenen PowerPoint-Versionen
- Wiedergabeprobleme – Codec-Probleme können die korrekte Wiedergabe von Videos verhindern
- Portabilität – Verknüpfte Videos können beim Teilen von Präsentationen beschädigt werden
Das Verständnis dieser Herausforderungen hilft Ihnen, die richtige Einfügemethode für Ihren spezifischen Anwendungsfall auszuwählen.
2. Übersicht über zuverlässige Methoden
Diese Anleitung behandelt vier praktische Möglichkeiten, Videos in PowerPoint-Präsentationen einzufügen:
- Lokale Videodatei einfügen – häufigste Methode, funktioniert offline
- Online-Video einbetten – hält die Dateigröße klein, erfordert Internet
- Auf externe Videodatei verknüpfen – gleicht Größe und Kontrolle aus
- Programmatisches Einfügen – Automatisierung und Stapelverarbeitung
-
Öffnen Sie Ihre PowerPoint-Präsentation - Starten Sie PowerPoint und öffnen Sie die Präsentation, in die Sie ein Video einfügen möchten.
-
Navigieren Sie zur Ziel-Folie - Gehen Sie zu der spezifischen Folie, auf der das Video erscheinen soll.
-
Klicken Sie auf die Registerkarte „Einfügen“ - Befindet sich im oberen Menüband.
-
Wählen Sie „Video“ - Klicken Sie in der Gruppe „Medien“ auf die Schaltfläche „Video“.
-
Wählen Sie „Dieses Gerät“ - Wählen Sie „Dieses Gerät“ aus dem Dropdown-Menü.
-
Auswählen und einfügen - Navigieren Sie zu Ihrer Videodatei, wählen Sie sie aus und klicken Sie auf Einfügen.
-
Gehen Sie zu der Folie, auf der Sie das Video haben möchten.
-
Klicken Sie auf Einfügen → Video → Online-Video.
-
Fügen Sie die Video-URL oder den Einbettungscode ein.
-
Klicken Sie auf Einfügen.
-
Gehen Sie zu Einfügen → Video → Dieses Gerät.
-
Wählen Sie die Videodatei aus.
-
Klicken Sie auf den Dropdown-Pfeil neben Einfügen.
-
Wählen Sie Mit Datei verknüpfen anstelle von Einfügen.
- Größe ändern durch Ziehen der Ecken
- Neu positionieren durch Klicken und Ziehen
- Drehen mit dem Drehgriff
- MP4 (empfohlen für Kompatibilität)
- MOV
- M4V
- WEBM
- Automatisch starten oder Beim Klicken
- Vollbild wiedergeben
- Endlosschleife bis zum Stoppen
- Video kürzen
- Einblenden / Ausblenden
- Einfach zu bedienen
- Funktioniert offline
- Volle Wiedergabesteuerung
- Erhöht die PPT-Dateigröße
- Kann zu Problemen beim Teilen führen, wenn die Datei zu groß wird
- Sie die PPT-Dateigröße reduzieren möchten
- Das Video öffentlich online gehostet wird
- Sie häufig aktualisierte Inhalte benötigen
- Erfordert eine Internetverbindung während der Präsentation
- Funktioniert möglicherweise nicht hinter Unternehmensfirewalls
- Das Video könnte nicht mehr verfügbar sein, wenn es online entfernt wird
- Videoplattformen können vor der Wiedergabe eine Anmeldung erfordern
- Sehr große Videodateien
- Gemeinsame Netzwerkspeicherumgebungen
- Zentralisierte Medienverwaltung
- Stapelverarbeitung von Präsentationen
- Integration mit Backend-Systemen
- Serverseitige Dokumentenerstellung
- Keine manuelle UI-Interaktion
- Wiederholbare Arbeitsabläufe
- Erstellt eine PowerPoint-Präsentation, falls noch keine vorhanden ist.
- Fügt automatisch Folien hinzu, wenn der angegebene Folienindex nicht existiert.
- Fügt ein Video in eine bestimmte Folie ein unter Verwendung anpassbarer Positions- und Größenparameter.
- Unterstützt zwei Einfügemodi:
- Eingebettetes Video – speichert das Video in der PPT-Datei.
- Verknüpftes Video – verweist auf das Video als externe Datei, um die Präsentation kleiner zu halten.
- Setzt optional ein Posterbild, das angezeigt wird, bevor das Video abgespielt wird.
- Enthält eine Fehlerbehandlung, um Fehler zu vermeiden, wenn Dateien fehlen.
- Speichert die generierte Präsentation als PPTX-Datei.
- Grundlegendes Einfügen von Videos
- Verknüpfen eines Videos anstelle des Einbettens
- Anpassen von Videoposition und -größe
- Hinzufügen eines Posterbild-Vorschaubildes
- Stapelweises Einfügen mehrerer Videos über Folien hinweg
- Keine Abhängigkeit von Microsoft Office
- Funktioniert in Serverumgebungen
- Unterstützt Multimedia-Elemente
- Geeignet für die Unternehmensautomatisierung
- Verwenden Sie das MP4-Format mit H.264-Video und AAC-Audio
- Optimieren Sie die Videoauflösung (1080p oder niedriger für Präsentationen)
- Komprimieren Sie große Videos vor dem Einbetten
- Testen Sie die Wiedergabe auf den Zielgeräten
- Bewahren Sie Videos im selben Ordner wie Ihre Präsentation auf
- Verwenden Sie beschreibende Dateinamen
- Bewahren Sie Sicherungskopien der Original-Videodateien auf
- Erwägen Sie Cloud-Speicher für verknüpfte Videos
- Verwenden Sie programmatisches Einfügen für Stapel-Workflows
- Testen Sie auf Windows- und Mac-Systemen
- Validieren Sie die Videowiedergabe vor Präsentationen
- Berücksichtigen Sie den Internetzugang des Publikums für eingebettete Videos
- Eine lokale Videodatei einfügen
- Video aus Online-Quellen in eine PowerPoint-Präsentation einbetten
- Eine verknüpfte Videodatei anhängen
- Videoeinfügung mit Python automatisieren
ol>
-
Tipp: Die meisten manuellen Methoden fügen Videos in einzelne Folien ein. Wenn Sie Videos über mehrere Präsentationen hinweg einfügen oder den Prozess automatisieren müssen, ist der programmatische Ansatz am effizientesten.
Die flexibelste Methode ist die Verwendung der Python-Automatisierung, die Stapelverarbeitung, serverseitige Generierung und die Integration in Geschäftsworkflows ermöglicht.
3. Methode 1: Video von Ihrem Computer einfügen (lokale Datei)
Der einfachste Weg, ein Video in eine PowerPoint-Folie einzufügen, ist das Hinzufügen einer lokalen Videodatei, die auf Ihrem Computer gespeichert ist.
Schritt-für-Schritt-Anleitung
Tipp: Stellen Sie sicher, dass Ihre Videodatei in einem unterstützten Format vorliegt, bevor Sie beginnen. MP4 mit H.264-Codierung funktioniert am besten.
Das Video wird auf der Folie als Medienobjekt angezeigt. Sie können:
Dies ist der einfachste Weg, ein Video in PowerPoint-Folien einzufügen, und es funktioniert vollständig offline.
Unterstützte Videoformate
PowerPoint unterstützt mehrere Videoformate, darunter:
Für beste Ergebnisse verwenden Sie MP4, das mit H.264-Video und AAC-Audio codiert ist.
Die vollständige Liste der unterstützten Medienformate finden Sie in der offiziellen Microsoft-Anleitung zu in PowerPoint unterstützten Video- und Audioformaten.
Anpassen der Wiedergabeeinstellungen
Nach dem Einfügen des Videos können Sie die Wiedergabeoptionen anpassen:
Diese Optionen sind auf der Registerkarte Wiedergabe verfügbar, sobald das Video ausgewählt ist.
Vor- und Nachteile des lokalen Einfügens von Videos
Vorteile
Nachteile
Das lokale Einfügen ist am besten für Präsentationen geeignet, die portabel sein und offline funktionieren müssen.
Hinweis: Eingebettete Videos werden in modernen PPTX-Präsentationen unterstützt. Wenn Sie mit einer älteren PPT-Datei arbeiten, sollten Sie diese zuerst in das PPTX-Format konvertieren. Lesen Sie unsere Anleitung zum Konvertieren von PPT in PPTX.
4. Methode 2: Video in PowerPoint-Präsentation einbetten (Online-Video)
Ein weiterer beliebter Ansatz ist das Einbetten von Videos in eine PowerPoint-Präsentation direkt von einer Online-Quelle wie YouTube.
Diese Methode hält Ihre Dateigröße klein, da das Video gestreamt und nicht in der Präsentation gespeichert wird.
So betten Sie ein YouTube-Video ein
PowerPoint erstellt einen eingebetteten Videorahmen auf der Folie.
Wann man Einbettung verwenden sollte
Das Einbetten ist ideal, wenn:
Einschränkungen von eingebetteten Videos
Es gibt jedoch einige wichtige Überlegungen:
Wenn Zuverlässigkeit entscheidend ist, kann das lokale Einfügen sicherer sein.
5. Methode 3: So hängen Sie ein Video in PPT an (Verknüpfen statt Einbetten)
Einige Benutzer fragen, wie man ein Video in PPT anhängt, anstatt es vollständig einzubetten.
Diese Methode verknüpft eine externe Videodatei, anstatt sie in der Präsentation zu speichern.
Einbetten vs. Anhängen: Was ist der Unterschied?
| Merkmal | Video einbetten | Video anhängen (verknüpfen) |
|---|---|---|
| In PPT gespeichert | Ja | Nein |
| Dateigröße | Größer | Kleiner |
| Internet erforderlich | Nein | Nein (wenn lokal) |
| Risiko eines defekten Links | Nein | Ja |
So verknüpfen Sie eine Videodatei
Jetzt verweist die PPT extern auf das Video.
Wann das Verknüpfen sinnvoll ist
Seien Sie vorsichtig beim Teilen der Präsentation – Sie müssen die Videodatei zusammen senden.
Wenn Sie auch Datenvisualisierungen zu Ihren Folien hinzufügen, möchten Sie vielleicht lernen, wie man ein Diagramm in PowerPoint einfügt.
6. Häufige Probleme beim Einfügen von Videos in PowerPoint
Auch wenn Sie wissen, wie man ein Video in eine PowerPoint-Präsentation einfügt, können dennoch Probleme auftreten.
Hier sind einige häufige Probleme und ihre Lösungen:
6.1 Video wird nicht abgespielt
Oft durch nicht unterstützte Codecs verursacht.
Lösung: Konvertieren Sie das Video in MP4 (H.264 + AAC).
6.2 Datei zu groß
Das Einbetten von hochauflösenden Videos kann die PPT-Größe drastisch erhöhen.
Lösung: Komprimieren Sie Medien mit Datei → Informationen → Medien komprimieren.
6.3 Kompatibilitätsprobleme (Mac vs. Windows)
Einige Formate verhalten sich auf verschiedenen Systemen unterschiedlich.
Lösung: Verwenden Sie MP4 für maximale Kompatibilität.
6.4 Verzögerung bei der Wiedergabe
Große Videos oder langsame Hardware können zu Ruckeln führen.
Lösung: Optimieren Sie die Videoauflösung oder verwenden Sie eine verknüpfte Datei.
7. Methode 4: Video mit Python in PowerPoint einfügen (automatisierte Lösung)
Für Entwickler und Unternehmen bietet Python eine leistungsstarke Möglichkeit, die Erstellung von PowerPoint und das Einfügen von Videos zu automatisieren.
Mit Spire.Presentation for Python können Sie Videos in Folien einfügen, ohne dass Microsoft Office erforderlich ist.
Warum Python für die PowerPoint-Automatisierung verwenden?
Bibliothek installieren
pip install Spire.Presentation
Schnelles Beispiel: Video mit Python in PowerPoint einfügen
Wenn Sie nur ein minimales Beispiel benötigen, fügt der folgende Code ein Video in die erste Folie einer neuen PowerPoint-Präsentation ein.
from spire.presentation import *

# Präsentation erstellen
presentation = Presentation()

# Video zur ersten Folie hinzufügen
slide = presentation.Slides[0]

video_rect = RectangleF.FromLTRB(100, 100, 500, 400)
slide.Shapes.AppendVideoMedia("demo_video.mp4", video_rect)

# Präsentation speichern
presentation.SaveToFile("video_demo.pptx", FileFormat.Pptx2019)
presentation.Dispose()
Dieses minimale Beispiel zeigt, wie man eine neue PowerPoint-Präsentation erstellt und ein Video an der angegebenen Position mit Python-Code in die erste Folie einfügt.
### Erweitertes Beispiel: Video in PowerPoint mit Python einfügen oder verknüpfen
Unten finden Sie ein erweitertes Beispiel mit Fehlerbehandlung und zusätzlichen Optionen:
from spire.presentation import *
import os
from pathlib import Path


def insert_video_to_powerpoint(video_path, output_path, slide_index=0, position=(100, 100), size=(400, 300),
                               poster_image_path=None, embed_video=True):
    """
    Ein Video programmgesteuert in eine PowerPoint-Präsentation einfügen

    Args:
        video_path: Pfad zur Videodatei (MP4, MOV, WMV, AVI)
        output_path: Ausgabepfad der PowerPoint-Datei (.pptx)
        slide_index: Foliennummer (0-basiert), auf der das Video eingefügt werden soll
        position: Tupel (x, y) Koordinaten für die Videoplatzierung
        size: Tupel (Breite, Höhe) für die Videoabmessungen
        poster_image_path: Optionaler Pfad zum Poster-/Vorschaubild für das Video
        embed_video: Boolescher Wert, der angibt, ob das Video eingebettet (True)
                     oder mit der Videodatei verknüpft (False) werden soll
    """
    try:
        # Eingabedatei validieren
        if not os.path.exists(video_path):
            raise FileNotFoundError(f"Videodatei nicht gefunden: {video_path}")

        # Dateierweiterung prüfen
        valid_extensions = {'.mp4', '.mov', '.wmv', '.avi'}
        file_ext = Path(video_path).suffix.lower()
        if file_ext not in valid_extensions:
            print(f"Warnung: {file_ext} wird möglicherweise nicht vollständig unterstützt. MP4 wird empfohlen.")

        # Präsentationsobjekt erstellen
        presentation = Presentation()

        # Sicherstellen, dass wir genügend Folien haben
        while presentation.Slides.Count <= slide_index:
            presentation.Slides.Append()

        # Ziel-Folie abrufen
        slide = presentation.Slides[slide_index]

        # Rechteck für Videoposition und -größe erstellen
        video_rect = RectangleF.FromLTRB(
            position[0],
            position[1],
            position[0] + size[0],
            position[1] + size[1]
        )

        # Video basierend auf dem Einbettungsmodus einfügen
        if embed_video:
            # Das Video in die Präsentation einbetten
            video = slide.Shapes.AppendVideoMedia(video_path, video_rect)
        else:
            # Das Video als Link einfügen (externe Dateireferenz)
            video = slide.Shapes.AppendVideoMediaLink(video_path, video_rect, False)

        # Posterbild setzen, falls vorhanden
        if poster_image_path and os.path.exists(poster_image_path):
            video.PictureFill.Picture.Url = poster_image_path

        # Die Präsentation speichern
        presentation.SaveToFile(output_path, FileFormat.Pptx2019)
        print(f"Erfolgreich erstellt: {output_path}")
        print(f"   - Video auf Folie {slide_index + 1} eingefügt")
        print(f"   - Modus: {'Eingebettet' if embed_video else 'Verknüpft'}")
        print(f"   - Position: {position}")
        print(f"   - Größe: {size}")

        return True

    except Exception as e:
        print(f"Fehler beim Einfügen des Videos: {e}")
        return False

    finally:
        # Ressourcen bereinigen
        if 'presentation' in locals():
            presentation.Dispose()


# Anwendungsbeispiele
if __name__ == "__main__":

    # Beispiel 1: Grundlegende Verwendung (Video einbetten)
    insert_video_to_powerpoint(
        video_path="presentation_video.mp4",
        output_path="presentation_with_video.pptx"
    )

    # Beispiel 2: Verknüpftes Video einfügen
    insert_video_to_powerpoint(
        video_path="demo_video.mp4",
        output_path="linked_video_slide.pptx",
        embed_video=False
    )

    # Beispiel 3: Benutzerdefinierte Position und Größe
    insert_video_to_powerpoint(
        video_path="demo_video.mp4",
        output_path="custom_video_slide.pptx",
        slide_index=2,  # Dritte Folie
        position=(150, 100),
        size=(500, 300)
    )

    # Beispiel 4: Mit Posterbild
    if os.path.exists("video_thumbnail.png"):
        insert_video_to_powerpoint(
            video_path="demo_video.mp4",
            output_path="video_with_poster.pptx",
            poster_image_path="video_thumbnail.png"
        )

    # Beispiel 5: Stapelverarbeitung mehrerer Videos
    videos = [
        ("intro.mp4", 0, (100, 100)),
        ("tutorial.mp4", 1, (100, 100)),
        ("conclusion.mp4", 2, (100, 100))
    ]

    for video_file, slide_num, pos in videos:
        if os.path.exists(video_file):
            insert_video_to_powerpoint(
                video_path=video_file,
                output_path=f"batch_output_slide{slide_num}.pptx",
                slide_index=slide_num,
                position=pos
            )
Unten sehen Sie eine Vorschau der generierten PowerPoint-Datei 'video_with_poster.pptx' mit eingefügtem Video:
Was dieser Code tut
Dieses Beispiel zeigt, wie man ein Video programmgesteuert mit Python in eine PowerPoint-Präsentation einfügt. Das Skript enthält mehrere praktische Funktionen, die es für reale Automatisierungsszenarien geeignet machen.
Die Funktion führt die folgenden Operationen aus:
Die bereitgestellten Beispiele demonstrieren mehrere gängige Szenarien:
Vorteile der Verwendung von Spire.Presentation
Für Teams, die eine große Anzahl von Präsentationen erstellen, bietet dieser Ansatz eine weitaus größere Skalierbarkeit als manuelle Methoden.
Wenn Sie Mediendateien weiter mit Python verwalten müssen, können Sie auch lernen, wie man Videos und Audio in PowerPoint-Präsentationen einfügt oder extrahiert.
8. Genauigkeitsvergleich aller Methoden
| Methode | Benutzerfreundlichkeit | Dateigröße | Internet erforderlich | Automatisierung | Am besten für |
|---|---|---|---|---|---|
| Lokales Video einfügen | Einfach | Groß | Nein | Nein | Tragbare Präsentationen |
| Online-Video einbetten | Einfach | Klein | Ja | Nein | Internetverbundene Präsentationen |
| Video anhängen (verknüpfen) | Mittel | Klein | Nein | Nein | Große Dateien, gemeinsamer Speicher |
| Python-Automatisierung | Fortgeschritten | Flexibel | Nein | Ja | Geschäftsautomatisierungs-Workflows |
9. Bewährte Praktiken für das Einfügen von Videos in hoher Qualität
Um die besten Ergebnisse zu erzielen, befolgen Sie diese bewährten Praktiken:
Videovorbereitung
Dateiverwaltung
Technische Empfehlungen
10. Häufig gestellte Fragen
1. Wie füge ich ein Video in PowerPoint ein, ohne die Dateigröße zu erhöhen?
Ja. Sie können entweder ein Online-Video einbetten oder auf eine lokale Datei verknüpfen, anstatt sie einzubetten. Das Verknüpfen hält die PPT-Datei kleiner, erfordert aber den Zugriff auf die externe Datei.
2. Wie füge ich ein Video in eine bestimmte Folie ein?
Navigieren Sie einfach zur Ziel-Folie, bevor Sie Einfügen → Video verwenden. In Automatisierungsszenarien können Sie den Folienindex programmgesteuert angeben.
3. Was ist das beste Videoformat für PowerPoint?
MP4 mit H.264-Video und AAC-Audio ist das kompatibelste Format für Windows- und Mac-Systeme.
4. Warum wird mein Video in PowerPoint nicht abgespielt?
Häufige Gründe sind nicht unterstützte Codecs, beschädigte Dateien oder Einbettungsprobleme. Das Konvertieren des Videos in MP4 löst das Problem normalerweise.
5. Kann ich Videos automatisch in PowerPoint einfügen?
Ja. Mit Python-Bibliotheken wie Spire.Presentation können Sie Videos programmgesteuert in PowerPoint-Folien einfügen, was es ideal für die Stapelverarbeitung und die Backend-Automatisierung macht.
11. Fazit
Jetzt wissen Sie, wie man Videos in PowerPoint einfügt, und zwar mit mehreren Ansätzen:
Für einzelne Benutzer, die gelegentlich Präsentationen erstellen, sind die integrierten Tools von PowerPoint mehr als ausreichend.
Für Entwickler, Unternehmen und Unternehmens-Workflows, die eine skalierbare Dokumentenerstellung erfordern, bietet die Automatisierung jedoch eine weitaus effizientere und flexiblere Lösung.
Die Wahl der richtigen Methode hängt ganz von Ihrem Anwendungsfall ab – Einfachheit für die manuelle Bearbeitung oder Skalierbarkeit für die automatisierte Produktion.
Um die vollen Möglichkeiten von Spire.Presentation for Python ohne Einschränkungen zu erkunden, können Sie eine kostenlose temporäre Lizenz beantragen.
Siehe auch
Как вставить видео в PowerPoint: полное руководство (2026)
Содержание
Добавление видео в презентацию — один из самых эффективных способов повысить вовлеченность. Создаете ли вы учебную колоду, демонстрацию продукта, маркетинговую презентацию или учебный материал, видео может сделать ваши слайды более динамичными и убедительными.
В этом полном руководстве объясняются надежные методы вставки видео в презентации PowerPoint. Вы изучите ручные подходы для локальных файлов, онлайн-видео, связанных файлов и высокоточные программные решения. Если вам нужно вставить видео в PowerPoint, встроить видео в презентацию PowerPoint или автоматизировать весь процесс для пакетной обработки, эта статья предоставит вам необходимые практические знания и технические идеи.
1. Зачем добавлять видео в презентации PowerPoint
Прежде чем изучать методы вставки, важно понять, почему важна интеграция видео и с какими проблемами вы можете столкнуться.
1.1 Преимущества видео в презентациях
Видеоконтент дает несколько преимуществ:
- Повышенная вовлеченность – визуальный и звуковой контент привлекает внимание эффективнее, чем статичные слайды
- Сложные демонстрации – показывайте процессы, продукты или процедуры, которые трудно объяснить текстом
- Эмоциональная связь – видео может оказывать более сильное эмоциональное воздействие, чем одни только изображения
- Профессиональный лоск – высококачественный видеоконтент повышает качество презентации
1.2 Распространенные проблемы
Однако вставка видео сопряжена с рядом технических проблем:
- Проблемы с размером файла – встроенные видео могут значительно увеличить размер файла PPT
- Совместимость форматов – не все форматы видео работают в разных версиях PowerPoint
- Проблемы с воспроизведением – проблемы с кодеками могут помешать правильному воспроизведению видео
- Портативность – связанные видео могут не работать при совместном использовании презентаций
Понимание этих проблем поможет вам выбрать правильный метод вставки для вашего конкретного случая.
2. Обзор надежных методов
В этом руководстве рассматриваются четыре практических способа вставки видео в презентации PowerPoint:
- Вставить локальный видеофайл – самый распространенный метод, работает в автономном режиме
- Встроить онлайн-видео – сохраняет небольшой размер файла, требует подключения к Интернету
- Ссылка на внешний видеофайл – баланс между размером и контролем
- Программная вставка – автоматизация и пакетная обработка
Совет: большинство ручных методов вставляют видео в отдельные слайды. Если вам нужно вставить видео в несколько презентаций или автоматизировать процесс, программный подход является наиболее эффективным.
Самый гибкий метод — это автоматизация с помощью Python, которая позволяет выполнять пакетную обработку, генерацию на стороне сервера и интеграцию с бизнес-процессами.
3. Метод 1: вставка видео с вашего компьютера (локальный файл)
Самый простой способ вставить видео в слайд PowerPoint — добавить локальный видеофайл, хранящийся на вашем компьютере.
Пошаговые инструкции
Совет: перед началом убедитесь, что ваш видеофайл имеет поддерживаемый формат. Лучше всего работает MP4 с кодировкой H.264.
-
Откройте презентацию PowerPoint - Запустите PowerPoint и откройте презентацию, в которую вы хотите добавить видео.
-
Перейдите к целевому слайду - Перейдите к конкретному слайду, на котором должно появиться видео.
-
Щелкните вкладку «Вставка» - находится в верхней ленте меню.
-
Выберите «Видео» - в группе «Медиа» нажмите кнопку «Видео».
-
Выберите «Это устройство» - выберите «Это устройство» в раскрывающемся меню.
-
Выберите и вставьте - перейдите к своему видеофайлу, выберите его и нажмите Вставить.
Видео появится на слайде как медиаобъект. Вы можете:
- Изменить размер, перетаскивая углы
- Переместить, щелкнув и перетащив
- Повернуть с помощью маркера поворота
Это самый простой способ вставить видео в слайды PowerPoint, и он работает полностью в автономном режиме.
Поддерживаемые форматы видео
PowerPoint поддерживает несколько форматов видео, в том числе:
- MP4 (рекомендуется для совместимости)
- MOV
- M4V
- WEBM
Для достижения наилучших результатов используйте MP4 с кодировкой видео H.264 и аудио AAC.
Вы можете найти полный список поддерживаемых форматов мультимедиа в официальном руководстве Microsoft по форматам видео и аудио, поддерживаемым в PowerPoint.
Настройка параметров воспроизведения
После вставки видео вы можете настроить параметры воспроизведения:
- Начать автоматически или По щелчку
- Воспроизвести в полноэкранном режиме
- Повторять до остановки
- Обрезать видео
- Появление / исчезновение
Эти параметры доступны на вкладке Воспроизведение после выбора видео.
Преимущества и недостатки вставки локального видео
Преимущества
- Простота в использовании
- Работает в автономном режиме
- Полный контроль воспроизведения
Недостатки
- Увеличивает размер файла PPT
- Может вызвать проблемы с совместным доступом, если файл станет слишком большим
Локальная вставка лучше всего подходит для презентаций, которые должны быть переносимыми и работать в автономном режиме.
Примечание: встроенные видео поддерживаются в современных презентациях PPTX. Если вы работаете со старым файлом PPT, сначала рассмотрите возможность его преобразования в формат PPTX. См. наше руководство о том, как преобразовать PPT в PPTX.
4. Метод 2: встраивание видео в презентацию PowerPoint (онлайн-видео)
Другой популярный подход — встраивать видео в презентацию PowerPoint непосредственно из онлайн-источника, такого как YouTube.
Этот метод сохраняет небольшой размер файла, поскольку видео транслируется, а не хранится внутри презентации.
Как встроить видео с YouTube
-
Перейдите к слайду, на котором вы хотите разместить видео.
-
Нажмите Вставка → Видео → Онлайн-видео.
-
Вставьте URL-адрес видео или код для встраивания.
-
Нажмите Вставить.
PowerPoint создаст на слайде встроенный видеокадр.
Когда использовать встраивание
Встраивание идеально, когда:
- Вы хотите уменьшить размер файла PPT
- Видео размещено в открытом доступе в Интернете
- Вам нужен часто обновляемый контент
Ограничения встроенных видео
Однако есть некоторые важные соображения:
- Требуется подключение к Интернету во время презентации
- Может не работать за корпоративными брандмауэрами
- Видео может стать недоступным, если его удалят из Интернета
- Видеоплатформы могут потребовать входа в систему перед воспроизведением
Если надежность имеет решающее значение, локальная вставка может быть безопаснее.
5. Метод 3: как прикрепить видео в PPT (ссылка вместо встраивания)
Некоторые пользователи спрашивают, как прикрепить видео в PPT, а не полностью встраивать его.
Этот метод ссылается на внешний видеофайл, а не хранит его внутри презентации.
Встроить или прикрепить: в чем разница?
| Особенность | Встроить видео | Прикрепить (ссылка) видео |
|---|---|---|
| Хранится внутри PPT | Да | Нет |
| Размер файла | Больше | Меньше |
| Требуется Интернет | Нет | Нет (если локально) |
| Риск неработающей ссылки | Нет | Да |
Как связать видеофайл
-
Перейдите в Вставка → Видео → Это устройство.
-
Выберите видеофайл.
-
Нажмите на стрелку раскрывающегося списка рядом с Вставить.
-
Выберите Связать с файлом вместо Вставить.
Теперь PPT будет ссылаться на видео извне.
Когда имеет смысл связывать
- Очень большие видеофайлы
- Среды общего сетевого хранения
- Централизованное управление медиа
Будьте осторожны при совместном использовании презентации — вы должны отправить видеофайл вместе.
Если вы также добавляете визуализацию данных на свои слайды, вы можете узнать, как вставить диаграмму в PowerPoint.
6. Распространенные проблемы при вставке видео в PowerPoint
Даже если вы знаете, как добавить видео в презентацию PowerPoint, проблемы все равно могут возникнуть.
Вот некоторые распространенные проблемы и их решения:
6.1 Видео не воспроизводится
Часто вызывается неподдерживаемыми кодеками.
Решение: преобразуйте видео в MP4 (H.264 + AAC).
6.2 Слишком большой файл
Встраивание видео высокого разрешения может значительно увеличить размер PPT.
Решение: сожмите медиафайлы, используя Файл → Сведения → Сжать медиа.
6.3 Проблемы совместимости (Mac и Windows)
Некоторые форматы ведут себя по-разному в разных системах.
Решение: используйте MP4 для максимальной совместимости.
6.4 Задержка во время воспроизведения
Большие видео или медленное оборудование могут вызывать заикание.
Решение: оптимизируйте разрешение видео или используйте связанный файл.
7. Метод 4: вставка видео в PowerPoint с помощью Python (автоматизированное решение)
Для разработчиков и предприятий Python предоставляет мощный способ автоматизировать создание PowerPoint и вставку видео.
Используя Spire.Presentation для Python, вы можете вставлять видео в слайды, не требуя Microsoft Office.
Зачем использовать Python для автоматизации PowerPoint?
- Пакетная обработка презентаций
- Интеграция с бэкэнд-системами
- Генерация документов на стороне сервера
- Нет ручного взаимодействия с пользовательским интерфейсом
- Повторяемые рабочие процессы
Установить библиотеку
pip install Spire.Presentation
Краткий пример: вставка видео в PowerPoint с помощью Python
Если вам нужен минимальный пример, следующий код вставляет видео в первый слайд новой презентации PowerPoint.
from spire.presentation import *

# Создать презентацию
presentation = Presentation()

# Добавить видео на первый слайд
slide = presentation.Slides[0]

video_rect = RectangleF.FromLTRB(100, 100, 500, 400)
slide.Shapes.AppendVideoMedia("demo_video.mp4", video_rect)

# Сохранить презентацию
presentation.SaveToFile("video_demo.pptx", FileFormat.Pptx2019)
presentation.Dispose()
Этот минимальный пример показывает, как создать новую презентацию PowerPoint и вставить видео в первый слайд в указанную позицию с помощью кода Python.
### Расширенный пример: вставка или связывание видео в PowerPoint с помощью Python
Ниже приведен расширенный пример с обработкой ошибок и дополнительными параметрами:
from spire.presentation import *
import os
from pathlib import Path


def insert_video_to_powerpoint(video_path, output_path, slide_index=0, position=(100, 100), size=(400, 300),
                               poster_image_path=None, embed_video=True):
    """
    Программно вставить видео в презентацию PowerPoint

    Args:
        video_path: путь к видеофайлу (MP4, MOV, WMV, AVI)
        output_path: путь к выходному файлу PowerPoint (.pptx)
        slide_index: номер слайда (начиная с 0), куда следует вставить видео
        position: кортеж (x, y) координат для размещения видео
        size: кортеж (ширина, высота) для размеров видео
        poster_image_path: необязательный путь к изображению-постеру/миниатюре для видео
        embed_video: логическое значение, указывающее, следует ли встраивать видео (True)
                     или ссылаться на видеофайл (False)
    """
    try:
        # Проверить входной файл
        if not os.path.exists(video_path):
            raise FileNotFoundError(f"Видеофайл не найден: {video_path}")

        # Проверить расширение файла
        valid_extensions = {'.mp4', '.mov', '.wmv', '.avi'}
        file_ext = Path(video_path).suffix.lower()
        if file_ext not in valid_extensions:
            print(f"Предупреждение: {file_ext} может не полностью поддерживаться. Рекомендуется MP4.")

        # Создать объект презентации
        presentation = Presentation()

        # Убедитесь, что у нас достаточно слайдов
        while presentation.Slides.Count <= slide_index:
            presentation.Slides.Append()

        # Получить целевой слайд
        slide = presentation.Slides[slide_index]

        # Создать прямоугольник для положения и размера видео
        video_rect = RectangleF.FromLTRB(
            position[0],
            position[1],
            position[0] + size[0],
            position[1] + size[1]
        )

        # Вставить видео в зависимости от режима встраивания
        if embed_video:
            # Встроить видео в презентацию
            video = slide.Shapes.AppendVideoMedia(video_path, video_rect)
        else:
            # Вставить видео как ссылку (ссылка на внешний файл)
            video = slide.Shapes.AppendVideoMediaLink(video_path, video_rect, False)

        # Установить изображение-постер, если оно предоставлено
        if poster_image_path and os.path.exists(poster_image_path):
            video.PictureFill.Picture.Url = poster_image_path

        # Сохранить презентацию
        presentation.SaveToFile(output_path, FileFormat.Pptx2019)
        print(f"Успешно создано: {output_path}")
        print(f"   - Видео вставлено на слайд {slide_index + 1}")
        print(f"   - Режим: {'Встроенный' if embed_video else 'Связанный'}")
        print(f"   - Позиция: {position}")
        print(f"   - Размер: {size}")

        return True

    except Exception as e:
        print(f"Ошибка при вставке видео: {e}")
        return False

    finally:
        # Очистить ресурсы
        if 'presentation' in locals():
            presentation.Dispose()


# Примеры использования
if __name__ == "__main__":

    # Пример 1: базовое использование (встраивание видео)
    insert_video_to_powerpoint(
        video_path="presentation_video.mp4",
        output_path="presentation_with_video.pptx"
    )

    # Пример 2: вставка связанного видео
    insert_video_to_powerpoint(
        video_path="demo_video.mp4",
        output_path="linked_video_slide.pptx",
        embed_video=False
    )

    # Пример 3: настраиваемая позиция и размер
    insert_video_to_powerpoint(
        video_path="demo_video.mp4",
        output_path="custom_video_slide.pptx",
        slide_index=2,  # Третий слайд
        position=(150, 100),
        size=(500, 300)
    )

    # Пример 4: с изображением-постером
    if os.path.exists("video_thumbnail.png"):
        insert_video_to_powerpoint(
            video_path="demo_video.mp4",
            output_path="video_with_poster.pptx",
            poster_image_path="video_thumbnail.png"
        )

    # Пример 5: пакетная обработка нескольких видео
    videos = [
        ("intro.mp4", 0, (100, 100)),
        ("tutorial.mp4", 1, (100, 100)),
        ("conclusion.mp4", 2, (100, 100))
    ]

    for video_file, slide_num, pos in videos:
        if os.path.exists(video_file):
            insert_video_to_powerpoint(
                video_path=video_file,
                output_path=f"batch_output_slide{slide_num}.pptx",
                slide_index=slide_num,
                position=pos
            )
Ниже приведен предварительный просмотр сгенерированного файла PowerPoint 'video_with_poster.pptx' со вставкой видео:
Что делает этот код
Этот пример демонстрирует, как программно вставить видео в презентацию PowerPoint с помощью Python. Скрипт включает в себя несколько практических функций, которые делают его подходящим для реальных сценариев автоматизации.
Функция выполняет следующие операции:
- Создает презентацию PowerPoint, если она еще не существует.
- Автоматически добавляет слайды, если указанный индекс слайда не существует.
- Вставляет видео в определенный слайд, используя настраиваемые параметры положения и размера.
- Поддерживает два режима вставки:
- Встроенное видео – хранит видео внутри файла PPT.
- Связанное видео – ссылается на видео как на внешний файл, чтобы презентация была меньше.
- При желании устанавливает изображение-постер, которое появляется перед началом воспроизведения видео.
- Включает обработку ошибок для предотвращения сбоев при отсутствии файлов.
- Сохраняет сгенерированную презентацию в виде файла PPTX.
Приведенные примеры демонстрируют несколько распространенных сценариев:
- Базовая вставка видео
- Связывание видео вместо его встраивания
- Настройка положения и размера видео
- Добавление миниатюры изображения-постера
- Пакетная вставка нескольких видео на слайды
Преимущества использования Spire.Presentation
- Нет зависимости от Microsoft Office
- Работает в серверных средах
- Поддерживает мультимедийные элементы
- Подходит для автоматизации предприятий
Для команд, создающих большое количество презентаций, этот подход обеспечивает гораздо большую масштабируемость, чем ручные методы.
Если вам нужно дополнительно управлять медиафайлами с помощью Python, вы также можете узнать, как вставлять или извлекать видео и аудио в презентациях PowerPoint.
8. Сравнение точности всех методов
| Метод | Простота использования | Размер файла | Требуется Интернет | Автоматизация | Лучше всего для |
|---|---|---|---|---|---|
| Вставить локальное видео | Легко | Большой | Нет | Нет | Переносимые презентации |
| Встроить онлайн-видео | Легко | Маленький | Да | Нет | Презентации, подключенные к Интернету |
| Прикрепить (ссылка) видео | Средний | Маленький | Нет | Нет | Большие файлы, общее хранилище |
| Автоматизация с помощью Python | Продвинутый | Гибкий | Нет | Да | Рабочие процессы автоматизации бизнеса |
9. Лучшие практики для высококачественной вставки видео
Чтобы обеспечить наилучшие результаты, следуйте этим рекомендациям:
Подготовка видео
- Используйте формат MP4 с видео H.264 и аудио AAC
- Оптимизируйте разрешение видео (1080p или ниже для презентаций)
- Сжимайте большие видео перед встраиванием
- Протестируйте воспроизведение на целевых устройствах
Управление файлами
- Храните видео в той же папке, что и ваша презентация
- Используйте описательные имена файлов
- Сохраняйте резервные копии исходных видеофайлов
- Рассмотрите возможность использования облачного хранилища для связанных видео
Технические рекомендации
- Используйте программную вставку для пакетных рабочих процессов
- Тестируйте как на системах Windows, так и на Mac
- Проверяйте воспроизведение видео перед презентациями
- Учитывайте доступ к Интернету аудитории для встроенных видео
10. Часто задаваемые вопросы
1. Как вставить видео в PowerPoint, не увеличивая размер файла?
Да. Вы можете либо встроить онлайн-видео, либо сослаться на локальный файл вместо его встраивания. Связывание сохраняет файл PPT меньшим, но требует доступа к внешнему файлу.
2. Как вставить видео в определенный слайд?
Просто перейдите к целевому слайду перед использованием Вставка → Видео. В сценариях автоматизации вы можете указать индекс слайда программно.
3. Какой формат видео лучше всего подходит для PowerPoint?
MP4 с видео H.264 и аудио AAC является наиболее совместимым форматом для систем Windows и Mac.
4. Почему мое видео не воспроизводится в PowerPoint?
Распространенные причины включают неподдерживаемые кодеки, поврежденные файлы или проблемы со встраиванием. Преобразование видео в MP4 обычно решает проблему.
5. Могу ли я автоматически вставлять видео в PowerPoint?
Да. Используя библиотеки Python, такие как Spire.Presentation, вы можете программно вставлять видео в слайды PowerPoint, что делает его идеальным для пакетной обработки и автоматизации бэкэнда.
11. Заключение
Теперь вы знаете, как вставить видео в PowerPoint, используя несколько подходов:
- Вставить локальный видеофайл
- Встроить видео в презентацию PowerPoint из онлайн-источников
- Прикрепить связанный видеофайл
- Автоматизировать вставку видео с помощью Python
Для отдельных пользователей, время от времени создающих презентации, встроенных инструментов PowerPoint более чем достаточно.
Однако для разработчиков, предприятий и корпоративных рабочих процессов, требующих масштабируемой генерации документов, автоматизация обеспечивает гораздо более эффективное и гибкое решение.
Выбор правильного метода полностью зависит от вашего варианта использования — простота для ручного редактирования или масштабируемость для автоматизированного производства.
Чтобы изучить все возможности Spire.Presentation для Python без ограничений, вы можете подать заявку на бесплатную временную лицензию.