Metadaten из PDF entfernen – Sichere und einfache Methoden
PDFs sind das am weitesten verbreitete Dokumentenformat für den Austausch von Arbeit, Verträgen, Berichten und persönlichen Dateien. Aber versteckte Metadaten in PDFs können sensible Informationen preisgeben, die Sie nie teilen wollten. Egal, ob Sie ein Profi, Student oder Gelegenheitsnutzer sind, das Wissen, wie man Metadaten aus PDF entfernt, ist für den Schutz der Privatsphäre und die Sicherheit unerlässlich.
In diesem vollständigen Leitfaden erklären wir, was PDF-Metadaten sind, warum sie wichtig sind, und führen Sie durch 5 kostenlose und einfache Methoden, um Metadaten aus PDF zu bereinigen.
- Was sind PDF-Metadaten?
- Warum Sie Metadaten aus PDF-Dateien löschen sollten
- Die 5 besten Methoden zum Entfernen von Metadaten aus PDF
- Häufig gestellte Fragen zum Entfernen von PDF-Metadaten
Was sind PDF-Metadaten?
Metadaten werden oft als "Daten über Daten" beschrieben. Auf eine PDF angewendet, bezieht es sich auf die eingebetteten Informationen, die in der Datei versteckt sind und ihre Eigenschaften und Herkunft beschreiben.
PDF-Metadaten umfassen:
- Autorenname, Ersteller und Bearbeiter
- Erstellungs-/Änderungsdatum
- Verwendete Software (z. B. Word, Adobe Acrobat, Canva)
- Dokumenttitel, Betreff, Schlüsselwörter
- Standort, Geräteinformationen und Bearbeitungsverlauf
- Versteckte Kommentare, Lesezeichen und Formulardaten
Diese Metadaten reisen mit der PDF-Datei, wann immer Sie sie online oder per E-Mail teilen, und geben möglicherweise mehr preis, als Sie beabsichtigt haben.
Warum Sie Metadaten aus PDF-Dateien löschen sollten
Das Bereinigen von Metadaten schützt Sie und Ihre Dokumente auf 4 wichtige Weisen:
- Datenschutz: Verbergen Sie Ihren Namen, Ihre E-Mail-Adresse, Ihr Gerät und Ihren Standort vor unbeabsichtigten Betrachtern.
- Sicherheit: Verhindern Sie, dass Konkurrenten oder böswillige Akteure Ihren Bearbeitungsprozess oder Ihre Werkzeuge verfolgen.
- Professionalität: Entfernen Sie unordentliche, automatisch generierte Informationen für Kunden- oder öffentliche Dokumente.
- Kleinere Dateigröße: Das Entfernen von Metadaten reduziert oft die PDF-Größe für einen schnelleren Austausch.
Das Versäumnis, Metadaten zu löschen, kann zu versehentlichen Datenlecks führen – selbst wenn der sichtbare Inhalt sauber aussieht.
Die 5 besten Methoden zum Entfernen von Metadaten aus PDF
Wir haben die zuverlässigsten kostenlosen und kostenpflichtigen Methoden zum Entfernen von Metadaten aus PDF-Dateien getestet. Wählen Sie die Methode, die zu Ihrem Gerät und Ihren Bedürfnissen passt.
Methode 1: Kostenlose Online-PDF-Metadaten-Entferner
Online-Tools sind die schnellste Option für einzelne Dateien. Sie funktionieren in jedem Browser auf Windows, Mac oder Mobilgeräten. Wenn Sie ein nicht sensibles Dokument bereinigen, bieten Dienste wie Metadata2Go Funktionen zum Entfernen von Metadaten.
Schritte zum Online-Löschen von Metadaten aus PDF:
- Navigieren Sie zum Metadata2Go Metadaten-Entferner-Tool.
- Klicken Sie auf „Datei auswählen“ oder ziehen Sie Ihre PDF per Drag & Drop, um sie hochzuladen.
- Klicken Sie auf „Start“ oder eine entsprechende Schaltfläche, um Metadaten aus der PDF zu löschen.
- Laden Sie die bereinigte PDF herunter.
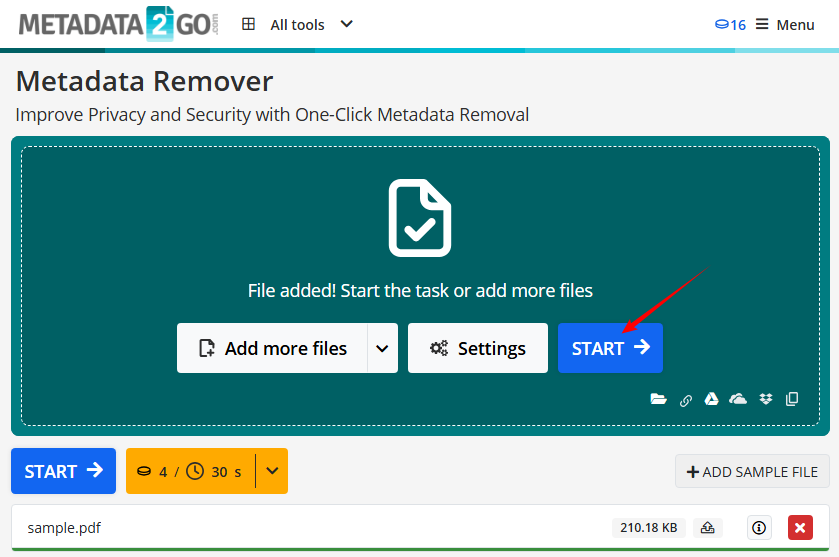
✔ Vorteile: Kostenlos, keine Installation erforderlich, einfach zu bedienen.
✘ Nachteile: Nicht für hochsensible Dateien empfohlen (verwenden Sie Desktop-Anwendungen für den Datenschutz).
Für die direkte Kontrolle über sichtbare Metadatenfelder können Sie PDF-Metadaten bearbeiten, um Titel, Autor, Betreff und Schlüsselwörter zu ändern.
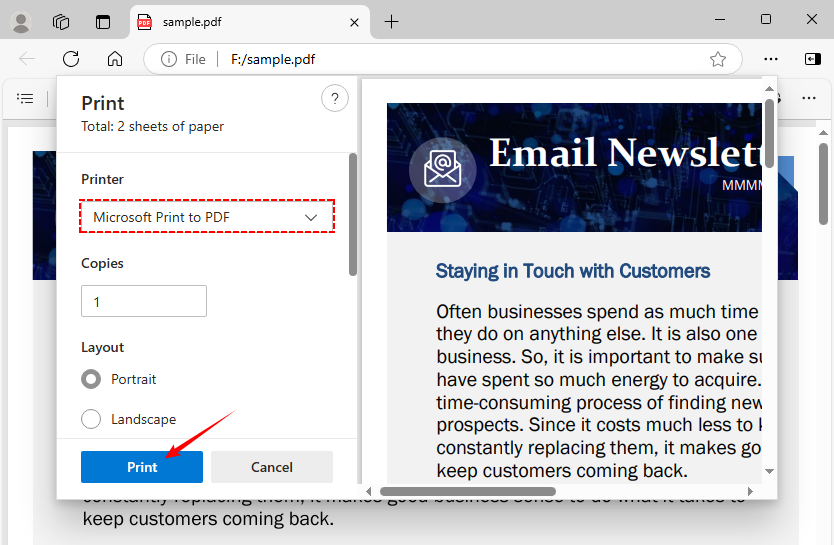
Methode 2: Integrierte Desktop-Metadaten-Reinigungstools
Für Windows-Benutzer verwenden Sie die In PDF drucken Funktion, um Metadaten zu entfernen, ohne neue Software zu installieren. Diese Methode funktioniert, indem die Datei „geglättet“ und die ursprünglichen Metadaten verworfen werden.
- Öffnen Sie die PDF in einem beliebigen Reader (Edge, Chrome).
- Gehen Sie zu „Datei > Drucken“.
- Wählen Sie „Microsoft Print to PDF“.
- Klicken Sie auf „Drucken“ und speichern Sie die neue Datei.
- Für Mac: Öffnen Sie die PDF in der Vorschau > Werkzeuge > Informationen einblenden > Weitere Informationen (i) > Löschen Sie den gesamten Text in den Metadatenfeldern.
✔ Vorteile: Kostenlos, sicher (Datei bleibt lokal), keine Drittanbieter-Tools.
✘ Nachteile: Die Methode „In PDF drucken“ kann interaktive Elemente wie Links entfernen. Das manuelle Löschen in der Vorschau entfernt nur grundlegende Felder, nicht aber tiefer versteckte Daten.
Methode 3: Metadaten mit Adobe Acrobat entfernen
Adobe Acrobat Pro ist das gründlichste Werkzeug zum Entfernen von PDF-Eigenschaften, ideal für Unternehmensanwender, Rechtsteams oder jeden, der eine vollständige Bereinigung von versteckten Daten (nicht nur grundlegenden Metadaten) benötigt. Es ist der Goldstandard für die sichere, professionelle Dokumentenbereinigung.
Schritt-für-Schritt zur vollständigen Entfernung von Metadaten:
- Öffnen Sie die PDF in Acrobat Pro.
- Grundlegende Bereinigung: Gehen Sie zu „Datei > Eigenschaften > Beschreibung“ und löschen Sie alle Metadaten manuell aus der PDF (Titel, Autor, Betreff, Schlüsselwörter).

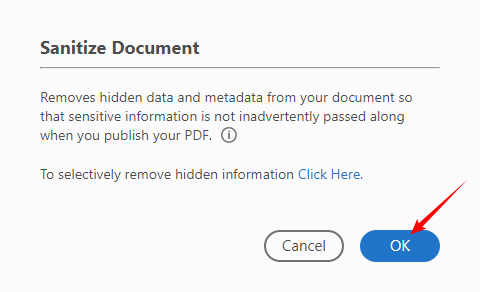
- Gründliche Bereinigung (empfohlen für sensible Dateien):
- Gehen Sie zu „Werkzeuge > Schwärzen“.
- Klicken Sie in der Schwärzen-Werkzeugleiste auf „Dokument bereinigen“.
- Klicken Sie im Dialogfeld „Dokument bereinigen“ auf „OK“, um alle Metadaten und versteckten Informationen zu entfernen
✔ Vorteile: Vollständige Bereinigung, Unterstützung für Stapelverarbeitung, Sicherheit auf Unternehmensebene.
✘ Nachteile: Erfordert ein kostenpflichtiges Abonnement.
Profi-Tipp: Um Metadaten aus interaktiven Elementen zu bereinigen, können Sie PDF-Formularfelder glätten , um bearbeitbare Formulardaten und die zugehörigen Metadaten zu löschen.
Methode 4: Befehlszeilentools zum Bereinigen von PDF-Metadaten
Für technisch versierte Benutzer bieten Befehlszeilentools wie ExifTool eine leistungsstarke Möglichkeit, Metadaten zu entfernen, insbesondere bei der Stapelverarbeitung. Es ist eine plattformübergreifende Perl-Bibliothek zum Lesen/Schreiben/Bearbeiten von Metadaten in allen Dateiformaten (einschließlich PDFs).
- Laden Sie ExifTool herunter und entpacken Sie es.
- Öffnen Sie die Eingabeaufforderung (Windows) oder das Terminal (Mac/Linux).
- Navigieren Sie zu Ihrem PDF-Ordner.
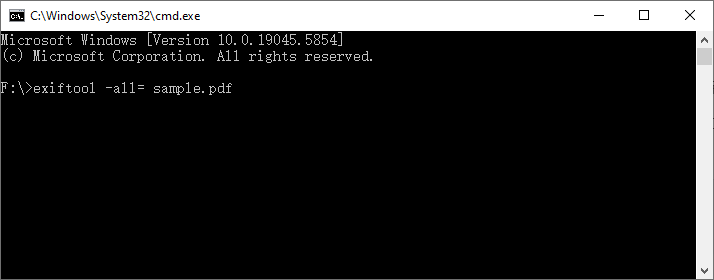
- Führen Sie den ExifTool-Befehl aus, um alle Metadaten aus der PDF zu entfernen**:**
exiftool -all= your-file.pdf
(Dieser Befehl erstellt eine Sicherungskopie der Originaldatei. Sie können -overwrite_original hinzufügen, um dies zu verhindern.)
✔ Vorteile: Kostenlos, Stapelverarbeitung, funktioniert auf jeder Plattform.
✘ Nachteile: Erfordert grundlegende Kenntnisse der Befehlszeile; nicht intuitiv für Gelegenheitsnutzer.
Methode 5: Automatisieren der PDF-Metadatenentfernung in C#
Wenn Sie ein .NET-Entwickler sind, der benutzerdefinierte PDF-Verarbeitungsworkflows erstellt (z. B. für Ihre App, Ihr Geschäftstool oder interne Systeme), ist Free Spire.PDF for .NET eine leistungsstarke kostenlose Bibliothek, mit der Sie die Metadatenentfernung direkt in Ihren C#/VB.NET-Code integrieren können. Es ist ideal für Entwickler, die die Bereinigung von PDF-Metadaten im großen Stil automatisieren müssen.
C#-Codebeispiel: PDF-Metadaten entfernen
Dieses vollständige C#-Beispiel lädt eine PDF, löscht alle Metadatenfelder (Autor, Titel, Ersteller usw.) und speichert die bereinigte Datei:
using Spire.Pdf;

namespace PDFProperties
{
    class Properties
    {
        static void Main(string[] args)
        {
            // 1. Load a sample PDF document
            PdfDocument pdf = new PdfDocument();
            pdf.LoadFromFile("sample.pdf");

            // 2. Access document metadata
            PdfDocumentInformation docInfo = pdf.DocumentInformation;

            // 3. Clear core metadata fields
            docInfo.Author = string.Empty;
            docInfo.Creator = string.Empty;
            docInfo.Title = string.Empty;
            docInfo.Subject = string.Empty;
            docInfo.Keywords = string.Empty;
            docInfo.Producer = string.Empty;

            // 4. Save the cleaned PDF
            pdf.SaveToFile("ClearMetadata.pdf");
            pdf.Close();
        }
    }
}
Die Klasse PdfDocumentInformation enthält die Metadaten eines PDF-Dokuments. Indem leere Zeichenfolgen ihren Kerneigenschaften zugewiesen werden, können die PDF-Metadaten effektiv entfernt werden. Für einen vollständigen Schutz der Privatsphäre ist es ebenso wichtig, PDF-Anhänge zu entfernen, da eingebettete Dateien oft zusätzliche Metadaten enthalten, die durch eine einfache Metadatenentfernung möglicherweise nicht gelöscht werden.
✔ Vorteile: Integration in .NET-Workflows, unterstützt Stapelverarbeitung, keine Abhängigkeit von Tools/APIs von Drittanbietern.
✘ Nachteile: Erfordert grundlegende C#/.NET-Programmierkenntnisse; 10-Seiten-Limit in der kostenlosen Version.
Abschließende Gedanken
Das Entfernen von Metadaten aus PDF ist ein einfacher, aber entscheidender Schritt zum Schutz Ihrer Privatsphäre und Professionalität. Ob Sie ein schnelles Online-Tool, eine sichere Desktop-Methode, Stapelverarbeitung oder eine programmierbare Lösung für die Entwicklung benötigen, es gibt eine auf Ihre Bedürfnisse zugeschnittene Option.
Wählen Sie den Ansatz, der Ihrem technischen Komfort und Ihren Sicherheitsanforderungen entspricht, und machen Sie die Metadatenentfernung zu einem Standardschritt vor dem Teilen von PDFs, um versehentliche Datenlecks zu verhindern.
Häufig gestellte Fragen zum Entfernen von PDF-Metadaten
F: Beschädigt das Entfernen von Metadaten die PDF?
A: Nein. Metadaten sind vom sichtbaren Inhalt getrennt. Das Entfernen verändert nicht den Text, die Bilder oder das Layout Ihres Dokuments.
F: Kann ich Metadaten aus einer passwortgeschützten PDF entfernen?
A: Sie müssen die PDF zuerst entsperren, um Metadaten zu bearbeiten oder zu löschen (Spire.PDF erfordert ebenfalls das Entsperren vor Metadatenbearbeitungen).
F: Welche Methode eignet sich am besten zum stapelweisen Entfernen von Metadaten aus PDF?
A: Für die Stapelverarbeitung verwenden Sie ExifTool (Befehlszeile) (kostenlos für alle Benutzer) oder Free Spire.PDF for .NET (für Entwickler, die automatisierte Workflows erstellen). Adobe Acrobat Pro unterstützt auch die Stapelbereinigung für zahlende Abonnenten.
F: Beeinträchtigt das Entfernen von Metadaten PDF-Formularfelder oder Signaturen?
A: Ja, in einigen Fällen. Das Entfernen von Metadaten – insbesondere mit Methoden wie „In PDF drucken“ – kann Formulare glätten und interaktive Felder oder digitale Signaturen beschädigen. Für Dokumente mit ausfüllbaren Formularen oder digitalen Signaturen verwenden Sie dedizierte Werkzeuge wie die Bereinigungsfunktion von Adobe Acrobat oder Spire.PDF programmgesteuert, um die Funktionalität zu erhalten.
Siehe auch
Удаление метаданных из PDF — безопасные и простые методы
PDF — это наиболее широко используемый формат документов для обмена рабочими материалами, контрактами, отчетами и личными файлами. Но скрытые метаданные в PDF-файлах могут раскрыть конфиденциальную информацию, которой вы никогда не собирались делиться. Независимо от того, являетесь ли вы профессионалом, студентом или обычным пользователем, знание того, как удалить метаданные из PDF, необходимо для обеспечения конфиденциальности и безопасности.
В этом полном руководстве мы объясним, что такое метаданные PDF, почему это важно, и познакомим вас с 5 бесплатными и простыми способами очистки метаданных из PDF.
- Что такое метаданные PDF?
- Почему следует удалять метаданные из PDF-файлов
- 5 лучших способов удалить метаданные из PDF
- Способ 1: Бесплатные онлайн-инструменты для удаления метаданных PDF
- Способ 2: Встроенные инструменты для очистки метаданных на рабочем столе
- Способ 3: Удаление метаданных с помощью Adobe Acrobat
- Способ 4: Инструменты командной строки для очистки метаданных PDF
- Способ 5: Автоматизация удаления метаданных PDF на C#
- Часто задаваемые вопросы об удалении метаданных PDF
Что такое метаданные PDF?
Метаданные часто описывают как «данные о данных». Применительно к PDF это относится к встроенной информации, скрытой в файле, которая описывает его свойства и происхождение.
Метаданные PDF включают:
- Имя автора, создателя и редактора
- Дата создания/изменения
- Используемое программное обеспечение (например, Word, Adobe Acrobat, Canva)
- Название документа, тема, ключевые слова
- Местоположение, информация об устройстве и история редактирования
- Скрытые комментарии, закладки и данные форм
Эти метаданные перемещаются вместе с PDF-файлом всякий раз, когда вы делитесь им в Интернете или по электронной почте, потенциально раскрывая больше, чем вы предполагали.
Почему следует удалять метаданные из PDF-файлов
Очистка метаданных защищает вас и ваши документы четырьмя основными способами:
- Защита конфиденциальности: скройте свое имя, адрес электронной почты, устройство и местоположение от посторонних глаз.
- Безопасность: не позволяйте конкурентам или злоумышленникам отслеживать ваш процесс редактирования или используемые инструменты.
- Профессионализм: удаляйте беспорядочную автоматически сгенерированную информацию для клиентских или общедоступных документов.
- Меньший размер файла: удаление метаданных часто уменьшает размер PDF для более быстрой передачи.
Неудаление метаданных может привести к случайным утечкам данных, даже если видимое содержимое выглядит чистым.
5 лучших способов удалить метаданные из PDF
Мы протестировали самые надежные бесплатные и платные способы очистки метаданных из PDF-файлов. Выберите метод, который соответствует вашему устройству и потребностям.
Способ 1: Бесплатные онлайн-инструменты для удаления метаданных PDF
Онлайн-инструменты — самый быстрый вариант для разовых файлов. Они работают в любом браузере на Windows, Mac или мобильных устройствах. Если вы очищаете неконфиденциальный документ, такие сервисы, как Metadata2Go, предлагают функции удаления метаданных.
Шаги по удалению метаданных из PDF онлайн:
- Перейдите к инструменту для удаления метаданных Metadata2Go.
- Нажмите «Выбрать файл» или перетащите PDF для загрузки.
- Нажмите «Старт» или аналогичную кнопку, чтобы стереть метаданные из PDF.
- Загрузите очищенный PDF.
✔ Плюсы: Бесплатно, не требует установки, просто в использовании.
✘ Минусы: Не рекомендуется для строго конфиденциальных файлов (используйте настольные приложения для обеспечения конфиденциальности).
Для прямого контроля над видимыми полями метаданных вы можете редактировать метаданные PDF, чтобы изменить заголовок, автора, тему и ключевые слова.
Способ 2: Встроенные инструменты для очистки метаданных на рабочем столе
Пользователи Windows могут использовать функцию Печать в PDF для удаления метаданных без установки нового программного обеспечения. Этот метод работает путем «сведения» файла и отбрасывания исходных метаданных.
- Откройте PDF в любом ридере (Edge, Chrome).
- Перейдите в «Файл > Печать».
- Выберите «Microsoft Print to PDF».
- Нажмите «Печать» и сохраните новый файл.
- Для Mac: откройте PDF в приложении «Просмотр» > «Инструменты» > «Показать инспектор» > «Дополнительная информация» (i) > удалите весь текст в полях метаданных.
✔ Плюсы: Бесплатно, безопасно (файл остается на локальном устройстве), не требует сторонних инструментов.
✘ Минусы: Метод «Печать в PDF» может удалить интерактивные элементы, такие как ссылки. Ручное удаление в «Просмотре» удаляет только основные поля, а не более глубоко скрытые данные.
Способ 3: Удаление метаданных с помощью Adobe Acrobat
Adobe Acrobat Pro — это самый тщательный инструмент для удаления свойств PDF, идеально подходящий для корпоративных пользователей, юридических отделов и всех, кому требуется полная очистка скрытых данных (а не только основных метаданных). Это золотой стандарт для безопасной и профессиональной очистки документов.
Пошаговая инструкция для полного удаления метаданных:
- Откройте PDF в Acrobat Pro.
- Базовая очистка: перейдите в «Файл > Свойства > Описание» и вручную удалите все метаданные из PDF (заголовок, автор, тема, ключевые слова).
- Тщательная санация (рекомендуется для конфиденциальных файлов):
- Перейдите в «Инструменты > Редактировать».
- Нажмите «Очистить документ» на панели инструментов «Редактировать».
- В диалоговом окне «Очистить документ» нажмите «ОК», чтобы удалить все метаданные и скрытую информацию
✔ Плюсы: Полная очистка, поддержка пакетной обработки, безопасность корпоративного уровня.
✘ Минусы: Требуется платная подписка.
Совет профессионала: чтобы очистить метаданные от интерактивных элементов, вы можете свести поля форм PDF , чтобы удалить редактируемые данные форм и связанные с ними метаданные.
Способ 4: Инструменты командной строки для очистки метаданных PDF
Для технических пользователей инструменты командной строки, такие как ExifTool, предлагают мощный способ удаления метаданных, особенно для пакетной обработки. Это кроссплатформенная библиотека Perl для чтения/записи/редактирования метаданных во всех форматах файлов (включая PDF).
- Загрузите ExifTool и распакуйте его.
- Откройте командную строку (Windows) или терминал (Mac/Linux).
- Перейдите в папку с вашими PDF-файлами.
- Выполните команду ExifTool, чтобы удалить все метаданные из PDF**:**
exiftool -all= ваш-файл.pdf
(Эта команда создает резервную копию исходного файла. Вы можете добавить -overwrite_original, чтобы предотвратить это.)
✔ Плюсы: Бесплатно, пакетная обработка, работает на любой платформе.
✘ Минусы: Требуются базовые знания командной строки; не интуитивно понятно для обычных пользователей.
Способ 5: Автоматизация удаления метаданных PDF на C#
Если вы .NET-разработчик, создающий настраиваемые рабочие процессы обработки PDF (например, для вашего приложения, бизнес-инструмента или внутренних систем), Free Spire.PDF for .NET — это мощная бесплатная библиотека, которая позволяет интегрировать удаление метаданных непосредственно в ваш код на C#/VB.NET. Она идеально подходит для разработчиков, которым необходимо автоматизировать очистку метаданных PDF в больших масштабах.
Пример кода на C#: удаление метаданных PDF
Этот полный пример на C# загружает PDF, очищает все поля метаданных (автор, заголовок, создатель и т. д.) и сохраняет очищенный файл:
using Spire.Pdf;

namespace PDFProperties
{
    class Properties
    {
        static void Main(string[] args)
        {
            // 1. Загрузите образец PDF-документа
            PdfDocument pdf = new PdfDocument();
            pdf.LoadFromFile("sample.pdf");

            // 2. Доступ к метаданным документа
            PdfDocumentInformation docInfo = pdf.DocumentInformation;

            // 3. Очистите основные поля метаданных
            docInfo.Author = string.Empty;
            docInfo.Creator = string.Empty;
            docInfo.Title = string.Empty;
            docInfo.Subject = string.Empty;
            docInfo.Keywords = string.Empty;
            docInfo.Producer = string.Empty;

            // 4. Сохраните очищенный PDF
            pdf.SaveToFile("ClearMetadata.pdf");
            pdf.Close();
        }
    }
}
Класс PdfDocumentInformation содержит метаданные документа PDF. Присваивая пустым строкам его основные свойства, можно эффективно удалить метаданные PDF. Для полной защиты конфиденциальности не менее важно удалять вложения PDF, поскольку встроенные файлы часто содержат дополнительные метаданные, которые базовое удаление метаданных может не удалить.
✔ Плюсы: Интеграция с рабочими процессами .NET, поддержка пакетной обработки, отсутствие зависимости от сторонних инструментов/API.
✘ Минусы: Требуются базовые знания программирования на C#/.NET; ограничение в 10 страниц в бесплатной версии.
Заключительные мысли
Удаление метаданных из PDF — это простой, но важный шаг для защиты вашей конфиденциальности и профессионализма. Независимо от того, нужен ли вам быстрый онлайн-инструмент, безопасный настольный метод, пакетная обработка или программируемое решение для разработки, найдется вариант, соответствующий вашим потребностям.
Выберите подход, который соответствует вашему техническому уровню и требованиям безопасности, и сделайте удаление метаданных стандартным шагом перед отправкой PDF-файлов, чтобы предотвратить случайные утечки данных.
Часто задаваемые вопросы об удалении метаданных PDF
В: Повредит ли удаление метаданных PDF-файл?
О: Нет. Метаданные отделены от видимого содержимого. Их удаление не изменяет текст, изображения или макет вашего документа.
В: Могу ли я удалить метаданные из защищенного паролем PDF?
О: Сначала вы должны разблокировать PDF, чтобы редактировать или удалять метаданные (Spire.PDF также требует разблокировки перед редактированием метаданных).
В: Какой метод лучше всего подходит для пакетного удаления метаданных из PDF?
О: Для массовой обработки используйте ExifTool (командная строка) (бесплатно для всех пользователей) или Free Spire.PDF for .NET (для разработчиков, создающих автоматизированные рабочие процессы). Adobe Acrobat Pro также поддерживает массовую санацию для платных подписчиков.
В: Повлияет ли удаление метаданных на поля форм или подписи в PDF?
О: Да, в некоторых случаях. Удаление метаданных, особенно с использованием методов «Печать в PDF», может свести формы и нарушить работу интерактивных полей или цифровых подписей. Для документов с заполняемыми формами или цифровыми подписями используйте специальные инструменты, такие как функция «Очистить» в Adobe Acrobat или Spire.PDF программно, чтобы сохранить функциональность.
Смотрите также
Como mesclar documentos do Word: preservar ou unificar a formatação
Índice
- Por que a formatação quebra ao mesclar documentos do Word
- Método 1. Mesclar documentos do Word usando "Texto do arquivo" (recurso integrado)
- Método 2. Mesclar documentos do Word usando Copiar e Colar (Manter formatação original)
- Método 3. Mesclar documentos do Word online (MergeEasy)
- Método 4. Mesclar documentos do Word usando VBA
- Método 5. Mesclar documentos do Word usando Python (Spire.Doc)
- Tabela de comparação: Qual método você deve escolher?
- Conclusão
- Perguntas frequentes
Mesclar documentos do Word é uma tarefa comum, mas surpreendentemente complexa. Esteja você combinando relatórios, compilando capítulos de livros ou consolidando vários arquivos de projeto em um produto final, a maneira como você mescla os documentos afeta diretamente a formatação, a consistência do layout e a manutenção a longo prazo.
Embora possa parecer uma simples operação de copiar e colar, a mesclagem do Word envolve definições de estilo, estruturas de seção e sistemas de formatação no nível do documento — e métodos diferentes podem produzir resultados drasticamente diferentes.
Neste guia, exploraremos cinco maneiras práticas de mesclar documentos do Word — desde recursos integrados do Word até VBA e Python — para que você possa escolher a abordagem que melhor se adapta às suas necessidades.
Navegação Rápida:
- Método 1. Mesclar documentos do Word usando "Texto do arquivo" (recurso integrado)
- Método 2. Mesclar documentos do Word usando Copiar e Colar (Manter formatação original)
- Método 3. Mesclar documentos do Word online (MergeEasy)
- Método 4. Mesclar documentos do Word usando VBA
- Método 5. Mesclar documentos do Word usando Python (Spire.Doc)
Por que a formatação quebra ao mesclar documentos do Word
Antes de explorar os cinco métodos, é útil entender um conceito-chave: o Word não combina simplesmente texto — ele combina sistemas de formatação.
Quando dois documentos são mesclados, o Word deve decidir como lidar com a configuração da página, estilos, numeração, cabeçalhos e outras regras de layout. Na maioria dos casos, o documento principal controla o resultado final - é por isso que a formatação pode mudar após a mesclagem.
Para simplificar, a formatação no Word pode ser dividida em dois níveis:
| Tipo de formatação | Controles | Exemplos | O que acontece durante a mesclagem |
|---|---|---|---|
| Formatação no nível da seção | Layout dentro de uma seção | Tamanho da página, margens, orientação, colunas, cabeçalhos/rodapés, numeração de página | O Word não insere uma quebra de seção automaticamente. O conteúdo inserido torna-se parte da seção atual. Para preservar as configurações de layout originais, você deve inserir uma quebra de seção antes de mesclar. |
| Formatação no nível do documento | Sistema de estilo geral | Estilos de título, estilo Normal, fontes de tema, cores de tema, definições de numeração | Se os estilos compartilharem o mesmo nome (por exemplo, "Título 1"), a definição do documento principal substituirá o estilo do documento inserido. |
O que isso significa na prática
- A maioria dos métodos de mesclagem prioriza a consistência em vez de preservar a aparência original.
- As definições de estilo do documento principal geralmente substituem estilos conflitantes.
- Apenas o Copiar e Colar → Manter formatação original manual tenta preservar o layout visual original.
Com isso em mente, vamos examinar cinco maneiras diferentes de mesclar documentos do Word — e quando cada método faz sentido.
Método 1. Mesclar documentos do Word usando "Texto do arquivo" (recurso integrado)
Se você deseja uma maneira rápida e nativa de mesclar documentos diretamente no Microsoft Word, Inserir → Texto do arquivo é a opção mais direta.
Como funciona
- Abra seu documento principal, coloque o cursor onde deseja que o conteúdo apareça.
- Vá para Inserir → Objeto → Texto do arquivo.
- Selecione um ou vários arquivos do Word.
- Clique em Inserir.
O Word insere o documento selecionado na posição atual do cursor. Para começar em uma nova página, insira uma Quebra de página ou Quebra de seção antes de mesclar.
O que esperar
Este método funciona melhor quando todos os documentos são baseados no mesmo modelo. Se os estilos forem diferentes, as definições do documento principal substituirão os estilos conflitantes. Por exemplo, se ambos os arquivos contiverem um estilo chamado Título 1, mas com fontes ou espaçamento diferentes, a versão do documento principal terá precedência.
Quando usar
Use este método quando:
- Você está compilando relatórios sob um modelo corporativo unificado.
- Todos os arquivos compartilham regras de formatação semelhantes.
- Você precisa de uma solução rápida e integrada, sem automação.
É simples e confiável, mas não é ideal para preservar a formatação original em diferentes designs.
Método 2. Mesclar documentos do Word usando Copiar e Colar (Manter formatação original)
Se a preservação da formatação for sua maior prioridade, o copiar e colar manual continua sendo o método mais preciso.
Como funciona
- Abra o documento principal e o documento de origem.
- No documento de origem, pressione Ctrl + A para selecionar todo o conteúdo e, em seguida, pressione Ctrl + C para copiá-lo.
- Mude para o documento principal e coloque o cursor onde o conteúdo mesclado deve começar, geralmente no final do documento.
- Vá para Layout → Quebras → Quebras de seção → Próxima página para inserir uma quebra de seção. (Esta etapa é essencial se você deseja preservar as margens, a orientação ou o estilo da fonte do documento de origem.)
- Na nova página, clique com o botão direito e escolha Opções de colagem → Manter formatação original.
Isso garante que tanto a formatação no nível da seção (estrutura de layout) quanto a formatação no nível do documento (fontes, estilos, numeração) sejam preservadas o máximo possível.
Por que este método é diferente
Quando você escolhe Manter formatação original, o Word cria definições de estilo internas adicionais, se necessário. Em vez de substituir estilos, ele mantém a aparência da fonte intacta, mesmo que isso signifique duplicar nomes de estilo nos bastidores.
Compensação
Embora a formatação seja preservada, a estrutura de estilo interna do documento pode se tornar complexa. Para projetos pequenos, isso não é um problema. Para documentação técnica grande, pode dificultar a manutenção a longo prazo.
Quando usar
- Contratos legais
- Artigos acadêmicos de diferentes autores
- Documentos sensíveis ao design
- Tarefas de mesclagem em pequena escala
Se a fidelidade visual for mais importante do que a consistência estrutural, esta é a escolha mais segura.
Método 3. Mesclar documentos do Word online (MergeEasy)
Se você preferir não usar o Word diretamente, as ferramentas de mesclagem online oferecem uma alternativa conveniente. Ferramentas como o MergeEasy permitem que você carregue vários arquivos do Word, reordene-os e baixe um documento combinado — tudo no seu navegador.
Como funciona
- Abra seu navegador e navegue até a ferramenta de mesclagem de documentos do Word online.
- Carregue os arquivos do Word que você deseja combinar.
- Organize os documentos na ordem desejada.
- (Opcional) Ative a opção “Adicionar quebras de página entre documentos” se desejar que cada arquivo comece em uma nova página.
- Clique em Mesclar documento do Word e baixe o documento combinado.
O que esperar
As ferramentas online visam preservar o layout razoavelmente bem, mas:
- Conflitos de estilo são tratados automaticamente.
- Você tem controle limitado sobre a lógica de formatação.
- Documentos confidenciais podem levantar preocupações com a privacidade.
Quando usar
- Tarefas de mesclagem rápidas
- Usuários sem o Microsoft Word instalado
- Arquivos não confidenciais
- Combinação ocasional de documentos
As ferramentas online priorizam a conveniência em detrimento do controle profundo da formatação.
Método 4. Mesclar documentos do Word usando VBA
Para usuários que trabalham intensamente no Microsoft Word, o VBA oferece automação sem software externo.
Em vez de inserir arquivos manualmente um por um, você pode escrever uma macro para mesclar documentos automaticamente. A macro insere cada documento selecionado no final do arquivo principal e os separa usando uma quebra de seção (próxima página).
Como funciona
- Abra o documento principal do Word.
- Pressione Alt + F11 para abrir o editor do VBA.
- Clique em Inserir → Módulo e cole a macro VBA fornecida na janela de código.
- Pressione F5 (ou clique em Executar) para executar a macro.
- Selecione os documentos do Word a serem mesclados e clique em Abrir.
Código VBA:
Sub MergeWordDocuments()

    Dim mainDoc As Document
    Dim fileDialog As FileDialog
    Dim selectedFile As Variant
    Dim insertRange As Range

    Set mainDoc = ActiveDocument

    ' Open file picker
    Set fileDialog = Application.FileDialog(msoFileDialogFilePicker)

    With fileDialog
        .Title = "Select Word Documents to Merge"
        .Filters.Clear
        .Filters.Add "Word Files", "*.doc; *.docx"
        .AllowMultiSelect = True

        If .Show = -1 Then

            For Each selectedFile In .SelectedItems

                ' Move to end of main document
                Set insertRange = mainDoc.Range
                insertRange.Collapse Direction:=wdCollapseEnd

                ' Insert Section Break (Next Page)
                insertRange.InsertBreak Type:=wdSectionBreakNextPage
                insertRange.Collapse Direction:=wdCollapseEnd

                ' Insert document content
                insertRange.InsertFile FileName:=selectedFile

            Next selectedFile

        End If

    End With

    MsgBox "Documents merged successfully!"

End Sub
O que acontece internamente
O VBA aproveita o modelo de objeto de documento (DOM) interno do Word, ele se comporta de forma idêntica ao mecanismo Inserir → Texto do arquivo, o que significa que os estilos do documento principal dominam. A vantagem está na automação, não na lógica de formatação.
Quando usar
- Consolidação de relatórios mensais ou semanais
- Fluxos de trabalho corporativos internos
- Documentação orientada por modelo
- Usuários familiarizados com macros do Word
O VBA é ideal quando você precisa de mesclagem repetível no ecossistema do Office.
Método 5. Mesclar documentos do Word usando Python (Spire.Doc)
Para desenvolvedores ou sistemas de back-end, o Python oferece mesclagem de documentos escalável sem depender do Microsoft Word. Usando o Spire.Doc for Python, você pode inserir documentos programaticamente em um arquivo principal.
Como funciona
- Abra seu IDE ou editor Python preferido.
- Instale a biblioteca do PyPI: pip install spire.doc
- Crie um novo arquivo Python (por exemplo, merge_word_documents.py).
- Cole um dos seguintes trechos de código no arquivo.
- Execute o script.
Esta abordagem requer conhecimento básico de Python. Antes de executar o script, ajuste os caminhos dos arquivos de entrada e saída de acordo com o seu ambiente local.
Exemplo 1. Mesclar dois documentos do Word
from spire.doc import *
from spire.doc.common import *

doc = Document()
doc.LoadFromFile("Main.docx")
doc.InsertTextFromFile("Source.docx", FileFormat.Docx)
doc.SaveToFile("MergedOutput.docx")
doc.Close()
Exemplo 2. Mesclar vários documentos em uma pasta
import os
from spire.doc import *
from spire.doc.common import *

folder_path = "Docs/"
files = [f for f in os.listdir(folder_path) if f.endswith(".docx")]

doc = Document()
doc.LoadFromFile(os.path.join(folder_path, files[0]))

for file in files[1:]:
    doc.InsertTextFromFile(os.path.join(folder_path, file), FileFormat.Docx)

doc.SaveToFile("MergedOutput.docx")
doc.Close()
Comportamento da formatação
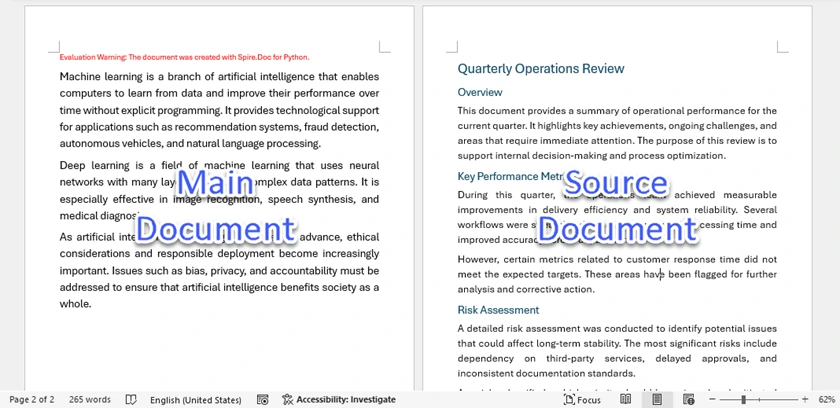
Quando InsertTextFromFile é executado, o documento inserido é anexado como uma nova seção no arquivo de destino. Na prática, isso significa que cada mesclagem normalmente introduz uma quebra de seção de próxima página, inicia o conteúdo inserido em uma nova página e aplica as definições de estilo do documento principal (de destino). Como resultado, os conflitos de formatação são resolvidos em favor do documento principal.
Essa abordagem ajuda a manter a consistência estrutural, mas pode alterar a aparência original do conteúdo mesclado se os dois documentos usarem definições de estilo diferentes.
Abaixo está uma captura de tela do documento mesclado criado pelo Spire.Doc:
Quando usar
- Sistemas de geração de documentos
- Aplicações SaaS
- Pipelines de processamento de back-end
- Mesclagem em lote em grande escala
Pontos fortes da abordagem Python
- Totalmente automatizado
- Escalável para processamento em lote
- Sem dependência do Microsoft Word
- Adequado para sistemas do lado do servidor
Depois de mesclar programaticamente documentos do Word em Python, você pode aprimorar a saída adicionando números de página, ajustando as configurações da página ou exportando o arquivo para o formato PDF. Ao combinar esses recursos, você pode criar um fluxo de trabalho de processamento de documentos do Word totalmente automatizado.
Tabela de comparação: Qual método você deve escolher?
| Método | Automação | Corresponder à formatação de destino | Preservar formatação original | Melhor para |
|---|---|---|---|---|
| Texto do arquivo | Manual | Sim | Não | Mesclagem rápida sob a formatação do documento principal |
| Copiar e colar (manter formatação original) | Manual | Não | Sim | Preservar estilos e layout originais |
| Ferramenta online (MergeEasy) | Semiautomatizado | Sim | Não | Mesclagem rápida sem o Word, sob a formatação do documento principal |
| Macro VBA | Automatizado (no Word) | Sim | Não | Automatizando mesclagens repetitivas no ambiente do Word |
| Python (Spire.Doc) | Totalmente automatizado | Sim | Não | Processamento em lote com formatação unificada |
Resumo do comportamento da formatação
Corresponder à formatação de destino
Todos os métodos de mesclagem, exceto Copiar e Colar → Manter formatação original, aplicam automaticamente as definições de estilo do documento principal ao conteúdo inserido. Isso inclui Texto do arquivo, ferramentas online, macros VBA e soluções Python. Nesses métodos, a formatação do documento de destino tem precedência quando ocorrem conflitos de estilo.
Preservar formatação original
Apenas Copiar e Colar usando "Manter formatação original" retém totalmente os estilos, fontes e layout do documento original. Outros métodos de mesclagem não preservam completamente a formatação de origem, pois os estilos conflitantes são substituídos pelo documento principal.
Conclusão
Mesclar documentos do Word não é apenas combinar conteúdo — é sobre controlar a lógica de formatação. Se o seu objetivo é a precisão visual, o "Manter formatação original" manual continua sendo a escolha mais segura. Se você precisa de consistência estrutural, as ferramentas integradas do Word são suficientes. E se a automação e a escalabilidade forem mais importantes, as soluções baseadas em VBA ou Python fornecem eficiência a longo prazo.
Ao entender como o Word lida com a formatação no nível da seção e no nível do documento, você pode eliminar mudanças inesperadas de layout e escolher com confiança a estratégia de mesclagem certa para o seu fluxo de trabalho.
Perguntas frequentes
Q1. Por que a formatação muda após a mesclagem de documentos do Word?
Porque o Word prioriza as definições de estilo do documento principal. Se dois documentos compartilharem nomes de estilo (como "Título 1"), a versão do documento principal substituirá a inserida.
Q2. Como posso preservar as margens e a orientação da página ao mesclar?
Você deve inserir uma quebra de seção (próxima página) antes de adicionar o novo documento. Sem uma quebra de seção, o conteúdo inserido torna-se parte da seção atual e herda suas configurações de layout.
Q3. "Manter formatação original" sempre preserva tudo?
Ele preserva a aparência visual na maioria dos casos. No entanto, o Word pode criar definições de estilo internas duplicadas, o que pode tornar a estrutura do documento mais complexa.
Q4. Posso mesclar documentos do Word sem o Microsoft Word instalado?
Sim. Você pode usar ferramentas online ou soluções programáticas como bibliotecas Python (por exemplo, Spire.Doc) para mesclar documentos sem depender do Word.
Q5. Qual método é melhor para mesclagem automatizada em grande escala?
As soluções baseadas em Python são as mais escaláveis. Elas permitem processamento em lote, integração de back-end e automação sem interação manual.
Você também pode se interessar por
Word 문서 병합 방법: 서식 유지 또는 통합
Word 문서를 병합하는 것은 흔하지만 놀라울 정도로 복잡한 작업입니다. 보고서를 결합하든, 책의 장을 편집하든, 여러 프로젝트 파일을 최종 결과물로 통합하든, 문서를 병합하는 방식은 서식, 레이아웃 일관성 및 장기적인 유지 관리에 직접적인 영향을 미칩니다.
단순한 복사-붙여넣기 작업처럼 보일 수 있지만, Word 병합에는 스타일 정의, 섹션 구조 및 문서 수준 서식 시스템이 포함되며, 다른 방법은 극적으로 다른 결과를 낳을 수 있습니다.
이 가이드에서는 Word 문서를 병합하는 다섯 가지 실용적인 방법—기본 제공 Word 기능부터 VBA 및 Python에 이르기까지—을 살펴보고 필요에 가장 적합한 접근 방식을 선택할 수 있도록 합니다.
빠른 탐색:
- 방법 1. "파일의 텍스트"를 사용하여 Word 문서 병합 (기본 제공 기능)
- 방법 2. 복사 및 붙여넣기를 사용하여 Word 문서 병합 (원본 서식 유지)
- 방법 3. 온라인으로 Word 문서 병합 (MergeEasy)
- 방법 4. VBA를 사용하여 Word 문서 병합
- 방법 5. Python(Spire.Doc)을 사용하여 Word 문서 병합
Word 문서 병합 시 서식이 깨지는 이유
다섯 가지 방법을 살펴보기 전에 한 가지 핵심 개념을 이해하는 것이 도움이 됩니다. Word는 단순히 텍스트를 결합하는 것이 아니라 서식 시스템을 결합합니다.
두 문서가 병합될 때 Word는 페이지 설정, 스타일, 번호 매기기, 머리글 및 기타 레이아웃 규칙을 처리하는 방법을 결정해야 합니다. 대부분의 경우 주 문서가 최종 결과를 제어하므로 병합 후 서식이 변경될 수 있습니다.
간단히 말해 Word의 서식은 두 가지 수준으로 나눌 수 있습니다.
| 서식 유형 | 제어 | 예시 | 병합 중 발생하는 일 |
|---|---|---|---|
| 섹션 수준 서식 | 섹션 내 레이아웃 | 페이지 크기, 여백, 방향, 단, 머리글/바닥글, 페이지 번호 매기기 | Word는 자동으로 섹션 나누기를 삽입하지 않습니다. 삽입된 콘텐츠는 현재 섹션의 일부가 됩니다. 원본 레이아웃 설정을 유지하려면 병합하기 전에 섹션 나누기를 삽입해야 합니다. |
| 문서 수준 서식 | 전체 스타일 시스템 | 제목 스타일, 보통 스타일, 테마 글꼴, 테마 색상, 번호 매기기 정의 | 스타일 이름이 같은 경우(예: "제목 1"), 주 문서의 정의가 삽입된 문서의 스타일을 재정의합니다. |
실제 적용
- 대부분의 병합 방법은 원본 모양을 유지하는 것보다 일관성을 우선시합니다.
- 주 문서의 스타일 정의는 일반적으로 충돌하는 스타일을 재정의합니다.
- 수동 복사 및 붙여넣기 → 원본 서식 유지만이 원본 시각적 레이아웃을 보존하려고 시도합니다.
이를 염두에 두고 Word 문서를 병합하는 다섯 가지 다른 방법과 각 방법이 언제 적합한지 살펴보겠습니다.
방법 1. "파일의 텍스트"를 사용하여 Word 문서 병합 (기본 제공 기능)
Microsoft Word 내에서 직접 문서를 병합하는 빠르고 기본 제공되는 방법을 원한다면 삽입 → 파일의 텍스트가 가장 간단한 옵션입니다.
작동 방식
- 주 문서를 열고 콘텐츠를 표시할 위치에 커서를 놓습니다.
- 삽입 → 개체 → 파일의 텍스트로 이동합니다.
- 하나 또는 여러 개의 Word 파일을 선택합니다.
- 삽입을 클릭합니다.
Word는 현재 커서 위치에 선택한 문서를 삽입합니다. 새 페이지에서 시작하려면 병합하기 전에 페이지 나누기 또는 섹션 나누기를 삽입하십시오.
예상 결과
이 방법은 모든 문서가 동일한 템플릿을 기반으로 할 때 가장 잘 작동합니다. 스타일이 다른 경우 주 문서의 정의가 충돌하는 스타일을 재정의합니다. 예를 들어 두 파일 모두에 제목 1이라는 스타일이 있지만 글꼴이나 간격이 다른 경우 주 문서의 버전이 우선합니다.
사용 시기
다음과 같은 경우 이 방법을 사용하십시오.
- 통합된 회사 템플릿에 따라 보고서를 작성하고 있습니다.
- 모든 파일이 유사한 서식 규칙을 공유합니다.
- 자동화 없이 빠른 기본 제공 솔루션이 필요합니다.
간단하고 신뢰할 수 있지만 다른 디자인에서 원본 서식을 유지하는 데는 이상적이지 않습니다.
방법 2. 복사 및 붙여넣기를 사용하여 Word 문서 병합 (원본 서식 유지)
서식 보존이 최우선 순위라면 수동 복사 및 붙여넣기가 가장 정확한 방법입니다.
작동 방식
- 주 문서와 원본 문서를 모두 엽니다.
- 원본 문서에서 Ctrl + A를 눌러 모든 콘텐츠를 선택한 다음 Ctrl + C를 눌러 복사합니다.
- 주 문서로 전환하고 병합된 콘텐츠가 시작되어야 하는 위치(일반적으로 문서 끝)에 커서를 놓습니다.
- 레이아웃 → 나누기 → 섹션 나누기 → 다음 페이지로 이동하여 섹션 나누기를 삽입합니다. (이 단계는 원본 문서의 여백, 방향 또는 글꼴 스타일을 유지하려는 경우 필수적입니다.)
- 새 페이지에서 마우스 오른쪽 버튼을 클릭하고 붙여넣기 옵션 → 원본 서식 유지를 선택합니다.
이렇게 하면 섹션 수준 서식(레이아웃 구조)과 문서 수준 서식(글꼴, 스타일, 번호 매기기)이 모두 최대한 보존됩니다.
이 방법이 다른 이유
원본 서식 유지를 선택하면 Word는 필요한 경우 추가 내부 스타일 정의를 만듭니다. 스타일을 바꾸는 대신, 백그라운드에서 스타일 이름을 복제하더라도 원본 모양을 그대로 유지합니다.
장단점
서식은 유지되지만 문서의 내부 스타일 구조가 복잡해질 수 있습니다. 작은 프로젝트의 경우 문제가 되지 않습니다. 대규모 기술 문서의 경우 장기적인 유지 관리가 더 어려워질 수 있습니다.
사용 시기
- 법률 계약서
- 다른 저자의 학술 논문
- 디자인에 민감한 문서
- 소규모 병합 작업
구조적 일관성보다 시각적 충실도가 더 중요하다면 이것이 가장 안전한 선택입니다.
방법 3. 온라인으로 Word 문서 병합 (MergeEasy)
Word를 직접 사용하지 않으려면 온라인 병합 도구가 편리한 대안을 제공합니다. MergeEasy와 같은 도구를 사용하면 여러 Word 파일을 업로드하고, 순서를 변경하고, 결합된 문서를 브라우저에서 모두 다운로드할 수 있습니다.
작동 방식
- 브라우저를 열고 온라인 Word 문서 병합 도구로 이동합니다.
- 결합하려는 Word 파일을 업로드합니다.
- 원하는 순서대로 문서를 정렬합니다.
- (선택 사항) 각 파일이 새 페이지에서 시작되도록 하려면 "문서 사이에 페이지 나누기 추가" 옵션을 활성화합니다.
- Word 문서 병합을 클릭하고 결합된 문서를 다운로드합니다.
예상 결과
온라인 도구는 레이아웃을 합리적으로 잘 보존하는 것을 목표로 하지만:
- 스타일 충돌은 자동으로 처리됩니다.
- 서식 논리에 대한 제어가 제한적입니다.
- 기밀 문서는 개인 정보 보호 문제를 일으킬 수 있습니다.
사용 시기
- 빠른 병합 작업
- Microsoft Word가 설치되지 않은 사용자
- 민감하지 않은 파일
- 가끔씩 문서 결합
온라인 도구는 심층적인 서식 제어보다 편의성을 우선시합니다.
방법 4. VBA를 사용하여 Word 문서 병합
Microsoft Word 내에서 많이 작업하는 사용자를 위해 VBA는 외부 소프트웨어 없이 자동화를 제공합니다.
파일을 하나씩 수동으로 삽입하는 대신 매크로를 작성하여 문서를 자동으로 병합할 수 있습니다. 매크로는 선택한 각 문서를 주 파일의 끝에 삽입하고 섹션 나누기(다음 페이지)를 사용하여 분리합니다.
작동 방식
- 주 Word 문서를 엽니다.
- Alt + F11을 눌러 VBA 편집기를 엽니다.
- 삽입 → 모듈을 클릭한 다음 제공된 VBA 매크로를 코드 창에 붙여넣습니다.
- F5를 누르거나 실행을 클릭하여 매크로를 실행합니다.
- 병합할 Word 문서를 선택한 다음 열기를 클릭합니다.
VBA 코드:
Sub MergeWordDocuments()

    Dim mainDoc As Document
    Dim fileDialog As FileDialog
    Dim selectedFile As Variant
    Dim insertRange As Range

    Set mainDoc = ActiveDocument

    ' 파일 선택기 열기
    Set fileDialog = Application.FileDialog(msoFileDialogFilePicker)

    With fileDialog
        .Title = "병합할 Word 문서 선택"
        .Filters.Clear
        .Filters.Add "Word 파일", "*.doc; *.docx"
        .AllowMultiSelect = True

        If .Show = -1 Then

            For Each selectedFile In .SelectedItems

                ' 주 문서의 끝으로 이동
                Set insertRange = mainDoc.Range
                insertRange.Collapse Direction:=wdCollapseEnd

                ' 섹션 나누기 삽입 (다음 페이지)
                insertRange.InsertBreak Type:=wdSectionBreakNextPage
                insertRange.Collapse Direction:=wdCollapseEnd

                ' 문서 내용 삽입
                insertRange.InsertFile FileName:=selectedFile

            Next selectedFile

        End If

    End With

    MsgBox "문서가 성공적으로 병합되었습니다!"

End Sub
내부적으로 발생하는 일
VBA는 Word의 내부 문서 개체 모델(DOM)을 활용하므로 삽입 → 파일의 텍스트 엔진과 동일하게 작동하며, 이는 주 문서 스타일이 우세함을 의미합니다. 장점은 서식 논리가 아닌 자동화에 있습니다.
사용 시기
- 월간 또는 주간 보고서 통합
- 내부 기업 워크플로
- 템플릿 기반 문서
- Word 매크로에 익숙한 사용자
VBA는 Office 에코시스템 내에서 반복 가능한 병합이 필요할 때 이상적입니다.
방법 5. Python(Spire.Doc)을 사용하여 Word 문서 병합
개발자나 백엔드 시스템의 경우 Python은 Microsoft Word에 의존하지 않고 확장 가능한 문서 병합을 제공합니다. Spire.Doc for Python을 사용하면 프로그래밍 방식으로 문서를 주 파일에 삽입할 수 있습니다.
작동 방식
- 선호하는 Python IDE 또는 편집기를 엽니다.
- PyPI에서 라이브러리 설치: pip install spire.doc
- 새 Python 파일(예: merge_word_documents.py)을 만듭니다.
- 다음 코드 조각 중 하나를 파일에 붙여넣습니다.
- 스크립트를 실행합니다.
이 접근 방식에는 Python에 대한 기본 지식이 필요합니다. 스크립트를 실행하기 전에 로컬 환경에 따라 입력 및 출력 파일 경로를 조정하십시오.
예제 1. 두 개의 Word 문서 병합
from spire.doc import *
from spire.doc.common import *

doc = Document()
doc.LoadFromFile("Main.docx")
doc.InsertTextFromFile("Source.docx", FileFormat.Docx)
doc.SaveToFile("MergedOutput.docx")
doc.Close()
예제 2. 폴더에 있는 여러 문서 병합
import os
from spire.doc import *
from spire.doc.common import *

folder_path = "Docs/"
files = [f for f in os.listdir(folder_path) if f.endswith(".docx")]

doc = Document()
doc.LoadFromFile(os.path.join(folder_path, files[0]))

for file in files[1:]:
    doc.InsertTextFromFile(os.path.join(folder_path, file), FileFormat.Docx)

doc.SaveToFile("MergedOutput.docx")
doc.Close()
서식 동작
InsertTextFromFile이 실행되면 삽입된 문서는 대상 파일에 새 섹션으로 추가됩니다. 실제로는 각 병합이 일반적으로 다음 페이지 섹션 나누기를 도입하고, 새 페이지에서 삽입된 콘텐츠를 시작하며, 주(대상) 문서의 스타일 정의를 적용함을 의미합니다. 결과적으로 서식 충돌은 기본 문서에 유리하게 해결됩니다.
이 접근 방식은 구조적 일관성을 유지하는 데 도움이 되지만, 두 문서가 다른 스타일 정의를 사용하는 경우 병합된 콘텐츠의 원래 모양을 변경할 수 있습니다.
다음은 Spire.Doc으로 만든 병합된 문서의 스크린샷입니다.
사용 시기
- 문서 생성 시스템
- SaaS 애플리케이션
- 백엔드 처리 파이프라인
- 대규모 일괄 병합
Python 접근 방식의 강점
- 완전 자동화
- 일괄 처리를 위한 확장성
- Microsoft Word 종속성 없음
- 서버 측 시스템에 적합
Python에서 프로그래밍 방식으로 Word 문서를 병합한 후 페이지 번호를 추가하거나 페이지 설정을 조정하거나 파일을 PDF 형식으로 내보내 출력을 향상시킬 수 있습니다. 이러한 기능을 결합하여 완전히 자동화된 Word 문서 처리 워크플로를 만들 수 있습니다.
비교표: 어떤 방법을 선택해야 할까요?
| 방법 | 자동화 | 대상 서식 일치 | 원본 서식 유지 | 최적 대상 |
|---|---|---|---|---|
| 파일의 텍스트 | 수동 | 예 | 아니요 | 주 문서 서식 하의 빠른 병합 |
| 복사 및 붙여넣기 (원본 서식 유지) | 수동 | 아니요 | 예 | 원본 스타일 및 레이아웃 유지 |
| 온라인 도구 (MergeEasy) | 반자동 | 예 | 아니요 | Word 없이 빠른 병합, 주 문서 서식 하 |
| VBA 매크로 | 자동화 (Word 내) | 예 | 아니요 | Word 환경에서 반복적인 병합 자동화 |
| Python (Spire.Doc) | 완전 자동화 | 예 | 아니요 | 통합된 서식으로 일괄 처리 |
서식 동작 요약
대상 서식 일치
복사 및 붙여넣기 → 원본 서식 유지를 제외한 모든 병합 방법은 주 문서의 스타일 정의를 삽입된 콘텐츠에 자동으로 적용합니다. 여기에는 파일의 텍스트, 온라인 도구, VBA 매크로 및 Python 솔루션이 포함됩니다. 이러한 방법에서는 스타일 충돌이 발생할 때 대상 문서의 서식이 우선합니다.
원본 서식 유지
"원본 서식 유지"를 사용한 복사 및 붙여넣기만이 원본 문서의 스타일, 글꼴 및 레이아웃을 완전히 유지합니다. 다른 병합 방법은 충돌하는 스타일이 주 문서에 의해 재정의되므로 원본 서식을 완전히 보존하지 않습니다.
결론
Word 문서를 병합하는 것은 단순히 콘텐츠를 결합하는 것이 아니라 서식 논리를 제어하는 것입니다. 목표가 시각적 정밀도라면 수동 "원본 서식 유지"가 가장 안전한 선택입니다. 구조적 일관성이 필요하다면 Word의 기본 제공 도구로 충분합니다. 그리고 자동화와 확장성이 가장 중요하다면 VBA 또는 Python 기반 솔루션이 장기적인 효율성을 제공합니다.
Word가 섹션 수준 및 문서 수준 서식을 처리하는 방법을 이해하면 예기치 않은 레이아웃 변경을 제거하고 워크플로에 적합한 병합 전략을 자신 있게 선택할 수 있습니다.
자주 묻는 질문
Q1. Word 문서를 병합한 후 서식이 변경되는 이유는 무엇입니까?
Word가 주 문서의 스타일 정의를 우선시하기 때문입니다. 두 문서가 스타일 이름(예: "제목 1")을 공유하는 경우 주 문서의 버전이 삽입된 버전을 재정의합니다.
Q2. 병합할 때 여백과 페이지 방향을 어떻게 유지할 수 있습니까?
새 문서를 추가하기 전에 섹션 나누기(다음 페이지)를 삽입해야 합니다. 섹션 나누기가 없으면 삽입된 콘텐츠는 현재 섹션의 일부가 되어 해당 레이아웃 설정을 상속합니다.
Q3. "원본 서식 유지"가 항상 모든 것을 보존합니까?
대부분의 경우 시각적 모양을 보존합니다. 그러나 Word는 중복된 내부 스타일 정의를 생성하여 문서 구조를 더 복잡하게 만들 수 있습니다.
Q4. Microsoft Word가 설치되지 않은 상태에서 Word 문서를 병합할 수 있습니까?
예. 온라인 도구나 Python 라이브러리(예: Spire.Doc)와 같은 프로그래밍 방식 솔루션을 사용하여 Word에 의존하지 않고 문서를 병합할 수 있습니다.
Q5. 대규모 자동 병합에 가장 적합한 방법은 무엇입니까?
Python 기반 솔루션이 가장 확장 가능합니다. 수동 상호 작용 없이 일괄 처리, 백엔드 통합 및 자동화를 허용합니다.
관심 있을 만한 다른 문서
Come unire documenti Word: mantenere o unificare la formattazione
Indice
- Perché la formattazione si rompe quando si uniscono documenti Word
- Metodo 1. Unire documenti Word utilizzando "Testo da file" (funzione integrata)
- Metodo 2. Unire documenti Word utilizzando Copia e incolla (Mantieni formattazione originale)
- Metodo 3. Unire documenti Word online (MergeEasy)
- Metodo 4. Unire documenti Word utilizzando VBA
- Metodo 5. Unire documenti Word utilizzando Python (Spire.Doc)
- Tabella di confronto: quale metodo scegliere?
- Conclusione
- Domande frequenti
L'unione di documenti Word è un'attività comune ma sorprendentemente complessa. Che si tratti di combinare report, compilare capitoli di libri o consolidare più file di progetto in un unico documento finale, il modo in cui si uniscono i documenti influisce direttamente sulla formattazione, sulla coerenza del layout e sulla manutenibilità a lungo termine.
Anche se può sembrare una semplice operazione di copia e incolla, l'unione in Word coinvolge definizioni di stile, strutture di sezione e sistemi di formattazione a livello di documento, e metodi diversi possono produrre risultati notevolmente differenti.
In questa guida, esploreremo cinque modi pratici per unire documenti Word—dalle funzionalità integrate di Word a VBA e Python—in modo da poter scegliere l'approccio che meglio si adatta alle tue esigenze.
Navigazione rapida:
- Metodo 1. Unire documenti Word utilizzando "Testo da file" (funzione integrata)
- Metodo 2. Unire documenti Word utilizzando Copia e incolla (Mantieni formattazione originale)
- Metodo 3. Unire documenti Word online (MergeEasy)
- Metodo 4. Unire documenti Word utilizzando VBA
- Metodo 5. Unire documenti Word utilizzando Python (Spire.Doc)
Perché la formattazione si rompe quando si uniscono documenti Word
Prima di esplorare i cinque metodi, è utile comprendere un concetto chiave: Word non si limita a combinare il testo, ma combina i sistemi di formattazione.
Quando due documenti vengono uniti, Word deve decidere come gestire l'impostazione della pagina, gli stili, la numerazione, le intestazioni e altre regole di layout. Nella maggior parte dei casi, il documento principale controlla il risultato finale - ecco perché la formattazione può cambiare dopo l'unione.
Per semplificare le cose, la formattazione in Word può essere suddivisa in due livelli:
| Tipo di formattazione | Controlli | Esempi | Cosa succede durante l'unione |
|---|---|---|---|
| Formattazione a livello di sezione | Layout all'interno di una sezione | Dimensioni pagina, margini, orientamento, colonne, intestazioni/piè di pagina, numerazione delle pagine | Word non inserisce automaticamente un'interruzione di sezione. Il contenuto inserito diventa parte della sezione corrente. Per preservare le impostazioni di layout originali, è necessario inserire un'interruzione di sezione prima di unire. |
| Formattazione a livello di documento | Sistema di stile generale | Stili di intestazione, stile Normale, caratteri del tema, colori del tema, definizioni di numerazione | Se gli stili condividono lo stesso nome (ad es. "Intestazione 1"), la definizione del documento principale sovrascrive lo stile del documento inserito. |
Cosa significa in pratica
- La maggior parte dei metodi di unione dà la priorità alla coerenza rispetto alla conservazione dell'aspetto originale.
- Le definizioni di stile del documento principale in genere sovrascrivono gli stili in conflitto.
- Solo il Copia e incolla manuale → Mantieni formattazione originale tenta di preservare il layout visivo originale.
Tenendo presente questo, esaminiamo cinque modi diversi per unire documenti Word—e quando ogni metodo ha senso.
Metodo 1. Unire documenti Word utilizzando "Testo da file" (funzione integrata)
Se desideri un modo rapido e nativo per unire documenti direttamente all'interno di Microsoft Word, Inserisci → Testo da file è l'opzione più semplice.
Come funziona
- Apri il documento principale, posiziona il cursore dove desideri che appaia il contenuto.
- Vai a Inserisci → Oggetto → Testo da file.
- Seleziona uno o più file di Word.
- Fai clic su Inserisci.
Word inserisce il documento selezionato nella posizione corrente del cursore. Per iniziare su una nuova pagina, inserisci un'interruzione di pagina o un'interruzione di sezione prima di unire.
Cosa aspettarsi
Questo metodo funziona meglio quando tutti i documenti si basano sullo stesso modello. Se gli stili differiscono, le definizioni del documento principale sovrascriveranno gli stili in conflitto. Ad esempio, se entrambi i file contengono uno stile denominato Intestazione 1 ma con caratteri o spaziatura diversi, prevarrà la versione del documento principale.
Quando usarlo
Usa questo metodo quando:
- Stai compilando report con un modello aziendale unificato.
- Tutti i file condividono regole di formattazione simili.
- Hai bisogno di una soluzione rapida e integrata senza automazione.
È semplice e affidabile—ma non ideale quando si desidera preservare la formattazione originale tra design diversi.
Metodo 2. Unire documenti Word utilizzando Copia e incolla (Mantieni formattazione originale)
Se la conservazione della formattazione è la tua massima priorità, il copia e incolla manuale rimane il metodo più preciso.
Come funziona
- Apri sia il documento principale che il documento di origine.
- Nel documento di origine, premi Ctrl + A per selezionare tutto il contenuto, quindi premi Ctrl + C per copiarlo.
- Passa al documento principale e posiziona il cursore dove dovrebbe iniziare il contenuto unito, in genere alla fine del documento.
- Vai a Layout → Interruzioni → Interruzioni di sezione → Pagina successiva per inserire un'interruzione di sezione. (Questo passaggio è essenziale se si desidera preservare i margini, l'orientamento o lo stile del carattere del documento di origine.)
- Nella nuova pagina, fai clic con il pulsante destro del mouse e scegli Opzioni Incolla → Mantieni formattazione originale.
Ciò garantisce che sia la formattazione a livello di sezione (struttura del layout) che la formattazione a livello di documento (caratteri, stili, numerazione) vengano preservate il più possibile.
Perché questo metodo è diverso
Quando scegli Mantieni formattazione originale, Word crea definizioni di stile interne aggiuntive se necessario. Invece di sostituire gli stili, mantiene intatto l'aspetto di origine—anche se ciò significa duplicare i nomi degli stili dietro le quinte.
Compromesso
Sebbene la formattazione venga preservata, la struttura interna dello stile del documento può diventare complessa. Per piccoli progetti, questo non è un problema. Per la documentazione tecnica di grandi dimensioni, può rendere più difficile la manutenzione a lungo termine.
Quando usarlo
- Contratti legali
- Articoli accademici di autori diversi
- Documenti sensibili al design
- Attività di unione su piccola scala
Se la fedeltà visiva è più importante della coerenza strutturale, questa è la scelta più sicura.
Metodo 3. Unire documenti Word online (MergeEasy)
Se preferisci non usare direttamente Word, gli strumenti di unione online offrono un'alternativa conveniente. Strumenti come MergeEasy ti consentono di caricare più file Word, riordinarli e scaricare un documento combinato—tutto nel tuo browser.
Come funziona
- Apri il tuo browser e vai allo strumento di unione di documenti Word online.
- Carica i file di Word che desideri combinare.
- Disponi i documenti nell'ordine desiderato.
- (Facoltativo) Abilita l'opzione "Aggiungi interruzioni di pagina tra i documenti" se desideri che ogni file inizi su una nuova pagina.
- Fai clic su Unisci documento Word e scarica il documento combinato.
Cosa aspettarsi
Gli strumenti online mirano a preservare il layout in modo ragionevolmente buono, ma:
- I conflitti di stile vengono gestiti automaticamente.
- Hai un controllo limitato sulla logica di formattazione.
- I documenti riservati possono sollevare problemi di privacy.
Quando usarlo
- Attività di unione rapide
- Utenti senza Microsoft Word installato
- File non sensibili
- Combinazione occasionale di documenti
Gli strumenti online danno la priorità alla convenienza rispetto al controllo approfondito della formattazione.
Metodo 4. Unire documenti Word utilizzando VBA
Per gli utenti che lavorano molto all'interno di Microsoft Word, VBA fornisce l'automazione senza software esterno.
Invece di inserire manualmente i file uno per uno, puoi scrivere una macro per unire i documenti automaticamente. La macro inserisce ogni documento selezionato alla fine del file principale e li separa utilizzando un'interruzione di sezione (pagina successiva).
Come funziona
- Apri il documento Word principale.
- Premi Alt + F11 per aprire l'editor VBA.
- Fai clic su Inserisci → Modulo, quindi incolla la macro VBA fornita nella finestra del codice.
- Premi F5 (o fai clic su Esegui) per eseguire la macro.
- Seleziona i documenti Word da unire, quindi fai clic su Apri.
Codice VBA:
Sub MergeWordDocuments()

    Dim mainDoc As Document
    Dim fileDialog As FileDialog
    Dim selectedFile As Variant
    Dim insertRange As Range

    Set mainDoc = ActiveDocument

    ' Open file picker
    Set fileDialog = Application.FileDialog(msoFileDialogFilePicker)

    With fileDialog
        .Title = "Select Word Documents to Merge"
        .Filters.Clear
        .Filters.Add "Word Files", "*.doc; *.docx"
        .AllowMultiSelect = True

        If .Show = -1 Then

            For Each selectedFile In .SelectedItems

                ' Move to end of main document
                Set insertRange = mainDoc.Range
                insertRange.Collapse Direction:=wdCollapseEnd

                ' Insert Section Break (Next Page)
                insertRange.InsertBreak Type:=wdSectionBreakNextPage
                insertRange.Collapse Direction:=wdCollapseEnd

                ' Insert document content
                insertRange.InsertFile FileName:=selectedFile

            Next selectedFile

        End If

    End With

    MsgBox "Documents merged successfully!"

End Sub
Cosa succede internamente
VBA sfrutta il modello a oggetti del documento (DOM) interno di Word, si comporta in modo identico al motore Inserisci → Testo da file, il che significa che dominano gli stili del documento principale. Il vantaggio sta nell'automazione—non nella logica di formattazione.
Quando usarlo
- Consolidamento di report mensili o settimanali
- Flussi di lavoro aziendali interni
- Documentazione basata su modelli
- Utenti a proprio agio con le macro di Word
VBA è ideale quando è necessario unire ripetutamente all'interno dell'ecosistema di Office.
Metodo 5. Unire documenti Word utilizzando Python (Spire.Doc)
Per sviluppatori o sistemi backend, Python offre un'unione di documenti scalabile senza fare affidamento su Microsoft Word. Utilizzando Spire.Doc per Python, è possibile inserire programmaticamente documenti in un file principale.
Come funziona
- Apri il tuo IDE o editor Python preferito.
- Installa la libreria da PyPI: pip install spire.doc
- Crea un nuovo file Python (ad es. merge_word_documents.py).
- Incolla uno dei seguenti frammenti di codice nel file.
- Esegui lo script.
Questo approccio richiede una conoscenza di base di Python. Prima di eseguire lo script, regola i percorsi dei file di input e output in base al tuo ambiente locale.
Esempio 1. Unire due documenti Word
from spire.doc import *
from spire.doc.common import *

doc = Document()
doc.LoadFromFile("Main.docx")
doc.InsertTextFromFile("Source.docx", FileFormat.Docx)
doc.SaveToFile("MergedOutput.docx")
doc.Close()
Esempio 2. Unire più documenti in una cartella
import os
from spire.doc import *
from spire.doc.common import *

folder_path = "Docs/"
files = [f for f in os.listdir(folder_path) if f.endswith(".docx")]

doc = Document()
doc.LoadFromFile(os.path.join(folder_path, files[0]))

for file in files[1:]:
    doc.InsertTextFromFile(os.path.join(folder_path, file), FileFormat.Docx)

doc.SaveToFile("MergedOutput.docx")
doc.Close()
Comportamento della formattazione
Quando viene eseguito InsertTextFromFile, il documento inserito viene aggiunto come nuova sezione nel file di destinazione. In pratica, ciò significa che ogni unione introduce in genere un'interruzione di sezione Pagina successiva, avvia il contenuto inserito in una nuova pagina e applica le definizioni di stile del documento principale (di destinazione). Di conseguenza, i conflitti di formattazione vengono risolti a favore del documento principale.
Questo approccio aiuta a mantenere la coerenza strutturale, ma può alterare l'aspetto originale del contenuto unito se i due documenti utilizzano definizioni di stile diverse.
Di seguito è riportato uno screenshot del documento unito creato da Spire.Doc:
Quando usarlo
- Sistemi di generazione di documenti
- Applicazioni SaaS
- Pipeline di elaborazione backend
- Unione batch su larga scala
Punti di forza dell'approccio Python
- Completamente automatizzato
- Scalabile per l'elaborazione batch
- Nessuna dipendenza da Microsoft Word
- Adatto per sistemi lato server
Dopo aver unito programmaticamente i documenti di Word in Python, è possibile migliorare l'output aggiungendo numeri di pagina, regolando le impostazioni della pagina o esportando il file in formato PDF. Combinando queste funzionalità, è possibile creare un flusso di lavoro di elaborazione di documenti Word completamente automatizzato.
Tabella di confronto: quale metodo scegliere?
| Metodo | Automazione | Corrispondenza formattazione destinazione | Mantieni formattazione originale | Ideale per |
|---|---|---|---|---|
| Testo da file | Manuale | Sì | No | Unione rapida con la formattazione del documento principale |
| Copia e incolla (Mantieni formattazione originale) | Manuale | No | Sì | Preserva stili e layout originali |
| Strumento online (MergeEasy) | Semi-automatizzato | Sì | No | Unione rapida senza Word, con la formattazione del documento principale |
| Macro VBA | Automatizzato (all'interno di Word) | Sì | No | Automazione di unioni ripetitive nell'ambiente Word |
| Python (Spire.Doc) | Completamente automatizzato | Sì | No | Elaborazione batch con formattazione unificata |
Riepilogo del comportamento della formattazione
Corrispondenza formattazione destinazione
Tutti i metodi di unione, ad eccezione di Copia e incolla → Mantieni formattazione originale, applicano automaticamente le definizioni di stile del documento principale al contenuto inserito. Ciò include Testo da file, strumenti online, macro VBA e soluzioni Python. In questi metodi, la formattazione del documento di destinazione ha la precedenza in caso di conflitti di stile.
Mantieni formattazione originale
Solo Copia e incolla utilizzando “Mantieni formattazione originale” conserva completamente gli stili, i caratteri e il layout del documento originale. Altri metodi di unione non preservano completamente la formattazione di origine, poiché gli stili in conflitto vengono sovrascritti dal documento principale.
Conclusione
L'unione di documenti Word non riguarda solo la combinazione di contenuti — ma anche il controllo della logica di formattazione. Se il tuo obiettivo è la precisione visiva, il "Mantieni formattazione originale" manuale rimane la scelta più sicura. Se hai bisogno di coerenza strutturale, gli strumenti integrati di Word sono sufficienti. E se l'automazione e la scalabilità sono più importanti, le soluzioni basate su VBA o Python offrono efficienza a lungo termine.
Comprendendo come Word gestisce la formattazione a livello di sezione e di documento, è possibile eliminare spostamenti di layout imprevisti e scegliere con sicurezza la giusta strategia di unione per il proprio flusso di lavoro.
Domande frequenti
D1. Perché la formattazione cambia dopo l'unione di documenti Word?
Perché Word dà la priorità alle definizioni di stile del documento principale. Se due documenti condividono nomi di stile (come "Intestazione 1"), la versione del documento principale sovrascrive quella inserita.
D2. Come posso preservare i margini e l'orientamento della pagina durante l'unione?
È necessario inserire un'interruzione di sezione (pagina successiva) prima di aggiungere il nuovo documento. Senza un'interruzione di sezione, il contenuto inserito diventa parte della sezione corrente e ne eredita le impostazioni di layout.
D3. "Mantieni formattazione originale" preserva sempre tutto?
Conserva l'aspetto visivo nella maggior parte dei casi. Tuttavia, Word potrebbe creare definizioni di stile interne duplicate, il che può rendere più complessa la struttura del documento.
D4. Posso unire documenti Word senza avere Microsoft Word installato?
Sì. È possibile utilizzare strumenti online o soluzioni programmatiche come le librerie Python (ad es. Spire.Doc) per unire documenti senza fare affidamento su Word.
D5. Qual è il metodo migliore per l'unione automatizzata su larga scala?
Le soluzioni basate su Python sono le più scalabili. Consentono l'elaborazione batch, l'integrazione backend e l'automazione senza interazione manuale.
Potrebbe interessarti anche
Comment fusionner des documents Word : conserver ou unifier la mise en forme
Table des matières
- Pourquoi la mise en forme se brise lors de la fusion de documents Word
- Méthode 1. Fusionner des documents Word à l'aide de « Texte à partir d'un fichier » (fonctionnalité intégrée)
- Méthode 2. Fusionner des documents Word en utilisant Copier & Coller (Conserver la mise en forme source)
- Méthode 3. Fusionner des documents Word en ligne (MergeEasy)
- Méthode 4. Fusionner des documents Word à l'aide de VBA
- Méthode 5. Fusionner des documents Word à l'aide de Python (Spire.Doc)
- Tableau comparatif : Quelle méthode choisir ?
- Conclusion
- FAQ
La fusion de documents Word est une tâche courante mais étonnamment complexe. Que vous combiniez des rapports, compiliez des chapitres de livre ou consolidiez plusieurs fichiers de projet en un livrable final, la manière dont vous fusionnez les documents a un impact direct sur la mise en forme, la cohérence de la mise en page et la maintenabilité à long terme.
Bien que cela puisse ressembler à une simple opération de copier-coller, la fusion dans Word implique des définitions de style, des structures de section et des systèmes de mise en forme au niveau du document — et différentes méthodes peuvent produire des résultats radicalement différents.
Dans ce guide, nous explorerons cinq manières pratiques de fusionner des documents Word — des fonctionnalités intégrées de Word à VBA et Python — afin que vous puissiez choisir l'approche qui correspond le mieux à vos besoins.
Navigation rapide :
- Méthode 1. Fusionner des documents Word à l'aide de « Texte à partir d'un fichier » (fonctionnalité intégrée)
- Méthode 2. Fusionner des documents Word en utilisant Copier & Coller (Conserver la mise en forme source)
- Méthode 3. Fusionner des documents Word en ligne (MergeEasy)
- Méthode 4. Fusionner des documents Word à l'aide de VBA
- Méthode 5. Fusionner des documents Word à l'aide de Python (Spire.Doc)
Pourquoi la mise en forme se brise lors de la fusion de documents Word
Avant d'explorer les cinq méthodes, il est utile de comprendre un concept clé : Word ne se contente pas de combiner du texte, il combine des systèmes de mise en forme.
Lorsque deux documents sont fusionnés, Word doit décider comment gérer la mise en page, les styles, la numérotation, les en-têtes et autres règles de mise en page. Dans la plupart des cas, le document principal contrôle le résultat final - c'est pourquoi la mise en forme peut changer après la fusion.
Pour simplifier les choses, la mise en forme dans Word peut être divisée en deux niveaux :
| Type de mise en forme | Contrôles | Exemples | Que se passe-t-il pendant la fusion |
|---|---|---|---|
| Mise en forme au niveau de la section | Mise en page dans une section | Taille de la page, marges, orientation, colonnes, en-têtes/pieds de page, numérotation des pages | Word n'insère pas automatiquement de saut de section. Le contenu inséré fait partie de la section actuelle. Pour préserver les paramètres de mise en page d'origine, vous devez insérer un saut de section avant la fusion. |
| Mise en forme au niveau du document | Système de style global | Styles de titre, style Normal, polices de thème, couleurs de thème, définitions de numérotation | Si les styles partagent le même nom (par exemple, « Titre 1 »), la définition du document principal remplace le style du document inséré. |
Ce que cela signifie en pratique
- La plupart des méthodes de fusion privilégient la cohérence plutôt que la préservation de l'apparence originale.
- Les définitions de style du document principal remplacent généralement les styles en conflit.
- Seul le Copier & Coller → Conserver la mise en forme source manuel tente de préserver la mise en page visuelle d'origine.
En gardant cela à l'esprit, examinons cinq manières différentes de fusionner des documents Word et quand chaque méthode est judicieuse.
Méthode 1. Fusionner des documents Word à l'aide de « Texte à partir d'un fichier » (fonctionnalité intégrée)
Si vous souhaitez un moyen rapide et natif de fusionner des documents directement dans Microsoft Word, Insérer → Texte à partir d'un fichier est l'option la plus simple.
Comment ça marche
- Ouvrez votre document principal, placez votre curseur à l'endroit où vous souhaitez que le contenu apparaisse.
- Allez dans Insérer → Objet → Texte à partir d'un fichier.
- Sélectionnez un ou plusieurs fichiers Word.
- Cliquez sur Insérer.
Word insère le document sélectionné à la position actuelle du curseur. Pour commencer sur une nouvelle page, insérez un saut de page ou un saut de section avant la fusion.
À quoi s'attendre
Cette méthode fonctionne mieux lorsque tous les documents sont basés sur le même modèle. Si les styles diffèrent, les définitions du document principal remplaceront les styles en conflit. Par exemple, si les deux fichiers contiennent un style nommé Titre 1 mais avec des polices ou des espacements différents, la version du document principal prévaudra.
Quand l'utiliser
Utilisez cette méthode lorsque :
- Vous compilez des rapports sous un modèle d'entreprise unifié.
- Tous les fichiers partagent des règles de mise en forme similaires.
- Vous avez besoin d'une solution rapide et intégrée sans automatisation.
C'est simple et fiable, mais pas idéal pour préserver la mise en forme d'origine sur différents designs.
Méthode 2. Fusionner des documents Word en utilisant Copier & Coller (Conserver la mise en forme source)
Si la préservation de la mise en forme est votre priorité absolue, le copier-coller manuel reste la méthode la plus précise.
Comment ça marche
- Ouvrez à la fois le document principal et le document source.
- Dans le document source, appuyez sur Ctrl + A pour sélectionner tout le contenu, puis appuyez sur Ctrl + C pour le copier.
- Passez au document principal et placez le curseur à l'endroit où le contenu fusionné doit commencer, généralement à la fin du document.
- Allez dans Mise en page → Sauts → Sauts de section → Page suivante pour insérer un saut de section. (Cette étape est essentielle si vous souhaitez préserver les marges, l'orientation ou le style de police du document source.)
- Sur la nouvelle page, faites un clic droit et choisissez Options de collage → Conserver la mise en forme source.
Cela garantit que la mise en forme au niveau de la section (structure de la mise en page) et la mise en forme au niveau du document (polices, styles, numérotation) sont préservées autant que possible.
Pourquoi cette méthode est différente
Lorsque vous choisissez Conserver la mise en forme source, Word crée des définitions de style internes supplémentaires si nécessaire. Au lieu de remplacer les styles, il conserve l'apparence source intacte, même si cela signifie dupliquer les noms de style en arrière-plan.
Compromis
Bien que la mise en forme soit préservée, la structure de style interne du document peut devenir complexe. Pour les petits projets, ce n'est pas un problème. Pour une documentation technique volumineuse, cela peut rendre la maintenance à long terme plus difficile.
Quand l'utiliser
- Contrats juridiques
- Articles académiques de différents auteurs
- Documents sensibles au design
- Tâches de fusion à petite échelle
Si la fidélité visuelle est plus importante que la cohérence structurelle, c'est le choix le plus sûr.
Méthode 3. Fusionner des documents Word en ligne (MergeEasy)
Si vous préférez ne pas utiliser Word directement, les outils de fusion en ligne offrent une alternative pratique. Des outils comme MergeEasy vous permettent de télécharger plusieurs fichiers Word, de les réorganiser et de télécharger un document combiné, le tout dans votre navigateur.
Comment ça marche
- Ouvrez votre navigateur et accédez à l'outil de fusion de documents Word en ligne.
- Téléchargez les fichiers Word que vous souhaitez combiner.
- Disposez les documents dans l'ordre souhaité.
- (Facultatif) Activez l'option « Ajouter des sauts de page entre les documents » si vous souhaitez que chaque fichier commence sur une nouvelle page.
- Cliquez sur Fusionner le document Word et téléchargez le document combiné.
À quoi s'attendre
Les outils en ligne visent à préserver raisonnablement bien la mise en page, mais :
- Les conflits de style sont gérés automatiquement.
- Vous avez un contrôle limité sur la logique de mise en forme.
- Les documents confidentiels peuvent soulever des problèmes de confidentialité.
Quand l'utiliser
- Tâches de fusion rapides
- Utilisateurs sans Microsoft Word installé
- Fichiers non sensibles
- Combinaison occasionnelle de documents
Les outils en ligne privilégient la commodité au détriment d'un contrôle approfondi de la mise en forme.
Méthode 4. Fusionner des documents Word à l'aide de VBA
Pour les utilisateurs travaillant intensivement dans Microsoft Word, VBA offre une automatisation sans logiciel externe.
Au lieu d'insérer manuellement les fichiers un par un, vous pouvez écrire une macro pour fusionner automatiquement les documents. La macro insère chaque document sélectionné à la fin du fichier principal et les sépare à l'aide d'un saut de section (page suivante).
Comment ça marche
- Ouvrez le document Word principal.
- Appuyez sur Alt + F11 pour ouvrir l'éditeur VBA.
- Cliquez sur Insérer → Module, puis collez la macro VBA fournie dans la fenêtre de code.
- Appuyez sur F5 (ou cliquez sur Exécuter) pour exécuter la macro.
- Sélectionnez les documents Word à fusionner, puis cliquez sur Ouvrir.
Code VBA :
Sub MergeWordDocuments()

    Dim mainDoc As Document
    Dim fileDialog As FileDialog
    Dim selectedFile As Variant
    Dim insertRange As Range

    Set mainDoc = ActiveDocument

    ' Open file picker
    Set fileDialog = Application.FileDialog(msoFileDialogFilePicker)

    With fileDialog
        .Title = "Select Word Documents to Merge"
        .Filters.Clear
        .Filters.Add "Word Files", "*.doc; *.docx"
        .AllowMultiSelect = True

        If .Show = -1 Then

            For Each selectedFile In .SelectedItems

                ' Move to end of main document
                Set insertRange = mainDoc.Range
                insertRange.Collapse Direction:=wdCollapseEnd

                ' Insert Section Break (Next Page)
                insertRange.InsertBreak Type:=wdSectionBreakNextPage
                insertRange.Collapse Direction:=wdCollapseEnd

                ' Insert document content
                insertRange.InsertFile FileName:=selectedFile

            Next selectedFile

        End If

    End With

    MsgBox "Documents merged successfully!"

End Sub
Que se passe-t-il en interne
VBA exploite le modèle objet de document (DOM) interne de Word, il se comporte de manière identique au moteur Insérer → Texte à partir d'un fichier, ce qui signifie que les styles du document principal dominent. L'avantage réside dans l'automatisation, pas dans la logique de mise en forme.
Quand l'utiliser
- Consolidation de rapports mensuels ou hebdomadaires
- Flux de travail d'entreprise internes
- Documentation basée sur des modèles
- Utilisateurs à l'aise avec les macros Word
VBA est idéal lorsque vous avez besoin d'une fusion reproductible dans l'écosystème Office.
Méthode 5. Fusionner des documents Word à l'aide de Python (Spire.Doc)
Pour les développeurs ou les systèmes backend, Python offre une fusion de documents évolutive sans dépendre de Microsoft Word. En utilisant Spire.Doc for Python, vous pouvez insérer des documents par programme dans un fichier principal.
Comment ça marche
- Ouvrez votre IDE ou éditeur Python préféré.
- Installez la bibliothèque depuis PyPI: pip install spire.doc
- Créez un nouveau fichier Python (par exemple, merge_word_documents.py).
- Collez l'un des extraits de code suivants dans le fichier.
- Exécutez le script.
Cette approche nécessite des connaissances de base en Python. Avant d'exécuter le script, ajustez les chemins des fichiers d'entrée et de sortie en fonction de votre environnement local.
Exemple 1. Fusionner deux documents Word
from spire.doc import *
from spire.doc.common import *

doc = Document()
doc.LoadFromFile("Main.docx")
doc.InsertTextFromFile("Source.docx", FileFormat.Docx)
doc.SaveToFile("MergedOutput.docx")
doc.Close()
Exemple 2. Fusionner plusieurs documents dans un dossier
import os
from spire.doc import *
from spire.doc.common import *

folder_path = "Docs/"
files = [f for f in os.listdir(folder_path) if f.endswith(".docx")]

doc = Document()
doc.LoadFromFile(os.path.join(folder_path, files[0]))

for file in files[1:]:
    doc.InsertTextFromFile(os.path.join(folder_path, file), FileFormat.Docx)

doc.SaveToFile("MergedOutput.docx")
doc.Close()
Comportement de la mise en forme
Lorsque InsertTextFromFile est exécuté, le document inséré est ajouté en tant que nouvelle section dans le fichier cible. En pratique, cela signifie que chaque fusion introduit généralement un saut de section Page suivante, commence le contenu inséré sur une nouvelle page et applique les définitions de style du document principal (de destination). Par conséquent, les conflits de mise en forme sont résolus en faveur du document principal.
Cette approche aide à maintenir la cohérence structurelle, mais elle peut modifier l'apparence originale du contenu fusionné si les deux documents utilisent des définitions de style différentes.
Voici une capture d'écran du document fusionné créé par Spire.Doc :
Quand l'utiliser
- Systèmes de génération de documents
- Applications SaaS
- Pipelines de traitement backend
- Fusion par lots à grande échelle
Points forts de l'approche Python
- Entièrement automatisé
- Évolutif pour le traitement par lots
- Aucune dépendance à Microsoft Word
- Convient aux systèmes côté serveur
Après avoir fusionné par programme des documents Word en Python, vous pouvez améliorer la sortie en ajoutant des numéros de page, en ajustant les paramètres de page ou en exportant le fichier au format PDF. En combinant ces fonctionnalités, vous pouvez créer un flux de travail de traitement de documents Word entièrement automatisé.
Tableau comparatif : Quelle méthode choisir ?
| Méthode | Automatisation | Correspondre à la mise en forme de destination | Conserver la mise en forme source | Idéal pour |
|---|---|---|---|---|
| Texte à partir d'un fichier | Manuel | Oui | Non | Fusion rapide sous la mise en forme du document principal |
| Copier & Coller (Conserver la mise en forme source) | Manuel | Non | Oui | Préserver les styles et la mise en page d'origine |
| Outil en ligne (MergeEasy) | Semi-automatisé | Oui | Non | Fusion rapide sans Word, sous la mise en forme du document principal |
| Macro VBA | Automatisé (dans Word) | Oui | Non | Automatisation des fusions répétitives dans l'environnement Word |
| Python (Spire.Doc) | Entièrement automatisé | Oui | Non | Traitement par lots avec une mise en forme unifiée |
Résumé du comportement de la mise en forme
Correspondre à la mise en forme de destination
Toutes les méthodes de fusion, à l'exception de Copier & Coller → Conserver la mise en forme source, appliquent automatiquement les définitions de style du document principal au contenu inséré. Cela inclut Texte à partir d'un fichier, les outils en ligne, les macros VBA et les solutions Python. Dans ces méthodes, la mise en forme du document de destination prévaut en cas de conflits de style.
Conserver la mise en forme source
Seul le Copier & Coller en utilisant « Conserver la mise en forme source » conserve entièrement les styles, les polices et la mise en page du document d'origine. Les autres méthodes de fusion ne préservent pas complètement la mise en forme source, car les styles en conflit sont remplacés par ceux du document principal.
Conclusion
La fusion de documents Word ne consiste pas seulement à combiner du contenu, il s'agit de contrôler la logique de mise en forme. Si votre objectif est la précision visuelle, le « Conserver la mise en forme source » manuel reste le choix le plus sûr. Si vous avez besoin de cohérence structurelle, les outils intégrés de Word sont suffisants. Et si l'automatisation et l'évolutivité sont les plus importantes, les solutions basées sur VBA ou Python offrent une efficacité à long terme.
En comprenant comment Word gère la mise en forme au niveau de la section et du document, vous pouvez éliminer les changements de mise en page inattendus et choisir en toute confiance la bonne stratégie de fusion pour votre flux de travail.
FAQ
Q1. Pourquoi la mise en forme change-t-elle après la fusion de documents Word ?
Parce que Word donne la priorité aux définitions de style du document principal. Si deux documents partagent des noms de style (tels que « Titre 1 »), la version du document principal remplace celle insérée.
Q2. Comment puis-je préserver les marges et l'orientation de la page lors de la fusion ?
Vous devez insérer un saut de section (page suivante) avant d'ajouter le nouveau document. Sans saut de section, le contenu inséré fait partie de la section actuelle et hérite de ses paramètres de mise en page.
Q3. Est-ce que « Conserver la mise en forme source » préserve toujours tout ?
Il préserve l'apparence visuelle dans la plupart des cas. Cependant, Word peut créer des définitions de style internes en double, ce qui peut rendre la structure du document plus complexe.
Q4. Puis-je fusionner des documents Word sans que Microsoft Word soit installé ?
Oui. Vous pouvez utiliser des outils en ligne ou des solutions programmatiques comme les bibliothèques Python (par exemple, Spire.Doc) pour fusionner des documents sans dépendre de Word.
Q5. Quelle est la meilleure méthode pour la fusion automatisée à grande échelle ?
Les solutions basées sur Python sont les plus évolutives. Elles permettent le traitement par lots, l'intégration backend et l'automatisation sans interaction manuelle.
Vous pourriez aussi être intéressé par
Cómo combinar documentos de Word: conservar o unificar el formato
Tabla de Contenidos
- Por Qué se Rompe el Formato al Combinar Documentos de Word
- Método 1. Combinar Documentos de Word Usando “Texto de Archivo” (Función Integrada)
- Método 2. Combinar Documentos de Word Usando Copiar y Pegar (Mantener Formato de Origen)
- Método 3. Combinar Documentos de Word en Línea (MergeEasy)
- Método 4. Combinar Documentos de Word Usando VBA
- Método 5. Combinar Documentos de Word Usando Python (Spire.Doc)
- Tabla Comparativa: ¿Qué Método Deberías Elegir?
- Conclusión
- Preguntas Frecuentes
Combinar documentos de Word es una tarea común pero sorprendentemente compleja. Ya sea que estés combinando informes, compilando capítulos de un libro o consolidando múltiples archivos de proyecto en un entregable final, la forma en que combinas los documentos afecta directamente el formato, la consistencia del diseño y la mantenibilidad a largo plazo.
Aunque pueda parecer una simple operación de copiar y pegar, la combinación en Word involucra definiciones de estilo, estructuras de sección y sistemas de formato a nivel de documento, y diferentes métodos pueden producir resultados drásticamente diferentes.
En esta guía, exploraremos cinco formas prácticas de combinar documentos de Word, desde las funciones integradas de Word hasta VBA y Python, para que puedas elegir el enfoque que mejor se adapte a tus necesidades.
Navegación Rápida:
- Método 1. Combinar Documentos de Word Usando “Texto de Archivo” (Función Integrada)
- Método 2. Combinar Documentos de Word Usando Copiar y Pegar (Mantener Formato de Origen)
- Método 3. Combinar Documentos de Word en Línea (MergeEasy)
- Método 4. Combinar Documentos de Word Usando VBA
- Método 5. Combinar Documentos de Word Usando Python (Spire.Doc)
Por Qué se Rompe el Formato al Combinar Documentos de Word
Antes de explorar los cinco métodos, es útil entender un concepto clave: Word no simplemente combina texto, combina sistemas de formato.
Cuando se combinan dos documentos, Word debe decidir cómo manejar la configuración de la página, los estilos, la numeración, los encabezados y otras reglas de diseño. En la mayoría de los casos, el documento principal controla el resultado final; es por eso que el formato puede cambiar después de la combinación.
Para simplificar las cosas, el formato en Word se puede dividir en dos niveles:
| Tipo de Formato | Controla | Ejemplos | Qué Sucede Durante la Combinación |
|---|---|---|---|
| Formato a Nivel de Sección | Diseño dentro de una sección | Tamaño de página, márgenes, orientación, columnas, encabezados/pies de página, numeración de páginas | Word no inserta automáticamente un salto de sección. El contenido insertado se convierte en parte de la sección actual. Para preservar la configuración de diseño original, debes insertar un Salto de Sección antes de combinar. |
| Formato a Nivel de Documento | Sistema de estilos general | Estilos de encabezado, estilo Normal, fuentes del tema, colores del tema, definiciones de numeración | Si los estilos comparten el mismo nombre (por ejemplo, “Encabezado 1”), la definición del documento principal anula el estilo del documento insertado. |
Qué Significa Esto en la Práctica
- La mayoría de los métodos de combinación priorizan la consistencia sobre la preservación de la apariencia original.
- Las definiciones de estilo del documento principal generalmente anulan los estilos en conflicto.
- Solo la opción manual Copiar y Pegar → Mantener Formato de Origen intenta preservar el diseño visual original.
Con esto en mente, examinemos cinco formas diferentes de combinar documentos de Word y cuándo tiene sentido cada método.
Método 1. Combinar Documentos de Word Usando “Texto de Archivo” (Función Integrada)
Si deseas una forma rápida y nativa de combinar documentos directamente dentro de Microsoft Word, Insertar → Texto de Archivo es la opción más sencilla.
Cómo Funciona
- Abre tu documento principal, coloca el cursor donde deseas que aparezca el contenido.
- Ve a Insertar → Objeto → Texto de Archivo.
- Selecciona uno o varios archivos de Word.
- Haz clic en Insertar.
Word inserta el documento seleccionado en la posición actual del cursor. Para comenzar en una nueva página, inserta un Salto de Página o un Salto de Sección antes de combinar.
Qué Esperar
Este método funciona mejor cuando todos los documentos se basan en la misma plantilla. Si los estilos difieren, las definiciones del documento principal anularán los estilos en conflicto. Por ejemplo, si ambos archivos contienen un estilo llamado Encabezado 1 pero con diferentes fuentes o espaciado, la versión del documento principal tendrá prioridad.
Cuándo Usarlo
Usa este método cuando:
- Estás compilando informes bajo una plantilla corporativa unificada.
- Todos los archivos comparten reglas de formato similares.
- Necesitas una solución rápida e integrada sin automatización.
Es simple y confiable, pero no es ideal cuando se busca preservar el formato original entre diferentes diseños.
Método 2. Combinar Documentos de Word Usando Copiar y Pegar (Mantener Formato de Origen)
Si la preservación del formato es tu máxima prioridad, el copiado y pegado manual sigue siendo el método más preciso.
Cómo Funciona
- Abre tanto el documento principal como el documento de origen.
- En el documento de origen, presiona Ctrl + A para seleccionar todo el contenido, luego presiona Ctrl + C para copiarlo.
- Cambia al documento principal y coloca el cursor donde debe comenzar el contenido combinado, generalmente al final del documento.
- Ve a Disposición → Saltos → Saltos de Sección → Página Siguiente para insertar un salto de sección. (Este paso es esencial si deseas preservar los márgenes, la orientación o el estilo de fuente del documento de origen).
- En la nueva página, haz clic derecho y elige Opciones de Pegado → Mantener Formato de Origen.
Esto asegura que tanto el formato a nivel de sección (estructura de diseño) como el formato a nivel de documento (fuentes, estilos, numeración) se preserven tanto como sea posible.
Por Qué Este Método es Diferente
Cuando eliges Mantener Formato de Origen, Word crea definiciones de estilo internas adicionales si es necesario. En lugar de reemplazar los estilos, mantiene intacta la apariencia de origen, incluso si eso significa duplicar nombres de estilo internamente.
Compensación
Aunque se preserva el formato, la estructura de estilos interna del documento puede volverse compleja. Para proyectos pequeños, esto no es un problema. Para documentación técnica extensa, puede dificultar el mantenimiento a largo plazo.
Cuándo Usarlo
- Contratos legales
- Artículos académicos de diferentes autores
- Documentos sensibles al diseño
- Tareas de combinación a pequeña escala
Si la fidelidad visual importa más que la consistencia estructural, esta es la opción más segura.
Método 3. Combinar Documentos de Word en Línea (MergeEasy)
Si prefieres no usar Word directamente, las herramientas de combinación en línea ofrecen una alternativa conveniente. Herramientas como MergeEasy te permiten subir múltiples archivos de Word, reordenarlos y descargar un documento combinado, todo en tu navegador.
Cómo Funciona
- Abre tu navegador y ve a la herramienta de combinación de documentos de Word en línea.
- Sube los archivos de Word que deseas combinar.
- Organiza los documentos en el orden deseado.
- (Opcional) Habilita la opción “Añadir saltos de página entre documentos” si deseas que cada archivo comience en una nueva página.
- Haz clic en Combinar Documento de Word y descarga el documento combinado.
Qué Esperar
Las herramientas en línea buscan preservar el diseño razonablemente bien, pero:
- Los conflictos de estilo se manejan automáticamente.
- Tienes un control limitado sobre la lógica de formato.
- Los documentos confidenciales pueden plantear problemas de privacidad.
Cuándo Usarlo
- Tareas de combinación rápidas
- Usuarios sin Microsoft Word instalado
- Archivos no sensibles
- Combinación ocasional de documentos
Las herramientas en línea priorizan la conveniencia sobre el control profundo del formato.
Método 4. Combinar Documentos de Word Usando VBA
Para los usuarios que trabajan intensamente dentro de Microsoft Word, VBA proporciona automatización sin software externo.
En lugar de insertar archivos manualmente uno por uno, puedes escribir una macro para combinar documentos automáticamente. La macro inserta cada documento seleccionado al final del archivo principal y los separa usando un Salto de Sección (Página Siguiente).
Cómo Funciona
- Abre el documento principal de Word.
- Presiona Alt + F11 para abrir el editor de VBA.
- Haz clic en Insertar → Módulo, luego pega la macro de VBA proporcionada en la ventana de código.
- Presiona F5 (o haz clic en Ejecutar) para ejecutar la macro.
- Selecciona los documentos de Word a combinar, luego haz clic en Abrir.
Código VBA:
Sub MergeWordDocuments()

    Dim mainDoc As Document
    Dim fileDialog As FileDialog
    Dim selectedFile As Variant
    Dim insertRange As Range

    Set mainDoc = ActiveDocument

    ' Abrir selector de archivos
    Set fileDialog = Application.FileDialog(msoFileDialogFilePicker)

    With fileDialog
        .Title = "Seleccionar Documentos de Word para Combinar"
        .Filters.Clear
        .Filters.Add "Archivos de Word", "*.doc; *.docx"
        .AllowMultiSelect = True

        If .Show = -1 Then

            For Each selectedFile In .SelectedItems

                ' Mover al final del documento principal
                Set insertRange = mainDoc.Range
                insertRange.Collapse Direction:=wdCollapseEnd

                ' Insertar Salto de Sección (Página Siguiente)
                insertRange.InsertBreak Type:=wdSectionBreakNextPage
                insertRange.Collapse Direction:=wdCollapseEnd

                ' Insertar contenido del documento
                insertRange.InsertFile FileName:=selectedFile

            Next selectedFile

        End If

    End With

    MsgBox "¡Documentos combinados con éxito!"

End Sub
Qué Sucede Internamente
VBA aprovecha el modelo de objetos de documento (DOM) interno de Word, se comporta de manera idéntica al motor de Insertar → Texto de Archivo, lo que significa que los estilos del documento principal dominan. La ventaja radica en la automatización, no en la lógica de formato.
Cuándo Usarlo
- Consolidación de informes mensuales o semanales
- Flujos de trabajo corporativos internos
- Documentación basada en plantillas
- Usuarios cómodos con las macros de Word
VBA es ideal cuando necesitas una combinación repetible dentro del ecosistema de Office.
Método 5. Combinar Documentos de Word Usando Python (Spire.Doc)
Para desarrolladores o sistemas de backend, Python proporciona una combinación de documentos escalable sin depender de Microsoft Word. Usando Spire.Doc for Python, puedes insertar documentos programáticamente en un archivo principal.
Cómo Funciona
- Abre tu IDE o editor de Python preferido.
- Instala la biblioteca desde PyPI: pip install spire.doc
- Crea un nuevo archivo de Python (por ejemplo, merge_word_documents.py).
- Pega uno de los siguientes fragmentos de código en el archivo.
- Ejecuta el script.
Este enfoque requiere conocimientos básicos de Python. Antes de ejecutar el script, ajusta las rutas de los archivos de entrada y salida según tu entorno local.
Ejemplo 1. Combinar Dos Documentos de Word
from spire.doc import *
from spire.doc.common import *

doc = Document()
doc.LoadFromFile("Main.docx")
doc.InsertTextFromFile("Source.docx", FileFormat.Docx)
doc.SaveToFile("MergedOutput.docx")
doc.Close()
Ejemplo 2. Combinar Múltiples Documentos en una Carpeta
import os
from spire.doc import *
from spire.doc.common import *

folder_path = "Docs/"
files = [f for f in os.listdir(folder_path) if f.endswith(".docx")]

doc = Document()
doc.LoadFromFile(os.path.join(folder_path, files[0]))

for file in files[1:]:
    doc.InsertTextFromFile(os.path.join(folder_path, file), FileFormat.Docx)

doc.SaveToFile("MergedOutput.docx")
doc.Close()
Comportamiento del Formato
Cuando se ejecuta InsertTextFromFile, el documento insertado se anexa como una nueva sección en el archivo de destino. En la práctica, esto significa que cada combinación generalmente introduce un salto de sección de Página Siguiente, comienza el contenido insertado en una nueva página y aplica las definiciones de estilo del documento principal (de destino). Como resultado, los conflictos de formato se resuelven a favor del documento primario.
Este enfoque ayuda a mantener la consistencia estructural, pero puede alterar la apariencia original del contenido combinado si los dos documentos usan definiciones de estilo diferentes.
A continuación se muestra una captura de pantalla del documento combinado creado por Spire.Doc:
Cuándo Usarlo
- Sistemas de generación de documentos
- Aplicaciones SaaS
- Canales de procesamiento de backend
- Combinación por lotes a gran escala
Fortalezas del Enfoque de Python
- Totalmente automatizado
- Escalable para procesamiento por lotes
- Sin dependencia de Microsoft Word
- Adecuado para sistemas del lado del servidor
Después de combinar programáticamente documentos de Word en Python, puedes mejorar la salida agregando números de página, ajustando la configuración de la página o exportando el archivo a formato PDF. Al combinar estas características, puedes crear un flujo de trabajo de procesamiento de documentos de Word totalmente automatizado.
Tabla Comparativa: ¿Qué Método Deberías Elegir?
| Método | Automatización | Coincidir con Formato de Destino | Preservar Formato de Origen | Ideal Para |
|---|---|---|---|---|
| Texto de Archivo | Manual | Sí | No | Combinación rápida bajo el formato del documento principal |
| Copiar y Pegar (Mantener Formato de Origen) | Manual | No | Sí | Preservar estilos y diseño originales |
| Herramienta en Línea (MergeEasy) | Semiautomatizado | Sí | No | Combinación rápida sin Word, bajo el formato del doc. principal |
| Macro VBA | Automatizado (dentro de Word) | Sí | No | Automatizar combinaciones repetitivas en el entorno de Word |
| Python (Spire.Doc) | Totalmente Automatizado | Sí | No | Procesamiento por lotes con formato unificado |
Resumen del Comportamiento del Formato
Coincidir con Formato de Destino
Todos los métodos de combinación, excepto Copiar y Pegar → Mantener Formato de Origen, aplican automáticamente las definiciones de estilo del documento principal al contenido insertado. Esto incluye Texto de Archivo, Herramientas en Línea, macros de VBA y soluciones de Python. En estos métodos, el formato del documento de destino tiene prioridad cuando ocurren conflictos de estilo.
Preservar Formato de Origen
Solo Copiar y Pegar usando “Mantener Formato de Origen” retiene completamente los estilos, fuentes y diseño del documento original. Otros métodos de combinación no preservan completamente el formato de origen, ya que los estilos en conflicto son anulados por el documento principal.
Conclusión
Combinar documentos de Word no se trata solo de combinar contenido, se trata de controlar la lógica de formato. Si tu objetivo es la precisión visual, la opción manual “Mantener Formato de Origen” sigue siendo la opción más segura. Si necesitas consistencia estructural, las herramientas integradas de Word son suficientes. Y si la automatización y la escalabilidad son lo más importante, las soluciones basadas en VBA o Python proporcionan eficiencia a largo plazo.
Al comprender cómo Word maneja el formato a nivel de sección y de documento, puedes eliminar cambios de diseño inesperados y elegir con confianza la estrategia de combinación adecuada para tu flujo de trabajo.
Preguntas Frecuentes
P1. ¿Por qué cambia el formato después de combinar documentos de Word?
Porque Word prioriza las definiciones de estilo del documento principal. Si dos documentos comparten nombres de estilo (como “Encabezado 1”), la versión del documento principal anula la del insertado.
P2. ¿Cómo puedo preservar los márgenes y la orientación de la página al combinar?
Debes insertar un Salto de Sección (Página Siguiente) antes de agregar el nuevo documento. Sin un salto de sección, el contenido insertado se convierte en parte de la sección actual y hereda su configuración de diseño.
P3. ¿La opción “Mantener Formato de Origen” siempre preserva todo?
Preserva la apariencia visual en la mayoría de los casos. Sin embargo, Word puede crear definiciones de estilo internas duplicadas, lo que puede hacer que la estructura del documento sea más compleja.
P4. ¿Puedo combinar documentos de Word sin tener Microsoft Word instalado?
Sí. Puedes usar herramientas en línea o soluciones programáticas como bibliotecas de Python (por ejemplo, Spire.Doc) para combinar documentos sin depender de Word.
P5. ¿Qué método es mejor para la combinación automatizada a gran escala?
Las soluciones basadas en Python son las más escalables. Permiten el procesamiento por lotes, la integración de backend y la automatización sin interacción manual.
También te puede interesar
Word-Dokumente zusammenfügen: Formatierung beibehalten oder vereinheitlichen
Inhaltsverzeichnis
- Warum die Formatierung beim Zusammenführen von Word-Dokumenten beschädigt wird
- Methode 1. Word-Dokumente mit „Text aus Datei“ zusammenführen (integrierte Funktion)
- Methode 2. Word-Dokumente mit Kopieren & Einfügen zusammenführen (Quellformatierung beibehalten)
- Methode 3. Word-Dokumente online zusammenführen (MergeEasy)
- Methode 4. Word-Dokumente mit VBA zusammenführen
- Methode 5. Word-Dokumente mit Python zusammenführen (Spire.Doc)
- Vergleichstabelle: Welche Methode sollten Sie wählen?
- Fazit
- Häufig gestellte Fragen
Das Zusammenführen von Word-Dokumenten ist eine häufige, aber überraschend komplexe Aufgabe. Ob Sie Berichte kombinieren, Buchkapitel zusammenstellen oder mehrere Projektdateien zu einem endgültigen Ergebnis zusammenfassen, die Art und Weise, wie Sie Dokumente zusammenführen, wirkt sich direkt auf die Formatierung, die Layoutkonsistenz und die langfristige Wartbarkeit aus.
Obwohl es wie ein einfacher Kopiervorgang aussehen mag, umfasst das Zusammenführen in Word Stildefinitionen, Abschnittsstrukturen und Formatierungssysteme auf Dokumentebene – und verschiedene Methoden können dramatisch unterschiedliche Ergebnisse liefern.
In diesem Leitfaden werden wir fünf praktische Möglichkeiten zum Zusammenführen von Word-Dokumenten untersuchen – von integrierten Word-Funktionen bis hin zu VBA und Python –, damit Sie den Ansatz wählen können, der Ihren Anforderungen am besten entspricht.
Schnellnavigation:
- Methode 1. Word-Dokumente mit „Text aus Datei“ zusammenführen (integrierte Funktion)
- Methode 2. Word-Dokumente mit Kopieren & Einfügen zusammenführen (Quellformatierung beibehalten)
- Methode 3. Word-Dokumente online zusammenführen (MergeEasy)
- Methode 4. Word-Dokumente mit VBA zusammenführen
- Methode 5. Word-Dokumente mit Python zusammenführen (Spire.Doc)
Warum die Formatierung beim Zusammenführen von Word-Dokumenten beschädigt wird
Bevor wir die fünf Methoden untersuchen, ist es hilfreich, ein Schlüsselkonzept zu verstehen: Word kombiniert nicht einfach nur Text – es kombiniert Formatierungssysteme.
Wenn zwei Dokumente zusammengeführt werden, muss Word entscheiden, wie Seiten-Setup, Stile, Nummerierung, Kopfzeilen und andere Layoutregeln gehandhabt werden. In den meisten Fällen steuert das Hauptdokument das Endergebnis - deshalb kann sich die Formatierung nach dem Zusammenführen ändern.
Zur Vereinfachung lässt sich die Formatierung in Word in zwei Ebenen unterteilen:
| Formatierungstyp | Steuerelemente | Beispiele | Was beim Zusammenführen passiert |
|---|---|---|---|
| Formatierung auf Abschnittsebene | Layout innerhalb eines Abschnitts | Seitengröße, Ränder, Ausrichtung, Spalten, Kopf-/Fußzeilen, Seitennummerierung | Word fügt nicht automatisch einen Abschnittsumbruch ein. Eingefügter Inhalt wird Teil des aktuellen Abschnitts. Um die ursprünglichen Layouteinstellungen beizubehalten, müssen Sie vor dem Zusammenführen einen Abschnittsumbruch einfügen. |
| Formatierung auf Dokumentebene | Gesamtes Stilsystem | Überschriftenstile, Standardstil, Design-Schriftarten, Design-Farben, Nummerierungsdefinitionen | Wenn Stile denselben Namen haben (z. B. „Überschrift 1“), überschreibt die Definition des Hauptdokuments den Stil des eingefügten Dokuments. |
Was das in der Praxis bedeutet
- Die meisten Zusammenführungsmethoden priorisieren Konsistenz gegenüber der Beibehaltung des ursprünglichen Erscheinungsbilds.
- Die Stildefinitionen des Hauptdokuments überschreiben normalerweise widersprüchliche Stile.
- Nur manuelles Kopieren & Einfügen → Quellformatierung beibehalten versucht, das ursprüngliche visuelle Layout zu erhalten.
Vor diesem Hintergrund wollen wir fünf verschiedene Möglichkeiten zum Zusammenführen von Word-Dokumenten untersuchen – und wann jede Methode sinnvoll ist.
Methode 1. Word-Dokumente mit „Text aus Datei“ zusammenführen (integrierte Funktion)
Wenn Sie eine schnelle, native Möglichkeit zum Zusammenführen von Dokumenten direkt in Microsoft Word wünschen, ist Einfügen → Text aus Datei die einfachste Option.
Wie es funktioniert
- Öffnen Sie Ihr Hauptdokument und platzieren Sie den Cursor dort, wo der Inhalt erscheinen soll.
- Gehen Sie zu Einfügen → Objekt → Text aus Datei.
- Wählen Sie eine oder mehrere Word-Dateien aus.
- Klicken Sie auf Einfügen.
Word fügt das ausgewählte Dokument an der aktuellen Cursorposition ein. Um auf einer neuen Seite zu beginnen, fügen Sie vor dem Zusammenführen einen Seitenumbruch oder Abschnittsumbruch ein.
Was zu erwarten ist
Diese Methode funktioniert am besten, wenn alle Dokumente auf derselben Vorlage basieren. Wenn sich die Stile unterscheiden, überschreiben die Definitionen des Hauptdokuments widersprüchliche Stile. Wenn beispielsweise beide Dateien einen Stil namens Überschrift 1 mit unterschiedlichen Schriftarten oder Abständen enthalten, hat die Version des Hauptdokuments Vorrang.
Wann man es benutzt
Verwenden Sie diese Methode, wenn:
- Sie stellen Berichte unter einer einheitlichen Unternehmensvorlage zusammen.
- Alle Dateien haben ähnliche Formatierungsregeln.
- Sie benötigen eine schnelle, integrierte Lösung ohne Automatisierung.
Es ist einfach und zuverlässig – aber nicht ideal, wenn die ursprüngliche Formatierung über verschiedene Designs hinweg beibehalten werden soll.
Methode 2. Word-Dokumente mit Kopieren & Einfügen zusammenführen (Quellformatierung beibehalten)
Wenn die Beibehaltung der Formatierung Ihre höchste Priorität hat, bleibt das manuelle Kopieren und Einfügen die präziseste Methode.
Wie es funktioniert
- Öffnen Sie sowohl das Hauptdokument als auch das Quelldokument.
- Drücken Sie im Quelldokument Strg + A, um den gesamten Inhalt auszuwählen, und drücken Sie dann Strg + C, um ihn zu kopieren.
- Wechseln Sie zum Hauptdokument und platzieren Sie den Cursor dort, wo der zusammengeführte Inhalt beginnen soll, normalerweise am Ende des Dokuments.
- Gehen Sie zu Layout → Umbrüche → Abschnittsumbrüche → Nächste Seite, um einen Abschnittsumbruch einzufügen. (Dieser Schritt ist unerlässlich, wenn Sie die Ränder, die Ausrichtung oder den Schriftstil des Quelldokuments beibehalten möchten.)
- Auf der neuen Seite klicken Sie mit der rechten Maustaste und wählen Einfügeoptionen → Quellformatierung beibehalten.
Dadurch wird sichergestellt, dass sowohl die Formatierung auf Abschnittsebene (Layoutstruktur) als auch die Formatierung auf Dokumentebene (Schriftarten, Stile, Nummerierung) so weit wie möglich erhalten bleiben.
Warum diese Methode anders ist
Wenn Sie Quellformatierung beibehalten wählen, erstellt Word bei Bedarf zusätzliche interne Stildefinitionen. Anstatt Stile zu ersetzen, behält es das ursprüngliche Erscheinungsbild bei – auch wenn dies bedeutet, dass Stilnamen hinter den Kulissen dupliziert werden.
Kompromiss
Während die Formatierung erhalten bleibt, kann die interne Stilstruktur des Dokuments komplex werden. Bei kleinen Projekten ist dies kein Problem. Bei großer technischer Dokumentation kann dies die langfristige Wartung erschweren.
Wann man es benutzt
- Rechtsverträge
- Wissenschaftliche Arbeiten von verschiedenen Autoren
- Design-sensible Dokumente
- Zusammenführungsaufgaben im kleinen Maßstab
Wenn visuelle Genauigkeit wichtiger ist als strukturelle Konsistenz, ist dies die sicherste Wahl.
Methode 3. Word-Dokumente online zusammenführen (MergeEasy)
Wenn Sie Word nicht direkt verwenden möchten, bieten Online-Zusammenführungstools eine bequeme Alternative. Tools wie MergeEasy ermöglichen es Ihnen, mehrere Word-Dateien hochzuladen, neu anzuordnen und ein kombiniertes Dokument herunterzuladen – alles in Ihrem Browser.
Wie es funktioniert
- Öffnen Sie Ihren Browser und navigieren Sie zum Online-Tool zum Zusammenführen von Word-Dokumenten.
- Laden Sie die Word-Dateien hoch, die Sie kombinieren möchten.
- Ordnen Sie die Dokumente in der gewünschten Reihenfolge an.
- (Optional) Aktivieren Sie die Option „Seitenumbrüche zwischen Dokumenten hinzufügen“, wenn jede Datei auf einer neuen Seite beginnen soll.
- Klicken Sie auf Word-Dokument zusammenführen und laden Sie das kombinierte Dokument herunter.
Was zu erwarten ist
Online-Tools zielen darauf ab, das Layout einigermaßen gut zu erhalten, aber:
- Stilkonflikte werden automatisch behandelt.
- Sie haben nur begrenzte Kontrolle über die Formatierungslogik.
- Vertrauliche Dokumente können Datenschutzbedenken aufwerfen.
Wann man es benutzt
- Schnelle Zusammenführungsaufgaben
- Benutzer ohne installiertes Microsoft Word
- Nicht vertrauliche Dateien
- Gelegentliche Dokumentenkombination
Online-Tools priorisieren Bequemlichkeit über tiefgreifende Formatierungskontrolle.
Methode 4. Word-Dokumente mit VBA zusammenführen
Für Benutzer, die intensiv in Microsoft Word arbeiten, bietet VBA Automatisierung ohne externe Software.
Anstatt Dateien manuell einzeln einzufügen, können Sie ein Makro schreiben, um Dokumente automatisch zusammenzuführen. Das Makro fügt jedes ausgewählte Dokument am Ende der Hauptdatei ein und trennt sie durch einen Abschnittsumbruch (Nächste Seite).
Wie es funktioniert
- Öffnen Sie das Haupt-Word-Dokument.
- Drücken Sie Alt + F11, um den VBA-Editor zu öffnen.
- Klicken Sie auf Einfügen → Modul, und fügen Sie dann das bereitgestellte VBA-Makro in das Codefenster ein.
- Drücken Sie F5 (oder klicken Sie auf Ausführen), um das Makro auszuführen.
- Wählen Sie die zusammenzuführenden Word-Dokumente aus und klicken Sie dann auf Öffnen.
VBA-Code:
Sub MergeWordDocuments()

    Dim mainDoc As Document
    Dim fileDialog As FileDialog
    Dim selectedFile As Variant
    Dim insertRange As Range

    Set mainDoc = ActiveDocument

    ' Open file picker
    Set fileDialog = Application.FileDialog(msoFileDialogFilePicker)

    With fileDialog
        .Title = "Select Word Documents to Merge"
        .Filters.Clear
        .Filters.Add "Word Files", "*.doc; *.docx"
        .AllowMultiSelect = True

        If .Show = -1 Then

            For Each selectedFile In .SelectedItems

                ' Move to end of main document
                Set insertRange = mainDoc.Range
                insertRange.Collapse Direction:=wdCollapseEnd

                ' Insert Section Break (Next Page)
                insertRange.InsertBreak Type:=wdSectionBreakNextPage
                insertRange.Collapse Direction:=wdCollapseEnd

                ' Insert document content
                insertRange.InsertFile FileName:=selectedFile

            Next selectedFile

        End If

    End With

    MsgBox "Documents merged successfully!"

End Sub
Was intern passiert
VBA nutzt das interne Dokumentobjektmodell (DOM) von Word und verhält sich identisch mit der Engine Einfügen → Text aus Datei, was bedeutet, dass die Stile des Hauptdokuments dominieren. Der Vorteil liegt in der Automatisierung – nicht in der Formatierungslogik.
Wann man es benutzt
- Monatliche oder wöchentliche Berichtskonsolidierung
- Interne Unternehmens-Workflows
- Vorlagenbasierte Dokumentation
- Benutzer, die mit Word-Makros vertraut sind
VBA ist ideal, wenn Sie wiederholbare Zusammenführungen innerhalb des Office-Ökosystems benötigen.
Methode 5. Word-Dokumente mit Python zusammenführen (Spire.Doc)
Für Entwickler oder Backend-Systeme bietet Python eine skalierbare Dokumentenzusammenführung, ohne auf Microsoft Word angewiesen zu sein. Mit Spire.Doc for Python können Sie Dokumente programmgesteuert in eine Hauptdatei einfügen.
Wie es funktioniert
- Öffnen Sie Ihre bevorzugte Python-IDE oder Ihren Editor.
- Installieren Sie die Bibliothek von PyPI: pip install spire.doc
- Erstellen Sie eine neue Python-Datei (z. B. merge_word_documents.py).
- Fügen Sie einen der folgenden Codeausschnitte in die Datei ein.
- Führen Sie das Skript aus.
Dieser Ansatz erfordert grundlegende Python-Kenntnisse. Passen Sie vor dem Ausführen des Skripts die Eingabe- und Ausgabedateipfade entsprechend Ihrer lokalen Umgebung an.
Beispiel 1. Zwei Word-Dokumente zusammenführen
from spire.doc import *
from spire.doc.common import *

doc = Document()
doc.LoadFromFile("Main.docx")
doc.InsertTextFromFile("Source.docx", FileFormat.Docx)
doc.SaveToFile("MergedOutput.docx")
doc.Close()
Beispiel 2. Mehrere Dokumente in einem Ordner zusammenführen
import os
from spire.doc import *
from spire.doc.common import *

folder_path = "Docs/"
files = [f for f in os.listdir(folder_path) if f.endswith(".docx")]

doc = Document()
doc.LoadFromFile(os.path.join(folder_path, files[0]))

for file in files[1:]:
    doc.InsertTextFromFile(os.path.join(folder_path, file), FileFormat.Docx)

doc.SaveToFile("MergedOutput.docx")
doc.Close()
Formatierungsverhalten
Wenn InsertTextFromFile ausgeführt wird, wird das eingefügte Dokument als neuer Abschnitt an die Zieldatei angehängt. In der Praxis bedeutet dies, dass jede Zusammenführung typischerweise einen Abschnittsumbruch für die nächste Seite einführt, den eingefügten Inhalt auf einer neuen Seite beginnt und die Stildefinitionen des Hauptdokuments (Ziel) anwendet. Infolgedessen werden Formatierungskonflikte zugunsten des primären Dokuments gelöst.
Dieser Ansatz hilft, die strukturelle Konsistenz zu wahren, kann aber das ursprüngliche Erscheinungsbild des zusammengeführten Inhalts verändern, wenn die beiden Dokumente unterschiedliche Stildefinitionen verwenden.
Unten sehen Sie einen Screenshot des von Spire.Doc erstellten zusammengeführten Dokuments:
Wann man es benutzt
- Dokumentengenerierungssysteme
- SaaS-Anwendungen
- Backend-Verarbeitungspipelines
- Groß angelegte Stapel-Zusammenführung
Stärken des Python-Ansatzes
- Vollautomatisch
- Skalierbar für die Stapelverarbeitung
- Keine Abhängigkeit von Microsoft Word
- Geeignet für serverseitige Systeme
Nach dem programmgesteuerten Zusammenführen von Word-Dokumenten in Python können Sie die Ausgabe verbessern, indem Sie Seitenzahlen hinzufügen, Seiteneinstellungen anpassen oder die Datei in das PDF-Format exportieren. Durch die Kombination dieser Funktionen können Sie einen vollständig automatisierten Workflow zur Verarbeitung von Word-Dokumenten erstellen.
Vergleichstabelle: Welche Methode sollten Sie wählen?
| Methode | Automatisierung | Zielformatierung anpassen | Quellformatierung beibehalten | Am besten für |
|---|---|---|---|---|
| Text aus Datei | Manuell | Ja | Nein | Schnelles Zusammenführen unter der Formatierung des Hauptdokuments |
| Kopieren & Einfügen (Quellformatierung beibehalten) | Manuell | Nein | Ja | Originalstile und -layout beibehalten |
| Online-Tool (MergeEasy) | Halbautomatisch | Ja | Nein | Schnelles Zusammenführen ohne Word, unter der Formatierung des Hauptdokuments |
| VBA-Makro | Automatisiert (innerhalb von Word) | Ja | Nein | Automatisierung wiederholter Zusammenführungen in der Word-Umgebung |
| Python (Spire.Doc) | Vollautomatisch | Ja | Nein | Stapelverarbeitung mit einheitlicher Formatierung |
Zusammenfassung des Formatierungsverhaltens
Zielformatierung anpassen
Alle Zusammenführungsmethoden außer Kopieren & Einfügen → Quellformatierung beibehalten wenden automatisch die Stildefinitionen des Hauptdokuments auf den eingefügten Inhalt an. Dies umfasst Text aus Datei, Online-Tools, VBA-Makros und Python-Lösungen. Bei diesen Methoden hat die Formatierung des Zieldokuments Vorrang, wenn Stilkonflikte auftreten.
Quellformatierung beibehalten
Nur Kopieren & Einfügen mit „Quellformatierung beibehalten“ behält die ursprünglichen Stile, Schriftarten und das Layout des Dokuments vollständig bei. Andere Zusammenführungsmethoden erhalten die Quellformatierung nicht vollständig, da widersprüchliche Stile vom Hauptdokument überschrieben werden.
Fazit
Beim Zusammenführen von Word-Dokumenten geht es nicht nur um das Kombinieren von Inhalten – es geht um die Steuerung der Formatierungslogik. Wenn Ihr Ziel visuelle Präzision ist, bleibt das manuelle „Quellformatierung beibehalten“ die sicherste Wahl. Wenn Sie strukturelle Konsistenz benötigen, sind die integrierten Tools von Word ausreichend. Und wenn Automatisierung und Skalierbarkeit am wichtigsten sind, bieten VBA- oder Python-basierte Lösungen langfristige Effizienz.
Indem Sie verstehen, wie Word die Formatierung auf Abschnitts- und Dokumentebene handhabt, können Sie unerwartete Layoutverschiebungen vermeiden und selbstbewusst die richtige Zusammenführungsstrategie für Ihren Workflow wählen.
Häufig gestellte Fragen
F1. Warum ändert sich die Formatierung nach dem Zusammenführen von Word-Dokumenten?
Weil Word die Stildefinitionen des Hauptdokuments priorisiert. Wenn zwei Dokumente Stilnamen teilen (wie „Überschrift 1“), überschreibt die Version des Hauptdokuments die eingefügte.
F2. Wie kann ich Ränder und Seitenausrichtung beim Zusammenführen beibehalten?
Sie müssen einen Abschnittsumbruch (Nächste Seite) einfügen, bevor Sie das neue Dokument hinzufügen. Ohne einen Abschnittsumbruch wird der eingefügte Inhalt Teil des aktuellen Abschnitts und erbt dessen Layouteinstellungen.
F3. Behält „Quellformatierung beibehalten“ immer alles bei?
Es bewahrt in den meisten Fällen das visuelle Erscheinungsbild. Word kann jedoch doppelte interne Stildefinitionen erstellen, was die Dokumentstruktur komplexer machen kann.
F4. Kann ich Word-Dokumente ohne installiertes Microsoft Word zusammenführen?
Ja. Sie können Online-Tools oder programmatische Lösungen wie Python-Bibliotheken (z. B. Spire.Doc) verwenden, um Dokumente ohne Word zusammenzuführen.
F5. Welche Methode eignet sich am besten für die groß angelegte automatisierte Zusammenführung?
Python-basierte Lösungen sind am skalierbarsten. Sie ermöglichen Stapelverarbeitung, Backend-Integration und Automatisierung ohne manuelle Interaktion.
Das könnte Sie auch interessieren
Как объединить документы Word: сохранение или унификация форматирования
Содержание
- Почему нарушается форматирование при объединении документов Word
- Метод 1. Объединение документов Word с помощью функции "Текст из файла" (встроенная функция)
- Метод 2. Объединение документов Word с помощью копирования и вставки (с сохранением исходного форматирования)
- Метод 3. Объединение документов Word онлайн (MergeEasy)
- Метод 4. Объединение документов Word с помощью VBA
- Метод 5. Объединение документов Word с помощью Python (Spire.Doc)
- Сравнительная таблица: какой метод выбрать?
- Заключение
- Часто задаваемые вопросы
Объединение документов Word — распространенная, но на удивление сложная задача. Независимо от того, объединяете ли вы отчеты, компилируете главы книг или консолидируете несколько файлов проекта в один конечный документ, способ объединения документов напрямую влияет на форматирование, согласованность макета и долгосрочную поддержку.
Хотя это может показаться простой операцией копирования и вставки, объединение в Word включает в себя определения стилей, структуры разделов и системы форматирования на уровне документа — и разные методы могут давать совершенно разные результаты.
В этом руководстве мы рассмотрим пять практических способов объединения документов Word— от встроенных функций Word до VBA и Python — чтобы вы могли выбрать подход, который наилучшим образом соответствует вашим потребностям.
Быстрая навигация:
- Метод 1. Объединение документов Word с помощью функции "Текст из файла" (встроенная функция)
- Метод 2. Объединение документов Word с помощью копирования и вставки (с сохранением исходного форматирования)
- Метод 3. Объединение документов Word онлайн (MergeEasy)
- Метод 4. Объединение документов Word с помощью VBA
- Метод 5. Объединение документов Word с помощью Python (Spire.Doc)
Почему нарушается форматирование при объединении документов Word
Прежде чем изучать пять методов, полезно понять одну ключевую концепцию: Word не просто объединяет текст — он объединяет системы форматирования.
При объединении двух документов Word должен решить, как обрабатывать параметры страницы, стили, нумерацию, верхние и нижние колонтитулы и другие правила макета. В большинстве случаев основной документ контролирует конечный результат - именно поэтому форматирование может измениться после объединения.
Для упрощения форматирование в Word можно разделить на два уровня:
| Тип форматирования | Управляет | Примеры | Что происходит во время объединения |
|---|---|---|---|
| Форматирование на уровне раздела | Макет в пределах раздела | Размер страницы, поля, ориентация, столбцы, верхние/нижние колонтитулы, нумерация страниц | Word не вставляет разрыв раздела автоматически. Вставленное содержимое становится частью текущего раздела. Чтобы сохранить исходные настройки макета, необходимо вставить разрыв раздела перед объединением. |
| Форматирование на уровне документа | Общая система стилей | Стили заголовков, обычный стиль, шрифты темы, цвета темы, определения нумерации | Если стили имеют одинаковое имя (например, "Заголовок 1"), определение основного документа переопределяет стиль вставленного документа. |
Что это означает на практике
- Большинство методов слияния отдают приоритет согласованности, а не сохранению исходного внешнего вида.
- Определения стилей основного документа обычно переопределяют конфликтующие стили.
- Только ручное Копирование и вставка → Сохранить исходное форматирование пытается сохранить исходный визуальный макет.
Имея это в виду, давайте рассмотрим пять различных способов объединения документов Word и выясним, когда каждый из них имеет смысл.
Метод 1. Объединение документов Word с помощью функции "Текст из файла" (встроенная функция)
Если вам нужен быстрый, встроенный способ объединения документов непосредственно в Microsoft Word, Вставка → Текст из файла — это самый простой вариант.
Как это работает
- Откройте основной документ, поместите курсор туда, где должно появиться содержимое.
- Перейдите в Вставка → Объект → Текст из файла.
- Выберите один или несколько файлов Word.
- Нажмите Вставить.
Word вставляет выбранный документ в текущую позицию курсора. Чтобы начать с новой страницы, вставьте разрыв страницы или разрыв раздела перед объединением.
Чего ожидать
Этот метод лучше всего работает, когда все документы основаны на одном и том же шаблоне. Если стили различаются, определения основного документа будут переопределять конфликтующие стили. Например, если оба файла содержат стиль с именем "Заголовок 1", но с разными шрифтами или интервалами, версия основного документа будет иметь приоритет.
Когда использовать
Используйте этот метод, когда:
- Вы составляете отчеты по единому корпоративному шаблону.
- Все файлы имеют схожие правила форматирования.
- Вам нужно быстрое встроенное решение без автоматизации.
Это просто и надежно, но не идеально, когда требуется сохранить исходное форматирование в разных дизайнах.
Метод 2. Объединение документов Word с помощью копирования и вставки (с сохранением исходного форматирования)
Если сохранение форматирования является вашим главным приоритетом, ручное копирование и вставка остается самым точным методом.
Как это работает
- Откройте как основной документ, так и исходный документ.
- В исходном документе нажмите Ctrl + A, чтобы выделить все содержимое, затем нажмите Ctrl + C, чтобы скопировать его.
- Переключитесь на основной документ и поместите курсор туда, где должно начаться объединенное содержимое, обычно в конце документа.
- Перейдите в Макет → Разрывы → Разрывы разделов → Следующая страница, чтобы вставить разрыв раздела. (Этот шаг важен, если вы хотите сохранить поля, ориентацию или стиль шрифта исходного документа.)
- На новой странице щелкните правой кнопкой мыши и выберите Параметры вставки → Сохранить исходное форматирование.
Это гарантирует, что как форматирование на уровне раздела (структура макета), так и форматирование на уровне документа (шрифты, стили, нумерация) будут сохранены в максимально возможной степени.
Почему этот метод отличается
Когда вы выбираете "Сохранить исходное форматирование", Word при необходимости создает дополнительные внутренние определения стилей. Вместо замены стилей он сохраняет исходный внешний вид — даже если это означает дублирование имен стилей "за кулисами".
Компромисс
Хотя форматирование сохраняется, внутренняя структура стилей документа может стать сложной. Для небольших проектов это не проблема. Для большой технической документации это может усложнить долгосрочное обслуживание.
Когда использовать
- Юридические контракты
- Научные статьи от разных авторов
- Документы, чувствительные к дизайну
- Небольшие задачи по объединению
Если визуальная точность важнее структурной согласованности, это самый безопасный выбор.
Метод 3. Объединение документов Word онлайн (MergeEasy)
Если вы предпочитаете не использовать Word напрямую, онлайн-инструменты для объединения предоставляют удобную альтернативу. Инструменты, такие как MergeEasy, позволяют загружать несколько файлов Word, изменять их порядок и загружать объединенный документ — все это в вашем браузере.
Как это работает
- Откройте браузер и перейдите к онлайн-инструменту для объединения документов Word.
- Загрузите файлы Word, которые вы хотите объединить.
- Расположите документы в нужном порядке.
- (Необязательно) Включите опцию "Добавлять разрывы страниц между документами", если вы хотите, чтобы каждый файл начинался с новой страницы.
- Нажмите Объединить документ Word и загрузите объединенный документ.
Чего ожидать
Онлайн-инструменты стремятся достаточно хорошо сохранять макет, но:
- Конфликты стилей обрабатываются автоматически.
- У вас ограниченный контроль над логикой форматирования.
- Конфиденциальные документы могут вызывать опасения по поводу конфиденциальности.
Когда использовать
- Быстрые задачи по объединению
- Пользователи без установленного Microsoft Word
- Неконфиденциальные файлы
- Эпизодическое объединение документов
Онлайн-инструменты отдают приоритет удобству, а не глубокому контролю над форматированием.
Метод 4. Объединение документов Word с помощью VBA
Для пользователей, активно работающих в Microsoft Word, VBA предоставляет автоматизацию без внешнего программного обеспечения.
Вместо того, чтобы вручную вставлять файлы один за другим, вы можете написать макрос для автоматического объединения документов. Макрос вставляет каждый выбранный документ в конец основного файла и разделяет их с помощью разрыва раздела (Следующая страница).
Как это работает
- Откройте основной документ Word.
- Нажмите Alt + F11, чтобы открыть редактор VBA.
- Нажмите Вставка → Модуль, затем вставьте предоставленный макрос VBA в окно кода.
- Нажмите F5 (или нажмите Выполнить), чтобы выполнить макрос.
- Выберите документы Word для объединения, затем нажмите Открыть.
Код VBA:
Sub MergeWordDocuments()

    Dim mainDoc As Document
    Dim fileDialog As FileDialog
    Dim selectedFile As Variant
    Dim insertRange As Range

    Set mainDoc = ActiveDocument

    ' Open file picker
    Set fileDialog = Application.FileDialog(msoFileDialogFilePicker)

    With fileDialog
        .Title = "Select Word Documents to Merge"
        .Filters.Clear
        .Filters.Add "Word Files", "*.doc; *.docx"
        .AllowMultiSelect = True

        If .Show = -1 Then

            For Each selectedFile In .SelectedItems

                ' Move to end of main document
                Set insertRange = mainDoc.Range
                insertRange.Collapse Direction:=wdCollapseEnd

                ' Insert Section Break (Next Page)
                insertRange.InsertBreak Type:=wdSectionBreakNextPage
                insertRange.Collapse Direction:=wdCollapseEnd

                ' Insert document content
                insertRange.InsertFile FileName:=selectedFile

            Next selectedFile

        End If

    End With

    MsgBox "Documents merged successfully!"

End Sub
Что происходит внутри
VBA использует внутреннюю объектную модель документа (DOM) Word, он ведет себя идентично механизму Вставка → Текст из файла, что означает, что стили основного документа доминируют. Преимущество заключается в автоматизации, а не в логике форматирования.
Когда использовать
- Ежемесячная или еженедельная консолидация отчетов
- Внутренние корпоративные рабочие процессы
- Документация на основе шаблонов
- Пользователи, знакомые с макросами Word
VBA идеален, когда вам нужно повторяемое объединение в экосистеме Office.
Метод 5. Объединение документов Word с помощью Python (Spire.Doc)
Для разработчиков или серверных систем Python предоставляет масштабируемое объединение документов без зависимости от Microsoft Word. Используя Spire.Doc for Python, вы можете программно вставлять документы в основной файл.
Как это работает
- Откройте предпочитаемую вами среду разработки или редактор Python.
- Установите библиотеку из PyPI: pip install spire.doc
- Создайте новый файл Python (например, merge_word_documents.py).
- Вставьте один из следующих фрагментов кода в файл.
- Запустите скрипт.
Этот подход требует базовых знаний Python. Перед выполнением скрипта настройте пути к входным и выходным файлам в соответствии с вашей локальной средой.
Пример 1. Объединение двух документов Word
from spire.doc import *
from spire.doc.common import *

doc = Document()
doc.LoadFromFile("Main.docx")
doc.InsertTextFromFile("Source.docx", FileFormat.Docx)
doc.SaveToFile("MergedOutput.docx")
doc.Close()
Пример 2. Объединение нескольких документов в папке
import os
from spire.doc import *
from spire.doc.common import *

folder_path = "Docs/"
files = [f for f in os.listdir(folder_path) if f.endswith(".docx")]

doc = Document()
doc.LoadFromFile(os.path.join(folder_path, files[0]))

for file in files[1:]:
    doc.InsertTextFromFile(os.path.join(folder_path, file), FileFormat.Docx)

doc.SaveToFile("MergedOutput.docx")
doc.Close()
Поведение форматирования
При выполнении InsertTextFromFile вставленный документ добавляется как новый раздел в целевой файл. На практике это означает, что каждое объединение обычно вводит разрыв раздела "Следующая страница", начинает вставленное содержимое на новой странице и применяет определения стилей основного (целевого) документа. В результате конфликты форматирования разрешаются в пользу основного документа.
Этот подход помогает поддерживать структурную согласованность, но может изменить первоначальный вид объединенного содержимого, если в двух документах используются разные определения стилей.
Ниже приведен снимок экрана объединенного документа, созданного Spire.Doc:
Когда использовать
- Системы генерации документов
- SaaS-приложения
- Конвейеры обработки на стороне сервера
- Крупномасштабное пакетное объединение
Преимущества подхода с использованием Python
- Полностью автоматизированный
- Масштабируемый для пакетной обработки
- Нет зависимости от Microsoft Word
- Подходит для серверных систем
После программного объединения документов Word на Python вы можете улучшить результат, добавив номера страниц, настроив параметры страницы или экспортировав файл в формат PDF. Комбинируя эти функции, вы можете создать полностью автоматизированный рабочий процесс обработки документов Word.
Сравнительная таблица: какой метод выбрать?
| Метод | Автоматизация | Соответствие форматированию назначения | Сохранение исходного форматирования | Лучше всего подходит для |
|---|---|---|---|---|
| Текст из файла | Вручную | Да | Нет | Быстрое объединение с форматированием основного документа |
| Копирование и вставка (с сохранением исходного форматирования) | Вручную | Нет | Да | Сохранение исходных стилей и макета |
| Онлайн-инструмент (MergeEasy) | Полуавтоматический | Да | Нет | Быстрое объединение без Word с форматированием основного документа |
| Макрос VBA | Автоматизированный (в Word) | Да | Нет | Автоматизация повторяющихся объединений в среде Word |
| Python (Spire.Doc) | Полностью автоматизированный | Да | Нет | Пакетная обработка с единым форматированием |
Сводка по поведению форматирования
Соответствие форматированию назначения
Все методы объединения, кроме Копирование и вставка → Сохранить исходное форматирование, автоматически применяют определения стилей основного документа к вставленному содержимому. Это включает в себя Текст из файла, онлайн-инструменты, макросы VBA и решения на Python. В этих методах форматирование целевого документа имеет приоритет при возникновении конфликтов стилей.
Сохранение исходного форматирования
Только Копирование и вставка с использованием "Сохранить исходное форматирование" полностью сохраняет исходные стили, шрифты и макет документа. Другие методы объединения не сохраняют полностью исходное форматирование, так как конфликтующие стили переопределяются основным документом.
Заключение
Объединение документов Word — это не просто объединение содержимого, это управление логикой форматирования. Если ваша цель — визуальная точность, ручное "Сохранить исходное форматирование" остается самым безопасным выбором. Если вам нужна структурная согласованность, встроенных инструментов Word будет достаточно. А если автоматизация и масштабируемость важнее всего, решения на основе VBA или Python обеспечат долгосрочную эффективность.
Понимая, как Word обрабатывает форматирование на уровне раздела и на уровне документа, вы можете избежать неожиданных сдвигов макета и уверенно выбрать правильную стратегию объединения для вашего рабочего процесса.
Часто задаваемые вопросы
В1. Почему меняется форматирование после объединения документов Word?
Потому что Word отдает приоритет определениям стилей основного документа. Если два документа имеют одинаковые имена стилей (например, "Заголовок 1"), версия основного документа переопределяет вставленную.
В2. Как сохранить поля и ориентацию страницы при объединении?
Вы должны вставить разрыв раздела (Следующая страница) перед добавлением нового документа. Без разрыва раздела вставленное содержимое становится частью текущего раздела и наследует его настройки макета.
В3. Всегда ли "Сохранить исходное форматирование" сохраняет все?
В большинстве случаев он сохраняет визуальный вид. Однако Word может создавать дублирующиеся внутренние определения стилей, что может усложнить структуру документа.
В4. Могу ли я объединять документы Word без установленного Microsoft Word?
Да. Вы можете использовать онлайн-инструменты или программные решения, такие как библиотеки Python (например, Spire.Doc), для объединения документов без зависимости от Word.
В5. Какой метод лучше всего подходит для крупномасштабного автоматического объединения?
Решения на основе Python являются наиболее масштабируемыми. Они позволяют выполнять пакетную обработку, интеграцию с серверной частью и автоматизацию без ручного вмешательства.
Вам также может быть интересно
Como fazer tachado no Excel: métodos para Windows e Mac
Índice
Gerenciar dados de forma eficaz geralmente requer dicas visuais para sinalizar a conclusão ou atualizações. Esteja você gerenciando uma lista de tarefas diárias, rastreando o estoque ou auditando registros financeiros, aprender como tachar no Excel é uma habilidade essencial para se manter organizado. O Excel não possui um botão de tachado na faixa de opções Página Inicial padrão, o que pode ser frustrante para novos usuários. No entanto, usando uma tecla de atalho específica do Excel para tachado ou acessando o menu de formatação, você pode riscar informações rapidamente sem excluir os dados subjacentes.
- Tachar Texto em Células do Excel com Métodos Básicos
- Adicionando o Tachado à sua Barra de Ferramentas de Acesso Rápido
- Tachado Usando Formatação Condicional
- Tachado Programático com Free Spire.XLS
- Perguntas Frequentes
Como Tachar Texto em Células do Excel (Métodos Básicos)
Dominar o básico é o primeiro passo para a eficiência da planilha. A maioria dos usuários procura como tachar texto em uma célula do Excel porque precisa de uma maneira de marcar itens como "concluído" ou "obsoleto", mantendo o registro visível para referência futura.
Existem duas maneiras principais de conseguir isso manualmente: usando comandos rápidos do teclado ou navegando pela ferramenta de formatação padrão. Ambos os métodos são eficazes para formatar uma célula inteira ou apenas uma sequência específica de texto dentro de uma célula.
O Atalho Definitivo para Tachar no Excel
A eficiência é fundamental ao lidar com grandes conjuntos de dados. Se você precisa frequentemente tachar no Excel, memorizar o atalho do teclado economizará horas de cliques em menus ao longo do tempo.
- Para Usuários do Windows: O atalho padrão para tachado no Excel é Ctrl + 5. Basta selecionar sua célula (ou destacar o texto dentro da barra de fórmulas) e pressionar essas teclas simultaneamente.
- Para Usuários de Mac: O atalho mais direto para tachado no Excel no Mac é Command + Shift + X. Se você preferir uma abordagem mais visual, pode pressionar Command + 1 para abrir a caixa de diálogo Formatar Células, navegar até a guia Fonte e marcar manualmente a caixa "Tachado".
Nota: Estes atalhos são alternáveis. Se você pressioná-los uma segunda vez na mesma célula, o efeito de tachado será removido imediatamente.
Método Manual: Usando a Ferramenta Formatar Células
Se você não é fã de atalhos de teclado, o menu clássico Formatar Células oferece uma maneira visual de aplicar estilos. Este método é frequentemente considerado a maneira mais confiável de riscar texto no Excel porque permite visualizar as alterações da fonte antes de aplicá-las à sua planilha.
Instruções Passo a Passo:
- Clique com o botão direito na célula ou no texto específico que deseja formatar.
- Selecione Formatar Células no menu de contexto (ou pressione Ctrl + 1).
- Navegue até a guia Fonte na janela pop-up.
- Na seção Efeitos, marque a caixa rotulada Tachado.
- Clique em OK para aplicar a alteração.
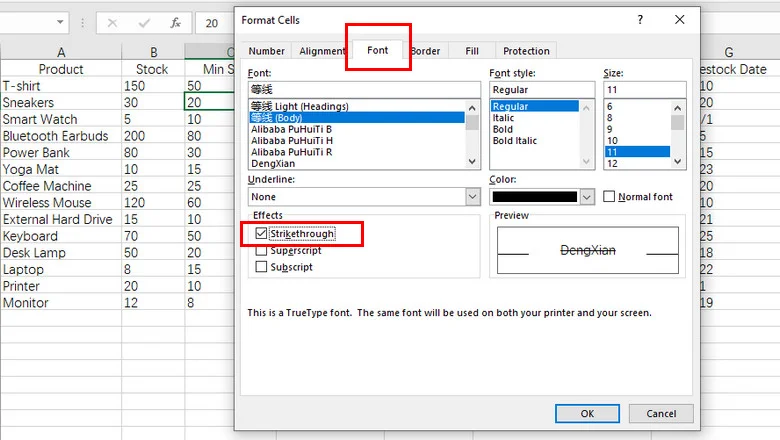
Dica: Se você deseja aprimorar ainda mais a aparência da sua célula, também pode querer aprender como girar texto no Excel para criar cabeçalhos profissionais.
Avançado: Adicionando o Tachado à sua Barra de Ferramentas de Acesso Rápido
Para aqueles que realizam esta ação dezenas de vezes por dia, até mesmo um atalho pode parecer repetitivo. Você pode realmente personalizar seu espaço de trabalho para incluir um botão dedicado para esta função, tornando mais fácil do que nunca tachar no Excel com um único clique.
Instruções Passo a Passo:
- Clique na pequena seta suspensa na Barra de Ferramentas de Acesso Rápido (localizada na parte superior da sua janela do Excel).
- Selecione Mais Comandos na lista.
- Em "Escolher comandos de," selecione Todos os Comandos.
- Role para baixo para encontrar Tachado e clique no botão Adicionar >> para movê-lo para sua barra de ferramentas.
- Clique em OK para salvar suas alterações.
Adicionar esses botões usados com frequência à sua faixa de opções economiza tempo. Assim como você adicionou um botão de tachado, dominar diferentes maneiras de quebrar texto ajudará a manter seus cabeçalhos e dados organizados com o mínimo de cliques.
Tachado Dinâmico: Usando Formatação Condicional
Às vezes, você quer que o Excel faça o trabalho pesado por você. Usando a formatação condicional, você pode configurar uma regra que aplica automaticamente um estilo de texto tachado em uma célula do Excel com base no valor de outra célula.
Instruções Passo a Passo:
- Destaque as células que você deseja que sejam riscadas automaticamente (por exemplo, nomes de tarefas na Coluna A).
- Vá para a guia Página Inicial e clique em Formatação Condicional > Nova Regra.
- Selecione Usar uma fórmula para determinar quais células formatar.
- Na caixa de fórmula, insira uma regra como
=$B2="Concluído"(supondo que a Coluna B contenha seu status). - Clique no botão Formatar, vá para a guia Fonte e marque a caixa Tachado.
- Clique em OK em ambas as janelas para aplicar a regra.
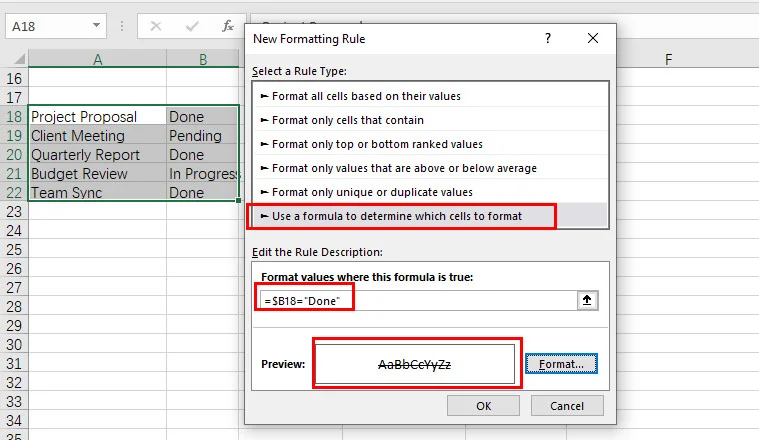
Agora, sempre que você digitar "Concluído" na Coluna B, a tarefa correspondente na Coluna A será instantaneamente tachada. Esta é a maneira mais inteligente de tachar texto em uma célula do Excel sem levantar um dedo após a conclusão da configuração.
Tachado Programático: Usando Free Spire.XLS para Python
Para desenvolvedores e analistas de dados, o clique manual não é uma opção ao lidar com milhares de relatórios gerados. Nesses casos, usar uma biblioteca robusta como o Free Spire.XLS permite automatizar como tachar no Excel por meio de código.
Usando o Free Spire.XLS, você pode definir estilos programaticamente para intervalos específicos. Isso é particularmente útil para auditoria financeira automatizada ou para gerar relatórios de antes e depois, onde as alterações precisam ser destacadas visualmente.
from spire.xls import *
from spire.xls.common import *

# Crie uma instância de Workbook e carregue um arquivo Excel
workbook = Workbook()
workbook.LoadFromFile("/input/sales report.xlsx")

# Obtenha uma planilha
sheet = workbook.Worksheets[0]

# Aplique o tachado a células específicas
sheet.Range["H3"].Style.Font.IsStrikethrough = True
sheet.Range["H10"].Style.Font.IsStrikethrough = True

# Salve o arquivo Excel modificado
workbook.SaveToFile("/output/Updated_Tasks.xlsx", ExcelVersion.Version2016)
workbook.Dispose()
A visualização do arquivo Excel de saída:
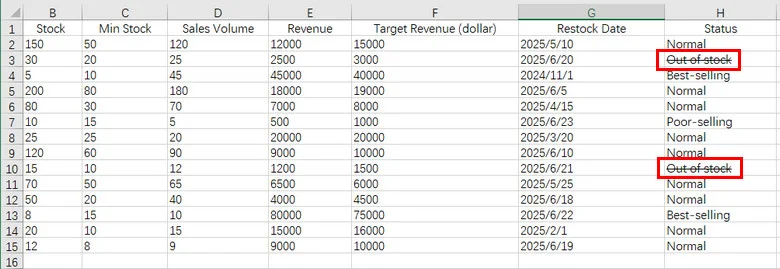
Esta abordagem permite aplicar a formatação de tachado programaticamente em grandes conjuntos de dados, garantindo consistência na documentação de nível empresarial sem erro humano.
Além disso, o Free Spire.XLS pode ser combinado perfeitamente com a lógica de formatação condicional. Por exemplo, no arquivo de inventário mostrado acima, você pode escrever um código para aplicar automaticamente um tachado a qualquer célula na Coluna H sempre que seu valor for definido como "Esgotado". Isso garante que seus dados permaneçam dinâmicos e visualmente intuitivos sem qualquer intervenção manual.
Conclusão
Dominar como tachar no Excel é uma maneira pequena, mas poderosa, de melhorar sua visualização de dados e gerenciamento de projetos. Quer você prefira a velocidade de um atalho para tachado no Excel, a precisão do menu Formatar Células ou o poder de automação do Free Spire.XLS, existe uma solução adaptada ao seu fluxo de trabalho específico. Ao incorporar essas técnicas, você pode transformar uma planilha estática em um painel funcional e de fácil leitura.
Perguntas Frequentes sobre Tachado no Excel
P1: Qual é o atalho para tachado no Excel?
R: Use Ctrl + 5 no Windows ou Command + Shift + X no Mac. É um alternador, então pressioná-lo novamente remove o efeito.
P2: Como tachar uma linha inteira no Excel?
R: Use a Formatação Condicional. Selecione seu intervalo e use uma fórmula como =$B2="Concluído". O $ garante que a linha inteira seja riscada com base no valor de uma célula.
P3: Qual é o código Alt para tachado?
R: Não há um código Alt direto, but você pode usar a sequência Alt > H > 4 no Windows para aplicá-lo através do menu da faixa de opções.
P4: Posso usar Ctrl + E para tachado?
R: Ctrl + E é para o Preenchimento Relâmpago. Para tachado, você precisa usar Ctrl + 5.