Come convertire BMP in PDF: 5 metodi per qualsiasi flusso di lavoro
Indice
- Metodo 1: Stampare BMP in PDF tramite la stampante PDF integrata di Windows
- Metodo 2: Convertire BMP in PDF utilizzando Microsoft Word
- Metodo 3: Convertire BMP in PDF tramite convertitore online
- Metodo 4: Unire più immagini BMP in un unico PDF con PDF24
- Metodo 5: Convertire BMP in PDF utilizzando Python
- Tabella comparativa: quale metodo scegliere?
- Conclusione
- Domande frequenti (FAQ) sulla conversione da BMP a PDF
BMP (Bitmap) è uno dei formati immagine più vecchi e semplici. Memorizza i dati dell'immagine senza compressioni complesse, rendendolo adatto per screenshot, documenti scansionati e flussi di lavoro di elaborazione delle immagini. Tuttavia, i file BMP sono spesso molto più grandi di altri formati immagine e non sempre sono comodi da condividere, stampare o archiviare.
Il PDF, d'altra parte, è ampiamente supportato da sistemi operativi e dispositivi. Convertire le immagini BMP in PDF può rendere i file più facili da distribuire, stampare e organizzare, specialmente quando è necessario combinare più immagini in un unico documento.
In questa guida, esploreremo cinque modi pratici per convertire BMP in PDF, che spaziano dagli strumenti integrati di Windows alle soluzioni automatizzate in Python.
Metodi trattati:
- Metodo 1: Stampare BMP in PDF tramite la stampante PDF integrata di Windows
- Metodo 2: Convertire BMP in PDF utilizzando Microsoft Word
- Metodo 3: Convertire BMP in PDF tramite convertitore online
- Metodo 4: Unire più immagini BMP in un unico PDF con PDF24
- Metodo 5: Convertire BMP in PDF utilizzando Python
Metodo 1: Stampare BMP in PDF tramite la stampante PDF integrata di Windows
Se devi convertire solo una singola immagine BMP, Windows offre già una soluzione rapida integrata. La funzione "Microsoft Print to PDF" ti consente di trasformare qualsiasi immagine in un PDF senza installare software aggiuntivo. È l'ideale per conversioni semplici e sporadiche.
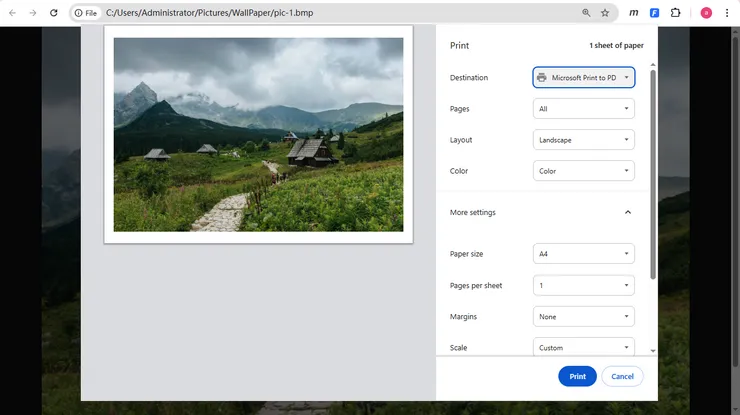
Per utilizzare questo metodo:
- Apri l'immagine BMP in Paint, Foto o qualsiasi browser moderno.
- Premi Ctrl + P o seleziona Stampa dal menu.
- Scegli Microsoft Print to PDF come stampante.
- Configura le dimensioni della pagina e l'orientamento, se necessario.
- Fai clic su Stampa e salva il file PDF risultante.
Questo approccio non richiede software aggiuntivo e funziona sulla maggior parte dei moderni sistemi Windows.
Pro
- Integrato in Windows
- Nessuna installazione richiesta
- Veloce e facile per un uso occasionale
Contro
- Non ideale per immagini multiple
- Controllo limitato sul layout del PDF
Se converti solo pochi file BMP di tanto in tanto, questa potrebbe essere la soluzione più rapida disponibile.
Metodo 2: Convertire BMP in PDF utilizzando Microsoft Word
Microsoft Word può essere utilizzato anche per convertire immagini BMP in formato PDF, offrendo al contempo un maggiore controllo sul layout. Puoi inserire una o più immagini in un documento e regolarne liberamente il posizionamento. Questo metodo è particolarmente utile quando desideri aggiungere didascalie, note o contenuti aggiuntivi accanto alle tue immagini.
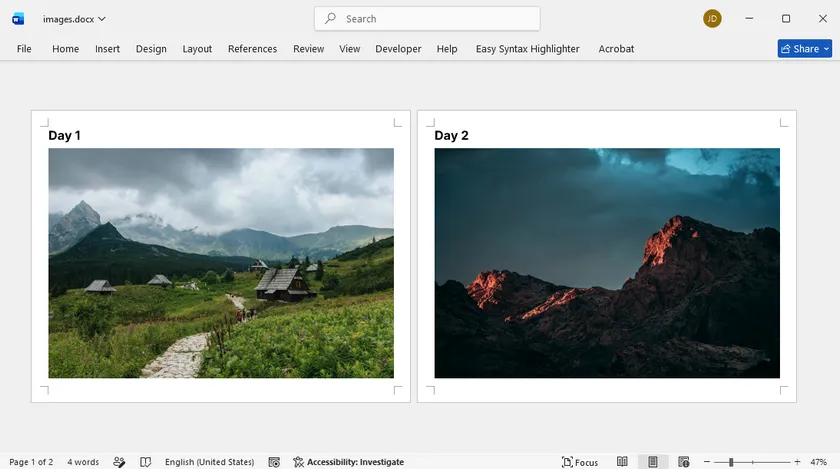
Passaggi:
- Apri un documento Word vuoto.
- Inserisci l'immagine/le immagini BMP utilizzando Inserisci > Immagini.
- Regola le dimensioni e la posizione dell'immagine come necessario.
- Seleziona File > Salva con nome.
- Scegli PDF come formato di output.
A differenza del metodo di stampa di Windows, Word ti consente di disporre più immagini su diverse pagine e di combinarle con contenuti testuali prima dell'esportazione.
Pro
- Facile organizzare le immagini
- Supporta più file BMP
- Consente una formattazione aggiuntiva del documento
Contro
- Richiede Microsoft Word
- Più passaggi rispetto alla conversione diretta
Questo metodo è una buona scelta quando l'immagine BMP fa parte di un rapporto, una presentazione o un documento più ampio.
Metodo 3: Convertire BMP in PDF tramite convertitore online
I convertitori online offrono un modo rapido e conveniente per convertire file BMP senza installare alcun software. La maggior parte degli strumenti supporta il caricamento tramite trascinamento (drag-and-drop) e può elaborare più immagini contemporaneamente. Tuttavia, sono più adatti per file non sensibili a causa di considerazioni sulla privacy.
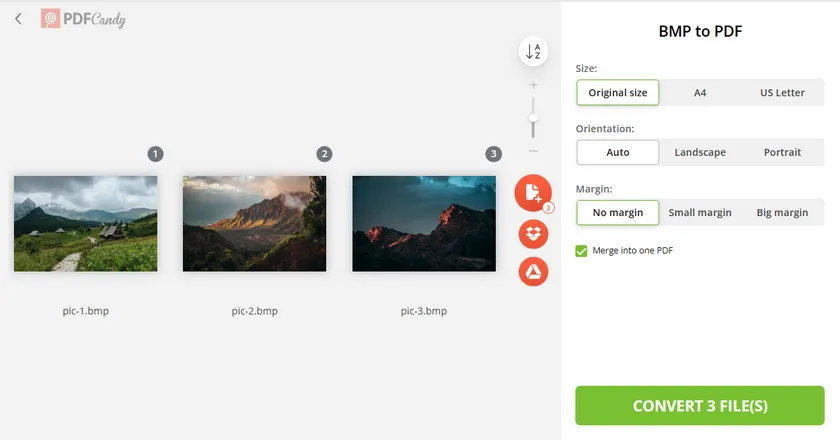
La maggior parte degli strumenti online segue lo stesso flusso di lavoro:
- Apri un sito web di conversione da BMP a PDF come PDFCandy.
- Carica uno o più file BMP.
- Configura opzioni come dimensioni, orientamento e margini.
- Seleziona l'opzione Unisci in un unico PDF se desideri combinare più file BMP in un solo PDF.
- Avvia il processo di conversione.
- Scarica il PDF generato.
Molti servizi supportano il caricamento tramite trascinamento e possono combinare automaticamente più immagini in un unico PDF.
Pro
- Funziona da qualsiasi dispositivo
- Nessuna installazione richiesta
- Esperienza utente semplice
Contro
- Richiede una connessione internet
- Il caricamento di file sensibili può sollevare problemi di privacy
- Potrebbero essere applicati limiti alle dimensioni dei file
Gli strumenti online sono più adatti per conversioni rapide che coinvolgono immagini non riservate. Per documenti aziendali o grandi lotti di file, le soluzioni offline sono spesso preferibili.
Metodo 4: Unire più immagini BMP in un unico PDF con PDF24
PDF24 Toolbox offre una semplice soluzione desktop per combinare più immagini BMP in un unico file PDF. Puoi trascinare le immagini, riordinarle e generare un unico documento di output in pochi passaggi. Questo lo rende ideale per pagine scansionate, set di foto o documenti basati su immagini.
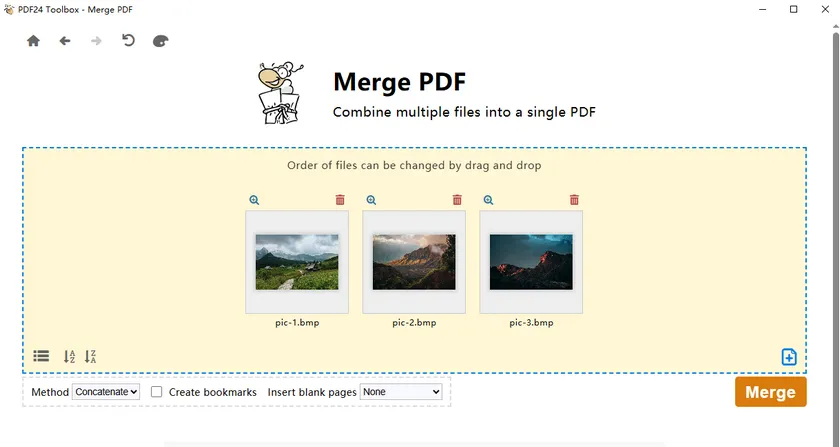
Segui questi passaggi:
- Scarica e installa PDF24 Creator. Una volta terminata l'installazione, verrà generato automaticamente un collegamento sul desktop a PDF24 Toolbox.
- Avvia PDF24 Toolbox.
- Scegli lo strumento Unisci PDF.
- Trascina i tuoi file immagine BMP nell'area di lavoro.
- Regola la sequenza delle immagini come necessario.
- Esporta e salva il file combinato in formato PDF.
Un vantaggio di questo metodo è che puoi regolare visivamente la sequenza delle immagini prima di generare il documento finale. Ciò è particolarmente utile per pagine scansionate, rapporti basati su immagini, collezioni di foto e archivi di documenti.
Pro
- Supporta l'elaborazione in batch
- Flusso di lavoro semplice tramite trascinamento
- Consente il riordino delle pagine
Contro
- Richiede l'installazione di software
- Controllo limitato sul layout del PDF
Per gli utenti che lavorano regolarmente con collezioni di immagini ma non necessitano di automazione basata sulla programmazione, PDF24 fornisce una pratica via di mezzo tra strumenti di base e codice personalizzato.
Metodo 5: Convertire BMP in PDF utilizzando Python
Per sviluppatori e team IT, l'automazione è spesso l'approccio più efficiente. Python ti consente di integrare la conversione da BMP a PDF in flussi di lavoro più ampi, attività pianificate, sistemi di gestione documentale o pipeline di elaborazione dati.
In questo esempio, utilizzeremo Spire.PDF for Python per convertire un'immagine BMP in PDF preservando le dimensioni originali dell'immagine.
Installa Spire.PDF for Python
pip install Spire.PDF
Convertire un singolo BMP in PDF
from spire.pdf.common import *
from spire.pdf import *

# Crea documento PDF
doc = PdfDocument()

# Carica immagine BMP
image = PdfImage.FromFile("sample.bmp")

# Crea pagina corrispondente alle dimensioni dell'immagine
page = doc.Pages.Add(SizeF(
    image.PhysicalDimension.Width,
    image.PhysicalDimension.Height
))

# Disegna immagine
page.Canvas.DrawImage(
    image,
    0,
    0,
    image.PhysicalDimension.Width,
    image.PhysicalDimension.Height
)

# Salva PDF
doc.SaveToFile("BMPtoPDF.pdf")
doc.Dispose()
Il codice crea una pagina PDF che corrisponde alle dimensioni dell'immagine e posiziona l'immagine BMP nell'angolo in alto a sinistra. Questo aiuta a mantenere l'aspetto originale senza ridimensionamenti o ritagli.
Logica di conversione in batch
Se devi elaborare più file BMP, puoi inserire la logica di conversione all'interno di un ciclo e scorrere tutte le immagini in una cartella.
Per esempio:
for file in bmp_files:
    image = PdfImage.FromFile(file)

    # crea pagina
    # disegna immagine
    # salva output
Questo approccio ti consente di convertire automaticamente intere directory di immagini BMP, rendendolo adatto per flussi di lavoro aziendali e attività di elaborazione documentale su larga scala.
Pro
- Completamente automatizzato
- Adatto per l'elaborazione in batch
- Facile da integrare in applicazioni e servizi
Contro
- Richiede conoscenze di Python
- La configurazione iniziale richiede più tempo rispetto agli strumenti con interfaccia grafica
Per le organizzazioni che elaborano regolarmente file immagine, l'automazione può far risparmiare molto tempo rispetto ai metodi di conversione manuale. Oltre alla semplice conversione da BMP a PDF, Spire.PDF for Python offre anche una vasta gamma di funzionalità di elaborazione PDF che possono essere integrate nello stesso flusso di lavoro.
Ad esempio, puoi aggiungere intestazioni o pagine vuote, inserire testo o filigrane immagine, applicare protezione tramite password e crittografia, o eseguire ulteriori post-elaborazioni prima di salvare il PDF finale. Queste funzionalità lo rendono adatto alla creazione di flussi di lavoro documentali personalizzati, che tu stia generando rapporti, archiviando immagini scansionate o creando PDF sicuri per uso aziendale.
Tabella comparativa: quale metodo scegliere?
Scegliere il metodo di conversione da BMP a PDF giusto dipende dalle tue esigenze specifiche, come velocità, elaborazione in batch e preferenza per strumenti online o offline. La tabella seguente riassume le differenze chiave per aiutarti a decidere rapidamente.
| Metodo | Ideale per | Pro | Contro |
|---|---|---|---|
| Stampa in PDF di Windows | Conversione BMP singola | Integrato, veloce, nessuna installazione | Non adatto per file multipli |
| Microsoft Word | Layout in stile documento | Formattazione flessibile, supporta più immagini | Richiede Word, più passaggi manuali |
| Convertitore online | Uso rapido e occasionale | Nessuna installazione, facile da usare | Problemi di privacy, limiti di dimensione file |
| PDF24 Toolbox | File BMP multipli | Elaborazione in batch, drag-and-drop, gratuito | Richiede l'installazione di software |
| Python (Spire.PDF) | Automazione e attività su larga scala | Completamente automatizzato, scalabile, personalizzabile | Richiede conoscenze di programmazione |
Conclusione
Non esiste un unico metodo migliore per convertire BMP in PDF: la scelta giusta dipende dai tuoi requisiti specifici.
- Usa Microsoft Print to PDF per conversioni rapide di singole immagini.
- Usa Microsoft Word quando le immagini devono essere combinate con contenuti testuali.
- Usa un convertitore online per conversioni occasionali senza installazione di software.
- Usa PDF24 Toolbox per combinare manualmente più immagini BMP in un unico PDF.
- Usa Python e Spire.PDF quando hai bisogno di automazione, scalabilità e integrazione con flussi di lavoro esistenti.
Che tu stia convertendo una singola immagine o migliaia di file, questi metodi offrono opzioni flessibili per trasformare le immagini BMP in documenti PDF in modo efficiente.
Domande frequenti (FAQ) sulla conversione da BMP a PDF
La conversione da BMP a PDF riduce la qualità dell'immagine?
No, la conversione da BMP a PDF non riduce necessariamente la qualità dell'immagine. La maggior parte dei metodi incorpora semplicemente l'immagine originale in un contenitore PDF senza compressione. Tuttavia, alcuni strumenti online potrebbero applicare una compressione, quindi la qualità dell'output dipende dallo strumento utilizzato.
Posso convertire più file BMP in un unico PDF?
Sì, diversi metodi supportano la combinazione di più immagini BMP in un unico PDF. Puoi utilizzare strumenti come PDF24 Toolbox, Microsoft Word o script automatizzati in Python. Questi metodi ti consentono di riordinare le immagini e generare un unico file PDF multipagina.
Esiste un modo gratuito per convertire BMP in PDF?
Sì, sono disponibili diverse opzioni gratuite. Windows include una funzione integrata "Stampa in PDF" e anche i convertitori online consentono l'uso gratuito per attività di base. Inoltre, strumenti come PDF24 Toolbox offrono una conversione gratuita basata su desktop.
Qual è il modo più semplice per convertire BMP in PDF?
Il metodo più semplice dipende dalle tue esigenze. Per una singola immagine, la funzione Stampa in PDF di Windows è la più veloce. Per più immagini, PDF24 Toolbox fornisce una semplice soluzione drag-and-drop senza richiedere competenze tecniche.
Come posso automatizzare la conversione da BMP a PDF?
Puoi automatizzare il processo utilizzando librerie Python come Spire.PDF. Scrivendo un semplice script, puoi scorrere tutti i file BMP in una cartella e generare PDF automaticamente. Questo è particolarmente utile per l'elaborazione in batch o i flussi di lavoro aziendali.
Posso convertire BMP in PDF senza installare software?
Sì, i convertitori online ti consentono di convertire file BMP direttamente nel browser senza installazione. Tuttavia, è meglio utilizzarli per file piccoli o non sensibili a causa delle limitazioni di caricamento e privacy.
Vedi anche
Comment convertir BMP en PDF : 5 méthodes pour tout flux de travail
Table des matières
- Méthode 1 : Imprimer un BMP en PDF via l'imprimante PDF intégrée de Windows
- Méthode 2 : Convertir un BMP en PDF à l'aide de Microsoft Word
- Méthode 3 : Convertir un BMP en PDF via un convertisseur en ligne
- Méthode 4 : Fusionner plusieurs images BMP en un seul PDF avec PDF24
- Méthode 5 : Convertir un BMP en PDF à l'aide de Python
- Tableau comparatif : Quelle méthode choisir ?
- Conclusion
- FAQ sur la conversion BMP en PDF
Le format BMP (Bitmap) est l'un des formats d'image les plus anciens et les plus simples. Il stocke les données d'image sans compression complexe, ce qui le rend adapté aux captures d'écran, aux documents numérisés et aux flux de traitement d'image. Cependant, les fichiers BMP sont souvent beaucoup plus volumineux que les autres formats d'image et ne sont pas toujours pratiques pour le partage, l'impression ou l'archivage.
Le PDF, quant à lui, est largement pris en charge par les systèmes d'exploitation et les appareils. Convertir des images BMP en PDF peut faciliter la distribution, l'impression et l'organisation des fichiers, surtout lorsque vous devez combiner plusieurs images en un seul document.
Dans ce guide, nous explorerons cinq méthodes pratiques pour convertir un BMP en PDF, allant des outils Windows intégrés aux solutions Python automatisées.
Méthodes couvertes :
- Méthode 1 : Imprimer un BMP en PDF via l'imprimante PDF intégrée de Windows
- Méthode 2 : Convertir un BMP en PDF à l'aide de Microsoft Word
- Méthode 3 : Convertir un BMP en PDF via un convertisseur en ligne
- Méthode 4 : Fusionner plusieurs images BMP en un seul PDF avec PDF24
- Méthode 5 : Convertir un BMP en PDF à l'aide de Python
Méthode 1 : Imprimer un BMP en PDF via l'imprimante PDF intégrée de Windows
Si vous n'avez besoin de convertir qu'une seule image BMP, Windows propose déjà une solution intégrée rapide. La fonctionnalité « Microsoft Print to PDF » vous permet de transformer n'importe quelle image en PDF sans installer de logiciel supplémentaire. C'est idéal pour des conversions simples et ponctuelles.
Pour utiliser cette méthode :
- Ouvrez l'image BMP dans Paint, Photos ou n'importe quel navigateur moderne.
- Appuyez sur Ctrl + P ou sélectionnez Imprimer dans le menu.
- Choisissez Microsoft Print to PDF comme imprimante.
- Configurez la taille et l'orientation de la page si nécessaire.
- Cliquez sur Imprimer et enregistrez le fichier PDF résultant.
Cette approche ne nécessite aucun logiciel supplémentaire et fonctionne sur la plupart des systèmes Windows modernes.
Avantages
- Intégré à Windows
- Aucune installation requise
- Rapide et facile pour une utilisation occasionnelle
Inconvénients
- Pas idéal pour plusieurs images
- Contrôle limité sur la mise en page du PDF
Si vous ne convertissez que quelques fichiers BMP de temps en temps, c'est peut-être la solution la plus rapide disponible.
Méthode 2 : Convertir un BMP en PDF à l'aide de Microsoft Word
Microsoft Word peut également être utilisé pour convertir des images BMP au format PDF tout en offrant un meilleur contrôle sur la mise en page. Vous pouvez insérer une ou plusieurs images dans un document et ajuster leur positionnement librement. Cette méthode est particulièrement utile lorsque vous souhaitez ajouter des légendes, des notes ou du contenu supplémentaire à côté de vos images.
Étapes :
- Ouvrez un document Word vierge.
- Insérez la ou les images BMP via Insertion > Images.
- Ajustez la taille et la position de l'image selon vos besoins.
- Sélectionnez Fichier > Enregistrer sous.
- Choisissez PDF comme format de sortie.
Contrairement à la méthode d'impression Windows, Word vous permet d'organiser plusieurs images sur différentes pages et de les combiner avec du contenu textuel avant l'exportation.
Avantages
- Facile d'organiser les images
- Prend en charge plusieurs fichiers BMP
- Permet une mise en forme supplémentaire du document
Inconvénients
- Nécessite Microsoft Word
- Plus d'étapes qu'une conversion directe
Cette méthode est un bon choix lorsque l'image BMP fait partie d'un rapport, d'une présentation ou d'un document plus large.
Méthode 3 : Convertir un BMP en PDF via un convertisseur en ligne
Les convertisseurs en ligne offrent un moyen rapide et pratique de convertir des fichiers BMP sans installer de logiciel. La plupart des outils prennent en charge le glisser-déposer et peuvent traiter plusieurs images à la fois. Cependant, ils sont mieux adaptés aux fichiers non sensibles en raison de considérations liées à la confidentialité.
La plupart des outils en ligne suivent le même flux de travail :
- Ouvrez un site Web de conversion BMP vers PDF comme PDFCandy.
- Téléchargez un ou plusieurs fichiers BMP.
- Configurez les options telles que la taille, l'orientation et les marges.
- Cochez l'option Fusionner en un seul PDF si vous souhaitez combiner plusieurs fichiers BMP dans un seul document.
- Lancez le processus de conversion.
- Téléchargez le PDF généré.
De nombreux services prennent en charge le glisser-déposer et peuvent combiner automatiquement plusieurs images en un seul PDF.
Avantages
- Fonctionne depuis n'importe quel appareil
- Aucune installation requise
- Expérience utilisateur simple
Inconvénients
- Nécessite une connexion Internet
- Le téléchargement de fichiers sensibles peut poser des problèmes de confidentialité
- Des limites de taille de fichier peuvent s'appliquer
Les outils en ligne sont mieux adaptés aux conversions rapides impliquant des images non confidentielles. Pour les documents professionnels ou les gros lots de fichiers, les solutions hors ligne sont souvent préférables.
Méthode 4 : Fusionner plusieurs images BMP en un seul PDF avec PDF24
PDF24 Toolbox propose une solution de bureau simple pour combiner plusieurs images BMP en un seul fichier PDF. Vous pouvez glisser-déposer des images, réorganiser leur ordre et générer un document de sortie unique en quelques étapes seulement. Cela le rend idéal pour les pages numérisées, les ensembles de photos ou les documents basés sur des images.
Suivez ces étapes :
- Téléchargez et installez PDF24 Creator. Un raccourci bureau PDF24 Toolbox sera généré automatiquement une fois l'installation terminée.
- Lancez PDF24 Toolbox.
- Choisissez l'outil Fusionner PDF.
- Glissez-déposez vos fichiers image BMP dans la zone de travail.
- Ajustez la séquence des images selon vos besoins.
- Exportez et enregistrez le fichier combiné au format PDF.
L'un des avantages de cette méthode est que vous pouvez ajuster visuellement la séquence des images avant de générer le document final. C'est particulièrement utile pour les pages numérisées, les rapports basés sur des images, les collections de photos et les archives de documents.
Avantages
- Prend en charge le traitement par lots
- Flux de travail simple par glisser-déposer
- Permet la réorganisation des pages
Inconvénients
- Nécessite l'installation d'un logiciel
- Contrôle limité sur la mise en page du PDF
Pour les utilisateurs qui travaillent régulièrement avec des collections d'images mais qui n'ont pas besoin d'automatisation basée sur la programmation, PDF24 offre un juste milieu pratique entre les outils de base et le code personnalisé.
Méthode 5 : Convertir un BMP en PDF à l'aide de Python
Pour les développeurs et les équipes informatiques, l'automatisation est souvent l'approche la plus efficace. Python vous permet d'intégrer la conversion BMP vers PDF dans des flux de travail plus larges, des tâches planifiées, des systèmes de gestion de documents ou des pipelines de traitement de données.
Dans cet exemple, nous utiliserons Spire.PDF for Python pour convertir une image BMP en PDF tout en préservant les dimensions d'origine de l'image.
Installer Spire.PDF for Python
pip install Spire.PDF
Convertir un seul BMP en PDF
from spire.pdf.common import *
from spire.pdf import *

# Créer un document PDF
doc = PdfDocument()

# Charger l'image BMP
image = PdfImage.FromFile("sample.bmp")

# Créer une page correspondant à la taille de l'image
page = doc.Pages.Add(SizeF(
    image.PhysicalDimension.Width,
    image.PhysicalDimension.Height
))

# Dessiner l'image
page.Canvas.DrawImage(
    image,
    0,
    0,
    image.PhysicalDimension.Width,
    image.PhysicalDimension.Height
)

# Enregistrer le PDF
doc.SaveToFile("BMPtoPDF.pdf")
doc.Dispose()
Le code crée une page PDF qui correspond aux dimensions de l'image et place l'image BMP dans le coin supérieur gauche. Cela permet de conserver l'apparence d'origine sans mise à l'échelle ni recadrage.
Logique de conversion par lots
Si vous devez traiter plusieurs fichiers BMP, vous pouvez placer la logique de conversion dans une boucle et parcourir toutes les images d'un dossier.
Par exemple :
for file in bmp_files:
    image = PdfImage.FromFile(file)

    # créer une page
    # dessiner l'image
    # enregistrer la sortie
Cette approche vous permet de convertir automatiquement des répertoires entiers d'images BMP, ce qui la rend adaptée aux flux de travail d'entreprise et aux tâches de traitement de documents à grande échelle.
Avantages
- Entièrement automatisé
- Adapté au traitement par lots
- Facile à intégrer dans des applications et des services
Inconvénients
- Nécessite des connaissances en Python
- La configuration initiale prend plus de temps que les outils GUI
Pour les organisations qui traitent régulièrement des fichiers image, l'automatisation peut faire gagner un temps considérable par rapport aux méthodes de conversion manuelles. Au-delà de la simple conversion BMP vers PDF, Spire.PDF for Python offre également une large gamme de fonctionnalités de traitement PDF qui peuvent être intégrées dans le même flux de travail.
Par exemple, vous pouvez ajouter des en-têtes ou des pages vierges, insérer du texte ou des filigranes d'image, appliquer une protection par mot de passe et un chiffrement, ou effectuer un post-traitement supplémentaire avant d'enregistrer le PDF final. Ces capacités le rendent bien adapté à la création de flux de travail documentaires personnalisés, que vous génériez des rapports, archiviez des images numérisées ou créiez des PDF sécurisés pour un usage professionnel.
Tableau comparatif : Quelle méthode choisir ?
Le choix de la méthode de conversion BMP vers PDF dépend de vos besoins spécifiques, tels que la vitesse, le traitement par lots et votre préférence pour les outils en ligne ou hors ligne. Le tableau ci-dessous résume les principales différences pour vous aider à décider rapidement.
| Méthode | Idéal pour | Avantages | Inconvénients |
|---|---|---|---|
| Impression PDF Windows | Conversion BMP unique | Intégré, rapide, sans installation | Ne convient pas aux fichiers multiples |
| Microsoft Word | Mises en page style document | Mise en forme flexible, prend en charge plusieurs images | Nécessite Word, plus d'étapes manuelles |
| Convertisseur en ligne | Utilisation rapide et occasionnelle | Aucune installation, facile à utiliser | Problèmes de confidentialité, limites de taille |
| PDF24 Toolbox | Plusieurs fichiers BMP | Traitement par lots, glisser-déposer, gratuit | Nécessite l'installation d'un logiciel |
| Python (Spire.PDF) | Automatisation & tâches à grande échelle | Entièrement automatisé, évolutif, personnalisable | Nécessite des connaissances en codage |
Conclusion
Il n'existe pas de méthode unique pour convertir un BMP en PDF ; le bon choix dépend de vos besoins spécifiques.
- Utilisez Microsoft Print to PDF pour des conversions rapides d'images uniques.
- Utilisez Microsoft Word lorsque les images doivent être combinées avec du contenu textuel.
- Utilisez un convertisseur en ligne pour des conversions occasionnelles sans installation de logiciel.
- Utilisez PDF24 Toolbox pour combiner manuellement plusieurs images BMP en un seul PDF.
- Utilisez Python et Spire.PDF lorsque vous avez besoin d'automatisation, d'évolutivité et d'intégration avec des flux de travail existants.
Que vous convertissiez une seule image ou des milliers de fichiers, ces méthodes offrent des options flexibles pour transformer efficacement vos images BMP en documents PDF.
FAQ sur la conversion BMP en PDF
La conversion BMP en PDF réduit-elle la qualité de l'image ?
Non, la conversion de BMP en PDF ne réduit pas nécessairement la qualité de l'image. La plupart des méthodes intègrent simplement l'image d'origine dans un conteneur PDF sans compression. Cependant, certains outils en ligne peuvent appliquer une compression, donc la qualité de sortie dépend de l'outil que vous utilisez.
Puis-je convertir plusieurs fichiers BMP en un seul PDF ?
Oui, plusieurs méthodes permettent de combiner plusieurs images BMP en un seul PDF. Vous pouvez utiliser des outils comme PDF24 Toolbox, Microsoft Word ou des scripts automatisés en Python. Ces méthodes vous permettent de réorganiser les images et de générer un seul fichier PDF multipage.
Existe-t-il un moyen gratuit de convertir un BMP en PDF ?
Oui, il existe plusieurs options gratuites. Windows inclut une fonctionnalité intégrée « Imprimer en PDF », et les convertisseurs en ligne permettent également une utilisation gratuite pour les tâches de base. De plus, des outils comme PDF24 Toolbox offrent une conversion gratuite basée sur le bureau.
Quel est le moyen le plus simple de convertir un BMP en PDF ?
La méthode la plus simple dépend de vos besoins. Pour une seule image, la fonctionnalité « Imprimer en PDF » de Windows est la plus rapide. Pour plusieurs images, PDF24 Toolbox offre une solution simple par glisser-déposer sans nécessiter de compétences techniques.
Comment puis-je automatiser la conversion BMP vers PDF ?
Vous pouvez automatiser le processus à l'aide de bibliothèques Python telles que Spire.PDF. En écrivant un script simple, vous pouvez parcourir tous les fichiers BMP d'un dossier et générer des PDF automatiquement. C'est particulièrement utile pour le traitement par lots ou les flux de travail d'entreprise.
Puis-je convertir un BMP en PDF sans installer de logiciel ?
Oui, les convertisseurs en ligne vous permettent de convertir des fichiers BMP directement dans votre navigateur sans installation. Cependant, ils sont mieux utilisés pour les fichiers petits ou non sensibles en raison des limitations de téléchargement et de confidentialité.
Voir aussi
Cómo convertir BMP a PDF: 5 métodos para cualquier flujo de trabajo
Tabla de contenidos
- Método 1: Imprimir BMP a PDF mediante la impresora PDF integrada de Windows
- Método 2: Convertir BMP a PDF usando Microsoft Word
- Método 3: Convertir BMP a PDF mediante un conversor en línea
- Método 4: Combinar múltiples imágenes BMP en un solo PDF con PDF24
- Método 5: Convertir BMP a PDF usando Python
- Tabla comparativa: ¿Qué método debería elegir?
- Conclusión
- Preguntas frecuentes sobre BMP a PDF
BMP (Bitmap) es uno de los formatos de imagen más antiguos y sencillos. Almacena datos de imagen sin una compresión compleja, lo que lo hace adecuado para capturas de pantalla, documentos escaneados y flujos de trabajo de procesamiento de imágenes. Sin embargo, los archivos BMP suelen ser mucho más grandes que otros formatos de imagen y no siempre son convenientes para compartir, imprimir o archivar.
PDF, por otro lado, es ampliamente compatible con sistemas operativos y dispositivos. Convertir imágenes BMP a PDF puede facilitar la distribución, impresión y organización de archivos, especialmente cuando necesita combinar varias imágenes en un solo documento.
En esta guía, exploraremos cinco formas prácticas de convertir BMP a PDF, desde herramientas integradas de Windows hasta soluciones automatizadas en Python.
Métodos cubiertos:
- Método 1: Imprimir BMP a PDF mediante la impresora PDF integrada de Windows
- Método 2: Convertir BMP a PDF usando Microsoft Word
- Método 3: Convertir BMP a PDF mediante un conversor en línea
- Método 4: Combinar múltiples imágenes BMP en un solo PDF con PDF24
- Método 5: Convertir BMP a PDF usando Python
Método 1: Imprimir BMP a PDF mediante la impresora PDF integrada de Windows
Si solo necesita convertir una única imagen BMP, Windows ya ofrece una solución rápida integrada. La función "Microsoft Print to PDF" le permite convertir cualquier imagen en un PDF sin instalar software adicional. Es ideal para conversiones simples y ocasionales.
Para usar este método:
- Abra la imagen BMP en Paint, Fotos o cualquier navegador moderno.
- Presione Ctrl + P o seleccione Imprimir en el menú.
- Elija Microsoft Print to PDF como impresora.
- Configure el tamaño y la orientación de la página si es necesario.
- Haga clic en Imprimir y guarde el archivo PDF resultante.
Este enfoque no requiere software adicional y funciona en la mayoría de los sistemas Windows modernos.
Ventajas
- Integrado en Windows
- No requiere instalación
- Rápido y fácil para uso ocasional
Desventajas
- No es ideal para múltiples imágenes
- Control limitado sobre el diseño del PDF
Si solo convierte algunos archivos BMP de vez en cuando, esta puede ser la solución más rápida disponible.
Método 2: Convertir BMP a PDF usando Microsoft Word
Microsoft Word también se puede utilizar para convertir imágenes BMP al formato PDF, ofreciendo un mayor control sobre el diseño. Puede insertar una o varias imágenes en un documento y ajustar su posición libremente. Este método es particularmente útil cuando desea añadir leyendas, notas o contenido adicional junto a sus imágenes.
Pasos:
- Abra un documento de Word en blanco.
- Inserte la(s) imagen(es) BMP usando Insertar > Imágenes.
- Ajuste el tamaño y la posición de la imagen según sea necesario.
- Seleccione Archivo > Guardar como.
- Elija PDF como formato de salida.
A diferencia del método de impresión de Windows, Word le permite organizar varias imágenes en diferentes páginas y combinarlas con contenido de texto antes de exportar.
Ventajas
- Fácil de organizar imágenes
- Admite múltiples archivos BMP
- Permite formateo adicional del documento
Desventajas
- Requiere Microsoft Word
- Más pasos que la conversión directa
Este método es una buena opción cuando la imagen BMP es parte de un informe, presentación o documento más grande.
Método 3: Convertir BMP a PDF mediante un conversor en línea
Los conversores en línea proporcionan una forma rápida y cómoda de convertir archivos BMP sin instalar ningún software. La mayoría de las herramientas admiten la carga mediante arrastrar y soltar y pueden procesar varias imágenes a la vez. Sin embargo, son más adecuados para archivos no confidenciales debido a consideraciones de privacidad.
La mayoría de las herramientas en línea siguen el mismo flujo de trabajo:
- Abra un sitio web de conversión de BMP a PDF como PDFCandy.
- Suba uno o más archivos BMP.
- Configure opciones como tamaño, orientación y márgenes.
- Marque la opción Combinar en un solo PDF si desea unir varios archivos BMP en un solo PDF.
- Inicie el proceso de conversión.
- Descargue el PDF generado.
Muchos servicios admiten la carga mediante arrastrar y soltar y pueden combinar automáticamente varias imágenes en un solo PDF.
Ventajas
- Funciona desde cualquier dispositivo
- No requiere instalación
- Experiencia de usuario sencilla
Desventajas
- Requiere conexión a Internet
- Subir archivos confidenciales puede plantear problemas de privacidad
- Pueden aplicarse límites de tamaño de archivo
Las herramientas en línea son más adecuadas para conversiones rápidas que involucren imágenes no confidenciales. Para documentos empresariales o grandes lotes de archivos, las soluciones sin conexión suelen ser preferibles.
Método 4: Combinar múltiples imágenes BMP en un solo PDF con PDF24
PDF24 Toolbox ofrece una solución de escritorio sencilla para combinar varias imágenes BMP en un solo archivo PDF. Puede arrastrar y soltar imágenes, reorganizar su orden y generar un documento de salida único en solo unos pocos pasos. Esto lo hace ideal para páginas escaneadas, conjuntos de fotos o documentos basados en imágenes.
Siga estos pasos:
- Descargue e instale PDF24 Creator. Se generará un acceso directo al escritorio de PDF24 Toolbox automáticamente una vez finalizada la instalación.
- Inicie PDF24 Toolbox.
- Elija la herramienta Combinar PDF.
- Arrastre y suelte sus archivos de imagen BMP en el área de trabajo.
- Ajuste la secuencia de las imágenes según sea necesario.
- Exporte y guarde el archivo combinado en formato PDF.
Una ventaja de este método es que puede ajustar visualmente la secuencia de las imágenes antes de generar el documento final. Esto es particularmente útil para páginas escaneadas, informes basados en imágenes, colecciones de fotos y archivos de documentos.
Ventajas
- Admite procesamiento por lotes
- Flujo de trabajo sencillo de arrastrar y soltar
- Permite reordenar páginas
Desventajas
- Requiere instalación de software
- Control limitado sobre el diseño del PDF
Para los usuarios que trabajan regularmente con colecciones de imágenes pero no necesitan automatización basada en programación, PDF24 proporciona un punto medio práctico entre las herramientas básicas y el código personalizado.
Método 5: Convertir BMP a PDF usando Python
Para desarrolladores y equipos de TI, la automatización suele ser el enfoque más eficiente. Python le permite integrar la conversión de BMP a PDF en flujos de trabajo más amplios, tareas programadas, sistemas de gestión de documentos o tuberías de procesamiento de datos.
En este ejemplo, usaremos Spire.PDF for Python para convertir una imagen BMP a PDF mientras se conservan las dimensiones originales de la imagen.
Instalar Spire.PDF for Python
pip install Spire.PDF
Convertir un solo BMP a PDF
from spire.pdf.common import *
from spire.pdf import *

# Crear documento PDF
doc = PdfDocument()

# Cargar imagen BMP
image = PdfImage.FromFile("sample.bmp")

# Crear página que coincida con el tamaño de la imagen
page = doc.Pages.Add(SizeF(
    image.PhysicalDimension.Width,
    image.PhysicalDimension.Height
))

# Dibujar imagen
page.Canvas.DrawImage(
    image,
    0,
    0,
    image.PhysicalDimension.Width,
    image.PhysicalDimension.Height
)

# Guardar PDF
doc.SaveToFile("BMPtoPDF.pdf")
doc.Dispose()
El código crea una página PDF que coincide con las dimensiones de la imagen y coloca la imagen BMP en la esquina superior izquierda. Esto ayuda a mantener la apariencia original sin escalar ni recortar.
Lógica de conversión por lotes
Si necesita procesar varios archivos BMP, puede colocar la lógica de conversión dentro de un bucle e iterar a través de todas las imágenes en una carpeta.
Por ejemplo:
for file in bmp_files:
    image = PdfImage.FromFile(file)

    # crear página
    # dibujar imagen
    # guardar salida
Este enfoque le permite convertir automáticamente directorios completos de imágenes BMP, lo que lo hace adecuado para flujos de trabajo empresariales y tareas de procesamiento de documentos a gran escala.
Ventajas
- Totalmente automatizado
- Adecuado para procesamiento por lotes
- Fácil de integrar en aplicaciones y servicios
Desventajas
- Requiere conocimientos de Python
- La configuración inicial lleva más tiempo que las herramientas con interfaz gráfica
Para las organizaciones que procesan archivos de imagen regularmente, la automatización puede ahorrar un tiempo significativo en comparación con los métodos de conversión manual. Más allá de la simple conversión de BMP a PDF, Spire.PDF for Python también proporciona una amplia gama de funciones de procesamiento de PDF que se pueden integrar en el mismo flujo de trabajo.
Por ejemplo, puede añadir encabezados o páginas en blanco, insertar texto o marcas de agua de imagen, aplicar protección con contraseña y cifrado, o realizar un procesamiento posterior adicional antes de guardar el PDF final. Estas capacidades lo hacen muy adecuado para construir flujos de trabajo de documentos personalizados, ya sea que esté generando informes, archivando imágenes escaneadas o creando archivos PDF seguros para uso comercial.
Tabla comparativa: ¿Qué método debería elegir?
Elegir el método de conversión de BMP a PDF adecuado depende de sus necesidades específicas, como la velocidad, el procesamiento por lotes y si prefiere herramientas en línea o sin conexión. La siguiente tabla resume las diferencias clave para ayudarle a decidir rápidamente.
| Método | Mejor para | Ventajas | Desventajas |
|---|---|---|---|
| Imprimir a PDF de Windows | Conversión de un solo BMP | Integrado, rápido, sin instalación | No apto para múltiples archivos |
| Microsoft Word | Diseños tipo documento | Formato flexible, admite múltiples imágenes | Requiere Word, más pasos manuales |
| Conversor en línea | Uso rápido y ocasional | Sin instalación, fácil de usar | Problemas de privacidad, límites de tamaño |
| PDF24 Toolbox | Múltiples archivos BMP | Procesamiento por lotes, arrastrar y soltar, gratis | Requiere instalación de software |
| Python (Spire.PDF) | Automatización y tareas a gran escala | Totalmente automatizado, escalable, personalizable | Requiere conocimientos de programación |
Conclusión
No existe una única mejor forma de convertir BMP a PDF; la elección correcta depende de sus requisitos específicos.
- Use Imprimir a PDF de Windows para conversiones rápidas de una sola imagen.
- Use Microsoft Word cuando las imágenes deban combinarse con contenido de texto.
- Use un conversor en línea para conversiones ocasionales sin instalación de software.
- Use PDF24 Toolbox al combinar manualmente varias imágenes BMP en un solo PDF.
- Use Python y Spire.PDF cuando necesite automatización, escalabilidad e integración con flujos de trabajo existentes.
Ya sea que esté convirtiendo una sola imagen o miles de archivos, estos métodos ofrecen opciones flexibles para convertir imágenes BMP en documentos PDF de manera eficiente.
Preguntas frecuentes sobre BMP a PDF
¿La conversión de BMP a PDF reduce la calidad de la imagen?
No, convertir BMP a PDF no reduce necesariamente la calidad de la imagen. La mayoría de los métodos simplemente incrustan la imagen original en un contenedor PDF sin compresión. Sin embargo, algunas herramientas en línea pueden aplicar compresión, por lo que la calidad de salida depende de la herramienta que utilice.
¿Puedo convertir varios archivos BMP en un solo PDF?
Sí, varios métodos admiten la combinación de varias imágenes BMP en un solo PDF. Puede usar herramientas como PDF24 Toolbox, Microsoft Word o scripts automatizados en Python. Estos métodos le permiten reordenar las imágenes y generar un único archivo PDF de varias páginas.
¿Existe una forma gratuita de convertir BMP a PDF?
Sí, hay varias opciones gratuitas disponibles. Windows incluye una función integrada de "Imprimir a PDF", y los conversores en línea también permiten el uso gratuito para tareas básicas. Además, herramientas como PDF24 Toolbox ofrecen conversión gratuita basada en escritorio.
¿Cuál es la forma más fácil de convertir BMP a PDF?
El método más fácil depende de sus necesidades. Para una sola imagen, la función "Imprimir a PDF" de Windows es la más rápida. Para varias imágenes, PDF24 Toolbox proporciona una solución sencilla de arrastrar y soltar sin requerir habilidades técnicas.
¿Cómo puedo automatizar la conversión de BMP a PDF?
Puede automatizar el proceso utilizando bibliotecas de Python como Spire.PDF. Al escribir un script simple, puede recorrer todos los archivos BMP en una carpeta y generar archivos PDF automáticamente. Esto es especialmente útil para el procesamiento por lotes o flujos de trabajo empresariales.
¿Puedo convertir BMP a PDF sin instalar software?
Sí, los conversores en línea le permiten convertir archivos BMP directamente en su navegador sin instalación. Sin embargo, es mejor usarlos para archivos pequeños o no confidenciales debido a las limitaciones de carga y privacidad.
Ver también
So konvertieren Sie BMP in PDF: 5 Methoden für jeden Arbeitsablauf
Inhaltsverzeichnis
- Methode 1: BMP über den Windows-eigenen PDF-Drucker als PDF drucken
- Methode 2: BMP mit Microsoft Word in PDF konvertieren
- Methode 3: BMP über einen Online-Konverter in PDF umwandeln
- Methode 4: Mehrere BMP-Bilder mit PDF24 zu einem PDF zusammenfügen
- Methode 5: BMP mit Python in PDF konvertieren
- Vergleichstabelle: Welche Methode sollten Sie wählen?
- Fazit
- Häufig gestellte Fragen (FAQs) zu BMP zu PDF
BMP (Bitmap) ist eines der ältesten und einfachsten Bildformate. Es speichert Bilddaten ohne komplexe Komprimierung, was es für Screenshots, gescannte Dokumente und Bildverarbeitungs-Workflows geeignet macht. BMP-Dateien sind jedoch oft viel größer als andere Bildformate und nicht immer praktisch für das Teilen, Drucken oder Archivieren.
PDF hingegen wird von Betriebssystemen und Geräten weitgehend unterstützt. Das Konvertieren von BMP-Bildern in PDF kann die Verteilung, den Druck und die Organisation von Dateien erleichtern, insbesondere wenn Sie mehrere Bilder zu einem einzigen Dokument zusammenfassen müssen.
In diesem Leitfaden stellen wir fünf praktische Möglichkeiten vor, BMP in PDF zu konvertieren – von integrierten Windows-Tools bis hin zu automatisierten Python-Lösungen.
Behandelte Methoden:
- Methode 1: BMP über den Windows-eigenen PDF-Drucker als PDF drucken
- Methode 2: BMP mit Microsoft Word in PDF konvertieren
- Methode 3: BMP über einen Online-Konverter in PDF umwandeln
- Methode 4: Mehrere BMP-Bilder mit PDF24 zu einem PDF zusammenfügen
- Methode 5: BMP mit Python in PDF konvertieren
Methode 1: BMP über den Windows-eigenen PDF-Drucker als PDF drucken
Wenn Sie nur ein einzelnes BMP-Bild konvertieren müssen, bietet Windows bereits eine schnelle integrierte Lösung. Mit der Funktion „Microsoft Print to PDF“ können Sie jedes Bild in ein PDF umwandeln, ohne zusätzliche Software installieren zu müssen. Dies ist ideal für einfache, einmalige Konvertierungen.
So verwenden Sie diese Methode:
- Öffnen Sie das BMP-Bild in Paint, Fotos oder einem modernen Browser.
- Drücken Sie Strg + P oder wählen Sie Drucken aus dem Menü.
- Wählen Sie Microsoft Print to PDF als Drucker aus.
- Konfigurieren Sie bei Bedarf Seitengröße und Ausrichtung.
- Klicken Sie auf Drucken und speichern Sie die resultierende PDF-Datei.
Dieser Ansatz erfordert keine zusätzliche Software und funktioniert auf den meisten modernen Windows-Systemen.
Vorteile
- In Windows integriert
- Keine Installation erforderlich
- Schnell und einfach für den gelegentlichen Gebrauch
Nachteile
- Nicht ideal für mehrere Bilder
- Eingeschränkte Kontrolle über das PDF-Layout
Wenn Sie nur gelegentlich einige BMP-Dateien konvertieren, ist dies möglicherweise die schnellste verfügbare Lösung.
Methode 2: BMP mit Microsoft Word in PDF konvertieren
Microsoft Word kann ebenfalls verwendet werden, um BMP-Bilder in das PDF-Format zu konvertieren, wobei es mehr Kontrolle über das Layout bietet. Sie können ein oder mehrere Bilder in ein Dokument einfügen und deren Position frei anpassen. Diese Methode ist besonders nützlich, wenn Sie Bildunterschriften, Notizen oder zusätzliche Inhalte neben Ihren Bildern hinzufügen möchten.
Schritte:
- Öffnen Sie ein leeres Word-Dokument.
- Fügen Sie das/die BMP-Bild(er) über Einfügen > Bilder ein.
- Passen Sie Bildgröße und Position nach Bedarf an.
- Wählen Sie Datei > Speichern unter.
- Wählen Sie PDF als Ausgabeformat.
Im Gegensatz zur Windows-Druckmethode ermöglicht Ihnen Word, mehrere Bilder über Seiten hinweg anzuordnen und sie vor dem Export mit Textinhalten zu kombinieren.
Vorteile
- Einfache Organisation von Bildern
- Unterstützt mehrere BMP-Dateien
- Ermöglicht zusätzliche Dokumentformatierung
Nachteile
- Erfordert Microsoft Word
- Mehr Schritte als bei der direkten Konvertierung
Diese Methode ist eine gute Wahl, wenn das BMP-Bild Teil eines größeren Berichts, einer Präsentation oder eines Dokuments ist.
Methode 3: BMP über einen Online-Konverter in PDF umwandeln
Online-Konverter bieten eine schnelle und bequeme Möglichkeit, BMP-Dateien zu konvertieren, ohne Software installieren zu müssen. Die meisten Tools unterstützen Drag-and-Drop-Uploads und können mehrere Bilder gleichzeitig verarbeiten. Aufgrund von Datenschutzbedenken eignen sie sich jedoch am besten für nicht sensible Dateien.
Die meisten Online-Tools folgen demselben Arbeitsablauf:
- Öffnen Sie eine BMP-zu-PDF-Konvertierungswebsite wie PDFCandy.
- Laden Sie eine oder mehrere BMP-Dateien hoch.
- Konfigurieren Sie Optionen wie Größe, Ausrichtung und Ränder.
- Aktivieren Sie die Option In ein PDF zusammenführen, wenn Sie mehrere BMP-Dateien in einem einzigen PDF kombinieren möchten.
- Starten Sie den Konvertierungsprozess.
- Laden Sie das generierte PDF herunter.
Viele Dienste unterstützen Drag-and-Drop-Uploads und können mehrere Bilder automatisch zu einem einzigen PDF zusammenfügen.
Vorteile
- Funktioniert von jedem Gerät aus
- Keine Installation erforderlich
- Einfache Benutzererfahrung
Nachteile
- Erfordert eine Internetverbindung
- Das Hochladen sensibler Dateien kann Datenschutzbedenken aufwerfen
- Dateigrößenbeschränkungen können gelten
Online-Tools eignen sich am besten für schnelle Konvertierungen von nicht vertraulichen Bildern. Für Geschäftsdokumente oder große Dateimengen sind Offline-Lösungen oft vorzuziehen.
Methode 4: Mehrere BMP-Bilder mit PDF24 zu einem PDF zusammenfügen
Die PDF24 Toolbox bietet eine einfache Desktop-Lösung zum Kombinieren mehrerer BMP-Bilder in einer PDF-Datei. Sie können Bilder per Drag-and-Drop hinzufügen, deren Reihenfolge ändern und mit nur wenigen Schritten ein einziges Ausgabedokument erstellen. Dies macht es ideal für gescannte Seiten, Fotosets oder bildbasierte Dokumente.
Folgen Sie diesen Schritten:
- Laden Sie PDF24 Creator herunter und installieren Sie es. Nach Abschluss der Installation wird automatisch eine Desktop-Verknüpfung zur PDF24 Toolbox erstellt.
- Starten Sie die PDF24 Toolbox.
- Wählen Sie das Tool PDF zusammenfügen.
- Ziehen Sie Ihre BMP-Bilddateien per Drag-and-Drop in den Arbeitsbereich.
- Passen Sie die Reihenfolge der Bilder nach Bedarf an.
- Exportieren und speichern Sie die kombinierte Datei im PDF-Format.
Ein Vorteil dieser Methode ist, dass Sie die Reihenfolge der Bilder visuell anpassen können, bevor das endgültige Dokument generiert wird. Dies ist besonders nützlich für gescannte Seiten, bildbasierte Berichte, Fotosammlungen und Dokumentenarchive.
Vorteile
- Unterstützt Stapelverarbeitung
- Einfacher Drag-and-Drop-Arbeitsablauf
- Ermöglicht das Neuanordnen von Seiten
Nachteile
- Erfordert Softwareinstallation
- Eingeschränkte Kontrolle über das PDF-Layout
Für Benutzer, die regelmäßig mit Bildersammlungen arbeiten, aber keine programmbasierte Automatisierung benötigen, bietet PDF24 einen praktischen Mittelweg zwischen einfachen Tools und benutzerdefiniertem Code.
Methode 5: BMP mit Python in PDF konvertieren
Für Entwickler und IT-Teams ist Automatisierung oft der effizienteste Ansatz. Python ermöglicht es Ihnen, die BMP-zu-PDF-Konvertierung in größere Arbeitsabläufe, geplante Aufgaben, Dokumentenmanagementsysteme oder Datenverarbeitungspipelines zu integrieren.
In diesem Beispiel verwenden wir Spire.PDF for Python, um ein BMP-Bild in ein PDF zu konvertieren, wobei die ursprünglichen Bildabmessungen beibehalten werden.
Spire.PDF for Python installieren
pip install Spire.PDF
Ein einzelnes BMP in PDF konvertieren
from spire.pdf.common import *
from spire.pdf import *

# PDF-Dokument erstellen
doc = PdfDocument()

# BMP-Bild laden
image = PdfImage.FromFile("sample.bmp")

# Seite erstellen, die der Bildgröße entspricht
page = doc.Pages.Add(SizeF(
    image.PhysicalDimension.Width,
    image.PhysicalDimension.Height
))

# Bild zeichnen
page.Canvas.DrawImage(
    image,
    0,
    0,
    image.PhysicalDimension.Width,
    image.PhysicalDimension.Height
)

# PDF speichern
doc.SaveToFile("BMPtoPDF.pdf")
doc.Dispose()
Der Code erstellt eine PDF-Seite, die den Bildabmessungen entspricht, und platziert das BMP-Bild in der oberen linken Ecke. Dies trägt dazu bei, das ursprüngliche Erscheinungsbild ohne Skalierung oder Zuschneiden beizubehalten.
Logik für Stapelverarbeitung
Wenn Sie mehrere BMP-Dateien verarbeiten müssen, können Sie die Konvertierungslogik in eine Schleife setzen und alle Bilder in einem Ordner durchlaufen.
Zum Beispiel:
for file in bmp_files:
    image = PdfImage.FromFile(file)

    # Seite erstellen
    # Bild zeichnen
    # Ausgabe speichern
Dieser Ansatz ermöglicht es Ihnen, ganze Verzeichnisse von BMP-Bildern automatisch zu konvertieren, was ihn für Unternehmens-Workflows und groß angelegte Dokumentenverarbeitungsaufgaben geeignet macht.
Vorteile
- Vollständig automatisiert
- Geeignet für Stapelverarbeitung
- Einfach in Anwendungen und Dienste zu integrieren
Nachteile
- Erfordert Python-Kenntnisse
- Die Ersteinrichtung dauert länger als bei GUI-Tools
Für Unternehmen, die regelmäßig Bilddateien verarbeiten, kann Automatisierung im Vergleich zu manuellen Konvertierungsmethoden erheblich Zeit sparen. Über die einfache BMP-zu-PDF-Konvertierung hinaus bietet Spire.PDF for Python eine breite Palette an PDF-Verarbeitungsfunktionen, die in denselben Workflow integriert werden können.
Sie können beispielsweise Kopfzeilen oder leere Seiten hinzufügen, Text oder Bildwasserzeichen einfügen, Passwortschutz und Verschlüsselung anwenden oder zusätzliche Nachbearbeitungen durchführen, bevor das endgültige PDF gespeichert wird. Diese Funktionen machen es sehr gut geeignet für den Aufbau maßgeschneiderter Dokumenten-Workflows, egal ob Sie Berichte erstellen, gescannte Bilder archivieren oder sichere PDFs für den geschäftlichen Gebrauch erstellen.
Vergleichstabelle: Welche Methode sollten Sie wählen?
Die Wahl der richtigen BMP-zu-PDF-Konvertierungsmethode hängt von Ihren spezifischen Anforderungen ab, wie Geschwindigkeit, Stapelverarbeitung und ob Sie Online- oder Offline-Tools bevorzugen. Die folgende Tabelle fasst die wichtigsten Unterschiede zusammen, um Ihnen bei der schnellen Entscheidung zu helfen.
| Methode | Am besten geeignet für | Vorteile | Nachteile |
|---|---|---|---|
| Windows Drucken in PDF | Einzelne BMP-Konvertierung | Integriert, schnell, keine Installation | Nicht für mehrere Dateien geeignet |
| Microsoft Word | Dokument-Layouts | Flexible Formatierung, unterstützt mehrere Bilder | Erfordert Word, mehr manuelle Schritte |
| Online-Konverter | Schnelle, gelegentliche Nutzung | Keine Installation, einfach zu bedienen | Datenschutzbedenken, Dateigrößenbeschränkungen |
| PDF24 Toolbox | Mehrere BMP-Dateien | Stapelverarbeitung, Drag-and-Drop, kostenlos | Erfordert Softwareinstallation |
| Python (Spire.PDF) | Automatisierung & große Aufgaben | Vollständig automatisiert, skalierbar, anpassbar | Erfordert Programmierkenntnisse |
Fazit
Es gibt nicht den einen besten Weg, BMP in PDF zu konvertieren – die richtige Wahl hängt von Ihren spezifischen Anforderungen ab.
- Verwenden Sie Microsoft Print to PDF für schnelle Konvertierungen einzelner Bilder.
- Verwenden Sie Microsoft Word, wenn Bilder mit Textinhalten kombiniert werden müssen.
- Verwenden Sie einen Online-Konverter für gelegentliche Konvertierungen ohne Softwareinstallation.
- Verwenden Sie die PDF24 Toolbox, wenn Sie mehrere BMP-Bilder manuell zu einem PDF kombinieren möchten.
- Verwenden Sie Python und Spire.PDF, wenn Sie Automatisierung, Skalierbarkeit und Integration in bestehende Workflows benötigen.
Egal, ob Sie ein einzelnes Bild oder Tausende von Dateien konvertieren, diese Methoden bieten flexible Optionen, um BMP-Bilder effizient in PDF-Dokumente umzuwandeln.
Häufig gestellte Fragen (FAQs) zu BMP zu PDF
Verringert die Konvertierung von BMP in PDF die Bildqualität?
Nein, die Konvertierung von BMP in PDF verringert nicht unbedingt die Bildqualität. Die meisten Methoden betten das Originalbild einfach ohne Komprimierung in einen PDF-Container ein. Einige Online-Tools können jedoch eine Komprimierung anwenden, daher hängt die Ausgabequalität vom verwendeten Tool ab.
Kann ich mehrere BMP-Dateien in ein PDF konvertieren?
Ja, mehrere Methoden unterstützen das Kombinieren mehrerer BMP-Bilder zu einem einzigen PDF. Sie können Tools wie die PDF24 Toolbox, Microsoft Word oder automatisierte Skripte in Python verwenden. Diese Methoden ermöglichen es Ihnen, Bilder neu anzuordnen und eine einzelne mehrseitige PDF-Datei zu generieren.
Gibt es eine kostenlose Möglichkeit, BMP in PDF zu konvertieren?
Ja, es gibt mehrere kostenlose Optionen. Windows enthält eine integrierte „Drucken in PDF“-Funktion, und Online-Konverter ermöglichen ebenfalls die kostenlose Nutzung für grundlegende Aufgaben. Darüber hinaus bieten Tools wie die PDF24 Toolbox kostenlose desktopbasierte Konvertierung.
Was ist der einfachste Weg, BMP in PDF zu konvertieren?
Die einfachste Methode hängt von Ihren Bedürfnissen ab. Für ein einzelnes Bild ist die Windows-Funktion „Drucken in PDF“ am schnellsten. Für mehrere Bilder bietet die PDF24 Toolbox eine einfache Drag-and-Drop-Lösung, ohne dass technische Kenntnisse erforderlich sind.
Wie kann ich die BMP-zu-PDF-Konvertierung automatisieren?
Sie können den Prozess mit Python-Bibliotheken wie Spire.PDF automatisieren. Durch das Schreiben eines einfachen Skripts können Sie alle BMP-Dateien in einem Ordner durchlaufen und automatisch PDFs generieren. Dies ist besonders nützlich für Stapelverarbeitung oder Unternehmens-Workflows.
Kann ich BMP in PDF konvertieren, ohne Software zu installieren?
Ja, Online-Konverter ermöglichen es Ihnen, BMP-Dateien direkt in Ihrem Browser ohne Installation zu konvertieren. Aufgrund von Upload- und Datenschutzbeschränkungen sollten sie jedoch am besten für kleine oder nicht sensible Dateien verwendet werden.
Siehe auch
Как конвертировать BMP в PDF: 5 способов для любого рабочего процесса
Оглавление
- Способ 1: Печать BMP в PDF с помощью встроенного принтера Windows
- Способ 2: Конвертация BMP в PDF с помощью Microsoft Word
- Способ 3: Конвертация BMP в PDF через онлайн-конвертер
- Способ 4: Объединение нескольких изображений BMP в один PDF с помощью PDF24
- Способ 5: Конвертация BMP в PDF с помощью Python
- Сравнительная таблица: какой метод выбрать?
- Заключение
- Часто задаваемые вопросы о конвертации BMP в PDF
BMP (Bitmap) — один из старейших и простейших форматов изображений. Он хранит данные изображения без сложного сжатия, что делает его удобным для скриншотов, сканированных документов и рабочих процессов обработки изображений. Однако файлы BMP часто занимают гораздо больше места, чем другие форматы, и не всегда удобны для обмена, печати или архивирования.
PDF, напротив, широко поддерживается различными операционными системами и устройствами. Конвертация изображений BMP в PDF упрощает распространение, печать и систематизацию файлов, особенно когда необходимо объединить несколько изображений в один документ.
В этом руководстве мы рассмотрим пять практических способов конвертации BMP в PDF: от использования встроенных инструментов Windows до автоматизированных решений на Python.
Рассматриваемые методы:
- Способ 1: Печать BMP в PDF с помощью встроенного принтера Windows
- Способ 2: Конвертация BMP в PDF с помощью Microsoft Word
- Способ 3: Конвертация BMP в PDF через онлайн-конвертер
- Способ 4: Объединение нескольких изображений BMP в один PDF с помощью PDF24
- Способ 5: Конвертация BMP в PDF с помощью Python
Способ 1: Печать BMP в PDF с помощью встроенного принтера Windows
Если вам нужно конвертировать только одно изображение BMP, в Windows уже есть быстрое встроенное решение. Функция «Microsoft Print to PDF» позволяет превратить любое изображение в PDF без установки дополнительного программного обеспечения. Это идеальный вариант для простых разовых конвертаций.
Чтобы воспользоваться этим методом:
- Откройте изображение BMP в Paint, «Фотографиях» или любом современном браузере.
- Нажмите Ctrl + P или выберите Печать в меню.
- Выберите Microsoft Print to PDF в качестве принтера.
- При необходимости настройте размер страницы и ориентацию.
- Нажмите Печать и сохраните полученный PDF-файл.
Этот подход не требует дополнительного ПО и работает в большинстве современных систем Windows.
Преимущества
- Встроено в Windows
- Не требует установки
- Быстро и удобно для редкого использования
Недостатки
- Не подходит для обработки нескольких изображений
- Ограниченный контроль над макетом PDF
Если вы конвертируете лишь несколько файлов BMP время от времени, это может быть самым быстрым доступным решением.
Способ 2: Конвертация BMP в PDF с помощью Microsoft Word
Microsoft Word также можно использовать для конвертации изображений BMP в формат PDF, при этом он предлагает больше возможностей для управления макетом. Вы можете вставить одно или несколько изображений в документ и свободно настраивать их расположение. Этот метод особенно полезен, если вы хотите добавить подписи, примечания или дополнительный контент рядом с изображениями.
Шаги:
- Откройте пустой документ Word.
- Вставьте изображение(я) BMP с помощью Вставка > Рисунки.
- Настройте размер и положение изображения по мере необходимости.
- Выберите Файл > Сохранить как.
- Выберите PDF в качестве формата вывода.
В отличие от метода печати Windows, Word позволяет размещать несколько изображений на страницах и комбинировать их с текстовым содержимым перед экспортом.
Преимущества
- Легко упорядочивать изображения
- Поддержка нескольких файлов BMP
- Возможность дополнительного форматирования документа
Недостатки
- Требуется наличие Microsoft Word
- Больше шагов, чем при прямой конвертации
Этот метод — хороший выбор, если изображение BMP является частью более крупного отчета, презентации или документа.
Способ 3: Конвертация BMP в PDF через онлайн-конвертер
Онлайн-конвертеры обеспечивают быстрый и удобный способ конвертации файлов BMP без установки какого-либо ПО. Большинство инструментов поддерживают перетаскивание (drag-and-drop) и могут обрабатывать несколько изображений одновременно. Однако из соображений конфиденциальности они лучше подходят для неконфиденциальных файлов.
Большинство онлайн-инструментов работают по одной схеме:
- Откройте сайт для конвертации BMP в PDF, например PDFCandy.
- Загрузите один или несколько файлов BMP.
- Настройте параметры, такие как размер, ориентация и поля.
- Установите флажок Объединить в один PDF, если хотите объединить несколько файлов BMP в один PDF-документ.
- Запустите процесс конвертации.
- Скачайте созданный PDF-файл.
Многие сервисы поддерживают загрузку методом перетаскивания и могут автоматически объединять несколько изображений в один PDF.
Преимущества
- Работает с любого устройства
- Не требует установки
- Простой пользовательский интерфейс
Недостатки
- Требуется подключение к интернету
- Загрузка конфиденциальных файлов может вызвать вопросы безопасности
- Могут действовать ограничения на размер файла
Онлайн-инструменты лучше всего подходят для быстрой конвертации неконфиденциальных изображений. Для деловых документов или больших пакетов файлов предпочтительнее использовать офлайн-решения.
Способ 4: Объединение нескольких изображений BMP в один PDF с помощью PDF24
PDF24 Toolbox предлагает простое настольное решение для объединения нескольких изображений BMP в один PDF-файл. Вы можете перетаскивать изображения, менять их порядок и создавать единый документ всего за несколько шагов. Это делает его идеальным для сканированных страниц, наборов фотографий или документов на основе изображений.
Следуйте этим шагам:
- Скачайте и установите PDF24 Creator. После завершения установки автоматически появится ярлык PDF24 Toolbox на рабочем столе.
- Запустите PDF24 Toolbox.
- Выберите инструмент Объединить PDF.
- Перетащите файлы изображений BMP в рабочую область.
- При необходимости настройте последовательность изображений.
- Экспортируйте и сохраните объединенный файл в формате PDF.
Одним из преимуществ этого метода является возможность визуально настроить последовательность изображений перед созданием финального документа. Это особенно полезно для сканированных страниц, отчетов, коллекций фотографий и архивов документов.
Преимущества
- Поддержка пакетной обработки
- Удобный интерфейс перетаскивания
- Возможность изменения порядка страниц
Недостатки
- Требуется установка ПО
- Ограниченный контроль над макетом PDF
Для пользователей, которые регулярно работают с коллекциями изображений, но не нуждаются в автоматизации на основе программирования, PDF24 обеспечивает практическую «золотую середину» между базовыми инструментами и написанием собственного кода.
Способ 5: Конвертация BMP в PDF с помощью Python
Для разработчиков и IT-команд автоматизация часто является наиболее эффективным подходом. Python позволяет интегрировать конвертацию BMP в PDF в более крупные рабочие процессы, запланированные задачи, системы управления документами или конвейеры обработки данных.
В этом примере мы будем использовать Spire.PDF for Python для конвертации изображения BMP в PDF с сохранением исходных размеров изображения.
Установка Spire.PDF for Python
pip install Spire.PDF
Конвертация одного BMP в PDF
from spire.pdf.common import *
from spire.pdf import *

# Создать PDF-документ
doc = PdfDocument()

# Загрузить изображение BMP
image = PdfImage.FromFile("sample.bmp")

# Создать страницу, соответствующую размеру изображения
page = doc.Pages.Add(SizeF(
    image.PhysicalDimension.Width,
    image.PhysicalDimension.Height
))

# Нарисовать изображение
page.Canvas.DrawImage(
    image,
    0,
    0,
    image.PhysicalDimension.Width,
    image.PhysicalDimension.Height
)

# Сохранить PDF
doc.SaveToFile("BMPtoPDF.pdf")
doc.Dispose()
Код создает PDF-страницу, которая соответствует размерам изображения, и размещает изображение BMP в верхнем левом углу. Это помогает сохранить исходный вид без масштабирования или обрезки.
Логика пакетной конвертации
Если вам нужно обработать несколько файлов BMP, вы можете поместить логику конвертации в цикл и перебрать все изображения в папке.
Например:
for file in bmp_files:
    image = PdfImage.FromFile(file)

    # создать страницу
    # нарисовать изображение
    # сохранить результат
Этот подход позволяет автоматически конвертировать целые каталоги изображений BMP, что делает его подходящим для корпоративных рабочих процессов и крупномасштабных задач по обработке документов.
Преимущества
- Полная автоматизация
- Подходит для пакетной обработки
- Легко интегрируется в приложения и сервисы
Недостатки
- Требуются знания Python
- Первоначальная настройка занимает больше времени, чем использование графических инструментов
Для организаций, которые регулярно обрабатывают файлы изображений, автоматизация может значительно сэкономить время по сравнению с ручными методами конвертации. Помимо простой конвертации BMP в PDF, Spire.PDF for Python также предоставляет широкий спектр функций обработки PDF, которые можно интегрировать в тот же рабочий процесс.
Например, вы можете добавлять колонтитулы или пустые страницы, вставлять текст или водяные знаки, устанавливать парольную защиту и шифрование, или выполнять дополнительную постобработку перед сохранением финального PDF. Эти возможности делают библиотеку хорошо подходящей для создания индивидуальных рабочих процессов с документами, будь то создание отчетов, архивирование сканированных изображений или создание защищенных PDF-файлов для бизнес-целей.
Сравнительная таблица: какой метод выбрать?
Выбор подходящего метода конвертации BMP в PDF зависит от ваших конкретных потребностей, таких как скорость, пакетная обработка и предпочтение онлайн- или офлайн-инструментов. В таблице ниже приведены ключевые различия, которые помогут вам быстро принять решение.
| Метод | Лучше всего подходит для | Преимущества | Недостатки |
|---|---|---|---|
| Windows Print to PDF | Конвертация одного BMP | Встроено, быстро, без установки | Не подходит для нескольких файлов |
| Microsoft Word | Макеты в стиле документа | Гибкое форматирование, поддержка нескольких изображений | Требуется Word, больше ручных действий |
| Онлайн-конвертер | Быстрое, редкое использование | Без установки, простота использования | Вопросы конфиденциальности, лимиты размера файлов |
| PDF24 Toolbox | Несколько файлов BMP | Пакетная обработка, перетаскивание, бесплатно | Требуется установка ПО |
| Python (Spire.PDF) | Автоматизация и масштабные задачи | Полная автоматизация, масштабируемость, настраиваемость | Требуются знания программирования |
Заключение
Не существует единственного «лучшего» способа конвертации BMP в PDF — правильный выбор зависит от ваших конкретных требований.
- Используйте Microsoft Print to PDF для быстрой конвертации одного изображения.
- Используйте Microsoft Word, когда изображения нужно объединить с текстовым содержимым.
- Используйте онлайн-конвертер для периодической конвертации без установки ПО.
- Используйте PDF24 Toolbox при ручном объединении нескольких изображений BMP в один PDF.
- Используйте Python и Spire.PDF, когда вам нужна автоматизация, масштабируемость и интеграция с существующими рабочими процессами.
Независимо от того, конвертируете ли вы одно изображение или тысячи файлов, эти методы предоставляют гибкие возможности для эффективного превращения изображений BMP в PDF-документы.
Часто задаваемые вопросы о конвертации BMP в PDF
Снижает ли конвертация BMP в PDF качество изображения?
Нет, конвертация BMP в PDF не обязательно снижает качество изображения. Большинство методов просто встраивают исходное изображение в PDF-контейнер без сжатия. Однако некоторые онлайн-инструменты могут применять сжатие, поэтому качество вывода зависит от используемого вами инструмента.
Можно ли конвертировать несколько файлов BMP в один PDF?
Да, несколько методов поддерживают объединение нескольких изображений BMP в один PDF. Вы можете использовать такие инструменты, как PDF24 Toolbox, Microsoft Word или автоматизированные скрипты на Python. Эти методы позволяют изменять порядок изображений и создавать единый многостраничный PDF-файл.
Существует ли бесплатный способ конвертации BMP в PDF?
Да, доступно множество бесплатных вариантов. Windows включает встроенную функцию «Печать в PDF», а онлайн-конвертеры также позволяют бесплатно выполнять базовые задачи. Кроме того, такие инструменты, как PDF24 Toolbox, предлагают бесплатную конвертацию на рабочем столе.
Какой самый простой способ конвертации BMP в PDF?
Самый простой метод зависит от ваших потребностей. Для одного изображения быстрее всего использовать функцию «Печать в PDF» в Windows. Для нескольких изображений PDF24 Toolbox предоставляет простое решение с перетаскиванием, не требующее технических навыков.
Как автоматизировать конвертацию BMP в PDF?
Вы можете автоматизировать процесс с помощью библиотек Python, таких как Spire.PDF. Написав простой скрипт, вы можете перебирать все файлы BMP в папке и автоматически создавать PDF-файлы. Это особенно полезно для пакетной обработки или корпоративных рабочих процессов.
Можно ли конвертировать BMP в PDF без установки ПО?
Да, онлайн-конвертеры позволяют конвертировать файлы BMP прямо в браузере без установки. Однако их лучше использовать для небольших или неконфиденциальных файлов из-за ограничений на загрузку и вопросов конфиденциальности.
Смотрите также
O guia definitivo para converter arquivos de texto para Excel (5 maneiras simples)
Índice
- Converter TXT para Excel importando dados com a guia Dados
- Abrir arquivo TXT diretamente no Excel e salvá-lo
- Converter trechos de texto selecionados com Texto para Colunas
- Converter TXT para Excel em lote com script Python
- Converter arquivos de texto para Excel rapidamente com conversor online
- Tabela comparativa dos 5 métodos
- Solução de problemas
- Perguntas frequentes
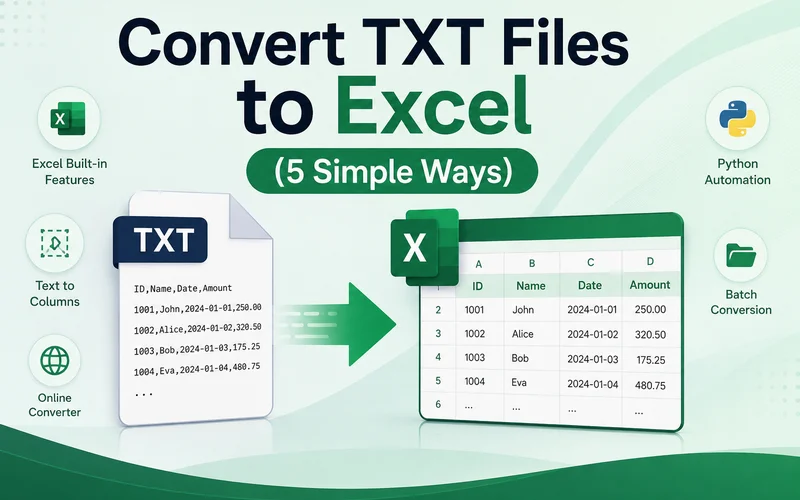
Muitos sistemas exportam relatórios, logs e registros de transações como arquivos TXT. Embora arquivos de texto sejam fáceis de armazenar e compartilhar, analisar grandes quantidades de dados em formato de texto simples pode ser frustrante. Classificar, filtrar e criar fórmulas torna-se difícil, e é por isso que muitos usuários precisam converter arquivos TXT para Excel para um gerenciamento de dados mais fácil.
Este guia aborda cinco maneiras práticas de converter arquivos de texto para Excel, incluindo as ferramentas de importação integradas do Microsoft Excel, soluções de automação em Python e conversores online.
- Converter TXT para Excel importando dados com a guia Dados
- Abrir arquivo TXT diretamente no Excel e salvá-lo
- Converter trechos de texto selecionados com Texto para Colunas
- Converter TXT para Excel em lote com script Python
- Converter arquivos de texto para Excel rapidamente com conversor online
- Tabela comparativa dos 5 métodos
- Solução de problemas
- Perguntas frequentes
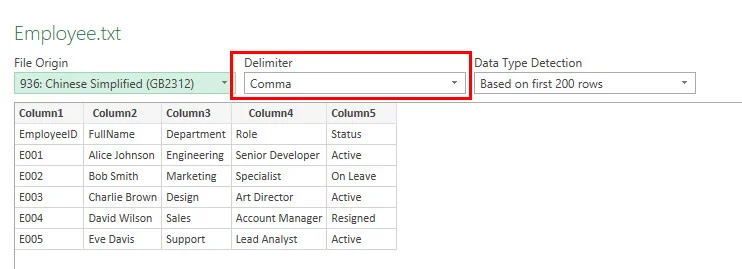
Converter TXT para Excel importando dados com a guia Dados
Vamos começar com os recursos integrados do Excel. Para tornar a migração de dados entre diferentes formatos muito mais suave, o Excel oferece ferramentas nativas para importar dados de várias fontes externas. Essa abordagem permite importar dados estruturados de um arquivo TXT preservando seu layout original. É uma maneira altamente confiável de converter um arquivo de texto para Excel.
Aqui estão os passos detalhados:
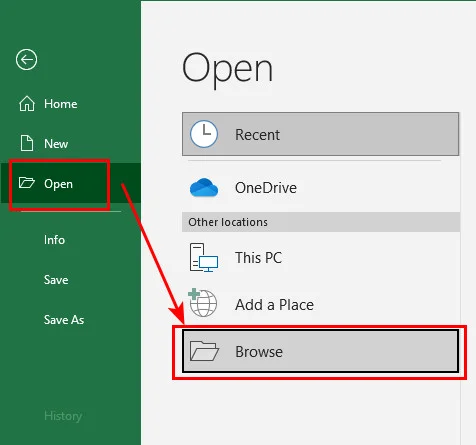
- Passo 1: Abra o Microsoft Excel e navegue até a barra de menu superior, clique na guia Dados, selecione Obter Dados > De Arquivo e, em seguida, clique em De Texto/CSV.
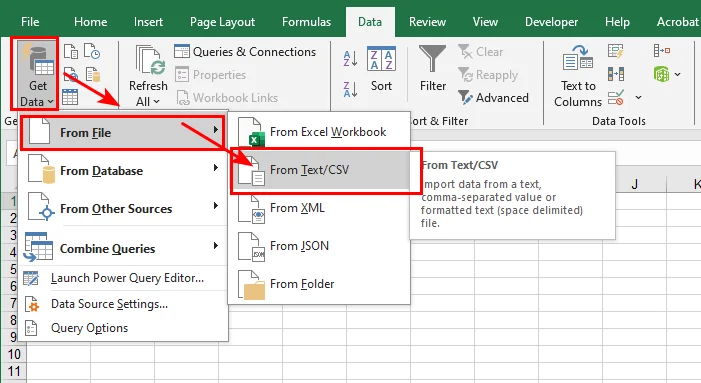
- Passo 2: Clique no menu suspenso Delimitador para verificar se seus dados são divididos corretamente usando vírgula, tabulação, espaço ou ponto e vírgula.
- Passo 3: Revise as colunas na grade de visualização, clique no botão Carregar no canto inferior direito e salve o documento.
Nota: Se o seu texto contiver caracteres não ingleses ou símbolos que pareçam distorcidos na janela de visualização, clique no menu suspenso Origem do Arquivo e altere a codificação para UTF-8 ou GBK para corrigir a exibição antes de carregar.
- Prós: Alta precisão, evita códigos confusos e lida perfeitamente com arquivos grandes.
- Contras: Requer alguns cliques a mais do que outros métodos.
Abrir arquivo TXT diretamente no Excel e salvá-lo
Se o seu conjunto de dados for simples e usar delimitadores claros, você pode abrir o documento bruto diretamente no aplicativo. Abra o arquivo de texto diretamente no Excel e deixe o assistente de importação integrado dividir automaticamente os dados em colunas. Este é o método mais rápido para abrir e converter um arquivo de texto bem formatado.
- Passo 1: Inicie o Excel, clique em Arquivo > Abrir > Procurar e altere o filtro do menu suspenso de tipo de arquivo de "Todos os Arquivos do Excel" para Todos os Arquivos (*.*).
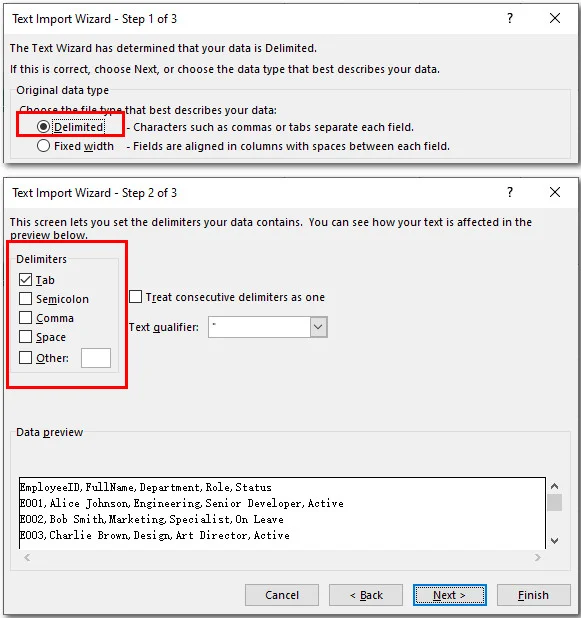
- Passo 2: Clique duas vezes no seu arquivo TXT para acionar a janela de análise de dados integrada do Excel.
- Passo 3: Selecione Delimitado, clique em avançar, marque o separador correto (como tabulação ou espaço) e clique em Concluir.
-
Passo 4: Vá para Arquivo > Salvar Como, escolha a pasta de destino e salve no formato Pasta de Trabalho do Excel (*.xlsx).
-
Prós: Rápido, não requer preparação.
-
Contras: Arriscado se o texto contiver formatação especial ou tipos de dados complexos.
Converter trechos de texto selecionados com Texto para Colunas
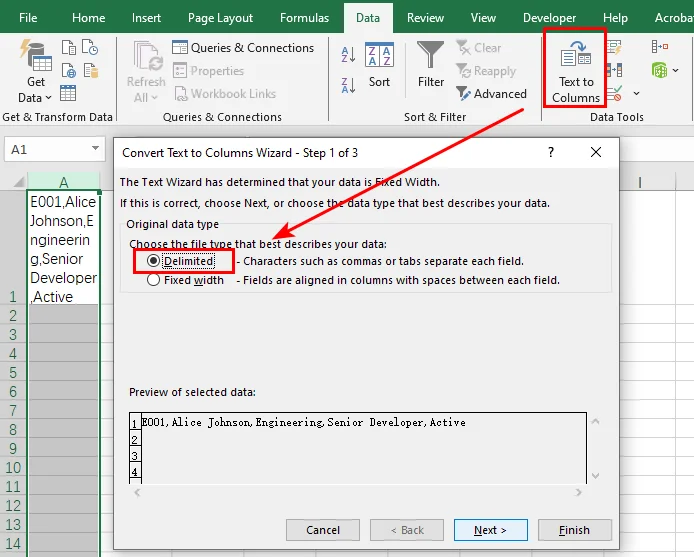
Às vezes, você não precisa transformar um relatório inteiro. Você pode precisar apenas de um pequeno trecho de dados de um e-mail ou log do sistema. Nesses cenários, um simples copiar e colar permite inserir os dados exatos que você deseja diretamente em uma única coluna. Em seguida, você pode usar o recurso Texto para Colunas para analisar rapidamente esse texto em células separadas, permitindo converter parte do arquivo TXT para Excel sem lidar com documentos completos.
- Passo 1: Copie os dados necessários em um arquivo de texto e cole-os em uma célula de uma planilha do Excel em branco.
- Passo 2: Destaque toda a coluna, vá para a guia Dados e clique em Texto para Colunas.
-
Passo 3: Escolha Delimitado na primeira tela e clique em Avançar.
-
Passo 4: Marque a caixa ao lado do seu delimitador (como vírgula ou espaço), clique em Concluir para distribuir o texto em células separadas e salve o documento.
-
Prós: Perfeito para edições rápidas e trechos de dados parciais.
-
Contras: Ineficiente para processar arquivos grandes ou vários documentos.
Converter TXT para Excel em lote com script Python
Se você lida com dezenas de relatórios diariamente, processar manualmente cada arquivo pode ser demorado. Aprender a converter arquivos TXT para Excel usando Python permite criar um pipeline de automação sem esforço manual. Para esta tarefa, usaremos o Free Spire.XLS for Python, uma biblioteca independente que permite aos desenvolvedores criar, gerenciar e converter planilhas do Excel programaticamente sem a necessidade de ter o Microsoft Excel instalado. Ao usar seus recursos avançados de pasta de trabalho, você pode analisar facilmente arquivos de texto com delimitadores personalizados e convertê-los em lotes.
Abaixo está o fluxo de trabalho para converter documentos de texto em planilhas do Excel em lote usando a biblioteca:
- Passo 1: Defina os caminhos dos arquivos e defina o delimitador de destino (como vírgula ou tabulação) para lidar com diferentes estruturas de texto.
- Passo 2: Percorra a pasta para localizar todos os arquivos
.txte gere dinamicamente os nomes de saída.xlsxcorrespondentes. - Passo 3: Inicialize o objeto
Workbooke use o métodoLoadFromFilepara analisar os dados de texto em linhas e colunas. - Passo 4: Chame
AutoFitColumns()no intervalo alocado para ajustar automaticamente as colunas ao comprimento dos dados e, em seguida, salve os documentos.
Veja como usar o Free Spire.XLS para ler e converter vários arquivos de texto com delimitadores mistos em planilhas do Excel:
import os
from spire.xls import *

# Definir caminhos de diretório de entrada e saída
input_folder = "/input/txt files/"
output_folder = "/output/excel files/"

# Percorrer e processar todos os arquivos de texto na pasta de entrada
for filename in os.listdir(input_folder):
    if filename.endswith(".txt"):
        txt_path = os.path.join(input_folder, filename)
        excel_name = filename.replace(".txt", ".xlsx")
        excel_path = os.path.join(output_folder, excel_name)

        # Ler a primeira linha
        with open(txt_path, 'r', encoding='utf-8') as f:
            first_line = f.readline()

        # Corresponder dinamicamente ao delimitador: prioridade para vírgula, depois espaço, caso contrário padrão para tabulação
        current_delimiter = "," if "," in first_line else (" " if " " in first_line else "\t")

        # Inicializar pasta de trabalho e carregar o arquivo de texto
        workbook = Workbook()
        workbook.LoadFromFile(txt_path, current_delimiter, 1, 1)

        # Ajustar automaticamente as colunas para corresponder ao comprimento dos dados
        sheet = workbook.Worksheets[0]
        sheet.AllocatedRange.AutoFitColumns()

        # Salvar o resultado como um arquivo Excel
        workbook.SaveToFile(excel_path, ExcelVersion.Version2016)
        workbook.Dispose()
        print(f"Convertido com sucesso ({'Vírgula' if current_delimiter==',' else 'Espaço'}): {filename} -> {excel_name}")
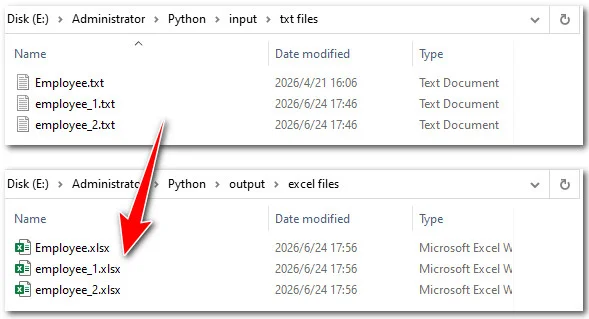
- Prós: 100% automatizado, processa centenas de arquivos instantaneamente, lida com diferentes arquivos usando delimitadores diferentes.
- Contras: Requer a configuração de um ambiente Python no seu dispositivo.
Converter arquivos de texto para Excel rapidamente com conversor online
Se você estiver trabalhando em um computador ou dispositivo móvel sem o Microsoft Excel instalado, as ferramentas online oferecem uma solução rápida. Um conversor de TXT para Excel baseado na web pode economizar tempo e esforço quando você precisa de um resultado rápido.
Veja como converter de arquivos de texto para Excel usando conversores online, usando o Convertio como exemplo:
- Passo 1: Encontre a ferramenta de TXT para XLSX do Convertio.
- Passo 2: Clique para fazer upload do arquivo TXT de destino do seu dispositivo.
- Passo 3: Clique no botão Converter, aguarde alguns segundos e, em seguida, você poderá baixar o arquivo Excel resultante.
- Prós: Não requer instalação de software, funciona em computadores e dispositivos móveis e converte arquivos rapidamente.
- Contras: Controle limitado sobre a formatação, restrições de tamanho de arquivo podem ser aplicadas e o upload de dados confidenciais para servidores de terceiros pode criar riscos de privacidade.
Tabela comparativa dos 5 métodos
Para ajudá-lo a encontrar a melhor abordagem, aqui está uma tabela comparativa rápida dos 5 métodos acima com base no tamanho dos dados, complexidade do arquivo e velocidade:
| Método | Melhor para | Limite de tamanho de dados | Velocidade |
|---|---|---|---|
| Importação da guia Dados | Layouts complexos e texto estrangeiro | Muito alto | Médio |
| Abrir diretamente | Arquivos de texto limpos e básicos | Médio | Rápido |
| Texto para Colunas | Copiar trechos de texto | Baixo | Rápido |
| Código Python | Conversão de pastas em lote | Ilimitado | Instantâneo (Automatizado) |
| Conversor Online | Uso de emergência sem Excel | Baixo | Rápido |
Solução de problemas
Ao aprender a converter um arquivo TXT para Excel, você pode encontrar pequenas falhas de formatação. Veja como corrigi-las rapidamente:
Texto distorcido ou ilegível
Se símbolos especiais ou caracteres acentuados se transformarem em formas estranhas, a codificação do seu arquivo está incompatível. Reimporte o arquivo usando o Método 1 e tente alternar o menu suspenso Origem do Arquivo para Windows-1252 (Europa Ocidental) ou UTF-8 até que o texto seja exibido corretamente na janela de visualização.
Números se transformando em notação científica
Se números de identificação longos aparecerem como 4.5E+11, o Excel os está formatando automaticamente como valores numéricos. Antes de importar, defina o tipo de coluna como Texto em vez de Geral. Se você já carregou os dados, ainda pode converter esses números de volta para o formato de texto para preservar o valor total.
Conclusão
Converter um arquivo TXT para Excel é mais fácil do que a maioria das pessoas espera. Se você só precisa trabalhar com um único arquivo, as ferramentas de importação integradas do Excel geralmente são a opção mais rápida. Para conjuntos de dados maiores, elas também oferecem melhor controle sobre delimitadores e codificação. Se o seu software de contabilidade, sistema ERP ou plataforma de relatórios exporta relatórios TXT diariamente, a automação em Python pode economizar um tempo significativo processando arquivos em lotes. Escolha o método que melhor se adapta ao seu fluxo de trabalho e você poderá transformar dados de texto brutos em pastas de trabalho organizadas do Excel em apenas alguns minutos.
Perguntas frequentes sobre a conversão de TXT para Excel
O Excel pode abrir arquivos TXT diretamente?
Sim. O Excel pode abrir arquivos TXT diretamente através de Arquivo > Abrir ou usando o recurso de importação Dados > De Texto/CSV. O método de importação é geralmente recomendado porque oferece mais controle sobre delimitadores, codificação e formatação de colunas.
Por que meu arquivo TXT parece distorcido no Excel?
Isso geralmente acontece quando a codificação do arquivo não corresponde às configurações de importação do Excel. Tente importar o arquivo novamente e selecionar uma codificação diferente, como UTF-8 ou Windows-1252, até que o texto seja exibido corretamente.
Como posso converter vários arquivos TXT para Excel de uma só vez?
Para conversão em lote, ferramentas de automação como o Free Spire.XLS for Python são frequentemente a opção mais eficiente. Um script pode processar uma pasta inteira de arquivos TXT e salvar cada um como uma pasta de trabalho do Excel automaticamente.
Posso converter TXT para Excel sem o Microsoft Excel?
Sim. Você pode usar conversores online de TXT para Excel ou soluções programáticas, como bibliotecas Python. No entanto, tenha cuidado ao fazer upload de arquivos que contenham informações confidenciais ou sigilosas.
Leia também
텍스트 파일을 엑셀로 변환하는 궁극의 가이드 (5가지 간단한 방법)
많은 시스템에서 보고서, 로그 및 트랜잭션 기록을 TXT 파일로 내보냅니다. 텍스트 파일은 저장하고 공유하기는 쉽지만, 일반 텍스트 형식으로 된 대량의 데이터를 분석하는 것은 번거로울 수 있습니다. 정렬, 필터링, 수식 작성이 어려워지기 때문에 많은 사용자가 더 쉬운 데이터 관리를 위해 TXT 파일을 Excel로 변환해야 합니다.
이 가이드에서는 Microsoft Excel의 내장 가져오기 도구, Python 자동화 솔루션 및 온라인 변환기를 포함하여 텍스트 파일을 Excel로 변환하는 5가지 실용적인 방법을 다룹니다.
- 데이터 탭을 사용하여 데이터를 가져와 TXT를 Excel로 변환하기
- TXT 파일을 Excel에서 직접 열고 저장하기
- 텍스트 나누기 기능을 사용하여 선택한 텍스트 조각 변환하기
- Python 스크립트로 TXT를 Excel로 일괄 변환하기
- 온라인 변환기로 텍스트 파일을 Excel로 빠르게 변환하기
- 5가지 방법 비교표
- 문제 해결
- 자주 묻는 질문(FAQ)
데이터 탭을 사용하여 데이터를 가져와 TXT를 Excel로 변환하기
Excel의 내장 기능부터 시작하겠습니다. 서로 다른 형식 간의 데이터 마이그레이션을 훨씬 원활하게 하기 위해 Excel은 다양한 외부 소스에서 데이터를 가져오는 기본 도구를 제공합니다. 이 방법을 사용하면 TXT 파일의 구조화된 데이터를 원래 레이아웃을 유지하면서 가져올 수 있습니다. 이는 텍스트 파일을 Excel로 변환하는 매우 신뢰할 수 있는 방법입니다.
자세한 단계는 다음과 같습니다.
- 1단계: Microsoft Excel을 열고 상단 메뉴 모음에서 데이터 탭을 클릭한 다음, 데이터 가져오기 > 파일에서를 선택하고 텍스트/CSV에서를 클릭합니다.
- 2단계: 구분 기호 드롭다운 메뉴를 클릭하여 쉼표, 탭, 공백 또는 세미콜론을 사용하여 데이터가 올바르게 분할되는지 확인합니다.
- 3단계: 미리 보기 그리드에서 열을 검토하고 오른쪽 하단의 로드 버튼을 클릭한 다음 문서를 저장합니다.
참고: 텍스트에 미리 보기 창에서 깨져 보이는 영문 이외의 문자나 기호가 포함되어 있는 경우, 파일 원본 드롭다운 메뉴를 클릭하고 인코딩을 UTF-8 또는 GBK로 변경하여 로드하기 전에 표시 문제를 해결하세요.
- 장점: 높은 정확도, 깨진 코드 방지, 대용량 파일 완벽 처리.
- 단점: 다른 방법보다 클릭 횟수가 조금 더 많음.
TXT 파일을 Excel에서 직접 열고 저장하기
데이터 세트가 간단하고 명확한 구분 기호를 사용하는 경우 원본 문서를 애플리케이션으로 바로 가져올 수 있습니다. 텍스트 파일을 Excel에서 직접 열면 내장된 가져오기 마법사가 자동으로 데이터를 열로 분할합니다. 이는 잘 형식화된 텍스트 파일을 열고 변환하는 가장 빠른 방법입니다.
- 1단계: Excel을 실행하고 파일 > 열기 > 찾아보기를 클릭한 다음, 파일 형식 드롭다운 필터를 "모든 Excel 파일"에서 모든 파일 (*.*)로 변경합니다.
- 2단계: TXT 파일을 더블 클릭하여 Excel의 내장 데이터 구문 분석 창을 실행합니다.
- 3단계: 구분 기호로 분리됨을 선택하고 다음을 클릭한 다음, 올바른 구분 기호(탭 또는 공백 등)를 체크하고 마침을 누릅니다.
-
4단계: 파일 > 다른 이름으로 저장으로 이동하여 대상 폴더를 선택하고 Excel 통합 문서 (*.xlsx) 형식으로 저장합니다.
-
장점: 빠르고 별도의 준비가 필요 없음.
-
단점: 텍스트에 특수 서식이나 복잡한 데이터 유형이 포함된 경우 위험할 수 있음.
텍스트 나누기 기능을 사용하여 선택한 텍스트 조각 변환하기
때로는 전체 보고서를 변환할 필요가 없을 수도 있습니다. 이메일이나 시스템 로그에서 데이터의 작은 조각만 필요할 수 있습니다. 이러한 경우 간단한 복사-붙여넣기를 통해 원하는 정확한 데이터를 단일 열에 삽입할 수 있습니다. 그런 다음 텍스트 나누기 기능을 사용하여 해당 텍스트를 별도의 셀로 빠르게 구문 분석하면 전체 문서를 다루지 않고도 TXT 파일의 일부를 Excel로 변환할 수 있습니다.
- 1단계: 텍스트 파일에서 필요한 데이터를 복사하여 빈 Excel 시트의 셀에 붙여넣습니다.
- 2단계: 전체 열을 강조 표시하고 데이터 탭으로 이동한 다음 텍스트 나누기를 클릭합니다.
-
3단계: 첫 번째 화면에서 구분 기호로 분리됨을 선택하고 다음을 누릅니다.
-
4단계: 구분 기호(쉼표나 공백 등) 옆의 상자를 체크하고 마침을 클릭하여 텍스트를 별도의 셀로 분배한 다음 문서를 저장합니다.
-
장점: 빠른 편집 및 부분 데이터 조각에 적합.
-
단점: 대용량 파일이나 여러 문서를 처리하는 데는 비효율적임.
Python 스크립트로 TXT를 Excel로 일괄 변환하기
매일 수십 개의 보고서를 처리해야 하는 경우 각 파일을 수동으로 처리하는 것은 시간이 많이 걸릴 수 있습니다. Python을 사용하여 TXT 파일을 Excel로 변환하는 방법을 배우면 자동화 파이프라인을 구축할 수 있습니다. 이 작업에는 Microsoft Excel을 설치할 필요 없이 프로그래밍 방식으로 Excel 스프레드시트를 생성, 관리 및 변환할 수 있는 독립형 라이브러리인 Free Spire.XLS for Python을 사용합니다. 고급 통합 문서 기능을 사용하면 사용자 지정 구분 기호가 있는 텍스트 파일을 쉽게 구문 분석하고 일괄적으로 변환할 수 있습니다.
다음은 라이브러리를 사용하여 텍스트 문서를 Excel 스프레드시트로 일괄 변환하는 워크플로입니다:
- 1단계: 파일 경로를 정의하고 대상 구분 기호(쉼표나 탭 등)를 설정하여 다양한 텍스트 구조를 처리합니다.
- 2단계: 폴더를 반복하여 모든
.txt파일을 찾고 해당.xlsx출력 이름을 동적으로 생성합니다. - 3단계:
Workbook개체를 초기화하고LoadFromFile메서드를 사용하여 텍스트 데이터를 행과 열로 구문 분석합니다. - 4단계: 할당된 범위에서
AutoFitColumns()를 호출하여 열이 데이터 길이에 맞게 자동 조정되도록 한 다음 문서를 저장합니다.
Free Spire.XLS를 사용하여 혼합 구분 기호가 있는 여러 텍스트 파일을 읽고 Excel 스프레드시트로 변환하는 방법은 다음과 같습니다:
import os
from spire.xls import *

# 입력 및 출력 디렉토리 경로 정의
input_folder = "/input/txt files/"
output_folder = "/output/excel files/"

# 입력 폴더의 모든 텍스트 파일을 반복하고 처리
for filename in os.listdir(input_folder):
    if filename.endswith(".txt"):
        txt_path = os.path.join(input_folder, filename)
        excel_name = filename.replace(".txt", ".xlsx")
        excel_path = os.path.join(output_folder, excel_name)

        # 첫 번째 줄 읽기
        with open(txt_path, 'r', encoding='utf-8') as f:
            first_line = f.readline()

        # 구분 기호 동적 일치: 쉼표 우선, 다음 공백, 그 외 탭 기본값
        current_delimiter = "," if "," in first_line else (" " if " " in first_line else "\t")

        # 통합 문서 초기화 및 텍스트 파일 로드
        workbook = Workbook()
        workbook.LoadFromFile(txt_path, current_delimiter, 1, 1)

        # 열이 데이터 길이에 맞게 자동 조정되도록 설정
        sheet = workbook.Worksheets[0]
        sheet.AllocatedRange.AutoFitColumns()

        # 결과를 Excel 파일로 저장
        workbook.SaveToFile(excel_path, ExcelVersion.Version2016)
        workbook.Dispose()
        print(f"성공적으로 변환됨 ({'쉼표' if current_delimiter==',' else '공백'}): {filename} -> {excel_name}")
- 장점: 100% 자동화, 수백 개의 파일을 즉시 처리, 서로 다른 구분 기호를 사용하는 파일 처리 가능.
- 단점: 장치에 Python 환경 설정이 필요함.
온라인 변환기로 텍스트 파일을 Excel로 빠르게 변환하기
Microsoft Excel이 설치되지 않은 컴퓨터나 모바일 장치에서 작업하는 경우 온라인 도구가 빠른 해결책을 제공합니다. 웹 기반 TXT-to-Excel 변환기는 빠른 처리가 필요할 때 시간과 노력을 절약할 수 있습니다.
다음은 Convertio를 예로 들어 온라인 변환기를 사용하여 텍스트 파일을 Excel로 변환하는 방법입니다:
- 1단계: Convertio의 TXT-to-XLSX 도구를 찾습니다.
- 2단계: 클릭하여 장치에서 대상 TXT 파일을 업로드합니다.
- 3단계: 변환 버튼을 클릭하고 몇 초 기다린 후 결과 Excel 파일을 다운로드할 수 있습니다.
- 장점: 소프트웨어 설치 불필요, 데스크톱 및 모바일 장치 모두에서 작동, 빠른 파일 변환.
- 단점: 서식 제어 제한, 파일 크기 제한이 있을 수 있음, 민감한 데이터를 타사 서버에 업로드할 경우 개인 정보 보호 위험 발생 가능.
5가지 방법 비교표
최고의 접근 방식을 찾는 데 도움이 되도록 데이터 크기, 파일 복잡성 및 속도를 기준으로 위의 5가지 방법을 비교한 표입니다:
| 방법 | 최적 대상 | 데이터 크기 제한 | 속도 |
|---|---|---|---|
| 데이터 탭 가져오기 | 복잡한 레이아웃 및 외국어 텍스트 | 매우 높음 | 보통 |
| 직접 열기 | 깔끔한 기본 텍스트 파일 | 보통 | 빠름 |
| 텍스트 나누기 | 텍스트 조각 복사 | 낮음 | 빠름 |
| Python 코드 | 폴더 일괄 변환 | 제한 없음 | 즉시 (자동화) |
| 온라인 변환기 | Excel 없는 긴급 상황 | 낮음 | 빠름 |
문제 해결
TXT 파일을 Excel로 변환하는 방법을 배울 때 사소한 서식 오류가 발생할 수 있습니다. 빠르게 해결하는 방법은 다음과 같습니다:
깨지거나 엉망인 텍스트
특수 기호나 악센트가 있는 문자가 이상한 모양으로 변하는 경우 파일 인코딩이 일치하지 않는 것입니다. 방법 1을 사용하여 파일을 다시 가져오고 파일 원본 드롭다운을 Windows-1252 (서유럽) 또는 UTF-8로 전환하여 미리 보기 창에 텍스트가 올바르게 표시될 때까지 시도하세요.
숫자가 과학적 표기법으로 변함
긴 ID 번호가 4.5E+11로 나타나는 경우 Excel이 자동으로 이를 숫자 값으로 서식 지정하고 있기 때문입니다. 가져오기 전에 열 유형을 일반 대신 텍스트로 설정하세요. 이미 데이터를 로드한 경우에도 해당 숫자를 다시 텍스트 형식으로 변환하여 전체 값을 유지할 수 있습니다.
결론
TXT 파일을 Excel로 변환하는 것은 대부분의 사람들이 예상하는 것보다 쉽습니다. 단일 파일만 작업하면 되는 경우 Excel의 내장 가져오기 도구가 일반적으로 가장 빠른 옵션입니다. 더 큰 데이터 세트의 경우 구분 기호와 인코딩을 더 잘 제어할 수 있습니다. 회계 소프트웨어, ERP 시스템 또는 보고 플랫폼에서 매일 TXT 보고서를 내보내는 경우 Python 자동화를 통해 파일을 일괄 처리하여 상당한 시간을 절약할 수 있습니다. 워크플로에 가장 적합한 방법을 선택하면 원시 텍스트 데이터를 몇 분 만에 정리된 Excel 통합 문서로 바꿀 수 있습니다.
TXT를 Excel로 변환하는 것에 대한 자주 묻는 질문(FAQ)
Excel에서 TXT 파일을 직접 열 수 있나요?
네. Excel은 파일 > 열기를 통하거나 데이터 > 텍스트/CSV에서 가져오기 기능을 사용하여 TXT 파일을 직접 열 수 있습니다. 가져오기 방법은 구분 기호, 인코딩 및 열 서식을 더 잘 제어할 수 있으므로 일반적으로 권장됩니다.
내 TXT 파일이 Excel에서 깨져 보이는 이유는 무엇인가요?
이는 일반적으로 파일 인코딩이 Excel의 가져오기 설정과 일치하지 않을 때 발생합니다. 파일을 다시 가져오고 텍스트가 올바르게 표시될 때까지 UTF-8 또는 Windows-1252와 같은 다른 인코딩을 선택해 보세요.
여러 TXT 파일을 한 번에 Excel로 변환하려면 어떻게 해야 하나요?
일괄 변환의 경우 Free Spire.XLS for Python과 같은 자동화 도구가 가장 효율적인 옵션인 경우가 많습니다. 스크립트를 사용하면 TXT 파일이 포함된 전체 폴더를 처리하고 각 파일을 Excel 통합 문서로 자동으로 저장할 수 있습니다.
Microsoft Excel 없이 TXT를 Excel로 변환할 수 있나요?
네. 온라인 TXT-to-Excel 변환기나 Python 라이브러리와 같은 프로그래밍 솔루션을 사용할 수 있습니다. 단, 민감하거나 기밀 정보가 포함된 파일을 업로드할 때는 주의하십시오.
추가 읽기
La guida definitiva per convertire file di testo in Excel (5 semplici modi)
Indice
- Convertire TXT in Excel importando i dati con la scheda Dati
- Aprire direttamente il file TXT in Excel e salvarlo
- Convertire frammenti di testo selezionati con Testo in colonne
- Convertire in blocco TXT in Excel con uno script Python
- Convertire rapidamente file di testo in Excel con un convertitore online
- Tabella comparativa dei 5 metodi
- Risoluzione dei problemi
- Domande frequenti (FAQ)
Molti sistemi esportano report, log e record di transazioni come file TXT. Sebbene i file di testo siano facili da archiviare e condividere, analizzare grandi quantità di dati in un formato di testo semplice può essere frustrante. Ordinare, filtrare e creare formule diventa difficile, motivo per cui molti utenti hanno bisogno di convertire i file TXT in Excel per una gestione dei dati più semplice.
Questa guida illustra cinque modi pratici per convertire file di testo in Excel, inclusi gli strumenti di importazione integrati di Microsoft Excel, soluzioni di automazione Python e convertitori online.
- Convertire TXT in Excel importando i dati con la scheda Dati
- Aprire direttamente il file TXT in Excel e salvarlo
- Convertire frammenti di testo selezionati con Testo in colonne
- Convertire in blocco TXT in Excel con uno script Python
- Convertire rapidamente file di testo in Excel con un convertitore online
- Tabella comparativa dei 5 metodi
- Risoluzione dei problemi
- Domande frequenti (FAQ)
Convertire TXT in Excel importando i dati con la scheda Dati
Iniziamo con le funzionalità integrate di Excel. Per rendere la migrazione dei dati tra formati diversi molto più fluida, Excel offre strumenti nativi per importare dati da varie fonti esterne. Questo approccio consente di importare dati strutturati da un file TXT preservandone il layout originale. È un modo estremamente affidabile per convertire un file di testo in Excel.
Ecco i passaggi dettagliati:
- Passaggio 1: Apri Microsoft Excel, vai sulla barra dei menu in alto, fai clic sulla scheda Dati, seleziona Recupera dati > Da file e quindi fai clic su Da testo/CSV.
- Passaggio 2: Fai clic sul menu a discesa Delimitatore per verificare se i dati vengono suddivisi correttamente utilizzando una virgola, una tabulazione, uno spazio o un punto e virgola.
- Passaggio 3: Esamina le colonne nella griglia di anteprima, fai clic sul pulsante Carica in basso a destra e salva il documento.
Nota: se il testo contiene caratteri non inglesi o simboli che appaiono confusi nella finestra di anteprima, fai clic sul menu a discesa Origine file e cambia la codifica in UTF-8 o GBK per correggere la visualizzazione prima del caricamento.
- Vantaggi: Alta precisione, previene codici errati e gestisce file di grandi dimensioni senza problemi.
- Svantaggi: Richiede qualche clic in più rispetto ad altri metodi.
Aprire direttamente il file TXT in Excel e salvarlo
Se il tuo set di dati è semplice e utilizza delimitatori chiari, puoi trascinare il documento grezzo direttamente nell'applicazione. Apri il file di testo direttamente in Excel e lascia che la procedura guidata di importazione integrata suddivida automaticamente i dati in colonne. Questo è il metodo più rapido per aprire e convertire un file di testo ben formattato.
- Passaggio 1: Avvia Excel, fai clic su File > Apri > Sfoglia e cambia il filtro del tipo di file da "Tutti i file di Excel" a Tutti i file (*.*).
- Passaggio 2: Fai doppio clic sul file TXT per attivare la finestra di analisi dati integrata di Excel.
- Passaggio 3: Seleziona Delimitato, fai clic su Avanti, controlla il separatore corretto (come tabulazione o spazio) e premi Fine.
-
Passaggio 4: Vai su File > Salva con nome, scegli la cartella di destinazione e salvalo nel formato Cartella di lavoro di Excel (*.xlsx).
-
Vantaggi: Veloce, non richiede preparazione.
-
Svantaggi: Rischioso se il testo contiene formattazioni speciali o tipi di dati complessi.
Convertire frammenti di testo selezionati con Testo in colonne
A volte non è necessario trasformare un intero report. Potresti aver bisogno solo di un piccolo frammento di dati da un'e-mail o da un log di sistema. In questi scenari, un semplice copia-incolla ti consente di inserire i dati esatti che desideri direttamente in una singola colonna. Quindi, puoi utilizzare la funzione Testo in colonne per analizzare rapidamente quel testo in celle separate, permettendoti di convertire una parte del file TXT in Excel senza dover gestire documenti completi.
- Passaggio 1: Copia i dati necessari in un file di testo e incollali in una cella di un foglio Excel vuoto.
- Passaggio 2: Evidenzia l'intera colonna, vai alla scheda Dati e fai clic su Testo in colonne.
-
Passaggio 3: Scegli Delimitato nella prima schermata e premi Avanti.
-
Passaggio 4: Seleziona la casella accanto al tuo delimitatore (come una virgola o uno spazio), fai clic su Fine per distribuire il testo in celle separate e salva il documento.
-
Vantaggi: Perfetto per modifiche rapide e frammenti di dati parziali.
-
Svantaggi: inefficiente per l'elaborazione di file di grandi dimensioni o documenti multipli.
Convertire in blocco TXT in Excel con uno script Python
Se gestisci decine di report ogni giorno, elaborare manualmente ogni file può richiedere molto tempo. Imparare a convertire file TXT in Excel usando Python ti consente di creare una pipeline di automazione "hands-free". Per questa attività, utilizzeremo Free Spire.XLS for Python, una libreria indipendente che consente agli sviluppatori di creare, gestire e convertire fogli di calcolo Excel a livello programmatico senza richiedere l'installazione di Microsoft Excel. Utilizzando le sue funzionalità avanzate per le cartelle di lavoro, puoi facilmente analizzare file di testo con delimitatori personalizzati e convertirli in blocco.
Di seguito è riportato il flusso di lavoro per la conversione in blocco di documenti di testo in fogli di calcolo Excel utilizzando la libreria:
- Passaggio 1: Definisci i percorsi dei file e imposta il delimitatore di destinazione (come una virgola o una tabulazione) per gestire diverse strutture di testo.
- Passaggio 2: Esegui un ciclo attraverso la cartella per individuare tutti i file
.txte generare dinamicamente i nomi di output.xlsxcorrispondenti. - Passaggio 3: Inizializza l'oggetto
Workbooke utilizza il metodoLoadFromFileper analizzare i dati di testo in righe e colonne. - Passaggio 4: Chiama
AutoFitColumns()sull'intervallo allocato per adattare automaticamente le colonne alla lunghezza dei dati, quindi salva i documenti.
Ecco come utilizzare Free Spire.XLS per leggere e convertire più file di testo con delimitatori misti in fogli di calcolo Excel:
import os
from spire.xls import *

# Definisci i percorsi delle directory di input e output
input_folder = "/input/txt files/"
output_folder = "/output/excel files/"

# Esegui il ciclo ed elabora tutti i file di testo nella cartella di input
for filename in os.listdir(input_folder):
    if filename.endswith(".txt"):
        txt_path = os.path.join(input_folder, filename)
        excel_name = filename.replace(".txt", ".xlsx")
        excel_path = os.path.join(output_folder, excel_name)

        # Leggi la prima riga
        with open(txt_path, 'r', encoding='utf-8') as f:
            first_line = f.readline()

        # Abbina dinamicamente il delimitatore: priorità alla virgola, poi allo spazio, altrimenti tabulazione
        current_delimiter = "," if "," in first_line else (" " if " " in first_line else "\t")

        # Inizializza la cartella di lavoro e carica il file di testo
        workbook = Workbook()
        workbook.LoadFromFile(txt_path, current_delimiter, 1, 1)

        # Adatta automaticamente le colonne alla lunghezza dei dati
        sheet = workbook.Worksheets[0]
        sheet.AllocatedRange.AutoFitColumns()

        # Salva il risultato come file Excel
        workbook.SaveToFile(excel_path, ExcelVersion.Version2016)
        workbook.Dispose()
        print(f"Convertito con successo ({'Virgola' if current_delimiter==',' else 'Spazio'}): {filename} -> {excel_name}")
- Vantaggi: Automazione al 100%, elabora centinaia di file istantaneamente, gestisce file diversi con delimitatori diversi.
- Svantaggi: Richiede la configurazione di un ambiente Python sul dispositivo.
Convertire rapidamente file di testo in Excel con un convertitore online
Se stai lavorando su un computer o un dispositivo mobile senza Microsoft Excel installato, gli strumenti online offrono una soluzione rapida. Un convertitore da TXT a Excel basato sul web può far risparmiare tempo e fatica quando hai bisogno di risultati immediati.
Ecco come convertire da file di testo a Excel utilizzando convertitori online, prendendo come esempio Convertio:
- Passaggio 1: Trova lo strumento da TXT a XLSX di Convertio.
- Passaggio 2: Fai clic per caricare il file TXT di destinazione dal tuo dispositivo.
- Passaggio 3: Fai clic sul pulsante Converti, attendi qualche secondo e quindi potrai scaricare il file Excel risultante.
- Vantaggi: Nessuna installazione di software richiesta, funziona sia su desktop che su dispositivi mobili e converte i file rapidamente.
- Svantaggi: Controllo limitato sulla formattazione, potrebbero essere applicate restrizioni sulla dimensione del file e il caricamento di dati sensibili su server di terze parti può creare rischi per la privacy.
Tabella comparativa dei 5 metodi
Per aiutarti a trovare l'approccio migliore, ecco una rapida tabella comparativa dei 5 metodi sopra indicati in base alla dimensione dei dati, alla complessità del file e alla velocità:
| Metodo | Ideale per | Limite dimensione dati | Velocità |
|---|---|---|---|
| Importazione scheda Dati | Layout complessi e testo straniero | Molto alta | Media |
| Apertura diretta | File di testo puliti e semplici | Media | Veloce |
| Testo in colonne | Copia di frammenti di testo | Bassa | Veloce |
| Codice Python | Conversione in blocco di cartelle | Illimitata | Istantanea (automatizzata) |
| Convertitore online | Uso di emergenza senza Excel | Bassa | Veloce |
Risoluzione dei problemi
Quando impari a convertire un file TXT in Excel, potresti riscontrare piccoli problemi di formattazione. Ecco come risolverli rapidamente:
Testo confuso o illeggibile
Se simboli speciali o caratteri accentati si trasformano in forme strane, la codifica del file non corrisponde. Reimporta il file utilizzando il Metodo 1 e prova a cambiare il menu a discesa Origine file in Windows-1252 (Europa occidentale) o UTF-8 finché il testo non viene visualizzato correttamente nella finestra di anteprima.
Numeri che si trasformano in notazione scientifica
Se i numeri ID lunghi appaiono come 4.5E+11, Excel li sta formattando automaticamente come valori numerici. Prima di importare, imposta il tipo di colonna su Testo invece di Generale. Se hai già caricato i dati, puoi comunque convertire quei numeri di nuovo in formato testo per preservare il valore completo.
Conclusione
Convertire un file TXT in Excel è più facile di quanto la maggior parte delle persone si aspetti. Se devi lavorare solo con un singolo file, gli strumenti di importazione integrati di Excel sono solitamente l'opzione più rapida. Per set di dati più grandi, offrono anche un controllo migliore sui delimitatori e sulla codifica. Se il tuo software di contabilità, sistema ERP o piattaforma di reportistica esporta report TXT giornalieri, l'automazione Python può far risparmiare molto tempo elaborando i file in blocco. Scegli il metodo più adatto al tuo flusso di lavoro e sarai in grado di trasformare i dati di testo grezzi in cartelle di lavoro Excel organizzate in pochi minuti.
Domande frequenti (FAQ) sulla conversione da TXT a Excel
Excel può aprire direttamente i file TXT?
Sì. Excel può aprire i file TXT direttamente tramite File > Apri o utilizzando la funzione di importazione Dati > Da testo/CSV. Il metodo di importazione è generalmente consigliato perché offre maggiore controllo su delimitatori, codifica e formattazione delle colonne.
Perché il mio file TXT appare confuso in Excel?
Questo accade solitamente quando la codifica del file non corrisponde alle impostazioni di importazione di Excel. Prova a reimportare il file e a selezionare una codifica diversa, come UTF-8 o Windows-1252, finché il testo non viene visualizzato correttamente.
Come posso convertire più file TXT in Excel contemporaneamente?
Per la conversione in blocco, gli strumenti di automazione come Free Spire.XLS for Python sono spesso l'opzione più efficiente. Uno script può elaborare un'intera cartella di file TXT e salvare ciascuno di essi come cartella di lavoro Excel automaticamente.
Posso convertire TXT in Excel senza Microsoft Excel?
Sì. Puoi utilizzare convertitori online da TXT a Excel o soluzioni programmatiche come le librerie Python. Tuttavia, fai attenzione quando carichi file che contengono informazioni sensibili o riservate.
Leggi anche
Le guide ultime pour convertir un fichier texte en Excel (5 méthodes simples)
Table des matières
- Convertir un TXT en Excel en important des données avec l'onglet Données
- Ouvrir directement un fichier TXT dans Excel et l'enregistrer
- Convertir des extraits de texte sélectionnés avec "Convertir"
- Convertir par lots des TXT en Excel avec un script Python
- Convertir rapidement des fichiers texte en Excel avec un convertisseur en ligne
- Tableau comparatif des 5 méthodes
- Dépannage
- FAQ
De nombreux systèmes exportent des rapports, des journaux et des enregistrements de transactions sous forme de fichiers TXT. Bien que les fichiers texte soient faciles à stocker et à partager, l'analyse de grandes quantités de données dans un format texte brut peut être frustrante. Le tri, le filtrage et la création de formules deviennent difficiles, c'est pourquoi de nombreux utilisateurs ont besoin de convertir des fichiers TXT en Excel pour une gestion des données plus aisée.
Ce guide couvre cinq méthodes pratiques pour convertir des fichiers texte en Excel, notamment les outils d'importation intégrés de Microsoft Excel, les solutions d'automatisation Python et les convertisseurs en ligne.
- Convertir un TXT en Excel en important des données avec l'onglet Données
- Ouvrir directement un fichier TXT dans Excel et l'enregistrer
- Convertir des extraits de texte sélectionnés avec "Convertir"
- Convertir par lots des TXT en Excel avec un script Python
- Convertir rapidement des fichiers texte en Excel avec un convertisseur en ligne
- Tableau comparatif des 5 méthodes
- Dépannage
- FAQ
Convertir un TXT en Excel en important des données avec l'onglet Données
Commençons par les fonctionnalités intégrées d'Excel. Pour rendre la migration de données entre différents formats beaucoup plus fluide, Excel propose des outils natifs permettant d'importer des données à partir de diverses sources externes. Cette approche vous permet d'importer des données structurées à partir d'un fichier TXT tout en préservant sa mise en page d'origine. C'est un moyen très fiable de convertir un fichier texte en Excel.
Voici les étapes détaillées :
- Étape 1 : Ouvrez Microsoft Excel, accédez à la barre de menu supérieure, cliquez sur l'onglet Données, sélectionnez Obtenir des données > À partir d'un fichier, puis cliquez sur À partir du texte/CSV.
- Étape 2 : Cliquez sur le menu déroulant Délimiteur pour vérifier si vos données sont correctement séparées par une virgule, une tabulation, un espace ou un point-virgule.
- Étape 3 : Vérifiez les colonnes dans la grille de prévisualisation, cliquez sur le bouton Charger en bas à droite et enregistrez le document.
Remarque : Si votre texte contient des caractères non anglais ou des symboles qui semblent brouillés dans la fenêtre de prévisualisation, cliquez sur le menu déroulant Origine du fichier et modifiez l'encodage en UTF-8 ou GBK pour corriger l'affichage avant le chargement.
- Avantages : Haute précision, évite les codes erronés et gère parfaitement les fichiers volumineux.
- Inconvénients : Nécessite quelques clics de plus que les autres méthodes.
Ouvrir directement un fichier TXT dans Excel et l'enregistrer
Si votre ensemble de données est simple et utilise des délimiteurs clairs, vous pouvez importer le document brut directement dans l'application. Ouvrez le fichier texte directement dans Excel et laissez l'assistant d'importation intégré diviser automatiquement les données en colonnes. C'est la méthode la plus rapide pour ouvrir et convertir un fichier texte bien formaté.
- Étape 1 : Lancez Excel, cliquez sur Fichier > Ouvrir > Parcourir, et remplacez le filtre de type de fichier "Tous les fichiers Excel" par Tous les fichiers (*.*).
- Étape 2 : Double-cliquez sur votre fichier TXT pour déclencher la fenêtre d'analyse de données intégrée d'Excel.
- Étape 3 : Sélectionnez Délimité, cliquez sur Suivant, cochez le séparateur correct (comme une tabulation ou un espace), et cliquez sur Terminer.
-
Étape 4 : Allez dans Fichier > Enregistrer sous, choisissez le dossier cible et enregistrez-le au format Classeur Excel (*.xlsx).
-
Avantages : Rapide, ne nécessite aucune préparation.
-
Inconvénients : Risqué si le texte contient un formatage spécial ou des types de données complexes.
Convertir des extraits de texte sélectionnés avec "Convertir"
Parfois, vous n'avez pas besoin de transformer un rapport entier. Vous pourriez simplement avoir besoin d'un petit extrait de données provenant d'un e-mail ou d'un journal système. Dans ces scénarios, un simple copier-coller vous permet d'insérer les données exactes que vous souhaitez directement dans une seule colonne. Ensuite, vous pouvez utiliser la fonctionnalité Convertir pour analyser rapidement ce texte en cellules distinctes, vous permettant de convertir une partie du fichier TXT en Excel sans traiter des documents complets.
- Étape 1 : Copiez les données dont vous avez besoin dans un fichier texte et collez-les dans une cellule d'une feuille Excel vierge.
- Étape 2 : Mettez en surbrillance toute la colonne, allez dans l'onglet Données et cliquez sur Convertir.
-
Étape 3 : Choisissez Délimité sur le premier écran et cliquez sur Suivant.
-
Étape 4 : Cochez la case correspondant à votre délimiteur (tel qu'une virgule ou un espace), cliquez sur Terminer pour distribuer le texte dans des cellules distinctes, et enregistrez le document.
-
Avantages : Parfait pour les modifications rapides et les extraits de données partiels.
-
Inconvénients : Inefficace pour traiter des fichiers volumineux ou plusieurs documents.
Convertir par lots des TXT en Excel avec un script Python
Si vous traitez des dizaines de rapports quotidiennement, le traitement manuel de chaque fichier peut devenir chronophage. Apprendre à convertir des fichiers TXT en Excel en utilisant Python vous permet de créer un pipeline d'automatisation sans intervention manuelle. Pour cette tâche, nous utiliserons Free Spire.XLS for Python, une bibliothèque autonome qui permet aux développeurs de créer, gérer et convertir des feuilles de calcul Excel par programmation sans nécessiter l'installation de Microsoft Excel. En utilisant ses fonctionnalités avancées de classeur, vous pouvez facilement analyser des fichiers texte avec des délimiteurs personnalisés et les convertir par lots.
Voici le flux de travail pour convertir par lots des documents texte en feuilles de calcul Excel à l'aide de la bibliothèque :
- Étape 1 : Définissez les chemins des fichiers et définissez le délimiteur cible (tel qu'une virgule ou une tabulation) pour gérer différentes structures de texte.
- Étape 2 : Parcourez le dossier pour localiser tous les fichiers
.txtet générez dynamiquement les noms de sortie.xlsxcorrespondants. - Étape 3 : Initialisez l'objet
Workbooket utilisez la méthodeLoadFromFilepour analyser les données texte en lignes et en colonnes. - Étape 4 : Appelez
AutoFitColumns()sur la plage allouée pour ajuster automatiquement les colonnes à la longueur des données, puis enregistrez les documents.
Voici comment utiliser Free Spire.XLS pour lire et convertir plusieurs fichiers texte avec des délimiteurs mixtes en feuilles de calcul Excel :
import os
from spire.xls import *

# Définir les chemins des répertoires d'entrée et de sortie
input_folder = "/input/txt files/"
output_folder = "/output/excel files/"

# Parcourir et traiter tous les fichiers texte dans le dossier d'entrée
for filename in os.listdir(input_folder):
    if filename.endswith(".txt"):
        txt_path = os.path.join(input_folder, filename)
        excel_name = filename.replace(".txt", ".xlsx")
        excel_path = os.path.join(output_folder, excel_name)

        # Lire la première ligne
        with open(txt_path, 'r', encoding='utf-8') as f:
            first_line = f.readline()

        # Correspondance dynamique du délimiteur : priorité à la virgule, puis espace, sinon tabulation par défaut
        current_delimiter = "," if "," in first_line else (" " if " " in first_line else "\t")

        # Initialiser le classeur et charger le fichier texte
        workbook = Workbook()
        workbook.LoadFromFile(txt_path, current_delimiter, 1, 1)

        # Ajuster automatiquement les colonnes pour qu'elles correspondent à la longueur des données
        sheet = workbook.Worksheets[0]
        sheet.AllocatedRange.AutoFitColumns()

        # Enregistrer le résultat sous forme de fichier Excel
        workbook.SaveToFile(excel_path, ExcelVersion.Version2016)
        workbook.Dispose()
        print(f"Conversion réussie ({'Virgule' if current_delimiter==',' else 'Espace'}): {filename} -> {excel_name}")
- Avantages : 100 % automatisé, traite des centaines de fichiers instantanément, gère différents fichiers utilisant différents délimiteurs.
- Inconvénients : Nécessite une configuration de l'environnement Python sur votre appareil.
Convertir rapidement des fichiers texte en Excel avec un convertisseur en ligne
Si vous travaillez sur un ordinateur ou un appareil mobile sans Microsoft Excel installé, les outils en ligne offrent une solution rapide. Un convertisseur TXT-vers-Excel basé sur le Web peut économiser du temps et des efforts lorsque vous avez besoin d'un résultat rapide.
Voici comment convertir des fichiers texte en Excel à l'aide de convertisseurs en ligne, en utilisant Convertio comme exemple :
- Étape 1 : Trouvez l'outil TXT-vers-XLSX de Convertio.
- Étape 2 : Cliquez pour télécharger le fichier TXT cible depuis votre appareil.
- Étape 3 : Cliquez sur le bouton Convertir, attendez quelques secondes, puis vous pourrez télécharger le fichier Excel résultant.
- Avantages : Aucune installation de logiciel requise, fonctionne sur ordinateur et mobile, et convertit les fichiers rapidement.
- Inconvénients : Contrôle limité sur le formatage, des restrictions de taille de fichier peuvent s'appliquer, et le téléchargement de données sensibles sur des serveurs tiers peut créer des risques de confidentialité.
Tableau comparatif des 5 méthodes
Pour vous aider à trouver la meilleure approche, voici un tableau comparatif rapide des 5 méthodes ci-dessus en fonction de la taille des données, de la complexité du fichier et de la vitesse :
| Méthode | Idéal pour | Limite de taille de données | Vitesse |
|---|---|---|---|
| Importation onglet Données | Mises en page complexes & texte étranger | Très élevée | Moyenne |
| Ouverture directe | Fichiers texte propres et basiques | Moyenne | Rapide |
| Convertir | Copier des extraits de texte | Faible | Rapide |
| Code Python | Conversion par lots de dossiers | Illimitée | Instantanée (Automatisée) |
| Convertisseur en ligne | Utilisation d'urgence sans Excel | Faible | Rapide |
Dépannage
Lorsque vous apprenez à convertir un fichier TXT en Excel, vous pouvez rencontrer des problèmes de formatage mineurs. Voici comment les corriger rapidement :
Texte brouillé ou illisible
Si des symboles spéciaux ou des caractères accentués se transforment en formes étranges, l'encodage de votre fichier ne correspond pas. Réimportez le fichier en utilisant la méthode 1 et essayez de changer le menu déroulant Origine du fichier pour Windows-1252 (Europe occidentale) ou UTF-8 jusqu'à ce que le texte s'affiche correctement dans la fenêtre de prévisualisation.
Nombres se transformant en notation scientifique
Si de longs numéros d'identification apparaissent sous la forme 4.5E+11, Excel les formate automatiquement en tant que valeurs numériques. Avant l'importation, définissez le type de colonne sur Texte au lieu de Standard. Si vous avez déjà chargé les données, vous pouvez toujours convertir ces nombres en format texte pour préserver la valeur complète.
Conclusion
Convertir un fichier TXT en Excel est plus facile que la plupart des gens ne le pensent. Si vous n'avez besoin de travailler qu'avec un seul fichier, les outils d'importation intégrés d'Excel sont généralement l'option la plus rapide. Pour des ensembles de données plus volumineux, ils offrent également un meilleur contrôle sur les délimiteurs et l'encodage. Si votre logiciel de comptabilité, votre système ERP ou votre plateforme de reporting exporte des rapports TXT quotidiens, l'automatisation Python peut faire gagner un temps précieux en traitant les fichiers par lots. Choisissez la méthode qui correspond le mieux à votre flux de travail, et vous pourrez transformer des données texte brutes en classeurs Excel organisés en quelques minutes seulement.
FAQ sur la conversion de TXT en Excel
Excel peut-il ouvrir directement les fichiers TXT ?
Oui. Excel peut ouvrir directement les fichiers TXT via Fichier > Ouvrir ou en utilisant la fonctionnalité d'importation Données > À partir du texte/CSV. La méthode d'importation est généralement recommandée car elle offre plus de contrôle sur les délimiteurs, l'encodage et le formatage des colonnes.
Pourquoi mon fichier TXT semble-t-il brouillé dans Excel ?
Cela se produit généralement lorsque l'encodage du fichier ne correspond pas aux paramètres d'importation d'Excel. Essayez de réimporter le fichier et de sélectionner un encodage différent, tel que UTF-8 ou Windows-1252, jusqu'à ce que le texte s'affiche correctement.
Comment puis-je convertir plusieurs fichiers TXT en Excel à la fois ?
Pour la conversion par lots, les outils d'automatisation tels que Free Spire.XLS for Python sont souvent l'option la plus efficace. Un script peut traiter un dossier entier de fichiers TXT et enregistrer chacun d'eux en tant que classeur Excel automatiquement.
Puis-je convertir un TXT en Excel sans Microsoft Excel ?
Oui. Vous pouvez utiliser des convertisseurs TXT-vers-Excel en ligne ou des solutions programmatiques telles que des bibliothèques Python. Cependant, soyez prudent lors du téléchargement de fichiers contenant des informations sensibles ou confidentielles.
À lire également
La guía definitiva para convertir archivos de texto a Excel (5 formas sencillas)
Tabla de contenidos
- Convertir TXT a Excel importando datos con la pestaña Datos
- Abrir un archivo TXT en Excel directamente y guardarlo
- Convertir fragmentos de texto seleccionados con Texto en columnas
- Convertir TXT a Excel por lotes con un script de Python
- Convertir archivos de texto a Excel rápidamente con un conversor en línea
- Tabla comparativa de los 5 métodos
- Solución de problemas
- Preguntas frecuentes
Muchos sistemas exportan informes, registros y transacciones como archivos TXT. Aunque los archivos de texto son fáciles de almacenar y compartir, analizar grandes cantidades de datos en formato de texto plano puede ser frustrante. Ordenar, filtrar y crear fórmulas se vuelve difícil, por lo que muchos usuarios necesitan convertir archivos TXT a Excel para una gestión de datos más sencilla.
Esta guía cubre cinco formas prácticas de convertir archivos de texto a Excel, incluyendo las herramientas de importación integradas de Microsoft Excel, soluciones de automatización con Python y conversores en línea.
- Convertir TXT a Excel importando datos con la pestaña Datos
- Abrir un archivo TXT en Excel directamente y guardarlo
- Convertir fragmentos de texto seleccionados con Texto en columnas
- Convertir TXT a Excel por lotes con un script de Python
- Convertir archivos de texto a Excel rápidamente con un conversor en línea
- Tabla comparativa de los 5 métodos
- Solución de problemas
- Preguntas frecuentes
Convertir TXT a Excel importando datos con la pestaña Datos
Comencemos con las funciones integradas de Excel. Para que la migración de datos entre diferentes formatos sea mucho más fluida, Excel ofrece herramientas nativas para importar datos de diversas fuentes externas. Este enfoque le permite importar datos estructurados desde un archivo TXT conservando su diseño original. Es una forma muy fiable de convertir un archivo de texto a Excel.
Aquí tiene los pasos detallados:
- Paso 1: Abra Microsoft Excel, vaya a la barra de menú superior, haga clic en la pestaña Datos, seleccione Obtener datos > De un archivo y luego haga clic en Desde texto/CSV.
- Paso 2: Haga clic en el menú desplegable Delimitador para verificar si sus datos se dividen correctamente usando una coma, tabulación, espacio o punto y coma.
- Paso 3: Revise las columnas en la cuadrícula de vista previa, haga clic en el botón Cargar en la parte inferior derecha y guarde el documento.
Nota: Si su texto contiene caracteres que no son en inglés o símbolos que se ven distorsionados en la ventana de vista previa, haga clic en el menú desplegable Origen del archivo y cambie la codificación a UTF-8 o GBK para corregir la visualización antes de cargar.
- Ventajas: Alta precisión, evita códigos desordenados y maneja archivos enormes sin problemas.
- Desventajas: Requiere algunos clics más que otros métodos.
Abrir un archivo TXT en Excel directamente y guardarlo
Si su conjunto de datos es sencillo y utiliza delimitadores claros, puede abrir el documento sin procesar directamente en la aplicación. Abra el archivo de texto directamente en Excel y deje que el asistente de importación integrado divida automáticamente los datos en columnas. Este es el método más rápido para abrir y convertir un archivo de texto bien formateado.
- Paso 1: Inicie Excel, haga clic en Archivo > Abrir > Examinar y cambie el filtro desplegable de tipo de archivo de "Todos los archivos de Excel" a Todos los archivos (*.*).
- Paso 2: Haga doble clic en su archivo TXT para activar la ventana de análisis de datos integrada de Excel.
- Paso 3: Seleccione Delimitados, haga clic en siguiente, marque el separador correcto (como tabulación o espacio) y presione Finalizar.
-
Paso 4: Vaya a Archivo > Guardar como, elija la carpeta de destino y guárdelo en formato Libro de Excel (*.xlsx).
-
Ventajas: Rápido, no requiere preparación.
-
Desventajas: Arriesgado si el texto contiene formato especial o tipos de datos complejos.
Convertir fragmentos de texto seleccionados con Texto en columnas
A veces, no necesita transformar un informe completo. Es posible que solo necesite un pequeño fragmento de datos de un correo electrónico o un registro del sistema. En estos casos, un simple copiar y pegar le permite insertar los datos exactos que desea directamente en una sola columna. Luego, puede usar la función Texto en columnas para analizar rápidamente ese texto en celdas separadas, lo que le permite convertir una parte del archivo TXT a Excel sin tener que lidiar con documentos completos.
- Paso 1: Copie los datos que necesita en un archivo de texto y péguelos en una celda de una hoja de Excel en blanco.
- Paso 2: Resalte toda la columna, vaya a la pestaña Datos y haga clic en Texto en columnas.
-
Paso 3: Elija Delimitados en la primera pantalla y presione Siguiente.
-
Paso 4: Marque la casilla junto a su delimitador (como una coma o espacio), haga clic en Finalizar para distribuir el texto en celdas separadas y guarde el documento.
-
Ventajas: Perfecto para ediciones rápidas y fragmentos de datos parciales.
-
Desventajas: Ineficiente para procesar archivos grandes o múltiples documentos.
Convertir TXT a Excel por lotes con un script de Python
Si maneja docenas de informes diariamente, procesar manualmente cada archivo puede llevar mucho tiempo. Aprender a convertir archivos TXT a Excel usando Python le permite crear una canalización de automatización sin intervención manual. Para esta tarea, utilizaremos Free Spire.XLS for Python, una biblioteca independiente que permite a los desarrolladores crear, gestionar y convertir hojas de cálculo de Excel mediante programación sin necesidad de tener instalado Microsoft Excel. Al utilizar sus funciones avanzadas de libro de trabajo, puede analizar fácilmente archivos de texto con delimitadores personalizados y convertirlos por lotes.
A continuación se muestra el flujo de trabajo para convertir por lotes documentos de texto a hojas de cálculo de Excel utilizando la biblioteca:
- Paso 1: Defina las rutas de los archivos y establezca el delimitador de destino (como una coma o tabulación) para manejar diferentes estructuras de texto.
- Paso 2: Recorra la carpeta para localizar todos los archivos
.txty generar dinámicamente los nombres de salida.xlsxcorrespondientes. - Paso 3: Inicialice el objeto
Workbooky utilice el métodoLoadFromFilepara analizar los datos de texto en filas y columnas. - Paso 4: Llame a
AutoFitColumns()en el rango asignado para ajustar automáticamente las columnas a la longitud de los datos y luego guarde los documentos.
Aquí le mostramos cómo usar Free Spire.XLS para leer y convertir múltiples archivos de texto con delimitadores mixtos en hojas de cálculo de Excel:
import os
from spire.xls import *

# Definir rutas de directorio de entrada y salida
input_folder = "/input/txt files/"
output_folder = "/output/excel files/"

# Recorrer y procesar todos los archivos de texto en la carpeta de entrada
for filename in os.listdir(input_folder):
    if filename.endswith(".txt"):
        txt_path = os.path.join(input_folder, filename)
        excel_name = filename.replace(".txt", ".xlsx")
        excel_path = os.path.join(output_folder, excel_name)

        # Leer la primera línea
        with open(txt_path, 'r', encoding='utf-8') as f:
            first_line = f.readline()

        # Coincidencia dinámica de delimitador: prioridad a la coma, luego espacio, sino tabulación
        current_delimiter = "," if "," in first_line else (" " if " " in first_line else "\t")

        # Inicializar libro de trabajo y cargar el archivo de texto
        workbook = Workbook()
        workbook.LoadFromFile(txt_path, current_delimiter, 1, 1)

        # Ajustar automáticamente las columnas para que coincidan con la longitud de los datos
        sheet = workbook.Worksheets[0]
        sheet.AllocatedRange.AutoFitColumns()

        # Guardar el resultado como un archivo de Excel
        workbook.SaveToFile(excel_path, ExcelVersion.Version2016)
        workbook.Dispose()
        print(f"Convertido con éxito ({'Coma' if current_delimiter==',' else 'Espacio'}): {filename} -> {excel_name}")
- Ventajas: 100% automatizado, procesa cientos de archivos al instante, maneja diferentes archivos con diferentes delimitadores.
- Desventajas: Requiere una configuración de entorno de Python en su dispositivo.
Convertir archivos de texto a Excel rápidamente con un conversor en línea
Si está trabajando en una computadora o dispositivo móvil sin Microsoft Excel instalado, las herramientas en línea ofrecen una solución rápida. Un conversor de TXT a Excel basado en web puede ahorrar tiempo y esfuerzo cuando necesita una solución rápida.
Aquí le mostramos cómo convertir archivos de texto a Excel usando conversores en línea, tomando Convertio como ejemplo:
- Paso 1: Busque la herramienta de TXT a XLSX de Convertio.
- Paso 2: Haga clic para cargar el archivo TXT de destino desde su dispositivo.
- Paso 3: Haga clic en el botón Convertir, espere unos segundos y luego podrá descargar el archivo de Excel resultante.
- Ventajas: No requiere instalación de software, funciona tanto en escritorio como en dispositivos móviles y convierte archivos rápidamente.
- Desventajas: Control limitado sobre el formato, pueden aplicarse restricciones de tamaño de archivo y cargar datos confidenciales a servidores de terceros puede crear riesgos de privacidad.
Tabla comparativa de los 5 métodos
Para ayudarle a encontrar el mejor enfoque, aquí tiene una tabla comparativa rápida de los 5 métodos anteriores según el tamaño de los datos, la complejidad del archivo y la velocidad:
| Método | Mejor para | Límite de tamaño de datos | Velocidad |
|---|---|---|---|
| Importación pestaña Datos | Diseños complejos y texto extranjero | Muy alto | Media |
| Abrir directamente | Archivos de texto limpios y básicos | Medio | Rápida |
| Texto en columnas | Copiar fragmentos de texto | Bajo | Rápida |
| Código Python | Convertir carpetas por lotes | Ilimitado | Instantánea (automatizada) |
| Conversor en línea | Uso de emergencia sin Excel | Bajo | Rápida |
Solución de problemas
Al aprender a convertir un archivo TXT a Excel, puede encontrar pequeños fallos de formato. Aquí le explicamos cómo solucionarlos rápidamente:
Texto distorsionado o ilegible
Si los símbolos especiales o caracteres acentuados se convierten en formas extrañas, la codificación de su archivo no coincide. Vuelva a importar el archivo usando el Método 1 e intente cambiar el menú desplegable Origen del archivo a Windows-1252 (Europa Occidental) o UTF-8 hasta que el texto se muestre correctamente en la ventana de vista previa.
Números convertidos a notación científica
Si los números de identificación largos aparecen como 4.5E+11, Excel los está formateando automáticamente como valores numéricos. Antes de importar, establezca el tipo de columna en Texto en lugar de General. Si ya ha cargado los datos, aún puede convertir esos números de nuevo a formato de texto para preservar el valor completo.
Conclusión
Convertir un archivo TXT a Excel es más fácil de lo que la mayoría de la gente espera. Si solo necesita trabajar con un solo archivo, las herramientas de importación integradas de Excel suelen ser la opción más rápida. Para conjuntos de datos más grandes, también proporcionan un mejor control sobre los delimitadores y la codificación. Si su software de contabilidad, sistema ERP o plataforma de informes exporta informes TXT diarios, la automatización con Python puede ahorrar un tiempo significativo al procesar archivos por lotes. Elija el método que mejor se adapte a su flujo de trabajo y podrá convertir datos de texto sin procesar en libros de Excel organizados en solo unos minutos.
Preguntas frecuentes sobre la conversión de TXT a Excel
¿Puede Excel abrir archivos TXT directamente?
Sí. Excel puede abrir archivos TXT directamente a través de Archivo > Abrir o utilizando la función de importación Datos > Desde texto/CSV. Generalmente se recomienda el método de importación porque proporciona más control sobre los delimitadores, la codificación y el formato de las columnas.
¿Por qué mi archivo TXT se ve distorsionado en Excel?
Esto suele ocurrir cuando la codificación del archivo no coincide con la configuración de importación de Excel. Intente volver a importar el archivo y seleccionar una codificación diferente, como UTF-8 o Windows-1252, hasta que el texto se muestre correctamente.
¿Cómo puedo convertir varios archivos TXT a Excel a la vez?
Para la conversión por lotes, las herramientas de automatización como Free Spire.XLS for Python son a menudo la opción más eficiente. Un script puede procesar una carpeta completa de archivos TXT y guardar cada uno como un libro de Excel automáticamente.
¿Puedo convertir TXT a Excel sin Microsoft Excel?
Sí. Puede utilizar conversores de TXT a Excel en línea o soluciones programáticas como bibliotecas de Python. Sin embargo, tenga cuidado al cargar archivos que contengan información confidencial o sensible.