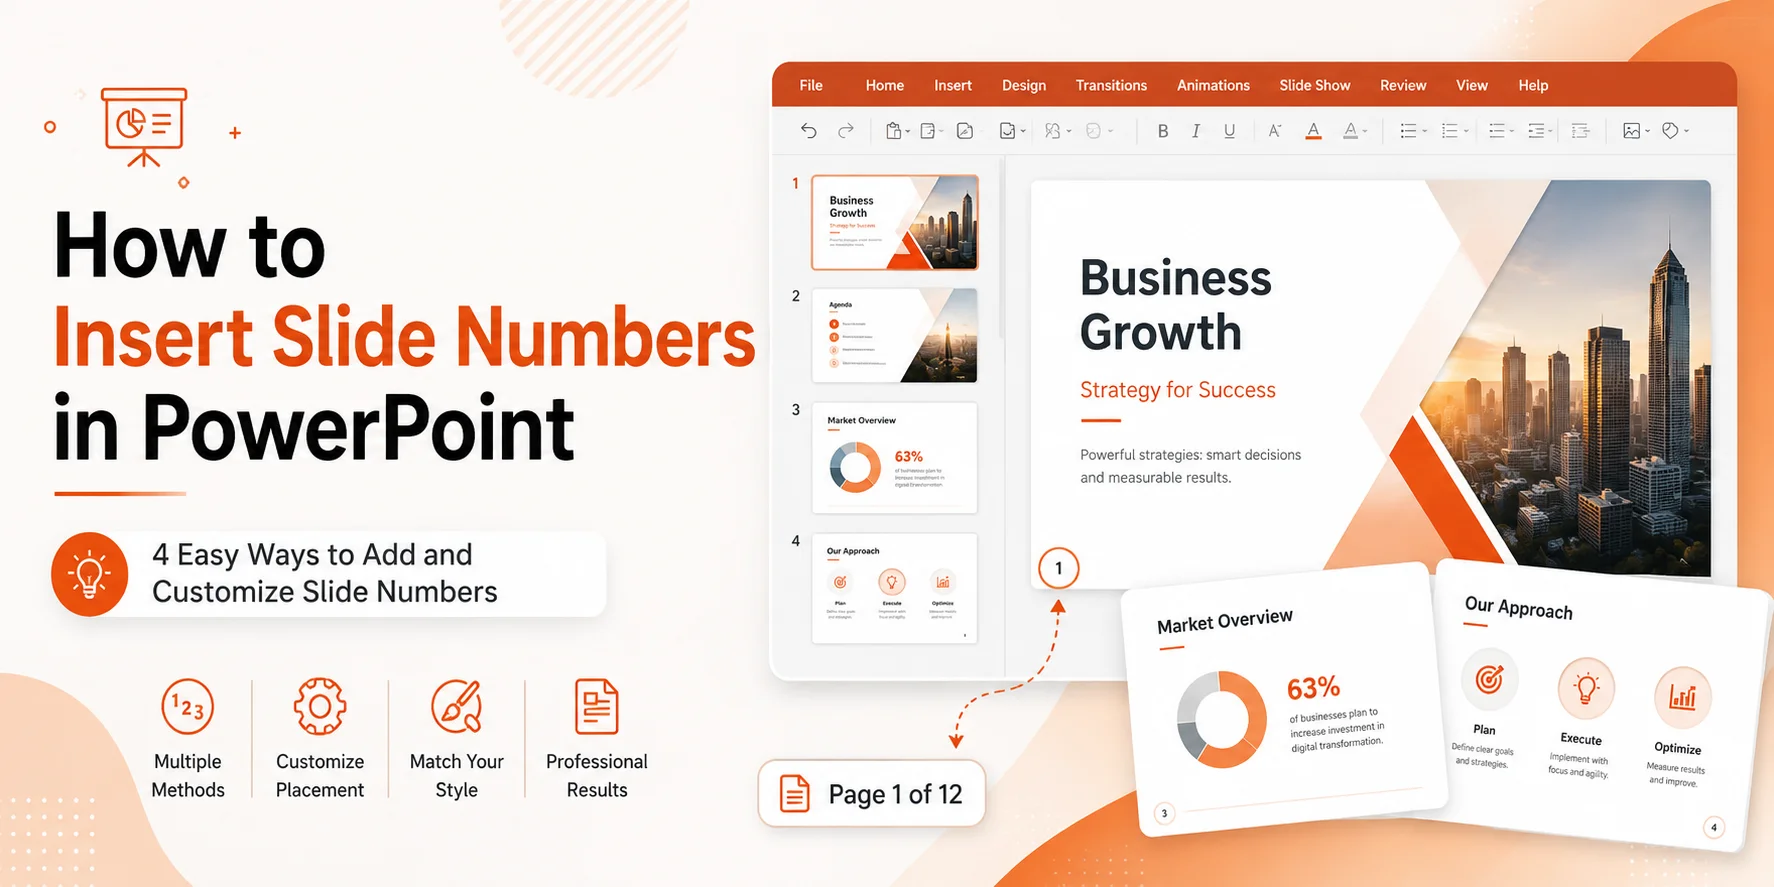
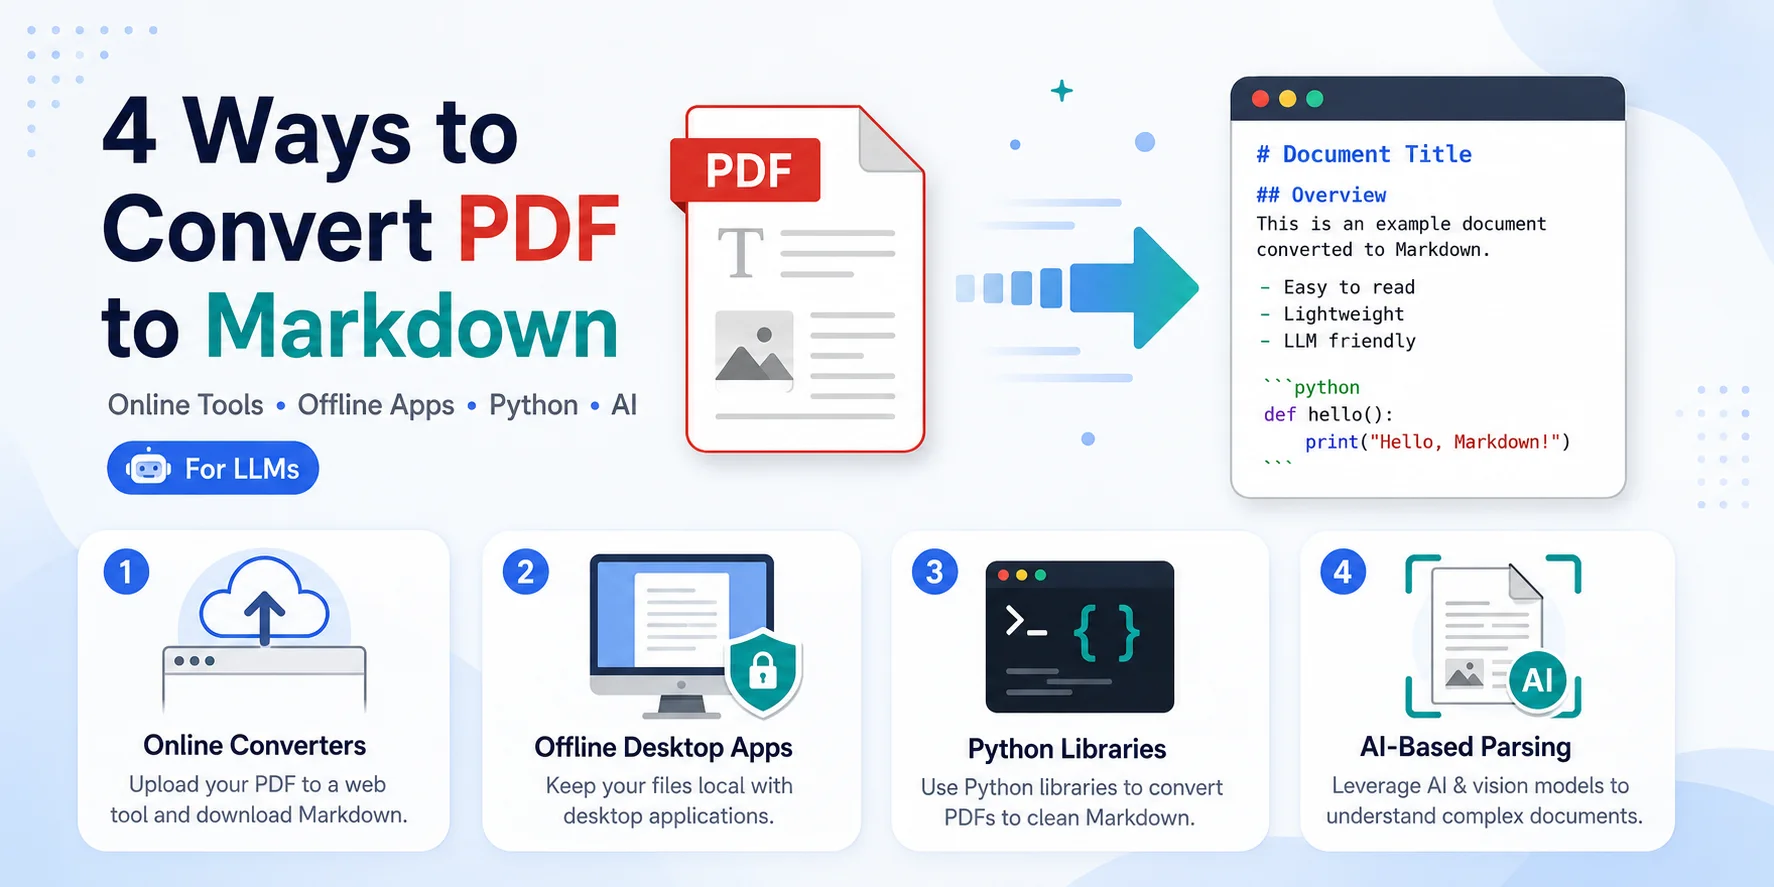
4 formas de insertar números de diapositiva en PowerPoint (sin escribir manualmente)
Tabla de contenidos
- Resumen de métodos
- Insertar números de diapositiva en PowerPoint de escritorio
- Añadir números de diapositiva en línea
- Automatizar la numeración de diapositivas mediante macros VBA
- Insertar números de diapositiva por lotes mediante C# y Free Spire.Presentation
- Solución de problemas: Los números de diapositiva no aparecen
- Preguntas frecuentes
- Resumen
Insertar números de diapositiva en PowerPoint ayuda a su audiencia a seguir su presentación y facilita la referencia a diapositivas específicas durante reuniones, conferencias, sesiones de formación o revisiones.
No necesita escribir los números de diapositiva manualmente en cada una. PowerPoint puede insertar números de diapositiva automáticos que se actualizan cuando las diapositivas se añaden, eliminan o reorganizan.
Esta guía muestra 4 formas prácticas de añadir números de diapositiva, desde las opciones integradas de PowerPoint hasta métodos automatizados para tareas repetitivas o de procesamiento por lotes. Además, incluye consejos avanzados para personalizar los números de diapositiva y adaptarlos al diseño de su plantilla.
Resumen de métodos
| Método | Ideal para | Ventajas | Limitaciones |
|---|---|---|---|
| PowerPoint de escritorio | La mayoría de presentaciones cotidianas | Integrado, fiable, admite personalización de diseño | Requiere ejecución manual por archivo |
| PowerPoint para la Web | Ediciones rápidas basadas en navegador | No requiere instalación de escritorio | Menos controles de patrón de diapositivas y diseño |
| Macro VBA | Tareas repetitivas en PowerPoint local | Automatización con un clic dentro de PowerPoint; sin librerías externas | Requiere PowerPoint habilitado para macros y configuración de confianza |
| Automatización C# | Procesamiento por lotes de múltiples archivos PowerPoint | Puede automatizar archivos sin tener Microsoft PowerPoint instalado | Requiere configuración de .NET y conocimientos de programación |
1. Insertar números de diapositiva en PowerPoint de escritorio
Se aplica a: PowerPoint para Microsoft 365, PowerPoint 2024, 2021, 2019 y 2016 (versiones de escritorio).
PowerPoint le permite añadir números de diapositiva a todas las diapositivas a la vez, o solo a la que está editando actualmente. Siga los pasos a continuación para configurar sus números de página.
Añadir números de diapositiva a todas las diapositivas
-
Vaya a la pestaña Insertar en la cinta superior.
-
Haga clic en Número de diapositiva (o Encabezado y pie de página) en la sección Texto.
-
En el cuadro de diálogo Encabezado y pie de página que se abre, marque la casilla junto a Número de diapositiva.
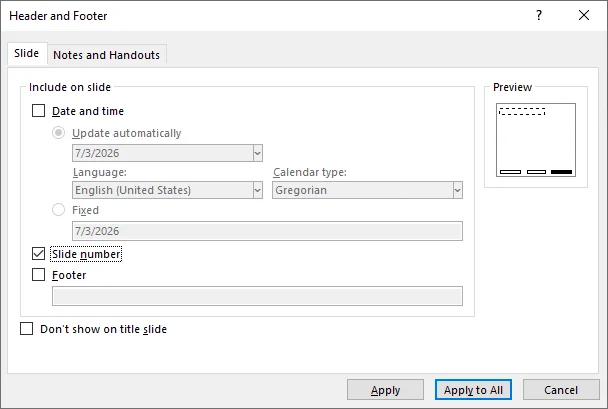
-
Haga clic en Aplicar a todas.
Resultado:
Cada diapositiva muestra su número en la posición predeterminada definida por el tema de su presentación actual.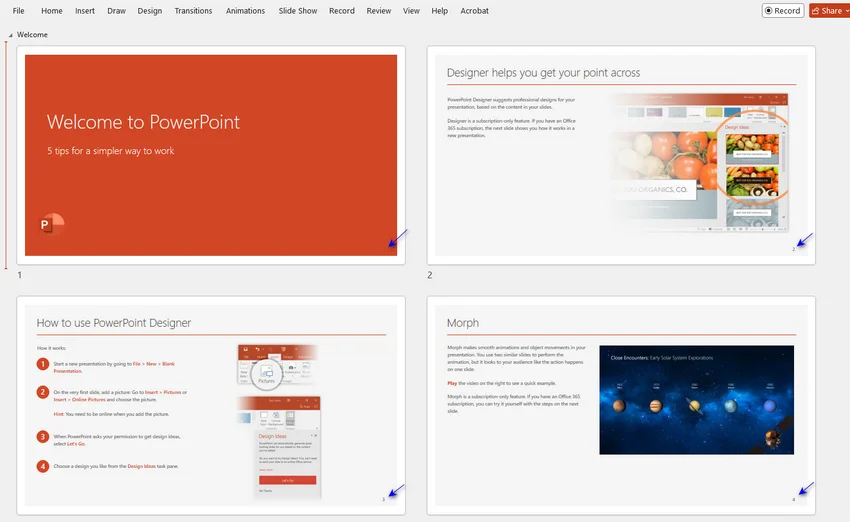
Añadir un número de diapositiva solo a una diapositiva
- Seleccione la diapositiva específica donde desea añadir el número desde el panel de miniaturas a la izquierda.
- Vaya a la pestaña Insertar y haga clic en Número de diapositiva (o Encabezado y pie de página).
- En el cuadro de diálogo emergente, marque la casilla junto a Número de diapositiva.
- Haga clic en Aplicar (no haga clic en Aplicar a todas).
Resultado:
Solo la diapositiva activa recibe un número visible. Las demás diapositivas permanecen sin cambios.
Consejos avanzados: Personalizar números de diapositiva
- Ocultar número de diapositiva en la diapositiva de título: Vaya a Insertar > Número de diapositiva, marque las casillas Número de diapositiva y No mostrar en diapositiva de título, luego haga clic en Aplicar a todas.
- Comenzar la numeración desde un número personalizado: Vaya a Diseño > Tamaño de diapositiva > Tamaño de diapositiva personalizado, establezca Numerar diapositivas desde: en el número entero deseado (por ejemplo, 0 o 2).
- Cambiar fuente, color o posición de los números: Vaya a Vista > Patrón de diapositivas y seleccione la diapositiva principal superior. Localice el cuadro de token ‹#›, formatee su fuente/color, o arrastre el cuadro a una nueva esquina. Cuando termine, haga clic en Cerrar vista patrón.
2. Añadir números de diapositiva en línea (PowerPoint para la Web)
Si está colaborando en la nube o editando sin la aplicación de escritorio instalada, PowerPoint para la Web ofrece una forma rápida basada en navegador para insertar la paginación.
Cómo insertar números de diapositiva en PowerPoint Online
- Abra su presentación en PowerPoint para la Web.
- Vaya a Insertar > Pie de página > Número de diapositiva.
- En el panel que aparece a la derecha, marque Número de diapositiva.
- (Opcional) Marque No mostrar en diapositiva de título si desea mantener su página de portada limpia.
- Haga clic en Aplicar a todas.
⚠️ Nota sobre el formato:
PowerPoint para la Web es ideal para una numeración básica, pero carece de controles de diseño avanzados. Si necesita mover el marcador de posición, modificar familias de fuentes o personalizar diseños de patrón, haga clic en el menú desplegable Edición en la esquina superior derecha y seleccione Abrir en la aplicación de escritorio para cambiar a la versión completa.
3. Automatizar la numeración de diapositivas mediante macros VBA (Solo escritorio)
Si gestiona presentaciones extensas y necesita implementar una lógica de numeración personalizada, como mostrar una etiqueta "Página X de Y", los menús estándar pueden no ser suficientes. Una macro VBA nativa le permite actualizar los números de diapositiva en toda la presentación con un solo clic.
Cómo ejecutar una macro de numeración dinámica
-
Presione Alt + F11 (Windows) o Option + F11 (Mac) para abrir el editor VBA.
-
Haga clic en Insertar > Módulo en la barra de menú superior para abrir una nueva ventana de script.
-
Copie y pegue el siguiente código en la ventana del módulo:
Sub FormatAllSlideNumbers() Dim sld As Slide Dim shp As Shape Dim totalSlides As Integer Dim trField As TextRange ' Obtener el número total de diapositivas en la presentación activa totalSlides = ActivePresentation.Slides.Count For Each sld In ActivePresentation.Slides ' Habilitar la visibilidad del número de diapositiva para la diapositiva actual sld.HeadersFooters.SlideNumber.Visible = msoTrue ' Recorrer las formas para encontrar el marcador de posición del número de diapositiva For Each shp In sld.Shapes If shp.Type = msoPlaceholder Then If shp.PlaceholderFormat.Type = ppPlaceholderSlideNumber Then ' Borrar texto existente para evitar duplicación si se vuelve a ejecutar la macro shp.TextFrame.TextRange.Text = "" ' Formatear texto como "Página X de Y" With shp.TextFrame.TextRange .Text = "Página " ' Insertar el campo dinámico de número de diapositiva (X) Set trField = .InsertSlideNumber ' Añadir el conteo total estático (de Y) trField.InsertAfter " de " & totalSlides End With ' Salir del bucle de formas una vez actualizado el marcador de posición Exit For End If End If Next shp Next sld MsgBox "Numeración Página X de Y aplicada a todas las diapositivas.", vbInformation, "Éxito" End Sub -
Presione F5 o haga clic en el botón verde de Ejecutar (triángulo) en la barra de herramientas para ejecutar su código.
Resultado:
PowerPoint recorre el archivo, calcula el número total actual de diapositivas y escribe una etiqueta "Página X de Y" en cada marcador de posición de número de diapositiva.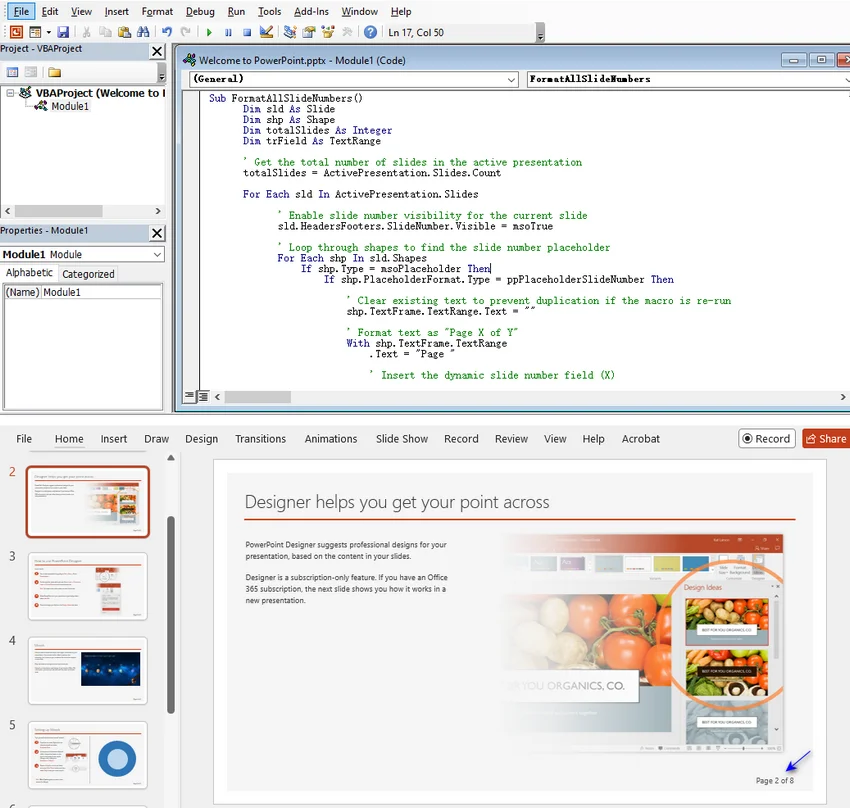
⚠️ Aviso importante:
- Si añade o elimina diapositivas, presione F5 de nuevo para actualizar el conteo total "de Y".
- Para mantener este script dentro de su archivo para futuras ediciones, guarde el archivo como Presentación habilitada para macros (.pptm), de lo contrario el código se perderá al cerrar.
- Asegúrese de que su Configuración de macros (en Archivo > Opciones > Centro de confianza) esté configurada para permitir la ejecución de macros.
4. Insertar números de diapositiva por lotes mediante C# y Free Spire.Presentation
Aunque VBA es efectivo, está restringido a la versión de escritorio de PowerPoint. Si necesita automatizar la numeración de diapositivas para múltiples presentaciones en entornos en la nube o del lado del servidor, puede procesar archivos sin interfaz utilizando C# y la librería Free Spire.Presentation para .NET, eliminando la necesidad de una instalación de Microsoft Office.
Cómo insertar números de diapositiva por lotes en PowerPoint con C#
-
Instale la librería necesaria. Abra su proyecto .NET e instale el paquete NuGet Free Spire.Presentation a través de la Consola del Administrador de Paquetes:
PM> Install-Package FreeSpire.Presentation -
Añada el código C# a su proyecto. El siguiente ejemplo procesa todos los archivos .pptx en una carpeta de entrada especificada y guarda los archivos numerados en una carpeta de salida:
using Spire.Presentation;
using System;
using System.IO;

namespace AddSlideNumber
{
    internal class Program
    {
        static void Main(string[] args)
        {
            string inputFolder = @"Input\";
            string outputFolder = @"Output\";

            Directory.CreateDirectory(outputFolder);

            foreach (string file in Directory.GetFiles(inputFolder, "*.pptx"))
            {
                Presentation presentation = new Presentation();

                try
                {
                    presentation.LoadFromFile(file);

                    // Habilitar números de diapositiva globalmente
                    presentation.SlideNumberVisible = true;
                    int totalSlides = presentation.Slides.Count;

                    // Recorrer cada diapositiva para encontrar y actualizar marcadores de posición existentes como Diapositiva X de Y
                    foreach (ISlide slide in presentation.Slides)
                    {
                        foreach (IShape shape in slide.Shapes)
                        {
                            if (shape.Placeholder != null &&
                                shape.Placeholder.Type == PlaceholderType.SlideNumber &&
                                shape is IAutoShape placeholder)
                            {
                                // Actualizar el texto de forma segura dentro de los límites del diseño maestro existente
                                placeholder.TextFrame.Text = $"Diapositiva {slide.SlideNumber} de {totalSlides}";

                                // Ajuste de formato opcional
                                placeholder.TextFrame.Paragraphs[0].Alignment = TextAlignmentType.Right;
                                break; // Pasar a la siguiente diapositiva una vez actualizado el marcador
                            }
                        }
                    }

                    string outputFile = Path.Combine(
                        outputFolder,
                        Path.GetFileNameWithoutExtension(file) + "_numbered.pptx"
                    );

                    presentation.SaveToFile(outputFile, FileFormat.Pptx2016);
                    Console.WriteLine($"{Path.GetFileName(file)} procesado con éxito.");
                }
                catch (Exception ex)
                {
                    Console.WriteLine($"Error al procesar {Path.GetFileName(file)}: {ex.Message}");
                }
                finally
                {
                    presentation.Dispose();
                }
            }

            Console.WriteLine("Todos los archivos completados.");
        }
    }
}
Consejos para desarrolladores:
- Este código actualiza diapositivas con marcadores de posición de número existentes. No fuerza nuevos cuadros de texto en diapositivas donde la numeración está excluida por diseño. Si los números no aparecen, verifique que estén habilitados en el Patrón de diapositivas de PowerPoint.
- Dado que este código formatea los marcadores como una cadena estática "Diapositiva X de Y", deberá volver a ejecutar el script si reorganiza, añade o elimina diapositivas más tarde.
- Este paquete NuGet gratuito admite hasta 10 diapositivas por archivo. Para documentos más grandes, puede dividir la presentación en archivos más pequeños o actualizar a la edición completa.
Si también desea mostrar la fecha y hora en el pie de página, consulte nuestra guía sobre cómo mostrar información adicional para las diapositivas de presentación en el área de encabezado y pie de página.
Solución de problemas: Los números de diapositiva no aparecen
Si sus números de diapositiva no aparecen incluso después de hacer clic en Insertar > Número de diapositiva > Aplicar a todas, pruebe estas soluciones rápidas:
- Restaurar marcadores de posición faltantes: Vaya a Vista > Patrón de diapositivas y seleccione la diapositiva maestra superior. Haga clic en Diseño del patrón en la cinta y asegúrese de que Número de diapositiva esté marcado. Luego, verifique cada diapositiva de diseño debajo del patrón; si falta el cuadro ‹#›, marque la casilla Pie de página en la cinta para forzar su aparición.
- Incluir diapositivas de título: Si el número que falta está solo en la primera diapositiva, vaya a Insertar > Número de diapositiva, desmarque No mostrar en diapositiva de título y haga clic en Aplicar a todas.
- Traer números al frente: Los gráficos de fondo grandes o las imágenes a sangre a menudo cubren los números de diapositiva. Haga clic derecho en la imagen o forma sospechosa del fondo y seleccione Enviar al fondo para traer la capa del número de página al frente.
- Restablecer diapositivas bloqueadas: Las diapositivas antiguas o copiadas pueden quedarse bloqueadas en un limbo de formato e ignorar las actualizaciones del patrón. Seleccione las diapositivas problemáticas en la vista normal, vaya a la pestaña Inicio y haga clic en Restablecer. Esto obliga a las diapositivas a realinearse con las reglas del diseño maestro.
Preguntas frecuentes
P1: ¿Cómo empiezo la numeración de diapositivas desde 0 u otro número?
R1: Vaya a Diseño > Tamaño de diapositiva > Tamaño de diapositiva personalizado. Cambie el valor de Numerar diapositivas desde a 0 o al número deseado y haga clic en Aceptar.
P2: ¿Puedo formatear los números de diapositiva como "Página X de Y" en PowerPoint?
R2: PowerPoint no tiene un contador total de páginas automatizado. Para hacerlo manualmente, vaya a Vista > Patrón de diapositivas, seleccione el marcador de posición del número de diapositiva y escriba el conteo total alrededor del token ‹#› (por ejemplo, Página ‹#› de 25). Para procesamiento por lotes, considere usar automatización VBA o C#.
P3: ¿Cómo oculto el número de diapositiva en la diapositiva de título?
R3: Vaya a Insertar > Número de diapositiva, marque la casilla No mostrar en diapositiva de título y haga clic en Aplicar a todas.
P4: ¿Cómo elimino los números de diapositiva de PowerPoint?
R4: Vaya a Insertar > Número de diapositiva, desmarque la casilla Número de diapositiva y haga clic en Aplicar a todas. Si los números siguen apareciendo, seleccione y elimine esos cuadros de texto manualmente de las diapositivas individuales.
P5: ¿Aparecerán los números de diapositiva cuando exporte PowerPoint a PDF?
R5: Sí. Los números de diapositiva que son visibles en las diapositivas generalmente aparecerán en el PDF exportado.
Resumen
Añadir números de diapositiva en PowerPoint es sencillo, pero el mejor método depende de cómo trabaje.
En la práctica, comience primero con las herramientas de interfaz integradas de PowerPoint. Luego considere VBA cuando necesite automatización de escritorio local, y C# cuando necesite procesamiento por lotes en múltiples archivos sin abrir PowerPoint.
4 Wege, Foliennummern in PowerPoint einzufügen (ohne manuelle Eingabe)
Inhaltsverzeichnis
- Zusammenfassung der Methoden
- Foliennummern in PowerPoint Desktop einfügen
- Foliennummern online hinzufügen
- Automatisierung der Foliennummerierung per VBA-Makro
- Stapelverarbeitung von Foliennummern mit C# und Free Spire.Presentation
- Fehlerbehebung: Foliennummern werden nicht angezeigt
- Häufig gestellte Fragen (FAQs)
- Zusammenfassung
Das Einfügen von Foliennummern in PowerPoint hilft Ihrem Publikum, Ihrer Präsentation zu folgen, und erleichtert den Verweis auf bestimmte Folien während Meetings, Vorträgen, Schulungen oder Überprüfungen.
Sie müssen Foliennummern nicht manuell auf jede Folie tippen. PowerPoint kann automatische Foliennummern einfügen, die sich aktualisieren, wenn Folien hinzugefügt, gelöscht oder neu angeordnet werden.
Dieser Leitfaden zeigt 4 praktische Wege, um Foliennummern hinzuzufügen – von den integrierten PowerPoint-Optionen bis hin zu automatisierten Methoden für wiederkehrende Aufgaben oder die Stapelverarbeitung. Zudem werden fortgeschrittene Tipps zur Anpassung der Foliennummern an Ihr Vorlagendesign behandelt.
Zusammenfassung der Methoden
| Methode | Am besten geeignet für | Vorteile | Einschränkungen |
|---|---|---|---|
| PowerPoint Desktop | Die meisten alltäglichen Präsentationen | Integriert, zuverlässig, unterstützt Layout-Anpassungen | Erfordert manuelle Ausführung pro Datei |
| PowerPoint für das Web | Schnelle browserbasierte Bearbeitungen | Keine Desktop-Installation erforderlich | Weniger Kontrollmöglichkeiten für Folienmaster und Layouts |
| VBA-Makro | Wiederkehrende lokale PowerPoint-Aufgaben | Ein-Klick-Automatisierung innerhalb von PowerPoint; keine externe Bibliothek | Erfordert makrofähiges PowerPoint und vertrauenswürdige Makroeinstellungen |
| C#-Automatisierung | Stapelverarbeitung mehrerer PowerPoint-Dateien | Kann Dateien ohne installiertes Microsoft PowerPoint automatisieren | Erfordert .NET-Einrichtung und Programmierkenntnisse |
1. Foliennummern in PowerPoint Desktop einfügen
Gilt für: PowerPoint für Microsoft 365, PowerPoint 2024, 2021, 2019 und 2016 (Desktop-Versionen).
PowerPoint ermöglicht es Ihnen, Foliennummern auf allen Folien gleichzeitig oder nur auf der aktuell bearbeiteten Folie hinzuzufügen. Befolgen Sie die unten stehenden Schritte, um Ihre Seitennummerierung einzurichten.
Foliennummern zu allen Folien hinzufügen
-
Gehen Sie im oberen Menüband auf die Registerkarte Einfügen.
-
Klicken Sie im Bereich Text auf Foliennummer (oder Kopf- und Fußzeile).
-
Aktivieren Sie im geöffneten Dialogfeld Kopf- und Fußzeile das Kontrollkästchen neben Foliennummer.
-
Klicken Sie auf Für alle übernehmen.
Ergebnis:
Jede Folie zeigt ihre Foliennummer an der Standardposition an, die durch Ihr aktuelles Präsentationsthema definiert ist.
Foliennummer nur zu einer einzigen Folie hinzufügen
- Wählen Sie die spezifische Folie aus, der Sie die Nummer hinzufügen möchten, über den Miniaturansichten-Bereich auf der linken Seite.
- Gehen Sie zur Registerkarte Einfügen und klicken Sie auf Foliennummer (oder Kopf- und Fußzeile).
- Aktivieren Sie im Dialogfeld das Kontrollkästchen neben Foliennummer.
- Klicken Sie auf Übernehmen (klicken Sie nicht auf „Für alle übernehmen“).
Ergebnis:
Nur die aktive Folie erhält eine sichtbare Nummer. Andere Folien bleiben unverändert.
Fortgeschrittene Tipps: Foliennummern anpassen
- Foliennummer auf Titelfolie ausblenden: Gehen Sie zu Einfügen > Foliennummer, aktivieren Sie die Kontrollkästchen Foliennummer und Auf Titelfolie nicht anzeigen, und klicken Sie dann auf Für alle übernehmen.
- Foliennummerierung mit einer benutzerdefinierten Zahl beginnen: Gehen Sie zu Entwurf > Foliengröße > Benutzerdefinierte Foliengröße und setzen Sie Nummerierung beginnt bei: auf die gewünschte Ganzzahl (z. B. 0 oder 2).
- Schriftart, Farbe oder Position der Foliennummern ändern: Gehen Sie zu Ansicht > Folienmaster und wählen Sie die große oberste Masterfolie aus. Suchen Sie das ‹#›-Platzhalterfeld, formatieren Sie dessen Schriftart/Farbe oder ziehen Sie das Feld an eine neue Ecke. Wenn Sie fertig sind, klicken Sie auf Masteransicht schließen.
2. Foliennummern online hinzufügen (PowerPoint für das Web)
Wenn Sie in der Cloud zusammenarbeiten oder bearbeiten, ohne die Desktop-Anwendung installiert zu haben, bietet PowerPoint für das Web eine schnelle, browserbasierte Möglichkeit, eine Seitennummerierung einzufügen.
So fügen Sie Foliennummern in PowerPoint Online ein
- Öffnen Sie Ihre Präsentation in PowerPoint für das Web.
- Gehen Sie zu Einfügen > Fußzeile > Foliennummer.
- Aktivieren Sie im Bereich, der auf der rechten Seite erscheint, die Option Foliennummer.
- (Optional) Aktivieren Sie Auf Titelfolie nicht anzeigen, wenn Sie Ihr Deckblatt sauber halten möchten.
- Klicken Sie auf Für alle übernehmen.
⚠️ Hinweis zur Formatierung:
PowerPoint für das Web ist ideal für eine einfache Nummerierung, bietet jedoch keine erweiterten Design-Kontrollen. Wenn Sie den Platzhalter verschieben, Schriftarten ändern oder Master-Layouts anpassen müssen, klicken Sie oben rechts auf das Dropdown-Menü Bearbeiten und wählen Sie In Desktop-App öffnen, um zur vollständigen Desktop-Version zu wechseln.
3. Automatisierung der Foliennummerierung per VBA-Makro (nur Desktop)
Wenn Sie umfangreiche Präsentationen verwalten und eine benutzerdefinierte Nummerierungslogik implementieren müssen – wie z. B. die Anzeige eines „Seite X von Y“-Labels –, reichen die Standard-Benutzeroberflächenmenüs möglicherweise nicht aus. Ein natives VBA-Makro ermöglicht es Ihnen, die Foliennummern in der gesamten Präsentation mit einem einzigen Klick zu aktualisieren.
So führen Sie ein Makro für dynamische Nummerierung aus
-
Drücken Sie Alt + F11 (Windows) oder Option + F11 (Mac), um den VBA-Editor zu öffnen.
-
Klicken Sie in der oberen Menüleiste auf Einfügen > Modul, um ein neues Skriptfenster zu öffnen.
-
Kopieren Sie den folgenden Code und fügen Sie ihn in das Modulfenster ein:
Sub FormatAllSlideNumbers() Dim sld As Slide Dim shp As Shape Dim totalSlides As Integer Dim trField As TextRange ' Gesamtzahl der Folien in der aktiven Präsentation abrufen totalSlides = ActivePresentation.Slides.Count For Each sld In ActivePresentation.Slides ' Sichtbarkeit der Foliennummer für die aktuelle Folie aktivieren sld.HeadersFooters.SlideNumber.Visible = msoTrue ' Formen durchlaufen, um den Platzhalter für die Foliennummer zu finden For Each shp In sld.Shapes If shp.Type = msoPlaceholder Then If shp.PlaceholderFormat.Type = ppPlaceholderSlideNumber Then ' Vorhandenen Text löschen, um Duplikate bei erneutem Ausführen des Makros zu vermeiden shp.TextFrame.TextRange.Text = "" ' Text als "Seite X von Y" formatieren With shp.TextFrame.TextRange .Text = "Seite " ' Dynamisches Foliennummernfeld (X) einfügen Set trField = .InsertSlideNumber ' Statische Gesamtzahl (von Y) anhängen trField.InsertAfter " von " & totalSlides End With ' Formschleife verlassen, sobald der Platzhalter aktualisiert wurde Exit For End If End If Next shp Next sld MsgBox "Seite X von Y-Nummerierung auf alle Folien angewendet.", vbInformation, "Erfolg" End Sub -
Drücken Sie F5 oder klicken Sie auf die grüne Ausführen-Schaltfläche (Dreieck) in der Symbolleiste, um Ihren Code auszuführen.
Ergebnis:
PowerPoint durchläuft die Datei, berechnet die aktuelle Gesamtzahl der Folien und schreibt ein „Seite X von Y“-Label in jeden Foliennummern-Platzhalter.
⚠️ Wichtiger Hinweis:
- Wenn Sie Folien hinzufügen oder löschen, drücken Sie erneut F5, um die Gesamtzahl „von Y“ zu aktualisieren.
- Um dieses Skript für zukünftige Bearbeitungen in Ihrer Datei zu behalten, speichern Sie die Datei als „PowerPoint-Präsentation mit Makros (.pptm)“, andernfalls geht der Code beim Schließen verloren.
- Stellen Sie sicher, dass Ihre Makroeinstellungen (unter Datei > Optionen > Trust Center) so konfiguriert sind, dass die Ausführung von Makros zugelassen wird.
4. Stapelverarbeitung von Foliennummern mit C# und Free Spire.Presentation
Obwohl VBA effektiv ist, ist es auf die Desktop-Version von PowerPoint beschränkt. Wenn Sie die Foliennummerierung für mehrere Präsentationen in Cloud-Umgebungen oder auf der Serverseite automatisieren müssen, können Sie Dateien „headless“ (ohne Benutzeroberfläche) mit C# und der Bibliothek Free Spire.Presentation für .NET verarbeiten, wodurch eine Microsoft Office-Installation überflüssig wird.
So fügen Sie Foliennummern in PowerPoint stapelweise mit C# ein
-
Installieren Sie die erforderliche Bibliothek. Öffnen Sie Ihr .NET-Projekt und installieren Sie das NuGet-Paket „FreeSpire.Presentation“ über die Paket-Manager-Konsole:
PM> Install-Package FreeSpire.Presentation -
Fügen Sie den C#-Code zu Ihrem Projekt hinzu. Das folgende Beispiel verarbeitet alle .pptx-Dateien in einem angegebenen Eingabeordner und speichert die nummerierten Dateien in einem Ausgabeordner:
using Spire.Presentation;
using System;
using System.IO;

namespace AddSlideNumber
{
    internal class Program
    {
        static void Main(string[] args)
        {
            string inputFolder = @"Input\";
            string outputFolder = @"Output\";

            Directory.CreateDirectory(outputFolder);

            foreach (string file in Directory.GetFiles(inputFolder, "*.pptx"))
            {
                Presentation presentation = new Presentation();

                try
                {
                    presentation.LoadFromFile(file);

                    // Foliennummern global aktivieren
                    presentation.SlideNumberVisible = true;
                    int totalSlides = presentation.Slides.Count;

                    // Jede Folie durchlaufen, um vorhandene Foliennummern-Platzhalter zu finden und als "Folie X von Y" zu aktualisieren
                    foreach (ISlide slide in presentation.Slides)
                    {
                        foreach (IShape shape in slide.Shapes)
                        {
                            if (shape.Placeholder != null &&
                                shape.Placeholder.Type == PlaceholderType.SlideNumber &&
                                shape is IAutoShape placeholder)
                            {
                                // Den Text sicher innerhalb der vorhandenen Master-Layout-Grenzen aktualisieren
                                placeholder.TextFrame.Text = $"Folie {slide.SlideNumber} von {totalSlides}";

                                // Optionale Formatierungsanpassung
                                placeholder.TextFrame.Paragraphs[0].Alignment = TextAlignmentType.Right;
                                break; // Zur nächsten Folie springen, sobald der Platzhalter aktualisiert wurde
                            }
                        }
                    }

                    string outputFile = Path.Combine(
                        outputFolder,
                        Path.GetFileNameWithoutExtension(file) + "_numbered.pptx"
                    );

                    presentation.SaveToFile(outputFile, FileFormat.Pptx2016);
                    Console.WriteLine($"{Path.GetFileName(file)} wurde erfolgreich verarbeitet.");
                }
                catch (Exception ex)
                {
                    Console.WriteLine($"Fehler bei der Verarbeitung von {Path.GetFileName(file)}: {ex.Message}");
                }
                finally
                {
                    presentation.Dispose();
                }
            }

            Console.WriteLine("Alle Dateien wurden fertiggestellt.");
        }
    }
}
Entwickler-Tipps:
- Dieser Code aktualisiert Folien mit vorhandenen Foliennummern-Platzhaltern. Er erzwingt keine neuen Textfelder auf Folien, auf denen die Nummerierung absichtlich ausgeschlossen wurde. Wenn keine Nummern erscheinen, überprüfen Sie, ob sie im PowerPoint-Folienmaster aktiviert sind.
- Da dieser Code Foliennummern-Platzhalter als statische „Folie X von Y“-Zeichenfolge formatiert, müssen Sie das Skript erneut ausführen, wenn Sie später Folien neu anordnen, hinzufügen oder entfernen.
- Dieses kostenlose NuGet-Paket unterstützt bis zu 10 Folien pro Datei. Für größere Dokumente können Sie entweder das Deck in kleinere Dateien aufteilen oder auf die Vollversion upgraden.
Wenn Sie auch Datum und Uhrzeit in der Fußzeile anzeigen möchten, lesen Sie unsere Anleitung dazu, wie zusätzliche Informationen für Präsentationsfolien im Kopf- und Fußzeilenbereich angezeigt werden.
Fehlerbehebung: Foliennummern werden nicht angezeigt
Wenn Ihre Foliennummern auch nach dem Klicken auf Einfügen > Foliennummer > Für alle übernehmen nicht erscheinen, versuchen Sie diese schnellen Lösungen:
- Fehlende Platzhalter wiederherstellen: Gehen Sie zu Ansicht > Folienmaster und wählen Sie die große oberste Masterfolie aus. Klicken Sie im Menüband auf Masterlayout und stellen Sie sicher, dass Foliennummer aktiviert ist. Überprüfen Sie anschließend jede Layout-Folie unterhalb des Masters; wenn das ‹#›-Feld fehlt, aktivieren Sie das Kontrollkästchen Fußzeilen im Menüband, um es zu erzwingen.
- Titelfolien einbeziehen: Wenn die fehlende Nummer nur auf der ersten Folie auftritt, gehen Sie zu Einfügen > Foliennummer, deaktivieren Sie Auf Titelfolie nicht anzeigen und klicken Sie auf Für alle übernehmen.
- Nummern in den Vordergrund bringen: Große Hintergrundgrafiken oder vollflächige Bilder verdecken oft die Foliennummern. Klicken Sie mit der rechten Maustaste auf das vermutete Hintergrundbild oder die Formen und wählen Sie In den Hintergrund, um die Ebene der Seitennummer nach vorne zu bringen.
- Feststeckende Folien zurücksetzen: Ältere oder kopierte Folien können in einem Formatierungs-Limbo feststecken und Master-Updates ignorieren. Wählen Sie die problematischen Folien in der Normalansicht aus, gehen Sie zur Registerkarte Start und klicken Sie auf Zurücksetzen. Dies zwingt die Folien dazu, sich wieder an die Master-Layout-Regeln anzupassen.
Häufig gestellte Fragen (FAQs)
Q1: Wie beginne ich die Foliennummerierung bei 0 oder einer anderen Zahl?
A1: Gehen Sie zu Entwurf > Foliengröße > Benutzerdefinierte Foliengröße. Ändern Sie den Wert bei Nummerierung beginnt bei auf 0 oder Ihre gewünschte Zahl und klicken Sie auf OK.
Q2: Kann ich Foliennummern in PowerPoint als „Seite X von Y“ formatieren?
A2: PowerPoint verfügt über keinen automatisierten Seitenzähler. Um dies manuell zu tun, gehen Sie zu Ansicht > Folienmaster, wählen Sie den Platzhalter für die Foliennummer aus und geben Sie die Gesamtzahl der Folien um das ‹#›-Token herum ein (z. B. Seite ‹#› von 25). Für die Stapelverarbeitung sollten Sie VBA- oder C#-Automatisierung in Betracht ziehen.
Q3: Wie blende ich die Foliennummer auf der Titelfolie aus?
A3: Gehen Sie zu Einfügen > Foliennummer, aktivieren Sie das Kontrollkästchen für Auf Titelfolie nicht anzeigen und klicken Sie auf Für alle übernehmen.
Q4: Wie entferne ich Foliennummern aus PowerPoint?
A4: Gehen Sie zu Einfügen > Foliennummer, deaktivieren Sie das Kontrollkästchen Foliennummer und klicken Sie auf Für alle übernehmen. Wenn weiterhin Nummern erscheinen, wählen Sie diese Textfelder manuell auf den einzelnen Folien aus und löschen Sie sie.
Q5: Erscheinen Foliennummern, wenn ich PowerPoint als PDF exportiere?
A5: Ja. Foliennummern, die auf den Folien sichtbar sind, erscheinen normalerweise auch im exportierten PDF.
Zusammenfassung
Das Hinzufügen von Foliennummern in PowerPoint ist einfach, aber die beste Methode hängt von Ihrer Arbeitsweise ab.
In der Praxis sollten Sie zunächst die integrierten UI-Tools von PowerPoint verwenden. Ziehen Sie dann VBA in Betracht, wenn Sie eine lokale Desktop-Automatisierung benötigen, und C#, wenn Sie eine Stapelverarbeitung über mehrere Dateien hinweg benötigen, ohne PowerPoint zu öffnen.
4 способа вставить номера слайдов в PowerPoint (без ручного ввода)
Содержание
- Краткий обзор методов
- Вставка номеров слайдов в настольной версии PowerPoint
- Добавление номеров слайдов онлайн
- Автоматизация нумерации слайдов через VBA-макрос
- Пакетная вставка номеров слайдов с помощью C# и Free Spire.Presentation
- Устранение неполадок: номера слайдов не отображаются
- Часто задаваемые вопросы
- Итоги
Вставка номеров слайдов в PowerPoint помогает аудитории ориентироваться в презентации, а также упрощает ссылки на конкретные слайды во время встреч, лекций, тренингов или обсуждений.
Вам не нужно вводить номера слайдов вручную на каждой странице. PowerPoint может автоматически вставлять номера, которые обновляются при добавлении, удалении или перестановке слайдов.
В этом руководстве представлены 4 практических способа добавления номеров слайдов: от встроенных функций PowerPoint до методов автоматизации для повторяющихся или пакетных задач. Кроме того, здесь вы найдете расширенные советы по настройке номеров слайдов в соответствии с дизайном вашего шаблона.
Краткий обзор методов
| Метод | Лучше всего подходит для | Преимущества | Ограничения |
|---|---|---|---|
| Настольный PowerPoint | Большинства повседневных презентаций | Встроенный, надежный, поддерживает настройку макета | Требует выполнения вручную для каждого файла |
| PowerPoint для Web | Быстрого редактирования в браузере | Не требует установки на компьютер | Меньше возможностей управления образцами слайдов и макетами |
| VBA-макрос | Повторяющихся локальных задач в PowerPoint | Автоматизация в один клик внутри PowerPoint; не требует внешних библиотек | Требует PowerPoint с поддержкой макросов и доверенных настроек |
| C# автоматизация | Пакетной обработки нескольких файлов PowerPoint | Возможность автоматизации без установленного Microsoft PowerPoint | Требует настройки .NET и навыков программирования |
1. Вставка номеров слайдов в настольной версии PowerPoint
Применимо к: PowerPoint для Microsoft 365, PowerPoint 2024, 2021, 2019 и 2016 (настольные версии).
PowerPoint позволяет добавить номера слайдов сразу ко всем слайдам или только к тому, который вы редактируете в данный момент. Выполните следующие действия, чтобы настроить нумерацию страниц.
Добавление номеров ко всем слайдам
-
Перейдите на вкладку Вставка на верхней ленте.
-
Нажмите Номер слайда (или Колонтитулы) в разделе Текст.
-
В открывшемся диалоговом окне Колонтитулы установите флажок рядом с пунктом Номер слайда.
-
Нажмите Применить ко всем.
Результат:
На каждом слайде отображается его номер в позиции по умолчанию, заданной текущей темой презентации.
Добавление номера только к одному слайду
- Выберите нужный слайд на панели эскизов слева.
- Перейдите на вкладку Вставка и нажмите Номер слайда (или Колонтитулы).
- В появившемся окне установите флажок рядом с пунктом Номер слайда.
- Нажмите Применить (не нажимайте «Применить ко всем»).
Результат:
Номер появится только на выбранном слайде. Остальные слайды останутся без изменений.
Расширенные советы: настройка номеров слайдов
- Скрыть номер на титульном слайде: Перейдите в Вставка > Номер слайда, установите флажки Номер слайда и Не показывать на титульном слайде, затем нажмите Применить ко всем.
- Начать нумерацию с произвольного числа: Перейдите в Дизайн > Размер слайда > Настроить размер слайда, установите нужное значение в поле Нумеровать слайды с: (например, 0 или 2).
- Изменение шрифта, цвета или позиции номеров: Перейдите в Вид > Образец слайдов и выберите самый верхний главный слайд. Найдите блок с символом ‹#›, измените его шрифт/цвет или перетащите блок в нужный угол. По завершении нажмите Закрыть режим образца.
2. Добавление номеров слайдов онлайн (PowerPoint для Web)
Если вы работаете совместно в облаке или редактируете презентацию без установленного настольного приложения, PowerPoint для Web предлагает быстрый способ вставки нумерации прямо в браузере.
Как вставить номера слайдов в PowerPoint Online
- Откройте презентацию в PowerPoint для Web.
- Перейдите в Вставка > Колонтитул > Номер слайда.
- На панели, которая появится справа, установите флажок Номер слайда.
- (Опционально) Установите флажок Не показывать на титульном слайде, если хотите, чтобы обложка осталась чистой.
- Нажмите Применить ко всем.
⚠️ Примечание по форматированию:
PowerPoint для Web отлично подходит для базовой нумерации, но в нем отсутствуют расширенные инструменты дизайна. Если вам нужно переместить заполнитель, изменить шрифты или настроить макеты образцов, нажмите на выпадающее меню «Редактирование» в правом верхнем углу и выберите Открыть в настольном приложении.
3. Автоматизация нумерации слайдов через VBA-макрос (только для настольных версий)
Если вы работаете с большими презентациями и вам нужна сложная логика нумерации (например, «Слайд X из Y»), стандартных меню может быть недостаточно. VBA-макрос позволяет обновить номера слайдов во всей презентации одним кликом.
Как запустить макрос динамической нумерации
-
Нажмите Alt + F11 (Windows) или Option + F11 (Mac), чтобы открыть редактор VBA.
-
Нажмите Вставка > Модуль в верхнем меню, чтобы открыть окно нового скрипта.
-
Скопируйте и вставьте следующий код в окно модуля:
Sub FormatAllSlideNumbers() Dim sld As Slide Dim shp As Shape Dim totalSlides As Integer Dim trField As TextRange ' Получение общего количества слайдов в активной презентации totalSlides = ActivePresentation.Slides.Count For Each sld In ActivePresentation.Slides ' Включение отображения номера для текущего слайда sld.HeadersFooters.SlideNumber.Visible = msoTrue ' Поиск заполнителя номера слайда среди фигур For Each shp In sld.Shapes If shp.Type = msoPlaceholder Then If shp.PlaceholderFormat.Type = ppPlaceholderSlideNumber Then ' Очистка существующего текста, чтобы избежать дублирования при повторном запуске shp.TextFrame.TextRange.Text = "" ' Форматирование текста как "Слайд X из Y" With shp.TextFrame.TextRange .Text = "Слайд " ' Вставка динамического номера (X) Set trField = .InsertSlideNumber ' Добавление общего количества (из Y) trField.InsertAfter " из " & totalSlides End With ' Выход из цикла фигур после обновления заполнителя Exit For End If End If Next shp Next sld MsgBox "Нумерация 'Слайд X из Y' применена ко всем слайдам.", vbInformation, "Успешно" End Sub -
Нажмите F5 или кнопку Выполнить (зеленый треугольник) на панели инструментов.
Результат:
PowerPoint проходит по всем слайдам, вычисляет их общее количество и записывает метку «Слайд X из Y» в каждый заполнитель номера.
⚠️ Важное примечание:
- Если вы добавляете или удаляете слайды, нажмите F5 снова, чтобы обновить общее количество «из Y».
- Чтобы сохранить этот скрипт в файле, сохраните его как «Презентация с поддержкой макросов (.pptm)», иначе код будет удален при закрытии.
- Убедитесь, что настройки макросов (в разделе Файл > Параметры > Центр управления безопасностью) разрешают выполнение макросов.
4. Пакетная вставка номеров слайдов с помощью C# и Free Spire.Presentation
Хотя VBA эффективен, он ограничен настольной версией PowerPoint. Если вам нужно автоматизировать нумерацию для множества презентаций в облаке или на сервере, вы можете обрабатывать файлы программно с помощью C# и библиотеки Free Spire.Presentation for .NET, не устанавливая Microsoft Office.
Как пакетно вставить номера слайдов в PowerPoint на C#
-
Установите библиотеку. Откройте ваш .NET проект и установите NuGet-пакет Free Spire.Presentation через консоль диспетчера пакетов:
PM> Install-Package FreeSpire.Presentation -
Добавьте код C#. Следующий пример обрабатывает все файлы .pptx в указанной папке и сохраняет их в папку вывода:
using Spire.Presentation;
using System;
using System.IO;

namespace AddSlideNumber
{
    internal class Program
    {
        static void Main(string[] args)
        {
            string inputFolder = @"Input\";
            string outputFolder = @"Output\";

            Directory.CreateDirectory(outputFolder);

            foreach (string file in Directory.GetFiles(inputFolder, "*.pptx"))
            {
                Presentation presentation = new Presentation();

                try
                {
                    presentation.LoadFromFile(file);

                    // Включение номеров слайдов глобально
                    presentation.SlideNumberVisible = true;
                    int totalSlides = presentation.Slides.Count;

                    // Цикл по слайдам для обновления заполнителей
                    foreach (ISlide slide in presentation.Slides)
                    {
                        foreach (IShape shape in slide.Shapes)
                        {
                            if (shape.Placeholder != null &&
                                shape.Placeholder.Type == PlaceholderType.SlideNumber &&
                                shape is IAutoShape placeholder)
                            {
                                // Обновление текста
                                placeholder.TextFrame.Text = $"Слайд {slide.SlideNumber} из {totalSlides}";

                                // Опциональное выравнивание
                                placeholder.TextFrame.Paragraphs[0].Alignment = TextAlignmentType.Right;
                                break;
                            }
                        }
                    }

                    string outputFile = Path.Combine(
                        outputFolder,
                        Path.GetFileNameWithoutExtension(file) + "_numbered.pptx"
                    );

                    presentation.SaveToFile(outputFile, FileFormat.Pptx2016);
                    Console.WriteLine($"Файл {Path.GetFileName(file)} успешно обработан.");
                }
                catch (Exception ex)
                {
                    Console.WriteLine($"Ошибка при обработке {Path.GetFileName(file)}: {ex.Message}");
                }
                finally
                {
                    presentation.Dispose();
                }
            }

            Console.WriteLine("Все файлы обработаны.");
        }
    }
}
Советы разработчикам:
- Этот код обновляет существующие заполнители. Если номера не появляются, убедитесь, что они включены в «Образце слайдов» (Slide Master).
- Поскольку код создает статический текст «Слайд X из Y», при изменении порядка или количества слайдов скрипт нужно запустить повторно.
- Бесплатная версия NuGet поддерживает до 10 слайдов на файл. Для больших документов можно разбить презентацию на части или перейти на полную версию.
Если вы также хотите отображать дату и время в нижнем колонтитуле, см. наше руководство по отображению дополнительной информации в области колонтитулов.
Устранение неполадок: номера слайдов не отображаются
Если номера не появляются даже после нажатия Вставка > Номер слайда > Применить ко всем, попробуйте следующее:
- Восстановление отсутствующих заполнителей: Перейдите в Вид > Образец слайдов и выберите главный слайд. Нажмите Макет образца и убедитесь, что флажок Номер слайда установлен. Проверьте макеты ниже: если блок ‹#› отсутствует, включите его через меню колонтитулов.
- Титульные слайды: Если номер отсутствует только на первом слайде, перейдите в Вставка > Номер слайда, снимите флажок Не показывать на титульном слайде и нажмите Применить ко всем.
- Перенос на передний план: Крупные фоновые изображения часто перекрывают номера. Нажмите правой кнопкой мыши на фоновый объект и выберите На задний план.
- Сброс слайдов: Иногда слайды «застревают» в старом форматировании. Выберите проблемные слайды, перейдите на вкладку Главная и нажмите Сброс. Это заставит слайды вернуться к правилам образца.
Часто задаваемые вопросы
В1: Как начать нумерацию с 0 или другого числа?
О1: Перейдите в Дизайн > Размер слайда > Настроить размер слайда. Измените значение Нумеровать слайды с на нужное и нажмите ОК.
В2: Можно ли сделать формат «Слайд X из Y» в PowerPoint?
О2: В PowerPoint нет встроенного автоматического счетчика общего количества страниц. Чтобы сделать это вручную, перейдите в Вид > Образец слайдов, выберите заполнитель номера и допишите текст вокруг ‹#› (например, Слайд ‹#› из 25). Для автоматизации используйте VBA или C#.
В3: Как скрыть номер на титульном слайде?
О3: Перейдите в Вставка > Номер слайда, установите флажок Не показывать на титульном слайде и нажмите Применить ко всем.
В4: Как удалить номера слайдов?
О4: Перейдите в Вставка > Номер слайда, снимите флажок Номер слайда и нажмите Применить ко всем.
В5: Будут ли видны номера при экспорте в PDF?
О5: Да, номера, видимые на слайдах, обычно сохраняются при экспорте в PDF.
Итоги
Добавление номеров слайдов — простая задача, но лучший метод зависит от ваших целей.
Начните со встроенных инструментов PowerPoint. Используйте VBA для локальной автоматизации и C# для пакетной обработки множества файлов без открытия приложения.
4 maneiras de converter PDF para Markdown (Guia completo)
Sumário
Converter arquivos PDF para Markdown (.md) é uma dor de cabeça comum quando você precisa importar documentos para bases de conhecimento pessoais como o Obsidian, limpar texto para alimentar Grandes Modelos de Linguagem (LLMs) ou simplesmente se livrar de formatações rígidas e pesadas.
Não existe uma ferramenta única que lide com todos os PDFs perfeitamente. A melhor abordagem depende de você ter um único arquivo ou milhares, da complexidade do layout e se seus dados são privados. Com base nesses cenários comuns, descrevemos abaixo quatro métodos práticos de PDF para MD. Vamos lá!
Resposta Rápida: Qual Método de PDF para Markdown Você Deve Usar?
| Método | Ideal Para | Nível de Privacidade | Limitação Principal |
|---|---|---|---|
| Conversores online | PDFs únicos e não sensíveis | Baixo a médio | Arquivos são processados por serviços de terceiros |
| Aplicativos desktop offline | Notas privadas, contratos, documentos internos | Alto se for totalmente local | Pode ter dificuldades com PDFs digitalizados ou complexos |
| Bibliotecas Python | Conversão em lote e automação | Alto se executado localmente | Requer programação e gerenciamento de dependências |
| IA Multimodal | PDFs digitalizados, equações, layouts de várias colunas | Depende da ferramenta | Requer custos de API ou hardware local potente (GPU); potencial para alucinações da IA. |
Método 1: Conversores Online (Mais Fácil)
Se você tem apenas alguns arquivos, seu PDF é basicamente texto padrão e você prefere uma solução sem código, as ferramentas gratuitas online de PDF para Markdown oferecem conversão instantânea sem necessidade de configurar o ambiente.
Principais Conversores Online
- CloudConvert: Utilitário web altamente confiável que preserva estruturas básicas de cabeçalho e listas com marcadores.
- Md-to.com: Uma ferramenta web simples otimizada especificamente para converter entre Markdown e diferentes formatos de arquivo, incluindo PDF, Word, HTML e outros.
Como Converter PDF para Markdown Online
-
Abra o conversor online de sua escolha (por exemplo, a ferramenta de PDF para MD do CloudConvert).
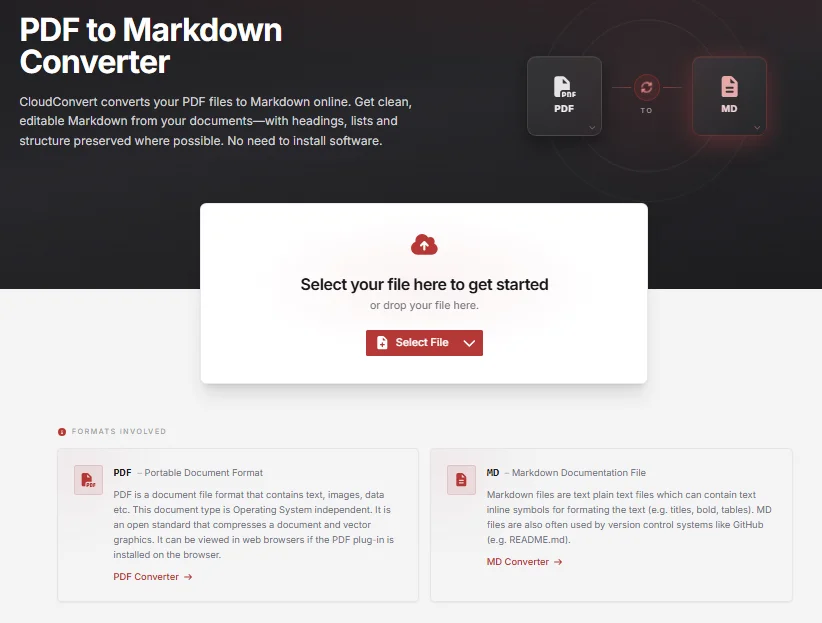
-
Clique em Selecionar Arquivo e envie seu PDF.
-
Certifique-se de que o formato de saída no menu suspenso esteja definido como MD ou Markdown.
-
Clique em Converter, aguarde alguns segundos para o processamento do arquivo e clique em Baixar.
⚠️ Notas Críticas:
- Aviso de Privacidade: Nunca envie extratos financeiros, contratos legais ou dados proprietários para ferramentas online gratuitas. Para arquivos confidenciais, pule diretamente para o Método 2.
- Limites: Algumas ferramentas restringem conversões diárias ou o tamanho do arquivo. Sempre verifique os limites atuais antes de enviar PDFs grandes.
Resultado:
O PDF é convertido para Markdown editável com cabeçalhos básicos, listas e estrutura preservados: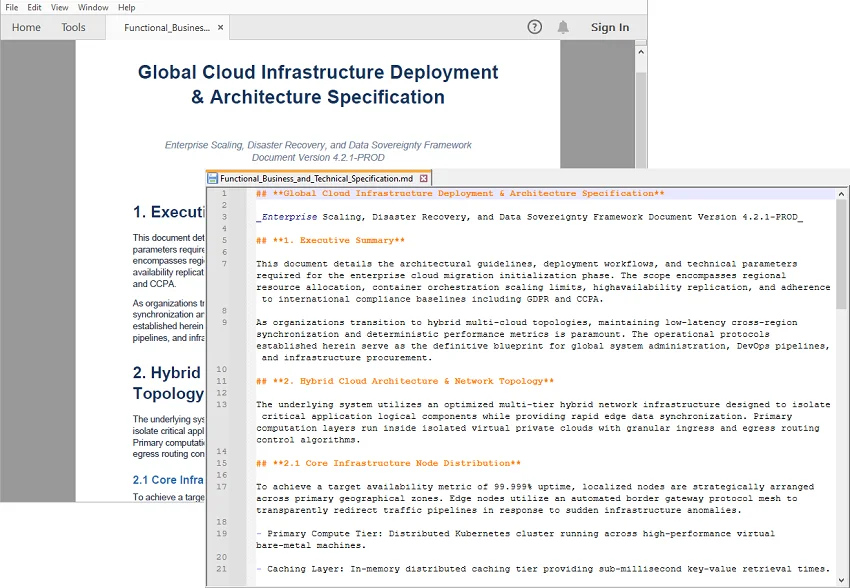
Método 2: Aplicativos Desktop Offline (Mais Seguro)
Se você estiver lidando com documentos confidenciais, extratos financeiros ou notas privadas, deve converter seus arquivos localmente com aplicativos desktop, sem enviá-los para a nuvem.
Opção A: MarkItDown GUI
Ideal para uma interface rápida de "apontar e clicar" sem precisar tocar em código.
-
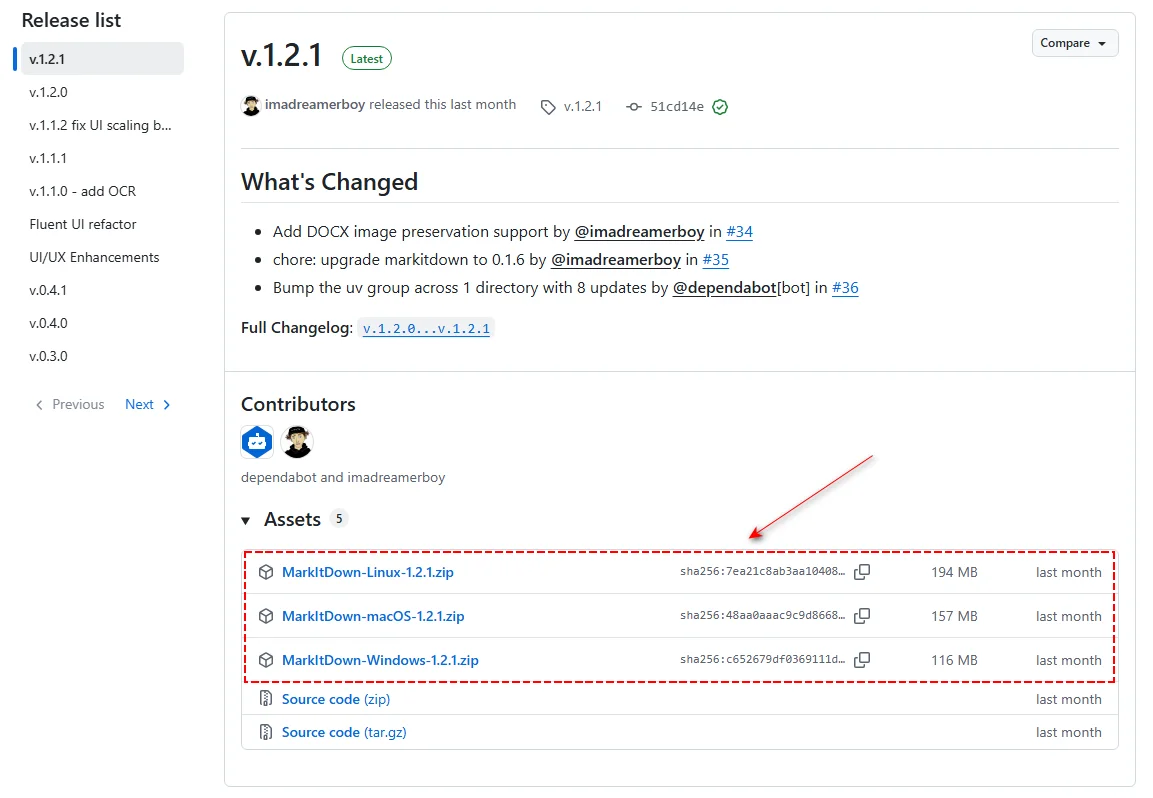
Baixe a versão mais recente do Markitdown-gui para seu sistema operacional (Windows, Linux ou Mac) na página de lançamentos do GitHub.
-
Extraia o arquivo ZIP baixado e clique duas vezes em MarkItDown.exe (ou o equivalente para Mac/Linux) para executá-lo.
-
Na janela aberta, clique em Adicionar Arquivos para carregar seu PDF e, em seguida, clique em Converter para gerar seu arquivo .md.
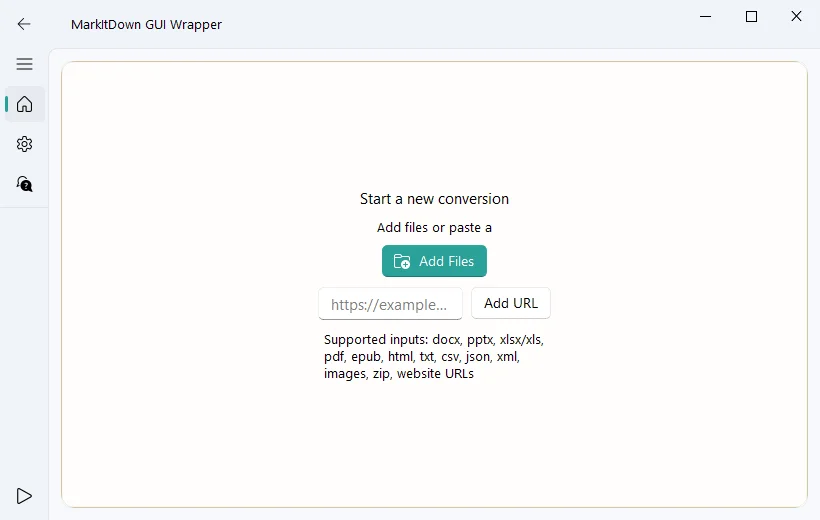
⚠️ Obtendo um arquivo em branco?
O MarkItDown funciona melhor com PDFs que contêm uma camada de texto selecionável. Se a saída estiver vazia, seu PDF pode ser digitalizado ou baseado em imagem. Pule para o Método 4 (IA de Visão).
Opção B: VS Code e Extensão MarkItDown
Ideal se você já usa o VS Code e deseja converter arquivos diretamente dentro do seu espaço de trabalho.
-
Abra o Visual Studio Code.
-
Vá para o Marketplace de Extensões pressionando Ctrl+Shift+X (ou Cmd+Shift+X no Mac).
-
Pesquise por MarkItDown e clique em Instalar.
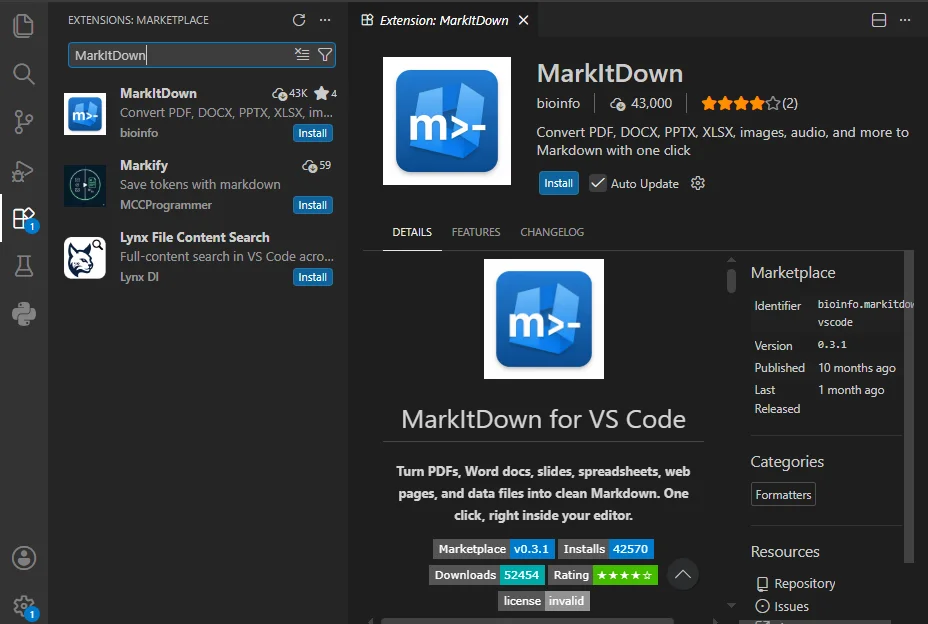
-
Abra sua pasta de projeto (Arquivo > Abrir Pasta) e arraste seu PDF para a barra lateral do Explorer do VS Code.
-
Na barra lateral esquerda do Explorer, clique com o botão direito no nome do arquivo PDF e selecione MarkItDown: Convert File to Markdown.
⚠️ Não clique duas vezes no PDF!
Abrir um PDF diretamente no painel do editor do VS Code apenas exibirá um texto binário ilegível. Sempre use o menu de clique com o botão direito na barra lateral.
Método 3: Bibliotecas Python (Melhor para Texto Limpo e Automação em Lote)
Se você tem dezenas ou centenas de PDFs baseados em texto para converter, clicar neles manualmente é altamente ineficiente. Bibliotecas Python permitem que você crie um pipeline automatizado para processar uma pasta inteira de documentos de uma só vez.
Opção A: Utilitário Python Microsoft MarkItDown
Use esta biblioteca de código aberto quando quiser uma maneira direta e totalmente gratuita de transformar PDFs em Markdown.
-
Abra seu terminal e instale o pacote MarkItDown via pip:
pip install "markitdown[all]" -
Crie um novo arquivo Python (por exemplo, batch_convert.py) e cole o código a seguir para converter todos os PDFs no diretório atual:
import glob import os from markitdown import MarkItDown md = MarkItDown() # Obter todos os arquivos PDF na pasta atual pdf_files = glob.glob("*.pdf") if not pdf_files: print("Nenhum arquivo PDF encontrado.") else: print(f"Processando {len(pdf_files)} arquivo(s)...") for pdf_file in pdf_files: output_file = os.path.splitext(pdf_file)[0] + ".md" try: print(f"Convertendo: {pdf_file}") result = md.convert(pdf_file) with open(output_file, "w", encoding="utf-8") as f: f.write(result.text_content) except Exception as e: print(f"Erro ao converter {pdf_file}: {e}") print("Concluído.") -
Execute o script no seu terminal para gerar seu arquivo Markdown instantaneamente.
Opção B: Spire.PDF para Python
Se você trabalha em um ambiente corporativo e precisa de controles avançados e granulares — como direcionar intervalos de páginas específicos ou isolar tabelas de texto comum — bibliotecas de nível empresarial como o Spire.PDF para Python oferecem APIs dedicadas para lidar com esses requisitos.
-
Instale a biblioteca via terminal:
pip install Spire.PDF -
Adicione um arquivo Python e cole os seguintes trechos de código para converter fatias de páginas específicas de todos os PDFs na pasta atual para Markdown:
import glob
import os
from spire.pdf.common import *
from spire.pdf import *

pdf_files = glob.glob("*.pdf")

if not pdf_files:
    print("Nenhum arquivo PDF encontrado.")
else:
    for pdf_file in pdf_files:
        output_file = os.path.splitext(pdf_file)[0] + "_partial.md"
        print(f"Extraindo páginas de: {pdf_file}")

        src_pdf = PdfDocument()
        src_pdf.LoadFromFile(pdf_file)
        extracted_pdf = PdfDocument()

        # Salvar intervalo de páginas específico em Markdown (índice baseado em zero: 1 a 4 extrai as páginas 2 a 5)
        if src_pdf.Pages.Count > 1:
            extracted_pdf.InsertPageRange(src_pdf, 1, min(4, src_pdf.Pages.Count - 1))
            extracted_pdf.SaveToFile(output_file, FileFormat.Markdown)
        else:
            print(f"Ignorado {pdf_file}: Menos de 2 páginas.")

        src_pdf.Close()
        extracted_pdf.Close()

print("Processamento em lote finalizado.")
⚠️ Nota para Desenvolvedores:
A versão de avaliação do Spire.PDF possui limites básicos de processamento de página e inclui marcas d'água. Se você estiver testando esses cenários em um ambiente de produção empresarial, pode solicitar uma licença temporária gratuita para desbloquear capacidades programáticas irrestritas.
Método 4: IA Multimodal (Melhor para PDFs Digitalizados e Layouts Complexos)
Ao lidar com PDFs digitalizados, artigos acadêmicos de várias colunas ou tabelas financeiras complexas, os parsers tradicionais frequentemente lutam para manter a formatação. Ferramentas de IA multimodal com reconhecimento de layout podem ajudar ao analisar visualmente a estrutura do documento para mapeá-la com precisão para Markdown.
Opção A: Microsoft MarkItDown com LLMs Multimodais (Configuração de API na Nuvem)
Você pode configurar a biblioteca MarkItDown da Microsoft para analisar documentos visuais instalando seu plugin oficial de OCR e conectando-o a um Modelo de Linguagem Grande com capacidade de visão, como o GPT-4o da OpenAI.
-
Instale a biblioteca principal, o plugin de OCR e a ponte da OpenAI:
pip install "markitdown[all]" markitdown-ocr openai -
Execute o script Python:
from markitdown import MarkItDown
from openai import OpenAI

# Inicializar o cliente OpenAI
client = OpenAI(api_key="sua-chave-api-openai")

# Habilitar plugins para carregar 'markitdown-ocr' e vinculá-lo ao GPT-4o para análise visual
md = MarkItDown(
    enable_plugins=True,
    llm_client=client,
    llm_model="gpt-4o",
)

# O plugin renderiza as páginas do PDF internamente e usa a LLM para estruturar o Markdown
result = md.convert("relatorio_digitalizado.pdf")

# Imprimir a saída Markdown estruturada
print(result.text_content)
⚠️ Aviso de Custo:
Como essa abordagem envia páginas de documentos como tokens visuais para a OpenAI, processar centenas de páginas digitalizadas pode aumentar rapidamente sua conta de API. Sempre teste primeiro com uma amostra pequena de 2 páginas.
Opção B: Modelos de IA de Código Aberto Locais (Melhor para Privacidade e Tarefas em Lote Gratuitas)
Para dados sensíveis ou pipelines de documentos em grande escala onde os custos de API na nuvem podem aumentar, modelos de documentos de código aberto oferecem uma alternativa local.
- MinerU (Magic-PDF): Otimizado para layouts científicos complexos. Projetado para remover cabeçalhos e rodapés enquanto converte fórmulas matemáticas em LaTeX markdown.
- Marker: Adaptado para livros didáticos e documentos de várias colunas. Ajuda a detectar ordens de leitura para produzir tabelas e blocos de texto em markdown mais limpos.
- LLMs de Visão Locais (via Ollama): Ao executar modelos multimodais como
llama3.2-visionouminicpm-vlocalmente via Ollama, você pode criar scripts para processar capturas de tela de páginas diretamente através de um endpoint local gratuitamente.
⚠️ Requisitos de Hardware:
Executar essas ferramentas de IA de código aberto localmente geralmente requer uma máquina equipada com uma placa de vídeo dedicada (uma GPU NVIDIA com suporte a CUDA) e cerca de 8GB a 16GB de VRAM para garantir velocidades de processamento eficientes.
Soluções Rápidas para Problemas Comuns na Conversão de PDF para MD
-
As colunas de texto ficaram misturadas
Se seu PDF tem um layout de várias colunas, conversores padrão podem ler a página inteira e embaralhar o texto. Para corrigir isso, tente ferramentas de IA que consigam ler visualmente o layout e manter as colunas separadas. -
Imagens e gráficos estão faltando ou quebrados
O Markdown lida com imagens através de links de arquivos externos ou dados de texto incorporados (como Base64). Se suas imagens não estiverem aparecendo, verifique se os caminhos dos arquivos ou códigos de incorporação estão corretos. Para ferramentas mais simples que removem completamente as imagens durante a conversão, você precisará salvar manualmente os gráficos e vinculá-los em seu texto Markdown. -
Símbolos estranhos e caixas estranhas aparecem
PDFs mais antigos com fontes personalizadas frequentemente se transformam em texto ilegível durante a conversão. Tente usar um aplicativo desktop offline (Método 2) para um melhor tratamento de fontes locais. Se isso falhar, trate-o como um arquivo digitalizado e deixe a IA lê-lo visualmente. -
O arquivo é muito grande para converter
Algumas ferramentas online gratuitas rejeitam arquivos acima de 10MB. Para corrigir isso, divida o arquivo PDF antes de enviá-lo.
Perguntas Frequentes (FAQs)
P1: Converter um PDF para Markdown preservará hiperlinks e sumário?
R1: Tags de hiperlink padrão ([Texto](URL)) geralmente são preservadas. No entanto, links de âncora internos do PDF (como um sumário clicável que pula para a página 5) serão quebrados, já que o Markdown lida com a navegação de documentos de forma diferente através de IDs de cabeçalho (#).
P2: Por que minha saída de PDF para Markdown está vazia?
R2: Seu PDF provavelmente foi digitalizado ou é baseado em imagem, portanto, conversores normais não conseguem ler sua camada de texto. Use OCR ou IA de Visão em vez disso.
P3: É seguro usar conversores online de PDF para Markdown?
R3: Apenas para PDFs não sensíveis. Não envie contratos, registros financeiros, dados pessoais ou documentos comerciais internos para conversores online.
Considerações Finais
Não existe um conversor universal de PDF para Markdown. O método correto depende do seu tipo de documento, requisitos de privacidade e tamanho do fluxo de trabalho.
Em resumo, use ferramentas online para conveniência, aplicativos offline para privacidade rigorosa, bibliotecas Python para automação em lote e métodos baseados em IA para layouts complexos ou digitalizados.
Isenção de responsabilidade: Todas as ferramentas de terceiros, plataformas e projetos de código aberto mencionados neste artigo são referenciados estritamente para fins informativos e educacionais. Não somos afiliados, patrocinados ou endossados por nenhum desses serviços externos.
PDF를 Markdown으로 변환하는 4가지 방법 (완벽 가이드)
PDF 파일을 마크다운(.md)으로 변환하는 것은 Obsidian과 같은 개인 지식 관리 도구에 문서를 가져오거나, 대규모 언어 모델(LLM)에 입력하기 위해 텍스트를 정리하거나, 혹은 복잡하고 경직된 서식을 제거해야 할 때 흔히 겪는 골칫거리입니다.
모든 PDF를 완벽하게 처리하는 단 하나의 도구는 없습니다. 가장 좋은 방법은 파일이 하나인지 수천 개인지, 레이아웃이 얼마나 복잡한지, 그리고 데이터가 비공개인지 여부에 따라 달라집니다. 이러한 일반적인 시나리오를 바탕으로, 아래에 4가지 실용적인 PDF를 MD로 변환하는 방법을 정리했습니다. 바로 시작해 보겠습니다!
빠른 답변: 어떤 PDF-마크다운 변환 방법을 사용해야 할까요?
| 방법 | 적합한 용도 | 개인정보 보호 수준 | 주요 제한 사항 |
|---|---|---|---|
| 온라인 변환기 | 일회성, 비민감성 PDF | 낮음~보통 | 파일이 타사 서비스에서 처리됨 |
| 오프라인 데스크톱 앱 | 개인 메모, 계약서, 내부 문서 | 완전 로컬 시 높음 | 스캔본이나 복잡한 PDF 처리에 어려움이 있을 수 있음 |
| 파이썬 라이브러리 | 대량 변환 및 자동화 | 로컬 실행 시 높음 | 코딩 및 종속성 관리 필요 |
| 멀티모달 AI | 스캔된 PDF, 수식, 다단 레이아웃 | 도구에 따라 다름 | API 비용 또는 고성능 로컬 하드웨어(GPU) 필요; AI 환각 가능성 |
방법 1: 온라인 변환기 (가장 쉬움)
파일 개수가 적고, PDF가 일반적인 텍스트 위주이며, 코딩 없이 해결하고 싶다면 무료 온라인 PDF-마크다운 변환 도구를 사용하여 환경 설정 없이 즉시 변환할 수 있습니다.
주요 온라인 변환기
- CloudConvert: 기본적인 헤더 구조와 글머리 기호를 잘 유지하는 신뢰도 높은 웹 유틸리티입니다.
- Md-to.com: PDF, Word, HTML 등 다양한 파일 형식을 마크다운으로 변환하는 데 최적화된 간단한 웹 도구입니다.
온라인에서 PDF를 마크다운으로 변환하는 방법
-
선택한 온라인 변환기(예: CloudConvert PDF to MD 도구)를 엽니다.
-
파일 선택(Select File)을 클릭하고 PDF를 업로드합니다.
-
출력 형식 드롭다운이 MD 또는 Markdown으로 설정되어 있는지 확인합니다.
-
변환(Convert)을 클릭하고 파일 처리가 완료될 때까지 잠시 기다린 후 다운로드를 클릭합니다.
⚠️ 주의 사항:
- 개인정보 경고: 재무제표, 법적 계약서, 기밀 데이터는 절대 무료 온라인 도구에 업로드하지 마세요. 기밀 파일의 경우 바로 방법 2로 넘어가세요.
- 제한: 일부 도구는 일일 변환 횟수나 파일 크기를 제한합니다. 대용량 PDF를 업로드하기 전에 항상 현재 제한 사항을 확인하세요.
결과:
PDF가 기본적인 헤더, 목록, 구조가 유지된 편집 가능한 마크다운으로 변환됩니다:
방법 2: 오프라인 데스크톱 앱 (가장 안전함)
기밀 문서, 재무제표, 개인 메모를 다루는 경우, 클라우드에 업로드하지 않고 데스크톱 앱을 사용하여 로컬에서 파일을 변환해야 합니다.
옵션 A: MarkItDown GUI
코딩 없이 클릭 몇 번으로 빠르게 처리하고 싶을 때 가장 좋습니다.
-
GitHub 릴리스 페이지에서 사용 중인 운영체제(Windows, Linux, Mac)에 맞는 최신 Markitdown-gui 버전을 다운로드합니다.
-
다운로드한 ZIP 파일의 압축을 풀고 MarkItDown.exe(또는 Mac/Linux용 실행 파일)를 더블 클릭하여 실행합니다.
-
열린 창에서 파일 추가(Add Files)를 클릭하여 PDF를 불러온 다음, 변환(Convert)을 클릭하여 .md 파일을 생성합니다.
⚠️ 빈 파일이 생성되나요?
MarkItDown은 텍스트 선택이 가능한 PDF에서 가장 잘 작동합니다. 결과물이 비어 있다면 해당 PDF는 스캔된 이미지 기반일 가능성이 높습니다. 이 경우 방법 4(Vision AI)로 넘어가세요.
옵션 B: VS Code 및 MarkItDown 확장 프로그램
이미 VS Code를 사용 중이며 작업 공간 내에서 직접 파일을 변환하고 싶을 때 가장 좋습니다.
-
Visual Studio Code를 엽니다.
-
Ctrl+Shift+X(Mac은 Cmd+Shift+X)를 눌러 확장 마켓플레이스로 이동합니다.
-
MarkItDown을 검색하고 설치(Install)를 클릭합니다.
-
프로젝트 폴더를 열고(파일 > 폴더 열기) PDF를 VS Code 탐색기 사이드바에 드래그합니다.
-
왼쪽 탐색기 사이드바에서 PDF 파일 이름을 마우스 오른쪽 버튼으로 클릭하고 MarkItDown: Convert File to Markdown을 선택합니다.
⚠️ PDF를 더블 클릭하지 마세요!
VS Code 편집기 패널에서 PDF를 직접 열면 읽을 수 없는 바이너리 텍스트만 표시됩니다. 항상 사이드바의 마우스 오른쪽 버튼 메뉴를 사용하세요.
방법 3: 파이썬 라이브러리 (깔끔한 텍스트 및 대량 자동화에 최적)
수십 또는 수백 개의 텍스트 기반 PDF를 변환해야 할 경우, 일일이 클릭하는 것은 매우 비효율적입니다. 파이썬 라이브러리를 사용하면 자동화된 파이프라인을 구축하여 폴더 전체의 문서를 한 번에 처리할 수 있습니다.
옵션 A: Microsoft MarkItDown 파이썬 유틸리티
PDF를 마크다운으로 변환하는 가장 간단하고 완전 무료인 방법을 원할 때 이 오픈 소스 라이브러리를 사용하세요.
-
터미널을 열고 pip를 통해 MarkItDown 패키지를 설치합니다:
pip install "markitdown[all]" -
새 파이썬 파일(예: batch_convert.py)을 만들고 다음 코드를 붙여넣어 현재 디렉터리의 모든 PDF를 변환합니다:
import glob import os from markitdown import MarkItDown md = MarkItDown() # 현재 폴더의 모든 PDF 파일 가져오기 pdf_files = glob.glob("*.pdf") if not pdf_files: print("PDF 파일을 찾을 수 없습니다.") else: print(f"{len(pdf_files)}개의 파일을 처리 중입니다...") for pdf_file in pdf_files: output_file = os.path.splitext(pdf_file)[0] + ".md" try: print(f"변환 중: {pdf_file}") result = md.convert(pdf_file) with open(output_file, "w", encoding="utf-8") as f: f.write(result.text_content) except Exception as e: print(f"{pdf_file} 변환 오류: {e}") print("완료.") -
터미널에서 스크립트를 실행하여 마크다운 파일을 즉시 생성합니다.
옵션 B: Spire.PDF for Python
엔터프라이즈 환경에서 특정 페이지 범위 지정이나 일반 텍스트에서 표 추출과 같은 고급 제어가 필요하다면, Spire.PDF for Python과 같은 엔터프라이즈급 라이브러리가 적합합니다.
-
터미널을 통해 라이브러리를 설치합니다:
pip install Spire.PDF -
파이썬 파일을 추가하고 다음 코드를 붙여넣어 현재 폴더의 모든 PDF에서 특정 페이지를 마크다운으로 변환합니다:
import glob
import os
from spire.pdf.common import *
from spire.pdf import *

pdf_files = glob.glob("*.pdf")

if not pdf_files:
    print("PDF 파일을 찾을 수 없습니다.")
else:
    for pdf_file in pdf_files:
        output_file = os.path.splitext(pdf_file)[0] + "_partial.md"
        print(f"추출 중: {pdf_file}")

        src_pdf = PdfDocument()
        src_pdf.LoadFromFile(pdf_file)
        extracted_pdf = PdfDocument()

        # 특정 페이지 범위를 마크다운으로 저장 (0부터 시작하는 인덱스: 1에서 4는 2~5페이지 추출)
        if src_pdf.Pages.Count > 1:
            extracted_pdf.InsertPageRange(src_pdf, 1, min(4, src_pdf.Pages.Count - 1))
            extracted_pdf.SaveToFile(output_file, FileFormat.Markdown)
        else:
            print(f"{pdf_file} 건너뜀: 2페이지 미만.")

        src_pdf.Close()
        extracted_pdf.Close()

print("일괄 처리 완료.")
⚠️ 개발자 참고 사항:
Spire.PDF 평가판에는 페이지 처리 제한이 있으며 워터마크가 포함됩니다. 엔터프라이즈 프로덕션 환경에서 테스트하는 경우, 무료 임시 라이선스를 요청하여 제한 없는 프로그래밍 기능을 사용할 수 있습니다.
방법 4: 멀티모달 AI (스캔된 PDF 및 복잡한 레이아웃에 최적)
스캔된 PDF, 다단 학술 논문, 복잡한 재무 표를 다룰 때 기존 파서는 서식을 유지하는 데 어려움을 겪습니다. 레이아웃을 이해하는 멀티모달 AI 도구는 문서 구조를 시각적으로 분석하여 마크다운으로 정확하게 변환하는 데 도움을 줍니다.
옵션 A: 멀티모달 LLM을 활용한 Microsoft MarkItDown (클라우드 API 설정)
공식 OCR 플러그인을 설치하고 OpenAI의 GPT-4o와 같은 시각 인식 가능 LLM에 연결하여 시각적 문서를 파싱하도록 Microsoft의 MarkItDown 라이브러리를 구성할 수 있습니다.
-
핵심 라이브러리, OCR 플러그인, OpenAI 브리지를 설치합니다:
pip install "markitdown[all]" markitdown-ocr openai -
파이썬 스크립트를 실행합니다:
from markitdown import MarkItDown
from openai import OpenAI

# OpenAI 클라이언트 초기화
client = OpenAI(api_key="your-openai-api-key")

# 플러그인을 활성화하여 'markitdown-ocr'을 로드하고 시각적 분석을 위해 GPT-4o에 바인딩
md = MarkItDown(
    enable_plugins=True,
    llm_client=client,
    llm_model="gpt-4o",
)

# 플러그인이 내부적으로 PDF 페이지를 렌더링하고 LLM을 사용하여 마크다운 구조화
result = md.convert("scanned_report.pdf")

# 구조화된 마크다운 출력 인쇄
print(result.text_content)
⚠️ 비용 경고:
이 방식은 문서 페이지를 시각적 토큰으로 OpenAI에 전송하므로, 수백 페이지의 스캔본을 처리하면 API 비용이 빠르게 증가할 수 있습니다. 항상 2페이지 정도의 샘플로 먼저 테스트하세요.
옵션 B: 로컬 오픈 소스 AI 모델 (개인정보 보호 및 무료 일괄 작업에 최적)
민감한 데이터나 클라우드 API 비용이 부담되는 대규모 문서 파이프라인의 경우, 오픈 소스 문서 모델이 로컬 대안이 될 수 있습니다.
- MinerU (Magic-PDF): 복잡한 과학 논문 레이아웃에 최적화되어 있습니다. 헤더와 푸터를 제거하고 수학 공식을 LaTeX 마크다운으로 변환하도록 설계되었습니다.
- Marker: 교과서 및 다단 문서에 맞춤화되어 있습니다. 읽기 순서를 감지하여 더 깔끔한 마크다운 표와 텍스트 블록을 생성합니다.
- 로컬 Vision LLM (Ollama 사용): Ollama를 통해
llama3.2-vision이나minicpm-v와 같은 멀티모달 모델을 로컬에서 실행하여, 페이지 스크린샷을 로컬 엔드포인트로 처리하는 스크립트를 무료로 만들 수 있습니다.
⚠️ 하드웨어 요구 사항:
이러한 오픈 소스 AI 도구를 로컬에서 실행하려면 일반적으로 전용 그래픽 카드(CUDA를 지원하는 NVIDIA GPU)와 효율적인 처리 속도를 보장하기 위해 약 8GB~16GB의 VRAM이 필요합니다.
PDF를 MD로 변환 시 흔한 문제 해결
-
텍스트 열이 섞임
PDF가 다단 레이아웃인 경우, 표준 변환기는 페이지 전체를 가로질러 읽어 텍스트를 뒤섞을 수 있습니다. 이를 해결하려면 레이아웃을 시각적으로 읽고 열을 분리할 수 있는 AI 도구를 사용해 보세요. -
이미지와 차트가 누락되거나 깨짐
마크다운은 외부 파일 링크나 임베디드 텍스트 데이터(Base64 등)를 통해 이미지를 처리합니다. 이미지가 보이지 않는다면 파일 경로가 올바른지 확인하세요. 변환 중 이미지를 완전히 제거하는 도구의 경우, 차트를 수동으로 저장하여 마크다운 텍스트에 연결해야 합니다. -
이상한 기호와 상자가 나타남
사용자 지정 폰트를 사용하는 오래된 PDF는 변환 시 깨지는 경우가 많습니다. 더 나은 로컬 폰트 처리를 위해 오프라인 데스크톱 앱(방법 2)을 사용해 보세요. 그래도 안 되면 스캔된 파일로 간주하고 AI가 시각적으로 읽도록 하세요. -
파일이 너무 커서 변환되지 않음
일부 무료 온라인 도구는 10MB 이상의 파일을 거부합니다. 이 경우 업로드 전에 PDF 파일을 분할하세요.
자주 묻는 질문(FAQ)
Q1: PDF를 마크다운으로 변환하면 하이퍼링크와 목차가 유지되나요?
A1: 표준 하이퍼링크 태그([텍스트](URL))는 일반적으로 유지됩니다. 하지만 마크다운은 헤더 ID(#)를 통해 문서 탐색을 처리하므로, PDF 내부의 앵커 링크(5페이지로 이동하는 클릭 가능한 목차 등)는 작동하지 않게 됩니다.
Q2: PDF를 마크다운으로 변환했는데 결과물이 비어 있습니다.
A2: PDF가 스캔되었거나 이미지 기반일 가능성이 높습니다. 일반 변환기는 텍스트 레이어를 읽을 수 없으므로 OCR이나 Vision AI를 대신 사용하세요.
Q3: 온라인 PDF-마크다운 변환기를 사용하는 것이 안전한가요?
A3: 비민감성 PDF에만 사용하세요. 계약서, 재무 기록, 개인 데이터, 내부 비즈니스 문서는 온라인 변환기에 절대 업로드하지 마세요.
결론
모든 상황에 완벽한 PDF-마크다운 변환기는 없습니다. 올바른 방법은 문서 유형, 개인정보 보호 요구 사항, 워크플로 규모에 따라 달라집니다.
요약하자면, 편리함을 위해서는 온라인 도구를, 엄격한 개인정보 보호를 위해서는 오프라인 앱을, 대량 자동화를 위해서는 파이썬 라이브러리를, 복잡하거나 스캔된 레이아웃을 위해서는 AI 기반 방법을 사용하세요.
면책 조항: 이 기사에서 언급된 모든 타사 도구, 플랫폼 및 오픈 소스 프로젝트는 정보 및 교육 목적으로만 참조되었습니다. 당사는 이러한 외부 서비스와 제휴, 후원 또는 보증 관계가 없습니다.
4 modi per convertire PDF in Markdown (Guida completa)
Indice
Convertire file PDF in Markdown (.md) è un problema comune quando si ha bisogno di importare documenti in basi di conoscenza personali come Obsidian, pulire il testo per alimentarlo in modelli linguistici di grandi dimensioni (LLM) o semplicemente eliminare formattazioni pesanti e rigide.
Non esiste un unico strumento in grado di gestire ogni PDF alla perfezione. L'approccio migliore dipende dal fatto che tu abbia un singolo file o migliaia, dalla complessità del layout e dalla riservatezza dei tuoi dati. In base a questi scenari comuni, abbiamo delineato quattro metodi pratici per la conversione da PDF a MD qui sotto. Entriamo nel vivo!
Risposta rapida: quale metodo di conversione da PDF a Markdown dovresti usare?
| Metodo | Ideale per | Livello di privacy | Limitazione principale |
|---|---|---|---|
| Convertitori online | PDF singoli, non sensibili | Da basso a medio | I file vengono elaborati da un servizio di terze parti |
| App desktop offline | Note private, contratti, documenti interni | Alto se completamente locale | Potrebbero avere difficoltà con PDF scansionati o complessi |
| Librerie Python | Conversione in batch e automazione | Alto se eseguite localmente | Richiede programmazione e gestione delle dipendenze |
| AI multimodale | PDF scansionati, equazioni, layout a più colonne | Dipende dallo strumento | Richiede costi API o hardware locale potente (GPU); potenziali allucinazioni dell'AI. |
Metodo 1: Convertitori online (Il più semplice)
Se hai solo pochi file, il tuo PDF è composto principalmente da testo standard e preferisci una soluzione senza programmazione, gli strumenti gratuiti online per convertire PDF in Markdown offrono una conversione istantanea senza alcuna configurazione dell'ambiente.
I migliori convertitori online
- CloudConvert: Utilità web altamente affidabile che preserva le strutture di base delle intestazioni e gli elenchi puntati.
- Md-to.com: Un semplice strumento web ottimizzato specificamente per la conversione tra Markdown e diversi formati di file, inclusi PDF, Word, HTML e altri.
Come convertire PDF in Markdown online
-
Apri il convertitore online scelto (es. lo strumento CloudConvert PDF to MD).
-
Clicca su Seleziona file e carica il tuo PDF.
-
Assicurati che il formato di output nel menu a tendina sia impostato su MD o Markdown.
-
Clicca su Converti, attendi qualche secondo per l'elaborazione del file e clicca su Scarica.
⚠️ Note critiche:
- Avviso sulla privacy: Non caricare mai estratti conto, contratti legali o dati proprietari su strumenti online gratuiti. Per file riservati, passa subito al Metodo 2.
- Limiti: Alcuni strumenti limitano le conversioni giornaliere o la dimensione dei file. Controlla sempre i limiti attuali prima di caricare PDF di grandi dimensioni.
Risultato:
Il PDF viene convertito in Markdown modificabile con intestazioni, elenchi e struttura di base preservati:
Metodo 2: Applicazioni desktop offline (Il più sicuro)
Se hai a che fare con documenti riservati, estratti conto o note private, dovresti convertire i tuoi file localmente con app desktop senza caricarli sul cloud.
Opzione A: MarkItDown GUI
Ideale per un'interfaccia rapida "punta e clicca" senza toccare il codice.
-
Scarica l'ultima versione di Markitdown-gui per il tuo sistema operativo (Windows, Linux o Mac) dalla pagina delle release di GitHub.
-
Estrai il file ZIP scaricato e fai doppio clic su MarkItDown.exe (o l'equivalente per Mac/Linux) per eseguirlo.
-
Nella finestra aperta, clicca su Aggiungi file per caricare il tuo PDF, quindi clicca su Converti per generare il tuo file .md.
⚠️ Ottieni un file vuoto?
MarkItDown funziona meglio con PDF che contengono un livello di testo selezionabile. Se l'output è vuoto, il tuo PDF potrebbe essere scansionato o basato su immagini. Passa direttamente al Metodo 4 (Vision AI).
Opzione B: VS Code ed estensione MarkItDown
Ideale se utilizzi già VS Code e desideri convertire i file direttamente all'interno del tuo spazio di lavoro.
-
Apri Visual Studio Code.
-
Vai al Marketplace delle estensioni premendo Ctrl+Shift+X (o Cmd+Shift+X su Mac).
-
Cerca MarkItDown e clicca su Installa.
-
Apri la cartella del tuo progetto (File > Apri cartella) e trascina il tuo PDF nella barra laterale di Explorer di VS Code.
-
Nella barra laterale di Explorer a sinistra, fai clic destro sul nome del file PDF e seleziona MarkItDown: Convert File to Markdown.
⚠️ Non fare doppio clic sul PDF!
Aprire un PDF direttamente all'interno del pannello dell'editor di VS Code mostrerà solo testo binario illeggibile. Usa sempre il menu del tasto destro nella barra laterale.
Metodo 3: Librerie Python (Ideale per testo pulito e automazione in blocco)
Se hai decine o centinaia di PDF basati su testo da convertire, farlo manualmente è altamente inefficiente. Le librerie Python programmatiche ti consentono di creare una pipeline automatizzata per elaborare un'intera cartella di documenti in una sola volta.
Opzione A: Utilità Python Microsoft MarkItDown
Usa questa libreria open source quando desideri un modo semplice e completamente gratuito per trasformare i PDF in Markdown.
-
Apri il tuo terminale e installa il pacchetto MarkItDown tramite pip:
pip install "markitdown[all]" -
Crea un nuovo file Python (es. batch_convert.py) e incolla il seguente codice per convertire tutti i PDF nella directory corrente:
import glob import os from markitdown import MarkItDown md = MarkItDown() # Ottieni tutti i file PDF nella cartella corrente pdf_files = glob.glob("*.pdf") if not pdf_files: print("Nessun file PDF trovato.") else: print(f"Elaborazione di {len(pdf_files)} file...") for pdf_file in pdf_files: output_file = os.path.splitext(pdf_file)[0] + ".md" try: print(f"Conversione: {pdf_file}") result = md.convert(pdf_file) with open(output_file, "w", encoding="utf-8") as f: f.write(result.text_content) except Exception as e: print(f"Errore durante la conversione di {pdf_file}: {e}") print("Fatto.") -
Esegui lo script nel tuo terminale per generare istantaneamente il tuo file Markdown.
Opzione B: Spire.PDF per Python
Se lavori in un ambiente aziendale e richiedi controlli avanzati e granulari, come puntare a intervalli di pagine specifici o isolare tabelle dal testo normale, le librerie di livello enterprise come Spire.PDF per Python offrono API dedicate per gestire questi requisiti.
-
Installa la libreria tramite il tuo terminale:
pip install Spire.PDF -
Aggiungi un file Python e incolla i seguenti frammenti di codice per convertire porzioni di pagine specifiche da tutti i PDF nella cartella corrente in Markdown:
import glob
import os
from spire.pdf.common import *
from spire.pdf import *

pdf_files = glob.glob("*.pdf")

if not pdf_files:
    print("Nessun file PDF trovato.")
else:
    for pdf_file in pdf_files:
        output_file = os.path.splitext(pdf_file)[0] + "_partial.md"
        print(f"Estrazione pagine da: {pdf_file}")

        src_pdf = PdfDocument()
        src_pdf.LoadFromFile(pdf_file)
        extracted_pdf = PdfDocument()

        # Salva un intervallo di pagine specifico in Markdown (indice basato su zero: da 1 a 4 estrae le pagine da 2 a 5)
        if src_pdf.Pages.Count > 1:
            extracted_pdf.InsertPageRange(src_pdf, 1, min(4, src_pdf.Pages.Count - 1))
            extracted_pdf.SaveToFile(output_file, FileFormat.Markdown)
        else:
            print(f"Saltato {pdf_file}: meno di 2 pagine.")

        src_pdf.Close()
        extracted_pdf.Close()

print("Elaborazione batch terminata.")
⚠️ Nota per lo sviluppatore:
La versione di valutazione di Spire.PDF ha limiti di base sull'elaborazione delle pagine e include filigrane. Se stai testando questi scenari in un ambiente di produzione aziendale, puoi richiedere una licenza temporanea gratuita per sbloccare le funzionalità programmatiche senza restrizioni.
Metodo 4: AI multimodale (Ideale per PDF scansionati e layout complessi)
Quando si ha a che fare con PDF scansionati, documenti accademici a più colonne o tabelle finanziarie complesse, i parser tradizionali spesso faticano a mantenere la formattazione. Gli strumenti di AI multimodale consapevoli del layout possono aiutare analizzando visivamente la struttura del documento per mapparla accuratamente in Markdown.
Opzione A: Microsoft MarkItDown con LLM multimodali (Configurazione API Cloud)
Puoi configurare la libreria MarkItDown di Microsoft per analizzare documenti visivi installando il suo plugin OCR ufficiale e collegandolo a un modello linguistico di grandi dimensioni capace di visione, come GPT-4o di OpenAI.
-
Installa la libreria principale, il plugin OCR e il bridge OpenAI:
pip install "markitdown[all]" markitdown-ocr openai -
Esegui lo script Python:
from markitdown import MarkItDown
from openai import OpenAI

# Inizializza il client OpenAI
client = OpenAI(api_key="tua-chiave-api-openai")

# Abilita i plugin per caricare 'markitdown-ocr' e collegarlo a GPT-4o per l'analisi visiva
md = MarkItDown(
    enable_plugins=True,
    llm_client=client,
    llm_model="gpt-4o",
)

# Il plugin renderizza le pagine PDF internamente e usa l'LLM per strutturare il Markdown
result = md.convert("rapporto_scansionato.pdf")

# Stampa l'output markdown strutturato
print(result.text_content)
⚠️ Avviso sui costi:
Poiché questo approccio invia le pagine del documento come token visivi a OpenAI, l'elaborazione di centinaia di pagine scansionate può far aumentare rapidamente la tua fattura API. Testa sempre prima su un piccolo campione di 2 pagine.
Opzione B: Modelli AI open source locali (Ideale per privacy e attività batch gratuite)
Per dati sensibili o pipeline di documenti su larga scala in cui i costi delle API cloud potrebbero aumentare, i modelli di documenti open source offrono un'alternativa locale.
- MinerU (Magic-PDF): Ottimizzato per layout scientifici complessi. È progettato per eliminare intestazioni e piè di pagina mentre converte le formule matematiche in LaTeX markdown.
- Marker: Su misura per libri di testo e documenti a più colonne. Aiuta a rilevare l'ordine di lettura per produrre tabelle e blocchi di testo markdown più puliti.
- Vision LLM locali (tramite Ollama): Eseguendo modelli multimodali come
llama3.2-visionominicpm-vlocalmente tramite Ollama, puoi creare script per elaborare screenshot delle pagine direttamente attraverso un endpoint locale gratuitamente.
⚠️ Requisiti hardware:
L'esecuzione di questi strumenti AI open source localmente richiede generalmente una macchina dotata di una scheda grafica dedicata (una GPU NVIDIA con supporto CUDA) e circa 8GB-16GB di VRAM per garantire velocità di elaborazione efficienti.
Soluzioni rapide per problemi comuni di conversione da PDF a MD
-
Le colonne di testo si sono mescolate
Se il tuo PDF ha un layout a più colonne, i convertitori standard potrebbero leggere l'intera pagina e confondere il testo. Per risolvere questo problema, prova strumenti AI in grado di leggere visivamente il layout e mantenere le colonne separate. -
Immagini e grafici mancano o sono rotti
Markdown gestisce le immagini tramite link a file esterni o dati di testo incorporati (come Base64). Se le tue immagini non vengono visualizzate, ricontrolla se i percorsi dei file o i codici di incorporamento sono corretti. Per strumenti più semplici che eliminano completamente le immagini durante la conversione, dovrai salvare manualmente i grafici e collegarli nel tuo testo Markdown. -
Appaiono simboli strani e caselle strane
I vecchi PDF con font personalizzati spesso si trasformano in geroglifici durante la conversione. Prova a utilizzare un'app desktop offline (Metodo 2) per una migliore gestione dei font locali. Se non funziona, trattalo come un file scansionato e lascia che l'AI lo legga visivamente. -
Il file è troppo grande per essere convertito
Alcuni strumenti online gratuiti rifiutano file superiori a 10MB. Per risolvere questo problema, dividi il file PDF prima di caricarlo.
Domande frequenti (FAQ)
D1: La conversione di un PDF in Markdown preserverà i collegamenti ipertestuali e l'indice?
R1: I tag dei collegamenti ipertestuali standard ([Testo](URL)) vengono solitamente preservati. Tuttavia, i link di ancoraggio interni del PDF (come un indice cliccabile che salta alla pagina 5) si interromperanno, poiché Markdown gestisce la navigazione dei documenti in modo diverso tramite gli ID delle intestazioni (#).
D2: Perché il mio output da PDF a Markdown è vuoto?
R2: Il tuo PDF è probabilmente scansionato o basato su immagini, quindi i normali convertitori non possono leggere il suo livello di testo. Usa invece OCR o Vision AI.
D3: È sicuro utilizzare convertitori online da PDF a Markdown?
R3: Solo per PDF non sensibili. Non caricare contratti, documenti finanziari, dati personali o documenti aziendali interni su convertitori online.
Considerazioni finali
Non esiste un convertitore universale da PDF a Markdown. Il metodo giusto dipende dal tipo di documento, dai requisiti di privacy e dalle dimensioni del flusso di lavoro.
In breve, usa strumenti online per comodità, app offline per una privacy rigorosa, librerie Python per l'automazione in blocco e metodi basati su AI per layout complessi o scansionati.
Disclaimer: Tutti gli strumenti, le piattaforme e i progetti open source di terze parti menzionati in questo articolo sono citati esclusivamente a scopo informativo ed educativo. Non siamo affiliati, sponsorizzati o approvati da nessuno di questi servizi esterni.
4 façons de convertir un PDF en Markdown (Guide complet)
Table des matières
Convertir des fichiers PDF en Markdown (.md) est un casse-tête courant lorsque vous devez importer des documents dans des bases de connaissances personnelles comme Obsidian, nettoyer du texte pour l'alimenter dans des modèles de langage (LLM), ou simplement vous débarrasser d'un formatage lourd et rigide.
Il n'existe pas d'outil unique capable de traiter parfaitement tous les PDF. La meilleure approche dépend du nombre de fichiers (un seul ou des milliers), de la complexité de la mise en page et de la confidentialité de vos données. En fonction de ces scénarios courants, nous avons décrit ci-dessous quatre méthodes pratiques de conversion de PDF en MD. Plongeons dans le vif du sujet !
Réponse rapide : Quelle méthode de conversion PDF vers Markdown utiliser ?
| Méthode | Idéal pour | Niveau de confidentialité | Limitation principale |
|---|---|---|---|
| Convertisseurs en ligne | PDF ponctuels, non sensibles | Faible à moyen | Les fichiers sont traités par un service tiers |
| Applications de bureau hors ligne | Notes privées, contrats, documents internes | Élevé si totalement local | Peut avoir des difficultés avec les PDF numérisés ou complexes |
| Bibliothèques Python | Conversion par lots et automatisation | Élevé si exécuté localement | Nécessite des compétences en codage et la gestion des dépendances |
| IA multimodale | PDF numérisés, équations, mises en page multi-colonnes | Dépend de l'outil | Nécessite des coûts d'API ou un matériel local puissant (GPU) ; hallucinations potentielles de l'IA. |
Méthode 1 : Convertisseurs en ligne (La plus simple)
Si vous n'avez que quelques fichiers, que votre PDF est principalement composé de texte standard et que vous préférez une solution sans code, les outils gratuits de conversion de PDF en Markdown en ligne offrent une conversion instantanée sans aucune configuration d'environnement.
Principaux convertisseurs en ligne
- CloudConvert : Utilitaire web très fiable qui préserve les structures de titres de base et les listes à puces.
- Md-to.com : Un outil web simple optimisé spécifiquement pour la conversion entre Markdown et différents formats de fichiers, y compris PDF, Word, HTML, et plus encore.
Comment convertir un PDF en Markdown en ligne
-
Ouvrez le convertisseur en ligne de votre choix (par exemple, l'outil CloudConvert PDF to MD).
-
Cliquez sur Sélectionner un fichier et téléchargez votre PDF.
-
Assurez-vous que le format de sortie est réglé sur MD ou Markdown.
-
Cliquez sur Convertir, attendez quelques secondes que le fichier soit traité, puis cliquez sur Télécharger.
⚠️ Notes importantes :
- Avertissement de confidentialité : Ne téléchargez jamais de relevés financiers, de contrats juridiques ou de données propriétaires sur des outils en ligne gratuits. Pour les fichiers confidentiels, passez immédiatement à la méthode 2.
- Limites : Certains outils restreignent le nombre de conversions quotidiennes ou la taille des fichiers. Vérifiez toujours les limites actuelles avant de télécharger des PDF volumineux.
Résultat :
Le PDF est converti en Markdown modifiable avec les titres, les listes et la structure de base préservés :
Méthode 2 : Applications de bureau hors ligne (La plus sécurisée)
Si vous traitez des documents confidentiels, des relevés financiers ou des notes privées, vous devriez convertir vos fichiers localement avec des applications de bureau sans les télécharger sur le cloud.
Option A : MarkItDown GUI
Idéal pour une interface rapide, par pointer-cliquer, sans toucher au code.
-
Téléchargez la dernière version de Markitdown-gui pour votre système d'exploitation (Windows, Linux ou Mac) depuis la page des versions GitHub.
-
Extrayez le fichier ZIP téléchargé et double-cliquez sur MarkItDown.exe (ou l'équivalent Mac/Linux) pour l'exécuter.
-
Dans la fenêtre ouverte, cliquez sur Ajouter des fichiers pour charger votre PDF, puis cliquez sur Convertir pour générer votre fichier .md.
⚠️ Vous obtenez un fichier vide ?
MarkItDown fonctionne mieux avec les PDF contenant une couche de texte sélectionnable. Si la sortie est vide, votre PDF est peut-être numérisé ou basé sur des images. Passez directement à la méthode 4 (IA de vision).
Option B : VS Code et extension MarkItDown
Idéal si vous utilisez déjà VS Code et souhaitez convertir des fichiers directement dans votre espace de travail.
-
Ouvrez Visual Studio Code.
-
Allez dans le Marketplace des extensions en appuyant sur Ctrl+Shift+X (ou Cmd+Shift+X sur Mac).
-
Recherchez MarkItDown et cliquez sur Installer.
-
Ouvrez votre dossier de projet (Fichier > Ouvrir le dossier) et faites glisser votre PDF dans la barre latérale de l'explorateur VS Code.
-
Dans la barre latérale de l'explorateur à gauche, faites un clic droit sur le nom du fichier PDF et sélectionnez MarkItDown: Convert File to Markdown.
⚠️ Ne double-cliquez pas sur le PDF !
Ouvrir un PDF directement dans le panneau de l'éditeur VS Code affichera simplement du texte binaire illisible. Utilisez toujours le menu contextuel (clic droit) dans la barre latérale.
Méthode 3 : Bibliothèques Python (Idéal pour un texte propre et l'automatisation par lots)
Si vous avez des dizaines ou des centaines de PDF textuels à convertir, le faire manuellement est très inefficace. Les bibliothèques Python programmatiques vous permettent de créer un pipeline automatisé pour traiter un dossier entier de documents en une seule fois.
Option A : Utilitaire Python Microsoft MarkItDown
Utilisez cette bibliothèque open-source lorsque vous voulez un moyen simple et totalement gratuit de transformer des PDF en Markdown.
-
Ouvrez votre terminal et installez le package MarkItDown via pip :
pip install "markitdown[all]" -
Créez un nouveau fichier Python (par exemple, batch_convert.py) et collez le code suivant pour convertir tous les PDF du répertoire actuel :
import glob import os from markitdown import MarkItDown md = MarkItDown() # Obtenir tous les fichiers PDF dans le dossier actuel pdf_files = glob.glob("*.pdf") if not pdf_files: print("Aucun fichier PDF trouvé.") else: print(f"Traitement de {len(pdf_files)} fichier(s)...") for pdf_file in pdf_files: output_file = os.path.splitext(pdf_file)[0] + ".md" try: print(f"Conversion : {pdf_file}") result = md.convert(pdf_file) with open(output_file, "w", encoding="utf-8") as f: f.write(result.text_content) except Exception as e: print(f"Erreur lors de la conversion de {pdf_file} : {e}") print("Terminé.") -
Exécutez le script dans votre terminal pour générer instantanément votre fichier Markdown.
Option B : Spire.PDF pour Python
Si vous travaillez dans un environnement d'entreprise et avez besoin de contrôles avancés et granulaires — comme cibler des plages de pages spécifiques ou isoler des tableaux du texte brut — des bibliothèques de qualité entreprise comme Spire.PDF pour Python offrent des API dédiées pour répondre à ces exigences.
-
Installez la bibliothèque via votre terminal :
pip install Spire.PDF -
Ajoutez un fichier Python et collez les extraits de code suivants pour convertir des tranches de pages spécifiques de tous les PDF du dossier actuel en Markdown :
import glob
import os
from spire.pdf.common import *
from spire.pdf import *

pdf_files = glob.glob("*.pdf")

if not pdf_files:
    print("Aucun fichier PDF trouvé.")
else:
    for pdf_file in pdf_files:
        output_file = os.path.splitext(pdf_file)[0] + "_partial.md"
        print(f"Extraction des pages de : {pdf_file}")

        src_pdf = PdfDocument()
        src_pdf.LoadFromFile(pdf_file)
        extracted_pdf = PdfDocument()

        # Enregistrer une plage de pages spécifique en Markdown (index basé sur zéro : 1 à 4 extrait les pages 2 à 5)
        if src_pdf.Pages.Count > 1:
            extracted_pdf.InsertPageRange(src_pdf, 1, min(4, src_pdf.Pages.Count - 1))
            extracted_pdf.SaveToFile(output_file, FileFormat.Markdown)
        else:
            print(f"Ignoré {pdf_file} : Moins de 2 pages.")

        src_pdf.Close()
        extracted_pdf.Close()

print("Traitement par lots terminé.")
⚠️ Note pour les développeurs :
La version d'évaluation de Spire.PDF a des limites de traitement de pages de base et inclut des filigranes. Si vous testez ces scénarios dans un environnement de production d'entreprise, vous pouvez demander une licence temporaire gratuite pour débloquer des capacités programmatiques illimitées.
Méthode 4 : IA multimodale (Idéal pour les PDF numérisés et les mises en page complexes)
Lorsqu'il s'agit de PDF numérisés, d'articles académiques multi-colonnes ou de tableaux financiers complexes, les analyseurs traditionnels ont souvent du mal à maintenir le formatage. Les outils d'IA multimodale conscients de la mise en page peuvent aider en analysant visuellement la structure du document pour la mapper avec précision en Markdown.
Option A : Microsoft MarkItDown avec LLM multimodaux (Configuration API Cloud)
Vous pouvez configurer la bibliothèque MarkItDown de Microsoft pour analyser des documents visuels en installant son extension OCR officielle et en la connectant à un modèle de langage capable de vision, tel que GPT-4o d'OpenAI.
-
Installez la bibliothèque principale, le plugin OCR et le pont OpenAI :
pip install "markitdown[all]" markitdown-ocr openai -
Exécutez le script Python :
from markitdown import MarkItDown
from openai import OpenAI

# Initialiser le client OpenAI
client = OpenAI(api_key="votre-cle-api-openai")

# Activer les plugins pour charger 'markitdown-ocr' et le lier à GPT-4o pour l'analyse visuelle
md = MarkItDown(
    enable_plugins=True,
    llm_client=client,
    llm_model="gpt-4o",
)

# Le plugin rend les pages PDF en interne et utilise le LLM pour structurer le Markdown
result = md.convert("rapport_scanne.pdf")

# Imprimer la sortie markdown structurée
print(result.text_content)
⚠️ Avertissement sur les coûts :
Comme cette approche envoie des pages de documents sous forme de jetons visuels à OpenAI, le traitement de centaines de pages numérisées peut rapidement augmenter votre facture API. Testez toujours sur un petit échantillon de 2 pages d'abord.
Option B : Modèles d'IA open-source locaux (Idéal pour la confidentialité et les tâches par lots gratuites)
Pour les données sensibles ou les pipelines de documents à grande échelle où les coûts d'API cloud pourraient grimper, les modèles de documents open-source offrent une alternative locale.
- MinerU (Magic-PDF) : Optimisé pour les mises en page scientifiques complexes. Il est conçu pour supprimer les en-têtes et les pieds de page tout en convertissant les formules mathématiques en LaTeX markdown.
- Marker : Adapté aux manuels scolaires et aux documents multi-colonnes. Il aide à détecter l'ordre de lecture pour produire des tableaux et des blocs de texte markdown plus propres.
- LLM de vision locaux (via Ollama) : En exécutant des modèles multimodaux comme
llama3.2-visionouminicpm-vlocalement via Ollama, vous pouvez créer des scripts pour traiter les captures d'écran de pages directement via un point de terminaison local gratuitement.
⚠️ Configuration matérielle requise :
L'exécution de ces outils d'IA open-source localement nécessite généralement une machine équipée d'une carte graphique dédiée (un GPU NVIDIA avec support CUDA) et d'environ 8 Go à 16 Go de VRAM pour garantir des vitesses de traitement efficaces.
Solutions rapides aux problèmes courants de conversion PDF vers MD
-
Les colonnes de texte sont mélangées
Si votre PDF a une mise en page multi-colonnes, les convertisseurs standard peuvent lire sur toute la largeur de la page et mélanger le texte. Pour corriger cela, essayez des outils d'IA capables de lire visuellement la mise en page et de garder les colonnes séparées. -
Les images et les graphiques sont manquants ou cassés
Markdown gère les images via des liens de fichiers externes ou des données textuelles intégrées (comme Base64). Si vos images ne s'affichent pas, vérifiez si les chemins de fichiers ou les codes d'intégration sont corrects. Pour les outils plus simples qui suppriment complètement les images lors de la conversion, vous devrez enregistrer manuellement les graphiques et les lier dans votre texte Markdown. -
Des symboles étranges et des boîtes bizarres apparaissent
Les anciens PDF avec des polices personnalisées se transforment souvent en charabia lors de la conversion. Essayez d'utiliser une application de bureau hors ligne (Méthode 2) pour une meilleure gestion locale des polices. Si cela échoue, traitez-le comme un fichier numérisé et laissez l'IA le lire visuellement. -
Le fichier est trop volumineux pour être converti
Certains outils en ligne gratuits rejettent les fichiers de plus de 10 Mo. Pour corriger cela, divisez le fichier PDF avant de le télécharger.
FAQ
Q1 : La conversion d'un PDF en Markdown préservera-t-elle les hyperliens et la table des matières ?
A1 : Les balises de lien hypertexte standard ([Texte](URL)) sont généralement préservées. Cependant, les liens d'ancrage internes au PDF (comme une table des matières cliquable qui saute à la page 5) seront rompus, car Markdown gère la navigation dans les documents différemment via les ID de titre (#).
Q2 : Pourquoi ma sortie PDF vers Markdown est-elle vide ?
A2 : Votre PDF est probablement numérisé ou basé sur des images, donc les convertisseurs normaux ne peuvent pas lire sa couche de texte. Utilisez plutôt l'OCR ou l'IA de vision.
Q3 : Est-il sûr d'utiliser des convertisseurs PDF vers Markdown en ligne ?
A3 : Uniquement pour les PDF non sensibles. Ne téléchargez pas de contrats, de dossiers financiers, de données personnelles ou de documents commerciaux internes sur des convertisseurs en ligne.
Réflexions finales
Il n'existe pas de meilleur convertisseur PDF vers Markdown universel. La bonne méthode dépend du type de votre document, des exigences de confidentialité et de la taille de votre flux de travail.
En résumé, utilisez les outils en ligne pour la commodité, les applications hors ligne pour une confidentialité stricte, les bibliothèques Python pour l'automatisation par lots et les méthodes basées sur l'IA pour les mises en page complexes ou numérisées.
Avis de non-responsabilité : Tous les outils tiers, plateformes et projets open-source mentionnés dans cet article sont référencés strictement à des fins informatives et éducatives. Nous ne sommes pas affiliés, sponsorisés ou approuvés par l'un de ces services externes.
4 formas de convertir PDF a Markdown (Guía completa)
Tabla de contenidos
Convertir archivos PDF a Markdown (.md) es un dolor de cabeza común cuando necesitas importar documentos a bases de conocimiento personales como Obsidian, limpiar texto para alimentar Modelos de Lenguaje Extensos (LLMs) o simplemente deshacerte de formatos rígidos y pesados.
No existe una herramienta única que maneje todos los PDF a la perfección. El mejor enfoque depende de si tienes un solo archivo o miles, qué tan complejo es el diseño y si tus datos son privados. Basándonos en estos escenarios comunes, hemos descrito cuatro métodos prácticos de PDF a MD a continuación. ¡Vamos a ello!
Respuesta rápida: ¿Qué método de PDF a Markdown deberías usar?
| Método | Ideal para | Nivel de privacidad | Limitación principal |
|---|---|---|---|
| Convertidores en línea | PDFs únicos y no sensibles | Bajo a medio | Los archivos son procesados por un servicio de terceros |
| Aplicaciones de escritorio | Notas privadas, contratos, documentos internos | Alto si es totalmente local | Puede tener dificultades con PDFs escaneados o complejos |
| Bibliotecas de Python | Conversión por lotes y automatización | Alto si se ejecuta localmente | Requiere programación y gestión de dependencias |
| IA multimodal | PDFs escaneados, ecuaciones, diseños de varias columnas | Depende de la herramienta | Requiere costos de API o hardware local potente (GPU); posibles alucinaciones de la IA. |
Método 1: Convertidores en línea (El más fácil)
Si solo tienes unos pocos archivos, tu PDF es mayormente texto estándar y prefieres una solución sin código, las herramientas gratuitas de conversión de PDF a Markdown en línea ofrecen una conversión instantánea sin necesidad de configurar ningún entorno.
Principales convertidores en línea
- CloudConvert: Utilidad web altamente confiable que conserva las estructuras básicas de encabezados y viñetas.
- Md-to.com: Una herramienta web sencilla optimizada específicamente para convertir entre Markdown y diferentes formatos de archivo, incluidos PDF, Word, HTML y más.
Cómo convertir PDF a Markdown en línea
-
Abre el convertidor en línea que hayas elegido (por ejemplo, la herramienta de PDF a MD de CloudConvert).
-
Haz clic en Seleccionar archivo y sube tu PDF.
-
Asegúrate de que el formato de salida en el menú desplegable esté configurado como MD o Markdown.
-
Haz clic en Convertir, espera unos segundos a que el archivo se procese y haz clic en Descargar.
⚠️ Notas críticas:
- Advertencia de privacidad: Nunca subas estados financieros, contratos legales o datos propietarios a herramientas gratuitas en línea. Para archivos confidenciales, pasa directamente al Método 2.
- Límites: Algunas herramientas restringen las conversiones diarias o el tamaño del archivo. Comprueba siempre los límites actuales antes de subir PDFs grandes.
Resultado:
El PDF se convierte a Markdown editable con encabezados, listas y estructuras básicas preservadas:
Método 2: Aplicaciones de escritorio sin conexión (El más seguro)
Si manejas documentos confidenciales, estados financieros o notas privadas, deberías convertir tus archivos localmente con aplicaciones de escritorio sin subirlos a la nube.
Opción A: Interfaz gráfica de MarkItDown
Ideal para una interfaz rápida de apuntar y hacer clic sin tocar código.
-
Descarga la última versión de Markitdown-gui para tu sistema operativo (Windows, Linux o Mac) desde la página de lanzamientos de GitHub.
-
Extrae el archivo ZIP descargado y haz doble clic en MarkItDown.exe (o el equivalente en Mac/Linux) para ejecutarlo.
-
En la ventana abierta, haz clic en Añadir archivos para cargar tu PDF, luego haz clic en Convertir para generar tu archivo .md.
⚠️ ¿Obtienes un archivo en blanco?
MarkItDown funciona mejor con PDFs que contienen una capa de texto seleccionable. Si la salida está vacía, es posible que tu PDF sea escaneado o basado en imágenes. Pasa al Método 4 (IA de visión) en su lugar.
Opción B: VS Code y extensión MarkItDown
Ideal si ya usas VS Code y quieres convertir archivos directamente dentro de tu espacio de trabajo.
-
Abre Visual Studio Code.
-
Ve al Marketplace de extensiones presionando Ctrl+Shift+X (o Cmd+Shift+X en Mac).
-
Busca MarkItDown y haz clic en Instalar.
-
Abre la carpeta de tu proyecto (Archivo > Abrir carpeta) y arrastra tu PDF a la barra lateral del Explorador de VS Code.
-
En la barra lateral izquierda del Explorador, haz clic derecho sobre el nombre del archivo PDF y selecciona MarkItDown: Convertir archivo a Markdown.
⚠️ ¡No hagas doble clic en el PDF!
Abrir un PDF directamente dentro del panel del editor de VS Code solo mostrará texto binario ilegible. Usa siempre el menú de clic derecho en la barra lateral.
Método 3: Bibliotecas de Python (Mejor para texto limpio y automatización masiva)
Si tienes docenas o cientos de PDFs basados en texto para convertir, hacer clic manualmente es altamente ineficiente. Las bibliotecas de Python permiten construir una tubería automatizada para procesar una carpeta completa de documentos de una sola vez.
Opción A: Utilidad de Python Microsoft MarkItDown
Usa esta biblioteca de código abierto cuando desees una forma directa y completamente gratuita de convertir PDFs a Markdown.
-
Abre tu terminal e instala el paquete MarkItDown vía pip:
pip install "markitdown[all]" -
Crea un nuevo archivo de Python (por ejemplo, batch_convert.py) y pega el siguiente código para convertir todos los PDFs en el directorio actual:
import glob import os from markitdown import MarkItDown md = MarkItDown() # Obtener todos los archivos PDF en la carpeta actual pdf_files = glob.glob("*.pdf") if not pdf_files: print("No se encontraron archivos PDF.") else: print(f"Procesando {len(pdf_files)} archivo(s)...") for pdf_file in pdf_files: output_file = os.path.splitext(pdf_file)[0] + ".md" try: print(f"Convirtiendo: {pdf_file}") result = md.convert(pdf_file) with open(output_file, "w", encoding="utf-8") as f: f.write(result.text_content) except Exception as e: print(f"Error al convertir {pdf_file}: {e}") print("Hecho.") -
Ejecuta el script en tu terminal para generar tu archivo Markdown al instante.
Opción B: Spire.PDF para Python
Si trabajas en un entorno empresarial y requieres controles avanzados y granulares, como apuntar a rangos de páginas específicos o aislar tablas de texto normal, las bibliotecas de nivel empresarial como Spire.PDF para Python ofrecen APIs dedicadas para manejar estos requisitos.
-
Instala la biblioteca vía terminal:
pip install Spire.PDF -
Añade un archivo de Python y pega los siguientes fragmentos de código para convertir fragmentos de páginas específicos de todos los PDFs en la carpeta actual a Markdown:
import glob
import os
from spire.pdf.common import *
from spire.pdf import *

pdf_files = glob.glob("*.pdf")

if not pdf_files:
    print("No se encontraron archivos PDF.")
else:
    for pdf_file in pdf_files:
        output_file = os.path.splitext(pdf_file)[0] + "_partial.md"
        print(f"Extrayendo páginas de: {pdf_file}")

        src_pdf = PdfDocument()
        src_pdf.LoadFromFile(pdf_file)
        extracted_pdf = PdfDocument()

        # Guardar rango de páginas específico a Markdown (índice basado en cero: 1 a 4 extrae páginas 2 a 5)
        if src_pdf.Pages.Count > 1:
            extracted_pdf.InsertPageRange(src_pdf, 1, min(4, src_pdf.Pages.Count - 1))
            extracted_pdf.SaveToFile(output_file, FileFormat.Markdown)
        else:
            print(f"Omitido {pdf_file}: Menos de 2 páginas.")

        src_pdf.Close()
        extracted_pdf.Close()

print("Procesamiento por lotes finalizado.")
⚠️ Nota para desarrolladores:
La versión de evaluación de Spire.PDF tiene límites básicos de procesamiento de páginas e incluye marcas de agua. Si estás probando estos escenarios en un entorno de producción empresarial, puedes solicitar una licencia temporal gratuita para desbloquear capacidades programáticas sin restricciones.
Método 4: IA multimodal (Ideal para PDFs escaneados y diseños complejos)
Al tratar con PDFs escaneados, artículos académicos de varias columnas o tablas financieras complejas, los analizadores tradicionales a menudo tienen dificultades para mantener el formato. Las herramientas de IA multimodal conscientes del diseño pueden ayudar analizando visualmente la estructura del documento para mapearlo con precisión en Markdown.
Opción A: Microsoft MarkItDown con LLMs multimodales (Configuración de API en la nube)
Puedes configurar la biblioteca MarkItDown de Microsoft para analizar documentos visuales instalando su extensión OCR oficial y conectándola a un Modelo de Lenguaje Extenso con capacidad de visión, como GPT-4o de OpenAI.
-
Instala la biblioteca central, el plugin OCR y el puente de OpenAI:
pip install "markitdown[all]" markitdown-ocr openai -
Ejecuta el script de Python:
from markitdown import MarkItDown
from openai import OpenAI

# Inicializar el cliente de OpenAI
client = OpenAI(api_key="tu-clave-api-openai")

# Habilitar plugins para cargar 'markitdown-ocr' y vincularlo a GPT-4o para análisis visual
md = MarkItDown(
    enable_plugins=True,
    llm_client=client,
    llm_model="gpt-4o",
)

# El plugin renderiza las páginas PDF internamente y usa el LLM para estructurar el Markdown
result = md.convert("informe_escaneado.pdf")

# Imprimir la salida Markdown estructurada
print(result.text_content)
⚠️ Advertencia de costos:
Dado que este enfoque envía páginas de documentos como tokens visuales a OpenAI, procesar cientos de páginas escaneadas puede aumentar rápidamente tu factura de API. Prueba siempre primero con una muestra pequeña de 2 páginas.
Opción B: Modelos de IA locales de código abierto (Ideal para privacidad y tareas por lotes gratuitas)
Para datos sensibles o tuberías de documentos a gran escala donde los costos de API en la nube podrían escalar, los modelos de documentos de código abierto ofrecen una alternativa local.
- MinerU (Magic-PDF): Optimizado para diseños científicos complejos. Está diseñado para eliminar encabezados y pies de página mientras convierte fórmulas matemáticas en Markdown LaTeX.
- Marker: Adaptado para libros de texto y documentos de varias columnas. Ayuda a detectar órdenes de lectura para producir tablas y bloques de texto en Markdown más limpios.
- LLMs de visión local (vía Ollama): Al ejecutar modelos multimodales como
llama3.2-visionominicpm-vlocalmente a través de Ollama, puedes crear scripts para procesar capturas de pantalla de páginas directamente a través de un punto final local de forma gratuita.
⚠️ Requisitos de hardware:
Ejecutar estas herramientas de IA de código abierto localmente generalmente requiere una máquina equipada con una tarjeta gráfica dedicada (una GPU NVIDIA con soporte CUDA) y aproximadamente de 8GB a 16GB de VRAM para garantizar velocidades de procesamiento eficientes.
Soluciones rápidas para problemas comunes de PDF a MD
-
Las columnas de texto se mezclaron
Si tu PDF tiene un diseño de varias columnas, los convertidores estándar pueden leer a través de toda la página y mezclar el texto. Para solucionar esto, prueba herramientas de IA que puedan leer visualmente el diseño y mantener las columnas separadas. -
Las imágenes y gráficos faltan o están rotos
Markdown maneja las imágenes a través de enlaces de archivos externos o datos de texto incrustados (como Base64). Si tus imágenes no aparecen, verifica si las rutas de archivo o los códigos de incrustación son correctos. Para herramientas más simples que eliminan completamente las imágenes durante la conversión, tendrás que guardar manualmente los gráficos y enlazarlos en tu texto Markdown. -
Aparecen símbolos extraños y cuadros raros
Los PDFs antiguos con fuentes personalizadas a menudo se convierten en galimatías durante la conversión. Intenta usar una aplicación de escritorio sin conexión (Método 2) para un mejor manejo de fuentes locales. Si eso falla, trátalo como un archivo escaneado y deja que la IA lo lea visualmente. -
El archivo es demasiado grande para convertir
Algunas herramientas gratuitas en línea rechazan archivos de más de 10MB. Para solucionar esto, divide el archivo PDF antes de subirlo.
Preguntas frecuentes
P1: ¿Convertir un PDF a Markdown conservará los hipervínculos y la tabla de contenidos?
R1: Las etiquetas de hipervínculo estándar ([Texto](URL)) generalmente se conservan. Sin embargo, los enlaces de anclaje internos del PDF (como una tabla de contenidos en la que se puede hacer clic para saltar a la página 5) se romperán, ya que Markdown maneja la navegación de documentos de manera diferente a través de IDs de encabezado (#).
P2: ¿Por qué mi salida de PDF a Markdown está vacía?
R2: Es probable que tu PDF esté escaneado o basado en imágenes, por lo que los convertidores normales no pueden leer su capa de texto. Usa OCR o IA de visión en su lugar.
P3: ¿Es seguro usar convertidores de PDF a Markdown en línea?
R3: Solo para PDFs no sensibles. No subas contratos, registros financieros, datos personales o documentos comerciales internos a convertidores en línea.
Reflexiones finales
No existe un mejor convertidor universal de PDF a Markdown. El método correcto depende de tu tipo de documento, requisitos de privacidad y tamaño del flujo de trabajo.
En resumen, usa herramientas en línea para mayor comodidad, aplicaciones sin conexión para una privacidad estricta, bibliotecas de Python para automatización masiva y métodos basados en IA para diseños complejos o escaneados.
Descargo de responsabilidad: Todas las herramientas, plataformas y proyectos de código abierto de terceros mencionados en este artículo se citan estrictamente con fines informativos y educativos. No estamos afiliados, patrocinados ni respaldados por ninguno de estos servicios externos.
4 Wege, um PDF in Markdown zu konvertieren (Vollständige Anleitung)
Die Konvertierung von PDF-Dateien in Markdown (.md) ist oft mühsam, wenn Sie Dokumente in persönliche Wissensdatenbanken wie Obsidian importieren, Text für Large Language Models (LLMs) bereinigen oder einfach überflüssige, starre Formatierungen entfernen möchten.
Es gibt kein einzelnes Tool, das jedes PDF perfekt verarbeitet. Der beste Ansatz hängt davon ab, ob Sie eine einzelne Datei oder Tausende konvertieren müssen, wie komplex das Layout ist und ob Ihre Daten vertraulich sind. Basierend auf diesen Szenarien haben wir unten vier praktische Methoden zur PDF-zu-MD-Konvertierung zusammengestellt. Fangen wir an!
Kurze Antwort: Welche PDF-zu-Markdown-Methode sollten Sie verwenden?
| Methode | Am besten geeignet für | Datenschutz | Hauptbeschränkung |
|---|---|---|---|
| Online-Konverter | Einzelne, nicht sensible PDFs | Niedrig bis mittel | Dateien werden von Drittanbietern verarbeitet |
| Offline-Desktop-Apps | Private Notizen, Verträge, interne Dokumente | Hoch (bei lokaler Nutzung) | Probleme bei gescannten oder komplexen PDFs |
| Python-Bibliotheken | Stapelverarbeitung und Automatisierung | Hoch (bei lokaler Ausführung) | Erfordert Programmierkenntnisse |
| Multimodale KI | Gescannte PDFs, Formeln, mehrspaltige Layouts | Je nach Tool | API-Kosten oder starke Hardware (GPU) erforderlich; potenzielle KI-Halluzinationen |
Methode 1: Online-Konverter (Am einfachsten)
Wenn Sie nur wenige Dateien haben, Ihr PDF hauptsächlich aus Standardtext besteht und Sie eine Lösung ohne Programmierung bevorzugen, bieten kostenlose Online-Tools eine sofortige Konvertierung ohne Einrichtungsaufwand.
Top Online-Konverter
- CloudConvert: Ein äußerst zuverlässiges Web-Tool, das grundlegende Überschriftenstrukturen und Aufzählungszeichen beibehält.
- Md-to.com: Ein einfaches Web-Tool, das speziell für die Konvertierung zwischen Markdown und verschiedenen Dateiformaten wie PDF, Word, HTML und mehr optimiert ist.
So konvertieren Sie PDF online in Markdown
-
Öffnen Sie den Online-Konverter Ihrer Wahl (z. B. das CloudConvert PDF-zu-MD-Tool).
-
Klicken Sie auf Datei auswählen und laden Sie Ihr PDF hoch.
-
Stellen Sie sicher, dass das Ausgabeformat auf MD oder Markdown eingestellt ist.
-
Klicken Sie auf Konvertieren, warten Sie einige Sekunden und klicken Sie auf Download.
⚠️ Wichtige Hinweise:
- Datenschutzwarnung: Laden Sie niemals Finanzberichte, Rechtsverträge oder geschützte Daten in kostenlose Online-Tools hoch. Bei vertraulichen Dateien sollten Sie direkt zu Methode 2 springen.
- Limits: Einige Tools beschränken die Anzahl der täglichen Konvertierungen oder die Dateigröße. Prüfen Sie immer die aktuellen Limits, bevor Sie große PDFs hochladen.
Ergebnis:
Das PDF wird in bearbeitbares Markdown umgewandelt, wobei grundlegende Überschriften, Listen und Strukturen erhalten bleiben:
Methode 2: Offline-Desktop-Apps (Am sichersten)
Wenn Sie mit vertraulichen Dokumenten, Finanzberichten oder privaten Notizen arbeiten, sollten Sie Ihre Dateien lokal mit Desktop-Apps konvertieren, ohne sie in die Cloud hochzuladen.
Option A: MarkItDown GUI
Ideal für eine schnelle Benutzeroberfläche ohne Programmierung.
-
Laden Sie die neueste Version von Markitdown-gui für Ihr Betriebssystem (Windows, Linux oder Mac) von der GitHub-Releases-Seite herunter.
-
Entpacken Sie die ZIP-Datei und führen Sie MarkItDown.exe (oder das entsprechende Pendant für Mac/Linux) aus.
-
Klicken Sie im geöffneten Fenster auf Dateien hinzufügen, um Ihr PDF zu laden, und dann auf Konvertieren, um die .md-Datei zu erstellen.
⚠️ Erhalten Sie eine leere Datei?
MarkItDown funktioniert am besten mit PDFs, die eine auswählbare Textebene enthalten. Wenn die Ausgabe leer ist, handelt es sich bei Ihrem PDF möglicherweise um ein gescanntes Dokument oder ein Bild. Springen Sie in diesem Fall zu Methode 4 (Vision KI).
Option B: VS Code & MarkItDown-Erweiterung
Am besten geeignet, wenn Sie bereits VS Code verwenden und Dateien direkt in Ihrem Arbeitsbereich konvertieren möchten.
-
Öffnen Sie Visual Studio Code.
-
Gehen Sie zum Extensions Marketplace, indem Sie Strg+Umschalt+X (oder Cmd+Umschalt+X auf dem Mac) drücken.
-
Suchen Sie nach MarkItDown und klicken Sie auf Installieren.
-
Öffnen Sie Ihren Projektordner (Datei > Ordner öffnen) und ziehen Sie Ihr PDF in die VS Code Explorer-Seitenleiste.
-
Klicken Sie in der linken Explorer-Seitenleiste mit der rechten Maustaste auf den PDF-Dateinamen und wählen Sie MarkItDown: Convert File to Markdown.
⚠️ Nicht auf das PDF doppelklicken!
Das direkte Öffnen eines PDFs im VS Code-Editor zeigt nur unlesbaren Binärcode an. Verwenden Sie immer das Rechtsklick-Menü in der Seitenleiste.
Methode 3: Python-Bibliotheken (Am besten für sauberen Text & Automatisierung)
Wenn Sie Dutzende oder Hunderte von textbasierten PDFs konvertieren müssen, ist die manuelle Bearbeitung ineffizient. Mit Python-Bibliotheken können Sie eine automatisierte Pipeline erstellen, um einen ganzen Ordner mit Dokumenten auf einmal zu verarbeiten.
Option A: Microsoft MarkItDown Python-Utility
Verwenden Sie diese Open-Source-Bibliothek für eine einfache und kostenlose Möglichkeit, PDFs in Markdown umzuwandeln.
-
Öffnen Sie Ihr Terminal und installieren Sie das MarkItDown-Paket via pip:
pip install "markitdown[all]" -
Erstellen Sie eine neue Python-Datei (z. B. batch_convert.py) und fügen Sie den folgenden Code ein, um alle PDFs im aktuellen Verzeichnis zu konvertieren:
import glob import os from markitdown import MarkItDown md = MarkItDown() # Alle PDF-Dateien im aktuellen Ordner abrufen pdf_files = glob.glob("*.pdf") if not pdf_files: print("Keine PDF-Dateien gefunden.") else: print(f"Verarbeite {len(pdf_files)} Datei(en)...") for pdf_file in pdf_files: output_file = os.path.splitext(pdf_file)[0] + ".md" try: print(f"Konvertiere: {pdf_file}") result = md.convert(pdf_file) with open(output_file, "w", encoding="utf-8") as f: f.write(result.text_content) except Exception as e: print(f"Fehler bei der Konvertierung von {pdf_file}: {e}") print("Fertig.") -
Führen Sie das Skript in Ihrem Terminal aus, um Ihre Markdown-Datei sofort zu generieren.
Option B: Spire.PDF für Python
Wenn Sie in einer Unternehmensumgebung arbeiten und erweiterte, granulare Kontrollen benötigen – wie das gezielte Ansteuern bestimmter Seitenzahlen oder das Extrahieren von Tabellen aus normalem Text – bieten Bibliotheken auf Enterprise-Niveau wie Spire.PDF für Python dedizierte APIs für diese Anforderungen.
-
Installieren Sie die Bibliothek über Ihr Terminal:
pip install Spire.PDF -
Fügen Sie eine Python-Datei hinzu und verwenden Sie den folgenden Code, um bestimmte Seitenbereiche aus allen PDFs im aktuellen Ordner in Markdown zu konvertieren:
import glob
import os
from spire.pdf.common import *
from spire.pdf import *

pdf_files = glob.glob("*.pdf")

if not pdf_files:
    print("Keine PDF-Dateien gefunden.")
else:
    for pdf_file in pdf_files:
        output_file = os.path.splitext(pdf_file)[0] + "_partial.md"
        print(f"Extrahiere Seiten aus: {pdf_file}")

        src_pdf = PdfDocument()
        src_pdf.LoadFromFile(pdf_file)
        extracted_pdf = PdfDocument()

        # Speichern eines bestimmten Seitenbereichs als Markdown (nullbasierter Index: 1 bis 4 extrahiert Seiten 2 bis 5)
        if src_pdf.Pages.Count > 1:
            extracted_pdf.InsertPageRange(src_pdf, 1, min(4, src_pdf.Pages.Count - 1))
            extracted_pdf.SaveToFile(output_file, FileFormat.Markdown)
        else:
            print(f"Übersprungen {pdf_file}: Weniger als 2 Seiten.")

        src_pdf.Close()
        extracted_pdf.Close()

print("Stapelverarbeitung abgeschlossen.")
⚠️ Hinweis für Entwickler:
Die Evaluierungsversion von Spire.PDF hat grundlegende Einschränkungen bei der Seitenverarbeitung und enthält Wasserzeichen. Wenn Sie diese Szenarien in einer Produktionsumgebung testen, können Sie eine kostenlose temporäre Lizenz anfordern, um alle Funktionen ohne Einschränkungen freizuschalten.
Methode 4: Multimodale KI (Am besten für gescannte PDFs & komplexe Layouts)
Bei gescannten PDFs, mehrspaltigen wissenschaftlichen Arbeiten oder komplexen Finanztabellen haben herkömmliche Parser oft Schwierigkeiten, die Formatierung beizubehalten. Layout-bewusste multimodale KI-Tools können helfen, indem sie die Dokumentstruktur visuell analysieren und präzise in Markdown abbilden.
Option A: Microsoft MarkItDown mit multimodalen LLMs (Cloud-API-Setup)
Sie können die MarkItDown-Bibliothek von Microsoft so konfigurieren, dass sie visuelle Dokumente analysiert, indem Sie das offizielle OCR-Plugin installieren und mit einem vision-fähigen Large Language Model wie GPT-4o von OpenAI verbinden.
-
Installieren Sie die Kernbibliothek, das OCR-Plugin und die OpenAI-Brücke:
pip install "markitdown[all]" markitdown-ocr openai -
Führen Sie das Python-Skript aus:
from markitdown import MarkItDown
from openai import OpenAI

# OpenAI-Client initialisieren
client = OpenAI(api_key="your-openai-api-key")

# Plugins aktivieren, um 'markitdown-ocr' zu laden und mit GPT-4o für die visuelle Analyse zu verbinden
md = MarkItDown(
    enable_plugins=True,
    llm_client=client,
    llm_model="gpt-4o",
)

# Das Plugin rendert die PDF-Seiten intern und nutzt das LLM, um das Markdown zu strukturieren
result = md.convert("scanned_report.pdf")

# Die strukturierte Markdown-Ausgabe ausgeben
print(result.text_content)
⚠️ Kostenwarnung:
Da dieser Ansatz Dokumentseiten als visuelle Tokens an OpenAI sendet, können die API-Kosten bei hunderten von gescannten Seiten schnell steigen. Testen Sie dies immer zuerst mit einem kleinen Beispiel von 2 Seiten.
Option B: Lokale Open-Source-KI-Modelle (Am besten für Datenschutz & kostenlose Stapelverarbeitung)
Für sensible Daten oder große Dokumenten-Pipelines, bei denen Cloud-API-Kosten zu hoch wären, bieten Open-Source-Dokumentenmodelle eine lokale Alternative.
- MinerU (Magic-PDF): Optimiert für komplexe wissenschaftliche Layouts. Es wurde entwickelt, um Kopf- und Fußzeilen zu entfernen und mathematische Formeln in LaTeX-Markdown umzuwandeln.
- Marker: Maßgeschneidert für Lehrbücher und mehrspaltige Dokumente. Es hilft dabei, die Leserichtung zu erkennen, um sauberere Markdown-Tabellen und Textblöcke zu erzeugen.
- Lokale Vision LLMs (via Ollama): Durch das lokale Ausführen multimodaler Modelle wie
llama3.2-visionoderminicpm-vvia Ollama können Sie Skripte erstellen, um Seitenscreenshots kostenlos über einen lokalen Endpunkt zu verarbeiten.
⚠️ Hardwareanforderungen:
Das lokale Ausführen dieser Open-Source-KI-Tools erfordert in der Regel einen Computer mit einer dedizierten Grafikkarte (NVIDIA-GPU mit CUDA-Unterstützung) und etwa 8 GB bis 16 GB VRAM, um eine effiziente Verarbeitungsgeschwindigkeit zu gewährleisten.
Schnelle Lösungen für häufige Probleme
-
Die Textspalten sind durcheinander
Wenn Ihr PDF ein mehrspaltiges Layout hat, lesen Standard-Konverter möglicherweise über die gesamte Seite hinweg und vermischen den Text. Versuchen Sie es in diesem Fall mit KI-Tools, die das Layout visuell erfassen und die Spalten getrennt halten können. -
Bilder und Diagramme fehlen oder sind defekt
Markdown verarbeitet Bilder über externe Dateilinks oder eingebettete Textdaten (wie Base64). Wenn Ihre Bilder nicht angezeigt werden, überprüfen Sie, ob die Dateipfade oder Einbettungscodes korrekt sind. Bei einfacheren Tools, die Bilder während der Konvertierung entfernen, müssen Sie die Diagramme manuell speichern und in Ihrem Markdown-Text verlinken. -
Seltsame Symbole und Zeichen erscheinen
Ältere PDFs mit benutzerdefinierten Schriftarten werden bei der Konvertierung oft unleserlich. Versuchen Sie eine Offline-Desktop-App (Methode 2) für eine bessere lokale Schriftartenverarbeitung. Wenn das fehlschlägt, behandeln Sie es als gescanntes Dokument und lassen Sie es von einer KI visuell lesen. -
Die Datei ist zu groß für die Konvertierung
Einige kostenlose Online-Tools lehnen Dateien über 10 MB ab. Um dies zu beheben, teilen Sie die PDF-Datei, bevor Sie sie hochladen.
Häufig gestellte Fragen (FAQs)
F1: Bleiben Hyperlinks und das Inhaltsverzeichnis bei der Konvertierung erhalten?
A1: Standard-Hyperlink-Tags ([Text](URL)) bleiben normalerweise erhalten. Interne PDF-Ankerlinks (wie ein anklickbares Inhaltsverzeichnis, das zu Seite 5 springt) funktionieren jedoch nicht mehr, da Markdown die Dokumentnavigation anders über Überschriften-IDs (#) handhabt.
F2: Warum ist meine PDF-zu-Markdown-Ausgabe leer?
A2: Ihr PDF ist wahrscheinlich gescannt oder bildbasiert, daher können normale Konverter die Textebene nicht lesen. Verwenden Sie stattdessen OCR oder Vision KI.
F3: Ist es sicher, Online-PDF-zu-Markdown-Konverter zu verwenden?
A3: Nur für nicht sensible PDFs. Laden Sie keine Verträge, Finanzunterlagen, persönlichen Daten oder internen Geschäftsdokumente in Online-Konverter hoch.
Fazit
Es gibt keinen universell besten PDF-zu-Markdown-Konverter. Die richtige Methode hängt von Ihrem Dokumenttyp, den Datenschutzanforderungen und dem Umfang Ihres Workflows ab.
Kurz gesagt: Verwenden Sie Online-Tools für den Komfort, Offline-Apps für strikten Datenschutz, Python-Bibliotheken für die Stapelverarbeitung und KI-basierte Methoden für komplexe oder gescannte Layouts.
Haftungsausschluss: Alle in diesem Artikel genannten Tools, Plattformen und Open-Source-Projekte dienen ausschließlich Informations- und Bildungszwecken. Wir sind mit keinem dieser externen Dienste verbunden, werden von ihnen gesponsert oder unterstützt.
4 способа конвертировать PDF в Markdown (полное руководство)
Конвертация PDF-файлов в Markdown (.md) часто вызывает затруднения, когда вам нужно импортировать документы в базы знаний, такие как Obsidian, подготовить текст для больших языковых моделей (LLM) или просто избавиться от громоздкого и жесткого форматирования.
Не существует универсального инструмента, который идеально справлялся бы с любым PDF. Лучший подход зависит от того, нужно ли вам обработать один файл или тысячи, насколько сложна верстка документа и насколько конфиденциальны ваши данные. Основываясь на этих сценариях, мы описали четыре практических метода конвертации PDF в MD. Давайте приступим!
Краткий ответ: какой метод конвертации PDF в Markdown выбрать?
| Метод | Для чего лучше всего подходит | Уровень конфиденциальности | Главное ограничение |
|---|---|---|---|
| Онлайн-конвертеры | Разовые задачи, неконфиденциальные PDF | От низкого до среднего | Файлы обрабатываются сторонним сервисом |
| Офлайн-приложения | Личные заметки, контракты, внутренние документы | Высокий (при полной локальной работе) | Могут плохо справляться со сканами или сложными PDF |
| Библиотеки Python | Пакетная конвертация и автоматизация | Высокий (при локальном запуске) | Требует навыков программирования и настройки зависимостей |
| Мультимодальный ИИ | Сканированные PDF, формулы, многоколоночная верстка | Зависит от инструмента | Требует оплаты API или мощного локального оборудования (GPU); возможны «галлюцинации» ИИ. |
Способ 1: Онлайн-конвертеры (самый простой)
Если у вас всего несколько файлов, ваш PDF содержит стандартный текст и вы предпочитаете решение без программирования, бесплатные онлайн-инструменты для конвертации PDF в Markdown обеспечат мгновенный результат без настройки окружения.
Лучшие онлайн-конвертеры
- CloudConvert: Очень надежная веб-утилита, которая сохраняет базовую структуру заголовков и маркированные списки.
- Md-to.com: Простой веб-инструмент, оптимизированный специально для конвертации между Markdown и различными форматами файлов, включая PDF, Word, HTML и другие.
Как конвертировать PDF в Markdown онлайн
-
Откройте выбранный онлайн-конвертер (например, инструмент CloudConvert для PDF в MD).
-
Нажмите Select File (Выбрать файл) и загрузите ваш PDF.
-
Убедитесь, что в выпадающем списке форматов вывода выбрано MD или Markdown.
-
Нажмите Convert, подождите несколько секунд, пока файл обрабатывается, и нажмите Download (Скачать).
⚠️ Важные примечания:
- Предупреждение о конфиденциальности: Никогда не загружайте финансовые отчеты, юридические контракты или проприетарные данные в бесплатные онлайн-инструменты. Для конфиденциальных файлов сразу переходите к способу №2.
- Ограничения: Некоторые инструменты ограничивают количество конвертаций в день или размер файла. Всегда проверяйте текущие лимиты перед загрузкой больших PDF.
Результат:
PDF конвертируется в редактируемый Markdown с сохранением базовых заголовков, списков и структуры:
Способ 2: Офлайн-приложения (самый безопасный)
Если вы работаете с конфиденциальными документами, финансовыми отчетами или личными заметками, вам следует конвертировать файлы локально с помощью настольных приложений, не загружая их в облако.
Вариант А: MarkItDown GUI
Лучший выбор для быстрого интерфейса «наведи и нажми» без написания кода.
-
Скачайте последнюю версию Markitdown-gui для вашей операционной системы (Windows, Linux или Mac) со страницы релизов на GitHub.
-
Распакуйте скачанный ZIP-файл и дважды щелкните MarkItDown.exe (или эквивалент для Mac/Linux), чтобы запустить его.
-
В открывшемся окне нажмите Add Files, чтобы загрузить PDF, а затем нажмите Convert для создания .md файла.
⚠️ Получили пустой файл?
MarkItDown лучше всего работает с PDF, содержащими текстовый слой. Если результат пуст, возможно, ваш PDF — это скан или изображение. Переходите к способу №4 (Vision AI).
Вариант Б: VS Code и расширение MarkItDown
Лучший выбор, если вы уже используете VS Code и хотите конвертировать файлы прямо в рабочей среде.
-
Откройте Visual Studio Code.
-
Перейдите в магазин расширений, нажав Ctrl+Shift+X (или Cmd+Shift+X на Mac).
-
Найдите MarkItDown и нажмите Install.
-
Откройте папку вашего проекта (File > Open Folder) и перетащите PDF в боковую панель проводника VS Code.
-
В боковой панели проводника щелкните правой кнопкой мыши на имени PDF-файла и выберите MarkItDown: Convert File to Markdown.
⚠️ Не открывайте PDF двойным кликом!
Открытие PDF напрямую в панели редактора VS Code просто отобразит нечитаемый бинарный код. Всегда используйте контекстное меню правой кнопки мыши на боковой панели.
Способ 3: Библиотеки Python (лучшее для чистого текста и автоматизации)
Если у вас десятки или сотни текстовых PDF-файлов, обрабатывать их вручную крайне неэффективно. Программные библиотеки Python позволяют создать автоматизированный конвейер для обработки целой папки документов за один раз.
Вариант А: Утилита Microsoft MarkItDown для Python
Используйте эту библиотеку с открытым исходным кодом, если вам нужен простой и полностью бесплатный способ превращения PDF в Markdown.
-
Откройте терминал и установите пакет MarkItDown через pip:
pip install "markitdown[all]" -
Создайте новый Python-файл (например, batch_convert.py) и вставьте следующий код для конвертации всех PDF в текущей директории:
import glob import os from markitdown import MarkItDown md = MarkItDown() # Получить все PDF-файлы в текущей папке pdf_files = glob.glob("*.pdf") if not pdf_files: print("PDF-файлы не найдены.") else: print(f"Обработка {len(pdf_files)} файла(ов)...") for pdf_file in pdf_files: output_file = os.path.splitext(pdf_file)[0] + ".md" try: print(f"Конвертация: {pdf_file}") result = md.convert(pdf_file) with open(output_file, "w", encoding="utf-8") as f: f.write(result.text_content) except Exception as e: print(f"Ошибка при конвертации {pdf_file}: {e}") print("Готово.") -
Запустите скрипт в терминале, чтобы мгновенно создать Markdown-файлы.
Вариант Б: Spire.PDF для Python
Если вы работаете в корпоративной среде и вам требуется расширенный, детальный контроль — например, работа с определенным диапазоном страниц или извлечение таблиц отдельно от обычного текста — корпоративные библиотеки, такие как Spire.PDF for Python, предлагают специализированные API для этих задач.
-
Установите библиотеку через терминал:
pip install Spire.PDF -
Создайте Python-файл и вставьте следующий код для конвертации определенных диапазонов страниц из всех PDF в папке в формат Markdown:
import glob
import os
from spire.pdf.common import *
from spire.pdf import *

pdf_files = glob.glob("*.pdf")

if not pdf_files:
    print("PDF-файлы не найдены.")
else:
    for pdf_file in pdf_files:
        output_file = os.path.splitext(pdf_file)[0] + "_partial.md"
        print(f"Извлечение страниц из: {pdf_file}")

        src_pdf = PdfDocument()
        src_pdf.LoadFromFile(pdf_file)
        extracted_pdf = PdfDocument()

        # Сохранение диапазона страниц в Markdown (индексация с нуля: от 1 до 4 извлекает страницы со 2 по 5)
        if src_pdf.Pages.Count > 1:
            extracted_pdf.InsertPageRange(src_pdf, 1, min(4, src_pdf.Pages.Count - 1))
            extracted_pdf.SaveToFile(output_file, FileFormat.Markdown)
        else:
            print(f"Пропущено {pdf_file}: менее 2 страниц.")

        src_pdf.Close()
        extracted_pdf.Close()

print("Пакетная обработка завершена.")
⚠️ Примечание для разработчиков:
Оценочная версия Spire.PDF имеет базовые ограничения на обработку страниц и добавляет водяные знаки. Если вы тестируете эти сценарии в корпоративной среде, вы можете запросить бесплатную временную лицензию, чтобы разблокировать все программные возможности.
Способ 4: Мультимодальный ИИ (лучшее для сканов и сложной верстки)
При работе со сканированными PDF, многоколоночными научными статьями или сложными финансовыми таблицами традиционные парсеры часто не могут сохранить форматирование. Мультимодальные ИИ-инструменты, понимающие структуру документа, помогают визуально анализировать его и точно переносить в Markdown.
Вариант А: Microsoft MarkItDown с мультимодальными LLM (настройка облачного API)
Вы можете настроить библиотеку MarkItDown от Microsoft для анализа визуальных документов, установив официальный OCR-плагин и подключив его к большой языковой модели с поддержкой зрения, такой как GPT-4o от OpenAI.
-
Установите основную библиотеку, OCR-плагин и мост для OpenAI:
pip install "markitdown[all]" markitdown-ocr openai -
Запустите Python-скрипт:
from markitdown import MarkItDown
from openai import OpenAI

# Инициализация клиента OpenAI
client = OpenAI(api_key="ваш-ключ-openai")

# Включение плагинов для загрузки 'markitdown-ocr' и привязка к GPT-4o для визуального анализа
md = MarkItDown(
    enable_plugins=True,
    llm_client=client,
    llm_model="gpt-4o",
)

# Плагин визуально обрабатывает страницы PDF и использует LLM для структурирования Markdown
result = md.convert("scanned_report.pdf")

# Вывод структурированного markdown
print(result.text_content)
⚠️ Предупреждение о стоимости:
Поскольку этот подход отправляет страницы документа как визуальные токены в OpenAI, обработка сотен сканированных страниц может быстро увеличить ваш счет за API. Всегда сначала тестируйте на небольшом образце из 2 страниц.
Вариант Б: Локальные ИИ-модели с открытым кодом (лучшее для конфиденциальности и бесплатных задач)
Для конфиденциальных данных или масштабных конвейеров обработки документов, где затраты на облачный API могут быть высокими, модели с открытым кодом предлагают локальную альтернативу.
- MinerU (Magic-PDF): Оптимизирован для сложных научных макетов. Предназначен для удаления колонтитулов и конвертации математических формул в LaTeX-разметку.
- Marker: Адаптирован для учебников и многоколоночных документов. Помогает определять порядок чтения для создания более чистых таблиц и текстовых блоков в Markdown.
- Локальные Vision LLM (через Ollama): Запуская мультимодальные модели, такие как
llama3.2-visionилиminicpm-vлокально через Ollama, вы можете создавать скрипты для бесплатной обработки скриншотов страниц через локальную конечную точку.
⚠️ Системные требования:
Запуск этих ИИ-инструментов локально обычно требует наличия компьютера с выделенной видеокартой (NVIDIA GPU с поддержкой CUDA) и примерно 8–16 ГБ видеопамяти (VRAM) для обеспечения эффективной скорости обработки.
Решение частых проблем при конвертации PDF в MD
-
Текстовые колонки перемешались
Если ваш PDF имеет многоколоночную верстку, стандартные конвертеры могут читать текст по всей ширине страницы, перемешивая его. Чтобы исправить это, попробуйте ИИ-инструменты, которые визуально распознают макет и сохраняют разделение колонок. -
Изображения и графики отсутствуют или повреждены
Markdown обрабатывает изображения через внешние ссылки или встроенные текстовые данные (например, Base64). Если изображения не отображаются, проверьте правильность путей к файлам или кодов вставки. Для простых инструментов, которые полностью удаляют изображения при конвертации, вам придется вручную сохранить графики и добавить их в Markdown-текст. -
Появляются странные символы и «кракозябры»
Старые PDF с нестандартными шрифтами часто превращаются в бессмыслицу при конвертации. Попробуйте использовать офлайн-приложение (способ №2) для лучшей обработки локальных шрифтов. Если это не помогает, относитесь к файлу как к скану и позвольте ИИ прочитать его визуально. -
Файл слишком большой для конвертации
Некоторые бесплатные онлайн-инструменты отклоняют файлы размером более 10 МБ. Чтобы исправить это, разделите PDF-файл перед загрузкой.
Часто задаваемые вопросы
В1: Сохранит ли конвертация PDF в Markdown гиперссылки и оглавление?
О1: Стандартные теги гиперссылок ([Текст](URL)) обычно сохраняются. Однако внутренние якорные ссылки PDF (например, кликабельное оглавление, перебрасывающее на 5-ю страницу) перестанут работать, так как Markdown обрабатывает навигацию по документу иначе — через ID заголовков (#).
В2: Почему мой результат конвертации PDF в Markdown пуст?
О2: Скорее всего, ваш PDF — это скан или изображение, поэтому обычные конвертеры не могут прочитать его текстовый слой. Используйте OCR или Vision AI.
В3: Безопасно ли использовать онлайн-конвертеры PDF в Markdown?
О3: Только для неконфиденциальных PDF. Не загружайте контракты, финансовые отчеты, персональные данные или внутренние бизнес-документы в онлайн-конвертеры.
Заключение
Не существует универсального лучшего конвертера PDF в Markdown. Правильный метод зависит от типа вашего документа, требований к конфиденциальности и объема работы.
Коротко: используйте онлайн-инструменты для удобства, офлайн-приложения для строгой конфиденциальности, библиотеки Python для массовой автоматизации, а ИИ-методы — для сложной или сканированной верстки.
Отказ от ответственности: Все сторонние инструменты, платформы и проекты с открытым исходным кодом, упомянутые в этой статье, приведены исключительно в информационных и образовательных целях. Мы не связаны с этими внешними сервисами, не спонсируемся ими и не поддерживаем их.