HTML to RTF (Rich Text): Online, Word, Pandoc & C#
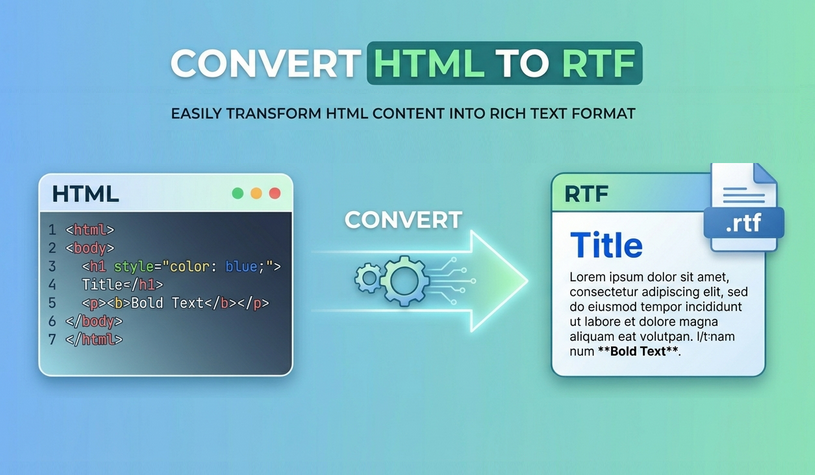
HTML (HyperText Markup Language) is the backbone of the web, but it’s not always the best format for document editing or sharing. RTF (Rich Text Format), on the other hand, is a cross-platform document format supported by virtually every word processor—Microsoft Word, Google Docs, LibreOffice, and even older software like WordPad.
Converting HTML to RTF allows you to:
- Preserve basic formatting (bold, italics, fonts, colors)
- Keep images and tables intact
- Share editable documents without relying on web browsers
- Avoid layout shifts caused by CSS or missing external files
Whether you’re a developer, content creator, or business professional, mastering efficient HTML to rich text (RTF) conversion streamlines your workflow and eliminates formatting frustrations. Below, we explore 4 practical methods from one-click online tools to automated code solutions, suitable for all usage scenarios.
- Free Online HTML to RTF Converters
- Convert with Microsoft Word
- Pandoc Command-Line Tool
- Automate with C#
- Which HTML to RTF Method Fits You?
- Frequently Asked Questions (FAQ)
1. Free Online HTML to RTF Converters (Fastest for Small Files)
✔ Best for: Quick, one‑off conversions of small files that are not sensitive.
If you need to convert a few HTML files quickly and don’t want to install software, online converters are the way to go. They work by parsing your HTML file and generating a downloadable RTF document. Here are the top picks:
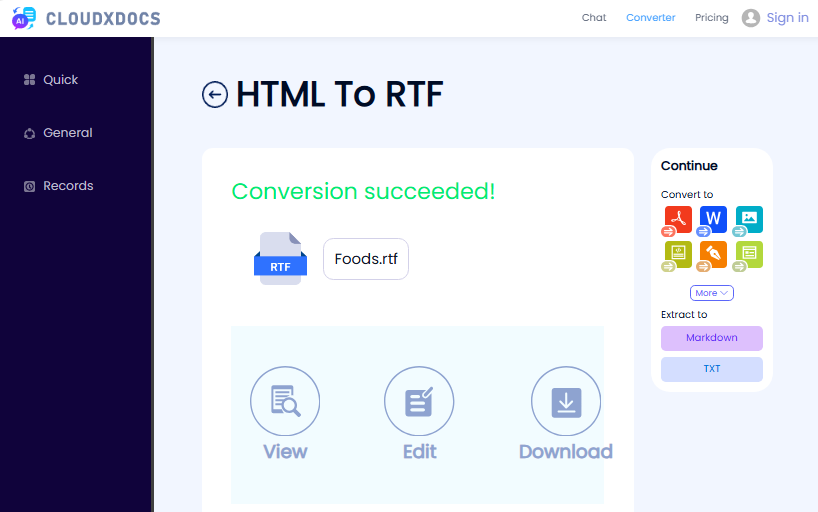
- CLOUDXDOCS: Clean ad-free interface, perfect for basic HTML formatting
- Convertio: Supports file uploads up to 100MB, retains basic styles.
- OnlineConvert: Free, no registration, preserves tables and inline CSS.
General steps to convert HTML to RTF online:
- Go to your chosen converter.
- Upload the .html file.
- Select RTF as the output format.
- Click Convert and download the generated RTF file.
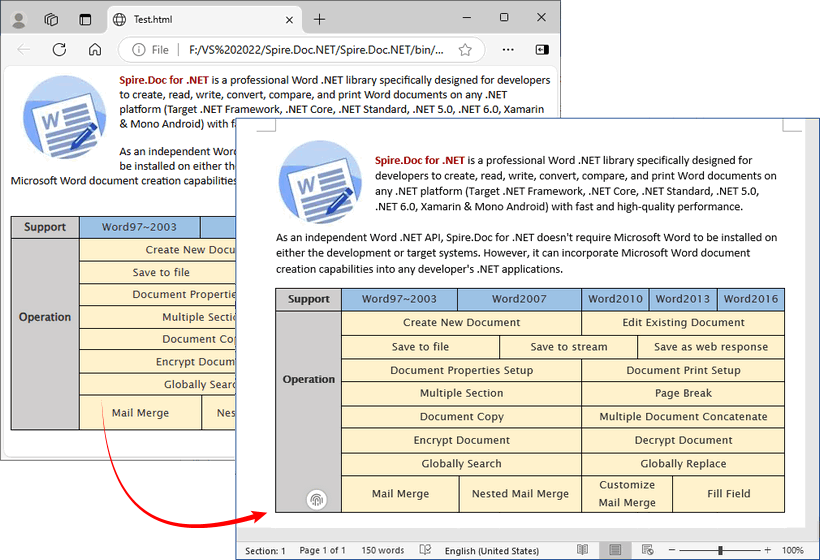
Example of using CLOUDXDOCS converter:
Bonus: Beyond converting an HTML file to RTF for editable rich text, HTML to PDF conversion is equally essential for creating shareable, fixed-layout documents.
2. Convert with Microsoft Word (Offline, High Fidelity)
✔ Best for: Users who already own Microsoft Word and need the highest possible formatting accuracy for complex tables, fonts, and nested elements.
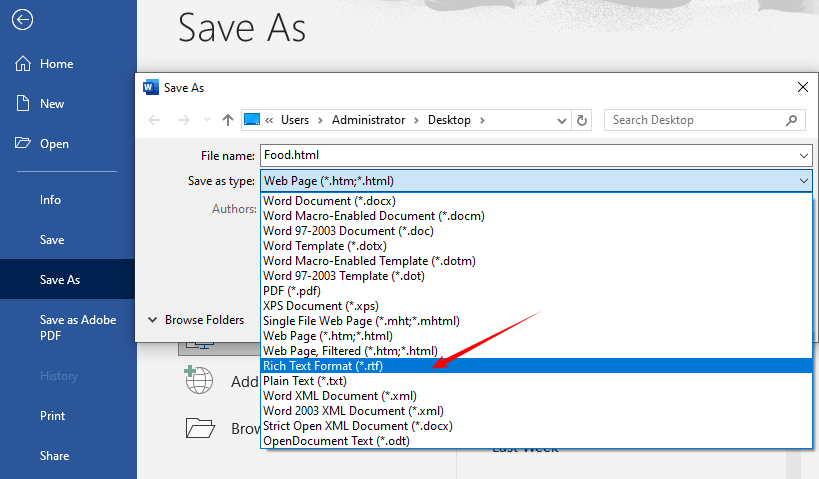
Microsoft Word has built‑in HTML rendering capabilities. It can open any .html file and preserve most CSS styles (inline, embedded, and even external stylesheets). Then you save as RTF.
How to convert HTML to rich text in Word:
- Open Microsoft Word.
- Go to File > Open and select your .html file.
- Word will automatically parse the HTML structure and render it as a formatted document.
- Once loaded, go to File > Save As.
- Choose Rich Text Format (.rtf) from the file type dropdown.
- Save the file.
Advanced Tips
- Fixing missing images: If images are linked to local paths, Word may not find them. Before opening in Word, edit the HTML to use absolute URLs or embed images as base64.
- Adjust page settings: Word uses its default page setup (usually Letter or A4). To change, go to “Layout > Size” before saving.
- Handling CSS @media queries: Word ignores most print‑specific CSS. If your HTML has separate print styles, they may not apply. Consider stripping them out.
Free Alternative: Use LibreOffice (Windows/Mac/Linux) for free offline high-quality HTML to rich text conversion without paying for Microsoft Word.
3. Pandoc Command-Line Tool (Best for Batch Conversions)
✔ Best for: Developers, technical writers, and anyone comfortable with the command line who needs to convert many HTML files quickly, reliably, and for free.
Pandoc is a free, open-source command-line tool that converts documents between dozens of formats, including HTML to RTF. It’s the gold standard for batch processing or integrating into scripts.
How to use Pandoc:
- Install Pandoc from pandoc.org.
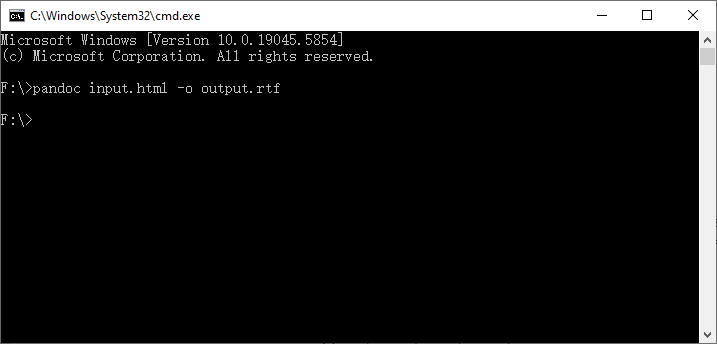
- Single file conversion (open Command Prompt/Terminal):
pandoc input.html -o output.rtf
- Batch convert all HTML files in a folder to RTF (Windows PowerShell):
Get-ChildItem *.html | ForEach-Object { pandoc $_.FullName -o $($_.BaseName + ".rtf") }
When to choose Pandoc: You care about document structure (headings, paragraphs, lists) and don’t need exact CSS styling. For pixel‑perfect conversions, use Microsoft Word or LibreOffice.
RTF retains formatting. If your goal is to remove formatting entirely, the HTML to text feature lets you extract plain text content instantly from any HTML file.
4. Automate with C# (Programmable .NET Solution)
✔ Best for: .NET developers integrating HTML→RTF conversion into web applications, desktop software, or automated workflows where you don’t want to rely on external executables.
Free Spire.Doc for .NET is a free .NET library that enables programmatic C# HTML to RTF conversion with just a few lines of code. It supports handling complex HTML structures such as CSS styles, tables, and lists.
C# Code Example for Converting an HTML file to RTF
using Spire.Doc;

namespace ConvertHtmlToRTF
{
    class Program
    {
        static void Main()
        {
            // 1. Create a Document object
            Document doc = new Document();

            // 2. Load an HTML file
            doc.LoadFromFile("Test.html", FileFormat.Html);

            // 3. Save the HTML file as rtf format
            doc.SaveToFile("HTMLtoRTF.rtf", FileFormat.Rtf);
            doc.Dispose();
        }
    }
}
This code loads a local HTML file and generates a formatted RTF document using the SaveToFile() method. Beyond local file processing, Free Spire.Doc fully supports converting dynamic HTML string fetched from user input, third-party APIs, or databases.
Conversion result:
When to choose Free Spire.Doc: You are already in a .NET ecosystem, you need to convert HTML fragments or full documents programmatically, and your documents are short. For large documents, consider Pandoc or the Spire.Doc commercial version.
Comparison Table: Which HTML to RTF Method Fits You?
| Method | Style Preservation | Cost | Technical Skill | Privacy | Batch Capable |
|---|---|---|---|---|---|
| Online Converter | Medium | Free (limits) | Low | Low (data leaves your device) | Limited |
| Microsoft Word | Very High | Paid (license) | Low | High | No (manual each file) |
| Pandoc (CLI) | Medium (structure only) | Free | Medium | High | Yes (scriptable) |
| C# + Spire.Doc | High | Free (limits) | High | High | Yes (programmatic) |
Final Thoughts
Converting HTML to RTF is simple and approachable for all users. For quick, single-file tasks, use free online HTML to rich text converters. For frequent or sensitive document conversions, choose offline software like Microsoft Word and LibreOffice. For batch processing and automated workflows, turn to command-line tools such as Pandoc or programming libraries like Free Spire.Doc.
By following the tips in this guide, you’ll enjoy seamless, accurate HTML to RTF conversions that are fully tailored to your needs.
Frequently Asked Questions (FAQ)
Q: Is HTML to RTF conversion free?
A: Yes, some online converters, LibreOffice, Pandoc, and Free Spire.Doc are all free to use.
Q: Can I convert HTML to RTF without losing formatting?
A: Yes. Use Microsoft Word (offline), Pandoc or Free Spire.Doc for maximum style retention. Embed images as base64 in HTML to keep all images.
Q: Can I batch convert multiple HTML files to RTF?
A: Yes. Use command-line tools (Pandoc) or programming library (Free Spire.Doc) for batch conversions. Some online tools also support bulk uploads (check their file size limits).
Q: Does RTF support hyperlinks from HTML?
A: Yes, RTF supports hyperlinks. Most converters preserve <a href="/..."> as clickable links in the RTF. However, some RTF viewers may require you to hold Ctrl+Click.
Q: Can I convert a web page URL directly to RTF?
A: Yes. Some online converters (OnlineConvert) support URL input; you can also save the web page as HTML first, then convert it offline.
See Also
Remove Hyperlinks from PDF – 4 Quick Methods
Table of Contents
Hyperlinks in PDFs are incredibly useful for digital navigation. However, there are many situations where these same hyperlinks can be distracting or redundant. Perhaps you’re preparing a document for printing, sharing a static report, or simply want to keep the layout clean. Whatever your reason, learning how to remove hyperlinks from PDF files is an essential skill.
This guide shares four reliable methods to remove hyperlinks from PDF—from a free built‑in Windows feature to professional software like Adobe Acrobat Pro, and even an automated C# solution for developers.
Here’s what you’ll learn:
- Method 1: Built-in “Print to PDF” Feature
- Method 2: Using Adobe Acrobat Pro
- Method 3: Free Online PDF Hyperlink Removers
- Method 4: C# Automation with Free Spire.PDF
- Pro Tips After Disabling Hyperlinks in PDF
- FAQs About Removing PDF Hyperlinks
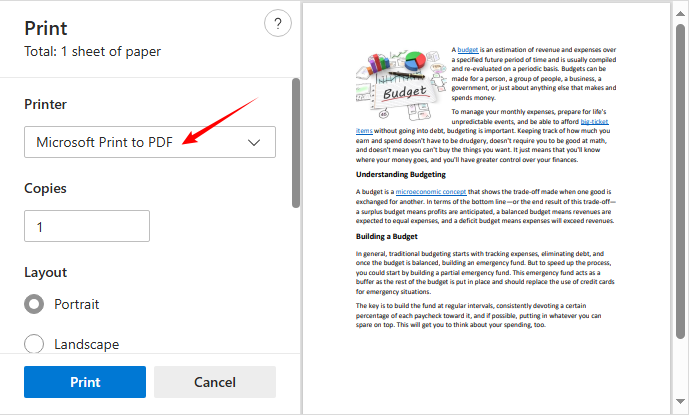
Method 1: Built-in “Print to PDF” Feature
If you want a quick solution without downloading apps, use the built-in “Print to PDF” feature to “flatten” the PDF document and remove all hyperlinks with a single click.
Step-by-Step:
- Open the PDF file with hyperlinks using your default PDF viewer (e.g., Microsoft Edge).
- Click the Print icon or use the “Ctrl+P” shortcut (Windows).
- In the “Printer” dropdown menu, select “Microsoft Print to PDF”.
- Click Print and choose a location to save the new PDF.
- Open the saved file—all hyperlinks will be removed.
When to use this: A quick, one‑time removal when you don’t need to edit the file afterward.
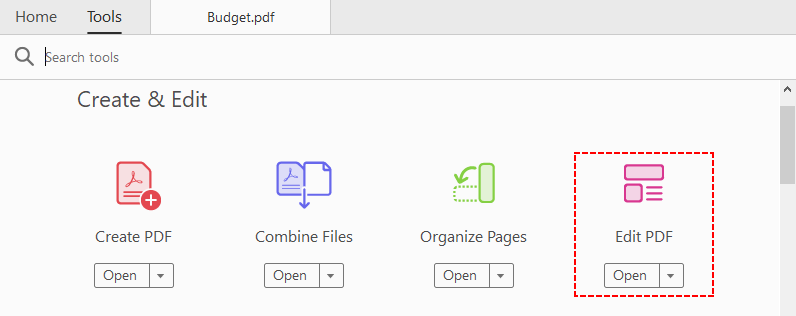
Method 2: Using Adobe Acrobat Pro
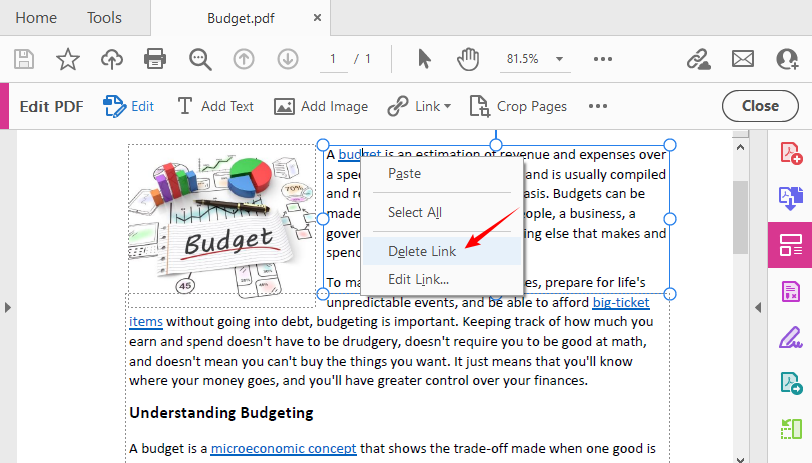
Adobe Acrobat Pro is the industry standard for PDF editing. Unlike the “Print to PDF” workaround, Acrobat allows you to delete hyperlink in PDF individually or in bulk without flattening the document, preserving full editability.
Adobe Acrobat Remove Hyperlinks:
- Open your PDF in Adobe Acrobat Pro.
- Click Tools in the top menu, then select “Edit PDF”.
- To remove a single hyperlink: Right‑click the linked text/image and select “Delete Link”.
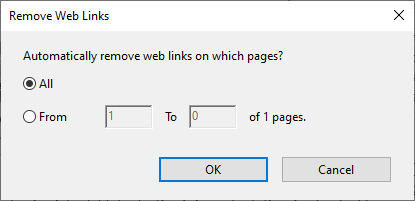
- To remove all links from PDF:
- Click “Link > Remove Web Links”.
- A pop‑up window will appear asking which pages you want to process. Select “All” (or choose a page range like 1–5).
- Click “OK”. Acrobat will scan every page and delete every web link annotation.
Best for: Professionals, businesses, and anyone who needs precise control and highly accurate results.
Method 3: Free Online PDF Hyperlink Removers
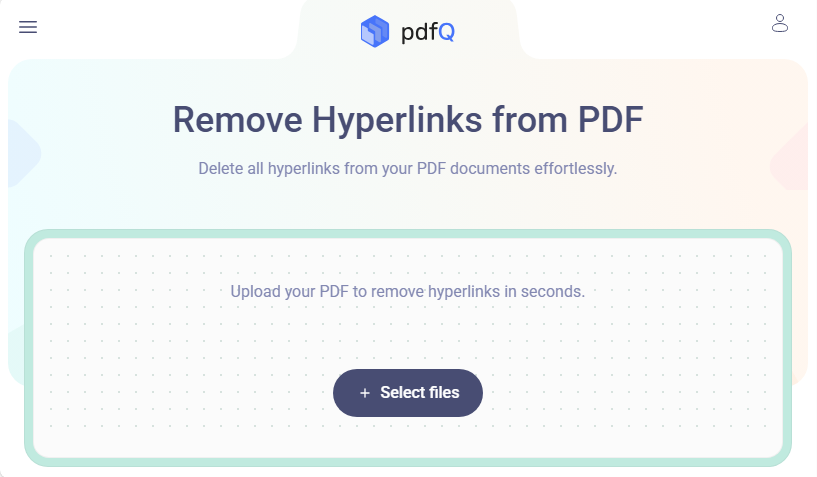
For casual users without access to Adobe Acrobat, free web-based tools (such as PDFQ, Zia Sign) provide a hassle-free way to remove hyperlink in PDF online for free, though they may have file size limits or require an internet connection.
Example of using PDFQ:
- Go to PDFQ remove hyperlink tool.
- Click “Select files” to upload your PDF.
- The tool will automatically scan and remove all hyperlinks.
- Preview the cleaned PDF to confirm all hyperlinks are gone.
- Download the hyperlink-free PDF file.
Most PDF link remover tools delete hyperlinks from all PDF pages. If you need selective link removal (e.g., only pages 5–10), simply split the PDF into the required page ranges before running the tool.
Security Note: Avoid uploading confidential, legal, or medical PDFs to any online service. For sensitive files, use offline methods (Method 1, 2, or 4).
Method 4: C# Automation with Free Spire.PDF
For developers or IT teams who need to automate hyperlink removal across hundreds of files, Free Spire.PDF for .NET is a reliable, code-based solution. This free .NET library supports a wide range of PDF processing features, including hyperlink addition and deletion.
C# Code to Remove All Hyperlinks from PDF
The following code loads a PDF, iterates through every page, identifies all web link annotations, and removes them.
using Spire.Pdf;
using Spire.Pdf.Annotations;
using System;

namespace DeleteHyperlink
{
    internal class Program
    {
        static void Main(string[] args)
        {
            // Create an object of PdfDocument
            PdfDocument pdf = new PdfDocument();

            // Load a PDF file
            pdf.LoadFromFile("Sample.pdf");

            // Remove all hyperlinks in the document
            // Loop through each page
            foreach (PdfPageBase page in pdf.Pages)
            {
                // Get the annotation collection of the page
                PdfAnnotationCollection collection = page.Annotations;
                // Iterate backwards to safely remove items
                for (int i = collection.Count - 1; i >= 0; i--)
                {
                    PdfAnnotation annotation = collection[i];
                    // Check if the annotation is a hyperlink (URI widget)
                    if (annotation is PdfUriAnnotationWidget)
                    {
                        PdfUriAnnotationWidget url = (PdfUriAnnotationWidget)annotation;
                        // Remove the hyperlink
                        collection.Remove(url);
                    }
                }
            }

            // Save the updated document
            pdf.SaveToFile("DeleteHyperlinks.pdf");
            pdf.Dispose();
        }
    }
}
Free Spire.PDF provides the PdfUriAnnotationWidget class to represent clickable web/URL hyperlink annotations in PDFs. If an annotation is detected as this web link type, call the Remove() method to disable links in PDF.
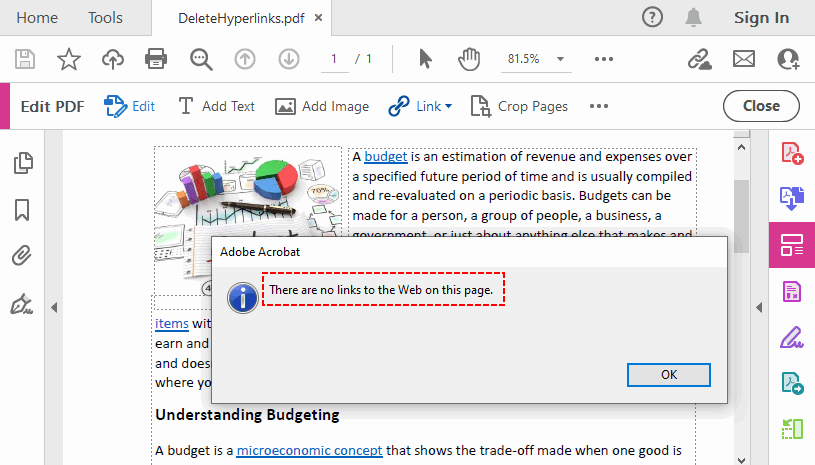
Result: The clickable links in PDF are removed and the underlying text remains unchanged (blue color, underline).
Optional: Remove Only a Specific Hyperlink
If you want to delete a single designated hyperlink (e.g., the second hyperlink on the first page), replace the inner loop with:
PdfPageBase page = pdf.Pages[0];
if (page.Annotations.Count > 1)
{
    page.AnnotationsWidget.RemoveAt(1); // zero-based index
}
✔ Pros: Supports batch automation, free for commercial & non-commercial use (10-page per file limit), fully preserves PDF editability and formatting.
✘ Cons: Requires basic C# programming knowledge, needs NuGet installation of the FreeSpire.PDF package.
Pro Tips After Disabling Hyperlinks in PDF
- Double-check your document: Some tools may delete text if used incorrectly. Always keep a backup of the original PDF.
- Flatten for Security: If you want to ensure links cannot be re-enabled, print the PDF to a new PDF using “Print to PDF” (Method 1).
- Reduce PDF file size: After link removal, use an online compressor or Acrobat’s “Save as Optimized” to shrink the file.
- Check for hidden links: Images, buttons, and even blank spaces can contain links. Use Acrobat’s “Edit” mode to see all annotations.
Conclusion
Removing hyperlinks from PDFs is simple and requires no advanced skills. This guide provides 4 reliable methods for every scenario: The free Print to PDF for quick one‑time fixes, Adobe Acrobat Pro for professional precision, online tools for browser‑based edits without installation, or a C# script (Free Spire.PDF) for batch processing by developers.
Choose the method that best fits your document type, skill level, and specific requirements to create clean, professional, link‑free PDFs in minutes. All approaches preserve your original content and layout while removing unwanted hyperlinks, resulting in polished final documents.
FAQs About Removing PDF Hyperlinks
Q1: Does removing hyperlinks delete the text?
No. Removing a link only deletes the clickable annotation—the text remains unchanged. However, if you use a destructive method (like deleting the text box), you may lose content.
Q2: What’s the fastest way to remove all hyperlinks at once?
- For small PDFs: The built-in Print to PDF feature (10 seconds).
- For large/editable PDFs: Adobe Acrobat Pro’s bulk link removal.
- For batch processing: The C# + Free Spire.PDF automation method.
Q3: Will removing hyperlinks break my PDF’s formatting?
No. Tools like Adobe Acrobat and the C# script only delete hyperlink annotations, preserving all layout, text, and images. The Print to PDF method flattens the PDF but keeps formatting unchanged (loses editability only).
Q4: Are online PDF link removers safe?
Only for non‑sensitive documents. Avoid uploading confidential, legal, or medical PDFs to untrusted online services. For such files, use offline methods (Methods 1, 2, 4).
See Also
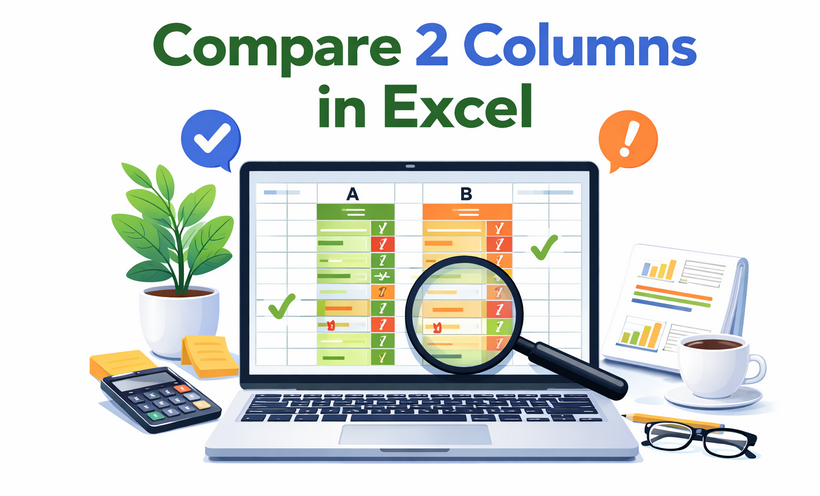
How to Compare Two Columns in Excel – 7 Easy Methods
Table of Contents
Comparing columns in Excel is a fundamental, high-value skill for data analysts, accountants, marketers, and all business professionals working with spreadsheets. Whether you’re reconciling financial invoices, scrubbing duplicate customer records, matching inventory SKUs, or validating survey response data, mastering efficient column comparison techniques eliminates hours of manual work.
Yet despite how common this task is, many Excel users rely on slow, error‑prone methods such as scanning row by row, using the filter dropdown repeatedly, or even printing two lists and marking them with a pen. These approaches not only waste time but also increase the risk of overlooking critical mismatches or duplicates.
That’s exactly why this guide exists. You will learn how to compare two columns in Excel using 7 proven methods—from beginner‑friendly visual checks to advanced automation with VBA and Python.
- Why Compare Columns in Excel?
- 1. Conditional Formatting (Highlight Matches/Differences)
- 2. Excel Formula to Compare Two Columns
- 3. Advanced Methods to Compare Columns in Excel
- Excel Column Comparison Method Cheat Sheet
- Frequently Asked Questions
Why Compare Columns in Excel?
Here are the most common real-world use cases to compare Excel columns:
- Data Reconciliation: Verify that two datasets (e.g., a sales report and a payment log) match.
- Duplicate Detection: Find duplicate values across columns (e.g., duplicate customer IDs or email addresses).
- Difference Identification: Spot discrepancies between two versions of the same data.
- Data Validation: Ensure consistency in data entry (e.g., checking that product codes in one column match a master list).
- Merging Datasets: Prepare data for merging by identifying common or unique values across columns.
No matter your use case, Excel has a method tailored to your skill level and data size. We’ll start with the simplest methods (great for beginners) and move to advanced techniques (for power users).
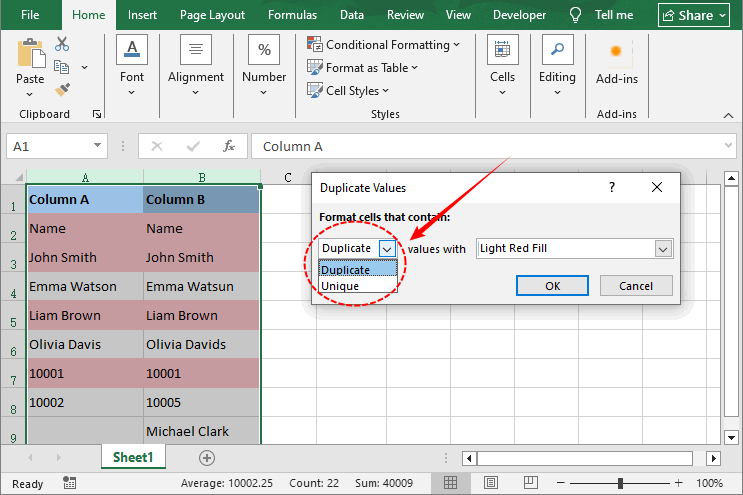
1. Conditional Formatting (Highlight Matches/Differences)
Conditional formatting is the fastest way to visually compare 2 columns in Excel. It highlights matches or differences with colors, making discrepancies easy to spot at a glance.
Best for: Quick visual identification without writing formulas.
How to Use Conditional Formatting:
- Select the two columns you want to compare (e.g., Column A and Column B).
- Go to the Home tab in the Excel ribbon.
- Click Conditional Formatting → Highlight Cells Rules → Duplicate Values.
- In the pop-up window:
- Choose Duplicate to highlight matching values.
- Choose Unique to highlight differences.
- Select a color scheme and click OK.

Example Result: All matching cells turn light red; differences remain uncolored.
Once you’ve mastered using conditional formatting to highlight matching or unique values between two columns, you can extend the same visual logic to identify data trends—for example, applying data bars to compare sales figures across two regions.
2. Excel Formula to Compare Two Columns
Formula-based methods give you full control over the comparison output. You can return TRUE/FALSE, custom text (“Match” / “Difference”), or even retrieve matching values from another column.
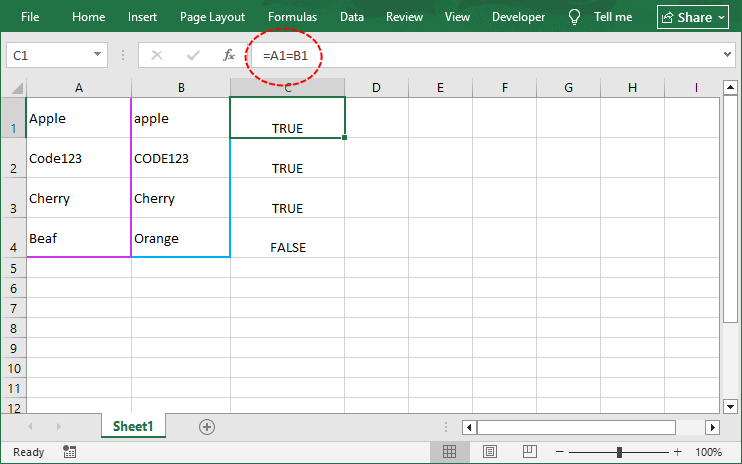
2.1 Equal Operator (=) & EXACT Function
These two methods are the foundation of row‑by‑row comparison. Both compare 2 Excel cells in the same row, but they differ in how they handle letter case. Use the equal operator (=) for case‑insensitive checks, or EXACT when letter case matters.
Case‑Insensitive Equal operator: =A1=B1
- Returns “TRUE” if values match (ignoring case), “FALSE” otherwise.
- Example: "Apple" vs "apple" → TRUE.
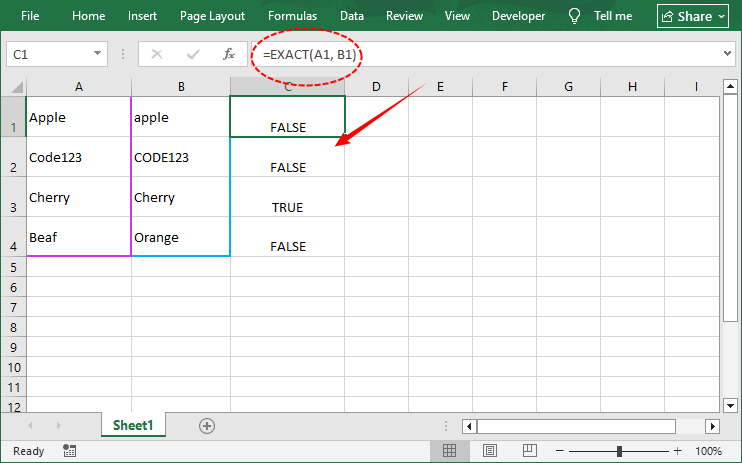
Case-Sensitive EXACT function: =EXACT(A1, B1)
- Returns “TRUE” only if values are identical (including case).
- Example: "Apple" vs "apple" → FALSE.
Related article: How to Remove Duplicate Rows from Excel - 6 Easy Ways
2.2 IF Function (Custom Result Labels)
The IF function lets you replace TRUE/FALSE with custom labels like “Match” or “Mismatch”, making your results easier to interpret. You can even add details about the differences.
Example Formula: =IF(A1=B1, "Match", "Difference")
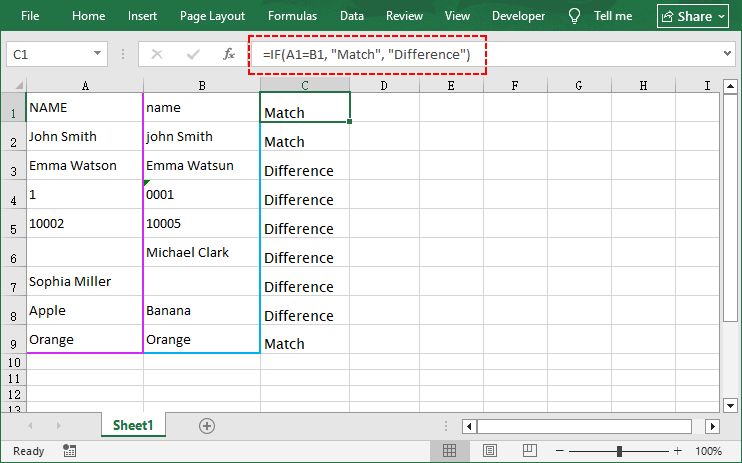
Variations for different scenarios:
| Scenario | Formula |
|---|---|
| Show only differences (blank if match) | =IF(A1<>B1, "Difference", "") |
| Numeric flag (0 = match, 1 = mismatch) | =IF(A1=B1, 0, 1) |
| Include cell values in message | =IF(A1=B1, "Match", "Mismatch: "&A1&" vs "&B1) |
| Case‑sensitive with custom label | =IF(EXACT(A1,B1), "Exact match", "Case or value differs") |
Why use IF instead of =?
- You can filter on "Match" / "Difference".
- You can combine with other functions to create richer reports.
- Non‑technical users understand words better than TRUE/FALSE.
2.3 VLOOKUP Function (Find Matches Across Columns)
VLOOKUP is the go-to tool for comparing columns with unordered data (e.g., finding a customer ID in Column A that exists in Column B, even if the rows don’t line up).
It searches for a specific value in one column and returns a corresponding value (or an error) if a match is found, making it perfect for finding missing values across columns.
Compare two columns in Excel using VLOOKUP:
- In an empty column (e.g., Column C), enter the formula: =VLOOKUP(A1, B:B, 1, FALSE).
- Breakdown of the formula:
- A1 – the lookup value (what you are searching for).
- B:B – the column to search in (Column B).
- 1 – column index (since B:B has only one column, return that column).
- FALSE – exact match (critical; TRUE would give approximate matches).
- Press Enter. Excel will return the value from Column B if it matches A1, or #N/A if no match is found.
- Drag the fill handle down to apply the formula.
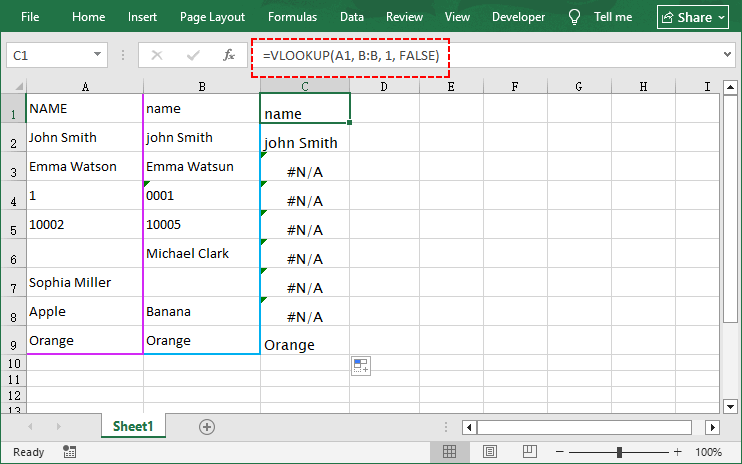
To replace #N/A with a custom label (e.g., "No Match"), wrap the formula in IFERROR: =IFERROR(VLOOKUP(A1, B:B, 1, FALSE), "No Match").
Limitation: VLOOKUP only searches from left to right. To look up values in any direction, use INDEX/MATCH (compatible with all Excel versions) or, if you have Excel 2021 or Microsoft 365, the more intuitive XLOOKUP function.
3. Advanced Methods to Compare Columns in Excel
These methods are for power users working with massive datasets or performing repetitive column comparisons. We cover two automation tools: VBA Macros (Excel-native) and Python (for ultra-scalable data).
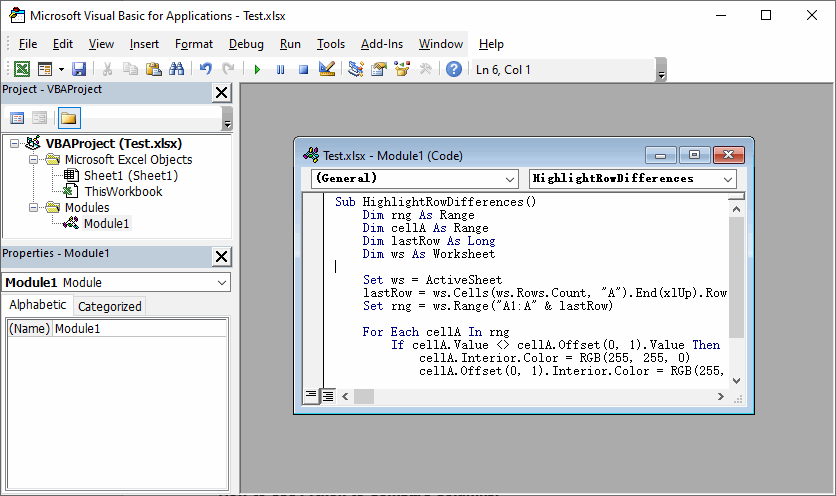
3.1 VBA Macro (Built‑in Excel Automation)
VBA (Visual Basic for Applications) allows you to write scripts that run directly inside Excel. Ideal for daily tasks without re‑entering formulas.
VBA Code to Compare Two Columns in Excel for Differences
Sub HighlightRowDifferences()
    Dim rng As Range
    Dim cellA As Range
    Dim lastRow As Long
    Dim ws As Worksheet

    Set ws = ActiveSheet
    lastRow = ws.Cells(ws.Rows.Count, "A").End(xlUp).Row
    Set rng = ws.Range("A1:A" & lastRow)

    For Each cellA In rng
        If cellA.Value <> cellA.Offset(0, 1).Value Then
            cellA.Interior.Color = RGB(255, 255, 0)      ' Yellow
            cellA.Offset(0, 1).Interior.Color = RGB(255, 255, 0)
        End If
    Next cellA
End Sub
How to use this macro:
- Open your Excel workbook and press Alt + F11 to open the VBA Editor.
- Go to Insert → Module to create a new module.
- Paste the code into the blank module window (customize column/range references as needed).
- Press F5 to run the macro.
Bonus Tip: To make column comparison more accurate, you can use the text to columns feature to split combined cell data (such as names and codes) into separate columns and standardize messy text formats.
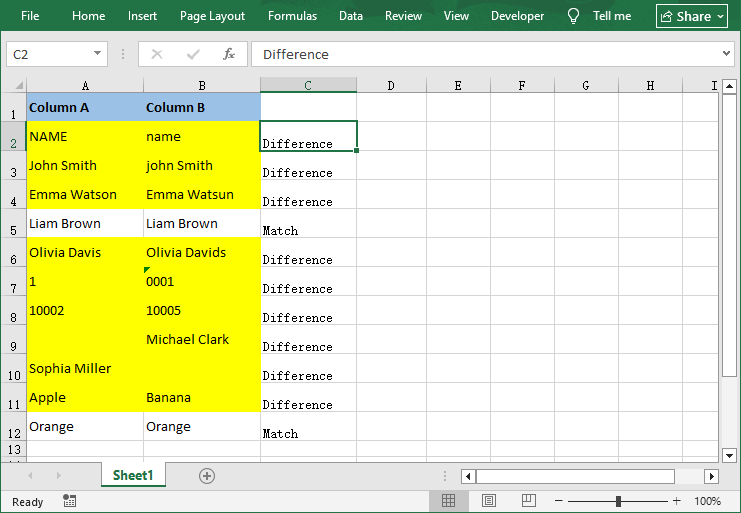
3.2 Python with Free Spire.XLS (Scalable & Cross‑Platform)
For developers who need to integrate column comparison into a data pipeline, Python with Free Spire.XLS is the most powerful option. This free library can read, write, and manipulate Excel files without needing Microsoft Excel installed.
Complete Python script to compare two columns:
from spire.xls import *
from spire.xls.common import *

# Create a workbook object
workbook = Workbook()
workbook.LoadFromFile("Test.xlsx")

# Get the first worksheet
sheet = workbook.Worksheets[0]

# Get data range (assume row 1 is header, data starts from row 2)
start_row = 2
end_row = sheet.LastRow

for row in range(start_row, end_row + 1):
    cell_a = sheet.Range[row, 1]
    cell_b = sheet.Range[row, 2]

    # Get values (Handle null values)
    val_a = cell_a.Value if cell_a.Value is not None else ""
    val_b = cell_b.Value if cell_b.Value is not None else ""

    # Compare values
    if val_a == val_b:
        sheet.Range[row, 3].Text = "Match"
    else:
        sheet.Range[row, 3].Text = "Difference"

        # Highlight different cells
        cell_a.Style.Color = Color.get_Yellow()
        cell_b.Style.Color = Color.get_Yellow()

# Save the result file
workbook.SaveToFile("compared.xlsx", ExcelVersion.Version2016)
workbook.Dispose()
The code loads an Excel file, compares two columns, labels results as “Match” or “Difference”, highlights differences in yellow, and saves a new output file.
After you add a “Match / Difference” column, you can insert a PivotTable to instantly count how many rows matched or differed, transforming a simple column comparison into an intuitive data reporting.
Excel Column Comparison Method Cheat Sheet
Not sure which method to use? Refer to this quick cheat sheet:
| Method | Best For | Skill Level | Pros | Cons |
|---|---|---|---|---|
| Conditional Formatting | Visual checks, small datasets | Beginner | Fast, no formulas, easy to spot differences | No written results, not for large datasets |
| Equal operator & EXACT | Row‑by‑row case‑insensitive or Case‑sensitive comparison | Beginner | Fast and simple formula | Basic output only, no custom labels |
| IF Function | Custom result labels | Intermediate | Easy to interpret, flexible | Requires formula setup |
| VLOOKUP | Unordered data, finding matches | Intermediate | Works with unordered data | Only searches left-to-right |
| VBA Macro | Automation, cross-sheet comparisons | Advanced | Saves time for repetitive tasks | Requires VBA knowledge |
| Python | cross‑platform batch processing, no Excel required | Advanced | Scalable, server‑friendly, and full automation | Requires Python knowledge |
Wrapping up
Comparing two columns in Excel doesn’t have to be a tedious, manual task. The right method depends on your dataset size, skill level, and whether you need visual checks, written results, or automation.
For beginners, start with Conditional Formatting (visual) or the equal operator (quick TRUE/FALSE). For larger datasets or unordered data, use IF or VLOOKUP for custom, readable results. For repetitive tasks or massive datasets, automate the process with a VBA Macro (Excel-native) or Python (scalable).
By mastering these 7 methods, you’ll streamline your data workflow, eliminate manual errors, and turn Excel into a powerful tool for data validation and cleaning.
Frequently Asked Questions
Q1: How do I compare two columns and show differences in a third sheet?
Use the IF function or a VBA macro. For a simple solution: Create a new sheet (e.g., Sheet3), enter =IF(Sheet1!A1=Sheet2!A1, "", "Difference") in the first cell, and drag the fill handle down.
Q2: Can I compare more than two columns at once?
Yes. For row‑wise comparison of three columns (A, B, C):
- Conditional formatting formula: =OR($A1<>$B1, $B1<>$C1) to highlight any mismatch.
- Formula: =IF(AND(A1=B1, B1=C1), "All match", "Mismatch")
- VBA: loop through columns A, B, C and compare each.
- Python: extend the comparison to check all required columns.
Q3: Can I reuse the VBA macro on different workbooks?
Yes. Copy the macro code, and paste it into a new module. Adjust the column letters in the code to match your new data range.
Q4. How can I compare two columns without opening Excel at all?
Use Python with Free Spire.XLS. The script can read the Excel file from disk, perform the comparison, and save the result – all without launching the Excel application. This is ideal for server-side or automated batch processing.
See Also
4 Proven Methods to Extract Metadata from PDF
PDFs are everywhere—from business contracts and academic papers to marketing brochures and legal documents. But beyond the visible text and images, every PDF contains hidden information called metadata. This behind-the-scenes data offers critical details about the document’s origin, author, creation date, and more. Whether you’re a content creator, developer, legal professional, or just someone looking to organize files, knowing how to extract metadata from PDF is a valuable skill.
This guide will walk you through the most effective methods to extract PDF metadata, from simple built-in tools to advanced programming libraries.
- Why Bother Extracting Metadata?
- 4 Proven Methods to Extract PDF Metadata
- Critical Notes for PDF Metadata Processing
- Frequently Asked Questions (FAQ)
Why Bother Extracting Metadata?
PDF Metadata is far more useful than you might think, with core value across multiple scenarios:
| Use Case | Why It Matters |
|---|---|
| Digital forensics | Track document origin and changes; detect forged files |
| Legal e-discovery | Metadata timestamps are court‑admissible evidence |
| Content management | Auto‑tag thousands of PDFs by author, date, or keyword |
| SEO & search visibility | Google uses the PDF title/subject in search snippets |
| Privacy protection | Find and remove hidden personal data before sharing |
| Workflow automation | Extract invoice numbers and report dates without manual reading |
| Library archiving | Build searchable PDF databases for research |
Even for a single document, knowing how to read PDF metadata helps you verify authenticity and avoid leaking sensitive information.
Also read: How to Edit PDF Metadata (4 Methods)
4 Proven Methods to Extract PDF Metadata (From Beginner to Pro)
Depending on how comfortable you are with tools and how many files you’re dealing with, you’ve got several options to get metadata from PDF, covering no‑code, online, programming, and command‑line approaches.
1. Adobe Acrobat Pro (Windows/Mac)
Adobe Acrobat Pro is the industry standard for PDF work. It provides a clean, graphical interface to view and export both standard and advanced metadata.
Here’s how to use it:
- Open your PDF in Adobe Acrobat Pro.
- Click “File” > “Properties” (or press Ctrl+D/Command+D).
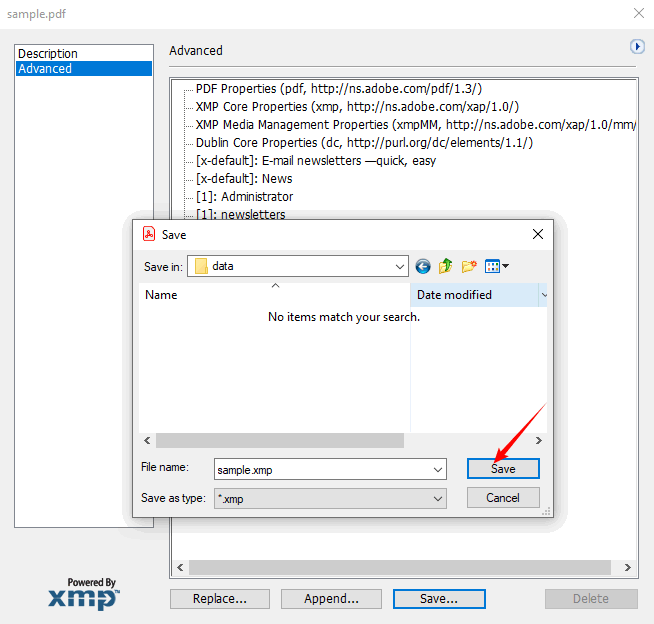
- The “Description” tab displays standard metadata (title, author, subject, etc.). The “Advanced” tab shows deeper XMP data (e.g., PDF creation software version).
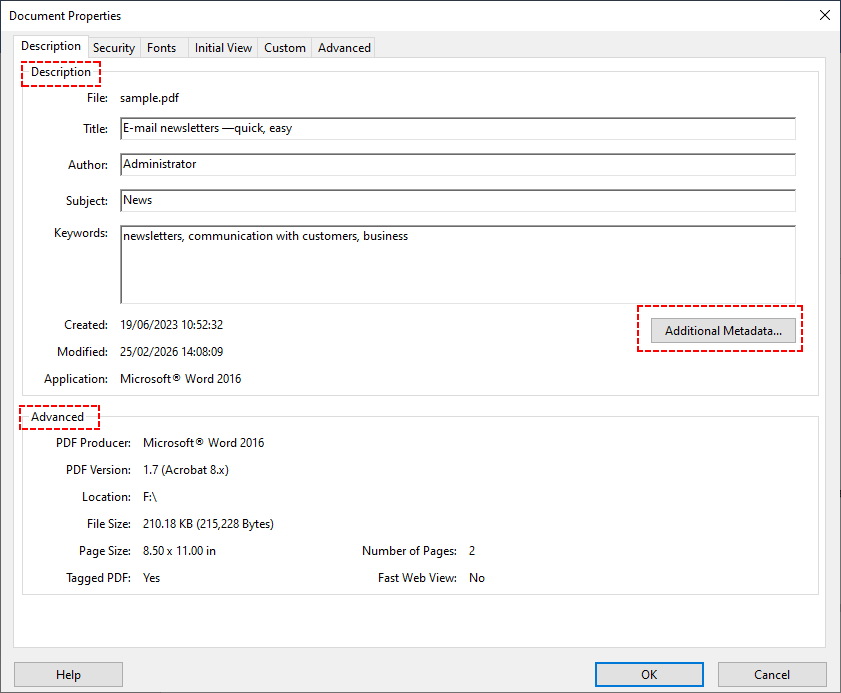
- For even more custom fields, click “Additional Metadata” to browse all XMP properties.
- Select “Export” to save as an XMP file. This file can be imported into other Adobe tools or read by custom scripts.
Downside: Requires a subscription. Suitable for professionals who already have Acrobat Pro, but overkill for a quick one‑file check.
Many secured PDFs restrict access to metadata, so removing PDF permissions unlocks full access to metadata and document content, allowing you to extract, modify, or export metadata from password-protected or restricted files without limitations.
2. Free Online Metadata Extractors (Quick and Easy)
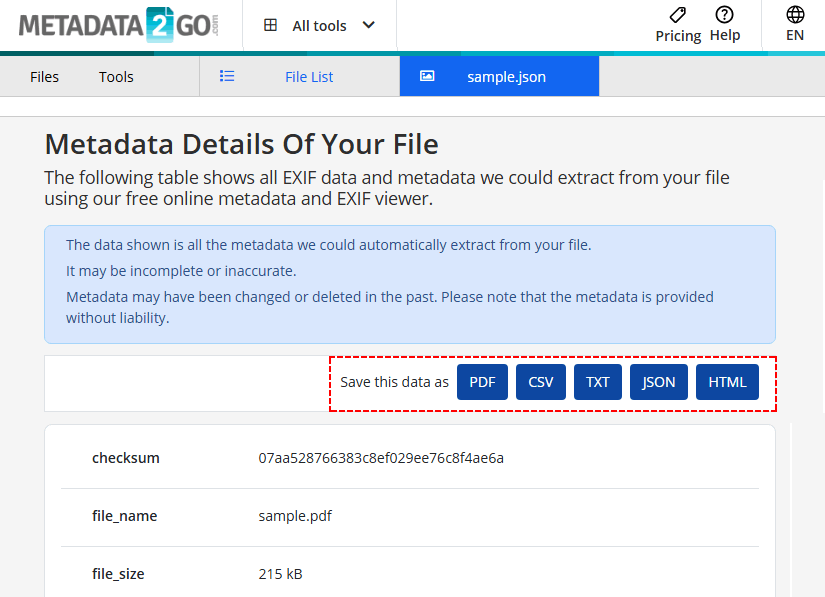
A quick Google search turns up dozens of sites that let you upload a PDF and view its metadata. Popular examples like Metadata2Go and GroupDocs PDF Metadata Extractor are incredibly convenient—no installation, no payment, and they work on any device.
Get PDF metadata online using Metadata2Go:
- Go to the tool’s View Metadata page.
- Upload the PDF via drag-and-drop or click “Choose file”.
- Wait for the tool to extract metadata from your PDF file.
- Export results to CSV/TXT/JSON/HTML as needed.
Security Risk: Never upload sensitive or confidential documents to a free online tool.
3. Programmatically Extract PDF Metadata (For Developers)
If you need to extract metadata from hundreds of PDFs or integrate metadata extraction into your own application, programming is the way to go. Below is a detailed example using C# and the Free Spire.PDF for .NET library.
Step 1 - Install the library via NuGet
Install-Package FreeSpire.PDF
Step 2 – Write C# code to read PDF metadata
using Spire.Pdf;
using System.IO;
using System.Text;
namespace ExtractPDFMetadata
{
class Program
{
static void Main(string[] args)
{
// Create a PdfDocument object
PdfDocument pdf = new PdfDocument();
// Load the PDF file (change path to your file)
pdf.LoadFromFile("F:\\sample.pdf");
// Access document information
PdfDocumentInformation info = pdf.DocumentInformation;
// Build metadata string
StringBuilder content = new StringBuilder();
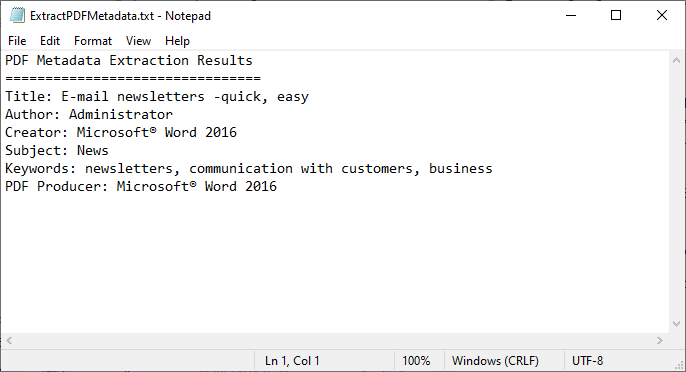
content.AppendLine("PDF Metadata Extraction Results");
content.AppendLine("================================");
content.Append("Title: " + info.Title + "\r\n");
content.Append("Author: " + info.Author + "\r\n");
content.Append("Creator: " + info.Creator + "\r\n");
content.Append("Subject: " + info.Subject + "\r\n");
content.Append("Keywords: " + info.Keywords + "\r\n");
content.Append("PDF Producer: " + info.Producer + "\r\n");
// Write the result to a TXT file
File.WriteAllText("ExtractPDFMetadata.txt", content.ToString());
}
}
}
The code loads a PDF file, gets its standard metadata fields, and writes them to a text file.
Batch processing: To extract metadata from multiple files, loop through all PDFs in a folder:
foreach (string file in Directory.GetFiles(@"C:\Invoices\", "*.pdf"))
{
    // process each file
}
Pro Tip: Beyond basic metadata, Free Spire.PDF also supports the extraction of other elements, such as extracting images, hyperlinks, form fields values, etc.
4. Command Line with ExifTool (For Advanced Users)
If you’re comfortable with a terminal or command prompt, ExifTool is a powerful metadata extraction tool. It’s free, cross‑platform (Windows, macOS, Linux), and reads metadata from almost any file type, not just PDFs.
Install
On Windows, download the executable from the official site.
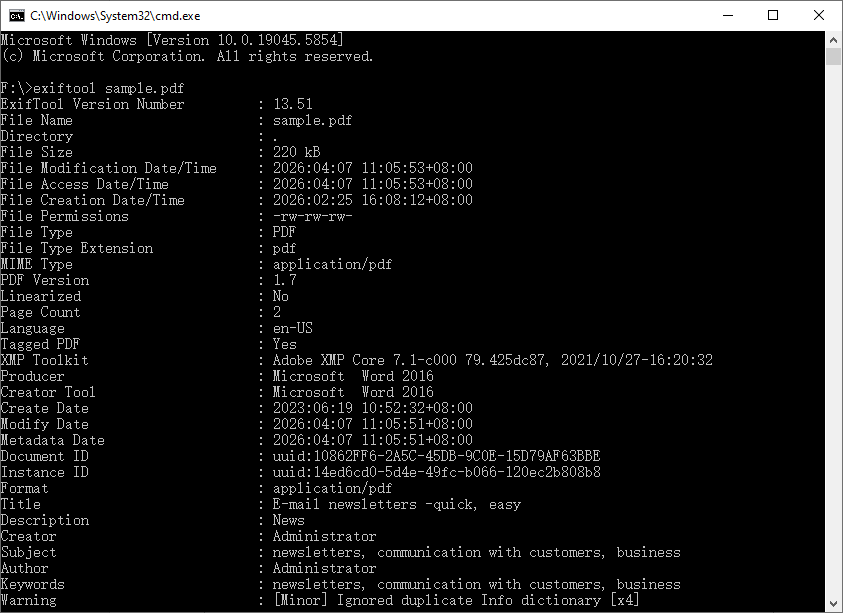
Basic usage – view metadata of a single PDF:
exiftool sample.pdf
This prints a long list of tag-value pairs directly in the terminal.
Batch export to CSV (ideal for analysis in Excel):
exiftool -csv *.pdf > metadata.csv
This command audits hundreds of PDFs at once and produces a CSV you can open in Excel or Google Sheets, giving you a searchable catalog.

When to use this: Large‑scale batch audits, forensic analysis, or when you prefer command‑line efficiency.
Metadata removal is a critical security feature that works alongside extraction. After reviewing extracted metadata, you can remove all hidden sensitive metadata from PDFs to prevent privacy leaks before sharing files externally.
Critical Notes for PDF Metadata Processing
- Metadata can be edited or faked.
Just because a PDF says “Author: John Doe” doesn’t mean John Doe actually wrote it. It provides helpful context but is not forensic proof without deeper analysis.
- Scanned PDFs are different.
If someone scanned a physical document and saved it as a PDF, the only metadata you’ll usually get is scanner info and a creation date. There’s no “author” or “keywords” unless someone adds them later.
- SEO tip.
If you put PDFs on your website, fill in the Title and Subject fields. Google often uses those for the title and description in search results, which beats showing a random filename.
Wrapping Up
Extracting metadata from PDFs is a practical skill that saves time, protects privacy, and sometimes uncovers exactly the detail you were looking for. Whether you use Acrobat’s Properties window for a quick check, a free online tool for public documents, a C# script to process thousands of invoices, or ExifTool for bulk command‑line audits, the right method depends on how many files you’re dealing with and how deep you need to go.
Next time you download a PDF or prepare one for sharing, take a moment to look at its metadata. You might be surprised what’s attached and you’ll now know exactly how to extract it.
Frequently Asked Questions (FAQ)
Q1: Can I extract metadata from scanned PDFs?
Scanned PDFs (which are just images) usually have no metadata. You’ll need to use OCR software to convert the image to text first, then add metadata manually.
Q2: Is metadata the same as file properties?
Not exactly. File properties (like file size, creation date) are managed by the operating system. PDF metadata is embedded inside the PDF itself and travels with the document.
Q3: Can I edit or delete PDF metadata?
Yes. Use Adobe Acrobat Pro (graphical) or ExifTool (command-line) to edit/delete metadata; programming libraries also support modification.
Q4: Does metadata affect PDF file size?
No. Metadata is lightweight text data and has no noticeable impact on file size.
See Also
How to Add Digital Signature in Excel (Visible & Invisible)
Table of Contents
Ensuring the authenticity and integrity of Excel workbooks is essential in modern business operations. Whether the document is an invoice, a financial report, or a contract, inserting digital signature in Excel confirms that the file is genuine, has not been altered, and originates from a trusted source.
This article will guide you through how to add a digital signature in Excel, including the prerequisites for obtaining a digital certificate, adding visible or invisible signatures, and a C# programmatic approach for developers to automate batch signing. By the end, you will be able to confidently digitally sign Excel workbooks for legal, financial, or internal use.
- What is a Digital Signature in Excel?
- Prerequisite: Get a Digital Certificate
- Example 1: Add an Invisible Digital Signature in Excel
- Example 2: Insert a Visible Signature Line in Excel
- Bonus: Programmatically Add a Digital Signature Using C#
- FAQs About Adding Digital Signatures in Excel
What is a Digital Signature in Excel? (Visible vs. Invisible)
In Microsoft Excel, there are two primary types of signatures available:
1. Signature Line (Visible Signature)
This creates a visible line where a signer can type their name, draw a signature using a stylus or mouse, or upload an image of their physical signature. It is often used for contracts, approval forms, and legally binding agreements where a visible sign-off is required.
2. Digital Signature (Invisible/Backend)
This adds a cryptographic "seal" to the file. The signature does not appear inside the cells but is displayed in the signature bar. It certifies the entire workbook’s integrity and prevents unauthorized edits.
⚠️ Important Clarification: Typing a name into a cell or pasting an image does not constitute a digital signature. A true digital signature requires a digital certificate issued by a Certificate Authority (CA) or a self‑signed certificate for testing purposes.
Prerequisite: Get a Digital Certificate
Before you add a digital signature to Excel, you first need a digital certificate—an electronic ID that verifies your identity. Think of it as a “digital passport” for your signature. Below are the three ways to obtain one,
1. Free Self-Signed Certificate (For Personal/Test Use)
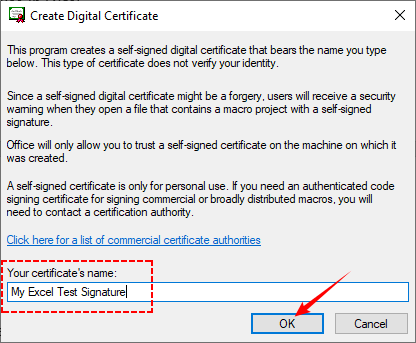
Microsoft Office includes a tool called SelfCert.exe that lets you create a free self-signed certificate. This is great for personal use, testing, or internal team documents, but it won’t be trusted by external parties since it’s not verified by a third-party CA.
How to create your own digital certificate:
- Open File Explorer and navigate to: “C:\Program Files (x86)\Microsoft Office\root\Office16\” (or "C:\Program Files\Microsoft Office\root\Office16")
- Double-click SELF CERT.EXE, and a “Create Digital Certificate” window will appear.
- Name your certificate (e.g., “My Excel Test Signature”) and click "OK".
- You will see a success message indicating that the certificate is now installed and ready for use in Excel.
2. Third-Party Certificate (For Business/External Use)
For documents shared with clients, partners, or regulators, use a certificate from a trusted Certifying Authority (CA) (e.g., DigiCert, GlobalSign). These certificates are verified by a third party, so they’re universally trusted. Most CAs charge a fee (annual or one-time), but some offer free options for personal use.
3. Organizational Certificate (For Enterprise Users)
If you work for a large company, your IT department may issue a digital certificate as part of your organization’s security protocols. This is ideal for internal documents and compliance with company policies.
Where to get it? Contact your IT help desk—they will provide a .pfx file or install the certificate directly into your Windows certificate store.
Example 1: Add an Invisible Digital Signature in Excel
If you are sending a file that contains macros, formulas, or sensitive data that you do not want altered after sending, you should use an invisible digital signature.
Step 1: Open Your Workbook and Access the Info Panel
Launch Microsoft Excel and open the workbook you want to sign.
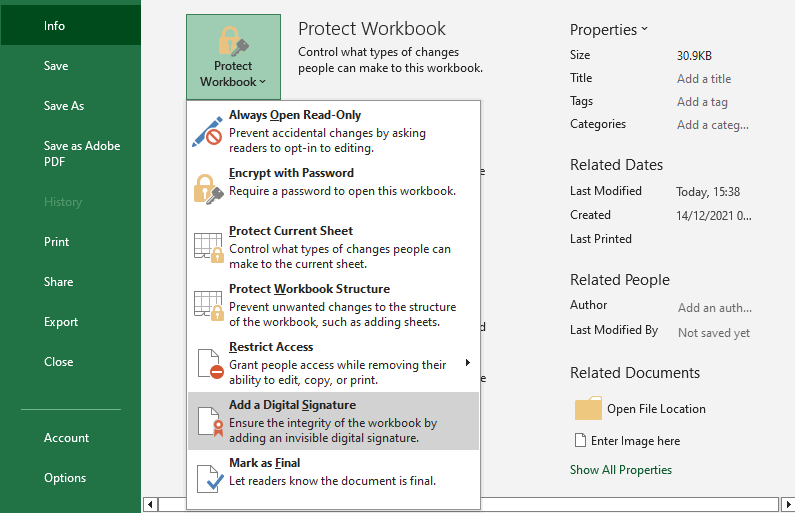
Step 2: Locate the “Add a Digital Signature” Option
- Click on “File” in the top‑left corner and select “Info”.
- In the “Info” panel, click the “Protect Workbook” dropdown arrow.
- From the dropdown menu, select “Add a Digital Signature”.
- Read the pop-up prompt and click “OK”.
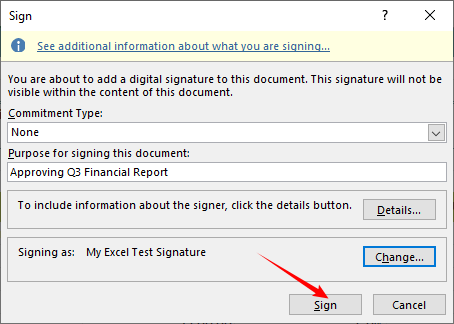
Step 3: Choose Your Digital Certificate and Sign
The “Sign” window will open. Here you configure the signature details.
- Select a “Commitment Type”.
- Type a purpose for signing (e.g., “Approving Q3 Financial Report”).
- Click “Change” if you want to select another certificate.
- Click the “Sign” button. Excel will save the workbook and apply the digital signature.
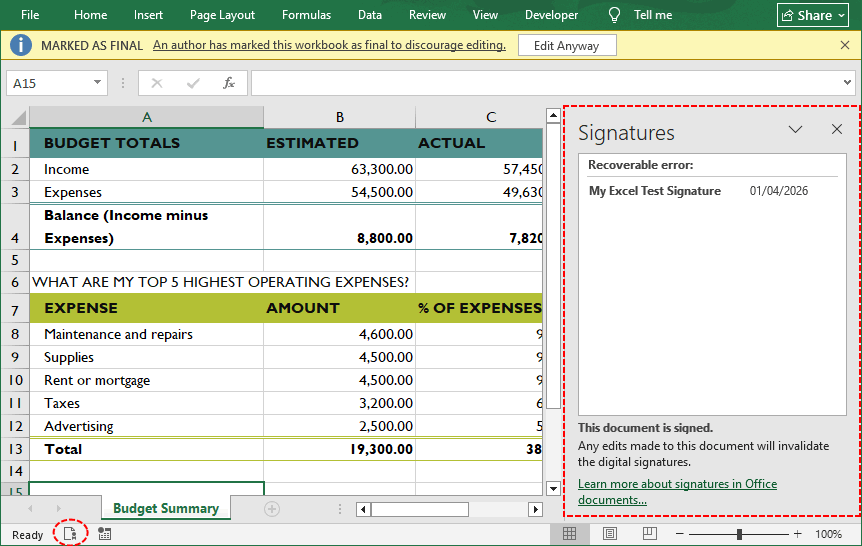
Step 4: Confirm and Verify the Signature
- A confirmation message will appear. Click “OK”.
- To verify, click the “Signature” button at the bottom of the Excel window, and a sidebar will open on the right, displaying the applied signature.
Pro Tip: Before applying a digital signature, you can lock certain Excel cells (e.g., formulas or totals) so that signers cannot edit them. This ensures both integrity and granular edit control.
Example 2: Insert a Visible Signature Line in Excel
This is the most common way to create a dedicated signature field where a user can formally sign the document, similar to a paper contract.
Step 1: Open Your Workbook
Open the Excel file where you need the signature.
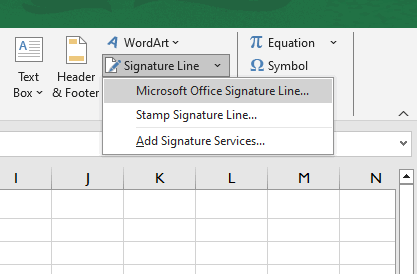
Step 2: Insert the Signature Line
- Select a cell where you want the signature to appear.
- Navigate to the “Insert” tab on the ribbon.
- In the “Text” group, click the “Signature Line” dropdown arrow (looks like a document with a pencil).
- Select “Microsoft Office Signature Line”.
Step 3: Configure the Signature Setup
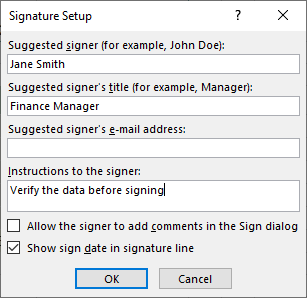
A dialog box titled "Signature Setup" will pop up. Here, you can fill in:
- Suggested signer: Full name of the person signing (e.g., “Jane Smith”).
- Suggested signer’s title: Job title (e.g., “Finance Manager”).
- Suggested signer’s email: Contact email address (optional).
- Instructions to the signer: Add any special notes (e.g., “Verify the data before signing”).
You can also check the boxes to allow the signer to add comments or to show the sign date. Click “OK”.
Step 4: Sign the Document
Once the line is inserted, double-click the signature line.
- To sign: Type your name, click "Select Image" to upload a scanned signature, or write it using a touch screen.
- To finalize: Click “Sign” to apply the digital signature.
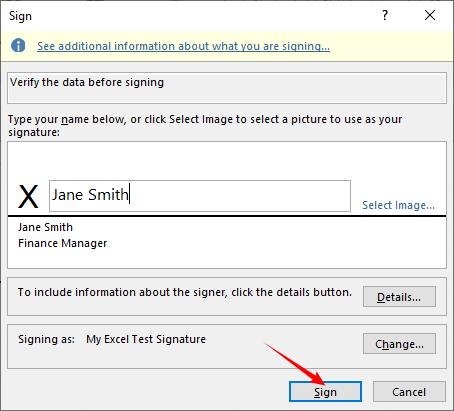
The signature line (looks like a horizontal line with “X”) will now show your signature, and the workbook will be locked from edits. A yellow ribbon may appear indicating that the document has been marked as final.

For a complete security strategy, adding a digital signature should be paired with other protection measures, such as encrypting the workbook with a password, to ensure only authorized users can view or modify the data.
Bonus: Programmatically Add a Digital Signature Using C#
If you are a developer looking to automate the signing process, you can use the Spire.XLS for .NET library. This library allows you to programmatically add or delete Excel digital signatures in C# without needing Microsoft Office installed on the server.
Step 1: Install Spire.XLS
Open Visual Studio, go to “Tools > NuGet Package Manager > Package Manager Console”, and run:
Install-Package Spire.XLS
Or you can search for "Spire.XLS" in the NuGet Package Manager UI and install.
Step 2: Prepare a PFX Certificate
Use a valid PFX certificate (.pfx file) that contains both the public and private keys. You can:
- Obtain one from a Certificate Authority (CA).
- Export a self-signed certificate for testing using PowerShell.
Make sure the .pfx file is accessible from your application’s file system.
Step 3: C# Code to Add a Digital Signature in Excel
Below is a complete C# example that loads an existing Excel file, applies an invisible digital signature, and saves the signed workbook.
using Spire.Xls;
using System;

namespace AddSignatureInExcel
{
    class Program
    {
        static void Main(string[] args)
        {
            // Create a Workbook instance
            Workbook workbook = new Workbook();

            // Load an existing Excel file
            workbook.LoadFromFile("Input.xlsx");

            // Define the path to the certificate file and its password
            string certificatePath = @"C:\Users\Administrator\Desktop\My Excel Test Signature.pfx";
            string certificatePassword = "123abc";

            // (Optional) Set a signing time
            DateTime signingTime = new DateTime(2026, 4, 1, 7, 10, 36);

            // Add a digital signature to the workbook
            workbook.AddDigitalSignature(certificatePath, certificatePassword, "Test Signature", signingTime);

            // Save the signed file
            workbook.SaveToFile("AddDigitalSignature.xlsx", FileFormat.Version2016);
            workbook.Dispose();
        }
    }
}
In this code, the AddDigitalSignature method applies the digital signature using the PFX file. The parameters are:
- certificatePath: Path to your .pfx file.
- certificatePassword: Password for the private key.
- comments: A string that appears in the signature details (e.g., “Test Signature”).
- signTime: A DateTime representing the signing time (this is not a cryptographic timestamp but can be used for display purposes).
The digital signature added: 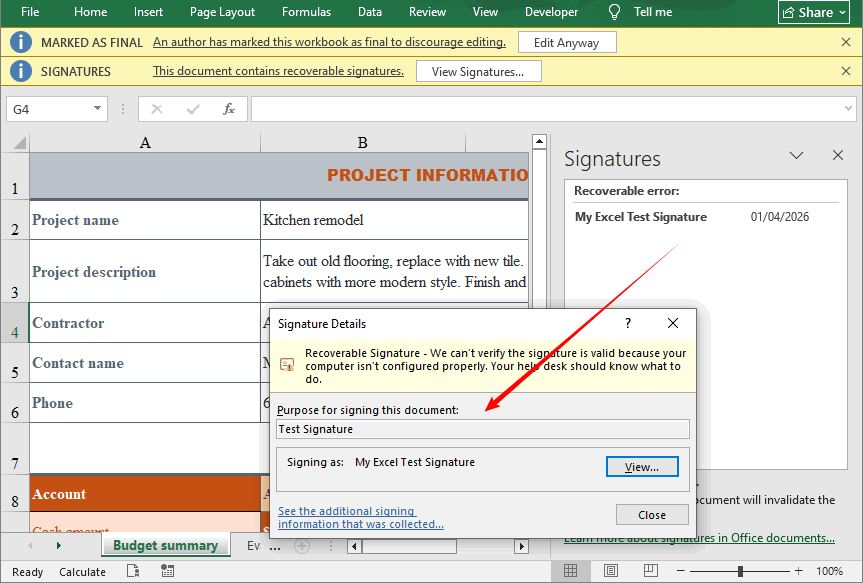
✅ Use Cases: Batch signing, server-side automation, enterprise workflow integration.
Wrapping it up
Adding a digital signature in Excel is essential for securing sensitive data—whether you use the manual steps for one-off files or the C# Spire.XLS method for automated batch signing. Both approaches create secure, legally binding digital signatures that protect your workbooks from tampering and verify authenticity.
Always use trusted digital certificates for external sharing, back up your credentials, and verify signatures before sharing or accepting Excel files. By following the procedures outlined in this guide, users can secure their Excel workbooks against unauthorized changes and verify the authenticity of signers with confidence.
FAQs About Adding Digital Signatures in Excel
Q1. How do I insert an electronic signature in Excel?
You have two main options: (a) Visible signature line – go to Insert > Signature Line, or (b) Invisible digital signature – go to File > Info > Protect Workbook > Add a Digital Signature. Choose based on whether you need a visible sign-off or backend integrity.
Q2. Can I add a digital signature to Excel for free?
Yes. Use the built‑in SelfCert.exe tool to create a free self‑signed certificate. However, this certificate is only trusted on your own computer. For external sharing, you may need a paid CA certificate.
Q3: How do I remove a digital signature from Excel?
Go to “File > Info > View Signatures”, right-click the signature, and select “Remove Signature”.
Q4: Can I add a signature to Excel without a certificate?
You can add a visual image signature, but it’s not a secure, verifiable digital signature.
See Also
Convert HTML to JPG (or PNG) - Free & Easy Tools
Table of Contents
- Why you might need to convert HTML to an image – from archiving web pages to creating automated social media cards.
- JPG vs. PNG: which format to choose – detailed comparison of compression, transparency, and file size, etc.
- 3 proven methods to convert HTML to JPG or PNG
- Pro tips for high‑quality conversions – optimizing HTML, setting resolution, handling fonts, and compressing final images.

Converting HTML to image format like JPG or PNG has become an essential task for developers, designers, and content creators. Whether you need to generate social media previews, capture data dashboards for reports, create website thumbnails, or automate screenshot workflows, knowing the right HTML to JPG or HTML to PNG conversion method is key to delivering high‑quality results efficiently.
This comprehensive guide covers everything you need to know about HTML to image conversion, including:
- Why you might need to convert HTML to an image – from archiving web pages to creating automated social media cards.
- JPG vs. PNG: which format to choose – detailed comparison of compression, transparency, and file size, etc.
- 3 proven methods to convert HTML to JPG or PNG:
- Online converters – quick solutions for one‑off conversions.
- Browser built‑in screenshot tools – leverage Chrome, Edge, or Firefox for high fidelity captures.
- C# with Free Spire.Doc for .NET – a reliable free library for server‑side automation.
- Pro tips for high‑quality conversions – optimizing HTML, setting resolution, handling fonts, and compressing final images.
By the end of this guide, you’ll have a clear understanding of how to choose the right approach based on your technical skill level, infrastructure, and automation needs.
Why Convert HTML to an Image?
HTML (HyperText Markup Language) is the backbone of web pages, but it’s not always the most portable or shareable format. Converting HTML file to JPG or PNG solves several common pain points:
- Preserve Layout & Design: Browsers render HTML differently, and converting to an image locks in the layout, ensuring your content looks the same everywhere.
- Easy Sharing: Images are universally supported across social media, email, presentations, and documents—no need for recipients to open a browser or have access to the original HTML file.
- Archiving & Documentation: Web pages change or disappear over time. Converting a webpage to an image creates a permanent snapshot of the content for records.
- Design & Mockups: Web designers often convert HTML prototypes to JPG/PNG to share with clients, showcase work in portfolios, or integrate into design systems.
- Performance Optimization: For simple content (e.g., infographics, static widgets), images load faster than HTML, especially on low-bandwidth devices.
JPG vs. PNG: Which Format Should You Choose?
Choosing the correct output format directly affects file size, quality, and transparency support. Here’s a quick comparison:
| Feature | PNG | JPG |
|---|---|---|
| Compression | Lossless | Lossy |
| File size | Larger | Smaller |
| Transparency | Supports alpha channel (transparent areas) | No transparency (fills with white or black) |
| Best for | Logos, icons, text‑heavy UIs, screenshots | Photographs, banners, large images |
Rule of thumb: Use PNG when you need sharp text, fine details, or a transparent background. Use JPG when you prioritize small file size and the content is photographic.
3 Methods to Convert HTML to Images (For All Skill Levels)
Whether you’re a beginner with no coding experience or a developer looking for automated solutions, there’s a method to fit your needs. We’ll cover the most reliable tools and techniques, from simple online converters to code-based solutions.
1. Online HTML to JPG/PNG Converters
Online converters are the simplest way to change HTML to JPG or HTML to PNG without any software or coding. They work directly in your browser and support HTML files or URLs. Top tools like Convertio and CloudxDocs deliver fast and reliable conversion results.
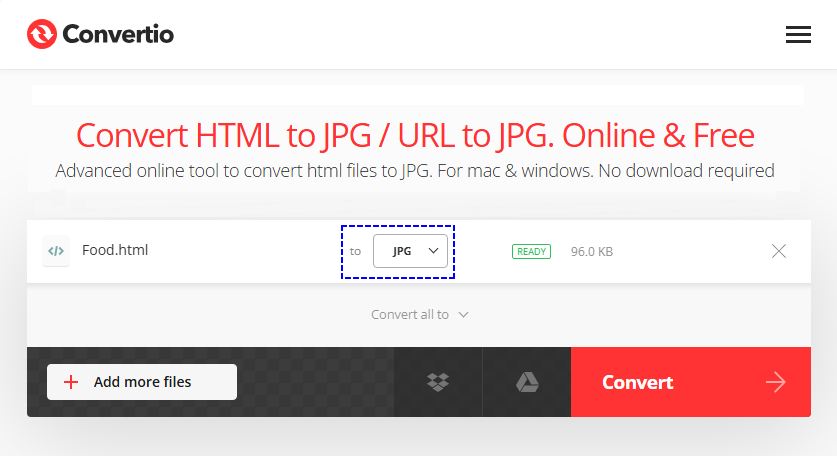
Step-by-Step with Convertio:
- Go to Convertio’s HTML to JPG/PNG tool.
- Upload your HTML/ URL file.
- Select the output format (JPG, JPEG, or PNG) from the dropdown menu.
- Click "Convert" and wait for the process to finish.
- Download the converted image to your device.
Pros: Zero setup, easy to use.
Cons: Require internet connection; free tiers may have file size limits.
Converting HTML to images preserves the visual layout, but sometimes you only need the underlying content. Learn how to extract plain text from HTML documents with our step‑by‑step guide, perfect for data mining, content migration, or search indexing.
2. Browser Built-in Screenshot Tools (Quick & Free)
All modern browsers (Chrome, Firefox, Safari, Edge) have built-in screenshot tools that can convert HTML to PNG. This is ideal for capturing web pages or specific HTML elements without third-party tools.
Example of Chrome HTML to PNG Conversion (steps are similar for other browsers):
- Open the HTML page in your browser (local file or URL).
- Press "F12" to open DevTools.
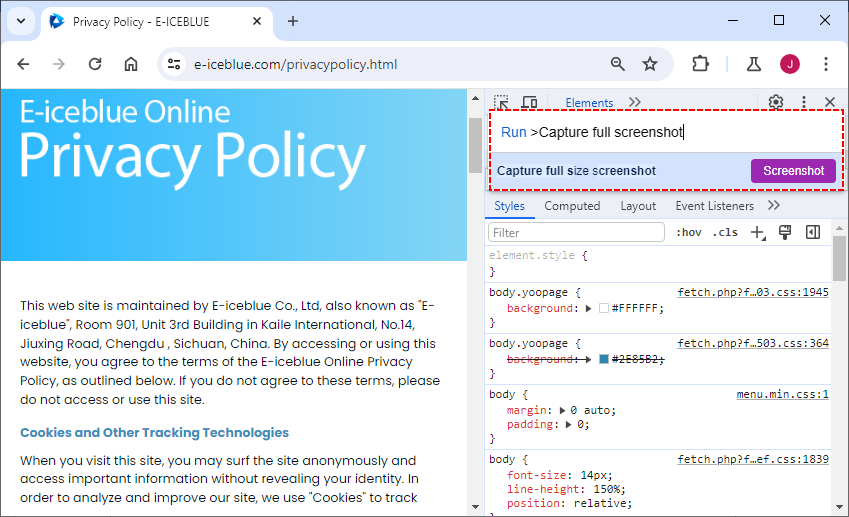
- In DevTools, press "Ctrl + Shift + P" (Windows) or "Cmd + Shift + P" (Mac) to open the command palette.
- Type "Capture full screenshot" (or "Capture full size screenshot") and press "Enter".
- The screenshot will automatically download as a PNG. To convert to JPG, use an image editor to save the PNG as JPG.
Pros: Perfect visual fidelity, zero setup, great for debugging/UI checks, 100% free.
Cons: Manual process (not automatable), only outputs PNG natively.
Pro Tip: While images are ideal for sharing visuals, converting HTML to PDF preserves both layout and text for documents, reports, and archiving, offering a complementary output format.
3. C# with Free Spire.Doc for .NET
For .NET developers building server-side applications, Free Spire.Doc for .NET is a reliable, free library that supports converting HTML to JPG, PNG, and other image formats. It handles complex HTML content (including CSS styles, tables, and images) without relying on a browser, making it ideal for automated .NET workflows.
Installation via NuGet:
The easiest way to install Free Spire.Doc is through NuGet Package Manager in Visual Studio:
Install-Package FreeSpire.Doc
C# Code to Convert HTML to PNG
This code converts a local HTML file to PNG (swap ImageFormat.Png for ImageFormat.Jpeg to output JPG) and customizes page margins for optimal rendering:
using Spire.Doc;
using Spire.Doc.Documents;
using System.Drawing;
using System.Drawing.Imaging;
namespace ConvertHtmlFileToPng
{
class Program
{
static void Main(string[] args)
{
// Create a Document object
Document document = new Document();
// Load an HTML file
document.LoadFromFile("input.html", FileFormat.Html, XHTMLValidationType.None);
// Get the first section
Section section = document.Sections[0];
// Set the page margins
section.PageSetup.Margins.All = 2;
// Convert the document to an array of bitmap images
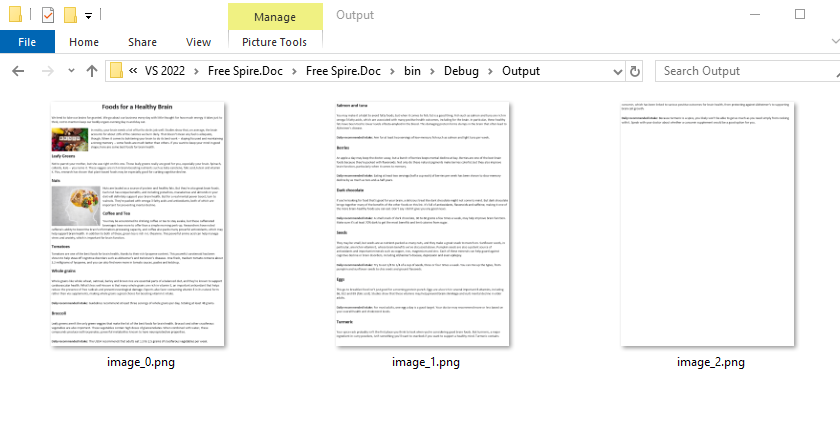
Image[] images = document.SaveToImages(ImageType.Bitmap);
// Iterate through the images
for (int index = 0; index < images.Length; index++)
{
// Specify the output file name
string fileName = string.Format(@"Output\image_{0}.png", index);
// Save each image as a PNG file
images[index].Save(fileName, ImageFormat.Png);
}
// Dispose resources
document.Dispose();
}
}
}
Conversion result: The library aligns HTML layout with the standard page model of a Word document. Accordingly, lengthy HTML content will be paginated and exported as multiple images.
Pros: High scalability, server-friendly, full control over rendering, supports bulk conversion.
Cons: Requires .NET coding knowledge.
Reference: Convert HTML File or HTML String to Image in C#
Pro Tips for High-Quality HTML to Image Conversions
To ensure your converted images are crisp, clear, and professional, follow these tips:
- Optimize HTML First: Remove unnecessary code, compress images, and ensure styles are consistent.
- Use High Resolution: When converting, set the resolution to at least 1920x1080 (Full HD) to avoid blurriness.
- Test for Responsiveness: If the source HTML is responsive, test different screen sizes to ensure the layout doesn’t break in the image.
- Handle Fonts Carefully: Embed custom fonts in your HTML; missing fonts cause distorted text and inconsistent rendering.
- Compress Final Images: Use tools like TinyPNG or Squoosh to reduce JPG/PNG file sizes without losing quality.
Final Thoughts
Converting HTML to JPG or PNG bridges the gap between dynamic web content and static, universally shareable media. Whether you’re a beginner using online tools, a designer using browser screenshots, or a developer automating conversions with code, the methods in this guide cover every use case.
Remember to choose the right format (JPG for photos, PNG for transparency), and follow the pro tips to optimize HTML and post-conversion images for quality and performance.
Frequently Asked Questions (FAQs)
Q1. Can I convert HTML to JPG/PNG without losing quality?
Yes. Use PNG for lossless quality or JPG with high quality (90–100%) for photos and full pages. Avoid repeated JPG conversions, as each edit degrades quality slightly.
Q2. Is there a way to batch convert multiple HTML files to JPG/PNG?
Yes. Use online tools like Convertio with batch uploads support. For developers, write a script to loop through HTML files and convert them automatically.
Q3. Can I convert HTML emails to JPG/PNG?
Yes. Open the HTML email in a browser, then use the browser’s screenshot tool or an online converter to capture the email as an image. This is useful for testing email rendering across devices.
Q4. Can I convert only a specific HTML element (not the full page) without cropping the image later?
Yes. Chrome/Firefox DevTools are designed for this:
- In DevTools (F12), use the Element Selector (arrow icon in the top-left) to click the specific HTML element (e.g., a div, table, or banner).
- Open the command palette (Ctrl/Cmd + Shift + P) and select Capture node screenshot—the tool will capture only the selected element as a PNG, no cropping needed.
See Also
Remove Permissions from PDF – Online, Offline & via Code
Table of Contents
- What Are PDF Permissions?
- Method 1: Using the Print to PDF Trick
- Method 2: Using Adobe Acrobat Pro
- Method 3: Using Online PDF Permissions Remover
- Method 4: Using QPDF Command Line Tool
- Method 5: Using Free Spire.PDF for .NET (C#)
- Comparison of All PDF Permission Removal Methods
- Frequently Asked Questions (FAQ)

Have you ever downloaded a crucial PDF only to find that you cannot edit it, copy text from it, or even print it? You are likely dealing with a PDF that has permissions restrictions (often labeled as “Secured” or “Protected”). When these restrictions stand in your way, you need a reliable way to remove permissions from PDF files so you can work with the document freely.
This article will walk you through five reliable methods to remove PDF permissions —ranging from free online tools and browser tricks to professional desktop software and programmatic solutions for developers.
- What Are PDF Permissions?
- Method 1: Using the Print to PDF Trick
- Method 2: Using Adobe Acrobat Pro
- Method 3: Using Online PDF Permissions Remover
- Method 4: Using QPDF Command Line Tool
- Method 5: Using Free Spire.PDF for .NET (C#)
- Comparison of All PDF Permission Removal Methods
- Frequently Asked Questions (FAQ)
What Are PDF Permissions?
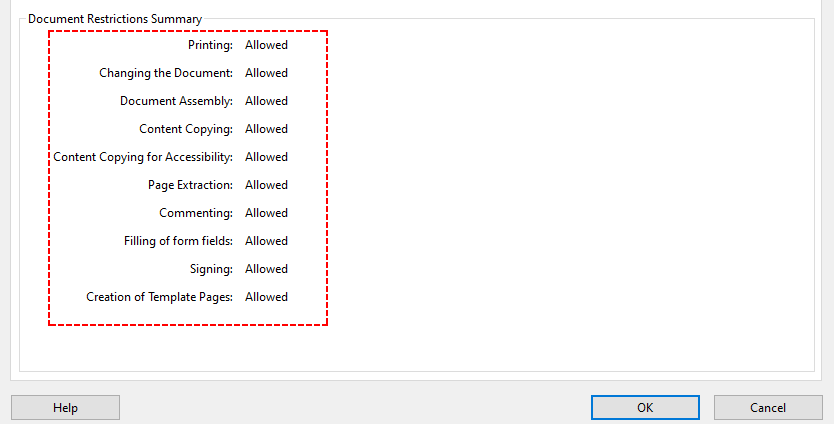
PDF permissions (also called “owner passwords” or “restrictions”) are security settings that control what users can do with a document after it is opened. Unlike a document open password that prevents viewing entirely, a permissions password allows viewing but limits actions such as:
- Printing
- Editing or modifying content
- Copying text or images
- Adding comments or annotations
- Filling in form fields
Common reasons for applying permissions:
- Protecting confidential business documents (e.g., financial reports, legal contracts)
- Preventing unauthorized modifications to official forms
- Controlling distribution of proprietary content
- Restrict form filling for unapproved users
However, these restrictions can become frustrating when you need to collaborate or extract information—and that’s where our guide comes in.
⚠️ Important: You should only remove permissions from PDFs you own or have legal authorization to modify. Unauthorized removal of PDF restrictions may violate copyright laws or terms of service.
Method 1: Using the Print to PDF Trick
The “Print to PDF” workaround is the most popular free method to bypass PDF permissions. It requires no additional software and works on most desktop devices (Windows/Mac).
Why this works
The "Print to PDF" function creates a brand-new file that inherits no restrictions from the original. But be aware that interactive elements like hyperlinks, fillable form fields, bookmarks, and digital signatures may be lost in the process.
Critical Requirement: The original PDF must allow printing. If the file has a “no printing” restriction, the print option will be grayed out, and this trick will fail.
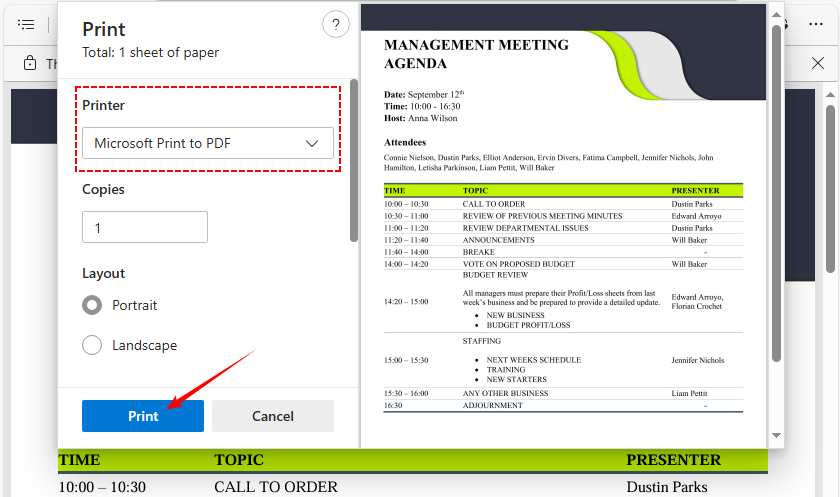
Steps to Print to PDF:
- Open the restricted PDF in a viewer (Microsoft Edge, Chrome).
- Click the Print icon in the top right corner (or use Ctrl + P / Cmd + P).
- In the print dialog box, click the "Destination" dropdown menu.
- Select “Microsoft Print to PDF” (or “Save as PDF”) as the printer.
- Click “Print” and choose a location to save the new PDF file.
- The new file will have no permissions restrictions (but may lose some formatting).
When you use the Print to PDF workaround to remove permissions, any fillable form fields in the original document disappear—leaving you with a flat, non‑interactive file. Refer to this guide to create a fillable PDF and restore those lost fields.
Method 2: Using Adobe Acrobat Pro
If you have a subscription to Adobe Acrobat Pro DC or Standard, this is the most reliable method. Adobe Acrobat is the industry standard for PDF management, and it makes removing permissions quick and straightforward.
✅ Best For: Professionals, daily PDF editing, and sensitive files (offline processing).
Steps to use Adobe:
- Open the restricted PDF in Adobe Acrobat Pro.
- Click "File" > "Properties", and select the "Security" tab.
- Click the "Security Method" dropdown menu.
- Change the setting from "Password Security" to "No Security."
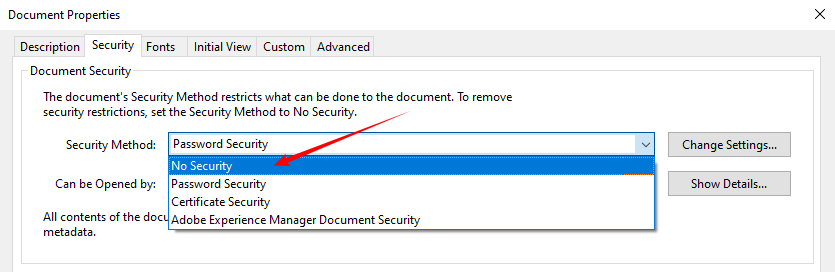
- A dialog box will appear asking for the permissions password. Enter it and click OK.
- Click OK again to save the changes. You can now edit and copy freely.
Note: If you do not know the permissions password, Adobe Acrobat Pro will not allow you to remove the restrictions. You will need to use one of the alternative methods below.
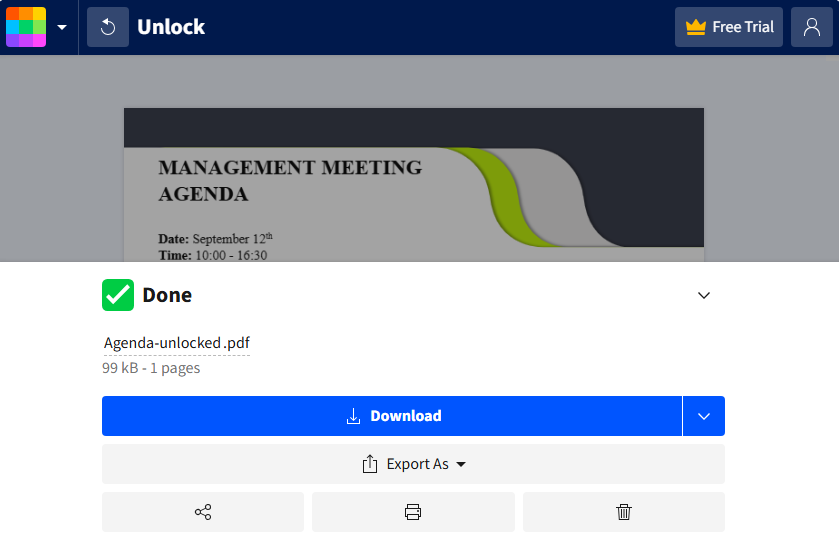
Method 3: Using Online PDF Permissions Remover
If you do not have access to a desktop browser or prefer a one-click solution, free online PDF permission remover tools are a good alternative. These tools strip the permission restrictions directly, and work on any device (Windows, Mac, iPhone, Android)
Important security note:
Never upload sensitive, confidential, or legally protected documents to a website you do not trust. For non‑sensitive files, the following services are reputable:
- Smallpdf (Unlock PDF) – Simple interface, no installation, works in browser.
- ILovePDF – Offers batch processing with a free account.
- Soda PDF – Provides both online and desktop versions.
Steps to unlock PDF permissions online:
- Go to your chosen PDF unlocker tool website.
- Upload your PDF file (drag-and-drop or click “CHOOSE FILES”).
- Wait for the tool to strip the restrictions automatically.
- Download the unlocked PDF—you can now edit, print, or copy its content.
Most online PDF unlockers do not require you to know the permissions password—they remove the restrictions by re‑encrypting the file without them.
SmallPDF Example:
Once you’ve unlocked a restricted PDF, extracting its content for analytical purposes is often a key next step. Here’s a deep dive into the top tools and proven techniques for extracting text from PDF documents.
Method 4: Using Command Line Tools
If you’re comfortable with command-line interfaces (CLI), tools like QPDF let you remove PDF permissions quickly and efficiently. QPDF is open-source, cross-platform, and works entirely offline, making it ideal for sensitive documents or batch processing.
Steps to use QPDF:
- Download QPDF from qpdf.sourceforge.io and install it on your system (Windows, Mac, Linux).
- Open Command Prompt (Windows) or Terminal (Mac/Linux).
- Navigate to the folder where your PDF is saved.
- Enter the decryption command (replace filenames with your own):
qpdf --decrypt "Restricted.pdf" "Unlocked.pdf"
- Press Enter. QPDF will remove all permissions and save the unlocked file.
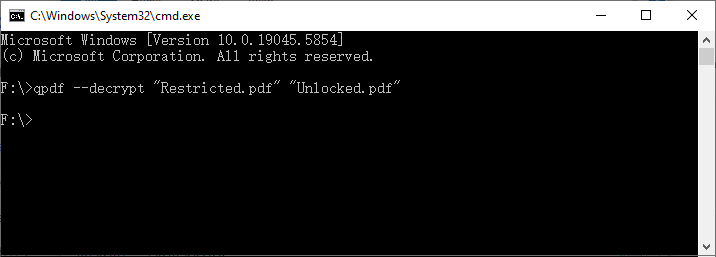
Why Use QPDF?
The best part? It runs entirely offline, so your sensitive files never leave your device. You can even script it to unlock a whole folder of PDFs in one go. And unlike the print trick, it works even if printing is locked.
Method 5: Using Free Spire.PDF for .NET (C#)
For .NET developers or anyone working with C# applications, Free Spire.PDF for .NET is a free library that lets you programmatically remove PDF permissions. It works offline and supports standard PDF encryption as well.
Install via NuGet: Install-Package FreeSpire.PDF
C# Code to Remove Permissions from PDF
The following code loads a PDF with the owner password (permission password) and then calls the Decrypt() method to strip all encryption and restrictions.
using Spire.Pdf;

namespace RemovePermissions
{
    class Program
    {
        static void Main(string[] args)
        {
            // Create a PdfDocument object
            PdfDocument pdf = new PdfDocument();

            // Load the PDF with the owner (permission) password.
            pdf.LoadFromFile(@"F:\Restricted.pdf", "123abc");

            // Decrypt the PDF – this removes all encryption and permissions
            pdf.Decrypt();

            // Save as a new PDF without any restrictions
            pdf.SaveToFile("RemovedPermissions.pdf");
        }
    }
}
Core Advantages of This Method
- Full programmability: Integrate unlock logic directly into your existing .NET apps.
- Batch processing: Unlock hundreds of restricted PDFs with a few lines of code.
- Preserves all PDF elements: Retains hyperlinks, fillable forms, bookmarks, digital signatures, and formatting.
- Cross-platform support: Works with .NET Framework (4.8+)/ .NET Standard (2.0), and is compatible with Windows, Linux, and macOS.
Pro Tip: If you only need to adjust existing permissions rather than removing them entirely, Free Spire.PDF for .NET allows you to change PDF permissions directly.
Comparison of All PDF Permission Removal Methods
Use this quick reference table to choose the best method for your needs. We’ve highlighted cost, difficulty, use cases, and password requirements for each:
| Method | Cost | Difficulty | Best For | Password Required? |
|---|---|---|---|---|
| Print to PDF Trick | 100% Free | Very Easy | Quick fixes when printing is allowed | No |
| Adobe Acrobat Pro | Paid (Subscription) | Easy | Professionals, daily editing, sensitive files | Yes |
| Free Online Tools | Free (Usually) | Very Easy | One‑off files (non‑sensitive) | Sometimes |
| QPDF (Command Line) | 100% Free | Moderate | tech users, batch processing, sensitive files | No |
| Free Spire.PDF for .NET | Free (with limits) | Moderate (C#) | Developers integrating into .NET apps | Yes |
Frequently Asked Questions (FAQ)
Q1: Is it legal to remove permissions from PDF files?
A: Yes, if you own the PDF or have explicit permission from the owner. Removing permissions from a PDF you don’t own or have rights to may violate copyright laws, terms of service, or data protection rules.
Q2: Will removing permissions affect the PDF’s quality?
A: No. Most tools (Adobe Acrobat, QPDF, Smallpdf, Free Spire.PDF) remove permissions without altering content, formatting, or resolution. The only exception is the “Print to PDF” method, which may lose interactive elements or cause minor formatting shifts.
Q3: Can I remove permissions from multiple PDFs at once?
A: Yes. Adobe Acrobat Pro (batch processing), QPDF (via scripting), and Free Spire.PDF (using loops) support bulk operations. Online tools usually limit batch processing to paid plans
Q4: I don’t know the permissions password. Can I still remove restrictions?
A: In many cases, yes. The Print to PDF trick, online unlockers, and QPDF can remove restrictions without requiring the owner password because they work by re‑creating the file. However, some high‑level encryption may require the password.
Final Words
Removing permissions from PDF depends on your needs. For quick, non‑sensitive files, use online tools like Smallpdf or the Print to PDF trick. For sensitive or professional work, offline options like Adobe Acrobat Pro or QPDF are best. Developers can integrate unlocking via Free Spire.PDF for .NET.
By following the steps in this guide, you’ll be able to unlock any PDF and access its content freely. Remember to only remove permissions from PDFs you own or have permission to modify, and always prioritize tools that protect your data (especially for sensitive files).
See Also
Extract Text from PDF for Free | Digital & Scanned PDFs (OCR)
Table of Contents
Imagine this: You finally locate the exact research report, business contract, or data-filled whitepaper you need, but it's trapped in a PDF. When you try to copy and paste its content, you’re met with jumbled formatting, unselectable text, or frustrating content protection blocks. The question is universal: how to extract text from PDF files without manual retyping or costly software?
In this comprehensive guide, we will explore the best ways to extract text from PDF for free (including scanned PDFs with OCR). Whether you are a student, a business professional, or a developer, you will find the perfect method to extract PDF text accurately and efficiently.
- Why Extracting PDF Text Can Be Tricky?
- The Simplest Trick – Copy and Paste
- Top Free Online Tools to Extract Text from PDF
- PDF24 Creator Free Desktop PDF Text Extraction Tools
- Free Developer Tool to Extract PDF Text in C#
- Frequently Asked Questions (FAQ)
Why Extracting PDF Text Can Be Tricky?
PDFs store text in a way that prioritizes visual consistency. This means the text might be stored as fragmented blocks, in an unusual order, or worse, as part of an image. There are two main types of PDFs, each with unique extraction challenges:
- Digital PDFs: These contain selectable text, but complex layouts like multi-column articles or tables can confuse simple copy-paste actions.
- Scanned PDFs: These are essentially images of pages. To extract text from scanned PDF, you need OCR (Optical Character Recognition) technology, which analyzes the image and recognizes the shapes of letters.
Thankfully, the free tools below handle both types with ease.
The Simplest Trick – Copy and Paste
If you have a simple, digital PDF and only need a small section of text, don't overlook the basics. It's the fastest way to get text from PDF for small tasks.
- Open the PDF: Use a standard viewer like Adobe Acrobat Reader, a web browser (like Chrome or Edge), or a preview app.
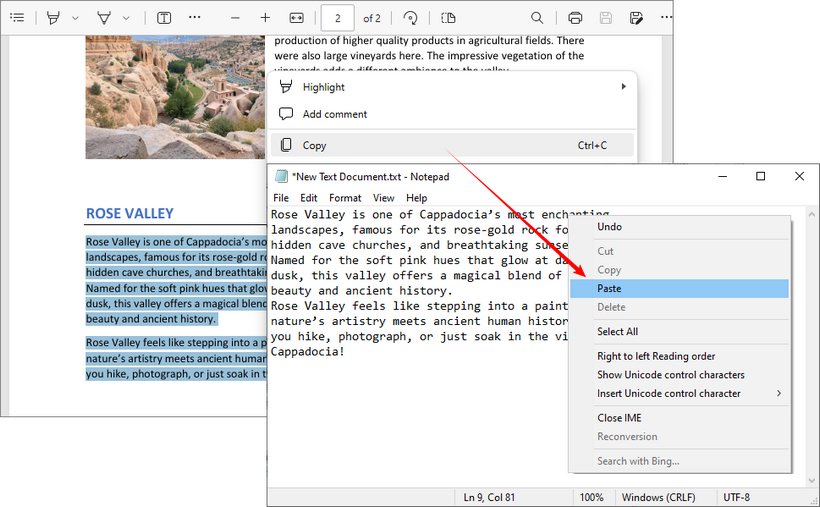
- Select and Copy: Highlight the text you want, right-click and select "Copy", or use the keyboard shortcuts “Ctrl+C” (Windows) or “Command+C” (Mac).
- Paste: Open a text editor (like Notepad or TextEdit) or a Word document and paste the text with “Ctrl+V” or “Command+V”.
The Catch: This method fails for scanned documents, protected PDFs, or when you need to preserve complex formatting. For these, use the dedicated free tools below or see our guide on how to copy text from a secured PDF.
Top Free Online Tools to Extract Text from PDF
For most users, free online tools are the quickest and easiest way to extract text from PDF for free. They work directly in your browser, require no installation, and many now include powerful OCR features. Below are the two top picks for different use cases—from basic text extraction to multilingual OCR.
CLOUDXDOCS - Simplest Free Tool for Digital PDFs
If you need a no-frills, ad-free tool for extracting text from text-based PDFs (not scanned), CLOUDXDOCS is ideal. It’s 100% free, requires no registration, and works in one click—perfect for grabbing text from PDF files in seconds.
Steps to extract text from PDF online:
- Visit the CLOUDXDOCS Free PDF to Text Converter.
- Upload your PDF file by dragging and dropping or clicking to browse.
- Wait for the tool to process your file.
- Download the extracted text as a TXT file.
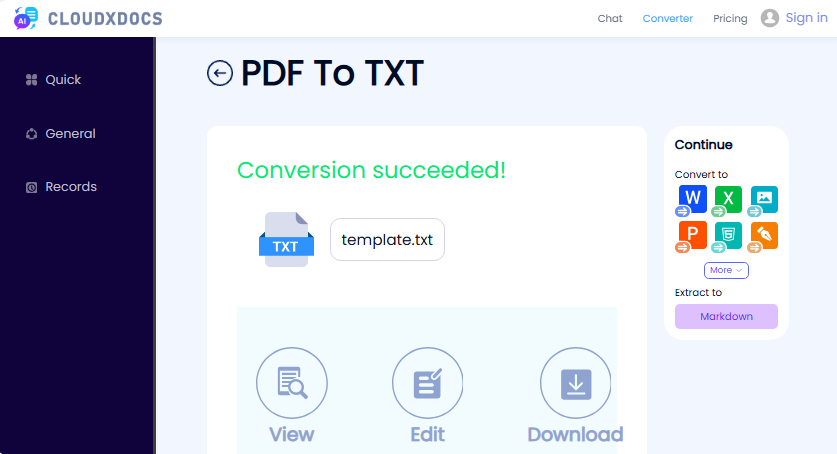
✔ Pros: No sign-up, no ads, simple interface.
✘ Cons: No OCR (won’t work for scanned PDFs).
i2OCR - Free OCR Tool for Scanned PDFs
i2OCR is a free online tool that specializes in OCR for images and scanned PDFs, supporting a whopping 100+ languages—perfect for non-English PDFs. It’s free for single-page use and offers multiple output formats.
Steps to extract text from scanned PDF online free:
- Visit the i2OCR PDF OCR tool.
- Select your recognition language and preferred OCR engine.
- Click “Select PDF” to upload your scanned PDF.
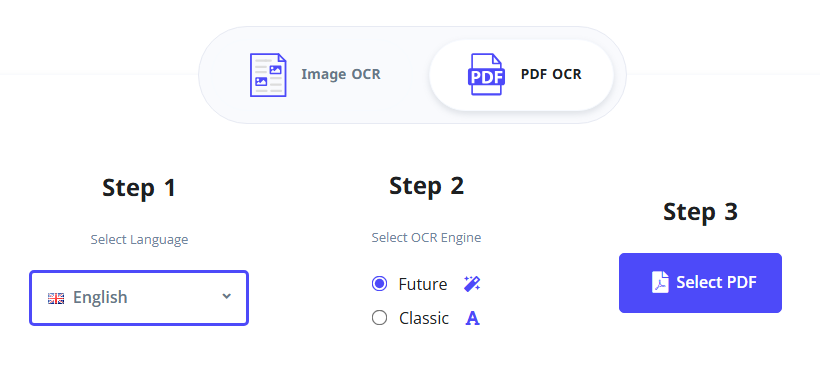
- Click “Start OCR” and wait for the tool to process the scan.
- Copy the extracted text or download it as TXT, Word, or HTML.

✔ Pros: 100+ language support, free OCR, multiple output formats, no sign-up.
✘ Cons: Free plan only supports one page at a time.
Besides text, PDFs often contain valuable images, charts, or diagrams—discover how to extract images embedded in your PDF document.
PDF24 Creator Free Desktop PDF Text Extraction Tools
If you work with PDFs frequently, need offline access, or have bulk files to process, PDF24 Creator is the ideal choice. This free Windows-exclusive desktop tool offers comprehensive PDF handling capabilities—including text extraction, OCR for scanned PDFs, and bulk processing—all while keeping your files local for maximum privacy.
Extract Text from a Digital (Selectable) PDF
- Go to the official PDF24 Creator download page and download the appropriate version for your Windows system.
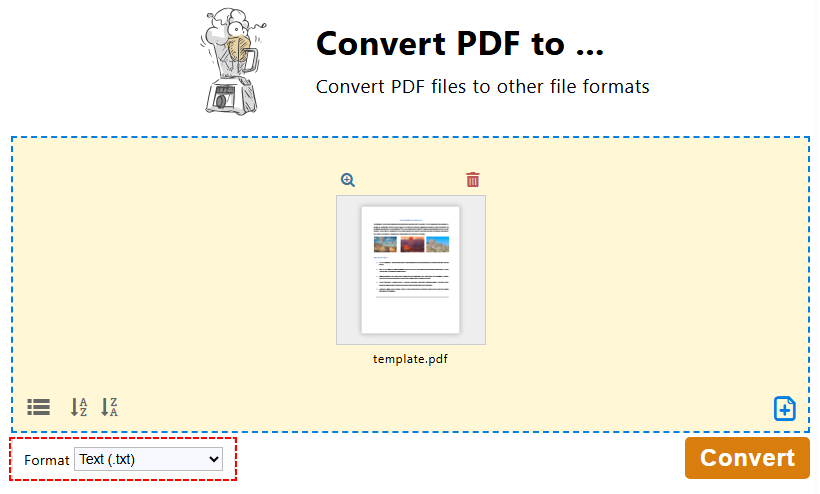
- Install and launch PDF24. You will see the PDF24 Toolbox (a dashboard with many PDF tools).
- In the PDF24 Toolbox, click "Convert PDF to…".
- Click the "Choose files" or drag and drop to upload your PDF file.
- Choose “Text (.txt)” as the output format and click "Convert".
- Save the extracted text file to your device.
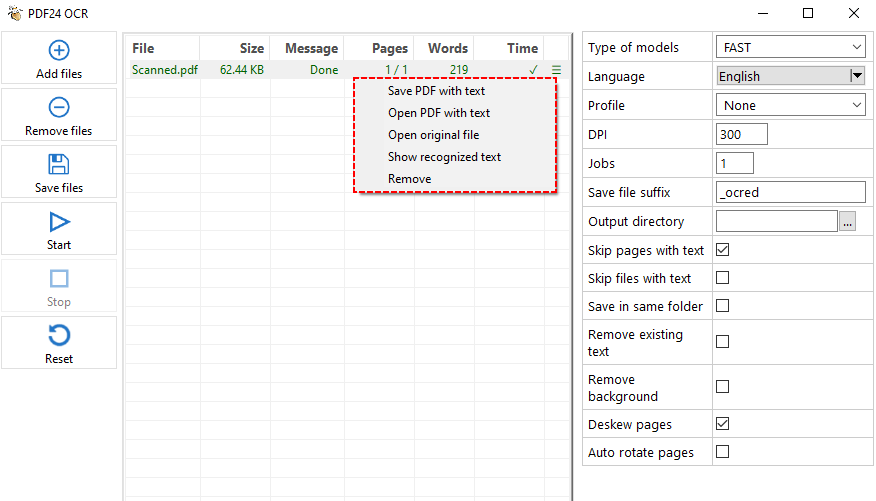
Extract Text from a Scanned PDF (Using OCR)
For scanned/image-based PDFs, use PDF24’s built-in OCR to recognize text from pdf scans and convert them to editable text or searchable PDFs:
- In the PDF24 Toolbox, click "PDF OCR".
- Click "Add file(s)" and select your scanned PDF.
- On the right settings panel, select the text recognition mode, language, DPI, output directory, etc.
- Click the "Start" button to process the PDF.
- PDF24 will process each page, recognize the text, and save it to a text file or a searchable PDF.
Pro Tip for Adobe Users:
If you have Adobe Acrobat Pro (paid), you can extract text by going to the “Export PDF” tool and selecting “Text (Plain)” as the output format. Acrobat will save the file as a .txt document instantly.
Free Developer Tool to Extract PDF Text in C#
If you’re a developer, Free Spire.PDF for .NET is a free, zero-dependency library to read text from PDF programmatically. It’s fast, lightweight, and perfect for integrating PDF text extraction into your projects.
C# Code to Extract Text from PDF
The code iterates through each page in a digital PDF file and extracts all text from the PDF. Core text extraction classes & methods include:
- PdfTextExtractor: A specialized utility class that pulls text from a single PDF page (one page at a time).
- PdfTextExtractOptions: A configuration class for text extraction. Sets rules such as whether to extract all text.
- ExtractText(): Executes text extraction on the PDF page and returns the extracted text string.
using Spire.Pdf;
using Spire.Pdf.Texts;
using System.IO;
using System.Text;

namespace ExtractAllTextFromPDF
{
    internal class Program
    {
        static void Main(string[] args)
        {
            // Create a PDF document instance
            PdfDocument pdf = new PdfDocument();
            // Load the PDF file
            pdf.LoadFromFile("SamplePDF.pdf");

            // Initialize a StringBuilder to hold the extracted text
            StringBuilder extractedText = new StringBuilder();
            // Loop through each page in the PDF
            foreach (PdfPageBase page in pdf.Pages)
            {
                // Create a PdfTextExtractor for the current page
                PdfTextExtractor extractor = new PdfTextExtractor(page);
                // Set extraction options
                PdfTextExtractOptions option = new PdfTextExtractOptions
                {
                    IsExtractAllText = true
                };
                // Extract text from the current page
                string text = extractor.ExtractText(option);
                // Append the extracted text to the StringBuilder
                extractedText.AppendLine(text);
            }

            // Save the extracted text to a text file
            File.WriteAllText("ExtractedText.txt", extractedText.ToString());
            // Close the PDF document
            pdf.Close();
        }
    }
}
Beyond extracting all text, Free Spire.PDF also allows you to extract text from a single page or a specified area. The extraction result is shown below:
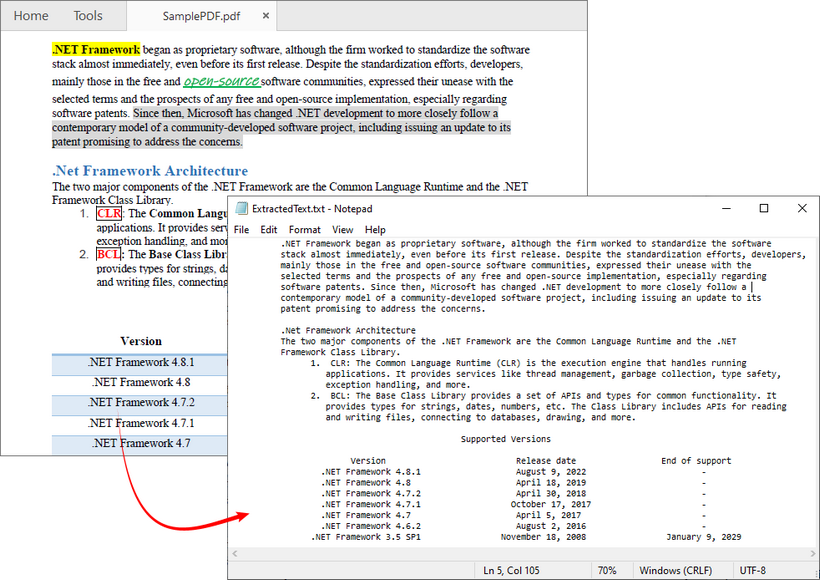
Pro Tip: To extract text from a scanned PDF in C#, follow the official guide: Perform OCR on Scanned PDFs in C# for Text Extraction
Frequently Asked Questions (FAQ)
Q1: How can I extract text from a scanned PDF for free?
A: Tools like the i2OCR, PDF24 all offer free OCR options. Simply upload your scanned PDF and enable the OCR setting before extracting.
Q2: Do free tools support bulk text extraction?
A: Yes, but the method matters. Most online free tools have bulk limits, but you can use an offline desktop tool like PDF24 Creator or a programmatic solution to bulk process multiple PDFs.
Q3: What is the best way to extract tables from a PDF?
A: Extracting tables to plain text is notoriously difficult, as the tabular structure is lost. Your best bet is to use a tool that can convert the PDF to Excel (XLSX) or CSV. This will attempt to place the data into cells, preserving the structure.
Q4: How do I extract text from a PDF and keep the formatting?
A: Plain text (.txt) cannot preserve formatting like bold, italics, or font sizes. To keep formatting, you should convert your PDF to a Word document (.docx).
Summary
This article presents several reliable ways to extract text from PDF for free, regardless of your technical skill level or the complexity of the document.
For a quick, one-off task, a reliable online tool like CLOUDXDOCS is your best bet. For recurring work or sensitive information, turn to offline software like PDF24. And if you're looking to build a cutting-edge, automated content pipeline, exploring a code solution like Free Spire.PDF can revolutionize your workflow.
With this guide, you are now equipped to unlock the text hidden in any PDF and put it to work for you.
See Also
- Convert PDF Tables to CSV: Manual, Online & Automated
- How to Unsecure a PDF (With or Without a Password)
- How to Extract Pages from a PDF for Free — No Adobe Needed
- Extract Text from PDF in Python: A Complete Guide with Practical Code Samples
- PDF to Text in Java: Extract Text from PDFs (Text-Based & Scanned)
How to Split a Cell in Excel (Text to Columns, Flash Fill, Python)
Table of Contents
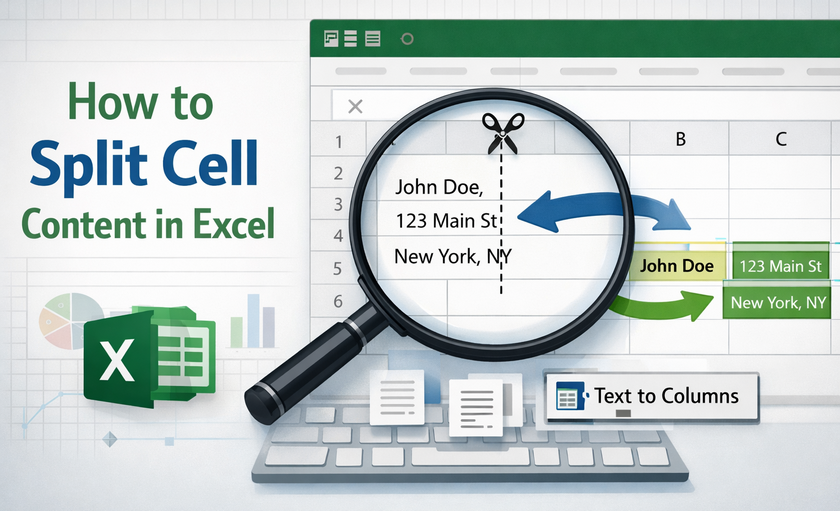
Mastering how to split a cell in Excel is one of the most essential data-cleaning skills for anyone working with spreadsheets. We’ve all been there: pasting data into Excel only to find every piece of information crammed into a single column, turning names, addresses, emails, and product codes into a jumbled mess that’s useless for sorting, filtering, or meaningful analysis.
While Excel doesn't let you physically divide a single cell into two smaller cells within the same column, it provides powerful tools to split the content of a cell across multiple adjacent columns. In this guide, we’ll break down the 5 best methods to split cell data in Excel—from beginner-friendly one-click tools like Flash Fill to automated workflows with Power Query and Python.
You'll learn:
- What Does "Split a Cell" Mean in Excel?
- Method 1: Split Cell with Excel Text to Columns
- Method 2: Split Cell with Flash Fill
- Method 3: Split Cell with Formulas
- Method 4: Split Cell with Power Query
- Method 5: Split Cell with Python
- FAQs: How to Separate a Cell in Excel
By the end, you'll be able to turn messy, unworkable data into analysis-ready spreadsheets in minutes.
What Does "Split a Cell" Mean in Excel?
In Excel, the phrase "split a cell" can be confusing because you cannot physically divide a single cell. Instead, the term refers to two different actions:
- Splitting contents of a cell: Taking the data inside one cell and distributing it across multiple adjacent cells (e.g., separating "John Smith" into "John" in one column and "Smith" in the next).
- Splitting a merged cell: Undoing a merge to restore the original, individual cells.
This guide focuses on the first, more common task: splitting cell data in Excel.
Method 1: Split Cell with Excel Text to Columns
Text to Columns is a built-in Excel tool that allows you to split the text of a cell or column into two or more separate columns. It works for both delimited data (text separated by commas, spaces, or other characters) and fixed-width data (text with consistent spacing). Here’s how to use each:
Option A: Excel Split Cell by Delimiter
This method is perfect for splitting data like CSV files, or lists where items are separated by a consistent symbol.
- Select the cells or column you want to split.
- Go to the Data tab → click Text to Columns (in the Data Tools group).
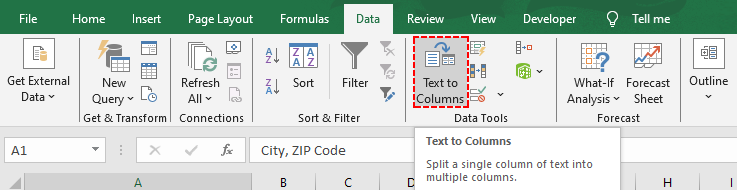
- In the Text to Columns Wizard:
- Select Delimited → click Next.
- Check the box next to your delimiter (e.g., Comma, Space, or Tab) →click Next.
- Choose a Destination (where to place the split data—e.g., $C$1 to start in column C).
- Select column formats (e.g., General for text/numbers, Text for phone numbers)
- Click Finish. Your data is now split into separate columns.
Pro Tip: While selecting the delimiter, you can check multiple delimiters if needed (e.g., comma + space). If your delimiter isn’t listed, select Other and type the character (e.g., a hyphen “-” or pipe “|”).
Option B: Excel Split Text by Fixed-Width
This method is ideal for data aligned with uniform spacing (e.g., product codes, formatted IDs):
- Follow steps 1-2 above (select cells → Data → Text to Columns).
- In the Text to Columns Wizard:
- Select Fixed width → click Next.
- Click to add split lines, drag to adjust positions, or double-click to delete lines → click Next.

- Choose a destination and column formats → click Finish.
The split data looks like:
Expand: If you have a list inside a cell and want to split cell into multiple rows, you can combine Text to Columns with the Excel Transpose feature.
Method 2: Split Cell with Flash Fill
Flash Fill is Excel’s "magic" tool for simple, one-click splits. It recognizes patterns you define and auto-completes the rest. No menus or formulas, perfect for extracting first names, phone numbers, area codes, or custom patterns.
How to Use Flash Fill for Excel Cell Split
Scenario: Extract first names from a full name list in column A.
- Type the first split result in the cell next to your data. For example, if cell A1 is “Liam Johnson”, type “Liam” in B1.
- Click on cell B1 (the one with your example).
- Go to the Data tab → click Flash Fill (or use the shortcut Ctrl + E on Windows).
- Excel will automatically fill the rest of the column with the split first names. Repeat for the last names if needed.
Method 3: Split Cell with Formulas
For flexible, dynamic splits (e.g., update the split result automatically when the original data changes), use the split formula in Excel. The most common formulas are LEFT, RIGHT, and TEXTSPLIT (Excel 365/2021+).
Extract Text Before a Delimiter (LEFT + SEARCH)
Use this formula to split text before a specific character (e.g., a space or comma).
=LEFT(A1, SEARCH(" ", A1) - 1)
- SEARCH(" ", A1): Finds the position number of the first space.
- -1: Removes the space itself, so you get “Liam” instead of “Liam ”.
Extract Text After a Delimiter (RIGHT + LEN + SEARCH)
Use this formula to split text after a specific character (right part):
=RIGHT(A1, LEN(A1) - SEARCH(" ", A1))
- LEN(A1): Gets the total length of the text.
- Subtract the position of the space to get the remaining text.
- Note: This formula works only for single-delimiter cases (e.g., one space or comma). It extracts all text after the first delimiter as a single block and cannot handle multiple delimiters.
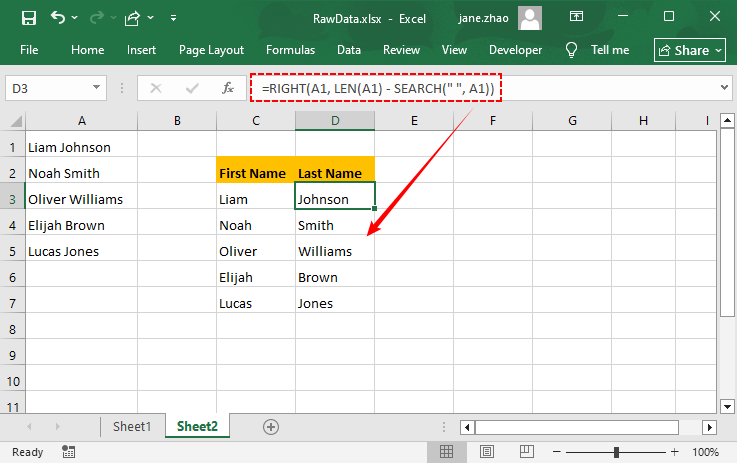
If you are using Microsoft 365, you can use the TEXTSPLIT formula to split text by a delimiter and spill the results into adjacent cells automatically.
Method 4: Split Cell with Power Query
Power Query is the best tool for bulk data splits or automated refreshes (e.g., importing new data weekly). It keeps your original data intact and lets you refresh split results with one click—critical for data pipelines and regular data cleaning.
Step-by-Step: Excel Split Columns in Power Query
-
Select your data range → go to the Data tab → click From Table/Range (Power Query will open).
-
In the Power Query Editor, select the column you want to split.
-
Click the Split Column dropdown and select an option:
- By Delimiter: Split by commas, spaces, or custom characters.
- By Number of Characters: Split fixed-length data.
- By Positions: Split at specific character positions.
- By Lowercase to Uppercase: Splits when a lowercase letter is followed by uppercase (e.g., "AirPlane" → "Air", "Plane").
- By Uppercase to Lowercase: Splits when uppercase is followed by lowercase (e.g., "iPhone" → "i", "Phone").
- By Digit to Non-digit: Splits when a number is followed by text (e.g., "123Shoes" → "123", "Shoes").
- By Non-digit to Digit: Splits when text is followed by a number (e.g., "Shoes123" → "Shoes", "123")
-
Select your split settings → click OK.
-
Click Close & Load to export the split data to a new worksheet.
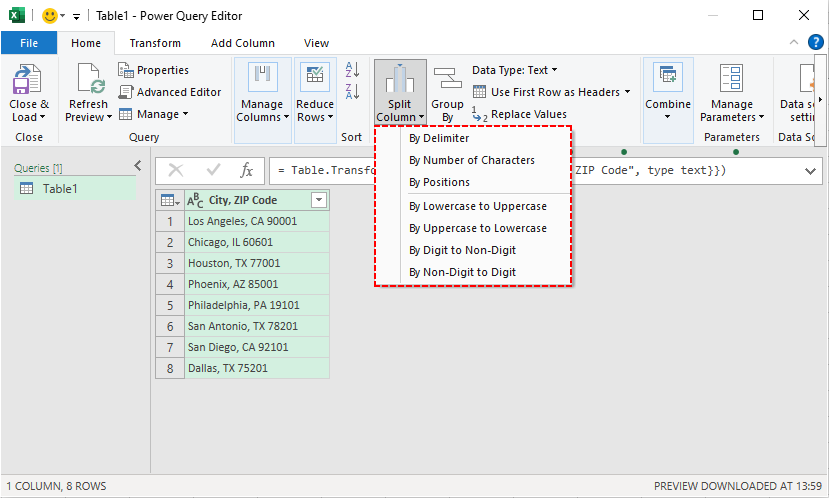
After splitting and organizing your data, the next step is often deduplication. Find out how to identify and remove duplicates in Excel to ensure your analysis is accurate.
Method 5: Split Cell with Python
For users who need to automate cell splitting at scale or integrate splitting into a Python workflow, the Free Spire.XLS for Python library is a robust, code-based solution. It works across all Excel file formats (.xlsx, .xls) and requires no manual Excel interaction.
Python Code to Separate Cell in Excel
This code splits cell content into adjacent columns. It reads an input Excel file, processes column A, and writes split results to adjacent columns in a new output file:
from spire.xls import *
from spire.xls.common import *

# Create an object of the Workbook class
workbook = Workbook()
# Load the Excel file
workbook.LoadFromFile("Data.xlsx")

# Get the first worksheet in the file
sheet = workbook.Worksheets[0]

# Loop through each row in the worksheet
for i in range(sheet.LastRow):
    # Get the text of the first cell in the current row
    text = sheet.Range[i + 1, 1].Text
    # Split the text by comma
    splitText = text.split(',')
    # Write the split data into individual columns
    for j in range(len(splitText)):
        sheet.Range[i + 1, j + 2].Text = splitText[j]

# Automatically adjust column widths in the worksheet
sheet.AllocatedRange.AutoFitColumns()

# Save the modified Excel file
workbook.SaveToFile("TextToColumns.xlsx", ExcelVersion.Version2016)
workbook.Dispose()
Key Code Explanations:
- Workbook() / LoadFromFile(): Initializes the Excel file handler and loads your source file.
- LastRow: Gets the total number of rows with data (avoids looping empty rows).
- split(','): Splits cell content by commas (change delimiter as needed).
- sheet.Range[i + 1, j + 2].Text: Writes split values starting at column B (index 2) to avoid overwriting original data in columns A.
- SaveToFile(): Exports results to a new file.
The result of splitting cell text into columns:
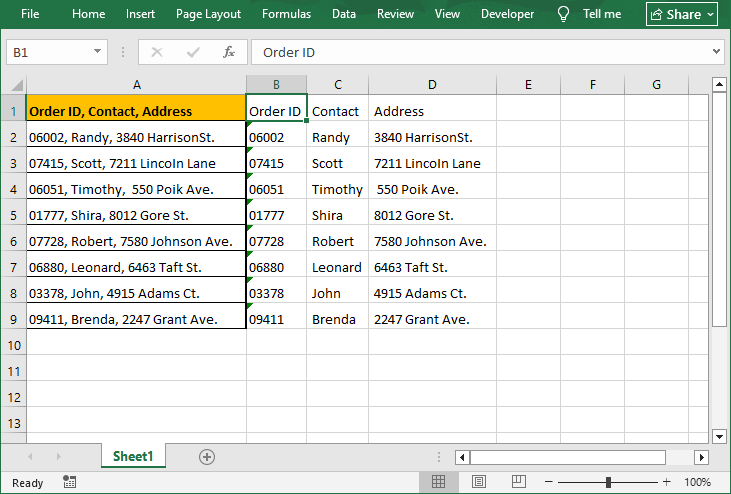
After splitting cell content into structured columns, apply data validation to the new columns to ensure consistent data entry (e.g., numeric formats for ZIP codes).
Pro Tips for Dividing a Cell in Excel
- Backup Your Data: Always make a copy of your original data before splitting. Some split actions are difficult to undo.
- Clean Data First: Remove extra spaces or hidden characters before splitting to avoid errors.
- Insert Blank Columns: Add enough blank columns to the right of your data to prevent split results from overwriting existing content.
- Check Your Data Preview: Always look at the data preview in the Text to Columns wizard and Power Query before finishing. This catches delimiter mistakes early.
Final Thoughts
Mastering how to split a cell in Excel is a fundamental skill that transforms messy data into a structured, powerful asset. Whether you're a beginner using Flash Fill/Text to Columns, an advanced analyst building Power Query pipelines, or a tech-savvy user automating bulk Excel cell splitting with Python, you now have a complete toolkit for any data-cleaning challenge.
Start with the method that feels most comfortable and experiment with the more advanced options as your needs grow. With these techniques, you'll save countless hours and unlock the full potential of your data for analysis and decision-making.
FAQs: How to Separate a Cell in Excel
Q1. Can I split a single cell into two smaller cells (not just the content)?
No. Excel does not allow you to physically split a single, unmerged cell into two smaller cells within the same column. The grid structure is fixed.
Q2. Why is Text to Columns greyed out?
The tool is disabled if:
- Your sheet is protected (unprotect via Review → Unprotect Sheet).
- You have merged cells (unmerge via Home → Merge & Center → Unmerge Cells).
- You’re editing a cell (press Enter to exit edit mode).
Q3. How do I split a cell in Google Sheets?
Google Sheets uses the SPLIT function (the equivalent of Excel’s TEXTSPLIT) for most splits:
- Basic split by delimiter: =SPLIT(A1, ",") (split by comma; replace with space/hyphen).
- Split by line breaks: =SPLIT(A1, CHAR(10)).
- Split into rows (not columns): =TRANSPOSE(SPLIT(A1, ",")).
Google Sheets also has a Text to Columns equivalent: select the range → Data → Split text to columns (auto-detects delimiters or lets you choose a custom one).
Q4. Can I automate cell splitting for monthly reports?
Yes. The best options are:
- Power Query: Set up the split once. Each month, paste new data into the source table and click Refresh. This is the easiest and most common approach.
- Python: Write a script and schedule it to run using Windows Task Scheduler or a cron job.
See Also
How to Remove a Drop-Down List in Excel
Table of Contents
Excel drop-down lists are essential for data entry consistency, preventing typos and standardizing inputs. But when restructuring spreadsheets, removing outdated validation rules, or simplifying workbooks for casual users, you’ll need to know how to remove drop-down list in Excel.
In this guide, we will walk you through the simple method to delete drop-down list in Excel without breaking your data, from deleting a single drop-down to batch-removing them across entire worksheets and automating the cleanup for dozens of files using Python.
Quick Navigation:
- What is a Drop-Down List in Excel?
- Standard Method: Remove Drop Down List via Data Validation
- Full Deletion: Delete Drop Down + Cell Content/Formatting
- Batch Removal: Clear Drop Down using a VBA Macro
- Advanced Method: Remove Excel Drop Down Lists with Python
- Frequently Asked Questions (FAQ)
What is a Drop-Down List in Excel?
In Excel, a drop-down list is created using a feature called Data Validation. This feature restricts the type of data (or the specific values) that can be entered into a cell.
When you remove a drop-down list, you are essentially clearing the Data Validation rules applied to that cell or range.
Standard Method: Remove Drop-Down List via Data Validation
The Data Validation method is the official, most reliable way to eliminate drop-down list in Excel while keeping all existing cell values intact. This method works for single cells, adjacent ranges, or non-adjacent cells.
Step-by-Step Instructions:
- Open your Excel worksheet and select the cell (or range of cells) that contains the drop-down list you want to remove.
- Navigate to the Data tab on the Excel Ribbon.
- In the Data Tools group, click on the Data Validation button.
- In the Data Validation dialog box, go to the Settings tab.
- Click the Clear All button to erase all validation rules (including the drop-down list, input messages, and error alerts).
- Click OK to apply changes. The drop-down arrow will disappear instantly, and your cell data remains unchanged.
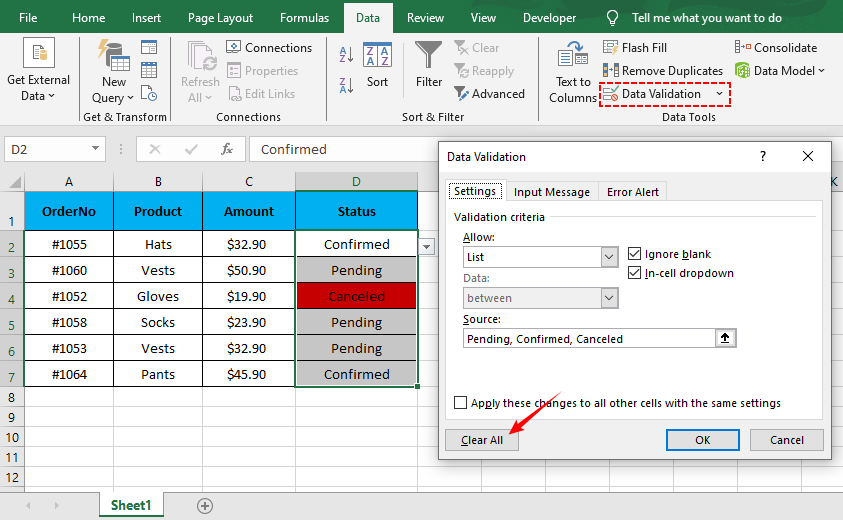
Now that you've learned how to remove unwanted drop-down lists, you might be interested in creating them from scratch. Our guide on How to Create a Drop-Down List in Excel walks you through setting up data validation rules using both static lists and dynamic ranges.
Full Deletion: Delete Drop-Down + Cell Content/Formatting
If you don't need the cell data, formatting, or the drop-down list, use Excel’s Clear tools to wipe everything in one step. This is ideal for resetting cells or deleting unused sections of a spreadsheet.
Step-by-Step Instructions:
- Select the cells with the drop-down list you want to delete.
- Go to the Home tab > Editing group > click Clear (eraser icon).
- Select the Clear All option to delete drop-down, cell data, formatting, and comments at once.
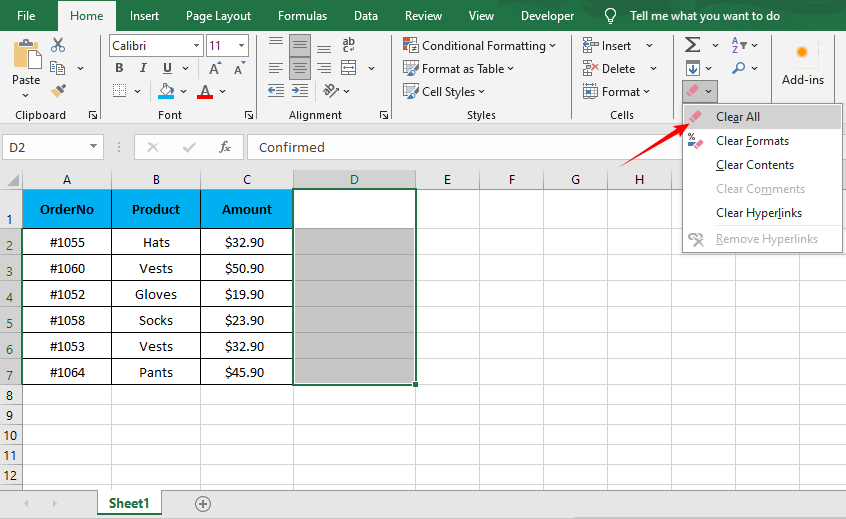
Warning: Use this only if you want the cell completely empty and plain. For partial clears (e.g., just content, not formatting), use the other Clear sub-options (Clear Contents, Clear Formats).
Batch Removal: Clear Drop-Down using a VBA Macro
If your workbook has dozens of sheets and you need to remove every single drop-down menu, a simple VBA macro is the most efficient solution. This method deletes all Data Validation rules (and drop-downs) across the entire workbook in seconds—no manual cell selection required.
How to do it:
- Press Alt + F11 to open the VBA editor.
- Go to Insert > Module.
- Paste the following code:
Sub RemoveAllDropDowns()
    Dim ws As Worksheet
    For Each ws In ActiveWorkbook.Worksheets
        ws.Cells.Validation.Delete
    Next ws
End Sub
- Press F5 to run it.
This macro loops through every worksheet in your active workbook and deletes all Data Validation lists.
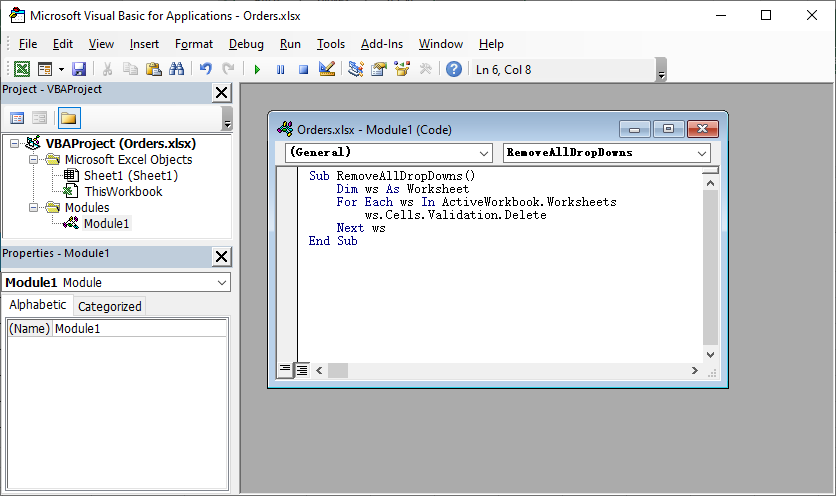
Once your drop-down lists are removed and data entry is freed up, you may want to clean up duplicate entries that users have entered. Learn how to remove duplicates in Excel to keep your records neat and organized.
Advanced Method: Remove Excel Drop-Down Lists with Python
For users who need to automate drop-down removal across multiple Excel files or integrate this into a script, Free Spire.XLS for Python is a free, powerful library that lets you manipulate Excel files programmatically—no Excel desktop app required.
Install the Free Python Library
Run this command in your command prompt/terminal to install the library via pip:
pip install Spire.Xls.Free
Python Code to Remove Drop-Down Lists (Data Validation)
This code will:
- Open an Excel file
- Remove all drop-down lists from a specific cell range
- Save the modified file (preserving all other data/formatting)
from spire.xls import *
from spire.xls.common import *

# Create a Workbook object to load the Excel file
workbook = Workbook()

# Load your Excel file (replace with your file path)
workbook.LoadFromFile("input.xlsx")

# Get the first worksheet
worksheet = workbook.Worksheets[0]

# Create a list of rectangles to define the cell range for removal
# Rectangle.FromLTRB(Left, Top, Right, Bottom) — all values are 0-indexed
rects= []
rects.append(Rectangle.FromLTRB(0,0,3,6)) # Range A1:D7

# Remove data validation (drop-down lists) from the specified cell range
worksheet.DVTable.Remove(rects)

# Save the modified file
workbook.SaveToFile("RemoveDropdowns.xlsx")
workbook.Dispose()
Customizing the Range
To remove validation from a different range, simply adjust the Rectangle.FromLTRB coordinates. For example:
- To cover columns B to D (indices 1 to 3) and rows 2 to 10 (indices 1 to 9), use Rectangle.FromLTRB(1, 1, 3, 9).
- To remove validation from multiple separate ranges, add multiple rectangles to the rects list.
Result:
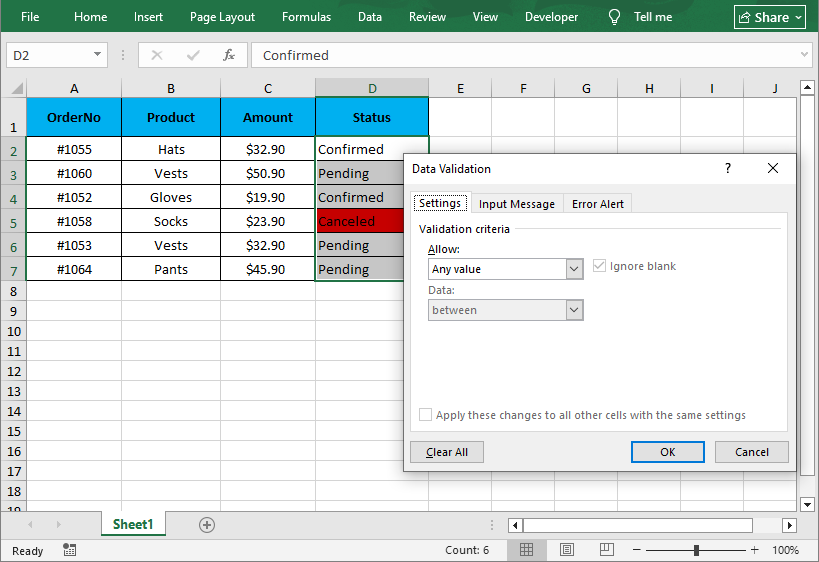
While drop-down lists control what users can enter, conditional formatting controls how data appears. The Free Spire.XLS library also enables you to apply conditional formatting in Excel to automatically highlight cells based on their values after you've removed validation restrictions.
Frequently Asked Questions (FAQ)
Q1. Why can’t I just press the Delete key to remove a drop-down list?
A: Pressing the Delete key (or Backspace) only removes the value inside the cell. It does not remove the underlying Data Validation rule. The drop-down arrow will still appear when you select the cell again.
Q2. How do I remove the arrow but keep the list active?
A: Technically, you cannot remove the arrow while keeping the list functional, as the arrow is the primary user interface for the drop-down. However, you can hide the arrow by unchecking the "In-cell dropdown" checkbox in the Data Validation settings.
- Result: The cell will still restrict entries to your list. Users must type the allowed value manually; the arrow will not appear.
Q3. Will removing the drop-down delete the data in the cell?
A: No, as long as you use the Clear All button in the Data Validation menu first, the text will stay.
Q4. Can I remove drop-downs from multiple Excel files at once?
A: Yes. There are two ways:
- Python (Recommended): Use the Free Spire.XLS script provided above, but wrap it in a loop that iterates over files in a folder using os.listdir().
- VBA Macro: Create a macro that opens each file in a folder, clears validation, saves, and closes it (best for Excel power users).
Summary
Learning how to remove a drop-down list in Excel is a basic but essential Excel skill that keeps your spreadsheets flexible and clutter-free. The Data Validation method is the gold standard for safe, targeted removal; VBA macros streamline large-scale edits; and Python automation lets you clear drop-downs from precise cell ranges, ideal for automated workflows.
By following this guide, you can take full control of your Excel sheets, removing restrictions whenever you need to. For more Excel automation tips with Python, check out our other tutorials for data validation, formatting, and spreadsheet optimization.