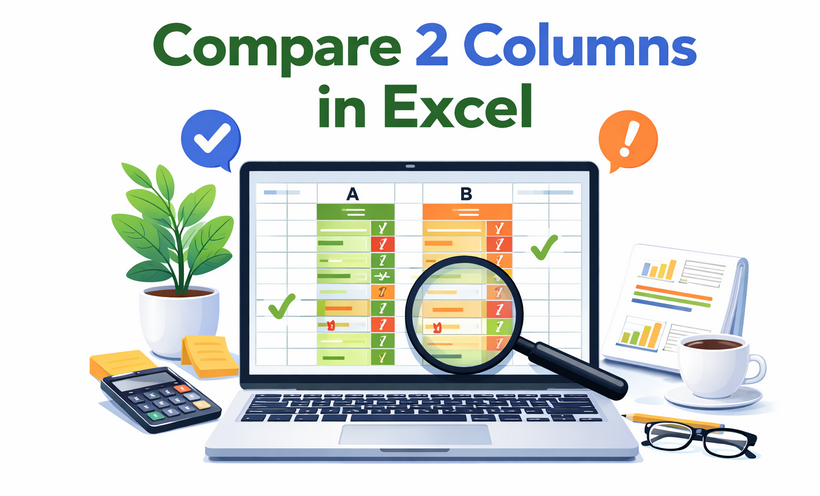
Como comparar duas colunas no Excel – 7 métodos fáceis
Índice
Comparar colunas no Excel é uma habilidade fundamental e de alto valor para analistas de dados, contadores, profissionais de marketing e todos os profissionais de negócios que trabalham com planilhas. Se você está reconciliando faturas financeiras, limpando registros de clientes duplicados, combinando SKUs de estoque ou validando dados de respostas de pesquisas, dominar técnicas eficientes de comparação de colunas elimina horas de trabalho manual.
No entanto, apesar de quão comum é essa tarefa, muitos usuários do Excel dependem de métodos lentos e propensos a erros, como digitalizar linha por linha, usar o filtro repetidamente ou até mesmo imprimir duas listas e marcá-las com uma caneta. Essas abordagens não apenas desperdiçam tempo, mas também aumentam o risco de ignorar incompatibilidades ou duplicatas críticas.
É exatamente por isso que este guia existe. Você aprenderá como comparar duas colunas no Excel usando 7 métodos comprovados — desde verificações visuais fáceis para iniciantes até automação avançada com VBA e Python.
- Por que comparar colunas no Excel?
- 1. Formatação Condicional (Destacar correspondências/diferenças)
- 2. Fórmula do Excel para comparar duas colunas
- 3. Métodos avançados para comparar colunas no Excel
- Folha de consulta de métodos de comparação de colunas do Excel
- Perguntas frequentes
Por que comparar colunas no Excel?
Aqui estão os casos de uso mais comuns no mundo real para comparar colunas do Excel:
- Reconciliação de Dados: Verificar se dois conjuntos de dados (por exemplo, um relatório de vendas e um registro de pagamentos) correspondem.
- Detecção de Duplicatas: Encontrar valores duplicados entre colunas (por exemplo, IDs de clientes ou endereços de e-mail duplicados).
- Identificação de Diferenças: Identificar discrepâncias entre duas versões dos mesmos dados.
- Validação de Dados: Garantir a consistência na entrada de dados (por exemplo, verificar se os códigos de produto em uma coluna correspondem a uma lista mestre).
- Mesclagem de Conjuntos de Dados: Preparar dados para mesclagem, identificando valores comuns ou exclusivos entre colunas.
Independentemente do seu caso de uso, o Excel tem um método adaptado ao seu nível de habilidade e tamanho dos dados. Começaremos com os métodos mais simples (ótimos para iniciantes) e passaremos para técnicas avançadas (para usuários avançados).
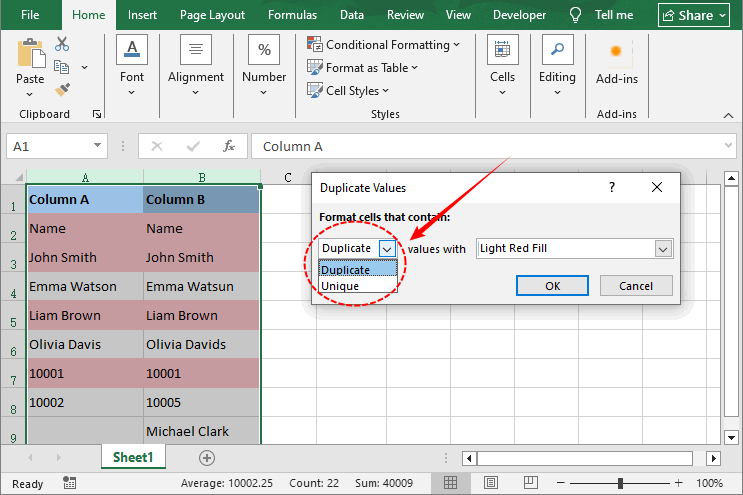
1. Formatação Condicional (Destacar correspondências/diferenças)
A formatação condicional é a maneira mais rápida de comparar visualmente 2 colunas no Excel. Ela destaca correspondências ou diferenças com cores, tornando as discrepâncias fáceis de identificar rapidamente.
Ideal para: Identificação visual rápida sem escrever fórmulas.
Como usar a Formatação Condicional:
- Selecione as duas colunas que você deseja comparar (por exemplo, Coluna A e Coluna B).
- Vá para a guia Página Inicial na faixa de opções do Excel.
- Clique em Formatação Condicional → Regras de Realce das Células → Valores Duplicados.

- Na janela pop-up:
- Escolha Duplicado para destacar valores correspondentes.
- Escolha Único para destacar diferenças.
- Selecione um esquema de cores e clique em OK.
Resultado de exemplo: Todas as células correspondentes ficam vermelhas claras; as diferenças permanecem sem cor.
Depois de dominar o uso da formatação condicional para destacar valores correspondentes ou exclusivos entre duas colunas, você pode estender a mesma lógica visual para identificar tendências de dados — por exemplo, aplicando barras de dados para comparar figuras de vendas entre duas regiões.
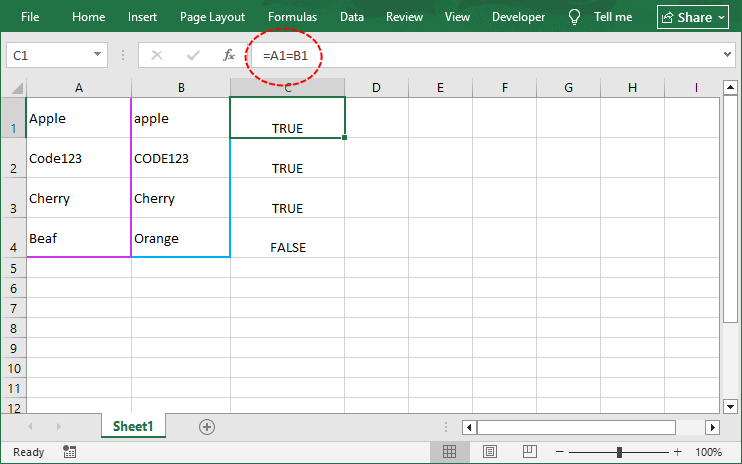
2. Fórmula do Excel para comparar duas colunas
Métodos baseados em fórmulas oferecem controle total sobre a saída da comparação. Você pode retornar VERDADEIRO/FALSO, texto personalizado ("Correspondência" / "Diferença") ou até mesmo recuperar valores correspondentes de outra coluna.
2.1 Operador de Igualdade (=) e Função EXACT
Esses dois métodos são a base da comparação linha por linha. Ambos comparam 2 células do Excel na mesma linha, mas diferem na forma como lidam com maiúsculas e minúsculas. Use o operador de igualdade (=) para verificações que não diferenciam maiúsculas de minúsculas, ou EXACT quando a diferenciação de maiúsculas e minúsculas for importante.
Operador de Igualdade que não diferencia maiúsculas de minúsculas: =A1=B1
- Retorna "VERDADEIRO" se os valores corresponderem (ignorando maiúsculas/minúsculas), "FALSO" caso contrário.
- Exemplo: "Maçã" vs "maçã" → VERDADEIRO.
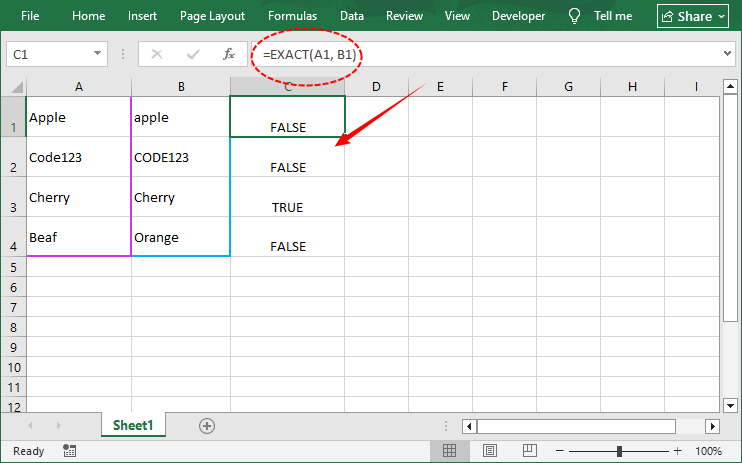
Função EXACT que diferencia maiúsculas de minúsculas: =EXACT(A1, B1)
- Retorna "VERDADEIRO" apenas se os valores forem idênticos (incluindo maiúsculas/minúsculas).
- Exemplo: "Maçã" vs "maçã" → FALSO.
Artigo relacionado: Como remover linhas duplicadas do Excel - 6 maneiras fáceis
2.2 Função IF (Rótulos de resultado personalizados)
A função IF permite substituir VERDADEIRO/FALSO por rótulos personalizados como "Correspondência" ou "Diferença", tornando seus resultados mais fáceis de interpretar. Você pode até adicionar detalhes sobre as diferenças.
Fórmula de exemplo: =SE(A1=B1, "Correspondência", "Diferença")
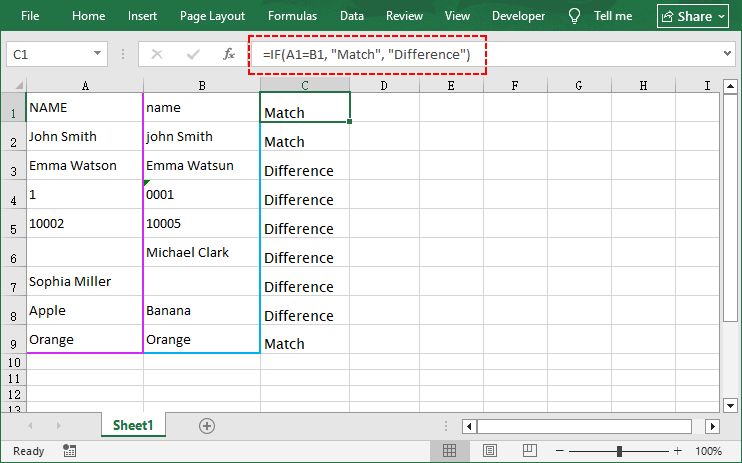
Variações para diferentes cenários:
| Cenário | Fórmula |
|---|---|
| Mostrar apenas diferenças (em branco se corresponder) | =SE(A1<>B1, "Diferença", "") |
| Indicador numérico (0 = correspondência, 1 = incompatibilidade) | =SE(A1=B1, 0, 1) |
| Incluir valores de célula na mensagem | =SE(A1=B1, "Correspondência", "Incompatibilidade: "&A1&" vs "&B1) |
| Diferenciação de maiúsculas/minúsculas com rótulo personalizado | =SE(EXACT(A1,B1), "Correspondência exata", "Diferença de maiúsculas ou valor") |
Por que usar IF em vez de =?
- Você pode filtrar por "Correspondência" / "Diferença".
- Você pode combinar com outras funções para criar relatórios mais ricos.
- Usuários não técnicos entendem palavras melhor do que VERDADEIRO/FALSO.
2.3 Função VLOOKUP (Encontrar correspondências entre colunas)
VLOOKUP é a ferramenta ideal para comparar colunas com dados não ordenados (por exemplo, encontrar um ID de cliente na Coluna A que existe na Coluna B, mesmo que as linhas não se alinhem).
Ela procura um valor específico em uma coluna e retorna um valor correspondente (ou um erro) se uma correspondência for encontrada, tornando-a perfeita para encontrar valores ausentes entre colunas.
Comparar duas colunas no Excel usando VLOOKUP:
- Em uma coluna vazia (por exemplo, Coluna C), insira a fórmula: =VLOOKUP(A1, B:B, 1, FALSE).
- Detalhe da fórmula:
- A1 – o valor a ser procurado (o que você está procurando).
- B:B – a coluna a ser pesquisada (Coluna B).
- 1 – índice da coluna (como B:B tem apenas uma coluna, retorne essa coluna).
- FALSE – correspondência exata (crítico; TRUE daria correspondências aproximadas).
- Pressione Enter. O Excel retornará o valor da Coluna B se corresponder a A1, ou #N/A se nenhuma correspondência for encontrada.
- Arraste a alça de preenchimento para baixo para aplicar a fórmula.
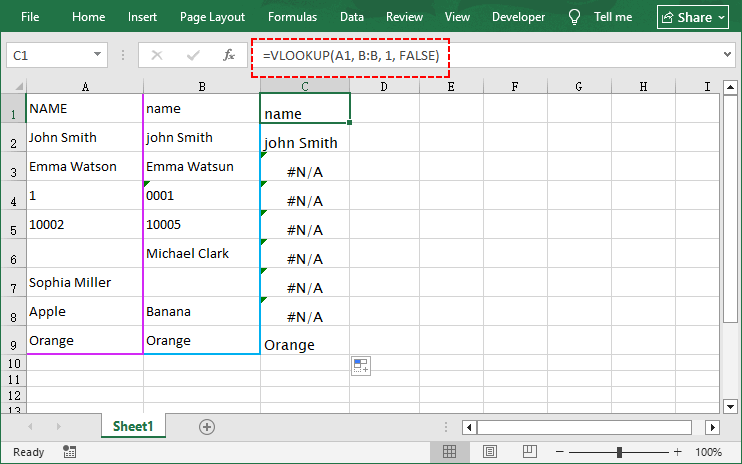
Para substituir #N/A por um rótulo personalizado (por exemplo, "Sem Correspondência"), envolva a fórmula em IFERROR: =IFERROR(VLOOKUP(A1, B:B, 1, FALSE), "Sem Correspondência").
Limitação: VLOOKUP só pesquisa da esquerda para a direita. Para procurar valores em qualquer direção, use INDEX/MATCH (compatível com todas as versões do Excel) ou, se você tiver o Excel 2021 ou Microsoft 365, a função mais intuitiva XLOOKUP.
3. Métodos avançados para comparar colunas no Excel
Esses métodos são para usuários avançados que trabalham com conjuntos de dados massivos ou realizam comparações de colunas repetitivas. Cobrimos duas ferramentas de automação: Macros VBA (nativas do Excel) e Python (para dados ultra-escaláveis).
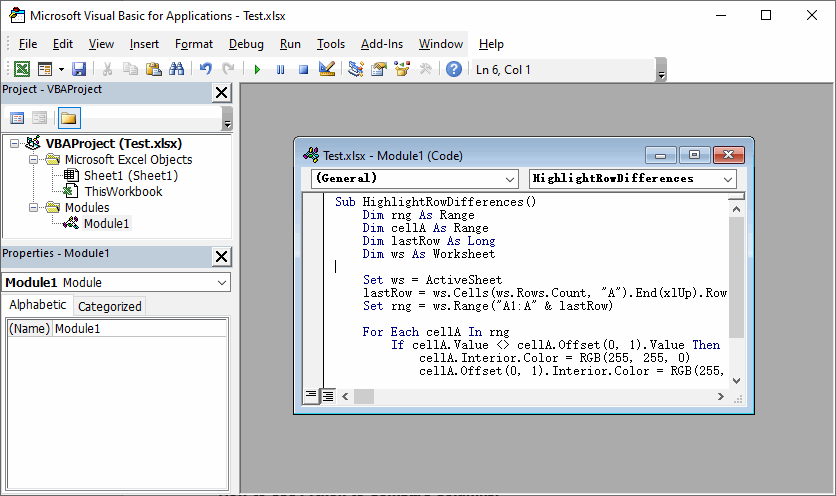
3.1 Macro VBA (Automação Integrada do Excel)
VBA (Visual Basic for Applications) permite escrever scripts que rodam diretamente dentro do Excel. Ideal para tarefas diárias sem reintroduzir fórmulas.
Código VBA para comparar duas colunas no Excel para diferenças
Sub HighlightRowDifferences()
    Dim rng As Range
    Dim cellA As Range
    Dim lastRow As Long
    Dim ws As Worksheet

    Set ws = ActiveSheet
    lastRow = ws.Cells(ws.Rows.Count, "A").End(xlUp).Row
    Set rng = ws.Range("A1:A" & lastRow)

    For Each cellA In rng
        If cellA.Value <> cellA.Offset(0, 1).Value Then
            cellA.Interior.Color = RGB(255, 255, 0)      ' Amarelo
            cellA.Offset(0, 1).Interior.Color = RGB(255, 255, 0)
        End If
    Next cellA
End Sub
Como usar esta macro:
- Abra sua pasta de trabalho do Excel e pressione Alt + F11 para abrir o Editor VBA.
- Vá para Inserir → Módulo para criar um novo módulo.
- Cole o código na janela em branco do módulo (personalize as referências de coluna/intervalo conforme necessário).
- Pressione F5 para executar a macro.
Dica Bônus: Para tornar a comparação de colunas mais precisa, você pode usar o recurso de texto para colunas para dividir dados combinados de células (como nomes e códigos) em colunas separadas e padronizar formatos de texto confusos.
3.2 Python com Spire.XLS Grátis (Escalável e Multiplataforma)
Para desenvolvedores que precisam integrar a comparação de colunas em um pipeline de dados, Python com Spire.XLS Grátis é a opção mais poderosa. Esta biblioteca gratuita pode ler, escrever e manipular arquivos do Excel sem precisar do Microsoft Excel instalado.
Script Python completo para comparar duas colunas:
from spire.xls import *
from spire.xls.common import *

# Criar um objeto de pasta de trabalho
workbook = Workbook()
workbook.LoadFromFile("Test.xlsx")

# Obter a primeira planilha
sheet = workbook.Worksheets[0]

# Obter intervalo de dados (assumir que a linha 1 é o cabeçalho, os dados começam na linha 2)
start_row = 2
end_row = sheet.LastRow

for row in range(start_row, end_row + 1):
    cell_a = sheet.Range[row, 1]
    cell_b = sheet.Range[row, 2]

    # Obter valores (Tratar valores nulos)
    val_a = cell_a.Value if cell_a.Value is not None else ""
    val_b = cell_b.Value if cell_b.Value is not None else ""

    # Comparar valores
    if val_a == val_b:
        sheet.Range[row, 3].Text = "Correspondência"
    else:
        sheet.Range[row, 3].Text = "Diferença"

        # Destacar células diferentes
        cell_a.Style.Color = Color.get_Yellow()
        cell_b.Style.Color = Color.get_Yellow()

# Salvar o arquivo de resultado
workbook.SaveToFile("compared.xlsx", ExcelVersion.Version2016)
workbook.Dispose()
O código carrega um arquivo Excel, compara duas colunas, rotula os resultados como "Correspondência" ou "Diferença", destaca as diferenças em amarelo e salva um novo arquivo de saída.
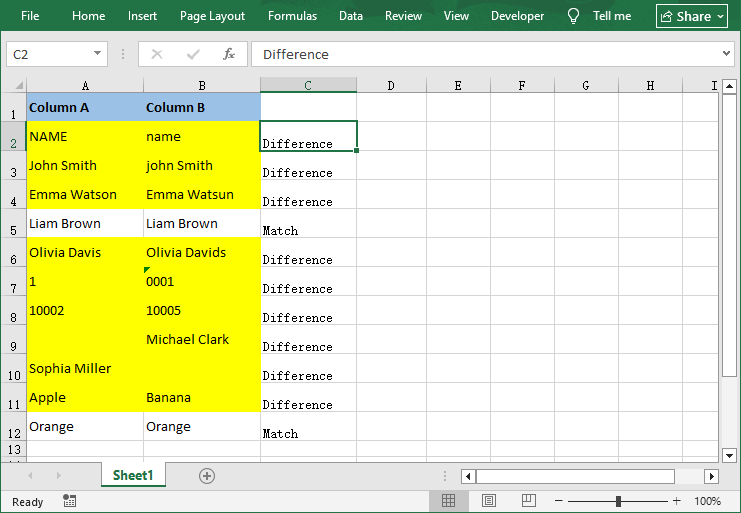
Depois de adicionar uma coluna "Correspondência / Diferença", você pode inserir uma Tabela Dinâmica para contar instantaneamente quantas linhas corresponderam ou diferiram, transformando uma simples comparação de colunas em um relatório de dados intuitivo.
Folha de consulta de métodos de comparação de colunas do Excel
Não tem certeza de qual método usar? Consulte esta folha de consulta rápida:
| Método | Ideal para | Nível de Habilidade | Prós | Contras |
|---|---|---|---|---|
| Formatação Condicional | Verificações visuais, pequenos conjuntos de dados | Iniciante | Rápido, sem fórmulas, fácil de identificar diferenças | Sem resultados escritos, não para grandes conjuntos de dados |
| Operador de Igualdade e EXACT | Comparação linha por linha que não diferencia maiúsculas de minúsculas ou que diferencia maiúsculas de minúsculas | Iniciante | Fórmula rápida e simples | Apenas saída básica, sem rótulos personalizados |
| Função IF | Rótulos de resultado personalizados | Intermediário | Fácil de interpretar, flexível | Requer configuração de fórmula |
| VLOOKUP | Dados não ordenados, encontrando correspondências | Intermediário | Funciona com dados não ordenados | Só pesquisa da esquerda para a direita |
| Macro VBA | Automação, comparações entre planilhas | Avançado | Economiza tempo para tarefas repetitivas | Requer conhecimento de VBA |
| Python | Processamento em lote multiplataforma, sem necessidade de Excel | Avançado | Escalável, amigável para servidor e automação completa | Requer conhecimento de Python |
Conclusão
Comparar duas colunas no Excel não precisa ser uma tarefa tediosa e manual. O método certo depende do tamanho do seu conjunto de dados, nível de habilidade e se você precisa de verificações visuais, resultados escritos ou automação.
Para iniciantes, comece com Formatação Condicional (visual) ou o operador de igualdade (VERDADEIRO/FALSO rápido). Para conjuntos de dados maiores ou dados não ordenados, use IF ou VLOOKUP para resultados personalizados e legíveis. Para tarefas repetitivas ou conjuntos de dados massivos, automatize o processo com uma Macro VBA (nativa do Excel) ou Python (escalável).
Ao dominar esses 7 métodos, você otimizará seu fluxo de trabalho de dados, eliminará erros manuais e transformará o Excel em uma ferramenta poderosa para validação e limpeza de dados.
Perguntas frequentes
P1: Como comparar duas colunas e mostrar as diferenças em uma terceira planilha?
Use a função IF ou uma macro VBA. Para uma solução simples: Crie uma nova planilha (por exemplo, Planilha3), insira =SE(Planilha1!A1=Planilha2!A1, "", "Diferença") na primeira célula e arraste a alça de preenchimento para baixo.
P2: Posso comparar mais de duas colunas de uma vez?
Sim. Para comparação linha por linha de três colunas (A, B, C):
- Fórmula de formatação condicional: =OU($A1<>$B1, $B1<>$C1) para destacar qualquer incompatibilidade.
- Fórmula: =SE(E(A1=B1, B1=C1), "Todas correspondem", "Incompatibilidade")
- VBA: percorra as colunas A, B, C e compare cada uma.
- Python: estenda a comparação para verificar todas as colunas necessárias.
P3: Posso reutilizar a macro VBA em diferentes pastas de trabalho?
Sim. Copie o código da macro e cole-o em um novo módulo. Ajuste as letras das colunas no código para corresponder ao seu novo intervalo de dados.
P4. Como posso comparar duas colunas sem abrir o Excel?
Use Python com Spire.XLS Grátis. O script pode ler o arquivo Excel do disco, realizar a comparação e salvar o resultado – tudo sem iniciar o aplicativo Excel. Isso é ideal para processamento em lote no servidor ou automatizado.
Veja também
Excel에서 두 열을 비교하는 방법 – 7가지 쉬운 방법
Excel에서 열을 비교하는 것은 데이터 분석가, 회계사, 마케터 및 스프레드시트 작업을 하는 모든 비즈니스 전문가에게 기본적이면서도 가치 높은 기술입니다. 재무 송장을 조정하거나, 중복 고객 기록을 정리하거나, 재고 SKU를 일치시키거나, 설문 응답 데이터를 검증하는 등 효율적인 열 비교 기술을 익히면 수동 작업 시간을 절약할 수 있습니다.
이 작업이 얼마나 일반적인지에도 불구하고, 많은 Excel 사용자는 행별로 스캔하거나, 필터 드롭다운을 반복해서 사용하거나, 심지어 두 목록을 인쇄하여 펜으로 표시하는 등 느리고 오류가 발생하기 쉬운 방법에 의존합니다. 이러한 접근 방식은 시간을 낭비할 뿐만 아니라 중요한 불일치 또는 중복을 간과할 위험을 증가시킵니다.
이 가이드가 존재하는 이유입니다. 이 가이드에서는 Excel에서 두 열을 비교하는 방법을 초보자 친화적인 시각적 확인부터 VBA 및 Python을 사용한 고급 자동화까지 7가지 검증된 방법을 통해 배울 수 있습니다.
- Excel에서 열을 비교하는 이유?
- 1. 조건부 서식 (일치/차이점 강조 표시)
- 2. 두 열을 비교하는 Excel 수식
- 3. Excel에서 열을 비교하는 고급 방법
- Excel 열 비교 방법 치트 시트
- 자주 묻는 질문
Excel에서 열을 비교하는 이유?
Excel 열을 비교하는 가장 일반적인 실제 사용 사례는 다음과 같습니다.
- 데이터 조정: 두 데이터 세트(예: 판매 보고서 및 결제 로그)가 일치하는지 확인합니다.
- 중복 감지: 열 간의 중복 값(예: 중복 고객 ID 또는 이메일 주소)을 찾습니다.
- 차이점 식별: 동일한 데이터의 두 버전 간의 불일치를 발견합니다.
- 데이터 유효성 검사: 데이터 입력의 일관성을 보장합니다(예: 한 열의 제품 코드가 마스터 목록과 일치하는지 확인).
- 데이터 세트 병합: 열 간의 공통 또는 고유 값을 식별하여 병합을 위한 데이터를 준비합니다.
사용 사례에 관계없이 Excel에는 기술 수준과 데이터 크기에 맞는 방법이 있습니다. 가장 간단한 방법(초보자에게 적합)부터 시작하여 고급 기술(파워 유저용)로 진행하겠습니다.
1. 조건부 서식 (일치/차이점 강조 표시)
조건부 서식은 Excel에서 2개의 열을 시각적으로 비교하는 가장 빠른 방법입니다. 색상으로 일치 항목 또는 차이점을 강조 표시하여 한눈에 불일치를 쉽게 파악할 수 있습니다.
적합 대상: 수식을 작성하지 않고 빠른 시각적 식별.
조건부 서식 사용 방법:
- 비교할 두 열을 선택합니다(예: A열 및 B열).
- Excel 리본에서 홈 탭으로 이동합니다.
- 조건부 서식 → 셀 강조 규칙 → 중복 값을 클릭합니다.
- 팝업 창에서:
- 중복을 선택하여 일치하는 값을 강조 표시합니다.
- 고유를 선택하여 차이점을 강조 표시합니다.
- 색 구성표를 선택하고 확인을 클릭합니다.
예시 결과: 일치하는 모든 셀이 연한 빨간색으로 표시되고, 차이점은 색상이 지정되지 않은 상태로 유지됩니다.
두 열 간의 일치하거나 고유한 값을 강조 표시하기 위해 조건부 서식을 사용하는 방법을 익혔다면, 동일한 시각적 논리를 확장하여 데이터 추세를 식별할 수 있습니다. 예를 들어, 데이터 막대를 적용하여 두 지역 간의 판매 수치를 비교할 수 있습니다.
2. 두 열을 비교하는 Excel 수식
수식 기반 방법을 사용하면 비교 결과에 대한 완전한 제어를 할 수 있습니다. TRUE/FALSE, 사용자 지정 텍스트("일치"/"차이")를 반환하거나 다른 열에서 일치하는 값을 검색할 수도 있습니다.
2.1 등호 연산자 (=) & EXACT 함수
이 두 가지 방법은 행별 비교의 기초입니다. 둘 다 같은 행의 두 Excel 셀을 비교하지만, 대소문자를 처리하는 방식이 다릅니다. 대소문자를 구분하지 않는 확인에는 등호 연산자(=)를 사용하고, 대소문자가 중요한 경우에는 EXACT를 사용합니다.
대소문자 구분 없는 등호 연산자: =A1=B1
- 값이 일치하면 "TRUE"를 반환하고(대소문자 무시), 그렇지 않으면 "FALSE"를 반환합니다.
- 예: "Apple" 대 "apple" → TRUE.
대소문자 구분하는 EXACT 함수: =EXACT(A1, B1)
- 값이 정확히 일치하는 경우에만 "TRUE"를 반환합니다(대소문자 포함).
- 예: "Apple" 대 "apple" → FALSE.
관련 기사: Excel에서 중복 행 제거하는 방법 - 6가지 쉬운 방법
2.2 IF 함수 (사용자 지정 결과 레이블)
IF 함수를 사용하면 TRUE/FALSE를 "일치" 또는 "불일치"와 같은 사용자 지정 레이블로 대체하여 결과를 더 쉽게 해석할 수 있습니다. 차이점에 대한 세부 정보를 추가할 수도 있습니다.
예시 수식: =IF(A1=B1, "일치", "차이")
다양한 시나리오에 대한 변형:
| 시나리오 | 수식 |
|---|---|
| 차이점만 표시(일치 시 공백) | =IF(A1<>B1, "차이", "") |
| 숫자 플래그(0 = 일치, 1 = 불일치) | =IF(A1=B1, 0, 1) |
| 메시지에 셀 값 포함 | =IF(A1=B1, "일치", "차이: "&A1&" 대 "&B1) |
| 사용자 지정 레이블로 대소문자 구분 | =IF(EXACT(A1,B1), "정확히 일치", "대소문자 또는 값이 다름") |
= 대신 IF를 사용하는 이유?
- "일치" / "차이"로 필터링할 수 있습니다.
- 다른 함수와 결합하여 더 풍부한 보고서를 만들 수 있습니다.
- 비기술적인 사용자는 TRUE/FALSE보다 단어를 더 잘 이해합니다.
2.3 VLOOKUP 함수 (열 간 일치 항목 찾기)
VLOOKUP은 정렬되지 않은 데이터가 있는 열을 비교하는 데 사용되는 도구입니다(예: A열의 고객 ID가 B열에 있는지 찾기, 행이 정렬되지 않은 경우에도).
한 열에서 특정 값을 검색하고 일치하는 항목이 발견되면 해당 값을 반환하거나 오류를 반환하여 열 간의 누락된 값을 찾는 데 완벽합니다.
VLOOKUP을 사용하여 Excel에서 두 열 비교:
- 빈 열(예: C열)에 다음 수식을 입력합니다: =VLOOKUP(A1, B:B, 1, FALSE).
- 수식 설명:
- A1 – 조회할 값(찾으려는 값).
- B:B – 검색할 열(B열).
- 1 – 열 인덱스(B:B는 열이 하나뿐이므로 해당 열을 반환).
- FALSE – 정확히 일치(중요; TRUE는 근사 일치를 제공함).
- Enter 키를 누릅니다. Excel은 A1과 일치하는 경우 B열의 값을 반환하고, 일치하는 항목이 없으면 #N/A를 반환합니다.
- 채우기 핸들을 아래로 끌어 수식을 적용합니다.
#N/A를 사용자 지정 레이블(예: "일치 없음")로 바꾸려면 수식을 IFERROR로 묶습니다: =IFERROR(VLOOKUP(A1, B:B, 1, FALSE), "일치 없음").
제한 사항: VLOOKUP은 왼쪽에서 오른쪽으로만 검색합니다. 모든 방향으로 값을 조회하려면 INDEX/MATCH(모든 Excel 버전과 호환) 또는 Excel 2021 또는 Microsoft 365를 사용하는 경우 더 직관적인 XLOOKUP 함수를 사용하십시오.
3. Excel에서 열을 비교하는 고급 방법
이 방법은 대규모 데이터 세트를 다루거나 반복적인 열 비교를 수행하는 파워 유저를 위한 것입니다. 두 가지 자동화 도구인 VBA 매크로(Excel 네이티브)와 Python(매우 확장 가능한 데이터용)을 다룹니다.
3.1 VBA 매크로 (내장 Excel 자동화)
VBA(Visual Basic for Applications)를 사용하면 Excel 내에서 직접 실행되는 스크립트를 작성할 수 있습니다. 수식을 다시 입력하지 않고 일상적인 작업을 수행하는 데 이상적입니다.
Excel에서 두 열을 비교하여 차이점을 찾는 VBA 코드
Sub HighlightRowDifferences()
    Dim rng As Range
    Dim cellA As Range
    Dim lastRow As Long
    Dim ws As Worksheet

    Set ws = ActiveSheet
    lastRow = ws.Cells(ws.Rows.Count, "A").End(xlUp).Row
    Set rng = ws.Range("A1:A" & lastRow)

    For Each cellA In rng
        If cellA.Value <> cellA.Offset(0, 1).Value Then
            cellA.Interior.Color = RGB(255, 255, 0)      ' Yellow
            cellA.Offset(0, 1).Interior.Color = RGB(255, 255, 0)
        End If
    Next cellA
End Sub
이 매크로 사용 방법:
- Excel 통합 문서를 열고 Alt + F11을 눌러 VBA 편집기를 엽니다.
- 삽입 → 모듈으로 이동하여 새 모듈을 만듭니다.
- 빈 모듈 창에 코드를 붙여넣습니다(필요에 따라 열/범위 참조 사용자 지정).
- F5를 눌러 매크로를 실행합니다.
보너스 팁: 열 비교를 더 정확하게 하려면 텍스트를 열로 분할하는 기능을 사용하여 결합된 셀 데이터(이름 및 코드 등)를 별도의 열로 분할하고 정리되지 않은 텍스트 형식을 표준화할 수 있습니다.
3.2 Free Spire.XLS를 사용한 Python (확장 가능 및 크로스 플랫폼)
열 비교를 데이터 파이프라인에 통합해야 하는 개발자에게는 Free Spire.XLS를 사용한 Python이 가장 강력한 옵션입니다. 이 무료 라이브러리는 Microsoft Excel이 설치되지 않아도 Excel 파일을 읽고, 쓰고, 조작할 수 있습니다.
두 열을 비교하는 완전한 Python 스크립트:
from spire.xls import *
from spire.xls.common import *

# Create a workbook object
workbook = Workbook()
workbook.LoadFromFile("Test.xlsx")

# Get the first worksheet
sheet = workbook.Worksheets[0]

# Get data range (assume row 1 is header, data starts from row 2)
start_row = 2
end_row = sheet.LastRow

for row in range(start_row, end_row + 1):
    cell_a = sheet.Range[row, 1]
    cell_b = sheet.Range[row, 2]

    # Get values (Handle null values)
    val_a = cell_a.Value if cell_a.Value is not None else ""
    val_b = cell_b.Value if cell_b.Value is not None else ""

    # Compare values
    if val_a == val_b:
        sheet.Range[row, 3].Text = "Match"
    else:
        sheet.Range[row, 3].Text = "Difference"

        # Highlight different cells
        cell_a.Style.Color = Color.get_Yellow()
        cell_b.Style.Color = Color.get_Yellow()

# Save the result file
workbook.SaveToFile("compared.xlsx", ExcelVersion.Version2016)
workbook.Dispose()
이 코드는 Excel 파일을 로드하고, 두 열을 비교하고, 결과를 "일치" 또는 "차이"로 레이블을 지정하고, 차이점을 노란색으로 강조 표시하고, 새 출력 파일을 저장합니다.
"일치 / 차이" 열을 추가한 후 피벗 테이블을 삽입하여 일치하거나 다른 행의 수를 즉시 계산하여 간단한 열 비교를 직관적인 데이터 보고로 변환할 수 있습니다.
Excel 열 비교 방법 치트 시트
어떤 방법을 사용해야 할지 모르겠다면 이 빠른 치트 시트를 참조하세요.
| 방법 | 가장 적합한 대상 | 기술 수준 | 장점 | 단점 |
|---|---|---|---|---|
| 조건부 서식 | 시각적 확인, 소규모 데이터 세트 | 초급 | 빠르고, 수식 필요 없음, 차이점 쉽게 파악 가능 | 결과 텍스트 없음, 대규모 데이터 세트에는 부적합 |
| 등호 연산자 & EXACT | 행별 대소문자 구분 없는 또는 대소문자 구분 비교 | 초급 | 빠르고 간단한 수식 | 기본 출력만 가능, 사용자 지정 레이블 없음 |
| IF 함수 | 사용자 지정 결과 레이블 | 중급 | 해석하기 쉽고 유연함 | 수식 설정 필요 |
| VLOOKUP | 정렬되지 않은 데이터, 일치 항목 찾기 | 중급 | 정렬되지 않은 데이터에서도 작동 | 왼쪽에서 오른쪽으로만 검색 가능 |
| VBA 매크로 | 자동화, 시트 간 비교 | 고급 | 반복적인 작업 시간 절약 | VBA 지식 필요 |
| Python | 크로스 플랫폼 일괄 처리, Excel 불필요 | 고급 | 확장 가능하고, 서버 친화적이며, 완전 자동화 가능 | Python 지식 필요 |
마무리
Excel에서 두 열을 비교하는 것은 지루하고 수동적인 작업이 될 필요가 없습니다. 올바른 방법은 데이터 세트 크기, 기술 수준, 시각적 확인, 텍스트 결과 또는 자동화가 필요한지에 따라 달라집니다.
초보자는 조건부 서식(시각적) 또는 등호 연산자(빠른 TRUE/FALSE)부터 시작하세요. 더 큰 데이터 세트 또는 정렬되지 않은 데이터의 경우 IF 또는 VLOOKUP을 사용하여 사용자 지정 가능하고 읽기 쉬운 결과를 얻으세요. 반복적인 작업 또는 대규모 데이터 세트의 경우 VBA 매크로(Excel 네이티브) 또는 Python(확장 가능)으로 프로세스를 자동화하세요.
이 7가지 방법을 익히면 데이터 워크플로우를 간소화하고 수동 오류를 제거하며 Excel을 데이터 유효성 검사 및 정리 도구로 만들 수 있습니다.
자주 묻는 질문
Q1: 두 열을 비교하고 세 번째 시트에 차이점을 표시하려면 어떻게 해야 합니까?
IF 함수 또는 VBA 매크로를 사용하세요. 간단한 해결 방법: 새 시트(예: Sheet3)를 만들고 첫 번째 셀에 =IF(Sheet1!A1=Sheet2!A1, "", "차이")를 입력하고 채우기 핸들을 아래로 끕니다.
Q2: 한 번에 세 개 이상의 열을 비교할 수 있습니까?
예. 세 개의 열(A, B, C)의 행별 비교의 경우:
- 조건부 서식 수식: =OR($A1<>$B1, $B1<>$C1)를 사용하여 모든 불일치를 강조 표시합니다.
- 수식: =IF(AND(A1=B1, B1=C1), "모두 일치", "불일치")
- VBA: A, B, C 열을 반복하며 각 열을 비교합니다.
- Python: 필요한 모든 열을 확인하도록 비교를 확장합니다.
Q3: VBA 매크로를 다른 통합 문서에 다시 사용할 수 있습니까?
예. 매크로 코드를 복사하여 새 모듈에 붙여넣습니다. 새 데이터 범위에 맞게 코드의 열 문자를 조정합니다.
Q4. Excel을 전혀 열지 않고 두 열을 비교할 수 있습니까?
Free Spire.XLS를 사용한 Python을 사용하세요. 이 스크립트는 Excel 애플리케이션을 실행하지 않고도 디스크에서 Excel 파일을 읽고, 비교를 수행하고, 결과를 저장할 수 있습니다. 이는 서버 측 또는 자동화된 일괄 처리에 이상적입니다.
참고 자료
Come confrontare due colonne in Excel – 7 semplici metodi
Indice
Confrontare le colonne in Excel è un'abilità fondamentale e di grande valore per analisti di dati, commercialisti, marketer e tutti i professionisti aziendali che lavorano con fogli di calcolo. Sia che tu stia riconciliando fatture finanziarie, ripulendo record di clienti duplicati, abbinando SKU di inventario o convalidando dati di risposte a sondaggi, padroneggiare tecniche efficienti di confronto delle colonne elimina ore di lavoro manuale.
Eppure, nonostante la frequenza di questo compito, molti utenti Excel si affidano a metodi lenti e soggetti a errori come la scansione riga per riga, l'uso ripetuto del filtro a discesa o persino la stampa di due elenchi e la loro marcatura con una penna. Questi approcci non solo sprecano tempo, ma aumentano anche il rischio di trascurare discrepanze o duplicati critici.
È esattamente per questo che esiste questa guida. Imparerai come confrontare due colonne in Excel utilizzando 7 metodi comprovati, dai controlli visivi adatti ai principianti all'automazione avanzata con VBA e Python.
- Perché confrontare le colonne in Excel?
- 1. Formattazione condizionale (Evidenzia corrispondenze/differenze)
- 2. Formula Excel per confrontare due colonne
- 3. Metodi avanzati per confrontare le colonne in Excel
- Scheda riassuntiva sui metodi di confronto delle colonne Excel
- Domande frequenti
Perché confrontare le colonne in Excel?
Ecco i casi d'uso più comuni nel mondo reale per confrontare le colonne di Excel:
- Riconciliazione dati: Verifica che due set di dati (ad es. un report vendite e un registro pagamenti) corrispondano.
- Rilevamento duplicati: Trova valori duplicati tra le colonne (ad es. ID cliente o indirizzi email duplicati).
- Identificazione differenze: Individua discrepanze tra due versioni degli stessi dati.
- Convalida dati: Assicura la coerenza nell'inserimento dei dati (ad es. verifica che i codici prodotto in una colonna corrispondano a un elenco master).
- Unione di set di dati: Prepara i dati per l'unione identificando valori comuni o univoci tra le colonne.
Indipendentemente dal tuo caso d'uso, Excel ha un metodo su misura per il tuo livello di competenza e la dimensione dei dati. Inizieremo con i metodi più semplici (ottimi per i principianti) per passare poi a tecniche avanzate (per utenti esperti).
1. Formattazione condizionale (Evidenzia corrispondenze/differenze)
La formattazione condizionale è il modo più veloce per confrontare visivamente 2 colonne in Excel. Evidenzia corrispondenze o differenze con colori, rendendo le discrepanze facili da individuare a colpo d'occhio.
Ideale per: Identificazione visiva rapida senza scrivere formule.
Come usare la formattazione condizionale:
- Seleziona le due colonne che vuoi confrontare (ad es. Colonna A e Colonna B).
- Vai alla scheda Home nella barra multifunzione di Excel.
- Fai clic su Formattazione condizionale → Regole evidenziazione celle → Valori duplicati.
- Nella finestra di dialogo:
- Scegli Duplica per evidenziare i valori corrispondenti.
- Scegli Univoco per evidenziare le differenze.
- Seleziona uno schema di colori e fai clic su OK.
Risultato di esempio: Tutte le celle corrispondenti diventano rosso chiaro; le differenze rimangono senza colore.
Una volta che hai imparato a usare la formattazione condizionale per evidenziare valori corrispondenti o univoci tra due colonne, puoi estendere la stessa logica visiva per identificare tendenze nei dati, ad esempio, applicando barre dati per confrontare le cifre di vendita tra due regioni.
2. Formula Excel per confrontare due colonne
I metodi basati su formule ti danno il pieno controllo sull'output del confronto. Puoi restituire VERO/FALSO, testo personalizzato ("Corrispondenza" / "Differenza") o persino recuperare valori corrispondenti da un'altra colonna.
2.1 Operatore di uguaglianza (=) e funzione EXACT
Questi due metodi sono il fondamento del confronto riga per riga. Entrambi confrontano 2 celle di Excel nella stessa riga, ma differiscono nel modo in cui gestiscono le maiuscole/minuscole. Usa l'operatore di uguaglianza (=) per controlli non sensibili alle maiuscole/minuscole, o EXACT quando le maiuscole/minuscole sono importanti.
Operatore di uguaglianza non sensibile alle maiuscole/minuscole: =A1=B1
- Restituisce "VERO" se i valori corrispondono (ignorando le maiuscole/minuscole), altrimenti "FALSO".
- Esempio: "Mela" vs "mela" → VERO.
Funzione EXACT sensibile alle maiuscole/minuscole: =EXACT(A1, B1)
- Restituisce "VERO" solo se i valori sono identici (comprese le maiuscole/minuscole).
- Esempio: "Mela" vs "mela" → FALSO.
Articolo correlato: Come rimuovere righe duplicate da Excel - 6 modi semplici
2.2 Funzione IF (Etichette di risultato personalizzate)
La funzione IF ti consente di sostituire VERO/FALSO con etichette personalizzate come "Corrispondenza" o "Differenza", rendendo i tuoi risultati più facili da interpretare. Puoi persino aggiungere dettagli sulle differenze.
Formula di esempio: =IF(A1=B1, "Corrispondenza", "Differenza")
Variazioni per scenari diversi:
| Scenario | Formula |
|---|---|
| Mostra solo differenze (vuoto se corrisponde) | =IF(A1<>B1, "Differenza", "") |
| Flag numerico (0 = corrispondenza, 1 = non corrispondenza) | =IF(A1=B1, 0, 1) |
| Includi valori delle celle nel messaggio | =IF(A1=B1, "Corrispondenza", "Non corrispondenza: "&A1&" vs "&B1) |
| Sensibile alle maiuscole/minuscole con etichetta personalizzata | =IF(EXACT(A1,B1), "Corrispondenza esatta", "Differenza maiuscole/minuscole o valore") |
Perché usare IF invece di =?
- Puoi filtrare su "Corrispondenza" / "Differenza".
- Puoi combinarlo con altre funzioni per creare report più ricchi.
- Gli utenti non tecnici capiscono meglio le parole di VERO/FALSO.
2.3 Funzione VLOOKUP (Trova corrispondenze tra colonne)
VLOOKUP è lo strumento di riferimento per confrontare colonne con dati non ordinati (ad es. trovare un ID cliente nella Colonna A che esiste nella Colonna B, anche se le righe non sono allineate).
Cerca un valore specifico in una colonna e restituisce un valore corrispondente (o un errore) se viene trovata una corrispondenza, rendendolo perfetto per trovare valori mancanti tra le colonne.
Confronta due colonne in Excel usando VLOOKUP:
- In una colonna vuota (ad es. Colonna C), inserisci la formula: =VLOOKUP(A1, B:B, 1, FALSE).
- Suddivisione della formula:
- A1 – il valore da cercare (ciò che stai cercando).
- B:B – la colonna in cui cercare (Colonna B).
- 1 – indice della colonna (poiché B:B ha una sola colonna, restituisce quella colonna).
- FALSE – corrispondenza esatta (fondamentale; TRUE darebbe corrispondenze approssimative).
- Premi Invio. Excel restituirà il valore dalla Colonna B se corrisponde ad A1, o #N/A se non viene trovata alcuna corrispondenza.
- Trascina la maniglia di riempimento verso il basso per applicare la formula.
Per sostituire #N/A con un'etichetta personalizzata (ad es. "Nessuna corrispondenza"), racchiudi la formula in IFERROR: =IFERROR(VLOOKUP(A1, B:B, 1, FALSE), "Nessuna corrispondenza").
Limitazione: VLOOKUP cerca solo da sinistra a destra. Per cercare valori in qualsiasi direzione, usa INDEX/MATCH (compatibile con tutte le versioni di Excel) o, se hai Excel 2021 o Microsoft 365, la funzione più intuitiva XLOOKUP.
3. Metodi avanzati per confrontare le colonne in Excel
Questi metodi sono per utenti esperti che lavorano con enormi set di dati o eseguono confronti di colonne ripetitivi. Copriamo due strumenti di automazione: Macro VBA (native di Excel) e Python (per dati ultra-scalabili).
3.1 Macro VBA (Automazione Excel integrata)
VBA (Visual Basic for Applications) ti consente di scrivere script che vengono eseguiti direttamente all'interno di Excel. Ideale per attività quotidiane senza reinserire formule.
Codice VBA per confrontare due colonne in Excel per differenze
Sub HighlightRowDifferences()
    Dim rng As Range
    Dim cellA As Range
    Dim lastRow As Long
    Dim ws As Worksheet

    Set ws = ActiveSheet
    lastRow = ws.Cells(ws.Rows.Count, "A").End(xlUp).Row
    Set rng = ws.Range("A1:A" & lastRow)

    For Each cellA In rng
        If cellA.Value <> cellA.Offset(0, 1).Value Then
            cellA.Interior.Color = RGB(255, 255, 0)      ' Giallo
            cellA.Offset(0, 1).Interior.Color = RGB(255, 255, 0)
        End If
    Next cellA
End Sub
Come usare questa macro:
- Apri la tua cartella di lavoro Excel e premi Alt + F11 per aprire l'Editor VBA.
- Vai su Inserisci → Modulo per creare un nuovo modulo.
- Incolla il codice nella finestra del modulo vuota (personalizza i riferimenti di colonna/intervallo secondo necessità).
- Premi F5 per eseguire la macro.
Suggerimento bonus: Per rendere il confronto delle colonne più accurato, puoi usare la funzione testo in colonne per dividere dati di celle combinati (come nomi e codici) in colonne separate e standardizzare formati di testo disordinati.
3.2 Python con Spire.XLS gratuito (Scalabile e multipiattaforma)
Per gli sviluppatori che necessitano di integrare il confronto delle colonne in una pipeline di dati, Python con Spire.XLS gratuito è l'opzione più potente. Questa libreria gratuita può leggere, scrivere e manipolare file Excel senza la necessità di installare Microsoft Excel.
Script Python completo per confrontare due colonne:
from spire.xls import *
from spire.xls.common import *

# Crea un oggetto workbook
workbook = Workbook()
workbook.LoadFromFile("Test.xlsx")

# Ottieni il primo foglio di lavoro
sheet = workbook.Worksheets[0]

# Ottieni l'intervallo dati (si presume che la riga 1 sia l'intestazione, i dati iniziano dalla riga 2)
start_row = 2
end_row = sheet.LastRow

for row in range(start_row, end_row + 1):
    cell_a = sheet.Range[row, 1]
    cell_b = sheet.Range[row, 2]

    # Ottieni i valori (gestisci valori nulli)
    val_a = cell_a.Value if cell_a.Value is not None else ""
    val_b = cell_b.Value if cell_b.Value is not None else ""

    # Confronta i valori
    if val_a == val_b:
        sheet.Range[row, 3].Text = "Corrispondenza"
    else:
        sheet.Range[row, 3].Text = "Differenza"

        # Evidenzia le celle diverse
        cell_a.Style.Color = Color.get_Yellow()
        cell_b.Style.Color = Color.get_Yellow()

# Salva il file di risultato
workbook.SaveToFile("compared.xlsx", ExcelVersion.Version2016)
workbook.Dispose()
Il codice carica un file Excel, confronta due colonne, etichetta i risultati come "Corrispondenza" o "Differenza", evidenzia le differenze in giallo e salva un nuovo file di output.
Dopo aver aggiunto una colonna "Corrispondenza / Differenza", puoi inserire una Tabella Pivot per contare istantaneamente quante righe sono corrispondenti o differiscono, trasformando un semplice confronto di colonne in un report dati intuitivo.
Scheda riassuntiva sui metodi di confronto delle colonne Excel
Non sei sicuro di quale metodo usare? Consulta questa rapida scheda riassuntiva:
| Metodo | Ideale per | Livello di competenza | Pro | Contro |
|---|---|---|---|---|
| Formattazione condizionale | Controlli visivi, piccoli set di dati | Principiante | Veloce, nessuna formula, facile individuare le differenze | Nessun risultato scritto, non per grandi set di dati |
| Operatore di uguaglianza & EXACT | Confronto riga per riga non sensibile o sensibile alle maiuscole/minuscole | Principiante | Formula veloce e semplice | Solo output di base, nessuna etichetta personalizzata |
| Funzione IF | Etichette di risultato personalizzate | Intermedio | Facile da interpretare, flessibile | Richiede impostazione della formula |
| VLOOKUP | Dati non ordinati, ricerca di corrispondenze | Intermedio | Funziona con dati non ordinati | Cerca solo da sinistra a destra |
| Macro VBA | Automazione, confronti tra fogli | Avanzato | Risparmia tempo per attività ripetitive | Richiede conoscenza VBA |
| Python | Elaborazione batch multipiattaforma, non è necessario Excel | Avanzato | Scalabile, adatto ai server e automazione completa | Richiede conoscenza Python |
In conclusione
Confrontare due colonne in Excel non deve essere un compito noioso e manuale. Il metodo giusto dipende dalla dimensione del tuo set di dati, dal tuo livello di competenza e se hai bisogno di controlli visivi, risultati scritti o automazione.
Per i principianti, inizia con la Formattazione condizionale (visiva) o l'operatore di uguaglianza (VERO/FALSO rapido). Per set di dati più grandi o dati non ordinati, usa IF o VLOOKUP per risultati personalizzati e leggibili. Per attività ripetitive o set di dati enormi, automatizza il processo con una Macro VBA (nativa di Excel) o Python (scalabile).
Padroneggiando questi 7 metodi, ottimizzerai il tuo flusso di lavoro dati, eliminerai errori manuali e trasformerai Excel in uno strumento potente per la convalida e la pulizia dei dati.
Domande frequenti
D1: Come confronto due colonne e mostro le differenze in una terza scheda?
Usa la funzione IF o una macro VBA. Per una soluzione semplice: crea una nuova scheda (ad es. Foglio3), inserisci =IF(Foglio1!A1=Foglio2!A1, "", "Differenza") nella prima cella e trascina la maniglia di riempimento verso il basso.
D2: Posso confrontare più di due colonne contemporaneamente?
Sì. Per il confronto riga per riga di tre colonne (A, B, C):
- Formattazione condizionale formula: =OR($A1<>$B1, $B1<>$C1) per evidenziare qualsiasi discrepanza.
- Formula: =IF(AND(A1=B1, B1=C1), "Tutte corrispondenti", "Non corrispondenti")
- VBA: scorri le colonne A, B, C e confronta ciascuna.
- Python: estendi il confronto per controllare tutte le colonne richieste.
D3: Posso riutilizzare la macro VBA su diverse cartelle di lavoro?
Sì. Copia il codice della macro e incollalo in un nuovo modulo. Modifica le lettere delle colonne nel codice per adattarle al tuo nuovo intervallo di dati.
D4. Come posso confrontare due colonne senza aprire Excel?
Usa Python con Spire.XLS gratuito. Lo script può leggere il file Excel dal disco, eseguire il confronto e salvare il risultato, tutto senza avviare l'applicazione Excel. Questo è ideale per l'elaborazione batch lato server o automatizzata.
Vedi anche
Comment comparer deux colonnes dans Excel – 7 méthodes simples
Table des matières
- Pourquoi comparer des colonnes dans Excel ?
- 1. Mise en forme conditionnelle (Surligner les correspondances/différences)
- 2. Formule Excel pour comparer deux colonnes
- 3. Méthodes avancées pour comparer des colonnes dans Excel
- Fiche récapitulative des méthodes de comparaison de colonnes Excel
- Questions fréquemment posées
Comparer des colonnes dans Excel est une compétence fondamentale et de grande valeur pour les analystes de données, les comptables, les spécialistes du marketing et tous les professionnels travaillant avec des feuilles de calcul. Que vous réconciliiez des factures financières, nettoyiez des enregistrements clients en double, faisiez correspondre des références de stock ou validiez des données de réponses à des enquêtes, maîtriser des techniques de comparaison de colonnes efficaces élimine des heures de travail manuel.
Pourtant, malgré la fréquence de cette tâche, de nombreux utilisateurs d'Excel s'appuient sur des méthodes lentes et sujettes aux erreurs telles que le balayage ligne par ligne, l'utilisation répétée du filtre déroulant, ou même l'impression de deux listes et leur marquage au stylo. Ces approches non seulement font perdre du temps, mais augmentent également le risque de passer à côté de divergences ou de doublons critiques.
C'est précisément la raison d'être de ce guide. Vous apprendrez comment comparer deux colonnes dans Excel en utilisant 7 méthodes éprouvées, des vérifications visuelles simples pour débutants à l'automatisation avancée avec VBA et Python.
- Pourquoi comparer des colonnes dans Excel ?
- 1. Mise en forme conditionnelle (Surligner les correspondances/différences)
- 2. Formule Excel pour comparer deux colonnes
- 3. Méthodes avancées pour comparer des colonnes dans Excel
- Fiche récapitulative des méthodes de comparaison de colonnes Excel
- Questions fréquemment posées
Pourquoi comparer des colonnes dans Excel ?
Voici les cas d'utilisation les plus courants dans le monde réel pour comparer des colonnes Excel :
- Réconciliation de données : Vérifier que deux ensembles de données (par exemple, un rapport de ventes et un journal de paiements) correspondent.
- Détection de doublons : Trouver des valeurs en double entre les colonnes (par exemple, des identifiants clients ou des adresses e-mail en double).
- Identification des différences : Repérer les divergences entre deux versions des mêmes données.
- Validation des données : Assurer la cohérence de la saisie des données (par exemple, vérifier que les codes produit d'une colonne correspondent à une liste maîtresse).
- Fusion de jeux de données : Préparer les données pour la fusion en identifiant les valeurs communes ou uniques entre les colonnes.
Quel que soit votre cas d'utilisation, Excel dispose d'une méthode adaptée à votre niveau de compétence et à la taille de vos données. Nous commencerons par les méthodes les plus simples (idéales pour les débutants) et passerons aux techniques avancées (pour les utilisateurs expérimentés).
1. Mise en forme conditionnelle (Surligner les correspondances/différences)
La mise en forme conditionnelle est le moyen le plus rapide de comparer visuellement 2 colonnes dans Excel. Elle surligne les correspondances ou les différences avec des couleurs, rendant les divergences faciles à repérer d'un coup d'œil.
Idéal pour : Identification visuelle rapide sans écrire de formules.
Comment utiliser la mise en forme conditionnelle :
- Sélectionnez les deux colonnes que vous souhaitez comparer (par exemple, Colonne A et Colonne B).
- Allez dans l'onglet Accueil du ruban Excel.
- Cliquez sur Mise en forme conditionnelle → Règles de mise en surbrillance des cellules → Valeurs en double.
- Dans la fenêtre contextuelle :
- Choisissez Doublon pour surligner les valeurs correspondantes.
- Choisissez Unique pour surligner les différences.
- Sélectionnez un schéma de couleurs et cliquez sur OK.
Résultat exemple : Toutes les cellules correspondantes deviennent rouge clair ; les différences restent sans couleur.
Une fois que vous maîtrisez l'utilisation de la mise en forme conditionnelle pour surligner les valeurs correspondantes ou uniques entre deux colonnes, vous pouvez étendre la même logique visuelle pour identifier les tendances des données, par exemple, en appliquant des barres de données pour comparer les chiffres de ventes entre deux régions.
2. Formule Excel pour comparer deux colonnes
Les méthodes basées sur des formules vous donnent un contrôle total sur le résultat de la comparaison. Vous pouvez retourner VRAI/FAUX, du texte personnalisé ("Correspondance" / "Différence"), ou même récupérer les valeurs correspondantes d'une autre colonne.
2.1 Opérateur d'égalité (=) & Fonction EXACT
Ces deux méthodes sont le fondement de la comparaison ligne par ligne. Les deux comparent 2 cellules Excel dans la même ligne, mais elles diffèrent dans leur façon de gérer la casse des lettres. Utilisez l'opérateur d'égalité (=) pour les vérifications insensibles à la casse, ou EXACT lorsque la casse des lettres est importante.
Opérateur d'égalité insensible à la casse : =A1=B1
- Retourne "VRAI" si les valeurs correspondent (en ignorant la casse), "FAUX" sinon.
- Exemple : "Pomme" vs "pomme" → VRAI.
Fonction EXACT sensible à la casse : =EXACT(A1, B1)
- Retourne "VRAI" uniquement si les valeurs sont identiques (y compris la casse).
- Exemple : "Pomme" vs "pomme" → FAUX.
Article connexe : Comment supprimer les lignes en double dans Excel - 6 méthodes faciles
2.2 Fonction SI (Libellés de résultat personnalisés)
La fonction SI vous permet de remplacer VRAI/FAUX par des libellés personnalisés comme "Correspondance" ou "Divergence", rendant vos résultats plus faciles à interpréter. Vous pouvez même ajouter des détails sur les différences.
Formule exemple : =SI(A1=B1, "Correspondance", "Différence")
Variations pour différents scénarios :
| Scénario | Formule |
|---|---|
| Afficher uniquement les différences (vide si correspondance) | =SI(A1<>B1, "Différence", "") |
| Indicateur numérique (0 = correspondance, 1 = divergence) | =SI(A1=B1, 0, 1) |
| Inclure les valeurs des cellules dans le message | =SI(A1=B1, "Correspondance", "Divergence : "&A1&" vs "&B1) |
| Sensible à la casse avec libellé personnalisé | =SI(EXACT(A1,B1), "Correspondance exacte", "Différence de casse ou de valeur") |
Pourquoi utiliser SI au lieu de = ?
- Vous pouvez filtrer sur "Correspondance" / "Différence".
- Vous pouvez combiner avec d'autres fonctions pour créer des rapports plus riches.
- Les utilisateurs non techniques comprennent mieux les mots que VRAI/FAUX.
2.3 Fonction RECHERCHEV (Trouver des correspondances entre colonnes)
RECHERCHEV est l'outil de référence pour comparer des colonnes avec des données non triées (par exemple, trouver un ID client dans la Colonne A qui existe dans la Colonne B, même si les lignes ne correspondent pas).
Elle recherche une valeur spécifique dans une colonne et retourne une valeur correspondante (ou une erreur) si une correspondance est trouvée, ce qui la rend parfaite pour trouver des valeurs manquantes entre les colonnes.
Comparer deux colonnes dans Excel en utilisant RECHERCHEV :
- Dans une colonne vide (par exemple, Colonne C), entrez la formule : =RECHERCHEV(A1, B:B, 1, FAUX).
- Détail de la formule :
- A1 – la valeur recherchée (ce que vous recherchez).
- B:B – la colonne dans laquelle rechercher (Colonne B).
- 1 – l'index de la colonne (puisque B:B n'a qu'une seule colonne, retournez cette colonne).
- FAUX – correspondance exacte (crucial ; VRAI donnerait des correspondances approximatives).
- Appuyez sur Entrée. Excel retournera la valeur de la Colonne B si elle correspond à A1, ou #N/A si aucune correspondance n'est trouvée.
- Faites glisser la poignée de recopie vers le bas pour appliquer la formule.
Pour remplacer #N/A par un libellé personnalisé (par exemple, "Aucune correspondance"), encapsulez la formule dans SIERREUR : =SIERREUR(RECHERCHEV(A1, B:B, 1, FAUX), "Aucune correspondance").
Limitation : RECHERCHEV ne recherche que de gauche à droite. Pour rechercher des valeurs dans n'importe quelle direction, utilisez INDEX/EQUIV (compatible avec toutes les versions d'Excel) ou, si vous avez Excel 2021 ou Microsoft 365, la fonction plus intuitive RECHERCHEX.
3. Méthodes avancées pour comparer des colonnes dans Excel
Ces méthodes sont destinées aux utilisateurs expérimentés travaillant avec des jeux de données massifs ou effectuant des comparaisons de colonnes répétitives. Nous couvrons deux outils d'automatisation : les macros VBA (natives à Excel) et Python (pour des données ultra-évolutives).
3.1 Macro VBA (Automatisation intégrée à Excel)
VBA (Visual Basic for Applications) vous permet d'écrire des scripts qui s'exécutent directement dans Excel. Idéal pour les tâches quotidiennes sans avoir à réentrer des formules.
Code VBA pour comparer deux colonnes dans Excel pour les différences
Sub HighlightRowDifferences()
    Dim rng As Range
    Dim cellA As Range
    Dim lastRow As Long
    Dim ws As Worksheet

    Set ws = ActiveSheet
    lastRow = ws.Cells(ws.Rows.Count, "A").End(xlUp).Row
    Set rng = ws.Range("A1:A" & lastRow)

    For Each cellA In rng
        If cellA.Value <> cellA.Offset(0, 1).Value Then
            cellA.Interior.Color = RGB(255, 255, 0)      ' Jaune
            cellA.Offset(0, 1).Interior.Color = RGB(255, 255, 0)
        End If
    Next cellA
End Sub
Comment utiliser cette macro :
- Ouvrez votre classeur Excel et appuyez sur Alt + F11 pour ouvrir l'éditeur VBA.
- Allez dans Insertion → Module pour créer un nouveau module.
- Collez le code dans la fenêtre de module vide (personnalisez les références de colonne/plage si nécessaire).
- Appuyez sur F5 pour exécuter la macro.
Astuce bonus : Pour rendre la comparaison de colonnes plus précise, vous pouvez utiliser la fonction "Texte en colonnes" pour diviser les données de cellules combinées (telles que les noms et les codes) en colonnes séparées et standardiser les formats de texte désordonnés.
3.2 Python avec Spire.XLS gratuit (Évolutif et multiplateforme)
Pour les développeurs qui ont besoin d'intégrer la comparaison de colonnes dans un pipeline de données, Python avec Spire.XLS gratuit est l'option la plus puissante. Cette bibliothèque gratuite peut lire, écrire et manipuler des fichiers Excel sans avoir besoin d'installer Microsoft Excel.
Script Python complet pour comparer deux colonnes :
from spire.xls import *
from spire.xls.common import *

# Créer un objet classeur
workbook = Workbook()
workbook.LoadFromFile("Test.xlsx")

# Obtenir la première feuille de calcul
sheet = workbook.Worksheets[0]

# Obtenir la plage de données (supposons que la ligne 1 est l'en-tête, les données commencent à la ligne 2)
start_row = 2
end_row = sheet.LastRow

for row in range(start_row, end_row + 1):
    cell_a = sheet.Range[row, 1]
    cell_b = sheet.Range[row, 2]

    # Obtenir les valeurs (Gérer les valeurs nulles)
    val_a = cell_a.Value if cell_a.Value is not None else ""
    val_b = cell_b.Value if cell_b.Value is not None else ""

    # Comparer les valeurs
    if val_a == val_b:
        sheet.Range[row, 3].Text = "Correspondance"
    else:
        sheet.Range[row, 3].Text = "Différence"

        # Surligner les cellules différentes
        cell_a.Style.Color = Color.get_Yellow()
        cell_b.Style.Color = Color.get_Yellow()

# Enregistrer le fichier de résultat
workbook.SaveToFile("compared.xlsx", ExcelVersion.Version2016)
workbook.Dispose()
Le code charge un fichier Excel, compare deux colonnes, étiquette les résultats comme "Correspondance" ou "Différence", surligne les différences en jaune et enregistre un nouveau fichier de sortie.
Après avoir ajouté une colonne "Correspondance / Différence", vous pouvez insérer un tableau croisé dynamique pour compter instantanément le nombre de lignes correspondantes ou différentes, transformant une simple comparaison de colonnes en un rapport de données intuitif.
Fiche récapitulative des méthodes de comparaison de colonnes Excel
Vous ne savez pas quelle méthode utiliser ? Référez-vous à cette fiche récapitulative rapide :
| Méthode | Idéal pour | Niveau de compétence | Avantages | Inconvénients |
|---|---|---|---|---|
| Mise en forme conditionnelle | Vérifications visuelles, petits jeux de données | Débutant | Rapide, pas de formules, différences faciles à repérer | Pas de résultats écrits, pas pour les grands jeux de données |
| Opérateur d'égalité & EXACT | Comparaison ligne par ligne insensible ou sensible à la casse | Débutant | Formule rapide et simple | Sortie basique uniquement, pas de libellés personnalisés |
| Fonction SI | Libellés de résultat personnalisés | Intermédiaire | Facile à interpréter, flexible | Nécessite la configuration de formules |
| RECHERCHEV | Données non triées, recherche de correspondances | Intermédiaire | Fonctionne avec des données non triées | Ne recherche que de gauche à droite |
| Macro VBA | Automatisation, comparaisons entre feuilles | Avancé | Gain de temps pour les tâches répétitives | Nécessite des connaissances en VBA |
| Python | Traitement par lots multiplateforme, pas d'Excel requis | Avancé | Évolutif, adapté aux serveurs et automatisation complète | Nécessite des connaissances en Python |
En résumé
Comparer deux colonnes dans Excel ne doit pas être une tâche fastidieuse et manuelle. La bonne méthode dépend de la taille de votre jeu de données, de votre niveau de compétence et de si vous avez besoin de vérifications visuelles, de résultats écrits ou d'automatisation.
Pour les débutants, commencez par la Mise en forme conditionnelle (visuelle) ou l'opérateur d'égalité (VRAI/FAUX rapide). Pour des jeux de données plus importants ou des données non triées, utilisez SI ou RECHERCHEV pour des résultats personnalisés et lisibles. Pour les tâches répétitives ou les jeux de données massifs, automatisez le processus avec une Macro VBA (native à Excel) ou Python (évolutif).
En maîtrisant ces 7 méthodes, vous rationaliserez votre flux de travail de données, éliminerez les erreurs manuelles et transformerez Excel en un outil puissant pour la validation et le nettoyage des données.
Questions fréquemment posées
Q1 : Comment comparer deux colonnes et afficher les différences dans une troisième feuille ?
Utilisez la fonction SI ou une macro VBA. Pour une solution simple : Créez une nouvelle feuille (par exemple, Feuille3), entrez =SI(Feuil1!A1=Feuil2!A1, "", "Différence") dans la première cellule, et faites glisser la poignée de recopie vers le bas.
Q2 : Puis-je comparer plus de deux colonnes à la fois ?
Oui. Pour une comparaison ligne par ligne de trois colonnes (A, B, C) :
- Formule de mise en forme conditionnelle : =OU($A1<>$B1, $B1<>$C1) pour surligner toute divergence.
- Formule : =SI(ET(A1=B1, B1=C1), "Toutes correspondent", "Divergence")
- VBA : parcourez les colonnes A, B, C et comparez chacune.
- Python : étendez la comparaison pour vérifier toutes les colonnes requises.
Q3 : Puis-je réutiliser la macro VBA sur différents classeurs ?
Oui. Copiez le code de la macro et collez-le dans un nouveau module. Ajustez les lettres des colonnes dans le code pour qu'elles correspondent à votre nouvelle plage de données.
Q4. Comment puis-je comparer deux colonnes sans ouvrir Excel du tout ?
Utilisez Python avec Spire.XLS gratuit. Le script peut lire le fichier Excel depuis le disque, effectuer la comparaison et enregistrer le résultat, le tout sans lancer l'application Excel. C'est idéal pour le traitement par lots côté serveur ou automatisé.
Voir aussi
- Trier les données dans Excel : 5 méthodes simples et avancées expliquées
- Comment supprimer les colonnes en double dans Excel : 4 meilleures méthodes
- Compter les cellules colorées dans Excel : 3 méthodes faciles (manuelle/automatisation)
- Python : Appliquer la mise en forme conditionnelle dans Excel
- C#/VB.NET : Supprimer les lignes en double dans Excel
Cómo comparar dos columnas en Excel: 7 métodos sencillos
Tabla de Contenidos
Comparar columnas en Excel es una habilidad fundamental y de alto valor para analistas de datos, contadores, especialistas en marketing y todos los profesionales de negocios que trabajan con hojas de cálculo. Ya sea que esté conciliando facturas financieras, depurando registros de clientes duplicados, haciendo coincidir SKUs de inventario o validando datos de respuestas de encuestas, dominar técnicas eficientes de comparación de columnas elimina horas de trabajo manual.
Sin embargo, a pesar de lo común que es esta tarea, muchos usuarios de Excel recurren a métodos lentos y propensos a errores, como escanear fila por fila, usar el menú desplegable del filtro repetidamente o incluso imprimir dos listas y marcarlas con un bolígrafo. Estos enfoques no solo pierden tiempo, sino que también aumentan el riesgo de pasar por alto discrepancias o duplicados críticos.
Esa es exactamente la razón por la que existe esta guía. Aprenderá cómo comparar dos columnas en Excel utilizando 7 métodos probados, desde verificaciones visuales amigables para principiantes hasta automatización avanzada con VBA y Python.
- ¿Por qué comparar columnas en Excel?
- 1. Formato Condicional (Resaltar coincidencias/diferencias)
- 2. Fórmula de Excel para comparar dos columnas
- 3. Métodos avanzados para comparar columnas en Excel
- Hoja de trucos para el método de comparación de columnas en Excel
- Preguntas frecuentes
¿Por qué comparar columnas en Excel?
Aquí están los casos de uso más comunes en el mundo real para comparar columnas de Excel:
- Conciliación de datos: Verificar que dos conjuntos de datos (por ejemplo, un informe de ventas y un registro de pagos) coincidan.
- Detección de duplicados: Encontrar valores duplicados entre columnas (por ejemplo, IDs de clientes o direcciones de correo electrónico duplicados).
- Identificación de diferencias: Detectar discrepancias entre dos versiones de los mismos datos.
- Validación de datos: Asegurar la consistencia en la entrada de datos (por ejemplo, verificar que los códigos de producto en una columna coincidan con una lista maestra).
- Combinación de conjuntos de datos: Preparar datos para combinarlos identificando valores comunes o únicos entre columnas.
Independientemente de su caso de uso, Excel tiene un método adaptado a su nivel de habilidad y tamaño de datos. Comenzaremos con los métodos más sencillos (ideales para principiantes) y pasaremos a técnicas avanzadas (para usuarios avanzados).
1. Formato Condicional (Resaltar coincidencias/diferencias)
El formato condicional es la forma más rápida de comparar visualmente 2 columnas en Excel. Resalta coincidencias o diferencias con colores, lo que facilita la detección de discrepancias de un vistazo.
Ideal para: Identificación visual rápida sin escribir fórmulas.
Cómo usar el formato condicional:
- Seleccione las dos columnas que desea comparar (por ejemplo, Columna A y Columna B).
- Vaya a la pestaña Inicio en la cinta de Excel.
- Haga clic en Formato condicional → Reglas para resaltar celdas → Valores duplicados.
- En la ventana emergente:
- Elija Duplicado para resaltar los valores coincidentes.
- Elija Único para resaltar las diferencias.
- Seleccione un esquema de color y haga clic en Aceptar.
Resultado de ejemplo: Todas las celdas coincidentes se vuelven de color rojo claro; las diferencias permanecen sin colorear.
Una vez que domine el uso del formato condicional para resaltar valores coincidentes o únicos entre dos columnas, puede extender la misma lógica visual para identificar tendencias de datos, por ejemplo, aplicando barras de datos para comparar cifras de ventas entre dos regiones.
2. Fórmula de Excel para comparar dos columnas
Los métodos basados en fórmulas le brindan control total sobre la salida de la comparación. Puede devolver VERDADERO/FALSO, texto personalizado ("Coincidencia" / "Diferencia") o incluso recuperar valores coincidentes de otra columna.
2.1 Operador de Igualdad (=) y función EXACTA
Estos dos métodos son la base de la comparación fila por fila. Ambos comparan 2 celdas de Excel en la misma fila, pero difieren en cómo manejan las mayúsculas y minúsculas. Use el operador de igualdad (=) para verificaciones que no distinguen entre mayúsculas y minúsculas, o EXACTA cuando las mayúsculas y minúsculas importan.
Operador de igualdad que no distingue entre mayúsculas y minúsculas: =A1=B1
- Devuelve "VERDADERO" si los valores coinciden (ignorando mayúsculas/minúsculas), "FALSO" en caso contrario.
- Ejemplo: "Manzana" vs "manzana" → VERDADERO.
Función EXACTA que distingue entre mayúsculas y minúsculas: =EXACTO(A1, B1)
- Devuelve "VERDADERO" solo si los valores son idénticos (incluyendo mayúsculas/minúsculas).
- Ejemplo: "Manzana" vs "manzana" → FALSO.
Artículo relacionado: Cómo eliminar filas duplicadas de Excel - 6 formas sencillas
2.2 Función SI (Etiquetas de resultado personalizadas)
La función SI le permite reemplazar VERDADERO/FALSO con etiquetas personalizadas como "Coincidencia" o "Diferencia", lo que hace que sus resultados sean más fáciles de interpretar. Incluso puede agregar detalles sobre las diferencias.
Fórmula de ejemplo: =SI(A1=B1, "Coincidencia", "Diferencia")
Variaciones para diferentes escenarios:
| Escenario | Fórmula |
|---|---|
| Mostrar solo diferencias (en blanco si coincide) | =SI(A1<>B1, "Diferencia", "") |
| Indicador numérico (0 = coincide, 1 = no coincide) | =SI(A1=B1, 0, 1) |
| Incluir valores de celda en el mensaje | =SI(A1=B1, "Coincidencia", "Diferencia: " &A1& " vs " &B1) |
| Distinguir mayúsculas/minúsculas con etiqueta personalizada | =SI(EXACTO(A1,B1), "Coincidencia exacta", "Diferencia de mayúsculas o valor") |
¿Por qué usar SI en lugar de =?
- Puede filtrar por "Coincidencia" / "Diferencia".
- Puede combinar con otras funciones para crear informes más enriquecidos.
- Los usuarios no técnicos entienden mejor las palabras que VERDADERO/FALSO.
2.3 Función BUSCARV (Encontrar coincidencias entre columnas)
BUSCARV es la herramienta ideal para comparar columnas con datos desordenados (por ejemplo, encontrar un ID de cliente en la Columna A que exista en la Columna B, incluso si las filas no están alineadas).
Busca un valor específico en una columna y devuelve un valor correspondiente (o un error) si se encuentra una coincidencia, lo que la hace perfecta para encontrar valores faltantes entre columnas.
Comparar dos columnas en Excel usando BUSCARV:
- En una columna vacía (por ejemplo, Columna C), ingrese la fórmula: =BUSCARV(A1, B:B, 1, FALSO).
- Desglose de la fórmula:
- A1 – el valor buscado (lo que está buscando).
- B:B – la columna donde buscar (Columna B).
- 1 – índice de columna (dado que B:B tiene solo una columna, devuelve esa columna).
- FALSO – coincidencia exacta (crítico; VERDADERO daría coincidencias aproximadas).
- Presione Enter. Excel devolverá el valor de la Columna B si coincide con A1, o #N/A si no se encuentra ninguna coincidencia.
- Arrastre el controlador de relleno hacia abajo para aplicar la fórmula.
Para reemplazar #N/A con una etiqueta personalizada (por ejemplo, "Sin coincidencia"), envuelva la fórmula en SI.ERROR: =SI.ERROR(BUSCARV(A1, B:B, 1, FALSO), "Sin coincidencia").
Limitación: BUSCARV solo busca de izquierda a derecha. Para buscar valores en cualquier dirección, use INDICE/COINCIDIR (compatible con todas las versiones de Excel) o, si tiene Excel 2021 o Microsoft 365, la función más intuitiva BUSCARX.
3. Métodos avanzados para comparar columnas en Excel
Estos métodos son para usuarios avanzados que trabajan con conjuntos de datos masivos o realizan comparaciones de columnas repetitivas. Cubrimos dos herramientas de automatización: Macros VBA (nativas de Excel) y Python (para datos ultra escalables).
3.1 Macro VBA (Automatización integrada de Excel)
VBA (Visual Basic for Applications) le permite escribir scripts que se ejecutan directamente dentro de Excel. Ideal para tareas diarias sin volver a ingresar fórmulas.
Código VBA para comparar dos columnas en Excel en busca de diferencias
Sub HighlightRowDifferences()
    Dim rng As Range
    Dim cellA As Range
    Dim lastRow As Long
    Dim ws As Worksheet

    Set ws = ActiveSheet
    lastRow = ws.Cells(ws.Rows.Count, "A").End(xlUp).Row
    Set rng = ws.Range("A1:A" & lastRow)

    For Each cellA In rng
        If cellA.Value <> cellA.Offset(0, 1).Value Then
            cellA.Interior.Color = RGB(255, 255, 0)      ' Amarillo
            cellA.Offset(0, 1).Interior.Color = RGB(255, 255, 0)
        End If
    Next cellA
End Sub
Cómo usar esta macro:
- Abra su libro de Excel y presione Alt + F11 para abrir el Editor de VBA.
- Vaya a Insertar → Módulo para crear un nuevo módulo.
- Pegue el código en la ventana del módulo en blanco (personalice las referencias de columna/rango según sea necesario).
- Presione F5 para ejecutar la macro.
Consejo adicional: Para que la comparación de columnas sea más precisa, puede usar la función "Texto en columnas" para dividir datos combinados de celdas (como nombres y códigos) en columnas separadas y estandarizar formatos de texto desordenados.
3.2 Python con Spire.XLS Gratis (Escalable y multiplataforma)
Para desarrolladores que necesitan integrar la comparación de columnas en un flujo de datos, Python con Spire.XLS Gratis es la opción más potente. Esta biblioteca gratuita puede leer, escribir y manipular archivos de Excel sin necesidad de tener Microsoft Excel instalado.
Script completo de Python para comparar dos columnas:
from spire.xls import *
from spire.xls.common import *

# Crear un objeto de libro de trabajo
workbook = Workbook()
workbook.LoadFromFile("Test.xlsx")

# Obtener la primera hoja de trabajo
sheet = workbook.Worksheets[0]

# Obtener el rango de datos (asumir que la fila 1 es el encabezado, los datos comienzan desde la fila 2)
start_row = 2
end_row = sheet.LastRow

for row in range(start_row, end_row + 1):
    cell_a = sheet.Range[row, 1]
    cell_b = sheet.Range[row, 2]

    # Obtener valores (manejar valores nulos)
    val_a = cell_a.Value if cell_a.Value is not None else ""
    val_b = cell_b.Value if cell_b.Value is not None else ""

    # Comparar valores
    if val_a == val_b:
        sheet.Range[row, 3].Text = "Coincidencia"
    else:
        sheet.Range[row, 3].Text = "Diferencia"

        # Resaltar celdas diferentes
        cell_a.Style.Color = Color.get_Yellow()
        cell_b.Style.Color = Color.get_Yellow()

# Guardar el archivo de resultado
workbook.SaveToFile("compared.xlsx", ExcelVersion.Version2016)
workbook.Dispose()
El código carga un archivo de Excel, compara dos columnas, etiqueta los resultados como "Coincidencia" o "Diferencia", resalta las diferencias en amarillo y guarda un nuevo archivo de salida.
Después de agregar una columna de "Coincidencia / Diferencia", puede insertar una tabla dinámica para contar instantáneamente cuántas filas coincidieron o difirieron, transformando una simple comparación de columnas en un informe de datos intuitivo.
Hoja de trucos para el método de comparación de columnas en Excel
¿No está seguro de qué método usar? Consulte esta hoja de trucos rápida:
| Método | Ideal para | Nivel de habilidad | Pros | Contras |
|---|---|---|---|---|
| Formato Condicional | Verificaciones visuales, conjuntos de datos pequeños | Principiante | Rápido, sin fórmulas, fácil de detectar diferencias | Sin resultados escritos, no para conjuntos de datos grandes |
| Operador de Igualdad y EXACTA | Comparación fila por fila que no distingue entre mayúsculas y minúsculas o que distingue entre mayúsculas y minúsculas | Principiante | Fórmula rápida y simple | Solo salida básica, sin etiquetas personalizadas |
| Función SI | Etiquetas de resultado personalizadas | Intermedio | Fácil de interpretar, flexible | Requiere configuración de fórmula |
| BUSCARV | Datos desordenados, encontrar coincidencias | Intermedio | Funciona con datos desordenados | Solo busca de izquierda a derecha |
| Macro VBA | Automatización, comparaciones entre hojas | Avanzado | Ahorra tiempo en tareas repetitivas | Requiere conocimiento de VBA |
| Python | Procesamiento por lotes multiplataforma, no requiere Excel | Avanzado | Escalable, compatible con servidores y automatización completa | Requiere conocimiento de Python |
Resumen
Comparar dos columnas en Excel no tiene por qué ser una tarea tediosa y manual. El método correcto depende del tamaño de su conjunto de datos, su nivel de habilidad y si necesita verificaciones visuales, resultados escritos o automatización.
Para principiantes, comience con Formato Condicional (visual) o el operador de igualdad (VERDADERO/FALSO rápido). Para conjuntos de datos más grandes o datos desordenados, use SI o BUSCARV para obtener resultados personalizados y legibles. Para tareas repetitivas o conjuntos de datos masivos, automatice el proceso con una Macro VBA (nativa de Excel) o Python (escalable).
Al dominar estos 7 métodos, optimizará su flujo de trabajo de datos, eliminará errores manuales y convertirá Excel en una herramienta poderosa para la validación y limpieza de datos.
Preguntas frecuentes
P1: ¿Cómo comparo dos columnas y muestro las diferencias en una tercera hoja?
Use la función SI o una macro VBA. Para una solución simple: Cree una nueva hoja (por ejemplo, Hoja3), ingrese =SI(Hoja1!A1=Hoja2!A1, "", "Diferencia") en la primera celda y arrastre el controlador de relleno hacia abajo.
P2: ¿Puedo comparar más de dos columnas a la vez?
Sí. Para la comparación fila por fila de tres columnas (A, B, C):
- Fórmula de Formato condicional: =O($A1<>$B1, $B1<>$C1) para resaltar cualquier discrepancia.
- Fórmula: =SI(Y(A1=B1, B1=C1), "Todas coinciden", "No coincide")
- VBA: recorra las columnas A, B, C y compare cada una.
- Python: extienda la comparación para verificar todas las columnas requeridas.
P3: ¿Puedo reutilizar la macro VBA en diferentes libros de trabajo?
Sí. Copie el código de la macro y péguelo en un nuevo módulo. Ajuste las letras de las columnas en el código para que coincidan con su nuevo rango de datos.
P4. ¿Cómo puedo comparar dos columnas sin abrir Excel en absoluto?
Use Python con Spire.XLS Gratis. El script puede leer el archivo de Excel desde el disco, realizar la comparación y guardar el resultado, todo sin iniciar la aplicación Excel. Esto es ideal para procesamiento por lotes automatizado o del lado del servidor.
Ver también
Zwei Spalten in Excel vergleichen – 7 einfache Methoden
Inhaltsverzeichnis
Spalten in Excel zu vergleichen ist eine grundlegende, wertvolle Fähigkeit für Datenanalysten, Buchhalter, Vermarkter und alle Geschäftsleute, die mit Tabellenkalkulationen arbeiten. Ob Sie Finanzrechnungen abgleichen, doppelte Kundendatensätze bereinigen, Lager-SKUs abgleichen oder Umfragedaten validieren, die Beherrschung effizienter Spaltenvergleichstechniken erspart Ihnen stundenlange manuelle Arbeit.
Doch trotz der Häufigkeit dieser Aufgabe verlassen sich viele Excel-Benutzer auf langsame, fehleranfällige Methoden wie das zeilenweise Scannen, wiederholtes Verwenden des Filter ड्रॉपdowns oder sogar das Drucken zweier Listen und das Markieren mit einem Stift. Diese Ansätze verschwenden nicht nur Zeit, sondern erhöhen auch das Risiko, kritische Abweichungen oder Duplikate zu übersehen.
Genau deshalb gibt es diesen Leitfaden. Sie lernen, wie Sie zwei Spalten in Excel vergleichen, indem Sie 7 bewährte Methoden anwenden – von anfängerfreundlichen visuellen Prüfungen bis hin zu fortgeschrittener Automatisierung mit VBA und Python.
- Warum Spalten in Excel vergleichen?
- 1. Bedingte Formatierung (Übereinstimmungen/Unterschiede hervorheben)
- 2. Excel-Formel zum Vergleichen zweier Spalten
- 3. Erweiterte Methoden zum Vergleichen von Spalten in Excel
- Spaltenvergleichsmethoden in Excel – Spickzettel
- Häufig gestellte Fragen
Warum Spalten in Excel vergleichen?
Hier sind die häufigsten realen Anwendungsfälle für den Vergleich von Excel-Spalten:
- Datenabgleich: Überprüfen Sie, ob zwei Datensätze (z. B. ein Verkaufsbericht und ein Zahlungslogbuch) übereinstimmen.
- Duplikaterkennung: Finden Sie doppelte Werte über Spalten hinweg (z. B. doppelte Kunden-IDs oder E-Mail-Adressen).
- Identifizierung von Unterschieden: Erkennen Sie Abweichungen zwischen zwei Versionen derselben Daten.
- Datenvalidierung: Stellen Sie die Konsistenz bei der Dateneingabe sicher (z. B. Überprüfung, ob Produktcodes in einer Spalte mit einer Masterliste übereinstimmen).
- Zusammenführen von Datensätzen: Bereiten Sie Daten für das Zusammenführen vor, indem Sie übereinstimmende oder eindeutige Werte über Spalten hinweg identifizieren.
Unabhängig von Ihrem Anwendungsfall bietet Excel eine Methode, die auf Ihr Fähigkeitsniveau und Ihre Datengröße zugeschnitten ist. Wir beginnen mit den einfachsten Methoden (ideal für Anfänger) und gehen zu fortgeschrittenen Techniken (für Power-User) über.
1. Bedingte Formatierung (Übereinstimmungen/Unterschiede hervorheben)
Die bedingte Formatierung ist der schnellste Weg, um 2 Spalten in Excel visuell zu vergleichen. Sie hebt Übereinstimmungen oder Unterschiede mit Farben hervor, wodurch Abweichungen auf einen Blick leicht erkennbar sind.
Am besten geeignet für: Schnelle visuelle Identifizierung ohne Formeln.
Verwendung der bedingten Formatierung:
- Wählen Sie die beiden zu vergleichenden Spalten aus (z. B. Spalte A und Spalte B).
- Gehen Sie zur Registerkarte Start im Excel-Menüband.
- Klicken Sie auf Bedingte Formatierung → Regeln zum Hervorheben von Zellen → Doppelte Werte.
- Wählen Sie im Pop-up-Fenster:
- Wählen Sie Duplikat, um übereinstimmende Werte hervorzuheben.
- Wählen Sie Eindeutig, um Unterschiede hervorzuheben.
- Wählen Sie ein Farbschema und klicken Sie auf OK.
Beispielergebnis: Alle übereinstimmenden Zellen werden hellrot gefärbt; Unterschiede bleiben farblos.
Nachdem Sie die bedingte Formatierung zum Hervorheben übereinstimmender oder eindeutiger Werte zwischen zwei Spalten gemeistert haben, können Sie dieselbe visuelle Logik erweitern, um Datentrends zu identifizieren – zum Beispiel, indem Sie Datenbalken anwenden, um Verkaufszahlen über zwei Regionen hinweg zu vergleichen.
2. Excel-Formel zum Vergleichen zweier Spalten
Formelbasierte Methoden geben Ihnen die volle Kontrolle über die Vergleichsergebnisse. Sie können WAHR/FALSCH, benutzerdefinierte Texte ("Übereinstimmung" / "Unterschied") zurückgeben oder sogar übereinstimmende Werte aus einer anderen Spalte abrufen.
2.1 Gleichheitsoperator (=) & EXACT-Funktion
Diese beiden Methoden sind die Grundlage des zeilenweisen Vergleichs. Beide vergleichen 2 Excel-Zellen in derselben Zeile, unterscheiden sich jedoch in der Behandlung von Groß- und Kleinschreibung. Verwenden Sie den Gleichheitsoperator (=) für nicht-fallbezogene Prüfungen oder EXACT, wenn die Groß-/Kleinschreibung wichtig ist.
Nicht-fallbezogener Gleichheitsoperator: =A1=B1
- Gibt "WAHR" zurück, wenn Werte übereinstimmen (Groß-/Kleinschreibung wird ignoriert), andernfalls "FALSCH".
- Beispiel: "Apfel" vs. "apfel" → WAHR.
Fallbezogene EXACT-Funktion: =EXACT(A1, B1)
- Gibt nur dann "WAHR" zurück, wenn die Werte identisch sind (einschließlich Groß-/Kleinschreibung).
- Beispiel: "Apfel" vs. "apfel" → FALSCH.
Verwandter Artikel: So entfernen Sie doppelte Zeilen aus Excel – 6 einfache Wege
2.2 WENN-Funktion (Benutzerdefinierte Ergebnisbeschriftungen)
Die WENN-Funktion ermöglicht es Ihnen, WAHR/FALSCH durch benutzerdefinierte Beschriftungen wie "Übereinstimmung" oder "Unterschied" zu ersetzen, wodurch Ihre Ergebnisse leichter zu interpretieren sind. Sie können sogar Details zu den Unterschieden hinzufügen.
Beispielformel: =WENN(A1=B1, "Übereinstimmung", "Unterschied")
Variationen für verschiedene Szenarien:
| Szenario | Formel |
|---|---|
| Nur Unterschiede anzeigen (leer, wenn übereinstimmend) | =WENN(A1<>B1, "Unterschied", "") |
| Numerischer Flag (0 = Übereinstimmung, 1 = Nichtübereinstimmung) | =WENN(A1=B1, 0, 1) |
| Zellwerte in die Nachricht einbeziehen | =WENN(A1=B1, "Übereinstimmung", "Unterschied: "&A1&" vs "&B1) |
| Fallbezogen mit benutzerdefinierter Beschriftung | =WENN(EXACT(A1,B1), "Exakte Übereinstimmung", "Fall oder Wert unterscheidet sich") |
Warum WENN anstelle von = verwenden?
- Sie können nach "Übereinstimmung" / "Unterschied" filtern.
- Sie können mit anderen Funktionen kombinieren, um aussagekräftigere Berichte zu erstellen.
- Nicht-technische Benutzer verstehen Wörter besser als WAHR/FALSCH.
2.3 SVERWEIS-Funktion (Übereinstimmungen über Spalten hinweg finden)
SVERWEIS ist das Standardwerkzeug für den Vergleich von Spalten mit unsortierten Daten (z. B. eine Kunden-ID in Spalte A finden, die in Spalte B vorhanden ist, auch wenn die Zeilen nicht übereinstimmen).
Es sucht nach einem bestimmten Wert in einer Spalte und gibt einen entsprechenden Wert (oder einen Fehler) zurück, wenn eine Übereinstimmung gefunden wird, was es perfekt für die Suche nach fehlenden Werten über Spalten hinweg macht.
Zwei Spalten in Excel mit SVERWEIS vergleichen:
- Geben Sie in einer leeren Spalte (z. B. Spalte C) die Formel ein: =SVERWEIS(A1; B:B; 1; FALSCH).
- Aufschlüsselung der Formel:
- A1 – der Suchwert (wonach Sie suchen).
- B:B – die zu durchsuchende Spalte (Spalte B).
- 1 – Spaltenindex (da B:B nur eine Spalte hat, geben Sie diese Spalte zurück).
- FALSCH – exakte Übereinstimmung (entscheidend; WAHR würde ungefähre Übereinstimmungen ergeben).
- Drücken Sie die Eingabetaste. Excel gibt den Wert aus Spalte B zurück, wenn er mit A1 übereinstimmt, oder #NV, wenn keine Übereinstimmung gefunden wird.
- Ziehen Sie das Ausfüllkästchen nach unten, um die Formel anzuwenden.
Um #NV durch eine benutzerdefinierte Beschriftung (z. B. "Keine Übereinstimmung") zu ersetzen, umschließen Sie die Formel mit FEHLER: =FEHLER(SVERWEIS(A1; B:B; 1; FALSCH); "Keine Übereinstimmung").
Einschränkung: SVERWEIS sucht nur von links nach rechts. Um Werte in beliebiger Richtung nachzuschlagen, verwenden Sie INDEX/VERGLEICH (kompatibel mit allen Excel-Versionen) oder, wenn Sie Excel 2021 oder Microsoft 365 haben, die intuitivere XVERWEIS-Funktion.
3. Erweiterte Methoden zum Vergleichen von Spalten in Excel
Diese Methoden sind für Power-User gedacht, die mit riesigen Datensätzen arbeiten oder wiederkehrende Spaltenvergleiche durchführen. Wir behandeln zwei Automatisierungstools: VBA-Makros (Excel-nativ) und Python (für extrem skalierbare Daten).
3.1 VBA-Makro (Integrierte Excel-Automatisierung)
VBA (Visual Basic for Applications) ermöglicht es Ihnen, Skripte zu schreiben, die direkt in Excel ausgeführt werden. Ideal für tägliche Aufgaben, ohne Formeln neu eingeben zu müssen.
VBA-Code zum Vergleichen zweier Spalten in Excel auf Unterschiede
Sub HighlightRowDifferences()
    Dim rng As Range
    Dim cellA As Range
    Dim lastRow As Long
    Dim ws As Worksheet

    Set ws = ActiveSheet
    lastRow = ws.Cells(ws.Rows.Count, "A").End(xlUp).Row
    Set rng = ws.Range("A1:A" & lastRow)

    For Each cellA In rng
        If cellA.Value <> cellA.Offset(0, 1).Value Then
            cellA.Interior.Color = RGB(255, 255, 0)      ' Gelb
            cellA.Offset(0, 1).Interior.Color = RGB(255, 255, 0)
        End If
    Next cellA
End Sub
Verwendung dieses Makros:
- Öffnen Sie Ihre Excel-Arbeitsmappe und drücken Sie Alt + F11, um den VBA-Editor zu öffnen.
- Gehen Sie zu Einfügen → Modul, um ein neues Modul zu erstellen.
- Fügen Sie den Code in das leere Modulfenster ein (passen Sie Spalten-/Bereichsreferenzen nach Bedarf an).
- Drücken Sie F5, um das Makro auszuführen.
Zusatztipp: Um den Spaltenvergleich genauer zu gestalten, können Sie die Funktion "Text in Spalten" verwenden, um kombinierte Zellendaten (wie Namen und Codes) in separate Spalten aufzuteilen und unordentliche Textformate zu standardisieren.
3.2 Python mit kostenlosem Spire.XLS (Skalierbar & plattformübergreifend)
Für Entwickler, die den Spaltenvergleich in eine Datenpipeline integrieren müssen, ist Python mit kostenlosem Spire.XLS die leistungsstärkste Option. Diese kostenlose Bibliothek kann Excel-Dateien lesen, schreiben und bearbeiten, ohne dass Microsoft Excel installiert sein muss.
Vollständiges Python-Skript zum Vergleichen zweier Spalten:
from spire.xls import *
from spire.xls.common import *

# Erstellen Sie ein Arbeitsmappenobjekt
workbook = Workbook()
workbook.LoadFromFile("Test.xlsx")

# Holen Sie sich das erste Arbeitsblatt
sheet = workbook.Worksheets[0]

# Datenbereich abrufen (angenommen, Zeile 1 ist die Kopfzeile, Daten beginnen ab Zeile 2)
start_row = 2
end_row = sheet.LastRow

for row in range(start_row, end_row + 1):
    cell_a = sheet.Range[row, 1]
    cell_b = sheet.Range[row, 2]

    # Werte abrufen (Nullwerte behandeln)
    val_a = cell_a.Value if cell_a.Value is not None else ""
    val_b = cell_b.Value if cell_b.Value is not None else ""

    # Werte vergleichen
    if val_a == val_b:
        sheet.Range[row, 3].Text = "Übereinstimmung"
    else:
        sheet.Range[row, 3].Text = "Unterschied"

        # Unterschiedliche Zellen hervorheben
        cell_a.Style.Color = Color.get_Yellow()
        cell_b.Style.Color = Color.get_Yellow()

# Ergebnisdatei speichern
workbook.SaveToFile("compared.xlsx", ExcelVersion.Version2016)
workbook.Dispose()
Der Code lädt eine Excel-Datei, vergleicht zwei Spalten, kennzeichnet die Ergebnisse als "Übereinstimmung" oder "Unterschied", hebt Unterschiede gelb hervor und speichert eine neue Ausgabedatei.
Nachdem Sie eine Spalte "Übereinstimmung / Unterschied" hinzugefügt haben, können Sie eine PivotTable einfügen, um sofort zu zählen, wie viele Zeilen übereinstimmten oder abwichen, und so einen einfachen Spaltenvergleich in eine intuitive Datenberichterstattung umwandeln.
Spaltenvergleichsmethoden in Excel – Spickzettel
Sie sind sich nicht sicher, welche Methode Sie verwenden sollen? Sehen Sie sich diesen schnellen Spickzettel an:
| Methode | Am besten geeignet für | Fähigkeitsniveau | Vorteile | Nachteile |
|---|---|---|---|---|
| Bedingte Formatierung | Visuelle Prüfungen, kleine Datensätze | Anfänger | Schnell, keine Formeln, leicht erkennbare Unterschiede | Keine schriftlichen Ergebnisse, nicht für große Datensätze |
| Gleichheitsoperator & EXACT | Zeilenweiser nicht-fallbezogener oder fallbezogener Vergleich | Anfänger | Schnelle und einfache Formel | Nur grundlegende Ausgabe, keine benutzerdefinierten Beschriftungen |
| WENN-Funktion | Benutzerdefinierte Ergebnisbeschriftungen | Fortgeschritten | Leicht zu interpretieren, flexibel | Erfordert Formeleinrichtung |
| SVERWEIS | Unsortierte Daten, Finden von Übereinstimmungen | Fortgeschritten | Funktioniert mit unsortierten Daten | Sucht nur von links nach rechts |
| VBA-Makro | Automatisierung, spaltenübergreifende Vergleiche | Experte | Spart Zeit bei wiederkehrenden Aufgaben | Erfordert VBA-Kenntnisse |
| Python | Plattformübergreifende Stapelverarbeitung, kein Excel erforderlich | Experte | Skalierbar, serverfreundlich und vollautomatisch | Erfordert Python-Kenntnisse |
Zusammenfassung
Zwei Spalten in Excel zu vergleichen muss keine mühsame, manuelle Aufgabe sein. Die richtige Methode hängt von der Größe Ihres Datensatzes, Ihrem Fähigkeitsniveau und davon ab, ob Sie visuelle Prüfungen, schriftliche Ergebnisse oder Automatisierung benötigen.
Für Anfänger beginnen Sie mit der bedingten Formatierung (visuell) oder dem Gleichheitsoperator (schnelles WAHR/FALSCH). Für größere Datensätze oder unsortierte Daten verwenden Sie WENN oder SVERWEIS für benutzerdefinierte, lesbare Ergebnisse. Für wiederkehrende Aufgaben oder riesige Datensätze automatisieren Sie den Prozess mit einem VBA-Makro (Excel-nativ) oder Python (skalierbar).
Durch die Beherrschung dieser 7 Methoden optimieren Sie Ihren Daten-Workflow, eliminieren manuelle Fehler und verwandeln Excel in ein leistungsstarkes Werkzeug für Datenvalidierung und -bereinigung.
Häufig gestellte Fragen
F1: Wie vergleiche ich zwei Spalten und zeige Unterschiede in einem dritten Blatt an?
Verwenden Sie die WENN-Funktion oder ein VBA-Makro. Für eine einfache Lösung: Erstellen Sie ein neues Blatt (z. B. Blatt3), geben Sie =WENN(Blatt1!A1=Blatt2!A1; ""; "Unterschied") in die erste Zelle ein und ziehen Sie das Ausfüllkästchen nach unten.
F2: Kann ich mehr als zwei Spalten gleichzeitig vergleichen?
Ja. Für einen zeilenweisen Vergleich von drei Spalten (A, B, C):
- Bedingte Formatierung-Formel: =ODER($A1<>$B1; $B1<>$C1), um jede Nichtübereinstimmung hervorzuheben.
- Formel: =WENN(UND(A1=B1; B1=C1); "Alle übereinstimmend"; "Nichtübereinstimmung")
- VBA: Schleife durch die Spalten A, B, C und vergleichen Sie jede.
- Python: Erweitern Sie den Vergleich, um alle erforderlichen Spalten zu prüfen.
F3: Kann ich das VBA-Makro auf verschiedenen Arbeitsmappen wiederverwenden?
Ja. Kopieren Sie den Makrocode und fügen Sie ihn in ein neues Modul ein. Passen Sie die Spaltenbuchstaben im Code an Ihren neuen Datenbereich an.
F4. Wie kann ich zwei Spalten vergleichen, ohne Excel überhaupt zu öffnen?
Verwenden Sie Python mit kostenlosem Spire.XLS. Das Skript kann die Excel-Datei von der Festplatte lesen, den Vergleich durchführen und das Ergebnis speichern – alles, ohne die Excel-Anwendung zu starten. Dies ist ideal für serverseitige oder automatisierte Stapelverarbeitung.
Siehe auch
Как сравнить два столбца в Excel – 7 простых способов
Содержание
Сравнение столбцов в Excel — это фундаментальный, высокоценный навык для аналитиков данных, бухгалтеров, маркетологов и всех бизнес-профессионалов, работающих с электронными таблицами. Будь то сверка финансовых счетов, очистка дублирующихся записей клиентов, сопоставление артикулов инвентаря или проверка данных опросов, освоение эффективных методов сравнения столбцов устраняет часы ручной работы.
Однако, несмотря на распространенность этой задачи, многие пользователи Excel полагаются на медленные, подверженные ошибкам методы, такие как сканирование построчно, многократное использование раскрывающегося списка фильтра или даже печать двух списков и их ручная маркировка. Эти подходы не только тратят время, но и увеличивают риск упустить критические несоответствия или дубликаты.
Именно поэтому существует это руководство. Вы узнаете, как сравнивать два столбца в Excel, используя 7 проверенных методов — от простых визуальных проверок для начинающих до продвинутой автоматизации с помощью VBA и Python.
- Зачем сравнивать столбцы в Excel?
- 1. Условное форматирование (выделение совпадений/различий)
- 2. Формула Excel для сравнения двух столбцов
- 3. Продвинутые методы сравнения столбцов в Excel
- Справочник по методам сравнения столбцов в Excel
- Часто задаваемые вопросы
Зачем сравнивать столбцы в Excel?
Вот наиболее распространенные реальные сценарии использования для сравнения столбцов Excel:
- Сверка данных: Проверка соответствия двух наборов данных (например, отчета о продажах и журнала платежей).
- Обнаружение дубликатов: Поиск дублирующихся значений в столбцах (например, дублирующихся идентификаторов клиентов или адресов электронной почты).
- Идентификация различий: Выявление несоответствий между двумя версиями одних и тех же данных.
- Проверка данных: Обеспечение единообразия ввода данных (например, проверка соответствия кодов продуктов в одном столбце основному списку).
- Объединение наборов данных: Подготовка данных для объединения путем выявления общих или уникальных значений в столбцах.
Независимо от вашего сценария, Excel предлагает метод, соответствующий вашему уровню навыков и размеру данных. Мы начнем с самых простых методов (отлично подходит для начинающих) и перейдем к продвинутым техникам (для опытных пользователей).
1. Условное форматирование (выделение совпадений/различий)
Условное форматирование — это самый быстрый способ визуально сравнить 2 столбца в Excel. Оно выделяет совпадения или различия цветами, делая несоответствия легко заметными с первого взгляда.
Лучше всего подходит для: Быстрого визуального определения без написания формул.
Как использовать условное форматирование:
- Выделите два столбца, которые вы хотите сравнить (например, столбец A и столбец B).
- Перейдите на вкладку Главная в ленте Excel.
- Нажмите Условное форматирование → Правила выделения ячеек → Повторяющиеся значения.
- В появившемся окне:
- Выберите Повторяющиеся, чтобы выделить совпадающие значения.
- Выберите Уникальные, чтобы выделить различия.
- Выберите цветовую схему и нажмите ОК.
Пример результата: Все совпадающие ячейки становятся светло-красными; различия остаются без цвета.
После того как вы освоите использование условного форматирования для выделения совпадающих или уникальных значений между двумя столбцами, вы можете применить ту же визуальную логику для выявления тенденций в данных — например, применить гистограммы для сравнения объемов продаж по двум регионам.
2. Формула Excel для сравнения двух столбцов
Методы, основанные на формулах, дают вам полный контроль над результатом сравнения. Вы можете получить TRUE/FALSE, пользовательский текст («Совпадение» / «Различие») или даже извлечь совпадающие значения из другого столбца.
2.1 Оператор равенства (=) и функция EXACT
Эти два метода являются основой построчного сравнения. Оба сравнивают 2 ячейки Excel в одной строке, но отличаются тем, как они обрабатывают регистр букв. Используйте оператор равенства (=) для сравнения без учета регистра или функцию EXACT, когда регистр букв имеет значение.
Оператор равенства без учета регистра: =A1=B1
- Возвращает «TRUE», если значения совпадают (без учета регистра), иначе — «FALSE».
- Пример: «Яблоко» против «яблоко» → TRUE.
Функция EXACT с учетом регистра: =EXACT(A1, B1)
- Возвращает «TRUE» только в том случае, если значения идентичны (включая регистр).
- Пример: «Яблоко» против «яблоко» → FALSE.
Связанная статья: Как удалить повторяющиеся строки из Excel — 6 простых способов
2.2 Функция IF (Пользовательские метки результата)
Функция IF позволяет заменить TRUE/FALSE на пользовательские метки, такие как «Совпадение» или «Различие», что делает ваши результаты более понятными. Вы даже можете добавить детали о различиях.
Пример формулы: =IF(A1=B1, «Совпадение», «Различие»)
Варианты для различных сценариев:
| Сценарий | Формула |
|---|---|
| Показывать только различия (пусто, если совпадение) | =IF(A1<>B1, «Различие», «») |
| Числовой флаг (0 = совпадение, 1 = несоответствие) | =IF(A1=B1, 0, 1) |
| Включить значения ячеек в сообщение | =IF(A1=B1, «Совпадение», «Несоответствие: «&A1&« против «&B1) |
| С учетом регистра с пользовательской меткой | =IF(EXACT(A1,B1), «Точное совпадение», «Регистр или значение отличается») |
Почему использовать IF вместо =?
- Вы можете фильтровать по «Совпадение» / «Различие».
- Вы можете комбинировать с другими функциями для создания более подробных отчетов.
- Нетехнические пользователи лучше понимают слова, чем TRUE/FALSE.
2.3 Функция VLOOKUP (Поиск совпадений между столбцами)
VLOOKUP — это основной инструмент для сравнения столбцов с неупорядоченными данными (например, поиск идентификатора клиента в столбце A, который существует в столбце B, даже если строки не совпадают).
Он ищет определенное значение в одном столбце и возвращает соответствующее значение (или ошибку), если совпадение найдено, что делает его идеальным для поиска отсутствующих значений в столбцах.
Сравнение двух столбцов в Excel с помощью VLOOKUP:
- В пустом столбце (например, столбец C) введите формулу: =VLOOKUP(A1, B:B, 1, FALSE).
- Разбор формулы:
- A1 – искомое значение (то, что вы ищете).
- B:B – столбец для поиска (столбец B).
- 1 – индекс столбца (поскольку B:B состоит только из одного столбца, возвращаем этот столбец).
- FALSE – точное совпадение (критически важно; TRUE даст приблизительные совпадения).
- Нажмите Enter. Excel вернет значение из столбца B, если оно совпадает с A1, или #N/A, если совпадение не найдено.
- Перетащите маркер заполнения вниз, чтобы применить формулу.
Чтобы заменить #N/A на пользовательскую метку (например, «Нет совпадения»), заключите формулу в IFERROR: =IFERROR(VLOOKUP(A1, B:B, 1, FALSE), «Нет совпадения»).
Ограничение: VLOOKUP ищет только слева направо. Чтобы искать значения в любом направлении, используйте INDEX/MATCH (совместимо со всеми версиями Excel) или, если у вас есть Excel 2021 или Microsoft 365, более интуитивно понятную функцию XLOOKUP.
3. Продвинутые методы сравнения столбцов в Excel
Эти методы предназначены для опытных пользователей, работающих с огромными наборами данных или выполняющих повторяющиеся сравнения столбцов. Мы рассмотрим два инструмента автоматизации: макросы VBA (встроенные в Excel) и Python (для масштабируемых данных).
3.1 Макрос VBA (Встроенная автоматизация Excel)
VBA (Visual Basic for Applications) позволяет писать скрипты, которые выполняются непосредственно в Excel. Идеально подходит для ежедневных задач без повторного ввода формул.
Код VBA для сравнения двух столбцов в Excel на предмет различий
Sub HighlightRowDifferences()
    Dim rng As Range
    Dim cellA As Range
    Dim lastRow As Long
    Dim ws As Worksheet

    Set ws = ActiveSheet
    lastRow = ws.Cells(ws.Rows.Count, "A").End(xlUp).Row
    Set rng = ws.Range("A1:A" & lastRow)

    For Each cellA In rng
        If cellA.Value <> cellA.Offset(0, 1).Value Then
            cellA.Interior.Color = RGB(255, 255, 0)      ' Желтый
            cellA.Offset(0, 1).Interior.Color = RGB(255, 255, 0)
        End If
    Next cellA
End Sub
Как использовать этот макрос:
- Откройте книгу Excel и нажмите Alt + F11, чтобы открыть редактор VBA.
- Перейдите в Insert → Module, чтобы создать новый модуль.
- Вставьте код в пустое окно модуля (при необходимости настройте ссылки на столбцы/диапазоны).
- Нажмите F5, чтобы запустить макрос.
Дополнительный совет: Для более точного сравнения столбцов вы можете использовать функцию «Текст по столбцам», чтобы разделить объединенные данные ячеек (например, имена и коды) на отдельные столбцы и стандартизировать неформатные текстовые форматы.
3.2 Python с бесплатным Spire.XLS (Масштабируемый и кроссплатформенный)
Для разработчиков, которым необходимо интегрировать сравнение столбцов в конвейер обработки данных, Python с бесплатным Spire.XLS является наиболее мощным вариантом. Эта бесплатная библиотека может читать, записывать и манипулировать файлами Excel без необходимости установки Microsoft Excel.
Полный скрипт Python для сравнения двух столбцов:
from spire.xls import *
from spire.xls.common import *

# Создать объект рабочей книги
workbook = Workbook()
workbook.LoadFromFile("Test.xlsx")

# Получить первый лист
sheet = workbook.Worksheets[0]

# Получить диапазон данных (предполагаем, что строка 1 — заголовок, данные начинаются со строки 2)
start_row = 2
end_row = sheet.LastRow

for row in range(start_row, end_row + 1):
    cell_a = sheet.Range[row, 1]
    cell_b = sheet.Range[row, 2]

    # Получить значения (обработать пустые значения)
    val_a = cell_a.Value if cell_a.Value is not None else ""
    val_b = cell_b.Value if cell_b.Value is not None else ""

    # Сравнить значения
    if val_a == val_b:
        sheet.Range[row, 3].Text = "Совпадение"
    else:
        sheet.Range[row, 3].Text = "Различие"

        # Выделить отличающиеся ячейки
        cell_a.Style.Color = Color.get_Yellow()
        cell_b.Style.Color = Color.get_Yellow()

# Сохранить результирующий файл
workbook.SaveToFile("compared.xlsx", ExcelVersion.Version2016)
workbook.Dispose()
Код загружает файл Excel, сравнивает два столбца, маркирует результаты как «Совпадение» или «Различие», выделяет различия желтым цветом и сохраняет новый выходной файл.
После добавления столбца «Совпадение / Различие» вы можете вставить сводную таблицу, чтобы мгновенно подсчитать, сколько строк совпало или различалось, превратив простое сравнение столбцов в интуитивно понятный отчет о данных.
Справочник по методам сравнения столбцов в Excel
Не уверены, какой метод использовать? Обратитесь к этой краткой справочной таблице:
| Метод | Лучше всего подходит для | Уровень навыков | Преимущества | Недостатки |
|---|---|---|---|---|
| Условное форматирование | Визуальные проверки, небольшие наборы данных | Начинающий | Быстро, без формул, легко заметить различия | Нет письменных результатов, не подходит для больших наборов данных |
| Оператор равенства & EXACT | Построчное сравнение без учета регистра или с учетом регистра | Начинающий | Быстрая и простая формула | Только базовый вывод, нет пользовательских меток |
| Функция IF | Пользовательские метки результата | Средний | Легко интерпретировать, гибко | Требует настройки формулы |
| VLOOKUP | Неупорядоченные данные, поиск совпадений | Средний | Работает с неупорядоченными данными | Ищет только слева направо |
| Макрос VBA | Автоматизация, сравнение между листами | Продвинутый | Экономит время для повторяющихся задач | Требует знания VBA |
| Python | Кроссплатформенная пакетная обработка, Excel не требуется | Продвинутый | Масштабируемость, подходит для серверов и полная автоматизация | Требует знания Python |
Заключение
Сравнение двух столбцов в Excel не обязательно должно быть утомительной ручной задачей. Правильный метод зависит от размера вашего набора данных, уровня навыков и того, нужны ли вам визуальные проверки, письменные результаты или автоматизация.
Для начинающих начните с условного форматирования (визуальное) или оператора равенства (быстрое TRUE/FALSE). Для больших наборов данных или неупорядоченных данных используйте IF или VLOOKUP для получения пользовательских, читаемых результатов. Для повторяющихся задач или огромных наборов данных автоматизируйте процесс с помощью макроса VBA (встроенного в Excel) или Python (масштабируемого).
Освоив эти 7 методов, вы оптимизируете свой рабочий процесс обработки данных, устраните ручные ошибки и превратите Excel в мощный инструмент для проверки и очистки данных.
Часто задаваемые вопросы
В1: Как сравнить два столбца и показать различия на третьем листе?
Используйте функцию IF или макрос VBA. Для простого решения: создайте новый лист (например, Sheet3), введите =IF(Sheet1!A1=Sheet2!A1, «», «Различие») в первой ячейке и перетащите маркер заполнения вниз.
В2: Могу ли я сравнить более двух столбцов одновременно?
Да. Для построчного сравнения трех столбцов (A, B, C):
- Формула условного форматирования: =OR($A1<>$B1, $B1<>$C1) для выделения любого несоответствия.
- Формула: =IF(AND(A1=B1, B1=C1), «Все совпадает», «Несоответствие»)
- VBA: перебирайте столбцы A, B, C и сравнивайте каждый.
- Python: расширьте сравнение, чтобы проверить все необходимые столбцы.
В3: Могу ли я повторно использовать макрос VBA на разных рабочих книгах?
Да. Скопируйте код макроса и вставьте его в новый модуль. Измените буквы столбцов в коде, чтобы они соответствовали вашему новому диапазону данных.
В4. Как сравнить два столбца, не открывая Excel вообще?
Используйте Python с бесплатным Spire.XLS. Скрипт может считывать файл Excel с диска, выполнять сравнение и сохранять результат — все это без запуска приложения Excel. Это идеально подходит для серверной или автоматизированной пакетной обработки.
См. также
- Сортировка данных в Excel: объяснение 5 простых и продвинутых методов
- Как удалить повторяющиеся столбцы в Excel: 4 лучших способа
- Подсчет цветных ячеек в Excel: 3 простых способа (вручную/автоматизация)
- Python: Применение условного форматирования в Excel
- C#/VB.NET: Удаление повторяющихся строк в Excel
Remover comentários no Word (excluir todos os comentários ou comentários individuais)

Antes de compartilhar um documento do Word, você já se preocupou em deixar comentários ou alterações rastreadas visíveis? Antes de enviá-lo, você deve garantir que suas discussões internas e histórico de edição não estejam visíveis para o destinatário. Deixar observações não resolvidas pode parecer pouco profissional e até vazar informações confidenciais. Se você está procurando como remover comentários no Word para finalizar seu arquivo, o processo é simples, mas alguns detalhes podem ser facilmente ignorados. Se você precisa excluir uma única nota ou limpar um documento inteiro, os seguintes métodos garantirão que os documentos permaneçam polidos e profissionais.
- Remover Comentários Usando a Guia Revisão
- Document Inspector para Limpeza Profunda
- Lidando com Alterações Rastreadas
- Remover Todos os Comentários Automaticamente
- Perguntas Frequentes
Remover Comentários no Word Usando a Guia Revisão
A guia Revisão é o centro de colaboração de documentos, tornando-a o local mais eficiente para gerenciar comentários. Ela ajuda os usuários a adicionar ou excluir comentários de forma eficiente com uma interface intuitiva.
Método 1: Remover um Comentário por Clique com o Botão Direito
Esta é a abordagem mais rápida quando você só precisa abordar pontos específicos, deixando outros comentários intactos para discussão posterior.
- Passo 1. Localize o comentário em seu documento.
- Passo 2. Clique com o botão direito diretamente na caixa de comentário.
- Passo 3. Selecione Excluir Comentário no menu de contexto.
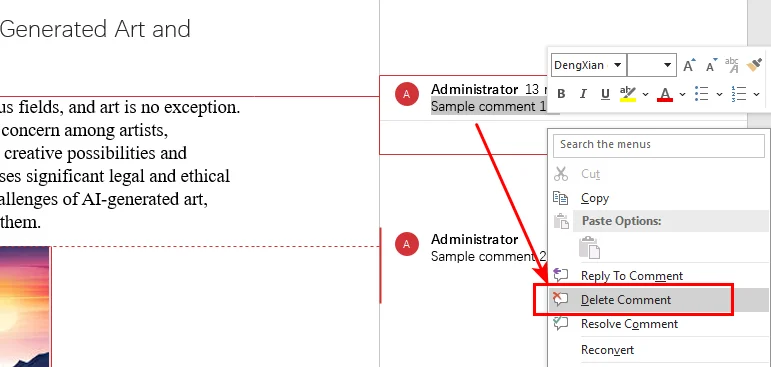
Observação: Pressionar Backspace ou Delete normalmente remove o texto dentro do comentário, não o comentário em si.
Método 2: Usar a Faixa de Opções Revisão para Exclusão Única ou em Massa
Para mais controle, ou quando você precisa saber como remover todos os comentários no Word instantaneamente, use as ferramentas especializadas na faixa de opções de navegação.
- Para remover um comentário específico:
- Passo 1. Clique dentro da caixa de comentário.
- Passo 2. Vá para a guia Revisão e clique no ícone Excluir.
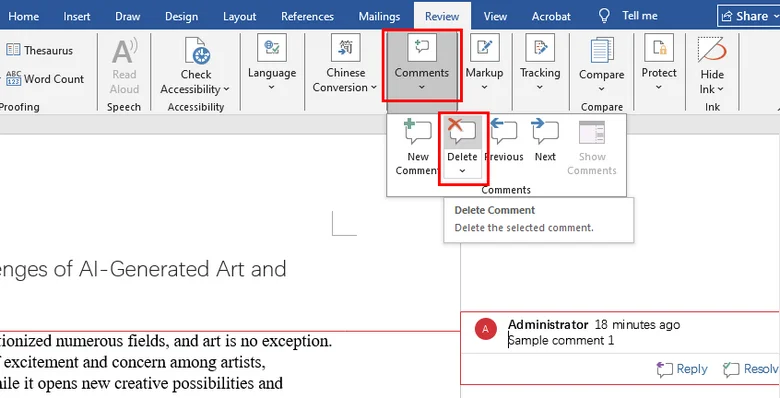
- Para remover todos os comentários de uma vez:
- Passo 1. Navegue até a guia Revisão no topo do Word.
- Passo 2. Encontre o grupo Comentários.
- Passo 3. Clique na seta suspensa abaixo do botão Excluir.
- Passo 4. Selecione Excluir Todos os Comentários do Documento.

O Método Document Inspector para Limpeza Profunda
Se você está preparando um contrato de alto risco ou um relatório público, você precisa de uma etapa extra de segurança. O Document Inspector é uma ferramenta avançada que verifica metadados ocultos que a exclusão manual pode não detectar.
Para excluir todos os comentários em um documento do Word e remover propriedades pessoais usando o Document Inspector:
- Passo 1. Clique em Arquivo > Informações.
- Passo 2. Selecione Verificar Problemas e, em seguida, clique em Inspecionar Documento.
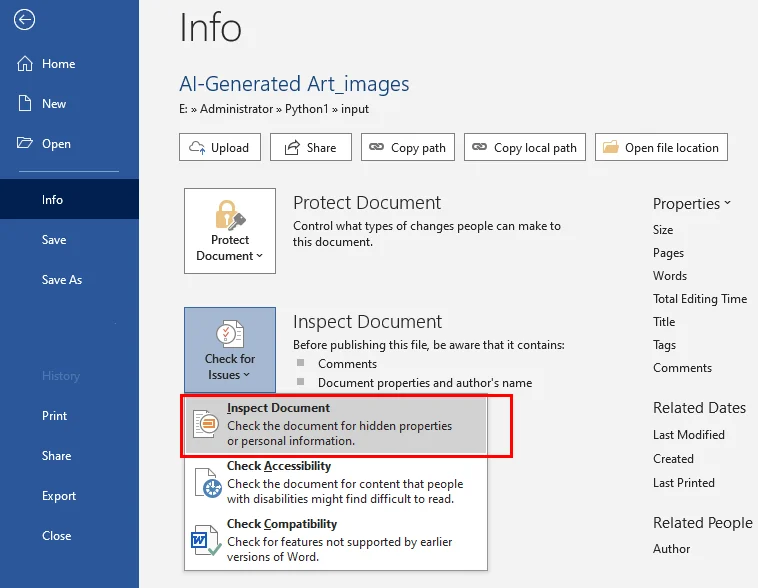
- Passo 3. Certifique-se de que Comentários, Revisões e Versões esteja marcado.
- Passo 4. Clique em Inspecionar e, em seguida, clique em Remover Tudo ao lado dos itens encontrados.
Dica: Além de remover comentários, você também pode precisar eliminar cabeçalhos no Word para criar um layout completamente limpo para seu relatório final.
Lidando com Alterações Rastreadas em Documentos do Word
Um erro comum ao remover comentários em um documento do Word é esquecer as linhas vermelhas ou as edições rastreadas. Se você excluir comentários, mas deixar as Alterações Rastreadas ativas, seu destinatário ainda verá cada exclusão e inserção, a menos que você aceite ou rejeite as alterações antes de compartilhar.
Aqui está o processo para parar de rastrear alterações em um documento do Word:
- Passo 1. Na guia Revisão, vá para a seção Rastreamento.
- Passo 2. Clique na seta em Aceitar.
- Passo 3. Escolha Aceitar Todas as Alterações e Parar de Rastrear.
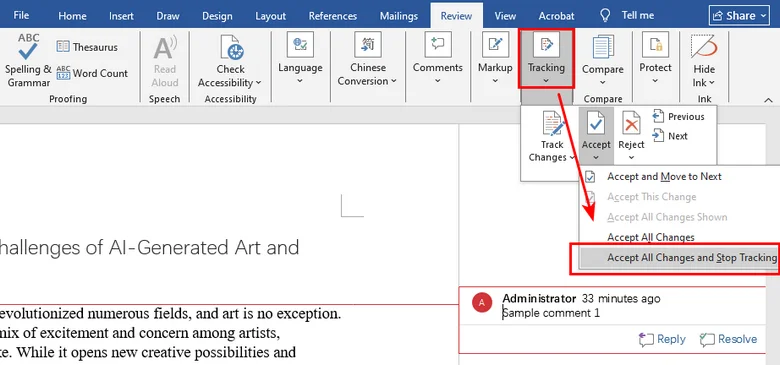
Uma vez feito isso, seu documento refletirá a versão final do texto sem nenhum histórico visível das modificações.
Remover Todos os Comentários em Documentos do Word Automaticamente
Para desenvolvedores ou equipes técnicas que gerenciam fluxos de trabalho de documentos em larga escala, operações manuais não são práticas. Você pode automatizar a remoção de comentários no Word usando Python ou VBA para garantir consistência entre os arquivos.
Opção A: Excluir Todos os Comentários Usando Python
Bibliotecas Python como Free Spire.Doc for Python permitem que você limpe comentários com algumas linhas de código. Esta biblioteca fornece um conjunto abrangente de APIs para criar, ler e editar documentos do Word sem exigir a instalação do Microsoft Word.

Abaixo está um exemplo de código Python para remover todos os comentários em um documento do Word:
from spire.doc import *
from spire.doc.common import *

# Create an object of Document class and load a Word document
doc = Document()
doc.LoadFromFile("Sample.docx")

# Remove all comments
doc.Comments.Clear()

# Save the document
doc.SaveToFile("output/RemoveComments.docx")
doc.Close()
Opção B: Remover Comentários em Arquivos do Word Usando uma Macro VBA
Se você prefere permanecer dentro do ambiente do Microsoft Office, pode usar um script VBA simples para limpar o documento atual instantaneamente.
Sub ClearAllMarkup()
    ' Remove all comments
    If ActiveDocument.Comments.Count > 0 Then
        ActiveDocument.DeleteAllComments
    End If
    ' Accept all changes
    ActiveDocument.Revisions.AcceptAll
End Sub
Perguntas Frequentes
- Como elimino comentários e metadados ocultos de um documento do Word?
- Como removo a seção de comentários no Word após excluir as notas?
- Existe um atalho de teclado para remover comentários no Word?
Use o Document Inspector através de Arquivo > Informações > Verificar Problemas. Ele verifica e remove comentários, revisões e propriedades pessoais de uma vez, garantindo que nenhum dado sensível permaneça ao converter para PDF ou compartilhar externamente.
Se uma barra lateral em branco permanecer, é provável que as Alterações Rastreadas ainda estejam ativas. Vá para a guia Revisão e selecione Aceitar > Aceitar Todas as Alterações e Parar de Rastrear para recolher a área de marcação e retornar o layout ao normal.
Para excluir um comentário no Word rapidamente, selecione-o e pressione Shift + F10 e depois D. Para excluir todos de uma vez pela faixa de opções, pressione Alt + R, depois D, e depois A em sequência.
Conclusão
Aprender como excluir comentários no Word é uma habilidade vital para manter padrões profissionais. Você pode usar a guia Revisão para uma correção rápida, o Document Inspector para uma verificação de segurança final ou ferramentas de automação como Free Spire.Doc for Python para processamento em massa. Seguindo os quatro métodos eficazes, você pode compartilhar seu trabalho com total confiança, sabendo que suas notas internas permanecem privadas.
Leia Também:
Word에서 메모 제거(모든 메모 또는 개별 메모 삭제)
Word 문서를 공유하기 전에 주석이나 추적 변경 내용이 그대로 남아 있을까 걱정한 적이 있나요? 보내기 전에 내부 논의 내용과 편집 기록이 수신자에게 보이지 않도록 해야 합니다. 해결되지 않은 메모를 남겨두면 비전문적으로 보일 수 있으며 민감한 정보가 유출될 수도 있습니다. 파일을 최종 확정하기 위해 Word에서 주석을 제거하는 방법을 찾고 있다면, 이 과정은 간단하지만 몇 가지 세부 사항을 간과하기 쉽습니다. 단일 메모를 삭제하든 전체 문서를 정리하든 다음 방법들을 통해 문서를 깔끔하고 전문적으로 유지할 수 있습니다.
검토 탭을 사용하여 Word에서 주석 제거
검토 탭은 문서 협업의 중심 허브이므로 주석을 관리하는 가장 효율적인 장소입니다. 직관적인 인터페이스를 통해 사용자가 효율적으로 주석을 추가하거나 삭제할 수 있도록 도와줍니다.
방법 1: 마우스 오른쪽 버튼 클릭으로 주석 제거
다른 주석은 그대로 두고 특정 항목만 처리해야 할 때 가장 빠른 방법입니다.
- 1단계. 문서에서 주석을 찾습니다.
- 2단계. 주석 상자를 마우스 오른쪽 버튼으로 클릭합니다.
- 3단계. 컨텍스트 메뉴에서 주석 삭제를 선택합니다.
참고: 일반적으로 Backspace 또는 Delete 키를 누르면 주석 안의 텍스트가 삭제될 뿐 주석 자체가 삭제되지는 않습니다.
방법 2: 검토 리본을 사용하여 단일 또는 일괄 삭제
더 많은 제어를 원하거나 Word에서 모든 주석을 즉시 제거하는 방법을 알고 싶을 때 탐색 리본의 특수 도구를 사용하세요.
- 특정 주석 제거 방법:
- 1단계. 주석 상자 안을 클릭합니다.
- 2단계. 검토 탭으로 이동하여 삭제 아이콘을 클릭합니다.
- 한 번에 모든 주석 제거 방법:
- 1단계. Word 상단의 검토 탭으로 이동합니다.
- 2단계. 주석 그룹을 찾습니다.
- 3단계. 삭제 버튼 아래의 드롭다운 화살표를 클릭합니다.
- 4단계. 문서의 모든 주석 삭제를 선택합니다.
정밀한 정리를 위한 문서 검사기 방법
중요 계약서나 공개 보고서를 준비하는 경우 추가적인 보안 조치가 필요합니다. 문서 검사기는 수동 삭제로 놓칠 수 있는 숨겨진 메타데이터를 검색하는 고급 도구입니다.
문서 검사기를 사용하여 Word 문서에서 모든 주석을 삭제하고 개인 속성을 제거하려면:
- 1단계. 파일 > 정보를 클릭합니다.
- 2단계. 문제 확인을 선택한 다음 문서 검사를 클릭합니다.
- 3단계. 주석, 변경 내용 및 버전이 선택되어 있는지 확인합니다.
- 4단계. 검사를 클릭한 다음 찾은 항목 옆의 모두 제거를 클릭합니다.
팁: 주석 제거 외에도 최종 보고서의 레이아웃을 완전히 깔끔하게 만들려면 Word에서 머리글 제거해야 할 수도 있습니다.
Word 문서에서 추적 변경 내용 처리
Word 문서에서 주석을 제거할 때 흔히 저지르는 실수는 빨간색 줄이나 추적된 편집 내용을 잊는 것입니다. 주석은 삭제했지만 추적 변경 내용이 활성화된 상태로 두면, 공유하기 전에 변경 내용을 수락하거나 거부하지 않는 한 수신자는 모든 삭제 및 삽입 내용을 볼 수 있습니다.
Word 문서에서 변경 내용 추적을 중지하는 과정은 다음과 같습니다.
- 1단계. 검토 탭에서 추적 섹션으로 이동합니다.
- 2단계. 수락 아래의 화살표를 클릭합니다.
- 3단계. 모든 변경 내용 수락 및 추적 중지를 선택합니다.
이 작업이 완료되면 문서에는 수정 기록이 보이지 않는 최종 텍스트 버전이 반영됩니다.
Word 문서에서 모든 주석 자동 제거
대규모 문서 워크플로를 관리하는 개발자나 기술 팀에게는 수동 작업이 실용적이지 않습니다. 파일 간 일관성을 보장하기 위해 Python 또는 VBA를 사용하여 Word에서 주석 제거를 자동화할 수 있습니다.
옵션 A: Python으로 모든 주석 삭제
Free Spire.Doc for Python과 같은 Python 라이브러리를 사용하면 몇 줄의 코드로 주석을 정리할 수 있습니다. 이 라이브러리는 Microsoft Word 설치 없이 Word 문서를 생성, 읽기 및 편집하기 위한 포괄적인 API 세트를 제공합니다.
다음은 Word 문서의 모든 주석을 제거하는 Python 코드 예제입니다.
from spire.doc import *
from spire.doc.common import *

# Create an object of Document class and load a Word document
doc = Document()
doc.LoadFromFile("Sample.docx")

# Remove all comments
doc.Comments.Clear()

# Save the document
doc.SaveToFile("output/RemoveComments.docx")
doc.Close()
옵션 B: VBA 매크로를 사용하여 Word 파일에서 주석 제거
Microsoft Office 환경 내에 머물고 싶다면 간단한 VBA 스크립트를 사용하여 현재 문서를 즉시 정리할 수 있습니다.
Sub ClearAllMarkup()
    ' Remove all comments
    If ActiveDocument.Comments.Count > 0 Then
        ActiveDocument.DeleteAllComments
    End If
    ' Accept all changes
    ActiveDocument.Revisions.AcceptAll
End Sub
자주 묻는 질문
- Word 문서에서 주석과 숨겨진 메타데이터를 제거하려면 어떻게 해야 하나요?
- 메모를 삭제한 후 Word에서 주석 섹션을 제거하려면 어떻게 해야 하나요?
- Word에서 주석을 제거하는 바로 가기 키가 있나요?
파일 > 정보 > 문제 확인을 통해 문서 검사기를 사용하세요. 주석, 변경 내용 및 개인 속성을 한 번에 검색하고 제거하여 PDF로 변환하거나 외부로 공유할 때 민감한 데이터가 남지 않도록 합니다.
빈 사이드바가 남아 있다면 추적 변경 내용이 여전히 활성화되어 있기 때문일 수 있습니다. 검토 탭으로 이동하여 수락 > 모든 변경 내용 수락 및 추적 중지를 선택하여 마크업 영역을 축소하고 레이아웃을 정상으로 되돌립니다.
Word에서 주석을 빠르게 삭제하려면 주석을 선택하고 Shift + F10을 누른 다음 D를 누릅니다. 리본을 통해 한 번에 모두 삭제하려면 Alt + R, D, A를 순서대로 누릅니다.
결론
Word에서 주석을 삭제하는 방법을 배우는 것은 전문적인 기준을 유지하는 데 필수적인 기술입니다. 검토 탭을 사용하여 빠르게 수정하거나, 문서 검사기를 사용하여 최종 보안 검사를 하거나, Free Spire.Doc for Python과 같은 자동화 도구를 사용하여 대량 처리를 할 수 있습니다. 네 가지 효과적인 방법을 따르면 내부 메모가 비공개로 유지된다는 확신을 가지고 작업을 공유할 수 있습니다.
함께 읽어보기:
Rimuovere i commenti in Word (eliminare tutti i commenti o singoli commenti)
Prima di condividere un documento Word, ti sei mai preoccupato di lasciare visibili commenti o modifiche tracciate? Prima di inviarlo, devi assicurarti che le tue discussioni interne e la cronologia delle modifiche non siano visibili al destinatario. Lasciare osservazioni irrisolte può apparire poco professionale e persino rivelare informazioni sensibili. Se stai cercando come rimuovere commenti in Word per finalizzare il tuo file, il processo è semplice, ma alcuni dettagli possono essere facilmente trascurati. Sia che tu debba eliminare una singola nota o cancellare un intero documento, i seguenti metodi garantiranno che i documenti rimangano curati e professionali.
- Rimuovere commenti tramite la scheda Revisione
- Ispettore documenti per pulizia approfondita
- Gestire le modifiche tracciate
- Rimuovere tutti i commenti automaticamente
- FAQ
Rimuovere commenti in Word tramite la scheda Revisione
La scheda Revisione è il centro di collaborazione per i documenti, rendendola il luogo più efficiente per gestire i commenti. Aiuta gli utenti ad aggiungere o eliminare commenti in modo efficiente con un'interfaccia intuitiva.
Metodo 1: Rimuovere un commento tramite clic destro
Questo è l'approccio più veloce quando è necessario affrontare solo punti specifici, lasciando intatti altri commenti per ulteriori discussioni.
- Passaggio 1. Individua il commento nel tuo documento.
- Passaggio 2. Fai clic destro direttamente sulla casella del commento.
- Passaggio 3. Seleziona Elimina commento dal menu contestuale.
Nota: Premere Backspace o Canc di solito rimuove il testo all'interno del commento, non il commento stesso.
Metodo 2: Utilizzare la barra multifunzione Revisione per eliminazione singola o in blocco
Per un maggiore controllo, o quando è necessario sapere come rimuovere tutti i commenti in Word istantaneamente, utilizzare gli strumenti specializzati nella barra multifunzione di navigazione.
- Per rimuovere un commento specifico:
- Passaggio 1. Fai clic all'interno della casella del commento.
- Passaggio 2. Vai alla scheda Revisione e fai clic sull'icona Elimina.
- Per rimuovere tutti i commenti contemporaneamente:
- Passaggio 1. Naviga alla scheda Revisione in alto in Word.
- Passaggio 2. Trova il gruppo Commenti.
- Passaggio 3. Fai clic sulla freccia a discesa sotto il pulsante Elimina.
- Passaggio 4. Seleziona Elimina tutti i commenti nel documento.
Il metodo Ispettore documenti per pulizia approfondita
Se stai preparando un contratto di alto profilo o un rapporto pubblico, hai bisogno di un ulteriore passaggio di sicurezza. L'Ispettore documenti è uno strumento avanzato che scansiona i metadati nascosti che l'eliminazione manuale potrebbe trascurare.
Per eliminare tutti i commenti in un documento Word e rimuovere le proprietà personali utilizzando l'Ispettore documenti:
- Passaggio 1. Fai clic su File > Informazioni.
- Passaggio 2. Seleziona Controlla problemi e quindi fai clic su Ispeziona documento.
- Passaggio 3. Assicurati che Commenti, revisioni e versioni sia selezionato.
- Passaggio 4. Fai clic su Ispeziona, quindi fai clic su Rimuovi tutto accanto agli elementi trovati.
Suggerimento: Oltre a rimuovere i commenti, potresti anche dover eliminare le intestazioni in Word per creare un layout completamente pulito per il tuo rapporto finale.
Gestire le modifiche tracciate nei documenti Word
Un errore comune quando si rimuovono commenti in un documento Word è dimenticare le linee rosse o le modifiche tracciate. Se elimini i commenti ma lasci attive le Modifiche tracciate, il tuo destinatario vedrà comunque ogni eliminazione e inserimento a meno che tu non accetti o rifiuti le modifiche prima della condivisione.
Ecco il processo per interrompere il tracciamento delle modifiche in un documento Word:
- Passaggio 1. Nella scheda Revisione, vai alla sezione Tracciamento.
- Passaggio 2. Fai clic sulla freccia sotto Accetta.
- Passaggio 3. Scegli Accetta tutte le modifiche e interrompi tracciamento.
Una volta fatto ciò, il tuo documento rifletterà la versione finale del testo senza alcuna cronologia visibile delle modifiche.
Rimuovere tutti i commenti nei documenti Word automaticamente
Per sviluppatori o team tecnici che gestiscono flussi di lavoro di documenti su larga scala, le operazioni manuali non sono pratiche. Puoi automatizzare la rimozione dei commenti in Word utilizzando Python o VBA per garantire la coerenza tra i file.
Opzione A: Eliminare tutti i commenti usando Python
Librerie Python come Free Spire.Doc per Python ti consentono di cancellare i commenti con poche righe di codice. Questa libreria fornisce un set completo di API per creare, leggere e modificare documenti Word senza richiedere l'installazione di Microsoft Word.
Di seguito è riportato un esempio di codice Python per rimuovere tutti i commenti in un documento Word:
from spire.doc import *
from spire.doc.common import *

# Crea un oggetto della classe Document e carica un documento Word
doc = Document()
doc.LoadFromFile("Sample.docx")

# Rimuovi tutti i commenti
doc.Comments.Clear()

# Salva il documento
doc.SaveToFile("output/RemoveComments.docx")
doc.Close()
Opzione B: Rimuovere commenti nei file Word utilizzando una macro VBA
Se preferisci rimanere all'interno dell'ambiente Microsoft Office, puoi utilizzare un semplice script VBA per cancellare istantaneamente il documento corrente.
Sub ClearAllMarkup()
    ' Rimuovi tutti i commenti
    If ActiveDocument.Comments.Count > 0 Then
        ActiveDocument.DeleteAllComments
    End If
    ' Accetta tutte le modifiche
    ActiveDocument.Revisions.AcceptAll
End Sub
FAQ
- Come elimino commenti e metadati nascosti da un documento Word?
- Come rimuovo la sezione commenti in Word dopo aver eliminato le note?
- Esiste una scorciatoia da tastiera per rimuovere i commenti in Word?
Utilizza l'Ispettore documenti tramite File > Informazioni > Controlla problemi. Scansiona e rimuove commenti, revisioni e proprietà personali in un colpo solo, assicurando che nessun dato sensibile rimanga durante la conversione in PDF o la condivisione esterna.
Se rimane una barra laterale vuota, è probabile che le Modifiche tracciate siano ancora attive. Vai alla scheda Revisione e seleziona Accetta > Accetta tutte le modifiche e interrompi tracciamento per chiudere l'area di markup e riportare il layout alla normalità.
Per eliminare rapidamente un commento in Word, selezionalo e premi Maiusc + F10 quindi E. Per eliminarli tutti contemporaneamente tramite la barra multifunzione, premi Alt + R, quindi E, quindi T in sequenza.
Conclusione
Imparare come eliminare i commenti in Word è un'abilità fondamentale per mantenere standard professionali. Puoi utilizzare la scheda Revisione per una correzione rapida, l'Ispettore documenti per un controllo di sicurezza finale o strumenti di automazione come Free Spire.Doc per Python per l'elaborazione in blocco. Seguendo i quattro metodi efficaci, puoi condividere il tuo lavoro con totale sicurezza, sapendo che le tue note interne rimangono private.