Cómo ocultar hojas en Excel (Manual, VBA y Python)
Tabla de Contenidos
A medida que los libros de Excel crecen en tamaño, la gestión de las hojas de cálculo puede volverse un desafío. Las hojas innecesarias pueden saturar la navegación, confundir a los usuarios o exponer datos confidenciales. Ocultar hojas en Excel es una forma simple pero efectiva de mantener los libros de trabajo organizados y controlados.
Esta guía cubre todas las formas prácticas de ocultar hojas de Excel, incluidos los métodos manuales, las hojas Muy Ocultas usando VBA, el ocultamiento avanzado a nivel de libro de trabajo y el ocultamiento automatizado por lotes con Python.
Por Qué Ocultar Hojas en Excel
Ocultar hojas en Excel no se trata solo de una limpieza visual; juega un papel importante en la usabilidad, la protección de datos y el control del flujo de trabajo.
Los beneficios clave incluyen:
-
Simplificar la navegación
Oculte hojas irrelevantes o intermedias para ayudar a los usuarios a centrarse en los datos e informes clave.
-
Proteger datos confidenciales
Mantenga los cálculos internos, los datos brutos o las tablas de soporte fuera de la vista.
-
Prevenir ediciones accidentales
Reduzca el riesgo de que los usuarios modifiquen fórmulas, referencias o lógica de backend.
-
Mejorar la eficiencia del flujo de trabajo
Presente un diseño de libro de trabajo limpio y orientado a un propósito para paneles y archivos compartidos.
Cómo Ocultar Hojas en Excel
Con estos beneficios en mente, echemos un vistazo más de cerca a las diferentes formas de ocultar hojas en Excel.
Ocultar una Sola Hoja en Excel
Puede ocultar una sola hoja de cálculo cuando desee eliminarla temporalmente de la vista sin afectar a otras hojas del libro. Excel proporciona varias formas rápidas de hacerlo.
Ocultar una Hoja Haciendo Clic Derecho
Este es el método más rápido y comúnmente utilizado para ocultar una hoja de cálculo durante el trabajo diario.
Pasos:
-
Seleccione la pestaña de la hoja que desea ocultar.
-
Haga clic derecho en la pestaña y elija Ocultar.
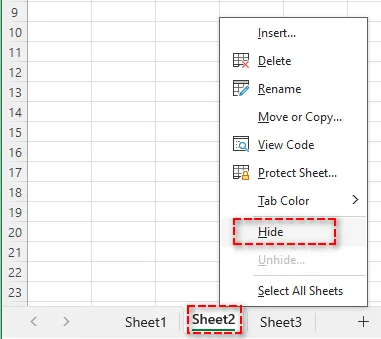
La hoja de cálculo se elimina inmediatamente de la barra de pestañas, pero se puede restaurar fácilmente más tarde haciendo clic con el botón derecho en cualquier hoja visible y seleccionando Mostrar.
También Leer: Copiar una Hoja de Cálculo en Excel (Manual, VBA y Python)
Ocultar una Hoja Usando la Cinta de Opciones
Si prefiere un enfoque basado en menús o necesita una guía visual más clara, puede ocultar una hoja de cálculo utilizando la Cinta de Opciones.
Pasos:
-
Seleccione la pestaña de la hoja que desea ocultar.
-
Vaya a la pestaña Inicio.
-
En el grupo Celdas, haga clic en Formato, y elija Ocultar y mostrar en Visibilidad.
-
Seleccione Ocultar hoja en el menú contextual.
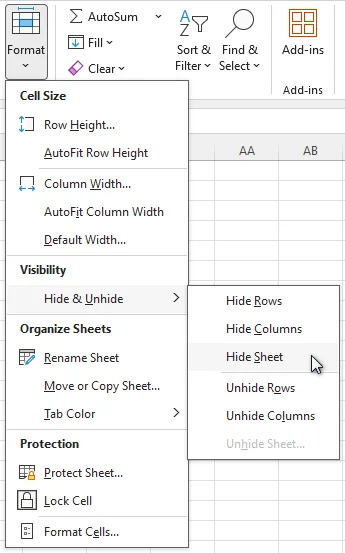
Este método produce el mismo resultado que ocultar con el botón derecho y es útil en flujos de trabajo estructurados o instructivos.
Ocultar una Hoja Usando un Atajo de Teclado
Para los usuarios que prefieren la navegación con el teclado, Excel proporciona un atajo incorporado que le permite ocultar la hoja de trabajo activa al instante, sin abrir ningún menú.
Pasos:
-
Seleccione la pestaña de la hoja que desea ocultar.
-
Presione las siguientes teclas en secuencia: Alt → O → C → O → H.

Nota: Este atajo solo oculta la hoja activa en Excel. Asegúrese de que la hoja que desea ocultar esté activa antes de usarlo.
Ocultar Varias Hojas en Excel a la Vez
Puede ocultar varias hojas de cálculo al mismo tiempo al organizar libros de trabajo grandes o preparar archivos para compartir.
Pasos:
- Seleccione las pestañas de las hojas que desea ocultar:
- Hojas adyacentes: Haga clic en la primera pestaña, mantenga presionada la tecla Mayús, y luego haga clic en la última pestaña.
- Hojas no adyacentes: Mantenga presionada la tecla Ctrl y haga clic en cada pestaña.
- Haga clic con el botón derecho en una de las pestañas seleccionadas y elija Ocultar.
Nota: Debe permanecer visible al menos una hoja de cálculo en el libro, ya que Excel no permite que todas las hojas se oculten al mismo tiempo.
Hacer una Hoja Muy Oculta en Excel con VBA
Cuando el ocultamiento estándar no es suficiente, puede hacer que una hoja de cálculo esté Muy Oculta usando VBA. Una hoja Muy Oculta no aparece en el cuadro de diálogo Mostrar de Excel y solo se puede volver a hacer visible a través de VBA o código.
Pasos:
-
Presione Alt + F11 para abrir el Editor de VBA.
-
En el Explorador de proyectos, seleccione la hoja de cálculo que desea ocultar.
-
Abra la ventana de Propiedades (F4).
-
Establezca Visible en xlSheetVeryHidden.
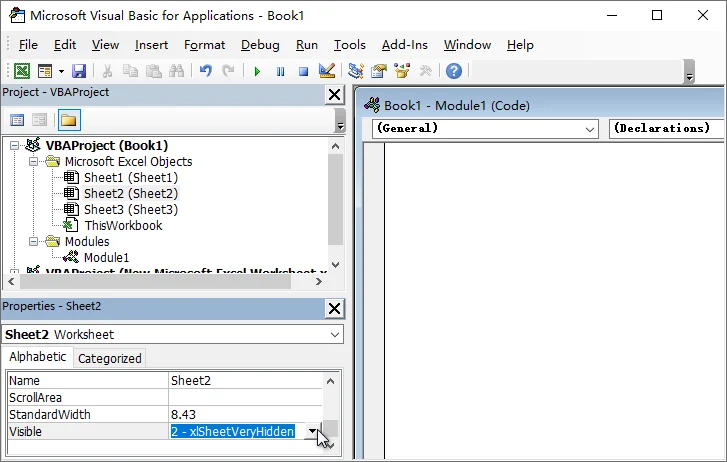
Nota: Las hojas Muy Ocultas aún pueden ser referenciadas por fórmulas y macros de Excel. Para restaurar la hoja, cambie la propiedad Visible nuevamente a xlSheetVisible.
Este método se usa comúnmente para plantillas, cálculos internos y datos de soporte que no deben exponerse a los usuarios finales.
Ocultar la Ventana del Libro de Trabajo en Excel
En escenarios avanzados, es posible que desee ocultar toda la ventana del libro de trabajo mientras lo mantiene abierto en segundo plano.
Pasos:
-
Abra el libro de trabajo que desea ocultar.
-
Vaya a la pestaña Vista.
-
En el grupo Ventana, haga clic en Ocultar.
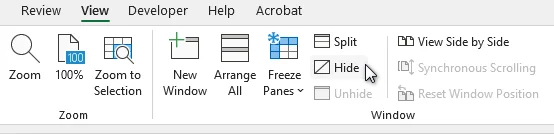
Consejo: Los libros de trabajo ocultos se pueden mostrar a través de Vista > Mostrar.
Ocultar Hojas Automáticamente con Python
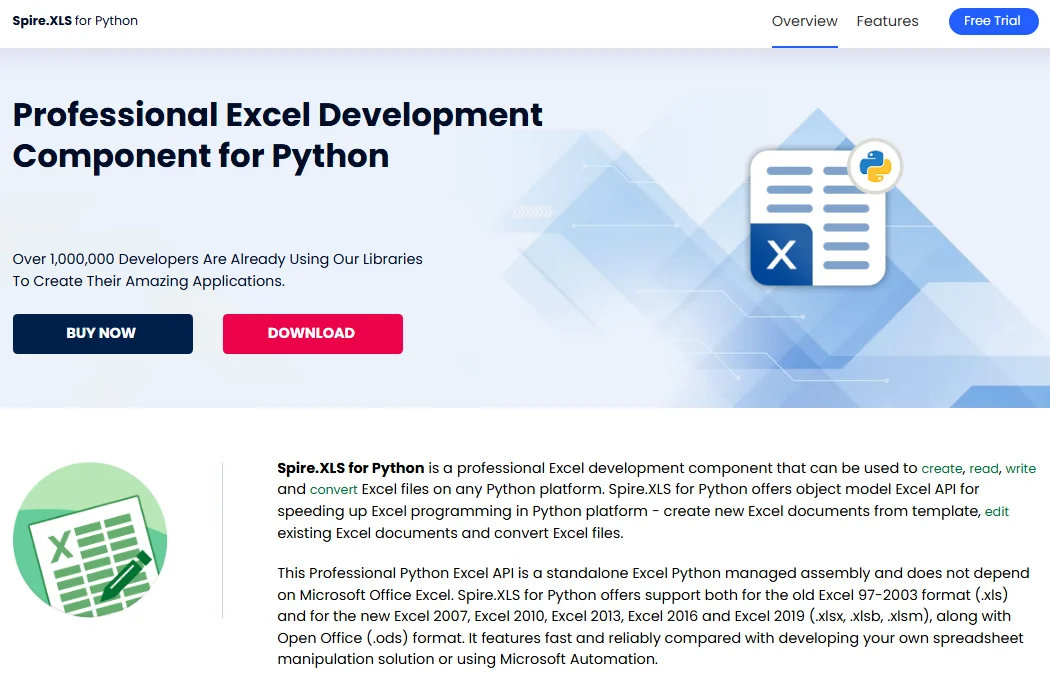
Cuando necesita ocultar hojas de cálculo en múltiples archivos de Excel, hacerlo manualmente puede llevar mucho tiempo y ser propenso a errores. Al usar Python con Spire.XLS for Python, puede administrar eficientemente las hojas de cálculo, incluida la automatización de la visibilidad de las hojas, en una gran cantidad de libros de trabajo.
Pasos para Ocultar Hojas de Excel por Lotes con Python:
-
Instalar Spire.XLS for Python
Instale la biblioteca desde PyPI usando el siguiente comando:
pip install spire.xls -
Ocultar Hojas Automáticamente con Python
El siguiente ejemplo oculta todas las hojas de cálculo, excepto las especificadas, en cada archivo de Excel dentro de una carpeta:
from spire.xls import *
import os

# Define input and output folders
input_folder = "input_excels"
output_folder = "output_excels"

# Iterate through all Excel files in the input folder
for file_name in os.listdir(input_folder):
    if file_name.endswith((".xlsx", ".xls")):
        workbook = Workbook()
        workbook.LoadFromFile(os.path.join(input_folder, file_name))

        # Loop through worksheets in each file
        for sheet in workbook.Worksheets:
            # Hide all worksheets except the specified ones
            if sheet.Name not in ["Dashboard", "Summary"]:
                sheet.Visibility = WorksheetVisibility.Hidden

        # Save the updated workbook
        workbook.SaveToFile(os.path.join(output_folder, file_name), ExcelVersion.Version2013)

        # Release resources
        workbook.Dispose()
Consejo: Si necesita evitar que los usuarios muestren hojas a través de la interfaz de Excel, use WorksheetVisibility.StrongHidden para crear hojas Muy Ocultas.
Artículo Relacionado: Python: Ocultar o Mostrar Hojas de Cálculo de Excel
Conclusión
Ocultar hojas en Excel mantiene los libros de trabajo organizados, protege los datos confidenciales y reduce la confusión del usuario. Elegir el método correcto depende de sus necesidades de control, la frecuencia con la que se realiza la tarea y la escala de su libro de trabajo:
- Para un ocultamiento rápido y temporal de hojas individuales, los métodos manuales son suficientes.
- Para las hojas que nunca deben mostrarse a través de la interfaz de Excel, use hojas Muy Ocultas con VBA.
- Para restringir la interacción del usuario mientras se mantiene un libro de trabajo abierto, ocultar la ventana del libro de trabajo es ideal.
- Para reglas consistentes en múltiples archivos de Excel, la automatización con Python proporciona la solución más eficiente.
¿Busca más tutoriales de Excel de alta calidad? Consulte nuestros recursos gratuitos de Excel.
Preguntas Frecuentes
P1: ¿Cuál es la diferencia entre las hojas Ocultas y Muy Ocultas en Excel?
R1: Las hojas ocultas se pueden mostrar a través de Excel, mientras que las hojas Muy Ocultas solo se pueden volver a hacer visibles mediante VBA o automatización.
P2: ¿Pueden los usuarios mostrar las hojas ocultas en Excel?
R2: Sí. Las hojas ocultas mediante métodos estándar se pueden mostrar a través de la opción Mostrar de Excel.
P3: ¿Puedo ocultar un libro de Excel completo sin cerrarlo?
R3: Sí. Vaya a la pestaña Vista y haga clic en Ocultar en el grupo Ventana para ocultar la ventana del libro de trabajo mientras se mantiene abierto.
P4: ¿Cómo puedo ocultar hojas en múltiples archivos de Excel por lotes?
R4: Al usar Python con bibliotecas como Spire.XLS for Python, puede aplicar las mismas reglas de visibilidad de hojas de cálculo en múltiples archivos de Excel en una carpeta y ocultar hojas en masa.
Ver También
Arbeitsblätter in Excel ausblenden (Manuell, VBA & Python)
Inhaltsverzeichnis
Wenn Excel-Arbeitsmappen an Größe zunehmen, kann die Verwaltung von Arbeitsblättern zu einer Herausforderung werden. Unnötige Blätter können die Navigation überladen, Benutzer verwirren oder sensible Daten preisgeben. Das Ausblenden von Blättern in Excel ist eine einfache, aber effektive Möglichkeit, Arbeitsmappen organisiert und kontrolliert zu halten.
Diese Anleitung behandelt alle praktischen Möglichkeiten, Excel-Blätter auszublenden, einschließlich manueller Methoden, sehr ausgeblendeter Blätter mit VBA, erweitertem Ausblenden auf Arbeitsmappenebene und automatisiertem Stapelausblenden mit Python.
Warum Blätter in Excel ausblenden
Das Ausblenden von Blättern in Excel dient nicht nur der visuellen Bereinigung – es spielt eine wichtige Rolle für die Benutzerfreundlichkeit, den Datenschutz und die Workflow-Steuerung.
Zu den wichtigsten Vorteilen gehören:
-
Navigation vereinfachen
Blenden Sie irrelevante oder zwischengeschaltete Blätter aus, damit sich die Benutzer auf wichtige Daten und Berichte konzentrieren können.
-
Sensible Daten schützen
Halten Sie interne Berechnungen, Rohdaten oder unterstützende Tabellen außer Sichtweite.
-
Versehentliche Bearbeitungen verhindern
Reduzieren Sie das Risiko, dass Benutzer Formeln, Verweise oder Backend-Logik ändern.
-
Workflow-Effizienz verbessern
Präsentieren Sie ein sauberes, zweckorientiertes Arbeitsmappenlayout für Dashboards und freigegebene Dateien.
So blenden Sie Blätter in Excel aus
Vor diesem Hintergrund werfen wir einen genaueren Blick auf die verschiedenen Möglichkeiten, Blätter in Excel auszublenden.
Ein einzelnes Blatt in Excel ausblenden
Sie können ein einzelnes Arbeitsblatt ausblenden, wenn Sie es vorübergehend aus der Ansicht entfernen möchten, ohne andere Blätter in der Arbeitsmappe zu beeinträchtigen. Excel bietet hierfür mehrere schnelle Möglichkeiten.
Ein Blatt per Rechtsklick ausblenden
Dies ist die schnellste und am häufigsten verwendete Methode, um ein Arbeitsblatt während der täglichen Arbeit auszublenden.
Schritte:
-
Wählen Sie die Blattregisterkarte aus, die Sie ausblenden möchten.
-
Klicken Sie mit der rechten Maustaste auf die Registerkarte und wählen Sie Ausblenden.
Das Arbeitsblatt wird sofort aus der Registerkartenleiste entfernt, kann aber später einfach wiederhergestellt werden, indem Sie mit der rechten Maustaste auf ein sichtbares Blatt klicken und Einblenden auswählen.
Lesen Sie auch: Ein Arbeitsblatt in Excel kopieren (Manuell, VBA & Python)
Ein Blatt über das Menüband ausblenden
Wenn Sie einen menügesteuerten Ansatz bevorzugen oder eine klarere visuelle Anleitung benötigen, können Sie ein Arbeitsblatt über das Menüband ausblenden.
Schritte:
-
Wählen Sie die Blattregisterkarte aus, die Sie ausblenden möchten.
-
Gehen Sie zur Registerkarte Start.
-
Klicken Sie in der Gruppe Zellen auf Format, und wählen Sie unter Sichtbarkeit die Option Ausblenden & Einblenden.
-
Wählen Sie Blatt ausblenden aus dem Kontextmenü.
Diese Methode führt zum gleichen Ergebnis wie das Ausblenden per Rechtsklick und ist in strukturierten oder anleitenden Arbeitsabläufen nützlich.
Ein Blatt mit einer Tastenkombination ausblenden
Für Benutzer, die die Tastaturnavigation bevorzugen, bietet Excel eine integrierte Tastenkombination, mit der Sie das aktive Arbeitsblatt sofort ausblenden können, ohne Menüs öffnen zu müssen.
Schritte:
-
Wählen Sie die Blattregisterkarte aus, die Sie ausblenden möchten.
-
Drücken Sie die folgenden Tasten nacheinander: Alt → H → O → U → S.
Hinweis: Diese Tastenkombination blendet nur das aktive Blatt in Excel aus. Stellen Sie sicher, dass das Blatt, das Sie ausblenden möchten, aktiv ist, bevor Sie sie verwenden.
Mehrere Blätter in Excel auf einmal ausblenden
Sie können mehrere Arbeitsblätter gleichzeitig ausblenden, wenn Sie große Arbeitsmappen organisieren oder Dateien für die Freigabe vorbereiten.
Schritte:
- Wählen Sie die Blattregisterkarten aus, die Sie ausblenden möchten:
- Benachbarte Blätter: Klicken Sie auf die erste Registerkarte, halten Sie die Umschalttaste gedrückt und klicken Sie dann auf die letzte Registerkarte.
- Nicht benachbarte Blätter: Halten Sie die Strg-Taste gedrückt und klicken Sie auf jede Registerkarte.
- Klicken Sie mit der rechten Maustaste auf eine der ausgewählten Registerkarten und wählen Sie Ausblenden.
Hinweis: Mindestens ein Arbeitsblatt muss in der Arbeitsmappe sichtbar bleiben, da Excel nicht zulässt, dass alle Blätter gleichzeitig ausgeblendet werden.
Ein Blatt in Excel mit VBA sehr gut ausblenden
Wenn das standardmäßige Ausblenden nicht ausreicht, können Sie ein Arbeitsblatt mit VBA sehr gut ausblenden. Ein sehr gut ausgeblendetes Blatt erscheint nicht im Einblenden-Dialog von Excel und kann nur durch VBA oder Code wieder sichtbar gemacht werden.
Schritte:
-
Drücken Sie Alt + F11, um den VBA-Editor zu öffnen.
-
Wählen Sie im Projekt-Explorer das Arbeitsblatt aus, das Sie ausblenden möchten.
-
Öffnen Sie das Eigenschaften-Fenster (F4).
-
Setzen Sie Visible auf xlSheetVeryHidden.
Hinweis: Auf sehr gut ausgeblendete Blätter kann weiterhin durch Excel-Formeln und -Makros verwiesen werden. Um das Blatt wiederherzustellen, ändern Sie die Visible-Eigenschaft zurück auf xlSheetVisible.
Diese Methode wird häufig für Vorlagen, interne Berechnungen und unterstützende Daten verwendet, die Endbenutzern nicht zugänglich gemacht werden sollen.
Das Arbeitsmappenfenster in Excel ausblenden
In fortgeschrittenen Szenarien möchten Sie möglicherweise das gesamte Arbeitsmappenfenster ausblenden, während die Arbeitsmappe im Hintergrund geöffnet bleibt.
Schritte:
-
Öffnen Sie die Arbeitsmappe, die Sie ausblenden möchten.
-
Gehen Sie zur Registerkarte Ansicht.
-
Klicken Sie in der Gruppe Fenster auf Ausblenden.
Tipp: Ausgeblendete Arbeitsmappen können über Ansicht > Einblenden wieder eingeblendet werden.
Blätter automatisch mit Python ausblenden
Wenn Sie Arbeitsblätter in mehreren Excel-Dateien ausblenden müssen, kann dies manuell zeitaufwändig und fehleranfällig sein. Durch die Verwendung von Python mit Spire.XLS for Python können Sie Arbeitsblätter effizient verwalten, einschließlich der Automatisierung der Blattsichtbarkeit, über eine große Anzahl von Arbeitsmappen hinweg.
Schritte zum Stapelausblenden von Excel-Blättern mit Python:
-
Spire.XLS for Python installieren
Installieren Sie die Bibliothek von PyPI mit dem folgenden Befehl:
pip install spire.xls -
Blätter automatisch mit Python ausblenden
Das folgende Beispiel blendet alle Arbeitsblätter außer den angegebenen in jeder Excel-Datei in einem Ordner aus:
from spire.xls import *
import os

# Eingabe- und Ausgabeordner definieren
input_folder = "input_excels"
output_folder = "output_excels"

# Durch alle Excel-Dateien im Eingabeordner iterieren
for file_name in os.listdir(input_folder):
    if file_name.endswith((".xlsx", ".xls")):
        workbook = Workbook()
        workbook.LoadFromFile(os.path.join(input_folder, file_name))

        # Durch die Arbeitsblätter in jeder Datei loopen
        for sheet in workbook.Worksheets:
            # Alle Arbeitsblätter außer den angegebenen ausblenden
            if sheet.Name not in ["Dashboard", "Summary"]:
                sheet.Visibility = WorksheetVisibility.Hidden

        # Die aktualisierte Arbeitsmappe speichern
        workbook.SaveToFile(os.path.join(output_folder, file_name), ExcelVersion.Version2013)

        # Ressourcen freigeben
        workbook.Dispose()
Tipp: Wenn Sie verhindern möchten, dass Benutzer Blätter über die Excel-Oberfläche wieder einblenden, verwenden Sie WorksheetVisibility.StrongHidden, um sehr gut ausgeblendete Blätter zu erstellen.
Verwandter Artikel: Python: Excel-Arbeitsblätter ausblenden oder einblenden
Fazit
Das Ausblenden von Blättern in Excel hält Arbeitsmappen organisiert, schützt sensible Daten und reduziert die Verwirrung der Benutzer. Die Wahl der richtigen Methode hängt von Ihren Kontrollanforderungen, der Häufigkeit der Ausführung der Aufgabe und dem Umfang Ihrer Arbeitsmappe ab:
- Für das schnelle, vorübergehende Ausblenden einzelner Blätter sind manuelle Methoden ausreichend.
- Für Blätter, die niemals über die Excel-Oberfläche wieder eingeblendet werden sollen, verwenden Sie sehr gut ausgeblendete Blätter mit VBA.
- Um die Benutzerinteraktion einzuschränken, während eine Arbeitsmappe geöffnet bleibt, ist das Ausblenden des Arbeitsmappenfensters ideal.
- Für konsistente Regeln über mehrere Excel-Dateien hinweg bietet die Python-Automatisierung die effizienteste Lösung.
Suchen Sie nach weiteren hochwertigen Excel-Tutorials? Schauen Sie sich unsere kostenlosen Excel-Ressourcen an.
Häufig gestellte Fragen
F1: Was ist der Unterschied zwischen ausgeblendeten und sehr gut ausgeblendeten Blättern in Excel?
A1: Ausgeblendete Blätter können über Excel wieder eingeblendet werden, während sehr gut ausgeblendete Blätter nur mit VBA oder Automatisierung wieder sichtbar gemacht werden können.
F2: Können Benutzer ausgeblendete Blätter in Excel wieder einblenden?
A2: Ja. Blätter, die mit Standardmethoden ausgeblendet wurden, können über die Option „Einblenden“ von Excel wieder eingeblendet werden.
F3: Kann ich eine ganze Excel-Arbeitsmappe ausblenden, ohne sie zu schließen?
A3: Ja. Gehen Sie zur Registerkarte „Ansicht“ und klicken Sie in der Gruppe „Fenster“ auf „Ausblenden“, um das Arbeitsmappenfenster auszublenden, während es geöffnet bleibt.
F4: Wie kann ich Blätter in mehreren Excel-Dateien stapelweise ausblenden?
A4: Durch die Verwendung von Python mit Bibliotheken wie Spire.XLS for Python können Sie dieselben Regeln für die Sichtbarkeit von Arbeitsblättern auf mehrere Excel-Dateien in einem Ordner anwenden und Blätter in großen Mengen ausblenden.
Siehe auch
Как скрыть листы в Excel (вручную, через VBA и Python)
Содержание
По мере увеличения размера рабочих книг Excel управление рабочими листами может стать сложной задачей. Ненужные листы могут загромождать навигацию, сбивать с толку пользователей или раскрывать конфиденциальные данные. Скрытие листов в Excel — это простой, но эффективный способ поддерживать порядок и контроль в рабочих книгах.
В этом руководстве рассматриваются все практические способы скрытия листов Excel, включая ручные методы, очень скрытые листы с использованием VBA, расширенное скрытие на уровне рабочей книги и автоматическое пакетное скрытие с помощью Python.
Зачем скрывать листы в Excel
Скрытие листов в Excel — это не просто визуальная очистка, оно играет важную роль в удобстве использования, защите данных и управлении рабочим процессом.
Основные преимущества включают:
-
Упрощение навигации
Скройте ненужные или промежуточные листы, чтобы помочь пользователям сосредоточиться на ключевых данных и отчетах.
-
Защита конфиденциальных данных
Держите внутренние расчеты, необработанные данные или вспомогательные таблицы вне поля зрения.
-
Предотвращение случайных правок
Снизьте риск того, что пользователи изменят формулы, ссылки или внутреннюю логику.
-
Повышение эффективности рабочего процесса
Представьте чистый, целенаправленный макет рабочей книги для информационных панелей и общих файлов.
Как скрыть листы в Excel
Учитывая эти преимущества, давайте подробнее рассмотрим различные способы скрытия листов в Excel.
Скрыть один лист в Excel
Вы можете скрыть один рабочий лист, если хотите временно убрать его из вида, не затрагивая другие листы в рабочей книге. Excel предоставляет несколько быстрых способов сделать это.
Скрыть лист щелчком правой кнопкой мыши
Это самый быстрый и наиболее часто используемый метод скрытия рабочего листа в повседневной работе.
Шаги:
-
Выберите вкладку листа, который вы хотите скрыть.
-
Щелкните правой кнопкой мыши по вкладке и выберите Скрыть.
Рабочий лист немедленно удаляется с панели вкладок, но его можно легко восстановить позже, щелкнув правой кнопкой мыши по любому видимому листу и выбрав Показать.
Также читайте: Копирование рабочего листа в Excel (вручную, VBA и Python)
Скрыть лист с помощью ленты
Если вы предпочитаете подход, основанный на меню, или вам нужны более четкие визуальные инструкции, вы можете скрыть рабочий лист с помощью ленты.
Шаги:
-
Выберите вкладку листа, который вы хотите скрыть.
-
Перейдите на вкладку Главная.
-
В группе Ячейки нажмите Формат и выберите Скрыть и показать в разделе Видимость.
-
Выберите Скрыть лист из контекстного меню.
Этот метод дает тот же результат, что и скрытие щелчком правой кнопкой мыши, и полезен в структурированных или учебных рабочих процессах.
Скрыть лист с помощью сочетания клавиш
Для пользователей, предпочитающих навигацию с помощью клавиатуры, в Excel есть встроенное сочетание клавиш, которое позволяет мгновенно скрыть активный рабочий лист, не открывая никаких меню.
Шаги:
-
Выберите вкладку листа, который вы хотите скрыть.
-
Нажмите следующие клавиши последовательно: Alt → H → O → U → S.
Примечание: Это сочетание клавиш скрывает только активный лист в Excel. Перед его использованием убедитесь, что лист, который вы хотите скрыть, активен.
Скрыть несколько листов в Excel одновременно
Вы можете скрыть несколько рабочих листов одновременно при организации больших рабочих книг или подготовке файлов к совместному использованию.
Шаги:
- Выберите вкладки листов, которые вы хотите скрыть:
- Смежные листы: Щелкните первую вкладку, удерживайте Shift, затем щелкните последнюю вкладку.
- Несмежные листы: Удерживайте Ctrl и щелкайте по каждой вкладке.
- Щелкните правой кнопкой мыши по одной из выбранных вкладок и выберите Скрыть.
Примечание: В рабочей книге должен оставаться видимым хотя бы один рабочий лист, так как Excel не позволяет скрыть все листы одновременно.
Сделать лист очень скрытым в Excel с помощью VBA
Когда стандартного скрытия недостаточно, вы можете сделать рабочий лист очень скрытым с помощью VBA. Очень скрытый лист не отображается в диалоговом окне Показать Excel и может быть снова сделан видимым только с помощью VBA или кода.
Шаги:
-
Нажмите Alt + F11, чтобы открыть редактор VBA.
-
В Обозревателе проектов выберите рабочий лист, который вы хотите скрыть.
-
Откройте окно Свойства (F4).
-
Установите для свойства Visible значение xlSheetVeryHidden.
Примечание: На очень скрытые листы все еще могут ссылаться формулы и макросы Excel. Чтобы восстановить лист, измените свойство Visible обратно на xlSheetVisible.
Этот метод обычно используется для шаблонов, внутренних расчетов и вспомогательных данных, которые не должны быть доступны конечным пользователям.
Скрыть окно рабочей книги в Excel
В более сложных сценариях вы можете захотеть скрыть все окно рабочей книги, оставив рабочую книгу открытой в фоновом режиме.
Шаги:
-
Откройте рабочую книгу, которую вы хотите скрыть.
-
Перейдите на вкладку Вид.
-
В группе Окно нажмите Скрыть.
Совет: Скрытые рабочие книги можно снова показать через Вид > Показать.
Автоматически скрывать листы с помощью Python
Когда вам нужно скрыть рабочие листы в нескольких файлах Excel, делать это вручную может быть трудоемко и чревато ошибками. Используя Python с Spire.XLS for Python, вы можете эффективно управлять рабочими листами, включая автоматизацию видимости листов, в большом количестве рабочих книг.
Шаги для пакетного скрытия листов Excel с помощью Python:
-
Установите Spire.XLS for Python
Установите библиотеку из PyPI с помощью следующей команды:
pip install spire.xls -
Автоматически скрывать листы с помощью Python
Следующий пример скрывает все рабочие листы, кроме указанных, в каждом файле Excel в папке:
from spire.xls import *
import os

# Определите входную и выходную папки
input_folder = "input_excels"
output_folder = "output_excels"

# Переберите все файлы Excel во входной папке
for file_name in os.listdir(input_folder):
    if file_name.endswith((".xlsx", ".xls")):
        workbook = Workbook()
        workbook.LoadFromFile(os.path.join(input_folder, file_name))

        # Переберите рабочие листы в каждом файле
        for sheet in workbook.Worksheets:
            # Скройте все рабочие листы, кроме указанных
            if sheet.Name not in ["Dashboard", "Summary"]:
                sheet.Visibility = WorksheetVisibility.Hidden

        # Сохраните обновленную рабочую книгу
        workbook.SaveToFile(os.path.join(output_folder, file_name), ExcelVersion.Version2013)

        # Освободите ресурсы
        workbook.Dispose()
Совет: Если вам нужно запретить пользователям показывать листы через интерфейс Excel, используйте WorksheetVisibility.StrongHidden, чтобы создать очень скрытые листы.
Связанная статья: Python: Скрыть или показать рабочие листы Excel
Заключение
Скрытие листов в Excel помогает поддерживать порядок в рабочих книгах, защищает конфиденциальные данные и уменьшает путаницу у пользователей. Выбор правильного метода зависит от ваших потребностей в контроле, частоты выполнения задачи и масштаба вашей рабочей книги:
- Для быстрого временного скрытия отдельных листов достаточно ручных методов.
- Для листов, которые никогда не должны быть показаны через интерфейс Excel, используйте очень скрытые листы с помощью VBA.
- Чтобы ограничить взаимодействие с пользователем, оставляя рабочую книгу открытой, идеально подходит скрытие окна рабочей книги.
- Для применения последовательных правил к нескольким файлам Excel автоматизация с помощью Python является наиболее эффективным решением.
Ищете больше качественных руководств по Excel? Ознакомьтесь с нашими бесплатными ресурсами по Excel.
Часто задаваемые вопросы
В1: В чем разница между скрытыми и очень скрытыми листами в Excel?
О1: Скрытые листы можно снова показать через Excel, в то время как очень скрытые листы можно сделать видимыми только с помощью VBA или автоматизации.
В2: Могут ли пользователи показывать скрытые листы в Excel?
О2: Да. Листы, скрытые стандартными методами, можно снова показать с помощью опции "Показать" в Excel.
В3: Могу ли я скрыть всю рабочую книгу Excel, не закрывая ее?
О3: Да. Перейдите на вкладку "Вид" и нажмите "Скрыть" в группе "Окно", чтобы скрыть окно рабочей книги, оставив ее открытой.
В4: Как я могу скрыть листы в нескольких файлах Excel в пакетном режиме?
О4: Используя Python с библиотеками, такими как Spire.XLS for Python, вы можете применять одни и те же правила видимости рабочих листов к нескольким файлам Excel в папке и скрывать листы массово.
Смотрите также
Converter JSON para CSV: ferramentas on-line gratuitas, Excel e scripts Python
Índice
No mundo do manuseio de dados, JSON e CSV são dois dos formatos mais utilizados. JSON é ideal para armazenar e transmitir dados estruturados, enquanto o CSV se destaca pela simplicidade, tornando-o perfeito para planilhas, ferramentas de análise de dados como Excel ou Google Sheets e compartilhamento rápido de dados. Converter JSON para CSV é uma tarefa comum para profissionais de marketing, analistas de dados, desenvolvedores e qualquer pessoa que trabalhe com dados estruturados.
Neste guia abrangente, vamos orientá-lo através dos métodos de conversão de JSON para CSV mais confiáveis, desde ferramentas online amigáveis para iniciantes até soluções baseadas em código para usuários avançados. Quer esteja a lidar com pequenos ficheiros JSON ou grandes conjuntos de dados, encontrará aqui uma abordagem adequada.
Conteúdo:
- O que são JSON e CSV? Uma Visão Geral Rápida
- Método 1: Usando Conversores Online de JSON para CSV (Rápido e Fácil)
- Método 2: Converter JSON para CSV em Python (Flexível e Escalável)
- Método 3: Transformar JSON para CSV Usando o MS Excel (Amigável à GUI)
- Comparação dos Métodos de JSON para CSV
- Melhores Práticas para a Conversão de JSON para CSV
- Perguntas Frequentes
O que são JSON e CSV? Uma Visão Geral Rápida
Antes de mergulhar na conversão, vamos recapitular brevemente o que são JSON e CSV, para que você entenda por que a conversão é muitas vezes necessária:
- JSON (JavaScript Object Notation): Um formato leve e legível por humanos que usa pares de chave-valor para armazenar dados. É amplamente utilizado em APIs, aplicações web e bancos de dados NoSQL porque lida bem com dados aninhados.
- CSV (Comma-Separated Values): Um formato de texto simples, semelhante a uma tabela, onde os valores são separados por vírgulas. É simples, compatível com quase todas as ferramentas de planilha e fácil de importar para softwares de análise de dados.
O processo de conversão de JSON para CSV essencialmente "achata" a estrutura hierárquica do JSON em linhas e colunas, aproveitando assim a compatibilidade do CSV com ferramentas de planilha e plataformas de análise de dados.
Método 1: Usando Conversores Online de JSON para CSV (Rápido e Fácil)
Os conversores online fornecem o caminho mais rápido para a conversão, perfeitos para tarefas únicas, pequenos conjuntos de dados ou usuários sem experiência em programação. Essas ferramentas baseadas na web lidam com a transformação inteiramente no seu navegador.
Passo 1: Encontre um Conversor Online Confiável
Procure por "conversor gratuito de JSON para CSV" e escolha uma ferramenta respeitável e com poucos anúncios como JSON-CSV.com ou OnlineJSONTools.com. Para dados sensíveis, considere opções focadas em privacidade que processam arquivos localmente no seu navegador sem fazer upload para servidores.
Passo 2: Prepare Seus Dados JSON
Certifique-se de que seu JSON está formatado corretamente e é válido. A maioria dos conversores falhará silenciosamente ou produzirá resultados inesperados com JSON malformado. Uma simples matriz de objetos é convertida de forma mais transparente:
[
  {"employee_id": 101, "name": "John Chen", "department": "Engineering", "salary": 85000},
  {"employee_id": 102, "name": "Maria Garcia", "department": "Marketing", "salary": 72000},
  {"employee_id": 103, "name": "David Kim", "department": "Sales", "salary": 68000}
]
Dica profissional: Use um validador de JSON como JSONLint if you're unsure about your file's structure.
Passo 3: Carregue, Cole ou Vincule Seus Dados JSON
Conversores de qualidade oferecem múltiplos métodos de entrada:
- Upload de Arquivo: Clique em “Importar” ou botão similar para selecionar seu arquivo .json
- Entrada Direta: Cole o JSON bruto em uma caixa de texto
- Busca por URL: Insira uma URL pública contendo dados JSON (útil para endpoints de API)
Para este exemplo, tente colar os dados do funcionário acima no campo de entrada do conversor.
Passo 4: Configure as Configurações de Conversão (Opções Avançadas)
Muitos conversores oferecem personalização:
- Delimitador: Escolha vírgula (padrão), ponto e vírgula, tabulação ou pipe
- Qualificador de Texto: Especifique como os campos de texto são delimitados, geralmente aspas duplas
- Codificação: UTF-8 é o padrão e lida com caracteres internacionais
- Linha de Cabeçalho: Incluir ou excluir cabeçalhos de coluna
- Manuseio de Aninhados: Escolha achatar objetos aninhados
Passo 5: Converta e Baixe
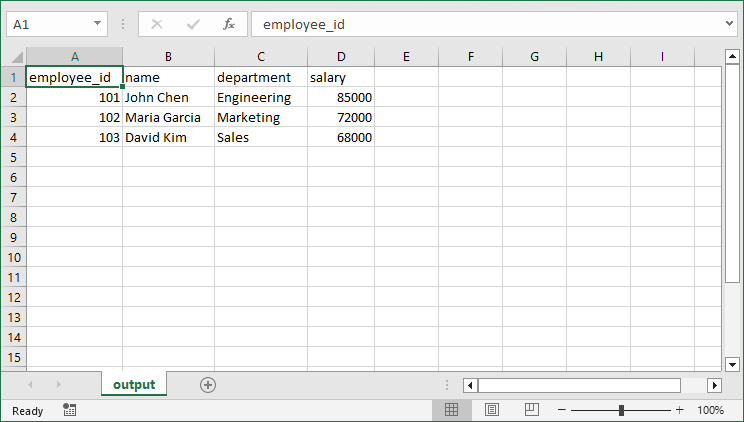
Clique no botão de conversão e você deverá ver uma pré-visualização em segundos. Clique em "Baixar CSV" para salvar o arquivo no seu computador. Abra-o no Excel ou em qualquer software de planilha para verificar a conversão.
Um exemplo de conversão de JSON para CSV usando JSON-CSV.com:

Limitações a serem observadas: as ferramentas online geralmente têm limites de tamanho de arquivo (geralmente de 1 a 10 MB), podem não lidar otimamente com JSON profundamente aninhado e levantam preocupações de segurança com dados confidenciais.
Método 2: Converter JSON para CSV em Python (Flexível e Escalável)
Para conversões recorrentes, grandes conjuntos de dados, estruturas JSON complexas ou fluxos de trabalho automatizados, usar Python é a opção mais eficiente. Entre seu rico ecossistema de bibliotecas de dados, o Free Spire.XLS for Python é uma biblioteca poderosa que simplifica a conversão de JSON para CSV (ou CSV para JSON).
Passo 1: Instale a Biblioteca Python Gratuita
Certifique-se de ter o Python instalado e, em seguida, abra seu terminal ou prompt de comando e execute o seguinte pip para instalar a biblioteca Free Spire.XLS:
pip install Spire.Xls.Free
Passo 2: Escreva o Script Python para converter um arquivo JSON para CSV
Este script funciona para arquivos JSON planos (sem dados aninhados).
import json
from spire.xls import *

# Load JSON data
with open('employee.json') as f:
    data = json.load(f)

# Create workbook and worksheet
workbook = Workbook()
sheet = workbook.Worksheets[0]
# Extract headers from JSON keys
headers = list(data[0].keys())

# Write headers to the first row
for col, header in enumerate(headers, start=1):
    sheet.Range[1, col].Value = header

# Populate values from each JSON object to the subsequent rows
for row_index, item in enumerate(data, start=2):
    for col_index, key in enumerate(headers, start=1):
        value = item.get(key, "")
        sheet.Range[row_index, col_index].Value = str(value) if value is not None else ""

# Save the worksheet as a CSV file
sheet.SaveToFile("output.csv", ",", Encoding.get_UTF8())
workbook.Dispose()
Métodos Principais Neste Código:
json.load(): Analisa o conteúdo JSON em uma lista/dicionário Python.Workbook(): Objeto principal do Spire.XLS para criar uma pasta de trabalho do Excel.data[].keys(): Extrai os cabeçalhos das colunas das chaves da lista JSON.Worksheet.Range[].Value: Escreve texto/valores em uma célula específica (indexação de linha/coluna baseada em 1 para o Spire.XLS).get(key, ""): Recupera com segurança o valor para cada chave (retorna uma string vazia se a chave estiver ausente, evitando KeyError).SaveToFile(filename, delimiter, encoding): Exporta a planilha para um arquivo CSV com parâmetros e codificação especificados.
O resultado da conversão:
O JSON do mundo real geralmente contém estruturas aninhadas. Para lidar com JSON aninhado com dicionários e matrizes, consulte o guia detalhado: JSON para CSV em Python – Guia Completo para JSON Plano e Aninhado
Método 3: Transformar JSON para CSV Usando o MS Excel (Amigável à GUI)
Para aqueles que preferem interfaces gráficas ou precisam revisar manualmente os dados durante a conversão, o MS Excel oferece uma capacidade integrada para importar JSON e salvar no formato CSV. Veja como:
- Abra o Excel e crie uma nova pasta de trabalho.
- Vá para a guia “Dados” > “Obter Dados” > “Do Arquivo” > “Do JSON”.
- Selecione seu arquivo JSON e clique em “Importar”, e então o Excel abrirá uma janela do “Editor do Power Query”.
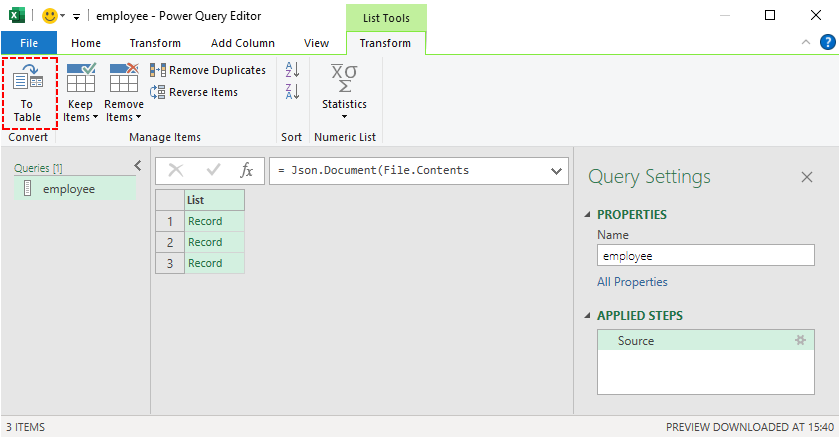
- Clique em “Para Tabela” na faixa de opções para converter a estrutura JSON.
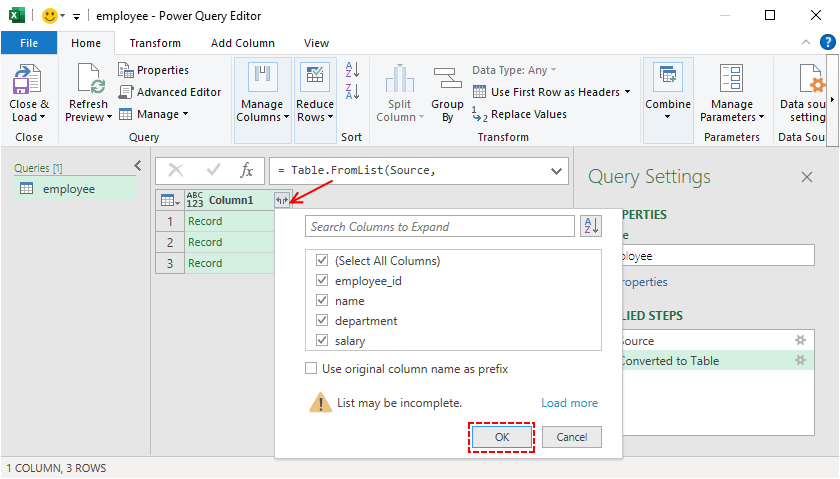
- Expanda as colunas clicando no ícone de seta dupla ao lado dos cabeçalhos das colunas.
- Transforme os dados conforme necessário usando a interface intuitiva do Power Query.
- Depois que os dados estiverem formatados corretamente, clique em “Fechar e Carregar” para importar os dados para sua planilha do Excel.
- Para converter JSON para CSV no Excel: Vá para “Arquivo” > “Salvar Como”, selecione “CSV (delimitado por vírgulas) (*.csv)” como o formato do arquivo e clique em “Salvar”.

Dica Profissional: O Power Query do Excel cria uma "consulta" reproduzível que pode ser atualizada se a sua fonte JSON for atualizada, perfeita para relatórios recorrentes.
Você também pode gostar: Converter CSV para TXT: 4 Métodos Fáceis para Todos os Usuários
Comparação dos Métodos de JSON para CSV
Escolha o método que se adapta ao tamanho do seu conjunto de dados, habilidade técnica e necessidades de segurança:
| Método | Melhor Para | Dificuldade | Personalização | Nível de Segurança |
|---|---|---|---|---|
| Ferramentas Online | Conversões rápidas e únicas | Iniciante | Baixa | Baixo (dados enviados para servidores de terceiros) |
| Python | Grandes conjuntos de dados, automação | Intermediário | Alta | Alto (execução local, sem que os dados saiam da sua máquina) |
| MS Excel | Revisão/edição manual | Iniciante | Médio | Médio (execução local, mas os arquivos do Excel podem ser compartilhados inadvertidamente) |
Melhores Práticas para a Conversão de JSON para CSV
- Valide o JSON Primeiro: Use o JSONLint ou validadores similares.
- Preserve os Tipos de Dados: Note que o CSV pode converter números em strings.
- Lide com Valores Nulos: Decida como representar valores nulos/vazios.
- Mantenha a Codificação de Caracteres: Use UTF-8 para preservar caracteres especiais.
- Teste com Dados de Amostra: Sempre teste com um pequeno subconjunto primeiro.
- Documente o Processo: Mantenha anotações sobre as transformações aplicadas.
Conclusão
Converter JSON para CSV é uma habilidade fundamental no processamento de dados. Seja você um iniciante precisando de uma ferramenta online rápida, um desenvolvedor automatizando fluxos de trabalho com Python, ou um analista usando o Excel para revisão manual, este guia tem tudo o que você precisa.
Com estas ferramentas e melhores práticas, você transformará dados JSON hierárquicos em arquivos CSV utilizáveis em minutos, desbloqueando a integração perfeita com planilhas, ferramentas de análise de dados e relatórios.
Perguntas Frequentes
Q1: É possível converter JSON para CSV gratuitamente?
Sim. Existem muitas ferramentas gratuitas, incluindo conversores online e Python com a biblioteca Free Spire.XLS (com certas limitações de página).
Q2: Posso converter JSON aninhado para CSV?
Sim, mas você precisa primeiro achatar os dados JSON aninhados. Use ferramentas como o Power Query do Excel, ferramentas online com recursos de achatamento ou o módulo json integrado do Python.
Q3: Como converto JSON para CSV em um Mac?
Usuários de Mac podem usar os mesmos métodos que os usuários de Windows: ferramentas online, Excel para Mac ou Python (que funciona em Mac, Windows e Linux).
Q4: Posso automatizar a conversão de JSON para CSV?
Sim. Use scripts Python para automatizar a conversão para múltiplos arquivos ou tarefas agendadas.
Veja Também
- 4 Maneiras Comprovadas de Converter CSV para Excel (Grátis e Automatizado)
- Converter Excel para XML: Ferramentas Gratuitas + Automação com Python
- Converta XLS/XLSX para HTML Facilmente — Mantenha a Formatação do Excel Intacta
- Converter JSON para/de Excel em Python – Guia Completo com Exemplos
- Converter Excel para JSON e JSON para Excel em C# .NET – Guia Passo a Passo
JSON을 CSV로 변환: 무료 온라인 도구, Excel 및 Python 스크립트
데이터 처리 세계에서 JSON과 CSV는 가장 널리 사용되는 두 가지 형식입니다. JSON은 구조화된 데이터를 저장하고 전송하는 데 이상적이며, CSV는 단순성이 뛰어나 스프레드시트, Excel 또는 Google Sheets와 같은 데이터 분석 도구 및 빠른 데이터 공유에 적합합니다. JSON을 CSV로 변환하는 것은 마케터, 데이터 분석가, 개발자 및 구조화된 데이터로 작업하는 모든 사람에게 일반적인 작업입니다.
이 종합 가이드에서는 초보자 친화적인 온라인 도구부터 고급 사용자를 위한 코드 기반 솔루션에 이르기까지 가장 신뢰할 수 있는 JSON을 CSV로 변환하는 방법을 안내합니다. 작은 JSON 파일을 다루든 대용량 데이터 세트를 다루든 여기에서 적합한 접근 방식을 찾을 수 있습니다.
내용:
- JSON과 CSV란 무엇인가? 간략한 개요
- 방법 1: JSON을 CSV로 변환하는 온라인 변환기 사용 (빠르고 쉬움)
- 방법 2: Python에서 JSON을 CSV로 변환 (유연하고 확장 가능)
- 방법 3: MS Excel을 사용하여 JSON을 CSV로 변환 (GUI 친화적)
- JSON-CSV 변환 방법 비교
- JSON을 CSV로 변환하기 위한 모범 사례
- 자주 묻는 질문
JSON과 CSV란 무엇인가? 간략한 개요
변환에 대해 알아보기 전에 JSON과 CSV가 무엇인지 간략하게 요약하여 변환이 왜 필요한지 이해해 보겠습니다.
- JSON (JavaScript Object Notation): 키-값 쌍을 사용하여 데이터를 저장하는 경량의 사람이 읽을 수 있는 형식입니다. 중첩된 데이터를 잘 처리하기 때문에 API, 웹 애플리케이션 및 NoSQL 데이터베이스에서 널리 사용됩니다.
- CSV (Comma-Separated Values): 값이 쉼표로 구분되는 일반 텍스트의 테이블 형식 형식입니다. 간단하고 거의 모든 스프레드시트 도구와 호환되며 데이터 분석 소프트웨어로 쉽게 가져올 수 있습니다.
JSON을 CSV로 변환하는 과정은 기본적으로 JSON의 계층적 구조를 행과 열로 "평탄화"하여 스프레드시트 도구 및 데이터 분석 플랫폼과의 CSV 호환성을 활용합니다.
방법 1: JSON을 CSV로 변환하는 온라인 변환기 사용 (빠르고 쉬움)
온라인 변환기는 변환에 가장 빠른 경로를 제공하며, 일회성 작업, 소규모 데이터 세트 또는 프로그래밍 경험이 없는 사용자에게 적합합니다. 이러한 웹 기반 도구는 브라우저에서 변환을 완전히 처리합니다.
1단계: 신뢰할 수 있는 온라인 변환기 찾기
"무료 JSON to CSV 변환기"를 검색하고 JSON-CSV.com 또는 OnlineJSONTools.com과 같이 평판이 좋고 광고가 적은 도구를 선택하십시오. 민감한 데이터의 경우 서버에 업로드하지 않고 브라우저에서 로컬로 파일을 처리하는 개인 정보 보호 중심 옵션을 고려하십시오.
2단계: JSON 데이터 준비
JSON이 올바르게 형식화되고 유효한지 확인하십시오. 대부분의 변환기는 잘못된 형식의 JSON으로 인해 자동으로 실패하거나 예기치 않은 결과를 생성합니다. 간단한 객체 배열이 가장 원활하게 변환됩니다.
[
  {"employee_id": 101, "name": "John Chen", "department": "Engineering", "salary": 85000},
  {"employee_id": 102, "name": "Maria Garcia", "department": "Marketing", "salary": 72000},
  {"employee_id": 103, "name": "David Kim", "department": "Sales", "salary": 68000}
]
전문가 팁: 파일 구조가 확실하지 않은 경우 JSONLint와 같은 JSON 유효성 검사기를 사용하십시오.
3단계: JSON 데이터 업로드, 붙여넣기 또는 연결
고품질 변환기는 여러 입력 방법을 제공합니다.
- 파일 업로드: "가져오기" 또는 유사한 버튼을 클릭하여 .json 파일을 선택합니다.
- 직접 입력: 원시 JSON을 텍스트 상자에 붙여넣습니다.
- URL 가져오기: JSON 데이터가 포함된 공개 URL을 입력합니다(API 엔드포인트에 유용).
이 예에서는 위의 직원 데이터를 변환기의 입력 필드에 붙여넣어 보십시오.
4단계: 변환 설정 구성 (고급 옵션)
많은 변환기가 사용자 지정을 제공합니다.
- 구분 기호: 쉼표(표준), 세미콜론, 탭 또는 파이프를 선택합니다.
- 텍스트 한정자: 텍스트 필드를 묶는 방법을 지정합니다(일반적으로 큰따옴표).
- 인코딩: UTF-8은 표준이며 국제 문자를 처리합니다.
- 헤더 행: 열 헤더를 포함하거나 제외합니다.
- 중첩 처리: 중첩된 객체를 평탄화하도록 선택합니다.
5단계: 변환 및 다운로드
변환 버튼을 클릭하면 몇 초 안에 미리보기가 표시됩니다. "CSV 다운로드"를 클릭하여 파일을 컴퓨터에 저장합니다. Excel 또는 다른 스프레드시트 소프트웨어에서 열어 변환을 확인합니다.
JSON-CSV.com을 사용하여 JSON을 CSV로 변환하는 예:
참고할 제한 사항: 온라인 도구는 일반적으로 파일 크기 제한(보통 1-10MB)이 있으며, 깊이 중첩된 JSON을 최적으로 처리하지 못할 수 있으며 민감한 데이터에 대한 보안 문제를 제기할 수 있습니다.
방법 2: Python에서 JSON을 CSV로 변환 (유연하고 확장 가능)
반복적인 변환, 대규모 데이터 세트, 복잡한 JSON 구조 또는 자동화된 워크플로의 경우 Python을 사용하는 것이 가장 효율적인 옵션입니다. 풍부한 데이터 라이브러리 생태계 중에서 Free Spire.XLS for Python은 JSON을 CSV로(또는 CSV를 JSON으로) 변환을 단순화하는 강력한 라이브러리입니다.
1단계: 무료 Python 라이브러리 설치
Python이 설치되어 있는지 확인한 다음 터미널 또는 명령 프롬프트를 열고 다음 pip를 실행하여 Free Spire.XLS 라이브러리를 설치합니다.
pip install Spire.Xls.Free
2단계: JSON 파일을 CSV로 변환하는 Python 스크립트 작성
이 스크립트는 플랫 JSON 파일(중첩 데이터 없음)에서 작동합니다.
import json
from spire.xls import *

# Load JSON data
with open('employee.json') as f:
    data = json.load(f)

# Create workbook and worksheet
workbook = Workbook()
sheet = workbook.Worksheets[0]
# Extract headers from JSON keys
headers = list(data[0].keys())

# Write headers to the first row
for col, header in enumerate(headers, start=1):
    sheet.Range[1, col].Value = header

# Populate values from each JSON object to the subsequent rows
for row_index, item in enumerate(data, start=2):
    for col_index, key in enumerate(headers, start=1):
        value = item.get(key, "")
        sheet.Range[row_index, col_index].Value = str(value) if value is not None else ""

# Save the worksheet as a CSV file
sheet.SaveToFile("output.csv", ",", Encoding.get_UTF8())
workbook.Dispose()
이 코드의 핵심 메서드:
json.load(): JSON 콘텐츠를 Python 목록/사전으로 구문 분석합니다.Workbook(): Excel 통합 문서를 만드는 Spire.XLS의 핵심 객체입니다.data[].keys(): JSON 목록의 키에서 열 헤더를 추출합니다.Worksheet.Range[].Value: 특정 셀에 텍스트/값을 씁니다(Spire.XLS의 경우 1부터 시작하는 행/열 인덱싱).get(key, ""): 각 키의 값을 안전하게 검색합니다(키가 없으면 빈 문자열을 반환하여 KeyError를 방지).SaveToFile(filename, delimiter, encoding): 지정된 매개변수와 인코딩으로 워크시트를 CSV 파일로 내보냅니다.
변환 결과:
실제 JSON에는 종종 중첩된 구조가 포함됩니다. 사전 및 배열이 있는 중첩된 JSON을 처리하려면 자세한 가이드인 Python에서 JSON을 CSV로 – 플랫 및 중첩 JSON에 대한 전체 가이드를 참조하십시오.
방법 3: MS Excel을 사용하여 JSON을 CSV로 변환 (GUI 친화적)
그래픽 인터페이스를 선호하거나 변환 중에 데이터를 수동으로 검토해야 하는 사용자를 위해 MS Excel은 JSON을 가져와 CSV 형식으로 저장하는 기본 기능을 제공합니다. 방법은 다음과 같습니다.
- Excel을 열고 새 통합 문서를 만듭니다.
- "데이터" 탭 > "데이터 가져오기" > "파일에서" > "JSON에서"로 이동합니다.
- JSON 파일을 선택하고 "가져오기"를 클릭하면 Excel에서 "파워 쿼리 편집기" 창이 열립니다.
- 리본에서 "테이블로"를 클릭하여 JSON 구조를 변환합니다.
- 열 헤더 옆에 있는 이중 화살표 아이콘을 클릭하여 열을 확장합니다.
- 파워 쿼리의 직관적인 인터페이스를 사용하여 필요에 따라 데이터를 변환합니다.
- 데이터가 올바르게 서식 지정되면 "닫기 및 로드"를 클릭하여 데이터를 Excel 워크시트로 가져옵니다.
- Excel에서 JSON을 CSV로 변환하려면: "파일" > "다른 이름으로 저장"으로 이동하여 파일 형식으로 "CSV (쉼표로 구분) (*.csv)"를 선택하고 "저장"을 클릭합니다.
전문가 팁: Excel의 파워 쿼리는 JSON 소스가 업데이트될 경우 새로 고칠 수 있는 재현 가능한 "쿼리"를 생성하므로 반복적인 보고서에 적합합니다.
관심 있을 만한 다른 글: CSV를 TXT로 변환: 모든 사용자를 위한 4가지 쉬운 방법
JSON-CSV 변환 방법 비교
데이터 세트 크기, 기술 능력 및 보안 요구 사항에 맞는 방법을 선택하십시오.
| 방법 | 최적 대상 | 난이도 | 사용자 지정 | 보안 수준 |
|---|---|---|---|---|
| 온라인 도구 | 빠른 일회성 변환 | 초급 | 낮음 | 낮음 (데이터가 타사 서버에 업로드됨) |
| Python | 대규모 데이터 세트, 자동화 | 중급 | 높음 | 높음 (로컬 실행, 데이터가 컴퓨터를 벗어나지 않음) |
| MS Excel | 수동 검토/편집 | 초급 | 중간 | 중간 (로컬 실행, 그러나 Excel 파일이 실수로 공유될 수 있음) |
JSON을 CSV로 변환하기 위한 모범 사례
- 먼저 JSON 유효성 검사: JSONLint 또는 유사한 유효성 검사기를 사용합니다.
- 데이터 유형 보존: CSV는 숫자를 문자열로 변환할 수 있습니다.
- Null 값 처리: null/빈 값을 나타내는 방법을 결정합니다.
- 문자 인코딩 유지: 특수 문자를 보존하려면 UTF-8을 사용합니다.
- 샘플 데이터로 테스트: 항상 작은 하위 집합으로 먼저 테스트합니다.
- 프로세스 문서화: 적용된 변환에 대한 메모를 유지합니다.
결론
JSON을 CSV로 변환하는 것은 데이터 처리의 기본 기술입니다. 빠른 온라인 도구가 필요한 초보자, Python으로 워크플로를 자동화하는 개발자, 수동 검토를 위해 Excel을 사용하는 분석가 등 이 가이드에서 모든 것을 다룹니다.
이러한 도구와 모범 사례를 사용하면 계층적 JSON 데이터를 몇 분 만에 사용 가능한 CSV 파일로 변환하여 스프레드시트, 데이터 분석 도구 및 보고서와의 원활한 통합을 실현할 수 있습니다.
자주 묻는 질문
Q1: JSON을 CSV로 무료로 변환할 수 있습니까?
예. 온라인 변환기 및 특정 페이지 제한이 있는 Free Spire.XLS 라이브러리가 포함된 Python을 비롯한 많은 무료 도구가 있습니다.
Q2: 중첩된 JSON을 CSV로 변환할 수 있습니까?
예, 하지만 먼저 중첩된 JSON 데이터를 평탄화해야 합니다. Excel의 파워 쿼리, 평탄화 기능이 있는 온라인 도구 또는 Python의 내장 json 모듈과 같은 도구를 사용하십시오.
Q3: Mac에서 JSON을 CSV로 변환하려면 어떻게 해야 합니까?
Mac 사용자는 Windows 사용자와 동일한 방법을 사용할 수 있습니다. 온라인 도구, Mac용 Excel 또는 Python(Mac, Windows 및 Linux에서 작동)입니다.
Q4: JSON을 CSV로 변환하는 것을 자동화할 수 있습니까?
예. Python 스크립트를 사용하여 여러 파일 또는 예약된 작업에 대한 변환을 자동화할 수 있습니다.
참고 항목
Convertire JSON in CSV: strumenti online gratuiti, Excel e script Python
Nel mondo della gestione dei dati, JSON e CSV sono due dei formati più utilizzati. JSON è ideale per archiviare e trasmettere dati strutturati, mentre CSV eccelle per la sua semplicità, rendendolo perfetto per fogli di calcolo, strumenti di analisi dei dati come Excel o Google Sheets e per una rapida condivisione dei dati. Convertire JSON in CSV è un'attività comune per marketer, analisti di dati, sviluppatori e chiunque lavori con dati strutturati.
In questa guida completa, ti illustreremo i metodi di conversione da JSON a CSV più affidabili, dagli strumenti online adatti ai principianti alle soluzioni basate su codice per utenti avanzati. Che tu abbia a che fare con piccoli file JSON o con grandi set di dati, qui troverai un approccio adatto.
Contenuti:
- Cosa Sono JSON e CSV? Una Rapida Panoramica
- Metodo 1: Utilizzare Convertitori Online da JSON a CSV (Facile e Veloce)
- Metodo 2: Convertire JSON in CSV in Python (Flessibile e Scalabile)
- Metodo 3: Trasformare JSON in CSV Usando MS Excel (Amichevole per l'Interfaccia Grafica)
- Confronto dei Metodi da JSON a CSV
- Migliori Pratiche per la Conversione da JSON a CSV
- Domande Frequenti
Cosa Sono JSON e CSV? Una Rapida Panoramica
Prima di immergerci nella conversione, ricapitoliamo brevemente cosa sono JSON e CSV, così capirai perché la conversione è spesso necessaria:
- JSON (JavaScript Object Notation): Un formato leggero e leggibile dall'uomo che utilizza coppie chiave-valore per archiviare i dati. È ampiamente utilizzato in API, applicazioni web e database NoSQL perché gestisce bene i dati annidati.
- CSV (Comma-Separated Values): Un formato di testo semplice, simile a una tabella, in cui i valori sono separati da virgole. È semplice, compatibile con quasi tutti gli strumenti per fogli di calcolo e facile da importare nei software di analisi dei dati.
Il processo di conversione da JSON a CSV essenzialmente "appiattisce" la struttura gerarchica di JSON in righe e colonne, sfruttando così la compatibilità di CSV con gli strumenti per fogli di calcolo e le piattaforme di analisi dei dati.
Metodo 1: Utilizzare Convertitori Online da JSON a CSV (Facile e Veloce)
I convertitori online forniscono il percorso più rapido per la conversione, perfetti per attività una tantum, piccoli set di dati o utenti senza esperienza di programmazione. Questi strumenti basati sul web gestiscono la trasformazione interamente nel tuo browser.
Passaggio 1: Trova un Convertitore Online Affidabile
Cerca "convertitore gratuito da JSON a CSV" e scegli uno strumento affidabile e con poche pubblicità come JSON-CSV.com o OnlineJSONTools.com. Per i dati sensibili, considera opzioni incentrate sulla privacy che elaborano i file localmente nel tuo browser senza caricarli sui server.
Passaggio 2: Prepara i Tuoi Dati JSON
Assicurati che il tuo JSON sia formattato correttamente e valido. La maggior parte dei convertitori fallirà silenziosamente o produrrà risultati inaspettati con JSON malformato. Un semplice array di oggetti si converte in modo più fluido:
[
  {"employee_id": 101, "name": "John Chen", "department": "Engineering", "salary": 85000},
  {"employee_id": 102, "name": "Maria Garcia", "department": "Marketing", "salary": 72000},
  {"employee_id": 103, "name": "David Kim", "department": "Sales", "salary": 68000}
]
Consiglio pro: Usa un validatore JSON come JSONLint se non sei sicuro della struttura del tuo file.
Passaggio 3: Carica, Incolla o Collega i Tuoi Dati JSON
I convertitori di qualità offrono più metodi di input:
- Caricamento File: Fai clic su "Importa" o un pulsante simile per selezionare il tuo file .json
- Input Diretto: Incolla il JSON grezzo in una casella di testo
- Recupero URL: Inserisci un URL pubblico contenente dati JSON (utile per gli endpoint API)
Per questo esempio, prova a incollare i dati dei dipendenti sopra nel campo di input del convertitore.
Passaggio 4: Configura le Impostazioni di Conversione (Opzioni Avanzate)
Molti convertitori offrono personalizzazione:
- Delimitatore: Scegli virgola (standard), punto e virgola, tabulazione o pipe
- Qualificatore di Testo: Specifica come sono racchiusi i campi di testo, in genere virgolette doppie
- Codifica: UTF-8 è standard e gestisce i caratteri internazionali
- Riga di Intestazione: Includi o escludi le intestazioni di colonna
- Gestione Annidata: Scegli di appiattire gli oggetti annidati
Passaggio 5: Converti e Scarica
Fai clic sul pulsante di conversione e dovresti vedere un'anteprima in pochi secondi. Fai clic su "Scarica CSV" per salvare il file sul tuo computer. Aprilo in Excel o in qualsiasi software per fogli di calcolo per verificare la conversione.
Un esempio di conversione da JSON a CSV utilizzando JSON-CSV.com:
Limitazioni da Notare: Gli strumenti online hanno in genere limiti di dimensione dei file (spesso 1-10 MB), potrebbero non gestire in modo ottimale JSON profondamente annidati e sollevare problemi di sicurezza con dati sensibili.
Metodo 2: Convertire JSON in CSV in Python (Flessibile e Scalabile)
Per conversioni ricorrenti, grandi set di dati, strutture JSON complesse o flussi di lavoro automatizzati, l'uso di Python è l'opzione più efficiente. Tra il suo ricco ecosistema di librerie di dati, Free Spire.XLS for Python è una potente libreria che semplifica la conversione da JSON a CSV (o da CSV a JSON).
Passaggio 1: Installa la Libreria Python Gratuita
Assicurati di avere Python installato, quindi apri il terminale o il prompt dei comandi ed esegui il seguente comando pip per installare la libreria Free Spire.XLS:
pip install Spire.Xls.Free
Passaggio 2: Scrivi lo Script Python per Convertire un File JSON in CSV
Questo script funziona per file JSON piatti (senza dati annidati).
import json
from spire.xls import *

# Load JSON data
with open('employee.json') as f:
    data = json.load(f)

# Create workbook and worksheet
workbook = Workbook()
sheet = workbook.Worksheets[0]
# Extract headers from JSON keys
headers = list(data[0].keys())

# Write headers to the first row
for col, header in enumerate(headers, start=1):
    sheet.Range[1, col].Value = header

# Populate values from each JSON object to the subsequent rows
for row_index, item in enumerate(data, start=2):
    for col_index, key in enumerate(headers, start=1):
        value = item.get(key, "")
        sheet.Range[row_index, col_index].Value = str(value) if value is not None else ""

# Save the worksheet as a CSV file
sheet.SaveToFile("output.csv", ",", Encoding.get_UTF8())
workbook.Dispose()
Metodi Principali in Questo Codice:
json.load(): Analizza il contenuto JSON in una lista/dizionario Python.Workbook(): L'oggetto principale di Spire.XLS per creare una cartella di lavoro Excel.data[].keys(): Estrae le intestazioni di colonna dalle chiavi della lista JSON.Worksheet.Range[].Value: Scrive testo/valori in una cella specifica (indicizzazione di righe/colonne basata su 1 per Spire.XLS).get(key, ""): Recupera in modo sicuro il valore per ogni chiave (restituisce una stringa vuota se la chiave è mancante, evitando un KeyError).SaveToFile(filename, delimiter, encoding): Esporta il foglio di lavoro in un file CSV con i parametri e la codifica specificati.
Il risultato della conversione:
Il JSON del mondo reale contiene spesso strutture annidate. Per gestire JSON annidato con dizionari e array, fare riferimento alla guida dettagliata: Da JSON a CSV in Python – Guida Completa per JSON Piatto e Annidato
Metodo 3: Trasformare JSON in CSV Usando MS Excel (Amichevole per l'Interfaccia Grafica)
Per coloro che preferiscono le interfacce grafiche o necessitano di rivedere manualmente i dati durante la conversione, MS Excel offre una funzionalità integrata per importare JSON e salvare in formato CSV. Ecco come:
- Apri Excel e crea una nuova cartella di lavoro.
- Vai alla scheda "Dati" > "Recupera dati" > "Da file" > "Da JSON".
- Seleziona il tuo file JSON e fai clic su "Importa", quindi Excel aprirà una finestra "Editor di Power Query".
- Fai clic su "In tabella" nella barra multifunzione per convertire la struttura JSON.
- Espandi le colonne facendo clic sull'icona a doppia freccia accanto alle intestazioni di colonna.
- Trasforma i dati secondo necessità utilizzando l'interfaccia intuitiva di Power Query.
- Una volta che i dati sono formattati correttamente, fai clic su "Chiudi e carica" per importare i dati nel tuo foglio di lavoro Excel.
- Per convertire JSON in CSV in Excel: Vai su "File" > "Salva con nome", seleziona "CSV (delimitato da virgole) (*.csv)" come formato file e fai clic su "Salva".
Consiglio pro: Power Query di Excel crea una "query" riproducibile che può essere aggiornata se la tua fonte JSON si aggiorna, perfetta per i report ricorrenti.
Potrebbe piacerti anche: Convertire CSV in TXT: 4 Metodi Semplici per Tutti gli Utenti
Confronto dei Metodi da JSON a CSV
Scegli il metodo che si adatta alle dimensioni del tuo set di dati, alle tue competenze tecniche e alle tue esigenze di sicurezza:
| Metodo | Ideale Per | Difficoltà | Personalizzazione | Livello di Sicurezza |
|---|---|---|---|---|
| Strumenti Online | Conversioni rapide e una tantum | Principiante | Bassa | Basso (dati caricati su server di terze parti) |
| Python | Grandi set di dati, automazione | Intermedio | Alta | Alto (esecuzione locale, nessun dato lascia la tua macchina) |
| MS Excel | Revisione/modifica manuale | Principiante | Media | Medio (esecuzione locale, ma i file di Excel potrebbero essere condivisi inavvertitamente) |
Migliori Pratiche per la Conversione da JSON a CSV
- Valida prima il JSON: Usa JSONLint o validatori simili.
- Conserva i Tipi di Dati: Nota che CSV potrebbe convertire i numeri in stringhe.
- Gestisci i Valori Null: Decidi come rappresentare i valori nulli/vuoti.
- Mantieni la Codifica dei Caratteri: Usa UTF-8 per preservare i caratteri speciali.
- Testa con Dati di Esempio: Testa sempre prima con un piccolo sottoinsieme.
- Documenta il Processo: Tieni appunti sulle trasformazioni applicate.
Conclusione
Convertire JSON in CSV è un'abilità fondamentale nell'elaborazione dei dati. Che tu sia un principiante che necessita di uno strumento online rapido, uno sviluppatore che automatizza i flussi di lavoro con Python o un analista che utilizza Excel per la revisione manuale, questa guida fa al caso tuo.
Con questi strumenti e le migliori pratiche, trasformerai i dati JSON gerarchici in file CSV utilizzabili in pochi minuti, sbloccando un'integrazione perfetta con fogli di calcolo, strumenti di analisi dei dati e report.
Domande Frequenti
D1: È possibile convertire JSON in CSV gratuitamente?
Sì. Esistono molti strumenti gratuiti, inclusi convertitori online e Python con la libreria Free Spire.XLS (con alcune limitazioni di pagina).
D2: Posso convertire JSON annidato in CSV?
Sì, ma è necessario prima appiattire i dati JSON annidati. Usa strumenti come Power Query di Excel, strumenti online con funzionalità di appiattimento o il modulo json integrato di Python.
D3: Come converto JSON in CSV su un Mac?
Gli utenti Mac possono utilizzare gli stessi metodi degli utenti Windows: strumenti online, Excel per Mac o Python (che funziona su Mac, Windows e Linux).
D4: Posso automatizzare la conversione da JSON a CSV?
Sì. Usa script Python per automatizzare la conversione per più file o attività pianificate.
Vedi Anche
- 4 Metodi Comprovati per Convertire CSV in Excel (Gratuiti e Automatizzati)
- Convertire Excel in XML: Strumenti Gratuiti + Automazione Python
- Converti Facilmente XLS/XLSX in HTML — Mantieni Intatta la Formattazione di Excel
- Convertire JSON da/a Excel in Python – Guida Completa con Esempi
- Convertire Excel in JSON e JSON in Excel in C# .NET – Guida Passo-Passo
Convertir JSON en CSV : outils en ligne gratuits, Excel et scripts Python
Table des matières
Dans le monde du traitement des données, JSON et CSV sont deux des formats les plus utilisés. JSON est idéal pour stocker et transmettre des données structurées, tandis que CSV excelle par sa simplicité, ce qui le rend parfait pour les feuilles de calcul, les outils d'analyse de données comme Excel ou Google Sheets, et le partage rapide de données. La conversion de JSON en CSV est une tâche courante pour les spécialistes du marketing, les analystes de données, les développeurs et toute personne travaillant avec des données structurées.
Dans ce guide complet, nous vous présenterons les méthodes de conversion JSON vers CSV les plus fiables, des outils en ligne conviviaux pour les débutants aux solutions basées sur le code pour les utilisateurs avancés. Que vous ayez affaire à de petits fichiers JSON ou à de grands ensembles de données, vous trouverez ici une approche adaptée.
Contenu :
- Qu'est-ce que JSON et CSV ? Un aperçu rapide
- Méthode 1 : Utiliser des convertisseurs en ligne de JSON en CSV (rapide et facile)
- Méthode 2 : Convertir JSON en CSV en Python (flexible et évolutif)
- Méthode 3 : Transformer JSON en CSV à l'aide de MS Excel (convivial)
- Comparaison des méthodes de conversion JSON en CSV
- Meilleures pratiques pour la conversion de JSON en CSV
- Questions fréquemment posées
Qu'est-ce que JSON et CSV ? Un aperçu rapide
Avant de nous lancer dans la conversion, rappelons brièvement ce que sont JSON et CSV, afin que vous compreniez pourquoi la conversion est souvent nécessaire :
- JSON (JavaScript Object Notation) : Un format léger et lisible par l'homme qui utilise des paires clé-valeur pour stocker des données. Il est largement utilisé dans les API, les applications Web et les bases de données NoSQL car il gère bien les données imbriquées.
- CSV (Comma-Separated Values) : Un format de texte brut, semblable à un tableau, où les valeurs sont séparées par des virgules. Il est simple, compatible avec presque tous les outils de tableur et facile à importer dans un logiciel d'analyse de données.
Le processus de conversion de JSON en CSV « aplatit » essentiellement la structure hiérarchique de JSON en lignes et colonnes, tirant ainsi parti de la compatibilité de CSV avec les outils de tableur et les plateformes d'analyse de données.
Méthode 1 : Utiliser des convertisseurs en ligne de JSON en CSV (rapide et facile)
Les convertisseurs en ligne offrent le chemin le plus rapide vers la conversion, parfait pour les tâches ponctuelles, les petits ensembles de données ou les utilisateurs sans expérience en programmation. Ces outils Web gèrent la transformation entièrement dans votre navigateur.
Étape 1 : Trouver un convertisseur en ligne fiable
Recherchez « convertisseur JSON en CSV gratuit » et choisissez un outil réputé et léger en publicité comme JSON-CSV.com ou OnlineJSONTools.com. Pour les données sensibles, envisagez des options axées sur la confidentialité qui traitent les fichiers localement dans votre navigateur sans les télécharger sur des serveurs.
Étape 2 : Préparez vos données JSON
Assurez-vous que votre JSON est correctement formaté et valide. La plupart des convertisseurs échoueront silencieusement ou produiront des résultats inattendus avec un JSON mal formé. Un simple tableau d'objets se convertit le plus facilement :
[
  {"employee_id": 101, "name": "John Chen", "department": "Engineering", "salary": 85000},
  {"employee_id": 102, "name": "Maria Garcia", "department": "Marketing", "salary": 72000},
  {"employee_id": 103, "name": "David Kim", "department": "Sales", "salary": 68000}
]
Conseil de pro : utilisez un validateur JSON comme JSONLint si vous n'êtes pas sûr de la structure de votre fichier.
Étape 3 : Téléchargez, collez ou liez vos données JSON
Les convertisseurs de qualité offrent plusieurs méthodes de saisie :
- Téléchargement de fichier : cliquez sur le bouton « Importer » ou un bouton similaire pour sélectionner votre fichier .json
- Saisie directe : collez le JSON brut dans une zone de texte
- Récupération d'URL : saisissez une URL publique contenant des données JSON (utile pour les points de terminaison d'API)
Pour cet exemple, essayez de coller les données des employés ci-dessus dans le champ de saisie du convertisseur.
Étape 4 : Configurer les paramètres de conversion (options avancées)
De nombreux convertisseurs offrent une personnalisation :
- Délimiteur : choisissez une virgule (standard), un point-virgule, une tabulation ou une barre verticale
- Qualificatif de texte : spécifiez comment les champs de texte sont encadrés, généralement des guillemets doubles
- Encodage : UTF-8 est standard et gère les caractères internationaux
- Ligne d'en-tête : inclure ou exclure les en-têtes de colonne
- Gestion imbriquée : choisissez d'aplatir les objets imbriqués
Étape 5 : Convertir et télécharger
Cliquez sur le bouton de conversion et vous devriez voir un aperçu en quelques secondes. Cliquez sur « Télécharger CSV » pour enregistrer le fichier sur votre ordinateur. Ouvrez-le dans Excel ou tout autre logiciel de tableur pour vérifier la conversion.
Un exemple de conversion de JSON en CSV à l'aide de JSON-CSV.com :
Limites à noter : les outils en ligne ont généralement des limites de taille de fichier (souvent de 1 à 10 Mo), peuvent ne pas gérer de manière optimale les JSON profondément imbriqués et soulèvent des problèmes de sécurité avec les données sensibles.
Méthode 2 : Convertir JSON en CSV en Python (flexible et évolutif)
Pour les conversions récurrentes, les grands ensembles de données, les structures JSON complexes ou les flux de travail automatisés, l'utilisation de Python est l'option la plus efficace. Parmi son riche écosystème de bibliothèques de données, Free Spire.XLS for Python est une bibliothèque puissante qui simplifie la conversion de JSON en CSV (ou de CSV en JSON).
Étape 1 : Installer la bibliothèque Python gratuite
Assurez-vous que Python est installé, puis ouvrez votre terminal ou votre invite de commande et exécutez la commande pip suivante pour installer la bibliothèque Free Spire.XLS :
pip install Spire.Xls.Free
Étape 2 : Écrire le script Python pour convertir un fichier JSON en CSV
Ce script fonctionne pour les fichiers JSON plats (pas de données imbriquées).
import json
from spire.xls import *

# Load JSON data
with open('employee.json') as f:
    data = json.load(f)

# Create workbook and worksheet
workbook = Workbook()
sheet = workbook.Worksheets[0]
# Extract headers from JSON keys
headers = list(data[0].keys())

# Write headers to the first row
for col, header in enumerate(headers, start=1):
    sheet.Range[1, col].Value = header

# Populate values from each JSON object to the subsequent rows
for row_index, item in enumerate(data, start=2):
    for col_index, key in enumerate(headers, start=1):
        value = item.get(key, "")
        sheet.Range[row_index, col_index].Value = str(value) if value is not None else ""

# Save the worksheet as a CSV file
sheet.SaveToFile("output.csv", ",", Encoding.get_UTF8())
workbook.Dispose()
Méthodes principales dans ce code :
json.load(): analyse le contenu JSON dans une liste/un dictionnaire Python.Workbook(): objet principal de Spire.XLS pour créer un classeur Excel.data[].keys(): extrait les en-têtes de colonne des clés de la liste JSON.Worksheet.Range[].Value: écrit du texte/des valeurs dans une cellule spécifique (indexation de ligne/colonne basée sur 1 pour Spire.XLS).get(key, ""): récupère en toute sécurité la valeur de chaque clé (renvoie une chaîne vide si la clé est manquante, évitant ainsi une KeyError).SaveToFile(filename, delimiter, encoding): exporte la feuille de calcul vers un fichier CSV avec les paramètres et l'encodage spécifiés.
Le résultat de la conversion :
Le JSON du monde réel contient souvent des structures imbriquées. Pour gérer les JSON imbriqués avec des dictionnaires et des tableaux, reportez-vous au guide détaillé : JSON vers CSV en Python – Guide complet pour les JSON plats et imbriqués
Méthode 3 : Transformer JSON en CSV à l'aide de MS Excel (convivial)
Pour ceux qui préfèrent les interfaces graphiques ou qui ont besoin de réviser manuellement les données lors de la conversion, MS Excel offre une fonctionnalité intégrée pour importer des JSON et les enregistrer au format CSV. Voici comment :
- Ouvrez Excel et créez un nouveau classeur.
- Allez dans l'onglet « Données » > « Obtenir des données » > « À partir d'un fichier » > « À partir de JSON ».
- Sélectionnez votre fichier JSON et cliquez sur « Importer », puis Excel ouvrira une fenêtre « Éditeur Power Query ».
- Cliquez sur « Vers la table » dans le ruban pour convertir la structure JSON.
- Développez les colonnes en cliquant sur l'icône à double flèche à côté des en-têtes de colonne.
- Transformez les données selon vos besoins à l'aide de l'interface intuitive de Power Query.
- Une fois les données correctement formatées, cliquez sur « Fermer et charger » pour importer les données dans votre feuille de calcul Excel.
- Pour convertir un JSON en CSV dans Excel : allez dans « Fichier » > « Enregistrer sous », sélectionnez « CSV (séparateur : virgule) (*.csv) » comme format de fichier, puis cliquez sur « Enregistrer ».
Conseil de pro : Power Query d'Excel crée une « requête » reproductible qui peut être actualisée si votre source JSON est mise à jour, ce qui est parfait pour les rapports récurrents.
Vous aimerez peut-être aussi : Convertir CSV en TXT : 4 méthodes faciles pour tous les utilisateurs
Comparaison des méthodes de conversion JSON en CSV
Choisissez la méthode qui correspond à la taille de votre ensemble de données, à vos compétences techniques et à vos besoins en matière de sécurité :
| Méthode | Idéal pour | Difficulté | Personnalisation | Niveau de sécurité |
|---|---|---|---|---|
| Outils en ligne | Conversions rapides et ponctuelles | Débutant | Faible | Faible (données téléchargées sur des serveurs tiers) |
| Python | Grands ensembles de données, automatisation | Intermédiaire | Élevé | Élevé (exécution locale, aucune donnée ne quitte votre machine) |
| MS Excel | Révision/modification manuelle | Débutant | Moyen | Moyen (exécution locale, mais les fichiers Excel peuvent être partagés par inadvertance) |
Meilleures pratiques pour la conversion de JSON en CSV
- Validez d'abord le JSON : utilisez JSONLint ou des validateurs similaires.
- Préservez les types de données : notez que le format CSV peut convertir les nombres en chaînes.
- Gérez les valeurs nulles : décidez comment représenter les valeurs nulles/vides.
- Maintenez l'encodage des caractères : utilisez l'UTF-8 pour préserver les caractères spéciaux.
- Testez avec des données d'échantillon : testez toujours d'abord avec un petit sous-ensemble.
- Documentez le processus : conservez des notes sur les transformations appliquées.
Conclusion
La conversion de JSON en CSV est une compétence fondamentale dans le traitement des données. Que vous soyez un débutant ayant besoin d'un outil en ligne rapide, un développeur automatisant des flux de travail avec Python ou un analyste utilisant Excel pour une révision manuelle, ce guide est fait pour vous.
Avec ces outils et ces meilleures pratiques, vous transformerez des données JSON hiérarchiques en fichiers CSV utilisables en quelques minutes, débloquant une intégration transparente avec les feuilles de calcul, les outils d'analyse de données et les rapports.
Questions fréquemment posées
Q1 : Est-il possible de convertir gratuitement un JSON en CSV ?
Oui. Il existe de nombreux outils gratuits, notamment des convertisseurs en ligne et Python avec la bibliothèque Free Spire.XLS (avec certaines limitations de pages).
Q2 : Puis-je convertir un JSON imbriqué en CSV ?
Oui, mais vous devez d'abord aplatir les données JSON imbriquées. Utilisez des outils comme Power Query d'Excel, des outils en ligne avec des fonctionnalités d'aplatissement ou le module json intégré de Python.
Q3 : Comment convertir un JSON en CSV sur un Mac ?
Les utilisateurs de Mac peuvent utiliser les mêmes méthodes que les utilisateurs de Windows : des outils en ligne, Excel pour Mac ou Python (qui fonctionne sur Mac, Windows et Linux).
Q4 : Puis-je automatiser la conversion de JSON en CSV ?
Oui. Utilisez des scripts Python pour automatiser la conversion de plusieurs fichiers ou pour des tâches planifiées.
Voir aussi
- 4 façons éprouvées de convertir un CSV en Excel (gratuit et automatisé)
- Convertir Excel en XML : outils gratuits + automatisation Python
- Convertir facilement XLS/XLSX en HTML — Conserver la mise en forme Excel intacte
- Convertir JSON vers/depuis Excel en Python – Guide complet avec exemples
- Convertir Excel en JSON et JSON en Excel en C# .NET – Guide étape par étape
Convertir JSON a CSV: herramientas en línea gratuitas, Excel y scripts de Python
Tabla de Contenidos
En el mundo del manejo de datos, JSON y CSV son dos de los formatos más utilizados. JSON es ideal para almacenar y transmitir datos estructurados, mientras que CSV sobresale por su simplicidad, lo que lo hace perfecto para hojas de cálculo, herramientas de análisis de datos como Excel o Google Sheets, y para compartir datos rápidamente. Convertir JSON a CSV es una tarea común para especialistas en marketing, analistas de datos, desarrolladores y cualquiera que trabaje con datos estructurados.
En esta guía completa, te guiaremos a través de los métodos de conversión de JSON a CSV más confiables, desde herramientas en línea para principiantes hasta soluciones basadas en código para usuarios avanzados. Ya sea que estés tratando con archivos JSON pequeños o grandes conjuntos de datos, aquí encontrarás un enfoque adecuado.
Contenidos:
- ¿Qué son JSON y CSV? Un Vistazo Rápido
- Método 1: Usar Conversores en Línea de JSON a CSV (Rápido y Fácil)
- Método 2: Convertir JSON a CSV en Python (Flexible y Escalable)
- Método 3: Transformar JSON a CSV Usando MS Excel (Amigable con GUI)
- Comparación de Métodos de JSON a CSV
- Mejores Prácticas para la Conversión de JSON a CSV
- Preguntas Frecuentes
¿Qué son JSON y CSV? Un Vistazo Rápido
Antes de sumergirnos en la conversión, recapitulemos brevemente qué son JSON y CSV, para que entiendas por qué la conversión es a menudo necesaria:
- JSON (JavaScript Object Notation): Un formato ligero y legible por humanos que utiliza pares clave-valor para almacenar datos. Es ampliamente utilizado en APIs, aplicaciones web y bases de datos NoSQL porque maneja bien los datos anidados.
- CSV (Valores Separados por Comas): Un formato de texto plano similar a una tabla donde los valores están separados por comas. Es simple, compatible con casi todas las herramientas de hojas de cálculo y fácil de importar en software de análisis de datos.
El proceso de conversión de JSON a CSV esencialmente "aplana" la estructura jerárquica de JSON en filas y columnas, aprovechando así la compatibilidad de CSV con herramientas de hojas de cálculo y plataformas de análisis de datos.
Método 1: Usar Conversores en Línea de JSON a CSV (Rápido y Fácil)
Los conversores en línea proporcionan la ruta más rápida para la conversión, perfectos para tareas únicas, conjuntos de datos pequeños o usuarios sin experiencia en programación. Estas herramientas basadas en la web manejan la transformación completamente en tu navegador.
Paso 1: Encuentra un Conversor en Línea Confiable
Busca "conversor gratuito de JSON a CSV" y elige una herramienta de buena reputación y con pocos anuncios como JSON-CSV.com o OnlineJSONTools.com. Para datos sensibles, considera opciones centradas en la privacidad que procesan archivos localmente en tu navegador sin subirlos a servidores.
Paso 2: Prepara tus Datos JSON
Asegúrate de que tu JSON esté correctamente formateado y sea válido. La mayoría de los conversores fallarán silenciosamente o producirán resultados inesperados con un JSON mal formado. Un simple array de objetos se convierte de la manera más fluida:
[
  {"employee_id": 101, "name": "John Chen", "department": "Engineering", "salary": 85000},
  {"employee_id": 102, "name": "Maria Garcia", "department": "Marketing", "salary": 72000},
  {"employee_id": 103, "name": "David Kim", "department": "Sales", "salary": 68000}
]
Consejo profesional: Usa un validador de JSON como JSONLint si no estás seguro de la estructura de tu archivo.
Paso 3: Sube, Pega o Vincula tus Datos JSON
Los conversores de calidad ofrecen múltiples métodos de entrada:
- Subir Archivo: Haz clic en “Importar” o un botón similar para seleccionar tu archivo .json
- Entrada Directa: Pega el JSON crudo en un cuadro de texto
- Obtener desde URL: Ingresa una URL pública que contenga datos JSON (útil para puntos finales de API)
Para este ejemplo, intenta pegar los datos de los empleados de arriba en el campo de entrada del conversor.
Paso 4: Configura los Ajustes de Conversión (Opciones Avanzadas)
Muchos conversores ofrecen personalización:
- Delimitador: Elige coma (estándar), punto y coma, tabulador o barra vertical
- Calificador de Texto: Especifica cómo se encierran los campos de texto, típicamente comillas dobles
- Codificación: UTF-8 es el estándar y maneja caracteres internacionales
- Fila de Encabezado: Incluir o excluir los encabezados de las columnas
- Manejo de Anidamiento: Elige aplanar objetos anidados
Paso 5: Convertir y Descargar
Haz clic en el botón de convertir, y deberías ver una vista previa en segundos. Haz clic en "Descargar CSV" para guardar el archivo en tu computadora. Ábrelo en Excel o cualquier software de hojas de cálculo para verificar la conversión.
Un ejemplo de conversión de JSON a CSV usando JSON-CSV.com:
Limitaciones a tener en cuenta: Las herramientas en línea suelen tener límites de tamaño de archivo (a menudo de 1 a 10 MB), pueden no manejar de manera óptima el JSON profundamente anidado y plantean problemas de seguridad con datos sensibles.
Método 2: Convertir JSON a CSV en Python (Flexible y Escalable)
Para conversiones recurrentes, grandes conjuntos de datos, estructuras JSON complejas o flujos de trabajo automatizados, usar Python es la opción más eficiente. Entre su rico ecosistema de bibliotecas de datos, Free Spire.XLS para Python es una potente biblioteca que simplifica la conversión de JSON a CSV (o de CSV a JSON).
Paso 1: Instala la Biblioteca Gratuita de Python
Asegúrate de tener Python instalado, y luego abre tu terminal o línea de comandos y ejecuta el siguiente comando pip para instalar la biblioteca Free Spire.XLS:
pip install Spire.Xls.Free
Paso 2: Escribe el Script de Python para convertir un archivo JSON a CSV
Este script funciona para archivos JSON planos (sin datos anidados).
import json
from spire.xls import *

# Load JSON data
with open('employee.json') as f:
    data = json.load(f)

# Create workbook and worksheet
workbook = Workbook()
sheet = workbook.Worksheets[0]
# Extract headers from JSON keys
headers = list(data[0].keys())

# Write headers to the first row
for col, header in enumerate(headers, start=1):
    sheet.Range[1, col].Value = header

# Populate values from each JSON object to the subsequent rows
for row_index, item in enumerate(data, start=2):
    for col_index, key in enumerate(headers, start=1):
        value = item.get(key, "")
        sheet.Range[row_index, col_index].Value = str(value) if value is not None else ""

# Save the worksheet as a CSV file
sheet.SaveToFile("output.csv", ",", Encoding.get_UTF8())
workbook.Dispose()
Métodos Principales en este Código:
json.load(): Analiza el contenido JSON en una lista/diccionario de Python.Workbook(): Objeto principal de Spire.XLS para crear un libro de trabajo de Excel.data[].keys(): Extrae los encabezados de las columnas de las claves de la lista JSON.Worksheet.Range[].Value: Escribe texto/valores en una celda específica (indexación de filas/columnas basada en 1 para Spire.XLS).get(key, ""): Recupera de forma segura el valor para cada clave (devuelve una cadena vacía si la clave falta, evitando un KeyError).SaveToFile(filename, delimiter, encoding): Exporta la hoja de trabajo a un archivo CSV con los parámetros y la codificación especificados.
El resultado de la conversión:
El JSON del mundo real a menudo contiene estructuras anidadas. Para manejar JSON anidado con diccionarios y arrays, consulta la guía detallada: JSON a CSV en Python – Guía Completa para JSON Plano y Anidado
Método 3: Transformar JSON a CSV Usando MS Excel (Amigable con GUI)
Para aquellos que prefieren interfaces gráficas o necesitan revisar manualmente los datos durante la conversión, MS Excel ofrece una capacidad incorporada para importar JSON y guardarlo en formato CSV. Así es como se hace:
- Abre Excel y crea un nuevo libro de trabajo.
- Ve a la pestaña “Datos” > “Obtener datos” > “Desde un archivo” > “Desde JSON”.
- Selecciona tu archivo JSON y haz clic en “Importar”, y luego Excel abrirá una ventana del “Editor de Power Query”.
- Haz clic en “A la tabla” en la cinta de opciones para convertir la estructura JSON.
- Expande las columnas haciendo clic en el icono de doble flecha junto a los encabezados de las columnas.
- Transforma los datos según sea necesario utilizando la interfaz intuitiva de Power Query.
- Una vez que los datos estén formateados correctamente, haz clic en “Cerrar y cargar” para importar los datos a tu hoja de cálculo de Excel.
- Para convertir JSON a CSV en Excel: Ve a “Archivo” > “Guardar como”, selecciona “CSV (delimitado por comas) (*.csv)” como formato de archivo, y haz clic en “Guardar”.
Consejo profesional: Power Query de Excel crea una "consulta" reproducible que se puede actualizar si tu fuente JSON cambia, perfecto para informes recurrentes.
También te puede interesar: Convertir CSV a TXT: 4 Métodos Fáciles para Todos los Usuarios
Comparación de Métodos de JSON a CSV
Elige el método que se ajuste al tamaño de tu conjunto de datos, habilidad técnica y necesidades de seguridad:
| Método | Mejor para | Dificultad | Personalización | Nivel de Seguridad |
|---|---|---|---|---|
| Herramientas en Línea | Conversiones rápidas y únicas | Principiante | Bajo | Bajo (datos subidos a servidores de terceros) |
| Python | Grandes conjuntos de datos, automatización | Intermedio | Alto | Alto (ejecución local, los datos no salen de tu máquina) |
| MS Excel | Revisión/edición manual | Principiante | Medio | Medio (ejecución local, pero los archivos de Excel pueden compartirse inadvertidamente) |
Mejores Prácticas para la Conversión de JSON a CSV
- Valida el JSON Primero: Usa JSONLint o validadores similares.
- Conserva los Tipos de Datos: Ten en cuenta que CSV puede convertir números a cadenas.
- Maneja los Valores Nulos: Decide cómo representar valores nulos/vacíos.
- Mantén la Codificación de Caracteres: Usa UTF-8 para preservar caracteres especiales.
- Prueba con Datos de Muestra: Siempre prueba primero con un pequeño subconjunto.
- Documenta el Proceso: Mantén notas sobre las transformaciones aplicadas.
Conclusión
Convertir JSON a CSV es una habilidad fundamental en el procesamiento de datos. Ya seas un principiante que necesita una herramienta en línea rápida, un desarrollador que automatiza flujos de trabajo con Python o un analista que usa Excel para una revisión manual, esta guía te tiene cubierto.
Con estas herramientas y mejores prácticas, convertirás datos JSON jerárquicos en archivos CSV utilizables en minutos, desbloqueando una integración perfecta con hojas de cálculo, herramientas de análisis de datos e informes.
Preguntas Frecuentes
P1: ¿Es posible convertir JSON a CSV de forma gratuita?
Sí. Hay muchas herramientas gratuitas, incluidos los conversores en línea y Python con la biblioteca Free Spire.XLS (con ciertas limitaciones de página).
P2: ¿Puedo convertir JSON anidado a CSV?
Sí, pero primero necesitas aplanar los datos JSON anidados. Usa herramientas como Power Query de Excel, herramientas en línea con funciones de aplanamiento o el módulo json incorporado de Python.
P3: ¿Cómo convierto JSON a CSV en una Mac?
Los usuarios de Mac pueden usar los mismos métodos que los usuarios de Windows: herramientas en línea, Excel para Mac o Python (que funciona en Mac, Windows y Linux).
P4: ¿Puedo automatizar la conversión de JSON a CSV?
Sí. Usa scripts de Python para automatizar la conversión de múltiples archivos o para tareas programadas.
Ver También
- 4 Maneras Comprobadas de Convertir CSV a Excel (Gratis y Automatizado)
- Convertir Excel a XML: Herramientas Gratuitas + Automatización con Python
- Convertir XLS/XLSX a HTML Fácilmente — Mantener Intacto el Formato de Excel
- Convertir JSON a/desde Excel en Python – Guía Completa con Ejemplos
- Convertir Excel a JSON y JSON a Excel en C# .NET – Guía Paso a Paso
JSON in CSV umwandeln: Kostenlose Online-Tools, Excel & Python-Skripte
Inhaltsverzeichnis
In der Welt der Datenverarbeitung sind JSON und CSV zwei der am weitesten verbreiteten Formate. JSON ist ideal zum Speichern und Übertragen strukturierter Daten, während CSV durch Einfachheit besticht und sich somit perfekt für Tabellenkalkulationen, Datenanalysetools wie Excel oder Google Sheets und den schnellen Datenaustausch eignet. Die Konvertierung von JSON in CSV ist eine häufige Aufgabe für Vermarkter, Datenanalysten, Entwickler und alle, die mit strukturierten Daten arbeiten.
In diesem umfassenden Leitfaden führen wir Sie durch die zuverlässigsten Methoden zur JSON-zu-CSV-Konvertierung, von anfängerfreundlichen Online-Tools bis hin zu codebasierten Lösungen für fortgeschrittene Benutzer. Egal, ob Sie mit kleinen JSON-Dateien oder großen Datensätzen arbeiten, hier finden Sie den passenden Ansatz.
Inhalt:
- Was sind JSON und CSV? Ein kurzer Überblick
- Methode 1: Verwendung von JSON-zu-CSV-Online-Konvertern (schnell & einfach)
- Methode 2: Konvertieren von JSON in CSV mit Python (flexibel & skalierbar)
- Methode 3: Umwandeln von JSON in CSV mit MS Excel (GUI-freundlich)
- Vergleich der JSON-zu-CSV-Methoden
- Best Practices für die JSON-zu-CSV-Konvertierung
- Häufig gestellte Fragen
Was sind JSON und CSV? Ein kurzer Überblick
Bevor wir uns mit der Konvertierung befassen, wollen wir kurz zusammenfassen, was JSON und CSV sind, damit Sie verstehen, warum eine Konvertierung oft notwendig ist:
- JSON (JavaScript Object Notation): Ein leichtgewichtiges, für Menschen lesbares Format, das Schlüssel-Wert-Paare zur Datenspeicherung verwendet. Es wird häufig in APIs, Webanwendungen und NoSQL-Datenbanken verwendet, da es verschachtelte Daten gut verarbeiten kann.
- CSV (Comma-Separated Values): Ein reines Textformat in Tabellenform, bei dem Werte durch Kommas getrennt sind. Es ist einfach, mit fast allen Tabellenkalkulationsprogrammen kompatibel und leicht in Datenanalysesoftware zu importieren.
Der Konvertierungsprozess von JSON zu CSV „flacht“ im Wesentlichen die hierarchische Struktur von JSON in Zeilen und Spalten ab und nutzt so die Kompatibilität von CSV mit Tabellenkalkulationsprogrammen und Datenanalyseplattformen.
Methode 1: Verwendung von JSON-zu-CSV-Online-Konvertern (schnell & einfach)
Online-Konverter bieten den schnellsten Weg zur Konvertierung, perfekt für einmalige Aufgaben, kleine Datensätze oder Benutzer ohne Programmiererfahrung. Diese webbasierten Tools führen die Umwandlung vollständig in Ihrem Browser durch.
Schritt 1: Finden Sie einen zuverlässigen Online-Konverter
Suchen Sie nach „kostenloser JSON-zu-CSV-Konverter“ und wählen Sie ein seriöses, werbearmes Tool wie JSON-CSV.com oder OnlineJSONTools.com. Bei sensiblen Daten sollten Sie datenschutzorientierte Optionen in Betracht ziehen, die Dateien lokal in Ihrem Browser verarbeiten, ohne sie auf Server hochzuladen.
Schritt 2: Bereiten Sie Ihre JSON-Daten vor
Stellen Sie sicher, dass Ihr JSON korrekt formatiert und gültig ist. Die meisten Konverter schlagen bei fehlerhaftem JSON stillschweigend fehl oder erzeugen unerwartete Ergebnisse. Ein einfaches Array von Objekten lässt sich am nahtlosesten konvertieren:
[
  {"employee_id": 101, "name": "John Chen", "department": "Engineering", "salary": 85000},
  {"employee_id": 102, "name": "Maria Garcia", "department": "Marketing", "salary": 72000},
  {"employee_id": 103, "name": "David Kim", "department": "Sales", "salary": 68000}
]
Profi-Tipp: Verwenden Sie einen JSON-Validator wie JSONLint, wenn Sie sich über die Struktur Ihrer Datei unsicher sind.
Schritt 3: Laden Sie Ihre JSON-Daten hoch, fügen Sie sie ein oder verlinken Sie sie
Qualitätskonverter bieten mehrere Eingabemethoden:
- Datei-Upload: Klicken Sie auf „Importieren“ oder eine ähnliche Schaltfläche, um Ihre .json-Datei auszuwählen
- Direkte Eingabe: Fügen Sie rohes JSON in ein Textfeld ein
- URL-Abruf: Geben Sie eine öffentliche URL ein, die JSON-Daten enthält (nützlich für API-Endpunkte)
Versuchen Sie für dieses Beispiel, die oben genannten Mitarbeiterdaten in das Eingabefeld des Konverters einzufügen.
Schritt 4: Konfigurieren Sie die Konvertierungseinstellungen (Erweiterte Optionen)
Viele Konverter bieten Anpassungsmöglichkeiten:
- Trennzeichen: Wählen Sie Komma (Standard), Semikolon, Tabulator oder Pipe
- Text-Qualifier: Geben Sie an, wie Textfelder umschlossen werden, normalerweise doppelte Anführungszeichen
- Kodierung: UTF-8 ist Standard und verarbeitet internationale Zeichen
- Kopfzeile: Spaltenüberschriften ein- oder ausschließen
- Umgang mit Verschachtelungen: Wählen Sie, ob verschachtelte Objekte abgeflacht werden sollen
Schritt 5: Konvertieren und Herunterladen
Klicken Sie auf die Schaltfläche „Konvertieren“, und Sie sollten innerhalb von Sekunden eine Vorschau sehen. Klicken Sie auf „CSV herunterladen“, um die Datei auf Ihrem Computer zu speichern. Öffnen Sie sie in Excel oder einer anderen Tabellenkalkulationssoftware, um die Konvertierung zu überprüfen.
Ein Beispiel für die Konvertierung von JSON in CSV mit JSON-CSV.com:
Zu beachtende Einschränkungen: Online-Tools haben in der Regel Dateigrößenbeschränkungen (oft 1-10 MB), können tief verschachteltes JSON möglicherweise nicht optimal verarbeiten und werfen Sicherheitsbedenken bei sensiblen Daten auf.
Methode 2: Konvertieren von JSON in CSV mit Python (flexibel & skalierbar)
Für wiederkehrende Konvertierungen, große Datensätze, komplexe JSON-Strukturen oder automatisierte Arbeitsabläufe ist die Verwendung von Python die effizienteste Option. Unter seinem reichhaltigen Ökosystem von Datenbibliotheken ist Free Spire.XLS for Python eine leistungsstarke Bibliothek, die die Konvertierung von JSON in CSV (oder CSV in JSON) vereinfacht.
Schritt 1: Installieren Sie die kostenlose Python-Bibliothek
Stellen Sie sicher, dass Sie Python installiert haben, öffnen Sie dann Ihr Terminal oder Ihre Eingabeaufforderung und führen Sie den folgenden Pip-Befehl aus, um die Free Spire.XLS-Bibliothek zu installieren:
pip install Spire.Xls.Free
Schritt 2: Schreiben Sie das Python-Skript, um eine JSON-Datei in CSV zu konvertieren
Dieses Skript funktioniert für flache JSON-Dateien (keine verschachtelten Daten).
import json
from spire.xls import *

# JSON-Daten laden
with open('employee.json') as f:
    data = json.load(f)

# Arbeitsmappe und Arbeitsblatt erstellen
workbook = Workbook()
sheet = workbook.Worksheets[0]
# Kopfzeilen aus JSON-Schlüsseln extrahieren
headers = list(data[0].keys())

# Kopfzeilen in die erste Zeile schreiben
for col, header in enumerate(headers, start=1):
    sheet.Range[1, col].Value = header

# Werte aus jedem JSON-Objekt in die nachfolgenden Zeilen eintragen
for row_index, item in enumerate(data, start=2):
    for col_index, key in enumerate(headers, start=1):
        value = item.get(key, "")
        sheet.Range[row_index, col_index].Value = str(value) if value is not None else ""

# Das Arbeitsblatt als CSV-Datei speichern
sheet.SaveToFile("output.csv", ",", Encoding.get_UTF8())
workbook.Dispose()
Kernmethoden in diesem Code:
json.load(): Analysiert den JSON-Inhalt in eine Python-Liste/ein Python-Wörterbuch.Workbook(): Das Kernobjekt von Spire.XLS zum Erstellen einer Excel-Arbeitsmappe.data[].keys(): Extrahiert Spaltenüberschriften aus den Schlüsseln der JSON-Liste.Worksheet.Range[].Value: Schreibt Text/Werte in eine bestimmte Zelle (1-basierte Zeilen-/Spaltenindizierung für Spire.XLS).get(key, ""): Ruft den Wert für jeden Schlüssel sicher ab (gibt eine leere Zeichenfolge zurück, wenn der Schlüssel fehlt, und vermeidet so einen KeyError).SaveToFile(filename, delimiter, encoding): Exportiert das Arbeitsblatt in eine CSV-Datei mit angegebenen Parametern und Kodierung.
Das Konvertierungsergebnis:
Echte JSON-Daten enthalten oft verschachtelte Strukturen. Informationen zum Umgang mit verschachteltem JSON mit Wörterbüchern und Arrays finden Sie im ausführlichen Leitfaden: JSON zu CSV in Python – Vollständiger Leitfaden für flaches & verschachteltes JSON
Methode 3: Umwandeln von JSON in CSV mit MS Excel (GUI-freundlich)
Für diejenigen, die grafische Oberflächen bevorzugen oder Daten während der Konvertierung manuell überprüfen müssen, bietet MS Excel eine integrierte Funktion zum Importieren von JSON und Speichern im CSV-Format. So geht's:
- Öffnen Sie Excel und erstellen Sie eine neue Arbeitsmappe.
- Gehen Sie zum Tab „Daten“ > „Daten abrufen“ > „Aus Datei“ > „Aus JSON“.
- Wählen Sie Ihre JSON-Datei aus und klicken Sie auf „Importieren“. Excel öffnet dann ein „Power Query-Editor“-Fenster.
- Klicken Sie im Menüband auf „In Tabelle“, um die JSON-Struktur zu konvertieren.
- Erweitern Sie Spalten , indem Sie auf das Doppelpfeil-Symbol neben den Spaltenüberschriften klicken.
- Transformieren Sie Daten nach Bedarf über die intuitive Benutzeroberfläche von Power Query.
- Sobald die Daten korrekt formatiert sind, klicken Sie auf „Schließen & Laden“, um die Daten in Ihr Excel-Arbeitsblatt zu importieren.
- Um JSON in CSV in Excel zu konvertieren: Gehen Sie zu „Datei“ > „Speichern unter“, wählen Sie „CSV (Trennzeichen-getrennt) (*.csv)“ als Dateiformat und klicken Sie auf „Speichern“.
Profi-Tipp: Der Power Query von Excel erstellt eine reproduzierbare „Abfrage“, die aktualisiert werden kann, wenn sich Ihre JSON-Quelle ändert – perfekt für wiederkehrende Berichte.
Das könnte Ihnen auch gefallen: CSV in TXT konvertieren: 4 einfache Methoden für alle Benutzer
Vergleich der JSON-zu-CSV-Methoden
Wählen Sie die Methode, die zu Ihrer Datensatzgröße, Ihren technischen Fähigkeiten und Ihren Sicherheitsanforderungen passt:
| Methode | Am besten für | Schwierigkeit | Anpassung | Sicherheitsstufe |
|---|---|---|---|---|
| Online-Tools | Schnelle, einmalige Konvertierungen | Anfänger | Niedrig | Niedrig (Daten werden auf Server von Drittanbietern hochgeladen) |
| Python | Große Datensätze, Automatisierung | Mittel | Hoch | Hoch (lokale Ausführung, keine Daten verlassen Ihren Computer) |
| MS Excel | Manuelle Überprüfung/Bearbeitung | Anfänger | Mittel | Mittel (lokale Ausführung, aber Excel-Dateien können versehentlich geteilt werden) |
Best Practices für die JSON-zu-CSV-Konvertierung
- Zuerst JSON validieren: Verwenden Sie JSONLint oder ähnliche Validatoren.
- Datentypen beibehalten: Beachten Sie, dass CSV Zahlen in Zeichenfolgen umwandeln kann.
- Umgang mit Nullwerten: Entscheiden Sie, wie Null-/Leerwerte dargestellt werden sollen.
- Zeichenkodierung beibehalten: Verwenden Sie UTF-8, um Sonderzeichen zu erhalten.
- Mit Beispieldaten testen: Testen Sie immer zuerst mit einer kleinen Teilmenge.
- Den Prozess dokumentieren: Notizen zu den angewendeten Transformationen aufbewahren.
Fazit
Die Konvertierung von JSON in CSV ist eine grundlegende Fähigkeit in der Datenverarbeitung. Ob Sie ein Anfänger sind, der ein schnelles Online-Tool benötigt, ein Entwickler, der Arbeitsabläufe mit Python automatisiert, oder ein Analyst, der Excel zur manuellen Überprüfung verwendet – dieser Leitfaden deckt alles ab.
Mit diesen Tools und Best Practices verwandeln Sie hierarchische JSON-Daten in wenigen Minuten in nutzbare CSV-Dateien und ermöglichen so eine nahtlose Integration mit Tabellenkalkulationen, Datenanalysetools und Berichten.
Häufig gestellte Fragen
F1: Ist es möglich, JSON kostenlos in CSV zu konvertieren?
Ja. Es gibt viele kostenlose Tools, einschließlich Online-Konvertern und Python mit der Free Spire.XLS-Bibliothek (mit bestimmten Seitenbeschränkungen).
F2: Kann ich verschachteltes JSON in CSV konvertieren?
Ja, aber Sie müssen die verschachtelten JSON-Daten zuerst abflachen. Verwenden Sie Tools wie den Power Query von Excel, Online-Tools mit Abflachungsfunktionen oder das integrierte json -Modul von Python.
F3: Wie konvertiere ich JSON auf einem Mac in CSV?
Mac-Benutzer können dieselben Methoden wie Windows-Benutzer verwenden: Online-Tools, Excel für Mac oder Python (das auf Mac, Windows und Linux funktioniert).
F4: Kann ich die Konvertierung von JSON in CSV automatisieren?
Ja. Verwenden Sie Python-Skripte, um die Konvertierung für mehrere Dateien oder geplante Aufgaben zu automatisieren.
Siehe auch
- 4 bewährte Methoden zur Konvertierung von CSV in Excel (kostenlos & automatisiert)
- Excel in XML konvertieren: Kostenlose Tools + Python-Automatisierung
- XLS/XLSX einfach in HTML konvertieren – Excel-Formatierung beibehalten
- JSON in/aus Excel in Python konvertieren – Vollständiger Leitfaden mit Beispielen
- Excel in JSON und JSON in Excel in C# .NET konvertieren – Schritt-für-Schritt-Anleitung
Конвертировать JSON в CSV: бесплатные онлайн-инструменты, Excel и скрипты Python
Содержание
В мире обработки данных JSON и CSV являются двумя наиболее широко используемыми форматами. JSON идеально подходит для хранения и передачи структурированных данных, в то время как CSV отличается простотой, что делает его идеальным для электронных таблиц, инструментов анализа данных, таких как Excel или Google Sheets, и быстрого обмена данными. Преобразование JSON в CSV — обычная задача для маркетологов, аналитиков данных, разработчиков и всех, кто работает со структурированными данными.
В этом подробном руководстве мы рассмотрим самые надежные методы преобразования JSON в CSV, от простых онлайн-инструментов для начинающих до решений на основе кода для опытных пользователей. Независимо от того, имеете ли вы дело с небольшими файлами JSON или большими наборами данных, вы найдете здесь подходящий подход.
Содержание:
- Что такое JSON и CSV? Краткий обзор
- Метод 1: Использование онлайн-конвертеров JSON в CSV (быстро и просто)
- Метод 2: Преобразование JSON в CSV на Python (гибко и масштабируемо)
- Метод 3: Преобразование JSON в CSV с помощью MS Excel (удобный графический интерфейс)
- Сравнение методов преобразования JSON в CSV
- Лучшие практики преобразования JSON в CSV
- Часто задаваемые вопросы
Что такое JSON и CSV? Краткий обзор
Прежде чем перейти к преобразованию, давайте кратко вспомним, что такое JSON и CSV, чтобы вы поняли, почему преобразование часто необходимо:
- JSON (JavaScript Object Notation): легковесный, удобочитаемый формат, использующий пары «ключ-значение» для хранения данных. Он широко используется в API, веб-приложениях и базах данных NoSQL, поскольку хорошо обрабатывает вложенные данные.
- CSV (Comma-Separated Values): простой текстовый, табличный формат, в котором значения разделены запятыми. Он прост, совместим почти со всеми инструментами для работы с электронными таблицами и легко импортируется в программное обеспечение для анализа данных.
Процесс преобразования JSON в CSV по сути «выравнивает» иерархическую структуру JSON в строки и столбцы, тем самым используя совместимость CSV с инструментами для работы с электронными таблицами и платформами анализа данных.
Метод 1: Использование онлайн-конвертеров JSON в CSV (быстро и просто)
Онлайн-конвертеры обеспечивают самый быстрый путь к преобразованию, идеально подходящий для одноразовых задач, небольших наборов данных или пользователей без опыта программирования. Эти веб-инструменты выполняют преобразование полностью в вашем браузере.
Шаг 1: Найдите надежный онлайн-конвертер
Найдите «бесплатный конвертер JSON в CSV» и выберите надежный инструмент с небольшим количеством рекламы, например JSON-CSV.com или OnlineJSONTools.com. Для конфиденциальных данных рассмотрите варианты, ориентированные на конфиденциальность, которые обрабатывают файлы локально в вашем браузере без загрузки на серверы.
Шаг 2: Подготовьте данные JSON
Убедитесь, что ваш JSON правильно отформатирован и действителен. Большинство конвертеров будут молча завершать работу с ошибкой или выдавать неожиданные результаты при неправильно отформатированном JSON. Простой массив объектов преобразуется наиболее гладко:
[
  {"employee_id": 101, "name": "John Chen", "department": "Engineering", "salary": 85000},
  {"employee_id": 102, "name": "Maria Garcia", "department": "Marketing", "salary": 72000},
  {"employee_id": 103, "name": "David Kim", "department": "Sales", "salary": 68000}
]
Совет: используйте валидатор JSON, например JSONLint, если вы не уверены в структуре вашего файла.
Шаг 3: Загрузите, вставьте или укажите ссылку на ваши данные JSON
Качественные конвертеры предлагают несколько методов ввода:
- Загрузка файла: нажмите кнопку «Импорт» или аналогичную, чтобы выбрать файл .json
- Прямой ввод: вставьте необработанный JSON в текстовое поле
- Получение по URL: введите общедоступный URL-адрес, содержащий данные JSON (полезно для конечных точек API)
Для этого примера попробуйте вставить данные о сотрудниках выше в поле ввода конвертера.
Шаг 4: Настройте параметры преобразования (дополнительные параметры)
Многие конвертеры предлагают настройку:
- Разделитель: выберите запятую (стандарт), точку с запятой, табуляцию или вертикальную черту
- Ограничитель текста: укажите, как заключаются текстовые поля, обычно двойные кавычки
- Кодировка: UTF-8 является стандартом и обрабатывает международные символы
- Строка заголовка: включить или исключить заголовки столбцов
- Обработка вложенности: выберите выравнивание вложенных объектов
Шаг 5: Преобразуйте и загрузите
Нажмите кнопку преобразования, и вы увидите предварительный просмотр в течение нескольких секунд. Нажмите «Скачать CSV», чтобы сохранить файл на свой компьютер. Откройте его в Excel или любом другом программном обеспечении для работы с электронными таблицами, чтобы проверить преобразование.
Пример преобразования JSON в CSV с помощью JSON-CSV.com:
Ограничения, которые следует учитывать: онлайн-инструменты обычно имеют ограничения на размер файла (часто 1–10 МБ), могут неоптимально обрабатывать глубоко вложенный JSON и вызывать проблемы с безопасностью при работе с конфиденциальными данными.
Метод 2: Преобразование JSON в CSV на Python (гибко и масштабируемо)
Для повторяющихся преобразований, больших наборов данных, сложных структур JSON или автоматизированных рабочих процессов использование Python является наиболее эффективным вариантом. Среди его богатой экосистемы библиотек данных Free Spire.XLS for Python — это мощная библиотека, которая упрощает преобразование JSON в CSV (или CSV в JSON).
Шаг 1: Установите бесплатную библиотеку Python
Убедитесь, что у вас установлен Python, а затем откройте терминал или командную строку и выполните следующую команду pip для установки библиотеки Free Spire.XLS:
pip install Spire.Xls.Free
Шаг 2: Напишите скрипт Python для преобразования файла JSON в CSV
Этот скрипт работает для плоских файлов JSON (без вложенных данных).
import json
from spire.xls import *

# Load JSON data
with open('employee.json') as f:
    data = json.load(f)

# Create workbook and worksheet
workbook = Workbook()
sheet = workbook.Worksheets[0]
# Extract headers from JSON keys
headers = list(data[0].keys())

# Write headers to the first row
for col, header in enumerate(headers, start=1):
    sheet.Range[1, col].Value = header

# Populate values from each JSON object to the subsequent rows
for row_index, item in enumerate(data, start=2):
    for col_index, key in enumerate(headers, start=1):
        value = item.get(key, "")
        sheet.Range[row_index, col_index].Value = str(value) if value is not None else ""

# Save the worksheet as a CSV file
sheet.SaveToFile("output.csv", ",", Encoding.get_UTF8())
workbook.Dispose()
Основные методы в этом коде:
json.load(): разбор содержимого JSON в список/словарь Python.Workbook(): основной объект Spire.XLS для создания рабочей книги Excel.data[].keys(): извлечение заголовков столбцов из ключей списка JSON.Worksheet.Range[].Value: запись текста/значений в определенную ячейку (индексация строк/столбцов в Spire.XLS начинается с 1).get(key, ""): безопасное получение значения для каждого ключа (возвращает пустую строку, если ключ отсутствует, избегая KeyError).SaveToFile(filename, delimiter, encoding): экспорт листа в файл CSV с указанными параметрами и кодировкой.
Результат преобразования:
Реальный JSON часто содержит вложенные структуры. Чтобы обрабатывать вложенный JSON со словарями и массивами, обратитесь к подробному руководству: JSON в CSV на Python – полное руководство для плоского и вложенного JSON
Метод 3: Преобразование JSON в CSV с помощью MS Excel (удобный графический интерфейс)
Для тех, кто предпочитает графические интерфейсы или нуждается в ручной проверке данных во время преобразования, MS Excel предлагает встроенную возможность импортировать JSON и сохранять в формате CSV. Вот как это сделать:
- Откройте Excel и создайте новую рабочую книгу.
- Перейдите на вкладку «Данные» > «Получить данные» > «Из файла» > «Из JSON».
- Выберите свой файл JSON и нажмите «Импорт», после чего Excel откроет окно «Редактор Power Query».
- Нажмите «В таблицу» на ленте, чтобы преобразовать структуру JSON.
- Разверните столбцы , щелкнув значок с двумя стрелками рядом с заголовками столбцов.
- Преобразуйте данные по мере необходимости, используя интуитивно понятный интерфейс Power Query.
- Как только данные будут правильно отформатированы, нажмите «Закрыть и загрузить», чтобы импортировать данные на лист Excel.
- Чтобы преобразовать JSON в CSV в Excel: перейдите в «Файл» > «Сохранить как», выберите «CSV (разделители-запятые) (*.csv)» в качестве формата файла и нажмите «Сохранить».
Совет: Power Query в Excel создает воспроизводимый «запрос», который можно обновить, если ваш источник JSON изменится, что идеально подходит для повторяющихся отчетов.
Вам также может понравиться: Преобразование CSV в TXT: 4 простых метода для всех пользователей
Сравнение методов преобразования JSON в CSV
Выберите метод, который соответствует размеру вашего набора данных, техническим навыкам и потребностям в безопасности:
| Метод | Лучше всего подходит для | Сложность | Настройка | Уровень безопасности |
|---|---|---|---|---|
| Онлайн-инструменты | Быстрые, одноразовые преобразования | Начинающий | Низкая | Низкий (данные загружаются на сторонние серверы) |
| Python | Большие наборы данных, автоматизация | Средний | Высокая | Высокий (локальное выполнение, данные не покидают вашу машину) |
| MS Excel | Ручной просмотр/редактирование | Начинающий | Средний | Средний (локальное выполнение, но файлы Excel могут быть случайно переданы) |
Лучшие практики преобразования JSON в CSV
- Сначала проверьте JSON: используйте JSONLint или аналогичные валидаторы.
- Сохраняйте типы данных: обратите внимание, что CSV может преобразовывать числа в строки.
- Обрабатывайте нулевые значения: решите, как представлять нулевые/пустые значения.
- Поддерживайте кодировку символов: используйте UTF-8 для сохранения специальных символов.
- Тестируйте на образце данных: всегда сначала тестируйте на небольшом подмножестве.
- Документируйте процесс: ведите записи о примененных преобразованиях.
Заключение
Преобразование JSON в CSV — это фундаментальный навык в обработке данных. Независимо от того, являетесь ли вы новичком, которому нужен быстрый онлайн-инструмент, разработчиком, автоматизирующим рабочие процессы с помощью Python, или аналитиком, использующим Excel для ручной проверки, это руководство поможет вам.
С помощью этих инструментов и лучших практик вы за считанные минуты превратите иерархические данные JSON в пригодные для использования файлы CSV, открывая бесшовную интеграцию с электронными таблицами, инструментами анализа данных и отчетами.
Часто задаваемые вопросы
В1: Можно ли бесплатно преобразовать JSON в CSV?
Да. Существует множество бесплатных инструментов, включая онлайн-конвертеры и Python с библиотекой Free Spire.XLS (с некоторыми ограничениями по страницам).
В2: Могу ли я преобразовать вложенный JSON в CSV?
Да, но сначала вам нужно выровнять вложенные данные JSON. Используйте такие инструменты, как Power Query в Excel, онлайн-инструменты с функциями выравнивания или встроенный модуль json в Python.
В3: Как мне преобразовать JSON в CSV на Mac?
Пользователи Mac могут использовать те же методы, что и пользователи Windows: онлайн-инструменты, Excel для Mac или Python (который работает на Mac, Windows и Linux).
В4: Могу ли я автоматизировать преобразование JSON в CSV?
Да. Используйте скрипты Python для автоматизации преобразования для нескольких файлов или запланированных задач.
Смотрите также
- 4 проверенных способа преобразования CSV в Excel (бесплатно и автоматически)
- Преобразование Excel в XML: бесплатные инструменты + автоматизация на Python
- Легко преобразуйте XLS/XLSX в HTML — сохраняйте форматирование Excel
- Преобразование JSON в/из Excel на Python – полное руководство с примерами
- Преобразование Excel в JSON и JSON в Excel на C# .NET – пошаговое руководство