Remover quebras de página no Excel: Guia manual e automático (2025)
Índice
Quebras de página indesejadas no Excel podem atrapalhar o layout da sua planilha e tornar a impressão dos seus dados frustrante. Elas geralmente aparecem após alterar as configurações de impressão, ajustar as margens ou mudar as visualizações. Quer as quebras de página sejam inseridas manualmente ou adicionadas automaticamente pelo Excel, saber como removê-las ajuda a manter uma planilha limpa e profissional.
Este artigo mostra como remover quebras de página no Excel, incluindo quebras de página manuais e automáticas. Ele também aborda como ocultar quebras de página e fornece soluções de remoção em lote para várias planilhas ou pastas de trabalho.
- Compreendendo as quebras de página no Excel (manuais vs. automáticas)
- Como remover quebras de página manuais no Excel
- Como remover quebras de página automáticas no Excel
- Ocultar quebras de página na visualização normal
- Remover quebras de página em lote no Excel com Python
Compreendendo as quebras de página no Excel (manuais vs. automáticas)
Antes de remover as quebras de página, é importante conhecer os dois tipos principais que o Excel usa:
- Quebras de página manuais: Inseridas pelos usuários para controlar onde uma página termina ao imprimir.
- Quebras de página automáticas: Adicionadas pelo Excel com base nas margens, tamanho do papel, configurações de escala e área de impressão.
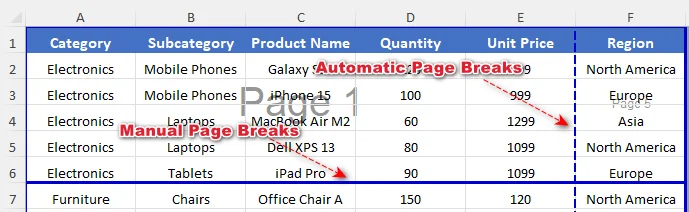
Você pode usar a Visualização de Quebra de Página para identificar os tipos de quebra de página. As quebras manuais aparecem como linhas azuis contínuas, enquanto as quebras automáticas aparecem como linhas azuis tracejadas.
O método de remoção depende do tipo de quebra de página com o qual você está lidando.
Como remover quebras de página manuais no Excel
Você pode remover quebras de página manuais individuais ou limpar todas as quebras de página manuais de uma planilha, conforme necessário. Para operações em massa, os scripts VBA do Excel permitem remover quebras de página de várias planilhas de forma eficiente.
Remover uma quebra de página manual
Você pode remover uma quebra de página manual específica em uma planilha do Excel selecionando a célula correta perto da quebra. Veja como fazer:
-
Vá para a guia Exibir na faixa de opções e clique em Visualização de Quebra de Página no grupo Modos de Exibição da Pasta de Trabalho.
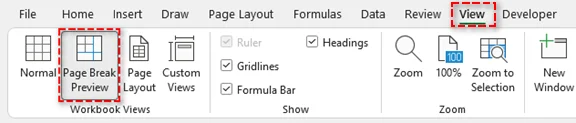
Você também pode clicar no ícone Visualização de Quebra de Página na barra de status (canto inferior direito).
-
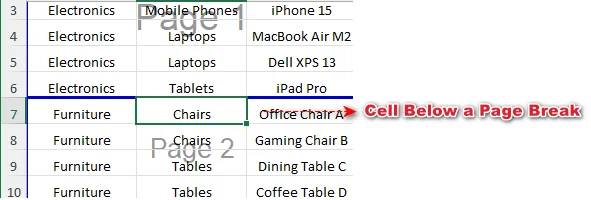
Identifique a quebra de página manual (linha azul contínua) que você deseja remover.
-
Selecione uma célula perto da quebra de página:
-
Para uma quebra de página horizontal, selecione qualquer célula abaixo da quebra.
-
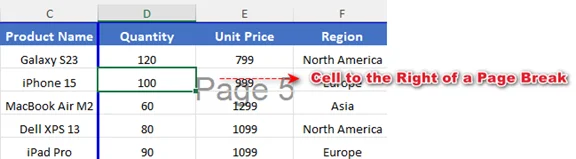
Para uma quebra de página vertical, selecione qualquer célula à direita da quebra.
-
-
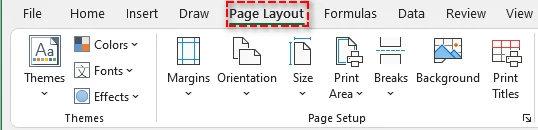
Vá para a guia Layout da Página na faixa de opções.
-
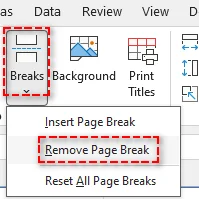
Clique em Quebras e escolha Remover Quebra de Página.
Isso remove apenas a quebra de página manual selecionada, e o restante da planilha permanecerá inalterado.
Dica: Você também pode clicar com o botão direito na célula e selecionar Remover Quebra de Página para excluir a quebra. Ou, arraste diretamente a linha de quebra para fora da área de visualização de quebra de página se o recurso de arrastar e soltar estiver ativado no seu Excel.
Remover todas as quebras de página manuais de uma planilha
Se a sua planilha tiver várias quebras de página manuais, removê-las todas de uma vez pode economizar tempo. Siga os passos abaixo:
-
Selecione qualquer célula na planilha.
-
Vá para a guia Layout da Página na faixa de opções.
-
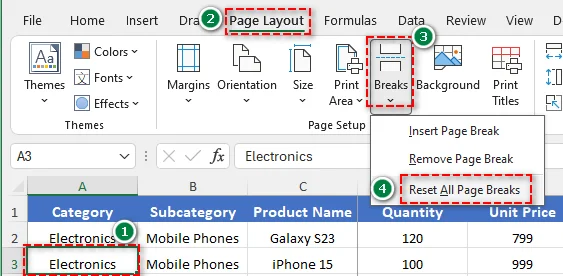
Clique em Quebras > Redefinir Todas as Quebras de Página.
Isso remove todas as quebras de página inseridas manualmente da planilha ativa.
Excluir quebras de página manuais de várias planilhas com VBA
Se você precisar remover quebras de página manuais de várias planilhas simultaneamente, usar VBA (Visual Basic for Applications) é a solução mais eficiente. Veja como fazer:
-
Pressione Alt + F11 (Windows) ou Option + F11 (Mac) para abrir o editor do VBA.
-
No editor, vá para Inserir > Módulo.
-
Copie e cole o seguinte código:
Sub ResetPageBreaksAllSheets() Dim ws As Worksheet For Each ws In ActiveWorkbook.Worksheets ws.ResetAllPageBreaks Next ws End Sub -
Pressione F5 para executar a macro.
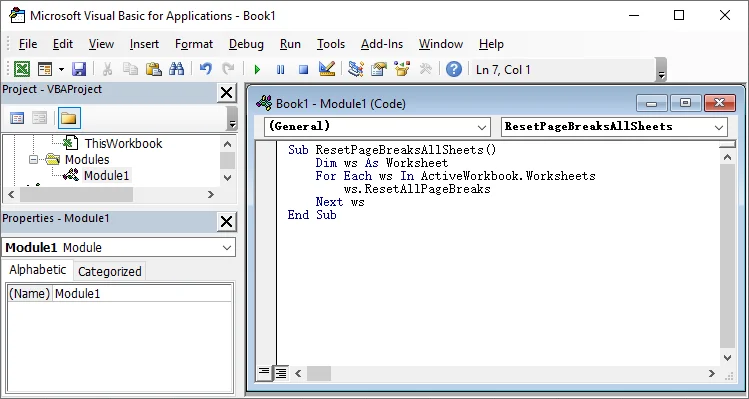
Todas as quebras de página manuais em cada planilha da pasta de trabalho ativa serão removidas de uma vez.
Como remover quebras de página automáticas no Excel
As quebras de página automáticas no Excel não podem ser removidas completamente. No entanto, você pode controlá-las ajustando as configurações de layout, como escala, margens, orientação da página e área de impressão. Otimizar essas configurações permite que mais conteúdo caiba em cada página e reduz quebras indesejadas.
Para reduzir as quebras de página automáticas:
- Alterar Escala
Vá para Layout da Página > Dimensionar para Ajustar, defina Largura e Altura como Automático ou aumente a porcentagem de escala.
Ajustar mais conteúdo por página reduz as quebras de página automáticas. - Ajustar Margens
Vá para Layout da Página > Margens e selecione Estreita ou Margens Personalizadas.
Margens menores expandem a área de impressão e ajudam a reduzir as quebras de página. - Alterar Orientação da Página
Vá para Layout da Página > Orientação e mude de Retrato para Paisagem.
Páginas mais largas acomodam mais colunas, reduzindo as quebras de página verticais. - Limpar Área de Impressão
Vá para Layout da Página > Área de Impressão e limpe a área de impressão se ela restringir o intervalo de conteúdo.
Limpar a área de impressão garante que o Excel calcule as quebras de página automáticas com precisão e evite quebras desnecessárias.
Ocultar quebras de página na visualização normal
Às vezes, os usuários desejam ocultar as linhas de quebra de página no Excel sem alterar o comportamento de impressão. Isso é útil se as linhas de quebra aparecerem após entrar na Visualização de Impressão. Siga estes passos:
-
Clique em Arquivo > Opções.
-
Vá para Avançado.
-
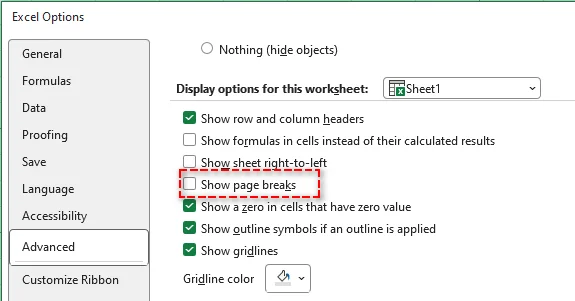
Role até Opções de exibição para esta planilha.
-
Desmarque Mostrar quebras de página.
-
Clique em OK.
Nota: Esta ação não remove as quebras de página. Ela apenas oculta as linhas de quebra de página na tela e não afeta o layout de impressão. Se a caixa Mostrar quebras de página não puder ser desmarcada, certifique-se de que a planilha esteja no modo de exibição Normal em vez do modo Visualização de Quebra de Página.
Remover quebras de página em lote no Excel com Python
Remover manualmente as quebras de página de várias pastas de trabalho do Excel pode ser demorado. Usando Python e bibliotecas como Spire.XLS para Python, você pode remover em lote todas as quebras de página de vários arquivos, economizando tempo e garantindo uma formatação consistente.

Passos para Remoção em Lote com Python:
-
Instale o Spire.XLS do PyPI usando pip:
pip install spire.xls -
Escreva um script Python para remover em lote as quebras de página de vários arquivos do Excel
from spire.xls import * import os input_folder = "input_excels" output_folder = "output_excels" for file_name in os.listdir(input_folder): if file_name.endswith(".xlsx"): # Load workbook workbook = Workbook() workbook.LoadFromFile(os.path.join(input_folder, file_name)) # Clear page breaks in all worksheets for sheet in workbook.Worksheets: sheet.HPageBreaks.Clear() sheet.VPageBreaks.Clear() sheet.ViewMode = ViewMode.Preview # Save updated workbook workbook.SaveToFile(os.path.join(output_folder, file_name), ExcelVersion.Version2013) workbook.Dispose() -
Execute o código
Execute o script para remover automaticamente as quebras de página na planilha do Excel de destino.
Dica: Você também pode ajustar a escala da planilha, as margens e a orientação da página em seu código para reduzir as quebras de página automáticas.
Artigo Relacionado: Python: Inserir ou Remover Quebras de Página no Excel
Conclusão
Neste guia, abordamos como remover quebras de página no Excel, incluindo quebras de página manuais e automáticas. Seguindo estes passos, você pode limpar efetivamente suas planilhas e mantê-las organizadas e prontas para impressão.
Procurando por mais tutoriais de Excel de alta qualidade? Confira nossos recursos gratuitos de Excel.
Perguntas Frequentes: Remover Quebras de Página no Excel
P1: Qual é a diferença entre quebras de página manuais e automáticas?
R1: As quebras de página manuais são inseridas pelos usuários para controlar exatamente onde as páginas quebram durante a impressão, enquanto as quebras de página automáticas são adicionadas pelo Excel com base nas configurações de impressão e no layout.
P2: Posso remover quebras de página sem afetar a impressão?
R2: Sim. Você pode ocultar as linhas de quebra de página na visualização Normal da planilha. Isso afeta apenas a exibição na tela; as quebras permanecem no arquivo e ainda podem influenciar a impressão.
P3: Por que não consigo remover algumas quebras de página no Excel?
R3: As quebras de página automáticas não podem ser excluídas diretamente. Elas são controladas pelo Excel para manter o layout de impressão, mas você pode influenciá-las ajustando as margens, a escala, o tamanho do papel ou a área de impressão.
P4: Como remover quebras de página em várias planilhas de uma vez?
R4: A maneira mais eficiente de remover quebras de página em várias planilhas no Excel é usar VBA ou Python. Isso permite que você limpe todas as quebras de página manuais em grandes pastas de trabalho ou vários arquivos de forma rápida e consistente.
Veja Também
Excel 페이지 나누기 제거: 수동 및 자동 가이드 (2025)
Excel의 원치 않는 페이지 나누기는 워크시트 레이아웃을 방해하고 데이터 인쇄를 어렵게 만들 수 있습니다. 인쇄 설정을 변경하거나, 여백을 조정하거나, 보기를 전환한 후에 종종 나타납니다. 페이지 나누기가 수동으로 삽입되었든 Excel에 의해 자동으로 추가되었든, 이를 제거하는 방법을 알면 깨끗하고 전문적인 워크시트를 유지하는 데 도움이 됩니다.
이 문서에서는 수동 및 자동 페이지 나누기를 포함하여 Excel에서 페이지 나누기를 제거하는 방법을 보여줍니다. 또한 페이지 나누기를 숨기는 방법과 여러 워크시트 또는 통합 문서에 대한 일괄 제거 솔루션을 다룹니다.
- Excel의 페이지 나누기 이해 (수동 대 자동)
- Excel에서 수동 페이지 나누기를 제거하는 방법
- Excel에서 자동 페이지 나누기를 제거하는 방법
- 기본 보기에서 페이지 나누기 숨기기
- Python으로 Excel에서 페이지 나누기 일괄 제거
Excel의 페이지 나누기 이해 (수동 대 자동)
페이지 나누기를 제거하기 전에 Excel에서 사용하는 두 가지 주요 유형을 아는 것이 중요합니다.
- 수동 페이지 나누기: 인쇄할 때 페이지가 끝나는 위치를 제어하기 위해 사용자가 삽입합니다.
- 자동 페이지 나누기: 여백, 용지 크기, 배율 설정 및 인쇄 영역을 기반으로 Excel에서 추가합니다.
페이지 나누기 미리 보기를 사용하여 페이지 나누기 유형을 식별할 수 있습니다. 수동 나누기는 실선 파란색 선으로 나타나고 자동 나누기는 파선 파란색 선으로 나타납니다.
제거 방법은 처리 중인 페이지 나누기 유형에 따라 다릅니다.
Excel에서 수동 페이지 나누기를 제거하는 방법
필요에 따라 개별 수동 페이지 나누기를 제거하거나 워크시트 내의 모든 수동 페이지 나누기를 지울 수 있습니다. 대량 작업의 경우 Excel VBA 스크립트를 사용하면 여러 워크시트에서 효율적으로 페이지 나누기를 제거할 수 있습니다.
수동 페이지 나누기 제거
나누기 근처의 올바른 셀을 선택하여 Excel 시트에서 특정 수동 페이지 나누기를 제거할 수 있습니다. 방법은 다음과 같습니다.
-
리본의 보기 탭으로 이동하여 통합 문서 보기 그룹 아래에서 페이지 나누기 미리 보기를 클릭합니다.
상태 표시줄(오른쪽 하단)의 페이지 나누기 미리 보기 아이콘을 클릭할 수도 있습니다.
-
제거하려는 수동 페이지 나누기(실선 파란색 선)를 식별합니다.
-
페이지 나누기 근처의 셀 선택:
-
가로 페이지 나누기의 경우 나누기 아래의 아무 셀이나 선택합니다.
-
세로 페이지 나누기의 경우 나누기 오른쪽의 아무 셀이나 선택합니다.
-
-
리본의 페이지 레이아웃 탭으로 이동합니다.
-
나누기를 클릭한 다음 페이지 나누기 제거를 선택합니다.
이렇게 하면 선택한 수동 페이지 나누기만 제거되고 나머지 시트는 변경되지 않습니다.
팁: 셀을 마우스 오른쪽 버튼으로 클릭하고 페이지 나누기 제거를 선택하여 나누기를 삭제할 수도 있습니다. 또는 Excel에서 끌어서 놓기 기능이 활성화된 경우 나누기 선을 페이지 나누기 미리 보기 영역 밖으로 직접 끕니다.
시트에서 모든 수동 페이지 나누기 제거
시트에 여러 개의 수동 페이지 나누기가 있는 경우 한 번에 모두 제거하면 시간을 절약할 수 있습니다. 아래 단계를 따르십시오.
-
시트에서 아무 셀이나 선택합니다.
-
리본의 페이지 레이아웃 탭으로 이동합니다.
-
나누기 > 모든 페이지 나누기 다시 설정을 클릭합니다.
활성 워크시트에서 수동으로 삽입된 모든 페이지 나누기를 제거합니다.
VBA로 여러 시트에서 수동 페이지 나누기 삭제
여러 시트에서 동시에 수동 페이지 나누기를 제거해야 하는 경우 VBA(Visual Basic for Applications)를 사용하는 것이 가장 효율적인 솔루션입니다. 방법은 다음과 같습니다.
-
Alt + F11(Windows) 또는 Option + F11(Mac)을 눌러 VBA 편집기를 엽니다.
-
편집기에서 삽입 > 모듈로 이동합니다.
-
다음 코드를 복사하여 붙여넣습니다.
Sub ResetPageBreaksAllSheets() Dim ws As Worksheet For Each ws In ActiveWorkbook.Worksheets ws.ResetAllPageBreaks Next ws End Sub -
F5를 눌러 매크로를 실행합니다.
활성 통합 문서의 모든 워크시트에 있는 모든 수동 페이지 나누기가 한 번에 제거됩니다.
Excel에서 자동 페이지 나누기를 제거하는 방법
Excel의 자동 페이지 나누기는 완전히 제거할 수 없습니다. 그러나 배율, 여백, 페이지 방향 및 인쇄 영역과 같은 레이아웃 설정을 조정하여 제어할 수 있습니다. 이러한 설정을 최적화하면 각 페이지에 더 많은 콘텐츠를 맞출 수 있고 원치 않는 나누기를 줄일 수 있습니다.
자동 페이지 나누기를 줄이려면:
- 배율 변경
페이지 레이아웃 > 맞춤 배율로 이동하여 너비와 높이를 자동으로 설정하거나 배율 백분율을 높입니다.
페이지당 더 많은 콘텐츠를 맞추면 자동 페이지 나누기가 줄어듭니다. - 여백 조정
페이지 레이아웃 > 여백으로 이동하여 좁게 또는 사용자 지정 여백을 선택합니다.
여백이 작을수록 인쇄 가능 영역이 확장되고 페이지 나누기를 줄이는 데 도움이 됩니다. - 페이지 방향 변경
페이지 레이아웃 > 방향으로 이동하여 세로에서 가로로 전환합니다.
페이지가 넓을수록 더 많은 열을 맞출 수 있어 세로 페이지 나누기가 줄어듭니다. - 인쇄 영역 지우기
페이지 레이아웃 > 인쇄 영역으로 이동하여 콘텐츠 범위를 제한하는 경우 인쇄 영역을 지웁니다.
인쇄 영역을 지우면 Excel이 자동 페이지 나누기를 정확하게 계산하고 불필요한 나누기를 방지할 수 있습니다.
기본 보기에서 페이지 나누기 숨기기
때로는 사용자가 인쇄 동작을 변경하지 않고 Excel에서 페이지 나누기 선을 숨기기를 원합니다. 이는 인쇄 미리 보기에 들어간 후 나누기 선이 나타나는 경우에 유용합니다. 다음 단계를 따르십시오.
-
파일 > 옵션을 클릭합니다.
-
고급으로 이동합니다.
-
이 워크시트에 대한 표시 옵션으로 스크롤합니다.
-
페이지 나누기 표시 선택을 취소합니다.
-
확인을 클릭합니다.
참고: 이 작업은 페이지 나누기를 제거하지 않습니다. 화면의 페이지 나누기 선만 숨기고 인쇄 레이아웃에는 영향을 미치지 않습니다. 페이지 나누기 표시 상자를 선택 취소할 수 없는 경우 워크시트가 페이지 나누기 미리 보기 모드가 아닌 기본 보기에 있는지 확인하십시오.
Python으로 Excel에서 페이지 나누기 일괄 제거
여러 Excel 통합 문서에서 수동으로 페이지 나누기를 제거하는 것은 시간이 많이 걸릴 수 있습니다. Python 및 Spire.XLS for Python과 같은 라이브러리를 사용하면 여러 파일에서 모든 페이지 나누기를 일괄적으로 제거하여 시간을 절약하고 일관된 서식을 보장할 수 있습니다.
Python을 사용한 일괄 제거 단계:
-
pip를 사용하여 PyPI에서 Spire.XLS 설치:
pip install spire.xls -
여러 Excel 파일에서 페이지 나누기를 일괄 제거하는 Python 스크립트 작성
from spire.xls import * import os input_folder = "input_excels" output_folder = "output_excels" for file_name in os.listdir(input_folder): if file_name.endswith(".xlsx"): # Load workbook workbook = Workbook() workbook.LoadFromFile(os.path.join(input_folder, file_name)) # Clear page breaks in all worksheets for sheet in workbook.Worksheets: sheet.HPageBreaks.Clear() sheet.VPageBreaks.Clear() sheet.ViewMode = ViewMode.Preview # Save updated workbook workbook.SaveToFile(os.path.join(output_folder, file_name), ExcelVersion.Version2013) workbook.Dispose() -
코드 실행
스크립트를 실행하여 대상 Excel 시트에서 페이지 나누기를 자동으로 제거합니다.
팁: 코드에서 시트 배율, 여백 및 페이지 방향을 조정하여 자동 페이지 나누기를 줄일 수도 있습니다.
관련 기사: Python: Excel에서 페이지 나누기 삽입 또는 제거
결론
이 가이드에서는 수동 및 자동 페이지 나누기를 포함하여 Excel에서 페이지 나누기를 제거하는 방법을 다루었습니다. 이 단계를 따르면 워크시트를 효과적으로 정리하고 정리되고 인쇄 준비가 된 상태로 유지할 수 있습니다.
더 많은 고품질 Excel 자습서를 찾고 계십니까? 무료 Excel 리소스를 확인하십시오.
자주 묻는 질문: Excel에서 페이지 나누기 제거
Q1: 수동 페이지 나누기와 자동 페이지 나누기의 차이점은 무엇입니까?
A1: 수동 페이지 나누기는 인쇄 중에 페이지가 나뉘는 위치를 정확하게 제어하기 위해 사용자가 삽입하는 반면, 자동 페이지 나누기는 인쇄 설정 및 레이아웃에 따라 Excel에서 추가합니다.
Q2: 인쇄에 영향을 주지 않고 페이지 나누기를 제거할 수 있습니까?
A2: 예. 일반 워크시트 보기에서 페이지 나누기 선을 숨길 수 있습니다. 이것은 화면 표시에만 영향을 미칩니다. 나누기는 파일에 남아 있으며 여전히 인쇄에 영향을 줄 수 있습니다.
Q3: Excel에서 일부 페이지 나누기를 제거할 수 없는 이유는 무엇입니까?
A3: 자동 페이지 나누기는 직접 삭제할 수 없습니다. 인쇄 레이아웃을 유지하기 위해 Excel에서 제어하지만 여백, 배율, 용지 크기 또는 인쇄 영역을 조정하여 영향을 줄 수 있습니다.
Q4: 여러 워크시트에서 페이지 나누기를 한 번에 제거하는 방법은 무엇입니까?
A4: Excel의 여러 워크시트에서 페이지 나누기를 제거하는 가장 효율적인 방법은 VBA 또는 Python을 사용하는 것입니다. 이를 통해 대규모 통합 문서 또는 여러 파일에서 모든 수동 페이지 나누기를 빠르고 일관되게 지울 수 있습니다.
참고 항목
Rimuovere le interruzioni di pagina in Excel: Guida manuale e automatica (2025)
Indice dei contenuti
- Comprendere le interruzioni di pagina in Excel (manuali e automatiche)
- Come rimuovere le interruzioni di pagina manuali in Excel
- Come rimuovere le interruzioni di pagina automatiche in Excel
- Nascondere le interruzioni di pagina nella visualizzazione normale
- Rimuovere in blocco le interruzioni di pagina in Excel con Python
Le interruzioni di pagina indesiderate in Excel possono disturbare il layout del foglio di lavoro e rendere frustrante la stampa dei dati. Spesso compaiono dopo aver modificato le impostazioni di stampa, regolato i margini o cambiato visualizzazione. Che le interruzioni di pagina siano inserite manualmente o aggiunte automaticamente da Excel, sapere come rimuoverle aiuta a mantenere un foglio di lavoro pulito e professionale.
Questo articolo mostra come rimuovere le interruzioni di pagina in Excel, incluse sia le interruzioni di pagina manuali che quelle automatiche. Tratta anche come nascondere le interruzioni di pagina e fornisce soluzioni per la rimozione in blocco per più fogli di lavoro o cartelle di lavoro.
- Comprendere le interruzioni di pagina in Excel (manuali e automatiche)
- Come rimuovere le interruzioni di pagina manuali in Excel
- Come rimuovere le interruzioni di pagina automatiche in Excel
- Nascondere le interruzioni di pagina nella visualizzazione normale
- Rimuovere in blocco le interruzioni di pagina in Excel con Python
Comprendere le interruzioni di pagina in Excel (manuali e automatiche)
Prima di rimuovere le interruzioni di pagina, è importante conoscere i due tipi principali utilizzati da Excel:
- Interruzioni di pagina manuali: Inserite dagli utenti per controllare dove termina una pagina durante la stampa.
- Interruzioni di pagina automatiche: Aggiunte da Excel in base a margini, dimensioni del foglio, impostazioni di scala e area di stampa.
È possibile utilizzare Anteprima interruzioni di pagina per identificare i tipi di interruzione di pagina. Le interruzioni manuali appaiono come linee blu continue, mentre le interruzioni automatiche appaiono come linee blu tratteggiate.
Il metodo di rimozione dipende dal tipo di interruzione di pagina con cui si ha a che fare.
Come rimuovere le interruzioni di pagina manuali in Excel
È possibile rimuovere singole interruzioni di pagina manuali o cancellare tutte le interruzioni di pagina manuali all'interno di un foglio di lavoro, se necessario. Per operazioni in blocco, gli script VBA di Excel consentono di rimuovere in modo efficiente le interruzioni di pagina su più fogli di lavoro.
Rimuovere un'interruzione di pagina manuale
È possibile rimuovere una specifica interruzione di pagina manuale in un foglio di Excel selezionando la cella corretta vicino all'interruzione. Ecco come fare:
-
Andare alla scheda Visualizza sulla barra multifunzione e fare clic su Anteprima interruzioni di pagina nel gruppo Visualizzazioni cartella di lavoro.
È anche possibile fare clic sull'icona Anteprima interruzioni di pagina sulla barra di stato (in basso a destra).
-
Identificare l'interruzione di pagina manuale (linea blu continua) che si desidera rimuovere.
-
Selezionare una cella vicino all'interruzione di pagina:
-
Per un'interruzione di pagina orizzontale, selezionare una cella qualsiasi sotto l'interruzione.
-
Per un'interruzione di pagina verticale, selezionare una cella qualsiasi a destra dell'interruzione.
-
-
Andare alla scheda Layout di pagina sulla barra multifunzione.
-
Fare clic su Interruzioni, quindi scegliere Rimuovi interruzione di pagina.
Questo rimuove solo l'interruzione di pagina manuale selezionata e il resto del foglio rimarrà invariato.
Suggerimento: è anche possibile fare clic con il pulsante destro del mouse sulla cella e selezionare Rimuovi interruzione di pagina per eliminare l'interruzione. Oppure, trascinare direttamente la linea di interruzione fuori dall'area di anteprima delle interruzioni di pagina se la funzione di trascinamento è abilitata in Excel.
Rimuovere tutte le interruzioni di pagina manuali da un foglio
Se il foglio ha più interruzioni di pagina manuali, rimuoverle tutte in una volta può far risparmiare tempo. Seguire i passaggi seguenti:
-
Selezionare una cella qualsiasi nel foglio.
-
Andare alla scheda Layout di pagina sulla barra multifunzione.
-
Fare clic su Interruzioni > Ripristina tutte le interruzioni di pagina.
Questo rimuove tutte le interruzioni di pagina inserite manualmente dal foglio di lavoro attivo.
Eliminare le interruzioni di pagina manuali da più fogli con VBA
Se è necessario rimuovere le interruzioni di pagina manuali da più fogli contemporaneamente, l'utilizzo di VBA (Visual Basic for Applications) è la soluzione più efficiente. Ecco come è possibile farlo:
-
Premere Alt + F11 (Windows) o Opzione + F11 (Mac) per aprire l'editor VBA.
-
Nell'editor, andare su Inserisci > Modulo.
-
Copiare e incollare il seguente codice:
Sub ResetPageBreaksAllSheets() Dim ws As Worksheet For Each ws In ActiveWorkbook.Worksheets ws.ResetAllPageBreaks Next ws End Sub -
Premere F5 per eseguire la macro.
Tutte le interruzioni di pagina manuali in ogni foglio di lavoro della cartella di lavoro attiva verranno rimosse contemporaneamente.
Come rimuovere le interruzioni di pagina automatiche in Excel
Le interruzioni di pagina automatiche in Excel non possono essere rimosse completamente. Tuttavia, è possibile controllarle regolando le impostazioni di layout come la scala, i margini, l'orientamento della pagina e l'area di stampa. L'ottimizzazione di queste impostazioni consente di inserire più contenuto in ogni pagina e riduce le interruzioni indesiderate.
Per ridurre le interruzioni di pagina automatiche:
- Modifica scala
Andare su Layout di pagina > Adatta alla pagina, impostare Larghezza e Altezza su Automatico o aumentare la percentuale di scala.
Adattare più contenuto per pagina riduce le interruzioni di pagina automatiche. - Regola margini
Andare su Layout di pagina > Margini e selezionare Stretti o Margini personalizzati.
Margini più piccoli espandono l'area stampabile e aiutano a ridurre le interruzioni di pagina. - Modifica orientamento pagina
Andare su Layout di pagina > Orientamento e passare da Verticale a Orizzontale.
Pagine più larghe si adattano a più colonne, riducendo le interruzioni di pagina verticali. - Cancella area di stampa
Andare su Layout di pagina > Area di stampa e cancellare l'area di stampa se limita l'intervallo di contenuto.
La cancellazione dell'area di stampa garantisce che Excel calcoli accuratamente le interruzioni di pagina automatiche ed eviti interruzioni non necessarie.
Nascondere le interruzioni di pagina nella visualizzazione normale
A volte, gli utenti desiderano nascondere le linee di interruzione di pagina in Excel senza modificare il comportamento di stampa. Ciò è utile se le linee di interruzione compaiono dopo essere entrati in Anteprima di stampa. Seguire questi passaggi:
-
Fare clic su File > Opzioni.
-
Andare su Avanzate.
-
Scorrere fino a Opzioni di visualizzazione per il foglio di lavoro.
-
Deselezionare Mostra interruzioni di pagina.
-
Fare clic su OK.
Nota: questa azione non rimuove le interruzioni di pagina. Nasconde solo le linee di interruzione di pagina sullo schermo e non influisce sul layout di stampa. Se la casella Mostra interruzioni di pagina non può essere deselezionata, assicurarsi che il foglio di lavoro sia in visualizzazione Normale anziché in modalità Anteprima interruzioni di pagina.
Rimuovere in blocco le interruzioni di pagina in Excel con Python
La rimozione manuale delle interruzioni di pagina da più cartelle di lavoro di Excel può richiedere molto tempo. Utilizzando Python e librerie come Spire.XLS per Python, è possibile rimuovere in blocco tutte le interruzioni di pagina su più file, risparmiando tempo e garantendo una formattazione coerente.
Passaggi per la rimozione in blocco con Python:
-
Installare Spire.XLS da PyPI usando pip:
pip install spire.xls -
Scrivere uno script Python per rimuovere in blocco le interruzioni di pagina da più file Excel
from spire.xls import * import os input_folder = "input_excels" output_folder = "output_excels" for file_name in os.listdir(input_folder): if file_name.endswith(".xlsx"): # Load workbook workbook = Workbook() workbook.LoadFromFile(os.path.join(input_folder, file_name)) # Clear page breaks in all worksheets for sheet in workbook.Worksheets: sheet.HPageBreaks.Clear() sheet.VPageBreaks.Clear() sheet.ViewMode = ViewMode.Preview # Save updated workbook workbook.SaveToFile(os.path.join(output_folder, file_name), ExcelVersion.Version2013) workbook.Dispose() -
Eseguire il codice
Eseguire lo script per rimuovere automaticamente le interruzioni di pagina nel foglio Excel di destinazione.
Suggerimento: è anche possibile regolare la scala del foglio, i margini e l'orientamento della pagina nel codice per ridurre le interruzioni di pagina automatiche.
Articolo correlato: Python: Inserire o rimuovere le interruzioni di pagina in Excel
Conclusione
In questa guida, abbiamo trattato come rimuovere le interruzioni di pagina in Excel, incluse sia le interruzioni di pagina manuali che quelle automatiche. Seguendo questi passaggi, è possibile pulire efficacemente i fogli di lavoro e mantenerli organizzati e pronti per la stampa.
Cerchi altri tutorial di alta qualità su Excel? Dai un'occhiata alle nostre risorse gratuite su Excel.
Domande frequenti: Rimuovere le interruzioni di pagina in Excel
D1: Qual è la differenza tra interruzioni di pagina manuali e automatiche?
R1: Le interruzioni di pagina manuali vengono inserite dagli utenti per controllare esattamente dove le pagine si interrompono durante la stampa, mentre le interruzioni di pagina automatiche vengono aggiunte da Excel in base alle impostazioni di stampa e al layout.
D2: Posso rimuovere le interruzioni di pagina senza influire sulla stampa?
R2: Sì. È possibile nascondere le linee di interruzione di pagina nella visualizzazione normale del foglio di lavoro. Ciò influisce solo sulla loro visualizzazione su schermo; le interruzioni rimangono nel file e possono comunque influenzare la stampa.
D3: Perché non riesco a rimuovere alcune interruzioni di pagina in Excel?
R3: Le interruzioni di pagina automatiche non possono essere eliminate direttamente. Sono controllate da Excel per mantenere il layout di stampa, ma è possibile influenzarle regolando i margini, la scala, le dimensioni del foglio o l'area di stampa.
D4: Come rimuovere le interruzioni di pagina in più fogli di lavoro contemporaneamente?
R4: Il modo più efficiente per rimuovere le interruzioni di pagina in più fogli di lavoro in Excel è utilizzare VBA o Python. Ciò consente di cancellare tutte le interruzioni di pagina manuali su grandi cartelle di lavoro o più file in modo rapido e coerente.
Vedi anche
- Impostare l'area di stampa in Excel: Manuale, VBA e Python
- Annullare l'unione di celle in Excel (Manuale, VBA e Python)
- Copiare un foglio di lavoro in Excel (Manuale, VBA e Python)
- Rimuovere le righe duplicate da Excel - 6 modi semplici
- Convertire Excel in ODS: 4 modi semplici (locale, online e automazione)
Supprimer les sauts de page dans Excel : Guide manuel et automatique (2025)
Table des matières
Les sauts de page indésirables dans Excel peuvent perturber la mise en page de votre feuille de calcul et rendre l'impression de vos données frustrante. Ils apparaissent souvent après avoir modifié les paramètres d'impression, ajusté les marges ou changé d'affichage. Que les sauts de page soient insérés manuellement ou ajoutés automatiquement par Excel, savoir comment les supprimer vous aide à conserver une feuille de calcul propre et professionnelle.
Cet article vous montre comment supprimer les sauts de page dans Excel, y compris les sauts de page manuels et automatiques. Il explique également comment masquer les sauts de page et fournit des solutions de suppression en masse pour plusieurs feuilles de calcul ou classeurs.
- Comprendre les sauts de page dans Excel (manuels ou automatiques)
- Comment supprimer les sauts de page manuels dans Excel
- Comment supprimer les sauts de page automatiques dans Excel
- Masquer les sauts de page en affichage Normal
- Supprimer en masse les sauts de page dans Excel avec Python
Comprendre les sauts de page dans Excel (manuels ou automatiques)
Avant de supprimer les sauts de page, il est important de connaître les deux principaux types utilisés par Excel :
- Sauts de page manuels : insérés par les utilisateurs pour contrôler où une page se termine lors de l'impression.
- Sauts de page automatiques : ajoutés par Excel en fonction des marges, de la taille du papier, des paramètres de mise à l'échelle et de la zone d'impression.
Vous pouvez utiliser l'Aperçu des sauts de page pour identifier les types de sauts de page. Les sauts manuels apparaissent comme des lignes bleues pleines, tandis que les sauts automatiques apparaissent comme des lignes bleues pointillées.
La méthode de suppression dépend du type de saut de page auquel vous avez affaire.
Comment supprimer les sauts de page manuels dans Excel
Vous pouvez supprimer des sauts de page manuels individuels ou effacer tous les sauts de page manuels d'une feuille de calcul selon les besoins. Pour les opérations en masse, les scripts VBA d'Excel vous permettent de supprimer efficacement les sauts de page sur plusieurs feuilles de calcul.
Supprimer un saut de page manuel
Vous pouvez supprimer un saut de page manuel spécifique dans une feuille Excel en sélectionnant la cellule correcte près du saut. Voici comment faire :
-
Allez dans l'onglet Affichage du ruban et cliquez sur Aperçu des sauts de page dans le groupe Affichages classeur.
Vous pouvez également cliquer sur l'icône Aperçu des sauts de page dans la barre d'état (en bas à droite).
-
Identifiez le saut de page manuel (ligne bleue pleine) que vous souhaitez supprimer.
-
Sélectionnez une cellule près du saut de page :
-
Pour un saut de page horizontal, sélectionnez n'importe quelle cellule en dessous du saut.
-
Pour un saut de page vertical, sélectionnez n'importe quelle cellule à droite du saut.
-
-
Allez dans l'onglet Mise en page du ruban.
-
Cliquez sur Sauts de page, puis choisissez Supprimer le saut de page.
Cela ne supprime que le saut de page manuel sélectionné, et le reste de la feuille restera inchangé.
Astuce : Vous pouvez également faire un clic droit sur la cellule et sélectionner Supprimer le saut de page pour supprimer le saut. Ou, faites glisser directement la ligne de saut en dehors de la zone d'aperçu des sauts de page si la fonction glisser-déposer est activée dans votre Excel.
Supprimer tous les sauts de page manuels d'une feuille
Si votre feuille comporte plusieurs sauts de page manuels, les supprimer tous en une seule fois peut vous faire gagner du temps. Suivez les étapes ci-dessous :
-
Sélectionnez n'importe quelle cellule de la feuille.
-
Allez dans l'onglet Mise en page du ruban.
-
Cliquez sur Sauts de page > Rétablir tous les sauts de page.
Cela supprime tous les sauts de page insérés manuellement de la feuille de calcul active.
Supprimer les sauts de page manuels de plusieurs feuilles avec VBA
Si vous devez supprimer simultanément les sauts de page manuels de plusieurs feuilles, l'utilisation de VBA (Visual Basic for Applications) est la solution la plus efficace. Voici comment vous pouvez le faire :
-
Appuyez sur Alt + F11 (Windows) ou Option + F11 (Mac) pour ouvrir l'éditeur VBA.
-
Dans l'éditeur, allez dans Insertion > Module.
-
Copiez et collez le code suivant :
Sub ResetPageBreaksAllSheets() Dim ws As Worksheet For Each ws In ActiveWorkbook.Worksheets ws.ResetAllPageBreaks Next ws End Sub -
Appuyez sur F5 pour exécuter la macro.
Tous les sauts de page manuels de chaque feuille de calcul du classeur actif seront supprimés en une seule fois.
Comment supprimer les sauts de page automatiques dans Excel
Les sauts de page automatiques dans Excel ne peuvent pas être supprimés complètement. Cependant, vous pouvez les contrôler en ajustant les paramètres de mise en page tels que la mise à l'échelle, les marges, l'orientation de la page et la zone d'impression. L'optimisation de ces paramètres permet de faire tenir plus de contenu on chaque page et de réduire les sauts indésirables.
Pour réduire les sauts de page automatiques :
- Modifier la mise à l'échelle
Allez dans Mise en page > Mise à l'échelle, réglez Largeur et Hauteur sur Automatique, ou augmentez le pourcentage de mise à l'échelle.
Faire tenir plus de contenu par page réduit les sauts de page automatiques. - Ajuster les marges
Allez dans Mise en page > Marges et sélectionnez Étroites ou Marges personnalisées.
Des marges plus petites agrandissent la zone imprimable et aident à réduire les sauts de page. - Changer l'orientation de la page
Allez dans Mise en page > Orientation et passez de Portrait à Paysage.
Les pages plus larges peuvent contenir plus de colonnes, ce qui réduit les sauts de page verticaux. - Définir la zone d'impression
Allez dans Mise en page > Zone d'impression et effacez la zone d'impression si elle restreint la plage de contenu.
Effacer la zone d'impression garantit qu'Excel calcule les sauts de page automatiques avec précision et évite les sauts inutiles.
Masquer les sauts de page en affichage Normal
Parfois, les utilisateurs souhaitent masquer les lignes de saut de page dans Excel sans modifier le comportement d'impression. Ceci est utile si les lignes de saut apparaissent après être entré en Aperçu avant impression. Suivez ces étapes :
-
Cliquez sur Fichier > Options.
-
Allez dans Options avancées.
-
Faites défiler jusqu'à Options d'affichage de cette feuille de calcul.
-
Décochez Afficher les sauts de page.
-
Cliquez sur OK.
Remarque : Cette action ne supprime pas les sauts de page. Elle ne fait que masquer les lignes de saut de page à l'écran et n'affecte pas la mise en page d'impression. Si la case Afficher les sauts de page ne peut pas être décochée, assurez-vous que la feuille de calcul est en affichage Normal plutôt qu'en mode Aperçu des sauts de page.
Supprimer en masse les sauts de page dans Excel avec Python
La suppression manuelle des sauts de page de plusieurs classeurs Excel peut prendre beaucoup de temps. En utilisant Python et des bibliothèques comme Spire.XLS for Python, vous pouvez supprimer en masse tous les sauts de page sur plusieurs fichiers, ce qui permet de gagner du temps et d'assurer un formatage cohérent.
Étapes pour la suppression en masse avec Python :
-
Installez Spire.XLS depuis PyPI en utilisant pip :
pip install spire.xls -
Écrivez un script Python pour supprimer en masse les sauts de page de plusieurs fichiers Excel
from spire.xls import * import os input_folder = "input_excels" output_folder = "output_excels" for file_name in os.listdir(input_folder): if file_name.endswith(".xlsx"): # Load workbook workbook = Workbook() workbook.LoadFromFile(os.path.join(input_folder, file_name)) # Clear page breaks in all worksheets for sheet in workbook.Worksheets: sheet.HPageBreaks.Clear() sheet.VPageBreaks.Clear() sheet.ViewMode = ViewMode.Preview # Save updated workbook workbook.SaveToFile(os.path.join(output_folder, file_name), ExcelVersion.Version2013) workbook.Dispose() -
Exécutez le code
Exécutez le script pour supprimer automatiquement les sauts de page dans la feuille Excel ciblée.
Astuce : Vous pouvez également ajuster la mise à l'échelle de la feuille, les marges et l'orientation de la page dans votre code pour réduire les sauts de page automatiques.
Article connexe : Python : Insérer ou supprimer des sauts de page dans Excel
Conclusion
Dans ce guide, nous avons expliqué comment supprimer les sauts de page dans Excel, y compris les sauts de page manuels et automatiques. En suivant ces étapes, vous pouvez nettoyer efficacement vos feuilles de calcul et les garder organisées et prêtes à être imprimées.
Vous cherchez d'autres tutoriels Excel de haute qualité ? Consultez nos ressources Excel gratuites.
Foire aux questions : Supprimer les sauts de page dans Excel
Q1 : Quelle est la différence entre les sauts de page manuels et automatiques ?
R1 : Les sauts de page manuels sont insérés par les utilisateurs pour contrôler exactement où les pages se coupent lors de l'impression, tandis que les sauts de page automatiques sont ajoutés par Excel en fonction des paramètres d'impression et de la mise en page.
Q2 : Puis-je supprimer les sauts de page sans affecter l'impression ?
R2 : Oui. Vous pouvez masquer les lignes de saut de page en affichage Normal de la feuille de calcul. Cela n'affecte que leur affichage à l'écran ; les sauts restent dans le fichier et peuvent toujours influencer l'impression.
Q3 : Pourquoi ne puis-je pas supprimer certains sauts de page dans Excel ?
R3 : Les sauts de page automatiques ne peuvent pas être supprimés directement. Ils sont contrôlés par Excel pour maintenir la mise en page d'impression, mais vous pouvez les influencer en ajustant les marges, la mise à l'échelle, la taille du papier ou la zone d'impression.
Q4 : Comment supprimer les sauts de page de plusieurs feuilles de calcul à la fois ?
R4 : La manière la plus efficace de supprimer les sauts de page de plusieurs feuilles de calcul dans Excel est d'utiliser VBA ou Python. Cela vous permet d'effacer tous les sauts de page manuels sur de grands classeurs ou plusieurs fichiers rapidement et de manière cohérente.
Voir aussi
- Définir la zone d'impression dans Excel : Manuel, VBA & Python
- Défusionner des cellules dans Excel (Manuel, VBA & Python)
- Copier une feuille de calcul dans Excel (Manuel, VBA & Python)
- Supprimer les lignes en double d'Excel - 6 méthodes faciles
- Convertir Excel en ODS : 4 méthodes faciles (Local, en ligne & automatisation)
Eliminar saltos de página en Excel: Guía manual y automática (2025)
Tabla de Contenidos
Los saltos de página no deseados en Excel pueden alterar el diseño de su hoja de cálculo y hacer que la impresión de sus datos sea frustrante. A menudo aparecen después de cambiar la configuración de impresión, ajustar los márgenes o cambiar de vista. Ya sea que los saltos de página se inserten manualmente o los agregue Excel automáticamente, saber cómo eliminarlos le ayuda a mantener una hoja de cálculo limpia y profesional.
Este artículo le muestra cómo quitar los saltos de página en Excel, incluidos los saltos de página manuales y automáticos. También cubre cómo ocultar los saltos de página y proporciona soluciones de eliminación por lotes para varias hojas de cálculo o libros de trabajo.
- Entender los Saltos de Página en Excel (Manuales vs. Automáticos)
- Cómo Quitar Saltos de Página Manuales en Excel
- Cómo Quitar Saltos de Página Automáticos en Excel
- Ocultar Saltos de Página en la Vista Normal
- Eliminar Saltos de Página en Lote en Excel con Python
Entender los Saltos de Página en Excel (Manuales vs. Automáticos)
Antes de quitar los saltos de página, es importante conocer los dos tipos principales que utiliza Excel:
- Saltos de página manuales: insertados por los usuarios para controlar dónde termina una página al imprimir.
- Saltos de página automáticos: agregados por Excel según los márgenes, el tamaño del papel, la configuración de escala y el área de impresión.
Puede usar la Vista previa de salto de página para identificar los tipos de saltos de página. Los saltos manuales aparecen como líneas azules continuas, mientras que los saltos automáticos aparecen como líneas azules discontinuas.
El método de eliminación depende del tipo de salto de página con el que esté tratando.
Cómo Quitar Saltos de Página Manuales en Excel
Puede quitar saltos de página manuales individuales o borrar todos los saltos de página manuales dentro de una hoja de cálculo según sea necesario. Para operaciones masivas, los scripts de Excel VBA le permiten quitar saltos de página en varias hojas de cálculo de manera eficiente.
Quitar un Salto de Página Manual
Puede quitar un salto de página manual específico en una hoja de Excel seleccionando la celda correcta cerca del salto. A continuación, le indicamos cómo hacerlo:
-
Vaya a la pestaña Vista en la cinta de opciones y haga clic en Vista previa de salto de página en el grupo Vistas de libro.
También puede hacer clic en el icono Vista previa de salto de página en la barra de estado (abajo a la derecha).
-
Identifique el salto de página manual (línea azul continua) que desea quitar.
-
Seleccione una celda cerca del salto de página:
-
Para un salto de página horizontal, seleccione cualquier celda debajo del salto.
-
Para un salto de página vertical, seleccione cualquier celda a la derecha del salto.
-
-
Vaya a la pestaña Diseño de página en la cinta de opciones.
-
Haga clic en Saltos y, a continuación, elija Quitar salto de página.
Esto solo quita el salto de página manual seleccionado, y el resto de la hoja permanecerá sin cambios.
Consejo: También puede hacer clic con el botón derecho en la celda y seleccionar Quitar salto de página para eliminar el salto. O bien, arrastre directamente la línea de salto fuera del área de vista previa de salto de página si la función de arrastrar y soltar está habilitada en su Excel.
Quitar Todos los Saltos de Página Manuales de una Hoja
Si su hoja tiene varios saltos de página manuales, quitarlos todos a la vez puede ahorrar tiempo. Siga estos pasos a continuación:
-
Seleccione cualquier celda de la hoja.
-
Vaya a la pestaña Diseño de página en la cinta de opciones.
-
Haga clic en Saltos > Restablecer todos los saltos de página.
Esto quita todos los saltos de página insertados manualmente de la hoja de cálculo activa.
Eliminar Saltos de Página Manuales de Varias Hojas con VBA
Si necesita quitar saltos de página manuales de varias hojas simultáneamente, usar VBA (Visual Basic para Aplicaciones) es la solución más eficiente. A continuación, le indicamos cómo puede hacerlo:
-
Presione Alt + F11 (Windows) u Opción + F11 (Mac) para abrir el editor de VBA.
-
En el editor, vaya a Insertar > Módulo.
-
Copie y pegue el siguiente código:
Sub ResetPageBreaksAllSheets() Dim ws As Worksheet For Each ws In ActiveWorkbook.Worksheets ws.ResetAllPageBreaks Next ws End Sub -
Presione F5 para ejecutar la macro.
Todos los saltos de página manuales en cada hoja de cálculo del libro de trabajo activo se quitarán de una vez.
Cómo Quitar Saltos de Página Automáticos en Excel
Los saltos de página automáticos en Excel no se pueden quitar por completo. Sin embargo, puede controlarlos ajustando la configuración de diseño, como la escala, los márgenes, la orientación de la página y el área de impresión. La optimización de esta configuración permite que quepa más contenido en cada página y reduce los saltos no deseados.
Para reducir los saltos de página automáticos:
- Cambiar escala
Vaya a Diseño de página > Ajustar escala, establezca Ancho y Alto en Automático, o aumente el porcentaje de escala.
Ajustar más contenido por página reduce los saltos de página automáticos. - Ajustar márgenes
Vaya a Diseño de página > Márgenes y seleccione Estrecho o Márgenes personalizados.
Los márgenes más pequeños amplían el área de impresión y ayudan a reducir los saltos de página. - Cambiar la orientación de la página
Vaya a Diseño de página > Orientación y cambie de Vertical a Horizontal.
Las páginas más anchas se ajustan a más columnas, lo que reduce los saltos de página verticales. - Borrar área de impresión
Vaya a Diseño de página > Área de impresión y borre el área de impresión si restringe el rango de contenido.
Borrar el área de impresión garantiza que Excel calcule los saltos de página automáticos con precisión y evite saltos innecesarios.
Ocultar Saltos de Página en la Vista Normal
A veces, los usuarios quieren ocultar las líneas de salto de página en Excel sin cambiar el comportamiento de impresión. Esto es útil si las líneas de salto aparecen después de ingresar a la Vista previa de impresión. Siga estos pasos:
-
Haga clic en Archivo > Opciones.
-
Vaya a Avanzado.
-
Desplácese hasta Opciones de visualización para esta hoja de cálculo.
-
Desmarque Mostrar saltos de página.
-
Haga clic en Aceptar.
Nota: Esta acción no quita los saltos de página. Solo oculta las líneas de salto de página en la pantalla y no afecta el diseño de impresión. Si la casilla Mostrar saltos de página no se puede desmarcar, asegúrese de que la hoja de cálculo esté en la vista Normal en lugar del modo Vista previa de salto de página.
Eliminar Saltos de Página en Lote en Excel con Python
Quitar manualmente los saltos de página de varios libros de Excel puede llevar mucho tiempo. Usando Python y bibliotecas como Spire.XLS para Python, puede eliminar por lotes todos los saltos de página en varios archivos, ahorrando tiempo y garantizando un formato coherente.
Pasos para la eliminación por lotes con Python:
-
Instale Spire.XLS desde PyPI usando pip:
pip install spire.xls -
Escriba un script de Python para eliminar por lotes los saltos de página de varios archivos de Excel
from spire.xls import * import os input_folder = "input_excels" output_folder = "output_excels" for file_name in os.listdir(input_folder): if file_name.endswith(".xlsx"): # Load workbook workbook = Workbook() workbook.LoadFromFile(os.path.join(input_folder, file_name)) # Clear page breaks in all worksheets for sheet in workbook.Worksheets: sheet.HPageBreaks.Clear() sheet.VPageBreaks.Clear() sheet.ViewMode = ViewMode.Preview # Save updated workbook workbook.SaveToFile(os.path.join(output_folder, file_name), ExcelVersion.Version2013) workbook.Dispose() -
Ejecute el código
Ejecute el script para quitar automáticamente los saltos de página en la hoja de Excel de destino.
Consejo: También puede ajustar la escala de la hoja, los márgenes y la orientación de la página en su código para reducir los saltos de página automáticos.
Artículo relacionado: Python: Insertar o quitar saltos de página en Excel
Conclusión
En esta guía, hemos cubierto cómo quitar los saltos de página en Excel, incluidos los saltos de página manuales y automáticos. Siguiendo estos pasos, puede limpiar eficazmente sus hojas de cálculo y mantenerlas organizadas y listas para imprimir.
¿Busca más tutoriales de Excel de alta calidad? Consulte nuestros recursos gratuitos de Excel.
Preguntas frecuentes: Quitar saltos de página en Excel
P1: ¿Cuál es la diferencia entre los saltos de página manuales y automáticos?
R1: Los saltos de página manuales los insertan los usuarios para controlar exactamente dónde se producen los saltos de página durante la impresión, mientras que los saltos de página automáticos los agrega Excel en función de la configuración de impresión y el diseño.
P2: ¿Puedo quitar los saltos de página sin que afecte a la impresión?
R2: Sí. Puede ocultar las líneas de salto de página en la vista de hoja de cálculo Normal. Esto solo afecta a su visualización en pantalla; los saltos permanecen en el archivo y aún pueden influir en la impresión.
P3: ¿Por qué no puedo quitar algunos saltos de página en Excel?
R3: Los saltos de página automáticos no se pueden eliminar directamente. Excel los controla para mantener el diseño de impresión, pero puede influir en ellos ajustando los márgenes, la escala, el tamaño del papel o el área de impresión.
P4: ¿Cómo quitar los saltos de página en varias hojas de cálculo a la vez?
R4: La forma más eficiente de quitar los saltos de página en varias hojas de cálculo en Excel es usar VBA o Python. Esto le permite borrar todos los saltos de página manuales en libros de trabajo grandes o en varios archivos de forma rápida y coherente.
Ver también
- Establecer área de impresión en Excel: Manual, VBA y Python
- Descombinar celdas en Excel (Manual, VBA y Python)
- Copiar una hoja de cálculo en Excel (Manual, VBA y Python)
- Eliminar filas duplicadas de Excel: 6 formas sencillas
- Convertir Excel a ODS: 4 formas sencillas (local, en línea y automatización)
Seitenumbrüche in Excel entfernen: Handbuch für manuelle und automatische Methoden (2025)
Inhaltsverzeichnis
Unerwünschte Seitenumbrüche in Excel können Ihr Arbeitsblattlayout stören und das Drucken Ihrer Daten frustrierend machen. Sie treten häufig nach dem Ändern von Druckeinstellungen, dem Anpassen von Rändern oder dem Wechseln der Ansichten auf. Unabhängig davon, ob die Seitenumbrüche manuell eingefügt oder von Excel automatisch hinzugefügt werden, hilft Ihnen das Wissen, wie Sie sie entfernen können, ein sauberes und professionelles Arbeitsblatt zu erhalten.
Dieser Artikel zeigt Ihnen, wie Sie Seitenumbrüche in Excel entfernen, einschließlich manueller und automatischer Seitenumbrüche. Er behandelt auch, wie Sie Seitenumbrüche ausblenden können, und bietet Lösungen zur Stapelentfernung für mehrere Arbeitsblätter oder Arbeitsmappen.
- Seitenumbrüche in Excel verstehen (manuell vs. automatisch)
- So entfernen Sie manuelle Seitenumbrüche in Excel
- So entfernen Sie automatische Seitenumbrüche in Excel
- Seitenumbrüche in der Normalansicht ausblenden
- Seitenumbrüche in Excel stapelweise mit Python entfernen
Seitenumbrüche in Excel verstehen (manuell vs. automatisch)
Bevor Sie Seitenumbrüche entfernen, ist es wichtig, die beiden Haupttypen zu kennen, die Excel verwendet:
- Manuelle Seitenumbrüche: Von Benutzern eingefügt, um zu steuern, wo eine Seite beim Drucken endet.
- Automatische Seitenumbrüche: Von Excel basierend auf Rändern, Papiergröße, Skalierungseinstellungen und Druckbereich hinzugefügt.
Sie können die Seitenumbruchvorschau verwenden, um die Arten von Seitenumbrüchen zu identifizieren. Manuelle Umbrüche erscheinen als durchgezogene blaue Linien, während automatische Umbrüche als gestrichelte blaue Linien erscheinen.
Die Entfernungsmethode hängt davon ab, mit welcher Art von Seitenumbruch Sie es zu tun haben.
So entfernen Sie manuelle Seitenumbrüche in Excel
Sie können einzelne manuelle Seitenumbrüche entfernen oder alle manuellen Seitenumbrüche innerhalb eines Arbeitsblatts nach Bedarf löschen. Für Massenoperationen ermöglichen Excel-VBA-Skripte das effiziente Entfernen von Seitenumbrüchen über mehrere Arbeitsblätter hinweg.
Einen manuellen Seitenumbruch entfernen
Sie können einen bestimmten manuellen Seitenumbruch in einem Excel-Blatt entfernen, indem Sie die richtige Zelle in der Nähe des Umbruchs auswählen. So geht's:
-
Gehen Sie zum Tab Ansicht im Menüband und klicken Sie auf Seitenumbruchvorschau in der Gruppe Arbeitsmappenansichten.
Sie können auch auf das Symbol Seitenumbruchvorschau in der Statusleiste (unten rechts) klicken.
-
Identifizieren Sie den manuellen Seitenumbruch (durchgezogene blaue Linie), den Sie entfernen möchten.
-
Wählen Sie eine Zelle in der Nähe des Seitenumbruchs aus:
-
Für einen horizontalen Seitenumbruch wählen Sie eine beliebige Zelle unterhalb des Umbruchs aus.
-
Für einen vertikalen Seitenumbruch wählen Sie eine beliebige Zelle rechts neben dem Umbruch aus.
-
-
Gehen Sie zum Tab Seitenlayout im Menüband.
-
Klicken Sie auf Umbrüche und wählen Sie dann Seitenumbruch entfernen.
Dadurch wird nur der ausgewählte manuelle Seitenumbruch entfernt, und der Rest des Blattes bleibt unverändert.
Tipp: Sie können auch mit der rechten Maustaste auf die Zelle klicken und Seitenumbruch entfernen auswählen, um den Umbruch zu löschen. Oder ziehen Sie die Umbruchlinie direkt aus dem Vorschaufenster für Seitenumbrüche, wenn die Drag-and-Drop-Funktion in Ihrem Excel aktiviert ist.
Alle manuellen Seitenumbrüche von einem Blatt entfernen
Wenn Ihr Blatt mehrere manuelle Seitenumbrüche aufweist, können Sie Zeit sparen, indem Sie sie alle auf einmal entfernen. Befolgen Sie die folgenden Schritte:
-
Wählen Sie eine beliebige Zelle im Blatt aus.
-
Gehen Sie zum Tab Seitenlayout im Menüband.
-
Klicken Sie auf Umbrüche > Alle Seitenumbrüche zurücksetzen.
Dadurch werden alle manuell eingefügten Seitenumbrüche aus dem aktiven Arbeitsblatt entfernt.
Manuelle Seitenumbrüche aus mehreren Blättern mit VBA löschen
Wenn Sie manuelle Seitenumbrüche aus mehreren Blättern gleichzeitig entfernen müssen, ist die Verwendung von VBA (Visual Basic for Applications) die effizienteste Lösung. So können Sie es tun:
-
Drücken Sie Alt + F11 (Windows) oder Option + F11 (Mac), um den VBA-Editor zu öffnen.
-
Gehen Sie im Editor zu Einfügen > Modul.
-
Kopieren Sie den folgenden Code und fügen Sie ihn ein:
Sub ResetPageBreaksAllSheets() Dim ws As Worksheet For Each ws In ActiveWorkbook.Worksheets ws.ResetAllPageBreaks Next ws End Sub -
Drücken Sie F5, um das Makro auszuführen.
Alle manuellen Seitenumbrüche auf jedem Arbeitsblatt in der aktiven Arbeitsmappe werden auf einmal entfernt.
So entfernen Sie automatische Seitenumbrüche in Excel
Automatische Seitenumbrüche in Excel können nicht vollständig entfernt werden. Sie können sie jedoch steuern, indem Sie Layouteinstellungen wie Skalierung, Ränder, Seitenausrichtung und Druckbereich anpassen. Die Optimierung dieser Einstellungen ermöglicht es, mehr Inhalt auf jede Seite zu bringen und unerwünschte Umbrüche zu reduzieren.
Um automatische Seitenumbrüche zu reduzieren:
- Skalierung ändern
Gehen Sie zu Seitenlayout > Anpassen, setzen Sie Breite und Höhe auf Automatisch oder erhöhen Sie den Skalierungsprozentsatz.
Wenn mehr Inhalt pro Seite passt, werden automatische Seitenumbrüche reduziert. - Ränder anpassen
Gehen Sie zu Seitenlayout > Ränder und wählen Sie Schmal oder Benutzerdefinierte Ränder.
Kleinere Ränder erweitern den druckbaren Bereich und helfen, Seitenumbrüche zu reduzieren. - Seitenausrichtung ändern
Gehen Sie zu Seitenlayout > Ausrichtung und wechseln Sie von Hochformat zu Querformat.
Breitere Seiten passen mehr Spalten, was vertikale Seitenumbrüche reduziert. - Druckbereich löschen
Gehen Sie zu Seitenlayout > Druckbereich und löschen Sie den Druckbereich, wenn er den Inhaltsbereich einschränkt.
Das Löschen des Druckbereichs stellt sicher, dass Excel automatische Seitenumbrüche genau berechnet und unnötige Umbrüche vermeidet.
Seitenumbrüche in der Normalansicht ausblenden
Manchmal möchten Benutzer Seitenumbruchlinien in Excel ausblenden, ohne das Druckverhalten zu ändern. Dies ist nützlich, wenn die Umbruchlinien nach dem Aufrufen der Druckvorschau angezeigt werden. Befolgen Sie diese Schritte:
-
Klicken Sie auf Datei > Optionen.
-
Gehen Sie zu Erweitert.
-
Scrollen Sie zu Anzeigeoptionen für dieses Arbeitsblatt.
-
Deaktivieren Sie Seitenumbrüche anzeigen.
-
Klicken Sie auf OK.
Hinweis: Diese Aktion entfernt keine Seitenumbrüche. Sie blendet nur die Seitenumbruchlinien auf dem Bildschirm aus und beeinflusst nicht das Drucklayout. Wenn das Kontrollkästchen Seitenumbrüche anzeigen nicht deaktiviert werden kann, stellen Sie sicher, dass sich das Arbeitsblatt in der Normalansicht und nicht im Modus Seitenumbruchvorschau befindet.
Seitenumbrüche in Excel stapelweise mit Python entfernen
Das manuelle Entfernen von Seitenumbrüchen aus mehreren Excel-Arbeitsmappen kann zeitaufwändig sein. Mit Python und Bibliotheken wie Spire.XLS for Python können Sie alle Seitenumbrüche stapelweise über mehrere Dateien entfernen, was Zeit spart und eine konsistente Formatierung gewährleistet.
Schritte zur Stapelentfernung mit Python:
-
Installieren Sie Spire.XLS von PyPI mit pip:
pip install spire.xls -
Schreiben Sie ein Python-Skript, um Seitenumbrüche aus mehreren Excel-Dateien stapelweise zu entfernen
from spire.xls import * import os input_folder = "input_excels" output_folder = "output_excels" for file_name in os.listdir(input_folder): if file_name.endswith(".xlsx"): # Load workbook workbook = Workbook() workbook.LoadFromFile(os.path.join(input_folder, file_name)) # Clear page breaks in all worksheets for sheet in workbook.Worksheets: sheet.HPageBreaks.Clear() sheet.VPageBreaks.Clear() sheet.ViewMode = ViewMode.Preview # Save updated workbook workbook.SaveToFile(os.path.join(output_folder, file_name), ExcelVersion.Version2013) workbook.Dispose() -
Führen Sie den Code aus
Führen Sie das Skript aus, um Seitenumbrüche im Ziel-Excel-Blatt automatisch zu entfernen.
Tipp: Sie können auch die Skalierung, die Ränder und die Seitenausrichtung des Blattes in Ihrem Code anpassen, um automatische Seitenumbrüche zu reduzieren.
Verwandter Artikel: Python: Seitenumbrüche in Excel einfügen oder entfernen
Fazit
In dieser Anleitung haben wir behandelt, wie man Seitenumbrüche in Excel entfernt, einschließlich manueller und automatischer Seitenumbrüche. Indem Sie diesen Schritten folgen, können Sie Ihre Arbeitsblätter effektiv bereinigen und sie organisiert und druckbereit halten.
Suchen Sie nach weiteren hochwertigen Excel-Tutorials? Schauen Sie sich unsere kostenlosen Excel-Ressourcen an.
Häufig gestellte Fragen: Seitenumbrüche in Excel entfernen
F1: Was ist der Unterschied zwischen manuellen und automatischen Seitenumbrüchen?
A1: Manuelle Seitenumbrüche werden von Benutzern eingefügt, um genau zu steuern, wo Seiten beim Drucken umgebrochen werden, während automatische Seitenumbrüche von Excel basierend auf Druckeinstellungen und Layout hinzugefügt werden.
F2: Kann ich Seitenumbrüche entfernen, ohne das Drucken zu beeinflussen?
A2: Ja. Sie können Seitenumbruchlinien in der normalen Arbeitsblattansicht ausblenden. Dies beeinflusst nur ihre Anzeige auf dem Bildschirm; die Umbrüche bleiben in der Datei und können das Drucken weiterhin beeinflussen.
F3: Warum kann ich einige Seitenumbrüche in Excel nicht entfernen?
A3: Automatische Seitenumbrüche können nicht direkt gelöscht werden. Sie werden von Excel gesteuert, um das Drucklayout beizubehalten, aber Sie können sie durch Anpassen von Rändern, Skalierung, Papiergröße oder dem Druckbereich beeinflussen.
F4: Wie entfernt man Seitenumbrüche in mehreren Arbeitsblättern auf einmal?
A4: Der effizienteste Weg, Seitenumbrüche in mehreren Arbeitsblättern in Excel zu entfernen, ist die Verwendung von VBA oder Python. Dies ermöglicht es Ihnen, alle manuellen Seitenumbrüche in großen Arbeitsmappen oder mehreren Dateien schnell und konsistent zu löschen.
Siehe auch
Удаление разрывов страниц в Excel: Руководство по ручному и автоматическому режимам (2025)
Содержание
Нежелательные разрывы страниц в Excel могут нарушить макет вашего листа и сделать печать данных утомительной. Они часто появляются после изменения настроек печати, корректировки полей или переключения режимов просмотра. Независимо от того, вставлены ли разрывы страниц вручную или добавлены Excel автоматически, знание того, как их удалить, поможет вам поддерживать чистоту и профессиональный вид листа.
Эта статья покажет вам, как удалять разрывы страниц в Excel, включая как ручные, так и автоматические разрывы страниц. В ней также рассматривается, как скрыть разрывы страниц и предлагаются решения для пакетного удаления для нескольких листов или книг.
- Понимание разрывов страниц в Excel (ручные и автоматические)
- Как удалить ручные разрывы страниц в Excel
- Как удалить автоматические разрывы страниц в Excel
- Скрыть разрывы страниц в обычном режиме
- Пакетное удаление разрывов страниц в Excel с помощью Python
Понимание разрывов страниц в Excel (ручные и автоматические)
Прежде чем удалять разрывы страниц, важно знать два основных типа, которые использует Excel:
- Ручные разрывы страниц: Вставляются пользователями для контроля того, где заканчивается страница при печати.
- Автоматические разрывы страниц: Добавляются Excel на основе полей, размера бумаги, настроек масштабирования и области печати.
Вы можете использовать Предварительный просмотр разрывов страниц для определения типов разрывов страниц. Ручные разрывы отображаются сплошными синими линиями, а автоматические — пунктирными синими линиями.
Метод удаления зависит от того, с каким типом разрыва страницы вы имеете дело.
Как удалить ручные разрывы страниц в Excel
Вы можете удалять отдельные ручные разрывы страниц или очищать все ручные разрывы страниц на листе по мере необходимости. Для массовых операций скрипты Excel VBA позволяют эффективно удалять разрывы страниц на нескольких листах.
Удалить ручной разрыв страницы
Вы можете удалить определенный ручной разрыв страницы на листе Excel, выбрав правильную ячейку рядом с разрывом. Вот как это сделать:
-
Перейдите на вкладку Вид на ленте и нажмите Предварительный просмотр разрывов страниц в группе Режимы просмотра книги.
Вы также можете нажать на значок Предварительный просмотр разрывов страниц в строке состояния (внизу справа).
-
Определите ручной разрыв страницы (сплошная синяя линия), который вы хотите удалить.
-
Выберите ячейку рядом с разрывом страницы:
-
Для горизонтального разрыва страницы выберите любую ячейку ниже разрыва.
-
Для вертикального разрыва страницы выберите любую ячейку справа от разрыва.
-
-
Перейдите на вкладку Разметка страницы на ленте.
-
Нажмите Разрывы, затем выберите Удалить разрыв страницы.
Это удаляет только выбранный ручной разрыв страницы, а остальная часть листа останется без изменений.
Совет: Вы также можете щелкнуть ячейку правой кнопкой мыши и выбрать Удалить разрыв страницы, чтобы удалить разрыв. Или напрямую перетащить линию разрыва за пределы области предварительного просмотра разрывов страниц, если в вашем Excel включена функция перетаскивания.
Удалить все ручные разрывы страниц с листа
Если на вашем листе несколько ручных разрывов страниц, их одновременное удаление может сэкономить время. Выполните следующие шаги:
-
Выберите любую ячейку на листе.
-
Перейдите на вкладку Разметка страницы на ленте.
-
Нажмите Разрывы > Сбросить все разрывы страниц.
Это удаляет все вручную вставленные разрывы страниц с активного листа.
Удалить ручные разрывы страниц с нескольких листов с помощью VBA
Если вам нужно одновременно удалить ручные разрывы страниц с нескольких листов, использование VBA (Visual Basic for Applications) является наиболее эффективным решением. Вот как это сделать:
-
Нажмите Alt + F11 (Windows) или Option + F11 (Mac), чтобы открыть редактор VBA.
-
В редакторе перейдите в Insert > Module.
-
Скопируйте и вставьте следующий код:
Sub ResetPageBreaksAllSheets() Dim ws As Worksheet For Each ws In ActiveWorkbook.Worksheets ws.ResetAllPageBreaks Next ws End Sub -
Нажмите F5, чтобы выполнить макрос.
Все ручные разрывы страниц на каждом листе в активной книге будут удалены одновременно.
Как удалить автоматические разрывы страниц в Excel
Автоматические разрывы страниц в Excel нельзя удалить полностью. Однако вы можете управлять ими, настраивая параметры макета, такие как масштабирование, поля, ориентация страницы и область печати. Оптимизация этих настроек позволяет разместить больше содержимого на каждой странице и уменьшить количество нежелательных разрывов.
Чтобы уменьшить количество автоматических разрывов страниц:
- Изменить масштабирование
Перейдите в Разметка страницы > Вписать, установите Ширина и Высота на Авто или увеличьте процент масштабирования.
Размещение большего количества содержимого на странице уменьшает количество автоматических разрывов страниц. - Настроить поля
Перейдите в Разметка страницы > Поля и выберите Узкие или Настраиваемые поля.
Меньшие поля расширяют область печати и помогают уменьшить количество разрывов страниц. - Изменить ориентацию страницы
Перейдите в Разметка страницы > Ориентация и переключитесь с Книжной на Альбомную.
Более широкие страницы вмещают больше столбцов, уменьшая количество вертикальных разрывов страниц. - Очистить область печати
Перейдите в Разметка страницы > Область печати и очистите область печати, если она ограничивает диапазон содержимого.
Очистка области печати гарантирует, что Excel точно рассчитает автоматические разрывы страниц и избежит ненужных разрывов.
Скрыть разрывы страниц в обычном режиме
Иногда пользователи хотят скрыть линии разрывов страниц в Excel, не изменяя поведение при печати. Это полезно, если линии разрывов появляются после входа в Предварительный просмотр. Выполните следующие шаги:
-
Нажмите Файл > Параметры.
-
Перейдите в Дополнительно.
-
Прокрутите до Параметры отображения для этого листа.
-
Снимите флажок Показывать разрывы страниц.
-
Нажмите ОК.
Примечание: Это действие не удаляет разрывы страниц. Оно только скрывает линии разрывов страниц на экране и не влияет на макет печати. Если флажок Показывать разрывы страниц нельзя снять, убедитесь, что лист находится в режиме Обычный, а не в режиме Предварительный просмотр разрывов страниц.
Пакетное удаление разрывов страниц в Excel с помощью Python
Ручное удаление разрывов страниц из нескольких книг Excel может занять много времени. Используя Python и библиотеки, такие как Spire.XLS for Python, вы можете пакетно удалить все разрывы страниц в нескольких файлах, экономя время и обеспечивая единообразное форматирование.
Шаги для пакетного удаления с помощью Python:
-
Установите Spire.XLS из PyPI с помощью pip:
pip install spire.xls -
Напишите скрипт Python для пакетного удаления разрывов страниц из нескольких файлов Excel
from spire.xls import * import os input_folder = "input_excels" output_folder = "output_excels" for file_name in os.listdir(input_folder): if file_name.endswith(".xlsx"): # Load workbook workbook = Workbook() workbook.LoadFromFile(os.path.join(input_folder, file_name)) # Clear page breaks in all worksheets for sheet in workbook.Worksheets: sheet.HPageBreaks.Clear() sheet.VPageBreaks.Clear() sheet.ViewMode = ViewMode.Preview # Save updated workbook workbook.SaveToFile(os.path.join(output_folder, file_name), ExcelVersion.Version2013) workbook.Dispose() -
Запустите код
Выполните скрипт для автоматического удаления разрывов страниц на целевом листе Excel.
Совет: Вы также можете настроить масштабирование листа, поля и ориентацию страницы в своем коде, чтобы уменьшить количество автоматических разрывов страниц.
Связанная статья: Python: вставка или удаление разрывов страниц в Excel
Заключение
В этом руководстве мы рассмотрели, как удалять разрывы страниц в Excel, включая как ручные, так и автоматические разрывы страниц. Следуя этим шагам, вы сможете эффективно очистить свои листы и поддерживать их в организованном и готовом к печати виде.
Ищете больше качественных руководств по Excel? Ознакомьтесь с нашими бесплатными ресурсами по Excel.
Часто задаваемые вопросы: удаление разрывов страниц в Excel
В1: В чем разница между ручными и автоматическими разрывами страниц?
О1: Ручные разрывы страниц вставляются пользователями для точного контроля мест разрыва страниц при печати, в то время как автоматические разрывы страниц добавляются Excel на основе настроек печати и макета.
В2: Могу ли я удалить разрывы страниц, не затрагивая печать?
О2: Да. Вы можете скрыть линии разрывов страниц в обычном режиме просмотра листа. Это влияет только на их отображение на экране; разрывы остаются в файле и все еще могут влиять на печать.
В3: Почему я не могу удалить некоторые разрывы страниц в Excel?
О3: Автоматические разрывы страниц нельзя удалить напрямую. Они контролируются Excel для поддержания макета печати, но вы можете влиять на них, настраивая поля, масштабирование, размер бумаги или область печати.
В4: Как удалить разрывы страниц на нескольких листах одновременно?
О4: Самый эффективный способ удалить разрывы страниц на нескольких листах в Excel — использовать VBA или Python. Это позволяет быстро и последовательно очищать все ручные разрывы страниц в больших книгах или нескольких файлах.
Смотрите также
Converter TXT para Word: 4 Métodos Fáceis e Gratuitos
Índice
- Método 1: Usando o Microsoft Word (Offline)
- Método 2: Usando o Conversor Online de TXT para Word
- Método 3: Usando o Google Docs (Gratuito e Baseado na Nuvem)
- Método 4: Programação em C# (Conversão em Lote/Automatizada)
- Dicas para uma Conversão de TXT para Word Bem-Sucedida
- Solução de Problemas Comuns
- Perguntas Frequentes
Os arquivos TXT são amplamente utilizados por sua simplicidade e compatibilidade em todos os dispositivos, mas carecem de opções de formatação como fontes, tabelas ou imagens que tornam os documentos profissionais. Se você precisa preparar um relatório, redigir um ensaio ou criar um documento de negócios, converter TXT para Word é uma tarefa comum que pode economizar seu tempo e melhorar a qualidade do seu trabalho.
Neste artigo, compartilharemos os métodos de conversão de TXT para Word mais eficazes e fáceis de usar, incluindo ferramentas offline, conversores online e fluxos de trabalho de programação automatizados. Ao final, você poderá escolher a melhor abordagem para suas necessidades e concluir a conversão em minutos.
- Método 1: Usando o Microsoft Word (Offline)
- Método 2: Usando o Conversor Online de TXT para Word
- Método 3: Usando o Google Docs (Gratuito e Baseado na Nuvem)
- Método 4: Programação em C# (Conversão em Lote/Automatizada)
- Dicas para uma Conversão de TXT para Word Bem-Sucedida
- Solução de Problemas Comuns
- Perguntas Frequentes
Método 1: Usando o Microsoft Word (Offline)
O Microsoft Word é o processador de texto mais popular e possui um recurso integrado para abrir e converter arquivos TXT diretamente. Este método é ideal se você já tem o Word instalado no seu computador, pois garante 100% de precisão na formatação (para texto simples) e não requer ferramentas de terceiros.
Guia passo a passo para converter arquivo de texto para Word:
- Abra o Microsoft Word e clique em “Arquivo” > “Abrir”.
- Na janela do explorador de arquivos, navegue até a pasta onde seu arquivo TXT está armazenado.
- No menu suspenso “Tipo de arquivo”, selecione “Texto Simples (*.txt)” para filtrar os arquivos TXT.
- Selecione seu arquivo TXT e clique em “Abrir”, depois escolha a codificação apropriada.
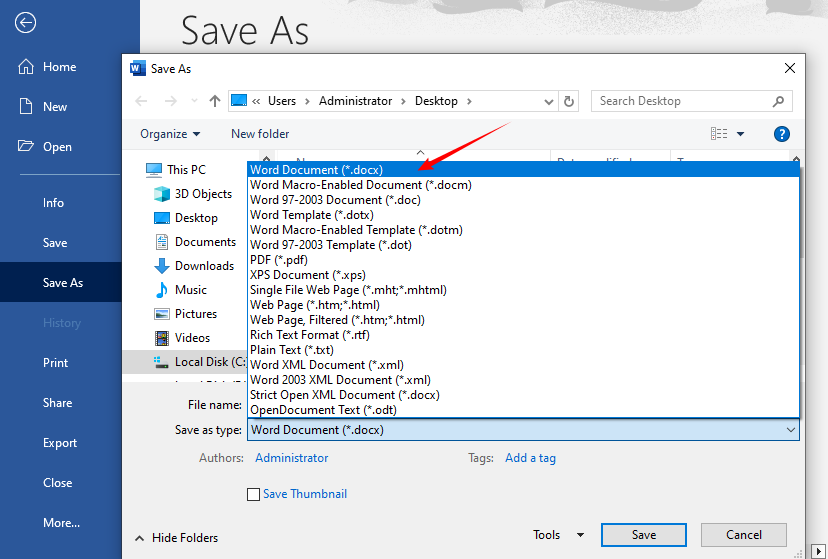
- Assim que o conteúdo do TXT for exibido no Word, clique em “Arquivo” novamente e selecione “Salvar Como”.
- Escolha um local para salvar, selecione “Documento do Word (*.docx)” ou “Documento do Word 97-2003 (*.doc)” como o formato do arquivo e clique em “Salvar”.
Dica: Se o seu arquivo TXT tiver caracteres especiais (por exemplo, acentos, símbolos), certifique-se de que a opção “Codificação” no Assistente de Importação de Texto esteja definida como “UTF-8” para preservá-los durante a conversão.
Método 2: Usando o Conversor Online de TXT para Word
Se você não tem o Microsoft Word instalado, os conversores online são uma ótima alternativa. Eles funcionam em qualquer dispositivo com conexão à internet (Windows, Mac, celular, tablet) e não exigem downloads.
Conversores Recomendados:
- CLOUDXDOCS: Converta arquivos TXT para Word sem anúncios ou marcas d'água
- FreeConvert: Conversor online fácil de usar com uma interface limpa
- Convertio: Suporta conversão em lote e converte TXT para doc/docx
Passos para converter TXT para Word online:
- Visite o site do conversor escolhido
- Envie seu arquivo TXT (arraste e solte ou procure)
- Selecione "DOC" ou "DOCX" como formato de saída
- Clique no botão "Converter" ou "Iniciar"
- Baixe o documento Word convertido
Exemplo de uso do CLOUDXDOCS:
Nota de Segurança: Para documentos sensíveis, considere métodos offline, pois as ferramentas online armazenam temporariamente os arquivos em seus servidores.
Você também pode gostar: Converta Texto para PDF Facilmente: 4 Métodos Rápidos e Profissionais
Método 3: Usando o Google Docs (Gratuito e Baseado na Nuvem)
O Google Docs é um processador de texto gratuito baseado na nuvem que permite abrir, editar e converter arquivos de texto para arquivos do Word sem instalar software. É perfeito para usuários que preferem armazenamento em nuvem e colaboração.
Guia passo a passo para converter TXT para Word gratuitamente:
- Abra seu navegador e vá para Google Docs. Clique no documento “Em branco” para criar um novo arquivo.
- Clique em “Arquivo” > “Abrir” no menu superior. Na janela “Abrir um arquivo”, clique na guia “Upload”.
- Arraste e solte seu arquivo TXT na área de upload ou clique em “Procurar” para escolhê-lo manually.
- Assim que o arquivo TXT for carregado, ele será aberto no Google Docs.
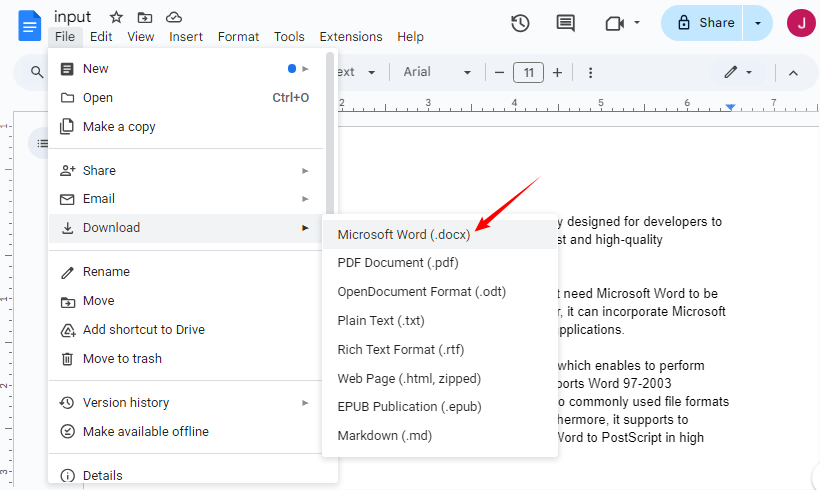
- Clique em “Arquivo” > “Fazer download” > “Microsoft Word (.docx)” no menu suspenso.
- O arquivo Word convertido será baixado automaticamente para o seu dispositivo.
✔ Ideal para: Edição colaborativa ou usuários que trabalham em vários dispositivos.
Método 4: Programação em C# (Conversão em Lote/Automatizada)
Para desenvolvedores ou equipes que precisam converter centenas de arquivos TXT (ou integrar a conversão em um aplicativo .NET), a abordagem em C# com o Free Spire.Doc for .NET é eficiente e escalável.
O que é o Free Spire.Doc for .NET?
Free Spire.Doc é uma biblioteca .NET gratuita que permite criar, editar e converter documentos do Word (DOC/DOCX) em C#/VB.NET sem instalar o Microsoft Office. Ele suporta o desenvolvimento multiplataforma e é ideal para fluxos de trabalho automatizados (por exemplo, converter arquivos TXT enviados por usuários em um aplicativo da web).
Passos para converter TXT para Word em C#
- Instalar via NuGet:
Install-Package FreeSpire.Doc
- Código C# Completo:
using Spire.Doc;

namespace ConvertTextToWord
{
    internal class Program
    {
        static void Main(string[] args)
        {
            // Create a Document object
            Document doc = new Document();
            // Load a text file
            doc.LoadText("Sample.txt");

            // Save the text file in Word format
            doc.SaveToFile("TextToWord.docx", FileFormat.Docx2016);
            doc.Close();
        }
    }
}
Este código carrega um arquivo TXT e o salva no formato DOCX através do método SaveToFile(). Além disso, o Free Spire.Doc também suporta a conversão de arquivos do Word de volta para arquivos TXT via C#.
Dicas para uma Conversão de TXT para Word Bem-Sucedida
Para evitar problemas comuns (por exemplo, texto ausente, erros de formatação), siga estas dicas:
- Faça backup do seu arquivo TXT original antes da conversão: Em caso de erros, você pode reverter para a versão original.
- Verifique as quebras de linha: Os arquivos TXT geralmente têm quebras de linha manuais. Após a conversão, use o recurso “Substituir” do Word (Ctrl+H) para remover quebras de linha extras, se necessário.
- Evite arquivos TXT grandes com conversores online: A maioria das ferramentas online gratuitas tem limites de tamanho de arquivo (50MB-100MB). Para arquivos grandes, use o Microsoft Word ou o Google Docs.
- Verifique os caracteres especiais: Se o seu arquivo TXT contiver caracteres ou símbolos não ingleses, verifique o arquivo Word convertido para garantir que eles sejam preservados.
Solução de Problemas Comuns
| Problema | Solução |
|---|---|
| Formatação perdida | Arquivos TXT não contêm formatação; reaplique os estilos no Word após a conversão. |
| Caracteres especiais são exibidos incorretamente | Certifique-se de que a codificação UTF-8 esteja selecionada durante a importação. |
| O arquivo não converte | Verifique se o arquivo não está corrompido ou protegido por senha. |
| O arquivo convertido é muito grande | Salve como DOCX, exclua linhas em branco não utilizadas ou comprima imagens (se adicionadas após a conversão). |
Conclusão
Converter TXT para o formato Word é simples com a abordagem certa. Para a maioria dos usuários, abrir diretamente o arquivo TXT no Microsoft Word oferece os melhores resultados. Para aqueles sem acesso ao Word, ferramentas online gratuitas ou o Google Docs oferecem alternativas confiáveis. Se você é um desenvolvededor que precisa de escalabilidade, o método em C# com o Free Spire.Doc permite automatizar conversões em lote e personalizar a formatação
Seja para aprimorar um único documento ou construir um fluxo de trabalho automatizado, esses métodos cobrem todos os casos de uso para a conversão de TXT para Word. Lembre-se de que, embora a conversão seja direta, a formatação precisará ser aplicada posteriormente, já que os arquivos de texto simples contêm apenas conteúdo bruto.
Perguntas Frequentes
P: A conversão de TXT para Word é gratuita?
R: Sim, existem vários métodos gratuitos, incluindo ferramentas online, o Google Docs e o uso da biblioteca .NET gratuita.
P: A conversão de TXT para Word preserva a formatação?
R: Os arquivos TXT não contêm dados de formatação, então você precisará aplicar a formatação no Word após a conversão.
P: Como posso converter vários arquivos TXT para Word de uma vez?
R: Você pode:
- Usar um conversor em lote online como o Convertio.
- Escrever um script em C# usando o Free Spire.Doc para percorrer todos os arquivos TXT em uma pasta com
Directory.GetFiles( @"C:\Documents\", "*.txt")e repetir a lógica de conversão para cada arquivo.
P: Qual é a diferença entre los formatos DOC e DOCX?
R: DOC é o formato binário mais antigo usado no Word 97–2003. DOCX é o formato mais novo, baseado em XML (usado desde o Word 2007), com melhor compressão de arquivo, segurança e recursos de recuperação. DOCX é recomendado, a menos que você precise de compatibilidade com software muito antigo.
Veja Também
TXT를 Word로 변환: 쉽고 무료인 4가지 방법
TXT 파일은 단순성과 모든 장치에서의 호환성 때문에 널리 사용되지만, 문서를 전문적으로 보이게 하는 글꼴, 표, 이미지와 같은 서식 옵션이 부족합니다. 보고서를 준비하거나, 에세이 초안을 작성하거나, 비즈니스 문서를 만들어야 할 때, TXT를 Word로 변환하는 것은 시간을 절약하고 작업 품질을 향상시킬 수 있는 일반적인 작업입니다.
이 기사에서는 오프라인 도구, 온라인 변환기, 자동화된 프로그래밍 워크플로우를 포함하여 가장 효과적이고 사용자 친화적인 TXT를 Word로 변환하는 방법을 공유합니다. 이 글을 다 읽고 나면, 필요에 가장 적합한 방법을 선택하고 몇 분 안에 변환을 완료할 수 있게 될 것입니다.
- 방법 1: Microsoft Word 사용 (오프라인)
- 방법 2: 온라인 TXT를 Word로 변환기 사용
- 방법 3: Google Docs 사용 (무료 및 클라우드 기반)
- 방법 4: C# 프로그래밍 (일괄/자동 변환)
- 성공적인 TXT를 Word로 변환하기 위한 팁
- 일반적인 문제 해결
- 자주 묻는 질문
방법 1: Microsoft Word 사용 (오프라인)
Microsoft Word는 가장 인기 있는 워드 프로세서이며, TXT 파일을 직접 열고 변환하는 내장 기능이 있습니다. 이 방법은 컴퓨터에 Word가 이미 설치되어 있는 경우에 이상적이며, (일반 텍스트에 대해) 100% 서식 정확도를 보장하고 타사 도구가 필요하지 않습니다.
텍스트 파일을 Word로 변환하는 단계별 안내:
- Microsoft Word를 열고 “파일” > “열기”를 클릭합니다.
- 파일 탐색기 창에서 TXT 파일이 저장된 폴더로 이동합니다.
- “파일 형식” 드롭다운에서 “일반 텍스트 (*.txt)”를 선택하여 TXT 파일을 필터링합니다.
- TXT 파일을 선택하고 “열기”를 클릭한 다음, 적절한 인코딩을 선택합니다.
- TXT 내용이 Word에 표시되면 다시 “파일”을 클릭하고 “다른 이름으로 저장”을 선택합니다.
- 저장 위치를 선택하고 파일 형식으로 “Word 문서 (*.docx)” 또는 “Word 97-2003 문서 (*.doc)”를 선택한 다음 “저장”을 클릭합니다.
팁: TXT 파일에 특수 문자(예: 악센트, 기호)가 있는 경우, 변환 중에 문자를 보존하기 위해 텍스트 가져오기 마법사의 “인코딩” 옵션이 “UTF-8”로 설정되었는지 확인하십시오.
방법 2: 온라인 TXT를 Word로 변환기 사용
Microsoft Word가 설치되어 있지 않은 경우, 온라인 변환기는 훌륭한 대안입니다. 인터넷에 연결된 모든 장치(Windows, Mac, 휴대폰, 태블릿)에서 작동하며 다운로드가 필요 없습니다.
추천 변환기:
- CLOUDXDOCS: 광고나 워터마크 없이 TXT를 Word 파일로 변환
- FreeConvert: 깔끔한 인터페이스를 갖춘 사용자 친화적인 온라인 변환기
- Convertio: 일괄 변환을 지원하며 TXT를 doc/docx로 변환
온라인에서 TXT를 Word로 변환하는 단계:
- 선택한 변환기 웹사이트를 방문하세요
- TXT 파일을 업로드하세요 (드래그 앤 드롭 또는 찾아보기)
- 출력 형식으로 "DOC" 또는 "DOCX"를 선택하세요
- "변환" 또는 "시작" 버튼을 클릭하세요
- 변환된 Word 문서를 다운로드하세요
CLOUDXDOCS 사용 예시:
보안 참고: 민감한 문서의 경우, 온라인 도구는 파일을 서버에 일시적으로 저장하므로 오프라인 방법을 고려하십시오.
관심 있을 만한 글: 텍스트를 PDF로 쉽게 변환하기: 4가지 빠르고 전문적인 방법
방법 3: Google Docs 사용 (무료 및 클라우드 기반)
Google Docs는 소프트웨어 설치 없이 텍스트 파일을 열고, 편집하고, Word 파일로 변환할 수 있는 무료 클라우드 기반 워드 프로세서입니다. 클라우드 저장소와 협업을 선호하는 사용자에게 적합합니다.
무료로 TXT를 Word로 변환하는 단계별 안내:
- 브라우저를 열고 Google Docs로 이동합니다. “내용 없음” 문서를 클릭하여 새 파일을 만듭니다.
- 상단 메뉴에서 “파일” > “열기”를 클릭합니다. “파일 열기” 창에서 “업로드” 탭을 클릭합니다.
- TXT 파일을 업로드 영역으로 드래그 앤 드롭하거나, “찾아보기”를 클릭하여 수동으로 선택합니다.
- TXT 파일이 업로드되면 Google Docs에서 열립니다.
- 드롭다운 메뉴에서 “파일” > “다운로드” > “Microsoft Word (.docx)”를 클릭합니다.
- 변환된 Word 파일이 장치에 자동으로 다운로드됩니다.
✔ 최적 대상: 협업 편집 또는 여러 장치에서 작업하는 사용자.
방법 4: C# 프로그래밍 (일괄/자동 변환)
수백 개의 TXT 파일을 변환해야 하거나 .NET 앱에 변환 기능을 통합해야 하는 개발자나 팀에게는 Free Spire.Doc for .NET을 사용한 C# 접근 방식이 효율적이고 확장 가능합니다.
Free Spire.Doc for .NET이란?
Free Spire.Doc은 Microsoft Office를 설치하지 않고도 C#/VB.NET에서 Word 문서(DOC/DOCX)를 생성, 편집 및 변환할 수 있는 무료 .NET 라이브러리입니다. 크로스플랫폼 개발을 지원하며 자동화된 워크플로우(예: 웹 앱에서 사용자가 업로드한 TXT 파일 변환)에 이상적입니다.
C#에서 TXT를 Word로 변환하는 단계
- NuGet을 통해 설치:
Install-Package FreeSpire.Doc
- 전체 C# 코드:
using Spire.Doc;

namespace ConvertTextToWord
{
    internal class Program
    {
        static void Main(string[] args)
        {
            // Create a Document object
            Document doc = new Document();
            // Load a text file
            doc.LoadText("Sample.txt");

            // Save the text file in Word format
            doc.SaveToFile("TextToWord.docx", FileFormat.Docx2016);
            doc.Close();
        }
    }
}
이 코드는 TXT 파일을 로드하고 SaveToFile() 메서드를 통해 DOCX 형식으로 저장합니다. 또한 Free Spire.Doc은 C#을 통해 Word 파일을 다시 TXT 파일로 변환하는 것도 지원합니다.
성공적인 TXT를 Word로 변환하기 위한 팁
일반적인 문제(예: 텍스트 누락, 서식 오류)를 피하려면 다음 팁을 따르십시오:
- 변환 전 원본 TXT 파일 백업: 오류가 발생할 경우 원본 버전으로 되돌릴 수 있습니다.
- 줄 바꿈 확인: TXT 파일에는 종종 수동 줄 바꿈이 있습니다. 변환 후 필요한 경우 Word의 “바꾸기” 기능(Ctrl+H)을 사용하여 추가 줄 바꿈을 제거하십시오.
- 온라인 변환기로 큰 TXT 파일 피하기: 대부분의 무료 온라인 도구에는 파일 크기 제한(50MB-100MB)이 있습니다. 큰 파일의 경우 Microsoft Word 또는 Google Docs를 사용하십시오.
- 특수 문자 확인: TXT 파일에 영어가 아닌 문자나 기호가 포함된 경우, 변환된 Word 파일을 확인하여 보존되었는지 확인하십시오.
일반적인 문제 해결
| 문제 | 해결책 |
|---|---|
| 서식 손실 | TXT 파일에는 서식이 포함되어 있지 않습니다. 변환 후 Word에서 스타일을 다시 적용하십시오. |
| 특수 문자가 잘못 표시됨 | 가져오는 동안 UTF-8 인코딩이 선택되었는지 확인하십시오. |
| 파일이 변환되지 않음 | 파일이 손상되지 않았거나 암호로 보호되어 있지 않은지 확인하십시오. |
| 변환된 파일이 너무 큼 | DOCX로 저장하고, 사용하지 않는 빈 줄을 삭제하거나, (변환 후 추가된 경우) 이미지를 압축하십시오. |
결론
TXT를 Word 형식으로 변환하는 것은 올바른 접근 방식을 사용하면 간단합니다. 대부분의 사용자에게는 Microsoft Word에서 직접 TXT 파일을 여는 것이 최상의 결과를 제공합니다. Word에 액세스할 수 없는 사용자에게는 무료 온라인 도구나 Google Docs가 신뢰할 수 있는 대안을 제공합니다. 확장성이 필요한 개발자라면 Free Spire.Doc을 사용한 C# 방법을 통해 일괄 변환을 자동화하고 서식을 사용자 지정할 수 있습니다.
단일 문서를 다듬거나 자동화된 워크플로우를 구축하든, 이 방법들은 TXT를 Word로 변환하는 모든 사용 사례를 다룹니다. 변환은 간단하지만, 일반 텍스트 파일에는 원시 콘텐츠만 포함되어 있으므로 나중에 서식을 적용해야 한다는 점을 기억하십시오.
자주 묻는 질문
Q: TXT를 Word로 변환하는 것은 무료인가요?
A: 예, 온라인 도구, Google Docs, 무료 .NET 라이브러리 사용을 포함하여 여러 무료 방법이 있습니다.
Q: TXT를 Word로 변환하면 서식이 유지되나요?
A: TXT 파일에는 서식 데이터가 포함되어 있지 않으므로 변환 후 Word에서 서식을 적용해야 합니다.
Q: 여러 TXT 파일을 한 번에 Word로 변환하려면 어떻게 해야 하나요?
A: 다음을 수행할 수 있습니다:
- Convertio와 같은 온라인 일괄 변환기를 사용합니다.
- Free Spire.Doc을 사용하여 C# 스크립트를 작성하여
Directory.GetFiles( @"C:\Documents\", "*.txt")로 폴더의 모든 TXT 파일을 반복하고 각 파일에 대해 변환 로직을 반복합니다.
Q: DOC와 DOCX 형식의 차이점은 무엇인가요?
A: DOC는 Word 97–2003에서 사용된 이전 바이너리 형식입니다. DOCX는 더 나은 파일 압축, 보안 및 복구 기능을 갖춘 최신 XML 기반 형식(Word 2007부터 사용)입니다. 매우 오래된 소프트웨어와의 호환성이 필요하지 않은 한 DOCX를 권장합니다.
관련 항목
Convertire TXT in Word: 4 metodi facili e gratuiti
Indice
- Metodo 1: Utilizzo di Microsoft Word (Offline)
- Metodo 2: Utilizzo di un convertitore online da TXT a Word
- Metodo 3: Utilizzo di Google Docs (Gratuito e basato su cloud)
- Metodo 4: Programmazione C# (Conversione batch/automatizzata)
- Suggerimenti per una conversione da TXT a Word di successo
- Risoluzione dei problemi comuni
- Domande frequenti
I file TXT sono ampiamente utilizzati per la loro semplicità e compatibilità su tutti i dispositivi, ma mancano di opzioni di formattazione come caratteri, tabelle o immagini che rendono i documenti professionali. Che tu debba preparare un rapporto, redigere un saggio o creare un documento aziendale, convertire TXT in Word è un'attività comune che può farti risparmiare tempo e migliorare la qualità del tuo lavoro.
In questo articolo, condivideremo i metodi di conversione da TXT a Word più efficaci e facili da usare, inclusi strumenti offline, convertitori online e flussi di lavoro di programmazione automatizzati. Alla fine, sarai in grado di scegliere l'approccio migliore per le tue esigenze e completare la conversione in pochi minuti.
- Metodo 1: Utilizzo di Microsoft Word (Offline)
- Metodo 2: Utilizzo di un convertitore online da TXT a Word
- Metodo 3: Utilizzo di Google Docs (Gratuito e basato su cloud)
- Metodo 4: Programmazione C# (Conversione batch/automatizzata)
- Suggerimenti per una conversione da TXT a Word di successo
- Risoluzione dei problemi comuni
- Domande frequenti
Metodo 1: Utilizzo di Microsoft Word (Offline)
Microsoft Word è l'elaboratore di testi più popolare e dispone di una funzione integrata per aprire e convertire direttamente i file TXT. Questo metodo è ideale se hai già Word installato sul tuo computer, poiché garantisce una precisione di formattazione del 100% (per il testo semplice) e non richiede strumenti di terze parti.
Guida passo passo per convertire un file di testo in Word:
- Apri Microsoft Word, quindi fai clic su “File” > “Apri”.
- Nella finestra di esplorazione file, vai alla cartella in cui è archiviato il tuo file TXT.
- Nel menu a discesa “Tipo file”, seleziona “Testo normale (*.txt)” per filtrare i file TXT.
- Seleziona il tuo file TXT e fai clic su “Apri”, quindi scegli la codifica appropriata.
- Una volta visualizzato il contenuto del TXT in Word, fai di nuovo clic su “File” e seleziona “Salva con nome”.
- Scegli una posizione di salvataggio, seleziona “Documento di Word (*.docx)” o “Documento di Word 97-2003 (*.doc)” come formato file e fai clic su “Salva”.
Suggerimento: se il tuo file TXT contiene caratteri speciali (ad es. accenti, simboli), assicurati che l'opzione “Codifica” nella procedura guidata di importazione del testo sia impostata su “UTF-8” per preservarli durante la conversione.
Metodo 2: Utilizzo di un convertitore online da TXT a Word
Se non hai installato Microsoft Word, i convertitori online sono un'ottima alternativa. Funzionano su qualsiasi dispositivo con una connessione Internet (Windows, Mac, telefono, tablet) e non richiedono download.
Convertitori consigliati:
- CLOUDXDOCS: Converti file TXT in Word senza pubblicità o filigrane
- FreeConvert: Convertitore online intuitivo con un'interfaccia pulita
- Convertio: Supporta la conversione batch e converte TXT in doc/docx
Passaggi per convertire TXT in Word online:
- Visita il sito web del convertitore scelto
- Carica il tuo file TXT (trascina e rilascia o sfoglia)
- Seleziona "DOC" o "DOCX" come formato di output
- Fai clic sul pulsante "Converti" o "Avvia"
- Scarica il documento Word convertito
Esempio di utilizzo di CLOUDXDOCS:
Nota sulla sicurezza: per i documenti sensibili, considera i metodi offline poiché gli strumenti online archiviano temporaneamente i file sui loro server.
Potrebbe piacerti anche: Convertire testo in PDF facilmente: 4 metodi rapidi e professionali
Metodo 3: Utilizzo di Google Docs (Gratuito e basato su cloud)
Google Docs è un elaboratore di testi gratuito basato su cloud che ti consente di aprire, modificare e convertire file di testo in file di Word senza installare software. È perfetto per gli utenti che preferiscono l'archiviazione su cloud e la collaborazione.
Guida passo passo per convertire gratuitamente TXT in Word:
- Apri il browser e vai su Google Docs. Fai clic sul documento “Vuoto” per creare un nuovo file.
- Fai clic su “File” > “Apri” dal menu in alto. Nella finestra “Apri un file”, fai clic sulla scheda “Carica”.
- Trascina e rilascia il tuo file TXT nell'area di caricamento o fai clic su “Sfoglia” per sceglierlo manualmente.
- Una volta caricato il file TXT, si aprirà in Google Docs.
- Fai clic su “File” > “Scarica” > “Microsoft Word (.docx)” dal menu a discesa.
- Il file Word convertito verrà scaricato automaticamente sul tuo dispositivo.
✔ Ideale per: Modifica collaborativa o utenti che lavorano su più dispositivi.
Metodo 4: Programmazione C# (Conversione batch/automatizzata)
Per sviluppatori o team che necessitano di convertire centinaia di file TXT (o integrare la conversione in un'app .NET), l'approccio C# con Free Spire.Doc for .NET è efficiente e scalabile.
Cos'è Free Spire.Doc for .NET?
Free Spire.Doc è una libreria .NET gratuita che ti consente di creare, modificare e convertire documenti Word (DOC/DOCX) in C#/VB.NET senza installare Microsoft Office. Supporta lo sviluppo multipiattaforma ed è ideale per flussi di lavoro automatizzati (ad es. conversione di file TXT caricati dall'utente in un'app web).
Passaggi per convertire TXT in Word in C#
- Installa tramite NuGet:
Install-Package FreeSpire.Doc
- Codice C# completo:
using Spire.Doc;

namespace ConvertTextToWord
{
    internal class Program
    {
        static void Main(string[] args)
        {
            // Create a Document object
            Document doc = new Document();
            // Load a text file
            doc.LoadText("Sample.txt");

            // Save the text file in Word format
            doc.SaveToFile("TextToWord.docx", FileFormat.Docx2016);
            doc.Close();
        }
    }
}
Questo codice carica un file TXT e lo salva in formato DOCX tramite il metodo SaveToFile(). Inoltre, Free Spire.Doc supporta anche la conversione di file Word in file TXT tramite C#.
Suggerimenti per una conversione da TXT a Word di successo
Per evitare problemi comuni (ad es. testo mancante, errori di formattazione), segui questi suggerimenti:
- Esegui il backup del file TXT originale prima della conversione: in caso di errori, puoi tornare alla versione originale.
- Controlla le interruzioni di riga: i file TXT hanno spesso interruzioni di riga manuali. Dopo la conversione, utilizza la funzione “Sostituisci” di Word (Ctrl+H) per rimuovere le interruzioni di riga extra se necessario.
- Evita file TXT di grandi dimensioni con i convertitori online: la maggior parte degli strumenti online gratuiti ha limiti di dimensione dei file (50 MB-100 MB). Per file di grandi dimensioni, utilizza Microsoft Word o Google Docs.
- Verifica i caratteri speciali: se il tuo file TXT contiene caratteri o simboli non inglesi, controlla il file Word convertito per assicurarti che vengano preservati.
Risoluzione dei problemi comuni
| Problema | Soluzione |
|---|---|
| Formattazione persa | I file TXT non contengono formattazione; riapplica gli stili in Word dopo la conversione. |
| I caratteri speciali vengono visualizzati in modo errato | Assicurati che la codifica UTF-8 sia selezionata durante l'importazione. |
| Il file non si converte | Verifica che il file non sia danneggiato o protetto da password. |
| Il file convertito è troppo grande | Salva come DOCX, elimina le righe vuote non utilizzate o comprimi le immagini (se aggiunte dopo la conversione). |
Conclusione
Convertire il formato da TXT a Word è semplice con l'approccio giusto. Per la maggior parte degli utenti, l'apertura diretta del file TXT in Microsoft Word fornisce i risultati migliori. Per coloro che non hanno accesso a Word, gli strumenti online gratuiti o Google Docs offrono alternative affidabili. Se sei uno sviluppatore che necessita di scalabilità, il metodo C# con Free Spire.Doc ti consente di automatizzare le conversioni batch e personalizzare la formattazione
Che tu stia perfezionando un singolo documento o creando un flusso di lavoro automatizzato, questi metodi coprono ogni caso d'uso per la conversione da TXT a Word. Ricorda che, sebbene la conversione sia semplice, la formattazione dovrà essere applicata in seguito poiché i file di testo semplice contengono solo contenuto grezzo.
Domande frequenti
D: La conversione da TXT a Word è gratuita?
R: Sì, esistono diversi metodi gratuiti, inclusi strumenti online, Google Docs e l'utilizzo della libreria .NET gratuita.
D: La conversione da TXT a Word preserva la formattazione?
R: I file TXT non contengono dati di formattazione, quindi dovrai applicare la formattazione in Word dopo la conversione.
D: Come posso convertire più file TXT in Word contemporaneamente?
R: Puoi:
- Utilizzare un convertitore batch online come Convertio.
- Scrivere uno script C# utilizzando Free Spire.Doc per scorrere tutti i file TXT in una cartella con
Directory.GetFiles( @"C:\Documents\", "*.txt")e ripetere la logica di conversione per ogni file.
D: Qual è la differenza tra i formati DOC e DOCX?
R: DOC è il vecchio formato binario utilizzato in Word 97–2003. DOCX è il formato più recente, basato su XML (utilizzato da Word 2007) con una migliore compressione dei file, sicurezza e funzionalità di ripristino. Si consiglia DOCX a meno che non sia necessaria la compatibilità con software molto vecchio.