Convertir un PDF en PostScript : 4 méthodes pour une impression de haute qualité
Table des matières
- Qu'est-ce que PostScript
- Comprendre les bases : Formats PostScript et niveaux de langage
- Méthode 1 : Convertir un PDF en PostScript avec Adobe Acrobat Pro
- Méthode 2 : Exporter un PDF en PostScript via la ligne de commande Ghostscript
- Méthode 3 : Convertir des fichiers PDF en PostScript gratuitement en ligne
- Méthode 4 : Automatiser la conversion PDF en PostScript en C# avec Spire.PDF
- Problèmes courants de conversion PDF en PostScript
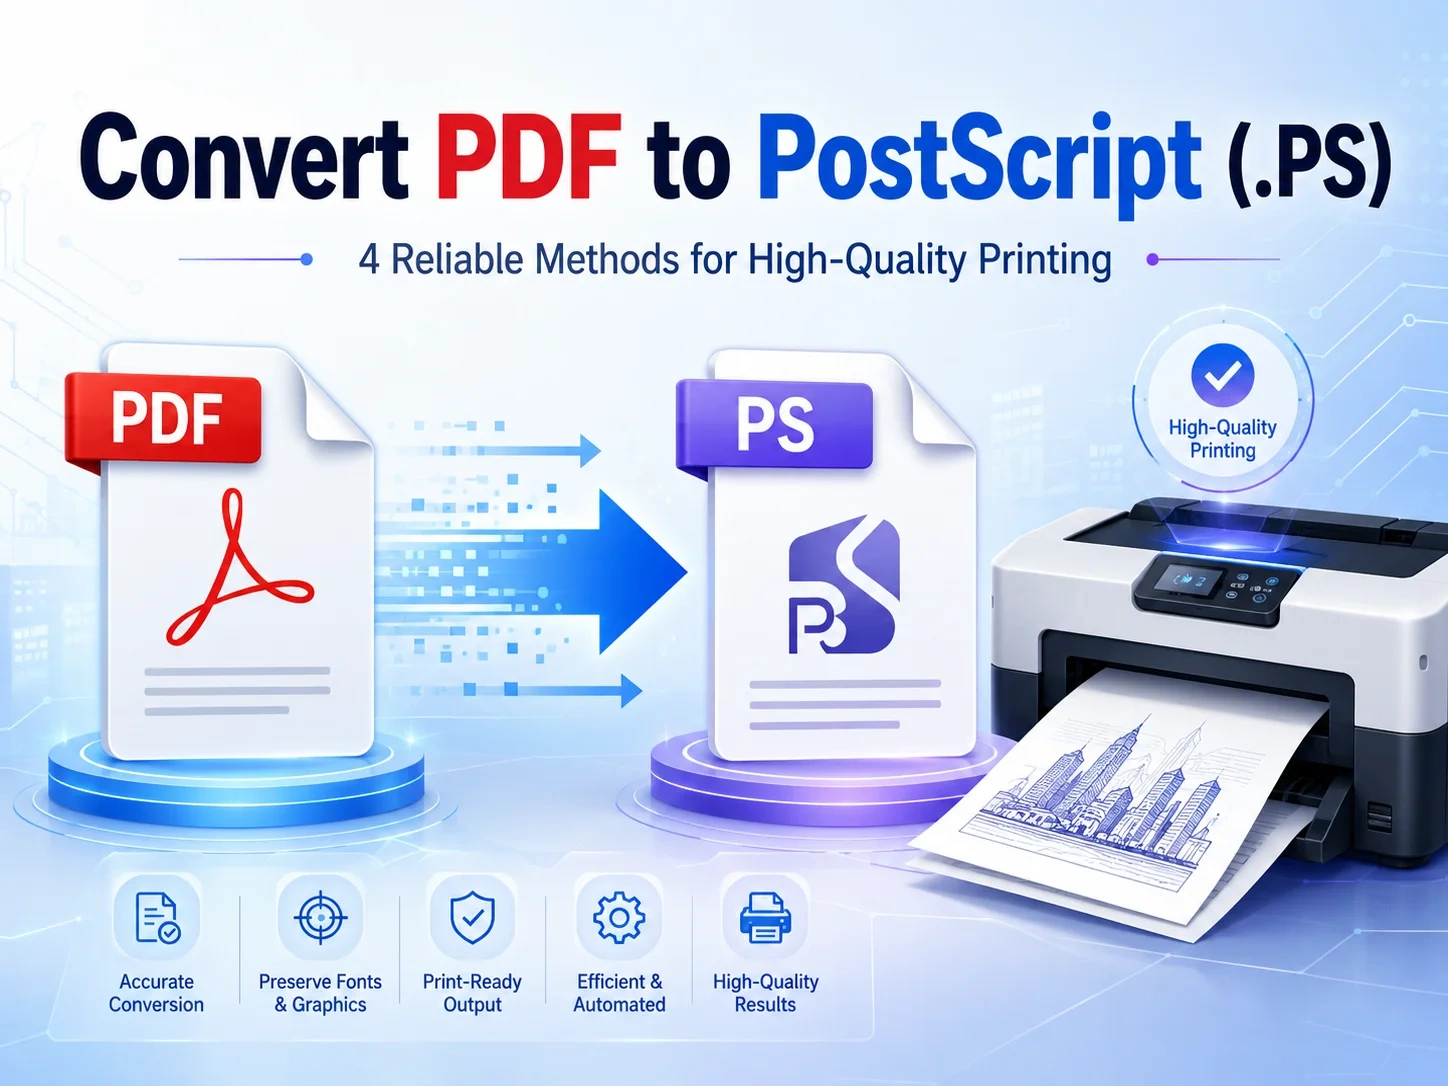
Vous cherchez un moyen fiable de convertir un PDF en PostScript (PS) pour une impression de haute qualité ? Alors que le PDF est la norme pour le partage, le PostScript offre un format vectoriel prêt pour l'impression, essentiel pour les périphériques d'impression professionnels et les flux de travail d'archivage.
Ce guide explique 4 méthodes fiables pour convertir un PDF en PS sans perdre la mise en forme, allant des logiciels de bureau professionnels, aux outils en ligne de commande, en passant par les convertisseurs en ligne gratuits et une solution C# entièrement automatisée pour les développeurs.
Ce que vous apprendrez
- Qu'est-ce que PostScript
- Comprendre les bases : Formats PostScript et niveaux de langage
- Méthode 1 : Convertir un PDF en PostScript avec Adobe Acrobat Pro
- Méthode 2 : Exporter un PDF en PostScript via la ligne de commande Ghostscript
- Méthode 3 : Convertir des fichiers PDF en PostScript gratuitement en ligne
- Méthode 4 : Automatiser la conversion PDF en PostScript en C# avec Spire.PDF
- Problèmes courants de conversion PDF en PostScript
Qu'est-ce que PostScript
PostScript (PS) est un langage de description de page utilisé pour l'impression de haute qualité. Contrairement au PDF, qui se concentre sur la portabilité des documents, PostScript est optimisé pour les flux de travail d'impression vectoriels, garantissant que les polices, les graphiques et la mise en page sont rendus avec précision sur les imprimantes professionnelles.
Pourquoi convertir un PDF en PostScript
- Impression haute fidélité : Conserve les tracés vectoriels, les polices et les mises en page précises.
- Flux de travail RIP : Requis par de nombreux systèmes d'impression commerciale.
- Normes d'archivage : Certaines organisations utilisent le PS pour la préservation des documents à long terme.
Comprendre les bases : Formats PostScript et niveaux de langage
Comprendre les formats PostScript et les niveaux de langage est essentiel pour maintenir la précision vectorielle et garantir la compatibilité avec les appareils lors de la conversion PDF en PostScript.
Formats PostScript : PS vs EPS
- PostScript standard (.PS) : Le choix idéal pour l'impression de documents complets. Il contient des instructions de mise en page, des polices et des images destinées à être directement envoyées à des imprimantes compatibles PostScript.
- PostScript encapsulé (.EPS) : Idéal pour les graphiques et illustrations individuels. L'EPS inclut une boîte englobante, permettant de mettre à l'échelle les images dans des logiciels de mise en page comme Adobe InDesign sans perte de résolution.
Niveaux de langage PostScript
- Niveau 1 (Obsolète) : Introduit en 1984, le Niveau 1 prend en charge le texte et les formes vectorielles de base. Évitez-le, sauf si vous utilisez du matériel vieux de 40 ans.
- Niveau 2 (Hérité) : Publié en 1991, le Niveau 2 a introduit le support de la couleur CMJN, une meilleure compression des données et une gestion améliorée des polices. À utiliser uniquement en dernier recours pour les anciennes imprimantes commerciales.
- Niveau 3 (Recommandé) : La norme industrielle moderne introduite en 1997. Il prend en charge la transparence complexe, les dégradés lisses, les technologies de polices avancées et une compression de fichiers efficace.
Astuce de pro : Privilégiez toujours le Niveau 3 lors de la conversion pour éviter les décalages de couleur ou les transparences aplaties, sauf si vous avez une exigence spécifique pour les anciennes imprimantes.
Méthode 1 : Convertir un PDF en PostScript avec Adobe Acrobat Pro
Pour les professionnels et les spécialistes de l'impression qui exigent la plus haute précision, Adobe Acrobat Pro est la référence pour la conversion PDF en PostScript. En tant que créateur du PDF et du PostScript, Adobe garantit que vos fichiers sont traduits avec une fidélité exceptionnelle, préservant les polices, les tracés vectoriels et la précision de la mise en page.
Guide étape par étape
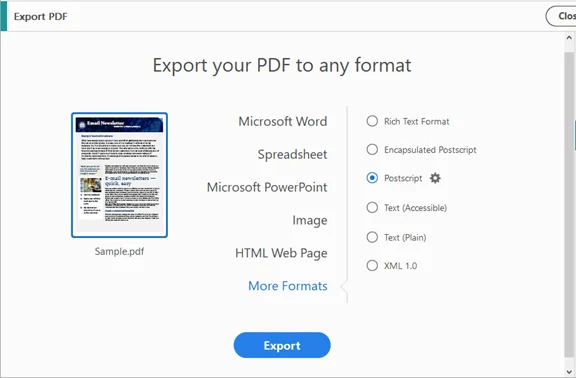
- Ouvrez votre PDF dans Adobe Acrobat Pro.
- Allez dans Outils → Exporter le PDF → Autres formats → PostScript (.PS/.EPS).
- Ajustez les paramètres :
- Niveau de langage : Niveau 3 recommandé
- Inclusion des polices : Intégrer les polices pour éviter la substitution
- Encodage de sortie : Binaire pour des fichiers plus petits ; ASCII pour les anciens systèmes
- Cliquez sur Exporter, sélectionnez un dossier de destination et enregistrez.
✅ Avantages : Haute fidélité, fiable pour les PDF complexes avec images et polices.
❌ Inconvénients : Nécessite une licence payante.
Méthode 2 : Exporter un PDF en PostScript via la ligne de commande Ghostscript
Pour les utilisateurs avancés recherchant une conversion PDF en PostScript rapide, flexible et gratuite, Ghostscript offre une solution robuste en ligne de commande qui préserve le texte consultable et les graphiques vectoriels.
Instructions étape par étape
- Téléchargez et installez Ghostscript sur votre machine.
- Ouvrez l'interface de ligne de commande :
- Windows : Ouvrez l'invite de commandes
- macOS/Linux : Ouvrez le Terminal
- Exécutez la commande de conversion :
-dNOPAUSE : Désactive les invites page par page.gswin64c -dNOPAUSE -dBATCH -sDEVICE=ps2write -sOutputFile=output.ps input.pdf
-dBATCH : Termine le programme après le traitement.
-sDEVICE=ps2write : Spécifie la sortie PostScript de niveau 2/3. - Vérifiez la sortie :
Vérifiez que output.ps est créé et s'ouvre correctement dans votre visionneuse ou imprimante PostScript.
✅ Avantages : Gratuit, scriptable, prend en charge les conversions par lots.
❌ Inconvénients : Nécessite une installation sur chaque machine. L'interface en ligne de commande peut être délicate pour les débutants.
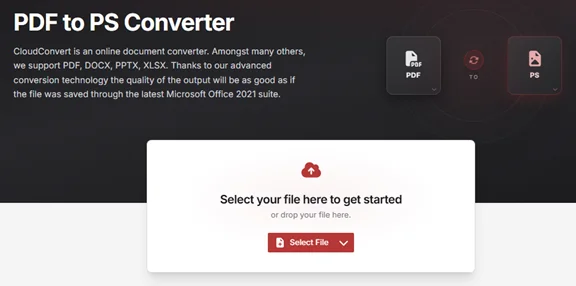
Méthode 3 : Convertir des fichiers PDF en PostScript gratuitement en ligne
Si vous préférez une conversion rapide sans installer de logiciel lourd, les convertisseurs PDF en PostScript en ligne gratuits sont l'alternative la plus pratique. Ces plateformes basées sur navigateur vous permettent de traiter des fichiers depuis n'importe quel appareil (Windows, Mac ou mobile), bien qu'elles puissent avoir des limites de taille de fichier spécifiques par rapport aux outils de bureau.
Instructions étape par étape
- Accédez à une plateforme de conversion fiable comme CloudConvert ou Zamzar.
- Cliquez sur Sélectionner le fichier pour télécharger votre PDF.
- Sélectionnez PS ou PostScript comme format de sortie cible.
- Cliquez sur Convertir et attendez le traitement dans le cloud.
- Téléchargez le fichier .ps final sur votre disque local.
Remarques :
- Évitez de télécharger des PDF confidentiels, d'entreprise ou médicaux sur un service en ligne. Pour les fichiers sensibles, utilisez des méthodes hors ligne (Méthode 1, 2 ou 4).
- Envisagez de diviser les PDF volumineux (> 50 Mo) en plus petites parties avant de les télécharger.
✅ Avantages : Rapide, accessible depuis n'importe quel appareil, aucune installation.
❌ Inconvénients : Limites de taille de fichier, préoccupations potentielles concernant la confidentialité.
Méthode 4 : Automatiser la conversion PDF en PostScript en C# avec Spire.PDF
Pour les développeurs ou les entreprises qui souhaitent intégrer la conversion PDF en PostScript directement dans leurs applications, une solution programmatique utilisant C# avec une bibliothèque comme Spire.PDF pour .NET offre l'approche la plus évolutive et la plus efficace. Cette méthode permet un traitement transparent, en coulisses, sans avoir besoin d'installer de logiciels externes.
Avantages clés
- Aucune dépendance externe : Vous n'avez pas besoin d'installer Ghostscript ou Adobe Acrobat sur le serveur cible.
- Haute évolutivité : Traitez facilement des milliers de documents dans une boucle ou un service d'arrière-plan.
- Contrôle granulaire : Vous pouvez sélectionner par programme des pages spécifiques à convertir avant de générer le fichier PS.
Convertir un PDF en PostScript en C#
using Spire.Pdf;

namespace PDFToPostScript
{
    class Program
    {
        static void Main(string[] args)
        {
            // Initialiser un objet PdfDocument
            PdfDocument doc = new PdfDocument();

            // Charger votre fichier PDF
            doc.LoadFromFile("Sample.pdf");

            // Enregistrer le document en tant que fichier PostScript (PS)
            doc.SaveToFile("PdfToPostScript.ps", FileFormat.PostScript);
        }
    }
}
Voici le fichier .ps converti avec les images et la mise en forme d'origine préservées :
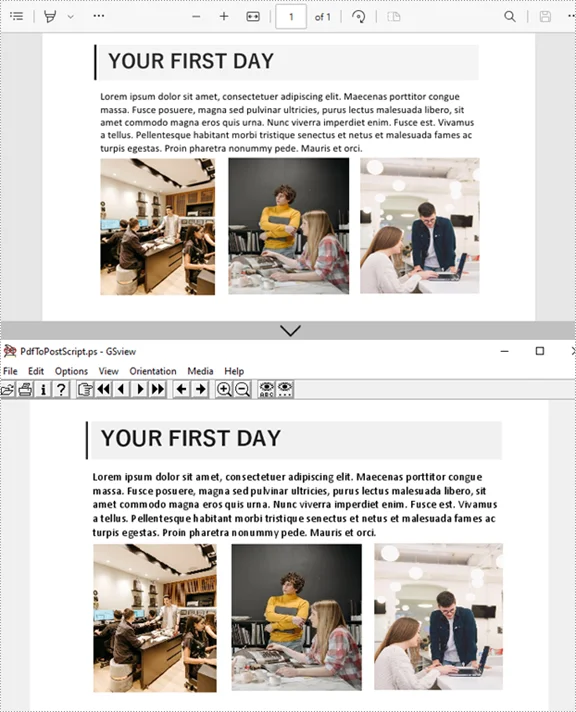
(Optionnel) Exporter une page spécifique d'un PDF en PostScript
// Charger le PDF d'origine
PdfDocument pdf = new PdfDocument();
pdf.LoadFromFile("Sample.pdf");

// Créer un nouveau document PDF pour les pages sélectionnées
PdfDocument selectedPdf = new PdfDocument();

// Ajouter les pages 2 et 3 (les index commencent à 0)
// La méthode InsertPage prend le document source, l'index de la page de départ et l'index de la page de fin
selectedPdf.InsertPage(pdf, 1, 2); // Page 2

// Convertir les pages sélectionnées en PostScript
selectedPdf.SaveToFile("selectedPages.ps", FileFormat.PostScript);
✅ Avantages : Entièrement automatisé, fonctionne en coulisses, évolutif pour les applications.
❌ Inconvénients : Nécessite des compétences en programmation, peut nécessiter une licence pour une utilisation en production.
Astuce de pro : Plus que la conversion PDF en PostScript
Spire.PDF sert de solution documentaire complète pour les développeurs. Si votre flux de travail nécessite plus que de simples fichiers .ps, vous pouvez utiliser la même bibliothèque pour gérer d'autres tâches documentaires critiques. Par exemple, convertir un PDF en Word ou exporter un PDF en Excel pour rendre vos données modifiables.
Problèmes courants de conversion PDF en PostScript
La conversion de fichiers PDF en PostScript peut parfois entraîner des problèmes inattendus. Comprendre ces problèmes courants et comment les résoudre garantit une impression fluide et de haute qualité. Ci-dessous, vous trouverez les défis typiques et les solutions pratiques :
1. Aplatissement de la transparence (artefacts de « couture »)
PostScript ne prend pas en charge la transparence en direct. Les effets tels que les ombres ou les lueurs peuvent produire de fines lignes blanches dans votre sortie. Pour éviter cela, utilisez l'Aperçu de l'aplatisseur d'Acrobat (Outils → Production d'impression → Aperçu de l'aplatisseur) avant d'exporter en PS.
2. Substitution de polices
Si les polices ne sont pas intégrées dans le PDF, PostScript utilise par défaut des polices génériques comme Courier ou Helvetica, ce qui peut modifier votre mise en page. Pour éviter cela, intégrez les polices dans le PDF ou convertissez-les en contours pour préserver la conception d'origine.
3. Taille de fichier importante
Les fichiers PostScript peuvent devenir considérablement plus volumineux que le PDF source car ils stockent des instructions non compressées. Réduisez la taille du fichier en utilisant l'encodage binaire au lieu de l'ASCII et envisagez de diviser les PDF très volumineux en segments plus petits.
4. Décalages de couleur
Lors de la conversion PDF en PS, les couleurs CMJN peuvent se décaler, affectant la précision de l'impression. Vérifiez toujours vos paramètres de couleur et effectuez une impression test pour garantir une reproduction fidèle des couleurs.
Conclusion
La conversion d'un PDF en PostScript est un moyen efficace de préparer des documents pour l'impression professionnelle. Parmi les quatre méthodes fiables couvertes :
- Adobe Acrobat Pro - Idéal pour les utilisateurs de bureau qui ont besoin d'un contrôle précis et d'une sortie de haute qualité.
- Ghostscript CLI - Convient aux passionnés de ligne de commande ou au traitement par lots automatisé.
- Convertisseurs en ligne - Pratique pour les petits fichiers ou les conversions occasionnelles sans installer de logiciel.
- Script d'automatisation C# - Idéal pour les développeurs ou les équipes qui ont besoin de flux de travail PDF vers PS évolutifs et répétables.
Chaque méthode a ses forces. Choisissez celle qui correspond à votre flux de travail et commencez dès aujourd'hui pour voir quelle approche vous convient le mieux.
FAQ sur la conversion PDF en PostScript
Q1 : La transparence peut-elle être préservée lors de la conversion ?
R1 : Non. La conversion PDF en PostScript aplatit la transparence, y compris les ombres, les lueurs et les superpositions.
Q2 : Puis-je reconvertir un PostScript en PDF ?
R2 : Oui. Vous pouvez utiliser Adobe Acrobat Distiller ou Ghostscript (périphérique pdfwrite) pour reconstruire un PDF structuré à partir d'un fichier PS.
Q3 : Existe-t-il des outils gratuits pour convertir un PDF en PostScript ?
R3 : Oui, il existe des convertisseurs en ligne gratuits et des outils en ligne de commande comme Ghostscript. Cependant, les outils gratuits peuvent avoir des limitations telles que des restrictions de taille de fichier ou une qualité de sortie réduite.
Q4 : Comment convertir plusieurs fichiers PDF en PostScript à la fois ?
R4 : Vous pouvez utiliser l'automatisation C# avec Spire.PDF pour convertir des centaines de PDF efficacement.
Q5 : Quel niveau de langage PostScript dois-je utiliser ?
R5 : Le niveau PS 2 ou 3 est recommandé pour la plupart des imprimantes ; le niveau 1 est hérité et peut manquer de fonctionnalités modernes.
Voir également
Convertir PDF a PostScript: 4 métodos para una impresión de alta calidad
Tabla de Contenidos
- ¿Qué es PostScript?
- Entendiendo lo Básico: Formatos y Niveles de Lenguaje PostScript
- Método 1: Convertir PDF a PostScript usando Adobe Acrobat Pro
- Método 2: Exportar PDF a PostScript a través de la Línea de Comandos de Ghostscript
- Método 3: Convertir Archivos PDF a PostScript en Línea Gratis
- Método 4: Automatizar la Conversión de PDF a PostScript en C# con Spire.PDF
- Problemas Comunes de Conversión de PDF a PostScript
¿Buscas una forma fiable de convertir PDF a PostScript (PS) para impresión de alta calidad? Mientras que el PDF es el estándar para compartir, el PostScript ofrece un formato vectorial listo para imprimir, esencial para dispositivos de impresión profesionales y flujos de trabajo de archivo.
Esta guía explica 4 métodos fiables para convertir PDF a PS sin perder formato, que van desde software profesional de escritorio, herramientas de línea de comandos y convertidores en línea gratuitos hasta una solución C# totalmente automatizada para desarrolladores.
Lo que Aprenderás
- ¿Qué es PostScript?
- Entendiendo lo Básico: Formatos y Niveles de Lenguaje PostScript
- Método 1: Convertir PDF a PostScript usando Adobe Acrobat Pro
- Método 2: Exportar PDF a PostScript a través de la Línea de Comandos de Ghostscript
- Método 3: Convertir Archivos PDF a PostScript en Línea Gratis
- Método 4: Automatizar la Conversión de PDF a PostScript en C# con Spire.PDF
- Problemas Comunes de Conversión de PDF a PostScript
¿Qué es PostScript?
PostScript (PS) es un lenguaje de descripción de página utilizado para impresión de alta calidad. A diferencia del PDF, que se centra en la portabilidad de documentos, PostScript está optimizado para flujos de trabajo de impresión basados en vectores, asegurando que las fuentes, gráficos y el diseño se representen con precisión en impresoras profesionales.
Por qué Convertir PDF a PostScript
- Impresión de alta fidelidad: Mantiene rutas vectoriales, fuentes y diseños precisos.
- Flujos de trabajo RIP: Requerido por muchos sistemas de impresión comercial.
- Estándares de archivo: Algunas organizaciones utilizan PS para la preservación de documentos a largo plazo.
Entendiendo lo Básico: Formatos y Niveles de Lenguaje PostScript
Comprender los formatos y niveles de lenguaje PostScript es clave para mantener la precisión vectorial y asegurar la compatibilidad del dispositivo durante la conversión de PDF a PostScript.
Formatos PostScript: PS vs. EPS
- PostScript Estándar (.PS): La opción principal para impresión de documentos completos. Contiene instrucciones de diseño, fuentes e imágenes destinadas a la salida directa a impresoras compatibles con PostScript.
- PostScript Encapsulado (.EPS): Ideal para gráficos e ilustraciones individuales. EPS incluye un cuadro delimitador, que permite escalar imágenes en software de diseño como Adobe InDesign sin perder resolución.
Niveles de Lenguaje PostScript
- Nivel 1 (Obsoleto): Introducido en 1984, el Nivel 1 soporta texto básico y formas vectoriales. Evítalo a menos que uses hardware de hace 40 años.
- Nivel 2 (Legado): Lanzado en 1991, el Nivel 2 introdujo soporte de color CMYK, mejor compresión de datos y manejo de fuentes mejorado. Úsalo solo como respaldo para impresoras comerciales antiguas.
- Nivel 3 (Recomendado): El estándar moderno de la industria introducido en 1997. Soporta transparencia compleja, degradados suaves, tecnologías de fuentes avanzadas y compresión de archivos eficiente.
Consejo Profesional: Siempre elige el Nivel 3 durante la conversión para evitar cambios de color o transparencias aplanadas, a menos que tengas un requisito específico para impresoras antiguas.
Método 1: Convertir PDF a PostScript usando Adobe Acrobat Pro
Para profesionales y especialistas en impresión que requieren la máxima precisión, Adobe Acrobat Pro es el estándar de oro para la conversión de PDF a PostScript. Como creador de PDF y PostScript, Adobe asegura que tus archivos se traduzcan con una fidelidad excepcional, preservando fuentes, rutas vectoriales y precisión del diseño.
Guía Paso a Paso
- Abre tu PDF en Adobe Acrobat Pro.
- Navega a Herramientas → Exportar PDF → Más formatos → PostScript (.PS/.EPS).
- Ajusta la configuración:
- Nivel de Lenguaje: Se recomienda el Nivel 3
- Inclusión de Fuentes: Incrusta fuentes para evitar sustituciones
- Codificación de Salida: Binaria para archivos más pequeños; ASCII para sistemas heredados
- Haz clic en Exportar, selecciona una carpeta de destino y guarda.
✅ Pros: Alta fidelidad, fiable para PDFs complejos con imágenes y fuentes.
❌ Contras: Requiere una licencia de pago.
Método 2: Exportar PDF a PostScript a través de la Línea de Comandos de Ghostscript
Para usuarios avanzados que buscan una conversión de PDF a PostScript rápida, flexible y gratuita, Ghostscript ofrece una solución robusta de línea de comandos que preserva el texto buscable y los gráficos vectoriales.
Instrucciones Paso a Paso
- Descarga e instala Ghostscript en tu máquina.
- Abre la interfaz de línea de comandos:
- Windows: Abre el Símbolo del sistema
- macOS/Linux: Abre Terminal
- Ejecuta el Comando de Conversión:
-dNOPAUSE: Desactiva las indicaciones página por página.gswin64c -dNOPAUSE -dBATCH -sDEVICE=ps2write -sOutputFile=output.ps input.pdf
-dBATCH: Termina el programa después de procesar.
-sDEVICE=ps2write: Especifica la salida PostScript Nivel 2/3. - Verifica la salida:
Comprueba que se haya creado output.ps y que se abra correctamente en tu visor o impresora PostScript.
✅ Pros: Gratuito, se puede programar, soporta conversiones por lotes.
❌ Contras: Requiere instalación en cada máquina. La interfaz de línea de comandos puede ser complicada para principiantes.
Método 3: Convertir Archivos PDF a PostScript en Línea Gratis
Si prefieres una conversión rápida sin instalar software pesado, los convertidores de PDF a PostScript en línea gratuitos son la alternativa más conveniente. Estas plataformas basadas en navegador te permiten procesar archivos desde cualquier dispositivo (Windows, Mac o Móvil), aunque pueden tener límites de tamaño de archivo específicos en comparación con las herramientas de escritorio.
Instrucciones Paso a Paso
- Navega a una plataforma de conversión de confianza como CloudConvert o Zamzar.
- Haz clic en Seleccionar Archivo para cargar tu PDF.
- Selecciona PS o PostScript como formato de salida objetivo.
- Haz clic en Convertir y espera el procesamiento en la nube.
- Descarga el archivo .ps final a tu unidad local.
Notas:
- Evita subir PDFs confidenciales, corporativos o médicos a cualquier servicio en línea. Para archivos sensibles, utiliza métodos sin conexión (Método 1, 2 o 4).
- Considera dividir PDFs grandes (> 50 MB) en partes más pequeñas antes de subirlos.
✅ Pros: Rápido, accesible desde cualquier dispositivo, sin instalación.
❌ Contras: Límites de tamaño de archivo, posibles preocupaciones de privacidad.
Método 4: Automatizar la Conversión de PDF a PostScript en C# con Spire.PDF
Para desarrolladores o empresas que buscan integrar la conversión de PDF a PostScript directamente en sus aplicaciones, una solución programática utilizando C# con una biblioteca como Spire.PDF para .NET ofrece el enfoque más escalable y eficiente. Este método permite un procesamiento fluido y discreto sin necesidad de instalaciones de software externas.
Ventajas Clave
- Sin Dependencias Externas: No necesitas instalar Ghostscript o Adobe Acrobat en el servidor de destino.
- Alta Escalabilidad: Procesa fácilmente miles de documentos dentro de un bucle o un servicio en segundo plano.
- Control Detallado: Puedes seleccionar programáticamente páginas específicas para convertir antes de generar el archivo PS.
Convertir un PDF a PostScript en C#
using Spire.Pdf;

namespace PDFToPostScript
{
    class Program
    {
        static void Main(string[] args)
        {
            // Inicializar un objeto PdfDocument
            PdfDocument doc = new PdfDocument();

            // Cargar tu archivo PDF
            doc.LoadFromFile("Sample.pdf");

            // Guardar el documento como un archivo PostScript (PS)
            doc.SaveToFile("PdfToPostScript.ps", FileFormat.PostScript);
        }
    }
}
Aquí está el archivo .ps convertido con las imágenes y el formato originales conservados:
(Opcional) Exportar una Página Específica de PDF a PostScript
// Cargar el PDF original
PdfDocument pdf = new PdfDocument();
pdf.LoadFromFile("Sample.pdf");

// Crear un nuevo documento PDF para las páginas seleccionadas
PdfDocument selectedPdf = new PdfDocument();

// Añadir las páginas 2 y 3 (los índices comienzan en 0)
// El método InsertPage toma el documento de origen, el índice de página de inicio y el índice de página de fin
selectedPdf.InsertPage(pdf, 1, 2); // Página 2

// Convertir las páginas seleccionadas a PostScript
selectedPdf.SaveToFile("selectedPages.ps", FileFormat.PostScript);
✅ Pros: Totalmente automatizado, funciona discretamente, escalable para aplicaciones.
❌ Contras: Requiere habilidades de programación, puede requerir una licencia para uso en producción.
Consejo Profesional: Más que solo PDF a PostScript
Spire.PDF sirve como una solución integral de documentos para desarrolladores. Si tu flujo de trabajo requiere más que solo archivos .ps, puedes usar la misma biblioteca para manejar otras tareas críticas de documentos. Por ejemplo, convertir PDF a Word o exportar PDF a Excel para hacer tus datos editables.
Problemas Comunes de Conversión de PDF a PostScript
Convertir archivos PDF a PostScript a veces puede generar problemas inesperados. Comprender estos problemas comunes y cómo solucionarlos asegura una impresión fluida y de alta calidad. A continuación, se presentan desafíos típicos y soluciones prácticas:
1. Aplanamiento de Transparencia (Artefactos de "Costura")
PostScript no soporta transparencia en vivo. Efectos como sombras o brillos pueden producir líneas blancas finas en tu salida. Para evitar esto, usa la Vista Previa de Aplanamiento de Acrobat (Herramientas → Producción de Impresión → Vista Previa de Aplanamiento) antes de exportar a PS.
2. Sustitución de Fuentes
Si las fuentes no están incrustadas en el PDF, PostScript utiliza fuentes genéricas como Courier o Helvetica por defecto, lo que puede alterar tu diseño. Para evitar esto, incrusta las fuentes en el PDF o conviértelas a contornos para preservar el diseño original.
3. Tamaño de Archivo Grande
Los archivos PostScript pueden volverse significativamente más grandes que el PDF de origen porque almacenan instrucciones sin comprimir. Reduce el tamaño del archivo utilizando codificación binaria en lugar de ASCII y considera dividir PDFs muy grandes en segmentos más pequeños.
4. Desplazamientos de Color
Durante la conversión de PDF a PS, los colores CMYK pueden desplazarse, afectando la precisión de la impresión. Siempre verifica la configuración de color y realiza una impresión de prueba para asegurar una reproducción de color precisa.
Conclusión
Convertir PDF a PostScript es una forma eficiente de preparar documentos para impresión profesional. Entre los cuatro métodos fiables cubiertos:
- Adobe Acrobat Pro - Lo mejor para usuarios de escritorio que necesitan control preciso y salida de alta calidad.
- Ghostscript CLI - Adecuado para entusiastas de la línea de comandos o procesamiento por lotes automatizado.
- Convertidores en Línea - Conveniente para archivos pequeños o conversiones ocasionales sin instalar software.
- Script de Automatización C# - Ideal para desarrolladores o equipos que requieren flujos de trabajo de PDF a PS escalables y repetibles.
Cada método tiene sus fortalezas. Elige el que se adapte a tu flujo de trabajo y comienza hoy mismo para ver qué enfoque funciona mejor para ti.
Preguntas Frecuentes sobre la Conversión de PDF a PostScript
P1: ¿Se puede conservar la transparencia durante la conversión?
R1: No. La conversión de PDF a PostScript aplana la transparencia, incluyendo sombras, brillos y superposiciones.
P2: ¿Puedo convertir PostScript de nuevo a PDF?
R2: Sí. Puedes usar Adobe Acrobat Distiller o Ghostscript (dispositivo pdfwrite) para reconstruir un PDF estructurado a partir de un archivo PS.
P3: ¿Existen herramientas gratuitas para convertir PDF a PostScript?
R3: Sí, existen convertidores en línea gratuitos y herramientas de línea de comandos como Ghostscript. Sin embargo, las herramientas gratuitas pueden tener limitaciones como restricciones de tamaño de archivo o menor calidad de salida.
P4: ¿Cómo convertir varios archivos PDF a PostScript a la vez?
R4: Puedes usar la automatización C# con Spire.PDF para convertir cientos de PDFs de manera eficiente.
P5: ¿Qué nivel de lenguaje PostScript debo usar?
R5: Se recomienda el Nivel 2 o 3 de PS para la mayoría de las impresoras; el Nivel 1 es obsoleto y puede carecer de características modernas.
Ver También
PDF в PostScript konvertieren: 4 Methoden für hochwertigen Druck
Inhaltsverzeichnis
- Was ist PostScript
- Grundlagen verstehen: PostScript-Formate & Sprachlevel
- Methode 1: PDF in PostScript mit Adobe Acrobat Pro konvertieren
- Methode 2: PDF über die Ghostscript-Befehlszeile nach PostScript exportieren
- Methode 3: PDF-Dateien kostenlos online in PostScript konvertieren
- Methode 4: PDF-zu-PostScript-Konvertierung in C# mit Spire.PDF automatisieren
- Häufige Probleme bei der PDF-zu-PostScript-Konvertierung
Suchen Sie nach einer zuverlässigen Methode, um PDF in PostScript (PS) für hochwertige Drucke zu konvertieren? Während PDF der Standard für den Austausch ist, bietet PostScript ein druckfertiges, vektorbasierendes Format, das für professionelle Druckgeräte und Archivierungs-Workflows unerlässlich ist.
Diese Anleitung erklärt 4 zuverlässige Methoden, um PDF in PS ohne Formatierungsverlust zu konvertieren, von professioneller Desktop-Software, Befehlszeilentools und kostenlosen Online-Konvertern bis hin zu einer vollständig automatisierten C#-Lösung für Entwickler.
Was Sie lernen werden
- Was ist PostScript
- Grundlagen verstehen: PostScript-Formate & Sprachlevel
- Methode 1: PDF in PostScript mit Adobe Acrobat Pro konvertieren
- Methode 2: PDF über die Ghostscript-Befehlszeile nach PostScript exportieren
- Methode 3: PDF-Dateien kostenlos online in PostScript konvertieren
- Methode 4: PDF-zu-PostScript-Konvertierung in C# mit Spire.PDF automatisieren
- Häufige Probleme bei der PDF-zu-PostScript-Konvertierung
Was ist PostScript
PostScript (PS) ist eine Seitengeneratorsprache für den hochwertigen Druck. Im Gegensatz zu PDF, das sich auf die Dokumentenportabilität konzentriert, ist PostScript für vektorbasierte Druck-Workflows optimiert und stellt sicher, dass Schriftarten, Grafiken und Layouts auf professionellen Druckern korrekt gerendert werden.
Warum PDF in PostScript konvertieren
- Hochwertiger Druck: Behält Vektorpfade, Schriftarten und präzise Layouts bei.
- RIP-Workflows: Wird von vielen kommerziellen Drucksystemen benötigt.
- Archivierungsstandards: Einige Organisationen verwenden PS für die langfristige Dokumentenarchivierung.
Grundlagen verstehen: PostScript-Formate & Sprachlevel
Das Verständnis von PostScript-Formaten und Sprachleveln ist entscheidend für die Beibehaltung der Vektorpräzision und die Gewährleistung der Gerätekompatibilität bei der Konvertierung von PDF in PostScript.
PostScript-Formate: PS vs. EPS
- Standard PostScript (.PS): Die erste Wahl für den Druck ganzer Dokumente. Es enthält Layoutanweisungen, Schriftarten und Bilder, die für die direkte Ausgabe auf PostScript-kompatiblen Druckern bestimmt sind.
- Encapsulated PostScript (.EPS): Ideal für einzelne Grafiken und Illustrationen. EPS enthält eine Bounding Box, die es ermöglicht, Bilder in Layout-Software wie Adobe InDesign zu skalieren, ohne die Auflösung zu verlieren.
PostScript-Sprachlevel
- Level 1 (Veraltet): Eingeführt 1984, unterstützt Level 1 grundlegenden Text und Vektorformen. Vermeiden Sie es, es sei denn, Sie verwenden 40 Jahre alte Hardware.
- Level 2 (Legacy): Veröffentlicht 1991, führte Level 2 CMYK-Farbunterstützung, bessere Datenkomprimierung und verbesserte Schriftartenbehandlung ein. Verwenden Sie es nur als Fallback für ältere kommerzielle Drucker.
- Level 3 (Empfohlen): Der moderne Industriestandard, eingeführt 1997. Er unterstützt komplexe Transparenz, sanfte Verläufe, fortschrittliche Schriftartentechnologien und effiziente Dateikomprimierung.
Profi-Tipp: Verwenden Sie während der Konvertierung immer Level 3, um Farbverschiebungen oder abgeflachte Transparenzen zu vermeiden, es sei denn, Sie haben eine spezielle Anforderung für ältere Drucker.
Methode 1: PDF in PostScript mit Adobe Acrobat Pro konvertieren
Für Profis und Druckspezialisten, die höchste Genauigkeit benötigen, ist Adobe Acrobat Pro der Goldstandard für die PDF-zu-PostScript-Konvertierung. Als Erfinder von PDF und PostScript stellt Adobe sicher, dass Ihre Dateien mit außergewöhnlicher Genauigkeit übersetzt werden und Schriftarten, Vektorpfade und Layoutpräzision erhalten bleiben.
Schritt-für-Schritt-Anleitung
- Öffnen Sie Ihr PDF in Adobe Acrobat Pro.
- Navigieren Sie zu Werkzeuge → PDF exportieren → Weitere Formate → PostScript (.PS/.EPS).
- Einstellungen anpassen:
- Sprachlevel: Level 3 empfohlen
- Schriftarten einbetten: Schriftarten einbetten, um Ersetzungen zu vermeiden
- Ausgabe-Kodierung: Binär für kleinere Dateien; ASCII für ältere Systeme
- Klicken Sie auf Exportieren, wählen Sie einen Zielordner und speichern Sie.
✅ Vorteile: Hohe Genauigkeit, zuverlässig für komplexe PDFs mit Bildern und Schriftarten.
❌ Nachteile: Erfordert eine kostenpflichtige Lizenz.
Methode 2: PDF über die Ghostscript-Befehlszeile nach PostScript exportieren
Für Power-User, die eine schnelle, flexible und kostenlose PDF-zu-PostScript-Konvertierung suchen, bietet Ghostscript eine robuste Befehlszeilenlösung, die durchsuchbaren Text und Vektorgrafiken beibehält.
Schritt-für-Schritt-Anleitung
- Laden Sie Ghostscript herunter und installieren Sie es auf Ihrem Computer.
- Öffnen Sie die Befehlszeilenschnittstelle:
- Windows: Eingabeaufforderung öffnen
- macOS/Linux: Terminal öffnen
- Konvertierungsbefehl ausführen:
-dNOPAUSE: Deaktiviert seitenweise Aufforderungen.gswin64c -dNOPAUSE -dBATCH -sDEVICE=ps2write -sOutputFile=output.ps input.pdf
-dBATCH: Beendet das Programm nach der Verarbeitung.
-sDEVICE=ps2write: Gibt PostScript Level 2/3 aus. - Ausgabe überprüfen:
Stellen Sie sicher, dass output.ps erstellt wurde und sich korrekt in Ihrem PostScript-Viewer oder Drucker öffnen lässt.
✅ Vorteile: Kostenlos, skriptfähig, unterstützt Stapelkonvertierungen.
❌ Nachteile: Muss auf jedem Computer installiert werden. Die Befehlszeilenschnittstelle kann für Anfänger schwierig sein.
Methode 3: PDF-Dateien kostenlos online in PostScript konvertieren
Wenn Sie eine schnelle Konvertierung ohne Installation umfangreicher Software bevorzugen, sind kostenlose Online-PDF-zu-PostScript-Konverter die bequemste Alternative. Diese browserbasierten Plattformen ermöglichen die Verarbeitung von Dateien von jedem Gerät aus (Windows, Mac oder Mobilgeräte), obwohl sie im Vergleich zu Desktop-Tools spezifische Dateigrößenbeschränkungen haben können.
Schritt-für-Schritt-Anleitung
- Navigieren Sie zu einer vertrauenswürdigen Konvertierungsplattform wie CloudConvert oder Zamzar.
- Klicken Sie auf Datei auswählen, um Ihre PDF-Datei hochzuladen.
- Wählen Sie PS oder PostScript als Zielformat.
- Klicken Sie auf Konvertieren und warten Sie auf die Cloud-Verarbeitung.
- Laden Sie die endgültige .ps-Datei auf Ihr lokales Laufwerk herunter.
Hinweise:
- Vermeiden Sie das Hochladen vertraulicher, geschäftlicher oder medizinischer PDFs auf Online-Dienste. Verwenden Sie für sensible Dateien Offline-Methoden (Methode 1, 2 oder 4).
- Erwägen Sie das Aufteilen großer PDFs (> 50 MB) in kleinere Teile, bevor Sie sie hochladen.
✅ Vorteile: Schnell, von jedem Gerät aus zugänglich, keine Installation.
❌ Nachteile: Dateigrößenbeschränkungen, potenzielle Datenschutzbedenken.
Methode 4: PDF-zu-PostScript-Konvertierung in C# mit Spire.PDF automatisieren
Für Entwickler oder Unternehmen, die die PDF-zu-PostScript-Konvertierung direkt in ihre Anwendungen integrieren möchten, bietet eine programmatische Lösung mit C# und einer Bibliothek wie Spire.PDF for .NET den skalierbarsten und effizientesten Ansatz. Diese Methode ermöglicht eine nahtlose, im Hintergrund ablaufende Verarbeitung, ohne dass externe Softwareinstallationen erforderlich sind.
Wichtige Vorteile
- Keine externen Abhängigkeiten: Sie müssen Ghostscript oder Adobe Acrobat nicht auf dem Zielserver installieren.
- Hohe Skalierbarkeit: Verarbeiten Sie problemlos Tausende von Dokumenten in einer Schleife oder einem Hintergrunddienst.
- Feingranulare Kontrolle: Sie können programmgesteuert bestimmte Seiten zum Konvertieren auswählen, bevor Sie die PS-Datei generieren.
PDF in PostScript in C# konvertieren
using Spire.Pdf;

namespace PDFToPostScript
{
    class Program
    {
        static void Main(string[] args)
        {
            // Initialisieren eines PdfDocument-Objekts
            PdfDocument doc = new PdfDocument();

            // Laden Sie Ihre PDF-Datei
            doc.LoadFromFile("Sample.pdf");

            // Speichern Sie das Dokument als PostScript (PS) Datei
            doc.SaveToFile("PdfToPostScript.ps", FileFormat.PostScript);
        }
    }
}
Hier ist die konvertierte .ps-Datei mit den ursprünglichen Bildern und Formatierungen:
(Optional) Eine bestimmte Seite von PDF nach PostScript exportieren
// Laden Sie das ursprüngliche PDF
PdfDocument pdf = new PdfDocument();
pdf.LoadFromFile("Sample.pdf");

// Erstellen Sie ein neues PDF-Dokument für ausgewählte Seiten
PdfDocument selectedPdf = new PdfDocument();

// Fügen Sie die Seiten 2 und 3 hinzu (Indizes beginnen bei 0)
// Die Methode InsertPage nimmt das Quelldokument, den Startseitenindex und den Endseitenindex
selectedPdf.InsertPage(pdf, 1, 2); // Seite 2

// Konvertieren Sie die ausgewählten Seiten in PostScript
selectedPdf.SaveToFile("selectedPages.ps", FileFormat.PostScript);
✅ Vorteile: Vollständig automatisiert, funktioniert im Hintergrund, skalierbar für Anwendungen.
❌ Nachteile: Erfordert Programmierkenntnisse, kann für die Produktion eine Lizenz erfordern.
Profi-Tipp: Mehr als nur PDF zu PostScript
Spire.PDF dient als umfassende Dokumentenlösung für Entwickler. Wenn Ihr Workflow mehr als nur .ps-Dateien erfordert, können Sie dieselbe Bibliothek verwenden, um andere kritische Dokumentenaufgaben zu bewältigen. Konvertieren Sie beispielsweise PDF in Word oder exportieren Sie PDF nach Excel, um Ihre Daten bearbeitbar zu machen.
Häufige Probleme bei der PDF-zu-PostScript-Konvertierung
Die Konvertierung von PDF-Dateien in PostScript kann manchmal zu unerwarteten Problemen führen. Das Verständnis dieser häufigen Probleme und deren Behebung gewährleistet einen reibungslosen, hochwertigen Druck. Nachfolgend sind typische Herausforderungen und praktische Lösungen aufgeführt:
1. Transparenz-Abflachung („Stitching“-Artefakte)
PostScript unterstützt keine Live-Transparenz. Effekte wie Schatten oder Glanzlichter können dünne weiße Linien in Ihrer Ausgabe erzeugen. Um dies zu verhindern, verwenden Sie die Flattener Preview von Acrobat (Werkzeuge → Druckproduktion → Flattener Preview), bevor Sie nach PS exportieren.
2. Schriftartenersetzung
Wenn Schriftarten nicht in das PDF eingebettet sind, greift PostScript auf generische Schriftarten wie Courier oder Helvetica zurück, was Ihr Layout potenziell verändert. Um dies zu vermeiden, betten Sie Schriftarten in das PDF ein oder konvertieren Sie sie in Umrisse, um das ursprüngliche Design zu erhalten.
3. Große Dateigröße
PostScript-Dateien können deutlich größer werden als die Quell-PDF, da sie unkomprimierte Anweisungen speichern. Reduzieren Sie die Dateigröße, indem Sie binäre Kodierung anstelle von ASCII verwenden und sehr große PDFs in kleinere Segmente aufteilen.
4. Farbverschiebungen
Während der PDF-zu-PS-Konvertierung können CMYK-Farben verschoben werden, was die Druckgenauigkeit beeinträchtigt. Überprüfen Sie immer Ihre Farbeinstellungen und führen Sie einen Testdruck durch, um eine genaue Farbwiedergabe sicherzustellen.
Fazit
Die Konvertierung von PDF in PostScript ist eine effiziente Methode zur Vorbereitung von Dokumenten für den professionellen Druck. Unter den vier abgedeckten zuverlässigen Methoden:
- Adobe Acrobat Pro – Am besten für Desktop-Benutzer, die präzise Kontrolle und hochwertige Ergebnisse benötigen.
- Ghostscript CLI – Geeignet für Befehlszeilen-Enthusiasten oder automatisierte Stapelverarbeitung.
- Online-Konverter – Praktisch für kleine Dateien oder gelegentliche Konvertierungen ohne Softwareinstallation.
- C#-Automatisierungsskript – Ideal für Entwickler oder Teams, die skalierbare, wiederholbare PDF-zu-PS-Workflows benötigen.
Jede Methode hat ihre Stärken. Wählen Sie diejenige, die zu Ihrem Workflow passt, und beginnen Sie noch heute, um herauszufinden, welcher Ansatz für Sie am besten geeignet ist.
FAQs zur PDF-zu-PostScript-Konvertierung
F1: Kann Transparenz während der Konvertierung erhalten bleiben?
A1: Nein. Die Konvertierung von PDF in PostScript flacht Transparenz ab, einschließlich Schatten, Glanzlichtern und Überlagerungen.
F2: Kann ich PostScript zurück in PDF konvertieren?
A2: Ja. Sie können Adobe Acrobat Distiller oder Ghostscript (pdfwrite-Gerät) verwenden, um ein strukturiertes PDF aus einer PS-Datei zu rekonstruieren.
F3: Gibt es kostenlose Tools zur Konvertierung von PDF in PostScript?
A3: Ja, es gibt kostenlose Online-Konverter und Befehlszeilentools wie Ghostscript. Kostenlose Tools können jedoch Einschränkungen wie Dateigrößenbeschränkungen oder eine geringere Ausgabequalität aufweisen.
F4: Wie konvertiere ich mehrere PDF-Dateien gleichzeitig in PostScript?
A4: Sie können die C#-Automatisierung mit Spire.PDF verwenden, um Hunderte von PDFs effizient zu konvertieren.
F5: Welches PostScript-Sprachlevel sollte ich verwenden?
A5: PS Level 2 oder 3 wird für die meisten Drucker empfohlen; Level 1 ist veraltet und kann moderne Funktionen fehlen.
Siehe auch
Конвертация PDF в PostScript: 4 метода для высококачественной печати
Содержание
- Что такое PostScript
- Основы: форматы PostScript и уровни языка
- Способ 1: Конвертирование PDF в PostScript с помощью Adobe Acrobat Pro
- Способ 2: Экспорт PDF в PostScript через командную строку Ghostscript
- Способ 3: Бесплатное онлайн-конвертирование PDF-файлов в PostScript
- Способ 4: Автоматизация конвертирования PDF в PostScript на C# с помощью Spire.PDF
- Распространенные проблемы при конвертировании PDF в PostScript
Ищете надежный способ конвертировать PDF в PostScript (PS) для высококачественной печати? Хотя PDF является стандартом для обмена документами, PostScript предлагает готовый к печати векторный формат, необходимый для профессионального печатного оборудования и архивных рабочих процессов.
В этом руководстве описаны 4 надежных способа конвертировать PDF в PS без потери форматирования, от профессионального настольного программного обеспечения, инструментов командной строки и бесплатных онлайн-конвертеров до полностью автоматизированного решения на C# для разработчиков.
Что вы узнаете
- Что такое PostScript
- Основы: форматы PostScript и уровни языка
- Способ 1: Конвертирование PDF в PostScript с помощью Adobe Acrobat Pro
- Способ 2: Экспорт PDF в PostScript через командную строку Ghostscript
- Способ 3: Бесплатное онлайн-конвертирование PDF-файлов в PostScript
- Способ 4: Автоматизация конвертирования PDF в PostScript на C# с помощью Spire.PDF
- Распространенные проблемы при конвертировании PDF в PostScript
Что такое PostScript
PostScript (PS) — это язык описания страниц, используемый для высококачественной печати. В отличие от PDF, который ориентирован на переносимость документов, PostScript оптимизирован для векторных рабочих процессов печати, гарантируя точное отображение шрифтов, графики и макета на профессиональных принтерах.
Зачем конвертировать PDF в PostScript
- Высокоточная печать: Сохраняет векторные контуры, шрифты и точные макеты.
- Рабочие процессы RIP: Требуется многими системами коммерческой печати.
- Архивные стандарты: Некоторые организации используют PS для долгосрочного сохранения документов.
Основы: форматы PostScript и уровни языка
Понимание форматов PostScript и уровней языка является ключом к сохранению векторной точности и обеспечению совместимости с устройствами при конвертировании PDF в PostScript.
Форматы PostScript: PS против EPS
- Стандартный PostScript (.PS): Лучший выбор для полностраничной печати. Он содержит инструкции по макету, шрифты и изображения, предназначенные для прямой отправки на принтеры, совместимые с PostScript.
- Encapsulated PostScript (.EPS): Идеально подходит для отдельных графических изображений и иллюстраций. EPS включает ограничивающую рамку, позволяющую масштабировать изображения в программах верстки, таких как Adobe InDesign, без потери разрешения.
Уровни языка PostScript
- Уровень 1 (Устарел): Выпущенный в 1984 году, Уровень 1 поддерживает базовый текст и векторные фигуры. Избегайте его, если только вы не используете оборудование 40-летней давности.
- Уровень 2 (Устаревший): Выпущенный в 1991 году, Уровень 2 представил поддержку цвета CMYK, улучшенное сжатие данных и улучшенную работу со шрифтами. Используйте только в качестве резервного варианта для старых коммерческих принтеров.
- Уровень 3 (Рекомендуется): Современный отраслевой стандарт, представленный в 1997 году. Он поддерживает сложную прозрачность, плавные градиенты, передовые технологии шрифтов и эффективное сжатие файлов.
Совет эксперта: Всегда выбирайте Уровень 3 при конвертировании, чтобы избежать сдвигов цвета или сглаживания прозрачности, если у вас нет особых требований для старых принтеров.
Способ 1: Конвертирование PDF в PostScript с помощью Adobe Acrobat Pro
Для профессионалов и специалистов по печати, которым требуется высочайшая точность, Adobe Acrobat Pro является золотым стандартом для конвертирования PDF в PostScript. Как создатель PDF и PostScript, Adobe гарантирует исключительную точность при переводе ваших файлов, сохраняя шрифты, векторные контуры и точность макета.
Пошаговое руководство
- Откройте ваш PDF в Adobe Acrobat Pro.
- Перейдите в раздел Инструменты → Экспорт PDF → Другие форматы → PostScript (.PS/.EPS).
- Настройте параметры:
- Уровень языка: Рекомендуется Уровень 3
- Включение шрифтов: Встраивайте шрифты, чтобы избежать подмены
- Кодировка вывода: Двоичная для меньших файлов; ASCII для устаревших систем
- Нажмите Экспорт, выберите папку назначения и сохраните.
✅ Плюсы: Высокая точность, надежность для сложных PDF с изображениями и шрифтами.
❌ Минусы: Требуется платная лицензия.
Способ 2: Экспорт PDF в PostScript через командную строку Ghostscript
Для опытных пользователей, ищущих быстрое, гибкое и бесплатное конвертирование PDF в PostScript, Ghostscript предлагает надежное решение командной строки, которое сохраняет искомый текст и векторную графику.
Пошаговые инструкции
- Загрузите и установите Ghostscript на ваш компьютер.
- Откройте интерфейс командной строки:
- Windows: Откройте командную строку
- macOS/Linux: Откройте Терминал
- Выполните команду конвертирования:
-dNOPAUSE: Отключает запросы по страницам.gswin64c -dNOPAUSE -dBATCH -sDEVICE=ps2write -sOutputFile=output.ps input.pdf
-dBATCH: Завершает программу после обработки.
-sDEVICE=ps2write: Указывает вывод PostScript Уровня 2/3. - Проверьте результат:
Убедитесь, что файл output.ps создан и корректно открывается в вашем просмотрщике PostScript или на принтере.
✅ Плюсы: Бесплатно, можно автоматизировать, поддерживает пакетное конвертирование.
❌ Минусы: Требует установки на каждой машине. Интерфейс командной строки может быть сложным для новичков.
Способ 3: Бесплатное онлайн-конвертирование PDF-файлов в PostScript
Если вы предпочитаете быстрое конвертирование без установки громоздкого программного обеспечения, бесплатные онлайн-конвертеры PDF в PostScript являются наиболее удобной альтернативой. Эти браузерные платформы позволяют обрабатывать файлы с любого устройства (Windows, Mac или мобильного), хотя они могут иметь ограничения по размеру файла по сравнению с настольными инструментами.
Пошаговые инструкции
- Перейдите на надежную платформу конвертирования, такую как CloudConvert или Zamzar.
- Нажмите Выбрать файл, чтобы загрузить ваш PDF.
- Выберите PS или PostScript в качестве целевого формата вывода.
- Нажмите Конвертировать и дождитесь облачной обработки.
- Скачайте финальный файл .ps на ваш локальный диск.
Примечания:
- Не загружайте конфиденциальные, корпоративные или медицинские PDF-файлы на какие-либо онлайн-сервисы. Для конфиденциальных файлов используйте офлайн-методы (Способ 1, 2 или 4).
- Рассмотрите возможность разделения больших PDF-файлов (более 50 МБ) на более мелкие части перед загрузкой.
✅ Плюсы: Быстро, доступно с любого устройства, не требует установки.
❌ Минусы: Ограничения по размеру файла, потенциальные проблемы с конфиденциальностью.
Способ 4: Автоматизация конвертирования PDF в PostScript на C# с помощью Spire.PDF
Для разработчиков или компаний, стремящихся интегрировать конвертирование PDF в PostScript непосредственно в свои приложения, программное решение с использованием C# и библиотеки, такой как Spire.PDF для .NET, предлагает наиболее масштабируемый и эффективный подход. Этот метод обеспечивает бесшовную фоновую обработку без необходимости установки внешнего программного обеспечения.
Ключевые преимущества
- Отсутствие внешних зависимостей: Вам не нужно устанавливать Ghostscript или Adobe Acrobat на целевом сервере.
- Высокая масштабируемость: Легко обрабатывайте тысячи документов в цикле или фоновой службе.
- Детальный контроль: Вы можете программно выбирать конкретные страницы для конвертирования перед генерацией файла PS.
Конвертирование PDF в PostScript на C#
using Spire.Pdf;

namespace PDFToPostScript
{
    class Program
    {
        static void Main(string[] args)
        {
            // Инициализация объекта PdfDocument
            PdfDocument doc = new PdfDocument();

            // Загрузка вашего PDF-файла
            doc.LoadFromFile("Sample.pdf");

            // Сохранение документа в формате PostScript (PS)
            doc.SaveToFile("PdfToPostScript.ps", FileFormat.PostScript);
        }
    }
}
Вот сконвертированный .ps файл с сохраненными исходными изображениями и форматированием:
(Необязательно) Экспорт отдельной страницы из PDF в PostScript
// Загрузка исходного PDF
PdfDocument pdf = new PdfDocument();
pdf.LoadFromFile("Sample.pdf");

// Создание нового PDF-документа для выбранных страниц
PdfDocument selectedPdf = new PdfDocument();

// Добавление страниц 2 и 3 (индексы начинаются с 0)
// Метод InsertPage принимает исходный документ, начальный индекс страницы и конечный индекс страницы
selectedPdf.InsertPage(pdf, 1, 2); // Страница 2

// Конвертирование выбранных страниц в PostScript
selectedPdf.SaveToFile("selectedPages.ps", FileFormat.PostScript);
✅ Плюсы: Полностью автоматизировано, работает в фоновом режиме, масштабируется для приложений.
❌ Минусы: Требуются навыки программирования, может потребоваться лицензия для производственного использования.
Совет эксперта: Больше, чем просто PDF в PostScript
Spire.PDF служит комплексным решением для работы с документами для разработчиков. Если ваш рабочий процесс требует большего, чем просто .ps файлы, вы можете использовать ту же библиотеку для выполнения других важных задач с документами. Например, конвертировать PDF в Word или экспортировать PDF в Excel, чтобы сделать ваши данные редактируемыми.
Распространенные проблемы при конвертировании PDF в PostScript
Конвертирование PDF-файлов в PostScript иногда может приводить к неожиданным проблемам. Понимание этих распространенных проблем и способов их устранения обеспечивает плавную и высококачественную печать. Ниже приведены типичные трудности и практические решения:
1. Сглаживание прозрачности (артефакты «сшивания»)
PostScript не поддерживает живую прозрачность. Эффекты, такие как тени или свечение, могут создавать тонкие белые линии в вашем выводе. Чтобы предотвратить это, используйте Предварительный просмотр сглаживания в Acrobat (Инструменты → Производство печати → Предварительный просмотр сглаживания) перед экспортом в PS.
2. Подмена шрифтов
Если шрифты не встроены в PDF, PostScript по умолчанию использует общие шрифты, такие как Courier или Helvetica, что может изменить ваш макет. Чтобы избежать этого, встраивайте шрифты в PDF или преобразуйте их в контуры, чтобы сохранить исходный дизайн.
3. Большой размер файла
Файлы PostScript могут стать значительно больше исходного PDF, поскольку они хранят несжатые инструкции. Уменьшите размер файла, используя двоичное кодирование вместо ASCII, и рассмотрите возможность разделения очень больших PDF на более мелкие сегменты.
4. Сдвиги цвета
Во время конвертирования PDF в PS цвета CMYK могут сдвигаться, влияя на точность печати. Всегда проверяйте настройки цвета и выполняйте тестовую печать, чтобы обеспечить точное воспроизведение цветов.
Заключение
Конвертирование PDF в PostScript — это эффективный способ подготовки документов для профессиональной печати. Среди четырех рассмотренных надежных методов:
- Adobe Acrobat Pro — Лучший выбор для настольных пользователей, которым требуется точный контроль и высококачественный вывод.
- Ghostscript CLI — Подходит для энтузиастов командной строки или для пакетной автоматической обработки.
- Онлайн-конвертеры — Удобны для небольших файлов или периодического конвертирования без установки программного обеспечения.
- Скрипт автоматизации C# — Идеально подходит для разработчиков или команд, которым требуются масштабируемые, повторяемые рабочие процессы PDF в PS.
Каждый метод имеет свои преимущества. Выберите тот, который соответствует вашему рабочему процессу, и начните сегодня, чтобы увидеть, какой подход лучше всего подходит для вас.
Часто задаваемые вопросы о конвертировании PDF в PostScript
В1: Можно ли сохранить прозрачность при конвертировании?
О1: Нет. Конвертирование PDF в PostScript сглаживает прозрачность, включая тени, свечение и наложения.
В2: Могу ли я конвертировать PostScript обратно в PDF?
О2: Да. Вы можете использовать Adobe Acrobat Distiller или Ghostscript (устройство pdfwrite) для реконструкции структурированного PDF из файла PS.
В3: Существуют ли бесплатные инструменты для конвертирования PDF в PostScript?
О3: Да, существуют бесплатные онлайн-конвертеры и инструменты командной строки, такие как Ghostscript. Однако бесплатные инструменты могут иметь ограничения, такие как ограничения по размеру файла или снижение качества вывода.
В4: Как конвертировать несколько PDF-файлов в PostScript одновременно?
О4: Вы можете использовать автоматизацию на C# с Spire.PDF для эффективного конвертирования сотен PDF-файлов.
В5: Какой уровень языка PostScript следует использовать?
О5: Рекомендуется PS Уровень 2 или 3 для большинства принтеров; Уровень 1 устарел и может не иметь современных функций.
См. также
Como fazer uma extensão de parágrafo no Word: 3 maneiras fáceis e úteis
Sumário
Se você está formatando um trabalho acadêmico, bibliografia ou lista de referências APA/MLA, pode ser necessário criar um recuo suspenso no Word. Embora o Microsoft Word inclua ferramentas de formatação integradas para isso, muitos usuários ainda têm dificuldade em encontrar o botão correto, especialmente nas versões mais recentes do Word. Neste guia, você aprenderá como criar um recuo suspenso no Word usando três métodos simples: formatação manual, atalhos de teclado e automação com Python para processamento de documentos em lote.
- Criar uma Recuo Suspenso no Microsoft Word Manualmente
- Criar um Recuo Suspenso no Word Usando Atalho
- Automatizar a Criação de Recuo Suspenso no Word com Python
- Solução de Problemas e Perguntas Frequentes
- Comparação de Métodos
Criar uma Recuo Suspenso no Microsoft Word Manualmente
Se você está se perguntando como fazer um recuo suspenso no Word para um único documento, o menu de configurações de Parágrafo é a sua abordagem mais confiável. Este método funciona na maioria das versões do Microsoft Word e permite que você personalize o tamanho do recuo com precisão.
Como configurar:
- Passo 1. Destaque os parágrafos específicos ou a bibliografia inteira que você deseja formatar.
- Passo 2. Clique com o botão direito do mouse no texto destacado e selecione Parágrafo... no menu de contexto. Isso abrirá instantaneamente a guia Recuos e Espaçamento.
- Passo 3. Na seção Recuo, encontre o menu suspenso Especial e selecione Suspenso.
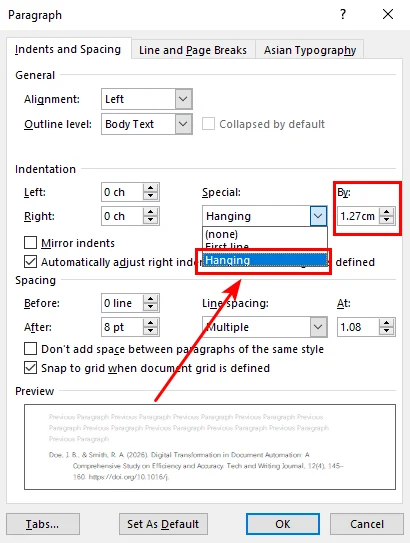
- Passo 4. O deslocamento padrão para os estilos APA ou MLA é de 0,5" (1,27 cm). Clique em OK e seu texto será ajustado.
Criar um Recuo Suspenso no Word Usando Atalho
Embora adicionar um recuo suspenso no Word usando o menu ofereça controle preciso, abrir repetidamente a caixa de diálogo Parágrafo pode se tornar ineficiente ao trabalhar com longas listas de citações. Se você tem uma longa lista de citações e deseja acelerar as coisas, usar um atalho de teclado é mais eficiente para usuários avançados.
Atalho de recuo suspenso para Windows e Mac:
- No Windows: Pressione Ctrl + T. Cada pressionamento aumenta o recuo. Para desfazer ou retornar, pressione Ctrl + Shift + T.
- No Mac: Pressione Command + T. O macOS não tem um atalho padrão para diminuir o recuo; você pode usar Command + Z para desfazer a ação imediatamente ou pressionar Option + Command + Q para redefinir toda a formatação do parágrafo.
Esses atalhos são especialmente úteis ao editar documentos longos e aplicar formatação repetidamente.
Dica: Ao ajustar seu layout, você pode encontrar linhas em branco persistentes que interrompem o fluxo. Para organizar seu documento de forma eficiente, você pode seguir este guia para remover linhas em branco no Word rapidamente.
Automatizar a Criação de Recuo Suspenso no Word com Python
Embora os métodos manual e de atalho sejam suficientes para usuários casuais, eles perdem eficiência quando você precisa lidar com centenas de documentos ou parágrafos espalhados por diferentes páginas. Para processamento de documentos em larga escala, a automação ajuda a manter a formatação consistente, reduzindo o trabalho manual.
Nesta seção, demonstraremos como adicionar um recuo suspenso em documentos do Word usando Free Spire.Doc for Python. Esta é uma biblioteca profissional gratuita projetada para criar, editar e converter documentos do Word. Ela apresenta o método ParagraphFormat.SetFirstLineIndent(), que permite alternar entre recuos de primeira linha e recuos suspensos simplesmente ajustando um único parâmetro.
Instalar Free Spire.Doc for Python
Antes de executar o código, instale a biblioteca usando pip:
pip install Spire.Doc.Free
Exemplo de Código Python (usando Free Spire.Doc)
O código Python a seguir mostra como segmentar o primeiro e o terceiro parágrafos dentro de um documento Word existente e definir um recuo suspenso nesses parágrafos.
from spire.doc import *
from spire.doc.common import *

# Carregar um documento Word existente
doc = Document()
doc.LoadFromFile("/input/apa style.docx")

# Acessar a primeira seção do documento
section = doc.Sections.get_Item(0)

# Formatar o primeiro parágrafo
para1 = section.Paragraphs.get_Item(0)
para1.Format.SetLeftIndent(36.0)
para1.Format.SetFirstLineIndent(-36.0)

# Formatar o quinto parágrafo
para3 = section.Paragraphs.get_Item(4)
para3.Format.SetLeftIndent(36.0)
para3.Format.SetFirstLineIndent(-36.0)

# Salvar o documento atualizado
doc.SaveToFile("/output/Hanging_Indent.docx", FileFormat.Docx2013)
doc.Close()
No código acima, usamos get_Item(4) para segmentar o que parece ser o terceiro parágrafo. Isso ocorre porque linhas em branco entre blocos de texto são frequentemente contadas como objetos de parágrafo individuais pela biblioteca. Se o seu documento não tiver linhas em branco, você pode precisar ajustar o índice para 2 em vez disso.
Aqui está a prévia do arquivo resultante e do documento Word original:
Dica: Depois de aperfeiçoar seu layout, você também pode usar o Free Spire.Doc para converter documentos do Word para PDF. Isso garante que seus recuos suspensos e a formatação geral permaneçam perfeitamente intactos em todas as plataformas e dispositivos.
Solução de Problemas e Perguntas Frequentes
P1: Por que Ctrl + T não está funcionando no meu Word?
Isso geralmente acontece se outro aplicativo em segundo plano tiver o mesmo atalho. Verifique se você tem algum software de tradução ou gravação de tela especializado em execução. Se tudo mais falhar, use o método manual acima.
P2: Como defino um recuo suspenso no Word Online?
A versão web é um pouco diferente. Vá para a guia Página Inicial, clique nos três pontos (...) para mais opções, selecione Opções de Parágrafo e encontre Recuo Especial.
P3: Qual é o tamanho padrão para APA ou MLA?
O padrão é 0,5 polegadas (1,27 cm). A maioria das versões do Word define isso por padrão assim que você seleciona "Suspenso".
Comparação de Métodos de Recuo Suspenso
Agora que cobrimos as abordagens manual e automatizada, vamos comparar brevemente quando cada método funciona melhor.
| Método | Melhor Para | Vantagens | Limitações |
|---|---|---|---|
| Formatação Manual | Edições únicas | Simples e integrado ao Word | Mais lento para tarefas repetidas |
| Atalho de Teclado | Edição rápida de documentos | Rápido e conveniente | Personalização limitada |
| Automação com Python | Processamento de documentos em lote | Eficiente e consistente | Requer conhecimento de programação |
Conclusão
Em resumo, cliques manuais e atalhos dentro do Microsoft Word oferecem uma solução rápida e conveniente para edições ocasionais e tarefas únicas. No entanto, para aqueles que procuram contornar o pacote de escritório e automatizar fluxos de trabalho de formatação, o Free Spire.Doc for Python oferece velocidade e precisão. Escolha a ferramenta que se alinha aos seus objetivos de projeto e comece a criar documentos profissionais e perfeitamente formatados hoje mesmo!
Leia Também:
Word에서 내어쓰기 만드는 방법: 쉽고 유용한 3가지 방법
학술 논문, 참고 문헌 또는 APA/MLA 참고 문헌 목록을 서식 지정하는 경우 Word에서 행잉 들여쓰기를 만들어야 할 수 있습니다. Microsoft Word에는 이를 위한 내장 서식 도구가 포함되어 있지만 많은 사용자가 특히 최신 버전의 Word에서 올바른 버튼을 찾는 데 어려움을 겪습니다. 이 가이드에서는 세 가지 간단한 방법, 즉 수동 서식 지정, 키보드 바로가기 및 일괄 문서 처리를 위한 Python 자동화를 사용하여 Word에서 행잉 들여쓰기를 만드는 방법을 배웁니다.
- Microsoft Word에서 수동으로 행잉 들여쓰기 만들기
- 바로가기를 사용하여 Word에서 행잉 들여쓰기 만들기
- Python으로 Word에서 행잉 들여쓰기 자동화하기
- 문제 해결 및 FAQ
- 방법 비교
Microsoft Word에서 수동으로 행잉 들여쓰기 만들기
단일 문서에 대한 행잉 들여쓰기를 Word에서 수행하는 방법을 궁금해하는 경우 단락 설정 메뉴가 가장 안정적인 접근 방식입니다. 이 방법은 대부분의 Microsoft Word 버전에서 작동하며 들여쓰기 크기를 정확하게 사용자 지정할 수 있습니다.
설정 방법:
- 1단계. 서식을 지정하려는 특정 단락 또는 전체 참고 문헌을 강조 표시합니다.
- 2단계. 강조 표시된 텍스트를 마우스 오른쪽 버튼으로 클릭하고 컨텍스트 메뉴에서 단락...을 선택합니다. 그러면 들여쓰기 및 간격 탭이 즉시 열립니다.
- 3단계. 들여쓰기 섹션에서 특수 드롭다운 메뉴를 찾아 행잉을 선택합니다.
- 4단계. APA 또는 MLA 스타일의 표준 오프셋은 0.5인치(1.27cm)입니다. 확인을 누르면 텍스트가 제자리에 맞춰집니다.
바로가기를 사용하여 Word에서 행잉 들여쓰기 만들기
메뉴를 사용하여 Word에서 행잉 들여쓰기를 추가하면 정확한 제어가 가능하지만, 긴 인용 목록을 작업할 때 단락 대화 상자를 반복해서 여는 것은 비효율적일 수 있습니다. 긴 인용 목록이 있고 속도를 높이고 싶다면 키보드 바로가기를 사용하는 것이 고급 사용자에게 더 효율적입니다.
Windows 및 Mac용 행잉 들여쓰기 바로가기:
- Windows: Ctrl + T를 누릅니다. 누를 때마다 들여쓰기가 늘어납니다. 실행 취소하거나 되돌리려면 Ctrl + Shift + T를 누릅니다.
- Mac: Command + T를 누릅니다. macOS에는 들여쓰기를 줄이는 기본 바로가기가 없습니다. 즉시 실행 취소하려면 Command + Z를 사용하거나 모든 단락 서식을 재설정하려면 Option + Command + Q를 누를 수 있습니다.
이러한 바로가기는 긴 문서를 편집하고 서식을 반복적으로 적용할 때 특히 유용합니다.
팁: 레이아웃을 조정하는 동안 흐름을 방해하는 끈질긴 빈 줄을 발견할 수 있습니다. 문서를 효율적으로 정리하려면 이 가이드에 따라 Word에서 빈 줄을 빠르게 제거할 수 있습니다.
Python으로 Word에서 행잉 들여쓰기 자동화하기
수동 및 바로가기 방법은 일반 사용자에게는 충분하지만, 수백 개의 문서 또는 다른 페이지에 흩어져 있는 단락을 처리해야 할 때는 효율성이 떨어집니다. 대규모 문서 처리를 위해 자동화는 수동 작업을 줄이면서 일관된 서식을 유지하는 데 도움이 됩니다.
이 섹션에서는 무료 Spire.Doc for Python을 사용하여 Word 문서에 행잉 들여쓰기를 추가하는 방법을 보여줍니다. 이는 Word 문서를 만들고 편집하고 변환하기 위한 무료 전문 라이브러리입니다. ParagraphFormat.SetFirstLineIndent() 메서드를 특징으로 하며, 단일 매개변수를 조정하여 첫 줄 들여쓰기와 행잉 들여쓰기 간에 전환할 수 있습니다.
무료 Spire.Doc for Python 설치
코드를 실행하기 전에 pip를 사용하여 라이브러리를 설치합니다.
pip install Spire.Doc.Free
Python 코드 예제(무료 Spire.Doc 사용)
다음 Python 코드는 기존 Word 문서 내의 첫 번째와 세 번째 단락을 대상으로 이러한 단락에 행잉 들여쓰기를 설정하는 방법을 보여줍니다.
from spire.doc import *
from spire.doc.common import *

# 기존 Word 문서 로드
doc = Document()
doc.LoadFromFile("/input/apa style.docx")

# 문서의 첫 번째 섹션 액세스
section = doc.Sections.get_Item(0)

# 첫 번째 단락 서식 지정
para1 = section.Paragraphs.get_Item(0)
para1.Format.SetLeftIndent(36.0)
para1.Format.SetFirstLineIndent(-36.0)

# 다섯 번째 단락 서식 지정
para3 = section.Paragraphs.get_Item(4)
para3.Format.SetLeftIndent(36.0)
para3.Format.SetFirstLineIndent(-36.0)

# 업데이트된 문서 저장
doc.SaveToFile("/output/Hanging_Indent.docx", FileFormat.Docx2013)
doc.Close()
위 코드에서 get_Item(4)를 사용하여 세 번째 단락으로 보이는 것을 대상으로 합니다. 이는 텍스트 블록 간의 빈 줄이 라이브러리에 의해 개별 단락 개체로 종종 계산되기 때문입니다. 문서에 빈 줄이 없으면 인덱스를 2로 조정해야 할 수 있습니다.
결과 파일과 원본 Word 문서의 미리 보기는 다음과 같습니다.
팁: 레이아웃을 완성한 후에는 무료 Spire.Doc을 사용하여 Word 문서를 PDF로 변환할 수도 있습니다. 이렇게 하면 행잉 들여쓰기와 전체 서식이 모든 플랫폼 및 장치에서 완벽하게 유지됩니다.
문제 해결 및 FAQ
Q1: Word에서 Ctrl + T가 작동하지 않는 이유는 무엇인가요?
다른 백그라운드 앱이 동일한 바로가기를 사용하는 경우 일반적으로 발생합니다. 특수 번역 또는 화면 녹화 소프트웨어가 실행 중인지 확인하십시오. 모든 것이 실패하면 위의 수동 방법을 사용하십시오.
Q2: Word Online에서 행잉 들여쓰기를 설정하는 방법은 무엇인가요?
웹 버전은 약간 다릅니다. 홈 탭으로 이동하여 세 개의 점(...)을 클릭하여 추가 옵션을 선택하고 단락 옵션을 선택한 다음 특수 들여쓰기를 찾으십시오.
Q3: APA 또는 MLA의 표준 크기는 무엇인가요?
표준은 0.5인치(1.27cm)입니다. 대부분의 Word 버전은 "행잉"을 선택하면 기본적으로 이 크기로 설정됩니다.
행잉 들여쓰기 방법 비교
수동 및 자동 접근 방식 모두를 다루었으므로 각 방법이 가장 적합한 경우를 간략하게 비교해 보겠습니다.
| 방법 | 가장 적합한 경우 | 장점 | 제한 사항 |
|---|---|---|---|
| 수동 서식 | 일회성 편집 | 간단하고 Word에 내장됨 | 반복 작업에 느림 |
| 키보드 바로가기 | 빠른 문서 편집 | 빠르고 편리함 | 제한된 사용자 지정 |
| Python 자동화 | 일괄 문서 처리 | 효율적이고 일관됨 | 코딩 지식 필요 |
결론
요약하자면, Microsoft Word 내의 수동 클릭 및 바로가기는 가끔 편집 및 일회성 작업에 대해 빠르고 편리한 솔루션을 제공합니다. 그러나 사무용 제품군을 우회하고 서식 워크플로를 자동화하려는 사람들에게는 무료 Spire.Doc for Python이 속도와 정확성을 제공합니다. 프로젝트 목표에 맞는 도구를 선택하고 오늘날 전문적이고 완벽하게 서식이 지정된 문서를 만들기 시작하십시오!
또한 읽어보세요:
Come fare un rientro sporgente in Word: 3 modi facili e utili
Indice dei contenuti
Se stai formattando un articolo accademico, una bibliografia o un elenco di riferimenti APA/MLA, potresti dover creare un rientro sporgente in Word. Sebbene Microsoft Word includa strumenti di formattazione integrati per questo, molti utenti hanno ancora difficoltà a trovare il pulsante corretto, specialmente nelle versioni più recenti di Word. In questa guida, imparerai come creare un rientro sporgente in Word utilizzando tre semplici metodi: formattazione manuale, scorciatoie da tastiera e automazione Python per l'elaborazione batch di documenti.
- Creare un rientro sporgente in Microsoft Word manualmente
- Creare un rientro sporgente in Word usando una scorciatoia
- Automatizzare la creazione di rientri sporgenti in Word con Python
- Risoluzione dei problemi e domande frequenti
- Confronto dei metodi
Creare un rientro sporgente in Microsoft Word manualmente
Se ti stai chiedendo come fare un rientro sporgente su Word per un singolo documento, il menu delle impostazioni Paragrafo è il tuo approccio più affidabile. Questo metodo funziona nella maggior parte delle versioni di Microsoft Word e ti consente di personalizzare con precisione la dimensione del rientro.
Come impostarlo:
- Passaggio 1. Evidenzia i paragrafi specifici o l'intera bibliografia che desideri formattare.
- Passaggio 2. Fai clic con il pulsante destro del mouse sul testo evidenziato e seleziona Paragrafo... dal menu contestuale. Questo aprirà immediatamente la scheda Rientri e spaziatura.
- Passaggio 3. Nella sezione Rientro, trova il menu a discesa Speciale e seleziona Sporgente.
- Passaggio 4. L'offset standard per gli stili APA o MLA è 0,5" (1,27 cm). Premi OK e il tuo testo si allineerà correttamente.
Creare un rientro sporgente in Word usando una scorciatoia
Mentre l'aggiunta di un rientro sporgente in Word tramite il menu offre un controllo preciso, l'apertura ripetuta della finestra di dialogo Paragrafo può diventare inefficiente quando si lavora con lunghi elenchi di citazioni. Se hai un lungo elenco di citazioni e vuoi velocizzare le cose, usare una scorciatoia da tastiera è più efficiente per gli utenti esperti.
Scorciatoia per rientro sporgente per Windows e Mac:
- Su Windows: Premi Ctrl + T. Ogni pressione aumenta il rientro. Per annullarlo o spostarlo indietro, premi Ctrl + Maiusc + T.
- Su Mac: Premi Comando + T. macOS non ha una scorciatoia predefinita per diminuire il rientro; puoi usare Comando + Z per annullare immediatamente l'azione, oppure premere Opzione + Comando + Q per reimpostare tutta la formattazione del paragrafo.
Queste scorciatoie sono particolarmente utili quando si modificano documenti lunghi e si applica la formattazione ripetutamente.
Suggerimento: Mentre regoli il tuo layout, potresti incontrare righe vuote ostinate che interrompono il flusso. Per riordinare il tuo documento in modo efficiente, puoi seguire questa guida per rimuovere rapidamente le righe vuote in Word.
Automatizzare la creazione di rientri sporgenti in Word con Python
Mentre i metodi manuali e con scorciatoia sono sufficienti per gli utenti occasionali, perdono efficienza quando è necessario gestire centinaia di documenti o paragrafi sparsi in diverse pagine. Per l'elaborazione di documenti su larga scala, l'automazione aiuta a mantenere una formattazione coerente riducendo il lavoro manuale.
In questa sezione, dimostreremo come aggiungere un rientro sporgente nei documenti Word utilizzando Spire.Doc gratuito per Python. Questa è una libreria professionale gratuita progettata per creare, modificare e convertire documenti Word. Dispone del metodo ParagraphFormat.SetFirstLineIndent(), che consente di passare dai rientri della prima riga ai rientri sporgenti semplicemente regolando un singolo parametro.
Installa Spire.Doc gratuito per Python
Prima di eseguire il codice, installa la libreria usando pip:
pip install Spire.Doc.Free
Esempio di codice Python (utilizzando Spire.Doc gratuito)
Il seguente codice Python mostra come selezionare il primo e il terzo paragrafo all'interno di un documento Word esistente e impostare un rientro sporgente su questi paragrafi.
from spire.doc import *
from spire.doc.common import *

# Carica un documento Word esistente
doc = Document()
doc.LoadFromFile("/input/apa style.docx")

# Accedi alla prima sezione del documento
section = doc.Sections.get_Item(0)

# Formatta il primo paragrafo
para1 = section.Paragraphs.get_Item(0)
para1.Format.SetLeftIndent(36.0)
para1.Format.SetFirstLineIndent(-36.0)

# Formatta il quinto paragrafo
para3 = section.Paragraphs.get_Item(4)
para3.Format.SetLeftIndent(36.0)
para3.Format.SetFirstLineIndent(-36.0)

# Salva il documento aggiornato
doc.SaveToFile("/output/Hanging_Indent.docx", FileFormat.Docx2013)
doc.Close()
Nel codice sopra, utilizziamo get_Item(4) per selezionare quello che sembra essere il terzo paragrafo. Questo perché le righe vuote tra i blocchi di testo sono spesso contate come singoli oggetti paragrafo dalla libreria. Se il tuo documento non ha righe vuote, potresti dover regolare l'indice a 2 invece.
Ecco l'anteprima del file risultante e del documento Word originale:
Suggerimento: Una volta perfezionato il tuo layout, puoi anche utilizzare Spire.Doc gratuito per convertire i documenti Word in PDF. Ciò garantisce che i tuoi rientri sporgenti e la formattazione generale rimangano perfettamente intatti su tutte le piattaforme e dispositivi.
Risoluzione dei problemi e domande frequenti
D1: Perché Ctrl + T non funziona nel mio Word?
Questo di solito accade se un'altra app in background ha la stessa scorciatoia. Verifica se hai in esecuzione software di traduzione o registrazione schermo specializzati. Se tutto il resto fallisce, usa il metodo manuale sopra.
D2: Come si imposta un rientro sporgente in Word Online?
La versione web è leggermente diversa. Vai alla scheda Home, fai clic sui tre punti (...) per altre opzioni, seleziona Opzioni paragrafo e trova Rientro speciale.
D3: Qual è la dimensione standard per APA o MLA?
Lo standard è 0,5 pollici (1,27 cm). La maggior parte delle versioni di Word imposta questo per impostazione predefinita non appena selezioni "Sporgente".
Confronto dei metodi di rientro sporgente
Ora che abbiamo trattato sia gli approcci manuali che quelli automatizzati, confrontiamo brevemente quando ciascun metodo funziona meglio.
| Metodo | Ideale per | Vantaggi | Limitazioni |
|---|---|---|---|
| Formattazione manuale | Modifiche una tantum | Semplice e integrato in Word | Più lento per attività ripetute |
| Scorciatoia da tastiera | Modifica rapida dei documenti | Veloce e conveniente | Personalizzazione limitata |
| Automazione Python | Elaborazione batch di documenti | Efficiente e coerente | Richiede conoscenze di programmazione |
Conclusione
In sintesi, clic manuali e scorciatoie all'interno di Microsoft Word offrono una soluzione rapida e conveniente per modifiche occasionali e attività singole. Tuttavia, per coloro che cercano di bypassare la suite per ufficio e automatizzare i flussi di lavoro di formattazione, Spire.Doc gratuito per Python offre velocità e precisione. Scegli lo strumento che si allinea ai tuoi obiettivi di progetto e inizia oggi stesso a creare documenti professionali e perfettamente formattati!
Leggi anche:
Comment faire un alinéa négatif dans Word : 3 méthodes simples et utiles
Table des matières
Si vous mettez en forme un document académique, une bibliographie ou une liste de références APA/MLA, vous devrez peut-être créer un retrait suspendu dans Word. Bien que Microsoft Word inclue des outils de mise en forme intégrés pour cela, de nombreux utilisateurs ont encore du mal à trouver le bon bouton, en particulier dans les versions plus récentes de Word. Dans ce guide, vous apprendrez comment créer un retrait suspendu dans Word en utilisant trois méthodes simples : la mise en forme manuelle, les raccourcis clavier et l'automatisation Python pour le traitement par lots de documents.
- Créer une retrait suspendu dans Microsoft Word manuellement
- Créer un retrait suspendu dans Word à l'aide d'un raccourci
- Automatiser la création d'un retrait suspendu dans Word avec Python
- Dépannage et FAQ
- Comparaison des méthodes
Créer une retrait suspendu dans Microsoft Word manuellement
Si vous vous demandez comment créer un retrait suspendu dans Word pour un seul document, le menu des paramètres de Paragraphe est votre approche la plus fiable. Cette méthode fonctionne dans la plupart des versions de Microsoft Word et vous permet de personnaliser précisément la taille du retrait.
Comment le configurer :
- Étape 1. Mettez en surbrillance les paragraphes spécifiques ou la bibliographie entière que vous souhaitez formater.
- Étape 2. Cliquez avec le bouton droit sur le texte sélectionné et choisissez Paragraphe... dans le menu contextuel. Cela ouvrira instantanément l'onglet Retraits et espacement.
- Étape 3. Dans la section Retrait, trouvez le menu déroulant Spécial et sélectionnez Suspendu.
- Étape 4. Le décalage standard pour les styles APA ou MLA est de 0,5" (1,27 cm). Appuyez sur OK, et votre texte s'alignera.
Créer un retrait suspendu dans Word à l'aide d'un raccourci
Bien que l'ajout d'un retrait suspendu dans Word à l'aide du menu offre un contrôle précis, l'ouverture répétée de la boîte de dialogue Paragraphe peut devenir inefficace lorsque vous travaillez avec de longues listes de citations. Si vous avez une longue liste de citations et que vous souhaitez accélérer les choses, l'utilisation d'un raccourci clavier est plus efficace pour les utilisateurs expérimentés.
Raccourci pour le retrait suspendu pour Windows et Mac :
- Sur Windows : Appuyez sur Ctrl + T. Chaque pression augmente le retrait. Pour l'annuler ou le déplacer en arrière, appuyez sur Ctrl + Maj + T.
- Sur Mac : Appuyez sur Commande + T. macOS n'a pas de raccourci par défaut pour diminuer le retrait ; vous pouvez utiliser Commande + Z pour annuler l'action immédiatement, ou appuyer sur Option + Commande + Q pour réinitialiser toute la mise en forme du paragraphe.
Ces raccourcis sont particulièrement utiles lors de la modification de longs documents et de l'application répétée de la mise en forme.
Astuce : Pendant que vous ajustez votre mise en page, vous pourriez rencontrer des lignes vides tenaces qui perturbent le flux. Pour nettoyer efficacement votre document, vous pouvez suivre ce guide pour supprimer rapidement les lignes vides dans Word.
Automatiser la création d'un retrait suspendu dans Word avec Python
Bien que les méthodes manuelles et par raccourci soient suffisantes pour les utilisateurs occasionnels, elles perdent en efficacité lorsque vous devez traiter des centaines de documents ou de paragraphes dispersés sur différentes pages. Pour le traitement de documents à grande échelle, l'automatisation permet de maintenir une mise en forme cohérente tout en réduisant le travail manuel.
Dans cette section, nous allons montrer comment ajouter un retrait suspendu dans des documents Word en utilisant Free Spire.Doc pour Python. Il s'agit d'une bibliothèque professionnelle gratuite conçue pour créer, modifier et convertir des documents Word. Elle dispose de la méthode ParagraphFormat.SetFirstLineIndent(), qui vous permet de passer d'un retrait de première ligne à un retrait suspendu simplement en ajustant un seul paramètre.
Installer Free Spire.Doc pour Python
Avant d'exécuter le code, installez la bibliothèque à l'aide de pip :
pip install Spire.Doc.Free
Exemple de code Python (utilisant Free Spire.Doc)
Le code Python suivant montre comment cibler le premier et le troisième paragraphe d'un document Word existant et appliquer un retrait suspendu à ces paragraphes.
from spire.doc import *
from spire.doc.common import *
# Charger un document Word existant
doc = Document()
doc.LoadFromFile("/input/apa style.docx")
# Accéder à la première section du document
section = doc.Sections.get_Item(0)
# Formater le premier paragraphe
para1 = section.Paragraphs.get_Item(0)
para1.Format.SetLeftIndent(36.0)
para1.Format.SetFirstLineIndent(-36.0)
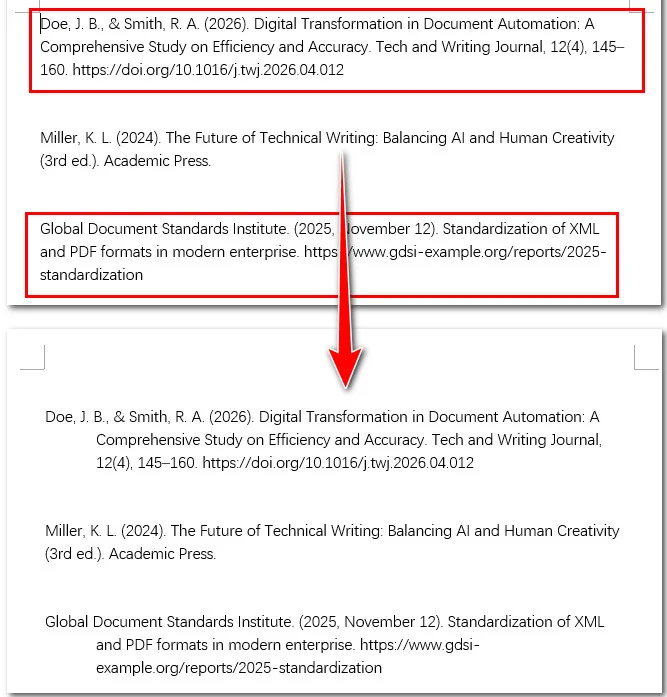
# Formater le cinquième paragraphe
para3 = section.Paragraphs.get_Item(4)
para3.Format.SetLeftIndent(36.0)
para3.Format.SetFirstLineIndent(-36.0)
# Enregistrer le document mis à jour
doc.SaveToFile("/output/Hanging_Indent.docx", FileFormat.Docx2013)
doc.Close()
Dans le code ci-dessus, nous utilisons get_Item(4) pour cibler ce qui semble être le troisième paragraphe. C'est parce que les lignes vides entre les blocs de texte sont souvent comptées comme des objets de paragraphe individuels par la bibliothèque. Si votre document ne contient pas de lignes vides, vous devrez peut-être ajuster l'indice à 2 à la place.
Voici un aperçu du fichier résultant et du document Word d'origine :
Astuce : Une fois que vous avez perfectionné votre mise en page, vous pouvez également utiliser Free Spire.Doc pour convertir les documents Word en PDF. Cela garantit que vos retraits suspendus et votre mise en forme générale restent parfaitement intacts sur toutes les plateformes et tous les appareils.
Dépannage et FAQ
Q1 : Pourquoi Ctrl + T ne fonctionne-t-il pas dans mon Word ?
Cela se produit généralement si une autre application en arrière-plan utilise le même raccourci. Vérifiez si vous avez un logiciel de traduction ou d'enregistrement d'écran spécialisé en cours d'exécution. Si tout le reste échoue, utilisez la méthode manuelle ci-dessus.
Q2 : Comment définir un retrait suspendu dans Word Online ?
La version web est légèrement différente. Allez dans l'onglet Accueil, cliquez sur les trois points (...) pour plus d'options, sélectionnez Options de paragraphe, et trouvez Retrait spécial.
Q3 : Quelle est la taille standard pour APA ou MLA ?
La norme est de 0,5 pouce (1,27 cm). La plupart des versions de Word définissent cela par défaut dès que vous sélectionnez "Suspendu".
Comparaison des méthodes de retrait suspendu
Maintenant que nous avons abordé les approches manuelles et automatisées, comparons brièvement quand chaque méthode fonctionne le mieux.
| Méthode | Idéal pour | Avantages | Limitations |
|---|---|---|---|
| Mise en forme manuelle | Modifications ponctuelles | Simple et intégré à Word | Plus lent pour les tâches répétées |
| Raccourci clavier | Édition rapide de documents | Rapide et pratique | Personnalisation limitée |
| Automatisation Python | Traitement par lots de documents | Efficace et cohérent | Nécessite des connaissances en codage |
Conclusion
En résumé, les clics manuels et les raccourcis dans Microsoft Word offrent une solution rapide et pratique pour les modifications occasionnelles et les tâches uniques. Cependant, pour ceux qui cherchent à contourner la suite bureautique et à automatiser les flux de travail de mise en forme, Free Spire.Doc pour Python offre vitesse et précision. Choisissez l'outil qui correspond aux objectifs de votre projet et commencez à créer des documents professionnels parfaitement formatés dès aujourd'hui !
À lire également :
Cómo hacer una sangría francesa en Word: 3 formas fáciles y útiles
Tabla de Contenidos
Si estás formateando un trabajo académico, una bibliografía o una lista de referencias APA/MLA, es posible que necesites crear una sangría francesa en Word. Aunque Microsoft Word incluye herramientas de formato integradas para esto, muchos usuarios todavía tienen dificultades para encontrar el botón correcto, especialmente en las versiones más recientes de Word. En esta guía, aprenderás cómo crear una sangría francesa en Word utilizando tres métodos sencillos: formato manual, atajos de teclado y automatización con Python para el procesamiento de documentos por lotes.
- Crear una sangría francesa en Microsoft Word manualmente
- Crear una sangría francesa en Word usando un atajo
- Automatizar la creación de sangría francesa en Word con Python
- Solución de problemas y preguntas frecuentes
- Comparación de métodos
Crear una sangría francesa en Microsoft Word manualmente
Si te preguntas cómo hacer una sangría francesa en Word para un solo documento, el menú de configuración de Párrafo es tu enfoque más fiable. Este método funciona en la mayoría de las versiones de Microsoft Word y te permite personalizar el tamaño de la sangría con precisión.
Cómo configurarlo:
- Paso 1. Resalta los párrafos específicos o toda la bibliografía que deseas formatear.
- Paso 2. Haz clic derecho en el texto resaltado y selecciona Párrafo... en el menú contextual. Esto abrirá instantáneamente la pestaña Sangría y espacio.
- Paso 3. En la sección Sangría, busca el menú desplegable Especial y selecciona Francesa.
- Paso 4. El desplazamiento estándar para los estilos APA o MLA es de 0.5" (1.27 cm). Pulsa Aceptar y tu texto se ajustará en su lugar.
Crear una sangría francesa en Word usando un atajo
Si bien agregar una sangría francesa en Word usando el menú ofrece un control preciso, abrir repetidamente el cuadro de diálogo Párrafo puede volverse ineficiente cuando se trabaja con listas de citas largas. Si tienes una lista larga de citas y quieres acelerar las cosas, usar un atajo de teclado es más eficiente para los usuarios avanzados.
Atajo de sangría francesa para Windows y Mac:
- En Windows: Pulsa Ctrl + T. Cada pulsación aumenta la sangría. Para deshacerla o retrocederla, pulsa Ctrl + Shift + T.
- En Mac: Pulsa Command + T. macOS no tiene un atajo predeterminado para disminuir la sangría; puedes usar Command + Z para deshacer la acción inmediatamente, o pulsar Option + Command + Q para restablecer todo el formato del párrafo.
Estos atajos son especialmente útiles al editar documentos largos y aplicar formato repetidamente.
Consejo: Mientras ajustas tu diseño, puedes encontrar líneas en blanco rebeldes que interrumpen el flujo. Para ordenar tu documento de manera eficiente, puedes seguir esta guía para eliminar líneas en blanco en Word rápidamente.
Automatizar la creación de sangría francesa en Word con Python
Si bien los métodos manuales y de atajos son suficientes para usuarios ocasionales, pierden eficiencia cuando necesitas procesar cientos de documentos o párrafos dispersos en diferentes páginas. Para el procesamiento de documentos a gran escala, la automatización ayuda a mantener un formato consistente y reduce el trabajo manual.
En esta sección, demostraremos cómo agregar una sangría francesa en documentos de Word usando Spire.Doc Gratis para Python. Esta es una biblioteca profesional gratuita diseñada para crear, editar y convertir documentos de Word. Cuenta con el método ParagraphFormat.SetFirstLineIndent(), que te permite alternar entre la primera línea y las sangrías francesas simplemente ajustando un solo parámetro.
Instalar Spire.Doc Gratis para Python
Antes de ejecutar el código, instala la biblioteca usando pip:
pip install Spire.Doc.Free
Ejemplo de código Python (usando Spire.Doc Gratis)
El siguiente código Python muestra cómo apuntar al primer y tercer párrafo dentro de un documento de Word existente y establecer una sangría francesa en estos párrafos.
from spire.doc import *
from spire.doc.common import *

# Cargar un documento de Word existente
doc = Document()
doc.LoadFromFile("/input/apa style.docx")

# Acceder a la primera sección del documento
section = doc.Sections.get_Item(0)

# Formatear el primer párrafo
para1 = section.Paragraphs.get_Item(0)
para1.Format.SetLeftIndent(36.0)
para1.Format.SetFirstLineIndent(-36.0)

# Formatear el quinto párrafo
para3 = section.Paragraphs.get_Item(4)
para3.Format.SetLeftIndent(36.0)
para3.Format.SetFirstLineIndent(-36.0)

# Guardar el documento actualizado
doc.SaveToFile("/output/Hanging_Indent.docx", FileFormat.Docx2013)
doc.Close()
En el código anterior, usamos get_Item(4) para apuntar a lo que parece ser el tercer párrafo. Esto se debe a que las líneas en blanco entre bloques de texto a menudo son contadas como objetos de párrafo individuales por la biblioteca. Si tu documento no tiene líneas en blanco, es posible que necesites ajustar el índice a 2 en su lugar.
Aquí tienes una vista previa del archivo resultante y el documento de Word original:
Consejo: Una vez que hayas perfeccionado tu diseño, también puedes usar Spire.Doc Gratis para convertir los documentos de Word a PDF. Esto asegura que tus sangrías francesas y el formato general permanezcan perfectamente intactos en todas las plataformas y dispositivos.
Solución de problemas y preguntas frecuentes
P1: ¿Por qué Ctrl + T no funciona en mi Word?
Esto suele ocurrir si otra aplicación en segundo plano tiene el mismo atajo. Comprueba si tienes algún software de traducción o grabación de pantalla especializado en ejecución. Si todo lo demás falla, utiliza el método manual anterior.
P2: ¿Cómo configuro una sangría francesa en Word Online?
La versión web es ligeramente diferente. Ve a la pestaña Inicio, haz clic en los tres puntos (...) para ver más opciones, selecciona Opciones de párrafo y busca Sangría especial.
P3: ¿Cuál es el tamaño estándar para APA o MLA?
El estándar es 0.5 pulgadas (1.27 cm). La mayoría de las versiones de Word lo configuran por defecto tan pronto como seleccionas "Francesa".
Comparación de métodos de sangría francesa
Ahora que hemos cubierto los enfoques manuales y automatizados, comparemos brevemente cuándo funciona mejor cada método.
| Método | Mejor para | Ventajas | Limitaciones |
|---|---|---|---|
| Formato Manual | Ediciones únicas | Sencillo y está integrado en Word | Más lento para tareas repetidas |
| Atajo de Teclado | Edición rápida de documentos | Rápido y conveniente | Personalización limitada |
| Automatización con Python | Procesamiento de documentos por lotes | Eficiente y consistente | Requiere conocimientos de codificación |
Conclusión
En resumen, los clics manuales y los atajos dentro de Microsoft Word ofrecen una solución rápida y conveniente para ediciones ocasionales y tareas únicas. Sin embargo, para aquellos que buscan omitir la suite de oficina y automatizar los flujos de trabajo de formato, Free Spire.Doc para Python ofrece velocidad y precisión. ¡Elige la herramienta que se alinee con los objetivos de tu proyecto y comienza a crear documentos profesionales y perfectamente formateados hoy mismo!
También lee:
Hängenden Einzug in Word erstellen: 3 einfache und nützliche Methoden
Inhaltsverzeichnis
Wenn Sie ein wissenschaftliches Paper, eine Bibliografie oder eine APA/MLA-Referenzliste formatieren, müssen Sie möglicherweise einen hängenden Einzug in Word erstellen. Obwohl Microsoft Word über integrierte Formatierungswerkzeuge dafür verfügt, haben viele Benutzer immer noch Schwierigkeiten, die richtige Schaltfläche zu finden, insbesondere in neueren Versionen von Word. In dieser Anleitung erfahren Sie, wie Sie mit drei einfachen Methoden einen hängenden Einzug in Word erstellen: manuelle Formatierung, Tastenkombinationen und Python-Automatisierung für die Stapelverarbeitung von Dokumenten.
- Hängenden Einzug in Microsoft Word manuell erstellen
- Hängenden Einzug in Word mit einer Tastenkombination erstellen
- Automatisierung der Erstellung eines hängenden Einzugs in Word mit Python
- Fehlerbehebung & FAQs
- Methodenvergleich
Hängenden Einzug in Microsoft Word manuell erstellen
Wenn Sie sich fragen, wie Sie einen hängenden Einzug in Word für ein einzelnes Dokument erstellen können, ist das Menü Absatz-Einstellungen Ihr zuverlässigster Ansatz. Diese Methode funktioniert in den meisten Versionen von Microsoft Word und ermöglicht es Ihnen, die Einzugsgröße präzise anzupassen.
So richten Sie es ein:
- Schritt 1. Markieren Sie die spezifischen Absätze oder die gesamte Bibliografie, die Sie formatieren möchten.
- Schritt 2. Klicken Sie mit der rechten Maustaste auf den markierten Text und wählen Sie im Kontextmenü Absatz... aus. Dadurch wird sofort der Tab Einzüge und Abstände geöffnet.
- Schritt 3. Suchen Sie im Abschnitt Einzug das Dropdown-Menü Spezial und wählen Sie Hängend aus.
- Schritt 4. Der Standardabstand für APA- oder MLA-Stile beträgt 0,5 Zoll (1,27 cm). Klicken Sie auf OK, und Ihr Text wird korrekt platziert.
Hängenden Einzug in Word mit einer Tastenkombination erstellen
Während das Hinzufügen eines hängenden Einzugs in Word über das Menü eine präzise Kontrolle bietet, kann das wiederholte Öffnen des Dialogfelds "Absatz" bei langen Zitatlisten ineffizient werden. Wenn Sie eine lange Liste von Zitaten haben und die Dinge beschleunigen möchten, ist die Verwendung einer Tastenkombination für Power-User effizienter.
Tastenkombination für hängenden Einzug für Windows und Mac:
- Unter Windows: Drücken Sie Strg + T. Jeder Druck erhöht den Einzug. Um ihn rückgängig zu machen oder zurückzubewegen, drücken Sie Strg + Umschalt + T.
- Auf dem Mac: Drücken Sie Befehl + T. macOS hat keine Standard-Tastenkombination zum Verringern des Einzugs; Sie können Befehl + Z verwenden, um die Aktion sofort rückgängig zu machen, oder Option + Befehl + Q drücken, um die gesamte Absatzformatierung zurückzusetzen.
Diese Tastenkombinationen sind besonders nützlich, wenn Sie lange Dokumente bearbeiten und Formatierungen wiederholt anwenden.
Tipp: Während Sie Ihr Layout anpassen, stoßen Sie möglicherweise auf hartnäckige Leerzeilen, die den Fluss stören. Um Ihr Dokument effizient aufzuräumen, können Sie dieser Anleitung folgen, um Leerzeilen in Word schnell zu entfernen.
Automatisierung der Erstellung eines hängenden Einzugs in Word mit Python
Während die manuellen und Tastenkombinationsmethoden für Gelegenheitsnutzer ausreichend sind, verlieren sie an Effizienz, wenn Sie Hunderte von Dokumenten oder Absätze auf verschiedenen Seiten verarbeiten müssen. Für die groß angelegte Dokumentenverarbeitung hilft die Automatisierung, eine konsistente Formatierung beizubehalten und gleichzeitig manuelle Arbeit zu reduzieren.
In diesem Abschnitt zeigen wir, wie Sie mit Free Spire.Doc für Python einen hängenden Einzug in Word-Dokumenten hinzufügen. Dies ist eine kostenlose professionelle Bibliothek zum Erstellen, Bearbeiten und Konvertieren von Word-Dokumenten. Sie verfügt über die Methode ParagraphFormat.SetFirstLineIndent(), mit der Sie einfach durch Anpassen eines einzelnen Parameters zwischen dem Einzug der ersten Zeile und hängenden Einzügen wechseln können.
Kostenloses Spire.Doc für Python installieren
Installieren Sie die Bibliothek vor dem Ausführen des Codes mit pip:
pip install Spire.Doc.Free
Python-Codebeispiel (mit kostenlosem Spire.Doc)
Der folgende Python-Code zeigt, wie Sie die ersten und dritten Absätze in einem vorhandenen Word-Dokument ansprechen und diesen Absätzen einen hängenden Einzug zuweisen.
from spire.doc import *
from spire.doc.common import *

# Ein vorhandenes Word-Dokument laden
doc = Document()
doc.LoadFromFile("/input/apa style.docx")

# Auf den ersten Abschnitt des Dokuments zugreifen
section = doc.Sections.get_Item(0)

# Den ersten Absatz formatieren
para1 = section.Paragraphs.get_Item(0)
para1.Format.SetLeftIndent(36.0)
para1.Format.SetFirstLineIndent(-36.0)

# Den fünften Absatz formatieren
para3 = section.Paragraphs.get_Item(4)
para3.Format.SetLeftIndent(36.0)
para3.Format.SetFirstLineIndent(-36.0)

# Das aktualisierte Dokument speichern
doc.SaveToFile("/output/Hanging_Indent.docx", FileFormat.Docx2013)
doc.Close()
Im obigen Code verwenden wir get_Item(4), um den scheinbar dritten Absatz anzusprechen. Dies liegt daran, dass leere Zeilen zwischen Textblöcken von der Bibliothek oft als einzelne Absatzobjekte gezählt werden. Wenn Ihr Dokument keine Leerzeilen enthält, müssen Sie den Index möglicherweise auf 2 ändern.
Hier ist die Vorschau der resultierenden Datei und des ursprünglichen Word-Dokuments:
Tipp: Sobald Sie Ihr Layout perfektioniert haben, können Sie Free Spire.Doc auch verwenden, um Word-Dokumente in PDF zu konvertieren. Dies stellt sicher, dass Ihre hängenden Einzüge und die allgemeine Formatierung auf allen Plattformen und Geräten perfekt erhalten bleiben.
Fehlerbehebung & FAQs
F1: Warum funktioniert Strg + T in meinem Word nicht?
Dies geschieht normalerweise, wenn eine andere Hintergrundanwendung dieselbe Tastenkombination verwendet. Überprüfen Sie, ob Sie eine spezielle Übersetzungs- oder Bildschirmaufzeichnungssoftware ausführen. Wenn alles andere fehlschlägt, verwenden Sie die manuelle Methode oben.
F2: Wie richte ich einen hängenden Einzug in Word Online ein?
Die Webversion ist etwas anders. Gehen Sie zum Tab Start, klicken Sie auf die drei Punkte (...) für weitere Optionen, wählen Sie Absatzoptionen und suchen Sie nach Spezialeinzug.
F3: Was ist die Standardgröße für APA oder MLA?
Der Standard ist 0,5 Zoll (1,27 cm). Die meisten Word-Versionen stellen dies standardmäßig ein, sobald Sie "Hängend" auswählen.
Hängenden Einzug Methodenvergleich
Nachdem wir nun sowohl manuelle als auch automatisierte Ansätze behandelt haben, vergleichen wir kurz, wann jede Methode am besten funktioniert.
| Methode | Am besten geeignet für | Vorteile | Einschränkungen |
|---|---|---|---|
| Manuelle Formatierung | Einmalige Bearbeitungen | Einfach und in Word integriert | Langsam für wiederholte Aufgaben |
| Tastenkombination | Schnelle Dokumentenbearbeitung | Schnell und bequem | Begrenzte Anpassungsmöglichkeiten |
| Python-Automatisierung | Stapelverarbeitung von Dokumenten | Effizient und konsistent | Erfordert Programmierkenntnisse |
Fazit
Zusammenfassend lässt sich sagen, dass manuelle Klicks und Tastenkombinationen in Microsoft Word eine schnelle und bequeme Lösung für gelegentliche Bearbeitungen und einmalige Aufgaben bieten. Für diejenigen, die die Office-Suite umgehen und Formatierungsabläufe automatisieren möchten, bietet Free Spire.Doc für Python jedoch Geschwindigkeit und Präzision. Wählen Sie das Werkzeug, das Ihren Projektzielen entspricht, und beginnen Sie noch heute mit der Erstellung professioneller, perfekt formatierter Dokumente!