Sostituire testo in PDF in blocco: 3 metodi pratici
I PDF sono ampiamente utilizzati per report, manuali e documentazione. Modificare il testo in un PDF non è così semplice come in Word, e sostituire manualmente ogni occorrenza di una parola può essere noioso. Questa guida ti mostrerà tre modi pratici per sostituire il testo in un singolo PDF in modo efficiente, in modo da poter correggere refusi, aggiornare termini o correggere errori nell'intero documento senza modificare ogni istanza manualmente.
Navigazione rapida:
- Metodo 1: Utilizzo di Adobe Acrobat Pro
- Metodo 2: Utilizzo di uno strumento online (PDF4me)
- Metodo 3: Utilizzo di un'API .NET (Approccio programmatico)
Perché sostituire il testo in un PDF?
Sostituire il testo in un PDF è spesso necessario perché i PDF sono progettati per preservare il contenuto e il layout, rendendo difficili le modifiche manuali. Scenari comuni includono:
- Correzione di refusi o errori – Anche i PDF preparati professionalmente possono contenere errori che devono essere corretti.
- Aggiornamento di informazioni obsolete – Nomi, date, dettagli aziendali o riferimenti a prodotti potrebbero dover essere rivisti senza ricreare l'intero documento.
- Standardizzazione della terminologia – Per coerenza tra report o manuali, termini specifici potrebbero dover essere aggiornati in tutto il documento.
- Aggiornamenti legali o di conformità – Alcuni documenti potrebbero richiedere modifiche testuali per soddisfare requisiti normativi o contrattuali.
- Miglioramento della leggibilità – Sostituire frasi goffe, abbreviazioni o termini tecnici può rendere i documenti più chiari per i lettori.
Sostituendo il testo in modo efficiente, risparmi tempo, mantieni una formattazione professionale ed eviti il fastidio di ricreare i PDF da zero.
Metodo 1: Utilizzo di Adobe Acrobat Pro
Adobe Acrobat Pro è uno degli strumenti di editing PDF più robusti e professionali disponibili. Ti consente di sostituire il testo in tutto un documento preservando la formattazione originale, il layout e i font. Questo è particolarmente utile quando si ha a che fare con PDF complessi che includono tabelle, immagini, intestazioni o piè di pagina.
Il software garantisce che la sostituzione non distorca l'allineamento del testo o la struttura della pagina, che è un problema comune con strumenti più semplici. Adobe Acrobat Pro è ideale per utenti d'ufficio o professionisti che necessitano di una soluzione desktop affidabile per un editing testuale preciso.

Istruzioni passo passo
-
Apri il tuo PDF in Adobe Acrobat Pro.
-
Vai su Modifica → Trova / Sostituisci → Sostituisci testo.
-
Inserisci il testo che desideri sostituire nel campo Trova.
-
Inserisci il nuovo testo nel campo Sostituisci con.
-
Configura l'opzione Maiuscole/minuscole in base alle tue esigenze.
- Abilitala se desideri sostituire solo il testo con la capitalizzazione esatta.
- Disabilitala se desideri che Acrobat sostituisca automaticamente tutte le variazioni di capitalizzazione.
-
Fai clic su Sostituisci finché ogni occorrenza nel documento non viene sostituita.
Nota: Presta molta attenzione alla capitalizzazione quando sostituisci il testo. Ad esempio, "Artifical" e "artifical" potrebbero essere trattati in modo diverso a seconda che la corrispondenza Maiuscole/minuscole sia abilitata o meno. Impostazioni errate potrebbero causare il salto di alcune occorrenze o la loro sostituzione involontaria.
Pro
- Preserva la formattazione, i font e il layout.
- Semplice e affidabile per documenti singoli.
Contro
- Software a pagamento.
- Meno adatto per flussi di lavoro completamente automatizzati.
Metodo 2: Utilizzo di uno strumento online (PDF4me)
Strumenti online come PDF4me sono convenienti per gli utenti che necessitano di una soluzione rapida senza installare alcun software. Ti consentono di sostituire tutte le occorrenze di una parola o frase in un singolo PDF direttamente nel tuo browser. Questo metodo è particolarmente utile quando lavori su un computer in cui non puoi installare software, o quando hai bisogno di una soluzione rapida per documenti di piccole o medie dimensioni.
Sebbene gli strumenti online siano generalmente facili da usare, potrebbero avere limitazioni sulla dimensione del file o sul numero di sostituzioni per sessione, e dovresti prestare attenzione quando carichi documenti sensibili.
Istruzioni passo passo
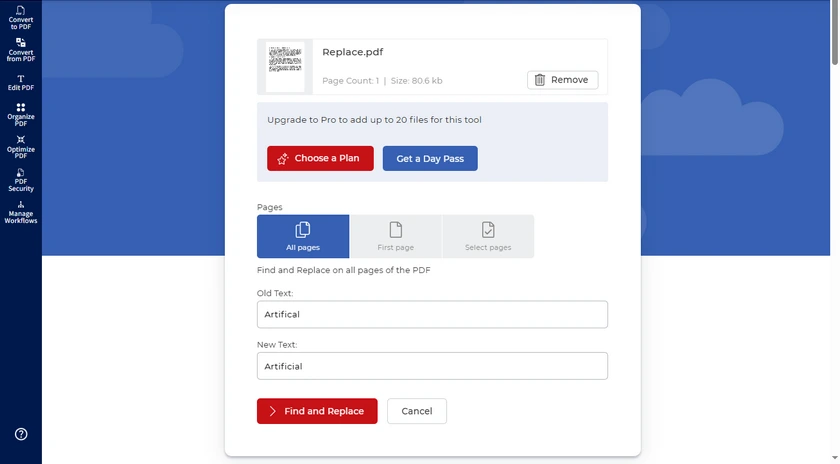
- Apri lo Strumento Trova e Sostituisci di PDF4me nel tuo browser.
- Carica il PDF che desideri modificare.
- Inserisci il testo da trovare e il testo di sostituzione.
- Fai clic su Trova e Sostituisci e scarica il PDF aggiornato.
Pro
- Nessuna installazione necessaria; funziona in qualsiasi browser.
- Veloce e facile da usare per modifiche occasionali.
Contro
- Potrebbero esserci limiti di dimensione del file o di sessione.
- Meno adatto per documenti riservati.
Metodo 3: Utilizzo di un'API .NET (Approccio programmatico)
Per sviluppatori o utenti esperti, Spire.PDF for .NET fornisce una soluzione programmatica per sostituire il testo in un intero PDF. A differenza dei metodi manuali o online, questo approccio consente un controllo preciso su ogni sostituzione e garantisce che tutte le pagine, i font e i layout vengano preservati. È particolarmente vantaggioso se è necessario sostituire più termini contemporaneamente o integrare la sostituzione del testo in un flusso di lavoro automatizzato.
Istruzioni passo passo
- Apri il tuo ambiente di sviluppo (Visual Studio, ecc.).
- Installa e fai riferimento a Spire.PDF for .NET nel tuo progetto.
- Utilizza il seguente codice C# per sostituire tutte le occorrenze di una parola:
PM> Install-Package Spire.PDF
using Spire.Pdf;
using Spire.Pdf.Texts;

namespace ReplaceInEntireDocument
{
    class Program
    {
        static void Main(string[] args)
        {
            // Carica un file PDF
            PdfDocument doc = new PdfDocument();
            doc.LoadFromFile("Input.pdf");

            // Crea un oggetto PdfTextReplaceOptions
            PdfTextReplaceOptions textReplaceOptions = new PdfTextReplaceOptions();

            // Specifica le opzioni per la sostituzione del testo
            textReplaceOptions.ReplaceType = PdfTextReplaceOptions.ReplaceActionType.WholeWord | PdfTextReplaceOptions.ReplaceActionType.AutofitWidth;

            for (int i = 0; i < doc.Pages.Count; i++) {

                // Ottieni una pagina specifica
                PdfPageBase page = doc.Pages[i];

                // Crea un oggetto PdfTextReplacer basato sulla pagina
                PdfTextReplacer textReplacer = new PdfTextReplacer(page);

                // Imposta le opzioni di sostituzione
                textReplacer.Options = textReplaceOptions;

                // Sostituisci tutte le occorrenze del testo di destinazione con il nuovo testo
                textReplacer.ReplaceAllText("artifical", "artificial");
                textReplacer.ReplaceAllText("Artifical", "Artificial");
            }

            // Salva il documento in un file PDF diverso
            doc.SaveToFile("Replaced.pdf");

            // Libera le risorse
            doc.Dispose();
        }
    }
}
Output:

Nota: In Spire.PDF, la sostituzione del testo è sensibile alle maiuscole/minuscole per impostazione predefinita. Ciò significa che "artifical" e "Artifical" sono considerate stringhe diverse.
Ecco perché l'esempio include due istruzioni di sostituzione:
textReplacer.ReplaceAllText("artifical", "artificial");
textReplacer.ReplaceAllText("Artifical", "Artificial");
Se il tuo documento contiene più stili di capitalizzazione, assicurati di sostituire ogni variazione separatamente.
Funzionalità avanzate per utenti esperti
Spire.PDF offre diverse funzionalità avanzate di ricerca e sostituzione che vanno oltre il semplice "sostituisci tutto":
- Sostituisci testo su una pagina specifica – Puoi scegliere di agire solo su una pagina invece che su tutte.
- Sostituisci la prima occorrenza – Utile quando solo la prima istanza di una parola necessita di un aggiornamento.
- Trova e sostituisci usando Regex – Consente la corrispondenza e la sostituzione di pattern complessi (ad es. date, indirizzi email o formati variabili).
Puoi implementare queste funzionalità modificando i metodi PdfTextReplacer o ReplaceAllText nel tuo codice. Ad esempio, puoi scorrere solo la pagina desiderata o utilizzare Regex nella stringa di ricerca per trovare pattern invece di parole esatte. Per ulteriori casi d'uso, consulta Sostituisci testo in un documento PDF usando C#.
Pro
- Completamente automatizzato; opzioni di sostituzione del testo flessibili.
- Preserva font, layout e formattazione.
- Può essere integrato in flussi di lavoro desktop o server per attività ripetute.
Contro
- Richiede conoscenze di programmazione.
- Potrebbe essere necessaria una licenza commerciale per le funzionalità complete.
Oltre a sostituire il testo, puoi anche sostituire immagini, font e altri elementi del documento programmaticamente utilizzando Spire.PDF for .NET. Questo lo rende una soluzione più completa per la modifica dei PDF oltre ai semplici aggiornamenti di testo.
Conclusione
Sostituire il testo in un PDF non deve essere difficile. Per la maggior parte degli utenti, sostituire tutte le occorrenze in un singolo PDF è sufficiente e pratico. A seconda delle tue esigenze:
- Adobe Acrobat Pro – Ideale per l'editing professionale su desktop con formattazione perfetta.
- PDF4me – Soluzione online rapida e semplice per uso occasionale.
- Spire.PDF for .NET – Ideale per sviluppatori che necessitano di sostituzioni automatizzate e precise.
Scegliendo il metodo che si adatta al tuo flusso di lavoro, puoi correggere refusi, aggiornare termini o correggere errori in modo efficiente senza modificare manualmente ogni istanza.
FAQ
D1: Posso sostituire il testo in un PDF scannerizzato?
No. I PDF scannerizzati sono essenzialmente immagini. Per sostituire il testo, è prima necessario eseguire l'OCR (Optical Character Recognition) per convertire le immagini in testo modificabile.
D2: La formattazione si romperà dopo aver sostituito il testo?
Dipende dal metodo. Adobe Acrobat Pro e Spire.PDF preservano font, layout e allineamento. Gli strumenti online potrebbero influire leggermente sulla formattazione, specialmente in PDF complessi.
D3: Posso sostituire più parole diverse contemporaneamente?
Sì. In Spire.PDF, puoi aggiungere più comandi ReplaceAllText per termini diversi. In Adobe Acrobat, devi ripetere Trova e Sostituisci per ogni termine.
D4: Ho bisogno di una licenza a pagamento per sostituire il testo?
Adobe Acrobat Pro è a pagamento e le funzionalità complete di Spire.PDF potrebbero richiedere una licenza commerciale. PDF4me offre prove gratuite o sostituzioni limitate, ma modifiche estese potrebbero richiedere un abbonamento.
D5: Posso annullare le sostituzioni se qualcosa va storto?
Salva sempre un backup del tuo PDF originale prima di sostituire il testo. Adobe Acrobat Pro dispone di una funzione Annulla, ma gli strumenti online e i metodi programmatici richiedono un backup per ripristinare il contenuto originale.
Vedi anche
Remplacer du texte dans un PDF en masse : 3 méthodes pratiques
Table des matières
Les PDF sont largement utilisés pour les rapports, les manuels et la documentation. La modification du texte dans un PDF n'est pas aussi simple que dans Word, et remplacer manuellement chaque occurrence d'un mot peut être fastidieux. Ce guide vous montrera trois façons pratiques de remplacer le texte dans un seul PDF efficacement, afin que vous puissiez corriger les fautes de frappe, mettre à jour les termes ou corriger les erreurs dans l'ensemble du document sans avoir à modifier chaque instance manuellement.
Navigation rapide :
- Méthode 1 : Utilisation d'Adobe Acrobat Pro
- Méthode 2 : Utilisation d'un outil en ligne (PDF4me)
- Méthode 3 : Utilisation d'une API .NET (Approche programmatique)
Pourquoi remplacer du texte dans un PDF ?
Remplacer du texte dans un PDF est souvent nécessaire car les PDF sont conçus pour préserver le contenu et la mise en page, ce qui rend les modifications manuelles difficiles. Les scénarios courants incluent :
- Correction des fautes de frappe ou des erreurs – Même les PDF préparés professionnellement peuvent contenir des erreurs qui doivent être corrigées.
- Mise à jour des informations obsolètes – Les noms, dates, détails de l'entreprise ou références de produits peuvent devoir être révisés sans recréer l'intégralité du document.
- Standardisation de la terminologie – Pour assurer la cohérence dans les rapports ou les manuels, des termes spécifiques peuvent devoir être mis à jour dans tout le document.
- Mises à jour légales ou de conformité – Certains documents peuvent nécessiter des modifications de texte pour répondre aux exigences réglementaires ou contractuelles.
- Amélioration de la lisibilité – Remplacer des formulations maladroites, des abréviations ou des termes techniques peut rendre les documents plus clairs pour les lecteurs.
En remplaçant le texte efficacement, vous gagnez du temps, maintenez une mise en forme professionnelle et évitez les tracas de la recréation des PDF à partir de zéro.
Méthode 1 : Utilisation d'Adobe Acrobat Pro
Adobe Acrobat Pro est l'un des outils d'édition de PDF les plus robustes et professionnels disponibles. Il vous permet de remplacer du texte dans un document tout en préservant la mise en forme, la mise en page et les polices d'origine. Ceci est particulièrement utile lorsque vous traitez des PDF complexes contenant des tableaux, des images, des en-têtes ou des pieds de page.
Le logiciel garantit que le remplacement ne déforme pas l'alignement du texte ni la structure de la page, ce qui est un problème courant avec les outils plus simples. Adobe Acrobat Pro est idéal pour les utilisateurs de bureau ou les professionnels qui ont besoin d'une solution de bureau fiable pour une édition de texte précise.
Instruction étape par étape
-
Ouvrez votre PDF dans Adobe Acrobat Pro.
-
Allez dans Édition → Rechercher / Remplacer → Remplacer le texte.
-
Entrez le texte que vous souhaitez remplacer dans le champ Rechercher.
-
Entrez le nouveau texte dans le champ Remplacer par.
-
Configurez l'option Respecter la casse selon vos besoins.
- Activez-la si vous souhaitez uniquement remplacer le texte avec la casse exacte.
- Désactivez-la si vous souhaitez qu'Acrobat remplace automatiquement toutes les variations de casse.
-
Cliquez sur Remplacer jusqu'à ce que chaque occurrence du document soit remplacée.
Remarque : Portez une attention particulière à la casse lors du remplacement du texte. Par exemple, « Artifical » et « artifical » peuvent être traités différemment selon que la correspondance Respecter la casse est activée ou non. Des paramètres incorrects peuvent entraîner le saut de certaines occurrences ou leur remplacement involontaire.
Avantages
- Préserve la mise en forme, les polices et la mise en page.
- Simple et fiable pour les documents uniques.
Inconvénients
- Logiciel payant.
- Moins adapté aux flux de travail entièrement automatisés.
Méthode 2 : Utilisation d'un outil en ligne (PDF4me)
Les outils en ligne tels que PDF4me sont pratiques pour les utilisateurs qui ont besoin d'une solution rapide sans installer de logiciel. Ils vous permettent de remplacer toutes les occurrences d'un mot ou d'une phrase dans un seul PDF directement dans votre navigateur. Cette méthode est particulièrement utile lorsque vous travaillez sur un ordinateur où vous ne pouvez pas installer de logiciel, ou lorsque vous avez besoin d'une correction rapide pour des documents de petite à moyenne taille.
Bien que les outils en ligne soient généralement faciles à utiliser, ils peuvent avoir des limitations sur la taille des fichiers ou le nombre de remplacements par session, et vous devez être prudent quant au téléchargement de documents sensibles.
Instruction étape par étape
- Ouvrez l'outil Rechercher et remplacer de PDF4me dans votre navigateur.
- Téléchargez le PDF que vous souhaitez modifier.
- Entrez le texte à rechercher et le texte de remplacement.
- Cliquez sur Rechercher et remplacer et téléchargez le PDF mis à jour.
Avantages
- Aucune installation nécessaire ; fonctionne dans n'importe quel navigateur.
- Rapide et convivial pour les modifications occasionnelles.
Inconvénients
- Peut avoir des limites de taille de fichier ou de session.
- Moins adapté aux documents confidentiels.
Méthode 3 : Utilisation d'une API .NET (Approche programmatique)
Pour les développeurs ou les utilisateurs avancés, Spire.PDF for .NET fournit une solution programmatique pour remplacer du texte dans un PDF entier. Contrairement aux méthodes manuelles ou en ligne, cette approche permet un contrôle précis sur chaque remplacement et garantit que toutes les pages, polices et mises en page sont préservées. Elle est particulièrement avantageuse si vous devez remplacer plusieurs termes à la fois ou intégrer le remplacement de texte dans un flux de travail automatisé.
Instruction étape par étape
- Ouvrez votre environnement de développement (Visual Studio, etc.).
- Installez et référencez Spire.PDF for .NET dans votre projet.
- Utilisez le code C# suivant pour remplacer toutes les occurrences d'un mot :
PM> Install-Package Spire.PDF
using Spire.Pdf;
using Spire.Pdf.Texts;

namespace ReplaceInEntireDocument
{
    class Program
    {
        static void Main(string[] args)
        {
            // Charger un fichier PDF
            PdfDocument doc = new PdfDocument();
            doc.LoadFromFile("Input.pdf");

            // Créer un objet PdfTextReplaceOptions
            PdfTextReplaceOptions textReplaceOptions = new PdfTextReplaceOptions();

            // Spécifier les options de remplacement de texte
            textReplaceOptions.ReplaceType = PdfTextReplaceOptions.ReplaceActionType.WholeWord | PdfTextReplaceOptions.ReplaceActionType.AutofitWidth;

            for (int i = 0; i < doc.Pages.Count; i++) {

                // Obtenir une page spécifique
                PdfPageBase page = doc.Pages[i];

                // Créer un objet PdfTextReplacer basé sur la page
                PdfTextReplacer textReplacer = new PdfTextReplacer(page);

                // Définir les options de remplacement
                textReplacer.Options = textReplaceOptions;

                // Remplacer toutes les occurrences du texte cible par le nouveau texte
                textReplacer.ReplaceAllText("artifical", "artificial");
                textReplacer.ReplaceAllText("Artifical", "Artificial");
            }

            // Enregistrer le document dans un autre fichier PDF
            doc.SaveToFile("Replaced.pdf");

            // Libérer les ressources
            doc.Dispose();
        }
    }
}
Sortie :
Remarque : Dans Spire.PDF, le remplacement de texte est sensible à la casse par défaut. Cela signifie que « artifical » et « Artifical » sont considérés comme des chaînes différentes.
C'est pourquoi l'exemple comprend deux instructions de remplacement :
textReplacer.ReplaceAllText("artifical", "artificial");
textReplacer.ReplaceAllText("Artifical", "Artificial");
Si votre document contient plusieurs styles de casse, assurez-vous de remplacer chaque variation séparément.
Fonctionnalités avancées pour les utilisateurs avancés
Spire.PDF offre plusieurs capacités avancées de recherche et de remplacement qui vont au-delà du simple « remplacer tout » :
- Remplacer le texte sur une page spécifique – Vous pouvez cibler une seule page au lieu de toutes les pages.
- Remplacer la première occurrence – Utile lorsque seule la première instance d'un mot doit être mise à jour.
- Rechercher et remplacer à l'aide d'expressions régulières (Regex) – Permet une correspondance et un remplacement de motifs complexes (par exemple, dates, adresses e-mail ou formats variables).
Vous pouvez implémenter ces fonctionnalités en ajustant les méthodes PdfTextReplacer ou ReplaceAllText dans votre code. Par exemple, vous pouvez parcourir uniquement la page souhaitée, ou utiliser des expressions régulières dans la chaîne de recherche pour faire correspondre des motifs plutôt que des mots exacts. Pour plus de cas d'utilisation, consultez Remplacer du texte dans un document PDF en utilisant C#.
Avantages
- Entièrement automatisé ; options de remplacement de texte flexibles.
- Préserve la police, la mise en page et la mise en forme.
- Peut être intégré dans des flux de travail de bureau ou de serveur pour des tâches répétées.
Inconvénients
En plus de remplacer du texte, vous pouvez également remplacer des images, des polices et d'autres éléments du document par programmation en utilisant Spire.PDF for .NET. Cela en fait une solution plus complète pour la modification de PDF au-delà des simples mises à jour de texte.
Conclusion
Remplacer du texte dans un PDF ne doit pas être difficile. Pour la plupart des utilisateurs, remplacer toutes les occurrences dans un seul PDF est suffisant et pratique. Selon vos besoins :
- Adobe Acrobat Pro – Idéal pour l'édition professionnelle sur ordinateur avec une mise en forme parfaite.
- PDF4me – Solution en ligne rapide et facile pour une utilisation occasionnelle.
- Spire.PDF for .NET – Idéal pour les développeurs ayant besoin de remplacements automatisés et précis.
En choisissant la méthode qui correspond à votre flux de travail, vous pouvez corriger les fautes de frappe, mettre à jour les termes ou corriger les erreurs efficacement sans modifier manuellement chaque instance.
FAQ
Q1 : Puis-je remplacer du texte dans un PDF numérisé ?
Non. Les PDF numérisés sont essentiellement des images. Pour remplacer du texte, vous devez d'abord effectuer une reconnaissance optique de caractères (OCR) pour convertir les images en texte modifiable.
Q2 : La mise en forme sera-t-elle rompue après le remplacement du texte ?
Cela dépend de la méthode. Adobe Acrobat Pro et Spire.PDF préservent les polices, la mise en page et l'alignement. Les outils en ligne peuvent légèrement affecter la mise en forme, en particulier dans les PDF complexes.
Q3 : Puis-je remplacer plusieurs mots différents en même temps ?
Oui. Dans Spire.PDF, vous pouvez ajouter plusieurs commandes ReplaceAllText pour différents termes. Dans Adobe Acrobat, vous devez répéter la recherche et le remplacement pour chaque terme.
Q4 : Ai-je besoin d'une licence payante pour remplacer du texte ?
Adobe Acrobat Pro est payant, et les fonctionnalités complètes de Spire.PDF peuvent nécessiter une licence commerciale. PDF4me propose des essais gratuits ou des remplacements limités, mais les modifications importantes peuvent nécessiter un abonnement.
Q5 : Puis-je annuler les remplacements si quelque chose tourne mal ?
Sauvegardez toujours une copie de votre PDF d'origine avant de remplacer du texte. Adobe Acrobat Pro dispose d'une fonction Annuler, mais les outils en ligne et les méthodes programmatiques nécessitent une sauvegarde pour restaurer le contenu d'origine.
Voir aussi
- Comment imprimer des PDF sous Windows : 5 méthodes simples et efficaces
- Copier du texte à partir de PDF sécurisés : 5 méthodes gratuites et faciles
- 5 méthodes efficaces pour convertir un PDF en noir et blanc
- Comment surligner du texte dans un PDF : 5 méthodes faciles
- Convertir un PDF en Excel gratuitement - Texte et PDF numérisés
Reemplazar texto en PDF por lotes: 3 métodos prácticos
Los PDF se utilizan ampliamente para informes, manuales y documentación. Editar texto en un PDF no es tan sencillo como en Word, y reemplazar manualmente cada ocurrencia de una palabra puede ser tedioso. Esta guía le mostrará tres formas prácticas de reemplazar texto en un solo PDF de manera eficiente, para que pueda corregir erratas, actualizar términos o corregir errores en todo el documento sin editar cada instancia manualmente.
Navegación Rápida:
- Método 1: Usando Adobe Acrobat Pro
- Método 2: Usando una herramienta en línea (PDF4me)
- Método 3: Usando una API .NET (Enfoque programático)
¿Por qué reemplazar texto en PDF?
Reemplazar texto en un PDF a menudo es necesario porque los PDF están diseñados para preservar el contenido y el diseño, lo que dificulta las ediciones manuales. Los escenarios comunes incluyen:
- Corregir erratas o errores: Incluso los PDF preparados profesionalmente pueden contener errores que deben corregirse.
- Actualizar información obsoleta: Es posible que sea necesario revisar nombres, fechas, detalles de la empresa o referencias de productos sin tener que recrear el documento completo.
- Estandarizar la terminología: Para lograr coherencia en informes o manuales, es posible que sea necesario actualizar términos específicos en todo el documento.
- Actualizaciones legales o de cumplimiento: Ciertos documentos pueden requerir cambios de texto para cumplir con los requisitos reglamentarios o contractuales.
- Mejorar la legibilidad: Reemplazar frases torpes, abreviaturas o términos técnicos puede hacer que los documentos sean más claros para los lectores.
Al reemplazar texto de manera eficiente, ahorra tiempo, mantiene un formato profesional y evita la molestia de recrear PDF desde cero.
Método 1: Usando Adobe Acrobat Pro
Adobe Acrobat Pro es una de las herramientas de edición de PDF más robustas y profesionales disponibles. Le permite reemplazar texto en todo un documento conservando el formato, el diseño y las fuentes originales. Esto es especialmente útil cuando se trabaja con PDF complejos que incluyen tablas, imágenes, encabezados o pies de página.
El software garantiza que el reemplazo no distorsione la alineación del texto ni la estructura de la página, lo que es un problema común con herramientas más simples. Adobe Acrobat Pro es ideal para usuarios de oficina o profesionales que necesitan una solución de escritorio confiable para una edición de texto precisa.
Instrucciones paso a paso
-
Abra su PDF en Adobe Acrobat Pro.
-
Vaya a Editar → Buscar / Reemplazar → Reemplazar texto.
-
Ingrese el texto que desea reemplazar en el campo Buscar.
-
Ingrese el nuevo texto en el campo Reemplazar con.
-
Configure la opción Distinguir mayúsculas y minúsculas según sus necesidades.
- Habilítela si solo desea reemplazar texto con la capitalización exacta.
- Desactívela si desea que Acrobat reemplace automáticamente todas las variaciones de capitalización.
-
Haga clic en Reemplazar hasta que se reemplace cada ocurrencia en el documento.
Nota: Preste mucha atención a la capitalización al reemplazar texto. Por ejemplo, "Artifical" y "artifical" pueden tratarse de manera diferente según si la coincidencia Distinguir mayúsculas y minúsculas está habilitada. La configuración incorrecta puede hacer que algunas ocurrencias se omitan o se reemplacen involuntariamente.
Ventajas
- Conserva el formato, las fuentes y el diseño.
- Sencillo y fiable para documentos individuales.
Desventajas
- Software de pago.
- Menos adecuado para flujos de trabajo completamente automatizados.
Método 2: Usando una herramienta en línea (PDF4me)
Las herramientas en línea como PDF4me son convenientes para los usuarios que necesitan una solución rápida sin instalar ningún software. Le permiten reemplazar todas las ocurrencias de una palabra o frase en un solo PDF directamente en su navegador. Este método es particularmente útil cuando trabaja en una computadora donde no puede instalar software, o cuando necesita una solución rápida para documentos pequeños o medianos.
Si bien las herramientas en línea son generalmente fáciles de usar, pueden tener limitaciones en el tamaño del archivo o en el número de reemplazos por sesión, y debe tener cuidado al cargar documentos confidenciales.
Instrucciones paso a paso
- Abra la Herramienta de Buscar y Reemplazar de PDF4me en su navegador.
- Cargue el PDF que desea editar.
- Ingrese el texto a buscar y el texto de reemplazo.
- Haga clic en Buscar y Reemplazar y descargue el PDF actualizado.
Ventajas
- No se necesita instalación; funciona en cualquier navegador.
- Rápido y fácil de usar para ediciones ocasionales.
Desventajas
- Puede tener límites de tamaño de archivo o de sesión.
- Menos adecuado para documentos confidenciales.
Método 3: Usando una API .NET (Enfoque programático)
Para desarrolladores o usuarios avanzados, Spire.PDF for .NET proporciona una solución programática para reemplazar texto en un PDF completo. A diferencia de los métodos manuales o en línea, este enfoque permite un control preciso sobre cada reemplazo y garantiza que se conserven todas las páginas, fuentes y diseños. Es particularmente beneficioso si necesita reemplazar varios términos a la vez o integrar el reemplazo de texto en un flujo de trabajo automatizado.
Instrucciones paso a paso
- Abra su entorno de desarrollo (Visual Studio, etc.).
- Instale y referencie Spire.PDF for .NET en su proyecto.
- Use el siguiente código C# para reemplazar todas las ocurrencias de una palabra:
PM> Install-Package Spire.PDF
using Spire.Pdf;
using Spire.Pdf.Texts;

namespace ReplaceInEntireDocument
{
    class Program
    {
        static void Main(string[] args)
        {
            // Cargar un archivo PDF
            PdfDocument doc = new PdfDocument();
            doc.LoadFromFile("Input.pdf");

            // Crear un objeto PdfTextReplaceOptions
            PdfTextReplaceOptions textReplaceOptions = new PdfTextReplaceOptions();

            // Especificar las opciones para el reemplazo de texto
            textReplaceOptions.ReplaceType = PdfTextReplaceOptions.ReplaceActionType.WholeWord | PdfTextReplaceOptions.ReplaceActionType.AutofitWidth;

            for (int i = 0; i < doc.Pages.Count; i++) {

                // Obtener una página específica
                PdfPageBase page = doc.Pages[i];

                // Crear un objeto PdfTextReplacer basado en la página
                PdfTextReplacer textReplacer = new PdfTextReplacer(page);

                // Establecer las opciones de reemplazo
                textReplacer.Options = textReplaceOptions;

                // Reemplazar todas las ocurrencias de texto de destino con texto nuevo
                textReplacer.ReplaceAllText("artifical", "artificial");
                textReplacer.ReplaceAllText("Artifical", "Artificial");
            }

            // Guardar el documento en un archivo PDF diferente
            doc.SaveToFile("Replaced.pdf");

            // Liberar recursos
            doc.Dispose();
        }
    }
}
Salida:
Nota: En Spire.PDF, el reemplazo de texto distingue entre mayúsculas y minúsculas por defecto. Esto significa que "artifical" y "Artifical" se consideran cadenas diferentes.
Por eso el ejemplo incluye dos declaraciones de reemplazo:
textReplacer.ReplaceAllText("artifical", "artificial");
textReplacer.ReplaceAllText("Artifical", "Artificial");
Si su documento contiene varios estilos de capitalización, asegúrese de reemplazar cada variación por separado.
Funciones avanzadas para usuarios avanzados
Spire.PDF ofrece varias capacidades avanzadas de búsqueda y reemplazo que van más allá del simple "reemplazar todo":
- Reemplazar texto en una página específica: Puede dirigirse solo a una página en lugar de a todas las páginas.
- Reemplazar la primera ocurrencia: Útil cuando solo se necesita actualizar la primera instancia de una palabra.
- Buscar y reemplazar usando Regex: Permite la coincidencia y el reemplazo de patrones complejos (por ejemplo, fechas, direcciones de correo electrónico o formatos variables).
Puede implementar estas funciones ajustando los métodos PdfTextReplacer o ReplaceAllText en su código. Por ejemplo, puede recorrer solo la página que desea, o usar Regex en la cadena de búsqueda para hacer coincidir patrones en lugar de palabras exactas. Para más casos de uso, consulte Reemplazar texto en un documento PDF usando C#.
Ventajas
- Totalmente automatizado; opciones flexibles de reemplazo de texto.
- Conserva la fuente, el diseño y el formato.
- Se puede integrar en flujos de trabajo de escritorio o de servidor para tareas repetidas.
Desventajas
- Requiere conocimientos de programación.
- Puede ser necesaria una licencia comercial para funciones completas.
Además de reemplazar texto, también puede reemplazar imágenes, fuentes y otros elementos del documento mediante programación utilizando Spire.PDF for .NET. Esto lo convierte en una solución más completa para la modificación de PDF más allá de las simples actualizaciones de texto.
Conclusión
Reemplazar texto en un PDF no tiene por qué ser difícil. Para la mayoría de los usuarios, reemplazar todas las ocurrencias en un solo PDF es suficiente y práctico. Dependiendo de sus necesidades:
- Adobe Acrobat Pro: Lo mejor para edición profesional de escritorio con formato perfecto.
- PDF4me: Solución en línea rápida y fácil para uso ocasional.
- Spire.PDF for .NET: Ideal para desarrolladores que necesitan reemplazos automatizados y precisos.
Al elegir el método que se adapta a su flujo de trabajo, puede corregir erratas, actualizar términos o corregir errores de manera eficiente sin editar manualmente cada instancia.
Preguntas Frecuentes
P1: ¿Puedo reemplazar texto en un PDF escaneado?
No. Los PDF escaneados son esencialmente imágenes. Para reemplazar texto, primero debe realizar OCR (Reconocimiento Óptico de Caracteres) para convertir las imágenes en texto editable.
P2: ¿Se romperá el formato después de reemplazar el texto?
Depende del método. Adobe Acrobat Pro y Spire.PDF conservan las fuentes, el diseño y la alineación. Las herramientas en línea pueden afectar ligeramente el formato, especialmente en PDF complejos.
P3: ¿Puedo reemplazar varias palabras diferentes al mismo tiempo?
Sí. En Spire.PDF, puede agregar varios comandos ReplaceAllText para diferentes términos. En Adobe Acrobat, necesita repetir Buscar y Reemplazar para cada término.
P4: ¿Necesito una licencia de pago para reemplazar texto?
Adobe Acrobat Pro es de pago, y las funciones completas de Spire.PDF pueden requerir una licencia comercial. PDF4me ofrece pruebas gratuitas o reemplazos limitados, pero las ediciones grandes pueden requerir una suscripción.
P5: ¿Puedo deshacer los reemplazos si algo sale mal?
Siempre guarde una copia de seguridad de su PDF original antes de reemplazar texto. Adobe Acrobat Pro tiene una función de Deshacer, pero las herramientas en línea y los métodos programáticos requieren una copia de seguridad para restaurar el contenido original.
Ver también
Text in PDF massenhaft ersetzen: 3 praktische Methoden
PDFs werden häufig für Berichte, Handbücher und Dokumentationen verwendet. Das Bearbeiten von Text in einem PDF ist nicht so einfach wie in Word, und das manuelle Ersetzen jedes Vorkommens eines Wortes kann mühsam sein. Diese Anleitung zeigt Ihnen drei praktische Möglichkeiten, Text in einem einzelnen PDF effizient zu ersetzen, damit Sie Tippfehler korrigieren, Begriffe aktualisieren oder Fehler im gesamten Dokument beheben können, ohne jede Instanz manuell zu bearbeiten.
Schnellnavigation:
- Methode 1: Verwendung von Adobe Acrobat Pro
- Methode 2: Verwendung eines Online-Tools (PDF4me)
- Methode 3: Verwendung einer .NET API (Programmatischer Ansatz)
Warum Text in PDF ersetzen?
Das Ersetzen von Text in einem PDF ist oft notwendig, da PDFs dazu dienen, Inhalt und Layout zu erhalten, was manuelle Bearbeitungen erschwert. Häufige Szenarien sind:
- Korrektur von Tippfehlern oder Fehlern – Selbst professionell erstellte PDFs können Fehler enthalten, die behoben werden müssen.
- Aktualisierung veralteter Informationen – Namen, Daten, Unternehmensdetails oder Produktreferenzen müssen möglicherweise überarbeitet werden, ohne das gesamte Dokument neu zu erstellen.
- Standardisierung der Terminologie – Für Konsistenz in Berichten oder Handbüchern müssen bestimmte Begriffe im gesamten Dokument aktualisiert werden.
- Rechtliche oder Compliance-Aktualisierungen – Bestimmte Dokumente erfordern Textänderungen, um regulatorische oder vertragliche Anforderungen zu erfüllen.
- Verbesserung der Lesbarkeit – Das Ersetzen von umständlichen Formulierungen, Abkürzungen oder Fachbegriffen kann Dokumente für die Leser verständlicher machen.
Durch effizientes Ersetzen von Text sparen Sie Zeit, erhalten ein professionelles Format und vermeiden den Aufwand, PDFs von Grund auf neu zu erstellen.
Methode 1: Verwendung von Adobe Acrobat Pro
Adobe Acrobat Pro ist eines der robustesten und professionellsten Werkzeuge zur PDF-Bearbeitung. Es ermöglicht Ihnen, Text im gesamten Dokument zu ersetzen und dabei das ursprüngliche Format, Layout und die Schriftarten beizubehalten. Dies ist besonders nützlich, wenn Sie mit komplexen PDFs arbeiten, die Tabellen, Bilder, Kopf- oder Fußzeilen enthalten.
Die Software stellt sicher, dass die Ersetzung die Textausrichtung oder Seitenstruktur nicht verzerrt, was bei einfacheren Werkzeugen ein häufiges Problem ist. Adobe Acrobat Pro ist ideal für Büroanwender oder Fachleute, die eine zuverlässige Desktop-Lösung für präzise Textbearbeitung benötigen.
Schritt-für-Schritt-Anleitung
-
Öffnen Sie Ihr PDF in Adobe Acrobat Pro.
-
Gehen Sie zu Bearbeiten → Suchen / Ersetzen → Text ersetzen.
-
Geben Sie den zu ersetzenden Text in das Feld Suchen ein.
-
Geben Sie den neuen Text in das Feld Ersetzen durch ein.
-
Konfigurieren Sie die Option Groß-/Kleinschreibung beachten nach Ihren Bedürfnissen.
- Aktivieren Sie sie, wenn Sie nur Text mit exakter Groß-/Kleinschreibung ersetzen möchten.
- Deaktivieren Sie sie, wenn Acrobat alle Varianten der Groß-/Kleinschreibung automatisch ersetzen soll.
-
Klicken Sie auf Ersetzen, bis jede Instanz im Dokument ersetzt wurde.
Hinweis: Achten Sie bei der Textersetzung genau auf die Groß-/Kleinschreibung. Zum Beispiel können "Artifical" und "artifical" unterschiedlich behandelt werden, je nachdem, ob die Option Groß-/Kleinschreibung beachten aktiviert ist. Falsche Einstellungen können dazu führen, dass einige Vorkommen übersprungen oder unbeabsichtigt ersetzt werden.
Vorteile
- Behält Formatierung, Schriftarten und Layout bei.
- Einfach und zuverlässig für einzelne Dokumente.
Nachteile
- Kostenpflichtige Software.
- Weniger geeignet für vollständig automatisierte Arbeitsabläufe.
Methode 2: Verwendung eines Online-Tools (PDF4me)
Online-Tools wie PDF4me sind praktisch für Benutzer, die eine schnelle Lösung ohne Installation von Software benötigen. Sie ermöglichen es Ihnen, alle Vorkommen eines Wortes oder einer Phrase in einem einzelnen PDF direkt in Ihrem Browser zu ersetzen. Diese Methode ist besonders nützlich, wenn Sie an einem Computer arbeiten, auf dem Sie keine Software installieren können, oder wenn Sie eine schnelle Korrektur für kleine bis mittelgroße Dokumente benötigen.
Obwohl Online-Tools im Allgemeinen einfach zu bedienen sind, können sie Einschränkungen hinsichtlich der Dateigröße oder der Anzahl der Ersetzungen pro Sitzung haben, und Sie sollten vorsichtig sein, wenn Sie sensible Dokumente hochladen.
Schritt-für-Schritt-Anleitung
- Öffnen Sie das Find and Replace Tool von PDF4me in Ihrem Browser.
- Laden Sie das zu bearbeitende PDF hoch.
- Geben Sie den zu suchenden Text und den Ersatztext ein.
- Klicken Sie auf Find and Replace und laden Sie das aktualisierte PDF herunter.
Vorteile
- Keine Installation erforderlich; funktioniert in jedem Browser.
- Schnell und benutzerfreundlich für gelegentliche Bearbeitungen.
Nachteile
- Kann Einschränkungen bei Dateigröße oder Sitzungen haben.
- Weniger geeignet für vertrauliche Dokumente.
Methode 3: Verwendung einer .NET API (Programmatischer Ansatz)
Für Entwickler oder Power-User bietet Spire.PDF for .NET eine programmatische Lösung zum Ersetzen von Text in einem gesamten PDF. Im Gegensatz zu manuellen oder Online-Methoden ermöglicht dieser Ansatz eine präzise Kontrolle über jede Ersetzung und stellt sicher, dass alle Seiten, Schriftarten und Layouts erhalten bleiben. Dies ist besonders vorteilhaft, wenn Sie mehrere Begriffe gleichzeitig ersetzen oder die Textersetzung in einen automatisierten Workflow integrieren müssen.
Schritt-für-Schritt-Anleitung
- Öffnen Sie Ihre Entwicklungsumgebung (Visual Studio usw.).
- Installieren und referenzieren Sie Spire.PDF for .NET in Ihrem Projekt.
- Verwenden Sie den folgenden C#-Code, um alle Vorkommen eines Wortes zu ersetzen:
PM> Install-Package Spire.PDF
using Spire.Pdf;
using Spire.Pdf.Texts;

namespace ReplaceInEntireDocument
{
    class Program
    {
        static void Main(string[] args)
        {
            // Ein PDF-Dokument laden
            PdfDocument doc = new PdfDocument();
            doc.LoadFromFile("Input.pdf");

            // Ein PdfTextReplaceOptions-Objekt erstellen
            PdfTextReplaceOptions textReplaceOptions = new PdfTextReplaceOptions();

            // Optionen für die Textersetzung festlegen
            textReplaceOptions.ReplaceType = PdfTextReplaceOptions.ReplaceActionType.WholeWord | PdfTextReplaceOptions.ReplaceActionType.AutofitWidth;

            for (int i = 0; i < doc.Pages.Count; i++) {

                // Eine bestimmte Seite abrufen
                PdfPageBase page = doc.Pages[i];

                // Ein PdfTextReplacer-Objekt basierend auf der Seite erstellen
                PdfTextReplacer textReplacer = new PdfTextReplacer(page);

                // Die Ersetzungsoptionen festlegen
                textReplacer.Options = textReplaceOptions;

                // Alle Vorkommen des Zieltextes durch neuen Text ersetzen
                textReplacer.ReplaceAllText("artifical", "artificial");
                textReplacer.ReplaceAllText("Artifical", "Artificial");
            }

            // Das Dokument in einer anderen PDF-Datei speichern
            doc.SaveToFile("Replaced.pdf");

            // Ressourcen freigeben
            doc.Dispose();
        }
    }
}
Ausgabe:
Hinweis: In Spire.PDF ist die Textersetzung standardmäßig Groß-/Kleinschreibung-sensitiv. Das bedeutet, dass "artifical" und "Artifical" als unterschiedliche Zeichenfolgen betrachtet werden.
Deshalb enthält das Beispiel zwei Ersetzungsanweisungen:
textReplacer.ReplaceAllText("artifical", "artificial");
textReplacer.ReplaceAllText("Artifical", "Artificial");
Wenn Ihr Dokument mehrere Groß-/Kleinschreibungsstile enthält, stellen Sie sicher, dass Sie jede Variante separat ersetzen.
Erweiterte Funktionen für Power-User
Spire.PDF bietet mehrere erweiterte Such- und Ersetzungsfunktionen, die über ein einfaches „Alle ersetzen“ hinausgehen:
- Text auf einer bestimmten Seite ersetzen – Sie können nur eine Seite anstelle aller Seiten anvisieren.
- Erstes Vorkommen ersetzen – Nützlich, wenn nur die erste Instanz eines Wortes aktualisiert werden muss.
- Suchen und Ersetzen mit Regex – Ermöglicht komplexe Mustererkennung und -ersetzung (z. B. Daten, E-Mail-Adressen oder variable Formate).
Sie können diese Funktionen implementieren, indem Sie die Methoden PdfTextReplacer oder ReplaceAllText in Ihrem Code anpassen. Zum Beispiel können Sie nur durch die gewünschte Seite iterieren oder Regex in der Suchzeichenfolge verwenden, um Muster anstelle von exakten Wörtern abzugleichen. Weitere Anwendungsfälle finden Sie unter Text in einem PDF-Dokument mit C# ersetzen.
Vorteile
- Vollständig automatisiert; flexible Optionen für die Textersetzung.
- Behält Schriftart, Layout und Formatierung bei.
- Kann in Desktop- oder Server-Workflows für wiederholte Aufgaben integriert werden.
Nachteile
Zusätzlich zum Ersetzen von Text können Sie mit Spire.PDF for .NET auch Bilder, Schriftarten und andere Dokumentelemente programmatisch ersetzen. Dies macht es zu einer umfassenderen Lösung für die PDF-Modifikation über einfache Textaktualisierungen hinaus.
Fazit
Das Ersetzen von Text in einem PDF muss nicht schwierig sein. Für die meisten Benutzer ist das Ersetzen aller Vorkommen in einem einzelnen PDF ausreichend und praktikabel. Je nach Ihren Bedürfnissen:
- Adobe Acrobat Pro – Am besten für professionelle Desktop-Bearbeitung mit perfekter Formatierung.
- PDF4me – Schnelle und einfache Online-Lösung für gelegentliche Nutzung.
- Spire.PDF for .NET – Ideal für Entwickler, die automatisierte, präzise Ersetzungen benötigen.
Durch die Wahl der Methode, die zu Ihrem Workflow passt, können Sie Tippfehler korrigieren, Begriffe aktualisieren oder Fehler effizient beheben, ohne jede Instanz manuell zu bearbeiten.
FAQs
F1: Kann ich Text in einem gescannten PDF ersetzen?
Nein. Gescannte PDFs sind im Wesentlichen Bilder. Um Text zu ersetzen, müssen Sie zuerst eine OCR (Optical Character Recognition) durchführen, um die Bilder in bearbeitbaren Text umzuwandeln.
F2: Wird die Formatierung nach dem Ersetzen von Text unterbrochen?
Das hängt von der Methode ab. Adobe Acrobat Pro und Spire.PDF erhalten Schriftarten, Layout und Ausrichtung. Online-Tools können die Formatierung leicht beeinträchtigen, insbesondere bei komplexen PDFs.
F3: Kann ich mehrere verschiedene Wörter gleichzeitig ersetzen?
Ja. In Spire.PDF können Sie mehrere ReplaceAllText-Befehle für verschiedene Begriffe hinzufügen. In Adobe Acrobat müssen Sie Suchen & Ersetzen für jeden Begriff wiederholen.
F4: Benötige ich eine kostenpflichtige Lizenz, um Text zu ersetzen?
Adobe Acrobat Pro ist kostenpflichtig, und die vollen Funktionen von Spire.PDF erfordern möglicherweise eine kommerzielle Lizenz. PDF4me bietet kostenlose Testversionen oder begrenzte Ersetzungen, aber große Bearbeitungen erfordern möglicherweise ein Abonnement.
F5: Kann ich Ersetzungen rückgängig machen, wenn etwas schief geht?
Speichern Sie immer ein Backup Ihres Original-PDFs, bevor Sie Text ersetzen. Adobe Acrobat Pro verfügt über eine Rückgängig machen-Funktion, aber Online-Tools und programmatische Methoden erfordern ein Backup, um den ursprünglichen Inhalt wiederherzustellen.
Siehe auch
- So drucken Sie PDFs unter Windows: 5 einfache und effektive Wege
- Text aus gesicherten PDFs kopieren: 5 kostenlose und einfache Wege
- 5 effiziente Wege, PDF in Schwarzweiß umzuwandeln
- So heben Sie Text in einem PDF hervor: 5 einfache Methoden
- PDF kostenlos in Excel konvertieren – Text & gescannte PDFs
Массовая замена текста в PDF: 3 практических метода
PDF-файлы широко используются для отчетов, руководств и документации. Редактирование текста в PDF не так просто, как в Word, и ручная замена каждого вхождения слова может быть утомительной. Это руководство покажет вам три практических способа эффективно заменить текст в одном PDF-файле, чтобы вы могли исправлять опечатки, обновлять термины или исправлять ошибки во всем документе без ручного редактирования каждого экземпляра.
Быстрая навигация:
- Способ 1: Использование Adobe Acrobat Pro
- Способ 2: Использование онлайн-инструмента (PDF4me)
- Способ 3: Использование .NET API (программный подход)
Зачем заменять текст в PDF?
Замена текста в PDF часто необходима, поскольку PDF-файлы предназначены для сохранения содержимого и макета, что затрудняет ручное редактирование. Распространенные сценарии включают:
- Исправление опечаток или ошибок – Даже профессионально подготовленные PDF-файлы могут содержать ошибки, которые необходимо исправить.
- Обновление устаревшей информации – Имена, даты, сведения о компании или ссылки на продукты могут потребовать пересмотра без пересоздания всего документа.
- Стандартизация терминологии – Для единообразия в отчетах или руководствах определенные термины могут потребовать обновления во всем документе.
- Юридические или нормативные обновления – Некоторые документы могут потребовать внесения текстовых изменений для соответствия нормативным или договорным требованиям.
- Улучшение читаемости – Замена неуклюжих формулировок, сокращений или технических терминов может сделать документы более понятными для читателей.
Эффективно заменяя текст, вы экономите время, сохраняете профессиональное форматирование и избегаете хлопот с пересозданием PDF-файлов с нуля.
Способ 1: Использование Adobe Acrobat Pro
Adobe Acrobat Pro — один из самых надежных и профессиональных инструментов для редактирования PDF. Он позволяет заменять текст во всем документе, сохраняя исходное форматирование, макет и шрифты. Это особенно полезно при работе со сложными PDF-файлами, содержащими таблицы, изображения, колонтитулы или верхние/нижние колонтитулы.
Программное обеспечение гарантирует, что замена не исказит выравнивание текста или структуру страницы, что является распространенной проблемой с более простыми инструментами. Adobe Acrobat Pro идеально подходит для офисных пользователей или профессионалов, которым требуется надежное настольное решение для точного редактирования текста.
Пошаговая инструкция
-
Откройте ваш PDF-файл в Adobe Acrobat Pro.
-
Перейдите в Редактировать → Найти / Заменить → Заменить текст .
-
Введите текст, который вы хотите заменить, в поле Найти.
-
Введите новый текст в поле Заменить на.
-
Настройте параметр С учетом регистра в соответствии с вашими потребностями.
- Включите его, если вы хотите заменять текст только с точным совпадением регистра.
- Отключите его, если вы хотите, чтобы Acrobat автоматически заменял все варианты регистра.
-
Нажмите Заменить, пока не будут заменены все вхождения в документе.
Примечание: Обращайте особое внимание на регистр при замене текста. Например, «Artifical» и «artifical» могут обрабатываться по-разному в зависимости от того, включено ли сопоставление С учетом регистра. Неправильные настройки могут привести к пропуску некоторых вхождений или их непреднамеренной замене.
Преимущества
- Сохраняет форматирование, шрифты и макет.
- Простое и надежное решение для отдельных документов.
Недостатки
- Платное программное обеспечение.
- Менее подходит для полностью автоматизированных рабочих процессов.
Способ 2: Использование онлайн-инструмента (PDF4me)
Онлайн-инструменты, такие как PDF4me, удобны для пользователей, которым требуется быстрое решение без установки какого-либо программного обеспечения. Они позволяют заменить все вхождения слова или фразы в одном PDF-файле непосредственно в вашем браузере. Этот метод особенно полезен, когда вы работаете на компьютере, где вы не можете установить программное обеспечение, или когда вам требуется быстрое исправление для небольших и средних документов.
Хотя онлайн-инструменты, как правило, просты в использовании, они могут иметь ограничения по размеру файла или количеству замен за сеанс, и вам следует проявлять осторожность при загрузке конфиденциальных документов.
Пошаговая инструкция
- Откройте инструмент поиска и замены PDF4me в вашем браузере.
- Загрузите PDF-файл, который вы хотите отредактировать.
- Введите текст для поиска и текст для замены.
- Нажмите Найти и заменить и скачайте обновленный PDF-файл.
Преимущества
- Не требуется установка; работает в любом браузере.
- Быстрое и удобное решение для периодического редактирования.
Недостатки
- Могут быть ограничения по размеру файла или количеству сеансов.
- Менее подходит для конфиденциальных документов.
Способ 3: Использование .NET API (программный подход)
Для разработчиков или опытных пользователей Spire.PDF for .NET предоставляет программное решение для замены текста во всем PDF-файле. В отличие от ручных или онлайн-методов, этот подход обеспечивает точный контроль над каждой заменой и гарантирует сохранение всех страниц, шрифтов и макетов. Это особенно полезно, если вам нужно заменить несколько терминов одновременно или интегрировать замену текста в автоматизированный рабочий процесс.
Пошаговая инструкция
- Откройте вашу среду разработки (Visual Studio и т. д.).
- Установите и добавьте ссылку на Spire.PDF for .NET в ваш проект.
- Используйте следующий код C#, чтобы заменить все вхождения слова:
PM> Install-Package Spire.PDF
using Spire.Pdf;
using Spire.Pdf.Texts;

namespace ReplaceInEntireDocument
{
    class Program
    {
        static void Main(string[] args)
        {
            // Загрузить PDF-файл
            PdfDocument doc = new PdfDocument();
            doc.LoadFromFile("Input.pdf");

            // Создать объект PdfTextReplaceOptions
            PdfTextReplaceOptions textReplaceOptions = new PdfTextReplaceOptions();

            // Указать параметры замены текста
            textReplaceOptions.ReplaceType = PdfTextReplaceOptions.ReplaceActionType.WholeWord | PdfTextReplaceOptions.ReplaceActionType.AutofitWidth;

            for (int i = 0; i < doc.Pages.Count; i++) {

                // Получить конкретную страницу
                PdfPageBase page = doc.Pages[i];

                // Создать объект PdfTextReplacer на основе страницы
                PdfTextReplacer textReplacer = new PdfTextReplacer(page);

                // Установить параметры замены
                textReplacer.Options = textReplaceOptions;

                // Заменить все вхождения целевого текста новым текстом
                textReplacer.ReplaceAllText("artifical", "artificial");
                textReplacer.ReplaceAllText("Artifical", "Artificial");
            }

            // Сохранить документ в другой PDF-файл
            doc.SaveToFile("Replaced.pdf");

            // Освободить ресурсы
            doc.Dispose();
        }
    }
}
Вывод:
Примечание: В Spire.PDF замена текста по умолчанию чувствительна к регистру. Это означает, что «artifical» и «Artifical» считаются разными строками.
Вот почему пример включает два оператора замены:
textReplacer.ReplaceAllText("artifical", "artificial");
textReplacer.ReplaceAllText("Artifical", "Artificial");
Если ваш документ содержит несколько стилей регистра, убедитесь, что вы заменяете каждый вариант отдельно.
Расширенные функции для опытных пользователей
Spire.PDF предлагает несколько расширенных возможностей поиска и замены, выходящих за рамки простой замены «всех»:
- Заменить текст на конкретной странице – Вы можете нацелиться только на одну страницу вместо всех страниц.
- Заменить первое вхождение – Полезно, когда нужно обновить только первое вхождение слова.
- Найти и заменить с использованием регулярных выражений – Позволяет выполнять сложное сопоставление с образцом и замену (например, даты, адреса электронной почты или переменные форматы).
Вы можете реализовать эти функции, настроив методы PdfTextReplacer или ReplaceAllText в вашем коде. Например, вы можете перебрать только нужную страницу или использовать регулярные выражения в строке поиска для сопоставления шаблонов, а не точных слов. Для получения дополнительных сценариев использования обратитесь к Замена текста в документе PDF с использованием C#.
Преимущества
- Полностью автоматизированный; гибкие параметры замены текста.
- Сохраняет шрифт, макет и форматирование.
- Может быть интегрирован в настольные или серверные рабочие процессы для повторяющихся задач.
Недостатки
- Требует знаний программирования.
- Для полных функций может потребоваться коммерческая лицензия.
Помимо замены текста, вы также можете заменять изображения, шрифты и другие элементы документа программно с помощью Spire.PDF for .NET. Это делает его более комплексным решением для модификации PDF, выходящим за рамки простых текстовых обновлений.
Заключение
Замена текста в PDF не обязательно должна быть сложной. Для большинства пользователей замена всех вхождений в одном PDF-файле достаточна и практична. В зависимости от ваших потребностей:
- Adobe Acrobat Pro – Лучше всего подходит для профессионального настольного редактирования с идеальным форматированием.
- PDF4me – Быстрое и простое онлайн-решение для периодического использования.
- Spire.PDF for .NET – Идеально подходит для разработчиков, которым нужны автоматизированные, точные замены.
Выбрав метод, соответствующий вашему рабочему процессу, вы сможете эффективно исправлять опечатки, обновлять термины или исправлять ошибки без ручного редактирования каждого экземпляра.
Часто задаваемые вопросы
В1: Могу ли я заменить текст в отсканированном PDF?
Нет. Отсканированные PDF-файлы по сути являются изображениями. Чтобы заменить текст, вам сначала необходимо выполнить OCR (оптическое распознавание символов), чтобы преобразовать изображения в редактируемый текст.
В2: Форматирование сломается после замены текста?
Это зависит от метода. Adobe Acrobat Pro и Spire.PDF сохраняют шрифты, макет и выравнивание. Онлайн-инструменты могут незначительно повлиять на форматирование, особенно в сложных PDF-файлах.
В3: Могу ли я заменить несколько разных слов одновременно?
Да. В Spire.PDF вы можете добавить несколько команд ReplaceAllText для разных терминов. В Adobe Acrobat вам нужно повторить поиск и замену для каждого термина.
В4: Нужна ли мне платная лицензия для замены текста?
Adobe Acrobat Pro является платным, а для полных функций Spire.PDF может потребоваться коммерческая лицензия. PDF4me предлагает бесплатные пробные версии или ограниченные замены, но большие правки могут потребовать подписки.
В5: Могу ли я отменить замены, если что-то пойдет не так?
Всегда сохраняйте резервную копию исходного PDF-файла перед заменой текста. Adobe Acrobat Pro имеет функцию Отменить, но онлайн-инструменты и программные методы требуют резервной копии для восстановления исходного содержимого.
См. также
- Как печатать PDF в Windows: 5 простых и эффективных способов
- Копирование текста из защищенных PDF: 5 бесплатных и простых способов
- 5 эффективных способов преобразования PDF в черно-белый формат
- Как выделять текст в PDF: 5 простых методов
- Бесплатное преобразование PDF в Excel – текст и отсканированные PDF
Como alterar as permissões de PDF? 4 métodos seguros
Sumário
- Quais permissões de PDF você pode alterar?
- Método 1: Editar permissões de PDF com Adobe Acrobat Pro
- Método 2: Alterar permissões de PDF usando LibreOffice Draw
- Método 3: Modificadores de permissão de PDF online
- Método 4: Alterar permissões programaticamente em C#
- Lista de verificação final antes de alterar as permissões
- Perguntas frequentes (FAQs)
Você está se perguntando como alterar permissões de PDF para restringir a edição, desabilitar a cópia, bloquear a impressão ou desbloquear arquivos PDF restritos? PDFs são universalmente usados para documentos profissionais, contratos, currículos e arquivos oficiais devido à sua formatação fixa e recursos de compartilhamento seguro. No entanto, as configurações de permissão de PDF padrão geralmente não atendem às suas necessidades exclusivas de compartilhamento e segurança.
Neste guia, cobriremos métodos fáceis e acionáveis para editar permissões de PDF usando software profissional, ferramentas de desktop gratuitas, plataformas online confiáveis e até mesmo abordagens programáticas para desenvolvedores.
- Quais permissões de PDF você pode alterar?
- Método 1: Editar permissões de PDF com Adobe Acrobat Pro
- Método 2: Alterar permissões de PDF usando LibreOffice Draw
- Método 3: Modificadores de permissão de PDF online
- Método 4: Alterar permissões programaticamente em C#
- Lista de verificação final antes de alterar as permissões
- Perguntas frequentes (FAQs)
Quais permissões de PDF você pode alterar?
As permissões de PDF (também chamadas de "configurações de restrição" ou "flags de segurança") controlam as ações principais do usuário. Você pode alternar essas configurações conforme necessário:
| Permissão | O que controla |
|---|---|
| Impressão | Se os usuários podem imprimir – Baixa resolução ou Alta resolução |
| Cópia de conteúdo | Capacidade de copiar texto ou imagens para a área de transferência |
| Montagem de documentos | Inserir, excluir ou girar páginas |
| Comentários | Adicionar notas, destaques ou comentários adesivos |
| Preenchimento de formulários | Trabalhar com campos de formulário preenchíveis |
| Extração de conteúdo | Ferramentas de acessibilidade e leitores de tela |
| Modificação | Editar texto, imagens ou objetos |
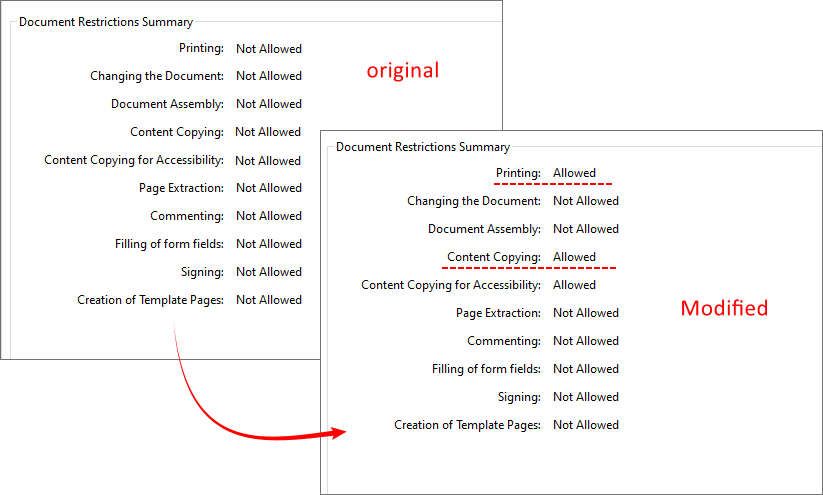
Ao alterar permissões, você está atualizando essas flags – por exemplo, mudando de "impressão não permitida" para "impressão em alta resolução permitida", ou habilitando comentários que foram anteriormente desabilitados.
Nota Crítica: Não existe "porta dos fundos" de segurança. Você não pode alterar legalmente as permissões sem a senha do proprietário ou o consentimento do autor.
Método 1: Editar permissões de PDF com Adobe Acrobat Pro
O Adobe Acrobat é a ferramenta oficial para modificar configurações de segurança de PDF, oferecendo controle total sobre todas as opções de permissão de PDF. É ideal para usuários profissionais que precisam de personalização precisa de segurança.
Etapas para alterar as permissões de arquivo PDF:
- Abra o arquivo PDF alvo no Adobe Acrobat Pro.
- Vá para Arquivo > Propriedades (atalho: Ctrl+D).
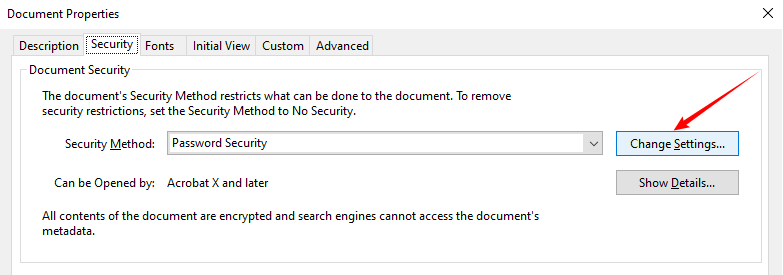
- Navegue até a guia Segurança – é aqui que todas as configurações de permissão são exibidas.
- Clique em Alterar Configurações para modificar as configurações de permissão existentes. Se o arquivo estiver bloqueado, insira a senha de permissão para desbloquear as configurações editáveis.
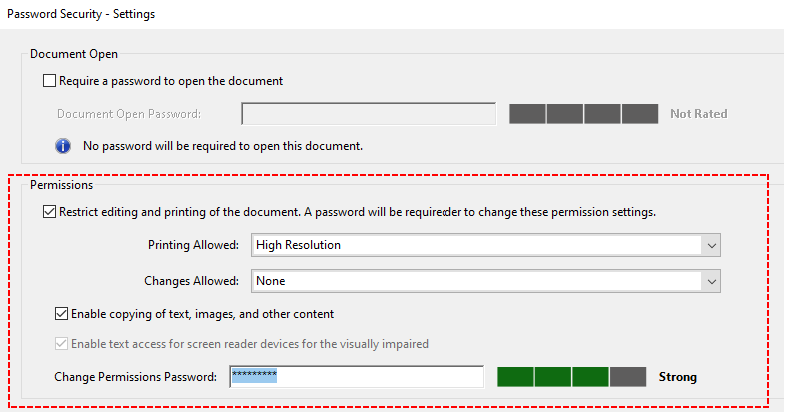
- Na janela "Segurança por senha – Configurações", personalize as permissões marcando ou desmarcando ações como:
- Definir impressão permitida (Nenhuma/Baixa/Alta Resolução)
- Definir alterações permitidas (Comentários/Preenchimento de formulários/Nenhuma)
- Alternar cópia de conteúdo e acesso de acessibilidade
- Defina uma nova senha de permissão, confirme as configurações e salve o arquivo PDF modificado para aplicar todas as alterações.
Nota: O Adobe Acrobat requer uma assinatura paga.
✅ Exemplos Práticos:
- Use "Alterações Permitidas: Nenhuma" para contratos finais somente leitura.
- Use "Alterações Permitidas: Comentários" para revisões em equipe.
Além de ajustar configurações específicas de permissão de PDF, as mesmas ferramentas também permitem remover permissões de PDF inteiramente para remover todas as restrições de uma vez.
Método 2: Alterar permissões de PDF usando LibreOffice Draw
Não tem Adobe? Sem problemas. Você pode usar o LibreOffice Draw para modificar permissões de PDF. Esta ferramenta pode abrir e editar PDFs, e depois reexportá-los com novas configurações de permissão. Funciona offline, respeita sua privacidade e não custa nada.
Etapas para usar o LibreOffice Draw:
- Baixe e instale em libreoffice.org. Escolha a versão para o seu sistema operacional (Windows, Mac, Linux).
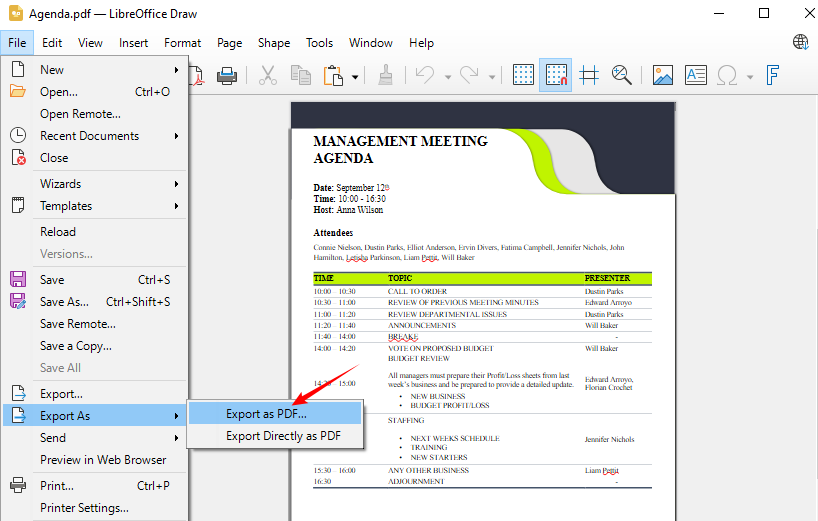
- Inicie o LibreOffice Draw e abra seu PDF nele.
- Vá para Arquivo > Exportar Como > Exportar como PDF.
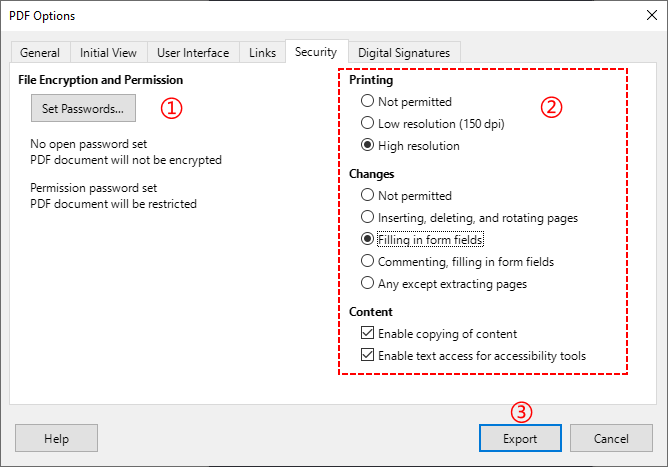
- Navegue até a guia Segurança na caixa de diálogo Opções de PDF.
- Defina uma nova senha de proprietário (necessária para alterar permissões).
- Ajuste as caixas de seleção de permissão conforme desejar. Por exemplo:
- Habilitar impressão em alta resolução
- Habilitar preenchimento de formulários (crie campos de formulário interativos em PDF primeiro)
- Habilitar cópia de conteúdo
- Habilitar texto/acesso para leitores de tela
- Clique em Exportar e salve o novo PDF.
⚠️ Aviso: Este método reescreve o PDF. Algumas formatações complexas (fontes, camadas) podem mudar. Teste com uma cópia primeiro.
Método 3: Modificadores de permissão de PDF online
Se você raramente ajusta permissões de PDF e se recusa a instalar software de desktop, ferramentas de PDF online seguras oferecem uma solução rápida e temporária. Ferramentas como SwiftPDFLab e pdfup.org suportam edição de permissão de PDF baseada em navegador.
Fluxo de trabalho geral para alterar permissões de PDF online:
- Abra um editor de permissão de PDF online confiável em seu navegador (por exemplo, Ferramenta de Alteração de Permissões do SwiftPDFLab).
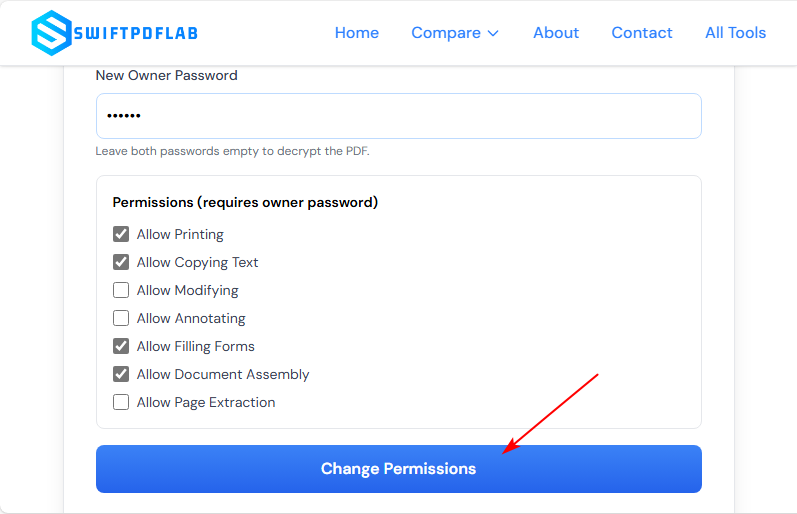
- Faça o upload do seu arquivo PDF para a plataforma online.
- Personalize as restrições de impressão, edição e cópia de acordo com seus requisitos.
- Defina uma nova senha de proprietário e clique em Alterar Permissões para aplicar as novas configurações.
- O arquivo PDF modificado será baixado automaticamente.
Melhor prática de segurança: Use uma ferramenta que exclua uploads automaticamente. Nunca faça upload de PDFs altamente confidenciais, privados ou sensíveis para negócios. Ferramentas online são recomendadas apenas para documentos públicos não sensíveis.
Método 4: Alterar permissões programaticamente em C#
Para desenvolvedores, equipes de TI ou usuários que precisam de automação de PDF em lote, você pode alterar permissões de PDF programaticamente com C# usando o Free Spire.PDF for .NET — uma biblioteca .NET gratuita e offline que lida com senhas de permissão e senhas de abertura, dando a você controle total do ciclo de vida da segurança de PDF.
Exemplo de Código C# (Habilitar Cópia e Impressão)
O seguinte código C# carrega um PDF, cria uma nova política de segurança, define várias permissões e salva o PDF com as novas permissões.
using Spire.Pdf;

namespace ChangeSecurityPermission
{
    class Program
    {
        static void Main(string[] args)
        {
            // 1. Criar um objeto PdfDocument
            PdfDocument pdf = new PdfDocument();

            // 2. Carregar o arquivo PDF restrito com senha do proprietário (se houver)
            pdf.LoadFromFile("Agenda.pdf", "12345");

            // 3. Especificar senha de abertura (deixe em branco se não for necessária)
            string openPsd = string.Empty;

            // 4. Especificar uma nova senha de proprietário
            string permissionPsd = "abc123";

            // 5. Criar uma política de segurança usando novas senhas de abertura e proprietário
            PdfSecurityPolicy securityPolicy = new PdfPasswordSecurityPolicy(openPsd, permissionPsd);

            // 6. Definir algoritmo de criptografia (AES 128 bits é moderno e seguro)
            securityPolicy.EncryptionAlgorithm = PdfEncryptionAlgorithm.AES_128;

            // 7. Definir as novas permissões que você deseja permitir
            securityPolicy.DocumentPrivilege.AllowContentCopying = true; // Permitir cópia de conteúdo
            securityPolicy.DocumentPrivilege.AllowPrint = true; // Permitir impressão

            // 8. Aplicar a nova política de segurança ao documento
            pdf.Encrypt(securityPolicy);

            // 9. Salvar o PDF atualizado em um novo arquivo
            pdf.SaveToFile("ChangePermissions.pdf");
            pdf.Close();
        }
    }
}
O objeto PdfDocumentPrivilege, recuperado via PdfSecurityPolicy.DocumentPrivilege, é uma classe granular de controle de permissão que define exatamente o que os usuários podem e não podem fazer com o PDF (as "regras de restrição"). É aqui que você alterna permissões como impressão, cópia, edição e preenchimento de formulários.
Resultado:
Quando usar este método:
- Você se sente confortável com C# e .NET.
- Você precisa processar muitos PDFs automaticamente (por exemplo, relatórios diários).
- Você deseja integrar alterações de permissão em seu próprio software.
Lista de verificação final antes de alterar as permissões
Antes de começar, verifique estes pontos:
- Você tem a senha do proprietário? (Não a senha do usuário/abertura)
- Você tem direitos legais para modificar este documento?
- Quais permissões você realmente precisa? (por exemplo, apenas impressão, ou cópia completa também)
- Você está usando uma ferramenta confiável (software local > plataformas online)?
Depois de confirmar isso, siga o método acima que corresponde ao seu orçamento e nível de habilidade.
Resumo
Aprender como alterar permissões de PDF permite que você controle totalmente seus arquivos PDF, equilibrando a segurança do documento e a flexibilidade. Para usuários profissionais, o Adobe Acrobat é a escolha mais confiável. O LibreOffice Draw serve como uma alternativa offline gratuita, mas pode alterar a formatação. Ferramentas online são para edições rápidas e não sensíveis, e C# com Free Spire.PDF é a melhor escolha para processamento em lote seguro e automatizado.
Priorize sempre métodos offline (software de desktop/código) para arquivos confidenciais de negócios e pessoais para evitar riscos de vazamento de dados. Ao dominar esses métodos, você pode facilmente bloquear, restringir ou desbloquear arquivos PDF para atender a todas as suas necessidades de compartilhamento e segurança de documentos.
Perguntas frequentes (FAQs)
Q1. Alterar permissões de PDF afetará o conteúdo existente do PDF?
Não. Alterar permissões apenas modifica o envelope de segurança ao redor do PDF. Os bytes de conteúdo permanecem idênticos. No entanto, o Método 2 (LibreOffice Draw) é uma exceção – como ele reexibe o PDF, a formatação pode mudar. Sempre use uma cópia com o Método 2.
Q2. Posso alterar permissões em um PDF assinado digitalmente?
Não. Assinaturas digitais bloqueiam o PDF para evitar adulteração. Você deve remover a assinatura (requer ação do signatário) antes de modificar as permissões.
Q3. Qual é a maneira mais segura de alterar permissões de PDF?
A maneira mais segura é offline com Adobe Acrobat Pro ou Free Spire.PDF porque:
- O arquivo nunca sai do seu computador.
- Criptografia forte (AES‑128) pode ser aplicada.
- Nenhum servidor de terceiros pode interceptar os dados.
Q4. O método Free Spire.PDF é seguro para produção?
Para ferramentas internas e automação em pequena escala, sim. Mas observe o limite de 10 páginas na versão gratuita. Para páginas ilimitadas, considere a versão comercial.
Veja também
- Como comprimir um PDF: Melhores ferramentas para tornar PDFs menores
- Como excluir páginas em branco em PDF (Manual e Automação)
- 3 maneiras de reordenar páginas de PDF: Online, Desktop e Python
- Como assinar digitalmente PDFs com C# (Tutorial de Código Prático)
- Java: Adicionar permissões de segurança a um documento PDF
PDF 권한을 변경하는 방법은 무엇입니까? 4가지 안전한 방법
편집 제한, 복사 비활성화, 인쇄 잠금 또는 제한된 PDF 파일 잠금 해제를 위해 PDF 권한을 변경하는 방법이 궁금하신가요? PDF는 고정된 형식과 안전한 공유 기능 덕분에 전문 문서, 계약서, 이력서 및 공식 파일에 보편적으로 사용됩니다. 그러나 기본 PDF 권한 설정은 종종 고유한 공유 및 보안 요구 사항과 일치하지 않습니다.
이 가이드에서는 전문 소프트웨어, 무료 데스크톱 도구, 신뢰할 수 있는 온라인 플랫폼 및 개발자를 위한 프로그래밍 방식 접근 방식을 사용하여 PDF 권한을 편집하는 쉽고 실행 가능한 방법을 다룹니다.
- 변경할 수 있는 PDF 권한은 무엇인가요?
- 방법 1: Adobe Acrobat Pro로 PDF 권한 편집하기
- 방법 2: LibreOffice Draw를 사용하여 PDF 권한 변경하기
- 방법 3: 온라인 PDF 권한 변경 도구
- 방법 4: C#에서 프로그래밍 방식으로 권한 변경하기
- 권한 변경 전 최종 점검 목록
- 자주 묻는 질문 (FAQ)
변경할 수 있는 PDF 권한은 무엇인가요?
PDF 권한( "제한 설정" 또는 "보안 플래그"라고도 함)은 핵심 사용자 작업을 제어합니다. 필요에 따라 이러한 설정을 전환할 수 있습니다.
| 권한 | 제어 내용 |
|---|---|
| 인쇄 | 사용자가 인쇄할 수 있는지 여부 – 저해상도 또는 고해상도 |
| 콘텐츠 복사 | 텍스트 또는 이미지를 클립보드로 복사하는 기능 |
| 문서 조립 | 페이지 삽입, 삭제 또는 회전 |
| 주석 | 메모, 강조 표시 또는 스티커 메모 추가 |
| 양식 채우기 | 채울 수 있는 양식 필드 작업 |
| 콘텐츠 추출 | 접근성 도구 및 화면 판독기 |
| 수정 | 텍스트, 이미지 또는 개체 편집 |
권한을 변경할 때 이러한 플래그를 업데이트하는 것입니다. 예를 들어 "인쇄 불가"에서 "고해상도 인쇄 가능"으로 전환하거나 이전에 비활성화되었던 주석을 활성화하는 것입니다.
중요 참고 사항: 보안 "백도어"는 없습니다. 소유자 암호 또는 작성자의 동의 없이는 합법적으로 권한을 변경할 수 없습니다.
방법 1: Adobe Acrobat Pro로 PDF 권한 편집하기
Adobe Acrobat은 PDF 보안 설정을 수정하는 공식 도구로, 모든 PDF 권한 옵션을 완벽하게 제어할 수 있습니다. 정밀한 보안 사용자 정의가 필요한 전문 사용자에게 이상적입니다.
PDF 파일 권한을 변경하는 단계:
- Adobe Acrobat Pro에서 대상 PDF 파일을 엽니다.
- 파일 > 속성 (단축키: Ctrl+D)으로 이동합니다.
- 보안 탭으로 이동합니다. 모든 권한 설정이 표시되는 곳입니다.
- 기존 권한 구성을 수정하려면 설정 변경을 클릭합니다. 파일이 잠겨 있으면 권한 암호를 입력하여 편집 가능한 설정을 잠금 해제합니다.
- "암호 보안 – 설정" 창에서 다음과 같은 작업을 선택하거나 선택 취소하여 권한을 사용자 정의합니다.
- 인쇄 허용 설정 (없음/저해상도/고해상도)
- 허용된 변경 사항 정의 (주석/양식 채우기/없음)
- 콘텐츠 복사 및 접근성 액세스 전환
- 새 권한 암호를 설정하고 설정을 확인한 다음 수정된 PDF 파일을 저장하여 모든 변경 사항을 적용합니다.
참고: Adobe Acrobat은 유료 구독이 필요합니다.
✅ 실용적인 예시:
- 최종 읽기 전용 계약서의 경우 "변경 허용: 없음"을 사용합니다.
- 팀 검토의 경우 "변경 허용: 주석"을 사용합니다.
특정 PDF 권한 설정을 조정하는 것 외에도 동일한 도구를 사용하여 PDF 권한을 완전히 제거하여 모든 제한을 한 번에 해제할 수 있습니다.
방법 2: LibreOffice Draw를 사용하여 PDF 권한 변경하기
Adobe가 없으신가요? 문제없습니다. LibreOffice Draw를 사용하여 PDF 권한을 수정할 수 있습니다. 이 도구는 PDF를 열고 편집한 다음 새 권한 설정으로 다시 내보낼 수 있습니다. 오프라인으로 작동하고 개인 정보를 존중하며 비용이 들지 않습니다.
LibreOffice Draw 사용 단계:
- libreoffice.org에서 다운로드하여 설치합니다. 운영 체제(Windows, Mac, Linux)에 맞는 버전을 선택합니다.
- LibreOffice Draw를 실행하고 PDF를 엽니다.
- 파일 > 다른 이름으로 내보내기 > PDF로 내보내기로 이동합니다.
- PDF 옵션 대화 상자에서 보안 탭으로 이동합니다.
- 새 소유자 암호를 설정합니다 (권한을 변경하려면 필요).
- 원하는 대로 권한 확인란을 조정합니다. 예를 들면 다음과 같습니다.
- 고해상도 인쇄 활성화
- 양식 채우기 활성화 (먼저 PDF에서 대화형 양식 필드 만들기 )
- 콘텐츠 복사 활성화
- 화면 판독기를 위한 텍스트/액세스 활성화
- 내보내기를 클릭하고 새 PDF를 저장합니다.
⚠️ 경고: 이 방법은 PDF를 다시 작성합니다. 일부 복잡한 서식(글꼴, 레이어)이 변경될 수 있습니다. 먼저 복사본으로 테스트하십시오.
방법 3: 온라인 PDF 권한 변경 도구
PDF 권한을 자주 조정하지 않고 데스크톱 소프트웨어를 설치하고 싶지 않다면, 안전한 온라인 PDF 도구가 빠르고 임시적인 솔루션을 제공합니다. SwiftPDFLab 및 pdfup.org와 같은 도구는 브라우저 기반 PDF 권한 편집을 지원합니다.
온라인으로 PDF 권한을 변경하는 일반적인 워크플로:
- 브라우저에서 신뢰할 수 있는 온라인 PDF 권한 편집기를 엽니다 (예: SwiftPDFLab 권한 변경 도구).
- 온라인 플랫폼에 PDF 파일을 업로드합니다.
- 요구 사항에 따라 인쇄, 편집 및 복사 제한을 사용자 정의합니다.
- 새 소유자 암호를 설정하고 권한 변경을 클릭하여 새 설정을 적용합니다.
- 수정된 PDF 파일이 자동으로 다운로드됩니다.
보안 모범 사례: 자동 삭제 기능을 제공하는 도구를 사용하십시오. 기밀, 개인 또는 비즈니스 관련 PDF는 절대 업로드하지 마십시오. 온라인 도구는 민감하지 않은 공개 문서에만 권장됩니다.
방법 4: C#에서 프로그래밍 방식으로 권한 변경하기
개발자, IT 팀 또는 일괄 PDF 자동화가 필요한 사용자를 위해, Free Spire.PDF for .NET을 사용하여 프로그래밍 방식으로 PDF 권한을 변경할 수 있습니다. 이 무료 오프라인 .NET 라이브러리는 권한 암호와 열기 암호를 모두 처리하여 PDF 보안에 대한 전체 수명 주기 제어를 제공합니다.
C# 코드 예제 (복사 및 인쇄 활성화)
다음 C# 코드는 PDF를 로드하고, 새 보안 정책을 생성하고, 다양한 권한을 설정하고, 새 권한으로 PDF를 저장합니다.
using Spire.Pdf;

namespace ChangeSecurityPermission
{
    class Program
    {
        static void Main(string[] args)
        {
            // 1. PdfDocument 객체 생성
            PdfDocument pdf = new PdfDocument();

            // 2. 소유자 암호(있는 경우)로 제한된 PDF 파일 로드
            pdf.LoadFromFile("Agenda.pdf", "12345");

            // 3. 열기 암호 지정 (필요하지 않은 경우 비워 둡니다)
            string openPsd = string.Empty;

            // 4. 새 소유자 암호 지정
            string permissionPsd = "abc123";

            // 5. 새 열기 및 소유자 암호를 사용하여 보안 정책 생성
            PdfSecurityPolicy securityPolicy = new PdfPasswordSecurityPolicy(openPsd, permissionPsd);

            // 6. 암호화 알고리즘 설정 (AES 128비트는 현대적이고 안전합니다)
            securityPolicy.EncryptionAlgorithm = PdfEncryptionAlgorithm.AES_128;

            // 7. 허용하려는 새 권한 정의
            securityPolicy.DocumentPrivilege.AllowContentCopying = true; // 콘텐츠 복사 허용
            securityPolicy.DocumentPrivilege.AllowPrint = true; // 인쇄 허용

            // 8. 새 보안 정책을 문서에 적용
            pdf.Encrypt(securityPolicy);

            // 9. 업데이트된 PDF를 새 파일에 저장
            pdf.SaveToFile("ChangePermissions.pdf");
            pdf.Close();
        }
    }
}
PdfSecurityPolicy.DocumentPrivilege를 통해 검색되는 PdfDocumentPrivilege 객체는 사용자가 PDF로 할 수 있는 것과 할 수 없는 것("제한 규칙")을 정확하게 정의하는 세분화된 권한 제어 클래스입니다. 여기서 인쇄, 복사, 편집, 양식 채우기와 같은 권한을 전환합니다.
결과:
이 방법을 사용해야 하는 경우:
- C# 및 .NET에 익숙합니다.
- 많은 PDF를 자동으로 처리해야 합니다 (예: 일일 보고서).
- 자체 소프트웨어에 권한 변경을 통합하고 싶습니다.
권한 변경 전 최종 점검 목록
시작하기 전에 다음 사항을 확인하십시오.
- 소유자 암호가 있습니까? (사용자/열기 암호가 아님)
- 이 문서를 수정할 법적 권리가 있습니까?
- 실제로 필요한 권한은 무엇입니까? (예: 인쇄만, 아니면 전체 복사도)
- 신뢰할 수 있는 도구를 사용하고 있습니까? (로컬 소프트웨어 > 온라인 플랫폼)
이러한 사항을 확인한 후 예산 및 기술 수준에 맞는 방법을 따르십시오.
요약
PDF 권한을 변경하는 방법을 배우면 PDF 파일을 완벽하게 제어하여 문서 보안과 유연성의 균형을 맞출 수 있습니다. 전문 사용자의 경우 Adobe Acrobat이 가장 신뢰할 수 있는 선택입니다. LibreOffice Draw는 무료 오프라인 대안 역할을 하지만 서식이 변경될 수 있습니다. 온라인 도구는 빠르고 민감하지 않은 편집을 위한 것이며, C#과 Free Spire.PDF는 안전하고 자동화된 일괄 처리에 가장 적합한 선택입니다.
데이터 유출 위험을 피하기 위해 기밀 비즈니스 및 개인 파일의 경우 항상 오프라인 방법(데스크톱 소프트웨어/코드)을 우선적으로 고려하십시오. 이러한 방법을 숙달하면 모든 문서 공유 및 보안 요구 사항을 충족하기 위해 PDF 파일을 쉽게 잠그거나, 제한하거나, 잠금 해제할 수 있습니다.
자주 묻는 질문 (FAQ)
Q1. PDF 권한을 변경하면 기존 PDF 콘텐츠에 영향을 미칩니까?
아니요. 권한을 변경하면 PDF 주변의 보안 봉투만 수정됩니다. 콘텐츠 바이트는 동일하게 유지됩니다. 그러나 방법 2 (LibreOffice Draw)는 예외입니다. PDF를 다시 렌더링하기 때문에 서식이 변경될 수 있습니다. 방법 2에서는 항상 복사본을 사용하십시오.
Q2. 디지털 서명된 PDF의 권한을 변경할 수 있습니까?
아니요. 디지털 서명은 PDF를 잠가 무단 수정을 방지합니다. 권한을 수정하기 전에 서명을 제거해야 합니다(서명자의 조치가 필요함).
Q3. PDF 권한을 변경하는 가장 안전한 방법은 무엇입니까?
가장 안전한 방법은 Adobe Acrobat Pro 또는 Free Spire.PDF를 사용하여 오프라인으로 변경하는 것입니다. 그 이유는 다음과 같습니다.
- 파일이 컴퓨터를 벗어나지 않습니다.
- 강력한 암호화(AES-128)를 적용할 수 있습니다.
- 제3자 서버가 데이터를 가로챌 수 없습니다.
Q4. Free Spire.PDF 방법은 프로덕션에 안전합니까?
내부 도구 및 소규모 자동화의 경우 예. 그러나 무료 버전에는 10페이지 제한이 있습니다. 무제한 페이지의 경우 상용 버전을 고려하십시오.
참고 자료
Come modificare le autorizzazioni dei PDF? 4 metodi sicuri
Indice dei contenuti
- Quali autorizzazioni PDF è possibile modificare?
- Metodo 1: Modifica delle autorizzazioni PDF con Adobe Acrobat Pro
- Metodo 2: Modifica delle autorizzazioni PDF utilizzando LibreOffice Draw
- Metodo 3: Modificatori di autorizzazioni PDF online
- Metodo 4: Modifica delle autorizzazioni programmaticamente in C#
- Checklist finale prima di modificare le autorizzazioni
- Domande frequenti (FAQ)
Ti stai chiedendo come modificare le autorizzazioni PDF per limitare la modifica, disabilitare la copia, bloccare la stampa o sbloccare file PDF protetti? I PDF sono universalmente utilizzati per documenti professionali, contratti, curriculum e file ufficiali grazie alla loro formattazione fissa e alle funzionalità di condivisione sicura. Tuttavia, le impostazioni predefinite delle autorizzazioni PDF spesso non soddisfano le tue esigenze uniche di condivisione e sicurezza.
In questa guida, copriremo metodi semplici e attuabili per modificare le autorizzazioni PDF utilizzando software professionali, strumenti desktop gratuiti, piattaforme online affidabili e persino approcci programmatici per gli sviluppatori.
- Quali autorizzazioni PDF è possibile modificare?
- Metodo 1: Modifica delle autorizzazioni PDF con Adobe Acrobat Pro
- Metodo 2: Modifica delle autorizzazioni PDF utilizzando LibreOffice Draw
- Metodo 3: Modificatori di autorizzazioni PDF online
- Metodo 4: Modifica delle autorizzazioni programmaticamente in C#
- Checklist finale prima di modificare le autorizzazioni
- Domande frequenti (FAQ)
Quali autorizzazioni PDF è possibile modificare?
Le autorizzazioni PDF (chiamate anche "impostazioni di restrizione" o "flag di sicurezza") controllano le azioni principali dell'utente. Puoi attivare o disattivare queste impostazioni secondo necessità:
| Autorizzazione | Cosa controlla |
|---|---|
| Stampa | Se gli utenti possono stampare – Bassa risoluzione o Alta risoluzione |
| Copia del contenuto | Possibilità di copiare testo o immagini negli appunti |
| Assemblaggio del documento | Inserimento, eliminazione o rotazione di pagine |
| Commenti | Aggiunta di note, evidenziazioni o commenti adesivi |
| Compilazione moduli | Lavorare con campi modulo compilabili |
| Estrazione del contenuto | Strumenti di accessibilità e screen reader |
| Modifica | Modifica di testo, immagini o oggetti |
Quando modifichi le autorizzazioni, stai aggiornando questi flag – ad esempio, passando da "stampa non consentita" a "stampa ad alta risoluzione consentita", o abilitando i commenti che erano precedentemente disabilitati.
Nota importante: Non esiste una "backdoor" di sicurezza. Non è possibile modificare legalmente le autorizzazioni senza la password del proprietario o il consenso dell'autore.
Metodo 1: Modifica delle autorizzazioni PDF con Adobe Acrobat Pro
Adobe Acrobat è lo strumento ufficiale per modificare le impostazioni di sicurezza dei PDF, offrendo il controllo completo su tutte le opzioni di autorizzazione PDF. È ideale per utenti professionali che necessitano di una personalizzazione precisa della sicurezza.
Passaggi per modificare le autorizzazioni dei file PDF:
- Apri il file PDF di destinazione in Adobe Acrobat Pro.
- Vai su File > Proprietà (scorciatoia: Ctrl+D).
- Naviga alla scheda Sicurezza – qui vengono visualizzate tutte le impostazioni di autorizzazione.
- Fai clic su Cambia impostazioni per modificare le configurazioni di autorizzazione esistenti. Se il file è bloccato, inserisci la password delle autorizzazioni per sbloccare le impostazioni modificabili.
- Nella finestra "Sicurezza con password – Impostazioni", personalizza le autorizzazioni selezionando o deselezionando azioni come:
- Imposta stampa consentita (Nessuna/Bassa/Alta risoluzione)
- Definisci modifiche consentite (Commenti/Compilazione moduli/Nessuna)
- Attiva/disattiva copia del contenuto e accesso all'accessibilità
- Imposta una nuova password delle autorizzazioni, conferma le impostazioni e salva il file PDF modificato per applicare tutte le modifiche.
Nota: Adobe Acrobat richiede un abbonamento a pagamento.
✅ Esempi pratici:
- Utilizza "Modifiche consentite: Nessuna" per contratti finali di sola lettura.
- Utilizza "Modifiche consentite: Commenti" per revisioni di gruppo.
Oltre a regolare le impostazioni specifiche delle autorizzazioni PDF, gli stessi strumenti ti consentono anche di rimuovere completamente le autorizzazioni PDF per rimuovere tutte le restrizioni contemporaneamente.
Metodo 2: Modifica delle autorizzazioni PDF utilizzando LibreOffice Draw
Non hai Adobe? Nessun problema. Puoi usare LibreOffice Draw per modificare le autorizzazioni PDF. Questo strumento può aprire e modificare PDF, quindi riesportarli con nuove impostazioni di autorizzazione. Funziona offline, rispetta la tua privacy e non costa nulla.
Passaggi per utilizzare LibreOffice Draw:
- Scarica e installa da libreoffice.org. Scegli la versione per il tuo sistema operativo (Windows, Mac, Linux).
- Avvia LibreOffice Draw e aprilo con il tuo PDF.
- Vai su File > Esporta come > Esporta come PDF.
- Naviga alla scheda Sicurezza nella finestra di dialogo Opzioni PDF.
- Imposta una nuova password del proprietario (necessaria per modificare le autorizzazioni).
- Regola le caselle di controllo delle autorizzazioni come desideri. Ad esempio:
- Abilita stampa ad alta risoluzione
- Abilita compilazione moduli (prima crea campi modulo interattivi in PDF)
- Abilita copia del contenuto
- Abilita testo/accesso per screen reader
- Fai clic su Esporta e salva il nuovo PDF.
⚠️ Attenzione: Questo metodo riscrive il PDF. Alcune formattazioni complesse (font, livelli) potrebbero spostarsi. Prova prima con una copia.
Metodo 3: Modificatori di autorizzazioni PDF online
Se raramente modifichi le autorizzazioni PDF e rifiuti di installare software desktop, gli strumenti PDF online sicuri offrono una soluzione rapida e temporanea. Strumenti come SwiftPDFLab e pdfup.org supportano la modifica delle autorizzazioni PDF basata su browser.
Flusso di lavoro generale per modificare le autorizzazioni PDF online:
- Apri un editor di autorizzazioni PDF online affidabile sul tuo browser (ad es. Strumento Cambia Autorizzazioni di SwiftPDFLab).
- Carica il tuo file PDF sulla piattaforma online.
- Personalizza le restrizioni di stampa, modifica e copia in base alle tue esigenze.
- Imposta una nuova password del proprietario e fai clic su Cambia autorizzazioni per applicare le nuove impostazioni.
- Il file PDF modificato verrà scaricato automaticamente.
Migliore pratica di sicurezza: Utilizza uno strumento che elimina automaticamente i caricamenti. Non caricare mai PDF altamente confidenziali, privati o sensibili per le aziende. Gli strumenti online sono raccomandati solo per documenti pubblici non sensibili.
Metodo 4: Modifica delle autorizzazioni programmaticamente in C#
Per sviluppatori, team IT o utenti che necessitano di automazione batch di PDF, è possibile modificare programmaticamente le autorizzazioni PDF con C# utilizzando Free Spire.PDF for .NET, una libreria .NET gratuita e offline che gestisce sia le password delle autorizzazioni che le password di apertura, offrendoti il controllo completo del ciclo di vita della sicurezza dei PDF.
Esempio di codice C# (Abilita copia e stampa)
Il seguente codice C# carica un PDF, crea una nuova policy di sicurezza, imposta varie autorizzazioni e salva il PDF con le nuove autorizzazioni.
using Spire.Pdf;

namespace ChangeSecurityPermission
{
    class Program
    {
        static void Main(string[] args)
        {
            // 1. Crea un oggetto PdfDocument
            PdfDocument pdf = new PdfDocument();

            // 2. Carica il file PDF protetto con password del proprietario (se presente)
            pdf.LoadFromFile("Agenda.pdf", "12345");

            // 3. Specifica la password di apertura (lascia vuota se non necessaria)
            string openPsd = string.Empty;

            // 4. Specifica una nuova password del proprietario
            string permissionPsd = "abc123";

            // 5. Crea una policy di sicurezza utilizzando le nuove password di apertura e proprietario
            PdfSecurityPolicy securityPolicy = new PdfPasswordSecurityPolicy(openPsd, permissionPsd);

            // 6. Imposta l'algoritmo di crittografia (AES a 128 bit è moderno e sicuro)
            securityPolicy.EncryptionAlgorithm = PdfEncryptionAlgorithm.AES_128;

            // 7. Definisci le nuove autorizzazioni che desideri consentire
            securityPolicy.DocumentPrivilege.AllowContentCopying = true; // Consenti copia del contenuto
            securityPolicy.DocumentPrivilege.AllowPrint = true; // Consenti stampa

            // 8. Applica la nuova policy di sicurezza al documento
            pdf.Encrypt(securityPolicy);

            // 9. Salva il PDF aggiornato in un nuovo file
            pdf.SaveToFile("ChangePermissions.pdf");
            pdf.Close();
        }
    }
}
L'oggetto PdfDocumentPrivilege, recuperato tramite PdfSecurityPolicy.DocumentPrivilege, è una classe di controllo delle autorizzazioni granulare che definisce esattamente cosa gli utenti possono e non possono fare con il PDF (le "regole di restrizione"). È qui che attivi/disattivi autorizzazioni come stampa, copia, modifica e compilazione moduli.
Risultato:
Quando usare questo metodo:
- Hai familiarità con C# e .NET.
- Devi elaborare molti PDF automaticamente (ad es. report giornalieri).
- Vuoi integrare le modifiche alle autorizzazioni nel tuo software.
Checklist finale prima di modificare le autorizzazioni
Prima di iniziare, verifica questi punti:
- Hai la password del proprietario? (Non la password utente/apertura)
- Hai i diritti legali per modificare questo documento?
- Quali autorizzazioni ti servono realmente? (ad es. solo la stampa, o anche la copia completa)
- Stai usando uno strumento affidabile (software locale > piattaforme online)?
Una volta confermati questi punti, segui il metodo sopra che corrisponde al tuo budget e al tuo livello di competenza.
Riepilogo
Imparare come modificare le autorizzazioni PDF ti consente di controllare completamente i tuoi file PDF, bilanciando la sicurezza del documento e la flessibilità. Per gli utenti professionali, Adobe Acrobat è la scelta più affidabile. LibreOffice Draw funge da alternativa offline gratuita ma potrebbe alterare la formattazione. Gli strumenti online sono per modifiche rapide e non sensibili, e C# con Free Spire.PDF è la scelta migliore per l'elaborazione batch sicura e automatizzata.
Dai sempre priorità ai metodi offline (software desktop/codice) per file aziendali e personali riservati per evitare rischi di fuga di dati. Padroneggiando questi metodi, puoi facilmente bloccare, limitare o sbloccare file PDF per soddisfare tutte le tue esigenze di condivisione di documenti e sicurezza.
Domande frequenti (FAQ)
D1. La modifica delle autorizzazioni PDF influenzerà il contenuto PDF esistente?
No. La modifica delle autorizzazioni modifica solo la "busta di sicurezza" attorno al PDF. I byte del contenuto rimangono identici. Tuttavia, il Metodo 2 (LibreOffice Draw) fa eccezione, poiché re-renderizza il PDF, la formattazione potrebbe cambiare. Usa sempre una copia con il Metodo 2.
D2. Posso modificare le autorizzazioni su un PDF firmato digitalmente?
No. Le firme digitali bloccano il PDF per impedirne la manomissione. Devi rimuovere la firma (richiede l'azione del firmatario) prima di modificare le autorizzazioni.
D3. Qual è il modo più sicuro per modificare le autorizzazioni PDF?
Il modo più sicuro è offline con Adobe Acrobat Pro o Free Spire.PDF perché:
- Il file non lascia mai il tuo computer.
- Può essere applicata una crittografia forte (AES-128).
- Nessun server di terze parti può intercettare i dati.
D4. Il metodo Free Spire.PDF è sicuro per la produzione?
Per strumenti interni e automazione su piccola scala, sì. Ma nota il limite di 10 pagine nella versione gratuita. Per pagine illimitate, considera la versione commerciale.
Vedi anche
- Come comprimere un PDF: i migliori strumenti per ridurre le dimensioni dei PDF
- Come eliminare pagine vuote in PDF (Manuale e Automazione)
- 3 modi per riordinare le pagine PDF: online, desktop e Python
- Come firmare digitalmente i PDF con C# (Tutorial pratico con codice)
- Java: Aggiungere autorizzazioni di sicurezza a un documento PDF
Comment modifier les autorisations d'un PDF ? 4 méthodes sécurisées
Table des matières
- Quelles autorisations PDF pouvez-vous modifier ?
- Méthode 1 : Modifier les autorisations PDF avec Adobe Acrobat Pro
- Méthode 2 : Modifier les autorisations PDF à l'aide de LibreOffice Draw
- Méthode 3 : Modificateurs d'autorisations PDF en ligne
- Méthode 4 : Modifier les autorisations par programmation en C#
- Liste de contrôle finale avant de modifier les autorisations
- Foire aux questions (FAQ)
Vous vous demandez comment modifier les autorisations PDF pour restreindre la modification, désactiver la copie, verrouiller l'impression ou déverrouiller des fichiers PDF restreints ? Les PDF sont universellement utilisés pour les documents professionnels, les contrats, les CV et les fichiers officiels en raison de leur mise en page fixe et de leurs fonctionnalités de partage sécurisé. Cependant, les paramètres d'autorisation PDF par défaut ne correspondent souvent pas à vos besoins uniques en matière de partage et de sécurité.
Dans ce guide, nous allons couvrir des méthodes simples et actionnables pour modifier les autorisations PDF à l'aide de logiciels professionnels, d'outils de bureau gratuits, de plateformes en ligne fiables et même d'approches programmatiques pour les développeurs.
- Quelles autorisations PDF pouvez-vous modifier ?
- Méthode 1 : Modifier les autorisations PDF avec Adobe Acrobat Pro
- Méthode 2 : Modifier les autorisations PDF à l'aide de LibreOffice Draw
- Méthode 3 : Modificateurs d'autorisations PDF en ligne
- Méthode 4 : Modifier les autorisations par programmation en C#
- Liste de contrôle finale avant de modifier les autorisations
- Foire aux questions (FAQ)
Quelles autorisations PDF pouvez-vous modifier ?
Les autorisations PDF (également appelées « paramètres de restriction » ou « indicateurs de sécurité ») contrôlent les actions principales des utilisateurs. Vous pouvez activer ou désactiver ces paramètres selon vos besoins :
| Autorisation | Ce qu'elle contrôle |
|---|---|
| Impression | Si les utilisateurs peuvent imprimer – Basse résolution ou Haute résolution |
| Copie de contenu | Possibilité de copier du texte ou des images dans le presse-papiers |
| Assemblage de documents | Insertion, suppression ou rotation de pages |
| Commentaires | Ajout de notes, de surlignages ou de commentaires autocollants |
| Remplissage de formulaires | Travail avec des champs de formulaire à remplir |
| Extraction de contenu | Outils d'accessibilité et lecteurs d'écran |
| Modification | Modification de texte, d'images ou d'objets |
Lorsque vous modifiez les autorisations, vous mettez à jour ces indicateurs – par exemple, en passant de « impression non autorisée » à « impression haute résolution autorisée », ou en activant les commentaires qui étaient précédemment désactivés.
Note critique : Il n'y a pas de « porte dérobée » de sécurité. Vous ne pouvez pas légalement modifier les autorisations sans le mot de passe du propriétaire ou le consentement de l'auteur.
Méthode 1 : Modifier les autorisations PDF avec Adobe Acrobat Pro
Adobe Acrobat est l'outil officiel pour modifier les paramètres de sécurité des PDF, offrant un contrôle total sur toutes les options d'autorisation PDF. Il est idéal pour les utilisateurs professionnels qui ont besoin d'une personnalisation précise de la sécurité.
Étapes pour modifier les autorisations de fichier PDF :
- Ouvrez le fichier PDF cible dans Adobe Acrobat Pro.
- Allez dans Fichier > Propriétés (raccourci : Ctrl+D).
- Accédez à l'onglet Sécurité – c'est là que tous les paramètres d'autorisation sont affichés.
- Cliquez sur Modifier les paramètres pour modifier les configurations d'autorisation existantes. Si le fichier est verrouillé, entrez le mot de passe d'autorisation pour déverrouiller les paramètres modifiables.
- Dans la fenêtre « Sécurité par mot de passe – Paramètres », personnalisez les autorisations en cochant ou décochant des actions telles que :
- Définir l'impression autorisée (Aucune/Basse/Haute résolution)
- Définir les modifications autorisées (Commentaires/Remplissage de formulaires/Aucune)
- Activer la copie de contenu et l'accès à l'accessibilité
- Définissez un nouveau mot de passe d'autorisation, confirmez les paramètres et enregistrez le fichier PDF modifié pour appliquer toutes les modifications.
Remarque : Adobe Acrobat nécessite un abonnement payant.
✅ Exemples pratiques :
- Utilisez « Modifications autorisées : Aucune » pour les contrats finaux, en lecture seule.
- Utilisez « Modifications autorisées : Commentaires » pour les revues d'équipe.
Au-delà de l'ajustement des paramètres d'autorisation PDF spécifiques, les mêmes outils vous permettent également de supprimer les autorisations PDF entièrement pour lever toutes les restrictions en une seule fois.
Méthode 2 : Modifier les autorisations PDF à l'aide de LibreOffice Draw
Vous n'avez pas Adobe ? Pas de problème. Vous pouvez utiliser LibreOffice Draw pour modifier les autorisations PDF. Cet outil peut ouvrir et modifier des PDF, puis les réexporter avec de nouveaux paramètres d'autorisation. Il fonctionne hors ligne, respecte votre vie privée et ne coûte rien.
Étapes pour utiliser LibreOffice Draw :
- Téléchargez et installez depuis libreoffice.org. Choisissez la version pour votre système d'exploitation (Windows, Mac, Linux).
- Lancez LibreOffice Draw et ouvrez votre PDF dedans.
- Allez dans Fichier > Exporter sous > Exporter au format PDF.
- Accédez à l'onglet Sécurité dans la boîte de dialogue Options PDF.
- Définissez un nouveau mot de passe propriétaire (requis pour modifier les autorisations).
- Ajustez les cases à cocher d'autorisation selon vos désirs. Par exemple :
- Activer l'impression haute résolution
- Activer le remplissage de formulaires (créez d'abord des champs de formulaire interactifs dans le PDF)
- Activer la copie de contenu
- Activer le texte/l'accès pour les lecteurs d'écran
- Cliquez sur Exporter et enregistrez le nouveau PDF.
⚠️ Attention : Cette méthode réécrit le PDF. Certains formats complexes (polices, calques) peuvent être modifiés. Testez d'abord avec une copie.
Méthode 3 : Modificateurs d'autorisations PDF en ligne
Si vous ajustez rarement les autorisations PDF et refusez d'installer un logiciel de bureau, les outils PDF en ligne sécurisés offrent une solution rapide et temporaire. Des outils comme SwiftPDFLab et pdfup.org prennent en charge la modification des autorisations PDF basée sur le navigateur.
Flux de travail général pour modifier les autorisations PDF en ligne :
- Ouvrez un éditeur d'autorisations PDF en ligne de confiance dans votre navigateur (par exemple, outil de modification des autorisations SwiftPDFLab).
- Téléchargez votre fichier PDF sur la plateforme en ligne.
- Personnalisez les restrictions d'impression, de modification et de copie selon vos besoins.
- Définissez un nouveau mot de passe propriétaire et cliquez sur Modifier les autorisations pour appliquer les nouveaux paramètres.
- Le fichier PDF modifié sera téléchargé automatiquement.
Bonne pratique de sécurité : Utilisez un outil qui supprime automatiquement les téléchargements. Ne téléchargez jamais de PDF hautement confidentiels, privés ou sensibles pour les entreprises. Les outils en ligne ne sont recommandés que pour les documents publics non sensibles.
Méthode 4 : Modifier les autorisations par programmation en C#
Pour les développeurs, les équipes informatiques ou les utilisateurs ayant besoin d'automatisation PDF par lots, vous pouvez modifier les autorisations PDF par programmation avec C# en utilisant Free Spire.PDF for .NET – une bibliothèque .NET gratuite et hors ligne qui gère à la fois les mots de passe d'autorisation et les mots de passe d'ouverture, vous donnant un contrôle complet du cycle de vie sur la sécurité PDF.
Exemple de code C# (Activer la copie et l'impression)
Le code C# suivant charge un PDF, crée une nouvelle politique de sécurité, définit diverses autorisations et enregistre le PDF avec les nouvelles autorisations.
using Spire.Pdf;

namespace ChangeSecurityPermission
{
    class Program
    {
        static void Main(string[] args)
        {
            // 1. Créez un objet PdfDocument
            PdfDocument pdf = new PdfDocument();

            // 2. Chargez le fichier PDF restreint avec le mot de passe du propriétaire (si applicable)
            pdf.LoadFromFile("Agenda.pdf", "12345");

            // 3. Spécifiez le mot de passe d'ouverture (laissez vide si non nécessaire)
            string openPsd = string.Empty;

            // 4. Spécifiez un nouveau mot de passe propriétaire
            string permissionPsd = "abc123";

            // 5. Créez une politique de sécurité à l'aide des nouveaux mots de passe d'ouverture et propriétaire
            PdfSecurityPolicy securityPolicy = new PdfPasswordSecurityPolicy(openPsd, permissionPsd);

            // 6. Définissez l'algorithme de chiffrement (AES 128 bits est moderne et sécurisé)
            securityPolicy.EncryptionAlgorithm = PdfEncryptionAlgorithm.AES_128;

            // 7. Définissez les nouvelles autorisations que vous souhaitez autoriser
            securityPolicy.DocumentPrivilege.AllowContentCopying = true; // Autoriser la copie de contenu
            securityPolicy.DocumentPrivilege.AllowPrint = true; // Autoriser l'impression

            // 8. Appliquez la nouvelle politique de sécurité au document
            pdf.Encrypt(securityPolicy);

            // 9. Enregistrez le PDF mis à jour dans un nouveau fichier
            pdf.SaveToFile("ChangePermissions.pdf");
            pdf.Close();
        }
    }
}
L'objet PdfDocumentPrivilege, récupéré via PdfSecurityPolicy.DocumentPrivilege, est une classe de contrôle d'autorisation granulaire qui définit exactement ce que les utilisateurs peuvent et ne peuvent pas faire avec le PDF (les « règles de restriction »). C'est ici que vous activez ou désactivez des autorisations telles que l'impression, la copie, la modification et le remplissage de formulaires.
Résultat :
Quand utiliser cette méthode :
- Vous êtes à l'aise avec C# et .NET.
- Vous devez traiter de nombreux PDF automatiquement (par exemple, des rapports quotidiens).
- Vous souhaitez intégrer la modification des autorisations dans votre propre logiciel.
Liste de contrôle finale avant de modifier les autorisations
Avant de commencer, vérifiez ces points :
- Avez-vous le mot de passe propriétaire ? (Pas le mot de passe utilisateur/d'ouverture)
- Avez-vous les droits légaux pour modifier ce document ?
- Quelles autorisations avez-vous réellement besoin ? (par exemple, juste l'impression, ou la copie complète aussi)
- Utilisez-vous un outil de confiance (logiciel local > plateformes en ligne) ?
Une fois que vous avez confirmé ces points, suivez la méthode ci-dessus qui correspond à votre budget et à votre niveau de compétence.
Résumé
Apprendre comment modifier les autorisations PDF vous permet de contrôler entièrement vos fichiers PDF, en équilibrant la sécurité des documents et la flexibilité. Pour les utilisateurs professionnels, Adobe Acrobat est le choix le plus fiable. LibreOffice Draw sert d'alternative gratuite hors ligne mais peut modifier le formatage. Les outils en ligne sont destinés aux modifications rapides et non sensibles, et C# avec Free Spire.PDF est le meilleur choix pour un traitement par lots sécurisé et automatisé.
Privilégiez toujours les méthodes hors ligne (logiciel de bureau/code) pour les fichiers professionnels et personnels confidentiels afin d'éviter les risques de fuite de données. En maîtrisant ces méthodes, vous pouvez facilement verrouiller, restreindre ou déverrouiller des fichiers PDF pour répondre à tous vos besoins de partage et de sécurité de documents.
Foire aux questions (FAQ)
Q1. La modification des autorisations PDF affectera-t-elle le contenu PDF existant ?
Non. La modification des autorisations ne modifie que l'enveloppe de sécurité du PDF. Les octets de contenu restent identiques. Cependant, la méthode 2 (LibreOffice Draw) fait exception – car elle ré-rend le PDF, le formatage peut changer. Utilisez toujours une copie avec la méthode 2.
Q2. Puis-je modifier les autorisations d'un PDF signé numériquement ?
Non. Les signatures numériques verrouillent le PDF pour empêcher toute falsification. Vous devez supprimer la signature (nécessite l'action du signataire) avant de modifier les autorisations.
Q3. Quelle est la méthode la plus sûre pour modifier les autorisations PDF ?
La méthode la plus sûre est hors ligne avec Adobe Acrobat Pro ou Free Spire.PDF car :
- Le fichier ne quitte jamais votre ordinateur.
- Un chiffrement fort (AES‑128) peut être appliqué.
- Aucun serveur tiers ne peut intercepter les données.
Q4. La méthode Free Spire.PDF est-elle sûre pour la production ?
Pour les outils internes et l'automatisation à petite échelle, oui. Mais notez la limite de 10 pages dans la version gratuite. Pour un nombre illimité de pages, envisagez la version commerciale.
Voir également
- Comment compresser un PDF : les meilleurs outils pour réduire la taille des PDF
- Comment supprimer les pages vierges dans un PDF (manuel et automatisation)
- 3 façons de réorganiser les pages PDF : en ligne, bureau et Python
- Comment signer numériquement des PDF avec C# (Tutoriel de code pratique)
- Java : Ajouter des autorisations de sécurité à un document PDF
¿Cómo cambiar los permisos de un PDF? 4 métodos seguros
Tabla de Contenidos
- ¿Qué permisos de PDF se pueden cambiar?
- Método 1: Editar permisos de PDF con Adobe Acrobat Pro
- Método 2: Cambiar permisos de PDF usando LibreOffice Draw
- Método 3: Cambiadores de permisos de PDF en línea
- Método 4: Cambiar permisos mediante programación en C#
- Lista de verificación final antes de cambiar los permisos
- Preguntas frecuentes (FAQ)
¿Te preguntas cómo cambiar los permisos de PDF para restringir la edición, deshabilitar la copia, bloquear la impresión o desbloquear archivos PDF restringidos? Los PDF se utilizan universalmente para documentos profesionales, contratos, currículums y archivos oficiales debido a su formato fijo y sus funciones de intercambio seguro. Sin embargo, la configuración de permisos de PDF predeterminada a menudo no coincide con tus necesidades únicas de intercambio y seguridad.
En esta guía, cubriremos métodos fáciles y prácticos para editar permisos de PDF utilizando software profesional, herramientas de escritorio gratuitas, plataformas en línea confiables e incluso enfoques programáticos para desarrolladores.
- ¿Qué permisos de PDF se pueden cambiar?
- Método 1: Editar permisos de PDF con Adobe Acrobat Pro
- Método 2: Cambiar permisos de PDF usando LibreOffice Draw
- Método 3: Cambiadores de permisos de PDF en línea
- Método 4: Cambiar permisos mediante programación en C#
- Lista de verificación final antes de cambiar los permisos
- Preguntas frecuentes (FAQ)
¿Qué permisos de PDF se pueden cambiar?
Los permisos de PDF (también llamados "configuración de restricción" o "banderas de seguridad") controlan las acciones principales del usuario. Puedes activar o desactivar estas configuraciones según sea necesario:
| Permiso | Qué controla |
|---|---|
| Impresión | Si los usuarios pueden imprimir – Baja resolución o Alta resolución |
| Copia de contenido | Capacidad de copiar texto o imágenes al portapapeles |
| Ensamblaje de documentos | Insertar, eliminar o rotar páginas |
| Comentarios | Agregar notas, resaltados o comentarios adhesivos |
| Relleno de formularios | Trabajar con campos de formulario rellenables |
| Extracción de contenido | Herramientas de accesibilidad y lectores de pantalla |
| Modificación | Editar texto, imágenes u objetos |
Cuando cambias los permisos, estás actualizando estas banderas – por ejemplo, cambiando de "impresión no permitida" a "impresión de alta resolución permitida", o habilitando comentarios que previamente estaban deshabilitados.
Nota importante: No hay una "puerta trasera" de seguridad. No puedes cambiar legalmente los permisos sin la contraseña del propietario o el consentimiento del autor.
Método 1: Editar permisos de PDF con Adobe Acrobat Pro
Adobe Acrobat es la herramienta oficial para modificar la configuración de seguridad de PDF, ofreciendo control total sobre todas las opciones de permisos de PDF. Es ideal para usuarios profesionales que necesitan una personalización de seguridad precisa.
Pasos para cambiar los permisos de archivos PDF:
- Abre el archivo PDF de destino en Adobe Acrobat Pro.
- Ve a Archivo > Propiedades (atajo: Ctrl+D).
- Navega a la pestaña Seguridad – aquí es donde se muestran todas las configuraciones de permisos.
- Haz clic en Cambiar configuración para modificar las configuraciones de permisos existentes. Si el archivo está bloqueado, ingresa la contraseña de permisos para desbloquear la configuración editable.
- En la ventana "Seguridad con contraseña – Configuración", personaliza los permisos marcando o desmarcando acciones como:
- Establecer impresión permitida (Ninguna/Baja/Alta Resolución)
- Definir cambios permitidos (Comentarios/Relleno de formularios/Ninguno)
- Activar o desactivar la copia de contenido y el acceso de accesibilidad
- Establece una nueva contraseña de permisos, confirma la configuración y guarda el archivo PDF modificado para aplicar todos los cambios.
Nota: Adobe Acrobat requiere una suscripción de pago.
✅ Ejemplos prácticos:
- Usa "Cambios permitidos: Ninguno" para contratos finales de solo lectura.
- Usa "Cambios permitidos: Comentarios" para revisiones de equipo.
Más allá de ajustar configuraciones específicas de permisos de PDF, las mismas herramientas también te permiten eliminar permisos de PDF por completo para levantar todas las restricciones a la vez.
Método 2: Cambiar permisos de PDF usando LibreOffice Draw
¿No tienes Adobe? No hay problema. Puedes usar LibreOffice Draw para modificar los permisos de PDF. Esta herramienta puede abrir y editar PDF, luego reexportarlos con nuevas configuraciones de permisos. Funciona sin conexión, respeta tu privacidad y no cuesta nada.
Pasos para usar LibreOffice Draw:
- Descarga e instala desde libreoffice.org. Elige la versión para tu sistema operativo (Windows, Mac, Linux).
- Inicia LibreOffice Draw y abre tu PDF en él.
- Ve a Archivo > Exportar como > Exportar como PDF.
- Navega a la pestaña Seguridad en el cuadro de diálogo Opciones de PDF.
- Establece una nueva contraseña de propietario (requerida para cambiar permisos).
- Ajusta las casillas de verificación de permisos según tu deseo. Por ejemplo:
- Habilitar impresión de alta resolución
- Habilitar relleno de formularios (primero crea campos de formulario interactivos en PDF)
- Habilitar copia de contenido
- Habilitar texto/acceso para lectores de pantalla
- Haz clic en Exportar y guarda el nuevo PDF.
⚠️ Advertencia: Este método reescribe el PDF. Algunos formatos complejos (fuentes, capas) pueden cambiar. Prueba primero con una copia.
Método 3: Cambiadores de permisos de PDF en línea
Si rara vez ajustas los permisos de PDF y te niegas a instalar software de escritorio, las herramientas seguras de PDF en línea proporcionan una solución rápida y temporal. Herramientas como SwiftPDFLab y pdfup.org admiten la edición de permisos de PDF basada en navegador.
Flujo de trabajo general para cambiar permisos de PDF en línea:
- Abre un editor de permisos de PDF en línea de confianza en tu navegador (por ejemplo, Herramienta de Cambio de Permisos de SwiftPDFLab).
- Sube tu archivo PDF a la plataforma en línea.
- Personaliza las restricciones de impresión, edición y copia según tus requisitos.
- Establece una nueva contraseña de propietario y haz clic en Cambiar permisos para aplicar la nueva configuración.
- El archivo PDF modificado se descargará automáticamente.
Mejor práctica de seguridad: Usa una herramienta que elimine las cargas automáticamente. Nunca subas PDF altamente confidenciales, privados o sensibles para negocios. Las herramientas en línea solo se recomiendan para documentos públicos no sensibles.
Método 4: Cambiar permisos mediante programación en C#
Para desarrolladores, equipos de TI o usuarios que necesitan automatización de PDF por lotes, puedes cambiar los permisos de PDF mediante programación con C# utilizando Free Spire.PDF for .NET, una biblioteca .NET gratuita y sin conexión que maneja tanto contraseñas de permisos como contraseñas de apertura, brindándote control total del ciclo de vida de la seguridad de PDF.
Ejemplo de código C# (Habilitar copia e impresión)
El siguiente código C# carga un PDF, crea una nueva política de seguridad, establece varios permisos y guarda el PDF con los nuevos permisos.
using Spire.Pdf;

namespace ChangeSecurityPermission
{
    class Program
    {
        static void Main(string[] args)
        {
            // 1. Crear un objeto PdfDocument
            PdfDocument pdf = new PdfDocument();

            // 2. Cargar el archivo PDF restringido con contraseña de propietario (si existe)
            pdf.LoadFromFile("Agenda.pdf", "12345");

            // 3. Especificar contraseña de apertura (dejar vacía si no es necesaria)
            string openPsd = string.Empty;

            // 4. Especificar una nueva contraseña de propietario
            string permissionPsd = "abc123";

            // 5. Crear una política de seguridad usando nuevas contraseñas de apertura y propietario
            PdfSecurityPolicy securityPolicy = new PdfPasswordSecurityPolicy(openPsd, permissionPsd);

            // 6. Establecer el algoritmo de cifrado (AES de 128 bits es moderno y seguro)
            securityPolicy.EncryptionAlgorithm = PdfEncryptionAlgorithm.AES_128;

            // 7. Definir los nuevos permisos que deseas permitir
            securityPolicy.DocumentPrivilege.AllowContentCopying = true; // Permitir copia de contenido
            securityPolicy.DocumentPrivilege.AllowPrint = true; // Permitir impresión

            // 8. Aplicar la nueva política de seguridad al documento
            pdf.Encrypt(securityPolicy);

            // 9. Guardar el PDF actualizado en un nuevo archivo
            pdf.SaveToFile("ChangePermissions.pdf");
            pdf.Close();
        }
    }
}
El objeto PdfDocumentPrivilege, recuperado a través de PdfSecurityPolicy.DocumentPrivilege, es una clase de control de permisos granular que define exactamente lo que los usuarios pueden y no pueden hacer con el PDF (las "reglas de restricción"). Aquí es donde activas o desactivas permisos como impresión, copia, edición y relleno de formularios.
Resultado:
Cuándo usar este método:
- Te sientes cómodo con C# y .NET.
- Necesitas procesar muchos PDF automáticamente (por ejemplo, informes diarios).
- Quieres integrar cambios de permisos en tu propio software.
Lista de verificación final antes de cambiar los permisos
Antes de empezar, verifica estos puntos:
- ¿Tienes la contraseña del propietario? (No la contraseña de usuario/apertura)
- ¿Tienes derechos legales para modificar este documento?
- ¿Qué permisos necesitas realmente? (por ejemplo, solo impresión, o copia completa también)
- ¿Estás utilizando una herramienta de confianza (software local > plataformas en línea)?
Una vez que confirmes estos puntos, sigue el método anterior que coincida con tu presupuesto y nivel de habilidad.
Resumen
Aprender cómo cambiar los permisos de PDF te permite controlar completamente tus archivos PDF, equilibrando la seguridad del documento y la flexibilidad. Para usuarios profesionales, Adobe Acrobat es la opción más confiable. LibreOffice Draw sirve como una alternativa gratuita sin conexión, pero puede alterar el formato. Las herramientas en línea son para ediciones rápidas y no sensibles, y C# con Free Spire.PDF es la mejor opción para procesamiento por lotes seguro y automatizado.
Prioriza siempre los métodos sin conexión (software de escritorio/código) para archivos comerciales y personales confidenciales para evitar riesgos de fuga de datos. Al dominar estos métodos, puedes bloquear, restringir o desbloquear fácilmente archivos PDF para satisfacer todas tus necesidades de intercambio de documentos y seguridad.
Preguntas frecuentes (FAQ)
P1. ¿Cambiar los permisos de PDF afectará el contenido existente del PDF?
No. Cambiar los permisos solo modifica el envoltorio de seguridad alrededor del PDF. Los bytes del contenido permanecen idénticos. Sin embargo, el Método 2 (LibreOffice Draw) es una excepción – dado que vuelve a renderizar el PDF, el formato puede cambiar. Usa siempre una copia con el Método 2.
P2. ¿Puedo cambiar los permisos en un PDF firmado digitalmente?
No. Las firmas digitales bloquean el PDF para evitar manipulaciones. Debes eliminar la firma (requiere la acción del firmante) antes de modificar los permisos.
P3. ¿Cuál es la forma más segura de cambiar los permisos de PDF?
La forma más segura es sin conexión con Adobe Acrobat Pro o Free Spire.PDF porque:
- El archivo nunca sale de tu computadora.
- Se puede aplicar cifrado fuerte (AES‑128).
- Ningún servidor de terceros puede interceptar los datos.
P4. ¿Es el método Free Spire.PDF seguro para producción?
Para herramientas internas y automatización a pequeña escala, sí. Pero ten en cuenta el límite de 10 páginas en la versión gratuita. Para páginas ilimitadas, considera la versión comercial.
Ver también
- Cómo comprimir un PDF: Las mejores herramientas para hacer PDF más pequeños
- Cómo eliminar páginas en blanco en PDF (Manual y Automatización)
- 3 formas de reordenar páginas de PDF: En línea, de escritorio y Python
- Cómo firmar digitalmente PDF con C# (Tutorial de código práctico)
- Java: Agregar permisos de seguridad a un documento PDF