Wie kann man PDF-Berechtigungen ändern? 4 sichere Methoden
Inhaltsverzeichnis
- Welche PDF-Berechtigungen können Sie ändern?
- Methode 1: PDF-Berechtigungen mit Adobe Acrobat Pro bearbeiten
- Methode 2: PDF-Berechtigungen mit LibreOffice Draw ändern
- Methode 3: Online-Tools zum Ändern von PDF-Berechtigungen
- Methode 4: Berechtigungen programmgesteuert in C# ändern
- Checkliste vor dem Ändern von Berechtigungen
- Häufig gestellte Fragen (FAQs)
Fragen Sie sich, wie Sie PDF-Berechtigungen ändern können, um Bearbeitungen einzuschränken, Kopieren zu deaktivieren, Drucken zu sperren oder eingeschränkte PDF-Dateien zu entsperren? PDFs werden aufgrund ihres festen Formats und ihrer sicheren Freigabefunktionen universell für professionelle Dokumente, Verträge, Lebensläufe und offizielle Dateien verwendet. Standardmäßige PDF-Berechtigungseinstellungen entsprechen jedoch oft nicht Ihren spezifischen Freigabe- und Sicherheitsanforderungen.
In diesem Leitfaden behandeln wir einfache, umsetzbare Methoden, um PDF-Berechtigungen zu bearbeiten, indem wir professionelle Software, kostenlose Desktop-Tools, zuverlässige Online-Plattformen und sogar programmatische Ansätze für Entwickler verwenden.
- Welche PDF-Berechtigungen können Sie ändern?
- Methode 1: PDF-Berechtigungen mit Adobe Acrobat Pro bearbeiten
- Methode 2: PDF-Berechtigungen mit LibreOffice Draw ändern
- Methode 3: Online-Tools zum Ändern von PDF-Berechtigungen
- Methode 4: Berechtigungen programmgesteuert in C# ändern
- Checkliste vor dem Ändern von Berechtigungen
- Häufig gestellte Fragen (FAQs)
Welche PDF-Berechtigungen können Sie ändern?
PDF-Berechtigungen (auch „Einschränkungseinstellungen“ oder „Sicherheitsflags“ genannt) steuern Kernaktionen von Benutzern. Sie können diese Einstellungen nach Bedarf umschalten:
| Berechtigung | Was sie steuert |
|---|---|
| Ob Benutzer drucken können – Niedrige Auflösung oder Hohe Auflösung | |
| Kopieren von Inhalten | Möglichkeit, Text oder Bilder in die Zwischenablage zu kopieren |
| Dokumentenmontage | Einfügen, Löschen oder Drehen von Seiten |
| Kommentieren | Hinzufügen von Notizen, Hervorhebungen oder Haftnotizen |
| Formularausfüllung | Arbeiten mit ausfüllbaren Formularfeldern |
| Extrahieren von Inhalten | Barrierefreiheitswerkzeuge und Screenreader |
| Änderung | Bearbeiten von Text, Bildern oder Objekten |
Wenn Sie Berechtigungen ändern, aktualisieren Sie diese Flags – zum Beispiel, indem Sie von „Drucken nicht erlaubt“ zu „Drucken in hoher Auflösung erlaubt“ wechseln oder das Kommentieren aktivieren, das zuvor deaktiviert war.
Wichtiger Hinweis: Es gibt keine Sicherheits-„Hintertür“. Sie können Berechtigungen nicht legal ändern, ohne das Eigentümerpasswort oder die Zustimmung des Autors.
Methode 1: PDF-Berechtigungen mit Adobe Acrobat Pro bearbeiten
Adobe Acrobat ist das offizielle Werkzeug zur Änderung von PDF-Sicherheitseinstellungen und bietet vollständige Kontrolle über alle PDF-Berechtigungsoptionen. Es ist ideal für professionelle Anwender, die eine präzise Sicherheitsanpassung benötigen.
Schritte zum Ändern von PDF-Dateiberechtigungen:
- Öffnen Sie die Ziel-PDF-Datei in Adobe Acrobat Pro.
- Gehen Sie zu Datei > Eigenschaften (Tastenkombination: Strg+D).
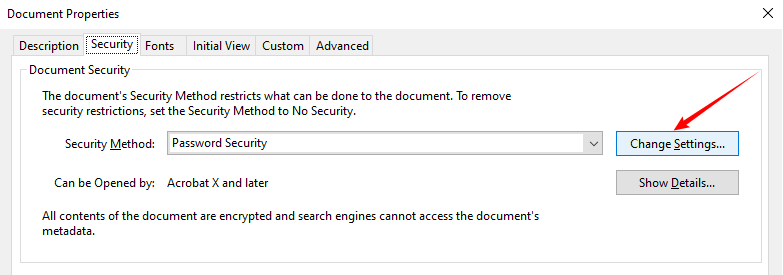
- Navigieren Sie zur Registerkarte Sicherheit – hier werden alle Berechtigungseinstellungen angezeigt.
- Klicken Sie auf Einstellungen ändern, um vorhandene Berechtigungskonfigurationen zu ändern. Wenn die Datei gesperrt ist, geben Sie das Berechtigungspasswort ein, um bearbeitbare Einstellungen zu entsperren.
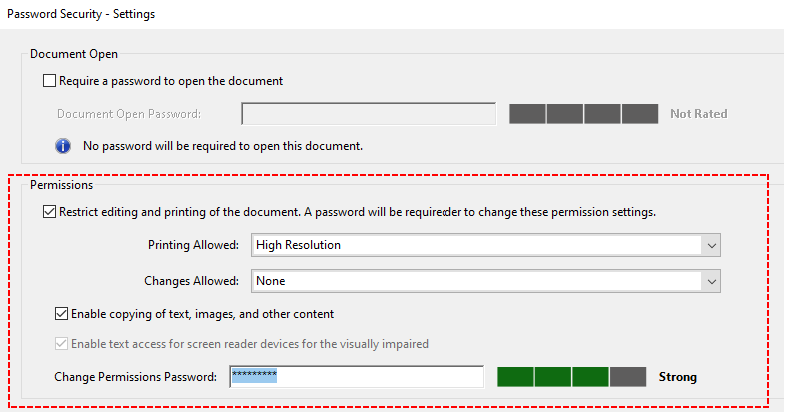
- Im Fenster „Passwortsicherheit – Einstellungen“ passen Sie die Berechtigungen an, indem Sie Aktionen aktivieren oder deaktivieren, wie z. B.:
- Drucken zulassen (Keine/Niedrige/Hohe Auflösung)
- Zulässige Änderungen definieren (Kommentieren/Formularausfüllung/Keine)
- Kopieren von Inhalten und Zugriff auf Barrierefreiheit umschalten
- Legen Sie ein neues Berechtigungspasswort fest, bestätigen Sie die Einstellungen und speichern Sie die geänderte PDF-Datei, um alle Änderungen anzuwenden.
Hinweis: Adobe Acrobat erfordert ein kostenpflichtiges Abonnement.
✅ Praktische Beispiele:
- Verwenden Sie „Änderungen zulässig: Keine“ für endgültige, schreibgeschützte Verträge.
- Verwenden Sie „Änderungen zulässig: Kommentieren“ für Team-Reviews.
Neben der Anpassung spezifischer PDF-Berechtigungseinstellungen können Sie mit denselben Werkzeugen auch PDF-Berechtigungen entfernen, um alle Einschränkungen auf einmal aufzuheben.
Methode 2: PDF-Berechtigungen mit LibreOffice Draw ändern
Haben Sie kein Adobe? Kein Problem. Sie können LibreOffice Draw verwenden, um PDF-Berechtigungen zu ändern. Dieses Tool kann PDFs öffnen und bearbeiten und sie dann mit neuen Berechtigungseinstellungen erneut exportieren. Es funktioniert offline, schützt Ihre Privatsphäre und kostet nichts.
Schritte zur Verwendung von LibreOffice Draw:
- Laden Sie es von libreoffice.org herunter und installieren Sie es. Wählen Sie die Version für Ihr Betriebssystem (Windows, Mac, Linux).
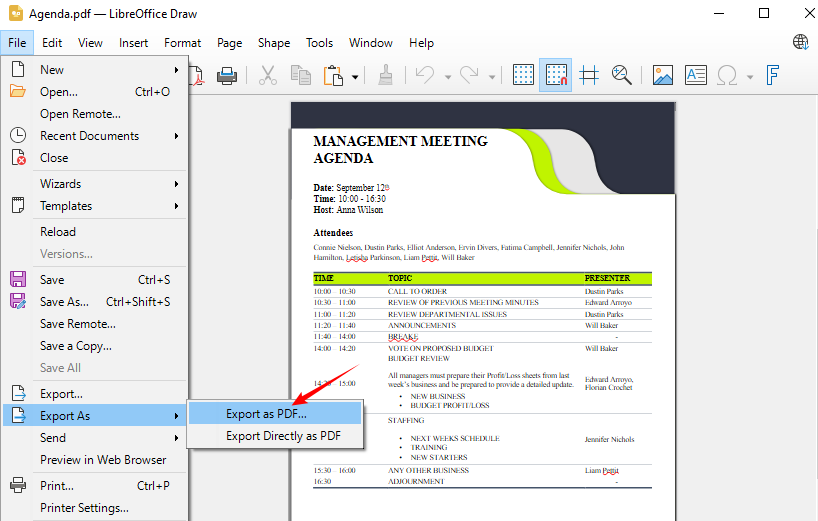
- Starten Sie LibreOffice Draw und öffnen Sie Ihre PDF-Datei darin.
- Gehen Sie zu Datei > Exportieren als > Als PDF exportieren.
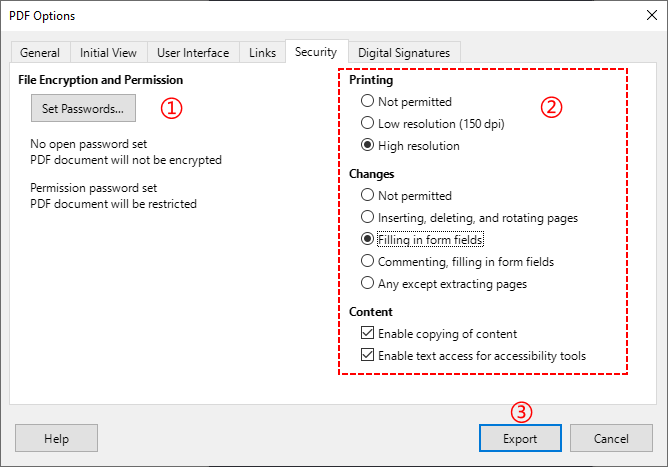
- Navigieren Sie im Dialogfeld „PDF-Optionen“ zur Registerkarte „Sicherheit“.
- Legen Sie ein neues Eigentümerpasswort fest (erforderlich, um Berechtigungen zu ändern).
- Passen Sie die Berechtigungs-Kontrollkästchen nach Ihren Wünschen an. Zum Beispiel:
- Drucken in hoher Auflösung aktivieren
- Formularausfüllung aktivieren (zuerst interaktive Formularfelder in PDF erstellen)
- Kopieren von Inhalten aktivieren
- Text-/Zugriff für Screenreader aktivieren
- Klicken Sie auf Exportieren und speichern Sie die neue PDF-Datei.
⚠️ Warnung: Diese Methode schreibt die PDF neu. Einige komplexe Formatierungen (Schriftarten, Ebenen) können sich verschieben. Testen Sie zuerst mit einer Kopie.
Methode 3: Online-Tools zum Ändern von PDF-Berechtigungen
Wenn Sie PDF-Berechtigungen nur selten ändern und keine Desktop-Software installieren möchten, bieten sichere Online-PDF-Tools eine schnelle, temporäre Lösung. Tools wie SwiftPDFLab und pdfup.org unterstützen die browserbasierte Bearbeitung von PDF-Berechtigungen.
Allgemeiner Workflow zum Ändern von PDF-Berechtigungen online:
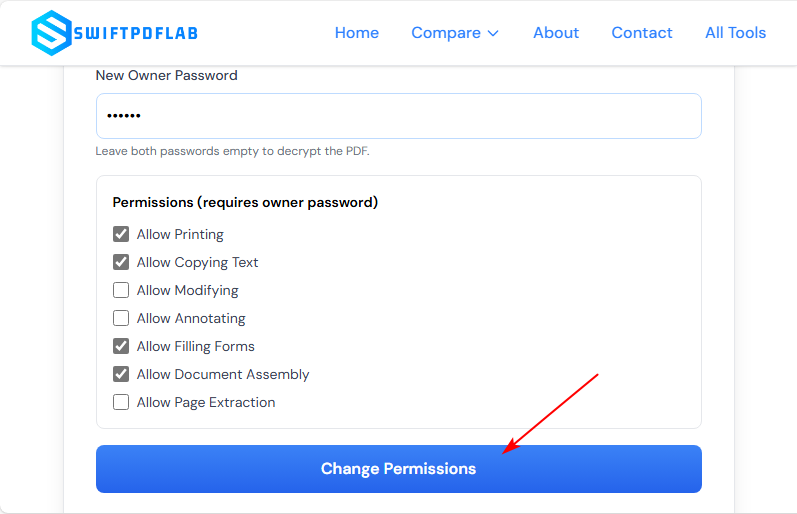
- Öffnen Sie einen vertrauenswürdigen Online-PDF-Berechtigungseditor in Ihrem Browser (z. B. das SwiftPDFLab Tool zum Ändern von Berechtigungen).
- Laden Sie Ihre PDF-Datei auf die Online-Plattform hoch.
- Passen Sie die Druck-, Bearbeitungs- und Kopierbeschränkungen entsprechend Ihren Anforderungen an.
- Legen Sie ein neues Eigentümerpasswort fest und klicken Sie auf Berechtigungen ändern, um die neuen Einstellungen anzuwenden.
- Die geänderte PDF-Datei wird automatisch heruntergeladen.
Best Practice für Sicherheit: Verwenden Sie ein Tool, das Uploads automatisch löscht. Laden Sie niemals hochvertrauliche, private oder geschäftskritische PDFs hoch. Online-Tools werden nur für nicht sensible öffentliche Dokumente empfohlen.
Methode 4: Berechtigungen programmgesteuert in C# ändern
Für Entwickler, IT-Teams oder Benutzer, die eine Stapelverarbeitung von PDFs benötigen, können Sie PDF-Berechtigungen mit C# programmgesteuert ändern, indem Sie Free Spire.PDF for .NET verwenden – eine kostenlose, Offline-.NET-Bibliothek, die sowohl Berechtigungs- als auch Öffnungspasswörter verarbeitet und Ihnen die vollständige Kontrolle über die PDF-Sicherheit über den gesamten Lebenszyklus ermöglicht.
C#-Codebeispiel (Kopieren und Drucken zulassen)
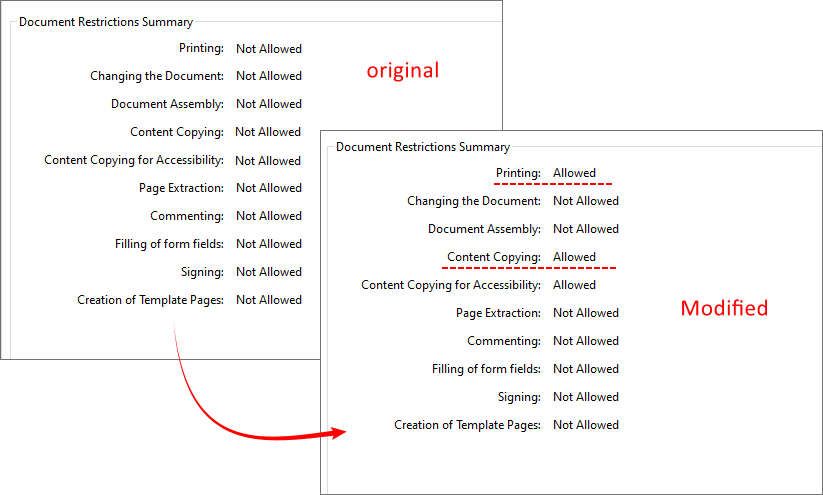
Der folgende C#-Code lädt eine PDF-Datei, erstellt eine neue Sicherheitrichtlinie, legt verschiedene Berechtigungen fest und speichert die PDF-Datei mit den neuen Berechtigungen.
using Spire.Pdf;

namespace ChangeSecurityPermission
{
    class Program
    {
        static void Main(string[] args)
        {
            // 1. Erstellen Sie ein PdfDocument-Objekt
            PdfDocument pdf = new PdfDocument();

            // 2. Laden Sie die eingeschränkte PDF-Datei mit dem Eigentümerpasswort (falls vorhanden)
            pdf.LoadFromFile("Agenda.pdf", "12345");

            // 3. Geben Sie das Öffnungspasswort an (leer lassen, falls nicht benötigt)
            string openPsd = string.Empty;

            // 4. Geben Sie ein neues Eigentümerpasswort an
            string permissionPsd = "abc123";

            // 5. Erstellen Sie eine Sicherheitrichtlinie mit neuen Öffnungs- & Eigentümerpasswörtern
            PdfSecurityPolicy securityPolicy = new PdfPasswordSecurityPolicy(openPsd, permissionPsd);

            // 6. Legen Sie den Verschlüsselungsalgorithmus fest (AES 128-Bit ist modern und sicher)
            securityPolicy.EncryptionAlgorithm = PdfEncryptionAlgorithm.AES_128;

            // 7. Definieren Sie die neuen Berechtigungen, die Sie zulassen möchten
            securityPolicy.DocumentPrivilege.AllowContentCopying = true; // Kopieren von Inhalten zulassen
            securityPolicy.DocumentPrivilege.AllowPrint = true; // Drucken zulassen

            // 8. Wenden Sie die neue Sicherheitrichtlinie auf das Dokument an
            pdf.Encrypt(securityPolicy);

            // 9. Speichern Sie die aktualisierte PDF-Datei in einer neuen Datei
            pdf.SaveToFile("ChangePermissions.pdf");
            pdf.Close();
        }
    }
}
Das PdfDocumentPrivilege-Objekt, das über PdfSecurityPolicy.DocumentPrivilege abgerufen wird, ist eine granulare Berechtigungsklasse, die genau definiert, was Benutzer mit der PDF tun können und was nicht (die „Einschränkungsregeln“). Hier schalten Sie Berechtigungen wie Drucken, Kopieren, Bearbeiten und Formularausfüllung um.
Ergebnis:
Wann diese Methode verwendet werden sollte:
- Sie sind mit C# und .NET vertraut.
- Sie müssen viele PDFs automatisch verarbeiten (z. B. tägliche Berichte).
- Sie möchten Berechtigungsänderungen in Ihre eigene Software integrieren.
Checkliste vor dem Ändern von Berechtigungen
Verifizieren Sie vor dem Start diese Punkte:
- Haben Sie das Eigentümerpasswort? (Nicht das Benutzer-/Öffnungspasswort)
- Haben Sie die rechtlichen Befugnisse, dieses Dokument zu ändern?
- Welche Berechtigungen benötigen Sie tatsächlich? (z. B. nur Drucken oder auch vollständiges Kopieren)
- Verwenden Sie ein vertrauenswürdiges Werkzeug (lokale Software > Online-Plattformen)?
Sobald Sie diese bestätigt haben, folgen Sie der obigen Methode, die Ihrem Budget und Ihrem Kenntnisstand entspricht.
Zusammenfassung
Das Erlernen, wie man PDF-Berechtigungen ändert, ermöglicht Ihnen die vollständige Kontrolle über Ihre PDF-Dateien und gleicht die Sicherheit von Dokumenten mit Flexibilität aus. Für professionelle Anwender ist Adobe Acrobat die zuverlässigste Wahl. LibreOffice Draw dient als kostenlose Offline-Alternative, kann aber die Formatierung ändern. Online-Tools sind für schnelle, nicht sensible Bearbeitungen gedacht, und C# mit Free Spire.PDF ist die beste Wahl für sichere, automatisierte Stapelverarbeitung.
Priorisieren Sie immer Offline-Methoden (Desktop-Software/Code) für vertrauliche Geschäfts- und persönliche Dateien, um Risiken von Datenlecks zu vermeiden. Durch die Beherrschung dieser Methoden können Sie PDF-Dateien einfach sperren, einschränken oder entsperren, um alle Ihre Anforderungen an die Dokumentenfreigabe und -sicherheit zu erfüllen.
Häufig gestellte Fragen (FAQs)
F1. Beeinflusst das Ändern von PDF-Berechtigungen vorhandene PDF-Inhalte?
Nein. Das Ändern von Berechtigungen modifiziert nur die Sicherheitsumgebung um die PDF. Die Inhaltsbytes bleiben identisch. Methode 2 (LibreOffice Draw) ist jedoch eine Ausnahme – da sie die PDF neu rendert, kann sich die Formatierung ändern. Verwenden Sie bei Methode 2 immer eine Kopie.
F2. Kann ich Berechtigungen für eine digital signierte PDF-Datei ändern?
Nein. Digitale Signaturen sperren die PDF, um Manipulationen zu verhindern. Sie müssen die Signatur entfernen (erfordert die Aktion des Unterzeichners), bevor Sie Berechtigungen ändern können.
F3. Was ist der sicherste Weg, PDF-Berechtigungen zu ändern?
Der sicherste Weg ist offline mit Adobe Acrobat Pro oder Free Spire.PDF, weil:
- Die Datei verlässt niemals Ihren Computer.
- Eine starke Verschlüsselung (AES‑128) kann angewendet werden.
- Kein Drittanbieter-Server kann die Daten abfangen.
F4. Ist die Free Spire.PDF-Methode sicher für die Produktion?
Für interne Tools und Kleinserienautomatisierung ja. Beachten Sie jedoch das 10-Seiten-Limit in der kostenlosen Version. Für unbegrenzte Seiten sollten Sie die kommerzielle Version in Betracht ziehen.
Siehe auch
- So komprimieren Sie eine PDF-Datei: Die besten Tools, um PDFs kleiner zu machen
- So löschen Sie leere Seiten in PDF (manuell & Automatisierung)
- 3 Wege, PDF-Seiten neu anzuordnen: Online, Desktop & Python
- So signieren Sie PDFs digital mit C# (Praktisches Code-Tutorial)
- Java: Sicherheitsberechtigungen zu einem PDF-Dokument hinzufügen
Как изменить разрешения PDF? 4 безопасных способа
Содержание
- Какие разрешения PDF можно изменить?
- Способ 1: Изменение разрешений PDF с помощью Adobe Acrobat Pro
- Способ 2: Изменение разрешений PDF с помощью LibreOffice Draw
- Способ 3: Онлайн-инструменты для изменения разрешений PDF
- Способ 4: Программное изменение разрешений в C#
- Финальный чек-лист перед изменением разрешений
- Часто задаваемые вопросы (FAQ)
Вы задаетесь вопросом, как изменить разрешения PDF, чтобы ограничить редактирование, запретить копирование, заблокировать печать или разблокировать защищенные файлы PDF? PDF-файлы повсеместно используются для профессиональных документов, контрактов, резюме и официальных файлов благодаря их фиксированному форматированию и функциям безопасного обмена. Однако стандартные настройки разрешений PDF часто не соответствуют вашим уникальным потребностям в обмене и безопасности.
В этом руководстве мы рассмотрим простые и действенные методы редактирования разрешений PDF с использованием профессионального программного обеспечения, бесплатных настольных инструментов, надежных онлайн-платформ и даже программных подходов для разработчиков.
- Какие разрешения PDF можно изменить?
- Способ 1: Изменение разрешений PDF с помощью Adobe Acrobat Pro
- Способ 2: Изменение разрешений PDF с помощью LibreOffice Draw
- Способ 3: Онлайн-инструменты для изменения разрешений PDF
- Способ 4: Программное изменение разрешений в C#
- Финальный чек-лист перед изменением разрешений
- Часто задаваемые вопросы (FAQ)
Какие разрешения PDF можно изменить?
Разрешения PDF (также называемые «настройки ограничений» или «флаги безопасности») контролируют основные действия пользователя. Вы можете переключать эти настройки по мере необходимости:
| Разрешение | Что контролирует |
|---|---|
| Печать | Разрешена ли печать – Низкое разрешение или Высокое разрешение |
| Копирование содержимого | Возможность копировать текст или изображения в буфер обмена |
| Сборка документа | Вставка, удаление или поворот страниц |
| Комментирование | Добавление заметок, выделений или стикеров |
| Заполнение форм | Работа с заполняемыми полями формы |
| Извлечение содержимого | Инструменты доступности и программы чтения с экрана |
| Модификация | Редактирование текста, изображений или объектов |
Когда вы изменяете разрешения, вы обновляете эти флаги – например, переключаясь с «печать не разрешена» на «печать в высоком разрешении разрешена» или включая комментирование, которое ранее было отключено.
Важное примечание: Не существует «бэкдора» для безопасности. Вы не можете законно изменить разрешения без пароля владельца или согласия автора.
Способ 1: Изменение разрешений PDF с помощью Adobe Acrobat Pro
Adobe Acrobat — это официальный инструмент для изменения настроек безопасности PDF, предоставляющий полный контроль над всеми параметрами разрешений PDF. Он идеально подходит для профессиональных пользователей, которым требуется точная настройка безопасности.
Шаги по изменению разрешений файла PDF:
- Откройте целевой PDF-файл в Adobe Acrobat Pro.
- Перейдите в раздел Файл > Свойства (сочетание клавиш: Ctrl+D).
- Перейдите на вкладку Безопасность – здесь отображаются все настройки разрешений.
- Нажмите Изменить настройки, чтобы изменить существующие конфигурации разрешений. Если файл заблокирован, введите пароль разрешений, чтобы разблокировать настраиваемые параметры.
- В окне «Безопасность паролем – Настройки» настройте разрешения, устанавливая или снимая флажки для таких действий, как:
- Установить разрешение на печать (Нет/Низкое/Высокое разрешение)
- Определить разрешенные изменения (Комментирование/Заполнение форм/Нет)
- Включить копирование содержимого и доступ для программ чтения с экрана
- Установите новый пароль разрешений, подтвердите настройки и сохраните измененный PDF-файл, чтобы применить все изменения.
Примечание: Adobe Acrobat требует платной подписки.
✅ Практические примеры:
- Используйте «Разрешенные изменения: Нет» для окончательных контрактов только для чтения.
- Используйте «Разрешенные изменения: Комментирование» для командных обзоров.
Помимо настройки конкретных параметров разрешений PDF, те же инструменты позволяют полностью удалить разрешения PDF, чтобы снять все ограничения одновременно.
Способ 2: Изменение разрешений PDF с помощью LibreOffice Draw
Нет Adobe? Не проблема. Вы можете использовать LibreOffice Draw для изменения разрешений PDF. Этот инструмент может открывать и редактировать PDF-файлы, а затем повторно экспортировать их с новыми настройками разрешений. Он работает в автономном режиме, уважает вашу конфиденциальность и ничего не стоит.
Шаги по использованию LibreOffice Draw:
- Загрузите и установите с сайта libreoffice.org. Выберите версию для вашей операционной системы (Windows, Mac, Linux).
- Запустите LibreOffice Draw и откройте в нем свой PDF-файл.
- Перейдите в раздел Файл > Экспортировать как > Экспортировать как PDF.
- Перейдите на вкладку Безопасность в диалоговом окне Параметры PDF.
- Установите новый пароль владельца (требуется для изменения разрешений).
- Настройте флажки разрешений по своему желанию. Например:
- Включить печать в высоком разрешении
- Включить заполнение форм (сначала создайте интерактивные поля формы в PDF)
- Включить копирование содержимого
- Включить текст/доступ для программ чтения с экрана
- Нажмите Экспортировать и сохраните новый PDF-файл.
⚠️ Предупреждение: Этот метод перезаписывает PDF. Некоторые сложные элементы форматирования (шрифты, слои) могут сместиться. Сначала протестируйте на копии.
Способ 3: Онлайн-инструменты для изменения разрешений PDF
Если вы редко изменяете разрешения PDF и отказываетесь устанавливать настольное программное обеспечение, безопасные онлайн-инструменты для работы с PDF предоставляют быстрое временное решение. Такие инструменты, как SwiftPDFLab и pdfup.org, поддерживают редактирование разрешений PDF через браузер.
Общий рабочий процесс для изменения разрешений PDF онлайн:
- Откройте надежный онлайн-редактор разрешений PDF в своем браузере (например, инструмент SwiftPDFLab для изменения разрешений).
- Загрузите свой PDF-файл на онлайн-платформу.
- Настройте ограничения на печать, редактирование и копирование в соответствии с вашими требованиями.
- Установите новый пароль владельца и нажмите Изменить разрешения, чтобы применить новые настройки.
- Измененный PDF-файл будет загружен автоматически.
Лучшая практика безопасности: Используйте инструмент, который автоматически удаляет загруженные файлы. Никогда не загружайте крайне конфиденциальные, личные или коммерчески важные PDF-файлы. Онлайн-инструменты рекомендуются только для нечувствительных общедоступных документов.
Способ 4: Программное изменение разрешений в C#
Для разработчиков, ИТ-отделов или пользователей, которым требуется пакетная автоматизация PDF, вы можете программно изменять разрешения PDF с помощью C#, используя Free Spire.PDF for .NET — бесплатную автономную библиотеку .NET, которая обрабатывает как пароли разрешений, так и открывающие пароли, предоставляя вам полный контроль над безопасностью PDF на протяжении всего жизненного цикла.
Пример кода на C# (Включение копирования и печати)
Следующий код на C# загружает PDF-файл, создает новую политику безопасности, устанавливает различные разрешения и сохраняет PDF с новыми разрешениями.
using Spire.Pdf;

namespace ChangeSecurityPermission
{
    class Program
    {
        static void Main(string[] args)
        {
            // 1. Создать объект PdfDocument
            PdfDocument pdf = new PdfDocument();

            // 2. Загрузить защищенный PDF-файл с паролем владельца (если есть)
            pdf.LoadFromFile("Agenda.pdf", "12345");

            // 3. Указать открывающий пароль (оставить пустым, если не требуется)
            string openPsd = string.Empty;

            // 4. Указать новый пароль владельца
            string permissionPsd = "abc123";

            // 5. Создать политику безопасности, используя новые открывающий и пароль владельца
            PdfSecurityPolicy securityPolicy = new PdfPasswordSecurityPolicy(openPsd, permissionPsd);

            // 6. Установить алгоритм шифрования (AES 128-бит является современным и безопасным)
            securityPolicy.EncryptionAlgorithm = PdfEncryptionAlgorithm.AES_128;

            // 7. Определить новые разрешения, которые вы хотите разрешить
            securityPolicy.DocumentPrivilege.AllowContentCopying = true; // Разрешить копирование содержимого
            securityPolicy.DocumentPrivilege.AllowPrint = true; // Разрешить печать

            // 8. Применить новую политику безопасности к документу
            pdf.Encrypt(securityPolicy);

            // 9. Сохранить обновленный PDF в новый файл
            pdf.SaveToFile("ChangePermissions.pdf");
            pdf.Close();
        }
    }
}
Объект PdfDocumentPrivilege, получаемый через PdfSecurityPolicy.DocumentPrivilege, представляет собой класс детального контроля разрешений, который определяет, что именно пользователи могут и не могут делать с PDF (т.е. «правила ограничений»). Именно здесь вы переключаете такие разрешения, как печать, копирование, редактирование и заполнение форм.
Результат:
Когда использовать этот метод:
- Вы уверенно владеете C# и .NET.
- Вам нужно автоматически обрабатывать большое количество PDF-файлов (например, ежедневные отчеты).
- Вы хотите интегрировать изменения разрешений в собственное программное обеспечение.
Финальный чек-лист перед изменением разрешений
Перед началом проверьте следующие пункты:
- У вас есть пароль владельца? (Не пользовательский/открывающий пароль)
- У вас есть юридические права на изменение этого документа?
- Какие разрешения вам действительно нужны? (например, только печать или полное копирование тоже)
- Вы используете надежный инструмент (настольное ПО > онлайн-платформы)?
После подтверждения этих пунктов следуйте приведенному выше методу, который соответствует вашему бюджету и уровню навыков.
Резюме
Изучение того, как изменить разрешения PDF, дает вам возможность полностью контролировать ваши PDF-файлы, балансируя безопасность документов и гибкость. Для профессиональных пользователей Adobe Acrobat является наиболее надежным выбором. LibreOffice Draw служит бесплатной автономной альтернативой, но может изменять форматирование. Онлайн-инструменты предназначены для быстрых, нечувствительных правок, а C# с Free Spire.PDF — лучший выбор для безопасной автоматизированной пакетной обработки.
Всегда отдавайте предпочтение автономным методам (настольное ПО/код) для конфиденциальных деловых и личных файлов, чтобы избежать рисков утечки данных. Освоив эти методы, вы сможете легко блокировать, ограничивать или разблокировать PDF-файлы для удовлетворения всех ваших потребностей в обмене документами и обеспечении безопасности.
Часто задаваемые вопросы (FAQ)
В1. Повлияет ли изменение разрешений PDF на существующее содержимое PDF?
Нет. Изменение разрешений только изменяет контейнер безопасности вокруг PDF. Байты содержимого остаются идентичными. Однако Способ 2 (LibreOffice Draw) является исключением – поскольку он перерисовывает PDF, форматирование может измениться. Всегда используйте копию со Способом 2.
В2. Могу ли я изменить разрешения в PDF с цифровой подписью?
Нет. Цифровые подписи блокируют PDF для предотвращения подделки. Перед изменением разрешений необходимо удалить подпись (требуется действие подписанта).
В3. Какой самый безопасный способ изменить разрешения PDF?
Самый безопасный способ — автономно с помощью Adobe Acrobat Pro или Free Spire.PDF, потому что:
- Файл никогда не покидает ваш компьютер.
- Может применяться сильное шифрование (AES‑128).
- Ни один сторонний сервер не может перехватить данные.
В4. Безопасен ли метод Free Spire.PDF для продакшена?
Для внутренних инструментов и маломасштабной автоматизации — да. Но обратите внимание на ограничение в 10 страниц в бесплатной версии. Для неограниченного количества страниц рассмотрите коммерческую версию.
См. также
- Как сжать PDF: лучшие инструменты для уменьшения размера PDF
- Как удалить пустые страницы в PDF (вручную и автоматизация)
- 3 способа изменить порядок страниц PDF: онлайн, настольные ПК и Python
- Как ставить цифровую подпись на PDF с помощью C# (практическое руководство по коду)
- Java: Добавление разрешений безопасности к документу PDF
5 maneiras simples de dividir um documento do Word em vários arquivos (manual e automatizado)
Sumário
Lidar com documentos Word grandes pode ser desafiador. Arquivos com centenas de páginas frequentemente deixam o Word lento, complicam a colaboração e tornam o compartilhamento por e-mail incômodo. Saber como dividir um documento Word eficientemente pode economizar tempo, reduzir o tamanho do arquivo e melhorar o fluxo de trabalho.
Neste guia, apresentaremos 5 maneiras práticas de dividir documentos Word, desde métodos manuais simples como Copiar e Colar até soluções automatizadas usando Python. Seja você um iniciante gerenciando um único arquivo ou um usuário avançado processando centenas de documentos, este artigo o ajudará a escolher o método que melhor se adapta às suas necessidades.
Visão Geral dos Métodos
- Método 1 - Dividir um Documento Word via Copiar e Colar
- Método 2 - Dividir Documento Word por Títulos
- Método 3 - Dividir Documentos Word via Conversão para PDF
- Método 4 - Dividir Páginas no Word Online Gratuitamente
- Método 5 - Automatizar a Divisão de Documentos Word com Python
Por Que Você Pode Precisar Dividir um Documento Word?
Dividir um documento Word não é apenas uma tarefa técnica - pode tornar seu trabalho mais organizado e fácil de gerenciar. Aqui estão algumas razões comuns para dividir documentos Word:
- Colaboração Aprimorada: Envie facilmente capítulos ou seções específicas para diferentes editores ou partes interessadas sem compartilhar o documento inteiro.
- Tamanho de Arquivo Otimizado: Reduza o volume de documentos massivos e ricos em imagens para e-mails mais rápidos e uploads mais suaves na nuvem.
- Melhor Organização: Divida um relatório complexo de múltiplos projetos em arquivos individuais e pesquisáveis.
- Conversão Perfeita: Prepare segmentos específicos para conversão para PDF, Markdown ou HTML.
Método 1 - Dividir um Documento Word via Copiar e Colar
Ideal para: Extrair seções específicas, edições únicas ou iniciantes.
O método de Copiar e Colar é a maneira mais intuitiva de dividir um documento Word manualmente. Ele não requer software adicional ou conhecimento técnico e funciona perfeitamente em todas as versões do Microsoft Word, incluindo Word para Microsoft 365, Word 2024, 2021, 2019 e 2016. Essa abordagem é ideal para usuários que precisam de controle granular total sobre o conteúdo específico que desejam isolar.
Instruções Passo a Passo:
-
Abra Seu Documento
Abra o Word e o arquivo que você deseja dividir. -
Selecione o Conteúdo Desejado
Destaque a seção ou capítulo a ser extraído.- ⚡ Dica: Use Ctrl + Shift + End (Windows) ou Cmd + Shift + End (Mac) para selecionar rapidamente tudo do seu cursor até o final do documento.
-
Copie o Conteúdo
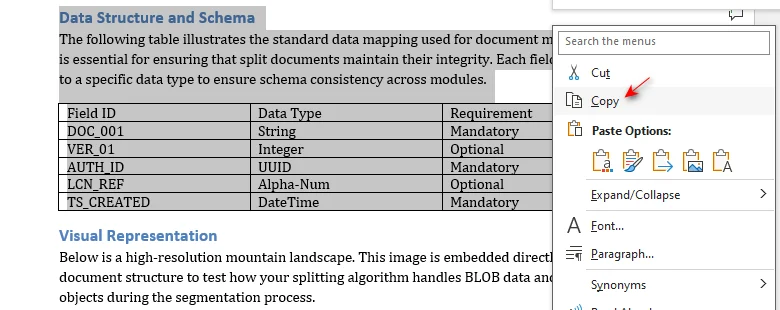
Pressione Ctrl + C (Windows) ou Cmd + C (Mac) no seu teclado, ou clique com o botão direito na área destacada e selecione Copiar.
-
Crie um Novo Arquivo
Pressione Ctrl + N para abrir instantaneamente um novo documento em branco. -
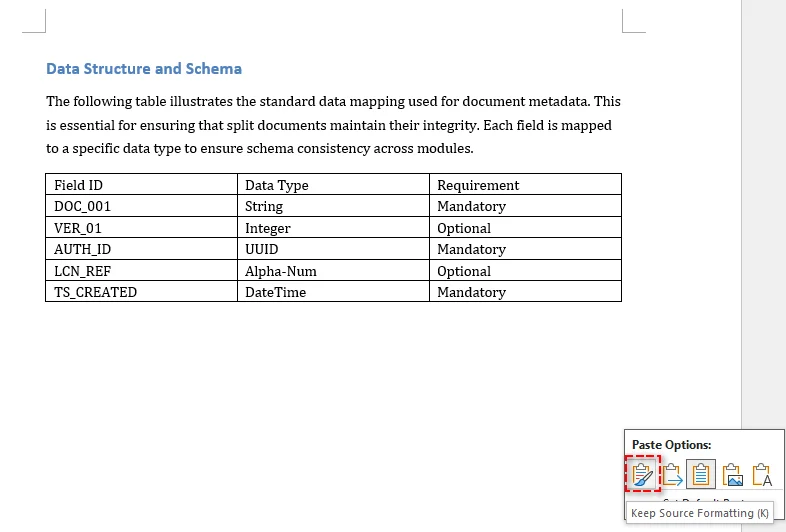
Cole o Conteúdo
Pressione Ctrl + V (Windows) ou Cmd + V (Mac) para colar. Para preservar a formatação original, clique no ícone Opções de Colagem no final do texto colado (ou pressione Ctrl) e selecione Manter Formatação Original (K).
-
Salve o Novo Arquivo
Pressione F12 para abrir a caixa de diálogo Salvar Como. Insira um nome de arquivo descritivo, escolha sua pasta de destino e clique em Salvar.
Pontos Fortes e Limitações:
| ✅ Pontos Fortes | ❌ Limitações |
|---|---|
| Curva de aprendizado zero | Ineficiente para tarefas em massa |
| Controle preciso sobre a seleção de conteúdo | Formatação complexa pode exigir ajuste manual |
Dicas Extras: Evitando Mudanças de Formatação
Copiar manualmente é rápido, mas pode quebrar layouts complexos. Siga estas dicas:
- Páginas Paisagem: Se a origem tiver páginas em paisagem, insira uma Quebra de Seção (Layout > Quebras > Próxima Página) no novo arquivo antes de colar para garantir que o layout horizontal seja preservado.
- Cabeçalhos e Rodapés: Esses elementos de fundo (incluindo números de página e marcas d'água) não são transferidos. Você precisará reaplicá-los manualmente no novo arquivo.
- Consistência de Estilo: Para evitar alterações de fonte ou espaçamento, sempre use Manter Formatação Original ao colar.
- Links Quebrados: Esteja ciente de que hiperlinks internos (Sumário) geralmente quebram; pressione F9 no novo arquivo para atualizar todos os campos.
Precisa converter esses arquivos divididos? Confira nosso guia sobre Converter Word para Markdown para documentação de alta velocidade.
Método 2 - Dividir Documento Word por Títulos
Ideal para: Dividir documentos longos e com múltiplos capítulos (por exemplo, 50+ páginas) que já utilizam os Estilos de Título do Word.
Se o seu documento está bem organizado com Estilos de Título (Título 1, 2, etc.), o recurso integrado Modo de Exibição de Tópicos do Microsoft Word é mais eficiente. Este método automatiza o processo de segmentação, garantindo que cada seção seja exportada como um arquivo vinculado individual, eliminando os erros de destaque manual e a 'formatação quebrada' comum com copiar e colar.
Instruções Passo a Passo:
-
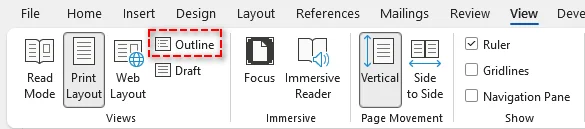
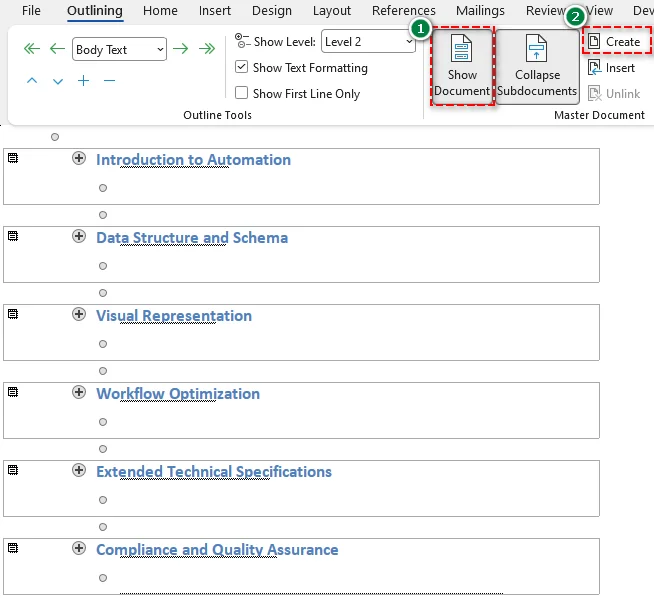
Entrar no Modo de Exibição de Tópicos
Navegue até a guia Exibir e clique em Tópicos.
-
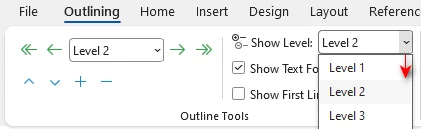
Mostrar Títulos
Na guia Tópicos, defina Mostrar Nível para o nível de título pelo qual você deseja dividir (por exemplo, Nível 2). Isso recolhe todo o texto do corpo, mostrando apenas seus títulos principais.
-
Selecionar Títulos
Destaque todos os títulos pelos quais você deseja dividir. -
Criar Subdocumentos
Clique no botão Mostrar Documento e, em seguida, clique em Criar. Você verá caixas cinzas finas (Subdocumentos) aparecerem ao redor dos seus títulos selecionados.
-
Salvar os Subdocumentos
Pressione F12, escolha uma pasta de destino e clique em Salvar para salvar os subdocumentos.
Resultado: O Word gerará instantaneamente arquivos separados para cada título que você selecionou dentro dessa pasta.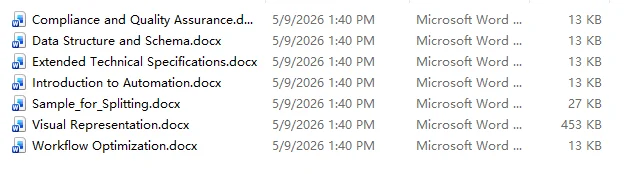
Pontos Fortes e Limitações:
| ✅ Pontos Fortes | ❌ Limitações |
|---|---|
| Sem arrastar manualmente | Só funciona se o documento usar Estilos de Título consistentes |
| Nomes de arquivo são atribuídos automaticamente | Cria links de subdocumentos complexos que podem ser frágeis se os arquivos forem movidos individualmente |
Dicas Extras:
- Regra da Nova Pasta: Sempre crie uma nova pasta antes de salvar os subdocumentos. O Word usará o texto do seu título como nomes de arquivo; sem uma pasta, ele poluirá seu diretório instantaneamente.
- Teste de Navegação Primeiro: Antes de dividir, vá para o Painel de Navegação (Ctrl + F > Títulos). Se estiver vazio, o Word não reconhece sua estrutura. Você precisará aplicar Estilos de Título aos seus títulos primeiro.
Método 3 - Dividir Documentos Word via Conversão para PDF
Ideal para: Compartilhar capítulos específicos que não exigem edição adicional e devem ter a mesma aparência em qualquer dispositivo.
Se o seu objetivo é distribuir um segmento polido do seu trabalho, dividir via conversão para PDF é a maneira mais confiável de garantir a compatibilidade entre plataformas. O PDF bloqueia seu layout, fontes e imagens, impedindo que as configurações do Word do destinatário baguncem seu trabalho árduo.
Instruções Passo a Passo:
-
Converter para PDF
Abra seu arquivo no Word, vá para Arquivo > Salvar Como e selecione PDF (*.pdf). -
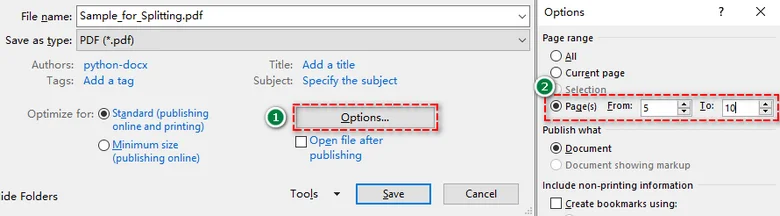
Definir Intervalo
Na caixa de diálogo, clique no botão Opções.... Na seção Intervalo de páginas, selecione Página(s), insira seu intervalo desejado (por exemplo, 5-10) e clique em OK.
-
Salvar o arquivo
Clique em Salvar e repita para outros intervalos de páginas.
Pontos Fortes e Limitações:
| ✅ Pontos Fortes | ❌ Limitações |
|---|---|
| Layout e formatação permanecem 100% estáticos | Mais difícil de editar após a divisão |
Dica Extra:
- Reedição: Precisa mudar algo? Clique com o botão direito no PDF dividido e selecione Abrir com > Word. O Word tentará reconstruir o texto para você, embora layouts complexos possam mudar ligeiramente.
Método 4 - Dividir Páginas no Word Online Gratuitamente
Ideal para: Usuários sem o Microsoft Word instalado no desktop ou qualquer pessoa que trabalhe em dispositivos móveis.
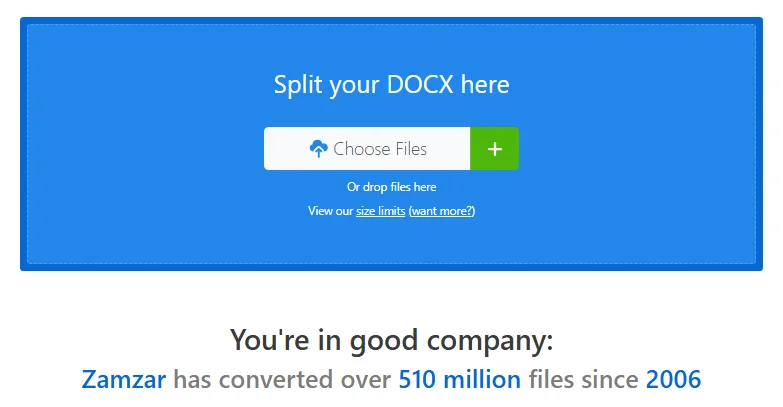
Se você não tem acesso ao aplicativo desktop do Microsoft Word, ou se precisa de uma solução de "um clique" em movimento, um divisor de documentos Word online como o Zamzar é a escolha mais conveniente. Esta ferramenta baseada em nuvem cuida do trabalho pesado em seus servidores, permitindo que você divida documentos Word a cada X páginas sem nenhuma formatação manual.
Como Dividir Páginas no Word Online:
-
Carregar Seu Arquivo
Acesse o site do divisor de documentos Word Zamzar e clique em Escolher Arquivos (ou arraste e solte seu documento).
-
Definir sua Lógica de Divisão
Especifique o intervalo para a divisão (por exemplo, dividir a cada 1 página).
-
Dividir e Baixar
Clique em Dividir Agora. Assim que o processo for concluído, baixe seus documentos divididos diretamente para o seu dispositivo.
Pontos Fortes e Limitações:
| ✅ Pontos Fortes | ❌ Limitações |
|---|---|
| Rápido e simples | Requer o upload do seu documento para um servidor de terceiros |
| Funciona em qualquer dispositivo (celulares, tablets e mais) | Versões gratuitas geralmente limitam o tamanho total do arquivo (por exemplo, 50 MB) |
Aviso de Segurança:
Embora os divisores online sejam incrivelmente convenientes, nunca os use para documentos confidenciais (como contratos legais, extratos bancários ou registros médicos). Para dados privados, sempre opte pelos métodos offline (Método 1, 2, 3 ou 5).
Método 5 - Automatizar a Divisão de Documentos Word com Python
Ideal para: Desenvolvedores e usuários avançados que precisam processar grandes volumes de documentos ou automatizar relatórios mensais recorrentes.
Se você está enfrentando uma "montanha" de arquivos - como dividir 500 contratos individuais em arquivos separados - clicar manualmente não é mais uma opção. A automação com Python permite criar um único script que lida com todo o processo em segundos, garantindo 100% de precisão sem intervenção humana.
Instruções Passo a Passo:
-
Configuração do Ambiente
Para automatizar a divisão de documentos Word, usaremos a biblioteca Spire.Doc para Python. Ao contrário de algumas bibliotecas de código aberto como python-docx, que lutam com layouts complexos do Word, Spire.Doc mantém alta fidelidade durante o processo de extração de páginas.Antes de prosseguir, instale-a executando o seguinte comando no seu terminal:
pip install Spire.Doc
-
Escrever o Script de Automação
Este script escaneia uma pasta de Entrada, encontra todos os arquivos .docx e extrai cada página em um documento separado automaticamente:import os from spire.doc import * # Definir caminhos das pastas input_folder = "Source_Documents/" output_folder = "Split_Results/" # Criar pasta de saída se ela não existir if not os.path.exists(output_folder): os.makedirs(output_folder) # Iterar por todos os arquivos na pasta de entrada for filename in os.listdir(input_folder): if filename.endswith(".docx"): file_path = os.path.join(input_folder, filename) # Carregar o documento doc = Document() doc.LoadFromFile(file_path) # Dividir o documento atual por página for i in range(doc.PageCount): single_page_doc = doc.ExtractPages(i, 1) # Salvar com um nome como "ContratoA_Pagina_1.docx" base_name = os.path.splitext(filename)[0] save_path = f"{output_folder}{base_name}_Page_{i + 1}.docx" single_page_doc.SaveToFile(save_path, FileFormat.Docx) single_page_doc.Dispose() doc.Dispose() print(f"Processado: {filename}") print("Todos os documentos foram divididos com sucesso!")
| ✅ Pontos Fortes | ❌ Limitações |
|---|---|
| Dividir em lote milhares de documentos com alta eficiência | Requer um ambiente Python e instalação de biblioteca |
| Lógica totalmente personalizável (dividir por página, intervalo de páginas ou seção) | Requer conhecimento básico de Python |
Dica Profissional:
- Além das Páginas: Se o seu documento usa Quebras de Seção, Spire.Doc pode dividir por seções automaticamente, o que é perfeito para documentos com comprimentos de capítulo variados.
Precisa combinar vários arquivos Word novamente? Confira nosso guia sobre Como Combinar Documentos Word em Python.
Comparação Rápida de Todos os Métodos de Divisão de Documentos Word
| Método | Melhor Caso de Uso | Nível de Habilidade | Preservação de Formatação |
|---|---|---|---|
| Copiar e Colar | Edições pequenas e únicas (1-5 páginas) | Iniciante | Parcial |
| Estilos de Título | Relatórios longos e estruturados | Intermediário | Alta |
| Conversão para PDF | Versões finais para compartilhamento | Iniciante | Muito Alta |
| Divisores Online | Usuários móveis ou não usuários do Word | Iniciante | Média |
| Script Python | Processamento em lote (100+ arquivos) | Avançado | Alta |
Dicas para Dividir Documentos Word Eficientemente
- Faça Backup Primeiro: Sempre crie uma cópia de backup do seu documento mestre antes de dividir. Isso o protege contra exclusões acidentais ou erros de formatação.
- Preservar Formatação: Use Manter Formatação Original ou modelos consistentes para garantir que títulos e layouts permaneçam idênticos em todos os arquivos divididos.
- Nomenclatura Inteligente de Arquivos: Use uma convenção de nomenclatura clara como NomeProjeto_Parte01.docx. Para usuários de Python, você pode automatizar isso extraindo IDs ou títulos exclusivos do texto.
- Revisão Final: Sempre verifique cabeçalhos, rodapés e números de página após a divisão. O Word frequentemente redefine esses elementos quando o conteúdo é movido para um novo arquivo.
Conclusão
Existem várias maneiras de dividir um documento Word, o melhor método depende do tamanho do seu arquivo, estrutura e fluxo de trabalho:
- Arquivos pequenos ou edições ocasionais: Copiar e Colar manual ou divisores online funcionam perfeitamente.
- Compartilhamento de segmentos com formatação fixa: A conversão para PDF garante um layout consistente em todos os dispositivos.
- Documentos de larga escala: A automação com Python oferece a máxima velocidade e precisão para processamento em lote.
Pronto para começar? Escolha o método que se adapta às suas necessidades e assuma o controle do seu gerenciamento de documentos hoje mesmo!
Perguntas Frequentes
P1: Posso dividir um documento Word sem instalar nenhum software?
R1: Sim. Você pode usar divisores online confiáveis como o Zamzar para dividir documentos Word sem precisar de uma instalação desktop.
P2: Por que minha formatação muda após dividir manualmente?
R2: Isso geralmente acontece quando o novo documento tem configurações de estilo diferentes. Para corrigir isso, sempre selecione Manter Formatação Original ao colar conteúdo em um novo arquivo.
P3: Como divido um documento por intervalos de páginas específicos?
R3: A maneira mais fácil é usar a Conversão para PDF. Nas opções Salvar Como, você pode especificar um intervalo personalizado (por exemplo, páginas 5-10) para extrair apenas essas páginas.
P4: É seguro dividir documentos confidenciais online?
R4: Para dados sensíveis, recomendamos métodos offline como Copiar e Colar ou automação com Python. Isso garante que seus dados nunca saiam do seu computador local.
P5: Como os desenvolvedores podem automatizar a divisão do Word em Python?
R5: Desenvolvedores podem usar bibliotecas como Spire.Doc para Python. Ela permite detectar programaticamente páginas e extrair intervalos ou seções específicas em novos arquivos com apenas algumas linhas de código.
Explore Mais Tutoriais de Processamento de Texto
Word 문서를 여러 파일로 분할하는 5가지 간단한 방법 (수동 및 자동)
대용량 워드 문서를 다루는 것은 어려울 수 있습니다. 수백 페이지에 달하는 파일은 종종 Word를 느리게 하고, 협업을 복잡하게 하며, 이메일 공유를 번거롭게 만듭니다. 워드 문서를 분할하는 방법을 효율적으로 알면 시간을 절약하고 파일 크기를 줄이며 워크플로우를 개선할 수 있습니다.
이 가이드에서는 복사 및 붙여넣기와 같은 간단한 수동 방법부터 Python을 사용한 자동화된 솔루션까지, 워드 문서를 분할하는 5가지 실용적인 방법을 안내합니다. 단일 파일을 관리하는 초보자이든 수백 개의 문서를 처리하는 파워 유저이든, 이 기사는 귀하의 요구에 가장 적합한 방법을 선택하는 데 도움이 될 것입니다.
방법 개요
- 방법 1 - 복사 및 붙여넣기를 통한 워드 문서 분할
- 방법 2 - 머리글을 통한 워드 문서 분할
- 방법 3 - PDF 변환을 통한 워드 문서 분할
- 방법 4 - Word Online에서 무료로 페이지 분할
- 방법 5 - Python을 사용하여 워드 문서 분할 자동화
워드 문서를 분할해야 하는 이유
워드 문서를 분할하는 것은 단순한 기술 작업이 아니라 작업을 더 체계적이고 쉽게 만들 수 있습니다. 워드 문서를 분할하는 몇 가지 일반적인 이유는 다음과 같습니다.
- 향상된 협업: 전체 문서를 공유하지 않고 특정 장이나 섹션을 다른 편집자 또는 이해 관계자에게 쉽게 보낼 수 있습니다.
- 최적화된 파일 크기: 이메일 전송 속도를 높이고 클라우드 업로드를 원활하게 하기 위해 대용량, 이미지 중심 문서의 크기를 줄입니다.
- 더 나은 구성: 복잡한 다중 프로젝트 보고서를 개별적이고 검색 가능한 파일로 나눕니다.
- 원활한 변환: PDF, Markdown 또는 HTML로 변환할 특정 세그먼트를 준비합니다.
방법 1 - 복사 및 붙여넣기를 통한 워드 문서 분할
적합 대상: 특정 섹션 추출, 일회성 편집 또는 초보자.
복사 및 붙여넣기 방법은 수동으로 워드 문서를 분할하는 가장 직관적인 방법입니다. 추가 소프트웨어나 기술 전문 지식이 필요하지 않으며 Microsoft 365용 Word, Word 2024, 2021, 2019 및 2016을 포함한 모든 버전의 Microsoft Word에서 원활하게 작동합니다. 이 접근 방식은 분리하려는 특정 콘텐츠에 대한 완전한 세부 제어가 필요한 사용자에게 이상적입니다.
단계별 지침:
-
문서 열기
Word를 실행하고 분할하려는 파일을 엽니다. -
대상 콘텐츠 선택
추출하려는 섹션 또는 장을 강조 표시합니다.- ⚡ 팁: Ctrl + Shift + End (Windows) 또는 Cmd + Shift + End (Mac)를 사용하여 커서부터 문서 끝까지 빠르게 선택합니다.
-
콘텐츠 복사
키보드에서 Ctrl + C (Windows) 또는 Cmd + C (Mac)를 누르거나 강조 표시된 영역을 마우스 오른쪽 버튼으로 클릭하고 복사를 선택합니다.
-
새 파일 만들기
Ctrl + N을 눌러 새 빈 문서를 즉시 엽니다. -
콘텐츠 붙여넣기
Ctrl + V (Windows) 또는 Cmd + V (Mac)를 눌러 붙여넣습니다. 원본 서식을 유지하려면 붙여넣은 텍스트 끝에 있는 붙여넣기 옵션 아이콘을 클릭하거나 (Ctrl 키를 누름) 원본 서식 유지 (K)를 선택합니다.
-
새 파일 저장
F12를 눌러 다른 이름으로 저장 대화 상자를 엽니다. 설명적인 파일 이름을 입력하고 대상 폴더를 선택한 다음 저장을 클릭합니다.
장점 및 단점:
| ✅ 장점 | ❌ 단점 |
|---|---|
| 학습 곡선 없음 | 대량 작업에 비효율적 |
| 콘텐츠 선택에 대한 정확한 제어 | 복잡한 서식은 수동 조정이 필요할 수 있음 |
추가 팁: 서식 변경 방지
수동 복사는 빠르지만 복잡한 레이아웃을 깨뜨릴 수 있습니다. 다음 팁을 따르세요.
- 가로 페이지: 원본에 가로 페이지가 있는 경우 새 파일에 구역 나누기 (레이아웃 > 나누기 > 다음 페이지)를 붙여넣기 전에 삽입하여 가로 레이아웃이 유지되도록 합니다.
- 머리글 및 바닥글: 이러한 배경 요소(페이지 번호 및 워터마크 포함)는 전송되지 않습니다. 새 파일에서 수동으로 다시 적용해야 합니다.
- 스타일 일관성: 글꼴 또는 간격 변경을 방지하려면 붙여넣을 때 항상 원본 서식 유지를 사용합니다.
- 깨진 링크: 내부 하이퍼링크(목차)는 종종 깨집니다. 새 파일에서 F9를 눌러 모든 필드를 새로 고칩니다.
분할된 파일을 변환해야 합니까? 빠른 문서화를 위해 Word를 Markdown으로 변환에 대한 가이드를 확인하세요.
방법 2 - 머리글을 통한 워드 문서 분할
적합 대상: Word의 머리글 스타일을 이미 사용하는 긴 다중 장 문서(예: 50페이지 이상) 분할.
문서가 머리글 스타일(머리글 1, 2 등)로 잘 구성되어 있다면 Microsoft Word의 기본 개요 보기 기능이 더 효율적입니다. 이 방법은 세그먼트화 프로세스를 자동화하여 각 섹션이 개별 연결 파일로 내보내지도록 하면서 복사 및 붙여넣기에서 흔히 발생하는 수동 강조 오류 및 '서식 깨짐'을 제거합니다.
단계별 지침:
-
개요 보기 진입
보기 탭으로 이동하여 개요를 클릭합니다.
-
머리글 표시
개요 탭에서 수준 표시를 분할하려는 머리글 수준(예: 수준 2)으로 설정합니다. 이렇게 하면 본문 텍스트가 모두 축소되고 주요 머리글만 표시됩니다.
-
머리글 선택
분할하려는 모든 머리글을 강조 표시합니다. -
하위 문서 만들기
문서 표시 버튼을 클릭한 다음 만들기를 클릭합니다. 선택한 머리글 주위에 얇은 회색 상자(하위 문서)가 나타납니다.
-
하위 문서 저장
F12를 누르고 대상 폴더를 선택한 다음 저장을 클릭하여 하위 문서를 저장합니다.
결과: Word는 해당 폴더에서 선택한 각 머리글에 대해 별도의 파일을 즉시 생성합니다.
장점 및 단점:
| ✅ 장점 | ❌ 단점 |
|---|---|
| 수동 드래그 없음 | 문서가 일관된 머리글 스타일을 사용하는 경우에만 작동 |
| 자동으로 할당되는 파일 이름 | 파일이 개별적으로 이동될 경우 불안정할 수 있는 복잡한 하위 문서 링크 생성 |
추가 팁:
- 새 폴더 규칙: 하위 문서를 저장하기 전에 항상 새 폴더를 만듭니다. Word는 머리글 텍스트를 파일 이름으로 사용합니다. 폴더가 없으면 디렉토리가 즉시 지저분해집니다.
- 탐색 먼저 테스트: 분할하기 전에 탐색 창 (Ctrl + F > 머리글)으로 이동합니다. 비어 있다면 Word가 구조를 인식하지 못하는 것입니다. 먼저 제목에 머리글 스타일을 적용해야 합니다.
방법 3 - PDF 변환을 통한 워드 문서 분할
적합 대상: 추가 편집이 필요하지 않고 모든 장치에서 동일하게 보여야 하는 특정 장을 공유하는 경우.
작업의 일부를 다듬어 배포하는 것이 목표라면 PDF 변환을 통한 분할이 플랫폼 간 호환성을 보장하는 가장 안정적인 방법입니다. PDF는 레이아웃, 글꼴 및 이미지를 잠가 수신자의 Word 설정이 열심히 작업한 내용을 망치는 것을 방지합니다.
단계별 지침:
-
PDF로 변환
Word에서 파일을 연 다음 파일 > 다른 이름으로 저장으로 이동하여 PDF (*.pdf)를 선택합니다. -
범위 정의
대화 상자에서 옵션... 버튼을 클릭합니다. 페이지 범위 섹션에서 페이지를 선택하고 대상 범위(예: 5-10)를 입력한 다음 확인을 클릭합니다.
-
파일 저장
저장을 클릭하고 다른 페이지 범위에 대해 반복합니다.
장점 및 단점:
| ✅ 장점 | ❌ 단점 |
|---|---|
| 레이아웃과 서식이 100% 고정됨 | 분할 후 편집하기 어려움 |
추가 팁:
- 재편집: 변경해야 할 사항이 있습니까? 분할된 PDF를 마우스 오른쪽 버튼으로 클릭하고 다음으로 열기 > Word를 선택합니다. Word가 텍스트를 다시 빌드하려고 시도하지만 복잡한 레이아웃은 약간 변경될 수 있습니다.
방법 4 - Word Online에서 무료로 페이지 분할
적합 대상: 데스크톱 Microsoft Word가 설치되지 않은 사용자 또는 모바일 장치에서 작업하는 모든 사용자.
Microsoft Word 데스크톱 앱에 액세스할 수 없거나 이동 중에 "원클릭" 솔루션이 필요한 경우 Zamzar와 같은 온라인 워드 문서 분할기가 가장 편리한 선택입니다. 이 클라우드 기반 도구는 서버에서 작업을 처리하여 수동 서식 없이도 모든 X 페이지마다 워드 문서를 분할할 수 있습니다.
Word Online에서 페이지 분할 방법:
-
파일 업로드
Zamzar 워드 문서 분할기 웹사이트로 이동하여 파일 선택을 클릭하거나 문서를 드래그 앤 드롭합니다.
-
분할 논리 설정
분할 간격을 지정합니다(예: 1페이지마다 분할).
-
분할 및 다운로드
지금 분할을 클릭합니다. 프로세스가 완료되면 분할된 문서를 장치로 직접 다운로드합니다.
장점 및 단점:
| ✅ 장점 | ❌ 단점 |
|---|---|
| 빠르고 간단함 | 문서를 타사 서버에 업로드해야 함 |
| 모든 장치(모바일, 태블릿 등)에서 작동 | 무료 버전은 총 파일 크기를 제한하는 경우가 많음(예: 50MB) |
보안 경고:
온라인 분할기는 매우 편리하지만 민감한 문서(법률 계약, 은행 명세서 또는 의료 기록 등)에는 절대 사용하지 마십시오. 개인 데이터의 경우 항상 오프라인 방법(방법 1, 2, 3 또는 5)을 사용하십시오.
방법 5 - Python을 사용하여 워드 문서 분할 자동화
적합 대상: 대량의 문서를 처리하거나 반복되는 월별 보고서를 자동화해야 하는 개발자 및 파워 유저.
수백 개의 개별 계약을 별도의 파일로 분할하는 것과 같은 "산더미"의 파일에 직면해 있다면 수동 클릭은 더 이상 옵션이 아닙니다. Python 자동화를 사용하면 전체 프로세스를 몇 초 안에 처리하는 단일 스크립트를 만들어 인간의 개입 없이 100% 정확도를 보장할 수 있습니다.
단계별 지침:
-
환경 설정
워드 문서 분할을 자동화하기 위해 Spire.Doc for Python 라이브러리를 사용합니다. 복잡한 Word 레이아웃으로 어려움을 겪는 python-docx와 같은 일부 오픈 소스 라이브러리와 달리 Spire.Doc은 페이지 추출 프로세스 중에 높은 충실도를 유지합니다.계속하기 전에 터미널에서 다음 명령을 실행하여 설치하십시오.
pip install Spire.Doc -
자동화 스크립트 작성
이 스크립트는 입력 폴더를 스캔하고 모든 .docx 파일을 찾아 각 페이지를 별도의 문서로 자동 추출합니다.import os from spire.doc import * # 폴더 경로 정의 input_folder = "Source_Documents/" output_folder = "Split_Results/" # 출력 폴더가 없으면 생성 if not os.path.exists(output_folder): os.makedirs(output_folder) # 입력 폴더의 모든 파일을 반복 for filename in os.listdir(input_folder): if filename.endswith(".docx"): file_path = os.path.join(input_folder, filename) # 문서 로드 doc = Document() doc.LoadFromFile(file_path) # 현재 문서를 페이지별로 분할 for i in range(doc.PageCount): single_page_doc = doc.ExtractPages(i, 1) # "ContractA_Page_1.docx"와 같은 이름으로 저장 base_name = os.path.splitext(filename)[0] save_path = f"{output_folder}{base_name}_Page_{i + 1}.docx" single_page_doc.SaveToFile(save_path, FileFormat.Docx) single_page_doc.Dispose() doc.Dispose() print(f"처리됨: {filename}") print("모든 문서가 성공적으로 분할되었습니다!")
| ✅ 장점 | ❌ 단점 |
|---|---|
| 수천 개의 문서를 높은 효율성으로 일괄 분할 | Python 환경 및 라이브러리 설치 필요 |
| 완전히 사용자 정의 가능한 논리(페이지, 페이지 범위 또는 섹션별 분할) | 기본적인 Python 지식 필요 |
프로 팁:
- 페이지 이상: 문서에 구역 나누기가 사용된 경우 Spire.Doc은 자동으로 섹션별로 분할할 수 있으며, 이는 다양한 장 길이의 문서에 적합합니다.
여러 Word 파일을 다시 결합해야 합니까? Python에서 Word 문서 병합 방법에 대한 가이드를 확인하세요.
모든 Word 문서 분할 방법의 빠른 비교
| 방법 | 최적의 사용 사례 | 기술 수준 | 서식 유지 |
|---|---|---|---|
| 복사 및 붙여넣기 | 일회성 소규모 편집(1-5페이지) | 초보자 | 부분적 |
| 머리글 스타일 | 긴 구조화 보고서 | 중급 | 높음 |
| PDF 변환 | 공유용 최종 버전 | 초보자 | 매우 높음 |
| 온라인 분할기 | 모바일 사용자 또는 Word 미사용자 | 초보자 | 중간 |
| Python 스크립트 | 일괄 처리(100개 이상 파일) | 고급 | 높음 |
워드 문서 효율적으로 분할하는 팁
- 먼저 백업: 분할하기 전에 항상 마스터 문서의 백업 복사본을 만드십시오. 이렇게 하면 실수로 삭제하거나 서식 오류가 발생하는 것을 방지할 수 있습니다.
- 서식 유지: 원본 서식 유지 또는 일관된 템플릿을 사용하여 모든 분할 파일에서 머리글과 레이아웃이 동일하게 유지되도록 합니다.
- 스마트 파일 이름 지정: ProjectName_Part01.docx와 같은 명확한 이름 지정 규칙을 사용합니다. Python 사용자의 경우 텍스트에서 고유 ID 또는 제목을 가져와 이를 자동화할 수 있습니다.
- 최종 검토: 분할 후 항상 머리글, 바닥글 및 페이지 번호를 확인하십시오. Word는 콘텐츠가 새 파일로 이동될 때 종종 이러한 요소를 재설정합니다.
결론
워드 문서를 분할하는 방법에는 여러 가지가 있으며, 최적의 방법은 파일 크기, 구조 및 워크플로우에 따라 달라집니다.
- 소규모 파일 또는 간헐적인 편집: 수동 복사 및 붙여넣기 또는 온라인 분할기가 완벽하게 작동합니다.
- 고정된 서식으로 세그먼트 공유: PDF 변환은 모든 장치에서 일관된 레이아웃을 보장합니다.
- 대규모 문서: Python 자동화는 일괄 처리를 위한 최고의 속도와 정밀도를 제공합니다.
시작할 준비가 되셨습니까? 귀하의 요구에 맞는 방법을 선택하고 오늘 문서 관리를 제어하십시오!
자주 묻는 질문
Q1: 소프트웨어를 설치하지 않고 워드 문서를 분할할 수 있습니까?
A1: 예. Zamzar와 같은 안정적인 온라인 분할기를 사용하여 데스크톱 설치 없이 워드 문서를 분할할 수 있습니다.
Q2: 수동으로 분할한 후 서식이 변경되는 이유는 무엇입니까?
A2: 일반적으로 새 문서에 다른 스타일 설정이 있을 때 발생합니다. 이를 수정하려면 새 파일에 콘텐츠를 붙여넣을 때 항상 원본 서식 유지를 선택하십시오.
Q3: 특정 페이지 범위별로 문서를 분할하려면 어떻게 해야 합니까?
A3: 가장 쉬운 방법은 PDF 변환을 사용하는 것입니다. 다른 이름으로 저장 옵션에서 사용자 지정 범위(예: 5-10페이지)를 지정하여 해당 페이지만 추출할 수 있습니다.
Q4: 온라인으로 기밀 문서를 분할해도 안전합니까?
A4: 민감한 데이터의 경우 복사 및 붙여넣기 또는 Python 자동화와 같은 오프라인 방법을 사용하는 것이 좋습니다. 이렇게 하면 데이터가 로컬 컴퓨터를 벗어나지 않습니다.
Q5: 개발자는 Python에서 Word 분할을 어떻게 자동화할 수 있습니까?
A5: 개발자는 Spire.Doc for Python과 같은 라이브러리를 사용할 수 있습니다. 몇 줄의 코드로 페이지를 프로그래밍 방식으로 감지하고 특정 범위 또는 섹션을 새 파일로 추출할 수 있습니다.
더 많은 Word 처리 튜토리얼 살펴보기
5 modi semplici per dividere un documento Word in più file (manuale e automatizzato)
Indice
Gestire documenti Word di grandi dimensioni può essere impegnativo. File con centinaia di pagine spesso rallentano Word, complicano la collaborazione e rendono la condivisione via email macchinosa. Sapere come dividere un documento Word in modo efficiente può far risparmiare tempo, ridurre le dimensioni dei file e migliorare il flusso di lavoro.
In questa guida, ti illustreremo 5 modi pratici per dividere documenti Word, da semplici metodi manuali come Copia e Incolla, a soluzioni automatizzate con Python. Che tu sia un principiante che gestisce un singolo file o un utente esperto che elabora centinaia di documenti, questo articolo ti aiuterà a scegliere il metodo più adatto alle tue esigenze.
Panoramica dei metodi
- Metodo 1 - Dividere un documento Word tramite Copia e Incolla
- Metodo 2 - Dividere un documento Word per intestazioni
- Metodo 3 - Dividere documenti Word tramite conversione PDF
- Metodo 4 - Dividere pagine in Word Online gratuitamente
- Metodo 5 - Automatizzare la divisione di documenti Word con Python
Perché potresti aver bisogno di dividere un documento Word?
Dividere un documento Word non è solo un'attività tecnica, può rendere il tuo lavoro più organizzato e facile da gestire. Ecco alcuni motivi comuni per dividere documenti Word:
- Collaborazione migliorata: Invia facilmente capitoli o sezioni specifiche a diversi editor o stakeholder senza condividere l'intero documento.
- Dimensioni del file ottimizzate: Riduci l'ingombro di documenti massicci e ricchi di immagini per email più veloci e caricamenti cloud più fluidi.
- Migliore organizzazione: Suddividi un rapporto complesso e multi-progetto in file individuali e ricercabili.
- Conversione senza interruzioni: Prepara segmenti specifici per la conversione in PDF, Markdown o HTML.
Metodo 1 - Dividere un documento Word tramite Copia e Incolla
Ideale per: Estrarre sezioni specifiche, modifiche una tantum o principianti.
Il metodo Copia e Incolla è il modo più intuitivo per dividere un documento Word manualmente. Non richiede software aggiuntivi o competenze tecniche e funziona perfettamente su tutte le versioni di Microsoft Word, inclusi Word per Microsoft 365, Word 2024, 2021, 2019 e 2016. Questo approccio è ideale per gli utenti che necessitano di un controllo granulare completo sul contenuto specifico che desiderano isolare.
Istruzioni passo passo:
-
Apri il tuo documento
Avvia Word e apri il file che desideri dividere. -
Seleziona il contenuto desiderato
Evidenzia la sezione o il capitolo da estrarre.- ⚡ Suggerimento: Usa Ctrl + Maiusc + Fine (Windows) o Cmd + Maiusc + Fine (Mac) per selezionare rapidamente tutto dal cursore alla fine del documento.
-
Copia il contenuto
Premi Ctrl + C (Windows) o Cmd + C (Mac) sulla tastiera, oppure fai clic con il pulsante destro del mouse sull'area evidenziata e seleziona Copia.
-
Crea un nuovo file
Premi Ctrl + N per aprire istantaneamente un nuovo documento vuoto. -
Incolla il contenuto
Premi Ctrl + V (Windows) o Cmd + V (Mac) per incollare. Per preservare la formattazione di origine, fai clic sull'icona Opzioni incolla alla fine del testo incollato (o premi Ctrl) e seleziona Mantieni formattazione originale (K).
-
Salva il nuovo file
Premi F12 per aprire la finestra di dialogo Salva con nome. Inserisci un nome file descrittivo, scegli la cartella di destinazione e fai clic su Salva.
Punti di forza e limitazioni:
| ✅ Punti di forza | ❌ Limitazioni |
|---|---|
| Nessuna curva di apprendimento | Inefficiente per attività di massa |
| Controllo preciso sulla selezione del contenuto | La formattazione complessa potrebbe richiedere aggiustamenti manuali |
Suggerimenti extra: Evitare spostamenti di formattazione
La copia manuale è veloce ma può rompere layout complessi. Segui questi suggerimenti:
- Pagine orizzontali: Se l'origine contiene pagine in orizzontale, inserisci un Interruzione di sezione (Layout > Interruzioni > Pagina successiva) nel nuovo file *prima* di incollare per garantire che il layout orizzontale venga preservato.
- Intestazioni e piè di pagina: Questi elementi di sfondo (inclusi numeri di pagina e filigrane) non vengono trasferiti. Dovrai riapplicarli manualmente nel nuovo file.
- Coerenza degli stili: Per evitare modifiche a font o spaziature, usa sempre Mantieni formattazione originale quando incolli.
- Collegamenti interrotti: Tieni presente che i collegamenti ipertestuali interni (Indice) spesso si interrompono; premi F9 nel nuovo file per aggiornare tutti i campi.
Hai bisogno di convertire questi file divisi? Dai un'occhiata alla nostra guida su Conversione da Word a Markdown per la documentazione ad alta velocità.
Metodo 2 - Dividere un documento Word per intestazioni
Ideale per: Dividere documenti lunghi e multi-capitolo (ad es. 50+ pagine) che utilizzano già gli Stili Titolo di Word.
Se il tuo documento è ben organizzato con Stili Titolo (Titolo 1, 2, ecc.), la funzionalità integrata Visualizzazione struttura di Microsoft Word è più efficiente. Questo metodo automatizza il processo di segmentazione, garantendo che ogni sezione venga esportata come un file collegato individuale, eliminando gli errori di evidenziazione manuale e la "formattazione interrotta" comune con il copia-incolla.
Istruzioni passo passo:
-
Entra nella Visualizzazione struttura
Vai alla scheda Visualizza e fai clic su Struttura.
-
Mostra intestazioni
Nella scheda Struttura, imposta Mostra livello al livello di intestazione per cui desideri dividere (ad es. Livello 2). Questo nasconde tutto il testo del corpo, mostrando solo le tue intestazioni principali.
-
Seleziona le intestazioni
Evidenzia tutte le intestazioni che desideri dividere. -
Crea sottodocumenti
Fai clic sul pulsante Mostra documento, quindi fai clic su Crea. Vedrai apparire delle sottili caselle grigie (Sottodocumenti) attorno alle intestazioni selezionate.
-
Salva i sottodocumenti
Premi F12, scegli una cartella di destinazione e fai clic su Salva per salvare i sottodocumenti.
Risultato: Word genererà istantaneamente file separati per ogni intestazione selezionata all'interno di quella cartella.
Punti di forza e limitazioni:
| ✅ Punti di forza | ❌ Limitazioni |
|---|---|
| Nessun trascinamento manuale | Funziona solo se il documento utilizza Stili Titolo coerenti |
| I nomi dei file vengono assegnati automaticamente | Crea collegamenti complessi tra sottodocumenti che possono essere fragili se i file vengono spostati singolarmente |
Suggerimenti extra:
- Regola della nuova cartella: Crea sempre una nuova cartella prima di salvare i sottodocumenti. Word utilizzerà il testo delle intestazioni come nomi file; senza una cartella, ingombrerà immediatamente la tua directory.
- Testa prima la navigazione: Prima di dividere, vai al Riquadro di spostamento (Ctrl + C > Intestazioni). Se è vuoto, Word non riconosce la tua struttura. Dovrai applicare gli Stili Titolo ai tuoi titoli per primi.
Metodo 3 - Dividere documenti Word tramite conversione PDF
Ideale per: Condividere capitoli specifici che non richiedono ulteriori modifiche e devono apparire identici su qualsiasi dispositivo.
Se il tuo obiettivo è distribuire una porzione rifinita del tuo lavoro, dividere tramite conversione PDF è il modo più affidabile per garantire la compatibilità multipiattaforma. PDF blocca il tuo layout, i font e le immagini, impedendo alle impostazioni Word del destinatario di rovinare il tuo duro lavoro.
Istruzioni passo passo:
-
Converti in PDF
Apri il tuo file in Word, quindi vai su File > Salva con nome e seleziona PDF (*.pdf). -
Definisci intervallo
Nella finestra di dialogo, fai clic sul pulsante Opzioni.... Nella sezione Intervallo pagine, seleziona Pagina/e, inserisci l'intervallo desiderato (ad es. 5-10) e fai clic su OK.
-
Salva il file
Fai clic su Salva e ripeti per altri intervalli di pagine.
Punti di forza e limitazioni:
| ✅ Punti di forza | ❌ Limitazioni |
|---|---|
| Layout e formattazione rimangono statici al 100% | Più difficile da modificare dopo la divisione |
Suggerimento extra:
- Ri-modifica: Devi cambiare qualcosa? Fai clic con il pulsante destro del mouse sul PDF diviso e seleziona Apri con > Word. Word tenterà di ricostruire il testo per te, anche se layout complessi potrebbero spostarsi leggermente.
Metodo 4 - Dividere pagine in Word Online gratuitamente
Ideale per: Utenti senza Microsoft Word desktop installato o chiunque lavori su dispositivi mobili.
Se non hai accesso all'app desktop Microsoft Word, o se hai bisogno di una soluzione "one-click" in movimento, uno splitter di documenti Word online come Zamzar è la scelta più conveniente. Questo strumento basato su cloud gestisce il lavoro pesante sui suoi server, permettendoti di dividere documenti Word ogni X pagine senza alcuna formattazione manuale.
Come dividere pagine in Word Online:
-
Carica il tuo file
Vai al sito web dello splitter di documenti Word di Zamzar e fai clic su Scegli file (o trascina e rilascia il tuo documento).
-
Imposta la logica di divisione
Specifica l'intervallo per la divisione (ad es. dividi ogni 1 pagina). -
Dividi e scarica
Fai clic su Dividi ora. Una volta completato il processo, scarica i tuoi documenti divisi direttamente sul tuo dispositivo.
Punti di forza e limitazioni:
| ✅ Punti di forza | ❌ Limitazioni |
|---|---|
| Veloce e semplice | Richiede il caricamento del tuo documento su un server di terze parti |
| Funziona su qualsiasi dispositivo (cellulari, tablet e altro) | Le versioni gratuite spesso limitano la dimensione totale del file (ad es. 50 MB) |
Avviso di sicurezza:
Sebbene gli splitter online siano incredibilmente convenienti, non usarli mai per documenti sensibili (come contratti legali, estratti conto bancari o cartelle cliniche). Per dati privati, attieniti sempre ai metodi offline (Metodo 1, 2, 3 o 5).
Metodo 5 - Automatizzare la divisione di documenti Word con Python
Ideale per: Sviluppatori e utenti esperti che necessitano di elaborare volumi massicci di documenti o automatizzare report mensili ricorrenti.
Se ti trovi di fronte a una "montagna" di file, come dividere 500 contratti individuali in file separati, il clic manuale non è più un'opzione. L'automazione con Python ti consente di creare un singolo script che gestisce l'intero processo in pochi secondi, garantendo un'accuratezza del 100% senza intervento umano.
Istruzioni passo passo:
-
Configurazione dell'ambiente
Per automatizzare la divisione di documenti Word, utilizzeremo la libreria Spire.Doc per Python. A differenza di alcune librerie open-source come python-docx che faticano con layout Word complessi, Spire.Doc mantiene un'elevata fedeltà durante il processo di estrazione delle pagine.Prima di procedere, installala eseguendo il seguente comando nel tuo terminale:
pip install Spire.Doc -
Scrivi lo script di automazione
Questo script analizza una cartella di input, trova ogni file .docx ed estrae automaticamente ogni pagina in un documento separato:import os from spire.doc import * # Definisci i percorsi delle cartelle input_folder = "Source_Documents/" output_folder = "Split_Results/" # Crea la cartella di output se non esiste if not os.path.exists(output_folder): os.makedirs(output_folder) # Cicla attraverso tutti i file nella cartella di input for filename in os.listdir(input_folder): if filename.endswith(".docx"): file_path = os.path.join(input_folder, filename) # Carica il documento doc = Document() doc.LoadFromFile(file_path) # Dividi il documento corrente per pagina for i in range(doc.PageCount): single_page_doc = doc.ExtractPages(i, 1) # Salva con un nome come "ContrattoA_Pagina_1.docx" base_name = os.path.splitext(filename)[0] save_path = f"{output_folder}{base_name}_Page_{i + 1}.docx" single_page_doc.SaveToFile(save_path, FileFormat.Docx) single_page_doc.Dispose() doc.Dispose() print(f"Elaborato: {filename}") print("Tutti i documenti sono stati divisi con successo!")
| ✅ Punti di forza | ❌ Limitazioni |
|---|---|
| Dividi in batch migliaia di documenti con alta efficienza | Richiede un ambiente Python e l'installazione della libreria |
| Logica completamente personalizzabile (divisione per pagina, intervallo di pagine o sezione) | Richiede conoscenze di base di Python |
Suggerimento Pro:
- Oltre le pagine: Se il tuo documento utilizza Interruzioni di sezione, Spire.Doc può dividere per sezioni automaticamente, il che è perfetto per documenti con lunghezze di capitolo variabili.
Hai bisogno di unire nuovamente più file Word? Dai un'occhiata alla nostra guida su Come unire documenti Word in Python.
Confronto rapido di tutti i metodi di divisione di documenti Word
| Metodo | Caso d'uso ideale | Livello di competenza | Preservazione della formattazione |
|---|---|---|---|
| Copia e Incolla | Modifiche una tantum di piccole dimensioni (1-5 pagine) | Principiante | Parziale |
| Stili Titolo | Report lunghi e strutturati | Intermedio | Alta |
| Conversione PDF | Versioni finali da condividere | Principiante | Molto alta |
| Splitter online | Utenti mobili o non utenti di Word | Principiante | Media |
| Script Python | Elaborazione in batch (100+ file) | Avanzato | Alta |
Suggerimenti per dividere documenti Word in modo efficiente
- Backup prima: Crea sempre una copia di backup del tuo documento master prima di dividerlo. Questo ti protegge da eliminazioni accidentali o errori di formattazione.
- Preserva la formattazione: Usa Mantieni formattazione originale o modelli coerenti per garantire che intestazioni e layout rimangano identici in tutti i file divisi.
- Denominazione file intelligente: Usa una convenzione di denominazione chiara come NomeProgetto_Parte01.docx. Per gli utenti Python, puoi automatizzare questo processo estraendo ID o titoli univoci dal testo.
- Revisione finale: Controlla sempre intestazioni, piè di pagina e numeri di pagina dopo la divisione. Word spesso reimposta questi elementi quando il contenuto viene spostato in un nuovo file.
Conclusione
Ci sono diversi modi per dividere un documento Word, il metodo migliore dipende dalle dimensioni del file, dalla struttura e dal flusso di lavoro:
- File piccoli o modifiche occasionali: Copia e Incolla manuale o splitter online funzionano perfettamente.
- Condivisione di segmenti con formattazione fissa: La conversione PDF garantisce un layout coerente su tutti i dispositivi.
- Documenti su larga scala: L'automazione con Python offre la massima velocità e precisione per l'elaborazione in batch.
Pronto per iniziare? Scegli il metodo che si adatta alle tue esigenze e prendi il controllo della gestione dei tuoi documenti oggi stesso!
Domande frequenti
D1: Posso dividere un documento Word senza installare alcun software?
R1: Sì. Puoi utilizzare splitter online affidabili come Zamzar per dividere documenti Word senza bisogno di un'installazione desktop.
D2: Perché la mia formattazione cambia dopo aver diviso manualmente?
R2: Questo di solito accade quando il nuovo documento ha impostazioni di stile diverse. Per risolvere questo problema, seleziona sempre Mantieni formattazione originale quando incolli il contenuto in un nuovo file.
D3: Come divido un documento per intervalli di pagine specifici?
R3: Il modo più semplice è utilizzare la Conversione PDF. Nelle opzioni Salva con nome, puoi specificare un intervallo personalizzato (ad es. pagine 5-10) per estrarre solo quelle pagine.
D4: È sicuro dividere documenti riservati online?
R4: Per dati sensibili, consigliamo metodi offline come Copia e Incolla o automazione Python. Questo garantisce che i tuoi dati non lascino mai il tuo computer locale.
D5: Come possono gli sviluppatori automatizzare la divisione di Word in Python?
R5: Gli sviluppatori possono utilizzare librerie come Spire.Doc per Python. Permette di rilevare programmaticamente le pagine ed estrarre intervalli o sezioni specifici in nuovi file con poche righe di codice.
Esplora altri tutorial di elaborazione testi
5 façons simples de diviser un document Word en plusieurs fichiers (manuel et automatisé)
Table des matières
La gestion de gros documents Word peut être difficile. Les fichiers comportant des centaines de pages ralentissent souvent Word, compliquent la collaboration et rendent le partage par e-mail fastidieux. Savoir comment diviser un document Word efficacement peut faire gagner du temps, réduire la taille des fichiers et améliorer le flux de travail.
Dans ce guide, nous vous présenterons 5 méthodes pratiques pour diviser des documents Word, des méthodes manuelles simples comme Copier et Coller, aux solutions automatisées utilisant Python. Que vous soyez un débutant gérant un seul fichier ou un utilisateur expérimenté traitant des centaines de documents, cet article vous aidera à choisir la méthode qui correspond le mieux à vos besoins.
Aperçu des méthodes
- Méthode 1 - Diviser un document Word via Copier et Coller
- Méthode 2 - Diviser un document Word par titres
- Méthode 3 - Diviser des documents Word via la conversion PDF
- Méthode 4 - Diviser des pages dans Word en ligne gratuitement
- Méthode 5 - Automatiser la division de documents Word avec Python
Pourquoi pourriez-vous avoir besoin de diviser un document Word ?
Diviser un document Word n'est pas seulement une tâche technique, cela peut rendre votre travail plus organisé et plus facile à gérer. Voici quelques raisons courantes pour diviser des documents Word :
- Collaboration améliorée : Envoyez facilement des chapitres ou des sections spécifiques à différents éditeurs ou parties prenantes sans partager l'intégralité du document.
- Taille de fichier optimisée : Réduisez le volume des documents massifs et riches en images pour des e-mails plus rapides et des téléchargements cloud plus fluides.
- Meilleure organisation : Décomposez un rapport complexe multi-projets en fichiers individuels et consultables.
- Conversion transparente : Préparez des segments spécifiques pour la conversion en PDF, Markdown ou HTML.
Méthode 1 - Diviser un document Word via Copier et Coller
Idéal pour : Extraire des sections spécifiques, des modifications ponctuelles ou pour les débutants.
La méthode Copier et Coller est la manière la plus intuitive de diviser manuellement un document Word. Elle ne nécessite aucun logiciel supplémentaire ni expertise technique et fonctionne de manière transparente sur toutes les versions de Microsoft Word, y compris Word pour Microsoft 365, Word 2024, 2021, 2019 et 2016. Cette approche est idéale pour les utilisateurs qui ont besoin d'un contrôle granulaire complet sur le contenu spécifique qu'ils souhaitent isoler.
Instructions étape par étape :
-
Ouvrir votre document
Lancez Word et ouvrez le fichier que vous souhaitez diviser. -
Sélectionner le contenu cible
Mettez en surbrillance la section ou le chapitre à extraire.- ⚡ Astuce : Utilisez Ctrl + Maj + Fin (Windows) ou Cmd + Maj + Fin (Mac) pour sélectionner rapidement tout ce qui se trouve de votre curseur à la fin du document.
-
Copier le contenu
Appuyez sur Ctrl + C (Windows) ou Cmd + C (Mac) sur votre clavier, ou faites un clic droit sur la zone sélectionnée et choisissez Copier.
-
Créer un nouveau fichier
Appuyez sur Ctrl + N pour ouvrir instantanément un nouveau document vierge. -
Coller le contenu
Appuyez sur Ctrl + V (Windows) ou Cmd + V (Mac) pour coller. Pour préserver la mise en forme source, cliquez sur l'icône Options de collage à la fin du texte collé (ou appuyez sur Ctrl) et sélectionnez Conserver la mise en forme source (K).
-
Enregistrer le nouveau fichier
Appuyez sur F12 pour ouvrir la boîte de dialogue Enregistrer sous. Entrez un nom de fichier descriptif, choisissez votre dossier de destination et cliquez sur Enregistrer.
Forces et limites :
| ✅ Forces | ❌ Limites |
|---|---|
| Aucune courbe d'apprentissage | Inefficace pour les tâches en masse |
| Contrôle précis de la sélection du contenu | La mise en forme complexe peut nécessiter un ajustement manuel |
Conseils supplémentaires : Éviter les décalages de mise en forme
La copie manuelle est rapide mais peut casser des mises en page complexes. Suivez ces conseils :
- Pages paysage : Si votre source contient des pages en paysage, insérez un Saut de section (Mise en page > Séparateurs > Page suivante) dans le nouveau fichier avant de coller pour vous assurer que la mise en page horizontale est conservée.
- En-têtes et pieds de page : Ces éléments d'arrière-plan (y compris les numéros de page et les filigranes) ne sont pas transférés. Vous devez les réappliquer manuellement dans le nouveau fichier.
- Cohérence des styles : Pour éviter les changements de police ou d'espacement, utilisez toujours Conserver la mise en forme source lors du collage.
- Liens brisés : Sachez que les hyperliens internes (Table des matières) se cassent souvent ; appuyez sur F9 dans le nouveau fichier pour actualiser tous les champs.
Besoin de convertir ces fichiers divisés ? Consultez notre guide sur la conversion de Word en Markdown pour une documentation à haute vitesse.
Méthode 2 - Diviser un document Word par titres
Idéal pour : Diviser des documents longs et multi-chapitres (par exemple, 50+ pages) qui utilisent déjà les styles de titre de Word.
Si votre document est bien organisé avec des styles de titre (Titre 1, 2, etc.), la fonctionnalité intégrée Mode Plan de Microsoft Word est plus efficace. Cette méthode automatise le processus de segmentation, garantissant que chaque section est exportée en tant que fichier lié individuel tout en éliminant les erreurs de mise en surbrillance manuelle et les problèmes de « mise en forme cassée » courants avec le copier-coller.
Instructions étape par étape :
-
Accéder au mode Plan
Accédez à l'onglet Affichage et cliquez sur Plan.
-
Afficher les titres
Dans l'onglet Plan, définissez Afficher le niveau sur le niveau de titre par lequel vous souhaitez diviser (par exemple, Niveau 2). Cela réduit tout le texte du corps, n'affichant que vos titres principaux.
-
Sélectionner les titres
Mettez en surbrillance tous les titres que vous souhaitez diviser. -
Créer des sous-documents
Cliquez sur le bouton Afficher le document, puis cliquez sur Créer. Vous verrez apparaître de fines boîtes grises (Sous-documents) autour de vos titres sélectionnés.
-
Enregistrer les sous-documents
Appuyez sur F12, choisissez un dossier de destination et cliquez sur Enregistrer pour enregistrer les sous-documents.
Résultat : Word générera instantanément des fichiers séparés pour chaque titre que vous avez sélectionné dans ce dossier.
Forces et limites :
| ✅ Forces | ❌ Limites |
|---|---|
| Pas de glisser-déposer manuel | Ne fonctionne que si le document utilise des styles de titre cohérents |
| Les noms de fichiers sont attribués automatiquement | Crée des liens de sous-documents complexes qui peuvent être fragiles si les fichiers sont déplacés individuellement |
Conseils supplémentaires :
- Règle du nouveau dossier : Créez toujours un nouveau dossier avant d'enregistrer les sous-documents. Word utilisera le texte de vos titres comme noms de fichiers ; sans dossier, il encombrera instantanément votre répertoire.
- Tester la navigation d'abord : Avant de diviser, allez dans le Volet de navigation (Ctrl + F > Titres). S'il est vide, Word ne reconnaît pas votre structure. Vous devrez appliquer les styles de titre à vos titres en premier.
Méthode 3 - Diviser des documents Word via la conversion PDF
Idéal pour : Partager des chapitres spécifiques qui ne nécessitent pas de modifications supplémentaires et qui doivent être identiques sur tous les appareils.
Si votre objectif est de distribuer une partie polie de votre travail, la division par conversion PDF est le moyen le plus fiable d'assurer la compatibilité multiplateforme. Le PDF verrouille votre mise en page, vos polices et vos images, empêchant les paramètres Word du destinataire de perturber votre travail acharné.
Instructions étape par étape :
-
Convertir en PDF
Ouvrez votre fichier dans Word, puis allez dans Fichier > Enregistrer sous et sélectionnez PDF (*.pdf). -
Définir la plage
Dans la boîte de dialogue, cliquez sur le bouton Options.... Dans la section Plage de pages, sélectionnez Pages, entrez votre plage cible (par exemple, 5-10) et cliquez sur OK.
-
Enregistrer le fichier
Cliquez sur Enregistrer et répétez pour d'autres plages de pages.
Forces et limites :
| ✅ Forces | ❌ Limites |
|---|---|
| La mise en page et la mise en forme restent 100 % statiques | Plus difficile à modifier après la division |
Astuce supplémentaire :
- Réédition : Besoin de changer quelque chose ? Faites un clic droit sur le PDF divisé et sélectionnez Ouvrir avec > Word. Word tentera de reconstruire le texte pour vous, bien que les mises en page complexes puissent légèrement changer.
Méthode 4 - Diviser des pages dans Word en ligne gratuitement
Idéal pour : Les utilisateurs sans Microsoft Word installé sur leur bureau ou toute personne travaillant sur des appareils mobiles.
Si vous n'avez pas accès à l'application de bureau Microsoft Word, ou si vous avez besoin d'une solution « en un clic » en déplacement, un diviseur de documents Word en ligne comme Zamzar est le choix le plus pratique. Cet outil basé sur le cloud s'occupe du travail lourd sur ses serveurs, vous permettant de diviser des documents Word par intervalles de X pages sans aucune mise en forme manuelle.
Comment diviser des pages dans Word en ligne :
-
Télécharger votre fichier
Allez sur le site web du diviseur de documents Word Zamzar et cliquez sur Choisir les fichiers (ou faites glisser et déposez votre document).
-
Définir votre logique de division
Spécifiez l'intervalle de division (par exemple, diviser toutes les 1 page).
-
Diviser et télécharger
Cliquez sur Diviser maintenant. Une fois le processus terminé, téléchargez vos documents divisés directement sur votre appareil.
Forces et limites :
| ✅ Forces | ❌ Limites |
|---|---|
| Rapide et simple | Nécessite de télécharger votre document sur un serveur tiers |
| Fonctionne sur n'importe quel appareil (mobiles, tablettes, etc.) | Les versions gratuites limitent souvent la taille totale des fichiers (par exemple, 50 Mo) |
Avertissement de sécurité :
Bien que les diviseurs en ligne soient incroyablement pratiques, ne les utilisez jamais pour des documents sensibles (comme des contrats juridiques, des relevés bancaires ou des dossiers médicaux). Pour les données privées, tenez-vous-en toujours aux méthodes hors ligne (Méthode 1, 2, 3 ou 5).
Méthode 5 - Automatiser la division de documents Word avec Python
Idéal pour : Les développeurs et les utilisateurs expérimentés qui ont besoin de traiter de gros volumes de documents ou d'automatiser des rapports mensuels récurrents.
Si vous êtes confronté à une « montagne » de fichiers – par exemple, diviser 500 contrats individuels en fichiers séparés – le clic manuel n'est plus une option. L'automatisation Python vous permet de créer un script unique qui gère l'ensemble du processus en quelques secondes, garantissant une précision de 100 % sans intervention humaine.
Instructions étape par étape :
-
Configuration de l'environnement
Pour automatiser la division de documents Word, nous utiliserons la bibliothèque Spire.Doc pour Python. Contrairement à certaines bibliothèques open-source comme python-docx qui ont du mal avec les mises en page Word complexes, Spire.Doc maintient une haute fidélité lors du processus d'extraction de pages.Avant de continuer, installez-la en exécutant la commande suivante dans votre terminal :
pip install Spire.Doc -
Écrire le script d'automatisation
Ce script analyse un dossier d'entrée, trouve tous les fichiers .docx et extrait chaque page dans un document séparé automatiquement :import os from spire.doc import * # Définir les chemins des dossiers input_folder = "Source_Documents/" output_folder = "Split_Results/" # Créer le dossier de sortie s'il n'existe pas if not os.path.exists(output_folder): os.makedirs(output_folder) # Parcourir tous les fichiers dans le dossier d'entrée for filename in os.listdir(input_folder): if filename.endswith(".docx"): file_path = os.path.join(input_folder, filename) # Charger le document doc = Document() doc.LoadFromFile(file_path) # Diviser le document actuel par page for i in range(doc.PageCount): single_page_doc = doc.ExtractPages(i, 1) # Enregistrer avec un nom comme "ContratA_Page_1.docx" base_name = os.path.splitext(filename)[0] save_path = f"{output_folder}{base_name}_Page_{i + 1}.docx" single_page_doc.SaveToFile(save_path, FileFormat.Docx) single_page_doc.Dispose() doc.Dispose() print(f"Traité : {filename}") print("Tous les documents ont été divisés avec succès !")
| ✅ Forces | ❌ Limites |
|---|---|
| Diviser par lots des milliers de documents avec une grande efficacité | Nécessite un environnement Python et l'installation de bibliothèques |
| Logique entièrement personnalisable (diviser par page, plage de pages ou section) | Nécessite des connaissances de base en Python |
Astuce Pro :
- Au-delà des pages : Si votre document utilise des Sauts de section, Spire.Doc peut diviser par sections automatiquement, ce qui est parfait pour les documents de longueurs de chapitre variables.
Besoin de combiner plusieurs fichiers Word ? Consultez notre guide sur Comment fusionner des documents Word en Python.
Comparaison rapide de toutes les méthodes de division de documents Word
| Méthode | Cas d'utilisation idéal | Niveau de compétence | Préservation de la mise en forme |
|---|---|---|---|
| Copier et Coller | Modifications ponctuelles de petite taille (1-5 pages) | Débutant | Partielle |
| Styles de titre | Rapports longs et structurés | Intermédiaire | Élevée |
| Conversion PDF | Versions finales à partager | Débutant | Très élevée |
| Diviseurs en ligne | Utilisateurs mobiles ou non-utilisateurs de Word | Débutant | Moyenne |
| Script Python | Traitement par lots (100+ fichiers) | Avancé | Élevée |
Conseils pour diviser efficacement des documents Word
- Sauvegarder d'abord : Créez toujours une copie de sauvegarde de votre document principal avant de le diviser. Cela vous protège contre les suppressions accidentelles ou les erreurs de mise en forme.
- Préserver la mise en forme : Utilisez Conserver la mise en forme source ou des modèles cohérents pour garantir que les titres et les mises en page restent identiques sur tous les fichiers divisés.
- Nommage intelligent des fichiers : Utilisez une convention de nommage claire comme NomProjet_Partie01.docx. Pour les utilisateurs de Python, vous pouvez automatiser cela en extrayant des identifiants uniques ou des titres du texte.
- Vérification finale : Vérifiez toujours les en-têtes, les pieds de page et les numéros de page après la division. Word réinitialise souvent ces éléments lorsque le contenu est déplacé vers un nouveau fichier.
Conclusion
Il existe plusieurs façons de diviser un document Word, la meilleure méthode dépend de la taille de votre fichier, de sa structure et de votre flux de travail :
- Petits fichiers ou modifications occasionnelles : Copier et Coller manuel ou les diviseurs en ligne fonctionnent parfaitement.
- Partage de segments avec une mise en forme fixe : La conversion PDF garantit une mise en page cohérente sur tous les appareils.
- Documents à grande échelle : L'automatisation Python offre une vitesse et une précision ultimes pour le traitement par lots.
Prêt à commencer ? Choisissez la méthode qui correspond à vos besoins et prenez le contrôle de votre gestion de documents dès aujourd'hui !
FAQ
Q1 : Puis-je diviser un document Word sans installer de logiciel ?
R1 : Oui. Vous pouvez utiliser des diviseurs en ligne fiables comme Zamzar pour diviser des documents Word sans avoir besoin d'une installation sur ordinateur.
Q2 : Pourquoi ma mise en forme change-t-elle après une division manuelle ?
R2 : Cela se produit généralement lorsque le nouveau document a des paramètres de style différents. Pour résoudre ce problème, sélectionnez toujours Conserver la mise en forme source lors du collage de contenu dans un nouveau fichier.
Q3 : Comment diviser un document par des plages de pages spécifiques ?
R3 : La manière la plus simple est d'utiliser la conversion PDF. Dans les options Enregistrer sous, vous pouvez spécifier une plage personnalisée (par exemple, pages 5-10) pour extraire uniquement ces pages.
Q4 : Est-il sûr de diviser des documents confidentiels en ligne ?
R4 : Pour les données sensibles, nous recommandons les méthodes hors ligne comme Copier et Coller ou l'automatisation Python. Cela garantit que vos données ne quittent jamais votre ordinateur local.
Q5 : Comment les développeurs peuvent-ils automatiser la division de documents Word en Python ?
R5 : Les développeurs peuvent utiliser des bibliothèques comme Spire.Doc pour Python. Elle leur permet de détecter par programme les pages et d'extraire des plages ou des sections spécifiques dans de nouveaux fichiers avec seulement quelques lignes de code.
Explorez d'autres tutoriels de traitement de texte
5 formas sencillas de dividir un documento de Word en varios archivos (manual y automático)
Tabla de Contenidos
- Método 1 - Dividir un documento de Word mediante Copiar y Pegar
- Método 2 - Dividir un documento de Word por Encabezados
- Método 3 - Dividir documentos de Word mediante conversión a PDF
- Método 4 - Dividir páginas en Word Online gratis
- Método 5 - Automatizar la división de documentos de Word con Python
Manejar documentos de Word grandes puede ser un desafío. Los archivos con cientos de páginas a menudo ralentizan Word, complican la colaboración y hacen que compartir por correo electrónico sea engorroso. Saber cómo dividir un documento de Word de manera eficiente puede ahorrar tiempo, reducir el tamaño del archivo y mejorar el flujo de trabajo.
En esta guía, te mostraremos 5 formas prácticas de dividir documentos de Word, desde métodos manuales sencillos como Copiar y Pegar, hasta soluciones automatizadas usando Python. Ya seas un principiante que maneja un solo archivo o un usuario avanzado que procesa cientos de documentos, este artículo te ayudará a elegir el método que mejor se adapte a tus necesidades.
Resumen de Métodos
- Método 1 - Dividir un documento de Word mediante Copiar y Pegar
- Método 2 - Dividir un documento de Word por Encabezados
- Método 3 - Dividir documentos de Word mediante conversión a PDF
- Método 4 - Dividir páginas en Word Online gratis
- Método 5 - Automatizar la división de documentos de Word con Python
¿Por qué podrías necesitar dividir un documento de Word?
Dividir un documento de Word no es solo una tarea técnica, puede hacer que tu trabajo sea más organizado y fácil de manejar. Aquí hay algunas razones comunes para dividir documentos de Word:
- Colaboración Mejorada: Envía fácilmente capítulos o secciones específicas a diferentes editores o partes interesadas sin compartir el documento completo.
- Tamaño de Archivo Optimizado: Reduce el volumen de documentos masivos y con muchas imágenes para correos electrónicos más rápidos y cargas más fluidas en la nube.
- Mejor Organización: Divide un informe complejo de varios proyectos en archivos individuales y buscables.
- Conversión sin Problemas: Prepara segmentos específicos para la conversión a PDF, Markdown o HTML.
Método 1 - Dividir un documento de Word mediante Copiar y Pegar
Ideal para: Extraer secciones específicas, ediciones puntuales o principiantes.
El método de Copiar y Pegar es la forma más intuitiva de dividir un documento de Word manualmente. No requiere software adicional ni experiencia técnica y funciona sin problemas en todas las versiones de Microsoft Word, incluyendo Word para Microsoft 365, Word 2024, 2021, 2019 y 2016. Este enfoque es ideal para usuarios que necesitan un control granular completo sobre el contenido específico que desean aislar.
Instrucciones Paso a Paso:
-
Abrir tu Documento
Inicia Word y abre el archivo que deseas dividir. -
Seleccionar el Contenido Deseado
Resalta la sección o capítulo a extraer.- ⚡ Consejo: Usa Ctrl + Shift + Fin (Windows) o Cmd + Shift + Fin (Mac) para seleccionar rápidamente todo desde tu cursor hasta el final del documento.
-
Copiar el Contenido
Presiona Ctrl + C (Windows) o Cmd + C (Mac) en tu teclado, o haz clic derecho en el área resaltada y selecciona Copiar.
-
Crear un Nuevo Archivo
Presiona Ctrl + N para abrir instantáneamente un documento nuevo y en blanco. -
Pegar el Contenido
Presiona Ctrl + V (Windows) o Cmd + V (Mac) para pegar. Para conservar el formato de origen, haz clic en el icono de Opciones de pegado al final del texto pegado (o presiona Ctrl) y selecciona Mantener formato de origen (K).
-
Guardar el Nuevo Archivo
Presiona F12 para abrir el cuadro de diálogo Guardar como. Introduce un nombre de archivo descriptivo, elige tu carpeta de destino y haz clic en Guardar.
Fortalezas y Limitaciones:
| ✅ Fortalezas | ❌ Limitaciones |
|---|---|
| Cero curva de aprendizaje | Ineficiente para tareas masivas |
| Control preciso sobre la selección de contenido | El formato complejo puede requerir ajustes manuales |
Consejos Adicionales: Evitar cambios de formato
Copiar manualmente es rápido pero puede romper diseños complejos. Sigue estos consejos:
- Páginas en Horizontal: Si la fuente tiene páginas en horizontal, inserta un Salto de Sección (Diseño > Saltos > Página siguiente) en el nuevo archivo *antes* de pegar para asegurar que el diseño horizontal se conserve.
- Encabezados y Pies de Página: Estos elementos de fondo (incluyendo números de página y marcas de agua) *no* se transfieren. Debes volver a aplicarlos manualmente en el nuevo archivo.
- Consistencia de Estilos: Para evitar cambios de fuente o espaciado, usa siempre Mantener formato de origen al pegar.
- Enlaces Rotos: Ten en cuenta que los hipervínculos internos (Tabla de Contenidos) a menudo se rompen; presiona F9 en el nuevo archivo para actualizar todos los campos.
¿Necesitas convertir estos archivos divididos? Consulta nuestra guía sobre Convertir Word a Markdown para documentación de alta velocidad.
Método 2 - Dividir un documento de Word por Encabezados
Ideal para: Dividir documentos largos y de varios capítulos (por ejemplo, más de 50 páginas) que ya utilizan los Estilos de Encabezado de Word.
Si tu documento está bien organizado con Estilos de Encabezado (Encabezado 1, 2, etc.), la función integrada Vista de Esquema de Microsoft Word es más eficiente. Este método automatiza el proceso de segmentación, asegurando que cada sección se exporte como un archivo individual enlazado, al tiempo que elimina los errores de resaltado manual y el 'formato roto' común al copiar y pegar.
Instrucciones Paso a Paso:
-
Entrar en Vista de Esquema
Navega a la pestaña Vista y haz clic en Esquema.
-
Mostrar Encabezados
En la pestaña Esquema, establece Mostrar Nivel al nivel de encabezado por el que deseas dividir (por ejemplo, Nivel 2). Esto colapsa todo el texto del cuerpo, mostrando solo tus encabezados principales.
-
Seleccionar Encabezados
Resalta todos los encabezados que deseas dividir. -
Crear Subdocumentos
Haz clic en el botón Mostrar Documento, luego haz clic en Crear. Verás cuadros grises delgados (Subdocumentos) aparecer alrededor de tus encabezados seleccionados.
-
Guardar los Subdocumentos
Presiona F12, elige una carpeta de destino y haz clic en Guardar para guardar los subdocumentos.
Resultado: Word generará instantáneamente archivos separados para cada encabezado que seleccionaste dentro de esa carpeta.
Fortalezas y Limitaciones:
| ✅ Fortalezas | ❌ Limitaciones |
|---|---|
| Sin arrastre manual | Solo funciona si el documento utiliza Estilos de Encabezado consistentes |
| Los nombres de archivo se asignan automáticamente | Crea enlaces de subdocumentos complejos que pueden ser frágiles si los archivos se mueven individualmente |
Consejos Adicionales:
- Regla de Carpeta Nueva: Crea siempre una carpeta nueva antes de guardar los subdocumentos. Word usará el texto de tu encabezado como nombres de archivo; sin una carpeta, saturará tu directorio instantáneamente.
- Probar Navegación Primero: Antes de dividir, ve al Panel de Navegación (Ctrl + B > Encabezados). Si está vacío, Word no reconoce tu estructura. Necesitarás aplicar Estilos de Encabezado a tus títulos primero.
Método 3 - Dividir documentos de Word mediante conversión a PDF
Ideal para: Compartir capítulos específicos que no requieren edición adicional y deben verse idénticos en cualquier dispositivo.
Si tu objetivo es distribuir un segmento pulido de tu trabajo, dividir mediante conversión a PDF es la forma más confiable de garantizar la compatibilidad multiplataforma. PDF bloquea tu diseño, fuentes e imágenes, evitando que la configuración de Word del destinatario arruine tu arduo trabajo.
Instrucciones Paso a Paso:
-
Convertir a PDF
Abre tu archivo en Word, luego ve a Archivo > Guardar como y selecciona PDF (*.pdf). -
Definir Rango
En el cuadro de diálogo, haz clic en el botón Opciones.... En la sección Rango de páginas, selecciona Página(s), introduce tu rango deseado (por ejemplo, 5-10) y haz clic en Aceptar.
-
Guardar el archivo
Haz clic en Guardar y repite para otros rangos de páginas.
Fortalezas y Limitaciones:
| ✅ Fortalezas | ❌ Limitaciones |
|---|---|
| El diseño y el formato permanecen 100% estáticos | Más difícil de editar después de dividir |
Consejo Adicional:
- Re-edición: ¿Necesitas cambiar algo? Haz clic derecho en el PDF dividido y selecciona Abrir con > Word. Word intentará reconstruir el texto por ti, aunque los diseños complejos pueden cambiar ligeramente.
Método 4 - Dividir páginas en Word Online gratis
Ideal para: Usuarios sin Microsoft Word de escritorio instalado o cualquiera que trabaje en dispositivos móviles.
Si no tienes acceso a la aplicación de escritorio de Microsoft Word, o si necesitas una solución de "un clic" mientras estás en movimiento, un divisor de documentos de Word en línea como Zamzar es la opción más conveniente. Esta herramienta basada en la nube se encarga del trabajo pesado en sus servidores, permitiéndote dividir documentos de Word cada X páginas sin ningún formato manual.
Cómo dividir páginas en Word Online:
-
Cargar tu Archivo
Ve al sitio web del divisor de documentos de Word de Zamzar y haz clic en Elegir Archivos (o arrastra y suelta tu documento).
-
Establecer tu Lógica de División
Especifica el intervalo para la división (por ejemplo, dividir cada 1 página).
-
Dividir y Descargar
Haz clic en Dividir Ahora. Una vez que el proceso se complete, descarga tus documentos divididos directamente a tu dispositivo.
Fortalezas y Limitaciones:
| ✅ Fortalezas | ❌ Limitaciones |
|---|---|
| Rápido y sencillo | Requiere subir tu documento a un servidor de terceros |
| Funciona en cualquier dispositivo (móviles, tabletas y más) | Las versiones gratuitas a menudo limitan el tamaño total del archivo (por ejemplo, 50 MB) |
Advertencia de Seguridad:
Si bien los divisores en línea son increíblemente convenientes, nunca los uses para documentos confidenciales (como contratos legales, extractos bancarios o registros médicos). Para datos privados, siempre recurre a los métodos sin conexión (Método 1, 2, 3 o 5).
Método 5 - Automatizar la división de documentos de Word con Python
Ideal para: Desarrolladores y usuarios avanzados que necesitan procesar grandes volúmenes de documentos o automatizar informes mensuales recurrentes.
Si te enfrentas a una "montaña" de archivos, como dividir 500 contratos individuales en archivos separados, hacer clic manualmente ya no es una opción. La automatización con Python te permite crear un script único que maneja todo el proceso en segundos, garantizando una precisión del 100% sin intervención humana.
Instrucciones Paso a Paso:
-
Configuración del Entorno
Para automatizar la división de documentos de Word, utilizaremos la biblioteca Spire.Doc para Python. A diferencia de algunas bibliotecas de código abierto como python-docx que tienen dificultades con diseños complejos de Word, Spire.Doc mantiene una alta fidelidad durante el proceso de extracción de páginas.Antes de continuar, instálala ejecutando el siguiente comando en tu terminal:
pip install Spire.Doc -
Escribir el Script de Automatización
Este script escanea una carpeta de Entrada, encuentra cada archivo .docx y extrae cada página en un documento separado automáticamente:import os from spire.doc import * # Definir rutas de carpetas input_folder = "Source_Documents/" output_folder = "Split_Results/" # Crear carpeta de salida si no existe if not os.path.exists(output_folder): os.makedirs(output_folder) # Bucle a través de todos los archivos en la carpeta de entrada for filename in os.listdir(input_folder): if filename.endswith(".docx"): file_path = os.path.join(input_folder, filename) # Cargar el documento doc = Document() doc.LoadFromFile(file_path) # Dividir el documento actual por página for i in range(doc.PageCount): single_page_doc = doc.ExtractPages(i, 1) # Guardar con un nombre como "ContratoA_Pagina_1.docx" base_name = os.path.splitext(filename)[0] save_path = f"{output_folder}{base_name}_Page_{i + 1}.docx" single_page_doc.SaveToFile(save_path, FileFormat.Docx) single_page_doc.Dispose() doc.Dispose() print(f"Procesado: {filename}") print("¡Todos los documentos se han dividido con éxito!")
| ✅ Fortalezas | ❌ Limitaciones |
|---|---|
| Dividir en lote miles de documentos con alta eficiencia | Requiere un entorno Python y la instalación de bibliotecas |
| Lógica totalmente personalizable (dividir por página, rango de páginas o sección) | Requiere conocimientos básicos de Python |
Consejo Profesional:
- Más allá de las Páginas: Si tu documento utiliza Saltos de Sección, Spire.Doc puede dividir por secciones automáticamente, lo cual es perfecto para documentos con longitudes de capítulo variables.
¿Necesitas combinar varios archivos de Word? Consulta nuestra guía sobre Cómo fusionar documentos de Word en Python.
Comparación Rápida de Todos los Métodos para Dividir Documentos de Word
| Método | Mejor Caso de Uso | Nivel de Habilidad | Preservación del Formato |
|---|---|---|---|
| Copiar y Pegar | Ediciones pequeñas puntuales (1-5 páginas) | Principiante | Parcial |
| Estilos de Encabezado | Informes largos y estructurados | Intermedio | Alto |
| Conversión a PDF | Versiones finales para compartir | Principiante | Muy Alto |
| Divisores en Línea | Usuarios móviles o usuarios sin Word | Principiante | Medio |
| Script de Python | Procesamiento en lote (100+ archivos) | Avanzado | Alto |
Consejos para Dividir Documentos de Word de Forma Eficiente
- Haz una Copia de Seguridad Primero: Siempre crea una copia de seguridad de tu documento maestro antes de dividirlo. Esto te protege de eliminaciones accidentales o errores de formato.
- Preservar el Formato: Usa Mantener formato de origen o plantillas consistentes para asegurar que los encabezados y diseños permanezcan idénticos en todos los archivos divididos.
- Nomenclatura Inteligente de Archivos: Usa una convención de nombres clara como NombreProyecto_Parte01.docx. Para usuarios de Python, puedes automatizar esto extrayendo IDs o títulos únicos del texto.
- Revisión Final: Siempre revisa los encabezados, pies de página y números de página después de dividir. Word a menudo restablece estos elementos cuando el contenido se mueve a un nuevo archivo.
Conclusión
Hay varias formas de dividir un documento de Word, el mejor método depende del tamaño de tu archivo, estructura y flujo de trabajo:
- Archivos pequeños o ediciones ocasionales: Copiar y Pegar manual o divisores en línea funcionan perfectamente.
- Compartir segmentos con formato fijo: La conversión a PDF garantiza un diseño consistente en todos los dispositivos.
- Documentos a gran escala: La automatización con Python ofrece la máxima velocidad y precisión para el procesamiento en lote.
¿Listo para empezar? ¡Elige el método que se adapte a tus necesidades y toma el control de la gestión de tus documentos hoy mismo!
Preguntas Frecuentes
P1: ¿Puedo dividir un documento de Word sin instalar ningún software?
R1: Sí. Puedes usar divisores en línea confiables como Zamzar para dividir documentos de Word sin necesidad de una instalación de escritorio.
P2: ¿Por qué mi formato cambia después de dividir manualmente?
R2: Esto suele suceder cuando el nuevo documento tiene configuraciones de estilo diferentes. Para solucionarlo, selecciona siempre Mantener formato de origen al pegar contenido en un nuevo archivo.
P3: ¿Cómo divido un documento por rangos de páginas específicos?
R3: La forma más fácil es usar la Conversión a PDF. En las opciones de Guardar como, puedes especificar un rango personalizado (por ejemplo, páginas 5-10) para extraer solo esas páginas.
P4: ¿Es seguro dividir documentos confidenciales en línea?
R4: Para datos sensibles, recomendamos métodos sin conexión como Copiar y Pegar o automatización con Python. Esto asegura que tus datos nunca salgan de tu computadora local.
P5: ¿Cómo pueden los desarrolladores automatizar la división de Word en Python?
R5: Los desarrolladores pueden usar bibliotecas como Spire.Doc para Python. Permite detectar programáticamente páginas y extraer rangos o secciones específicas en nuevos archivos con solo unas pocas líneas de código.
Explora Más Tutoriales de Procesamiento de Texto
5 einfache Möglichkeiten, ein Word-Dokument in mehrere Dateien aufzuteilen (manuell und automatisiert)
Inhaltsverzeichnis
Die Bearbeitung großer Word-Dokumente kann eine Herausforderung sein. Dateien mit Hunderten von Seiten verlangsamen Word oft, erschweren die Zusammenarbeit und machen die Weitergabe per E-Mail umständlich. Zu wissen, wie man ein Word-Dokument aufteilt, kann Zeit sparen, die Dateigröße reduzieren und den Arbeitsablauf verbessern.
In dieser Anleitung führen wir Sie durch 5 praktische Möglichkeiten, Word-Dokumente aufzuteilen, von einfachen manuellen Methoden wie Kopieren & Einfügen bis hin zu automatisierten Lösungen mit Python. Egal, ob Sie ein Anfänger sind, der eine einzelne Datei verwaltet, oder ein Power-User, der Hunderte von Dokumenten verarbeitet, dieser Artikel hilft Ihnen bei der Auswahl der für Sie am besten geeigneten Methode.
Übersicht der Methoden
- Methode 1 – Ein Word-Dokument per Kopieren & Einfügen aufteilen
- Methode 2 – Word-Dokument nach Überschriften aufteilen
- Methode 3 – Word-Dokumente durch PDF-Konvertierung aufteilen
- Methode 4 – Seiten in Word Online kostenlos aufteilen
- Methode 5 – Word-Dokumentaufteilung mit Python automatisieren
Warum Sie ein Word-Dokument aufteilen müssen
Das Aufteilen eines Word-Dokuments ist nicht nur eine technische Aufgabe – es kann Ihre Arbeit organisierter und einfacher gestalten. Hier sind einige häufige Gründe, Word-Dokumente zu teilen:
- Verbesserte Zusammenarbeit: Senden Sie einfach bestimmte Kapitel oder Abschnitte an verschiedene Redakteure oder Stakeholder, ohne das gesamte Dokument freizugeben.
- Optimierte Dateigröße: Reduzieren Sie den Umfang riesiger, bildlastiger Dokumente für schnellere E-Mails und reibungslosere Cloud-Uploads.
- Bessere Organisation: Teilen Sie einen komplexen Bericht mit mehreren Projekten in einzelne, durchsuchbare Dateien auf.
- Nahtlose Konvertierung: Bereiten Sie bestimmte Segmente für die Konvertierung in PDF, Markdown oder HTML vor.
Methode 1 – Ein Word-Dokument per Kopieren & Einfügen aufteilen
Am besten geeignet für: Extrahieren spezifischer Abschnitte, einmalige Bearbeitungen oder Anfänger.
Die Methode Kopieren und Einfügen ist der intuitivste Weg, um manuell ein Word-Dokument aufzuteilen. Sie erfordert keine zusätzliche Software oder technisches Fachwissen und funktioniert nahtlos in allen Versionen von Microsoft Word, einschließlich Word für Microsoft 365, Word 2024, 2021, 2019 und 2016. Dieser Ansatz ist ideal für Benutzer, die die volle Kontrolle über die spezifischen Inhalte wünschen, die sie isolieren möchten.
Schritt-für-Schritt-Anleitung:
-
Öffnen Sie Ihr Dokument
Starten Sie Word und öffnen Sie die Datei, die Sie aufteilen möchten. -
Wählen Sie den Zielinhalt aus
Markieren Sie den Abschnitt oder das Kapitel, das Sie extrahieren möchten.- ⚡ Tipp: Verwenden Sie Strg + Umschalt + Ende (Windows) oder Cmd + Umschalt + Ende (Mac), um schnell alles von Ihrer Cursorposition bis zum Ende des Dokuments auszuwählen.
-
Kopieren Sie den Inhalt
Drücken Sie Strg + C (Windows) oder Cmd + C (Mac) auf Ihrer Tastatur, oder klicken Sie mit der rechten Maustaste auf den markierten Bereich und wählen Sie Kopieren.
-
Erstellen Sie eine neue Datei
Drücken Sie Strg + N, um sofort ein neues, leeres Dokument zu öffnen. -
Fügen Sie den Inhalt ein
Drücken Sie Strg + V (Windows) oder Cmd + V (Mac), um einzufügen. Um die Quellformatierung beizubehalten, klicken Sie auf das Symbol Einfügeoptionen am Ende des eingefügten Textes (oder drücken Sie Strg) und wählen Sie Quellformatierung beibehalten (K).
-
Speichern Sie die neue Datei
Drücken Sie F12, um den Dialog Speichern unter zu öffnen. Geben Sie einen beschreibenden Dateinamen ein, wählen Sie Ihren Zielordner und klicken Sie auf Speichern.
Stärken und Einschränkungen:
| ✅ Stärken | ❌ Einschränkungen |
|---|---|
| Keine Lernkurve | Ineffizient für Massenaufgaben |
| Präzise Kontrolle über die Inhaltsauswahl | Komplexe Formatierungen erfordern möglicherweise manuelle Anpassungen |
Zusätzliche Tipps: Formatierungsverschiebungen vermeiden
Manuelles Kopieren ist schnell, kann aber komplexe Layouts beeinträchtigen. Befolgen Sie diese Tipps:
- Querformat-Seiten: Wenn Ihre Quelle Querformat-Seiten enthält, fügen Sie einen Abschnittsumbruch (Layout > Umbrüche > Nächste Seite) in die neue Datei ein, bevor Sie einfügen, um sicherzustellen, dass das horizontale Layout beibehalten wird.
- Kopf- und Fußzeilen: Diese Hintergrundelemente (einschließlich Seitenzahlen und Wasserzeichen) werden nicht übertragen. Sie müssen sie in der neuen Datei manuell neu anwenden.
- Konsistenz der Formatvorlagen: Um Änderungen an Schriftarten oder Abständen zu vermeiden, verwenden Sie immer Quellformatierung beibehalten beim Einfügen.
- Defekte Links: Beachten Sie, dass interne Hyperlinks (Inhaltsverzeichnis) oft defekt sind; drücken Sie F9 in der neuen Datei, um alle Felder zu aktualisieren.
Müssen Sie diese aufgeteilten Dateien konvertieren? Sehen Sie sich unseren Leitfaden zum Konvertieren von Word in Markdown für Hochgeschwindigkeitsdokumentation an.
Methode 2 – Word-Dokument nach Überschriften aufteilen
Am besten geeignet für: Aufteilen langer, mehrkapiteliger Dokumente (z. B. 50+ Seiten), die bereits die Überschriftenformate von Word verwenden.
Wenn Ihr Dokument gut mit Überschriftenformaten (Überschrift 1, 2 usw.) organisiert ist, ist die integrierte Funktion Gliederungsansicht von Microsoft Word effizienter. Diese Methode automatisiert den Segmentierungsprozess, stellt sicher, dass jeder Abschnitt als einzelnes verknüpftes Dokument exportiert wird, und eliminiert manuelle Markierungsfehler und „defekte Formatierungen“, die beim Kopieren und Einfügen häufig auftreten.
Schritt-für-Schritt-Anleitung:
-
Gliederungsansicht aufrufen
Navigieren Sie zur Registerkarte Ansicht und klicken Sie auf Gliederung.
-
Überschriften anzeigen
Stellen Sie auf der Registerkarte „Gliederung“ unter Ebene anzeigen die Überschriftenebene ein, nach der Sie aufteilen möchten (z. B. Ebene 2). Dadurch wird der gesamte Textkörper ausgeblendet, und nur Ihre Hauptüberschriften werden angezeigt.
-
Überschriften auswählen
Markieren Sie alle Überschriften, die Sie aufteilen möchten. -
Unterdokumente erstellen
Klicken Sie auf die Schaltfläche Dokument anzeigen und dann auf Erstellen. Um Ihre ausgewählten Überschriften herum erscheinen dünne graue Kästchen (Unterdokumente).
-
Unterdokumente speichern
Drücken Sie F12, wählen Sie einen Zielordner und klicken Sie auf Speichern, um die Unterdokumente zu speichern.
Ergebnis: Word generiert sofort separate Dateien für jede von Ihnen ausgewählte Überschrift in diesem Ordner.
Stärken und Einschränkungen:
| ✅ Stärken | ❌ Einschränkungen |
|---|---|
| Kein manuelles Ziehen | Funktioniert nur, wenn das Dokument konsistente Überschriftenformate verwendet |
| Dateinamen werden automatisch zugewiesen | Erstellt komplexe Unterdokumentverknüpfungen, die fragil sein können, wenn Dateien einzeln verschoben werden |
Zusätzliche Tipps:
- Regel für neue Ordner: Erstellen Sie immer einen neuen Ordner, bevor Sie die Unterdokumente speichern. Word verwendet Ihren Überschriftentext als Dateinamen; ohne Ordner wird Ihr Verzeichnis sofort unübersichtlich.
- Navigation zuerst testen: Gehen Sie vor dem Aufteilen zum Navigationsbereich (Strg + F > Überschriften). Wenn dieser leer ist, erkennt Word Ihre Struktur nicht. Sie müssen zuerst Überschriftenformate auf Ihre Titel anwenden.
Methode 3 – Word-Dokumente durch PDF-Konvertierung aufteilen
Am besten geeignet für: Das Teilen bestimmter Kapitel, die keine weitere Bearbeitung erfordern und auf jedem Gerät identisch aussehen müssen.
Wenn Ihr Ziel ist, ein poliertes Segment Ihrer Arbeit zu verteilen, ist die Aufteilung durch PDF-Konvertierung der zuverlässigste Weg, um plattformübergreifende Kompatibilität zu gewährleisten. PDF sperrt Ihr Layout, Ihre Schriftarten und Ihre Bilder und verhindert, dass die Word-Einstellungen des Empfängers Ihre harte Arbeit durcheinanderbringen.
Schritt-für-Schritt-Anleitung:
-
In PDF konvertieren
Öffnen Sie Ihre Datei in Word, gehen Sie dann zu Datei > Speichern unter und wählen Sie PDF (*.pdf). -
Bereich definieren
Klicken Sie im Dialogfeld auf die Schaltfläche Optionen.... Wählen Sie im Abschnitt Seitenbereich die Option Seite(n), geben Sie Ihren Zielbereich ein (z. B. 5-10) und klicken Sie auf OK.
-
Datei speichern
Klicken Sie auf Speichern und wiederholen Sie den Vorgang für andere Seitenbereiche.
Stärken und Einschränkungen:
| ✅ Stärken | ❌ Einschränkungen |
|---|---|
| Layout und Formatierung bleiben zu 100 % statisch | Nach dem Aufteilen schwieriger zu bearbeiten |
Zusätzlicher Tipp:
- Erneute Bearbeitung: Müssen Sie etwas ändern? Klicken Sie mit der rechten Maustaste auf das aufgeteilte PDF und wählen Sie Öffnen mit > Word. Word versucht, den Text für Sie neu zu erstellen, obwohl komplexe Layouts leicht verschoben werden können.
Methode 4 – Seiten in Word Online kostenlos aufteilen
Am besten geeignet für: Benutzer ohne installierte Desktop-Version von Microsoft Word oder alle, die auf mobilen Geräten arbeiten.
Wenn Sie keinen Zugriff auf die Microsoft Word Desktop-App haben oder eine „Ein-Klick“-Lösung für unterwegs benötigen, ist ein Online-Word-Dokument-Splitter wie Zamzar die bequemste Wahl. Dieses cloudbasierte Tool übernimmt die Hauptarbeit auf seinen Servern, sodass Sie Word-Dokumente seitenweise aufteilen können, ohne manuelle Formatierungen vornehmen zu müssen.
So teilen Sie Seiten in Word Online auf:
-
Datei hochladen
Gehen Sie zur Zamzar Word-Dokument-Splitter-Website und klicken Sie auf Dateien auswählen (oder ziehen Sie Ihr Dokument per Drag & Drop).
-
Teilungslogik festlegen
Geben Sie das Intervall für die Aufteilung an (z. B. alle 1 Seite aufteilen).
-
Aufteilen & Herunterladen
Klicken Sie auf Jetzt aufteilen. Sobald der Vorgang abgeschlossen ist, laden Sie Ihre aufgeteilten Dokumente direkt auf Ihr Gerät herunter.
Stärken und Einschränkungen:
| ✅ Stärken | ❌ Einschränkungen |
|---|---|
| Schnell und einfach | Erfordert das Hochladen Ihres Dokuments auf einen Drittanbieter-Server |
| Funktioniert auf jedem Gerät (Mobiltelefone, Tablets und mehr) | Kostenlose Versionen beschränken oft die Gesamtdateigröße (z. B. 50 MB) |
Sicherheitshinweis:
Während Online-Splitter unglaublich praktisch sind, verwenden Sie sie niemals für sensible Dokumente (wie Rechtsverträge, Kontoauszüge oder medizinische Aufzeichnungen). Für private Daten bleiben Sie immer bei den Offline-Methoden (Methode 1, 2, 3 oder 5).
Methode 5 – Word-Dokumentaufteilung mit Python automatisieren
Am besten geeignet für: Entwickler und Power-User, die riesige Mengen an Dokumenten verarbeiten oder wiederkehrende monatliche Berichte automatisieren müssen.
Wenn Sie mit einem „Berg“ von Dateien konfrontiert sind – wie z. B. dem Aufteilen von 500 einzelnen Verträgen in separate Dateien – ist manuelles Klicken keine Option mehr. Python-Automatisierung ermöglicht es Ihnen, ein einziges Skript zu erstellen, das den gesamten Prozess in Sekundenschnelle abwickelt und eine 100%ige Genauigkeit ohne menschliches Eingreifen gewährleistet.
Schritt-für-Schritt-Anleitung:
-
Umgebungssetup
Um die Aufteilung von Word-Dokumenten zu automatisieren, verwenden wir die Spire.Doc for Python-Bibliothek. Im Gegensatz zu einigen Open-Source-Bibliotheken wie python-docx, die mit komplexen Word-Layouts zu kämpfen haben, behält Spire.Doc während des Seitenextraktionsprozesses eine hohe Wiedergabetreue bei.Installieren Sie sie, bevor Sie fortfahren, indem Sie den folgenden Befehl in Ihrem Terminal ausführen:
pip install Spire.Doc -
Schreiben Sie das Automatisierungsskript
Dieses Skript scannt einen Eingabeordner, findet jede .docx-Datei und extrahiert automatisch jede Seite in ein separates Dokument:import os from spire.doc import * # Ordnerpfade definieren input_folder = "Source_Documents/" output_folder = "Split_Results/" # Ausgabeverzeichnis erstellen, falls es nicht existiert if not os.path.exists(output_folder): os.makedirs(output_folder) # Alle Dateien im Eingabeordner durchlaufen for filename in os.listdir(input_folder): if filename.endswith(".docx"): file_path = os.path.join(input_folder, filename) # Dokument laden doc = Document() doc.LoadFromFile(file_path) # Aktuelles Dokument seitenweise aufteilen for i in range(doc.PageCount): single_page_doc = doc.ExtractPages(i, 1) # Speichern mit einem Namen wie "VertragA_Seite_1.docx" base_name = os.path.splitext(filename)[0] save_path = f"{output_folder}{base_name}_Page_{i + 1}.docx" single_page_doc.SaveToFile(save_path, FileFormat.Docx) single_page_doc.Dispose() doc.Dispose() print(f"Verarbeitet: {filename}") print("Alle Dokumente wurden erfolgreich aufgeteilt!")
| ✅ Stärken | ❌ Einschränkungen |
|---|---|
| Stapelaufteilung von Tausenden von Dokumenten mit hoher Effizienz | Erfordert eine Python-Umgebung und die Installation von Bibliotheken |
| Vollständig anpassbare Logik (Aufteilung nach Seite, Seitenbereich oder Abschnitt) | Erfordert grundlegende Python-Kenntnisse |
Profi-Tipp:
- Mehr als nur Seiten: Wenn Ihr Dokument Abschnittsumbrüche verwendet, kann Spire.Doc automatisch nach Abschnitten aufteilen, was perfekt für Dokumente mit unterschiedlichen Kapitellängen ist.
Müssen Sie mehrere Word-Dateien wieder zusammenführen? Sehen Sie sich unseren Leitfaden zum Zusammenführen von Word-Dokumenten in Python an.
Schneller Vergleich aller Methoden zur Aufteilung von Word-Dokumenten
| Methode | Bester Anwendungsfall | Fähigkeitsstufe | Formatierungserhaltung |
|---|---|---|---|
| Kopieren & Einfügen | Einmalige kleine Bearbeitungen (1-5 Seiten) | Anfänger | Teilweise |
| Überschriftenformate | Lange, strukturierte Berichte | Fortgeschritten | Hoch |
| PDF-Konvertierung | Endgültige Versionen zum Teilen | Anfänger | Sehr hoch |
| Online-Splitter | Mobile Benutzer oder Nicht-Word-Benutzer | Anfänger | Mittel |
| Python-Skript | Stapelverarbeitung (100+ Dateien) | Experte | Hoch |
Tipps zur effizienten Aufteilung von Word-Dokumenten
- Zuerst sichern: Erstellen Sie immer eine Sicherungskopie Ihres Master-Dokuments, bevor Sie es aufteilen. Dies schützt Sie vor versehentlichen Löschungen oder Formatierungsfehlern.
- Formatierung beibehalten: Verwenden Sie Quellformatierung beibehalten oder konsistente Vorlagen, um sicherzustellen, dass Überschriften und Layouts in allen aufgeteilten Dateien identisch bleiben.
- Intelligente Dateibenennung: Verwenden Sie eine klare Benennungskonvention wie ProjektName_Teil01.docx. Für Python-Benutzer können Sie dies automatisieren, indem Sie eindeutige IDs oder Titel aus dem Text extrahieren.
- Abschließende Überprüfung: Überprüfen Sie nach dem Aufteilen immer Kopf- und Fußzeilen sowie Seitenzahlen. Word setzt diese Elemente oft zurück, wenn Inhalte in eine neue Datei verschoben werden.
Fazit
Es gibt mehrere Möglichkeiten, ein Word-Dokument aufzuteilen. Die beste Methode hängt von Ihrer Dateigröße, Struktur und Ihrem Arbeitsablauf ab:
- Kleine Dateien oder gelegentliche Bearbeitungen: Manuelles Kopieren & Einfügen oder Online-Splitter funktionieren perfekt.
- Teile teilen mit fester Formatierung: Die PDF-Konvertierung gewährleistet ein konsistentes Layout auf allen Geräten.
- Groß angelegte Dokumente: Python-Automatisierung bietet die ultimative Geschwindigkeit und Präzision für die Stapelverarbeitung.
Bereit zum Start? Wählen Sie die Methode, die Ihren Bedürfnissen entspricht, und übernehmen Sie noch heute die Kontrolle über Ihre Dokumentenverwaltung!
FAQs
F1: Kann ich ein Word-Dokument aufteilen, ohne Software zu installieren?
A1: Ja. Sie können zuverlässige Online-Splitter wie Zamzar verwenden, um Word-Dokumente aufzuteilen, ohne eine Desktop-Installation zu benötigen.
F2: Warum ändert sich meine Formatierung nach manueller Aufteilung?
A2: Dies geschieht normalerweise, wenn das neue Dokument andere Stileinstellungen hat. Um dies zu beheben, wählen Sie immer Quellformatierung beibehalten, wenn Sie Inhalte in eine neue Datei einfügen.
F3: Wie teile ich ein Dokument nach bestimmten Seitenbereichen auf?
A3: Der einfachste Weg ist die PDF-Konvertierung. In den Optionen Speichern unter können Sie einen benutzerdefinierten Bereich (z. B. Seiten 5-10) angeben, um nur diese Seiten zu extrahieren.
F4: Ist es sicher, vertrauliche Dokumente online aufzuteilen?
A4: Für sensible Daten empfehlen wir Offline-Methoden wie Kopieren & Einfügen oder Python-Automatisierung. Dies stellt sicher, dass Ihre Daten Ihren lokalen Computer niemals verlassen.
F5: Wie können Entwickler die Word-Aufteilung in Python automatisieren?
A5: Entwickler können Bibliotheken wie Spire.Doc for Python verwenden. Sie ermöglicht es Ihnen, Seiten programmgesteuert zu erkennen und bestimmte Bereiche oder Abschnitte mit nur wenigen Codezeilen in neue Dateien zu extrahieren.
Weitere Tutorials zur Textverarbeitung entdecken
5 простых способов разделить документ Word на несколько файлов (ручной и автоматизированный)
Содержание
- Способ 1 — Разделение документа Word через копирование и вставку
- Способ 2 — Разделение документа Word по заголовкам
- Способ 3 — Разделение документов Word путем преобразования в PDF
- Способ 4 — Бесплатное разделение страниц в Word Online
- Способ 5 — Автоматизация разделения документов Word с помощью Python
Работа с большими документами Word может быть сложной. Файлы с сотнями страниц часто замедляют работу Word, усложняют совместную работу и делают обмен по электронной почте громоздким. Знание того, как эффективно разделять документ Word, может сэкономить время, уменьшить размер файла и улучшить рабочий процесс.
В этом руководстве мы рассмотрим 5 практических способов разделения документов Word, от простых ручных методов, таких как копирование и вставка, до автоматизированных решений с использованием Python. Независимо от того, являетесь ли вы новичком, работающим с одним файлом, или опытным пользователем, обрабатывающим сотни документов, эта статья поможет вам выбрать метод, который наилучшим образом соответствует вашим потребностям.
Обзор методов
- Способ 1 — Разделение документа Word через копирование и вставку
- Способ 2 — Разделение документа Word по заголовкам
- Способ 3 — Разделение документов Word путем преобразования в PDF
- Способ 4 — Бесплатное разделение страниц в Word Online
- Способ 5 — Автоматизация разделения документов Word с помощью Python
Зачем может понадобиться разделять документ Word?
Разделение документа Word — это не просто техническая задача, оно может сделать вашу работу более организованной и удобной. Вот несколько распространенных причин для разделения документов Word:
- Улучшенное совместное использование: Легко отправляйте отдельные главы или разделы разным редакторам или заинтересованным сторонам, не делясь всем документом.
- Оптимизированный размер файла: Уменьшите объем массивных документов с большим количеством изображений для более быстрой отправки по электронной почте и плавной загрузки в облако.
- Лучшая организация: Разбейте сложный отчет по нескольким проектам на отдельные, удобные для поиска файлы.
- Бесшовное преобразование: Подготовьте отдельные сегменты для преобразования в PDF, Markdown или HTML.
Способ 1 — Разделение документа Word через копирование и вставку
Лучше всего подходит для: Извлечения отдельных разделов, разовых правок или для новичков.
Метод копирования и вставки — это самый интуитивно понятный способ вручную разделять документ Word. Он не требует дополнительного программного обеспечения или технических знаний и безупречно работает во всех версиях Microsoft Word, включая Word для Microsoft 365, Word 2024, 2021, 2019 и 2016. Этот подход идеально подходит для пользователей, которым требуется полный гранулярный контроль над конкретным контентом, который они хотят выделить.
Пошаговые инструкции:
-
Откройте документ
Запустите Word и откройте файл, который вы хотите разделить. -
Выберите нужный контент
Выделите раздел или главу для извлечения.- ⚡ Совет: Используйте Ctrl + Shift + End (Windows) или Cmd + Shift + End (Mac), чтобы быстро выделить все от курсора до конца документа.
-
Скопируйте контент
Нажмите Ctrl + C (Windows) или Cmd + C (Mac) на клавиатуре, или щелкните правой кнопкой мыши по выделенной области и выберите Копировать.
-
Создайте новый файл
Нажмите Ctrl + N, чтобы мгновенно открыть новый пустой документ. -
Вставьте контент
Нажмите Ctrl + V (Windows) или Cmd + V (Mac), чтобы вставить. Чтобы сохранить исходное форматирование, нажмите на значок Параметры вставки в конце вставленного текста (или нажмите Ctrl) и выберите Сохранить исходное форматирование (К).
-
Сохраните новый файл
Нажмите F12, чтобы открыть диалоговое окно Сохранить как. Введите описательное имя файла, выберите папку назначения и нажмите Сохранить.
Преимущества и ограничения:
| ✅ Преимущества | ❌ Ограничения |
|---|---|
| Нулевая кривая обучения | Неэффективно для пакетных задач |
| Точный контроль над выбором контента | Сложное форматирование может потребовать ручной корректировки |
Дополнительные советы: Как избежать сдвигов форматирования
Ручное копирование — это быстро, но может нарушить сложную компоновку. Следуйте этим советам:
- Альбомная ориентация страниц: Если в источнике есть страницы в альбомной ориентации, вставьте Разрыв раздела (Макет > Разрывы > Следующая страница) в новый файл перед вставкой, чтобы горизонтальная компоновка сохранилась.
- Верхние и нижние колонтитулы: Эти фоновые элементы (включая номера страниц и водяные знаки) не переносятся. Вам придется применить их вручную в новом файле.
- Согласованность стилей: Чтобы предотвратить изменение шрифтов или интервалов, всегда используйте Сохранить исходное форматирование при вставке.
- Поврежденные гиперссылки: Имейте в виду, что внутренние гиперссылки (оглавление) часто ломаются; нажмите F9 в новом файле, чтобы обновить все поля.
Нужно преобразовать эти разделенные файлы? Ознакомьтесь с нашим руководством по преобразованию Word в Markdown для высокоскоростной документации.
Способ 2 — Разделение документа Word по заголовкам
Лучше всего подходит для: Разделения длинных многоглавных документов (например, 50+ страниц), в которых уже используются стили заголовков Word.
Если ваш документ хорошо организован с использованием стилей заголовков (Заголовок 1, 2 и т. д.), встроенная функция Режим структуры Microsoft Word более эффективна. Этот метод автоматизирует процесс сегментации, гарантируя, что каждый раздел будет экспортирован как отдельный связанный файл, устраняя ошибки ручного выделения и «повреждение форматирования», распространенные при копировании и вставке.
Пошаговые инструкции:
-
Перейдите в режим структуры
Перейдите на вкладку Вид и нажмите Структура.
-
Показать заголовки
На вкладке «Структура» установите Уровень отображения на уровень заголовка, по которому вы хотите разделить (например, Уровень 2). Это свернет весь основной текст, показывая только ваши основные заголовки.
-
Выберите заголовки
Выделите все заголовки, которые вы хотите разделить. -
Создайте поддокументы
Нажмите кнопку Показать документ, затем нажмите Создать. Вокруг выбранных заголовков появятся тонкие серые поля (Поддокументы).
-
Сохраните поддокументы
Нажмите F12, выберите папку назначения и нажмите Сохранить, чтобы сохранить поддокументы.
Результат: Word мгновенно создаст отдельные файлы для каждого выбранного вами заголовка в этой папке.
Преимущества и ограничения:
| ✅ Преимущества | ❌ Ограничения |
|---|---|
| Без ручного перетаскивания | Работает только если документ использует последовательные стили заголовков |
| Имена файлов назначаются автоматически | Создает сложные связи поддокументов, которые могут быть хрупкими, если файлы перемещаются по отдельности |
Дополнительные советы:
- Правило новой папки: Всегда создавайте новую папку перед сохранением поддокументов. Word будет использовать текст заголовка в качестве имен файлов; без папки он мгновенно загромоздит ваш каталог.
- Сначала протестируйте навигацию: Перед разделением перейдите в область навигации (Ctrl + F > Заголовки). Если она пуста, Word не распознает вашу структуру. Вам нужно будет применить стили заголовков к вашим заголовкам.
Способ 3 — Разделение документов Word путем преобразования в PDF
Лучше всего подходит для: Обмена отдельными главами, которые не требуют дальнейшего редактирования и должны выглядеть идентично на любом устройстве.
Если ваша цель — распространить отполированный сегмент вашей работы, разделение путем преобразования в PDF является наиболее надежным способом обеспечения кроссплатформенной совместимости. PDF фиксирует вашу компоновку, шрифты и изображения, предотвращая искажение вашей кропотливой работы из-за настроек Word получателя.
Пошаговые инструкции:
-
Преобразование в PDF
Откройте файл в Word, затем перейдите в Файл > Сохранить как и выберите PDF (*.pdf). -
Определение диапазона
В диалоговом окне нажмите кнопку Параметры.... В разделе Диапазон страниц выберите Страницы, введите нужный диапазон (например, 5-10) и нажмите OK.
-
Сохраните файл
Нажмите Сохранить и повторите для других диапазонов страниц.
Преимущества и ограничения:
| ✅ Преимущества | ❌ Ограничения |
|---|---|
| Компоновка и форматирование остаются на 100% статичными | Сложнее редактировать после разделения |
Дополнительный совет:
- Повторное редактирование: Нужно что-то изменить? Щелкните правой кнопкой мыши по разделенному PDF-файлу и выберите Открыть с помощью > Word. Word попытается восстановить текст для вас, хотя сложные компоновки могут немного сдвинуться.
Способ 4 — Бесплатное разделение страниц в Word Online
Лучше всего подходит для: Пользователей без установленного настольного Microsoft Word или для тех, кто работает на мобильных устройствах.
Если у вас нет доступа к настольному приложению Microsoft Word или вам нужно решение «в один клик» на ходу, онлайн-разделитель документов Word, такой как Zamzar, является наиболее удобным выбором. Этот облачный инструмент выполняет основную работу на своих серверах, позволяя разделять документы Word по каждые X страниц без ручного форматирования.
Как разделить страницы в Word Online:
-
Загрузите файл
Перейдите на сайт разделителя документов Word Zamzar и нажмите Выбрать файлы (или перетащите свой документ). -
Установите логику разделения
Укажите интервал для разделения (например, разделять каждую 1 страницу). -
Разделить и скачать
Нажмите Разделить сейчас. После завершения процесса скачайте разделенные документы непосредственно на свое устройство.
Преимущества и ограничения:
| ✅ Преимущества | ❌ Ограничения |
|---|---|
| Быстро и просто | Требуется загрузка документа на сторонний сервер |
| Работает на любом устройстве (мобильные телефоны, планшеты и т. д.) | Бесплатные версии часто ограничивают общий размер файла (например, 50 МБ) |
Предупреждение о безопасности:
Хотя онлайн-разделители невероятно удобны, никогда не используйте их для конфиденциальных документов (таких как юридические контракты, банковские выписки или медицинские записи). Для личных данных всегда придерживайтесь офлайн-методов (Способ 1, 2, 3 или 5).
Способ 5 — Автоматизация разделения документов Word с помощью Python
Лучше всего подходит для: Разработчиков и опытных пользователей, которым необходимо обрабатывать огромные объемы документов или автоматизировать повторяющиеся ежемесячные отчеты.
Если вы сталкиваетесь с «горой» файлов — например, разделяете 500 отдельных договоров на отдельные файлы — ручное нажатие кнопок больше не является вариантом. Автоматизация Python позволяет создать единый скрипт, который обрабатывает весь процесс за секунды, обеспечивая 100% точность без вмешательства человека.
Пошаговые инструкции:
-
Настройка среды
Для автоматизации разделения документов Word мы будем использовать библиотеку Spire.Doc for Python. В отличие от некоторых библиотек с открытым исходным кодом, таких как python-docx, которые испытывают трудности со сложными компоновками Word, Spire.Doc сохраняет высокую точность в процессе извлечения страниц.Перед продолжением установите ее, выполнив следующую команду в терминале:
pip install Spire.Doc -
Напишите скрипт автоматизации
Этот скрипт сканирует папку «Входные данные», находит каждый файл .docx и автоматически извлекает каждую страницу в отдельный документ:import os from spire.doc import * # Определите пути к папкам input_folder = "Source_Documents/" output_folder = "Split_Results/" # Создайте выходную папку, если она не существует if not os.path.exists(output_folder): os.makedirs(output_folder) # Пройдитесь по всем файлам во входной папке for filename in os.listdir(input_folder): if filename.endswith(".docx"): file_path = os.path.join(input_folder, filename) # Загрузите документ doc = Document() doc.LoadFromFile(file_path) # Разделите текущий документ по страницам for i in range(doc.PageCount): single_page_doc = doc.ExtractPages(i, 1) # Сохраните с именем, например «ContractA_Page_1.docx» base_name = os.path.splitext(filename)[0] save_path = f"{output_folder}{base_name}_Page_{i + 1}.docx" single_page_doc.SaveToFile(save_path, FileFormat.Docx) single_page_doc.Dispose() doc.Dispose() print(f"Обработано: {filename}") print("Все документы успешно разделены!")
| ✅ Преимущества | ❌ Ограничения |
|---|---|
| Пакетное разделение тысяч документов с высокой эффективностью | Требуется среда Python и установка библиотеки |
| Полностью настраиваемая логика (разделение по страницам, диапазонам страниц или разделам) | Требуются базовые знания Python |
Профессиональный совет:
- За пределами страниц: Если в документе используются разрывы разделов, Spire.Doc может автоматически разделять по разделам, что идеально подходит для документов с разной длиной глав.
Нужно снова объединить несколько файлов Word? Ознакомьтесь с нашим руководством по Как объединить документы Word в Python.
Краткое сравнение всех методов разделения документов Word
| Метод | Лучший сценарий использования | Уровень навыков | Сохранение форматирования |
|---|---|---|---|
| Копирование и вставка | Разовые мелкие правки (1-5 страниц) | Новичок | Частичное |
| Стили заголовков | Длинные, структурированные отчеты | Средний | Высокое |
| Преобразование в PDF | Финальные версии для обмена | Новичок | Очень высокое |
| Онлайн-разделители | Пользователи мобильных устройств или не пользователи Word | Новичок | Среднее |
| Скрипт Python | Пакетная обработка (100+ файлов) | Продвинутый | Высокое |
Советы по эффективному разделению документов Word
- Сначала сделайте резервную копию: Всегда создавайте резервную копию основного документа перед разделением. Это защитит вас от случайного удаления или ошибок форматирования.
- Сохранение форматирования: Используйте Сохранить исходное форматирование или согласованные шаблоны, чтобы заголовки и компоновки оставались идентичными во всех разделенных файлах.
- Умное именование файлов: Используйте четкое соглашение об именовании, например ProjectName_Part01.docx. Для пользователей Python вы можете автоматизировать это, извлекая уникальные идентификаторы или заголовки из текста.
- Финальная проверка: Всегда проверяйте верхние и нижние колонтитулы, а также номера страниц после разделения. Word часто сбрасывает эти элементы при перемещении контента в новый файл.
Заключение
Существует несколько способов разделения документа Word, лучший метод зависит от размера файла, структуры и рабочего процесса:
- Маленькие файлы или редкие правки: Ручное копирование и вставка или онлайн-разделители работают отлично.
- Обмен сегментами с фиксированным форматированием: Преобразование в PDF обеспечивает согласованную компоновку на всех устройствах.
- Крупномасштабные документы: Автоматизация Python обеспечивает максимальную скорость и точность для пакетной обработки.
Готовы начать? Выберите метод, который соответствует вашим потребностям, и возьмите под контроль управление документами уже сегодня!
Часто задаваемые вопросы
В1: Могу ли я разделить документ Word без установки какого-либо программного обеспечения?
О1: Да. Вы можете использовать надежные онлайн-разделители, такие как Zamzar, для разделения документов Word без необходимости установки на настольный компьютер.
В2: Почему мое форматирование меняется после ручного разделения?
О2: Это обычно происходит, когда новый документ имеет другие настройки стиля. Чтобы исправить это, всегда выбирайте Сохранить исходное форматирование при вставке контента в новый файл.
В3: Как разделить документ по определенным диапазонам страниц?
О3: Самый простой способ — использовать преобразование в PDF. В параметрах Сохранить как вы можете указать пользовательский диапазон (например, страницы 5-10), чтобы извлечь только эти страницы.
В4: Безопасно ли разделять конфиденциальные документы онлайн?
О4: Для конфиденциальных данных мы рекомендуем офлайн-методы, такие как копирование и вставка или автоматизация Python. Это гарантирует, что ваши данные никогда не покинут ваш локальный компьютер.
В5: Как разработчики могут автоматизировать разделение Word в Python?
О5: Разработчики могут использовать библиотеки, такие как Spire.Doc for Python. Это позволяет программно обнаруживать страницы и извлекать определенные диапазоны или разделы в новые файлы всего за несколько строк кода.
Исследуйте больше учебных пособий по обработке текстов
Como imprimir uma planilha do Excel em uma página: 7 maneiras eficazes
Sumário
- Por que as Planilhas do Excel Não Cabem em Uma Página
- Método 1: Use a Opção “Ajustar Planilha em Uma Página”
- Método 2: Ajuste o Dimensionamento da Página Manualmente
- Método 3: Altere a Orientação da Página
- Método 4: Reduza as Margens e Remova Colunas Extras
- Método 5: Defina uma Área de Impressão Personalizada
- Método 6: Altere o Tamanho do Papel
- Método 7: Imprima a Planilha do Excel em Uma Página Usando C#
- Tabela de Comparação Rápida
- Perguntas Frequentes
- Conclusão
As planilhas do Excel geralmente ficam perfeitas na tela, mas tornam-se difíceis de imprimir corretamente. Tabelas grandes podem se estender por várias páginas, colunas são cortadas ou o resultado impresso fica confuso e difícil de ler.
Felizmente, o Excel oferece várias ferramentas integradas para ajudar a ajustar planilhas em uma única página ao imprimir. Se você estiver imprimindo faturas, relatórios, cronogramas, painéis ou demonstrações financeiras, esses métodos podem ajudar a criar impressões mais limpas e profissionais.
Neste guia, você aprenderá 7 maneiras eficazes de imprimir uma planilha do Excel em uma página, desde configurações fáceis do Excel para iniciantes até automação avançada em C# usando Spire.XLS.
Navegação Rápida:
- Método 1: Use a Opção “Ajustar Planilha em Uma Página”
- Método 2: Ajuste o Dimensionamento da Página Manualmente
- Método 3: Altere a Orientação da Página
- Método 4: Reduza as Margens e Remova Colunas Extras
- Método 5: Defina uma Área de Impressão Personalizada
- Método 6: Altere o Tamanho do Papel
- Método 7: Imprima a Planilha do Excel em Uma Página Usando C#
Por que as Planilhas do Excel Não Cabem em Uma Página
O Excel separa automaticamente as planilhas em várias páginas impressas com base no tamanho da página, margens, dimensionamento e dimensões do conteúdo. Se uma planilha contiver muitas colunas ou linhas, o Excel poderá dividir o conteúdo em várias páginas durante a impressão.
Razões comuns incluem:
- Tabelas largas com muitas colunas
- Tamanhos de fonte grandes
- Espaços em branco excessivos
- Margens de página largas
- Orientação de página incorreta
- Células não utilizadas que estendem o intervalo de impressão
Como resultado, os relatórios podem se tornar difíceis de ler e desperdiçar papel desnecessariamente. Os seguintes métodos ajudarão você a otimizar o layout da sua planilha e ajustar o conteúdo em uma única página impressa.
Método 1: Use a Opção “Ajustar Planilha em Uma Página”
Este é o método mais fácil e mais usado. O Excel inclui um recurso de dimensionamento integrado que encolhe automaticamente o conteúdo da planilha para caber em uma página impressa.
Funciona particularmente bem para faturas, cronogramas, relatórios e tabelas de tamanho médio.
Passos
- Abra sua planilha do Excel.
- Clique em Arquivo > Imprimir.
- Em Configurações, clique em Sem Dimensionamento.
- Selecione Ajustar Planilha em Uma Página.
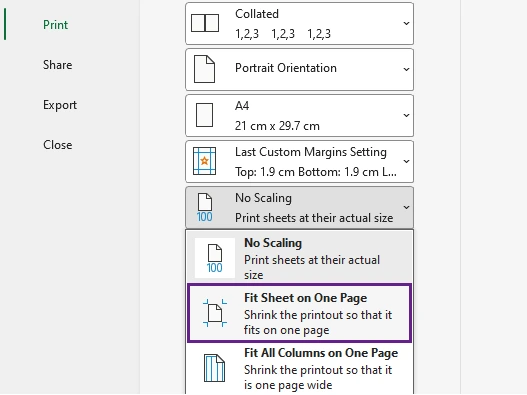
- Visualize o resultado no painel Visualizar Impressão.
- Clique em Imprimir para imprimir a planilha.
O que Acontece
O Excel dimensiona automaticamente a planilha para que todas as linhas e colunas caibam em uma única página durante a impressão.
Prós
- Extremamente fácil de usar
- Nenhum redimensionamento manual necessário
- Integrado diretamente no Excel
Contras
- O texto pode ficar muito pequeno para planilhas muito grandes
Método 2: Ajuste o Dimensionamento da Página Manualmente
Em vez de forçar tudo em uma página automaticamente, você pode reduzir manualmente a porcentagem de dimensionamento. Isso oferece mais controle sobre a legibilidade e a aparência da impressão.
Por exemplo, reduzir o dimensionamento para 85% ou 90% pode ajustar o conteúdo de forma agradável, mantendo o texto legível.
Passos
- Abra sua planilha do Excel e clique em Arquivo > Imprimir.
- Em Configurações, clique em Sem Dimensionamento.
- Selecione Opções de Dimensionamento Personalizado.
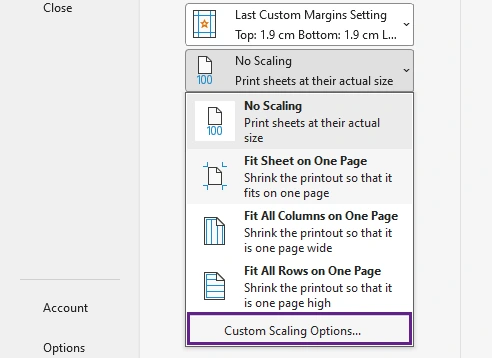
- Nas configurações de dimensionamento, reduza a porcentagem de dimensionamento até que a planilha se ajuste melhor à página.
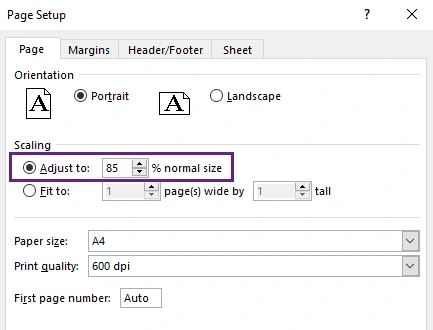
- Verifique o layout no painel Visualizar Impressão e continue ajustando, se necessário.
- Quando a planilha se ajustar corretamente em uma página, clique em Imprimir.
Melhor Para
- Relatórios financeiros
- Tabelas com colunas ligeiramente grandes demais
- Planilhas onde a legibilidade é importante
Dica: Evite reduzir o dimensionamento agressivamente. Texto muito pequeno pode tornar os documentos impressos difíceis de ler.
Método 3: Altere a Orientação da Página
Muitas planilhas do Excel são mais largas do que altas. Mudar da orientação Retrato para Paisagem fornece mais espaço horizontal e pode reduzir instantaneamente as quebras de página.
Este ajuste simples é especialmente eficaz para planilhas com muitas colunas.
Passos
- Abra sua planilha do Excel e clique em Arquivo > Imprimir.
- Na janela de configurações de impressão, clique em Configurar Página.
- Na guia Página, selecione a orientação Paisagem.
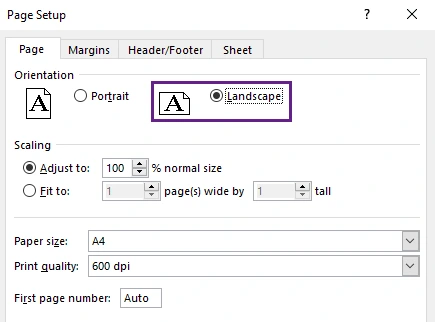
- Clique em OK para aplicar a configuração.
- Revise o layout no painel Visualizar Impressão.
- Se a planilha se ajustar corretamente em uma página, clique em Imprimir.
Por que Ajuda
O modo Paisagem aumenta a largura imprimível, permitindo que mais colunas caibam em uma única página.
Melhor Para
- Tabelas de dados largas
- Painéis
- Relatórios com muitas colunas
Método 4: Reduza as Margens e Remova Colunas Extras
Margens de página grandes e áreas de planilha não utilizadas consomem espaço de impressão valioso. Reduzir as margens e remover conteúdo desnecessário pode melhorar significativamente o ajuste da página.
Este método é frequentemente combinado com o dimensionamento para melhores resultados.
Passos
- Abra sua planilha do Excel e remova o conteúdo desnecessário, como linhas em branco, colunas vazias, fontes grandes demais, espaçamento excessivo ou dados que não precisam ser impressos.
- Clique em Arquivo > Imprimir.
- Em Configurações, clique em Margens Normais.
- Selecione Estreita para reduzir as margens da página e criar mais espaço imprimível.
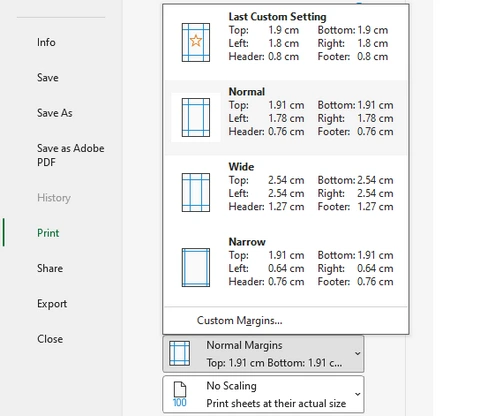
- Se precisar de espaço adicional, selecione Margens Personalizadas e reduza manualmente as margens superior, inferior, esquerda e direita ainda mais.
- Revise o resultado no painel Visualizar Impressão.
- Quando a planilha se ajustar corretamente em uma página, clique em Imprimir.
Por que Funciona
Margens menores fornecem mais área imprimível, enquanto a limpeza de conteúdo não utilizado impede que o Excel imprima páginas desnecessárias.
Dica: Pressione Ctrl + Fim para ver a última célula usada pelo Excel. Às vezes, a formatação oculta se estende muito além dos seus dados reais.
Método 5: Defina uma Área de Impressão Personalizada
Às vezes, apenas parte da planilha precisa ser impressa. Ao definir uma área de impressão personalizada, o Excel ignora células desnecessárias e se concentra apenas no conteúdo selecionado.
Esta é uma das maneiras mais eficazes de evitar páginas em branco e intervalos de impressão grandes demais.
Passos
- Selecione as células ou o intervalo que você deseja imprimir.
- Vá para a guia Layout da Página.
- Clique em Área de Impressão no grupo Configurar Página.
- Selecione Definir Área de Impressão.
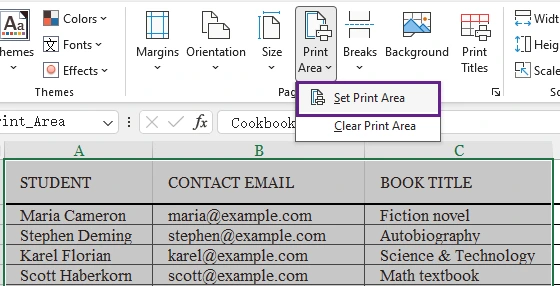
- Clique em Arquivo > Imprimir para abrir as configurações de impressão.
- Revise o conteúdo selecionado no painel Visualizar Impressão.
- Se o layout estiver correto, clique em Imprimir.
Melhor Para
- Relatórios
- Painéis
- Resumos
- Seções de faturas
Prós
- Evita páginas em branco extras
- Impressão mais rápida
- Saída mais limpa
Método 6: Altere o Tamanho do Papel
Usar um tamanho de papel maior fornece espaço de impressão adicional e reduz a necessidade de dimensionamento excessivo. Este método é comumente usado em escritórios para planilhas grandes e relatórios detalhados.
Por exemplo, mudar de papel Carta para Ofício pode melhorar drasticamente o layout de impressão.
Passos
- Abra sua planilha do Excel e clique em Arquivo > Imprimir.
- Em Configurações, clique no tamanho de papel atual (como A4).
- Selecione um tamanho de papel maior, como Ofício, A3 ou Tabloide.
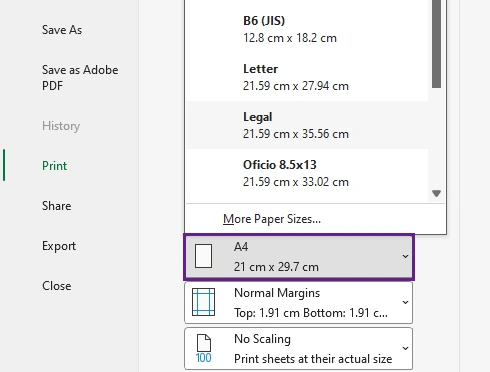
- Revise o layout no painel Visualizar Impressão.
- Se a planilha se ajustar corretamente na página, clique em Imprimir.
Melhor Para
- Relatórios grandes
- Planilhas financeiras
- Tabelas largas
Nota Importante
Certifique-se de que sua impressora suporte o tamanho de papel selecionado.
Método 7: Imprima a Planilha do Excel em Uma Página Usando C#
Se você precisar imprimir planilhas do Excel programaticamente, a automação em C# oferece uma solução muito mais eficiente do que a impressão manual. Essa abordagem é ideal para sistemas corporativos, plataformas de relatórios, tarefas agendadas e processamento de documentos em lote.
Usando Spire.XLS for .NET, você pode configurar automaticamente as configurações de página e ajustar as planilhas em uma única página impressa.
A configuração chave é:
pageSetup.IsFitToPage = true;
Essa propriedade dimensiona automaticamente o conteúdo da planilha para caber em uma página durante a impressão.
Instale Spire.XLS
Você pode instalar Spire.XLS via NuGet:
Install-Package Spire.XLS
Exemplo de C#: Imprimir Planilha do Excel em Uma Página
using Spire.Xls;
using System.Drawing.Printing;

namespace PrintExcel
{
    class Program
    {
        static void Main(string[] args)
        {
            // Carregar um documento Excel
            Workbook workbook = new Workbook();
            workbook.LoadFromFile("Sample.xlsx");

            // Percorrer as planilhas
            for (int i = 0; i < workbook.Worksheets.Count; i++)
            {
                // Obter uma planilha específica
                Worksheet worksheet = workbook.Worksheets[i];

                // Obter o objeto PageSetup
                PageSetup pageSetup = worksheet.PageSetup;

                // Definir margens da página
                pageSetup.TopMargin = 0.3;
                pageSetup.BottomMargin = 0.3;
                pageSetup.LeftMargin = 0.3;
                pageSetup.RightMargin = 0.3;

                // Permitir imprimir com linhas de grade
                pageSetup.IsPrintGridlines = true;

                // Ajustar planilha em uma página
                pageSetup.IsFitToPage = true;
            }

            // Obter PrinterSettings
            PrinterSettings settings = workbook.PrintDocument.PrinterSettings;

            // Especificar nome da impressora
            settings.PrinterName = "Seu Nome da Impressora";

            // Especificar intervalo de páginas para imprimir
            settings.FromPage = 1;
            settings.ToPage = 3;

            // Executar a impressão
            workbook.PrintDocument.Print();
        }
    }
}
Vantagens Deste Método
- Impressão de Excel totalmente automatizada
- Suporta processamento em lote
- Adequado para aplicações corporativas
- Elimina operações manuais do Excel
- Fácil de integrar em sistemas de relatórios
Como uma API abrangente de Excel para .NET, Spire.XLS for .NET permite que os desenvolvedores controlem totalmente a impressão de planilhas por meio de código, incluindo dimensionamento, áreas de impressão, margens, orientação, cabeçalhos, rodapés e quebras de página.
Além da impressão, ele também suporta criação de Excel, edição, importação/exportação de dados, cálculo de fórmulas, processamento de gráficos e conversão entre formatos Excel, PDF, CSV, HTML e imagem. É amplamente utilizado para geração de relatórios, automação de negócios, sistemas financeiros e aplicações de processamento de planilhas em larga escala.
Tabela de Comparação Rápida
| Método | Dificuldade | Melhor Para | Automação |
|---|---|---|---|
| Ajustar Planilha em Uma Página | Fácil | Impressão rápida | Não |
| Dimensionamento Manual | Fácil | Melhor legibilidade | Não |
| Orientação Paisagem | Fácil | Planilhas largas | Não |
| Reduzir Margens | Fácil | Pequenos ajustes de layout | Não |
| Definir Área de Impressão | Fácil | Impressão de parte da planilha | Não |
| Alterar Tamanho do Papel | Fácil | Relatórios grandes | Não |
| C# com Spire.XLS | Avançado | Impressão em lote/automática | Sim |
Conclusão
Imprimir planilhas do Excel em uma única página pode melhorar muito a legibilidade e a qualidade de apresentação do documento. O Excel oferece vários recursos integrados — incluindo dimensionamento, orientação paisagem, configuração de área de impressão e ajuste de margens — para ajudar a otimizar os layouts de impressão rapidamente.
Para desenvolvedores e usuários corporativos, a impressão programática com Spire.XLS oferece uma poderosa solução de automação. Ao habilitar a propriedade IsFitToPage, as planilhas do Excel podem se ajustar automaticamente a uma página impressa, tornando a impressão em lote e a geração de relatórios muito mais eficientes.
Perguntas Frequentes
P1. Por que minha planilha do Excel ainda está imprimindo em várias páginas?
Sua planilha pode conter dados ocultos, células formatadas não utilizadas, margens grandes ou muitas colunas. Verifique a área de impressão e as configurações de dimensionamento.
P2. Ajustar uma planilha em uma página reduz a qualidade de impressão?
Não. O Excel apenas dimensiona o tamanho do conteúdo. No entanto, o encolhimento excessivo pode tornar o texto difícil de ler.
P3. Posso ajustar apenas as colunas em uma página?
Sim. Em Configurações, clique em Sem Dimensionamento e escolha Ajustar Todas as Colunas em Uma Página. Isso mantém as linhas fluindo naturalmente enquanto ajusta todas as colunas em uma página.
P4. O modo Paisagem é melhor para imprimir planilhas do Excel?
Para planilhas largas, sim. A orientação Paisagem fornece mais espaço de impressão horizontal.
P5. Posso automatizar a impressão do Excel em aplicações de backend?
Sim. Bibliotecas como Spire.XLS permitem que os desenvolvedores imprimam arquivos do Excel programaticamente usando C# sem abrir o Excel manualmente.