Convert Excel to OFD in C++ | Complete Guide
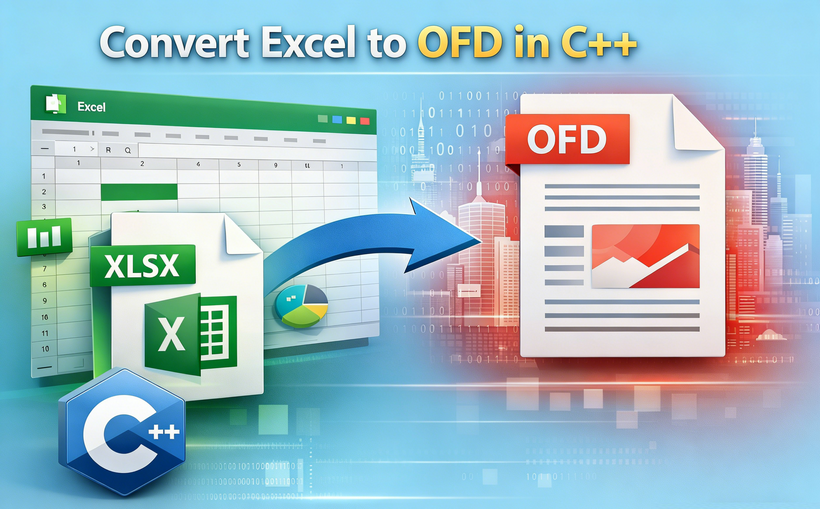
In the world of document management, the OFD (Open Fixed-layout Document) format is gaining significant traction, particularly in East Asian markets, as a domestic alternative to PDF. Whether you are developing financial reporting software or an enterprise document management system, the need to convert Excel to OFD in C++ environments is becoming increasingly common.
This guide provides a comprehensive tutorial on how to convert Excel spreadsheets (XLS/XLSX) to OFD format using Spire.XLS for C++, a robust library designed to handle Excel operations without requiring Microsoft Office to be installed.
- Why Convert Excel to OFD?
- Setting Up Spire.XLS for C++
- Basic Excel to OFD Conversion in C++
- Advanced Excel to OFD Conversion Settings
- Frequently Asked Questions (FAQs)
- Get a Free License
Why Convert Excel to OFD?
Before diving into the code, it is essential to understand the benefits of OFD conversion:
- Immutable Format: OFD preserves the layout, fonts, and images of your Excel sheets, ensuring they look the same on any device.
- Standard Compliance: As a national standard in China (GB/T 33190-2016), OFD is often required for government and archival submissions.
- Compact Size: OFD files are typically smaller than Excel files with rich images/formatting while maintaining high quality.
Setting Up Spire.XLS for C++
The first step is to integrate the library into your project. The easiest method is to use the official NuGet package or manually include the files.
Option A: Install via NuGet Package Manager
- Open your project in Visual Studio.
- Go to Tools -> NuGet Package Manager -> Manage NuGet Packages for Solution...
- Search for "Spire.XLS.Cpp".
- Click "Install".
Option B: Manual Installation
- Download the latest version of Spire.XLS for C++ from the official website.
- Unzip the package.
- Configure your Visual Studio project to include the Include directory path and link the lib directory. Ensure the DLL files are placed in the same directory as your executable or in a system path.
For detailed installation instructions, see: Integrate Spire.XLS for C++ in a C++ Application
Basic Excel to OFD Conversion in C++
Once the Excel library is set up, you can write the code to load an Excel document (.xls or .xlsx) and save it as an OFD.
Here is a complete C++ example:
#include "Spire.Xls.o.h"

using namespace Spire::Xls;
using namespace std;

int main() {

	wstring inputFile = L"Budget.xlsx";
	wstring outputFile = L"ExcelToOFD.ofd";

	// Create a new Workbook object
	intrusive_ptr<Workbook> workbook = new Workbook();

	// Load the workbook from the specified input file
	workbook->LoadFromFile(inputFile.c_str());

	// Save the workbook to the OFD format
	workbook->SaveToFile(outputFile.c_str(), FileFormat::OFD);

	// Dispose of the workbook object.
	workbook->Dispose();
}
Key Code Explanations:
- Create Workbook: The Workbook class represents the entire Excel file and handles loading/saving operations.
- Load Excel File: The LoadFromFile method reads your source Excel document.
- Save as OFD: The SaveToFile method with the FileFormat::OFD enum converts the spreadsheet data into the fixed-layout OFD format.
Excel to OFD conversion result:

The code converts each sheet in the Excel file to a separate page in the OFD document. If you need to convert only a specific worksheet, you can copy the worksheet to a new workbook first and then use the above code for conversion.
Advanced Excel to OFD Conversion Settings
To gain finer control over how your spreadsheets appear in the final OFD document, Spire.XLS for CPP provides several options to tailor the OFD output. Below are two practical advanced configurations:
Fit Excel Sheet to One Page in OFD Output
By default, when an Excel worksheet is larger than a standard page, it may be split across multiple OFD pages. This can break the visual flow of your data. Spire.XLS for C++ provides the ConverterSetting class to customize Excel conversion, and by setting its SetSheetFitToPage method to true, you can fit each worksheet to a single OFD page.
Core implementation code:
intrusive_ptr<Workbook> workbook = new Workbook();
workbook->LoadFromFile(L"Sample.xlsx");

// Enable fit to one page
workbook->GetConverterSetting()->SetSheetFitToPage(true);

workbook->SaveToFile(L"FittedSheet.ofd", FileFormat::OFD);
workbook->Dispose();
What the code does:
- If the worksheet’s content exceeds the page dimensions, the library scales it down proportionally to fit on a single page.
- This ensures that a wide table or chart is not split awkwardly across pages.
Adjust Page Setup Before Conversion
For more precise control, you can modify the PageSetup properties of individual worksheets. This allows you to set the paper orientation, margins, paper size, and more—just as you would in Excel's Page Layout view.
Core implementation code:
intrusive_ptr<Workbook> workbook = new Workbook();
workbook->LoadFromFile(L"Sample.xlsx");

// Access the first worksheet
intrusive_ptr<Worksheet> sheet = dynamic_pointer_cast<Worksheet>(workbook->GetWorksheets()->Get(0));

// Get the PageSetup object of this worksheet
intrusive_ptr<PageSetup> pageSetup = dynamic_pointer_cast<PageSetup>(sheet->GetPageSetup());

// Set orientation to Landscape
pageSetup->SetOrientation(PageOrientationType::Landscape);

//Set the paper size to A4 paper
pageSetup->SetPaperSize(PaperSizeType::PaperA4);

// Set custom margins (in inches)
pageSetup->SetBottomMargin(2);
pageSetup->SetLeftMargin(1);
pageSetup->SetRightMargin(1);
pageSetup->SetTopMargin(2);

workbook->SaveToFile(L"CustomPageSetup.ofd", FileFormat::OFD);
What the code does:
- Orientation: Changes the page orientation to landscape (ideal for wide tables).
- Margins: Sets custom margins around the content.
- Paper Size: Sets the page size to A4 (options include PaperA4, PaperLetter, PaperLegal, etc.).
- Per‑sheet control: You can apply different settings to each worksheet before conversion.
Pro Tip: If your workflow requires broader compatibility, Spire.XLS for C++ also supports direct Excel to PDF conversion, giving you the flexibility to output to either format depending on your regional or archival requirements.
Frequently Asked Questions (FAQs)
Q1. Do I need Microsoft Excel installed on my server to use Spire.XLS for C++?
A: No. Spire.XLS for C++ is a completely independent library. It does not require Microsoft Office or Excel to be installed on the machine where the application is deployed. This makes it ideal for server-side deployments.
Q2. Does the conversion support all Excel elements (Charts, Pivot Tables, Shapes)?
A: Yes. The library is designed to preserve high-fidelity. Elements such as charts, shapes, images, formulas (as calculated values), and pivot tables are rendered accurately in the output OFD file, maintaining the visual appearance of the original spreadsheet.
Q3. Can I skip a worksheet and converts the rest to OFD?
A: Yes. You can hide unwanted worksheets before conversion (Spire.XLS for C++ skips hidden sheets):
//Hide the the first worksheet
workbook->GetWorksheets()->Get(0)->SetVisibility(WorksheetVisibility::Hidden);
Alternatively, copy the desired sheet to a new workbook as mentioned earlier.
Q4: Does Spire.XLS for CPP support batch converting multiple Excel files to OFD?
A: Yes. You can loop through all Excel files in a specified folder and convert them to OFD in batches.
Conclusion
Converting Excel to OFD in C++ is both straightforward and scalable with Spire.XLS for C++. Whether you need to convert a single spreadsheet or automate batch processing, the library delivers high‑performance results with minimal code. By using advanced settings like fit‑to‑page and custom page setup, you can ensure your OFD documents meet exacting presentation standards.
For more features such as Excel encryption, data writing, or formula calculation, explore the official documentation.
Get a Free License
To fully experience the capabilities of Spire.XLS for C++ without any watermarks or limitations, you can request a 30-day trial license here.
Extract Images from Word Document: 5 Fast & Free Methods
Table of Contents
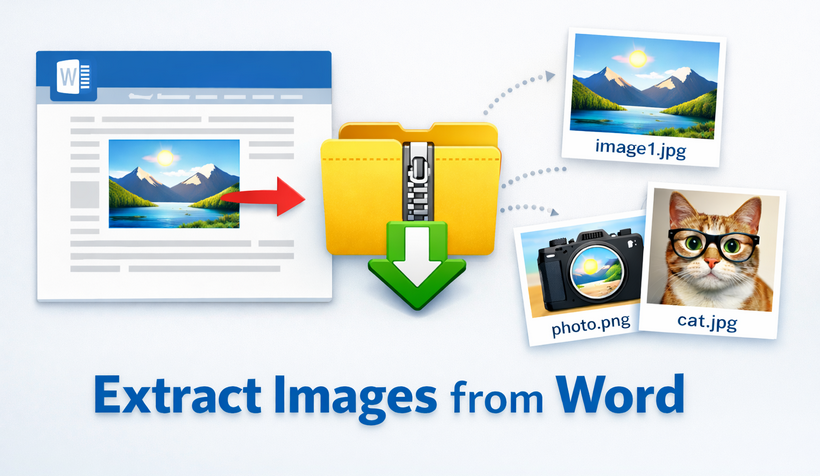
Extracting images from Word DOC/DOCX is one of the most common daily tasks for students, marketers, designers, and office workers. Whether you want to reuse pictures in a presentation, edit them in Photoshop, share visuals on social media, or organize a media library, knowing how to extract images from Word document efficiently saves you hours of repetitive work.
In this step-by-step guide, we’ll show you 5 reliable, free, and easy ways to extract pictures from Word. We cover single-image extraction, batch processing, online tools, and professional software.
- Why Extract Images from Word?
- Method 1: Right-Click Save As Picture
- Method 2: Save as Web Page
- Method 3: The ZIP File Trick
- Method 4: Free Online Word Image Extractors
- Method 5: Free Programming Solutions
- Quick Comparison of All Methods
- FAQs About Extracting Images from Word
Why Extract Images from Word?
Understanding the use cases helps you choose the right extraction method:
- Repurposing Content: Transform internal document visuals into blog graphics, social media posts, or presentation slides
- Backup: Preserve original image quality separately from evolving document versions
- Editing: Edit photos in specialized software without the compression artifacts from repeated Word saves
- File Size Reduction: Reduce document size by removing large embedded graphics for email or cloud storage
Method 1: Right-Click Save As Picture
Best for: Users already in Microsoft Word who need to quickly extract 1–3 images.
"Save As Picture" is the most intuitive method to extract pictures from Word when you only need one or two images. It requires no technical knowledge and works in seconds.
Step-by-Step Instructions:
- Open your Word document in Microsoft Word.
- Right-click the image you want to save.
- From the context menu, select Save as Picture.
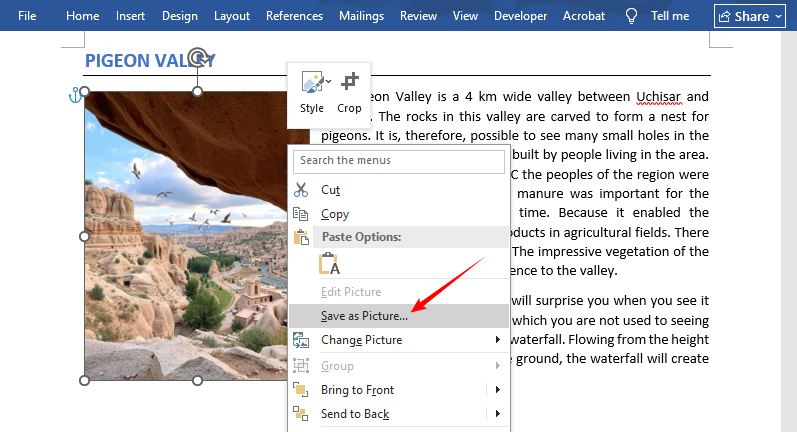
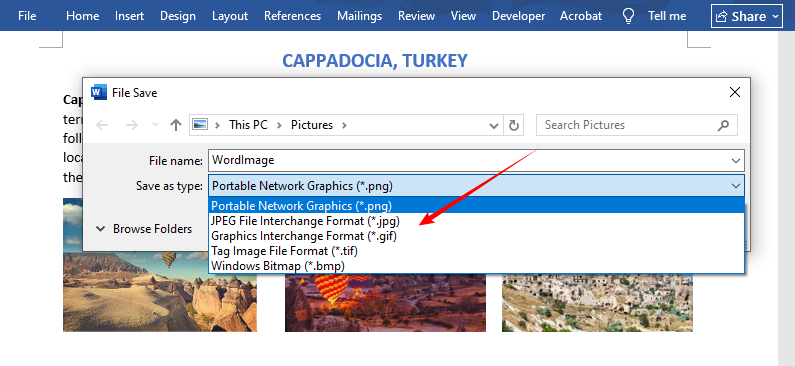
- In the dialog box:
- Choose a destination folder
- Rename the file (optional but recommended)
- Select your preferred format (PNG for transparency, JPG for photos, GIF for simple graphics)
- Click Save.
✔ Pros: Free, built-in, 1-click operation, Microsoft Word’s native feature
✘ Cons: Extremely slow for batch extraction (only one image at a time)
While Word documents are common, you may also need to extract images from PDFs. Check out our complete guide to extract PDF images – including free tools and advanced methods.
Method 2: Save as Web Page
Best for: Users who prefer Word’s native features for batch image saving.
Microsoft Word includes a powerful hidden feature: saving as a web page automatically exports every embedded image into a dedicated folder. This is one of the oldest and most reliable methods to extract images from Word doc or docx files.
Complete Walkthrough:
- Open the Word document.
- Click File → Save As and choose a save location on your device.
- In the "Save as type" dropdown, select *Web Page (.htm; *.html)**.
- Note: Do NOT select "Single File Web Page" – this packages everything into one file
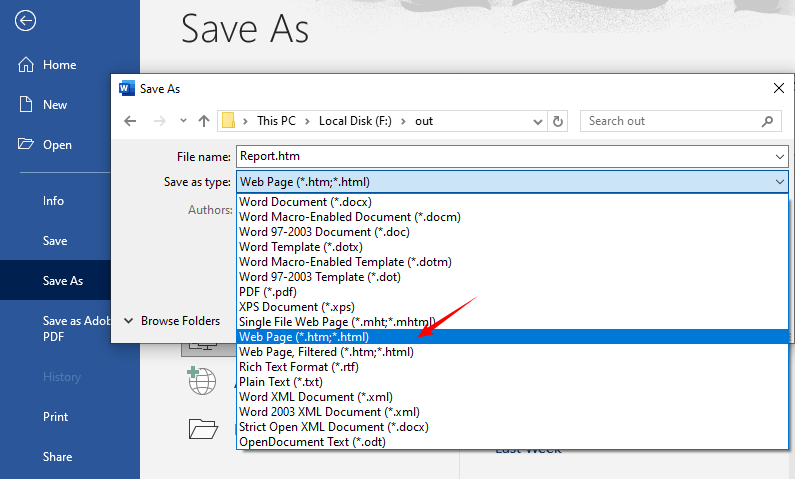
- Click Save—Word will generate two items in your chosen folder:
- The HTML webpage file.
- A folder named [YourDocumentName]_files (e.g., Report_files).
- Open that folder to access all extracted images (in their original formats like PNG/JPG).
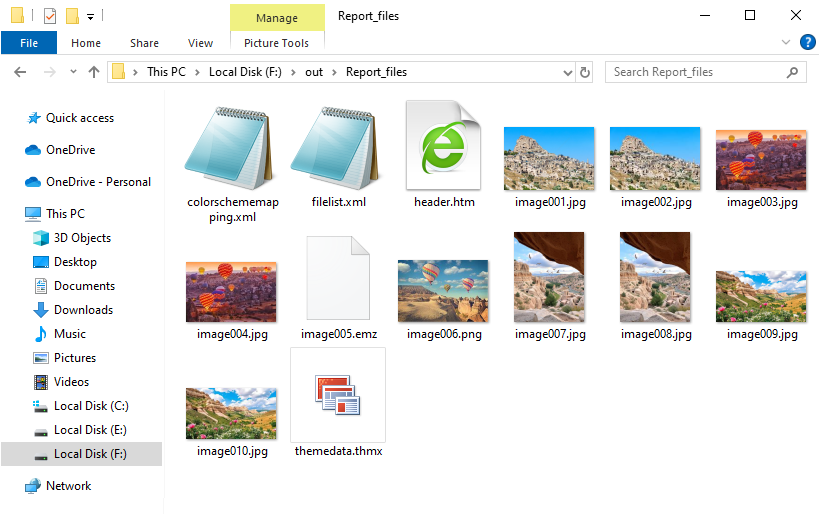
✔ Pros: Native Word tool, batch extracts all images instantly, retains good quality
✘ Cons: Creates extra HTML files, generates duplicate images if visuals are reused in the document
Method 3: The ZIP File Trick
Best For: Users who need to bulk extract all high-resolution images from DOCX files—no software required.
Here's a little-known fact: modern Word documents (.docx) are actually compressed ZIP archives. This means you can extract images from docx files without ever opening Microsoft Word.
Why This Works:
Since Microsoft Office 2007, Word has used the Open XML format. A .docx file is essentially a container with XML files and a dedicated /word/media/ folder containing all embedded images.
Detailed Steps:
- Locate your DOCX file and make a copy (to protect the original).
- Right-click the file and select Rename.
- Change the file extension from .docx to .zip (e.g., report.docx → report.zip).
- Press Enter to confirm the extension change.
- Click Yes if a warning pops up.
- Double-click to open like any folder (Windows Explorer or Mac Finder).
- Navigate to the folder path: word → media.
- Copy all images to your desired folder.
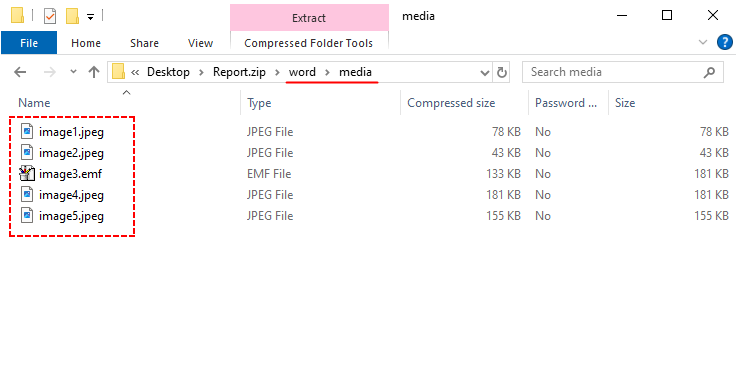
✔ Pros: 100% free, batch extraction, preserves original high resolution
✘ Cons: Only works for DOCX files.
Quick Tip: For bulk extracting images from legacy .doc files, use Method 2 (Save as Web Page), or convert DOC to DOCX first before applying this method.
Method 4: Free Online Word Image Extractors
Best for: Users who don’t want to install software or need a quick cross-platform solution (works on Windows, Mac, mobile).
Dedicated online tools like ExtractAssets or Groupdocs handle both DOC and DOCX files, extracting all images and delivering them as a downloadable ZIP file—no technical steps required.
Steps to extract images from Word online:
- Navigate to the tool's website (e.g., ExtractAssets Word Image Extractor)
- Upload your Word document.
- Click Extract Images.
- Download the images as a ZIP file.
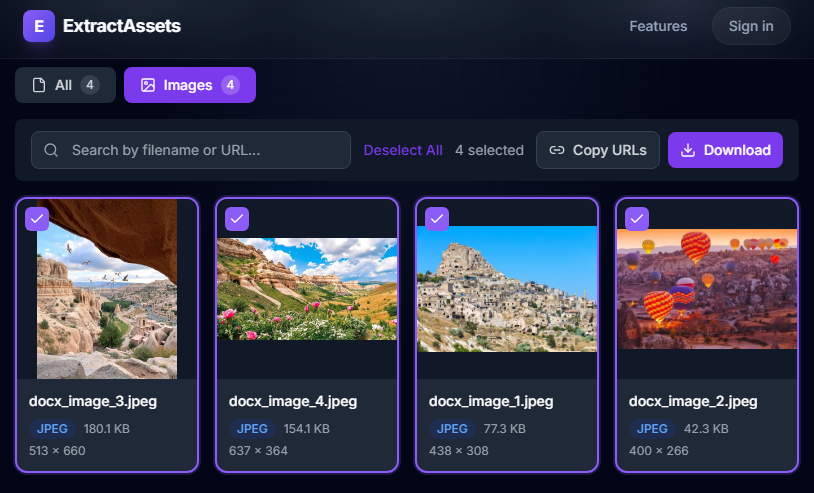
✔ Pros: No installation, cross-platform, works for DOC and DOCX files
✘ Cons: Needs internet; file size limits for free users
Warning: Be cautious when uploading sensitive or confidential documents to online tools. For private files, stick to the offline methods.
Method 5: Free Programming Solutions
Best for: Frequent users who need to batch extract images or integrate into automated workflows.
For businesses and developers, Free Spire.Doc for .NET is a powerful library that lets you programmatically extract images from Word in C# with full control over output format.
C# Code to Extract Word Images:
using Spire.Doc;
using Spire.Doc.Documents;
using Spire.Doc.Fields;

namespace ExtractImage
{
    class Program
    {
        static void Main(string[] args)
        {
            // Load a Word document
            Document document = new Document("input.docx");
            int index = 0;

            // Traverses each section in the document
            foreach (Section section in document.Sections)
            {
                // Traverses each paragraph in the current section
                foreach (Paragraph paragraph in section.Paragraphs)
                {
                    // Traverses each document object in the current paragraph
                    foreach (DocumentObject docObject in paragraph.ChildObjects)
                    {
                        // Checks if the current document object is an image
                        if (docObject.DocumentObjectType == DocumentObjectType.Picture)
                        {
                            DocPicture picture = docObject as DocPicture;
                            // Saves the extracted image as a PNG file
                            picture.Image.Save(string.Format("image_{0}.png", index), System.Drawing.Imaging.ImageFormat.Png);
                            index++;
                        }
                    }
                }
            }
        }
    }
}
The code loads a Word document and traverses it in a hierarchical manner: Document → Section → Paragraph → DocumentObject, filtering only image-type objects and then saving them as separate PNG files.
Key Technical Capabilities:
- Format Support: DOC, DOCX, DOT, DOTX, DOCM, RTF, and more
- Output Formats: Save extracted images as PNG, JPG, BMP, EMF, GIF, TIFF
- Batch Processing: Process thousands of documents with a single script
- Selective Extraction: Extract images from specific sections, paragraphs
✔ Pros: Full batch automation, wide file format support, enterprise-grade reliability
✘ Cons: Basic coding knowledge required; free version has certain limitations
Images aren't the only valuable content in your Word documents. Discover how to extract text, tables, and formatting for repurposing in other projects
Quick Comparison of All Methods
Use this table to instantly pick the right method for your use case:
| Method | Scenario | Batch Extract | Software Needed | Works for DOCX/DOC |
|---|---|---|---|---|
| Right-Click Save | Single images | ✘ | Microsoft Word only | Both |
| Save as Web Page | Word Built-in batch extraction | ✔ | Microsoft Word only | Both |
| ZIP Trick | Bulk DOCX, original quality | ✔ | None (OS only) | DOCX only |
| Online Tools | No-install cross-platform use | ✔ | Web browser only | Both |
| Free Spire.Doc | Developer batch automation | ✔ | .NET environment + Free Spire.Doc library | Both |
FAQs About Extracting Images from Word
Q1: Can I extract images from a password-protected Word document?
A: You must unlock the document first, then use any method above.
Q2: How do I get high-resolution images from Word?
A: Use the ZIP trick for .docx. For .doc files, the Save as Web Page method typically preserves better quality than right-click saving.
Q3: What image formats can I extract from Word?
A: Word supports embedded images in various formats, including:
- JPEG/JPG (photos)
- PNG (graphics with transparency)
- GIF (animations, simple graphics)
- BMP (bitmap images)
- TIFF (high-resolution images)
- EMF/WMF (vector graphics)
- SVG (scalable vector graphics – newer Word versions)
Q4: Can I extract images from multiple Word documents at once?
A: Yes, use professional tools like Spire.Doc to process entire folders with a script. Some online tools also offer batch processing of multiple Word documents.
Final Words
You now have 5 free and effective ways to extract images from Word document, each suited to different needs and technical skill levels. For quick single images, use right-click save. For batch extraction, the ZIP trick is the best free choice. Online tools work on the go, while professional software like Spire.Doc delivers high-quality, automated results for heavy use.
No more wasting time taking screenshots or re-creating images. Instead, use these methods to get clean, high-quality images from Word in seconds.
See Also
5 Best Ways to Convert Word Doc to TXT
Table of Contents
- Word vs. TXT: Key Differences
- Method 1: Using Microsoft Word "Save As" Method
- Method 2: Using Notepad Copy-Paste Method
- Method 3: Free Online Word to TXT Converters
- Method 4: Using Windows PowerShell for Bulk Conversion
- Method 5: Using Python with Free Spire.Doc
- Common Issues When Converting to TXT
- Frequently Asked Questions (FAQ)
Converting Word DOC to TXT (plain text) is a common task for professionals, students, and developers alike. TXT files are lightweight, universally compatible, and free of formatting, making them ideal for data extraction, cross-platform sharing, and integration with software applications.
Whether you need to strip formatting from a Word document, extract text for analysis, or ensure compatibility with old systems, this comprehensive guide will walk you through the best methods to convert Word file to TXT—including free tools, online converters, copy-paste shortcuts, and even coding solutions.
Content Overview:
- Word vs. TXT: Key Differences
- Method 1: Using Microsoft Word "Save As" Method
- Method 2: Using Notepad Copy-Paste Method
- Method 3: Free Online Word to TXT Converters
- Method 4: Using Windows PowerShell for Bulk Conversion
- Method 5: Using Python with Free Spire.Doc
- Common Issues When Converting to TXT
- Frequently Asked Questions (FAQ)
Word vs. TXT: Key Differences
To master the Doc to TXT or Docx to TXT conversion process, you must first understand the fundamental differences between the source and target formats. Here’s a quick breakdown:
| Word Document (.doc / .docx) | Plain Text File (.txt) |
|---|---|
| Supports fonts, colors, bold/italics, spacing | No formatting of any kind—only raw text |
| Includes images, tables, charts, macros | No media or interactive elements |
| Larger file size (due to embedded data) | Ultra-lightweight file size |
| Proprietary format (Microsoft) | Universal, open format (readable by any device/software) |
| Risk of compatibility issues with old systems | Compatible with nearly all OS/software (Windows, Mac, Linux, mobile) |
Why Convert? Converting Word to TXT removes the "formatting overhead" of Word files, leaving behind pure data that can be processed by any computer system.
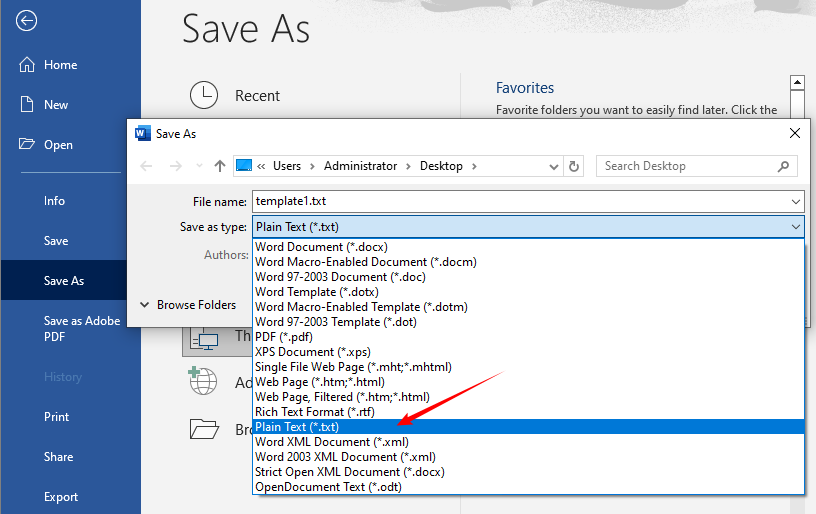
Method 1: Using Microsoft Word "Save As" Method
Microsoft Word’s built-in “Save As” feature is the simplest way to convert a single Word document to TXT. This method works for both DOC and DOCX files and is ideal for users who already have Word installed.
- Open your Word document in Microsoft Word.
- Click the File tab (top-left) → select Save As.
- Choose a save location for your TXT file (e.g., Desktop).
- In the Save as type dropdown, select Plain Text (*.txt).
- Click Save—a File Conversion dialog box will pop up.
- Optional: Select UTF-8 encoding here to support non-English characters, emojis, and special symbols. Leave other settings on default.
- Navigate to your save location and open the TXT file with a text editor (Notepad, VS Code) to verify.
If you need to preserve basic structure, convert Word to RTF (rich text) instead of TXT format.
Method 2: Using Notepad Copy-Paste Method
If you don’t want to save an entirely new file, or only need to work with a portion of the document, the simple copy-paste method works perfectly. This method requires no extra tools beyond standard text/word processing software.
- Open your Word document and select the text you need (Ctrl + A for the entire document).
- Copy the text: Ctrl + C.
- Open Notepad (search for it in the Windows Start Menu).
- Paste the text: Ctrl + V.
- Go to File → Save → name the file and ensure the extension is .txt → click Save.
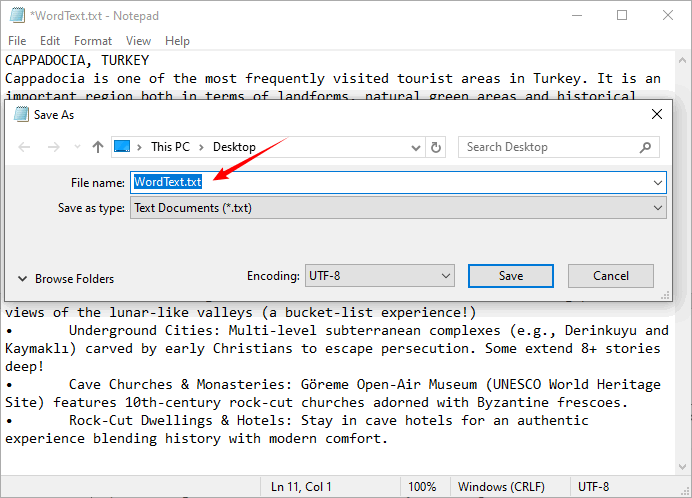
Pro Tip: This method is great for quick text extraction, but avoid it for large documents (it may cause minor line break issues).
Method 3: Free Online Word to TXT Converters
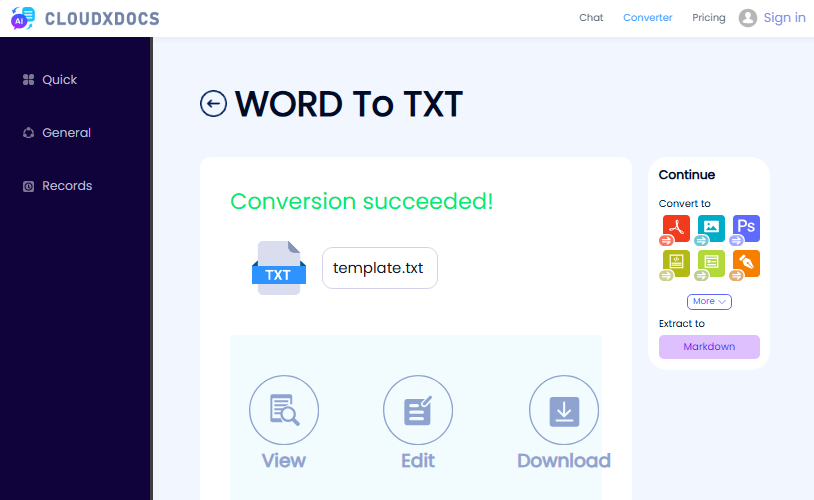
Online tools are a fast way to convert DOC to TXT online without installing any software. They’re quick, free, and work on any device with an internet connection. Stick to reputable sites such as CLOUDXDOCS and Zamzar for security.
- Go to the converter’s Doc to TXT converter page (e.g., CLOUDXDOCS Word to TXT converter).
- Upload your Word document (supports DOC, DOCX, DOT, DOCM).
- Wait for the conversion to finish.
- Click Download to save the TXT file to your device.
Security Warning: Avoid uploading personal, financial, or confidential legal documents to free online tools. For those files, stick to the desktop methods.
While converting Word to TXT strips away formatting for compatibility and data extraction, you may eventually need to bring that plain text back into a formatted document—here's how to convert TXT to Word when you're ready to rebuild structure.
Method 4: Using Windows PowerShell for Bulk Conversion
If you have dozens or hundreds of Word files to convert, manual conversion is tedious. Windows PowerShell is a free built-in tool that lets you batch convert Word to TXT in seconds—no coding experience required. This method uses Word’s built-in automation to process all files in a folder.
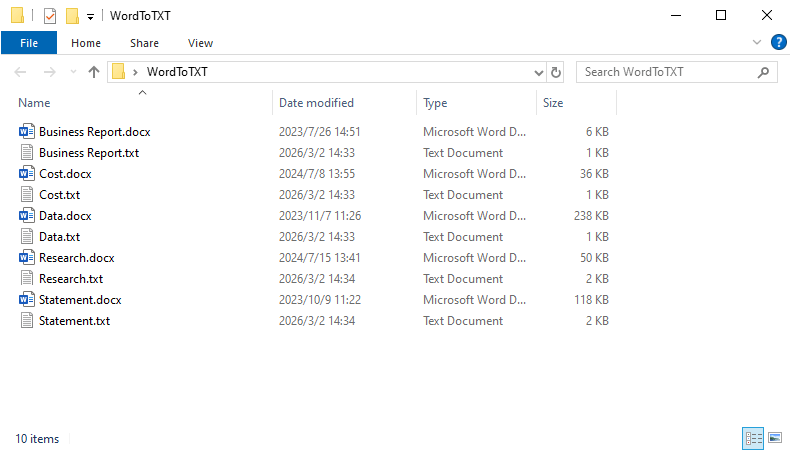
- Create a new folder on your Desktop and name it WordToTXT—move all your Word DOC/DOCX files into this folder.
- Search for Windows PowerShell in the Start Menu → open it as Administrator.
- Paste the following command and press Enter (replace YourUsername with your actual Windows username):
cd "C:\Users\YourUsername\Desktop\WordToTXT"
- Paste the following script and press Enter to start bulk conversion:
$word = New-Object -ComObject Word.Application
$word.Visible = $false
$files = Get-ChildItem -Filter *.doc*
foreach ($file in $files) {
    $doc = $word.Documents.Open($file.FullName)
    $txtPath = [System.IO.Path]::ChangeExtension($file.FullName, '.txt')
    $doc.SaveAs($txtPath, 7) # 7 = wdFormatUnicodeText
    $doc.Close()
}
$word.Quit()
[System.Runtime.Interopservices.Marshal]::ReleaseComObject($word) | Out-Null
- Once the script finishes, check your WordToTXT folder—all your Word files will now have a matching TXT file.
Note: Ensure that Microsoft Word is installed on your system; otherwise, the script will not run. Also, remember to close all Word windows before running the script to avoid errors. The script will automatically close the Word COM object to free up resources.
Method 5: Using Python with Free Spire.Doc
If you’re a developer or need to automate Word-to-TXT conversions, Python with the Free Spire.Doc library is a powerful and user-friendly solution. This library supports both DOC and DOCX formats and simplifies the conversion process with minimal code.
Why Use Python for Conversion?
- Automation: Schedule conversions for daily reports.
- Batch Processing: Convert thousands of files in minutes.
- Integration: Feed the extracted text directly into a search engine index or a machine learning model.
Python Code for Word to TXT Conversion
Use the following Python code to convert Doc or Docx files to TXT:
from spire.doc import *
from spire.doc.common import *

# Create a Document object to load the Word file
document = Document()

# Load a Word file (DOC or DOCX) from your local disk
document.LoadFromFile("Input.docx")

# Save the Word file as a TXT file
document.SaveToFile("result.txt", FileFormat.Txt)

# Close the document to release resources
document.Close()
The conversion result:
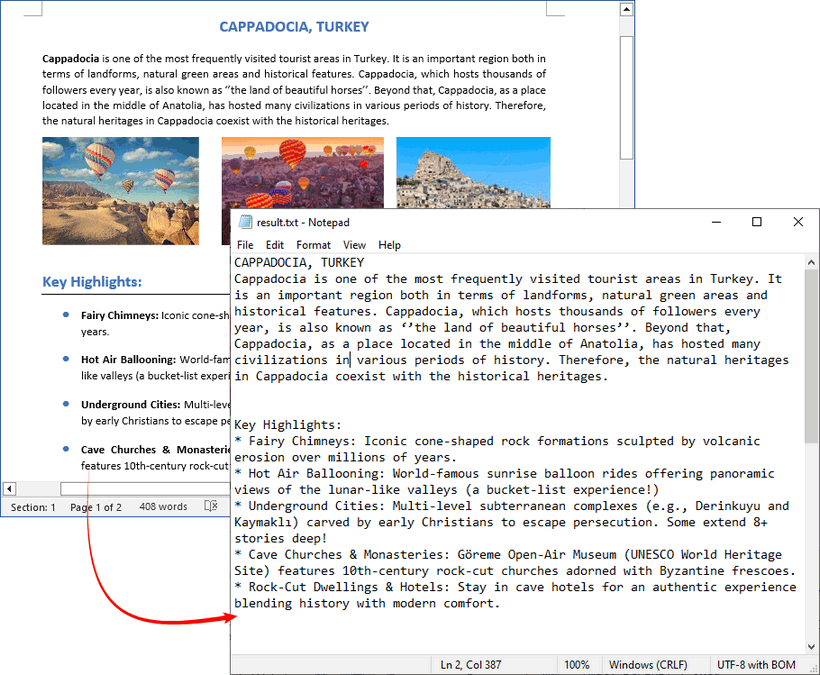
TXT files cannot store images, so extract the images from your Word document before conversion if you need to preserve them.
Common Issues When Converting to TXT
Even a simple DOC to TXT conversion can hit snags. Here is how to fix them.
- Loss of Formatting: TXT files do not support any formatting. Bullet points may turn into asterisks/dashes, tables will appear as jumbled lines of text, and bold/italics will disappear.
- Fix: No fix needed. It’s a feature of TXT, not a bug.
- Character Encoding Problems: Sometimes, special characters (like curly quotes, em dashes, or symbols) may turn into gibberish (e.g., —). This is an encoding issue.
- Fix: When saving in Word (Method 1), the "File Conversion" dialog allows you to choose an encoding. Try "UTF-8," as it supports the widest range of characters.
- Line Breaks: Long paragraphs in Word may not wrap correctly in Notepad—this is a text editor display issue, not a conversion error.
- Fix: Enable Word Wrap in your text editor (Notepad: Format → Word Wrap).
Frequently Asked Questions (FAQ)
Q1: Can I convert a password-protected Word document to TXT?
A: Most tools (including Word and Python libraries) require you to unlock the document first. You must remove the password protection in Microsoft Word before attempting conversion.
Q2: Does converting to TXT reduce file size?
A: Significantly. A 10 MB Word document with images might become a 50 KB text file, as all binary data (images) is discarded.
Q3: What is the difference between saving as TXT and saving as RTF?
A: RTF (Rich Text Format) preserves basic formatting like bold and italics, while TXT does not. If you need formatting, save as RTF. If you need pure data, save as TXT.
Q4: How does the conversion handle hyperlinks?
A: In most cases, the visible text of the hyperlink is preserved, but the underlying URL is lost. If you need to preserve the actual URLs, you must use a specialized tool or a Python script that specifically extracts hyperlink addresses.
Conclusion
Converting Word DOC to TXT is a straightforward process that greatly enhances compatibility and simplicity. For everyday users handling individual files, Word's "Save As" function or online converters are reliable options, while copy-pasting works well for quickly extracting small portions of text. For bulk conversions, Windows PowerShell offers an efficient solution, and developers can seamlessly integrate Word to TXT conversion into their workflows using Python and Free Spire.Doc.
Choose the method that best fits your technical comfort level, scale, and security requirements (keep sensitive files offline). With these options, proprietary Word formats no longer lock in your data, ensuring your text remains universally accessible and compatible with any device or system, now and in the future.
See Also
Remove Metadata from PDF – Safe & Easy Methods
PDFs are the most widely used document format for sharing work, contracts, reports, and personal files. But hidden metadata in PDFs can expose sensitive information you never intended to share. Whether you’re a professional, student, or casual user, knowing how to remove metadata from PDF is essential for privacy and security.
In this complete guide, we’ll explain what PDF metadata is, why it matters, and walk you through 5 free & easy methods to clean metadata from PDF.
- What is PDF Metadata?
- Why You Should Delete Metadata from PDF Files
- 5 Best Methods to Remove Metadata from PDF
- FAQ About Removing PDF Metadata
What is PDF Metadata?
Metadata is often described as "data about data." When applied to a PDF, it refers to the embedded information hidden within the file that describes its properties and origins.
PDF metadata includes:
- Author name, creator, and editor
- Date created/modified
- Software used (e.g., Word, Adobe Acrobat, Canva)
- Document title, subject, keywords
- Location, device info, and editing history
- Hidden comments, bookmarks, and form data
This metadata travels with the PDF file whenever you share it online or via email, potentially exposing more than you bargained for.
Why You Should Delete Metadata from PDF Files
Cleaning metadata protects you and your documents in 4 key ways:
- Privacy Protection: Hide your name, email, device, and location from unintended viewers.
- Security: Prevent competitors or bad actors from tracking your editing process or tools.
- Professionalism: Remove messy auto-generated info for client or public documents.
- Smaller File Size: Stripping metadata often reduces PDF size for faster sharing.
Failing to erase metadata can lead to accidental data leaks—even if the visible content looks clean.
5 Best Methods to Remove Metadata from PDF
We’ve tested the most reliable free and paid ways to clear metadata from PDF files. Choose the method that fits your device and needs.
Method 1: Free Online PDF Metadata Removers
Online tools are the fastest option for one-off files. They work in any browser on Windows, Mac, or mobile. If you are cleaning a non-sensitive document, services like Metadata2Go offer metadata removal features.
Steps to delete metadata from PDF online:
- Navigate to Metadata2Go Metadata Remover Tool.
- Click “Choose file” or drag & drop to upload your PDF.
- Click “Start” or equivalent button to erase metadata from PDF.
- Download the cleaned PDF.
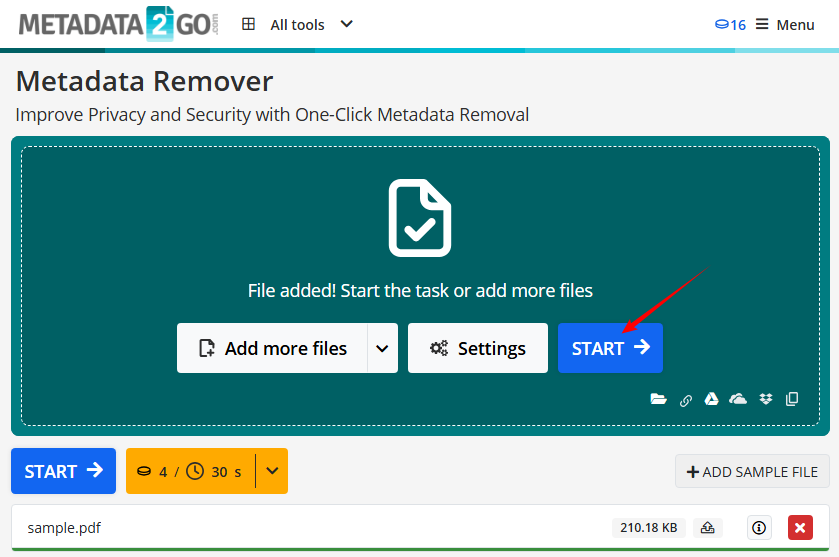
✔ Pros: Free, no installation required, easy to use.
✘ Cons: Not recommended for highly sensitive files (use desktop apps for privacy).
For direct control over visible metadata fields, you can edit PDF metadata to modify title, author, subject, and keywords.
Method 2: Built-in Desktop Metadata Cleaner Tools
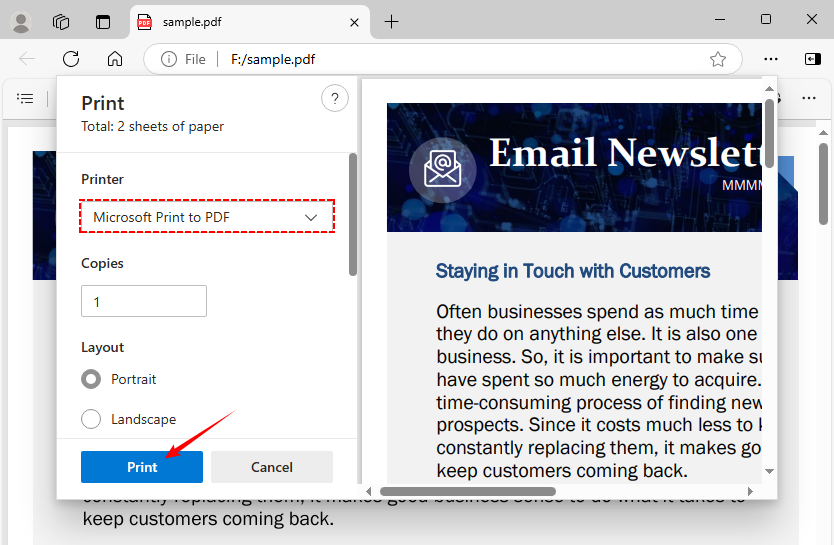
For Windows users, use the Print to PDF feature to remove metadata without installing any new software. This method works by "flattening" the file and discarding the original metadata.
- Open the PDF in any reader (Edge, Chrome).
- Go to “File > Print”.
- Select “Microsoft Print to PDF”.
- Click “Print” and save the new file.
- For Mac: Open the PDF in Preview > Tools > Show Inspector > More Info (i) > Delete all text in metadata fields.
✔ Pros: Free, secure (file stays local), no third-party tools.
✘ Cons: The "Print to PDF" method can remove interactive elements like links. Manual deletion in Preview only removes basic fields, not deeper hidden data.
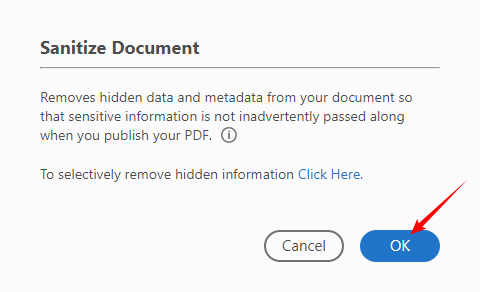
Method 3: Adobe Acrobat Remove Metadata
Adobe Acrobat Pro is the most thorough PDF properties remover tool, ideal for enterprise users, legal teams, or anyone needing a complete scrub of hidden data (not just basic metadata). It’s the gold standard for secure, professional document cleaning.
Step-by-step for full metadata removal:
- Open the PDF in Acrobat Pro.
- Basic cleanup: Go to “File > Properties > Description” and manually delete all metadata from PDF (title, author, subject, keywords).

- Thorough sanitization (recommended for sensitive files):
- Go to “Tools > Redact”.
- Click “Sanitize Document” in the Redact toolbar.
- In the Sanitize Document dialog, click “OK” to remove all metadata and hidden information
✔ Pros: Complete cleanup, batch processing support, enterprise-grade security.
✘ Cons: Requires a paid subscription.
Pro Tip: To clean metadata from interactive elements, you can flatten PDF form fields to delete editable form data and its associated metadata.
Method 4: Command Line Tools to Clean PDF Metadata
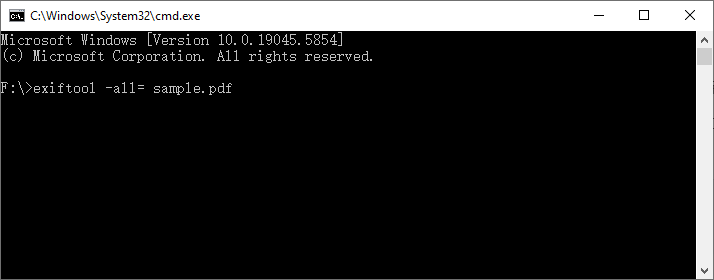
For tech users, command-line tools like ExifTool offer a powerful way to remove metadata, especially for batch processing. It is a cross-platform Perl library for reading/writing/editing metadata in all file formats (including PDFs).
- Download ExifTool and unzip it.
- Open Command Prompt (Windows) or Terminal (Mac/Linux).
- Navigate to your PDF folder.
- Run the ExifTool command to remove all metadata from PDF**:**
exiftool -all= your-file.pdf
(This command creates a backup of the original file. You can add -overwrite_original to prevent this.)
✔ Pros: Free, batch processing, works on any platform.
✘ Cons: Requires basic command-line knowledge; not intuitive for casual users.
Method 5: Automate PDF Metadata Removal in C#
If you’re a .NET developer building custom PDF processing workflows (e.g., for your app, business tool, or internal systems), Free Spire.PDF for .NET is a powerful free library that lets you integrate metadata removal directly into your C#/VB.NET code. It’s ideal for developers needing to automate PDF metadata cleaning at scale.
C# Code Example: Remove PDF Metadata
This complete C# example loads a PDF, clears all metadata fields (author, title, creator, etc.), and saves the cleaned file:
using Spire.Pdf;

namespace PDFProperties
{
    class Properties
    {
        static void Main(string[] args)
        {
            // 1. Load a sample PDF document
            PdfDocument pdf = new PdfDocument();
            pdf.LoadFromFile("sample.pdf");

            // 2. Access document metadata
            PdfDocumentInformation docInfo = pdf.DocumentInformation;

            // 3. Clear core metadata fields
            docInfo.Author = string.Empty;
            docInfo.Creator = string.Empty;
            docInfo.Title = string.Empty;
            docInfo.Subject = string.Empty;
            docInfo.Keywords = string.Empty;
            docInfo.Producer = string.Empty;

            // 4. Save the cleaned PDF
            pdf.SaveToFile("ClearMetadata.pdf");
            pdf.Close();
        }
    }
}
The PdfDocumentInformation class holds the metadata of a PDF document. By assigning blank strings to its core properties, the PDF metadata can be removed effectively. For complete privacy protection, it is equally important to remove PDF attachments, since embedded files often carry extra metadata that basic metadata removal may not delete.
✔ Pros: Integrate with .NET workflows, supports batch processing, no reliance on third-party tools/APIs.
✘ Cons: Requires basic C#/.NET programming knowledge; 10-page limit in the free version.
Final Thoughts
Removing metadata from PDF is a simple but critical step to protect your privacy and professionalism. Whether you need a quick online tool, a secure desktop method, batch processing, or a programmable solution for development, there’s an option tailored to your needs.
Choose the approach that matches your technical comfort and security requirements, and make metadata removal a standard step before sharing PDFs to prevent accidental data leaks.
FAQ About Removing PDF Metadata
Q: Does removing metadata break the PDF?
A: No. Metadata is separate from the visible content. Removing it does not alter the text, images, or layout of your document.
Q: Can I remove metadata from a password-protected PDF?
A: You must unlock the PDF first to edit or delete metadata (Spire.PDF also requires unlocking before metadata edits).
Q: Which method is best for batch removing metadata from PDF?
A: For bulk processing, use ExifTool (command line) (free for all users) or Free Spire.PDF for .NET (for developers building automated workflows). Adobe Acrobat Pro also supports bulk sanitization for paid subscribers.
Q: Will removing metadata affect PDF form fields or signatures?
A: Yes, in some cases. Stripping metadata—especially using "Print to PDF" methods—can flatten forms and break interactive fields or digital signatures. For documents with fillable forms or digital signatures, use dedicated tools like Adobe Acrobat's Sanitize feature or Spire.PDF programmatically to preserve functionality.
See Also
Converting Columns to Rows in Excel - 5 Ways to Transpose Data
Table of Contents
- What Does “Converting Columns to Rows” Mean in Excel?
- Prerequisites Before Transposing
- Method 1: Paste Special Transpose (Quickest for Static Data)
- Method 2: TRANSPOSE Function (Dynamic, Auto-Updating)
- Method 3: Power Query (Best for Large Datasets)
- Method 4: VBA Macro (Automate Batch Transpositions)
- Method 5: Python with Free Spire.XLS (Programmatic Transposition)
- Comparison Table: Choosing the Right Method
- FAQ: Switch Columns and Rows in Excel
Excel users often encounter situations where data is structured in columns but would be more useful in rows, or vice versa. This common data reorganization challenge can transform how you analyze and present information. Whether you're dealing with survey data, financial reports, or any dataset that needs reorientation, learning to convert columns to rows in Excel is an essential skill that can save hours of manual work.
In this comprehensive guide, we'll explore multiple methods for changing columns to rows in Excel, ranging from quick manual techniques to automated solutions using VBA and Python, helping you to transpose data efficiently.
- What Does “Converting Columns to Rows” Mean in Excel?
- Prerequisites Before Transposing
- Method 1: Paste Special Transpose (Quickest for Static Data)
- Method 2: TRANSPOSE Function (Dynamic, Auto-Updating)
- Method 3: Power Query (Best for Large Datasets)
- Method 4: VBA Macro (Automate Batch Transpositions)
- Method 5: Python with Free Spire.XLS (Programmatic Transposition)
- Comparison Table: Choosing the Right Method
- FAQ: Switch Columns and Rows in Excel
What Does “Converting Columns to Rows” Mean in Excel?
Converting columns to rows (or rows to columns) in Excel is called transposing data. It involves rotating your dataset 90 degrees, so the values that were in vertical columns become horizontal rows. For example, if you have product names in a column and monthly sales in rows, transposing will switch them: product names become rows, and monthly sales become columns—making it easier to analyze trends or create visualizations like charts.
The Excel transpose feature is useful for:
- Restructuring data for pivot tables or reports
- Simplifying data visualization (e.g., switching X and Y axes)
- Organizing messy datasets into a more readable format
- Sharing data with others who prefer a different layout
Prerequisites Before Transposing
To avoid data loss or errors, follow these quick prep steps:
- Backup Your Workbook: Save a copy of your file before transposing—this protects you if something goes wrong.
- Unmerge cells: Merged cells can break transposition. Unmerge any cells in your source data first.
- Clear Target Area: Ensure the area where you’ll paste transposed data is empty—Excel will overwrite existing data without warning.
- Note Your Excel Version: Some methods (like dynamic TRANSPOSE) work best in Excel 365/2021, while older versions (2019-) require alternative array formula steps.
Method 1: Paste Special Transpose (Quickest for Static Data)
The Paste Special Transpose method is the most popular and straightforward way to change an Excel column to row. It’s ideal for one-off tasks where your data won’t change (static data), as it creates a fixed snapshot of your transposed data.
Step-by-Step Guide:
- Select Your Source Data: Click and drag to highlight the columns you want to convert to rows.
- Copy the Data: Right-click and select “Copy” or press “Ctrl+C”. Note: Do not use “Ctrl+X” (Cut)—this will not work for transposition.
- Choose a Target Cell: Click on the cell where you want your transposed rows to start (e.g., C1).
- Paste with Transpose: Right-click and hover over “Paste Special”, then select the “Transpose” option (it looks like a rotated grid).
- Finalize: The data will now be pasted with columns converted to rows. You can delete the original column data if needed.

Pros & Cons:
- ✔ Pros: No formulas required, takes 10 seconds, retains original formatting (colors, fonts, cell styles) and formulas (with adjusted references).
- ✘ Cons: Static (no auto-updates if original data changes); does not work with Excel Tables (convert tables to ranges first).
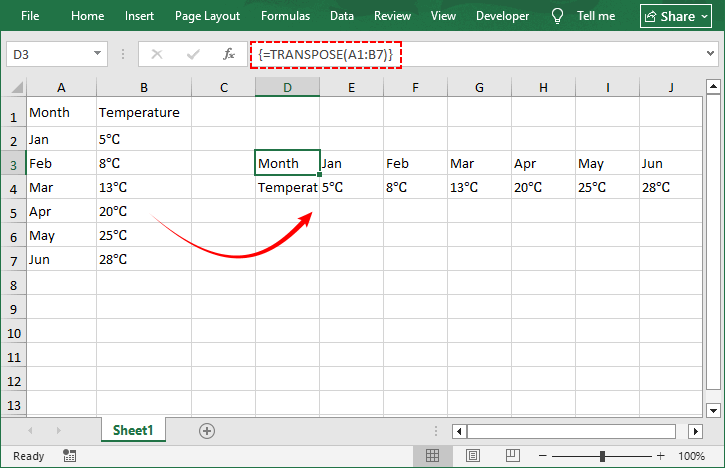
Method 2: TRANSPOSE Function (Dynamic, Auto-Updating)
For data that updates frequently, the TRANSPOSE function creates a dynamic link between original and transposed data—edits to the source columns reflect instantly in the transposed rows.
Step-by-Step Guide:
- Select the Target Range: Count the rows/columns of your source data (e.g., 7 columns × 2 rows) and select the opposite orientation (2 columns × 7 rows) in the empty target area.
- Enter the formula: With the range selected, type =TRANSPOSE(
- Select your source data: Click and drag to select the original data range
- Complete as an array formula: Press “Ctrl+Shift+Enter” (Excel 2019 and earlier) or just “Enter” (Excel 365 and later)
- Your data is now dynamically transposed: Changes to the original will reflect in the transposed version
Pros & Cons:
- ✔ Pros: Dynamic updates, no manual rework, works with most data types (text, numbers, dates).
- ✘ Cons: Cannot edit individual cells in the transposed array; #SPILL! error if the target range is not empty.
Method 3: Power Query (Best for Large Datasets)
Power Query (also called Get & Transform) is Excel’s powerful data transformation tool—perfect for transposing large datasets, repeating the same transposition multiple times, or cleaning data before transposing.
Step-by-Step Guide:
- Import Data to Power Query: Select your source columns (e.g., A1:C7), go to “Data” > “From Table/Range” (Excel will create a table if needed)
- Transpose Data: In the Power Query Editor, go to “Transform” > “Transpose”. Your columns will instantly convert to rows
- Load the Transposed Data: Click “Home” > “Close & Load”. Excel will paste the transposed rows into a new worksheet (or your chosen location)

Pros & Cons:
- ✔ Pros: Handles large datasets (1000+ rows/columns) easily, repeatable (refresh with one click if source data changes), preserves data integrity, and cleans data simultaneously.
- ✘ Cons: Slightly steeper learning curve for beginners, overkill for small, one-off transpositions.
Pro Tip: Combining transposition with other data cleaning techniques, such as removing blank rows and adjusting data types (e.g., converting numbers to text), ensures that restructured data is polished and ready for analysis, pivot tables, and sharing.
Method 4: VBA Macro (Automate Batch Transpositions)
If you need to switch data from column to row in Excel automatically (e.g., for multiple sheets or datasets), use a simple VBA macro. This method is ideal for advanced users or those who repeat the same transposition task regularly.
Step-by-Step Guide:
- Open the VBA Editor: Press “Alt+F11” to open.
- Insert a Module: Right-click your workbook in the Project Explorer > Insert > Module.
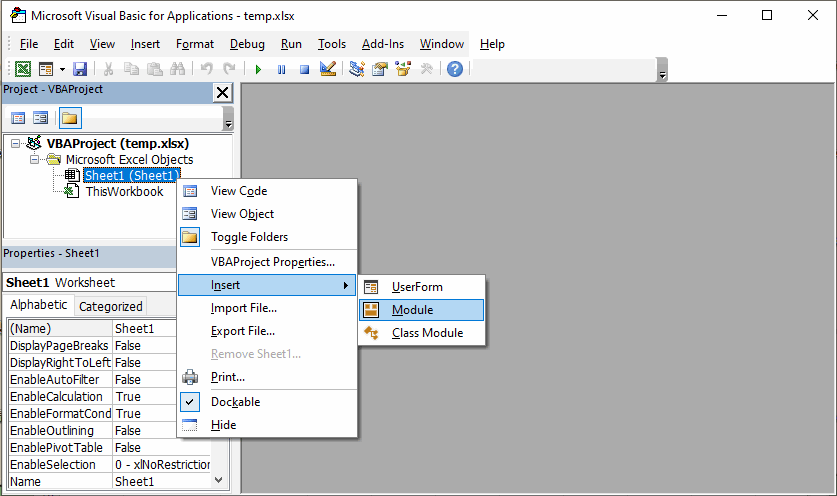
- Paste the VBA Code: Copy and paste the following code into the module (customize ranges as needed):
Sub TransposeColumnsToRows()
    Dim SourceRange As Range
    Dim DestinationCell As Range

    ' Set your source range (adjust as needed)
    Set SourceRange = ThisWorkbook.Sheets("Sheet1").Range("A1:C7")

    ' Set destination cell which is the top-left of where transposed data should go (adjust as needed)
    Set DestinationCell = ThisWorkbook.Sheets("Sheet1").Range("E5")

    ' Transpose the data
    SourceRange.Copy
    DestinationCell.PasteSpecial Paste:=xlPasteAll, Operation:=xlNone, _
                                 SkipBlanks:=False, Transpose:=True

    ' Clear clipboard
    Application.CutCopyMode = False

    MsgBox "Transposition complete!", vbInformation
End Sub
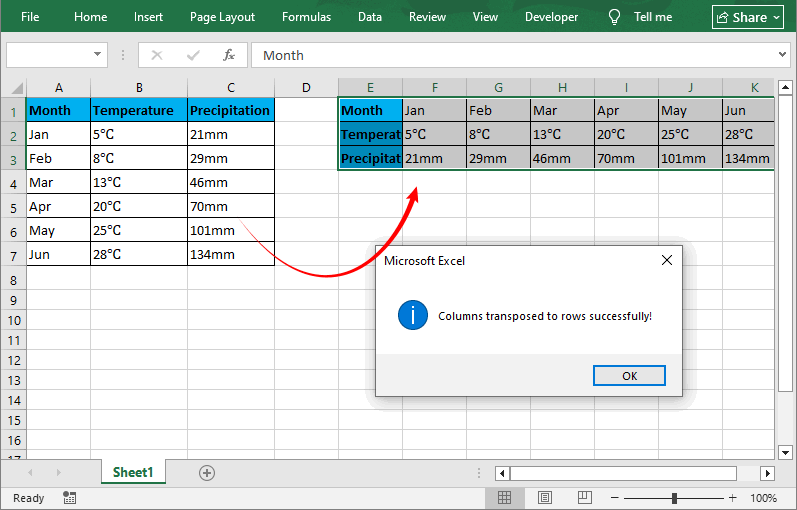
- Run the Macro: Press “F5” or click the "Run" button (green play icon). A prompt will inform you that the columns switch to rows.
Key Macro Features
- Preserves all cell formatting, formulas, and values.
- Reusable: Save the macro in your Personal Macro Workbook for use across all Excel files.
- Customizable: Modify the code to loop through multiple sheets/datasets (batch transposition).
Pros & Cons:
- ✔ Pros: Automates batch tasks, saves time for repeated transpositions, and works with large datasets
- ✘ Cons: Requires basic VBA knowledge to modify, not necessary for simple tasks.
Method 5: Python with Free Spire.XLS (Programmatic Transposition)
For developers and data analysts who need to transpose data without opening Excel (e.g., server automation) or batch-process hundreds of files, the Free Spire.XLS for Python library provides a powerful way for cross-platform (Windows/Mac/Linux) Excel manipulation
Python Transposition Script
Use the script below to transpose a column to a row (customize paths/ranges as needed):
from spire.xls import *
from spire.xls.common import *
# Create Workbook instance
workbook = Workbook()
# Load an Excel file
workbook.LoadFromFile("input.xlsx")
# Get the first worksheet
worksheet = workbook.Worksheets[0]
# Read all non-empty data and corresponding cell styles from Column 1
col_index = 1
column_data = []
max_row = worksheet.LastRow
for row_index in range(1, max_row + 1):
cell = worksheet.Range[row_index, col_index]
if cell.Value is None or str(cell.Value).strip() == "":
continue
# Store cell value and its style (preserves formatting like font, color, etc.)
column_data.append((cell.Value, cell.Style))
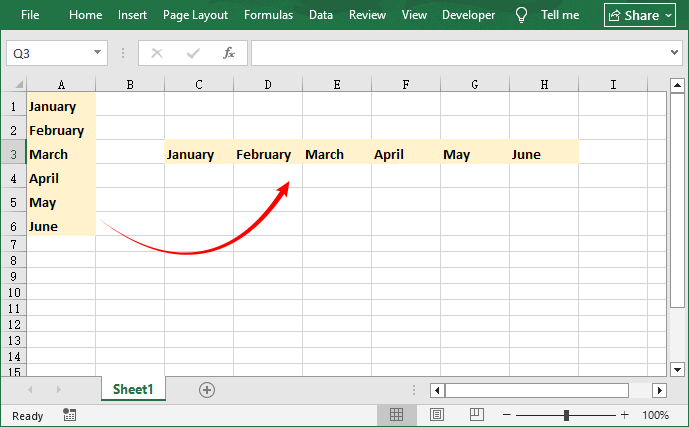
row_index += 1
# Write the saved column data (with styles) to Row 3
target_row = 3
for idx, (value, source_style) in enumerate(column_data):
target_col = idx + 3 # start writing from Column 3
target_cell = worksheet.Range[target_row, target_col]
# Assign the original cell value to the target cell
target_cell.Value = value
# Copy the original cell's style
target_cell.Style = source_style
# Save Excel file and free up memory
workbook.SaveToFile("output.xlsx", ExcelVersion.Version2016)
workbook.Dispose()
print(f"Excel column to row conversion completed!")
This code reads all non-empty data (and their associated cell styles) from a specified column, then writes this column data to the target row of the same worksheet.
Pros & Cons
- ✔ Pros: Cross-platform, bulk processing support, preserves formatting, no Excel installation required, scalable for hundreds of files.
- ✘ Cons: Requires basic Python knowledge, free tier has certain limitations, steeper learning curve for non-coders.
Beyond column-to-row transposition, you can also use Spire.XLS for Python to apply formatting, merge cells, sort data, or export to PDF/CSV—all programmatically.
Comparison Table: Choosing the Right Method
| Method | Best For | Dynamic? | Formatting Preserved | Excel Required | Difficulty |
|---|---|---|---|---|---|
| Paste Special | Quick one-off tasks | ✘ | ✔ | Yes | Beginner |
| TRANSPOSE Function | Live-updating reports | ✔ | ✘ (values only) | Yes | Intermediate |
| Power Query | Large or recurring jobs | ✔ (refresh) | ✔ | Yes | Intermediate |
| VBA | Batch automation | ✔ (triggered) | ✔ | Yes | Advanced |
| Python + Spire.XLS | Server-side / bulk | ✔ (rerun script) | ✔ | No | Advanced |
FAQ: Switch Columns and Rows in Excel
Q: Can I transpose multiple sheets at once?
A: Yes! Use Power Query (to combine sheets first) or Python/Spire.XLS (loop through sheets) for batch transposition of similar datasets. VBA can also be modified to loop through multiple sheets.
Q: Will transposing data delete my original columns?
A: No. All five methods create a copy of your data in the new row orientation. Your original columns will remain intact unless you manually delete them.
Q: How do I convert rows to columns?
A: All the same methods work in reverse! The process is identical regardless of direction.
Q: Can I transpose data between different workbooks?
A: Yes. All methods support cross-workbook transposition. For VBA and Python, you'll need to specify workbook paths correctly.
Q: Does the Python method work for .xlsx and .xls files?
A: Yes. Spire.XLS supports both Excel formats (For .xls format, use: ExcelVersion.Version97to2003).
Final Thoughts
Mastering the art of changing columns to rows in Excel unlocks new possibilities for data analysis and presentation. Whether you choose the simplicity of Paste Special, the dynamism of the TRANSPOSE function, the power of Power Query, the automation of VBA, or the programmatic flexibility of Python with Free Spire.XLS, you now have a comprehensive toolkit for any transposition scenario.
Each method has its strengths, and by incorporating these techniques into your data workflow, you'll save time, reduce errors, and gain unprecedented flexibility in how you work with data.
See Also
How to Create a Fillable PDF – 3 Ways to Make PDF Editable
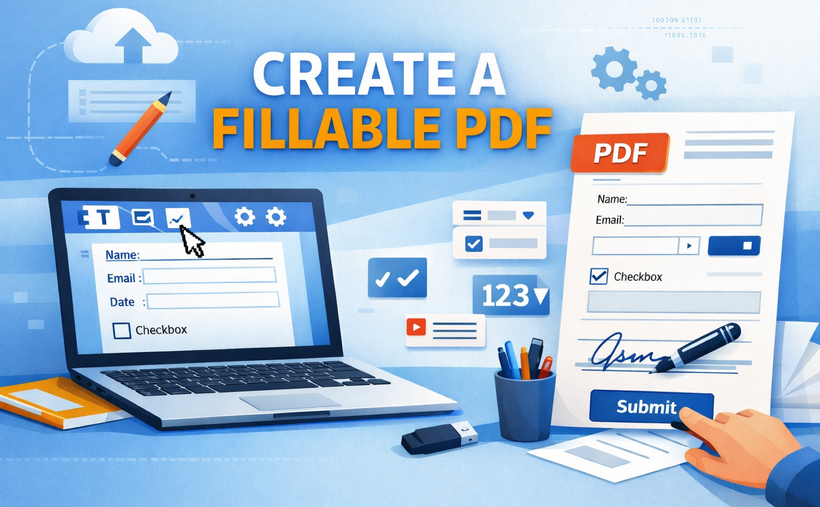
In today’s digital workflow, the ability to create fillable PDF files is more than a convenience—it’s a necessity. Whether you're distributing surveys, application forms, contracts, or worksheets, fillable PDFs allow recipients to enter information directly, reduce manual handling, and deliver a clean, professional experience.
This comprehensive guide will walk you through the most effective ways to create editable PDFs, from user-friendly free tools and professional software to automated scripting for developers. You’ll learn:
- What a fillable PDF is and why it’s useful
- Create an Editable PDF Using Adobe Acrobat Pro
- Free Online Tools to Make PDF Fillable
- Programmatically Create a Fillable PDF in Python
By the end of this guide, you’ll be able to choose the best method for your needs and start creating professional, interactive PDF forms in minutes.
What is a Fillable PDF?
A fillable PDF (also known as an interactive PDF form) is a document that contains editable fields—such as text boxes, checkboxes, radio buttons, and dropdown lists—that users can complete digitally without needing to print anything. Unlike a static PDF, a fillable form guides the user, ensures all necessary information is collected, and often includes features like data validation and digital signatures.
Why Use Fillable PDFs?
- Professionalism: Presents a clean, branded interface for business or personal use
- Efficiency: Saves time for both sender and recipient. Data can be auto-filled, exported, or shared instantly.
- Accuracy: Reduces errors from illegible handwriting or incorrect data entry.
- Accessibility: Can be used on any device (desktop, mobile, tablet) from anywhere.
1. Create an Editable PDF Using Adobe Acrobat Pro (The Industry Standard)
Adobe Acrobat is the gold standard for creating interactive PDFs—it’s trusted by businesses worldwide for its robust features, including automatic form field detection, e-signature integration, and data collection tools. It’s ideal if you need advanced functionality (e.g., calculations, data validation).
Steps to create a fillable form:
- Open Adobe Acrobat and select “Tools” > “Prepare Form” from the toolbar.
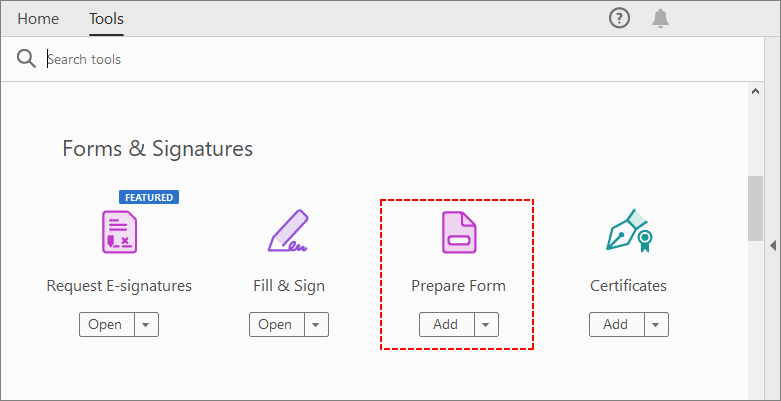
- Choose a Document: You can start from a blank PDF, upload an existing PDF, or even scan a paper form. Acrobat will automatically detect static fields and convert them to fillable text fields.
- Customize Form Fields: Use the right pane to add or edit fields:
- Text Fields: For names, emails, addresses, or free-form text.
- Checkboxes/Radio Buttons: For yes/no questions or single/multiple-choice answers.
- Dropdown List: For presenting a set of pre-defined options.
- Signature Fields: Let users add digital signatures.
- Button: For submit actions, resetting the form, or hyperlinks.
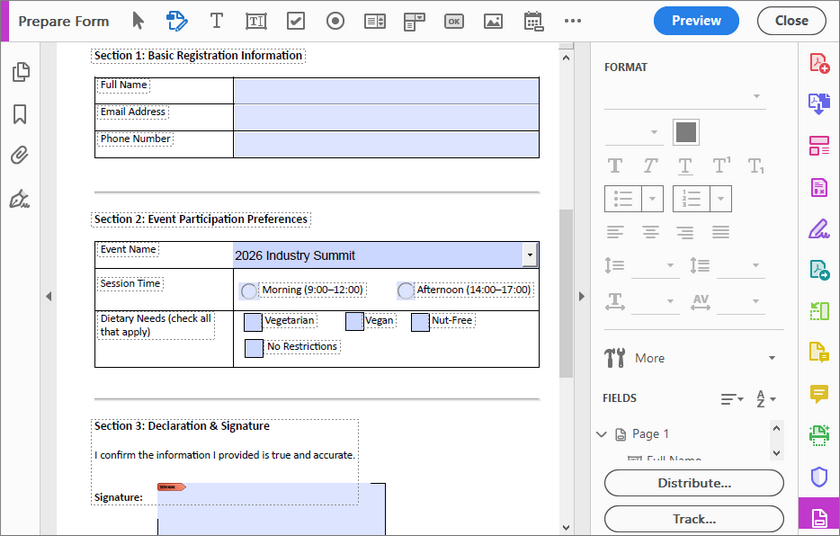
- Preview & Test: Click “Preview” to test the form—ensure fields are correctly sized, labeled, and functional.
- Save & Distribute: Save the PDF, then use Acrobat’s “Distribute” feature to send it via email, share a link, or collect responses in a spreadsheet.
Pro Tip: Once your fillable PDF is created and filled out, flattening the PDF becomes essential. Flattening turns all editable parts into static text and images. This stops anyone from changing the content by accident.
2. Free Online Tools to Make PDF Fillable (No Installation Required)
If you don’t want to pay for software, some online PDF editors let you create a fillable PDF for free—no downloads, no technical skills needed. Tools like Sejda, PDFescape, and Formize provide web-based interfaces for adding PDF form fields. These are user-friendly but may have file size or privacy limitations.
Steps to create a fillable PDF online:
Here we use Sejda as an example to add fillable fields. It works on all browsers and lets you edit existing PDFs or start from scratch.
- Go to Sejda’s PDF Editor and upload your PDF.
- Select “Form Fields” from the toolbar and add the desired fields.
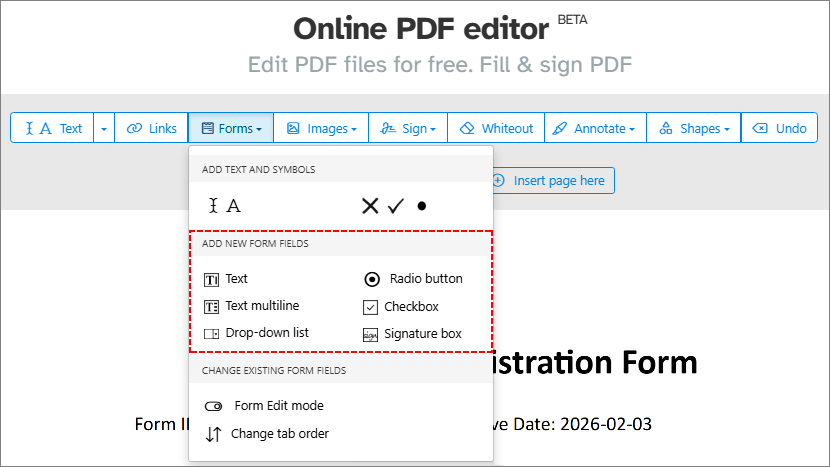
- Customize field layout and properties (e.g., field name, required status).
- Click “Apply changes” and download the fillable PDF.
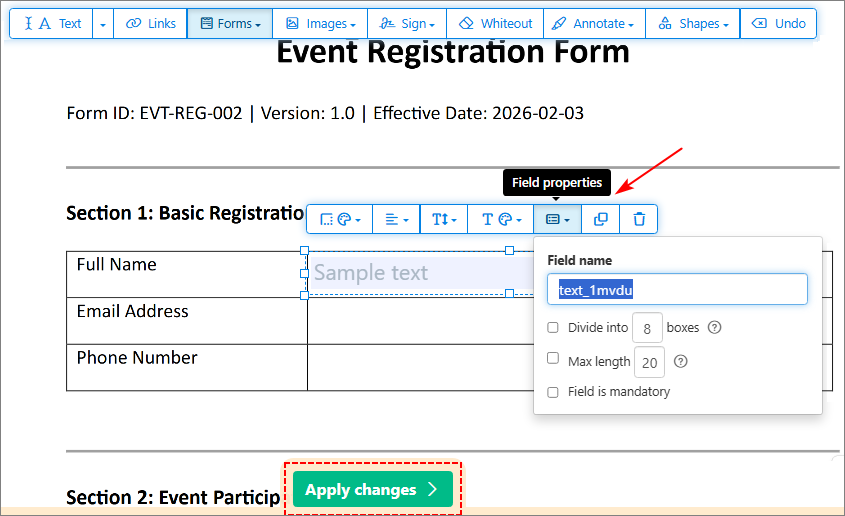
Important: Be mindful of sensitive data. Read the privacy policy of free online tools before uploading confidential information.
3. Programmatically Create a Fillable PDF in Python (Advanced, For Developers)
If you’re a developer, you can create editable PDFs via code using the Free Spire.PDF library. This is ideal for integrating form creation into apps or automating workflows.
Free Spire.PDF for Python is a robust, free library that supports creating, editing, and manipulating PDFs. Unlike some Python alternatives, it provides:
- No cost for both personal and commercial use (with certain page limitations).
- Comprehensive form field support (text fields, buttons, combo boxes, etc.).
- Easy integration with Python scripts.
Python code to add PDF fillable forms
The code below creates a fillable PDF with 5 common form fields:
- Text box (for name input)
- Checkboxes (for gender selection)
- List box (for country selection)
- Radio buttons (for hobby selection)
- Combobox/dropdown (for education degree selection)
from spire.pdf.common import *
from spire.pdf import *

# Create a PdfDocument object (blank PDF)
doc = PdfDocument()

# Add a blank page to the document (default A4 size)
page = doc.Pages.Add()

# Initialize x and y coordinates to position form fields
baseX = 100.0
baseY = 30.0

# Create brush objects for text color (blue for labels, black for options)
brush1 = PdfSolidBrush(PdfRGBColor(Color.get_Blue()))
brush2 = PdfSolidBrush(PdfRGBColor(Color.get_Black()))

# Create a font object (Times Roman, 12pt, regular style)
font = PdfFont(PdfFontFamily.TimesRoman, 12.0, PdfFontStyle.Regular)

# --------------------------
# 1. Add a Text Box (Name)
# --------------------------
# Draw label for the text box (blue color)
page.Canvas.DrawString("Name:", font, brush1, PointF(10.0, baseY))
# Define bounds (position + size) for the text box
tbxBounds = RectangleF(baseX, baseY, 150.0, 15.0)
# Create text box field with unique name "name"
textBox = PdfTextBoxField(page, "name")
textBox.Bounds = tbxBounds
textBox.Font = font
# Add text box to the PDF form
doc.Form.Fields.Add(textBox)
# Move y-coordinate down to avoid overlapping fields
baseY += 30.0

# --------------------------
# 2. Add Checkboxes (Gender)
# --------------------------
# Draw label for gender selection
page.Canvas.DrawString("Gender:", font, brush1, PointF(10.0, baseY))
# Checkbox 1: Male
checkboxBound1 = RectangleF(baseX, baseY, 15.0, 15.0)
checkBoxField1 = PdfCheckBoxField(page, "male")
checkBoxField1.Bounds = checkboxBound1
checkBoxField1.Checked = False  # Unchecked by default
page.Canvas.DrawString("Male", font, brush2, PointF(baseX + 20.0, baseY))

# Checkbox 2: Female
checkboxBound2 = RectangleF(baseX + 70.0, baseY, 15.0, 15.0)
checkBoxField2 = PdfCheckBoxField(page, "female")
checkBoxField2.Bounds = checkboxBound2
checkBoxField2.Checked = False
page.Canvas.DrawString("Female", font, brush2, PointF(baseX + 90.0, baseY))

# Add checkboxes to the form
doc.Form.Fields.Add(checkBoxField1)
doc.Form.Fields.Add(checkBoxField2)
baseY += 30.0

# --------------------------
# 3. Add a List Box (Country)
# --------------------------
# Draw label for country selection
page.Canvas.DrawString("Country:", font, brush1, PointF(10.0, baseY))
# Define bounds for the list box
listboxBound = RectangleF(baseX, baseY, 150.0, 50.0)
# Create list box field with unique name "country"
listBoxField = PdfListBoxField(page, "country")
# Add options (display text + internal value)
listBoxField.Items.Add(PdfListFieldItem("USA", "usa"))
listBoxField.Items.Add(PdfListFieldItem("Canada", "canada"))
listBoxField.Items.Add(PdfListFieldItem("Mexico", "mexico"))
listBoxField.Bounds = listboxBound
listBoxField.Font = font
# Add list box to the form
doc.Form.Fields.Add(listBoxField)
baseY += 60.0

# --------------------------
# 4. Add Radio Buttons (Hobbies)
# --------------------------
# Draw label for hobby selection
page.Canvas.DrawString("Hobbies:", font, brush1, PointF(10.0, baseY))
# Create radio button group (unique name "hobbies" ensures mutual exclusivity)
radioButtonListField = PdfRadioButtonListField(page, "hobbies")

# Radio button 1: Travel
radioItem1 = PdfRadioButtonListItem("travel")
radioBound1 = RectangleF(baseX, baseY, 15.0, 15.0)
radioItem1.Bounds = radioBound1
page.Canvas.DrawString("Travel", font, brush2, PointF(baseX + 20.0, baseY))

# Radio button 2: Movie
radioItem2 = PdfRadioButtonListItem("movie")
radioBound2 = RectangleF(baseX + 70.0, baseY, 15.0, 15.0)
radioItem2.Bounds = radioBound2
page.Canvas.DrawString("Movie", font, brush2, PointF(baseX + 90.0, baseY))

# Add radio buttons to the group and group to the form
radioButtonListField.Items.Add(radioItem1)
radioButtonListField.Items.Add(radioItem2)
doc.Form.Fields.Add(radioButtonListField)
baseY += 30.0

# --------------------------
# 5. Add a Combobox (Degree)
# --------------------------
# Draw label for education degree
page.Canvas.DrawString("Degree:", font, brush1, PointF(10.0, baseY))
# Define bounds for the combobox
cmbBounds = RectangleF(baseX, baseY, 150.0, 15.0)
comboBoxField = PdfComboBoxField(page, "degree")
comboBoxField.Bounds = cmbBounds
# Add degree options (display text + internal value)
comboBoxField.Items.Add(PdfListFieldItem("Bachelor", "bachelor"))
comboBoxField.Items.Add(PdfListFieldItem("Master", "master"))
comboBoxField.Items.Add(PdfListFieldItem("Doctor", "doctor"))
comboBoxField.Font = font
# Add combobox to the form
doc.Form.Fields.Add(comboBoxField)
baseY += 30.0

# --------------------------
# Save the fillable PDF
# --------------------------
doc.SaveToFile("PdfForm.pdf", FileFormat.PDF)
Key Code Explanations
- PDF Document Setup: PdfDocument() creates a blank PDF, and Pages.Add() adds a default A4 page (no need to explicitly define size).
- Layout & Styling:
- baseX/baseY: Coordinates to control field positioning (avoids overlapping and ensures clean layout).
- PdfSolidBrush: Defines text colors (blue for labels, black for options) to improve form readability.
- PdfFont: Sets a standard Times Roman 12pt font for consistent text styling across all fields.
- Form Field Types:
- PdfTextBoxField: Single-line text input with font alignment to the input text.
- PdfCheckBoxField: Binary selection with unchecked default state.
- PdfListBoxField: Multi-line selectable list with taller bounds to show multiple options.
- PdfRadioButtonListField: Mutually exclusive selection – grouping under one name ensures only one can be selected.
- PdfComboBoxField: Dropdown selection with human-readable labels and machine-friendly internal values.
- File Saving: The PDF is saved to specified path with explicit FileFormat.PDF for compatibility.
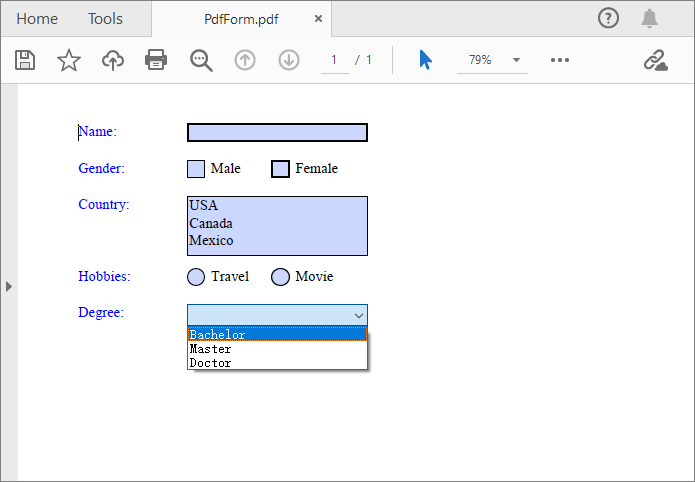
The generated fillable PDF looks like:
Beyond creating fillable PDFs, a critical real-world requirement for developers building automated workflows is the ability to read the form field values and export collected PDF form data into standard formats for further analyzing.
Frequently Asked Questions (FAQ)
Q1: Can I create a fillable PDF for free?
Yes. Free online tools like PDFescape or Sejda allow basic form creation without payment or installation. Python libraries like Free Spire.PDF also offer a free, programmatic approach for developers.
Q2: Are fillable PDFs compatible with all devices and PDF readers?
Most modern PDF readers (Adobe Acrobat Reader, Preview on Mac, Chrome, Edge) support filling out forms. However, creating or editing form fields typically requires specialized tools.
Q3: Can fillable PDFs include digital signatures?
Yes. Many tools, including Adobe Acrobat and several online editors, allow you to add signature fields where users can draw, type, or upload a digital signature.
Q4: Which method is best for batch creating fillable PDFs?
For batch generation, a programmatic approach using Python is most efficient. You can automate the creation of hundreds of forms with similar layouts but unique data.
Final Thoughts
Creating a fillable PDF doesn’t have to be complicated—whether you’re a beginner or a developer, there’s a tool that fits your workflow. For casual use, free online tools like PDFescape or Sejda are perfect. For professional forms (e.g., contracts, invoices), invest in Adobe Acrobat for advanced features. And for automated, scalable solutions, Python with Free Spire.PDF offers a powerful and free alternative.
By following the steps in this guide, you’ll create fillable PDFs that save time, reduce errors, and improve the user experience
See Also
3 Best Ways to Convert TXT to CSV (Fast & Error-Free)
Table of Contents
Whether you’re a data analyst, student, small business owner, or someone who works with plain text data regularly, you’ve probably encountered a scenario where you need to convert TXT to CSV. Text files are universal but unstructured—making them hard to import into spreadsheets (Excel, Google Sheets), databases, or programming tools (Python, R). CSV (Comma-Separated Values) files, by contrast, are the industry standard for tabular data: they’re supported by every data tool, easy to sort/filter, and free of formatting headaches.
In this guide, we will walk you through 5 simple methods to convert text to CSV, including free online tools, spreadsheet software, and Python scripts for batch/automated conversions.
What you’ll learn in this comprehensive TXT to CSV conversion guide:
- Prerequisites Before Converting Text File to CSV
- Method 1: Manually TXT to CSV Conversion Using MS Excel
- Method 2: Convert Text to CSV Using Free Online Tools
- Method 3: Batch Convert TXT to CSV Using Python
- FAQs About Converting TXT to CSV
Prerequisites Before Converting Text File to CSV
Before you start converting, take 2 minutes to prepare your TXT file to prevent common errors like misaligned columns or garbled text:
- Check the Delimiter: A delimiter is the character that separates values in your TXT file. Most TXT files use commas or tabs, and you can open your text file in Notepad (Windows) or TextEdit (Mac) to confirm.
- Ensure Consistent Formatting: Make sure every row in your TXT file has the same number of delimiters. For example, if your first row is
Name,Age,City, every subsequent row should have 2 commas (e.g.,John,28,New York). - Check Encoding: To avoid garbled text, save your TXT file with UTF-8 encoding (the standard for data files). In Notepad, click “File → Save As” and select “UTF-8” from the “Encoding” dropdown.
Method 1: Manually TXT to CSV Conversion Using MS Excel
If you only need to convert 1-2 small TXT files (under 100 rows), manual conversion via spreadsheet software is a reliable method. Microsoft Excel is the most popular tool that can be used to convert text into CSV. Follow these step-by-step instructions to proceed:
- Open Excel and create a new workbook.
- Navigate to Data → Get Data → From File → From Text/CSV.
- In the file explorer, select your TXT file and click Import.
- Excel's import wizard will detect delimiters automatically.
- Preview your TXT data and adjust settings if needed:
- File origin/encoding (UTF-8, ASCII, etc.)
- Delimiter (comma, tab, semicolon, space)
- Data type detection
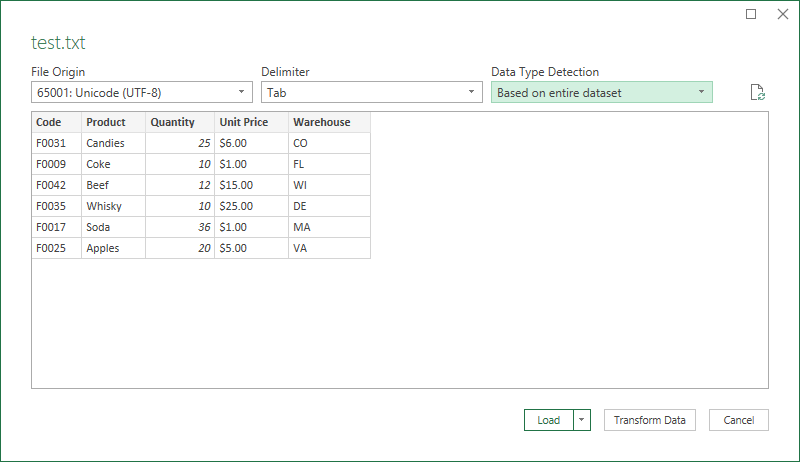
- Click Load to import the TXT data into an Excel spreadsheet.
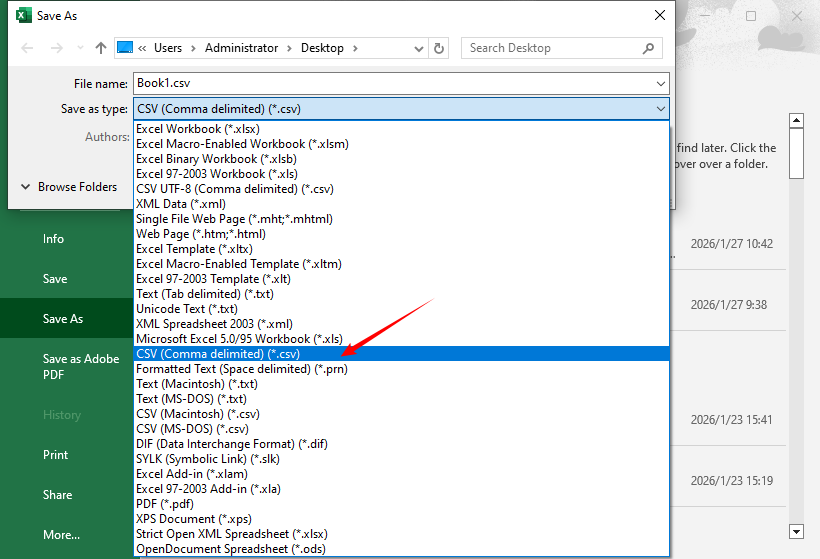
- Save the file as a CSV: Go to File → Save As, select CSV (Comma delimited) (*.csv) from the “Save as type” dropdown, choose a save location, and click Save.
Alternative: For users who want to avoid Microsoft products, LibreOffice Calc is a free, open-source spreasheet alternative that supports importing text files and saving them in CSV format.
Want to convert a CSV file back to a TXT file? Here’s a guide for you: Convert CSV to TXT: 4 Easy Methods for All Users
Method 2: Convert Text to CSV Using Free Online Tools
1. Free Online TXT to CSV Converter
Online converter are quick, require no downloads, and work in any browser. Convertio and Zamzar are two reliable text-to-CSV converters; both offer batch processing capabilities.
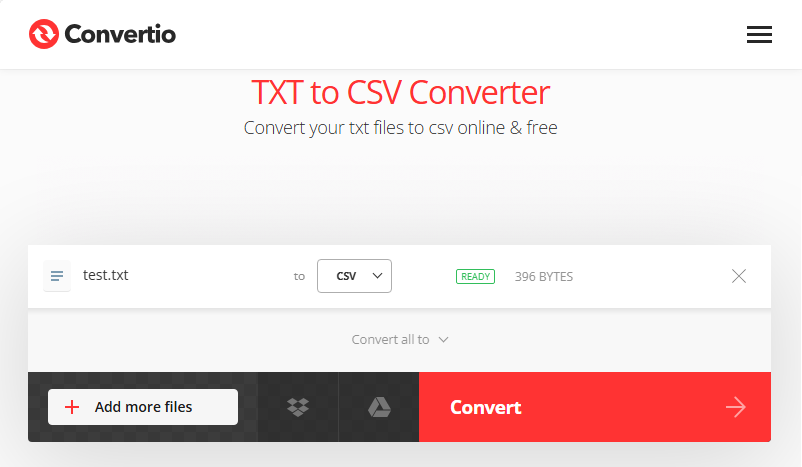
How to convert text to CSV online:
- Go to your chosen converter (e.g., Convertio TXT to CSV Converter).
- Click Choose Files and select your TXT file (or drag and drop it).
- Ensure the input format is “TXT” and the output format is “CSV.”
- Click Convert—the process takes 1-2 seconds for small files.
- Click Download to save your CSV file to your computer.
✔ Best for: Quick one-time conversions, users without spreadsheet software, and small files.
2. Google Sheets (Free, Cloud-Based)
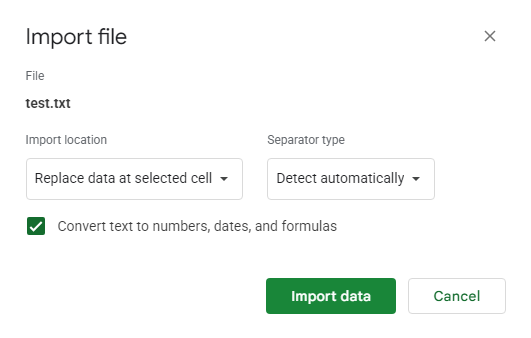
Google Sheets is a free, privacy-friendly alternative to third-party online conveters—no sensitive data leaves your Google Drive, and you maintain full control over your files. Here’s how to change TXT to CSV:
- Open Google Sheets in your browser and create a new spreadsheet.
- Go to File → Import → Upload → Select your .txt file.
- In the import window, choose import settings, and click Import data.
- Import location: select your preferred option (e.g., Replace data at selected cell)
- Separator type: Detect automatically or specify
- Convert text to numbers/dates if applicable
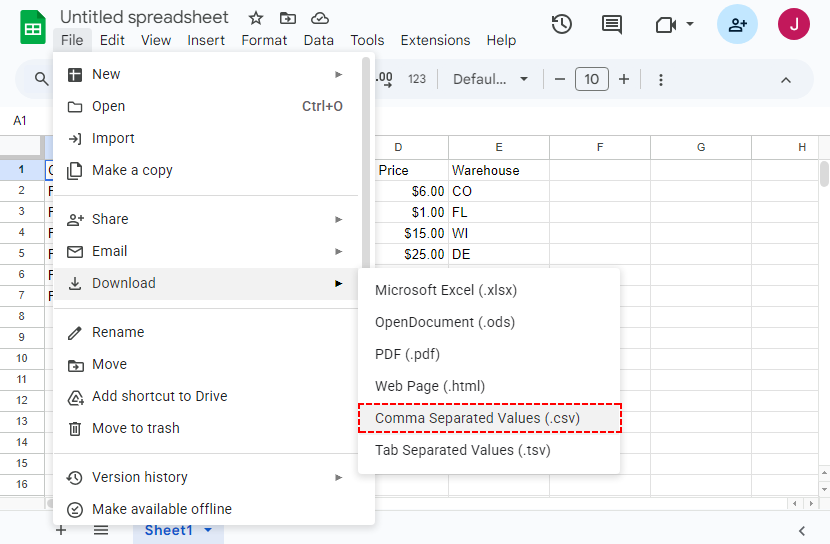
- Save as CSV: Go to File → Download → Comma-separated values (.csv).
✔ Best for: Collaborative work, cloud-based workflows, Mac/Linux users.
You may also like: Convert JSON to CSV: Free Online Tools, Excel & Python Scripts
Method 3: Batch Convert TXT to CSV Using Python
If you need to convert hundreds of TXT files to CSV or automate the conversion process, Python is the most efficient method. We’ll use the Spire.XLS for Python library to convert (no Excel required).
Step 1: Install Spire.XLS
pip install spire.Xls
Step 2: Use this script to convert TXT to CSV in Python:
from spire.xls import *

# Read the txt file
with open("Test.txt", "r", encoding="utf-8") as file:
    lines = file.readlines()

# Process each line by splitting based on delimiter
processed_data = [line.strip().split() for line in lines]

# Create an Excel workbook
workbook = Workbook()
# Get the first worksheet
sheet = workbook.Worksheets[0]

# Write data from the processed list to the worksheet
for row_num, row_data in enumerate(processed_data):
    for col_num, cell_data in enumerate(row_data):
        # Write data into cells
        sheet.Range[row_num + 1, col_num + 1].Value = cell_data

# Save the sheet as a CSV file (UTF-8 encoded)
sheet.SaveToFile("TxtToCsv.csv", ",", Encoding.get_UTF8())
# Dispose workbook to release resources
workbook.Dispose()
The code converts text document to CSV by:
- Read all content from the TXT file into a list of lines.
- Clean and split TXT line into structured data via strip() + split().
- Create a blank Excel workbook and get its first worksheet.
- Write data from the 2D list to Excel cells via Range[row, col].Value.
- Save the worksheet as a CSV file via SaveToFile().
- Release system resources occupied by the Excel workbook.
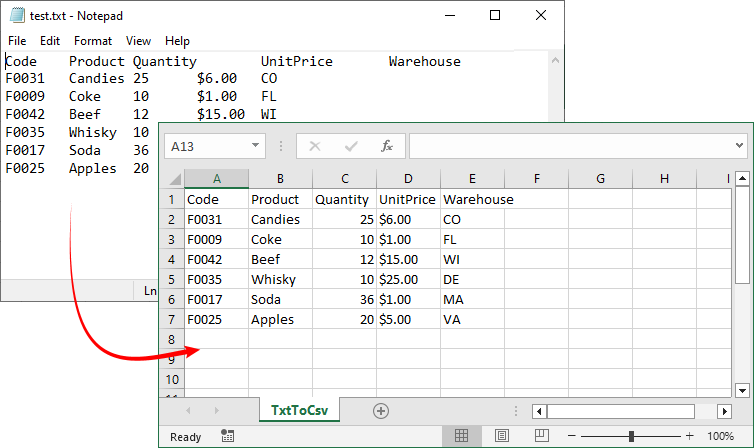
Conversion result:
CSV files don't store formatting. If you want to apply formatting (bold, colors), consider converting TXT to Excel using Spire.XLS for Python.
Final Thoughts
Converting TXT to CSV might seem trivial, but doing it correctly requires understanding your data structure, choosing appropriate tools, and validating results. For occasional conversions, spreadsheet software or online converters provide the simplest solution. For repetitive tasks, scripting with Python offers the most control and automation capabilities.
Mastering TXT to CSV conversion eliminates a common data bottleneck, enabling smoother analysis, reporting, and data sharing in your workflow.
FAQs About Converting TXT to CSV
Q1: Can I convert TXT to CSV without Excel?
A: Yes. You can use Google Sheets (free, cloud-based), LibreOffice Calc (free, open-source), online tools like Convertio, or Python with Spire.XLS.
Q2: Is it possible to batch convert multiple TXT to CSV?
A: Yes. Use online converters such as Zamzar/Convertio (batch upload). To convert multiple text files to CSV in Python, add a loop to the code:
import os

# Folder path with TXT files (replace with your folder)
txt_folder = "path/to/your/txt/files"
output_folder = "path/to/save/csv/files"

# Create output folder if it doesn't exist
os.makedirs(output_folder, exist_ok=True)

# Loop through all TXT files
for filename in os.listdir(txt_folder):
    if filename.endswith(".txt"):
        txt_path = os.path.join(txt_folder, filename)
        csv_filename = os.path.splitext(filename)[0] + ".csv"
        csv_path = os.path.join(output_folder, csv_filename)
# txt to csv conversion script
Q3: What if my TXT file has a custom delimiter (e.g., pipe |)?
A: All methods support custom delimiters:
- Excel Spreadsheet: Select the delimiter in the import wizard.
- Python: Replace split(" ") with split("|") in the script.
- Online tools: Most converters detect automatically.
Q4: Why is my CSV file showing garbled text?
A: This is usually due to incorrect encoding. Save your TXT file with UTF-8 encoding before converting, and ensure your conversion tool uses UTF-8.
See Also
Convert PDF to Excel for Free - Text & Scanned PDFs
Need to convert PDF to Excel for free? You’re in the right place. PDFs keep your formatting intact but lock your data away from editing. Whether you’re working with invoices, reports, or data tables, there’s no need to manually retype or pay for expensive software.
This guide walks you through the best free tools and methods to quickly and accurately transform PDF to Excel. From simple one-click online converters to automated Python scripts, we’ll match you with the right solution for your document type and workflow.
Content Overview:
- Understanding Your PDF Type: The Critical First Step
- Top Free Methods to Convert Native PDF To Excel
- Top Free OCR Tools to Convert Scanned PDF to Excel
- Frequently Asked Questions (FAQ)
Understanding Your PDF Type: The Critical First Step
Not all PDFs are created equal, and understanding your document's composition is essential for choosing the right conversion method.
| PDF Type | How to Identify | Best Conversion Method |
|---|---|---|
| Native/Text-Based PDF | Text is selectable and highlightable. | Standard converters work perfectly. |
| Scanned/Image-Based PDF | Text cannot be selected; file is an image. | Requires OCR (Optical Character Recognition) technology. |
Top Free Methods to Convert Native PDF To Excel
Native PDFs are the easiest to convert, with minimal formatting loss. Choose from 3 methods based on your needs: speed, privacy, or automation.
Free PDF to Excel Online Converter
Online converters are the fastest way to convert PDF to Excel for free—perfect if you only need to convert a few files or don’t want to install software. Here are some of the best PDF to Excel converters:
- CLOUDXDOC: Clean interface to convert PDF to XLSX without watermarks or ads
- Smallpdf: A robust free option with good formatting accuracy.
- IlovePDF: Supports batch conversion and offers detailed settings for better results.
How to export PDF to Excel online:
- Navigate to the website of your chosen tool.
- Upload your PDF via drag-and-drop or file selection.
- Click “Convert to Excel” (or similar option).
- Wait for the processing to complete.
- Download your new .xls or .xlsx file.
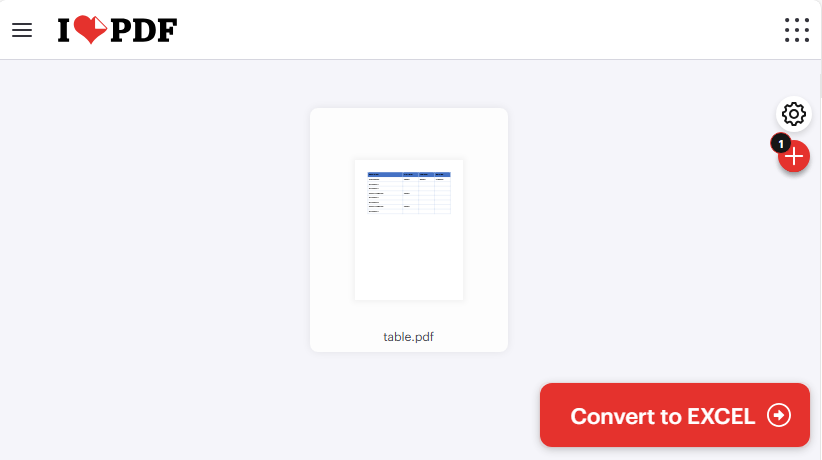
An example of using IlovePDF to convert PDF table to Excel:
Security Note: Avoid uploading sensitive financial, legal, or personal documents. For confidential data, use offline methods instead
2. Free Desktop Software to Convert PDF to Excel
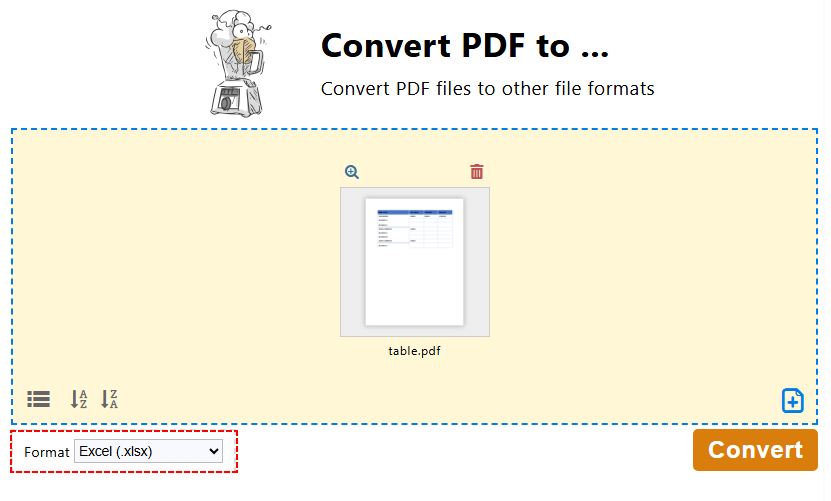
If you convert PDFs to Excel often or work with sensitive data, desktop software is better. PDF24 Creator is a 100% free offline tool that offers robust PDF to Excel conversion with batch support.
How to use PDF24 to change PDF to Excel:
- Download PDF24 Creator and install it (compatible with Windows 10/11).
- Open PDF24 Toolbox and select the “Convert PDF to …” option.
- Click “Choose files” to select one or multiple PDF files.
- Select “Excel (.xlsx)” as the output format.
- Click “Convert” to start the process. PDF24 preserves table structures and text formatting.
- Once done, click “Save” to download the Excel file.
Pro Tip: If you only need to convert a specific page or section of a PDF to Excel, you can extract PDF pages or crop the PDF before conversion.
3. Free PDF to Excel Python Converter Library
For tech-savvy users or anyone who needs to automate PDF to Excel conversions (e.g., bulk processing), using Python with Free Spire.PDF is a powerful free solution. Free Spire.PDF for Python is a lightweight library that supports creating, processing, and converting PDFs in Python without external dependencies.
Preconditions:
- Install Python 3.6 or higher
- Install Free Spire.PDF for Python via pip:
pip install Spire.Pdf.Free
Step-by-Step Code to Convert PDF to Excel in Python:
from spire.pdf import *

# 1. Create a PdfDocument object
pdf = PdfDocument()

# 2. Load your PDF file
pdf.LoadFromFile("table.pdf")

# 3. Define layout options
# Parameters: convertToMultipleSheet, rotatedText, splitCell, wrapText, overlapText
layout_options = XlsxLineLayoutOptions(True, True, False, True, False)

# 4. Apply layout options
pdf.ConvertOptions.SetPdfToXlsxOptions(layout_options)

# 5. Convert the PDF to Excel
pdf.SaveToFile("output.xlsx", FileFormat.XLSX)

# Close the document
pdf.Close()
This code uses SaveToFile() to convert the loaded PDF file to an Excel file. During conversion, the XlsxLineLayoutOptions class defines granular rules for how PDF content maps to Excel cells/sheets. The five boolean parameters control:
- convertToMultipleSheet: Determines whether each PDF page is converted into a separate worksheet.
- rotatedText: Controls whether rotated text in PDF retains its original rotation angle in Excel.
- splitCell: Specifies whether multi-line text in a single PDF table cell is split into multiple Excel cells.
- wrapText: Enables or disables automatic text wrapping within Excel cells.
- overlapText: Decides whether overlapping text in PDF is displayed in Excel.
PDF to XLSX Conversion Result:
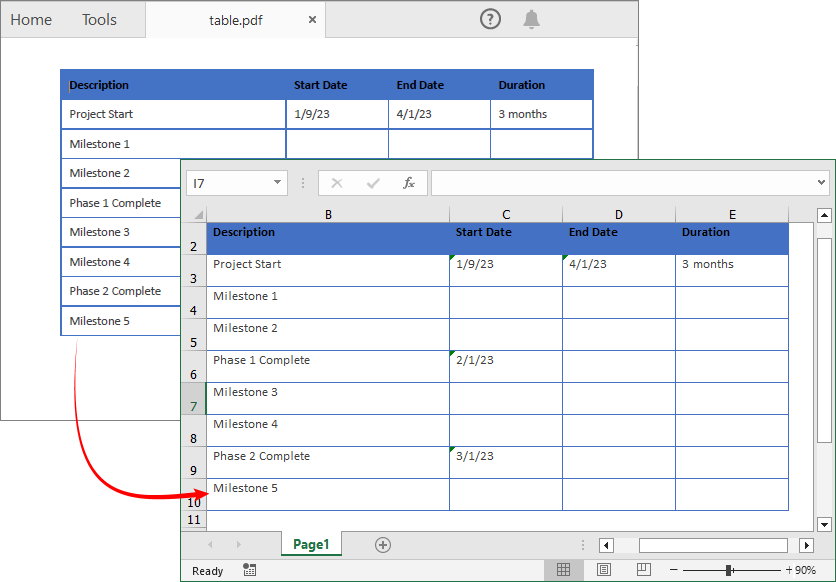
Free Spire.PDF for Python also allows export PDF table to CSV format. Details refer to: How to Convert PDF to CSV in Python (Fast & Accurate Table Extraction)
Top Free OCR Tools to Convert Scanned PDF to Excel
Most free converters struggle with scanned PDFs, but there are two tools that let you convert them to editable Excel for free—no paid OCR required.
Option 1: PDFgear (Supports Large/Multi-Page Scanned PDF)
PDFgear is a free online tool with powerful OCR capabilities—ideal for large scanned PDFs and multi-page documents. It preserves layouts and requires no sign-up.
- Go to the PDFgear Free PDF to Excel Converter (no sign-up required).
- Click “Select PDF File” or drag and drop your PDF into the upload box.
- For scanned PDF, choose the “Advanced” convert mode to enable OCR technology.
- Click “Convert” and wait 1–2 minutes. PDFgear preserves original layouts, fonts, and formatting.
- Click “Download” to save your editable Excel file (.xlsx) to your device.
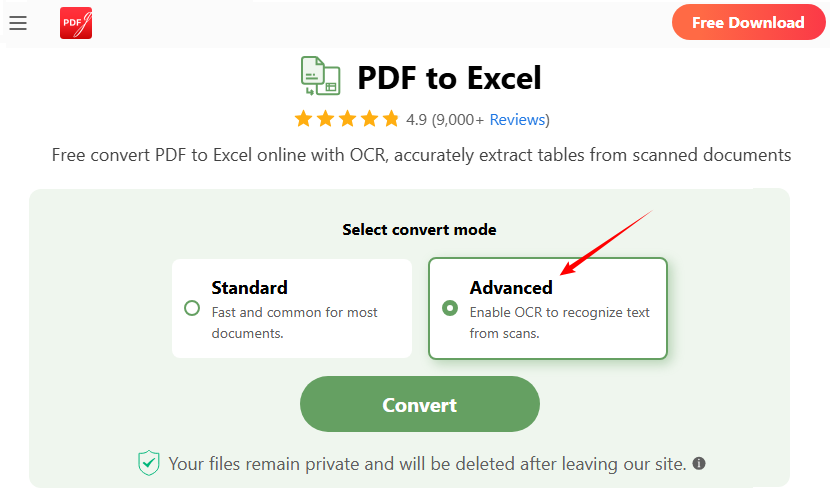
Option 2: Online OCR (For Small Scanned PDFs)
Online OCR is free for files up to 15MB and supports 40+ languages. It’s simple but less powerful for large documents.
- Go to Online OCR’s PDF to Excel Converter.
- Click “SELECT FILE” to upload your scanned PDF file.
- Choose the recognition language (e.g., English).
- Click “Convert” and wait for the OCR to extract text from the image.
- Download your editable Excel file.
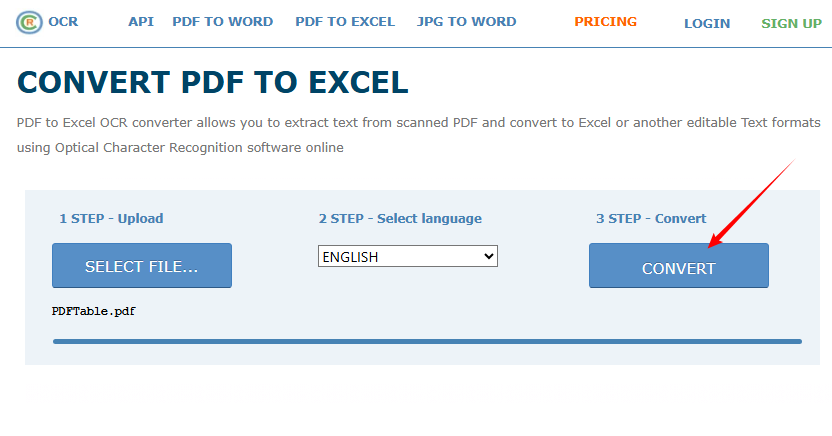
Frequently Asked Questions (FAQ)
Q1: Can I convert multiple PDFs to Excel at once for free?
Yes. PDF24 (desktop) and IlovePDF (online) support batch conversion for free. For automated batch processing, use the Python method with Free Spire.XLS (add a loop to process multiple files).
Q2: Will the Excel file retain the original table format?
- Native PDFs: 90-99% of formatting is preserved (tables, fonts, alignment).
- Scanned PDFs: 70-90% accuracy (depends on scan quality)—use PDFgear or Online OCR for best results.
Q3: My converted Excel file has text in a single cell. How can I split it?
This often occurs with simple converters. Use Excel's built-in "Text to Columns" feature (under the Data tab) to split content based on delimiters. For future conversions, choose a tool with better layout analysis, like PDF24 or the Python library with the splitCell parameter enabled.
Q4: Can I use these free tools on Mac, iPhone, or Android?
Yes. Most online tools (CLOUDXDOC, IlovePDF, PDFgear) work on Mac, iOS, and Android—no installation needed.
Final Thoughts
This article has introduced a range of tools and methods to export PDF to Excel for free. From user-friendly online converters and reliable desktop applications to programmable Python libraries and dedicated OCR solutions, you can confidently transform any PDF—whether native or scanned—into editable, organized spreadsheets.
By understanding your PDF type and selecting the right method, you can unlock your data for editing, analysis, and reporting without any cost.
See Also
Create a CSV File in Python: Simple & Advanced Examples
CSV (Comma-Separated Values) files are the backbone of data exchange across industries—from data analysis to backend systems. They’re lightweight, human-readable, and compatible with almost every tool (Excel, Google Sheets, databases). If you’re a developer seeking a reliable way to create a CSV file in Python, Spire.XLS for Python is a powerful library that simplifies the process.
In this comprehensive guide, we'll explore how to generate a CSV file in Python with Spire.XLS, covering basic CSV creation and advanced use cases like list to CSV and Excel to CSV conversion.
What You’ll Learn
- Installation and Setup
- Basic: Create a Simple CSV File in Python
- Dynamic Data: Generate CSV from a List of Dictionaries in Python
- Excel-to-CSV: Generate CSV From an Excel File in Python
- Best Practices for CSV Creation
- FAQ: Create CSV in Python
Installation and Setup
Getting started with Spire.XLS for Python is straightforward. Follow these steps to set up your environment:
Step 1: Ensure Python 3.6 or higher is installed.
Step 2: Install the library via pip (the official package manager for Python):
pip install Spire.XLS
Step 3 (Optional): Request a temporary free license to test full features without any limitations.
Basic: Create a Simple CSV File in Python
Let’s start with a simple scenario: creating a CSV file from scratch with static data (e.g., a sales report). The code below creates a new workbook, populates it with data, and saves it as a CSV file.
from spire.xls import *
from spire.xls.common import *

# 1. Create a new workbook
workbook = Workbook()

# 2. Get the first worksheet (default sheet)
worksheet = workbook.Worksheets[0]

# 3. Populate data into cells
# Header row
worksheet.Range["A1"].Text = "ProductID"
worksheet.Range["B1"].Text = "ProductName"
worksheet.Range["C1"].Text = "Price"
worksheet.Range["D1"].Text = "QuantitySold"

worksheet.Range["A2"].NumberValue = 101
worksheet.Range["B2"].Text = "Wireless Headphones"
worksheet.Range["C2"].NumberValue = 79.99
worksheet.Range["D2"].NumberValue = 250

worksheet.Range["A3"].NumberValue = 102
worksheet.Range["B3"].Text = "Bluetooth Speaker"
worksheet.Range["C3"].NumberValue = 49.99
worksheet.Range["D3"].NumberValue = 180

# Save the worksheet to CSV
worksheet.SaveToFile("BasicSalesReport.csv", ",", Encoding.get_UTF8())
workbook.Dispose()
Core Workflow
- Initialize Core object: Workbook() creates a new Excel workbook, Worksheets[0] accesses the target sheet.
- Fill data into cells: Use .Text (for strings) and .NumberValue (for numbers) to ensure correct data types.
- Export & cleanup: SaveToFile() exports the worksheet to CSV , and Dispose() prevents memory leaks.
Output:
The resulting BasicSalesReport.csv will look like this:

Dynamic Data: Generate CSV from a List of Dictionaries in Python
In real-world scenarios, data is often stored in dictionaries (e.g., from APIs/databases). The code below converts a list of dictionaries to a CSV:
from spire.xls import *
from spire.xls.common import *

# Sample data (e.g., from a database/API)
customer_data = [
    {"CustomerID": 1, "Name": "John Doe", "Email": "john@example.com", "Country": "USA"},
    {"CustomerID": 2, "Name": "Maria Garcia", "Email": "maria@example.es", "Country": "Spain"},
    {"CustomerID": 3, "Name": "Li Wei", "Email": "wei@example.cn", "Country": "China"}
]

# 1. Create workbook and worksheet
workbook = Workbook()
worksheet = workbook.Worksheets[0]

# 2. Write headers (extract keys from the first dictionary)
headers = list(customer_data[0].keys())
for col_idx, header in enumerate(headers, start=1):
    worksheet.Range[1, col_idx].Text = header  # Row 1 = headers

# 3. Write data rows
for row_idx, customer in enumerate(customer_data, start=2):  # Start at row 2
    for col_idx, key in enumerate(headers, start=1):
        # Handle different data types (text/numbers)
        value = customer[key]
        if isinstance(value, (int, float)):
            worksheet.Range[row_idx, col_idx].NumberValue = value
        else:
            worksheet.Range[row_idx, col_idx].Text = value

# 4. Save as CSV
worksheet.SaveToFile("CustomerData.csv", ",", Encoding.get_UTF8())
workbook.Dispose()
This example is ideal for JSON to CSV conversion, database dumps, and REST API data exports. Key advantages include:
- Dynamic Headers: Automatically extracts headers from the keys of the first dictionary in the dataset.
- Scalable: Seamlessly adapts to any volume of dictionaries or key-value pairs (perfect for dynamic data).
- Clean Output: Preserves the original order of dictionary keys for consistent CSV structure.
The generated CSV file:
Excel-to-CSV: Generate CSV From an Excel File in Python
Spire.XLS excels at converting Excel (XLS/XLSX) to CSV in Python. This is useful if you have Excel reports and need to export them to CSV for data pipelines or third-party tools.
from spire.xls import *

# 1. Initialize a workbook instance
workbook = Workbook()

# 2. Load a xlsx file
workbook.LoadFromFile("Expenses.xlsx")

# 3. Save Excel as a CSV file
workbook.SaveToFile("XLSXToCSV.csv", FileFormat.CSV)
workbook.Dispose()
Conversion result:
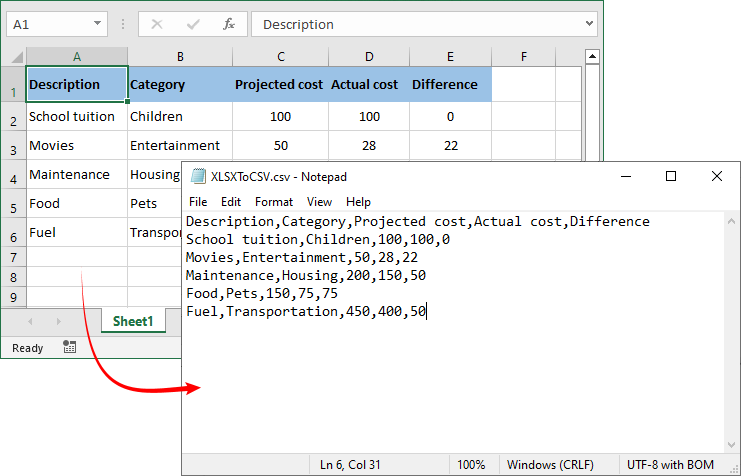
Note: By default, SaveToFile() converts only the first worksheet. For converting multiple sheets to separate CSV files, refer to the comprehensive guide: Convert Excel (XLSX/XLS) to CSV in Python – Batch & Multi-Sheet
Best Practices for CSV Creation
Follow these guidelines to ensure robust and professional CSV output:
- Validate Data First: Clean empty rows/columns before exporting to CSV.
- Use UTF-8 Encoding: Always specify UTF-8 encoding (Encoding.get_UTF8()) to support international characters seamlessly.
- Batch Process Smartly: For 100k+ rows, process data in chunks (avoid loading all data into memory at once).
- Choose the Correct Delimiter: Be mindful of regional settings. For European users, use a semicolon (;) as the delimiter to avoid locale issues.
- Dispose Objects: Release workbook/worksheet resources with Dispose() to prevent memory leaks.
Conclusion
Spire.XLS simplifies the process of leveraging Python to generate CSV files. Whether you're creating reports from scratch, converting Excel workbooks, or handling dynamic data from APIs and databases, this library delivers a robust and flexible solution.
By following this guide, you can easily customize delimiters, specify encodings such as UTF-8, and manage data types—ensuring your CSV files are accurate, compatible, and ready for any application. For more advanced features, you can explore the Spire.XLS for Python tutorials.
FAQ: Create CSV in Python
Q1: Why choose Spire.XLS over Python’s built-in csv module?
A: While Python's csv module is excellent for basic read/write operations, Spire.XLS offers significant advantages:
- Better data type handling: Automatic distinction between text and numeric data.
- Excel Compatibility: Seamlessly converts between Excel (XLSX/XLS) and CSV—critical for teams using Excel as a data source.
- Advanced Customization: Supports customizing the delimiter and encoding of the generated CSV file.
- Batch processing: Efficient handling of large datasets and multiple files.
- Cross-Platform Support: Works on Windows, macOS, and Linux (no Excel installation required).
Q2: Can I use Spire.XLS for Python to read CSV files?
A: Yes. Spire.XLS supports parsing CSV files and extracting their data. Details refer to: How to Read CSV Files in Python: A Comprehensive Guide
Q3: Can Spire.XLS convert CSV files back to Excel format?
A: Yes! Spire.XLS supports bidirectional conversion. A quick example:
from spire.xls import *

# Create a workbook
workbook = Workbook()

# Load a CSV file
workbook.LoadFromFile("sample.csv", ",", 1, 1)

# Save CSV as Excel
workbook.SaveToFile("CSVToExcel.xlsx", ExcelVersion.Version2016)
Q4: How do I change the CSV delimiter?
A: The SaveToFile() method’s second parameter controls the delimiter:
# Semicolon (for European locales):
worksheet.SaveToFile("EU.csv", ";", Encoding.get_UTF8())
# Tab (for tab-separated values/TSV)
worksheet.SaveToFile("TSV_File.csv", "\t", Encoding.get_UTF8())
How to Convert PDF to SVG (3 Easy Methods)
Table of Contents

In today's digital landscape, scalable vector graphics (SVG) have become the gold standard for web graphics, digital illustrations, and responsive design. Unlike PDFs, which can contain both vector and raster elements, SVG files are pure vector format—meaning they scale infinitely without losing quality. Knowing how to convert PDF to SVG unlocks new possibilities for web integration, animation, and precise editing in design software.
Whether you're a web developer needing scalable logos, a designer repurposing print materials for digital platforms, or a content creator looking to enhance your website's visuals, this guide will walk you through the most effective methods to convert PDF to SVG, covering free tools, professional software, and automation scripts, along with pro tips to ensure flawless results.
Contents:
- Understanding the Basics: PDF vs. SVG
- Method 1: Using Online Free PDF to SVG Converters
- Method 2: Using Free Desktop Software Inkscape
- Method 3: Using Python to Automate PDF to SVG Conversion
- Best Practices for PDF to SVG Conversion
- Common PDF to SVG Questions
Understanding the Basics: PDF vs. SVG
Before diving into conversion methods, let’s clarify the core differences between these two formats to help you make informed decisions:
- PDF (Portable Document Format) can contain text, images, vector graphics, and complex layouts. It is primarily designed for consistent printing and document sharing.
- SVG (Scalable Vector Graphics) is an XML-based vector image format for logos, icons, diagrams, and illustrations. It is natively supported by all modern browsers and is SEO-friendly (text is indexable).
When to Change PDF to SVG:
- Extracting logos or icons from PDF documents
- Converting diagrams for web presentation
- Preparing illustrations for animation
- Creating responsive graphics that scale across devices
Method 1: Using Online Free PDF to SVG Converters
If you need a quick conversion for non-sensitive files, online tools are your best bet. They’re free, require no software setup, and work on any OS (Windows, Mac, Linux, or mobile). Here are the two most reliable options:
Option A: CLOUDXDOCS (Free, No Registration)
CLOUDXDOCS is a trusted, ad-free converter that supports converting PDF to SVG online. It’s ideal for small to medium files and requires zero sign-up.
- Go to CLOUDXDOCS PDF to SVG converter.
- Upload your PDF file or drag-and-drop the file into the upload area.
- Wait for the conversion process to complete.
- Download the converted SVG file.
Option B: Convertio (Batch Conversion)
Convertio online converter is great for batch processing and works on mobile devices. It preserves vector elements effectively.
- Visit Convertio PDF to SVG Converter.
- Click “Choose Files” to upload your PDF files.
- Click “Convert” – no extra settings needed for basic use.
- Download individual SVGs or a zip folder of all files.
Pro Tip: To optimize the final SVG file size, you can crop PDF pages before conversion to remove irrelevant content and focus on the core elements you need.
Method 2: Using Free Desktop Software Inkscape
For more control (and offline use), Inkscape is the best free tool. It’s open-source, supports advanced vector editing, and ensures high-quality conversions, perfect for designers or power users.
- Download and install Inkscape from inkscape.org.
- Open Inkscape, then go to “File > Import” and select your PDF file.
- In the import dialog, choose your preferred options to handle PDF pages and images, then click “OK”.
- Optional: Edit the file (e.g., ungroup elements, remove unwanted parts, or adjust paths).
- Save as SVG: Go to “File > Save As”, select “Plain SVG (*.svg)” or "Inkscape SVG (*.svg)” from the dropdown, and click “Save”.

Advantage: Inkscape often preserves vector paths more accurately than some online tools.
You may also like: Convert Images to PDF on Windows, Mac, and Linux
Method 3: Using Python to Automate PDF to SVG Conversion
Developers can integrate PDF to SVG conversion into apps, scripts, or pipelines using Spire.PDF for Python —a powerful library that supports multi-page PDFs, batch processing, and custom settings.
Step-by-Step Guide:
1. Install the Python PDF processing library:
pip install Spire.PDF
2. Use this code to convert a PDF to SVG (supports multi-page PDFs):
from spire.pdf import *

# Create an object of the PdfDocument class
doc = PdfDocument()
# Load a PDF file
doc.LoadFromFile("Sample.pdf")

# Save each page of the file to a separate SVG file
doc.SaveToFile("PdfToSVG/converted.svg", FileFormat.SVG)

# Close the PdfDocument object
doc.Close()
The SaveToFile() method converts each page of a PDF file to a separate SVG file. Here’s the result of converting a 5-page PDF file:
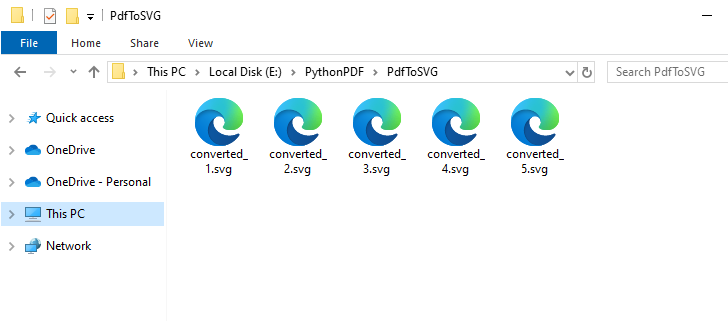
In addition to vector graphics, Spire.PDF for Python also supports converting PDF to common bitmap images such as PNG, JPG, and BMP.
Best Practices for PDF to SVG Conversion
Before Conversion:
- Verify PDF type: Vector-based PDFs yield the best results
- Extract specific pages if needed
- Check resolution: Minimum 300 DPI for embedded images
- Simplify complex documents when possible
After Conversion:
- Compress SVG size with SVGOMG
- Validate SVG structure using W3C Validator
- Test across browsers (Chrome, Firefox, Safari)
- Add accessibility tags (title, desc, ARIA labels)
Conclusion
Converting PDF to SVG unlocks powerful capabilities for web and digital design. For quick conversions, use online tools like CLOUDXDOCS. For professional work, Inkscape provides free, powerful editing. Developers can automate with Python for scalable workflows.
By following this comprehensive guide, you'll achieve perfect SVG conversions every time, ready for any web or design application.
Common PDF to SVG Questions
Q: Is it possible to convert a PDF to SVG for free?
A: Yes. Use online tools like CLOUDXDOCS, or desktop software like Inkscape (free and open-source). For Python solution, try the Free Spire.PDF for Python library (with limitations).
Q: Does the conversion preserve layers?
A: This depends on the converter. Inkscape preserves layers if “Import as Pages” is selected, while many online tools flatten the document.
Q: Is there a loss of quality?
A: Pure vector elements should convert without quality loss. However, raster images embedded in PDFs will remain raster in the SVG unless manually traced.
Q: Can I batch convert multiple PDFs to SVG?
A: Yes. Use the online batch converter or Python scripts to automate bulk conversion.