Не удаляется пустая страница в Word? 5 способов, которые действительно работают
Оглавление
Вы когда-нибудь нажимали клавиши Backspace или Delete несколько раз, но пустая страница в Microsoft Word так и не исчезала?
В Word пустая страница редко бывает по-настоящему пустой. Обычно она остается из-за скрытых элементов форматирования, таких как лишние знаки абзаца, ручные разрывы страниц, разрывы разделов или обязательный абзац после таблицы.
Самый надежный способ решить эту проблему — сделать видимыми скрытые элементы Word, определить причину и удалить нужный объект. В этом руководстве представлено 5 практических способов удаления пустой страницы в Word, включая метод автоматизации на Python для пакетной очистки документов.
Выявление причин появления пустой страницы
Прежде чем пытаться исправить проблему, включите отображение знаков форматирования, чтобы увидеть скрытые элементы, создающие пустую страницу.
-
Перейдите на вкладку Главная.
-
В группе Абзац нажмите кнопку Отобразить все знаки (¶).
-
Или используйте сочетание клавиш:
- Windows: Ctrl + Shift + 8
- Mac: Command + 8
Когда скрытые знаки станут видны, посмотрите, что отображается на пустой странице, и выберите соответствующий метод ниже.
| Что вы видите на пустой странице | Лучший способ решения |
|---|---|
| Лишние знаки абзаца ¶ | Удалить лишние знаки абзаца |
| Линия ------- Разрыв страницы ------- | Удалить ручной разрыв страницы |
| Линия ======= Разрыв раздела ======= | Удалить или настроить разрыв раздела |
| Знак абзаца ¶ сразу после таблицы в конце страницы | Уменьшить абзац после таблицы |
| Пустые страницы в десятках файлов | Использовать Python для пакетного удаления |
5 практических способов удаления пустой страницы в Word
Способ 1: Удаление лишних знаков абзаца
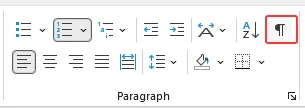
Если на вашей пустой странице есть один или несколько символов ¶, это обычно вызвано слишком частым нажатием клавиши Enter.
Как исправить
- Нажмите и перетащите мышь, чтобы выделить все лишние знаки ¶ на пустой странице.
- Нажмите Backspace или Delete на клавиатуре.
Результат
Лишние знаки абзаца будут удалены, и пустая страница исчезнет.
⚠️ Важное примечание
Не удаляйте знаки абзаца бездумно по всему документу. Некоторые знаки ¶ несут в себе специфическое форматирование интервалов, стилей или макета. Удаляйте только те знаки, которые непосредственно создают нежелательную пустую страницу.
Способ 2: Удаление ручного разрыва страницы
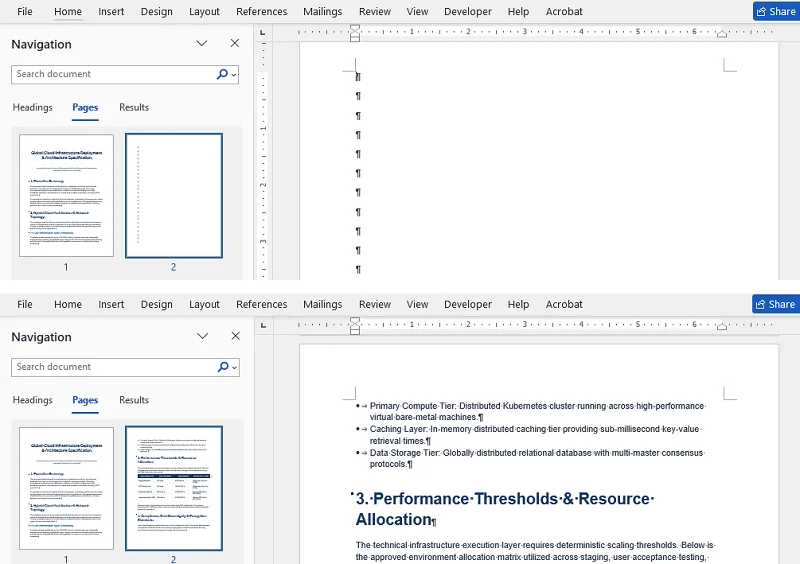
Если вы видите пунктирную линию с надписью ------- Разрыв страницы -------, это ручной разрыв, который заставляет содержимое после него начинаться с новой страницы.
Как исправить
- Дважды щелкните линию ------- Разрыв страницы -------, чтобы выделить ее.
- Нажмите Delete на клавиатуре.
Результат
Ручной разрыв страницы будет удален, и содержимое после него сместится вверх.
Дополнительный совет
Ручной разрыв страницы отличается от автоматического. Word создает автоматические разрывы страниц на основе размера страницы, полей и потока содержимого. Автоматические разрывы страниц нельзя удалить напрямую.
Способ 3: Удаление или настройка разрыва раздела
Если вы видите линию ======= Разрыв раздела (со следующей страницы) =======, возможно, Word начинает следующий раздел с новой страницы, что может оставить пустую страницу между ними.
Чтобы исправить это, у вас есть два варианта в зависимости от того, хотите ли вы полностью удалить разрыв или сохранить его преимущества в форматировании:
Вариант 1: Полное удаление разрыва раздела
- Поместите курсор прямо перед линией ======= Разрыв раздела (со следующей страницы) =======.
- Нажмите Delete.
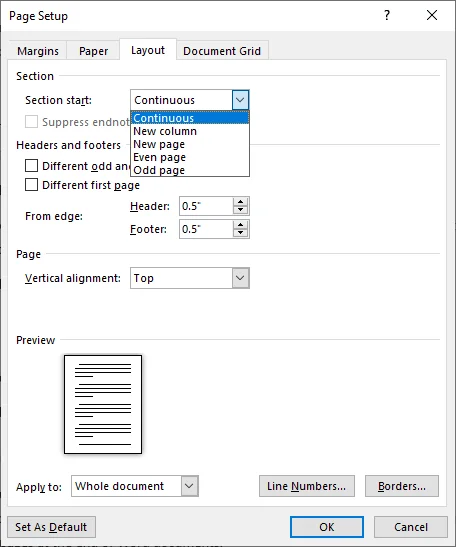
Вариант 2: Преобразование в разрыв раздела «Текущая страница»
-
Дважды щелкните линию ======= Разрыв раздела (со следующей страницы) =======, чтобы открыть меню Параметры страницы.
-
Перейдите на вкладку Макет.
-
Измените значение в выпадающем списке Начало раздела на Текущая страница, затем нажмите ОК.
⚠️ Важное примечание
Удаление разрыва раздела иногда может изменить колонтитулы или поля окружающего текста, так как содержимое объединяется с форматированием следующего раздела. Если макет нарушился, немедленно нажмите Ctrl + Z, чтобы отменить действие, и воспользуйтесь Вариантом 2.
Продвинутый совет: Проверка параметров разбиения на страницы
Если вы не можете найти ручные разрывы страниц или разделов, но пустая страница все равно появляется, причиной может быть скрытая настройка абзаца.
- Найдите знак абзаца с маленьким квадратиком рядом с ним на пустой странице или в начале следующей страницы.
- Выберите этот абзац.
- Нажмите правой кнопкой мыши и выберите Абзац.
- Откройте вкладку Положение на странице.
- Снимите флажок С новой страницы.
- Нажмите ОК.
Это позволит абзацу располагаться в обычном порядке, вместо того чтобы принудительно начинать новую страницу.
Способ 4: Уменьшение абзаца после таблицы
Согласно документации Microsoft Support, Word включает в себя неудалимый конечный абзац, который иногда может переноситься на новую пустую страницу. Это часто случается, когда таблица заканчивается в самом низу страницы.
Как удалить пустую страницу после таблицы в Word
-
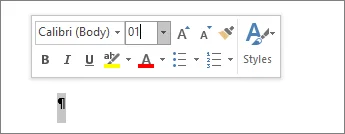
Выберите знак абзаца (¶) сразу после таблицы.
-
Перейдите в поле Размер шрифта.
-
Введите 1 и нажмите Enter.
Дополнительный совет
Если уменьшение размера шрифта до 1 не помогло, попробуйте следующее:
- Выберите знак абзаца после таблицы, нажмите Ctrl + D, чтобы открыть диалоговое окно «Шрифт», установите флажок Скрытый в разделе Эффекты и нажмите ОК.
- Немного уменьшите нижнее поле в меню Макет > Поля > Настраиваемые поля. Используйте этот метод осторожно, так как изменение полей может повлиять на макет всей страницы.
Способ 5: Использование Python для пакетного удаления пустых страниц
Если вы имеете дело с десятками или сотнями документов Word, засоренных случайными пустыми страницами, делать это вручную крайне неэффективно. Вы можете использовать Python и библиотеку Spire.Doc for Python для автоматического пакетного удаления пустых страниц без открытия Microsoft Word.
Предварительные требования
Сначала убедитесь, что у вас установлен Python 3.7 или выше, затем установите Spire.Doc for Python через pip:
pip install spire.doc
Для пошагового руководства по настройке ознакомьтесь с тем, как установить Spire.Doc for Python.
Пакетное удаление пустых страниц из документов Word с помощью Python и Spire.Doc
Этот скрипт автоматически сканирует папку, открывает каждый файл Word .docx, удаляет пустые страницы с помощью метода RemoveBlankPages() и сохраняет очищенный файл.
import os
from spire.doc import Document, FileFormat

input_folder = "./input_docs/"
output_folder = "./cleaned_docs/"

# Создать выходную папку, если она не существует
if not os.path.exists(output_folder):
    os.makedirs(output_folder)

# Цикл по всем файлам в папке ввода
for filename in os.listdir(input_folder):
    if filename.endswith(".docx") and not filename.startswith("~$"):
        doc = Document()
        doc.LoadFromFile(os.path.join(input_folder, filename))

        # Автоматическое удаление пустых страниц
        doc.RemoveBlankPages()

        # Сохранение в выходную папку
        doc.SaveToFile(os.path.join(output_folder, "cleaned_" + filename), FileFormat.Docx2016)
        doc.Close()
Совет профессионала
- Всегда делайте резервные копии исходных файлов Word перед запуском любых скриптов автоматизации.
- Сначала протестируйте скрипт на небольшом количестве файлов и проверьте результат, прежде чем обрабатывать всю папку.
Хотите экспортировать очищенный документ в PDF? Ознакомьтесь с нашим руководством по конвертации Word в PDF на Python.
Заключение
Большинство пустых страниц в Word вызваны скрытыми элементами форматирования, такими как лишние знаки абзаца, разрывы страниц, разрывы разделов или обязательный абзац после таблицы. Как только вы сделаете эти знаки видимыми, вы сможете удалить пустую страницу, не повреждая макет документа.
Для одного документа обычно достаточно встроенных инструментов Word. Для регулярной очистки множества файлов автоматизация на Python сделает процесс быстрее и стабильнее.
Часто задаваемые вопросы
В1: Почему я не могу удалить пустую страницу в Word?
О: Пустые страницы часто вызваны скрытыми элементами, такими как лишние знаки абзаца, ручные разрывы страниц или разрывы разделов. Включите отображение знаков форматирования (¶), чтобы найти и удалить их.
В2: Повлияет ли удаление пустой страницы на форматирование моего документа?
О: Это зависит от типа пустой страницы. Удаление лишних абзацев или ручных разрывов страниц обычно имеет минимальное влияние. Однако удаление разрывов разделов может изменить колонтитулы или поля, поэтому будьте осторожны и используйте «Отмену» (Undo), если это необходимо.
В3: Могу ли я удалять пустые страницы в Word Online?
О: Да, но с ограничениями. В Word Online можно включить отображение знаков форматирования, а затем удалить лишние знаки абзаца. Однако некоторые сложные элементы форматирования, такие как разрывы разделов, сложнее контролировать в Word Online.
В4: Как я могу удалить пустые страницы из нескольких документов Word одновременно?
О: Для массового удаления можно использовать скрипты Python с библиотеками вроде Spire.Doc, чтобы автоматически обнаруживать и удалять пустые страницы во многих документах, экономя время на рутинном редактировании.
В5: Можно ли экспортировать документ Word без последней пустой страницы?
О: Да. Если вам нужна только PDF-версия или распечатка, вы можете исключить последнюю пустую страницу, используя пользовательский диапазон страниц. Например, если страница 5 пустая, перейдите в Файл > Печать и введите 1-4, или перейдите в Файл > Экспорт > Создать PDF/XPS > Параметры и укажите страницы, которые нужно включить. Это не удалит пустую страницу из самого документа Word.
Изучите другие руководства по обработке документов Word
Como converter PowerPoint para vídeo (MP4): 3 métodos comprovados
Índice
Ao compartilhar apresentações do PowerPoint em plataformas como YouTube, sistemas LMS ou dispositivos móveis, podem ocorrer problemas de compatibilidade, como fontes ausentes ou animações corrompidas. Converter o PowerPoint para vídeo MP4 garante uma reprodução consistente e uma distribuição mais fácil.
Este guia explica três métodos práticos para converter PowerPoint para vídeo, incluindo ferramentas de exportação integradas, conversores online e automação em C# para processamento em lote.
- Método 1: Recurso de exportação nativo do Microsoft PowerPoint (Suporte nativo)
- Método 2: Conversores online de PowerPoint para vídeo (Sem instalação)
- Método 3: Automação em C# usando Spire.Presentation (Processamento em lote)
PowerPoint vs. Vídeo: Por que a conversão é importante
Antes de mergulhar nos métodos, é útil entender a diferença fundamental entre esses dois formatos.
Um arquivo do PowerPoint (.pptx) é um formato de apresentação editável, projetado para criação ao vivo e navegação manual de slides. Já um arquivo de vídeo (.mp4) é um formato de mídia totalmente renderizado, projetado para uma reprodução contínua.
Uma vez convertido em vídeo, sua apresentação torna-se:
- Universalmente compatível: Reproduz em qualquer dispositivo sem a necessidade do Microsoft PowerPoint ou visualizadores compatíveis.
- À prova de alterações: Não editável, protegendo suas fontes, layouts e propriedade intelectual contra alterações acidentais.
- Pronta para streaming: Altamente otimizada para upload direto e distribuição suave em plataformas modernas.
Em suma, o PowerPoint continua sendo sua ferramenta de criação, enquanto o formato de vídeo é o seu melhor veículo para distribuição.
Método 1: Recurso de exportação nativo do Microsoft PowerPoint (Suporte nativo)
Se você já trabalha no Microsoft PowerPoint, o recurso de exportação integrado é a maneira mais rápida e confiável de converter uma apresentação em vídeo sem usar ferramentas de terceiros.
Guia passo a passo:
-
Abra seu arquivo de apresentação do PowerPoint.
-
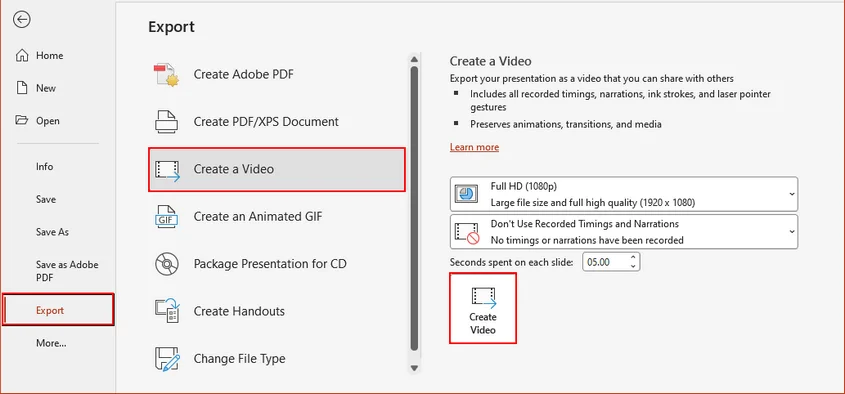
Navegue até o menu superior e clique em Arquivo > Exportar > Criar Vídeo.
-
Escolha a qualidade de vídeo desejada (por exemplo, Ultra HD 4K, Full HD 1080p) e configure os tempos gravados/narrações, se necessário.
-
Clique no botão Criar Vídeo, selecione o destino de saída e salve-o como um arquivo MP4.
Dica:
Se nenhuma narração manual for adicionada, certifique-se de que os tempos dos slides estejam definidos corretamente; caso contrário, o vídeo usará durações fixas padrão.
⚠️ Notas:
Este método preserva animações, transições e mídias incorporadas. No entanto, a exportação é totalmente manual e cada arquivo precisa ser processado individualmente.
Quando usar:
Ideal para converter rapidamente um pequeno número de apresentações com preservação total de recursos usando apenas o PowerPoint.
Método 2: Conversores online de PowerPoint para vídeo (Sem instalação)
Quando você não tem o PowerPoint instalado ou precisa de uma conversão rápida em qualquer dispositivo, os conversores online de PowerPoint para vídeo podem ser uma opção conveniente.
Essas ferramentas rodam no navegador e permitem que você envie uma apresentação e baixe-a como um arquivo de vídeo.
Como converter PowerPoint para vídeo online
-
Envie seu arquivo .ppt ou .pptx para uma plataforma de conversão confiável, como o Canva.

-
Selecione MP4 como o formato de saída desejado.
-
Clique em Converter e aguarde a conclusão do processamento na nuvem.
-
Baixe o arquivo de vídeo gerado.
⚠️ Notas de segurança:
Conversores online são convenientes, mas nem sempre são adequados para apresentações confidenciais ou grandes, já que os arquivos são processados em servidores de terceiros e podem ter limitações de tamanho, recursos ou riscos potenciais à privacidade. Para informações confidenciais, considere usar métodos offline, como o PowerPoint ou C#.
Quando usar:
Adequado para conversões rápidas e ocasionais quando você não tem o PowerPoint instalado e o arquivo não é confidencial.
Método 3: Automação em C# usando Spire.Presentation (Processamento em lote)
Para desenvolvedores e ambientes corporativos que lidam com várias apresentações do PowerPoint, a automação é o método mais escalável. Usando C# e Spire.Presentation for .NET, você pode converter programaticamente arquivos do PowerPoint para o formato de vídeo e integrar perfeitamente a lógica em serviços de backend ou pipelines de processamento em lote.
Este método não requer que o Microsoft Office esteja instalado na máquina host, tornando-o adequado para processamento no lado do servidor.
Configuração do ambiente
-
Instale a biblioteca necessária: Baixe a biblioteca através da página oficial ou instale-a via Console do Gerenciador de Pacotes NuGet:
Install-Package Spire.Presentation -
Instale a dependência FFmpeg: Este recurso depende do FFmpeg para codificação de vídeo. Baixe o pacote FFmpeg e extraia-o para um diretório local.
Script em C# para converter em lote várias apresentações do PowerPoint para MP4
O exemplo de código a seguir verifica um diretório de entrada em busca de arquivos .pptx, configura os parâmetros de renderização e os exporta para vídeos.
using System;
using System.IO;
using Spire.Presentation;

namespace PptToVideoAutomation
{
    class Program
    {
        static void Main(string[] args)
        {
            // Definir caminhos do ambiente
            string ffmpegBinPath = @"D:\tools\ffmpeg\bin"; // O caminho para a pasta bin do pacote FFmpeg
            string inputFolder   = @"C:\PPT\Input\";
            string outputFolder  = @"C:\PPT\Output\";

            // Garantir que o diretório de saída exista
            if (!Directory.Exists(outputFolder))
            {
                Directory.CreateDirectory(outputFolder);
            }

            // Recuperar todos os arquivos do PowerPoint do diretório de entrada
            string[] pptxFiles = Directory.GetFiles(inputFolder, "*.pptx");

            Console.WriteLine($"Encontrados {pptxFiles.Length} arquivos para converter. Iniciando pipeline...\n");

            foreach (string inputFile in pptxFiles)
            {
                try
                {
                    string fileName = Path.GetFileNameWithoutExtension(inputFile);
                    string outputFile = Path.Combine(outputFolder, $"{fileName}.mp4");

                    // Use o bloco 'using' para liberar automaticamente memória e recursos por arquivo
                    using (Presentation presentation = new Presentation())
                    {
                        // Carregar o arquivo do PowerPoint
                        presentation.LoadFromFile(inputFile);

                        // Apontar para a pasta binária do FFmpeg
                        presentation.SaveToVideoOption = new SaveToVideoOption(ffmpegBinPath);

                        // Personalizar configurações de desempenho de vídeo
                        presentation.SaveToVideoOption.Fps = 30;                  // Taxa de quadros / Suavidade (Máx: 60)
                        presentation.SaveToVideoOption.DurationForEachSlide = 4;  // Duração da tela por slide estático (Segundos)

                        // Salvar como MP4 (Ou use FileFormat.WMV para Windows Media Video)
                        presentation.SaveToFile(outputFile, FileFormat.MP4);

                        Console.WriteLine($"[SUCESSO] Convertido: {fileName}.pptx -> {fileName}.mp4");
                    }
                }
                catch (Exception ex)
                {
                    Console.WriteLine($"[ERRO] Falha ao converter {Path.GetFileName(inputFile)}: {ex.Message}");
                }
            }

            Console.WriteLine("\nProcesso de conversão em lote finalizado.");
        }
    }
}
Resultado:
Aqui está um dos vídeos convertidos a partir do PowerPoint, com toda a formatação e animações preservadas:
Quando usar:
Ideal para conversão em lote automatizada em larga escala em fluxos de trabalho de desenvolvedores ou empresas.
Se você precisar reutilizar o conteúdo do PowerPoint em diferentes formatos, leia nosso guia sobre converter apresentações para PDF ou imagens em C#.
Comparação: Qual método de conversão de PowerPoint para vídeo você deve escolher
| Método | Qualidade de saída | Segurança | Automação | Escalabilidade | Ideal para |
|---|---|---|---|---|---|
| Exportação MS PowerPoint | ⭐⭐⭐⭐⭐ | ⭐⭐⭐⭐⭐ | ❌ Não | Baixa | Pequeno número de arquivos, conversão de alta fidelidade |
| Conversores Online | ⭐⭐⭐ | ⭐⭐ | ❌ Não | Baixa | Tarefas rápidas, usuários sem MS Office |
| C# (Spire.Presentation) | ⭐⭐⭐⭐ | ⭐⭐⭐⭐⭐ | ✅ Sim | Muito Alta | Processamento em lote, automação de nível empresarial |
Como escolher o método de conversão correto?
- Se você precisa de qualidade máxima + animações preservadas → Exportação do PowerPoint
- Se você precisa de conversão rápida única → Ferramentas online
- Se você precisa de automação ou processamento em lote → Solução em C#
Problemas comuns na conversão de PPT para vídeo e soluções
- Animações ausentes: Algumas ferramentas web falham ao renderizar animações complexas. Exporte via Microsoft PowerPoint ou uma biblioteca profissional que suporte linhas do tempo de transição de slides.
- Tamanho de vídeo excessivo: Renderização em 4K ou mídia interna grande torna o arquivo enorme. Execute "Compactar Mídia" no PowerPoint antes de exportar ou reduza a resolução de exportação.
- Falhas de conversão: Formatos .ppt obsoletos podem travar analisadores de código modernos. Salve arquivos .ppt no formato moderno .pptx antes de processar.
- Sem áudio/narração: Áudio externo vinculado é descartado durante a exportação. Incorpore os arquivos de áudio diretamente no PPT antes de converter.
Conclusão
Converter PowerPoint para vídeo é importante para a distribuição moderna de conteúdo. Embora ferramentas de desktop e online sejam adequadas para conversões simples, elas carecem de escalabilidade e automação. Para fluxos de trabalho de nível empresarial, os desenvolvedores podem usar C# e bibliotecas como o Spire.Presentation para permitir um processamento em lote eficiente e geração automatizada de vídeos.
Perguntas frequentes (FAQs)
P1: O PowerPoint pode converter PPT para vídeo diretamente?
R1: Sim, o Microsoft PowerPoint possui um recurso integrado de "Exportar para Vídeo" que permite salvar apresentações como arquivos MP4.
P2: Qual é o melhor formato para saída de vídeo do PowerPoint?
R2: MP4 é o formato mais recomendado porque oferece boa compressão e é compatível com quase todos os dispositivos e plataformas.
P3: Posso converter arquivos do PowerPoint para vídeo em lote?
R3: Sim. A conversão em lote pode ser automatizada usando C# com bibliotecas como o Spire.Presentation.
P4: O Spire.Presentation preserva animações?
R4: Sim, ele suporta a maioria dos elementos de slide, incluindo transições e animações comuns durante a conversão.
P5: Preciso do Microsoft Office instalado para a conversão de PowerPoint para vídeo em C#?
R5: Não. O Spire.Presentation funciona independentemente do Microsoft Office e pode ser executado em ambientes de servidor ou nuvem.
Explore mais tutoriais de processamento de PowerPoint
PowerPoint를 동영상(MP4)으로 변환하는 방법: 검증된 3가지 방법
YouTube, LMS 시스템 또는 모바일 장치와 같은 플랫폼에서 PowerPoint 프레젠테이션을 공유할 때, 글꼴 누락이나 애니메이션 깨짐과 같은 호환성 문제가 발생할 수 있습니다. PowerPoint를 MP4 비디오로 변환하면 일관된 재생을 보장하고 배포를 더 쉽게 만들 수 있습니다.
이 가이드에서는 내장 내보내기 도구, 온라인 변환기, 일괄 처리를 위한 C# 자동화를 포함하여 PowerPoint를 비디오로 변환하는 세 가지 실용적인 방법을 설명합니다.
- 방법 1: Microsoft PowerPoint 내장 내보내기 기능 (기본 지원)
- 방법 2: 온라인 PowerPoint-비디오 변환기 (설치 불필요)
- 방법 3: Spire.Presentation을 사용한 C# 자동화 (일괄 처리)
PowerPoint vs. 비디오: 변환이 중요한 이유
방법을 살펴보기 전에 이 두 형식의 근본적인 차이점을 이해하는 것이 도움이 됩니다.
PowerPoint 파일(.pptx)은 실시간 작성 및 수동 슬라이드 탐색을 위해 설계된 편집 가능한 프레젠테이션 형식입니다. 반면, 비디오 파일(.mp4)은 원활한 재생을 위해 설계된 완전히 렌더링된 미디어 형식입니다.
비디오로 변환하면 프레젠테이션은 다음과 같은 이점을 갖게 됩니다:
- 범용 호환성: Microsoft PowerPoint나 호환 뷰어 없이도 모든 장치에서 재생됩니다.
- 변조 방지: 편집이 불가능하여 글꼴, 레이아웃 및 지적 재산권을 실수로 인한 변경으로부터 보호합니다.
- 스트리밍 준비 완료: 현대적인 플랫폼에서 직접 업로드하고 원활하게 배포할 수 있도록 최적화되어 있습니다.
요약하자면, PowerPoint는 여전히 제작 도구로 남고, 비디오 형식은 배포를 위한 최상의 수단이 됩니다.
방법 1: Microsoft PowerPoint 내장 내보내기 기능 (기본 지원)
이미 Microsoft PowerPoint를 사용 중이라면, 내장 내보내기 기능이 타사 도구 없이 프레젠테이션을 비디오로 변환하는 가장 빠르고 안정적인 방법입니다.
단계별 가이드:
-
PowerPoint 프레젠테이션 파일을 엽니다.
-
상단 메뉴로 이동하여 파일 > 내보내기 > 비디오 만들기를 클릭합니다.
-
원하는 비디오 품질(예: Ultra HD 4K, Full HD 1080p)을 선택하고 필요한 경우 기록된 타이밍/내레이션을 구성합니다.
-
비디오 만들기 버튼을 클릭하고 출력 대상을 선택한 다음 MP4 파일로 저장합니다.
팁:
수동 내레이션이 추가되지 않은 경우 슬라이드 타이밍이 올바르게 설정되었는지 확인하십시오. 그렇지 않으면 비디오는 기본 고정 시간으로 설정됩니다.
⚠️ 참고:
이 방법은 애니메이션, 전환 및 포함된 미디어를 유지합니다. 그러나 내보내기 과정이 완전히 수동이며, 각 파일을 개별적으로 처리해야 합니다.
사용 시기:
PowerPoint만 사용하여 기능을 완전히 유지하면서 소수의 프레젠테이션을 빠르게 변환할 때 가장 좋습니다.
방법 2: 온라인 PowerPoint-비디오 변환기 (설치 불필요)
PowerPoint가 설치되어 있지 않거나 모든 장치에서 빠른 변환이 필요한 경우, 온라인 PowerPoint-비디오 변환기가 편리한 옵션이 될 수 있습니다.
이 도구들은 브라우저에서 실행되며 프레젠테이션을 업로드하고 비디오 파일로 다운로드할 수 있게 해줍니다.
온라인에서 PowerPoint를 비디오로 변환하는 방법
-
.ppt 또는 .pptx 파일을 Canva와 같은 신뢰할 수 있는 변환 플랫폼에 업로드합니다.
-
대상 출력 형식으로 MP4를 선택합니다.
-
변환을 클릭하고 클라우드 처리가 완료될 때까지 기다립니다.
-
생성된 비디오 파일을 다운로드합니다.
⚠️ 보안 참고 사항:
온라인 변환기는 편리하지만, 파일이 타사 서버에서 처리되고 크기나 기능 제한 및 잠재적인 개인 정보 보호 위험이 있을 수 있으므로 민감하거나 큰 프레젠테이션에는 항상 적합하지는 않습니다. 기밀 정보의 경우 PowerPoint나 C#과 같은 오프라인 방법을 고려하십시오.
사용 시기:
PowerPoint가 설치되어 있지 않고 파일이 민감하지 않은 경우, 가끔씩 빠르게 변환할 때 적합합니다.
방법 3: Spire.Presentation을 사용한 C# 자동화 (일괄 처리)
여러 PowerPoint 프레젠테이션을 처리하는 개발자 및 기업 환경에서는 자동화가 가장 확장 가능한 방법입니다. C#과 Spire.Presentation for .NET을 사용하면 PowerPoint 파일을 비디오 형식으로 프로그래밍 방식으로 변환하고 백엔드 서비스나 일괄 처리 파이프라인에 논리를 원활하게 통합할 수 있습니다.
이 방법은 호스트 컴퓨터에 Microsoft Office가 설치되어 있을 필요가 없으므로 서버 측 처리에 적합합니다.
환경 설정
-
필수 라이브러리 설치: 공식 페이지를 통해 라이브러리를 다운로드하거나 NuGet 패키지 관리자 콘솔을 통해 설치합니다:
Install-Package Spire.Presentation -
FFmpeg 종속성 설치: 이 기능은 비디오 인코딩을 위해 FFmpeg에 의존합니다. FFmpeg 패키지를 다운로드하여 로컬 디렉토리에 압축을 풉니다.
여러 PowerPoint 프레젠테이션을 MP4로 일괄 변환하는 C# 스크립트
다음 코드 예제는 입력 디렉토리에서 .pptx 파일을 검색하고, 렌더링 매개변수를 구성하며, 비디오로 내보냅니다.
using System;
using System.IO;
using Spire.Presentation;

namespace PptToVideoAutomation
{
    class Program
    {
        static void Main(string[] args)
        {
            // 환경 경로 정의
            string ffmpegBinPath = @"D:\tools\ffmpeg\bin"; // FFmpeg 패키지의 bin 폴더 경로
            string inputFolder   = @"C:\PPT\Input\";
            string outputFolder  = @"C:\PPT\Output\";

            // 출력 디렉토리가 존재하는지 확인
            if (!Directory.Exists(outputFolder))
            {
                Directory.CreateDirectory(outputFolder);
            }

            // 입력 디렉토리에서 모든 PowerPoint 파일 검색
            string[] pptxFiles = Directory.GetFiles(inputFolder, "*.pptx");

            Console.WriteLine($"변환할 {pptxFiles.Length}개의 파일을 찾았습니다. 파이프라인을 시작합니다...\n");

            foreach (string inputFile in pptxFiles)
            {
                try
                {
                    string fileName = Path.GetFileNameWithoutExtension(inputFile);
                    string outputFile = Path.Combine(outputFolder, $"{fileName}.mp4");

                    // 'using' 블록을 사용하여 파일별로 메모리와 리소스를 자동으로 해제
                    using (Presentation presentation = new Presentation())
                    {
                        // PowerPoint 파일 로드
                        presentation.LoadFromFile(inputFile);

                        // FFmpeg 바이너리 폴더 지정
                        presentation.SaveToVideoOption = new SaveToVideoOption(ffmpegBinPath);

                        // 비디오 성능 설정 사용자 지정
                        presentation.SaveToVideoOption.Fps = 30;                  // 프레임 속도 / 부드러움 (최대: 60)
                        presentation.SaveToVideoOption.DurationForEachSlide = 4;  // 정적 슬라이드당 화면 지속 시간 (초)

                        // MP4로 저장 (또는 Windows Media Video의 경우 FileFormat.WMV 사용)
                        presentation.SaveToFile(outputFile, FileFormat.MP4);

                        Console.WriteLine($"[성공] 변환됨: {fileName}.pptx -> {fileName}.mp4");
                    }
                }
                catch (Exception ex)
                {
                    Console.WriteLine($"[오류] {Path.GetFileName(inputFile)} 변환 실패: {ex.Message}");
                }
            }

            Console.WriteLine("\n일괄 변환 프로세스가 완료되었습니다.");
        }
    }
}
결과:
모든 서식과 애니메이션이 유지된 상태로 PowerPoint에서 변환된 비디오 중 하나입니다:
사용 시기:
개발자 또는 기업 워크플로우에서 대규모 자동 일괄 변환에 가장 적합합니다.
PowerPoint 콘텐츠를 다른 형식으로 재사용해야 하는 경우, C#에서 프레젠테이션을 PDF로 변환하거나 이미지로 변환하는 가이드를 읽어보십시오.
비교: 어떤 PowerPoint-비디오 변환 방법을 선택해야 할까요?
| 방법 | 출력 품질 | 보안 | 자동화 | 확장성 | 최적 대상 |
|---|---|---|---|---|---|
| MS PowerPoint 내보내기 | ⭐⭐⭐⭐⭐ | ⭐⭐⭐⭐⭐ | ❌ 아니오 | 낮음 | 소수의 파일, 고충실도 변환 |
| 온라인 변환기 | ⭐⭐⭐ | ⭐⭐ | ❌ 아니오 | 낮음 | 빠른 작업, MS Office가 없는 사용자 |
| C# (Spire.Presentation) | ⭐⭐⭐⭐ | ⭐⭐⭐⭐⭐ | ✅ 예 | 매우 높음 | 일괄 처리, 기업 수준 자동화 |
올바른 변환 방법을 선택하는 방법은 무엇인가요?
- 최고 품질 + 애니메이션 유지가 필요하다면 → PowerPoint 내보내기
- 빠른 일회성 변환이 필요하다면 → 온라인 도구
- 자동화 또는 일괄 처리가 필요하다면 → C# 솔루션
일반적인 PPT-비디오 변환 문제 및 해결 방법
- 애니메이션 누락: 일부 웹 도구는 복잡한 애니메이션을 렌더링하지 못합니다. Microsoft PowerPoint를 통해 내보내거나 슬라이드 전환 타임라인을 지원하는 전문 라이브러리를 사용하십시오.
- 비디오 크기 비대화: 4K 렌더링이나 큰 내부 미디어는 파일 크기를 엄청나게 만듭니다. 내보내기 전에 PowerPoint에서 '미디어 압축'을 실행하거나 내보내기 해상도를 낮추십시오.
- 변환 실패: 오래된 .ppt 형식은 최신 코드 파서에서 충돌을 일으킬 수 있습니다. 처리하기 전에 .ppt 파일을 최신 .pptx 형식으로 저장하십시오.
- 오디오/내레이션 없음: 연결된 외부 오디오는 내보내는 동안 삭제됩니다. 변환하기 전에 오디오 파일을 PPT 내부에 직접 포함하십시오.
결론
PowerPoint를 비디오로 변환하는 것은 현대적인 콘텐츠 배포에 중요합니다. 데스크톱 및 온라인 도구는 간단한 변환에는 적합하지만 확장성과 자동화가 부족합니다. 기업 수준의 워크플로우를 위해 개발자는 C#과 Spire.Presentation과 같은 라이브러리를 사용하여 효율적인 일괄 처리와 자동화된 비디오 생성을 구현할 수 있습니다.
자주 묻는 질문 (FAQs)
Q1: PowerPoint에서 PPT를 비디오로 직접 변환할 수 있나요?
A1: 네, Microsoft PowerPoint에는 프레젠테이션을 MP4 파일로 저장할 수 있는 내장 "비디오로 내보내기" 기능이 있습니다.
Q2: PowerPoint 비디오 출력에 가장 좋은 형식은 무엇인가요?
A2: MP4는 압축률이 좋고 거의 모든 장치 및 플랫폼과 호환되므로 가장 권장되는 형식입니다.
Q3: PowerPoint 파일을 비디오로 일괄 변환할 수 있나요?
A3: 네. Spire.Presentation과 같은 라이브러리를 사용하여 C#으로 일괄 변환을 자동화할 수 있습니다.
Q4: Spire.Presentation은 애니메이션을 유지하나요?
A4: 네, 변환 중에 전환 및 일반적인 애니메이션을 포함한 대부분의 슬라이드 요소를 지원합니다.
Q5: C# PowerPoint-비디오 변환을 위해 Microsoft Office가 설치되어 있어야 하나요?
A5: 아니오. Spire.Presentation은 Microsoft Office와 독립적으로 작동하며 서버나 클라우드 환경에서 실행될 수 있습니다.
더 많은 PowerPoint 처리 튜토리얼 살펴보기
Come convertire PowerPoint in video (MP4): 3 metodi comprovati
Indice
Quando si condividono presentazioni PowerPoint su piattaforme come YouTube, sistemi LMS o dispositivi mobili, possono verificarsi problemi di compatibilità come caratteri mancanti o animazioni interrotte. Convertire PowerPoint in video MP4 garantisce una riproduzione coerente e una distribuzione più semplice.
Questa guida illustra tre metodi pratici per convertire PowerPoint in video, inclusi strumenti di esportazione integrati, convertitori online e automazione C# per l'elaborazione batch.
- Metodo 1: Funzionalità di esportazione integrata di Microsoft PowerPoint (Supporto nativo)
- Metodo 2: Convertitori online da PowerPoint a video (Nessuna installazione)
- Metodo 3: Automazione C# tramite Spire.Presentation (Elaborazione batch)
PowerPoint vs. Video: Perché la conversione è importante
Prima di addentrarsi nei metodi, è utile comprendere la differenza fondamentale tra questi due formati.
Un file PowerPoint (.pptx) è un formato di presentazione modificabile, progettato per la creazione dal vivo e la navigazione manuale delle diapositive. Un file video (.mp4), d'altra parte, è un formato multimediale completamente renderizzato, progettato per una riproduzione fluida.
Una volta convertita in video, la tua presentazione diventa:
- Universalmente compatibile: Riproducibile su qualsiasi dispositivo senza richiedere Microsoft PowerPoint o visualizzatori compatibili.
- A prova di manomissione: Non modificabile, proteggendo caratteri, layout e proprietà intellettuale da modifiche accidentali.
- Pronta per lo streaming: Altamente ottimizzata per il caricamento diretto e una distribuzione fluida sulle piattaforme moderne.
In breve, PowerPoint rimane il tuo strumento di creazione, mentre il formato video è il tuo miglior veicolo per la distribuzione.
Metodo 1: Funzionalità di esportazione integrata di Microsoft PowerPoint (Supporto nativo)
Se stai già lavorando in Microsoft PowerPoint, la funzionalità di esportazione integrata è il modo più rapido e affidabile per convertire una presentazione in un video senza utilizzare strumenti di terze parti.
Guida passo dopo passo:
-
Apri il tuo file di presentazione PowerPoint.
-
Vai al menu in alto e clicca su File > Esporta > Crea video.
-
Scegli la qualità video desiderata (es. Ultra HD 4K, Full HD 1080p) e configura le tempistiche registrate/narrazioni se necessario.
-
Clicca sul pulsante Crea video, seleziona la destinazione di output e salvalo come file MP4.
Suggerimento:
Se non viene aggiunta alcuna narrazione manuale, assicurati che le tempistiche delle diapositive siano impostate correttamente; in caso contrario, il video utilizzerà durate predefinite.
⚠️ Note:
Questo metodo preserva animazioni, transizioni e contenuti multimediali incorporati. Tuttavia, l'esportazione è completamente manuale e ogni file deve essere elaborato singolarmente.
Quando usarlo:
Ideale per convertire rapidamente un numero limitato di presentazioni preservando tutte le funzionalità utilizzando solo PowerPoint.
Metodo 2: Convertitori online da PowerPoint a video (Nessuna installazione)
Quando non hai PowerPoint installato o hai bisogno di una conversione rapida su qualsiasi dispositivo, i convertitori online da PowerPoint a video possono essere un'opzione conveniente.
Questi strumenti funzionano nel browser e ti consentono di caricare una presentazione e scaricarla come file video.
Come convertire PowerPoint in video online
-
Carica il tuo file .ppt o .pptx su una piattaforma di conversione affidabile come Canva.
-
Seleziona MP4 come formato di output desiderato.
-
Clicca su Converti e attendi il completamento dell'elaborazione nel cloud.
-
Scarica il file video generato.
⚠️ Note sulla sicurezza:
I convertitori online sono convenienti, ma non sempre adatti a presentazioni sensibili o di grandi dimensioni, poiché i file vengono elaborati su server di terze parti e potrebbero avere limitazioni di dimensione o funzionalità, oltre a potenziali rischi per la privacy. Per informazioni riservate, considera l'utilizzo di metodi offline come PowerPoint o C#.
Quando usarlo:
Adatto per conversioni rapide e occasionali quando non hai PowerPoint installato e il file non contiene dati sensibili.
Metodo 3: Automazione C# tramite Spire.Presentation (Elaborazione batch)
Per gli sviluppatori e gli ambienti aziendali che gestiscono molteplici presentazioni PowerPoint, l'automazione è il metodo più scalabile. Utilizzando C# e Spire.Presentation for .NET, puoi convertire programmaticamente file PowerPoint in formato video e integrare perfettamente la logica in servizi backend o pipeline batch.
Questo metodo non richiede che Microsoft Office sia installato sulla macchina host, rendendolo adatto all'elaborazione lato server.
Configurazione dell'ambiente
-
Installa la libreria richiesta: Scarica la libreria tramite la pagina ufficiale o installala tramite la console di Gestione pacchetti NuGet:
Install-Package Spire.Presentation -
Installa la dipendenza FFmpeg: Questa funzionalità si basa su FFmpeg per la codifica video. Scarica il pacchetto FFmpeg ed estrailo in una directory locale.
Script C# per convertire in batch più presentazioni PowerPoint in MP4
Il seguente esempio di codice scansiona una directory di input alla ricerca di file .pptx, configura i parametri di rendering ed esporta i video.
using System;
using System.IO;
using Spire.Presentation;

namespace PptToVideoAutomation
{
    class Program
    {
        static void Main(string[] args)
        {
            // Definisci i percorsi dell'ambiente
            string ffmpegBinPath = @"D:\tools\ffmpeg\bin"; // Il percorso alla cartella bin del pacchetto FFmpeg
            string inputFolder   = @"C:\PPT\Input\";
            string outputFolder  = @"C:\PPT\Output\";

            // Assicurati che la directory di output esista
            if (!Directory.Exists(outputFolder))
            {
                Directory.CreateDirectory(outputFolder);
            }

            // Recupera tutti i file PowerPoint dalla directory di input
            string[] pptxFiles = Directory.GetFiles(inputFolder, "*.pptx");

            Console.WriteLine($"Trovati {pptxFiles.Length} file da convertire. Avvio della pipeline...\n");

            foreach (string inputFile in pptxFiles)
            {
                try
                {
                    string fileName = Path.GetFileNameWithoutExtension(inputFile);
                    string outputFile = Path.Combine(outputFolder, $"{fileName}.mp4");

                    // Usa il blocco 'using' per rilasciare automaticamente memoria e risorse per ogni file
                    using (Presentation presentation = new Presentation())
                    {
                        // Carica il file PowerPoint
                        presentation.LoadFromFile(inputFile);

                        // Punta alla cartella dei binari FFmpeg
                        presentation.SaveToVideoOption = new SaveToVideoOption(ffmpegBinPath);

                        // Personalizza le impostazioni delle prestazioni video
                        presentation.SaveToVideoOption.Fps = 30;                  // Frame rate / Fluidità (Max: 60)
                        presentation.SaveToVideoOption.DurationForEachSlide = 4;  // Durata schermo per diapositiva statica (Secondi)

                        // Salva in MP4 (O usa FileFormat.WMV per Windows Media Video)
                        presentation.SaveToFile(outputFile, FileFormat.MP4);

                        Console.WriteLine($"[SUCCESSO] Convertito: {fileName}.pptx -> {fileName}.mp4");
                    }
                }
                catch (Exception ex)
                {
                    Console.WriteLine($"[ERRORE] Impossibile convertire {Path.GetFileName(inputFile)}: {ex.Message}");
                }
            }

            Console.WriteLine("\nProcesso di conversione batch terminato.");
        }
    }
}
Risultato:
Ecco uno dei video convertiti da PowerPoint, con tutta la formattazione e le animazioni preservate:
Quando usarlo:
Ideale per conversioni batch automatizzate su larga scala in flussi di lavoro di sviluppo o aziendali.
Se hai bisogno di riutilizzare contenuti PowerPoint in formati diversi, leggi la nostra guida sulla conversione di presentazioni in PDF o immagini in C#.
Confronto: Quale metodo di conversione da PowerPoint a video scegliere
| Metodo | Qualità output | Sicurezza | Automazione | Scalabilità | Ideale per |
|---|---|---|---|---|---|
| Esportazione MS PowerPoint | ⭐⭐⭐⭐⭐ | ⭐⭐⭐⭐⭐ | ❌ No | Bassa | Piccolo numero di file, conversione ad alta fedeltà |
| Convertitori online | ⭐⭐⭐ | ⭐⭐ | ❌ No | Bassa | Attività rapide, utenti senza MS Office |
| C# (Spire.Presentation) | ⭐⭐⭐⭐ | ⭐⭐⭐⭐⭐ | ✅ Sì | Molto alta | Elaborazione batch, automazione a livello aziendale |
Come scegliere il metodo di conversione corretto?
- Se hai bisogno di massima qualità + animazioni preservate → Esportazione PowerPoint
- Se hai bisogno di conversione rapida una tantum → Strumenti online
- Se hai bisogno di automazione o elaborazione batch → Soluzione C#
Problemi comuni nella conversione da PPT a video e soluzioni
- Animazioni mancanti: Alcuni strumenti web non riescono a renderizzare animazioni complesse. Esporta tramite Microsoft PowerPoint o una libreria professionale che supporti le timeline delle transizioni delle diapositive.
- Dimensioni video eccessive: Il rendering in 4K o contenuti multimediali interni pesanti rendono il file enorme. Esegui "Comprimi file multimediali" in PowerPoint prima di esportare, o riduci la risoluzione di esportazione.
- Errori di conversione: I formati .ppt obsoleti possono bloccare i moderni parser di codice. Salva i file .ppt nel formato moderno .pptx prima di procedere.
- Nessun audio/narrazione: L'audio esterno collegato viene rimosso durante l'esportazione. Incorpora i file audio direttamente all'interno del PPT prima di convertire.
Conclusione
Convertire PowerPoint in video è importante per la distribuzione moderna dei contenuti. Sebbene gli strumenti desktop e online siano adatti a conversioni semplici, mancano di scalabilità e automazione. Per flussi di lavoro a livello aziendale, gli sviluppatori possono utilizzare C# e librerie come Spire.Presentation per abilitare un'elaborazione batch efficiente e la generazione automatizzata di video.
Domande frequenti (FAQ)
D1: PowerPoint può convertire direttamente PPT in video?
R1: Sì, Microsoft PowerPoint ha una funzionalità integrata "Esporta in video" che ti consente di salvare le presentazioni come file MP4.
D2: Qual è il formato migliore per l'output video di PowerPoint?
R2: MP4 è il formato più consigliato perché offre una buona compressione ed è compatibile con quasi tutti i dispositivi e le piattaforme.
D3: Posso convertire in batch file PowerPoint in video?
R3: Sì. La conversione batch può essere automatizzata utilizzando C# con librerie come Spire.Presentation.
D4: Spire.Presentation preserva le animazioni?
R4: Sì, supporta la maggior parte degli elementi delle diapositive, incluse transizioni e animazioni comuni durante la conversione.
D5: Ho bisogno di Microsoft Office installato per la conversione da PowerPoint a video in C#?
R5: No. Spire.Presentation funziona indipendentemente da Microsoft Office e può essere eseguito in ambienti server o cloud.
Esplora altri tutorial sull'elaborazione di PowerPoint
Comment convertir PowerPoint en vidéo (MP4) : 3 méthodes éprouvées
Table des matières
Lors du partage de présentations PowerPoint sur des plateformes telles que YouTube, des systèmes LMS ou des appareils mobiles, des problèmes de compatibilité comme des polices manquantes ou des animations corrompues peuvent survenir. Convertir PowerPoint en vidéo MP4 garantit une lecture cohérente et une distribution plus facile.
Ce guide explique trois méthodes pratiques pour convertir PowerPoint en vidéo, incluant les outils d'exportation intégrés, les convertisseurs en ligne et l'automatisation C# pour le traitement par lots.
- Méthode 1 : Fonction d'exportation intégrée de Microsoft PowerPoint (support natif)
- Méthode 2 : Convertisseurs PowerPoint en vidéo en ligne (sans installation)
- Méthode 3 : Automatisation C# avec Spire.Presentation (traitement par lots)
PowerPoint vs Vidéo : Pourquoi la conversion est importante
Avant d'aborder les méthodes, il est utile de comprendre la différence fondamentale entre ces deux formats.
Un fichier PowerPoint (.pptx) est un format de présentation modifiable, conçu pour la création en direct et la navigation manuelle dans les diapositives. Un fichier vidéo (.mp4), en revanche, est un format média entièrement rendu, conçu pour une lecture fluide.
Une fois convertie en vidéo, votre présentation devient :
- Universellement compatible : Lisible sur n'importe quel appareil sans nécessiter Microsoft PowerPoint ou des visionneuses compatibles.
- Inaltérable : Non modifiable, protégeant vos polices, mises en page et propriété intellectuelle contre les modifications accidentelles.
- Prête pour le streaming : Hautement optimisée pour une mise en ligne directe et une distribution fluide sur les plateformes modernes.
En résumé, PowerPoint reste votre outil de création, tandis que le format vidéo est votre meilleur vecteur de distribution.
Méthode 1 : Fonction d'exportation intégrée de Microsoft PowerPoint (support natif)
Si vous travaillez déjà dans Microsoft PowerPoint, la fonction d'exportation intégrée est le moyen le plus rapide et le plus fiable de convertir une présentation en vidéo sans utiliser d'outils tiers.
Guide étape par étape :
-
Ouvrez votre fichier de présentation PowerPoint.
-
Accédez au menu supérieur et cliquez sur Fichier > Exporter > Créer une vidéo.
-
Choisissez la qualité vidéo souhaitée (par ex. Ultra HD 4K, Full HD 1080p) et configurez les minutages enregistrés ou les narrations si nécessaire.
-
Cliquez sur le bouton Créer une vidéo, sélectionnez votre destination de sortie et enregistrez-la en tant que fichier MP4.
Conseil :
Si aucune narration manuelle n'est ajoutée, assurez-vous que les minutages des diapositives sont correctement définis ; sinon, la vidéo utilisera des durées fixes par défaut.
⚠️ Remarques :
Cette méthode préserve les animations, les transitions et les médias intégrés. Cependant, l'exportation est entièrement manuelle et chaque fichier doit être traité individuellement.
Quand l'utiliser :
Idéal pour convertir rapidement un petit nombre de présentations en préservant toutes les fonctionnalités en utilisant uniquement PowerPoint.
Méthode 2 : Convertisseurs PowerPoint en vidéo en ligne (sans installation)
Lorsque vous n'avez pas PowerPoint installé ou que vous avez besoin d'une conversion rapide sur n'importe quel appareil, les convertisseurs PowerPoint en vidéo en ligne peuvent être une option pratique.
Ces outils fonctionnent dans le navigateur et vous permettent de télécharger une présentation et de la récupérer sous forme de fichier vidéo.
Comment convertir PowerPoint en vidéo en ligne
-
Téléchargez votre fichier .ppt ou .pptx sur une plateforme de conversion fiable telle que Canva.
-
Sélectionnez MP4 comme format de sortie cible.
-
Cliquez sur Convertir et attendez que le traitement dans le cloud se termine.
-
Téléchargez le fichier vidéo généré.
⚠️ Remarques sur la sécurité :
Les convertisseurs en ligne sont pratiques, mais ils ne sont pas toujours adaptés aux présentations sensibles ou volumineuses, car les fichiers sont traités sur des serveurs tiers et peuvent présenter des limitations de taille ou de fonctionnalités, ainsi que des risques potentiels pour la confidentialité. Pour les informations confidentielles, envisagez d'utiliser des méthodes hors ligne comme PowerPoint ou C#.
Quand l'utiliser :
Adapté aux conversions rapides et occasionnelles lorsque vous n'avez pas PowerPoint installé et que le fichier n'est pas sensible.
Méthode 3 : Automatisation C# avec Spire.Presentation (traitement par lots)
Pour les développeurs et les environnements d'entreprise gérant plusieurs présentations PowerPoint, l'automatisation est la méthode la plus évolutive. En utilisant C# et Spire.Presentation for .NET, vous pouvez convertir par programmation des fichiers PowerPoint en format vidéo et intégrer facilement la logique dans des services backend ou des pipelines de traitement par lots.
Cette méthode ne nécessite pas que Microsoft Office soit installé sur la machine hôte, ce qui la rend adaptée au traitement côté serveur.
Configuration de l'environnement
-
Installer la bibliothèque requise : Téléchargez la bibliothèque via la page officielle ou installez-la via la console du gestionnaire de paquets NuGet :
Install-Package Spire.Presentation -
Installer la dépendance FFmpeg : Cette fonctionnalité repose sur FFmpeg pour l'encodage vidéo. Téléchargez le paquet FFmpeg et extrayez-le dans un répertoire local.
Script C# pour convertir par lots plusieurs présentations PowerPoint en MP4
L'exemple de code suivant scanne un répertoire d'entrée pour les fichiers .pptx, configure les paramètres de rendu et les exporte en vidéos.
using System;
using System.IO;
using Spire.Presentation;

namespace PptToVideoAutomation
{
    class Program
    {
        static void Main(string[] args)
        {
            // Définir les chemins d'environnement
            string ffmpegBinPath = @"D:\tools\ffmpeg\bin"; // Le chemin vers le dossier bin du paquet FFmpeg
            string inputFolder   = @"C:\PPT\Input\";
            string outputFolder  = @"C:\PPT\Output\";

            // S'assurer que le répertoire de sortie existe
            if (!Directory.Exists(outputFolder))
            {
                Directory.CreateDirectory(outputFolder);
            }

            // Récupérer tous les fichiers PowerPoint du répertoire d'entrée
            string[] pptxFiles = Directory.GetFiles(inputFolder, "*.pptx");

            Console.WriteLine($"{pptxFiles.Length} fichiers trouvés à convertir. Démarrage du pipeline...\n");

            foreach (string inputFile in pptxFiles)
            {
                try
                {
                    string fileName = Path.GetFileNameWithoutExtension(inputFile);
                    string outputFile = Path.Combine(outputFolder, $"{fileName}.mp4");

                    // Utiliser le bloc 'using' pour libérer automatiquement la mémoire et les ressources par fichier
                    using (Presentation presentation = new Presentation())
                    {
                        // Charger le fichier PowerPoint
                        presentation.LoadFromFile(inputFile);

                        // Pointer vers le dossier binaire FFmpeg
                        presentation.SaveToVideoOption = new SaveToVideoOption(ffmpegBinPath);

                        // Personnaliser les paramètres de performance vidéo
                        presentation.SaveToVideoOption.Fps = 30;                  // Fréquence d'images / Fluidité (Max : 60)
                        presentation.SaveToVideoOption.DurationForEachSlide = 4;  // Durée d'affichage par diapositive statique (secondes)

                        // Enregistrer en MP4 (ou utiliser FileFormat.WMV pour Windows Media Video)
                        presentation.SaveToFile(outputFile, FileFormat.MP4);

                        Console.WriteLine($"[SUCCÈS] Converti : {fileName}.pptx -> {fileName}.mp4");
                    }
                }
                catch (Exception ex)
                {
                    Console.WriteLine($"[ERREUR] Échec de la conversion de {Path.GetFileName(inputFile)} : {ex.Message}");
                }
            }

            Console.WriteLine("\nProcessus de conversion par lots terminé.");
        }
    }
}
Résultat :
Voici l'une des vidéos converties à partir de PowerPoint, avec tout le formatage et les animations préservés :
Quand l'utiliser :
Idéal pour la conversion par lots automatisée à grande échelle dans les flux de travail de développement ou d'entreprise.
Si vous avez besoin de réutiliser du contenu PowerPoint dans différents formats, lisez notre guide sur la conversion de présentations en PDF ou en images en C#.
Comparaison : Quelle méthode de conversion PowerPoint en vidéo choisir ?
| Méthode | Qualité de sortie | Sécurité | Automatisation | Évolutivité | Idéal pour |
|---|---|---|---|---|---|
| Exportation MS PowerPoint | ⭐⭐⭐⭐⭐ | ⭐⭐⭐⭐⭐ | ❌ Non | Faible | Petit nombre de fichiers, conversion haute fidélité |
| Convertisseurs en ligne | ⭐⭐⭐ | ⭐⭐ | ❌ Non | Faible | Tâches rapides, utilisateurs sans MS Office |
| C# (Spire.Presentation) | ⭐⭐⭐⭐ | ⭐⭐⭐⭐⭐ | ✅ Oui | Très élevée | Traitement par lots, automatisation au niveau de l'entreprise |
Comment choisir la bonne méthode de conversion ?
- Si vous avez besoin d'une qualité maximale + animations préservées → Exportation PowerPoint
- Si vous avez besoin d'une conversion rapide et ponctuelle → Outils en ligne
- Si vous avez besoin d'automatisation ou de traitement par lots → Solution C#
Problèmes courants de conversion PPT en vidéo et solutions
- Animations manquantes : Certains outils web échouent à rendre les animations complexes. Exportez via Microsoft PowerPoint ou une bibliothèque professionnelle prenant en charge les chronologies de transition des diapositives.
- Taille de vidéo excessive : Le rendu 4K ou les médias internes volumineux rendent le fichier massif. Exécutez "Compresser les médias" dans PowerPoint avant l'exportation, ou réduisez la résolution d'exportation.
- Échecs de conversion : Les formats .ppt obsolètes peuvent faire planter les analyseurs de code modernes. Enregistrez les fichiers .ppt au format moderne .pptx avant le traitement.
- Pas d'audio/narration : L'audio externe lié est supprimé lors de l'exportation. Intégrez les fichiers audio directement dans le PPT avant la conversion.
Conclusion
La conversion de PowerPoint en vidéo est importante pour la distribution de contenu moderne. Bien que les outils de bureau et en ligne soient adaptés aux conversions simples, ils manquent d'évolutivité et d'automatisation. Pour les flux de travail au niveau de l'entreprise, les développeurs peuvent utiliser C# et des bibliothèques telles que Spire.Presentation pour permettre un traitement par lots efficace et une génération vidéo automatisée.
FAQ
Q1 : PowerPoint peut-il convertir directement un PPT en vidéo ?
A1 : Oui, Microsoft PowerPoint dispose d'une fonction intégrée "Exporter en vidéo" qui vous permet d'enregistrer des présentations sous forme de fichiers MP4.
Q2 : Quel est le meilleur format pour la sortie vidéo PowerPoint ?
A2 : Le MP4 est le format le plus recommandé car il offre une bonne compression et est compatible avec presque tous les appareils et plateformes.
Q3 : Puis-je convertir des fichiers PowerPoint en vidéo par lots ?
A3 : Oui. La conversion par lots peut être automatisée en utilisant C# avec des bibliothèques comme Spire.Presentation.
Q4 : Spire.Presentation préserve-t-il les animations ?
A4 : Oui, il prend en charge la plupart des éléments de diapositive, y compris les transitions et les animations courantes lors de la conversion.
Q5 : Ai-je besoin de Microsoft Office installé pour la conversion C# de PowerPoint en vidéo ?
A5 : Non. Spire.Presentation fonctionne indépendamment de Microsoft Office et peut s'exécuter dans des environnements serveur ou cloud.
Explorer plus de tutoriels sur le traitement PowerPoint
Cómo convertir PowerPoint a video (MP4): 3 métodos probados
Tabla de contenidos
Al compartir presentaciones de PowerPoint en plataformas como YouTube, sistemas LMS o dispositivos móviles, pueden surgir problemas de compatibilidad, como fuentes faltantes o animaciones dañadas. Convertir PowerPoint a video MP4 garantiza una reproducción consistente y una distribución más sencilla.
Esta guía explica tres métodos prácticos para convertir PowerPoint a video, incluyendo herramientas de exportación integradas, convertidores en línea y automatización en C# para procesamiento por lotes.
- Método 1: Función de exportación integrada de Microsoft PowerPoint (soporte nativo)
- Método 2: Convertidores de PowerPoint a video en línea (sin instalación)
- Método 3: Automatización en C# usando Spire.Presentation (procesamiento por lotes)
PowerPoint vs. Video: Por qué es importante la conversión
Antes de profundizar en los métodos, es útil comprender la diferencia fundamental entre estos dos formatos.
Un archivo de PowerPoint (.pptx) es un formato de presentación editable, diseñado para la creación en vivo y la navegación manual de diapositivas. Por otro lado, un archivo de video (.mp4) es un formato multimedia completamente renderizado, diseñado para una reproducción fluida.
Una vez convertido a video, su presentación se vuelve:
- Universalmente compatible: Se reproduce en cualquier dispositivo sin necesidad de Microsoft PowerPoint o visores compatibles.
- A prueba de manipulaciones: No es editable, lo que protege sus fuentes, diseños y propiedad intelectual de cambios accidentales.
- Lista para streaming: Altamente optimizada para carga directa y distribución fluida en plataformas modernas.
En resumen, PowerPoint sigue siendo su herramienta de creación, mientras que el formato de video es su mejor vehículo para la distribución.
Método 1: Función de exportación integrada de Microsoft PowerPoint (soporte nativo)
Si ya está trabajando en Microsoft PowerPoint, la función de exportación integrada es la forma más rápida y confiable de convertir una presentación en un video sin utilizar herramientas de terceros.
Guía paso a paso:
-
Abra su archivo de presentación de PowerPoint.
-
Vaya al menú superior y haga clic en Archivo > Exportar > Crear un video.
-
Elija la calidad de video deseada (por ejemplo, Ultra HD 4K, Full HD 1080p) y configure los tiempos o narraciones grabadas si es necesario.
-
Haga clic en el botón Crear video, seleccione el destino de salida y guárdelo como un archivo MP4.
Consejo:
Si no se ha añadido una narración manual, asegúrese de que los tiempos de las diapositivas estén configurados correctamente; de lo contrario, el video utilizará duraciones fijas predeterminadas.
⚠️ Notas:
Este método conserva animaciones, transiciones y contenido multimedia incrustado. Sin embargo, la exportación es totalmente manual y cada archivo debe procesarse individualmente.
Cuándo usar:
Es ideal para convertir rápidamente un número pequeño de presentaciones conservando todas las funciones usando solo PowerPoint.
Método 2: Convertidores de PowerPoint a video en línea (sin instalación)
Cuando no tiene PowerPoint instalado o necesita una conversión rápida en cualquier dispositivo, los convertidores de PowerPoint a video en línea pueden ser una opción conveniente.
Estas herramientas funcionan en el navegador y le permiten cargar una presentación y descargarla como un archivo de video.
Cómo convertir PowerPoint a video en línea
-
Cargue su archivo .ppt o .pptx en una plataforma de conversión confiable como Canva.
-
Seleccione MP4 como formato de salida deseado.
-
Haga clic en Convertir y espere a que finalice el procesamiento en la nube.
-
Descargue el archivo de video generado.
⚠️ Notas de seguridad:
Los convertidores en línea son convenientes, pero no siempre son adecuados para presentaciones sensibles o grandes, ya que los archivos se procesan en servidores de terceros y pueden tener limitaciones de tamaño o funciones, además de posibles riesgos de privacidad. Para información confidencial, considere usar métodos sin conexión como PowerPoint o C#.
Cuándo usar:
Adecuado para conversiones rápidas y ocasionales cuando no tiene PowerPoint instalado y el archivo no contiene información sensible.
Método 3: Automatización en C# usando Spire.Presentation (procesamiento por lotes)
Para desarrolladores y entornos empresariales que manejan múltiples presentaciones de PowerPoint, la automatización es el método más escalable. Usando C# y Spire.Presentation for .NET, puede convertir mediante programación archivos de PowerPoint a formato de video e integrar la lógica sin problemas en servicios backend o procesos por lotes.
Este método no requiere que Microsoft Office esté instalado en la máquina host, lo que lo hace adecuado para el procesamiento del lado del servidor.
Configuración del entorno
-
Instalar la biblioteca requerida: Descargue la biblioteca a través de la página oficial o instálela mediante la consola del Administrador de paquetes NuGet:
Install-Package Spire.Presentation -
Instalar la dependencia FFmpeg: Esta función depende de FFmpeg para la codificación de video. Descargue el paquete FFmpeg y extráigalo en un directorio local.
Script en C# para convertir por lotes múltiples presentaciones de PowerPoint a MP4
El siguiente ejemplo de código escanea un directorio de entrada en busca de archivos .pptx, configura los parámetros de renderizado y los exporta a videos.
using System;
using System.IO;
using Spire.Presentation;

namespace PptToVideoAutomation
{
    class Program
    {
        static void Main(string[] args)
        {
            // Definir rutas del entorno
            string ffmpegBinPath = @"D:\tools\ffmpeg\bin"; // La ruta a la carpeta bin del paquete FFmpeg
            string inputFolder   = @"C:\PPT\Input\";
            string outputFolder  = @"C:\PPT\Output\";

            // Asegurarse de que el directorio de salida exista
            if (!Directory.Exists(outputFolder))
            {
                Directory.CreateDirectory(outputFolder);
            }

            // Recuperar todos los archivos de PowerPoint del directorio de entrada
            string[] pptxFiles = Directory.GetFiles(inputFolder, "*.pptx");

            Console.WriteLine($"Se encontraron {pptxFiles.Length} archivos para convertir. Iniciando proceso...\n");

            foreach (string inputFile in pptxFiles)
            {
                try
                {
                    string fileName = Path.GetFileNameWithoutExtension(inputFile);
                    string outputFile = Path.Combine(outputFolder, $"{fileName}.mp4");

                    // Usar el bloque 'using' para liberar automáticamente memoria y recursos por archivo
                    using (Presentation presentation = new Presentation())
                    {
                        // Cargar el archivo de PowerPoint
                        presentation.LoadFromFile(inputFile);

                        // Apuntar a la carpeta binaria de FFmpeg
                        presentation.SaveToVideoOption = new SaveToVideoOption(ffmpegBinPath);

                        // Personalizar la configuración de rendimiento del video
                        presentation.SaveToVideoOption.Fps = 30;                  // Tasa de fotogramas / Fluidez (Máx: 60)
                        presentation.SaveToVideoOption.DurationForEachSlide = 4;  // Duración en pantalla por diapositiva estática (segundos)

                        // Guardar como MP4 (O usar FileFormat.WMV para Windows Media Video)
                        presentation.SaveToFile(outputFile, FileFormat.MP4);

                        Console.WriteLine($"[ÉXITO] Convertido: {fileName}.pptx -> {fileName}.mp4");
                    }
                }
                catch (Exception ex)
                {
                    Console.WriteLine($"[ERROR] Error al convertir {Path.GetFileName(inputFile)}: {ex.Message}");
                }
            }

            Console.WriteLine("\nProceso de conversión por lotes finalizado.");
        }
    }
}
Resultado:
Aquí hay uno de los videos convertidos desde PowerPoint, con todo el formato y las animaciones preservadas:
Cuándo usar:
Es ideal para conversiones por lotes automatizadas a gran escala en flujos de trabajo de desarrollo o empresariales.
Si necesita reutilizar contenido de PowerPoint en diferentes formatos, lea nuestra guía sobre cómo convertir presentaciones a PDF o imágenes en C#.
Comparación: ¿Qué método de conversión de PowerPoint a video debería elegir?
| Método | Calidad de salida | Seguridad | Automatización | Escalabilidad | Mejor para |
|---|---|---|---|---|---|
| Exportación de MS PowerPoint | ⭐⭐⭐⭐⭐ | ⭐⭐⭐⭐⭐ | ❌ No | Baja | Pequeño número de archivos, conversión de alta fidelidad |
| Convertidores en línea | ⭐⭐⭐ | ⭐⭐ | ❌ No | Baja | Tareas rápidas, usuarios sin MS Office |
| C# (Spire.Presentation) | ⭐⭐⭐⭐ | ⭐⭐⭐⭐⭐ | ✅ Sí | Muy alta | Procesamiento por lotes, automatización a nivel empresarial |
¿Cómo elegir el método de conversión correcto?
- Si necesita máxima calidad + animaciones preservadas → Exportación de PowerPoint
- Si necesita conversión rápida de una sola vez → Herramientas en línea
- Si necesita automatización o procesamiento por lotes → Solución en C#
Problemas comunes en la conversión de PPT a video y sus soluciones
- Animaciones faltantes: Algunas herramientas web no logran renderizar animaciones complejas. Exporte a través de Microsoft PowerPoint o una biblioteca profesional que admita líneas de tiempo de transición de diapositivas.
- Tamaño de video excesivo: El renderizado en 4K o el contenido multimedia interno grande hacen que el archivo sea enorme. Ejecute "Comprimir medios" en PowerPoint antes de exportar o reduzca la resolución de exportación.
- Fallos de conversión: Los formatos .ppt obsoletos pueden bloquear los analizadores de código modernos. Guarde los archivos .ppt en formato .pptx moderno antes de procesarlos.
- Sin audio/narración: El audio externo vinculado se pierde durante la exportación. Incruste los archivos de audio directamente dentro del PPT antes de convertir.
Conclusión
Convertir PowerPoint a video es importante para la distribución moderna de contenido. Si bien las herramientas de escritorio y en línea son adecuadas para conversiones simples, carecen de escalabilidad y automatización. Para flujos de trabajo a nivel empresarial, los desarrolladores pueden usar C# y bibliotecas como Spire.Presentation para permitir un procesamiento por lotes eficiente y la generación automatizada de videos.
Preguntas frecuentes
P1: ¿Puede PowerPoint convertir PPT a video directamente?
R1: Sí, Microsoft PowerPoint tiene una función integrada de "Exportar a video" que le permite guardar presentaciones como archivos MP4.
P2: ¿Cuál es el mejor formato para la salida de video de PowerPoint?
R2: MP4 es el formato más recomendado porque ofrece una buena compresión y es compatible con casi todos los dispositivos y plataformas.
P3: ¿Puedo convertir archivos de PowerPoint a video por lotes?
R3: Sí. La conversión por lotes se puede automatizar usando C# con bibliotecas como Spire.Presentation.
P4: ¿Spire.Presentation conserva las animaciones?
R4: Sí, admite la mayoría de los elementos de las diapositivas, incluidas las transiciones y las animaciones comunes durante la conversión.
P5: ¿Necesito Microsoft Office instalado para la conversión de PowerPoint a video con C#?
R5: No. Spire.Presentation funciona independientemente de Microsoft Office y puede ejecutarse en entornos de servidor o en la nube.
Explore más tutoriales de procesamiento de PowerPoint
PowerPoint in Video (MP4) umwandeln: 3 bewährte Methoden
Inhaltsverzeichnis
Beim Teilen von PowerPoint-Präsentationen auf Plattformen wie YouTube, LMS-Systemen oder Mobilgeräten können Kompatibilitätsprobleme wie fehlende Schriftarten oder defekte Animationen auftreten. Die Konvertierung von PowerPoint in MP4-Video gewährleistet eine konsistente Wiedergabe und eine einfachere Verteilung.
Dieser Leitfaden erläutert drei praktische Methoden, um PowerPoint in Video zu konvertieren, einschließlich integrierter Export-Tools, Online-Konverter und C#-Automatisierung für die Stapelverarbeitung.
- Methode 1: Integrierte Exportfunktion von Microsoft PowerPoint (Native Unterstützung)
- Methode 2: Online-Konverter für PowerPoint zu Video (Keine Installation)
- Methode 3: C#-Automatisierung mit Spire.Presentation (Stapelverarbeitung)
PowerPoint vs. Video: Warum die Konvertierung wichtig ist
Bevor wir uns mit den Methoden befassen, ist es hilfreich, den grundlegenden Unterschied zwischen diesen beiden Formaten zu verstehen.
Eine PowerPoint-Datei (.pptx) ist ein bearbeitbares Präsentationsformat, das für die Live-Erstellung und manuelle Foliennavigation konzipiert ist. Eine Videodatei (.mp4) hingegen ist ein vollständig gerendertes Medienformat, das für eine nahtlose Wiedergabe entwickelt wurde.
Sobald Ihre Präsentation in ein Video konvertiert wurde, ist sie:
- Universell kompatibel: Läuft auf jedem Gerät, ohne dass Microsoft PowerPoint oder kompatible Viewer erforderlich sind.
- Manipulationssicher: Nicht bearbeitbar, wodurch Ihre Schriftarten, Layouts und geistiges Eigentum vor versehentlichen Änderungen geschützt sind.
- Streaming-bereit: Hochgradig optimiert für den direkten Upload und eine reibungslose Verteilung auf modernen Plattformen.
Kurz gesagt: PowerPoint bleibt Ihr Werkzeug zur Erstellung, während das Videoformat Ihr bestes Medium für die Verteilung ist.
Methode 1: Integrierte Exportfunktion von Microsoft PowerPoint (Native Unterstützung)
Wenn Sie bereits mit Microsoft PowerPoint arbeiten, ist die integrierte Exportfunktion der schnellste und zuverlässigste Weg, um eine Präsentation in ein Video zu konvertieren, ohne Tools von Drittanbietern zu verwenden.
Schritt-für-Schritt-Anleitung:
-
Öffnen Sie Ihre PowerPoint-Präsentationsdatei.
-
Navigieren Sie zum oberen Menü und klicken Sie auf Datei > Exportieren > Video erstellen.
-
Wählen Sie die gewünschte Videoqualität (z. B. Ultra HD 4K, Full HD 1080p) und konfigurieren Sie bei Bedarf die aufgezeichneten Zeitabläufe/Erzählungen.
-
Klicken Sie auf die Schaltfläche Video erstellen, wählen Sie Ihren Speicherort und speichern Sie es als MP4-Datei.
Tipp:
Wenn keine manuelle Erzählung hinzugefügt wurde, stellen Sie sicher, dass die Folienzeitabläufe korrekt eingestellt sind; andernfalls verwendet das Video standardmäßig feste Zeitdauern.
⚠️ Hinweise:
Diese Methode bewahrt Animationen, Übergänge und eingebettete Medien. Der Export erfolgt jedoch vollständig manuell, und jede Datei muss einzeln verarbeitet werden.
Wann zu verwenden:
Am besten geeignet für die schnelle Konvertierung einer kleinen Anzahl von Präsentationen unter vollständiger Beibehaltung aller Funktionen nur mit PowerPoint.
Methode 2: Online-Konverter für PowerPoint zu Video (Keine Installation)
Wenn Sie PowerPoint nicht installiert haben oder eine schnelle Konvertierung auf einem beliebigen Gerät benötigen, können Online-Konverter für PowerPoint zu Video eine bequeme Option sein.
Diese Tools laufen im Browser und ermöglichen es Ihnen, eine Präsentation hochzuladen und als Videodatei herunterzuladen.
So konvertieren Sie PowerPoint online in Video
-
Laden Sie Ihre .ppt- oder .pptx-Datei auf eine vertrauenswürdige Konvertierungsplattform wie Canva hoch.
-
Wählen Sie MP4 als Ziel-Ausgabeformat.
-
Klicken Sie auf Konvertieren und warten Sie, bis die Cloud-Verarbeitung abgeschlossen ist.
-
Laden Sie die generierte Videodatei herunter.
⚠️ Sicherheitshinweise:
Online-Konverter sind praktisch, aber nicht immer für sensible oder große Präsentationen geeignet, da die Dateien auf Servern von Drittanbietern verarbeitet werden und Größenbeschränkungen, Funktionsbegrenzungen sowie potenzielle Datenschutzrisiken bestehen können. Bei vertraulichen Informationen sollten Sie Offline-Methoden wie PowerPoint oder C# in Betracht ziehen.
Wann zu verwenden:
Geeignet für schnelle, gelegentliche Konvertierungen, wenn Sie PowerPoint nicht installiert haben und die Datei nicht vertraulich ist.
Methode 3: C#-Automatisierung mit Spire.Presentation (Stapelverarbeitung)
Für Entwickler und Unternehmensumgebungen, die mehrere PowerPoint-Präsentationen verarbeiten, ist Automatisierung die skalierbarste Methode. Mit C# und Spire.Presentation for .NET können Sie PowerPoint-Dateien programmgesteuert in das Videoformat konvertieren und die Logik nahtlos in Backend-Dienste oder Stapelverarbeitungspipelines integrieren.
Diese Methode erfordert nicht, dass Microsoft Office auf dem Host-Rechner installiert ist, was sie für die serverseitige Verarbeitung geeignet macht.
Einrichtung der Umgebung
-
Installieren Sie die erforderliche Bibliothek: Laden Sie die Bibliothek über die offizielle Seite herunter oder installieren Sie sie über die NuGet-Paket-Manager-Konsole:
Install-Package Spire.Presentation -
Installieren Sie die FFmpeg-Abhängigkeit: Diese Funktion basiert für die Videokodierung auf FFmpeg. Laden Sie das FFmpeg-Paket herunter und entpacken Sie es in ein lokales Verzeichnis.
C#-Skript zur Stapelkonvertierung mehrerer PowerPoint-Präsentationen in MP4
Das folgende Codebeispiel durchsucht ein Eingabeverzeichnis nach .pptx-Dateien, konfiguriert Rendering-Parameter und exportiert sie als Videos.
using System;
using System.IO;
using Spire.Presentation;

namespace PptToVideoAutomation
{
    class Program
    {
        static void Main(string[] args)
        {
            // Umgebungspfade definieren
            string ffmpegBinPath = @"D:\tools\ffmpeg\bin"; // Der Pfad zum bin-Ordner des FFmpeg-Pakets
            string inputFolder   = @"C:\PPT\Input\";
            string outputFolder  = @"C:\PPT\Output\";

            // Sicherstellen, dass das Ausgabeverzeichnis existiert
            if (!Directory.Exists(outputFolder))
            {
                Directory.CreateDirectory(outputFolder);
            }

            // Alle PowerPoint-Dateien aus dem Eingabeverzeichnis abrufen
            string[] pptxFiles = Directory.GetFiles(inputFolder, "*.pptx");

            Console.WriteLine($"{pptxFiles.Length} Dateien zur Konvertierung gefunden. Starte Pipeline...\n");

            foreach (string inputFile in pptxFiles)
            {
                try
                {
                    string fileName = Path.GetFileNameWithoutExtension(inputFile);
                    string outputFile = Path.Combine(outputFolder, $"{fileName}.mp4");

                    // Verwenden Sie den 'using'-Block, um Speicher und Ressourcen pro Datei automatisch freizugeben
                    using (Presentation presentation = new Presentation())
                    {
                        // Die PowerPoint-Datei laden
                        presentation.LoadFromFile(inputFile);

                        // Auf den FFmpeg-Binärordner verweisen
                        presentation.SaveToVideoOption = new SaveToVideoOption(ffmpegBinPath);

                        // Video-Leistungseinstellungen anpassen
                        presentation.SaveToVideoOption.Fps = 30;                  // Bildrate / Glätte (Max: 60)
                        presentation.SaveToVideoOption.DurationForEachSlide = 4;  // Anzeigedauer pro statischer Folie (Sekunden)

                        // Als MP4 speichern (Oder FileFormat.WMV für Windows Media Video verwenden)
                        presentation.SaveToFile(outputFile, FileFormat.MP4);

                        Console.WriteLine($"[ERFOLG] Konvertiert: {fileName}.pptx -> {fileName}.mp4");
                    }
                }
                catch (Exception ex)
                {
                    Console.WriteLine($"[FEHLER] Konvertierung von {Path.GetFileName(inputFile)} fehlgeschlagen: {ex.Message}");
                }
            }

            Console.WriteLine("\nStapelkonvertierungsprozess abgeschlossen.");
        }
    }
}
Ergebnis:
Hier ist eines der aus PowerPoint konvertierten Videos, bei dem alle Formatierungen und Animationen beibehalten wurden:
Wann zu verwenden:
Am besten geeignet für groß angelegte, automatisierte Stapelkonvertierungen in Entwickler- oder Unternehmens-Workflows.
Wenn Sie PowerPoint-Inhalte in verschiedenen Formaten wiederverwenden müssen, lesen Sie unsere Anleitung zum Konvertieren von Präsentationen in PDF oder Bilder in C#.
Vergleich: Welche PowerPoint-zu-Video-Methode sollten Sie wählen?
| Methode | Ausgabequalität | Sicherheit | Automatisierung | Skalierbarkeit | Am besten für |
|---|---|---|---|---|---|
| MS PowerPoint Export | ⭐⭐⭐⭐⭐ | ⭐⭐⭐⭐⭐ | ❌ Nein | Gering | Kleine Anzahl von Dateien, hochpräzise Konvertierung |
| Online-Konverter | ⭐⭐⭐ | ⭐⭐ | ❌ Nein | Gering | Schnelle Aufgaben, Benutzer ohne MS Office |
| C# (Spire.Presentation) | ⭐⭐⭐⭐ | ⭐⭐⭐⭐⭐ | ✅ Ja | Sehr hoch | Stapelverarbeitung, Automatisierung auf Unternehmensebene |
Wie wählt man die richtige Konvertierungsmethode?
- Wenn Sie maximale Qualität + beibehaltene Animationen benötigen → PowerPoint-Export
- Wenn Sie eine schnelle einmalige Konvertierung benötigen → Online-Tools
- Wenn Sie Automatisierung oder Stapelverarbeitung benötigen → C#-Lösung
Häufige Probleme bei der PPT-zu-Video-Konvertierung und Lösungen
- Fehlende Animationen: Einige Web-Tools rendern komplexe Animationen nicht korrekt. Exportieren Sie über Microsoft PowerPoint oder eine professionelle Bibliothek, die Zeitachsen für Folienübergänge unterstützt.
- Aufgeblähte Videogröße: 4K-Rendering oder große interne Medien machen die Datei riesig. Führen Sie in PowerPoint "Medien komprimieren" aus, bevor Sie exportieren, oder verringern Sie die Exportauflösung.
- Konvertierungsfehler: Veraltete .ppt-Formate können moderne Code-Parser zum Absturz bringen. Speichern Sie .ppt-Dateien im modernen .pptx-Format, bevor Sie sie verarbeiten.
- Kein Audio/Erzählung: Verknüpfte externe Audiodateien gehen beim Export verloren. Betten Sie die Audiodateien direkt in die PPT ein, bevor Sie sie konvertieren.
Fazit
Die Konvertierung von PowerPoint in Video ist für die moderne Inhaltsverteilung wichtig. Während Desktop- und Online-Tools für einfache Konvertierungen geeignet sind, mangelt es ihnen an Skalierbarkeit und Automatisierung. Für Workflows auf Unternehmensebene können Entwickler C# und Bibliotheken wie Spire.Presentation verwenden, um eine effiziente Stapelverarbeitung und automatisierte Videogenerierung zu ermöglichen.
FAQs
F1: Kann PowerPoint PPT direkt in Video konvertieren?
A1: Ja, Microsoft PowerPoint verfügt über eine integrierte "Exportieren in Video"-Funktion, mit der Sie Präsentationen als MP4-Dateien speichern können.
F2: Was ist das beste Format für die PowerPoint-Videoausgabe?
A2: MP4 ist das am meisten empfohlene Format, da es eine gute Komprimierung bietet und mit fast allen Geräten und Plattformen kompatibel ist.
F3: Kann ich PowerPoint-Dateien stapelweise in Video konvertieren?
A3: Ja. Die Stapelkonvertierung kann mit C# und Bibliotheken wie Spire.Presentation automatisiert werden.
F4: Behält Spire.Presentation Animationen bei?
A4: Ja, es unterstützt die meisten Folienelemente, einschließlich Übergängen und gängigen Animationen während der Konvertierung.
F5: Muss Microsoft Office für die C#-PowerPoint-zu-Video-Konvertierung installiert sein?
A5: Nein. Spire.Presentation arbeitet unabhängig von Microsoft Office und kann in Server- oder Cloud-Umgebungen ausgeführt werden.
Entdecken Sie weitere Tutorials zur PowerPoint-Verarbeitung
Как конвертировать PowerPoint в видео (MP4): 3 проверенных способа
Содержание
При обмене презентациями PowerPoint через такие платформы, как YouTube, системы LMS или мобильные устройства, могут возникать проблемы совместимости, такие как отсутствие шрифтов или некорректное отображение анимаций. Конвертация PowerPoint в видео MP4 обеспечивает стабильное воспроизведение и упрощает распространение.
В этом руководстве описаны три практических способа конвертации PowerPoint в видео, включая встроенные инструменты экспорта, онлайн-конвертеры и автоматизацию на C# для пакетной обработки.
- Способ 1: Встроенная функция экспорта Microsoft PowerPoint (нативная поддержка)
- Способ 2: Онлайн-конвертеры PowerPoint в видео (без установки)
- Способ 3: Автоматизация на C# с использованием Spire.Presentation (пакетная обработка)
PowerPoint против видео: почему важна конвертация
Прежде чем перейти к методам, полезно понять фундаментальную разницу между этими двумя форматами.
Файл PowerPoint (.pptx) — это формат редактируемой презентации, предназначенный для создания и ручного переключения слайдов. Видеофайл (.mp4), напротив, является полностью отрендеренным медиаформатом, созданным для плавного воспроизведения.
После конвертации в видео ваша презентация становится:
- Универсально совместимой: воспроизводится на любом устройстве без необходимости установки Microsoft PowerPoint или совместимых программ.
- Защищенной от изменений: файл нельзя отредактировать, что защищает ваши шрифты, макеты и интеллектуальную собственность от случайных правок.
- Готовой к стримингу: оптимизирована для прямой загрузки и удобного распространения на современных платформах.
Короче говоря, PowerPoint остается вашим инструментом для создания, а видеоформат — лучшим средством для распространения.
Способ 1: Встроенная функция экспорта Microsoft PowerPoint (нативная поддержка)
Если вы уже работаете в Microsoft PowerPoint, встроенная функция экспорта — это самый быстрый и надежный способ преобразовать презентацию в видео без использования сторонних инструментов.
Пошаговое руководство:
-
Откройте файл презентации PowerPoint.
-
Перейдите в верхнее меню и нажмите Файл > Экспорт > Создать видео.
-
Выберите желаемое качество видео (например, Ultra HD 4K, Full HD 1080p) и при необходимости настройте записанные тайминги или закадровый голос.
-
Нажмите кнопку Создать видео, выберите место сохранения и сохраните его как файл MP4.
Совет:
Если ручное озвучивание не добавлено, убедитесь, что тайминги слайдов установлены правильно; в противном случае видео будет использовать стандартную длительность для каждого слайда.
⚠️ Примечания:
Этот метод сохраняет анимации, переходы и встроенные медиафайлы. Однако экспорт выполняется полностью вручную, и каждый файл нужно обрабатывать отдельно.
Когда использовать:
Лучше всего подходит для быстрой конвертации небольшого количества презентаций с сохранением всех функций, используя только PowerPoint.
Способ 2: Онлайн-конвертеры PowerPoint в видео (без установки)
Если у вас не установлен PowerPoint или вам нужна быстрая конвертация на любом устройстве, онлайн-конвертеры могут стать удобным вариантом.
Эти инструменты работают в браузере и позволяют загрузить презентацию и скачать её в виде видеофайла.
Как конвертировать PowerPoint в видео онлайн
-
Загрузите ваш файл .ppt или .pptx на надежную платформу для конвертации, такую как Canva.
-
Выберите MP4 в качестве целевого формата вывода.
-
Нажмите Конвертировать и дождитесь завершения облачной обработки.
-
Скачайте созданный видеофайл.
⚠️ Примечания по безопасности:
Онлайн-конвертеры удобны, но не всегда подходят для конфиденциальных или больших презентаций, так как файлы обрабатываются на сторонних серверах и могут иметь ограничения по размеру или функционалу, а также нести риски конфиденциальности. Для конфиденциальной информации используйте офлайн-методы, такие как PowerPoint или C#.
Когда использовать:
Подходит для быстрой, эпизодической конвертации, когда у вас не установлен PowerPoint, а файл не содержит секретных данных.
Способ 3: Автоматизация на C# с использованием Spire.Presentation (пакетная обработка)
Для разработчиков и корпоративных сред, работающих с множеством презентаций PowerPoint, автоматизация является наиболее масштабируемым методом. Используя C# и Spire.Presentation for .NET, вы можете программно конвертировать файлы PowerPoint в видеоформат и легко интегрировать эту логику в серверные службы или пакетные процессы.
Этот метод не требует установки Microsoft Office на хост-машине, что делает его пригодным для серверной обработки.
Настройка среды
-
Установите необходимую библиотеку: Скачайте библиотеку с официальной страницы или установите её через консоль диспетчера пакетов NuGet:
Install-Package Spire.Presentation -
Установите зависимость FFmpeg: Эта функция полагается на FFmpeg для кодирования видео. Скачайте пакет FFmpeg и распакуйте его в локальную папку.
Скрипт C# для пакетной конвертации нескольких презентаций PowerPoint в MP4
Следующий пример кода сканирует входную папку на наличие файлов .pptx, настраивает параметры рендеринга и экспортирует их в видео.
using System;
using System.IO;
using Spire.Presentation;

namespace PptToVideoAutomation
{
    class Program
    {
        static void Main(string[] args)
        {
            // Укажите пути к среде
            string ffmpegBinPath = @"D:\tools\ffmpeg\bin"; // Путь к папке bin пакета FFmpeg
            string inputFolder   = @"C:\PPT\Input\";
            string outputFolder  = @"C:\PPT\Output\";

            // Убедитесь, что выходная папка существует
            if (!Directory.Exists(outputFolder))
            {
                Directory.CreateDirectory(outputFolder);
            }

            // Получите все файлы PowerPoint из входной папки
            string[] pptxFiles = Directory.GetFiles(inputFolder, "*.pptx");

            Console.WriteLine($"Найдено {pptxFiles.Length} файлов для конвертации. Запуск процесса...\n");

            foreach (string inputFile in pptxFiles)
            {
                try
                {
                    string fileName = Path.GetFileNameWithoutExtension(inputFile);
                    string outputFile = Path.Combine(outputFolder, $"{fileName}.mp4");

                    // Используйте блок 'using' для автоматического освобождения памяти и ресурсов
                    using (Presentation presentation = new Presentation())
                    {
                        // Загрузите файл PowerPoint
                        presentation.LoadFromFile(inputFile);

                        // Укажите путь к папке с бинарными файлами FFmpeg
                        presentation.SaveToVideoOption = new SaveToVideoOption(ffmpegBinPath);

                        // Настройте параметры производительности видео
                        presentation.SaveToVideoOption.Fps = 30;                  // Частота кадров (Макс: 60)
                        presentation.SaveToVideoOption.DurationForEachSlide = 4;  // Длительность показа статического слайда (в секундах)

                        // Сохраните в MP4 (или используйте FileFormat.WMV для Windows Media Video)
                        presentation.SaveToFile(outputFile, FileFormat.MP4);

                        Console.WriteLine($"[УСПЕХ] Конвертировано: {fileName}.pptx -> {fileName}.mp4");
                    }
                }
                catch (Exception ex)
                {
                    Console.WriteLine($"[ОШИБКА] Не удалось конвертировать {Path.GetFileName(inputFile)}: {ex.Message}");
                }
            }

            Console.WriteLine("\nПроцесс пакетной конвертации завершен.");
        }
    }
}
Результат:
Вот одно из видео, конвертированных из PowerPoint, с сохранением всего форматирования и анимаций:
Когда использовать:
Лучше всего подходит для крупномасштабной автоматизированной пакетной конвертации в рабочих процессах разработчиков или предприятий.
Если вам нужно повторно использовать контент PowerPoint в других форматах, прочитайте наше руководство по конвертации презентаций в PDF или изображения на C#.
Сравнение: какой метод конвертации PowerPoint в видео выбрать
| Метод | Качество вывода | Безопасность | Автоматизация | Масштабируемость | Лучше всего для |
|---|---|---|---|---|---|
| Экспорт MS PowerPoint | ⭐⭐⭐⭐⭐ | ⭐⭐⭐⭐⭐ | ❌ Нет | Низкая | Небольшое количество файлов, высокая точность |
| Онлайн-конвертеры | ⭐⭐⭐ | ⭐⭐ | ❌ Нет | Низкая | Быстрые задачи, пользователи без MS Office |
| C# (Spire.Presentation) | ⭐⭐⭐⭐ | ⭐⭐⭐⭐⭐ | ✅ Да | Очень высокая | Пакетная обработка, автоматизация корпоративного уровня |
Как выбрать правильный метод конвертации?
- Если нужно максимальное качество + сохранение анимаций → экспорт через PowerPoint
- Если нужна быстрая разовая конвертация → онлайн-инструменты
- Если нужна автоматизация или пакетная обработка → решение на C#
Распространенные проблемы при конвертации PPT в видео и их решения
- Отсутствие анимаций: Некоторые веб-инструменты не могут корректно отобразить сложные анимации. Используйте экспорт через Microsoft PowerPoint или профессиональную библиотеку, поддерживающую таймлайны переходов слайдов.
- Раздутый размер видео: Рендеринг в 4K или большое количество встроенных медиафайлов делает файл огромным. Выполните «Сжатие медиа» в PowerPoint перед экспортом или уменьшите разрешение экспорта.
- Сбои конвертации: Устаревшие форматы .ppt могут приводить к ошибкам в современных парсерах кода. Сохраните файлы .ppt в современный формат .pptx перед обработкой.
- Нет звука/озвучки: Связанные внешние аудиофайлы могут теряться при экспорте. Внедряйте аудиофайлы непосредственно в PPT перед конвертацией.
Заключение
Конвертация PowerPoint в видео важна для современного распространения контента. Хотя настольные и онлайн-инструменты подходят для простых задач, им не хватает масштабируемости и автоматизации. Для рабочих процессов корпоративного уровня разработчики могут использовать C# и такие библиотеки, как Spire.Presentation, для обеспечения эффективной пакетной обработки и автоматизированной генерации видео.
Часто задаваемые вопросы (FAQ)
В1: Может ли PowerPoint конвертировать PPT в видео напрямую?
О1: Да, в Microsoft PowerPoint есть встроенная функция «Экспорт в видео», которая позволяет сохранять презентации как файлы MP4.
В2: Какой формат лучше всего подходит для вывода видео из PowerPoint?
О2: MP4 — наиболее рекомендуемый формат, так как он обеспечивает хорошее сжатие и совместим практически со всеми устройствами и платформами.
В3: Можно ли пакетно конвертировать файлы PowerPoint в видео?
О3: Да. Пакетную конвертацию можно автоматизировать с помощью C# и библиотек, таких как Spire.Presentation.
В4: Сохраняет ли Spire.Presentation анимации?
О4: Да, он поддерживает большинство элементов слайдов, включая переходы и стандартные анимации при конвертации.
В5: Нужно ли устанавливать Microsoft Office для конвертации PowerPoint в видео на C#?
О5: Нет. Spire.Presentation работает независимо от Microsoft Office и может использоваться на серверах или в облачных средах.
Изучите другие руководства по обработке PowerPoint
Como incorporar fontes em documentos do Word: 3 métodos eficazes
Índice
- Pré-requisitos e considerações importantes
- Método 1: Incorporar fontes usando o recurso integrado do Microsoft Word
- Método 2: Converter documentos do Word para PDF com fontes incorporadas
- Método 3: Incorporar fontes em documentos do Word programaticamente em C#
- Como verificar se as fontes estão incorporadas
- Solução de problemas comuns de incorporação de fontes
- Conclusão
- Perguntas frequentes (FAQs)
Ao compartilhar um documento do Word com colegas, clientes ou gráficas, você espera que ele tenha exatamente a mesma aparência em todos os dispositivos. No entanto, se o destinatário não tiver as fontes usadas no documento instaladas, o Word poderá substituí-las automaticamente por outras fontes, causando alterações no layout, problemas de espaçamento e formatação inconsistente.
A incorporação de fontes resolve esse problema armazenando as informações da fonte diretamente dentro do documento ou arquivo de saída. Como resultado, o documento pode preservar sua aparência original mesmo quando aberto em um computador que não possui as fontes necessárias.
Neste guia, você aprenderá três maneiras práticas de incorporar fontes em documentos do Word, incluindo o recurso de incorporação de fontes integrado do Word, conversão para PDF e uma solução de automação em C# para desenvolvedores.
Navegação rápida:
- Método 1: Incorporar fontes usando o recurso integrado do Microsoft Word
- Método 2: Converter documentos do Word para PDF com fontes incorporadas
- Método 3: Incorporar fontes em documentos do Word programaticamente em C#
Pré-requisitos e considerações importantes
Antes de incorporar fontes, é útil entender algumas limitações e requisitos.
Versões do Word suportadas
A incorporação de fontes é suportada na maioria das versões modernas do Microsoft Word, incluindo Microsoft 365, Word 2021, Word 2019 e Word 2016. Se você estiver usando uma versão mais antiga, algumas opções podem estar indisponíveis ou se comportar de maneira diferente.
Tipos de fonte suportados
O Word suporta principalmente a incorporação de fontes TrueType (.ttf) e OpenType (.otf). A maioria das fontes modernas se enquadra em uma dessas categorias.
Licenciamento de fontes e permissões de incorporação
Nem todas as fontes podem ser incorporadas. Os criadores de fontes podem definir permissões de incorporação que determinam se uma fonte pode ser incluída em um documento. Algumas fontes permitem a incorporação total, enquanto outras permitem apenas a visualização e impressão. Fontes restritas não podem ser incorporadas de forma alguma.
Impacto no tamanho do arquivo
A incorporação de fontes aumenta o tamanho de um documento porque os dados da fonte são armazenados dentro do arquivo. O aumento depende de você incorporar a fonte inteira ou apenas os caracteres realmente usados no documento.
Método 1: Incorporar fontes usando o recurso integrado do Microsoft Word
O Microsoft Word inclui uma opção integrada que permite incorporar fontes diretamente em um documento. Esta é a solução mais simples e comumente usada.
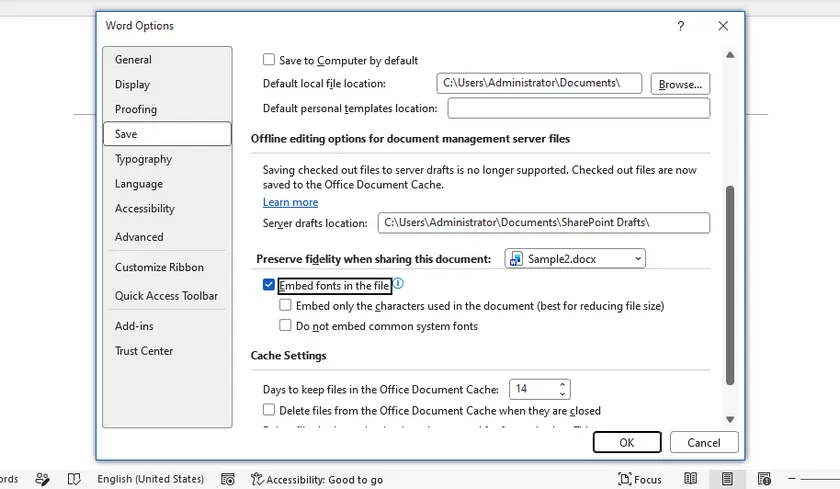
Habilitar a incorporação de fontes no Word
Para incorporar fontes:
- Abra seu documento do Word.
- Clique em Arquivo > Opções.
- Selecione Salvar.
- Em Preservar fidelidade ao compartilhar este documento, marque Incorporar fontes no arquivo.
- Salve o documento.
Após salvar, o Word armazena as informações da fonte dentro do documento sempre que as fontes selecionadas permitirem a incorporação.
Opções avançadas de incorporação
O Word oferece duas opções adicionais que ajudam a equilibrar a compatibilidade e o tamanho do arquivo:
- Incorporar apenas os caracteres usados no documento – Incorpora apenas os glifos que aparecem no documento, reduzindo o tamanho do arquivo. No entanto, se alguém adicionar novos caracteres posteriormente que não foram incluídos, a fonte original poderá ser necessária.
- Não incorporar fontes comuns do sistema – Ignora fontes que são comumente instaladas na maioria dos computadores, reduzindo ainda mais o tamanho do arquivo enquanto depende do sistema do destinatário para fornecer essas fontes.
Para documentos destinados à edição e compartilhamento de longo prazo, incorporar todos os dados de fonte necessários é geralmente a escolha mais segura. Se o tamanho do arquivo for uma preocupação, considere incorporar apenas os caracteres usados enquanto mantém fontes personalizadas importantes incorporadas.
Método 2: Converter documentos do Word para PDF com fontes incorporadas
Em muitas situações, o objetivo não é editar o documento, mas simplesmente garantir que ele seja exibido e impresso corretamente. Nesses casos, converter o documento do Word para PDF pode ser uma alternativa eficaz.
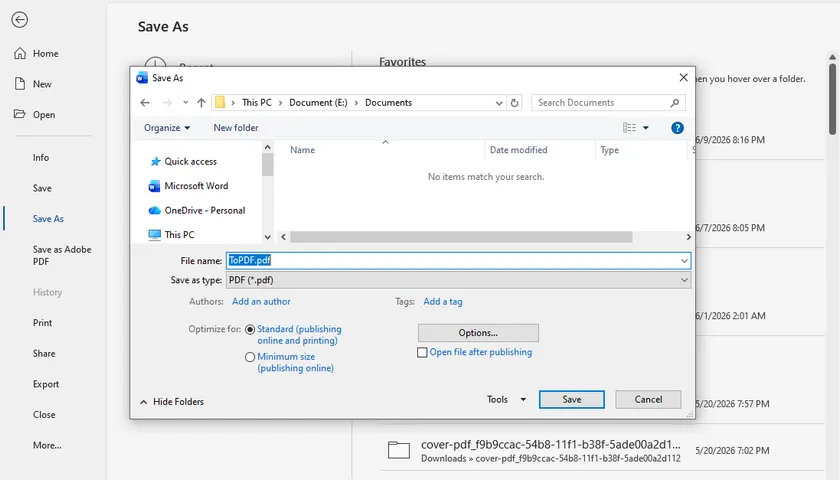
Salvar um documento do Word como PDF
O Microsoft Word pode exportar documentos diretamente para PDF.
- Abra o documento.
- Clique em Arquivo > Salvar Como.
- Escolha uma pasta de destino.
- Selecione PDF como o tipo de arquivo.
- Salve o arquivo.
Durante a criação do PDF, o Word normalmente incorpora as fontes necessárias para renderizar o documento corretamente.
Verificar se as fontes estão incorporadas
Após gerar o PDF, você pode verificar as fontes incorporadas usando um visualizador de PDF.
No Adobe Acrobat Reader:
- Abra o PDF.
- Selecione Arquivo > Propriedades.
- Abra a guia Fontes.
Fontes marcadas como Incorporada ou Subconjunto incorporado indicam que as informações da fonte estão incluídas no PDF.
Vantagens e limitações
Arquivos PDF oferecem excelente consistência entre sistemas operacionais e dispositivos. Eles são ideais para distribuição de documentos, publicação e impressão.
No entanto, arquivos PDF não são destinados à edição colaborativa. Se os destinatários precisarem modificar o conteúdo extensivamente, incorporar fontes diretamente no documento do Word pode ser uma escolha melhor.
Método 3: Incorporar fontes em documentos do Word programaticamente em C#
Se você gera documentos do Word automaticamente, configurar manualmente as definições de fonte no Word pode não ser prático. Nesses casos, a incorporação programática de fontes oferece uma solução escalável.
Usando o Spire.Doc for .NET, você pode incorporar fontes personalizadas em documentos do Word especificando arquivos de fonte locais. A biblioteca suporta documentos recém-criados e arquivos do Word existentes, tornando-a adequada para fluxos de trabalho de documentos automatizados.
Por que usar a incorporação programática de fontes?
A incorporação automatizada de fontes é útil para:
- Sistemas de geração de documentos
- Aplicações de relatórios
- Processamento de documentos em lote
- Fluxos de trabalho baseados em modelos
- Documentos que dependem de fontes de marca personalizada
Em vez de exigir que os usuários instalem fontes manualmente, a aplicação pode empacotar os recursos de fonte necessários diretamente no documento gerado.
Incorporar fontes em um documento do Word usando C#
using Spire.Doc;
using Spire.Doc.Documents;
using Spire.Doc.Fields;

namespace Embed_private_font_into_Word
{
    class Program
    {
        static void Main(string[] args)
        {
            Document document = new Document();
            Section section = document.AddSection();
            Paragraph p = section.AddParagraph();

            TextRange range = p.AppendText("Que a vida seja bela como as flores de verão\n"
                +"A vida, fina e leve, de tempos em tempos\n"
                + "Frívola e incansável");
            range.CharacterFormat.FontName = "DeeDeeFlowers";
            range.CharacterFormat.FontSize = 20;

            document.EmbedFontsInFile = true;
            document.PrivateFontList.Add(new PrivateFontPath("DeeDeeFlowers", @"C:\Fonts\DeeDeeFlowers.ttf"));

            document.SaveToFile("resultado.docx", FileFormat.Docx);
        }
    }
}
Neste exemplo, uma fonte personalizada é carregada de um arquivo TTF local, aplicada ao conteúdo do documento e incorporada no arquivo DOCX gerado. Como resultado, o documento pode ser exibido corretamente mesmo em sistemas onde a fonte não está instalada.
Benefícios da incorporação automatizada de fontes
A incorporação automatizada de fontes é especialmente valiosa em fluxos de trabalho de geração e processamento de documentos. Além de incorporar fontes personalizadas, os desenvolvedores podem modificar programaticamente o conteúdo do documento, alterar fontes, aplicar formatação e converter documentos do Word para PDF mantendo uma aparência consistente. Combinar essas operações em um único fluxo de trabalho reduz o trabalho manual e ajuda a garantir resultados confiáveis em diferentes dispositivos e ambientes.
Como verificar se as fontes estão incorporadas
Após incorporar as fontes, é uma boa ideia verificar o resultado.
Para documentos do Word, reabra o arquivo em outro computador que não tenha a fonte original instalada. Se o documento for exibido corretamente sem substituição de fonte, a incorporação foi bem-sucedida.
Para arquivos PDF, use a seção de Fontes nas propriedades do documento para confirmar se as fontes estão listadas como incorporadas.
Testar em uma máquina separada é frequentemente a maneira mais confiável de validar o resultado final.
Solução de problemas comuns de incorporação de fontes
Fontes não incorporadas com sucesso
Se o documento for exibido corretamente no seu computador, mas usar fontes diferentes em outro dispositivo, as fontes podem não ter sido incorporadas com sucesso. Certifique-se de que o arquivo esteja salvo no formato .docx e que Incorporar fontes no arquivo esteja habilitado antes de salvar. Para verificar o resultado, abra o documento em um computador que não tenha as fontes originais instaladas.
Opção "Incorporar fontes" cinza (indisponível)
Esta opção pode estar indisponível quando o documento é aberto no Modo de Compatibilidade, definido como somente leitura ou restrito por políticas organizacionais. Tente converter o arquivo para o formato DOCX mais recente e remover quaisquer restrições de edição. Atualizar o Microsoft Word para a versão mais recente também pode restaurar o recurso.
Tamanho do arquivo muito grande após a incorporação
A incorporação de fontes pode aumentar visivelmente o tamanho do arquivo, especialmente quando várias fontes personalizadas são usadas. Para reduzir o impacto, habilite Incorporar apenas os caracteres usados no documento e Não incorporar fontes comuns do sistema. Limitar o número de famílias de fontes incorporadas também pode ajudar a manter o tamanho do documento gerenciável.
Fontes específicas não podem ser incorporadas
Algumas fontes incluem restrições de licenciamento que impedem a incorporação. Se o Word exibir um aviso ou pular uma fonte durante o salvamento, verifique as permissões de incorporação da fonte e considere usar uma alternativa incorporável. Se a edição não for necessária, converter o documento para PDF é frequentemente a solução alternativa mais simples.
Conclusão
A incorporação de fontes é uma das maneiras mais eficazes de preservar a aparência de documentos do Word em diferentes dispositivos e ambientes. Para o uso diário, o recurso de incorporação integrado do Word costuma ser suficiente. Para distribuição de documentos, a conversão para PDF oferece excelente compatibilidade. Para fluxos de trabalho automatizados e geração de documentos em larga escala, a incorporação de fontes em C# oferece a maior flexibilidade e controle.
Ao escolher o método que melhor se adapta ao seu cenário, você pode evitar problemas de substituição de fontes e garantir que seus documentos sempre apareçam exatamente como pretendido.
Perguntas frequentes (FAQs)
Todas as fontes podem ser incorporadas no Word?
Não. A incorporação de fontes depende das permissões definidas pelo fornecedor da fonte.
A incorporação de fontes aumenta o tamanho do arquivo?
Sim. O documento fica maior porque os dados da fonte são armazenados dentro do arquivo.
Qual é a diferença entre incorporação total e incorporação de subconjunto?
A incorporação total inclui a fonte inteira, enquanto a incorporação de subconjunto inclui apenas os caracteres usados no documento.
O PDF é melhor do que incorporar fontes no Word?
O PDF é geralmente melhor para compartilhar e imprimir, enquanto documentos do Word incorporados permanecem mais fáceis de editar.
Posso incorporar fontes automaticamente usando C#?
Sim. Bibliotecas como o Spire.Doc permitem que desenvolvedores incorporem fontes programaticamente durante a geração do documento.
Veja também
Word 문서에 글꼴을 포함하는 방법: 3가지 효과적인 방법
동료, 고객 또는 인쇄소와 Word 문서를 공유할 때 모든 기기에서 동일하게 보이기를 기대합니다. 그러나 수신자의 컴퓨터에 문서에 사용된 글꼴이 설치되어 있지 않으면 Word가 자동으로 다른 글꼴로 대체하여 레이아웃이 틀어지거나 간격 문제, 서식 불일치가 발생할 수 있습니다.
글꼴 포함(Font embedding)은 글꼴 정보를 문서나 출력 파일 내부에 직접 저장하여 이 문제를 해결합니다. 결과적으로 필요한 글꼴이 없는 컴퓨터에서 열더라도 문서의 원래 모양을 유지할 수 있습니다.
이 가이드에서는 Word의 내장 글꼴 포함 기능, PDF 변환, 개발자를 위한 C# 자동화 솔루션을 포함하여 Word 문서에 글꼴을 포함하는 세 가지 실용적인 방법을 알아봅니다.
빠른 탐색:
- 방법 1: Microsoft Word의 내장 기능을 사용하여 글꼴 포함하기
- 방법 2: 글꼴이 포함된 Word 문서를 PDF로 변환하기
- 방법 3: C#에서 프로그래밍 방식으로 Word 문서에 글꼴 포함하기
사전 요구 사항 및 중요 고려 사항
글꼴을 포함하기 전에 몇 가지 제한 사항과 요구 사항을 이해하는 것이 좋습니다.
지원되는 Word 버전
글꼴 포함은 Microsoft 365, Word 2021, Word 2019, Word 2016을 포함한 대부분의 최신 Microsoft Word 버전에서 지원됩니다. 이전 버전을 사용하는 경우 일부 옵션을 사용할 수 없거나 다르게 작동할 수 있습니다.
지원되는 글꼴 유형
Word는 주로 TrueType(.ttf) 및 OpenType(.otf) 글꼴 포함을 지원합니다. 대부분의 최신 글꼴은 이러한 범주에 속합니다.
글꼴 라이선스 및 포함 권한
모든 글꼴을 포함할 수 있는 것은 아닙니다. 글꼴 제작자는 문서에 글꼴을 포함할 수 있는지 여부를 결정하는 포함 권한을 정의할 수 있습니다. 일부 글꼴은 전체 포함을 허용하지만, 일부는 미리 보기 및 인쇄만 허용합니다. 제한된 글꼴은 전혀 포함할 수 없습니다.
파일 크기에 미치는 영향
글꼴 데이터가 파일 내에 저장되므로 글꼴을 포함하면 문서 크기가 커집니다. 증가하는 크기는 글꼴 전체를 포함하는지, 아니면 문서에 실제로 사용된 문자만 포함하는지에 따라 달라집니다.
방법 1: Microsoft Word의 내장 기능을 사용하여 글꼴 포함하기
Microsoft Word에는 글꼴을 문서에 직접 포함할 수 있는 내장 옵션이 있습니다. 이는 가장 간단하고 일반적으로 사용되는 솔루션입니다.
Word에서 글꼴 포함 활성화
글꼴을 포함하려면:
- Word 문서를 엽니다.
- 파일 > 옵션을 클릭합니다.
- 저장을 선택합니다.
- 이 문서를 공유할 때 모양 유지 아래에서 파일에 글꼴 포함을 체크합니다.
- 문서를 저장합니다.
저장 후, 선택한 글꼴이 포함을 허용하는 경우 Word는 문서 내부에 글꼴 정보를 저장합니다.
고급 포함 옵션
Word는 호환성과 파일 크기 사이의 균형을 맞추는 데 도움이 되는 두 가지 추가 옵션을 제공합니다.
- 문서에 사용된 문자만 포함 – 문서에 나타나는 글리프만 포함하여 파일 크기를 줄입니다. 그러나 나중에 포함되지 않은 새 문자를 추가하면 원래 글꼴이 필요할 수 있습니다.
- 일반 시스템 글꼴은 포함 안 함 – 대부분의 컴퓨터에 일반적으로 설치된 글꼴을 건너뛰어 파일 크기를 더욱 줄이면서 해당 글꼴을 수신자의 시스템에 의존합니다.
편집 및 장기 공유를 위한 문서의 경우, 필요한 모든 글꼴 데이터를 포함하는 것이 가장 안전합니다. 파일 크기가 중요한 경우, 중요한 사용자 지정 글꼴만 포함하면서 사용된 문자만 포함하는 것을 고려하십시오.
방법 2: 글꼴이 포함된 Word 문서를 PDF로 변환하기
많은 경우, 목표는 문서를 편집하는 것이 아니라 단순히 올바르게 표시되고 인쇄되도록 하는 것입니다. 이러한 경우 Word 문서를 PDF로 변환하는 것이 효과적인 대안이 될 수 있습니다.
Word 문서를 PDF로 저장
Microsoft Word는 문서를 PDF로 직접 내보낼 수 있습니다.
- 문서를 엽니다.
- 파일 > 다른 이름으로 저장을 클릭합니다.
- 대상 폴더를 선택합니다.
- 파일 형식으로 PDF를 선택합니다.
- 파일을 저장합니다.
PDF 생성 중에 Word는 일반적으로 문서를 올바르게 렌더링하는 데 필요한 글꼴을 포함합니다.
글꼴 포함 확인
PDF를 생성한 후 PDF 뷰어를 사용하여 포함된 글꼴을 확인할 수 있습니다.
Adobe Acrobat Reader의 경우:
- PDF를 엽니다.
- 파일 > 속성을 선택합니다.
- 글꼴 탭을 엽니다.
포함(Embedded) 또는 부분 포함(Embedded Subset)으로 표시된 글꼴은 글꼴 정보가 PDF에 포함되어 있음을 나타냅니다.
장점 및 제한 사항
PDF 파일은 운영 체제와 기기 전반에서 뛰어난 일관성을 제공합니다. 문서 배포, 게시 및 인쇄에 이상적입니다.
그러나 PDF 파일은 공동 편집을 위한 것이 아닙니다. 수신자가 콘텐츠를 광범위하게 수정해야 하는 경우 Word 문서에 직접 글꼴을 포함하는 것이 더 나은 선택일 수 있습니다.
방법 3: C#에서 프로그래밍 방식으로 Word 문서에 글꼴 포함하기
Word 문서를 자동으로 생성하는 경우 Word에서 글꼴 설정을 수동으로 구성하는 것은 실용적이지 않을 수 있습니다. 이러한 경우 프로그래밍 방식의 글꼴 포함은 확장 가능한 솔루션을 제공합니다.
Spire.Doc for .NET을 사용하면 로컬 글꼴 파일을 지정하여 Word 문서에 사용자 지정 글꼴을 포함할 수 있습니다. 이 라이브러리는 새로 생성된 문서와 기존 Word 파일 모두를 지원하므로 자동화된 문서 워크플로에 적합합니다.
프로그래밍 방식의 글꼴 포함을 사용하는 이유
자동화된 글꼴 포함은 다음 경우에 유용합니다:
- 문서 생성 시스템
- 보고 애플리케이션
- 일괄 문서 처리
- 템플릿 기반 워크플로
- 사용자 지정 브랜드 글꼴에 의존하는 문서
사용자가 글꼴을 수동으로 설치하도록 요구하는 대신, 애플리케이션이 필요한 글꼴 리소스를 생성된 문서에 직접 패키징할 수 있습니다.
C#을 사용하여 Word 문서에 글꼴 포함하기
using Spire.Doc;
using Spire.Doc.Documents;
using Spire.Doc.Fields;

namespace Embed_private_font_into_Word
{
    class Program
    {
        static void Main(string[] args)
        {
            Document document = new Document();
            Section section = document.AddSection();
            Paragraph p = section.AddParagraph();

            TextRange range = p.AppendText("Let life be beautiful like summer flowers\n"
                +"Life, thin and light-off time and time again\n"
                + "Frivolous tireless");
            range.CharacterFormat.FontName = "DeeDeeFlowers";
            range.CharacterFormat.FontSize = 20;

            document.EmbedFontsInFile = true;
            document.PrivateFontList.Add(new PrivateFontPath("DeeDeeFlowers", @"C:\Fonts\DeeDeeFlowers.ttf"));

            document.SaveToFile("result.docx", FileFormat.Docx);
        }
    }
}
이 예제에서는 사용자 지정 글꼴을 로컬 TTF 파일에서 로드하여 문서 콘텐츠에 적용하고 생성된 DOCX 파일에 포함합니다. 결과적으로 해당 글꼴이 설치되지 않은 시스템에서도 문서가 올바르게 표시될 수 있습니다.
자동화된 글꼴 포함의 이점
자동화된 글꼴 포함은 문서 생성 및 처리 워크플로에서 특히 유용합니다. 사용자 지정 글꼴을 포함하는 것 외에도 개발자는 프로그래밍 방식으로 문서 콘텐츠를 수정하고, 글꼴을 변경하며, 서식을 적용하고, 일관된 모양을 유지하면서 Word 문서를 PDF로 변환할 수 있습니다. 이러한 작업을 단일 워크플로로 결합하면 수동 작업을 줄이고 다양한 기기와 환경에서 안정적인 결과를 보장하는 데 도움이 됩니다.
글꼴이 포함되었는지 확인하는 방법
글꼴을 포함한 후 결과를 확인하는 것이 좋습니다.
Word 문서의 경우, 원래 글꼴이 설치되지 않은 다른 컴퓨터에서 파일을 다시 엽니다. 글꼴 대체 없이 문서가 올바르게 표시되면 포함이 성공한 것입니다.
PDF 파일의 경우, 문서 속성의 글꼴 섹션을 사용하여 글꼴이 포함된 것으로 나열되는지 확인합니다.
별도의 기기에서 테스트하는 것이 최종 출력을 검증하는 가장 확실한 방법입니다.
일반적인 글꼴 포함 문제 해결
글꼴이 성공적으로 포함되지 않음
문서가 내 컴퓨터에서는 올바르게 표시되지만 다른 기기에서는 다른 글꼴을 사용하는 경우 글꼴이 성공적으로 포함되지 않았을 수 있습니다. 파일을 .docx 형식으로 저장하고 저장하기 전에 파일에 글꼴 포함이 활성화되어 있는지 확인하십시오. 결과를 확인하려면 원래 글꼴이 설치되지 않은 컴퓨터에서 문서를 열어보십시오.
글꼴 포함 옵션이 회색으로 표시됨
이 옵션은 문서를 호환 모드에서 열거나, 읽기 전용으로 설정하거나, 조직 정책에 의해 제한된 경우 사용할 수 없을 수 있습니다. 파일을 최신 DOCX 형식으로 변환하고 편집 제한을 제거해 보십시오. Microsoft Word를 최신 버전으로 업데이트하면 기능이 복구될 수도 있습니다.
포함 후 파일 크기가 너무 큼
글꼴을 포함하면 특히 여러 사용자 지정 글꼴을 사용할 때 파일 크기가 눈에 띄게 커질 수 있습니다. 영향을 줄이려면 문서에 사용된 문자만 포함 및 일반 시스템 글꼴은 포함 안 함을 활성화하십시오. 포함된 글꼴 패밀리 수를 제한하는 것도 문서 크기를 관리하는 데 도움이 됩니다.
특정 글꼴을 포함할 수 없음
일부 글꼴에는 포함을 방지하는 라이선스 제한이 있습니다. Word가 저장 중에 경고를 표시하거나 글꼴을 건너뛰는 경우 글꼴의 포함 권한을 확인하고 포함 가능한 대안을 사용하는 것을 고려하십시오. 편집이 필요하지 않은 경우 문서를 PDF로 변환하는 것이 가장 간단한 해결 방법인 경우가 많습니다.
결론
글꼴 포함은 다양한 기기와 환경에서 Word 문서의 모양을 유지하는 가장 효과적인 방법 중 하나입니다. 일상적인 사용의 경우 Word의 내장 포함 기능으로 충분한 경우가 많습니다. 문서 배포의 경우 PDF로 변환하면 뛰어난 호환성을 제공합니다. 자동화된 워크플로 및 대규모 문서 생성의 경우 C# 글꼴 포함이 가장 큰 유연성과 제어 기능을 제공합니다.
상황에 가장 적합한 방법을 선택하면 글꼴 대체 문제를 방지하고 문서가 항상 의도한 대로 정확하게 표시되도록 할 수 있습니다.
자주 묻는 질문(FAQ)
모든 글꼴을 Word에 포함할 수 있나요?
아니요. 글꼴 포함은 글꼴 공급업체가 정의한 권한에 따라 다릅니다.
글꼴을 포함하면 파일 크기가 커지나요?
네. 글꼴 데이터가 파일 내부에 저장되므로 문서가 더 커집니다.
전체 포함과 부분 포함의 차이점은 무엇인가요?
전체 포함은 글꼴 전체를 포함하고, 부분 포함은 문서에 사용된 문자만 포함합니다.
PDF가 Word에 글꼴을 포함하는 것보다 나은가요?
PDF는 일반적으로 공유 및 인쇄에 더 좋고, 포함된 Word 문서는 편집하기가 더 쉽습니다.
C#을 사용하여 자동으로 글꼴을 포함할 수 있나요?
네. Spire.Doc과 같은 라이브러리를 사용하면 개발자가 문서 생성 중에 프로그래밍 방식으로 글꼴을 포함할 수 있습니다.