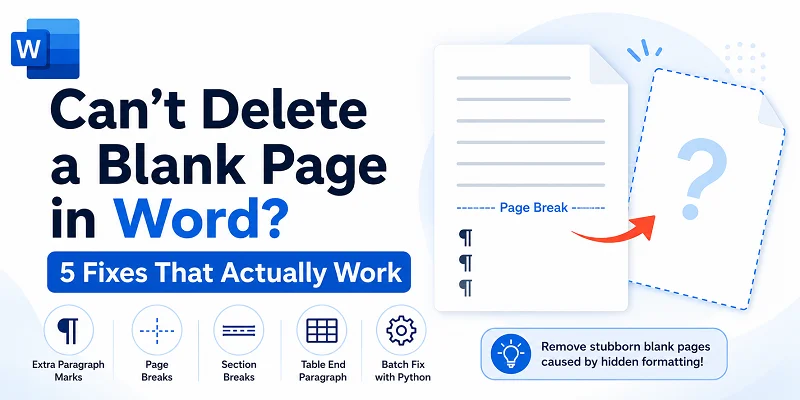
Can't Delete a Blank Page in Word? 5 Fixes That Actually Work
Table of Contents
Have you ever pressed Backspace or Delete several times, only to find that a blank page still refuses to disappear in Microsoft Word?
In Word, a blank page is rarely truly empty. It usually remains because of hidden formatting elements, such as extra paragraph marks, manual page breaks, section breaks, or the required paragraph after a table.
The safest way to fix the problem is to reveal what Word is hiding, identify the cause, and then remove the right element. This guide shows 5 practical ways to delete a blank page in Word, including a Python automation method for batch document cleanup.
Reveal What's Causing the Blank Page
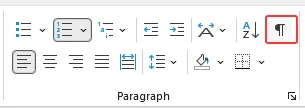
Before trying any fix, turn on formatting marks so you can see the hidden elements that are creating the blank page.
-
Go to the Home tab.
-
In the Paragraph group, click the Show/Hide ¶ button.
-
Or use the shortcut:
- Windows: Ctrl + Shift + 8
- Mac: Command + 8
Once the hidden marks are visible, check what appears on the blank page and choose the matching method below.
| What You See on the Blank Page | Best Method to Use |
|---|---|
| Extra ¶ paragraph marks | Delete extra paragraph marks |
| A ------- Page Break ------- line | Remove the manual page break |
| A ======= Section Break ======= line | Delete or adjust the section break |
| A ¶ paragraph mark right after a table at the page end | Shrink the paragraph after a table |
| Blank pages across dozens of files | Use Python to remove blank pages in batch |
5 Practical Ways to Delete a Blank Page in Word
Method 1: Delete Extra Paragraph Marks
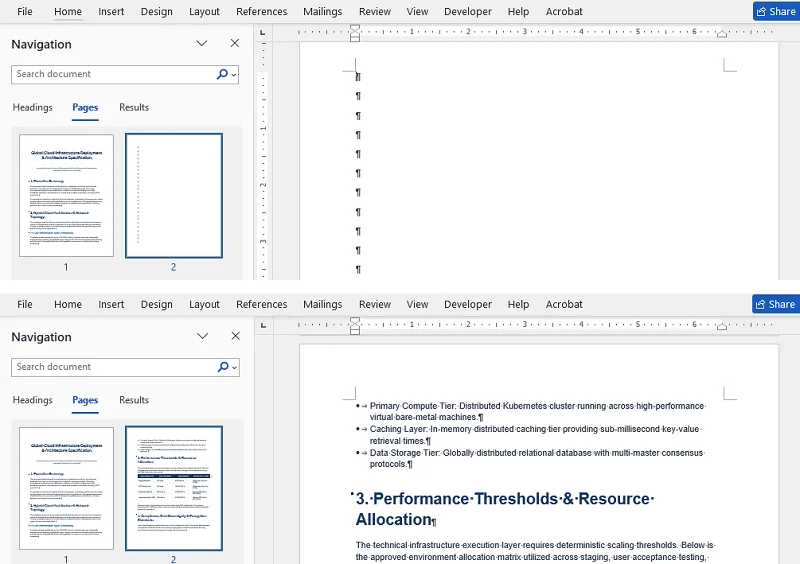
If your blank page contains one or more ¶ symbols, it is usually caused by pressing the Enter key too many times.
How to Fix It
- Click and drag your mouse to highlight all the extra ¶ marks on the blank page.
- Press Backspace or Delete on your keyboard.
Result
The extra paragraph marks are removed, and the blank page disappears.
⚠️ Important Note
Do not delete paragraph marks blindly throughout a formatted document. Some ¶ marks carry specific spacing, styles, or layout formatting. Only delete the marks that are actively creating the unwanted blank page.
Method 2: Remove the Manual Page Break
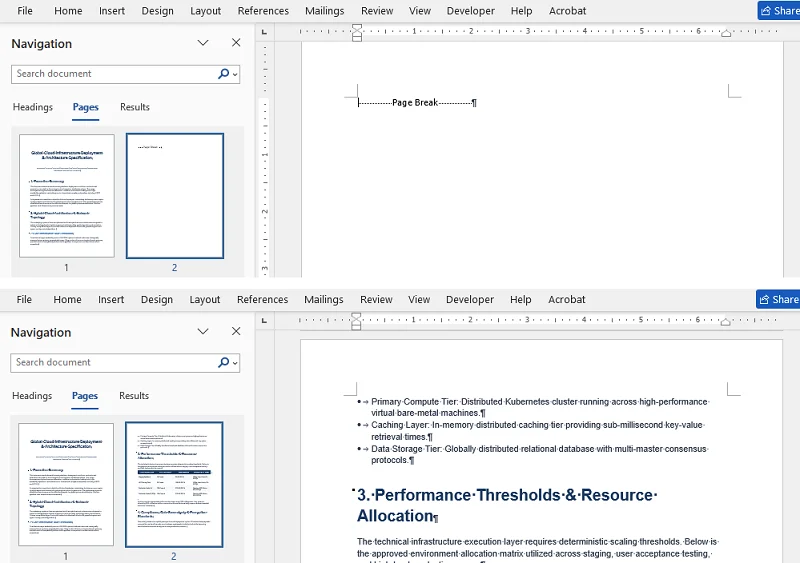
If you see a dotted line that explicitly says ------- Page Break -------, this is a manual break forcing the content after it to start on a fresh page.
How to Fix It
- Double click the ------- Page Break ------- line to select it.
- Press Delete on your keyboard.
Result
The manual page break is removed, and the content after it moves up.
Extra Tip
A manual page break is different from an automatic page break. Word creates automatic page breaks based on page size, margins, and content flow. Automatic page breaks cannot be deleted directly.
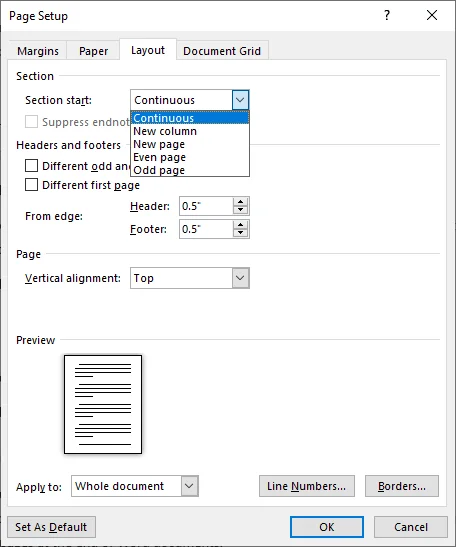
Method 3: Delete or Adjust a Section Break
If you see a ======= Section Break (Next Page) ======= line, Word may be starting the next section on a new page, which can leave a blank page in between.
To fix this, you have two options depending on whether you want to completely remove the break or keep its formatting benefits:
Option 1: Delete the Section Break Completely
- Place your cursor right before the ======= Section Break (Next Page) ======= line.
- Press Delete.
Option 2: Convert to a Continuous Section Break
-
Double-click the ======= Section Break (Next Page) ======= line to open the Page Setup menu.
-
Switch to the Layout tab.
-
Change the Section start dropdown selection to Continuous, then click OK.
⚠️ Important Note
Deleting a section break can sometimes alter the headers, footers, or margins of the surrounding text because the content merges into the next section's formatting. If your layout breaks unexpectedly, press Ctrl + Z immediately to undo and use Option 2 instead.
Advanced Tip: Check Paragraph Pagination Settings
If you cannot find any manual page breaks or section breaks, but a blank page still appears, a hidden paragraph setting might be the cause.
- Look for a paragraph mark with a small square next to it on the blank page or at the top of the next page.
- Select that paragraph.
- Right-click and choose Paragraph.
- Open the Line and Page Breaks tab.
- Uncheck Page break before.
- Click OK.
This allows the paragraph to flow normally instead of forcing a new page.
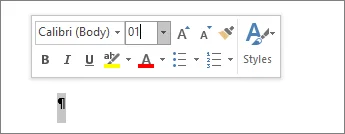
Method 4: Shrink the Paragraph After a Table
According to Microsoft Support documentation, Word includes a non-deletable end paragraph, which can sometimes be pushed to a new blank page. This often happens when a table ends at the very bottom of a page.
How to Remove a Blank Page After a Table in Word
-
Select the paragraph mark (¶) right after the table.
-
Go to the Font Size box.
-
Type 1 and press Enter.
Extra Tip
If shrinking the font size to 1 doesn't work, try one of the following:
- Select the paragraph mark after the table, press Ctrl + D to open the Font dialog box, check Hidden under the Effects section, and click OK.
- Slightly reduce the bottom margin from Layout > Margins > Custom Margins. Use this carefully, because changing margins may affect the page layout.
Method 5: Use Python to Remove Blank Pages in Batch
If you are dealing with dozens or hundreds of Word documents cluttered with accidental blank pages, doing this manually is highly inefficient. You can use Python and the Spire.Doc for Python library to batch remove blank pages automatically without opening Microsoft Word.
Prerequisites
First, ensure you have Python 3.7 or above installed, then install Spire.Doc for Python via pip:
pip install spire.doc
For a step-by-step setup guide, check how to install Spire.Doc for Python.
Batch Remove Blank Pages from Word Documents with Python and Spire.Doc
This script automatically scans a folder, opens each Word .docx file, removes blank pages using the RemoveBlankPages() method, and saves the cleaned file.
import os
from spire.doc import Document, FileFormat

input_folder = "./input_docs/"
output_folder = "./cleaned_docs/"

# Create output directory if it doesn't exist
if not os.path.exists(output_folder):
    os.makedirs(output_folder)

# Loop through all files in the input folder
for filename in os.listdir(input_folder):
    if filename.endswith(".docx") and not filename.startswith("~$"):
        doc = Document()
        doc.LoadFromFile(os.path.join(input_folder, filename))

        # Remove blank pages automatically
        doc.RemoveBlankPages()

        # Save to the output folder
        doc.SaveToFile(os.path.join(output_folder, "cleaned_" + filename), FileFormat.Docx2016)
        doc.Close()
Pro Tip
- Always back up your original Word files before running any automation scripts on them.
- Test on a small number of files first and review the output documents before processing the entire folder.
Want to export the cleaned document to PDF? See our guide on converting Word to PDF in Python.
Conclusion
Most blank pages in Word are caused by hidden formatting elements, such as extra paragraph marks, page breaks, section breaks, or the required paragraph after a table. Once you reveal these marks, you can remove the blank page without damaging the document layout.
For one document, Word's built-in tools are usually enough. For repeated cleanup across many files, Python automation can make the process faster and more consistent.
Frequently Asked Questions
Q1: Why can't I remove a blank page in Word?
A: Blank pages are often caused by hidden elements such as extra paragraph marks, manual page breaks, or section breaks. Turn on formatting marks (¶) to identify and delete them.
Q2: Will removing a blank page affect my document's formatting?
A: It depends on the type of blank page. Deleting extra paragraphs or manual page breaks usually has minimal impact. However, removing section breaks can alter headers, footers, or margins, so be careful and use "Undo" if needed.
Q3: Can I delete blank pages in Word Online?
A: Yes, but with limitations. In Word Online, you can show formatting marks, then delete extra paragraph marks. However, some advanced formatting like section breaks may be harder to manage in Word Online.
Q4: How can I remove blank pages from multiple Word documents at once?
A: For bulk removal, you can use Python scripts with libraries like Spire.Doc to automatically detect and delete blank pages across multiple documents, saving time on repetitive manual edits.
Q5: Can I export a Word document without the last blank page?
A: Yes. If you only need a PDF or printed copy, you can exclude the last blank page by using a custom page range. For example, if page 5 is blank, go to File > Print and enter 1-4, or go to File > Export > Create PDF/XPS > Options and specify the pages you want to include. This does not delete the blank page from the Word document itself.
Explore More Word Processing Tutorials
How to Convert PowerPoint to Video (MP4): 3 Proven Methods

When sharing PowerPoint presentations across platforms such as YouTube, LMS systems, or mobile devices, compatibility issues like missing fonts or broken animations can occur. Converting PowerPoint to MP4 video ensures consistent playback and easier distribution.
This guide explains three practical methods to convert PowerPoint to video, including built-in export tools, online converters, and C# automation for batch processing.
- Method 1: Microsoft PowerPoint Built-in Export Feature (Native Support)
- Method 2: Online PowerPoint to Video Converters (No Installation)
- Method 3: C# automation using Spire.Presentation (Batch Processing)
PowerPoint vs. Video: Why Conversion Matters
Before diving into the methods, it helps to understand the fundamental difference between these two formats.
A PowerPoint file (.pptx) is an editable presentation format, designed for live creation and manual slide navigation. A video file (.mp4), on the other hand, is a fully rendered media format, engineered for seamless playback.
Once converted into a video, your presentation becomes:
- Universally Compatible: Plays on any device without requiring Microsoft PowerPoint or compatible viewers.
- Tamper-Proof: Non-editable, protecting your fonts, layouts, and intellectual property from accidental changes.
- Stream-Ready: Highly optimized for direct upload and smooth distribution across modern platforms.
In short, PowerPoint remains your tool for creation, while video format is your best vehicle for distribution.
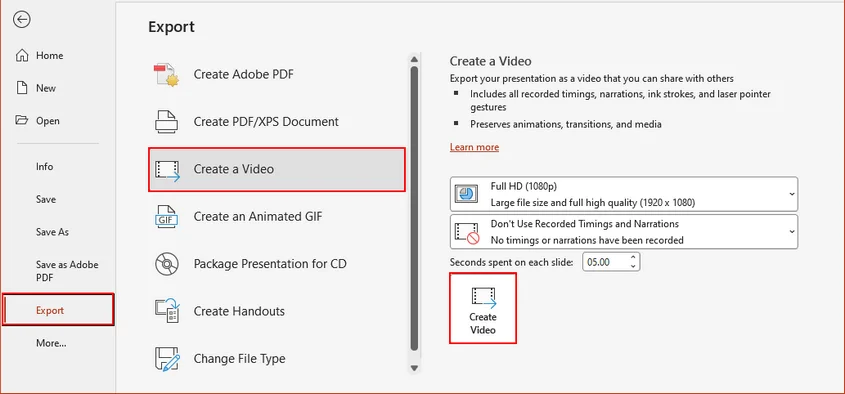
Method 1: Microsoft PowerPoint Built-in Export Feature (Native Support)
If you're already working in Microsoft PowerPoint, the built-in export feature is the fastest and most reliable way to convert a presentation into a video without using third-party tools
Step-by-Step Guide:
-
Open your PowerPoint presentation file.
-
Navigate to the top menu and click File > Export > Create a Video.
-
Choose your desired video quality (e.g., Ultra HD 4K, Full HD 1080p) and configure the recorded timings/narrations if needed.
-
Click the Create Video button, select your output destination, and save it as an MP4 file.
Tip:
If no manual narration is added, make sure slide timings are properly set; otherwise, the video will default to fixed durations.
⚠️ Notes:
This method preserves animations, transitions, and embedded media. However, the export is fully manual, and each file needs to be processed individually.
When to use:
Best for quickly converting a small number of presentations with full feature preservation using PowerPoint only.
Method 2: Online PowerPoint to Video Converters (No Installation)
When you don't have PowerPoint installed or need a quick conversion on any device, online PowerPoint-to-video converters can be a convenient option.
These tools run in the browser and allow you to upload a presentation and download it as a video file.
How to Convert PowerPoint to Video Online
-
Upload your .ppt or .pptx file to a trusted conversion platform such as Canva.

-
Select MP4 as the target output format.
-
Click Convert and wait for cloud processing to finish.
-
Download the generated video file.
⚠️ Security Notes:
Online converters are convenient, but they are not always suitable for sensitive or large presentations, since files are processed on third-party servers and may have size or feature limitations and potential privacy risks. For confidential information, consider using offline methods such as PowerPoint or C#.
When to use:
Suitable for fast, occasional conversions when you don't have PowerPoint installed and the file is not sensitive.
Method 3: C# automation using Spire.Presentation (Batch Processing)
For developers and enterprise environments handling multiple PowerPoint presentations, automation is the most scalable method. Using C# and Spire.Presentation for .NET, you can programmatically convert PowerPoint files into video format and seamlessly integrate the logic into backend services or batch pipelines.
This method does not require Microsoft Office to be installed on the host machine, making it suitable for server-side processing.
Environment Setup
-
Install the Required Library: Download the library via the official page or install it via the NuGet Package Manager Console:
Install-Package Spire.Presentation -
Install FFmpeg Dependency: This feature relies on FFmpeg for video encoding. Download the FFmpeg package and extract it to a local directory.
C# Script to Batch Convert Multiple PowerPoint Presentations to MP4
The following code example scans an input directory for .pptx files, configures rendering parameters, and exports them to videos.
using System;
using System.IO;
using Spire.Presentation;

namespace PptToVideoAutomation
{
    class Program
    {
        static void Main(string[] args)
        {
            // Define environment paths
            string ffmpegBinPath = @"D:\tools\ffmpeg\bin"; // The path to the bin folder of the FFmpeg package
            string inputFolder   = @"C:\PPT\Input\";
            string outputFolder  = @"C:\PPT\Output\";

            // Ensure the output directory exists
            if (!Directory.Exists(outputFolder))
            {
                Directory.CreateDirectory(outputFolder);
            }

            // Retrieve all PowerPoint files from the input directory
            string[] pptxFiles = Directory.GetFiles(inputFolder, "*.pptx");

            Console.WriteLine($"Found {pptxFiles.Length} files to convert. Starting pipeline...\n");

            foreach (string inputFile in pptxFiles)
            {
                try
                {
                    string fileName = Path.GetFileNameWithoutExtension(inputFile);
                    string outputFile = Path.Combine(outputFolder, $"{fileName}.mp4");

                    // Use the 'using' block to automatically release memory and resources per file
                    using (Presentation presentation = new Presentation())
                    {
                        // Load the PowerPoint file
                        presentation.LoadFromFile(inputFile);

                        // Point to the FFmpeg binary folder
                        presentation.SaveToVideoOption = new SaveToVideoOption(ffmpegBinPath);

                        // Customize video performance settings
                        presentation.SaveToVideoOption.Fps = 30;                  // Frame rate / Smoothness (Max: 60)
                        presentation.SaveToVideoOption.DurationForEachSlide = 4;  // Screen duration per static slide (Seconds)

                        // Save to MP4 (Or use FileFormat.WMV for Windows Media Video)
                        presentation.SaveToFile(outputFile, FileFormat.MP4);

                        Console.WriteLine($"[SUCCESS] Converted: {fileName}.pptx -> {fileName}.mp4");
                    }
                }
                catch (Exception ex)
                {
                    Console.WriteLine($"[ERROR] Failed to convert {Path.GetFileName(inputFile)}: {ex.Message}");
                }
            }

            Console.WriteLine("\nBatch conversion process finished.");
        }
    }
}
Result:
Here is one of the videos converted from PowerPoint, with all formatting and animations preserved:
When to Use:
Best for large-scale, automated batch conversion in developer or enterprise workflows.
If you need to reuse PowerPoint content in different formats, read our guide on converting presentations to PDF or images in C#.
Comparison: Which PowerPoint to Video Method Should You Choose
| Method | Output Quality | Security | Automation | Scalability | Best For |
|---|---|---|---|---|---|
| MS PowerPoint Export | ⭐⭐⭐⭐⭐ | ⭐⭐⭐⭐⭐ | ❌ No | Low | Small number of files, high-fidelity conversion |
| Online Converters | ⭐⭐⭐ | ⭐⭐ | ❌ No | Low | Quick tasks, users without MS Office |
| C# (Spire.Presentation) | ⭐⭐⭐⭐ | ⭐⭐⭐⭐⭐ | ✅ Yes | Very High | Batch processing, Enterprise-level automation |
How to choose the correct conversion method?
- If you need maximum quality + animations preserved → PowerPoint export
- If you need quick one-time conversion → Online tools
- If you need automation or batch processing → C# solution
Common PPT to Video Conversion Issues and Fixes
- Missing Animations: Some web tools fail to render complex animations. Export via Microsoft PowerPoint or a professional library that supports slide transition timelines.
- Bloated Video Size: 4K rendering or large internal media makes the file massive. Run Compress Media in PowerPoint before exporting, or lower the export resolution.
- Conversion Failures: Outdated .ppt formats can crash modern code parsers. Save .ppt files to modern .pptx format before processing.
- No Audio/Narration: Linked external audio gets dropped during export. Embed the audio files directly inside the PPT before converting.
Conclusion
Converting PowerPoint to video is important for modern content distribution. While desktop and online tools are suitable for simple conversions, they lack scalability and automation. For enterprise-level workflows, developers can use C# and libraries such as Spire.Presentation to enable efficient batch processing and automated video generation.
FAQs
Q1: Can PowerPoint convert PPT to video directly?
A1: Yes, Microsoft PowerPoint has a built-in "Export to Video" feature that allows you to save presentations as MP4 files.
Q2: What is the best format for PowerPoint video output?
A2: MP4 is the most recommended format because it offers good compression and is compatible with almost all devices and platforms.
Q3: Can I batch convert PowerPoint files to video?
A3: Yes. Batch conversion can be automated using C# with libraries like Spire.Presentation.
Q4: Does Spire.Presentation preserve animations?
A4: Yes, it supports most slide elements, including transitions and common animations during conversion.
Q5: Do I need Microsoft Office installed for C# PowerPoint to video conversion?
A5: No. Spire.Presentation works independently of Microsoft Office and can run in server or cloud environments.
Explore More PowerPoint Processing Tutorials
How to Convert Excel to Markdown in Python (Files, Sheets & Ranges)
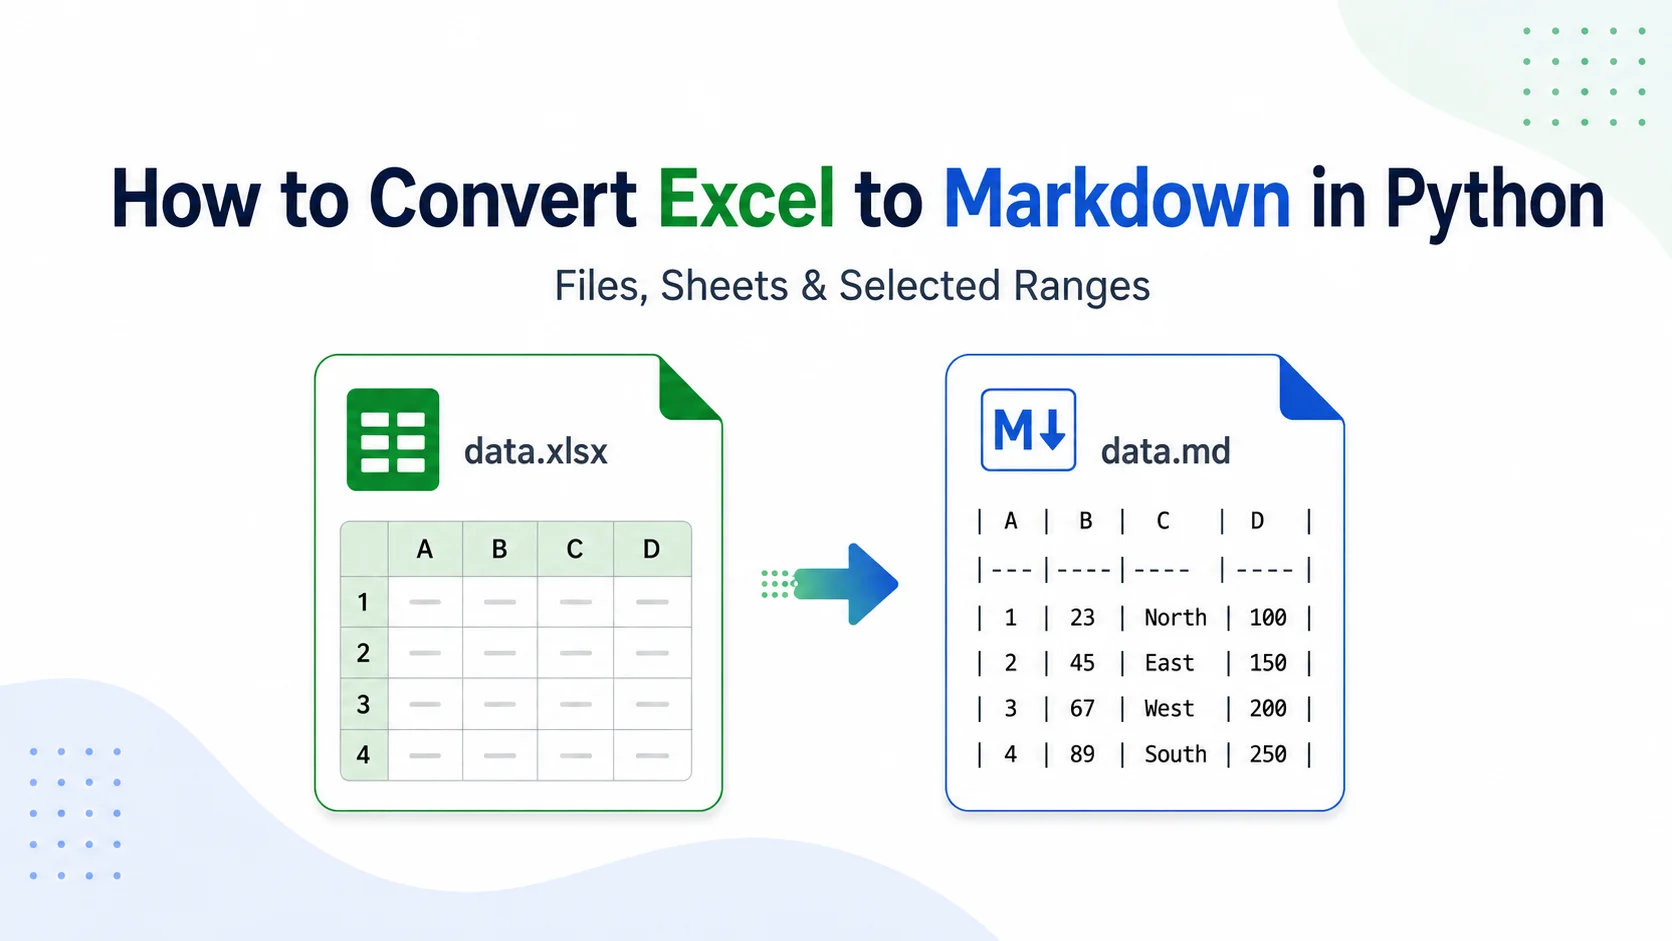
Excel files are commonly used to store structured data, while Markdown is widely used in technical documentation, static websites, and Git-based publishing workflows. When you need to reuse spreadsheet data in Markdown documents, manually copying and reformatting Excel tables can be time-consuming and error-prone. A more reliable approach is to automate the conversion with Python.
This tutorial demonstrates how to convert Excel to Markdown in Python using Spire.XLS for Python. You will learn how to convert entire workbooks, export specific sheets or cell ranges, as well as batch processing with simple code examples.
In This Article
- Why Convert Excel to Markdown?
- Install Python Excel to Markdown Library
- Basic Excel to Markdown Conversion in Python
- Advanced Excel to Markdown Conversion Scenarios
- Best Practices for Converting Excel to Markdown
- Conclusion
- FAQs
Why Convert Excel to Markdown?
Converting Excel tables to Markdown can be useful in several scenarios:
- Create documentation: Add Excel tables to README files and wikis.
- Use with Git: Markdown is text-based and easier to track than Excel files.
- Publish online: Use Excel data in blogs or docs sites.
- Share data easily: Markdown tables are lightweight and widely compatible across platforms.
Install Python Excel to Markdown Library
To convert Excel files to Markdown in Python, install Spire.XLS for Python from PyPI:
pip install spire.xls
Markdown conversion is supported in Spire.XLS for Python 16.4.0 and later versions. If you are using an earlier version, upgrade the package first:
pip install --upgrade spire.xls
Basic Excel to Markdown Conversion in Python
The simplest way to convert an Excel file to Markdown is to load the workbook and save it as a .md file.
The process only requires three main steps:
- Create a Workbook object.
- Load the Excel file using the Workbook.LoadFromFile() method.
- Save the workbook as a Markdown file using the Workbook.SaveToMarkdown() method.
from spire.xls import Workbook

# Create a Workbook object
workbook = Workbook()

# Load an Excel file
workbook.LoadFromFile("report.xlsx")

# Save the workbook as a Markdown file
workbook.SaveToMarkdown("output.md")

# Release resources
workbook.Dispose()
Output:
Advanced Excel to Markdown Conversion Scenarios
In many real-world projects, you may not always need to convert the entire workbook. You may want to customize how images and hyperlinks are exported, convert only one worksheet, export a selected range, or process a folder of Excel files automatically.
The following sections show how to implement these conversions in Python.
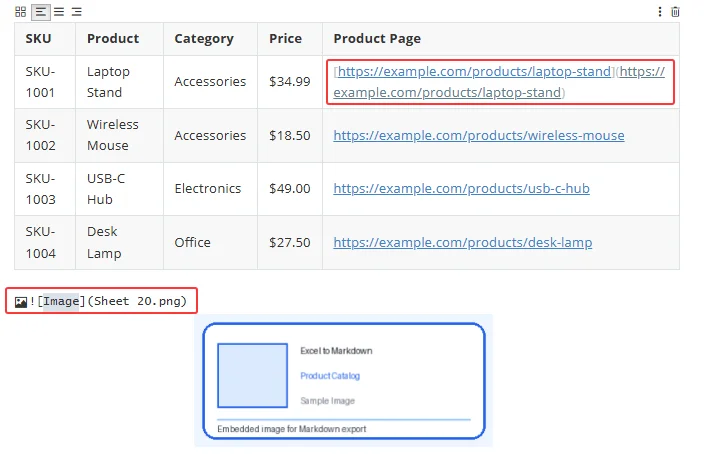
1. Customize Image and Hyperlink Export Options
When exporting Excel to Markdown, images and hyperlinks are written as Markdown syntax. You can use the properties of the MarkdownOptions class to control how image paths and hyperlinks are saved in the output file.
| Property | When Set to True | When Set to False |
|---|---|---|
| SavePicInRelativePath | Images are saved with relative paths, such as  . |
Images are saved with absolute paths, such as  . |
| SaveHyperlinkAsRef | Hyperlinks are saved as reference-style links, such as [Link Text][ref1] . |
Hyperlinks are saved as inline links, such as [Link Text](https://example.com) . |
Using relative image paths is usually better for documentation projects because the Markdown file and image folder can be moved together. Inline links are often easier to read and maintain in smaller Markdown files.
The following example shows how to convert an Excel workbook to Markdown with custom image and hyperlink options:
from spire.xls import Workbook, MarkdownOptions

# Create a Workbook object
workbook = Workbook()

# Load an Excel file
workbook.LoadFromFile("sample.xlsx")

# Create a MarkdownOptions object
markdown_options = MarkdownOptions()

# Save images with relative paths
markdown_options.SavePicInRelativePath = True

# Save hyperlinks as inline links
markdown_options.SaveHyperlinkAsRef = False

# Save the workbook as a Markdown file
workbook.SaveToMarkdown("custom_options.md", markdown_options)

# Release resources
workbook.Dispose()
Output:
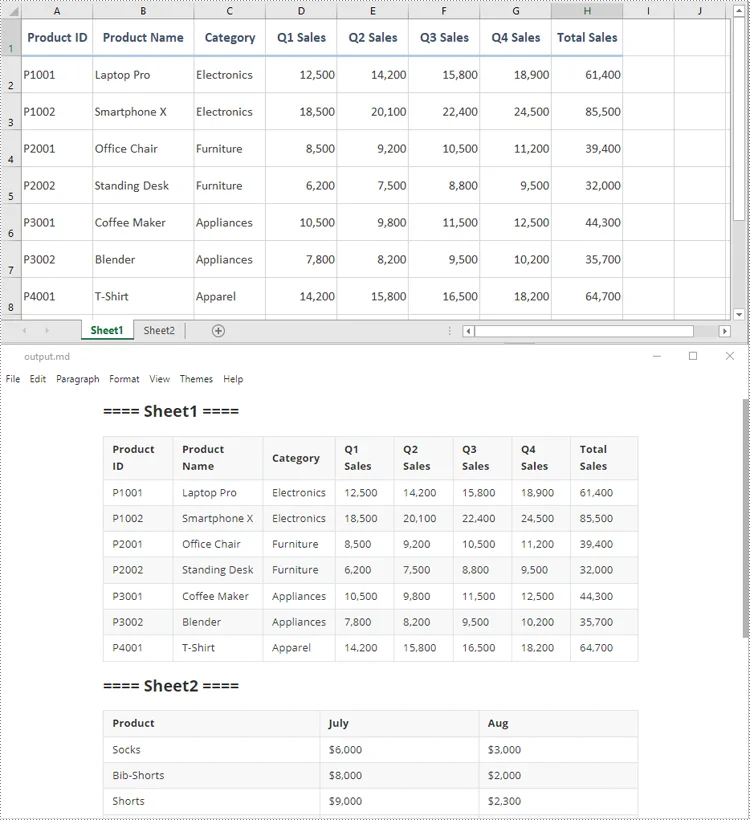
2. Convert a Specific Sheet to Markdown
If an Excel workbook contains multiple worksheets, but you only need to export one sheet, you can copy the target worksheet to a new workbook with the AddCopy method, and then save that new workbook as a .md file.
This approach helps avoid exporting unnecessary sheets into the same Markdown document.
from spire.xls import Workbook


def convert_specific_sheet(excel_file, sheet_name, output_md):
    """
    Convert a specific worksheet in an Excel file to Markdown.
    """
    workbook = Workbook()
    new_workbook = None

    try:
        # Load the Excel file
        workbook.LoadFromFile(excel_file)

        # Find the target worksheet by name
        worksheet = None
        for ws in workbook.Worksheets:
            if ws.Name == sheet_name:
                worksheet = ws
                break

        if worksheet is None:
            print(f"Worksheet '{sheet_name}' was not found.")
            return

        # Create a new workbook that contains only the target worksheet
        new_workbook = Workbook()
        new_workbook.Worksheets.Clear()
        new_workbook.Worksheets.AddCopy(worksheet)

        # Save the new workbook as Markdown
        new_workbook.SaveToMarkdown(output_md)

        print(f"Worksheet '{sheet_name}' converted successfully to {output_md}.")

    finally:
        # Release resources
        if new_workbook is not None:
            new_workbook.Dispose()

        workbook.Dispose()


# Usage
convert_specific_sheet("report.xlsx", "Sheet 1", "sheet1.md")
3. Export a Selected Cell Range to Markdown
Sometimes, you may only need to export part of a worksheet, such as a summary table, a data range, or a report section. In this case, you can copy the required cell range to a new workbook and save it as a Markdown file.
The following example converts a selected range from a specific worksheet to a Markdown file:
from spire.xls import Workbook, CopyRangeOptions


def convert_cell_range_to_markdown(excel_file, sheet_name, cell_range, output_md):
    """Convert a specific cell range from an Excel worksheet to Markdown.

    Example cell range: "A1:C5"
    """
    workbook = Workbook()
    new_workbook = Workbook()

    try:
        # Load the original Excel file
        workbook.LoadFromFile(excel_file)

        # Get the target worksheet by name
        worksheet = workbook.Worksheets[sheet_name]
        if worksheet is None:
            print(f"Worksheet '{sheet_name}' was not found.")
            return

        # Get the specific source cell range (e.g., "A1:C5")
        src_range = worksheet.Range[cell_range]

        # Initialize the new workbook with a single blank sheet
        new_workbook.CreateEmptySheets(1)
        new_sheet = new_workbook.Worksheets[0]

        # Define the destination range starting at cell A1 in the new sheet.
        # We use the row and column count of the source range to match the size perfectly.
        dest_range = new_sheet.Range[
            1, 1, src_range.Rows.Count, src_range.Columns.Count
        ]

        # Copy ONLY the selected range (all data, formulas, and formatting)
        src_range.Copy(dest_range, CopyRangeOptions.All)

        # Save the new isolated workbook as Markdown
        new_workbook.SaveToMarkdown(output_md)

        print(
            f"Cell range '{cell_range}' from worksheet '{sheet_name}' "
            f"converted successfully to {output_md}."
        )

    except Exception as e:
        print(f"An error occurred: {e}")

    finally:
        # Release resources
        new_workbook.Dispose()
        workbook.Dispose()


# Usage
convert_cell_range_to_markdown(
    "report.xlsx", "Sheet 1", "A1:C5", "cell_range.md"
)
This method is useful when you want to reuse only the key part of a worksheet in documentation, instead of exporting the entire sheet.
4. Batch Convert Multiple Excel Files to Markdown
For large-scale conversion tasks, you can loop through a folder and convert all .xlsx and .xls files to Markdown automatically.
This is especially useful when you need to generate documentation from multiple reports, export datasets regularly, or integrate Excel-to-Markdown conversion into a publishing workflow.
from pathlib import Path
from spire.xls import Workbook


def batch_convert_excel_to_markdown(input_folder, output_folder):
    """
    Convert all Excel files in a folder to Markdown files.
    Supported formats: .xlsx and .xls
    """
    input_dir = Path(input_folder)
    output_dir = Path(output_folder)

    # Create the output folder if it does not exist
    output_dir.mkdir(parents=True, exist_ok=True)

    # Supported Excel file extensions
    excel_extensions = {".xlsx", ".xls"}

    converted_count = 0

    for input_file in input_dir.iterdir():
        # Skip folders, temporary Excel files, and unsupported files
        if not input_file.is_file():
            continue

        if input_file.name.startswith("~$"):
            continue

        if input_file.suffix.lower() not in excel_extensions:
            continue

        output_file = output_dir / f"{input_file.stem}.md"

        workbook = Workbook()

        try:
            # Load the Excel file
            workbook.LoadFromFile(str(input_file))

            # Save as Markdown
            workbook.SaveToMarkdown(str(output_file))

            converted_count += 1
            print(f"Converted: {input_file.name} -> {output_file.name}")

        except Exception as e:
            print(f"Failed to convert {input_file.name}: {e}")

        finally:
            workbook.Dispose()

    print(f"\nBatch conversion complete. {converted_count} file(s) converted.")


# Usage
batch_convert_excel_to_markdown("./excel_files", "./markdown_output")
Best Practices for Converting Excel to Markdown
To get cleaner Markdown output, keep the following tips in mind:
- Use simple table structures whenever possible.
- Unmerge merged cells if the output is intended for Markdown tables.
- Remove unused rows and columns before conversion.
- Use relative image paths for portable documentation projects.
- Review the generated Markdown file before publishing it to GitHub, a wiki, or a static website.
Conclusion
Converting Excel to Markdown in Python with Spire.XLS for Python makes it easy to generate Markdown files from workbook data with minimal code. It is a practical solution for developers who need to add Excel data export to documentation, reporting, or publishing workflows.
FAQs
Q1: What Excel formats can be converted to Markdown?
A1: Common Excel formats such as .xlsx and .xls can be loaded and saved as Markdown files.
Q2: Are images preserved when converting Excel to Markdown?
A2: Yes. By default, images can be embedded in the Markdown output as Base64 strings. You can also configure the export options to save images with relative or absolute file paths.
Q3: Do I need Microsoft Office to convert Excel to Markdown in Python?
A3: No. Spire.XLS for Python works independently and does not require Microsoft Excel or Microsoft Office to be installed.
Get a Free License
To fully experience the capabilities of Spire.XLS for .NET without any evaluation limitations, you can request a free 30-day trial license.
See Also
How to Remove Conditional Formatting in Excel: 5 Easy Ways
Table of Contents
- Quick Summary: How to Remove Conditional Formatting in Excel
- Method 1: Excel Clear Rules Menu (The Native Way)
- Method 2: Excel Clear Formats Tool (The Blanket Reset)
- Method 3: Online Excel Editors (Cloud-Based Cleanup)
- Method 4: VBA Macro (Multi-Sheet Automation)
- Method 5: Python Automation with Spire.XLS (Batch Processing)
- Why Can’t I Remove Conditional Formatting in Excel?
- Clear Rules vs. Clear Formats: What’s the Difference?
- Frequently Asked Questions
Conditional formatting in Excel helps you highlight duplicates, overdue dates, top values, and data trends. However, when a workbook contains too many overlapping or outdated rules, it may become harder to read, slower to edit, or visually cluttered.
Fortunately, clearing conditional formatting does not have to be complicated. In this guide, we will walk you through 5 simple ways to remove conditional formatting in Excel — without altering your underlying worksheet data or structure.
- Quick Summary: How to Remove Conditional Formatting in Excel
- Method 1: Excel Clear Rules Menu (The Native Way)
- Method 2: Excel Clear Formats Tool (The Blanket Reset)
- Method 3: Online Excel Editors (Cloud-Based Cleanup)
- Method 4: VBA Macro (Multi-Sheet Automation)
- Method 5: Python Automation with Spire.XLS (Batch Processing)
- Why Can’t I Remove Conditional Formatting in Excel?
- Clear Rules vs. Clear Formats: What’s the Difference?
- Frequently Asked Questions
Quick Summary: How to Remove Conditional Formatting in Excel
The best method depends on your workflow requirements, your technical setup, and how much formatting you need to clear.
| Method | Best For | Preserves Manual Styles? |
|---|---|---|
| Excel Clear Rules Menu | Quick cleanup of a range, sheet, or table | Yes |
| Excel Clear Formats Tool | Removing all visual styling — including fonts, borders, fills, and conditional formatting — in one go | No |
| Online Excel Editors (Microsoft 365) | Browser-based cleanup without installing Excel | Yes |
| VBA Macro | Automating cleanup across many sheets inside Excel | Yes |
| Python Automation with Spire.XLS | Batch processing many files without opening Excel | Yes |
Method 1: Excel Clear Rules Menu (The Native Way)
The most direct way to remove conditional formatting in Excel is by using the native Clear Rules menu. This method gives you surgical control, allowing you to delete formatting rules from a specific selection or wipe it from the entire worksheet at once.
Step-by-Step Instructions
-
Select your target cells. Highlight a specific area to clean, or click anywhere if you intend to clear the entire worksheet.
-
Navigate to the Home tab on the Excel Ribbon.
-
In the Styles group, click on Conditional Formatting.
-
Hover over Clear Rules to reveal the secondary menu.

-
Choose one of the following options based on your target:
- Clear Rules from Selected Cells: Only affects the area you highlighted.
- Clear Rules from Entire Sheet: Purges all conditional formatting from the active worksheet.
- Clear Rules from This Table: Strips formatting rules from the active table boundary (selectable only if your cursor is inside an Excel Table).
- Clear Rules from This PivotTable: Clears formatting rules applied to the PivotTable (selectable only if your cursor is inside a PivotTable).
After that, Excel will remove all the conditional formatting rules from the selected area.
Tip: Remove a Specific Conditional Formatting Rule from Excel
If you only want to delete one specific rule instead of all rules, go to Home > Conditional Formatting > Manage Rules. Select the rule you no longer need, click Delete Rule, then click Apply and OK.
Method 2: Excel Clear Formats Tool (The Blanket Reset)
If you want to remove conditional formatting together with all other visual cell styles, the Clear Formats tool can reset the selected range in one step.
Step-by-Step Instructions
-
Highlight the range of cells, columns, or rows you want to reset.
-
Stay on the Home tab and look to the far right side of the Ribbon (the Editing group).
-
Click the Clear button (represented by a pink/purple eraser icon).
-
Select Clear Formats from the dropdown menu.
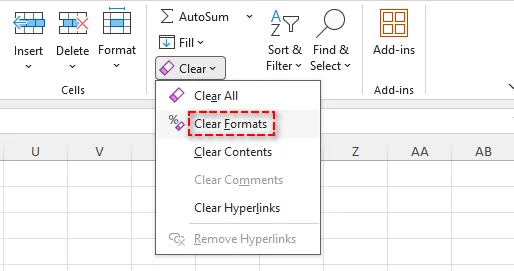
Warning
This removes all custom visuals. Manual bold fonts, borders, fills, currency symbols ($), and custom date formats will instantly revert to Excel's default "General" format. Use this only when you want a completely blank slate.
Method 3: Online Excel Editors (Cloud-Based Cleanup)
If you are collaborating on the go or don't have the desktop version of Excel installed, you can easily clean up rules using Excel for the Web (Microsoft 365).
Step-by-Step Instructions
-
Open Excel for the Web (Microsoft 365) and upload your Excel file.
-
Select the cells containing the formatting you wish to remove.
-
Go to the Home tab on the top ribbon.
-
Click on Conditional Formatting > Clear Rules.
-
Select either From Selected Cells or From Entire Sheet.
The web version instantly syncs your changes, making this an ideal method for cross-platform teams utilizing real-time collaboration.
Method 4: VBA Macro (Multi-Sheet Automation)
Cleaning conditional formatting in Excel sheet-by-sheet in a massive workbook with dozens of tabs is incredibly tedious. You can leverage a simple VBA (Visual Basic for Applications) macro to automate this across your entire file in seconds.
Step-by-Step Instructions
-
Open your Excel workbook.
-
Press Alt + F11 to open the VBA Editor.
-
Click Insert > Module from the top menu.
-
Copy and paste the following VBA code into the code window:
Sub RemoveAllConditionalFormatting()
    Dim ws As Worksheet
    Dim response As VbMsgBoxResult

    response = MsgBox("Are you sure you want to remove conditional formatting from ALL sheets?", vbYesNo + vbQuestion, "Confirm Clear")

    If response = vbYes Then
        For Each ws In ThisWorkbook.Worksheets
            ws.Cells.FormatConditions.Delete
        Next ws

        MsgBox "Successfully removed all conditional formatting rules!", vbInformation, "Done"
    End If
End Sub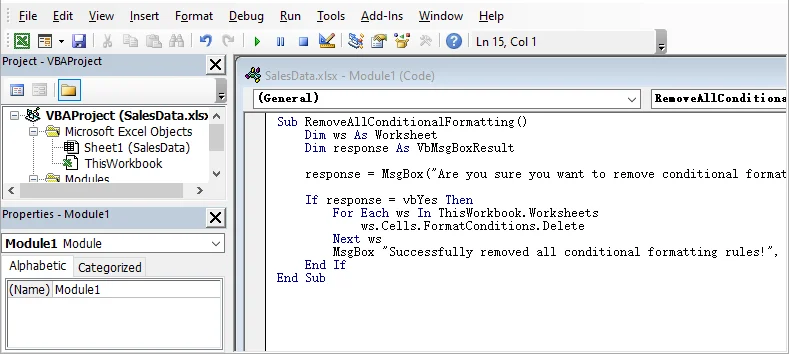
-
Press F5 or click the Run button to execute the macro.
-
Save your workbook as an Excel Macro-Enabled Workbook (.xlsm) if you want to keep the tool for future use.
Note Before Running the VBA Macro
- Save a backup copy first. VBA changes cannot be undone with Ctrl + Z.
- If the macro does not run, check File > Options > Trust Center > Trust Center Settings > Macro Settings. Only enable macros for files and code you trust.
Method 5: Python Automation with Spire.XLS (Batch Processing)
For data engineers, developers, or sysadmins managing hundreds of Excel files on a server, opening individual GUI interfaces isn't viable. Using Python alongside the library Spire.XLS for Python, you can programmatically strip conditional formatting rules from Excel files completely headless and at scale.
Prerequisites
First, ensure you have Python 3.7 or above installed, then install Spire.XLS for Python via pip:
pip install Spire.Xls
For a step-by-step setup guide, check how to install Spire.XLS for Python.
Batch Remove Conditional Formatting from Excel with Python and Spire.XLS
The following script loops through a folder of Excel files, clears all conditional formatting rules using ClearConditionalFormats(), and saves the cleaned copies to an output directory.
from pathlib import Path
from spire.xls import Workbook, ExcelVersion

source_dir = Path("raw_excel_files")
output_dir = Path("cleaned_excel_files")
output_dir.mkdir(exist_ok=True)

for file_path in source_dir.iterdir():
    # Process standard Excel file types
    if file_path.suffix.lower() not in [".xls", ".xlsx"]:
        continue

    # Skip temporary Excel lock files
    if file_path.name.startswith("~$"):
        continue

    try:
        workbook = Workbook()
        workbook.LoadFromFile(str(file_path))

        # Loop through all worksheets in the current workbook
        for worksheet in workbook.Worksheets:
            # Clear conditional formatting from the populated cell boundaries
            worksheet.AllocatedRange.ClearConditionalFormats()

        # Save the sanitized file to the output directory
        output_path = output_dir / f"{file_path.stem}_cleaned.xlsx"
        workbook.SaveToFile(str(output_path), ExcelVersion.Version2016)
        workbook.Dispose()

        print(f"Processed: {file_path.name}")

    except Exception as e:
        print(f"Failed to process {file_path.name}: {e}")

print("Batch processing completed.")
Optional: Remove Formatting from a Specific Sheet or Range Only
If you do not want to clean the entire workbook, you can target a specific worksheet index or an exact cell range.
To clear all rules from the first worksheet only:
worksheet = workbook.Worksheets[0]
worksheet.AllocatedRange.ClearConditionalFormats()
To target a designated cell range (e.g., A1 to F20) on a specific sheet:
worksheet = workbook.Worksheets[0]
worksheet.Range["A1:F20"].ClearConditionalFormats()
If you need to write new rules back into your sheets, see our guide on applying conditional formatting in Excel with Python.
License Notice
Spire.XLS for Python may require a license for production use to remove watermarks. You can request a free trial license for testing, or use the Free Spire.XLS version for small use cases.
Why Can’t I Remove Conditional Formatting in Excel?
If you tried the steps above and the annoying highlights or color scales still won't go away, you are likely dealing with one of these common technical roadblocks:
1. The Worksheet is Protected
If a workbook creator locked the structure to prevent accidental edits, formatting options will be greyed out.
- The Fix: Go to the Review tab and check if the Unprotect Sheet button is visible. If prompted, you will need the original password to unlock it.
2. Shared Workbooks / Legacy Co-authoring
Older Excel file formats (.xls) using legacy "Shared Workbook" settings heavily restrict structural changes, including editing formatting rules.
- The Fix: Go to the Review tab, click Share Workbook, and uncheck "Use the old shared workbooks feature". Better yet, resave the file as a modern .xlsx to unlock full functionality.
3. They are Manual Fills, Not Conditional Rules
It is incredibly common to mistake manual cell fills (someone using the "Paint Bucket" tool to color code cells) for active conditional rules. Clear Rules won't fix manual work.
- The Fix: Highlight the cells, click the Fill Color icon (Paint Bucket) on the Home tab, and select No Fill.
4. The Rule Is Applied to a Different Range
Sometimes the selected cells are not the actual range controlled by the rule.
- The Fix: Go to Home > Conditional Formatting > Manage Rules, change the dropdown to This Worksheet, and check the Applies to range.
Clear Rules vs. Clear Formats: What’s the Difference?
A common mistake is reaching for the general Clear tool, which can strip out formatting you actually want to keep.
- Conditional Formatting > Clear Rules — Removes only the automated rules. Your manually applied fonts, borders, number formats, and alignment stay exactly as they are.
- Home > Clear > Clear Formats — Completely resets all cell styling, including background fills, custom fonts, borders, and critical layouts like currency or date formatting. Use with caution.
Rule of thumb: If you want to clean up automation without touching your design, always use Clear Rules, not Clear Formats.
Frequently Asked Questions
Q1: Can I remove conditional formatting in Excel but keep the cell colors?
A1: Not directly. The colors usually disappear when the rules are removed. To keep them, apply the colors as regular cell formatting first.
Q2: Can I remove only one conditional formatting rule from Excel?
A2: Yes. Go to Home > Conditional Formatting > Manage Rules, select the rule, and click Delete Rule.
Q3: Will removing conditional formatting delete my data or formulas?
A3: No. It only removes rule-based formatting, such as colors, icons, or data bars. Your values and formulas remain unchanged.
Q4: How do I remove conditional formatting from an entire Excel workbook?
A4: Excel’s built-in Clear Rules option works on one worksheet at a time. To remove conditional formatting from all sheets in a workbook, use VBA or Python automation.
Summary
Removing conditional formatting in Excel is straightforward with the right method. For quick manual cleanup, Excel’s Clear Rules Menu is the safest option. For repetitive work, VBA is useful inside Excel, while Python with Spire.XLS provides a practical way to remove conditional formatting from multiple Excel files programmatically without opening Microsoft Excel.
Explore More Excel Processing Tutorials
How to Convert HTML to Markdown in C# (File, String & Stream)
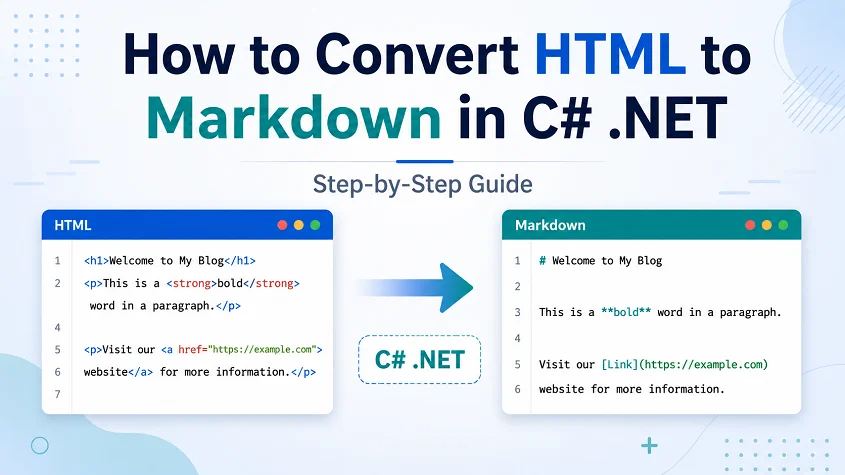
HTML is widely used for web pages, online articles, and rich text content, while Markdown (.md) is often preferred for documentation, technical writing, and text-based publishing. If you need to reuse HTML content in a Markdown-based workflow, converting it manually can be time-consuming and error-prone.
In this tutorial, we’ll show you how to convert HTML to Markdown in C# step-by-step using Spire.Doc for .NET. You’ll learn how to convert HTML files, HTML strings, streams, and multiple HTML files in batch.
Table of Contents
- When Do You Need to Convert HTML to Markdown?
- Install C# HTML to Markdown Library
- Convert an HTML File to Markdown in C#
- Convert HTML Strings to Markdown in C#
- Convert HTML Stream to Markdown in C#
- Batch Convert Multiple HTML Files
- What HTML Elements Can Be Converted to Markdown?
- Troubleshooting Common HTML to Markdown Issues
When Do You Need to Convert HTML to Markdown?
Converting HTML to Markdown is useful when you want to reuse web-based or rich-text content in a cleaner, text-friendly format. Common scenarios include:
- Moving HTML articles or CMS content into Markdown-based documentation systems.
- Preparing content for GitHub, static site generators, or developer portals.
- Converting rich text editor output into editable Markdown files.
- Simplifying HTML pages for version control, review, or long-term maintenance.
- Exporting help center articles, product descriptions, or blog content as .md files.
Install C# HTML to Markdown Library
To convert HTML to Markdown programmatically, you need to add Spire.Doc for .NET to your project. This standalone document processing library allows you to parse HTML and export it to clean Markdown without requiring Microsoft Word or Microsoft Office interop assemblies on your server.
Method 1: Install via NuGet Package Manager
Run this command in your NuGet Package Manager Console:
Install-Package Spire.Doc
Method 2: Download and Reference DLLs Manually
If your development environment is offline or you prefer not to use NuGet, you can manually download and reference the library:
- Download & Unzip: Get the Spire.Doc for .NET package from the official download page and extract it.
- Add Reference: In the Solution Explorer of Visual Studio, right-click Dependencies (or References) > Add Project Reference (or Add Reference) > Browse and select the
Spire.Doc.dllthat matches your target .NET Framework or .NET Core version.
Note: Markdown support is available in Spire.Doc for .NET version 12.3.12 or later.
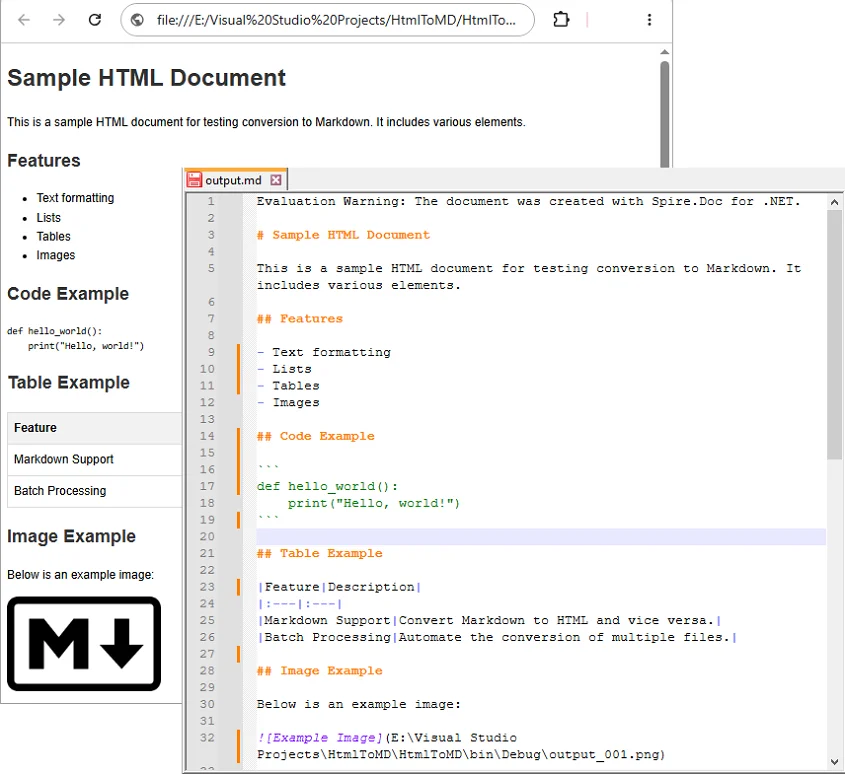
Convert an HTML File to Markdown in C#
If your HTML content is stored as a local .html or .htm file, you can convert it directly using the Document object. This approach is ideal for processing static web pages, documentation exports, or offline help articles.
C# Code Example
using Spire.Doc;
using Spire.Doc.Documents;

namespace ConvertHtmlFileToMarkdown
{
    class Program
    {
        static void Main(string[] args)
        {
            // Initialize a Document instance within a using statement
            using (Document document = new Document())
            {
                // Load the local HTML file
                document.LoadFromFile("input.html", FileFormat.Html, XHTMLValidationType.None);

                // Export the HTML file to a Markdown file
                document.SaveToFile("output.md", FileFormat.Markdown);
            }
        }
    }
}
How the Code Works:
using (Document document = new Document()): Ensures theDocumentobject is properly disposed of after conversion.LoadFromFile("input.html", FileFormat.Html, XHTMLValidationType.None): Reads the source HTML file without strict XHTML validation, allowing the library to parse the HTML even if it doesn’t fully comply with XHTML rules.SaveToFile("output.md", FileFormat.Markdown): Maps the supported HTML elements such as headings, bold text, lists, images, and links into Markdown syntax, and generate the .md file.
Output:
Convert HTML Strings to Markdown in C#
When dealing with dynamic web data—such as content fetched from a database, API responses, or CMS rich-text inputs—you can convert raw HTML strings directly to Markdown without saving them as physical files first.
C# Code Example
using Spire.Doc;
using Spire.Doc.Documents;
namespace ConvertHtmlStringToMarkdown
{
class Program
{
static void Main(string[] args)
{
// Initialize a Document instance
using (Document document = new Document())
{
// Add a section and paragraph to host the dynamic html content
Section section = document.AddSection();
Paragraph paragraph = section.AddParagraph();
// Define the source HTML string
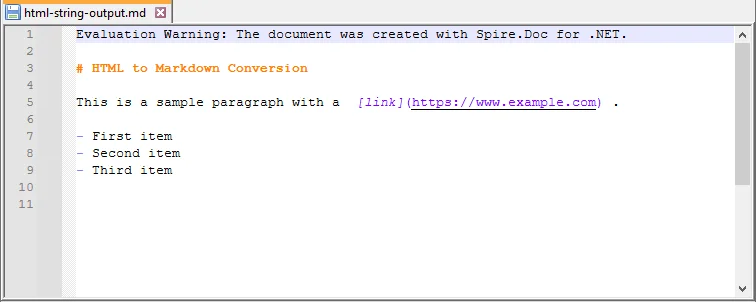
string htmlString = @"
<h1>HTML to Markdown Conversion</h1>
<p>This is a sample paragraph with a <a href='https://www.example.com'>link</a>.</p>
<ul>
<li>First item</li>
<li>Second item</li>
<li>Third item</li>
</ul>";
// Parse and append the HTML string directly into the text paragraph
paragraph.AppendHTML(htmlString);
// Save the fully compiled document model as Markdown
document.SaveToFile("html-string-output.md", FileFormat.Markdown);
}
}
}
}
Key Methods Explanation:
document.AddSection()§ion.AddParagraph(): An emptyDocumentobject does not contain structural layouts. You must explicitly create a parent section and a text paragraph to serve as the container before injecting raw HTML string content.paragraph.AppendHTML(htmlString): Parses the HTML string and inserts supported HTML elements into the document structure.
Output:
Convert HTML Stream to Markdown in C#
In cloud-ready or backend enterprise applications, HTML content is often processed in memory as a stream rather than being read from a fixed physical path. Using LoadFromStream() and SaveToStream(), you can convert in-memory HTML content directly to a Markdown stream.
This approach is useful for web services, ASP.NET applications, background processing tasks, or conversion APIs where files are uploaded, converted, and returned without permanent disk storage.
C# Code Example
using System.IO;
using System.Text;
using Spire.Doc;
using Spire.Doc.Documents;

namespace ConvertHtmlStreamToMarkdown
{
    class Program
    {
        static void Main(string[] args)
        {
            // Define a sample HTML string to simulate an in-memory input source
            string htmlContent = "<h1>HTML Stream to Markdown Stream</h1><p>This process happens entirely in memory.</p>";
            byte[] htmlBytes = Encoding.UTF8.GetBytes(htmlContent);

            // Create an input stream from the HTML bytes
            using (MemoryStream inputStream = new MemoryStream(htmlBytes))
            {
                // Create an empty memory stream to receive the converted Markdown data
                using (MemoryStream outputStream = new MemoryStream())
                {
                    // Initialize the Document instance
                    using (Document document = new Document())
                    {
                        // Load the HTML content directly from the input stream
                        document.LoadFromStream(inputStream, FileFormat.Html, XHTMLValidationType.None);

                        // Save the converted content directly into the output stream as Markdown
                        document.SaveToStream(outputStream, FileFormat.Markdown);
                    }

                    // Crucial: Reset the output stream position to the beginning before reading it
                    outputStream.Position = 0;

                    // Optional: Convert the output stream back to a string to verify the result (you can also save it as a .md file)
                    using (StreamReader reader = new StreamReader(outputStream, Encoding.UTF8))
                    {
                        string markdownResult = reader.ReadToEnd();
                        System.Console.WriteLine(markdownResult);
                    }
                }
            }
        }
    }
}
Batch Convert Multiple HTML Files
For large-scale publishing workflows, you can automate the conversion of multiple HTML files to Markdown using a loop.
C# Code Example
The following example converts all .html files in a source folder to .md files in an output folder.
using Spire.Doc;
using Spire.Doc.Documents;
using System;
using System.IO;

namespace BatchConvertHtmlToMarkdown
{
    internal class Program
    {
        static void Main(string[] args)
        {
            string inputFolder = @"C:\HtmlFiles";
            string outputFolder = @"C:\MarkdownFiles";

            // Create output folder if it does not exist
            Directory.CreateDirectory(outputFolder);

            // Get all HTML files
            string[] htmlFiles = Directory.GetFiles(inputFolder, "*.html");

            foreach (string htmlFile in htmlFiles)
            {
                try
                {
                    string fileName = Path.GetFileNameWithoutExtension(htmlFile);
                    string outputPath = Path.Combine(outputFolder, fileName + ".md");

                    using (Document document = new Document())
                    {
                        document.LoadFromFile(htmlFile, FileFormat.Html, XHTMLValidationType.None);
                        document.SaveToFile(outputPath, FileFormat.Markdown);
                    }

                    Console.WriteLine($"Converted: {Path.GetFileName(htmlFile)}");
                }
                catch (Exception ex)
                {
                    Console.WriteLine($"Failed to convert {Path.GetFileName(htmlFile)}");
                    Console.WriteLine($"Error: {ex.Message}");
                }
            }

            Console.WriteLine("HTML to Markdown batch conversion completed.");
        }
    }
}
What HTML Elements Can Be Converted to Markdown?
HTML has many elements, but Markdown supports only a smaller set of document structures. During conversion, content-focused elements are usually easier to preserve than layout-focused or style-heavy elements. For instance, standard Markdown tables only support basic rows and columns. If your source contains complex tables, you might want to convert HTML to Excel in C# instead.
The following table summarizes common HTML elements and how they may appear in Markdown.
| HTML Element | Markdown Syntax |
|---|---|
<h1> to <h6> |
# to ###### (Headings) |
<p> |
Plain paragraph |
<strong>, <b> |
**bold** |
<em>, <i> |
*italic* |
<ul>, <ol>, <li> |
Bulleted or numbered lists |
<a> |
[Link Text](URL) |
<img> |
 |
<table> |
Markdown table |
<code> |
Inline code |
<pre> |
Code block |
<br> |
Line break |
<div>, <section> |
Usually simplified |
| CSS styles | Limited or removed |
| JavaScript | Not supported |
Tip: Actual output may vary depending on the source HTML structure and the Markdown features supported by the target editor or platform.
Troubleshooting Common HTML to Markdown Issues
- Images not showing: Verify that all image paths are still valid after conversion; relative paths may need adjustment.
- Tables look different: Markdown supports only basic tables. For complex tables with merged cells, nested layouts, or custom styling, simplify the HTML table before conversion or manually adjust the generated Markdown table afterward.
- Special characters appear incorrectly: This is usually an encoding issue. Make sure the source HTML file uses UTF-8 encoding and open the generated Markdown file in an editor that supports UTF-8.
- Extra blank lines: Remove unnecessary empty tags, nested
divelements, or redundantbrtags from the source HTML before conversion. You can also clean the generated Markdown file afterward by opening it in a text editor like Notepad++ and then performing a find & replace.
Conclusion
With Spire.Doc for .NET, converting HTML to Markdown in C# can be implemented in just a few lines of code. This guide covered the core approaches needed for various development scenarios:
- Converting local HTML files and streams to Markdown.
- Inserting and converting dynamic HTML strings.
- Batch converting multiple HTML files simultaneously.
If your workflow also requires the reverse process, see this tutorial on how to convert Markdown to HTML in C#.
Frequently Asked Questions
Q1: Will images be preserved during HTML to Markdown conversion?
A1: Yes. Standard HTML <img> tags can be converted into Markdown image syntax (). Just ensure your source HTML links use valid URLs or correct file paths so the images can load.
Q2: Can I convert an HTML string or stream to Markdown without saving files?
A2: Yes. You can load an HTML string using AppendHTML() or a stream via LoadFromStream(), then export it entirely in memory using SaveToStream() without hitting the local disk.
Q3: Can I convert multiple HTML files to Markdown at once in C#?
A3: Yes. You can use a foreach loop in C# to scan a folder for *.html files, process each file through the converter, and output them to a destination folder in bulk.
Q4: Is Microsoft Word required for HTML to Markdown conversion?
A4: No. Spire.Doc for .NET is a standalone library, so Microsoft Word does not need to be installed.
Convert Markdown to Text | 4 Free, Online & Automated Methods
Table of Contents

Markdown is the gold standard for drafting engineering docs and web content. However, there are many scenarios—such as preparing plain-text emails, generating reports, or integrating content into legacy systems—that require plain text. Converting Markdown to text ensures your content remains readable, accessible, and versatile across platforms.
In this guide, we’ll explore 4 straightforward methods that writers and developers can use to transform Markdown (.md) into clean, plain text (.txt) without losing structure or clarity.
Quick Summary: Best Markdown to Text Methods
Markdown can be converted to text in multiple ways, depending on your technical comfort level, document complexity, and file volume. Here is a quick breakdown of the top 4 methods:
| Method & Tools | Key Advantage | Best For |
|---|---|---|
| Online tools (MDToText, Picotoolkit) | Instant browser conversion, no installation required | One-off, non-sensitive conversion |
| Desktop editors (VS Code, Obsidian) | Works offline and gives you more control over privacy | Regular editing and confidential files |
| Pandoc CLI | Preserves structure better for lists, links, and complex Markdown | Accurate conversion and batch processing |
| Python scripts (Spire.Doc) | Programmable and easy to integrate into automated workflows | Large file sets, AI pipelines, and recurring tasks |
Click any method above to jump directly to the section, or continue reading for the full step-by-step guide.
Method 1: Use Online Markdown to Text Converters
When you just need a quick, one-off conversion, downloading heavy desktop software is overkill. Free online Markdown-to-text converters offer the fastest, browser-based workflow for content creators. You can strip formatting and get copy-ready plain text in seconds with zero installation.
How to Convert Markdown to Text Online (Step-by-Step)
- Select a tool – Open a trusted, browser-based Markdown converter, such as mdtotext.com or Picotoolkit MD to TXT Converter.
- Paste your content – Copy the Markdown text and paste it directly into the tool's input box (or upload your .md file).
- Strip formatting – The tool automatically removes markdown symbols like
#,**, and link brackets in real-time. - Copy or download the output – Review the cleaned, unformatted text in the output pane, then copy it to your clipboard or download the file.
⚠️ Important Considerations:
- Data Privacy and Security – Avoid pasting sensitive company data, API keys, or proprietary source code into public online converters. Always use offline methods for confidential files.
- Formatting Limitations – Advanced elements like nested tables, blockquotes, or task lists may not convert perfectly. Always proofread the final output before publishing.
✅ Pros: Instant, zero setup, works on any device.
❌ Cons: Not suitable for bulk files, requires internet.
Method 2: Export Markdown to Text via Desktop Editors
If you handle confidential Markdown files or prefer working offline, using a desktop Markdown editor is the best choice. Popular apps like VS Code and Obsidian allow you to convert Markdown files locally, giving you complete control over your data privacy.
Using VS Code
-
Open your .md file in VS Code by dragging and dropping or clicking File → Open.
-
Press Ctrl + Shift + V (Windows) or Cmd + Shift + V (Mac) to open the Markdown preview pane.
-
Select all text in the preview window (Ctrl + A or Cmd + A) and copy it.
-
Paste the cleaned text into a new .txt file.
Using Obsidian
- Open your Markdown file in Obsidian.
- Switch to Reading View (Preview mode).
- Select all text, copy and paste it into your standard text editor.
Quick Tips:
- Scroll in Preview mode to verify how content looks before exporting.
✅ Pros: Works offline, secure, supports complex Markdown.
❌ Cons: Manual copy-paste, not ideal for multiple files.
Method 3: Convert Markdown to Text Using Pandoc CLI
For technical writers, developers, and system administrators, Pandoc is the best choice when precision is critical. It accurately converts complex Markdown elements—tables, lists, links—into clean plain text. It also supports automation and batch processing.
1. Install Pandoc
- Mac (via Homebrew):
brew install pandoc - Windows (via Winget):
winget install pandoc
Note: Ensure Pandoc is added to your system PATH so it can run from any terminal.
2. Convert a Single Markdown File to Text
Navigate to the folder containing your Markdown file, then run the following command:
pandoc input.md -t plain -o output.txt
-t plain: Instructs Pandoc to output clean, readable plain text.-o output.txt: Specifies the name of the resulting plain text file.
3. Batch Convert Multiple MD Files to TXT
If you need to process many files at once, use these shell loops:
Mac/Linux:
for file in *.md; do
  pandoc "$file" -t plain -o "${file%.md}.txt"
done
Windows PowerShell:
Get-ChildItem *.md | ForEach-Object { pandoc $_.FullName -t plain -o "$($_.DirectoryName)\$($_.BaseName).txt" }
Tips:
- Test with a single file first before running batch operations.
- Keep your original Markdown files backed up.
- Combine with shell scripts or automation for recurring bulk conversions.
✅ Pros: High fidelity, batch processing, accurate for complex Markdown.
❌ Cons: Requires CLI knowledge, PATH setup may be tricky.
Method 4: Automate Markdown Files to Text Conversion with Python
For developers integrating Markdown conversion into automated workflows or pipelines, Python is ideal. Using libraries like Spire.Doc for Python, you can parse Markdown programmatically, clean text, and feed it into custom pipelines, AI models, or batch processing scripts.
While basic open-source libraries can strip text, using Spire.Doc ensures that complex elements like nested word tables, text alignments, and headers are properly managed without writing complex regex blocks. This makes it a robust solution for enterprise-level data preprocessing.
Step 1: Install Required Packages
Open your terminal and install the Spire.Doc for Python library:
pip install Spire.Doc
Step 2: Automate Markdown to TXT Conversion with Python
You can use the following script to handle single files or easily adapt it into a loop to scan an entire directory:
from spire.doc import *

# Create an object of the Document class
document = Document()

# Load a Markdown file
document.LoadFromFile("input.md")

# Save the Markdown file to a .txt file
document.SaveToFile("output.txt", FileFormat.Txt)

document.Close()
✅ Pros: Programmable, supports batch processing, integrates with pipelines and AI workflows.
❌ Cons: Requires Python knowledge and third-party dependencies.
Looking for rich text? If you need to preserve styling in a professional document format instead of stripping it entirely, check out our guide on converting Markdown to Word and Markdown to PDF via Python.
Pro Tips for Better Markdown to TXT Conversion
When stripping Markdown, some structural elements require a bit of strategic oversight to ensure your plain text doesn't lose its context.
- Hyperlinks:
[Text](URL)may become just Text when stripping Markdown. Use Pandoc-t plainto keep URLs. - Tables: Complex tables can break in plain text. For tabular data, consider exporting Markdown to Excel or CSV instead.
- Code Blocks: Triple-backtick code may merge with text. Review manually or add indentation/markers to preserve readability.
- Preview and Backup: Always preview output and keep a backup of your original Markdown.
Conclusion: Which Method Should You Choose?
Converting Markdown to plain text is a core workflow for developers, technical writers, and AI data engineers. The best method depends entirely on your file volume, data privacy needs, and automation requirements:
- Use Online Tools for fast, one-off, low-stakes text conversions where privacy isn't a concern.
- Use Desktop Editors for secure, manual, offline work with sensitive data.
- Use Pandoc CLI when structural accuracy (like nested lists) matters most or for bulk conversions.
- Use Python Automation for deep integration into AI prompt pipelines, LLM data preprocessing, or recurring developer workflows.
By choosing the right approach for your project, you can efficiently strip Markdown syntax while keeping your plain text clean, readable, and ready for any platform.
FAQs
Q1: How can I convert multiple Markdown files to text at once?
A1: The most efficient way is using Pandoc CLI with a shell loop or writing a Python automation script to batch-process entire directories.
Q2: Will links and images be kept when converting Markdown to text?
A2: The visible anchor text and alt text will remain, but the raw image paths and URLs are typically stripped. Use Pandoc if you want to keep the URLs written out next to the text.
Q3: Is it safe to use online Markdown to text converters for private files?
A3: No. Public online converters process your data on third-party servers. For confidential data, financial records, or internal code, always stick to offline methods like VS Code, Pandoc, or Python.
Q4: What’s the easiest way to convert a single Markdown file to text?
A4: For a quick, non-sensitive single file, online tools like mdtotext.com are the easiest since they require zero setup or installation.
See Also
Convert PDF to PostScript: 4 Methods for High-Quality Printing
Table of Contents
- What is PostScript
- Understanding the Basics: PostScript Formats & Language Levels
- Method 1: Convert PDF to PostScript Using Adobe Acrobat Pro
- Method 2: Export PDF to PostScript via Ghostscript Command Line
- Method 3: Convert PDF Files to PostScript Online for Free
- Method 4: Automate PDF to PostScript Conversion in C# with Spire.PDF
- Common PDF to PostScript Issues
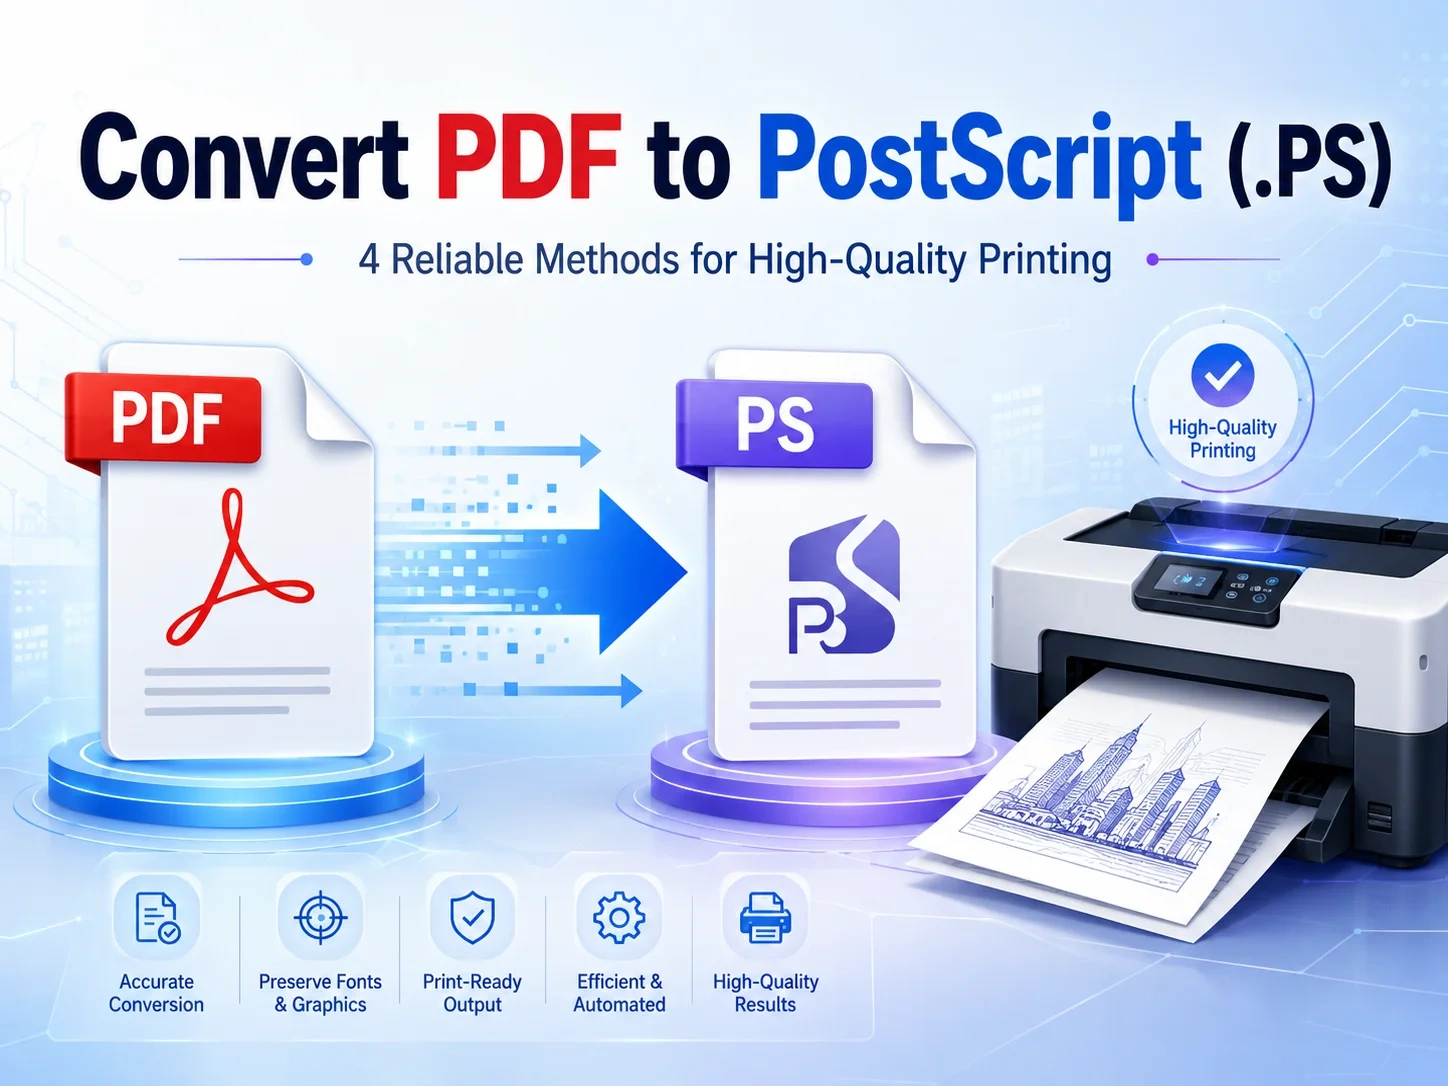
Looking for a reliable way to convert PDF to PostScript (PS) for high-quality printing? While PDF is the standard for sharing, PostScript offers a printer-ready, vector-based format essential for professional print devices and archival workflows.
This guide explains 4 reliable methods to convert PDF to PS without losing formatting, ranging from professional desktop software, command-line tools, and free online converters to a fully automated C# solution for developers.
What You Will Learn
- What is PostScript
- Understanding the Basics: PostScript Formats & Language Levels
- Method 1: Convert PDF to PostScript Using Adobe Acrobat Pro
- Method 2: Export PDF to PostScript via Ghostscript Command Line
- Method 3: Convert PDF Files to PostScript Online for Free
- Method 4: Automate PDF to PostScript Conversion in C# with Spire.PDF
- Common PDF to PostScript Issues
What is PostScript
PostScript (PS) is a page description language used for high-quality printing. Unlike PDF, which focuses on document portability, PostScript is optimized for vector-based printing workflows, ensuring that fonts, graphics, and layout are accurately rendered on professional printers.
Why Convert PDF to PostScript
- High-fidelity printing: Maintains vector paths, fonts, and precise layouts.
- RIP workflows: Required by many commercial printing systems.
- Archival standards: Some organizations use PS for long-term document preservation.
Understanding the Basics: PostScript Formats & Language Levels
Understanding PostScript formats and language levels is key to maintaining vector precision and ensuring device compatibility during PDF to PostScript conversion.
PostScript Formats: PS vs. EPS
- Standard PostScript (.PS): The go-to choice for full-document printing. It contains layout instructions, fonts, and images meant for direct output to PostScript-compatible printers.
- Encapsulated PostScript (.EPS): Ideal for individual graphics and illustrations. EPS includes a Bounding Box, allowing images to be scaled in layout software like Adobe InDesign without losing resolution.
PostScript Language Levels
- Level 1 (Obsolete): Introduced in 1984, Level 1 supports basic text and vector shapes. Avoid it unless using 40-year-old hardware.
- Level 2 (Legacy): Released in 1991, Level 2 introduced CMYK color support, better data compression, and improved font handling. Use only as a fallback for older commercial printers.
- Level 3 (Recommended): The modern industry standard introduced in 1997. It supports complex transparency, smooth gradients, advanced font technologies, and efficient file compression.
Pro Tip: Always default to Level 3 during conversion to prevent color shifts or flattened transparencies unless you have a specific requirement for older printers.
Method 1: Convert PDF to PostScript Using Adobe Acrobat Pro
For professionals and print specialists who require the highest accuracy, Adobe Acrobat Pro is the gold standard for PDF to PostScript conversion. As the creator of PDF and PostScript, Adobe ensures your files are translated with exceptional fidelity, preserving fonts, vector paths, and layout precision.
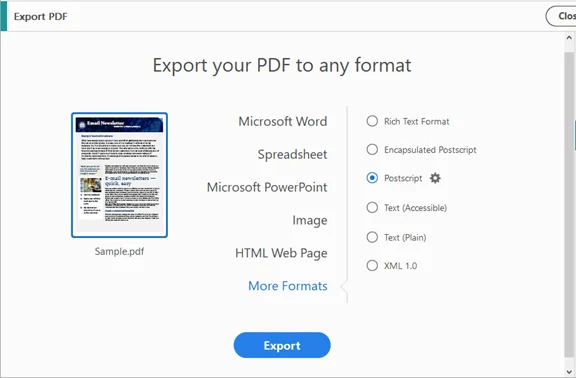
Step-by-Step Guide
- Open your PDF in Adobe Acrobat Pro.
- Navigate to Tools → Export PDF → More Formats → PostScript (.PS/.EPS).
- Adjust settings:
- Language Level: Level 3 recommended
- Font Inclusion: Embed fonts to avoid substitution
- Output Encoding: Binary for smaller files; ASCII for legacy systems
- Click Export, select a destination folder, and save.
✅ Pros: High fidelity, reliable for complex PDFs with images and fonts.
❌ Cons: Requires a paid license.
Method 2: Export PDF to PostScript via Ghostscript Command Line
For power users seeking fast, flexible, and free PDF-to-PostScript conversion, Ghostscript offers a robust command-line solution that preserves searchable text and vector graphics.
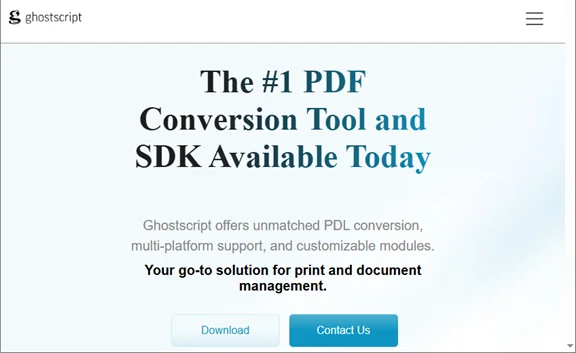
Step-by-Step Instructions
- Download and install Ghostscript on your machine.
- Open command line interface:
- Windows: Open Command Prompt
- macOS/Linux: Open Terminal
- Run Conversion Command:
-dNOPAUSE: Disables page-by-page prompts.gswin64c -dNOPAUSE -dBATCH -sDEVICE=ps2write -sOutputFile=output.ps input.pdf
-dBATCH: Terminates the program after processing.
-sDEVICE=ps2write: Specifies PostScript Level 2/3 output. - Verify output:
Check that output.ps is created and opens correctly in your PostScript viewer or printer.
✅ Pros: Free, scriptable, supports batch conversions.
❌ Cons: Requires installation on each machine. Command-line interface can be tricky for beginners.
Method 3: Convert PDF Files to PostScript Online for Free
If you prefer a quick conversion without installing heavy software, free online PDF to PostScript converters are the most convenient alternative. These browser-based platforms allow you to process files from any device (Windows, Mac, or Mobile), though they may have specific file size limits compared to desktop tools.
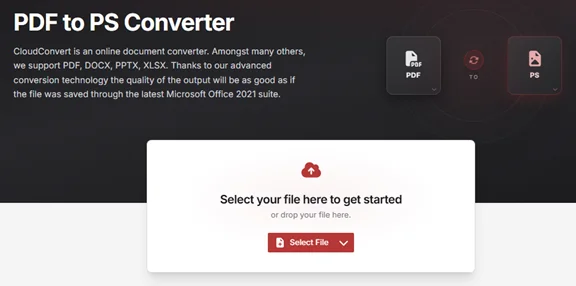
Step-by-Step Instructions
- Navigate to a trusted conversion platform like CloudConvert or Zamzar.
- Click Select File to upload your PDF.
- Select PS or PostScript as the target output format.
- Click Convert and wait for cloud processing.
- Download the final .ps file to your local drive.
Notes:
- Avoid uploading confidential, corporate, or medical PDFs to any online service. For sensitive files, use offline methods (Method 1, 2, or 4).
- Consider splitting large PDFs (> 50 MB) into smaller parts before uploading.
✅ Pros: Quick, accessible from any device, no installation.
❌ Cons: File size limits, potential privacy concerns.
Method 4: Automate PDF to PostScript Conversion in C# with Spire.PDF
For developers or businesses aiming to integrate PDF-to-PostScript conversion directly into their applications, a programmatic solution using C# with a library like Spire.PDF for .NET offers the most scalable and efficient approach. This method enables seamless, behind-the-scenes processing without the need for external software installations.
Key Advantages
- No External Dependencies: You don't need to install Ghostscript or Adobe Acrobat on the target server.
- High Scalability: Easily process thousands of documents within a loop or a background service.
- Fine-Grained Control: You can programmatically select specific pages to convert before generating the PS file.
Convert a PDF to PostScript in C#
using Spire.Pdf;
namespace PDFToPostScript
{
class Program
{
static void Main(string[] args)
{
// Initialize a PdfDocument object
PdfDocument doc = new PdfDocument();
// Load your PDF file
doc.LoadFromFile("Sample.pdf");
// Save the document as a PostScript (PS) file
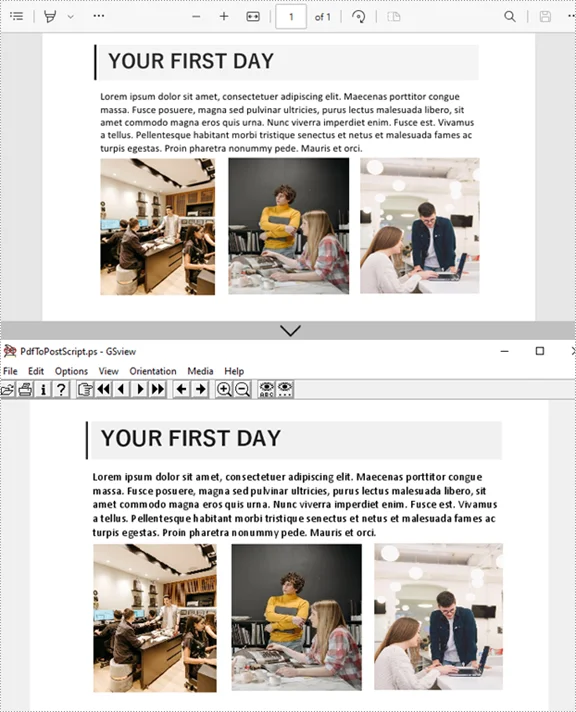
doc.SaveToFile("PdfToPostScript.ps", FileFormat.PostScript);
}
}
}
Here is the converted .ps file with the original images and formatting preserved:
(Optional) Export a Specific Page from PDF to PostScript
// Load the original PDF
PdfDocument pdf = new PdfDocument();
pdf.LoadFromFile("Sample.pdf");

// Create a new PDF document for selected pages
PdfDocument selectedPdf = new PdfDocument();

// Add pages 2 and 3 (indexes start at 0)
// The InsertPage method takes the source document, the start page index, and the end page index
selectedPdf.InsertPage(pdf, 1, 2); // Page 2

// Convert the selected pages to PostScript
selectedPdf.SaveToFile("selectedPages.ps", FileFormat.PostScript);
✅ Pros: Fully automated, works behind the scenes, scalable for applications.
❌ Cons: Requires programming skills, may require a license for production use.
Pro Tip: More Than Just PDF to PostScript
Spire.PDF serves as a comprehensive document solution for developers. If your workflow requires more than just .ps files, you can use the same library to handle other critical document tasks. For example, convert PDF to Word or export PDF to Excel to make your data editable.
Common PDF to PostScript Conversion Issues
Converting PDF files to PostScript can sometimes lead to unexpected problems. Understanding these common issues and how to fix them ensures smooth, high-quality printing. Below are typical challenges and practical solutions:
1. Transparency Flattening ("Stitching" Artifacts)
PostScript does not support live transparency. Effects like shadows or glows can produce thin white lines in your output. To prevent this, use Acrobat's Flattener Preview (Tools → Print Production → Flattener Preview) before exporting to PS.
2. Font Substitution
If fonts aren't embedded in the PDF, PostScript defaults to generic fonts such as Courier or Helvetica, potentially altering your layout. To avoid this, embed fonts in the PDF or convert them to outlines to preserve the original design.
3. Large File Size
PostScript files can become significantly larger than the source PDF because they store uncompressed instructions. Reduce file size by using binary encoding instead of ASCII and consider splitting very large PDFs into smaller segments.
4. Color Shifts
During PDF-to-PS conversion, CMYK colors may shift, affecting print accuracy. Always verify your color settings and perform a test print to ensure accurate color reproduction.
Conclusion
Converting PDF to PostScript is an efficient way to prepare documents for professional printing. Among the four reliable methods covered:
- Adobe Acrobat Pro - Best for desktop users who need precise control and high-quality output.
- Ghostscript CLI - Suitable for command-line enthusiasts or automated batch processing.
- Online Converters - Convenient for small files or occasional conversions without installing software.
- C# Automation Script - Ideal for developers or teams who require scalable, repeatable PDF-to-PS workflows.
Each method has its strengths. Choose the one that fits your workflow, and get started today to see which approach works best for you.
FAQs About PDF to PostScript Conversion
Q1: Can transparency be preserved during conversion?
A1: No. PDF to PostScript conversion flattens transparency, including shadows, glows, and overlays.
Q2: Can I convert PostScript back to PDF?
A2: Yes. You can use Adobe Acrobat Distiller or Ghostscript (pdfwrite device) to reconstruct a structured PDF from a PS file.
Q3: Are there free tools to convert PDF to PostScript?
A3: Yes, there are free online converters and command-line tools like Ghostscript. However, free tools may have limitations such as file size restrictions or reduced output quality.
Q4: How to convert multiple PDF files to PostScript at once?
A4: You can use C# automation with Spire.PDF to convert hundreds of PDFs efficiently.
Q5: Which PostScript language level should I use?
A5: PS Level 2 or 3 is recommended for most printers; Level 1 is legacy and may lack modern features.
See Also
5 Simple Ways to Split a Word Document into Multiple Files (Manual & Automated)
Table of Contents
Handling large Word documents can be challenging. Files with hundreds of pages often slow down Word, complicate collaboration, and make sharing via email cumbersome. Knowing how to split a Word document efficiently can save time, reduce file size, and improve workflow.
In this guide, we'll walk you through 5 practical ways to split Word documents, from simple manual methods like Copy & Paste, to automated solutions using Python. Whether you're a beginner managing a single file or a power user processing hundreds of documents, this article will help you choose the method that fits your needs best.
Methods Overview
- Method 1 - Split a Word Document via Copy & Paste
- Method 2 - Split Word Document by Headings
- Method 3 - Split Word Documents via PDF Conversion
- Method 4 - Split Pages in Word Online for Free
- Method 5 - Automate Word Document Splitting with Python
Why You May Need to Split a Word Document?
Splitting a Word document isn't just a technical task-it can make your work more organized and easier to work with. Here are some common reasons to divide Word documents:
- Enhanced Collaboration: Easily send specific chapters or sections to different editors or stakeholders without sharing the entire document.
- Optimized File Size: Reduce the bulk of massive, image-heavy documents for faster emailing and smoother cloud uploads.
- Better Organization: Break down a complex, multi-project report into individual, searchable files.
- Seamless Conversion: Prepare specific segments for conversion to PDF, Markdown, or HTML.
Method 1 - Split a Word Document via Copy & Paste
Best for: Extracting specific sections, one-off edits, or beginners.
The Copy and Paste method is the most intuitive way to manually split a Word document. It requires no extra software or technical expertise and works seamlessly across all versions of Microsoft Word, including Word for Microsoft 365, Word 2024, 2021, 2019, and 2016. This approach is ideal for users who need full granular control over the specific content they wish to isolate.
Step-by-Step Instructions:
-
Open Your Document
Launch Word and open the file you want to split. -
Select the Target Content
Highlight the section or chapter to extract.- ⚡ Tip: Use Ctrl + Shift + End (Windows) or Cmd + Shift + End (Mac) to select everything from your cursor to the end of the document quickly.
-
Copy the Content
Press Ctrl + C (Windows) or Cmd + C (Mac) on your keyboard, or right-click the highlighted area and select Copy.
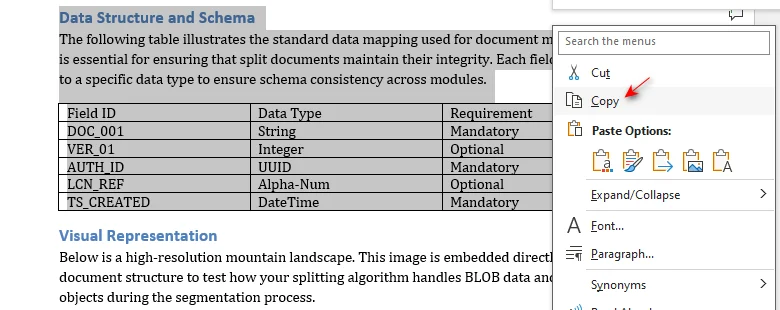
-
Create a New File
Press Ctrl + N to instantly open a fresh, blank document. -
Paste the Content
Press Ctrl + V (Windows) or Cmd + V (Mac) to paste. To preserve the source formatting, click the Paste Options icon at the end of the pasted text (or press Ctrl) and select Keep Source Formatting (K).
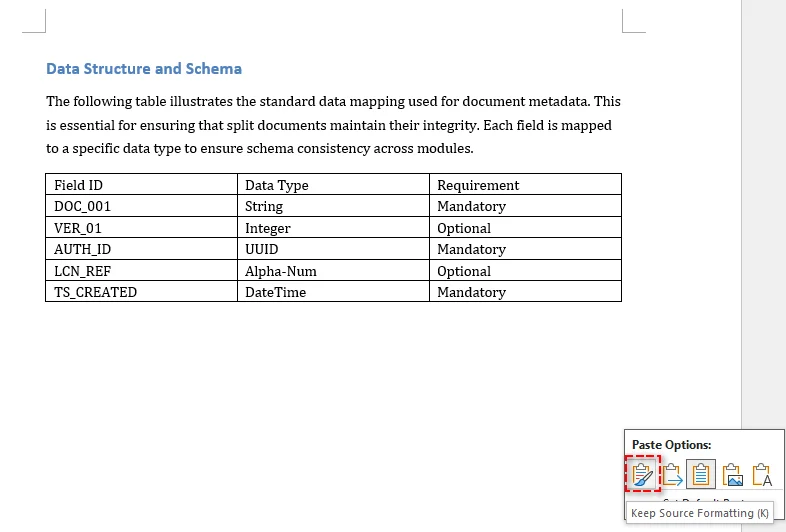
-
Save the New File
Press F12 to open the Save As dialog. Enter a descriptive file name, choose your destination folder, and click Save.
Strengths and Limitations:
| ✅ Strengths | ❌ Limitations |
|---|---|
| Zero learning curve | Inefficient for bulk tasks |
| Precise control over content selection | Complex formatting may require manual adjustment |
Extra Tips: Avoiding Formatting Shifts
Manual copying is fast but can break complex layouts. Follow these tips:
- Landscape Pages: If your source has landscape pages, insert a Section Break (Layout > Breaks > Next Page) in the new file before pasting to ensure the horizontal layout is preserved.
- Headers & Footers: These background elements (including page numbers and watermarks) do not transfer. You must reapply them manually in the new file.
- Style Consistency: To prevent font or spacing changes, always use Keep Source Formatting when pasting.
- Broken Links: Be aware that internal hyperlinks (Table of Contents) often break; press F9 in the new file to refresh all fields.
Need to convert these split files? Check out our guide on Converting Word to Markdown for high-speed documentation.
Method 2 - Split Word Document by Headings
Best for: Splitting long, multi-chapter documents (e.g., 50+ pages) that already use Word's Heading Styles.
If your document is well organized with Heading Styles (Heading 1, 2, etc.), Microsoft Word's built-in Outline View feature is more efficient. This method automates the segmentation process, ensuring each section is exported as an individual linked file while eliminating the manual highlighting errors and 'broken formatting' common with copy-pasting.
Step-by-Step Instructions:
-
Enter Outline View
Navigate to the View tab and click Outline.
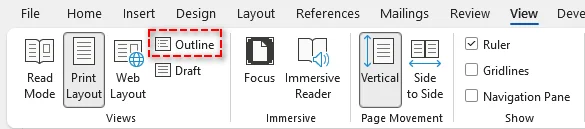
-
Show Headings
In the Outlining tab, set Show Level to the heading level you want to split by (e.g., Level 2). This collapses all body text, showing only your main headings.
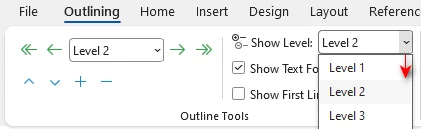
-
Select Headings
Highlight all the headings you want to split. -
Create Subdocuments
Click the Show Document button, then click Create. You will see thin gray boxes (Subdocuments) appear around your selected headings.
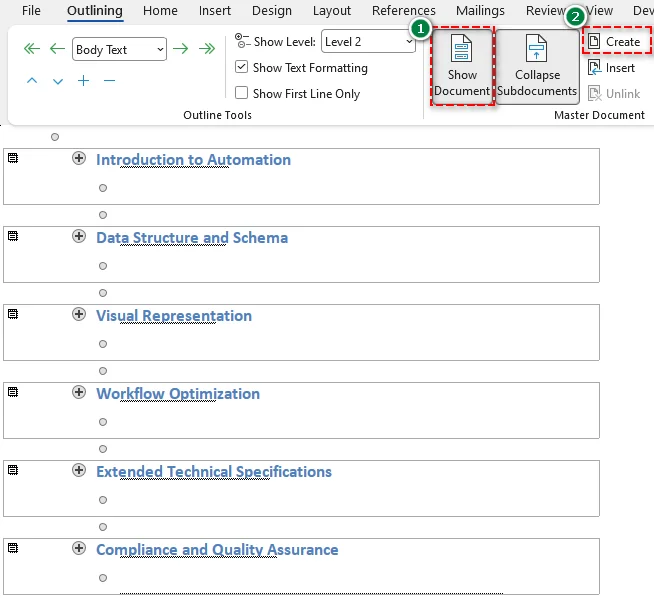
-
Save the Subdocuments
Press F12, choose a destination folder, and click Save to save the subdocuments.
Result: Word will instantly generate separate files for every heading you selected within that folder.
Strengths and Limitations:
| ✅ Strengths | ❌ Limitations |
|---|---|
| No Manual Dragging | Only works if the document uses consistent Heading Styles |
| Filenames are automatically assigned | Creates complex sub-document links that can be fragile if files are moved individually |
Extra Tips:
- New Folder Rule: Always create a new folder before saving the subdocuments. Word will use your heading text as filenames; without a folder, it will clutter your directory instantly.
- Test Navigation First: Before splitting, go to the Navigation Pane (Ctrl + F > Headings). If it is empty, Word doesn't recognize your structure. You'll need to apply Heading Styles to your titles first.
Method 3 - Split Word Documents via PDF Conversion
Best for: Sharing specific chapters that don't require further editing and must look identical on any device.
If your goal is to distribute a polished segment of your work, splitting via PDF conversion is the most reliable way to ensure cross-platform compatibility. PDF locks your layout, fonts, and images, preventing the recipient's Word settings from messing up your hard work.
Step-by-Step Instructions:
-
Convert to PDF
Open your file in Word, then go to File > Save As and select PDF (*.pdf). -
Define Range
In the dialog, click the Options... button. Under the Page range section, select Page(s), enter your target range (e.g., 5-10) and click OK.
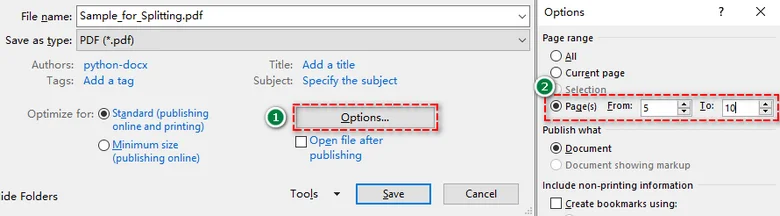
-
Save the file
Click Save and repeat for other page ranges.
Strengths and Limitations:
| ✅ Strengths | ❌ Limitations |
|---|---|
| Layout and formatting remain 100% static | Harder to edit after splitting |
Extra Tip:
- Re-Editing: Need to change something? Right-click the split PDF and select Open with > Word. Word will attempt to rebuild the text for you, though complex layouts may shift slightly.
Method 4 - Split Pages in Word Online for Free
Best for: Users without a desktop Microsoft Word installed or anyone working on mobile devices.
If you don't have access to the Microsoft Word desktop app, or if you need a "one-click" solution while on the go, an online Word document splitter like Zamzar is the most convenient choice. This cloud-based tool handles the heavy lifting on its servers, allowing you to split Word documents by every X pages without any manual formatting.
How to Split Pages in Word Online:
-
Upload Your File
Go to the Zamzar Word document splitter website and click Choose Files (or drag and drop your document).
-
Set Your Split Logic
Specify the interval for splitting (e.g., split every 1 page).

-
Split & Download
Click Split Now. Once the process is complete, download your split documents directly to your device.
Strengths and Limitations:
| ✅ Strengths | ❌ Limitations |
|---|---|
| Quick and simple | Requires uploading your document to a third-party server |
| Works across any device (mobiles, tablets, and more) | Free versions often limit the total file size (e.g., 50MB) |
Security Warning:
While online splitters are incredibly convenient, never use them for sensitive documents (like legal contracts, bank statements, or medical records). For private data, always stick to the offline methods (Method 1, 2, 3 or 5).
Method 5 - Automate Word Document Splitting with Python
Best for: Developers and power users who need to process massive volumes of documents or automate recurring monthly reports.
If you are facing a "mountain" of files-such as splitting 500 individual contracts into separate files-manual clicking is no longer an option. Python automation allows you to create a single script that handles the entire process in seconds, ensuring 100% accuracy without human intervention.
Step-by-Step Instructions:
-
Environment Setup
To automate Word document splitting, we will use the Spire.Doc for Python library. Unlike some open-source libraries like python-docx that struggle with complex Word layouts, Spire.Doc maintains high fidelity during the page extraction process.Before proceeding, install it by running the following command in your terminal:
pip install Spire.Doc
-
Write the Automation Script
This script scans an Input folder, finds every .docx file, and extracts each page into a separate document automatically:import os from spire.doc import * # Define folder paths input_folder = "Source_Documents/" output_folder = "Split_Results/" # Create output folder if it doesn't exist if not os.path.exists(output_folder): os.makedirs(output_folder) # Loop through all files in the input folder for filename in os.listdir(input_folder): if filename.endswith(".docx"): file_path = os.path.join(input_folder, filename) # Load the document doc = Document() doc.LoadFromFile(file_path) # Split the current document by page for i in range(doc.PageCount): single_page_doc = doc.ExtractPages(i, 1) # Save with a name like "ContractA_Page_1.docx" base_name = os.path.splitext(filename)[0] save_path = f"{output_folder}{base_name}_Page_{i + 1}.docx" single_page_doc.SaveToFile(save_path, FileFormat.Docx) single_page_doc.Dispose() doc.Dispose() print(f"Processed: {filename}") print("All documents have been successfully split!")
| ✅ Strengths | ❌ Limitations |
|---|---|
| Batch Split thousands of documents with high efficiency | Requires a Python environment and library installation |
| Fully customizable logic (split by page, page range, or section) | Requires basic Python knowledge |
Pro Tip:
- Beyond Pages: If your document uses Section Breaks, Spire.Doc can split by sections automatically, which is perfect for documents with varying chapter lengths.
Need to combine multiple Word files back together? Check out our guide on How to Merge Word Documents in Python.
Quick Comparison of All Word Document Splitting Methods
| Method | Best Use Case | Skill Level | Formatting Preservation |
|---|---|---|---|
| Copy & Paste | One-off small edits (1-5 pages) | Beginner | Partial |
| Heading Styles | Long, structured reports | Intermediate | High |
| PDF Conversion | Final versions for sharing | Beginner | Very High |
| Online Splitters | Mobile users or non-Word users | Beginner | Medium |
| Python Script | Batch processing (100+ files) | Advanced | High |
Tips for Splitting Word Documents Efficiently
- Backup First: Always create a backup copy of your master document before splitting. This protects you from accidental deletions or formatting errors.
- Preserve Formatting: Use Keep Source Formatting or consistent templates to ensure headings and layouts remain identical across all split files.
- Smart File Naming: Use a clear naming convention like ProjectName_Part01.docx. For Python users, you can automate this by pulling unique IDs or titles from the text.
- Final Review: Always check headers, footers, and page numbers after splitting. Word often resets these elements when content is moved to a new file.
Conclusion
There are several ways to split a Word document, the best method depends on your file size, structure, and workflow:
- Small files or occasional edits: Manual Copy & Paste or online splitters work perfectly.
- Sharing segments with fixed formatting: PDF conversion ensures consistent layout across all devices.
- Large-scale documents: Python automation delivers the ultimate speed and precision for batch processing.
Ready to start? Choose the method that fits your needs and take control of your document management today!
FAQs
Q1: Can I split a Word document without installing any software?
A1: Yes. You can use reliable online splitters like Zamzar to split Word documents without needing a desktop installation.
Q2: Why does my formatting change after splitting manually?
A2: This usually happens when the new document has different style settings. To fix this, always select Keep Source Formatting when pasting content into a new file.
Q3: How do I split a document by specific page ranges?
A3: The easiest way is using PDF Conversion. In the Save As options, you can specify a custom range (e.g., pages 5-10) to extract just those pages.
Q4: Is it safe to split confidential documents online?
A4: For sensitive data, we recommend offline methods like Copy & Paste or Python automation. This ensures your data never leaves your local computer.
Q5: How can developers automate Word splitting in Python?
A5: Developers can use libraries like Spire.Doc for Python. It allows you to programmatically detect pages and extract specific ranges or sections into new files with just a few lines of code.
Explore More Word Processing Tutorials
How to Replace Text in Excel: 5 Fast Ways (Manual to Automated)
Table of Contents
- Method 1 - Replace Text Manually with Excel's Find & Replace
- Method 2 - Replace Text by Position Using Excel's REPLACE Function
- Method 3 - Replace Text by Content Using Excel's SUBSTITUTE Function
- Method 4 - Automate Text Replacements in Excel with VBA
- Method 5 - Batch Replace Text Across Multiple Excel Files with Python
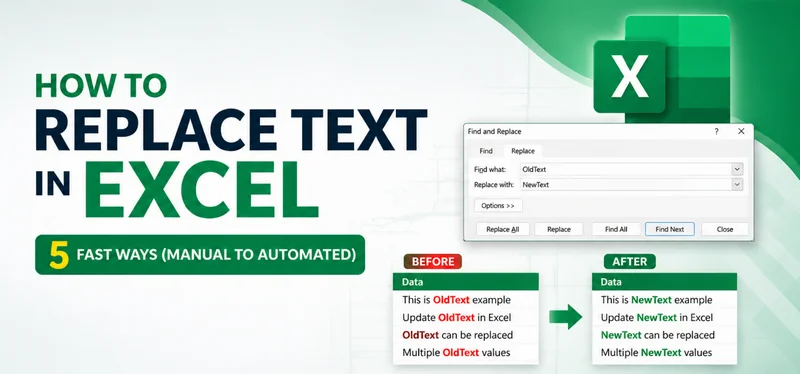
When working with large Excel workbooks, inconsistent or outdated data can quickly derail your reporting and decision-making. Manually scanning thousands of cells to fix typos is not only time-consuming but also prone to costly human errors. Mastering how to replace text in Excel efficiently is a critical skill for any data professional.
In this comprehensive guide, we explore 5 practical methods to replace text in Excel - ranging from the built-in Find & Replace tool and worksheet formulas to advanced VBA and Python automation. Whether you need to update a single cell or batch-process hundreds of workbooks, our step-by-step instructions will help you streamline your workflow and ensure data integrity.
Methods Overview
- Method 1 - Replace Text Manually with Excel's Find & Replace
- Method 2 - Replace Text by Position Using Excel's REPLACE Function
- Method 3 - Replace Text by Content Using Excel's SUBSTITUTE Function
- Method 4 - Automate Text Replacements in Excel with VBA
- Method 5 - Batch Replace Text Across Multiple Excel Files with Python
Understanding Text Replacement in Excel
Text replacement in Excel isn't just a cosmetic change-it can:
- Correct errors - fix typos or outdated codes.
- Standardize formats - unify product codes, emails, or dates.
- Improve data analysis - ensure consistency before calculations, filtering, or pivot tables.
- Save time in repetitive tasks - especially when working with large datasets or multiple files.
Below, we'll explore 5 practical ways to replace data in Excel.
Method 1 - Replace Text Manually with Excel's Find & Replace
Excel's built-in Find and Replace tool is the most efficient manual method to replace text in Excel within a single worksheet or an entire workbook. It's perfect for quick, one-off updates where formulas or automation are not required.
How to Access the Find & Replace Tool:
- Shortcut: Press Ctrl + H (Windows) or Command + Shift + H (Mac).
- Menu Path: Go to the Home tab > Editing group > Find & Select > Replace.
Step-by-Step Instructions:
-
Open the Workbook: Select the worksheet where you need to perform text replacement.
-
Access the Tool: Use the shortcut or menu path to trigger the Find and Replace window.
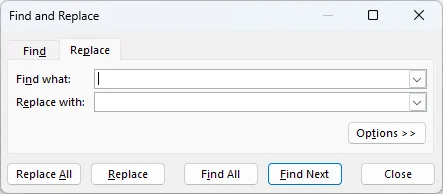
-
Input Data: In the Find what box, type the specific text or numbers you want to change. In the Replace with box, type your new content.
-
Execute Replacement: Click Replace to update the current selection and move to the next instance, or Replace All to update every instance in the sheet instantly.
Pro Tips:
Click the Options >> button to unlock advanced controls:
- Search Scope: Change the Within setting from Sheet to Workbook to replace text across all tabs at once.
- Pattern Matching: Use Wildcards like * (multiple characters) or ? (single character) for flexible searching (e.g., S*t matches both "Smart" and "Street").
- Precision Control: Enable Match case to replace only exact matches or Match entire cell contents to avoid replacing parts of words accidentally.
✅ Pros: Quick, intuitive, and handles formatting changes as well.
⚠️ Limitations: Manual and repetitive; not suitable for batch-processing hundreds of separate files.
You may also be interested in: 5 Ways to Wrap Text in Excel.
Method 2 - Replace Text by Position Using Excel's REPLACE Function
When you need to replace text in Excel based on its character position rather than the content itself, the REPLACE function is the best tool. This formula is ideal for cleaning up structured data like phone numbers, serial codes, or standardized product IDs.
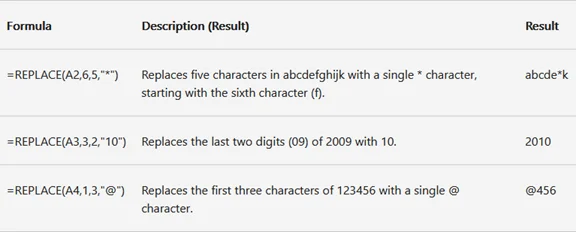
Replace Function Syntax
=REPLACE(old_text, start_num, num_chars, new_text)
- old_text: The original text (or the cell reference containing the text).
- start_num: The position (index) of the first character you want to replace.
- num_chars: The total number of characters to remove.
- new_text: The new text you want to insert.
Practical Example: Masking Sensitive Data
If you have a serial code "123-ABC" in cell A1 and want to change the first three numbers to "XXX":
- Formula:
=REPLACE(A1, 1, 3, "XXX") - Result: "XXX-ABC"
Step-by-Step Implementation:
-
Select a Cell: Click on the cell where you want the updated text to appear (e.g., B2).
-
Enter the Formula: Type =REPLACE( and select the source cell (e.g., A2).
-
Define the Range: Enter the start_num (where the replacement begins) and the num_chars (how many characters to swap).
-
Add New Text: Type your replacement text inside quotation marks (e.g., "XXX").
-
Apply to List: Press Enter and use the AutoFill handle (the small green square) to drag the formula down to other rows.
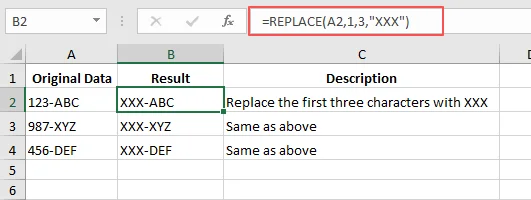
Pro Tips:
- Combine with Other Functions: Use LEN() or FIND() as the start_num to handle strings of varying lengths dynamically.
- Handle Numeric Results: The REPLACE function always returns text. To convert it back to a number for calculations, add *1 to the end of your formula (e.g.,
=REPLACE(...) * 1). - Nesting: You can nest multiple REPLACE functions in a single formula if you need to update two or more different positions at once.
✅ Pros: Perfect for structured data; ensures precise control over character replacement.
⚠️ Limitations: Less effective for data where the target text appears in different positions in each cell.
Method 3 - Replace Text by Content Using Excel's SUBSTITUTE Function
The SUBSTITUTE function is the go-to tool when you need to replace text in Excel based on specific content rather than its position. This is ideal for correcting repeated typos, updating year references, or expanding abbreviations across a large dataset.
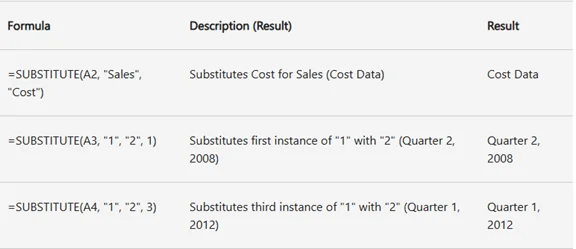
SUBSTITUTE Function Syntax
=SUBSTITUTE(text, old_text, new_text, [instance_num])
- text: The original text (or the cell reference containing the text).
- old_text: The specific character or word you want to change.
- new_text: The text you want to insert instead.
- [instance_num]: (Optional) Specifies which occurrence to replace. If omitted, all instances are updated.
Practical Example: Bulk Updating Years
If you need to update "Report 2023" to "Report 2024" in cell A1:
- Formula:
=SUBSTITUTE(A1, "2023", "2024") - Result: "Report 2024"
Advanced: Nested SUBSTITUTE for Multiple Updates
You can nest multiple SUBSTITUTE functions to replace several different terms in a single cell simultaneously. This is perfect for converting shorthand codes into full descriptions:
- Formula:
=SUBSTITUTE(SUBSTITUTE(A2, "PR", "Project"), "ML", "Milestone") - Result: Converts "PR-01, ML-05" into "Project-01, Milestone-05".
Step-by-Step Implementation:
-
Identify the Target: Click the cell where you want the cleaned data to appear.
-
Apply the Formula: Type =SUBSTITUTE( and select the source cell.
-
Define Text Strings: Enter the old_text and new_text inside double quotation marks (e.g., "old", "new").
-
Optional Instance: If you only want to replace the second occurrence of a word, add , 2 at the end before closing the parentheses.
-
Drag to Apply: Press Enter and use the AutoFill handle to apply the formula to the rest of your column.
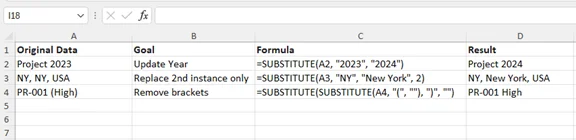
Pro Tips:
- Case Sensitivity: SUBSTITUTE is case-sensitive. To perform a case-insensitive search, wrap your cell reference in the UPPER or LOWER function.
- Removing Text: To delete a specific word entirely, use an empty string "" as your new_text.
- Non-Destructive: Unlike Find & Replace, using formulas keeps your original data intact in the source column, providing a better audit trail.
✅ Pros: Excellent for content-based replacement; highly flexible with nesting.
⚠️ Limitations: Does not handle position-based changes; requires a helper column to store results.
Method 4 - Automate Text Replacement in Excel with VBA
When you need to replace text in Excel across multiple sheets or handle repetitive, large-scale cleanup tasks, a VBA macro is the most powerful solution. This method allows you to automate the process with a single click, saving you from manual errors.
Why Use VBA for Replacement?
- Efficiency: Update hundreds of cells instantly.
- Consistency: Ensure the same replacement logic is applied every time.
- Multi-Sheet Support: Unlike formulas, VBA can scan every tab in your workbook.
Example VBA Macro to Replace data in the Active Excel Sheet
Copy and paste the following code into your VBA editor to replace specific terms across your current worksheet:
Sub BatchReplaceText()
    Dim ws As Worksheet
    Set ws = ActiveSheet

    ' Define what to find and what to replace
    ws.Cells.Replace What:="OldText", Replacement:="NewText", _
        LookAt:=xlPart, SearchOrder:=xlByRows, MatchCase:=False

    MsgBox "Replacement Complete!", vbInformation
End Sub
How to Run This Macro (Step-by-Step):
-
Open the Editor: Press Alt + F11 to open the Visual Basic for Applications window.
-
Insert a Module: Go to Insert > Module to create a blank workspace.
-
Paste the Code: Copy the script above and paste it into the module. Replace "OldText" and "NewText" with your actual data.
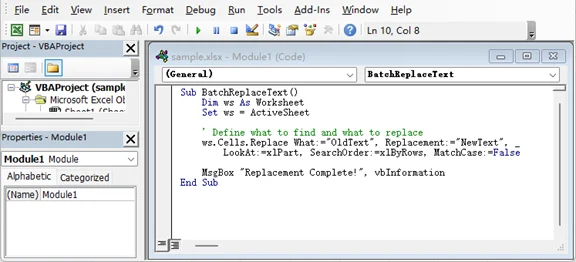
-
Execute the Macro: Press F5 or go back to Excel and press Alt + F8, select BatchReplaceText, and click Run.
Pro Tips:
- Precision Control: In the code above, LookAt:=xlPart allows the macro to replace text even if it's only part of a cell's content (e.g., changing "App" to "Application" within "App Store"). If you need to replace only cells that match your text exactly, change this parameter to LookAt:=xlWhole.
- Backup First: Unlike formulas, VBA actions cannot be undone (Ctrl+Z). Always save a backup copy of your file before running a macro.
- Loop Through All Sheets: You can modify the code to loop through Each ws In ThisWorkbook.Worksheets to perform a global replacement.
- Keyword Variables: For more flexibility, use InputBox to let users type the text they want to replace whenever the macro runs.
✅ Pros: Highly efficient for large datasets; automates repetitive tasks.
⚠️ Limitations: Requires the workbook to be saved as an Excel Macro-Enabled Workbook (.xlsm); cannot be undone.
Method 5 - Batch Replace Text Across Multiple Excel Files with Python
For the ultimate level of automation, using Python with the Spire.XLS library is the best way to batch replace text across multiple Excel files without even opening them. This is a game-changer for professionals managing hundreds of reports who need to maintain document formatting and structure.

Why Use Spire.XLS for Python?
- Format Preservation: Unlike other libraries, Spire.XLS keeps your fonts, colors, and layouts intact while replacing text.
- Scalability: Process thousands of workbooks in seconds-ideal for company-wide rebranding or data updates.
- Formula Support: Allows inserting various Excel formulas, making it easy to perform complex calculations, even without opening Excel.
- No Excel Required: Operates independently of Microsoft Office, making it perfect for automated server environments.
Python Code: Batch Replacement Using Spire.XLS
This script iterates through an entire folder, searches every worksheet, and replaces specific terms:
from spire.xls import *
import glob

# Path to your folder containing Excel files
files = glob.glob("C:/your_folder/*.xlsx")

for file in files:
    # Load the workbook
    workbook = Workbook()
    workbook.LoadFromFile(file)

    # Iterate through all worksheets to replace text
    for i in range(workbook.Worksheets.Count):
        sheet = workbook.Worksheets[i]

        # Find all instances of the old text
        found_ranges = sheet.FindAll("OldText", FindType.Text, ExcelFindOptions.MatchEntireCellContent)
        if found_ranges:
            for cell_range in found_ranges:
                # Apply the replacement text
                cell_range.Text = "NewText"

    # Save the updated workbook
    workbook.SaveToFile(file, ExcelVersion.Version2016)
    workbook.Dispose()

print("Batch text replacement completed successfully!")
Step-by-Step Implementation:
- Set Up Environment: Install the library via terminal:
pip install Spire.Xls - Prepare Your Script: Paste the code into an editor like VS Code or PyCharm.
- Configure Parameters: Update the folder path and replace "OldText" and "NewText" with your actual data.
- Run & Verify: Press F5 to execute the script. Verify the output files to confirm the replacement results are correct.
Pro Tips:
- Partial Text Replacement: If a cell contains a long string (e.g., "Order: 1001") and you only want to change the number, use
cell_range.TextPartReplace("1001", "2002"). This keeps the surrounding text intact. - Case Sensitivity: The ExcelFindOptions parameter in the FindAll method allows you to toggle case-sensitive or whole-word matching for higher precision.
- Range-Specific Finding: If you know the target data is only in a specific area, call FindAll on an XlsRange instead of the whole Sheet:
sheet.Range["A1:C10"].FindAll(). - Regex & Patterns: You can combine this with Python's re module for complex pattern matching before passing the string to the replacement loop.
✅ Pros: Unmatched speed for high-volume tasks; handles multiple files; preserves all original Excel formatting.
⚠️ Limitations: Requires a Python environment setup and basic programming knowledge.
Conclusion: Which Method Should You Choose?
Choosing the best way to replace text in Excel depends on the scale of your data and your comfort level with automation:
- Quick & Simple Edits: Use the built-in Find & Replace tool.
- Position-Based Precision: Use the REPLACE function for structured data (e.g., ID codes).
- Content-Based Logic: Use the SUBSTITUTE function for correcting specific terms.
- Workbook Automation: Use VBA macros to handle repetitive tasks across multiple sheets.
- Professional Batch Processing: Use Python to manage hundreds of files with formatting preserved.
By selecting the right workflow, you can ensure data consistency, save hours of manual labor, and eliminate human error.
Troubleshooting Common Text Replacement Issues
Even with the right tools, you might encounter roadblocks. Here are the most common issues and how to fix them:
| Issue | Likely Cause | Solution |
|---|---|---|
| Replacement didn't happen | Text doesn't exactly match the Find or old_text string. | Check for extra spaces or hidden characters. Use TRIM() or CLEAN() functions to sanitize data first. |
| Only part of the text replaced | Find & Replace settings are too restrictive. | In the Options menu, ensure Match case and Match entire cell contents is unchecked for partial replacements. |
| #VALUE! error (REPLACE) | Invalid start position or character count. | Ensure start_num and num_chars are positive integers and within the string's length. |
| Formula results are text-only | REPLACE and SUBSTITUTE always return text. | If you need a number, multiply the result by 1 (e.g., =SUBSTITUTE(...)*1) or wrap it in VALUE(). |
| VBA macro won't run | Macro security settings or protected sheets. | Enable macros in Trust Center and ensure the worksheet is unprotected before execution. |
| Python script errors | Incorrect file paths or missing dependencies. | Ensure Spire.Xls is installed. Double-check your folder path syntax (use / or \\ in Windows). |
FAQs: Replace Data in Excel
Q1: Can I replace text across multiple sheets without VBA or Python?
Yes. In the Find & Replace dialog, click Options and change the Within dropdown from "Sheet" to "Workbook". This allows you to update the entire file at once.
Q2: How do I replace text while preserving cell formatting?
Standard formulas (SUBSTITUTE) create new text in a new cell. To keep formatting in the original cell, use the manual Find & Replace tool or a professional library like Spire.XLS for Python, which is designed to modify content without stripping styles.
Q3: Can I replace text based on a specific pattern (e.g., any 3 digits)?
Yes, but you'll need Wildcards (* or ?) in the Find & Replace tool, or Regular Expressions (Regex) in a Python script for more complex patterns.
Q4: What if the target text is in a different position in every cell?
Use a dynamic formula combining REPLACE with FIND:
=IFERROR(REPLACE(A2, FIND("old", A2), LEN("old"), "new"), A2)
This locates the "old" text regardless of where it starts and replaces it with "new".
Q5: How can I automate replacements for hundreds of separate files?
The most efficient method is using Python. By leveraging glob to find files and Spire.XLS to process them, you can update thousands of workbooks in seconds without even opening Excel.
See Also
Convert RTF to Markdown: 4 Easy Ways for Single & Batch Files
Table of Contents
- What's the Difference between RTF and Markdown
- Use Cases: When You Should Convert RTF to Markdown
- Method 1: Copy RTF Content and Paste into a Markdown Editor
- Method 2: Convert RTF to Markdown Online
- Method 3: Use Pandoc for High-Fidelity RTF to Markdown Conversion
- Method 4: Batch Convert RTF Files to Markdown with C#
- Comparison: Which RTF to Markdown Method Should You Choose
- Troubleshooting Common Conversion Issues
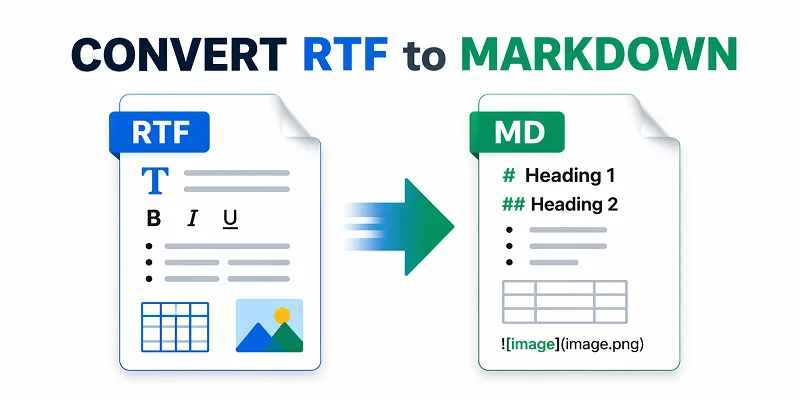
RTF (Rich Text Format) files are great for storing formatted text, but when it comes to documentation, blogging, or version-controlled writing, Markdown (MD) is often the preferred choice. Converting RTF to Markdown makes your content lightweight, portable, and easier to integrate with modern tools like Git, static site generators, or Markdown-based editors.
In this article, we'll explore 4 practical methods to convert RTF to Markdown, ranging from simple copy-and-paste techniques to automated batch conversion with C#. Whether you're a beginner working with a single file or a developer looking to process multiple documents efficiently, you'll find the method that best suits your workflow.
Contents Overview
- What's the Difference between RTF and Markdown
- Use Cases: When You Should Convert RTF to Markdown
- Method 1: Copy RTF Content and Paste into a Markdown Editor
- Method 2: Convert RTF to Markdown Online
- Method 3: Use Pandoc for High-Fidelity RTF to Markdown Conversion
- Method 4: Batch Convert RTF Files to Markdown with C#
- Comparison: Which RTF to Markdown Method Should You Choose
- Troubleshooting Common Conversion Issues
What's the Difference between RTF and Markdown?
Before diving into the conversion methods, it's helpful to understand how RTF and Markdown differ. The table below summarizes their main characteristics and typical use cases.
| Feature | RTF (Rich Text Format) | Markdown (MD) |
|---|---|---|
| File Extension | .rtf | .md / .markdown |
| Content Type | Rich Text: Binary-like plain text supporting font sizes, colors, tables, and inline images | Plain Text: Human-readable text using simple Markdown syntax (symbols like # or *) to define headers and lists |
| Primary Use | Cross-platform document exchange and word processing | Documentation, technical blogging, version-controlled content (GitHub) |
| Origin | Developed by Microsoft (1987) | Created by John Gruber (2004) |
| MIME Type | application/rtf | text/markdown |
| Resources | Rich Text Format on Wikipedia | Markdown on Wikipedia |
Use Cases: When You Should Convert RTF to Markdown?
Converting RTF to MD is useful in many scenarios:
- Documentation: Markdown is widely used for technical documentation, READMEs, and knowledge bases, making your RTF content easier to maintain.
- Content Publishing: Bloggers and writers benefit from Markdown's simplicity and compatibility with static site generators or CMS platforms.
- Version Control: Plain-text Markdown works seamlessly with Git, unlike RTF, which is a binary file.
- Collaboration: Markdown files are easier to share, edit, and merge across teams without losing formatting.
- Automation: Converting multiple RTF files to Markdown allows batch processing for reporting, note-taking, or migrating content.
With these use cases in mind, let's look at how you can convert RTF files to .md format.
Method 1: Copy RTF Content and Paste into a Markdown Editor
When you only need to convert specific sections of an RTF file to Markdown, manually copying and pasting content into a Markdown editor is a simple and effective approach. Many modern Markdown editors (like Typora, Obsidian, or Joplin) automatically translate Rich Text Formatting into clean Markdown syntax when pasting.
Quick Conversion Guide:
-
Open your RTF file in a word processor like Microsoft Word or macOS TextEdit.
-
Select the content you want to convert, then copy it (Windows: Ctrl+C, Mac: Cmd+C).
-
Open your preferred Markdown editor, then paste the content (Windows: Ctrl+V, Mac: Cmd+V).
- Pro Tip: To remove all formatting and start with plain text, use Ctrl+Shift+V (Windows) or Cmd+Shift+V (Mac) when pasting.
-
Preview the output and adjust formatting if needed.
Here is the screenshot of the output Markdown file:
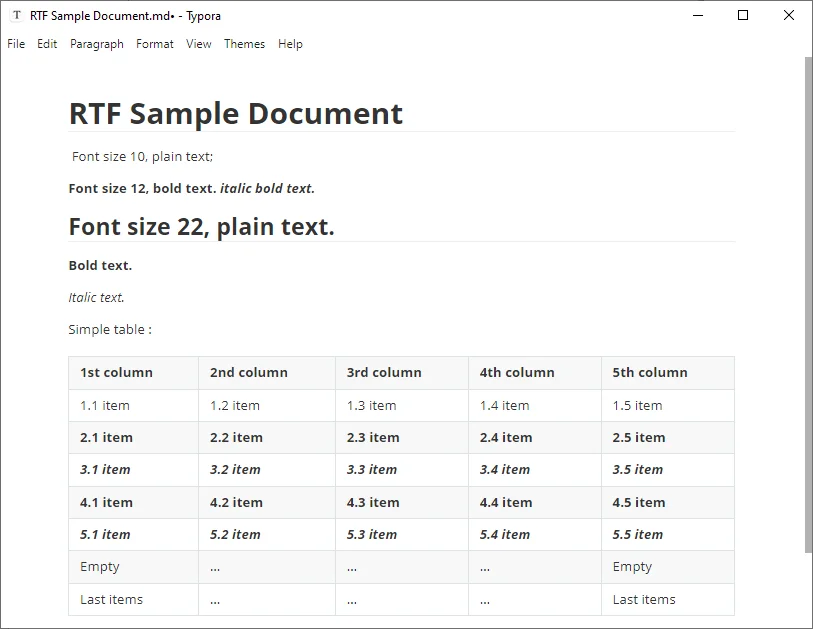
Pros & Cons:
✅ Pros: Allows selective conversion; quick for small files; full control over formatting.
❌ Cons: Inefficient for large documents; some complex RTF styling may be lost.
Method 2: Convert RTF to Markdown Online
For users who want a convenient, no-software solution, online converters provide a fast way to transform RTF content to MD. These tools are ideal for quick, one-off tasks.
Top Online Free RTF to Markdown Converters:
- Zamzar: A reliable file-upload service that converts .rtf files into downloadable .md files.
- Rich Text to Markdown: Allows you to paste or type rich text directly and copy or download the result Markdown.
How to Convert RTF to Markdown Online:
-
Upload your RTF file to a trusted online converter like Zamzar.
-
Select md as the output format.
-
Click Convert Now, then download your Markdown file.
Pros & Cons:
✅ Pros: Zero setup; easy for beginners;
❌ Cons: Privacy concerns; requires an internet connection.
Security Warning:
Avoid using online converters for sensitive company data or private legal documents, as files are processed on external servers - consider using offline methods instead.
You may also be interested in: Convert RTF to Word: 3 Easy Methods
Method 3: Use Pandoc for High-Fidelity RTF to Markdown Conversion
For users comfortable with basic scripting and seeking high-fidelity RTF to MD conversion, Pandoc is the industry-standard tool. Widely recommended by technical writers, it ensures accurate handling of images, tables, nested lists, and complex formatting.
Step-by-Step Guide:
-
Download and install Pandoc from the official website.
-
Open your Terminal (macOS/Linux) or Command Prompt (Windows).
-
Run the conversion command:
pandoc input.rtf -f rtf -t markdown -o output.md --extract-media=./mediaTip: To output GitHub Flavored Markdown (standard for GitHub/GitLab), change -t markdown to -t gfm.
Key Parameters Explained:
- input.rtf: Your source file name.
- --extract-media=./media: extracts all images from the RTF into a media folder and updates Markdown links automatically.
- output.md: The name of your new Markdown file.
Pros & Cons:
- ✅ Pros: Most accurate conversion; handles complex tables; free and open-source.
- ❌ Cons: Requires command-line knowledge.
Method 4: Batch Convert RTF Files to Markdown with C#
For developers or power users handling large volumes of documents, a C# script offers the most scalable solution. By automating the RTF to Markdown conversion, you can migrate entire archives in seconds, ensuring consistency across all files. This method is ideal for integrating into content pipelines or CI/CD workflows.
Prerequisites
Before starting, ensure you have the following:
- A C# IDE like Microsoft Visual Studio
- .NET Framework or .NET Core
- Spire.Doc for .NET - a document processing library that supports .rtf, .docx, .doc, and more.
You can install the library via NuGet through the command below:
PM> Install-Package Spire.Doc
C# Example: Batch Convert RTF Files to Markdown
The following code snippet demonstrates how to iterate through a directory and transform all .rtf files into clean .md documents:
using Spire.Doc;
using System.IO;

class Program
{
    static void Main(string[] args)
    {
        // Define source and destination paths
        string[] files = Directory.GetFiles(@"C:\Documents\RTF_Source\", "*.rtf");

        foreach (string file in files)
        {
            // Initialize Document instance
            Document document = new Document();
            document.LoadFromFile(file);

            // Save the RTF as Markdown
            string fileName = Path.GetFileNameWithoutExtension(file);
            document.SaveToFile(@"C:\Documents\MD_Output\" + fileName + ".md", FileFormat.Markdown);

            System.Console.WriteLine($"{fileName} converted successfully.");
        }
    }
}
Output:
Below is one example of the Markdown output after conversion:
**Bold Text** and *Italic Text*.

Here is a ***combination of bold and italic***.

- List item 1
- List item 2

Table:

| Header 1     | Header 2     | Header 3     |
|--------------|-------------|-------------|
| Row 1 Col 1  | Row 1 Col 2 | Row 1 Col 3 |
Tip: In addition to RTF to Markdown, this library can also be used for Word .docx or .doc to Markdown, as well as Markdown to Word/PDF.
Pros & Cons:
- ✅ Pros: Fastest method for bulk files; highly customizable; easily integrated into larger workflows.
- ❌ Cons: Requires C# environment setup; requires basic coding knowledge.
Comparison: Which RTF to Markdown Method Should You Choose
To help you decide, here is a quick comparison of all the RTF to Markdown methods discussed above:
| Method | Best For | Accuracy | Difficulty | Key Advantage |
|---|---|---|---|---|
| Copy & Paste | Short snippets | Medium | ⭐ | No installation required |
| Online Converters | One-off, simple files | Medium | ⭐ | Fast & browser-based |
| Pandoc | Complex docs & technical users | Highest | ⭐⭐⭐ | Handles images & tables perfectly |
| C# Script | Enterprise-grade batch processing | Highest | ⭐⭐⭐⭐ | Fully automatable for 100+ files |
Summary:
For simple files, copy & paste or online tools work fine. For complex or bulk conversions, Pandoc or automated C# scripts are the most reliable choice.
Troubleshooting Common Conversion Issues
- Broken Tables: Markdown only supports basic tables. RTF tables with merged cells or nested rows often break or lose formatting during conversion.
- Missing Images: Some web converters may strip images. Use Pandoc with the --extract-media flag if you need to preserve pictures from your original document.
- Unsupported Formatting & Styles: Markdown does not natively support font colors, highlights, or custom font families. Simplify your RTF to standard bold/italics before converting. If colors are essential, consider using HTML tags like <span style="color:red">text</span> if your target Markdown viewer supports HTML rendering.
- Encoding Errors: If you see strange characters (like Â), ensure your Markdown editor is set to UTF-8 encoding.
Pro Tip: Always review your Markdown after conversion to ensure formatting, tables, images, and special elements appear correctly. Even automated tools can miss subtle details.
Frequently Asked Questions: RTF to MD
Q1: What is the easiest way to convert RTF to Markdown?
A1: For most users, using an online RTF to Markdown converter like Zamzar is the fastest and easiest path.
Q2: Can I convert only part of an RTF file?
A2: Yes. The Copy & Paste method is best for this. Simply highlight the section you need and paste it into a Markdown-aware editor.
Q3: Which method preserves images and tables best?
A3: Pandoc is the most reliable option for maintaining tables, lists, and images with high fidelity.
Q4: Can I convert multiple RTF files to Markdown at once?
A4: Yes. Using C# with libraries like Spire.Doc, you can batch convert hundreds of RTF files into Markdown, fully automating the process.