Como Classificar Linhas no Excel por Uma ou Mais Colunas [Guia]
Índice
- Classificar linhas inteiras no Excel por uma coluna
- Classificar linhas em ordem crescente ou decrescente
- Classificar linhas usando a caixa de diálogo Classificar
- Classificar linhas por várias colunas no Excel
- Classificar linhas da esquerda para a direita no Excel
- Classificar linhas automaticamente no Excel usando Python
Classificar linhas no Excel é uma maneira simples de organizar dados e torná-los mais fáceis de ler, comparar e analisar. Quer você precise organizar registros por valor, colocar entradas em ordem alfabética ou classificar datas da mais antiga para a mais recente, o Excel oferece ferramentas integradas para a tarefa. O ponto principal é classificar linhas inteiras em vez de células individuais, para que os dados relacionados permaneçam juntos. Este guia explica como classificar linhas no Excel por uma ou mais colunas, classificar dados da esquerda para a direita e automatizar a classificação de linhas com Python.
Como classificar linhas inteiras no Excel por uma coluna
Classificar linhas no Excel por uma única coluna é útil quando você precisa organizar registros em uma ordem específica. O Excel permite classificar dados em ordem crescente ou decrescente enquanto mantém os valores relacionados em cada linha juntos. Você pode usar os comandos de classificação rápida para tarefas simples ou a caixa de diálogo Classificar para especificar a coluna e a ordem de classificação.
Classificar linhas em ordem crescente ou decrescente
Se você só precisa classificar por uma coluna, a abordagem mais rápida é usar os comandos de classificação na guia Dados. O Excel pode organizar números, texto e datas em ordem crescente ou decrescente, dependendo do tipo de dados.
- Etapa 1: Abra sua planilha do Excel e selecione uma célula na coluna pela qual deseja classificar. Por exemplo, clique em uma célula na coluna de receita para classificar produtos por receita de vendas.
- Etapa 2: Vá para Dados e escolha uma das seguintes opções:
- Classificar de A a Z: Classifique números do menor para o maior, texto em ordem alfabética ou datas da mais antiga para a mais recente.
- Classificar de Z a A: Classifique números do maior para o menor, texto em ordem alfabética inversa ou datas da mais recente para a mais antiga.
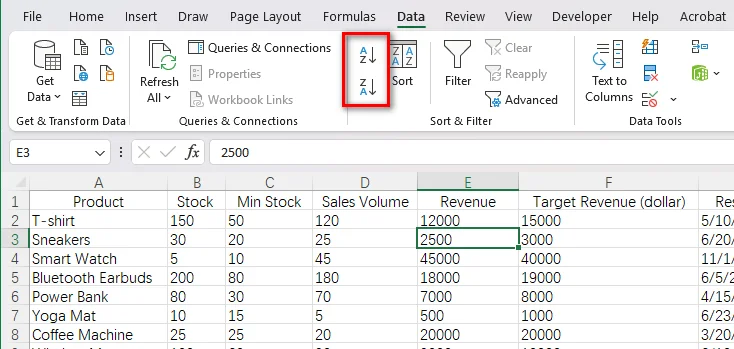
- Etapa 3: Se o Excel exibir uma caixa de diálogo Aviso de classificação, selecione Expandir a seleção e clique em Classificar. Esta opção move a linha inteira junto com o valor selecionado em vez de classificar apenas uma coluna.
Após a classificação, todos os valores de uma linha permanecem associados ao mesmo registro. Você pode usar o mesmo processo para classificar linhas por outros critérios, como quantidade, nome, números de vendas ou data.
Classificar linhas por uma coluna específica usando a caixa de diálogo Classificar
Para uma classificação mais precisa, você pode usar a caixa de diálogo Classificar do Excel para especificar o intervalo de dados, a coluna pela qual classificar e a ordem de classificação. Isso é especialmente útil quando você precisa classificar um intervalo específico ou definir explicitamente os critérios de classificação.
- Etapa 1: Selecione todo o intervalo de dados que deseja classificar, incluindo as colunas relevantes. Se sua planilha contiver uma linha de cabeçalho, inclua-a na seleção.
- Etapa 2: Vá para Dados → Classificar para abrir a caixa de diálogo Classificar.
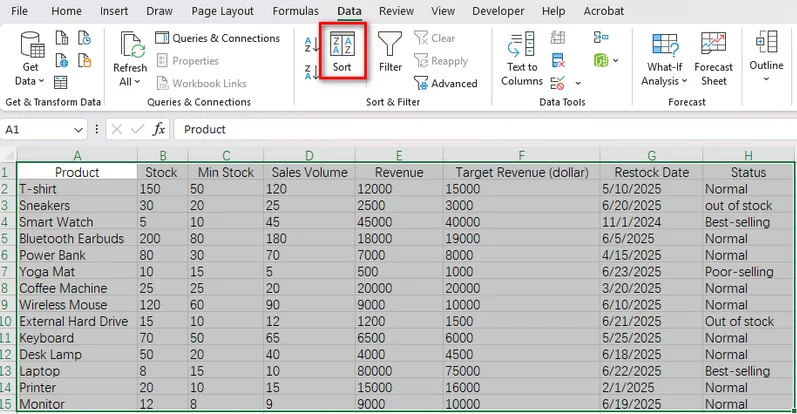
- Etapa 3: Se o intervalo selecionado tiver cabeçalhos de coluna, marque Meus dados têm cabeçalhos. Isso ajuda o Excel a reconhecer a linha de cabeçalho e mantê-la fora dos registros classificados.
- Etapa 4: Configure as opções de classificação:
- Coluna: Selecione a coluna pela qual classificar, como Receita.
- Classificar em: Escolha Valores da célula para uma classificação padrão baseada em valores.
- Ordem: Selecione Do menor para o maior, Do maior para o menor, A a Z ou outra ordem adequada, dependendo do tipo de dados.
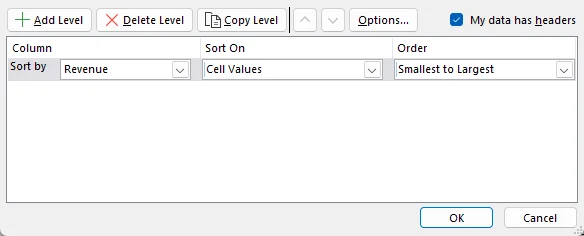
- Etapa 5: Clique em OK para aplicar a classificação.
Leia também: Limpar ou remover filtros no Excel: 6 maneiras (manual e automatizado)
Como classificar linhas por várias colunas no Excel
Quando você classifica por uma única coluna, os registros com o mesmo valor permanecem vinculados sob esse critério de classificação. Para organizar esses registros ainda mais, o Excel permite definir vários níveis de classificação, para que você possa classificar por uma coluna primeiro e depois organizar registros com valores correspondentes de acordo com outra coluna.
- Etapa 1: Selecione seu intervalo de dados e vá para Dados → Classificar.
- Etapa 2: Configure a condição de classificação primária. Por exemplo, escolha Status em Coluna e selecione A a Z em Ordem.
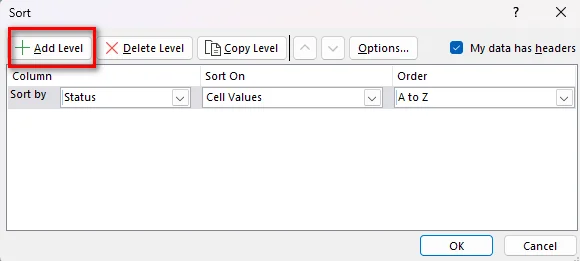
- Etapa 3: Clique em Adicionar nível para criar uma segunda condição de classificação.
- Etapa 4: Defina o segundo nível como Receita e escolha Do maior para o menor.
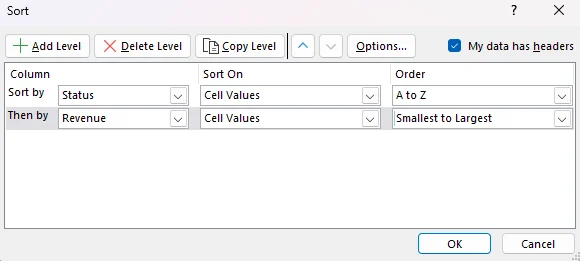
- Etapa 5: Clique em OK para classificar os dados.
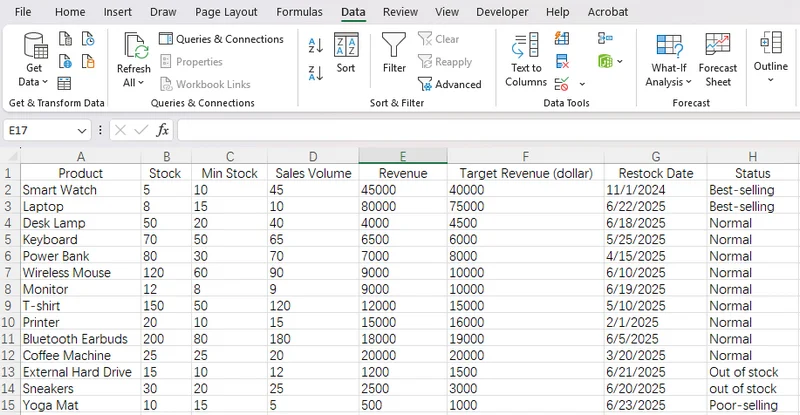
Após aplicar a classificação, as linhas são agrupadas por status e classificadas por receita dentro de cada grupo. Todos os valores relacionados permanecem juntos, facilitando a comparação de registros com o mesmo status.
Como classificar linhas da esquerda para a direita no Excel
Às vezes, os dados são organizados horizontalmente em vez de verticalmente. Por exemplo, uma planilha pode listar meses em colunas e números de vendas em uma única linha. Nesse caso, talvez seja necessário classificar colunas com base nos valores de uma linha, em vez de classificar linhas inteiras por uma coluna.
- Etapa 1: Selecione o intervalo de dados que deseja classificar horizontalmente.
- Etapa 2: Vá para Dados → Classificar para abrir a caixa de diálogo Classificar.
- Etapa 3: Clique em Opções e selecione Classificar da esquerda para a direita, depois clique em OK.
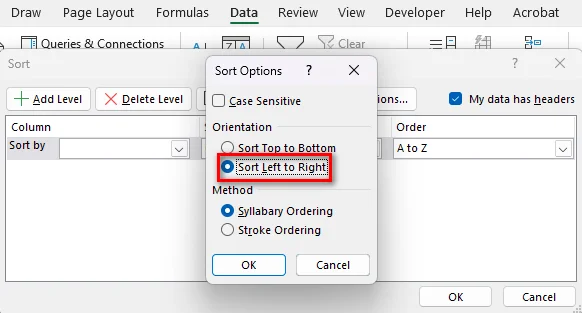
- Etapa 4: Na lista suspensa Classificar por, escolha a linha que contém os valores que você deseja usar como chave de classificação.
- Etapa 5: Selecione a ordem desejada e clique em OK.
Como classificar linhas automaticamente no Excel usando Python
Os recursos de classificação integrados do Excel funcionam bem para tarefas manuais, mas podem ser menos convenientes quando a mesma operação precisa ser repetida em vários arquivos. O Free Spire.XLS for Python oferece uma maneira de automatizar a classificação de linhas do Excel por meio de código, facilitando a aplicação de regras de classificação consistentes aos dados da pasta de trabalho.
Classificar linhas por receita em ordem decrescente
Neste exemplo, usaremos Free Spire.XLS for Python para classificar uma planilha de inventário de produtos por receita, do maior para o menor. A planilha contém oito colunas, e o código classifica os dados em A2:H15, mantendo a linha de cabeçalho fora do intervalo de classificação.
Antes de executar o código, instale Free Spire.XLS em seu ambiente Python usando pip install Spire.Xls.Free e prepare uma pasta de trabalho do Excel contendo os dados que você deseja classificar.
O exemplo completo de código Python:
from spire.xls.common import *
from spire.xls import *

# Create a Workbook object
workbook = Workbook()

# Load the Excel file
workbook.LoadFromFile("/input/sample.xlsx")

# Get the first worksheet
sheet = workbook.Worksheets[0]

# Clear existing sort criteria
workbook.DataSorter.SortColumns.Clear()

# Sort by Revenue (column E) in descending order
workbook.DataSorter.SortColumns.Add(
    4, SortComparisonType.Values, OrderBy.Descending
)

# Sort the entire data range, excluding the header row
workbook.DataSorter.Sort(sheet.Range["A2:H15"])

# Save the sorted workbook
workbook.SaveToFile(
    "/output/Sorted.xlsx",
    ExcelVersion.Version2016
)

# Release resources
workbook.Dispose()
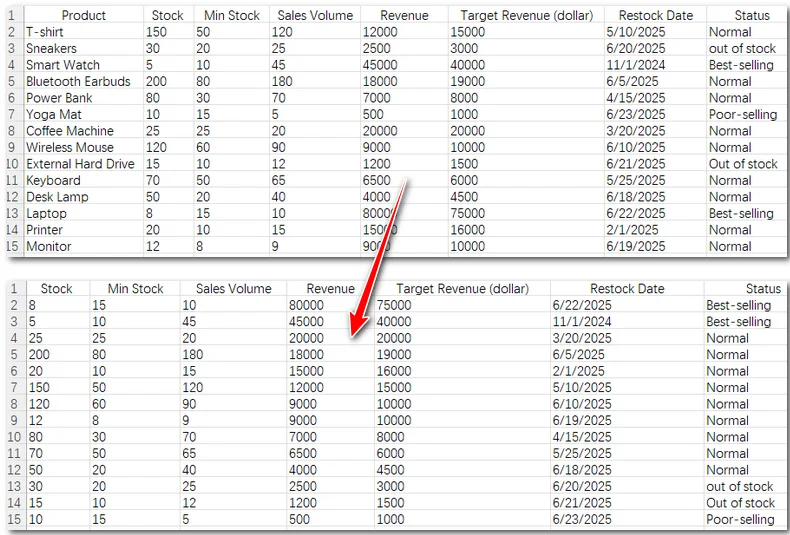
O código usa as seguintes etapas para classificar os dados:
- Etapa 1: Crie um objeto Workbook e carregue o arquivo Excel de origem com LoadFromFile().
- Etapa 2: Acesse a primeira planilha e limpe quaisquer critérios de classificação existentes.
- Etapa 3: Chame SortColumns.Add() para especificar a coluna E, que contém receita, como chave de classificação. O índice 4 identifica a quinta coluna porque o índice de coluna é baseado em zero. SortComparisonType.Values informa ao classificador para comparar valores de célula, enquanto OrderBy.Descending coloca valores mais altos primeiro.
- Etapa 4: Chame DataSorter.Sort() em A2:H15. O intervalo inclui todas as oito colunas e exclui a linha 1, então o cabeçalho permanece no lugar enquanto os registros de produtos são classificados juntos.
- Etapa 5: Salve o resultado em uma nova pasta de trabalho com SaveToFile().
Conclusão
A classificação de linhas no Excel ajuda você a organizar dados por receita, níveis de estoque, datas ou outros valores, mantendo as informações relacionadas juntas. Para uma classificação rápida, use as opções de classificação integradas do Excel. Quando você precisa classificar por várias colunas ou organizar dados horizontais, a caixa de diálogo Classificar oferece mais controle. Se você processa arquivos do Excel regularmente ou precisa automatizar a classificação em Python, Spire.XLS for Python oferece uma maneira de automatizar a tarefa com código. Experimente o método que melhor se adapta ao seu fluxo de trabalho para tornar a classificação de dados do Excel mais simples e eficiente.
Leia também:
Excel에서 하나 이상의 열을 기준으로 행을 정렬하는 방법 [가이드]
Excel에서 행 정렬은 데이터를 정리하여 읽고, 비교하고, 분석하기 쉽게 만드는 간단한 방법입니다. 값을 기준으로 레코드를 정렬하거나, 항목을 알파벳순으로 배치하거나, 날짜를 오래된 것부터 최신 순으로 정렬해야 할 때 Excel에는 이를 위한 기본 제공 도구가 있습니다. 핵심은 개별 셀이 아니라 전체 행을 정렬하여 관련 데이터가 함께 유지되도록 하는 것입니다. 이 가이드에서는 하나 이상의 열을 기준으로 Excel에서 행을 정렬하는 방법, 데이터를 왼쪽에서 오른쪽으로 정렬하는 방법, Python으로 행 정렬을 자동화하는 방법을 설명합니다.
Excel에서 열을 기준으로 전체 행을 정렬하는 방법
Excel에서 단일 열을 기준으로 행을 정렬하는 것은 레코드를 특정 순서로 정렬해야 할 때 유용합니다. Excel에서는 각 행의 관련 값을 함께 유지하면서 데이터를 오름차순 또는 내림차순으로 정렬할 수 있습니다. 간단한 작업에는 빠른 정렬 명령을 사용하거나, 정렬 대화 상자를 사용하여 정렬 열과 순서를 지정할 수 있습니다.
오름차순 또는 내림차순으로 행 정렬
하나의 열로만 정렬해야 하는 경우 가장 빠른 방법은 데이터 탭의 정렬 명령을 사용하는 것입니다. Excel은 데이터 형식에 따라 숫자, 텍스트, 날짜를 오름차순 또는 내림차순으로 정렬할 수 있습니다.
- 1단계: Excel 워크시트를 열고 정렬 기준으로 사용할 열의 셀을 선택합니다. 예를 들어 판매 수익을 기준으로 제품을 정렬하려면 매출 열의 셀을 클릭합니다.
- 2단계: 데이터로 이동한 다음 다음 옵션 중 하나를 선택합니다.
- A에서 Z로 정렬: 숫자는 가장 작은 값에서 가장 큰 값으로, 텍스트는 알파벳순으로, 날짜는 오래된 날짜에서 최신 날짜로 정렬합니다.
- Z에서 A로 정렬: 숫자는 가장 큰 값에서 가장 작은 값으로, 텍스트는 역 알파벳순으로, 날짜는 최신 날짜에서 오래된 날짜로 정렬합니다.
- 3단계: Excel에 정렬 경고 대화 상자가 표시되면 선택 영역 확장을 선택하고 정렬을 클릭합니다. 이 옵션은 하나의 열만 정렬하는 대신 선택한 값이 있는 전체 행을 함께 이동합니다.
정렬 후에는 행의 모든 값이 동일한 레코드와 연결된 상태로 유지됩니다. 동일한 과정을 사용하여 수량, 이름, 판매 수치, 날짜 등 다른 기준으로 행을 정렬할 수 있습니다.
정렬 대화 상자를 사용하여 특정 열로 행 정렬
더 정밀하게 정렬하려면 Excel의 정렬 대화 상자를 사용하여 데이터 범위, 정렬 기준 열, 정렬 순서를 지정할 수 있습니다. 이는 특정 범위를 정렬하거나 정렬 기준을 명시적으로 정의해야 할 때 특히 유용합니다.
- 1단계: 관련 열을 포함하여 정렬할 전체 데이터 범위를 선택합니다. 워크시트에 머리글 행이 있으면 선택 항목에 포함합니다.
- 2단계: 데이터 → 정렬로 이동하여 정렬 대화 상자를 엽니다.
- 3단계: 선택한 범위에 열 머리글이 있으면 내 데이터에 머리글이 있습니다를 선택합니다. 이렇게 하면 Excel이 머리글 행을 인식하고 정렬된 레코드에서 제외하는 데 도움이 됩니다.
- 4단계: 정렬 옵션을 구성합니다.
- 열: 매출과 같이 정렬 기준으로 사용할 열을 선택합니다.
- 정렬 기준: 표준 값 기반 정렬을 위해 셀 값을 선택합니다.
- 순서: 데이터 형식에 따라 가장 작은 값에서 가장 큰 값, 가장 큰 값에서 가장 작은 값, A에서 Z 등 적절한 순서를 선택합니다.
- 5단계: 확인을 클릭하여 정렬을 적용합니다.
함께 읽기: Excel에서 필터 지우기 또는 제거: 6가지 방법(수동 및 자동)
Excel에서 여러 열을 기준으로 행 정렬
단일 열을 기준으로 정렬할 때 동일한 값을 가진 레코드는 해당 정렬 기준 아래에 묶여 유지됩니다. 이러한 레코드를 더 세분화하려면 Excel에서 여러 정렬 수준을 정의할 수 있으므로, 먼저 한 열을 기준으로 정렬한 다음 동일한 값을 가진 레코드를 다른 열에 따라 정렬할 수 있습니다.
- 1단계: 데이터 범위를 선택하고 데이터 → 정렬로 이동합니다.
- 2단계: 기본 정렬 조건을 구성합니다. 예를 들어 열에서 상태를 선택하고 순서에서 A에서 Z를 선택합니다.
- 3단계: 수준 추가를 클릭하여 두 번째 정렬 조건을 만듭니다.
- 4단계: 두 번째 수준을 매출로 설정한 다음 가장 큰 값에서 가장 작은 값을 선택합니다.
- 5단계: 확인을 클릭하여 데이터를 정렬합니다.
정렬을 적용하면 상태별로 행이 그룹화되고 각 그룹 내에서 매출별로 정렬됩니다. 관련된 모든 값이 함께 유지되므로 동일한 상태의 레코드를 더 쉽게 비교할 수 있습니다.
Excel에서 왼쪽에서 오른쪽으로 행 정렬
때로는 데이터가 세로가 아니라 가로로 배열되어 있을 수 있습니다. 예를 들어 워크시트에서 월을 열 전체에 나열하고 판매 수치를 단일 행에 표시할 수 있습니다. 이 경우 열을 기준으로 전체 행을 정렬하는 대신 행의 값을 기준으로 열을 정렬해야 할 수 있습니다.
- 1단계: 가로로 정렬할 데이터 범위를 선택합니다.
- 2단계: 데이터 → 정렬로 이동하여 정렬 대화 상자를 엽니다.
- 3단계: 옵션을 클릭하고 왼쪽에서 오른쪽으로 정렬을 선택한 다음 확인을 클릭합니다.
- 4단계: 정렬 기준 드롭다운에서 정렬 키로 사용할 값이 포함된 행을 선택합니다.
- 5단계: 원하는 순서를 선택하고 확인을 클릭합니다.
Python을 사용하여 Excel에서 행 자동 정렬
Excel의 기본 제공 정렬 기능은 수동 작업에는 잘 작동하지만, 동일한 작업을 여러 파일에 반복해야 할 때는 덜 편리할 수 있습니다. Free Spire.XLS for Python은 코드를 통해 Excel 행 정렬을 자동화하는 방법을 제공하므로 통합 문서 데이터에 일관된 정렬 규칙을 더 쉽게 적용할 수 있습니다.
매출 기준으로 행을 내림차순 정렬
이 예제에서는 Free Spire.XLS for Python을 사용하여 제품 재고 워크시트를 매출 기준으로 내림차순 정렬합니다. 워크시트에는 8개의 열이 있으며, 코드는 A2:H15의 데이터를 정렬하면서 머리글 행은 정렬 범위에서 제외합니다.
코드를 실행하기 전에 pip install Spire.Xls.Free를 사용하여 Python 환경에 Free Spire.XLS를 설치하고, 정렬할 데이터가 포함된 Excel 통합 문서를 준비합니다.
전체 Python 코드 예제:
from spire.xls.common import *
from spire.xls import *

# Create a Workbook object
workbook = Workbook()

# Load the Excel file
workbook.LoadFromFile("/input/sample.xlsx")

# Get the first worksheet
sheet = workbook.Worksheets[0]

# Clear existing sort criteria
workbook.DataSorter.SortColumns.Clear()

# Sort by Revenue (column E) in descending order
workbook.DataSorter.SortColumns.Add(
    4, SortComparisonType.Values, OrderBy.Descending
)

# Sort the entire data range, excluding the header row
workbook.DataSorter.Sort(sheet.Range["A2:H15"])

# Save the sorted workbook
workbook.SaveToFile(
    "/output/Sorted.xlsx",
    ExcelVersion.Version2016
)

# Release resources
workbook.Dispose()
이 코드는 다음 단계를 사용하여 데이터를 정렬합니다.
- 1단계: Workbook 개체를 만들고 LoadFromFile()로 원본 Excel 파일을 로드합니다.
- 2단계: 첫 번째 워크시트에 액세스하고 기존 정렬 기준을 모두 지웁니다.
- 3단계: SortColumns.Add()를 호출하여 매출이 포함된 E 열을 정렬 키로 지정합니다. 인덱스 4는 열 인덱스가 0부터 시작하므로 다섯 번째 열을 나타냅니다. SortComparisonType.Values는 정렬자에게 셀 값을 비교하도록 지시하고, OrderBy.Descending은 더 높은 값을 먼저 배치합니다.
- 4단계: A2:H15에서 DataSorter.Sort()를 호출합니다. 이 범위에는 8개의 열이 모두 포함되고 1행은 제외되므로 머리글은 제자리에 유지되고 제품 레코드는 함께 정렬됩니다.
- 5단계: SaveToFile()로 결과를 새 통합 문서에 저장합니다.
결론
Excel에서 행을 정렬하면 관련 정보를 함께 유지하면서 매출, 재고 수준, 날짜 또는 기타 값을 기준으로 데이터를 구성할 수 있습니다. 빠른 정렬이 필요하면 Excel의 기본 제공 정렬 옵션을 사용하세요. 여러 열을 기준으로 정렬하거나 가로 데이터를 정렬해야 할 때는 정렬 대화 상자가 더 많은 제어 기능을 제공합니다. Excel 파일을 정기적으로 처리하거나 Python에서 정렬을 자동화해야 하는 경우 Spire.XLS for Python은 코드로 작업을 자동화하는 방법을 제공합니다. 워크플로에 가장 적합한 방법을 사용하여 Excel 데이터 정렬을 더 간단하고 효율적으로 만들어 보세요.
함께 읽기:
Come ordinare le righe in Excel per una o più colonne [Guida]
Indice
- Ordinare intere righe in Excel in base a una colonna
- Ordinare le righe in ordine crescente o decrescente
- Ordinare le righe usando la finestra di dialogo Ordina
- Ordinare le righe in base a più colonne in Excel
- Ordinare le righe da sinistra a destra in Excel
- Ordinare automaticamente le righe in Excel usando Python
Ordinare le righe in Excel è un modo semplice per organizzare i dati e renderli più facili da leggere, confrontare e analizzare. Che tu debba disporre i record per valore, mettere le voci in ordine alfabetico o ordinare le date dalla meno recente alla più recente, Excel offre strumenti integrati per farlo. La chiave è ordinare intere righe anziché singole celle, così i dati correlati restano insieme. Questa guida spiega come ordinare le righe in Excel in base a una o più colonne, ordinare i dati da sinistra a destra e automatizzare l'ordinamento delle righe con Python.
Come ordinare intere righe in Excel in base a una colonna
Ordinare le righe in Excel in base a una singola colonna è utile quando devi disporre i record in un ordine specifico. Excel consente di ordinare i dati in ordine crescente o decrescente mantenendo insieme i valori correlati in ciascuna riga. Puoi usare i comandi di ordinamento rapido per attività semplici o la finestra di dialogo Ordina per specificare la colonna e l'ordine di ordinamento.
Ordinare le righe in ordine crescente o decrescente
Se devi ordinare solo in base a una colonna, l'approccio più rapido è usare i comandi di ordinamento nella scheda Dati. Excel può disporre numeri, testo e date in ordine crescente o decrescente, a seconda del tipo di dati.
- Passaggio 1: Apri il foglio di lavoro di Excel e seleziona una cella nella colonna in base alla quale vuoi ordinare. Ad esempio, fai clic su una cella nella colonna dei ricavi per ordinare i prodotti in base ai ricavi delle vendite.
- Passaggio 2: Vai su Dati e scegli una delle seguenti opzioni:
- Ordina dalla A alla Z: ordina i numeri dal più piccolo al più grande, il testo in ordine alfabetico o le date dalla meno recente alla più recente.
- Ordina dalla Z alla A: ordina i numeri dal più grande al più piccolo, il testo in ordine alfabetico inverso o le date dalla più recente alla meno recente.
- Passaggio 3: Se Excel visualizza una finestra di dialogo Avviso di ordinamento, seleziona Espandi la selezione e fai clic su Ordina. Questa opzione sposta l'intera riga con il valore selezionato invece di ordinare solo una colonna.
Dopo l'ordinamento, tutti i valori di una riga restano associati allo stesso record. Puoi usare lo stesso processo per ordinare le righe in base ad altri criteri, come quantità, nome, valori di vendita o data.
Ordinare le righe in base a una colonna specifica usando la finestra di dialogo Ordina
Per un ordinamento più preciso, puoi usare la finestra di dialogo Ordina di Excel per specificare l'intervallo di dati, la colonna in base alla quale ordinare e l'ordine di ordinamento. Questo è particolarmente utile quando devi ordinare un intervallo specifico o definire esplicitamente i criteri di ordinamento.
- Passaggio 1: Seleziona l'intero intervallo di dati che vuoi ordinare, incluse le colonne pertinenti. Se il foglio di lavoro contiene una riga di intestazione, includila nella selezione.
- Passaggio 2: Vai su Dati → Ordina per aprire la finestra di dialogo Ordina.
- Passaggio 3: Se l'intervallo selezionato ha intestazioni di colonna, seleziona I miei dati hanno intestazioni. Questo aiuta Excel a riconoscere la riga di intestazione e a tenerla fuori dai record ordinati.
- Passaggio 4: Configura le opzioni di ordinamento:
- Colonna: Seleziona la colonna in base alla quale ordinare, ad esempio Ricavi.
- Ordina in base a: Scegli Valori celle per un ordinamento standard basato sui valori.
- Ordine: Seleziona Dal più piccolo al più grande, Dal più grande al più piccolo, Da A a Z o un altro ordine adatto, a seconda del tipo di dati.
- Passaggio 5: Fai clic su OK per applicare l'ordinamento.
Leggi anche: Cancellare o rimuovere i filtri in Excel: 6 modi (manuale e automatizzato)
Come ordinare le righe in base a più colonne in Excel
Quando si ordina in base a una singola colonna, i record con lo stesso valore restano legati a quel criterio di ordinamento. Per organizzarli ulteriormente, Excel consente di definire più livelli di ordinamento, così puoi ordinare prima in base a una colonna e poi disporre i record con valori corrispondenti in base a un'altra colonna.
- Passaggio 1: Seleziona l'intervallo di dati e vai su Dati → Ordina.
- Passaggio 2: Configura la condizione di ordinamento principale. Ad esempio, scegli Stato in Colonna e seleziona Da A a Z in Ordine.
- Passaggio 3: Fai clic su Aggiungi livello per creare una seconda condizione di ordinamento.
- Passaggio 4: Imposta il secondo livello su Ricavi, quindi scegli Dal più grande al più piccolo.
- Passaggio 5: Fai clic su OK per ordinare i dati.
Dopo aver applicato l'ordinamento, le righe vengono raggruppate per stato e ordinate per ricavi all'interno di ciascun gruppo. Tutti i valori correlati restano insieme, rendendo più facile confrontare i record con lo stesso stato.
Come ordinare le righe da sinistra a destra in Excel
A volte i dati sono disposti orizzontalmente anziché verticalmente. Ad esempio, un foglio di lavoro potrebbe elencare i mesi nelle colonne e i valori di vendita in una singola riga. In questo caso, potresti dover ordinare le colonne in base ai valori di una riga invece di ordinare intere righe in base a una colonna.
- Passaggio 1: Seleziona l'intervallo di dati che vuoi ordinare orizzontalmente.
- Passaggio 2: Vai su Dati → Ordina per aprire la finestra di dialogo Ordina.
- Passaggio 3: Fai clic su Opzioni e seleziona Ordina da sinistra a destra, quindi fai clic su OK.
- Passaggio 4: Nell'elenco a discesa Ordina per, scegli la riga contenente i valori che vuoi usare come chiave di ordinamento.
- Passaggio 5: Seleziona l'ordine desiderato e fai clic su OK.
Come ordinare automaticamente le righe in Excel usando Python
Le funzionalità di ordinamento integrate di Excel funzionano bene per le attività manuali, ma possono essere meno pratiche quando la stessa operazione deve essere ripetuta su più file. Free Spire.XLS for Python offre un modo per automatizzare l'ordinamento delle righe di Excel tramite codice, rendendo più facile applicare regole di ordinamento coerenti ai dati della cartella di lavoro.
Ordinare le righe per ricavi in ordine decrescente
In questo esempio, useremo Free Spire.XLS for Python per ordinare un foglio di lavoro dell'inventario prodotti in base ai ricavi, dal più alto al più basso. Il foglio di lavoro contiene otto colonne e il codice ordina i dati in A2:H15, mantenendo la riga di intestazione fuori dall'intervallo di ordinamento.
Prima di eseguire il codice, installa Free Spire.XLS nel tuo ambiente Python usando pip install Spire.Xls.Free e prepara una cartella di lavoro di Excel contenente i dati che vuoi ordinare.
L'esempio completo di codice Python:
from spire.xls.common import *
from spire.xls import *

# Create a Workbook object
workbook = Workbook()

# Load the Excel file
workbook.LoadFromFile("/input/sample.xlsx")

# Get the first worksheet
sheet = workbook.Worksheets[0]

# Clear existing sort criteria
workbook.DataSorter.SortColumns.Clear()

# Sort by Revenue (column E) in descending order
workbook.DataSorter.SortColumns.Add(
    4, SortComparisonType.Values, OrderBy.Descending
)

# Sort the entire data range, excluding the header row
workbook.DataSorter.Sort(sheet.Range["A2:H15"])

# Save the sorted workbook
workbook.SaveToFile(
    "/output/Sorted.xlsx",
    ExcelVersion.Version2016
)

# Release resources
workbook.Dispose()
Il codice usa i seguenti passaggi per ordinare i dati:
- Passaggio 1: Crea un oggetto Workbook e carica il file Excel di origine con LoadFromFile().
- Passaggio 2: Accedi al primo foglio di lavoro e cancella eventuali criteri di ordinamento esistenti.
- Passaggio 3: Chiama SortColumns.Add() per specificare la colonna E, che contiene i ricavi, come chiave di ordinamento. L'indice 4 identifica la quinta colonna perché l'indice di colonna è basato su zero. SortComparisonType.Values indica all'ordinatore di confrontare i valori delle celle, mentre OrderBy.Descending mette i valori più alti per primi.
- Passaggio 4: Chiama DataSorter.Sort() su A2:H15. L'intervallo include tutte e otto le colonne ed esclude la riga 1, quindi l'intestazione resta al suo posto mentre i record dei prodotti vengono ordinati insieme.
- Passaggio 5: Salva il risultato in una nuova cartella di lavoro con SaveToFile().
Conclusione
Ordinare le righe in Excel ti aiuta a organizzare i dati per ricavi, livelli di stock, date o altri valori mantenendo insieme le informazioni correlate. Per un ordinamento rapido, usa le opzioni di ordinamento integrate di Excel. Quando devi ordinare in base a più colonne o disporre dati orizzontali, la finestra di dialogo Ordina ti offre un maggiore controllo. Se elabori regolarmente file Excel o devi automatizzare l'ordinamento in Python, Spire.XLS for Python offre un modo per automatizzare l'attività con il codice. Prova il metodo più adatto al tuo flusso di lavoro per rendere l'ordinamento dei dati di Excel più semplice ed efficiente.
Leggi anche:
Comment trier des lignes dans Excel par une ou plusieurs colonnes [Guide]
Table des matières
- Trier des lignes entières dans Excel par une colonne
- Trier les lignes par ordre croissant ou décroissant
- Trier les lignes à l'aide de la boîte de dialogue Trier
- Trier les lignes par plusieurs colonnes dans Excel
- Trier les lignes de gauche à droite dans Excel
- Trier automatiquement les lignes dans Excel avec Python
Trier des lignes dans Excel est un moyen simple d'organiser les données et de les rendre plus faciles à lire, à comparer et à analyser. Que vous ayez besoin d'organiser des enregistrements par valeur, de classer des entrées par ordre alphabétique ou de trier des dates de la plus ancienne à la plus récente, Excel propose des outils intégrés pour effectuer ce travail. La clé est de trier des lignes entières plutôt que des cellules individuelles, afin que les données associées restent ensemble. Ce guide explique comment trier des lignes dans Excel par une ou plusieurs colonnes, trier des données de gauche à droite et automatiser le tri des lignes avec Python.
Comment trier des lignes entières dans Excel par une colonne
Trier des lignes dans Excel par une seule colonne est utile lorsque vous devez organiser des enregistrements dans un ordre spécifique. Excel vous permet de trier les données par ordre croissant ou décroissant tout en conservant les valeurs associées dans chaque ligne. Vous pouvez utiliser les commandes de tri rapide pour des tâches simples ou la boîte de dialogue Trier pour spécifier la colonne et l'ordre de tri.
Trier les lignes par ordre croissant ou décroissant
Si vous devez uniquement trier par une seule colonne, l'approche la plus rapide consiste à utiliser les commandes de tri dans l'onglet Données. Excel peut organiser les nombres, le texte et les dates par ordre croissant ou décroissant, selon le type de données.
- Étape 1 : Ouvrez votre feuille de calcul Excel et sélectionnez une cellule dans la colonne par laquelle vous souhaitez trier. Par exemple, cliquez sur une cellule de la colonne de chiffre d'affaires pour trier les produits par chiffre d'affaires.
- Étape 2 : Accédez à Données et choisissez l'une des options suivantes :
- Trier de A à Z : Triez les nombres du plus petit au plus grand, le texte par ordre alphabétique ou les dates de la plus ancienne à la plus récente.
- Trier de Z à A : Triez les nombres du plus grand au plus petit, le texte par ordre alphabétique inverse ou les dates de la plus récente à la plus ancienne.
- Étape 3 : Si Excel affiche une boîte de dialogue Avertissement de tri, sélectionnez Étendre la sélection et cliquez sur Trier. Cette option déplace la ligne entière avec la valeur sélectionnée au lieu de trier uniquement une colonne.
Après le tri, toutes les valeurs d'une ligne restent associées au même enregistrement. Vous pouvez utiliser le même processus pour trier les lignes selon d'autres critères, tels que la quantité, le nom, les chiffres de ventes ou la date.
Trier les lignes par une colonne spécifique à l'aide de la boîte de dialogue Trier
Pour un tri plus précis, vous pouvez utiliser la boîte de dialogue Trier d'Excel pour spécifier la plage de données, la colonne par laquelle trier et l'ordre de tri. Cela est particulièrement utile lorsque vous devez trier une plage particulière ou définir explicitement les critères de tri.
- Étape 1 : Sélectionnez toute la plage de données que vous souhaitez trier, y compris les colonnes concernées. Si votre feuille de calcul contient une ligne d'en-tête, incluez-la dans la sélection.
- Étape 2 : Accédez à Données → Trier pour ouvrir la boîte de dialogue Trier.
- Étape 3 : Si votre plage sélectionnée comporte des en-têtes de colonnes, cochez Mes données ont des en-têtes. Cela aide Excel à reconnaître la ligne d'en-tête et à l'exclure des enregistrements triés.
- Étape 4 : Configurez les options de tri :
- Colonne : Sélectionnez la colonne par laquelle trier, par exemple le chiffre d'affaires.
- Trier sur : Choisissez Valeurs de cellule pour un tri standard basé sur les valeurs.
- Ordre : Sélectionnez Du plus petit au plus grand, Du plus grand au plus petit, A à Z ou un autre ordre approprié, selon le type de données.
- Étape 5 : Cliquez sur OK pour appliquer le tri.
À lire aussi : Effacer ou supprimer les filtres dans Excel : 6 méthodes (manuelles et automatisées)
Comment trier des lignes par plusieurs colonnes dans Excel
Lors du tri par une seule colonne, les enregistrements ayant la même valeur restent liés sous ce critère de tri. Pour organiser davantage ces enregistrements, Excel vous permet de définir plusieurs niveaux de tri, de sorte que vous pouvez d'abord trier par une colonne, puis organiser les enregistrements ayant des valeurs correspondantes en fonction d'une autre colonne.
- Étape 1 : Sélectionnez votre plage de données et accédez à Données → Trier.
- Étape 2 : Configurez la condition de tri principale. Par exemple, choisissez Statut sous Colonne et sélectionnez A à Z sous Ordre.
- Étape 3 : Cliquez sur Ajouter un niveau pour créer une deuxième condition de tri.
- Étape 4 : Définissez le deuxième niveau sur Chiffre d'affaires, puis choisissez Du plus grand au plus petit.
- Étape 5 : Cliquez sur OK pour trier les données.
Après avoir appliqué le tri, les lignes sont regroupées par statut et triées par chiffre d'affaires au sein de chaque groupe. Toutes les valeurs associées restent ensemble, ce qui facilite la comparaison des enregistrements ayant le même statut.
Comment trier des lignes de gauche à droite dans Excel
Parfois, les données sont disposées horizontalement plutôt que verticalement. Par exemple, une feuille de calcul peut lister des mois en colonnes et des chiffres de ventes sur une seule ligne. Dans ce cas, vous devrez peut-être trier les colonnes en fonction des valeurs d'une ligne au lieu de trier des lignes entières par une colonne.
- Étape 1 : Sélectionnez la plage de données que vous souhaitez trier horizontalement.
- Étape 2 : Accédez à Données → Trier pour ouvrir la boîte de dialogue Trier.
- Étape 3 : Cliquez sur Options et sélectionnez Trier de gauche à droite, puis cliquez sur OK.
- Étape 4 : Dans la liste déroulante Trier par, choisissez la ligne contenant les valeurs que vous souhaitez utiliser comme clé de tri.
- Étape 5 : Sélectionnez l'ordre souhaité et cliquez sur OK.
Comment trier automatiquement des lignes dans Excel avec Python
Les fonctionnalités de tri intégrées d'Excel fonctionnent bien pour les tâches manuelles, mais elles peuvent être moins pratiques lorsque la même opération doit être répétée sur plusieurs fichiers. Free Spire.XLS for Python offre un moyen d'automatiser le tri des lignes Excel via du code, ce qui facilite l'application de règles de tri cohérentes aux données du classeur.
Trier les lignes par chiffre d'affaires par ordre décroissant
Dans cet exemple, nous utiliserons Free Spire.XLS for Python pour trier une feuille de calcul d'inventaire de produits par chiffre d'affaires, du plus élevé au plus bas. La feuille de calcul contient huit colonnes, et le code trie les données dans A2:H15, en excluant la ligne d'en-tête de la plage de tri.
Avant d'exécuter le code, installez Free Spire.XLS dans votre environnement Python à l'aide de pip install Spire.Xls.Free, et préparez un classeur Excel contenant les données que vous souhaitez trier.
L'exemple de code Python complet :
from spire.xls.common import *
from spire.xls import *

# Create a Workbook object
workbook = Workbook()

# Load the Excel file
workbook.LoadFromFile("/input/sample.xlsx")

# Get the first worksheet
sheet = workbook.Worksheets[0]

# Clear existing sort criteria
workbook.DataSorter.SortColumns.Clear()

# Sort by Revenue (column E) in descending order
workbook.DataSorter.SortColumns.Add(
    4, SortComparisonType.Values, OrderBy.Descending
)

# Sort the entire data range, excluding the header row
workbook.DataSorter.Sort(sheet.Range["A2:H15"])

# Save the sorted workbook
workbook.SaveToFile(
    "/output/Sorted.xlsx",
    ExcelVersion.Version2016
)

# Release resources
workbook.Dispose()
Le code utilise les étapes suivantes pour trier les données :
- Étape 1 : Créez un objet Workbook et chargez le fichier Excel source avec LoadFromFile().
- Étape 2 : Accédez à la première feuille de calcul et effacez tous les critères de tri existants.
- Étape 3 : Appelez SortColumns.Add() pour spécifier la colonne E, qui contient le chiffre d'affaires, comme clé de tri. L'index 4 identifie la cinquième colonne car l'index de colonne est basé sur zéro. SortComparisonType.Values indique au trieur de comparer les valeurs des cellules, tandis que OrderBy.Descending place les valeurs plus élevées en premier.
- Étape 4 : Appelez DataSorter.Sort() sur A2:H15. La plage inclut les huit colonnes et exclut la ligne 1, de sorte que l'en-tête reste en place tandis que les enregistrements de produits sont triés ensemble.
- Étape 5 : Enregistrez le résultat dans un nouveau classeur avec SaveToFile().
Conclusion
Trier des lignes dans Excel vous aide à organiser les données par chiffre d'affaires, niveaux de stock, dates ou autres valeurs tout en conservant les informations associées ensemble. Pour un tri rapide, utilisez les options de tri intégrées d'Excel. Lorsque vous devez trier par plusieurs colonnes ou organiser des données horizontales, la boîte de dialogue Trier vous offre plus de contrôle. Si vous traitez régulièrement des fichiers Excel ou si vous devez automatiser le tri en Python, Spire.XLS for Python offre un moyen d'automatiser la tâche avec du code. Essayez la méthode qui correspond le mieux à votre flux de travail pour rendre le tri des données Excel plus simple et plus efficace.
À lire aussi :
Cómo ordenar filas en Excel por una o más columnas [Guía]
Tabla de contenido
Ordenar filas en Excel es una forma sencilla de organizar datos y facilitar su lectura, comparación y análisis. Tanto si necesitas ordenar registros por valor, poner entradas en orden alfabético u ordenar fechas de la más antigua a la más reciente, Excel ofrece herramientas integradas para hacerlo. La clave es ordenar filas enteras en lugar de celdas individuales, para que los datos relacionados permanezcan juntos. Esta guía explica cómo ordenar filas en Excel por una o varias columnas, ordenar datos de izquierda a derecha y automatizar la ordenación de filas con Python.
Cómo ordenar filas enteras en Excel por una columna
Ordenar filas en Excel por una sola columna resulta útil cuando necesitas organizar registros en un orden específico. Excel te permite ordenar datos en orden ascendente o descendente mientras mantiene juntos los valores relacionados de cada fila. Puedes usar los comandos de ordenación rápida para tareas sencillas o el cuadro de diálogo Ordenar para especificar la columna y el orden de ordenación.
Ordenar filas en orden ascendente o descendente
Si solo necesitas ordenar por una columna, la forma más rápida es usar los comandos de ordenación de la pestaña Datos. Excel puede organizar números, texto y fechas en orden ascendente o descendente, según el tipo de datos.
- Paso 1: Abre tu hoja de cálculo de Excel y selecciona una celda de la columna por la que quieres ordenar. Por ejemplo, haz clic en una celda de la columna de ingresos para ordenar productos por ingresos de ventas.
- Paso 2: Ve a Datos y elige una de las siguientes opciones:
- Ordenar de A a Z: Ordena números de menor a mayor, texto alfabéticamente o fechas de la más antigua a la más reciente.
- Ordenar de Z a A: Ordena números de mayor a menor, texto en orden alfabético inverso o fechas de la más reciente a la más antigua.
- Paso 3: Si Excel muestra un cuadro de diálogo Advertencia de ordenación, selecciona Expandir la selección y haz clic en Ordenar. Esta opción mueve la fila entera con el valor seleccionado en lugar de ordenar solo una columna.
Después de ordenar, todos los valores de una fila permanecen asociados con el mismo registro. Puedes usar el mismo proceso para ordenar filas por otros criterios, como cantidad, nombre, cifras de ventas o fecha.
Ordenar filas por una columna específica mediante el cuadro de diálogo Ordenar
Para una ordenación más precisa, puedes usar el cuadro de diálogo Ordenar de Excel para especificar el rango de datos, la columna por la que ordenar y el orden de ordenación. Esto resulta especialmente útil cuando necesitas ordenar un rango concreto o definir explícitamente los criterios de ordenación.
- Paso 1: Selecciona todo el rango de datos que quieres ordenar, incluidas las columnas relevantes. Si tu hoja de cálculo contiene una fila de encabezado, inclúyela en la selección.
- Paso 2: Ve a Datos → Ordenar para abrir el cuadro de diálogo Ordenar.
- Paso 3: Si el rango seleccionado tiene encabezados de columna, marca Mis datos tienen encabezados. Esto ayuda a Excel a reconocer la fila de encabezado y mantenerla fuera de los registros ordenados.
- Paso 4: Configura las opciones de ordenación:
- Columna: Selecciona la columna por la que quieres ordenar, como ingresos.
- Ordenar según: Elige Valores de celda para una ordenación estándar basada en valores.
- Orden: Selecciona Menor a mayor, Mayor a menor, A a Z u otro orden adecuado, según el tipo de datos.
- Paso 5: Haz clic en Aceptar para aplicar la ordenación.
Leer también: Borrar o quitar filtros en Excel: 6 métodos (manuales y automatizados)
Cómo ordenar filas por varias columnas en Excel
Cuando ordenas por una sola columna, los registros con el mismo valor permanecen vinculados bajo ese criterio de ordenación. Para organizar estos registros aún más, Excel te permite definir varios niveles de ordenación, de modo que puedes ordenar por una columna primero y luego organizar los registros con valores coincidentes según otra columna.
- Paso 1: Selecciona tu rango de datos y ve a Datos → Ordenar.
- Paso 2: Configura la condición de ordenación principal. Por ejemplo, elige Estado en Columna y selecciona A a Z en Orden.
- Paso 3: Haz clic en Agregar nivel para crear una segunda condición de ordenación.
- Paso 4: Establece el segundo nivel en Ingresos, luego elige Mayor a menor.
- Paso 5: Haz clic en Aceptar para ordenar los datos.
Después de aplicar la ordenación, las filas se agrupan por estado y se ordenan por ingresos dentro de cada grupo. Todos los valores relacionados permanecen juntos, lo que facilita la comparación de registros con el mismo estado.
Cómo ordenar filas de izquierda a derecha en Excel
A veces, los datos están organizados horizontalmente en lugar de verticalmente. Por ejemplo, una hoja de cálculo podría enumerar meses en columnas e ingresos de ventas en una sola fila. En este caso, es posible que necesites ordenar columnas según los valores de una fila en lugar de ordenar filas enteras por una columna.
- Paso 1: Selecciona el rango de datos que quieres ordenar horizontalmente.
- Paso 2: Ve a Datos → Ordenar para abrir el cuadro de diálogo Ordenar.
- Paso 3: Haz clic en Opciones y selecciona Ordenar de izquierda a derecha, luego haz clic en Aceptar.
- Paso 4: En la lista desplegable Ordenar por, elige la fila que contiene los valores que quieres usar como clave de ordenación.
- Paso 5: Selecciona el orden deseado y haz clic en Aceptar.
Cómo ordenar filas automáticamente en Excel con Python
Las funciones de ordenación integradas de Excel funcionan bien para tareas manuales, pero pueden resultar menos cómodas cuando la misma operación debe repetirse en varios archivos. Free Spire.XLS for Python ofrece una forma de automatizar la ordenación de filas de Excel mediante código, lo que facilita la aplicación de reglas de ordenación coherentes a los datos del libro.
Ordenar filas por ingresos en orden descendente
En este ejemplo, usaremos Free Spire.XLS for Python para ordenar una hoja de cálculo de inventario de productos por ingresos, del más alto al más bajo. La hoja de cálculo contiene ocho columnas y el código ordena los datos en A2:H15, manteniendo la fila de encabezado fuera del rango de ordenación.
Antes de ejecutar el código, instala Free Spire.XLS en tu entorno de Python con pip install Spire.Xls.Free y prepara un libro de Excel que contenga los datos que quieres ordenar.
El ejemplo completo de código Python:
from spire.xls.common import *
from spire.xls import *

# Create a Workbook object
workbook = Workbook()

# Load the Excel file
workbook.LoadFromFile("/input/sample.xlsx")

# Get the first worksheet
sheet = workbook.Worksheets[0]

# Clear existing sort criteria
workbook.DataSorter.SortColumns.Clear()

# Sort by Revenue (column E) in descending order
workbook.DataSorter.SortColumns.Add(
    4, SortComparisonType.Values, OrderBy.Descending
)

# Sort the entire data range, excluding the header row
workbook.DataSorter.Sort(sheet.Range["A2:H15"])

# Save the sorted workbook
workbook.SaveToFile(
    "/output/Sorted.xlsx",
    ExcelVersion.Version2016
)

# Release resources
workbook.Dispose()
El código usa los siguientes pasos para ordenar los datos:
- Paso 1: Crea un objeto Workbook y carga el archivo de Excel de origen con LoadFromFile().
- Paso 2: Accede a la primera hoja de cálculo y borra cualquier criterio de ordenación existente.
- Paso 3: Llama a SortColumns.Add() para especificar la columna E, que contiene ingresos, como clave de ordenación. El índice 4 identifica la quinta columna porque el índice de columna empieza en cero. SortComparisonType.Values indica al ordenador que compare valores de celda, mientras que OrderBy.Descending coloca primero los valores más altos.
- Paso 4: Llama a DataSorter.Sort() en A2:H15. El rango incluye las ocho columnas y excluye la fila 1, por lo que el encabezado permanece en su lugar mientras los registros de productos se ordenan juntos.
- Paso 5: Guarda el resultado en un nuevo libro con SaveToFile().
Conclusión
Ordenar filas en Excel te ayuda a organizar datos por ingresos, niveles de existencias, fechas u otros valores mientras mantienes juntos la información relacionada. Para una ordenación rápida, usa las opciones de ordenación integradas de Excel. Cuando necesites ordenar por varias columnas u organizar datos horizontales, el cuadro de diálogo Ordenar te ofrece más control. Si procesas archivos de Excel con regularidad o necesitas automatizar la ordenación en Python, Spire.XLS for Python ofrece una forma de automatizar la tarea con código. Prueba el método que mejor se adapte a tu flujo de trabajo para simplificar y agilizar la ordenación de datos de Excel.
Leer también:
So sortieren Sie Zeilen in Excel nach einer oder mehreren Spalten [Anleitung]
Inhaltsverzeichnis
Das Sortieren von Zeilen in Excel ist eine einfache Möglichkeit, Daten zu organisieren und sie leichter lesbar, vergleichbar und analysierbar zu machen. Ob Sie Datensätze nach Werten anordnen, Einträge in alphabetische Reihenfolge bringen oder Datumswerte vom ältesten zum neuesten sortieren möchten – Excel bietet integrierte Werkzeuge dafür. Entscheidend ist, ganze Zeilen statt einzelner Zellen zu sortieren, damit zusammengehörige Daten beieinanderbleiben. Dieser Leitfaden erklärt, wie Sie Zeilen in Excel nach einer oder mehreren Spalten sortieren, Daten von links nach rechts sortieren und die Zeilensortierung mit Python automatisieren.
Ganze Zeilen in Excel nach einer Spalte sortieren
Das Sortieren von Zeilen in Excel nach einer einzelnen Spalte ist nützlich, wenn Sie Datensätze in einer bestimmten Reihenfolge anordnen möchten. Excel ermöglicht das Sortieren von Daten in aufsteigender oder absteigender Reihenfolge, während zusammengehörige Werte in jeder Zeile beieinanderbleiben. Für einfache Aufgaben können Sie die Schnellsortierbefehle verwenden oder den Sortieren-Dialog, um die Sortierspalte und die Reihenfolge festzulegen.
Zeilen in aufsteigender oder absteigender Reihenfolge sortieren
Wenn Sie nur nach einer Spalte sortieren müssen, ist der schnellste Ansatz die Verwendung der Sortierbefehle auf der Registerkarte Daten. Excel kann Zahlen, Text und Datumswerte je nach Datentyp in aufsteigender oder absteigender Reihenfolge anordnen.
- Schritt 1: Öffnen Sie Ihr Excel-Arbeitsblatt und wählen Sie eine Zelle in der Spalte aus, nach der Sie sortieren möchten. Klicken Sie beispielsweise auf eine Zelle in der Umsatzspalte, um Produkte nach dem Verkaufsumsatz zu sortieren.
- Schritt 2: Wechseln Sie zu Daten und wählen Sie eine der folgenden Optionen:
- Von A bis Z sortieren: Sortiert Zahlen vom kleinsten zum größten Wert, Text alphabetisch oder Datumswerte vom ältesten zum neuesten.
- Von Z bis A sortieren: Sortiert Zahlen vom größten zum kleinsten Wert, Text in umgekehrter alphabetischer Reihenfolge oder Datumswerte vom neuesten zum ältesten.
- Schritt 3: Wenn Excel das Dialogfeld Sortierwarnung anzeigt, wählen Sie Auswahl erweitern und klicken Sie auf Sortieren. Mit dieser Option wird die gesamte Zeile mit dem ausgewählten Wert verschoben, anstatt nur eine Spalte zu sortieren.
Nach dem Sortieren bleiben alle Werte einer Zeile demselben Datensatz zugeordnet. Sie können denselben Vorgang verwenden, um Zeilen nach anderen Kriterien zu sortieren, etwa nach Menge, Name, Verkaufszahlen oder Datum.
Zeilen mithilfe des Sortierdialogs nach einer bestimmten Spalte sortieren
Für eine präzisere Sortierung können Sie den Sortieren-Dialog von Excel verwenden, um den Datenbereich, die Spalte, nach der sortiert werden soll, und die Sortierreihenfolge anzugeben. Dies ist besonders nützlich, wenn Sie einen bestimmten Bereich sortieren oder die Sortierkriterien ausdrücklich festlegen müssen.
- Schritt 1: Wählen Sie den gesamten Datenbereich aus, den Sie sortieren möchten, einschließlich der relevanten Spalten. Wenn Ihr Arbeitsblatt eine Kopfzeile enthält, schließen Sie diese in die Auswahl ein.
- Schritt 2: Wechseln Sie zu Daten → Sortieren, um den Sortierdialog zu öffnen.
- Schritt 3: Wenn Ihr ausgewählter Bereich Spaltenüberschriften enthält, aktivieren Sie Meine Daten haben Überschriften. Dadurch erkennt Excel die Kopfzeile und hält sie aus den sortierten Datensätzen heraus.
- Schritt 4: Konfigurieren Sie die Sortieroptionen:
- Spalte: Wählen Sie die Spalte aus, nach der sortiert werden soll, z. B. Umsatz.
- Sortieren nach: Wählen Sie Zellenwerte für eine standardmäßige Sortierung nach Werten.
- Reihenfolge: Wählen Sie je nach Datentyp Vom kleinsten zum größten Wert, Vom größten zum kleinsten Wert, Von A bis Z oder eine andere geeignete Reihenfolge.
- Schritt 5: Klicken Sie auf OK, um die Sortierung anzuwenden.
Lesen Sie auch: Filter in Excel löschen oder entfernen: 6 Möglichkeiten (manuell & automatisiert)
Zeilen in Excel nach mehreren Spalten sortieren
Beim Sortieren nach einer einzelnen Spalte bleiben Datensätze mit demselben Wert unter diesem Sortierkriterium verbunden. Um diese Datensätze weiter zu organisieren, können Sie in Excel mehrere Sortierebenen definieren. So können Sie zuerst nach einer Spalte sortieren und anschließend Datensätze mit übereinstimmenden Werten nach einer anderen Spalte anordnen.
- Schritt 1: Wählen Sie Ihren Datenbereich aus, und wechseln Sie zu Daten → Sortieren.
- Schritt 2: Konfigurieren Sie die primäre Sortierbedingung. Wählen Sie beispielsweise unter Spalte den Eintrag Status und unter Reihenfolge die Option Von A bis Z.
- Schritt 3: Klicken Sie auf Ebene hinzufügen, um eine zweite Sortierbedingung zu erstellen.
- Schritt 4: Legen Sie die zweite Ebene auf Umsatz fest, und wählen Sie dann Vom größten zum kleinsten Wert.
- Schritt 5: Klicken Sie auf OK, um die Daten zu sortieren.
Nach dem Anwenden der Sortierung sind die Zeilen gruppiert, und zwar nach Status, und innerhalb jeder Gruppe nach Umsatz sortiert. Alle zusammengehörigen Werte bleiben beieinander, sodass Datensätze mit demselben Status leichter verglichen werden können.
Zeilen in Excel von links nach rechts sortieren
Manchmal sind Daten horizontal statt vertikal angeordnet. Ein Arbeitsblatt kann beispielsweise Monate über Spalten hinweg und Verkaufszahlen in einer einzigen Zeile auflisten. In diesem Fall müssen Sie möglicherweise Spalten anhand der Werte in einer Zeile sortieren, statt ganze Zeilen nach einer Spalte zu sortieren.
- Schritt 1: Wählen Sie den Datenbereich aus, den Sie horizontal sortieren möchten.
- Schritt 2: Wechseln Sie zu Daten → Sortieren, um den Sortieren-Dialog zu öffnen.
- Schritt 3: Klicken Sie auf Optionen, wählen Sie Von links nach rechts sortieren und klicken Sie dann auf OK.
- Schritt 4: Wählen Sie im Dropdownmenü Sortieren nach die Zeile aus, die die Werte enthält, die Sie als Sortierschlüssel verwenden möchten.
- Schritt 5: Wählen Sie die gewünschte Reihenfolge aus, und klicken Sie auf OK.
Zeilen in Excel mit Python automatisch sortieren
Die integrierten Sortierfunktionen von Excel eignen sich gut für manuelle Aufgaben, können jedoch weniger praktisch sein, wenn derselbe Vorgang über mehrere Dateien hinweg wiederholt werden muss. Free Spire.XLS for Python bietet eine Möglichkeit, die Zeilensortierung in Excel per Code zu automatisieren, sodass sich konsistente Sortierregeln einfacher auf Arbeitsmappendaten anwenden lassen.
Zeilen nach Umsatz in absteigender Reihenfolge sortieren
In diesem Beispiel verwenden wir Free Spire.XLS for Python, um ein Arbeitsblatt mit einem Produktinventar nach Umsatz vom höchsten zum niedrigsten Wert zu sortieren. Das Arbeitsblatt enthält acht Spalten, und der Code sortiert die Daten in A2:H15, wobei die Kopfzeile aus dem Sortierbereich ausgeschlossen bleibt.
Bevor Sie den Code ausführen, installieren Sie Free Spire.XLS in Ihrer Python-Umgebung mit pip install Spire.Xls.Free und bereiten Sie eine Excel-Arbeitsmappe mit den Daten vor, die Sie sortieren möchten.
Das vollständige Python-Codebeispiel:
from spire.xls.common import *
from spire.xls import *

# Create a Workbook object
workbook = Workbook()

# Load the Excel file
workbook.LoadFromFile("/input/sample.xlsx")

# Get the first worksheet
sheet = workbook.Worksheets[0]

# Clear existing sort criteria
workbook.DataSorter.SortColumns.Clear()

# Sort by Revenue (column E) in descending order
workbook.DataSorter.SortColumns.Add(
    4, SortComparisonType.Values, OrderBy.Descending
)

# Sort the entire data range, excluding the header row
workbook.DataSorter.Sort(sheet.Range["A2:H15"])

# Save the sorted workbook
workbook.SaveToFile(
    "/output/Sorted.xlsx",
    ExcelVersion.Version2016
)

# Release resources
workbook.Dispose()
Der Code verwendet die folgenden Schritte, um die Daten zu sortieren:
- Schritt 1: Erstellen Sie ein Workbook-Objekt, und laden Sie die Excel-Quelldatei mit LoadFromFile().
- Schritt 2: Greifen Sie auf das erste Arbeitsblatt zu, und löschen Sie alle vorhandenen Sortierkriterien.
- Schritt 3: Rufen Sie SortColumns.Add() auf, um Spalte E, die den Umsatz enthält, als Sortierschlüssel anzugeben. Der Index 4 kennzeichnet die fünfte Spalte, da der Spaltenindex nullbasiert ist. SortComparisonType.Values weist den Sortierer an, Zellwerte zu vergleichen, während OrderBy.Descending höhere Werte zuerst platziert.
- Schritt 4: Rufen Sie DataSorter.Sort() für A2:H15 auf. Der Bereich umfasst alle acht Spalten und schließt Zeile 1 aus, sodass die Kopfzeile an ihrem Platz bleibt, während die Produktdatensätze gemeinsam sortiert werden.
- Schritt 5: Speichern Sie das Ergebnis mit SaveToFile() in einer neuen Arbeitsmappe.
Fazit
Das Sortieren von Zeilen in Excel hilft Ihnen, Daten nach Umsatz, Lagerbeständen, Datumswerten oder anderen Werten zu organisieren und dabei zusammengehörige Informationen beieinanderzuhalten. Für eine schnelle Sortierung verwenden Sie die integrierten Sortieroptionen von Excel. Wenn Sie nach mehreren Spalten sortieren oder horizontale Daten anordnen müssen, bietet der Sortierdialog mehr Kontrolle. Wenn Sie regelmäßig Excel-Dateien verarbeiten oder die Sortierung in Python automatisieren möchten, bietet Spire.XLS for Python eine Möglichkeit, die Aufgabe per Code zu automatisieren. Testen Sie die Methode, die am besten zu Ihrem Arbeitsablauf passt, um das Sortieren von Excel-Daten einfacher und effizienter zu gestalten.
Lesen Sie auch:
Как сортировать строки в Excel по одному или нескольким столбцам [Руководство]
Содержание
Сортировка строк в Excel — простой способ упорядочить данные и сделать их более удобными для чтения, сравнения и анализа. Если вам нужно упорядочить записи по значению, расположить элементы в алфавитном порядке или отсортировать даты от старых к новым, Excel предлагает встроенные инструменты для этой задачи. Главное — сортировать целые строки, а не отдельные ячейки, чтобы связанные данные оставались вместе. В этом руководстве объясняется, как сортировать строки в Excel по одному или нескольким столбцам, сортировать данные слева направо и автоматизировать сортировку строк с помощью Python.
Как сортировать целые строки в Excel по столбцу
Сортировка строк в Excel по одному столбцу полезна, когда нужно упорядочить записи в определенном порядке. Excel позволяет сортировать данные по возрастанию или убыванию, сохраняя связанные значения в каждой строке вместе. Для простых задач можно использовать быстрые команды сортировки или диалоговое окно Сортировка, чтобы указать столбец и порядок сортировки.
Сортировка строк по возрастанию или убыванию
Если нужно сортировать только по одному столбцу, самый быстрый способ — использовать команды сортировки на вкладке Данные. Excel может упорядочивать числа, текст и даты по возрастанию или убыванию в зависимости от типа данных.
- Шаг 1: Откройте лист Excel и выберите ячейку в столбце, по которому хотите сортировать. Например, щелкните ячейку в столбце выручки, чтобы отсортировать продукты по выручке от продаж.
- Шаг 2: Перейдите на вкладку Данные и выберите один из следующих вариантов:
- Сортировка от А до Я: сортировка чисел от меньшего к большему, текста по алфавиту или дат от старых к новым.
- Сортировка от Я до А: сортировка чисел от большего к меньшему, текста в обратном алфавитном порядке или дат от новых к старым.
- Шаг 3: Если Excel отображает диалоговое окно Предупреждение о сортировке, выберите Развернуть выделенный диапазон и нажмите Сортировать. Этот параметр перемещает всю строку вместе с выбранным значением, а не сортирует только один столбец.
После сортировки все значения в строке остаются связанными с одной записью. Тем же способом можно сортировать строки по другим критериям, например по количеству, названию, показателям продаж или дате.
Сортировка строк по определенному столбцу с помощью диалогового окна «Сортировка»
Для более точной сортировки можно использовать диалоговое окно «Сортировка» в Excel, чтобы указать диапазон данных, столбец для сортировки и порядок сортировки. Это особенно полезно, когда нужно отсортировать определенный диапазон или явно задать критерии сортировки.
- Шаг 1: Выделите весь диапазон данных, который хотите отсортировать, включая соответствующие столбцы. Если на листе есть строка заголовков, включите ее в выделение.
- Шаг 2: Перейдите в Данные → Сортировка, чтобы открыть диалоговое окно «Сортировка».
- Шаг 3: Если в выделенном диапазоне есть заголовки столбцов, установите флажок Мои данные содержат заголовки. Это поможет Excel распознать строку заголовков и не включать ее в сортируемые записи.
- Шаг 4: Настройте параметры сортировки:
- Столбец: выберите столбец для сортировки, например «Выручка».
- Сортировать по: выберите Значения ячеек для стандартной сортировки по значениям.
- Порядок: выберите «От меньшего к большему», «От большего к меньшему», «От А до Я» или другой подходящий порядок в зависимости от типа данных.
- Шаг 5: Нажмите ОК, чтобы применить сортировку.
Также читайте: Очистка или удаление фильтров в Excel: 6 способов (вручную и автоматически)
Как сортировать строки по нескольким столбцам в Excel
При сортировке по одному столбцу записи с одинаковыми значениями остаются связанными по этому критерию сортировки. Чтобы дополнительно упорядочить такие записи, Excel позволяет задавать несколько уровней сортировки: сначала можно отсортировать по одному столбцу, а затем упорядочить записи с совпадающими значениями по другому столбцу.
- Шаг 1: Выделите диапазон данных и перейдите в Данные → Сортировка.
- Шаг 2: Настройте основное условие сортировки. Например, выберите Статус в поле «Столбец» и От А до Я в поле «Порядок».
- Шаг 3: Нажмите Добавить уровень, чтобы создать второе условие сортировки.
- Шаг 4: Задайте для второго уровня Выручка, затем выберите От большего к меньшему.
- Шаг 5: Нажмите ОК, чтобы отсортировать данные.
После применения сортировки строки группируются по статусу и сортируются по выручке внутри каждой группы. Все связанные значения остаются вместе, что упрощает сравнение записей с одинаковым статусом.
Как сортировать строки слева направо в Excel
Иногда данные расположены горизонтально, а не вертикально. Например, на листе месяцы могут быть перечислены по столбцам, а показатели продаж — в одной строке. В этом случае может потребоваться сортировать столбцы на основе значений в строке, а не сортировать целые строки по столбцу.
- Шаг 1: Выделите диапазон данных, который хотите отсортировать по горизонтали.
- Шаг 2: Перейдите в Данные → Сортировка, чтобы открыть диалоговое окно Сортировка.
- Шаг 3: Нажмите Параметры и выберите Сортировать слева направо, затем нажмите ОК.
- Шаг 4: В раскрывающемся списке Сортировать по выберите строку, содержащую значения, которые нужно использовать как ключ сортировки.
- Шаг 5: Выберите нужный порядок и нажмите ОК.
Как автоматически сортировать строки в Excel с помощью Python
Встроенные функции сортировки Excel хорошо подходят для ручных задач, но могут быть менее удобны, когда одну и ту же операцию нужно повторять в нескольких файлах. Free Spire.XLS for Python позволяет автоматизировать сортировку строк Excel с помощью кода, упрощая применение единообразных правил сортировки к данным книги.
Сортировка строк по выручке по убыванию
В этом примере мы используем Free Spire.XLS for Python, чтобы отсортировать лист учета товарных запасов по выручке от наибольшей к наименьшей. Лист содержит восемь столбцов, а код сортирует данные в диапазоне A2:H15, не включая строку заголовков в диапазон сортировки.
Перед запуском кода установите Free Spire.XLS в своей среде Python с помощью pip install Spire.Xls.Free и подготовьте книгу Excel с данными, которые хотите отсортировать.
Полный пример кода на Python:
from spire.xls.common import *
from spire.xls import *

# Create a Workbook object
workbook = Workbook()

# Load the Excel file
workbook.LoadFromFile("/input/sample.xlsx")

# Get the first worksheet
sheet = workbook.Worksheets[0]

# Clear existing sort criteria
workbook.DataSorter.SortColumns.Clear()

# Sort by Revenue (column E) in descending order
workbook.DataSorter.SortColumns.Add(
    4, SortComparisonType.Values, OrderBy.Descending
)

# Sort the entire data range, excluding the header row
workbook.DataSorter.Sort(sheet.Range["A2:H15"])

# Save the sorted workbook
workbook.SaveToFile(
    "/output/Sorted.xlsx",
    ExcelVersion.Version2016
)

# Release resources
workbook.Dispose()
Код выполняет следующие шаги для сортировки данных:
- Шаг 1: Создайте объект Workbook и загрузите исходный файл Excel с помощью LoadFromFile().
- Шаг 2: Получите доступ к первому листу и очистите все существующие критерии сортировки.
- Шаг 3: Вызовите SortColumns.Add(), чтобы указать столбец E, содержащий выручку, в качестве ключа сортировки. Индекс 4 обозначает пятый столбец, поскольку индекс столбца начинается с нуля. SortComparisonType.Values указывает сортировщику сравнивать значения ячеек, а OrderBy.Descending размещает более высокие значения первыми.
- Шаг 4: Вызовите DataSorter.Sort() для A2:H15. Диапазон включает все восемь столбцов и исключает строку 1, поэтому заголовок остается на месте, а записи о продуктах сортируются вместе.
- Шаг 5: Сохраните результат в новую книгу с помощью SaveToFile().
Заключение
Сортировка строк в Excel помогает упорядочивать данные по выручке, уровню запасов, датам или другим значениям, сохраняя связанную информацию вместе. Для быстрой сортировки используйте встроенные параметры сортировки Excel. Когда нужно сортировать по нескольким столбцам или упорядочить горизонтальные данные, диалоговое окно «Сортировка» дает больше возможностей. Если вы регулярно обрабатываете файлы Excel или хотите автоматизировать сортировку в Python, Spire.XLS for Python предлагает способ автоматизировать задачу с помощью кода. Попробуйте метод, который лучше всего подходит для вашего рабочего процесса, чтобы сделать сортировку данных Excel проще и эффективнее.
Также читайте:
How to Sort Rows in Excel by One or More Columns [Guide]
Table of Contents
Sorting rows in Excel is a simple way to organize data and make it easier to read, compare, and analyze. Whether you need to arrange records by value, put entries in alphabetical order, or sort dates from oldest to newest, Excel provides built-in tools for the job. The key is to sort entire rows rather than individual cells, so related data stays together. This guide explains how to sort rows in Excel by one or more columns, sort data from left to right, and automate row sorting with Python.
How to Sort Entire Rows in Excel by a Column
Sorting rows in Excel by a single column is useful when you need to arrange records in a specific order. Excel lets you sort data in ascending or descending order while keeping related values in each row together. You can use the quick sorting commands for simple tasks or the Sort dialog to specify the sorting column and order.
Sort Rows in Ascending or Descending Order
If you only need to sort by one column, the quickest approach is to use the sorting commands on the Data tab. Excel can arrange numbers, text, and dates in ascending or descending order, depending on the type of data.
- Step 1: Open your Excel worksheet and select a cell in the column you want to sort by. For example, click a cell in the revenue column to sort products by sales revenue.
- Step 2: Go to Data and choose one of the following options:
- Sort A to Z: Sort numbers from smallest to largest, text alphabetically, or dates from oldest to newest.
- Sort Z to A: Sort numbers from largest to smallest, text in reverse alphabetical order, or dates from newest to oldest.
- Step 3: If Excel displays a Sort Warning dialog, select Expand the selection and click Sort. This option moves the entire row with the selected value instead of sorting only one column.
After sorting, all values in a row remain associated with the same record. You can use the same process to sort rows by other criteria, such as quantity, name, sales figures, or date.
Sort Rows by a Specific Column Using the Sort Dialog
For more precise sorting, you can use Excel's Sort dialog to specify the data range, the column to sort by, and the sort order. This is especially useful when you need to sort a particular range or define the sorting criteria explicitly.
- Step 1: Select the entire data range you want to sort, including the relevant columns. If your worksheet contains a header row, include it in the selection.
- Step 2: Go to Data → Sort to open the Sort dialog.
- Step 3: If your selected range has column headers, check My data has headers. This helps Excel recognize the header row and keep it out of the sorted records.
- Step 4: Configure the sorting options:
- Column: Select the column to sort by, such as revenue.
- Sort On: Choose Cell Values for a standard value-based sort.
- Order: Select Smallest to Largest, Largest to Smallest, A to Z, or another suitable order, depending on the data type.
- Step 5: Click OK to apply the sort.
Also Read: Clear or Remove Filters in Excel: 6 Ways (Manual & Automated)
How to Sort Rows by Multiple Columns in Excel
When sorting by a single column, records with the same value remain tied under that sorting criterion. To organize these records further, Excel lets you define multiple sorting levels, so you can sort by one column first and then arrange records with matching values according to another column.
- Step 1: Select your data range and go to Data → Sort.
- Step 2: Configure the primary sorting condition. For example, choose Status under Column and select A to Z under Order.
- Step 3: Click Add Level to create a second sorting condition.
- Step 4: Set the second level to Revenue, then choose Largest to Smallest.
- Step 5: Click OK to sort the data.
After applying the sort, rows are grouped by status and sorted by revenue within each group. All related values remain together, making it easier to compare records with the same status.
How to Sort Rows from Left to Right in Excel
Sometimes, the data is arranged horizontally rather than vertically. For example, a worksheet might list months across columns and sales figures in a single row. In this case, you may need to sort columns based on the values in a row instead of sorting entire rows by a column.
- Step 1: Select the data range you want to sort horizontally.
- Step 2: Go to Data → Sort to open the Sort dialog.
- Step 3: Click Options and select Sort left to right, then click OK.
- Step 4: In the Sort by dropdown, choose the row containing the values you want to use as the sorting key.
- Step 5: Select the desired order, and click OK.
How to Automatically Sort Rows in Excel Using Python
Excel's built-in sorting features work well for manual tasks, but they can be less convenient when the same operation needs to be repeated across multiple files. Free Spire.XLS for Python provides a way to automate Excel row sorting through code, making it easier to apply consistent sorting rules to workbook data.
Sort Rows by Revenue in Descending Order
In this example, we'll use Free Spire.XLS for Python to sort a product inventory worksheet by revenue, from highest to lowest. The worksheet contains eight columns, and the code sorts the data in A2:H15, keeping the header row out of the sorting range.
Before running the code, install Free Spire.XLS in your Python environment using pip install Spire.Xls.Free, and prepare an Excel workbook containing the data you want to sort.
The complete Python code example:
from spire.xls.common import *
from spire.xls import *

# Create a Workbook object
workbook = Workbook()

# Load the Excel file
workbook.LoadFromFile("/input/sample.xlsx")

# Get the first worksheet
sheet = workbook.Worksheets[0]

# Clear existing sort criteria
workbook.DataSorter.SortColumns.Clear()

# Sort by Revenue (column E) in descending order
workbook.DataSorter.SortColumns.Add(
    4, SortComparisonType.Values, OrderBy.Descending
)

# Sort the entire data range, excluding the header row
workbook.DataSorter.Sort(sheet.Range["A2:H15"])

# Save the sorted workbook
workbook.SaveToFile(
    "/output/Sorted.xlsx",
    ExcelVersion.Version2016
)

# Release resources
workbook.Dispose()
The code uses the following steps to sort the data:
- Step 1: Create a Workbook object and load the source Excel file with LoadFromFile().
- Step 2: Access the first worksheet and clear any existing sort criteria.
- Step 3: Call SortColumns.Add() to specify column E, which contains revenue, as the sort key. The index 4 identifies the fifth column because the column index is zero-based. SortComparisonType.Values tells the sorter to compare cell values, while OrderBy.Descending places higher values first.
- Step 4: Call DataSorter.Sort() on A2:H15. The range includes all eight columns and excludes row 1, so the header stays in place while the product records are sorted together.
- Step 5: Save the result to a new workbook with SaveToFile().
Conclusion
Sorting rows in Excel helps you organize data by revenue, stock levels, dates, or other values while keeping related information together. For a quick sort, use Excel’s built-in sorting options. When you need to sort by multiple columns or arrange horizontal data, the Sort dialog gives you more control. If you regularly process Excel files or need to automate sorting in Python, Spire.XLS for Python offers a way to automate the task with code. Try the method that best fits your workflow to make sorting Excel data simpler and more efficient.
Also Read:
Como Remover Texto de PDF (Com ou Sem Adobe)

Precisa corrigir um erro de digitação, remover informações desatualizadas ou excluir conteúdo indesejado de um PDF? Há várias maneiras de remover texto de um PDF, dependendo de quanto conteúdo você precisa alterar e se prefere edição manual, automação ou uma ferramenta online.
Este guia aborda três métodos principais usando Adobe Acrobat, Python e um editor de PDF online, além de uma abordagem alternativa para editar texto no Word antes de converter o documento de volta para PDF.
Como Remover Texto de PDF com Adobe Acrobat
O Adobe Acrobat é uma das ferramentas de PDF mais conhecidas, então costuma ser uma das primeiras opções consideradas quando as pessoas precisam editar um PDF. Ele permite editar texto existente de PDF diretamente, tornando-o uma escolha prática para remover algumas palavras, corrigir pequenas seções ou atualizar informações desatualizadas sem reconstruir todo o documento.
- Passo 1: Abra o PDF no Adobe Acrobat. Clique em Editar PDF na barra lateral direita ou vá para Editar > Editar Texto e Imagens na barra de ferramentas.
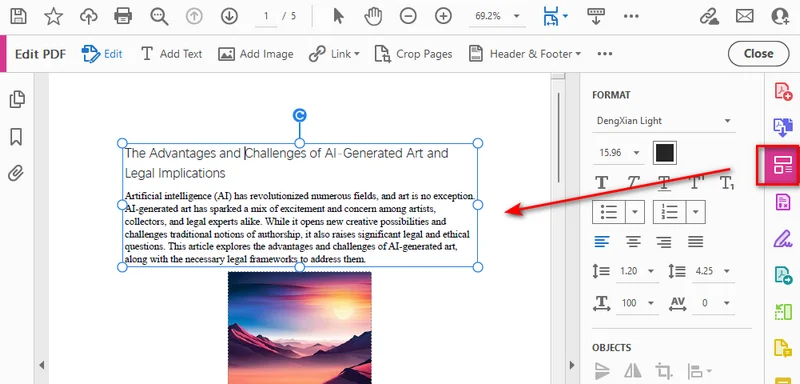
- Passo 2: Selecione o texto ou a caixa de texto que deseja remover e pressione Backspace no Windows ou Delete no macOS.
Observação: Editar texto existente no Adobe Acrobat requer uma assinatura paga. Se precisar remover informações confidenciais permanentemente, use a ferramenta Redigir em vez de simplesmente excluir o texto.
Como Excluir Texto de PDF Usando Python
Se você precisar remover o mesmo texto de vários PDFs ou repetir a tarefa regularmente, o Python pode automatizar o processo. Free Spire.PDF for Python é uma biblioteca PDF gratuita que permite aos desenvolvedores criar, ler, editar e salvar documentos PDF por meio de código Python. Ela fornece APIs para trabalhar com texto, páginas, imagens e outros elementos de documentos PDF, o que a torna útil para automatizar tarefas comuns em PDF. Neste exemplo, usaremos sua classe PdfTextReplacer para localizar texto específico e substituí-lo por uma string vazia, para que você possa remover texto indesejado de um PDF sem editar cada ocorrência manualmente.
Passo 1: Instalar o Free Spire.PDF for Python
Primeiro, instale o Free Spire.PDF for Python em seu ambiente Python. Você pode usar o pip para instalar o pacote:
pip install Spire.Pdf.Free
Em seguida, importe a biblioteca em seu script Python:
from spire.pdf import *
Com a biblioteca instalada, você pode carregar um PDF, processar suas páginas e salvar o resultado programaticamente.
Passo 2: Carregar o PDF e Remover o Texto Alvo
A classe PdfTextReplacer fornece o método ReplaceAllText() para substituir texto correspondente em uma página. O exemplo a seguir remove todas as ocorrências correspondentes do texto alvo das páginas do PDF.
from spire.pdf import *

# Define the input file, output file, and target text.
input_file = "input.pdf"
output_file = "output.pdf"
target_text = "AI-Generated"

# Load the source PDF.
pdf = PdfDocument()
pdf.LoadFromFile(input_file)

# Find and remove the target text on each page.
for i in range(pdf.Pages.Count):
    page = pdf.Pages.get_Item(i)
    replacer = PdfTextReplacer(page)
    replacer.ReplaceAllText(target_text, "")

# Save the modified PDF and release resources.
pdf.SaveToFile(output_file)
pdf.Close()
Veja a prévia do arquivo PDF modificado:
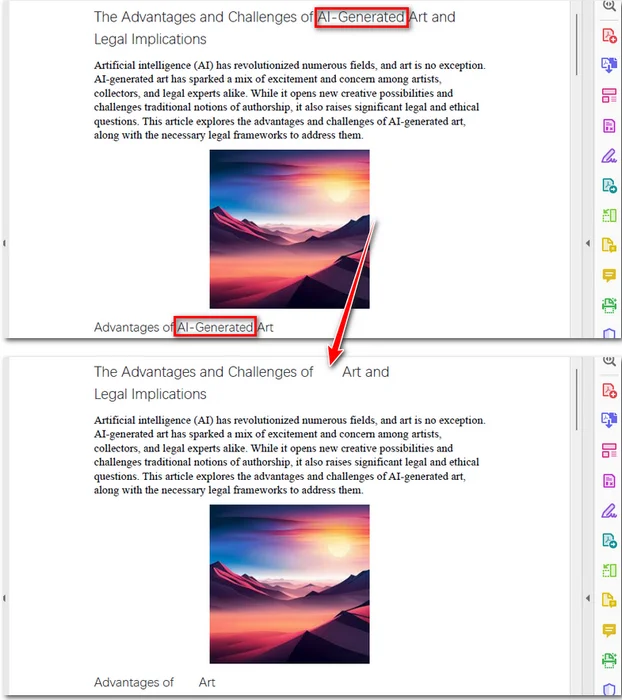
O método ReplaceAllText() usa uma string vazia ("") para substituir todas as ocorrências correspondentes do texto alvo em uma página. Isso permite remover rapidamente texto repetido, como uma palavra ou frase específica, em todo o PDF. No entanto, as páginas PDF usam um layout fixo, então remover texto não faz o conteúdo ao redor se ajustar automaticamente. O texto original pode desaparecer, mas o espaço que ele ocupava pode permanecer em branco.
Por padrão, o exemplo diferencia maiúsculas e minúsculas do texto alvo. Por exemplo, "AI-Generated" e "ai-generated" podem ser tratados como correspondências diferentes. Para tornar a substituição insensível a maiúsculas e minúsculas, defina a opção ReplaceType como ReplaceActionType.IgnoreCase antes de chamar ReplaceAllText():
replacer.Options.ReplaceType = ReplaceActionType.IgnoreCase
replacer.ReplaceAllText(target_text, "")
Como Remover Texto de PDF Online
Se você quiser remover texto de um PDF sem instalar software, um editor de PDF online é uma opção conveniente. A ferramenta Edit PDF do iLovePDF permite modificar ou excluir texto existente diretamente no navegador, tornando-a útil para correções rápidas e remoção de conteúdo indesejado.
- Passo 1: Acesse a ferramenta Edit PDF do iLovePDF e faça upload do seu arquivo PDF.

- Passo 2: Clique no ícone Edit na barra de ferramentas para habilitar a edição. Selecione o texto que deseja remover e exclua o conteúdo indesejado.
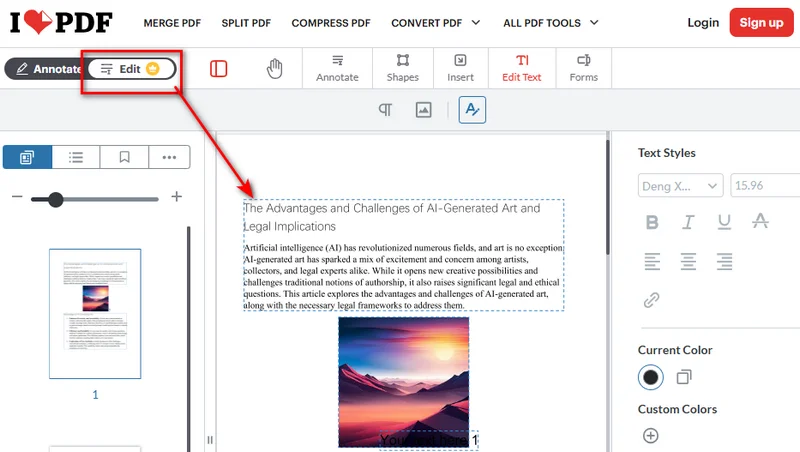
- Passo 3: Revise suas alterações e clique em Edit PDF para processar o arquivo. Baixe o PDF editado para o seu dispositivo.
Ferramentas de edição online são convenientes para remover texto comum, corrigir erros e atualizar o conteúdo de documentos. No entanto, simplesmente excluir texto em um editor não é o mesmo que redigir informações confidenciais com segurança. Se você precisar remover dados confidenciais permanentemente, use uma ferramenta de redação dedicada e verifique se o texto original não pode mais ser pesquisado, copiado ou extraído. Antes de enviar um documento privado, verifique a política de privacidade do serviço.
Alternativa: Converter PDF para Word para Remover Texto
Se você precisar editar seções maiores de texto, converter o PDF para Word pode ser outra opção. Abra o documento convertido no Microsoft Word, exclua o texto indesejado e salve-o novamente como PDF.
No entanto, a conversão pode afetar o layout original, especialmente em documentos com formatação complexa, tabelas ou imagens. Verifique o documento convertido cuidadosamente antes de exportá-lo novamente para PDF.
Ideal para: Editar passagens mais longas ou fazer várias alterações no conteúdo de um PDF.
Qual Método Você Deve Escolher?
Cada método tem seus próprios pontos fortes e limitações. A melhor escolha depende de quanto texto você precisa remover, com que frequência processa PDFs e como prefere trabalhar. A tabela abaixo compara as opções disponíveis para ajudar você a escolher a certa.
| Método | Melhor caso de uso | Principal limitação |
|---|---|---|
| Adobe Acrobat | Excluir texto manualmente ou fazer pequenas correções | Editar texto existente requer uma assinatura paga |
| Free Spire.PDF for Python | Automatizar a substituição de texto em vários PDFs | Pode deixar espaços em branco onde o texto foi removido |
| iLovePDF Edit PDF | Fazer edições rápidas online sem instalar software | Requer o upload do PDF para um serviço online |
| Conversão de PDF para Word | Editar passagens mais longas ou fazer alterações extensas | Pode afetar o layout original durante a conversão |
Perguntas Frequentes
1. Como Faço para Extrair Texto de um PDF?
Extrair texto é diferente de removê-lo. Se o PDF contiver texto selecionável, muitas vezes você pode copiá-lo diretamente ou usar uma ferramenta de extração de texto de PDF. Para PDFs digitalizados, você pode precisar de reconhecimento óptico de caracteres (OCR) para reconhecer texto em imagens de páginas.
2. Por Que Não Consigo Excluir uma Caixa de Texto em um PDF?
Esses PDFs podem conter conteúdo achatado, imagens de páginas digitalizadas ou texto convertido em contornos. Se o texto fizer parte de uma imagem, você precisará de OCR ou de uma abordagem de edição de imagem em vez de edição de texto comum em PDF.
3. Como Posso Remover Texto de um PDF sem Remover o Fundo?
Normalmente, você pode excluir texto diretamente com um editor de PDF sem afetar o fundo. No entanto, cobrir o texto com um retângulo branco ou preto também pode cobrir padrões de fundo ou imagens.
4. Como Posso Fazer o Texto Desaparecer Permanentemente em um PDF?
Use um editor de PDF para excluir o texto do documento. Se você apenas cobri-lo com um retângulo branco ou preto, o texto original ainda pode ser recuperável. Para informações confidenciais, use uma ferramenta de redação para remover o conteúdo permanentemente.
Conclusão
Você pode remover texto de um PDF usando um editor de desktop, Python ou uma ferramenta online. Adobe Acrobat e iLovePDF são convenientes para edições rápidas, enquanto o Free Spire.PDF é útil para automatizar a substituição repetitiva de texto. Se você precisar fazer alterações extensas, converter o PDF para Word pode ser outra opção, embora o layout original possa não ser totalmente preservado. Escolha o método que se adapta ao seu fluxo de trabalho e torne a edição de PDF mais rápida e eficiente.
Leia Também:
PDF에서 텍스트 제거하는 방법 (Adobe 사용 여부에 관계없이)
PDF에서 오타를 수정하거나 오래된 정보를 제거하거나 원치 않는 콘텐츠를 삭제해야 하나요? PDF에서 텍스트를 제거하는 방법은 여러 가지가 있으며, 변경해야 할 콘텐츠의 양과 수동 편집, 자동화, 온라인 도구 중 어떤 방식을 선호하는지에 따라 달라집니다.
이 가이드에서는 Adobe Acrobat, Python, 온라인 PDF 편집기를 사용하는 세 가지 주요 방법과, 문서를 다시 PDF로 변환하기 전에 Word에서 텍스트를 편집하는 대안 접근법을 다룹니다.
Adobe Acrobat으로 PDF에서 텍스트를 제거하는 방법
Adobe Acrobat은 가장 잘 알려진 PDF 도구 중 하나이므로, 사람들이 PDF를 편집해야 할 때 가장 먼저 고려하는 옵션 중 하나입니다. 기존 PDF 텍스트를 직접 편집할 수 있어, 전체 문서를 다시 만들지 않고도 몇 단어를 제거하거나 작은 부분을 수정하거나 오래된 정보를 업데이트하는 데 실용적인 선택입니다.
- 1단계: Adobe Acrobat에서 PDF를 엽니다. 오른쪽 사이드바에서 PDF 편집을 클릭하거나 도구 모음에서 편집 > 텍스트 및 이미지 편집으로 이동합니다.
- 2단계: 제거할 텍스트 또는 텍스트 상자를 선택한 다음, Windows에서는 Backspace를, macOS에서는 Delete를 누릅니다.
참고: Adobe Acrobat에서 기존 텍스트를 편집하려면 유료 구독이 필요합니다. 기밀 정보를 영구적으로 제거해야 하는 경우 단순히 텍스트를 삭제하는 대신 교정 도구를 사용하세요.
Python을 사용하여 PDF에서 텍스트를 삭제하는 방법
여러 PDF에서 동일한 텍스트를 제거해야 하거나 이 작업을 정기적으로 반복해야 하는 경우, Python으로 프로세스를 자동화할 수 있습니다. Free Spire.PDF for Python은 개발자가 Python 코드를 통해 PDF 문서를 생성, 읽기, 편집 및 저장할 수 있게 해 주는 무료 PDF 라이브러리입니다. PDF 텍스트, 페이지, 이미지 및 기타 문서 요소를 다루기 위한 API를 제공하므로 일반적인 PDF 작업을 자동화하는 데 유용합니다. 이 예제에서는 PdfTextReplacer 클래스를 사용하여 특정 텍스트를 찾아 빈 문자열로 바꾸므로, 각 항목을 수동으로 편집하지 않고도 PDF에서 원치 않는 텍스트를 제거할 수 있습니다.
1단계: Free Spire.PDF for Python 설치
먼저 Python 환경에 Free Spire.PDF for Python을 설치합니다. pip를 사용하여 패키지를 설치할 수 있습니다:
pip install Spire.Pdf.Free
그런 다음 Python 스크립트에서 라이브러리를 가져옵니다:
from spire.pdf import *
라이브러리가 설치되면 PDF를 로드하고, 페이지를 처리하고, 결과를 프로그래밍 방식으로 저장할 수 있습니다.
2단계: PDF 로드 및 대상 텍스트 제거
PdfTextReplacer 클래스는 페이지에서 일치하는 텍스트를 바꾸기 위한 ReplaceAllText() 메서드를 제공합니다. 다음 예제는 PDF 페이지에서 대상 텍스트와 일치하는 모든 항목을 제거합니다.
from spire.pdf import *

# Define the input file, output file, and target text.
input_file = "input.pdf"
output_file = "output.pdf"
target_text = "AI-Generated"

# Load the source PDF.
pdf = PdfDocument()
pdf.LoadFromFile(input_file)

# Find and remove the target text on each page.
for i in range(pdf.Pages.Count):
    page = pdf.Pages.get_Item(i)
    replacer = PdfTextReplacer(page)
    replacer.ReplaceAllText(target_text, "")

# Save the modified PDF and release resources.
pdf.SaveToFile(output_file)
pdf.Close()
다음은 수정된 PDF 파일의 미리보기입니다:
ReplaceAllText() 메서드는 빈 문자열("")을 사용하여 페이지에서 대상 텍스트와 일치하는 모든 항목을 바꿉니다. 이를 통해 PDF 전체에서 특정 단어나 구문처럼 반복되는 텍스트를 빠르게 제거할 수 있습니다. 그러나 PDF 페이지는 고정 레이아웃을 사용하므로 텍스트를 제거해도 주변 콘텐츠가 자동으로 재배치되지 않습니다. 원본 텍스트는 사라질 수 있지만, 그 텍스트가 차지하던 공간은 빈 상태로 남을 수 있습니다.
기본적으로 이 예제는 대상 텍스트의 대/소문자를 구분하여 일치시킵니다. 예를 들어 "AI-Generated"와 "ai-generated"는 서로 다른 일치 항목으로 처리될 수 있습니다. 대/소문자를 구분하지 않고 바꾸려면 ReplaceAllText()를 호출하기 전에 ReplaceType 옵션을 ReplaceActionType.IgnoreCase로 설정하세요:
replacer.Options.ReplaceType = ReplaceActionType.IgnoreCase
replacer.ReplaceAllText(target_text, "")
온라인에서 PDF에서 텍스트를 제거하는 방법
소프트웨어를 설치하지 않고 PDF에서 텍스트를 제거하려면 온라인 PDF 편집기가 편리한 옵션입니다. iLovePDF의 PDF 편집 도구를 사용하면 브라우저에서 직접 기존 텍스트를 수정하거나 삭제할 수 있어 빠른 수정과 원치 않는 콘텐츠 제거에 유용합니다.
- 1단계: iLovePDF의 PDF 편집 도구로 이동하여 PDF 파일을 업로드합니다.
- 2단계: 도구 모음에서 편집 아이콘을 클릭하여 편집을 활성화합니다. 제거할 텍스트를 선택한 다음 원치 않는 콘텐츠를 삭제합니다.
- 3단계: 변경 사항을 검토하고 PDF 편집을 클릭하여 파일을 처리합니다. 편집된 PDF를 기기에 다운로드합니다.
온라인 편집 도구는 일반 텍스트를 제거하거나 오류를 수정하거나 문서 콘텐츠를 업데이트하는 데 편리합니다. 그러나 편집기에서 단순히 텍스트를 삭제하는 것은 민감한 정보를 안전하게 교정하는 것과 같지 않습니다. 기밀 데이터를 영구적으로 제거해야 하는 경우 전용 교정 도구를 사용하고 원본 텍스트를 더 이상 검색, 복사 또는 추출할 수 없는지 확인하세요. 개인 문서를 업로드하기 전에 해당 서비스의 개인정보 처리방침을 확인하세요.
대안: 텍스트 제거를 위해 PDF를 Word로 변환
더 큰 텍스트 섹션을 편집해야 하는 경우 PDF를 Word로 변환하는 것이 또 다른 옵션이 될 수 있습니다. 변환된 문서를 Microsoft Word에서 열고, 원치 않는 텍스트를 삭제한 다음, 다시 PDF로 저장합니다.
그러나 변환은 특히 복잡한 서식, 표 또는 이미지가 있는 문서에서 원본 레이아웃에 영향을 줄 수 있습니다. 다시 PDF로 내보내기 전에 변환된 문서를 주의 깊게 확인하세요.
적합한 경우: 더 긴 구절을 편집하거나 PDF 콘텐츠를 여러 번 변경할 때.
어떤 방법을 선택해야 할까요?
각 방법에는 고유한 장점과 한계가 있습니다. 최선의 선택은 제거해야 할 텍스트의 양, PDF를 처리하는 빈도, 선호하는 작업 방식에 따라 달라집니다. 아래 표에서는 사용 가능한 옵션을 비교하여 올바른 방법을 선택하는 데 도움을 줍니다.
| 방법 | 최적 사용 사례 | 주요 한계 |
|---|---|---|
| Adobe Acrobat | 수동으로 텍스트를 삭제하거나 작은 수정을 할 때 | 기존 텍스트 편집에는 유료 구독이 필요함 |
| Free Spire.PDF for Python | 여러 PDF에서 텍스트 바꾸기 자동화 | 텍스트가 제거된 자리에 빈 공간이 남을 수 있음 |
| iLovePDF PDF 편집 | 소프트웨어를 설치하지 않고 온라인에서 빠르게 편집할 때 | PDF를 온라인 서비스에 업로드해야 함 |
| PDF-Word 변환 | 더 긴 구절을 편집하거나 광범위한 변경을 할 때 | 변환 중 원본 레이아웃에 영향을 줄 수 있음 |
자주 묻는 질문
1. PDF에서 텍스트를 추출하려면 어떻게 하나요?
텍스트 추출은 제거와 다릅니다. PDF에 선택 가능한 텍스트가 포함되어 있으면 일반적으로 직접 복사하거나 PDF 텍스트 추출 도구를 사용할 수 있습니다. 스캔한 PDF의 경우 페이지 이미지의 텍스트를 인식하려면 광학 문자 인식(OCR)이 필요할 수 있습니다.
2. PDF에서 텍스트 상자를 삭제할 수 없는 이유는 무엇인가요?
이러한 PDF에는 병합된 콘텐츠, 스캔한 페이지 이미지 또는 윤곽선으로 변환된 텍스트가 포함되어 있을 수 있습니다. 텍스트가 이미지의 일부인 경우 일반 PDF 텍스트 편집 대신 OCR 또는 이미지 편집 방식을 사용해야 합니다.
3. 배경을 제거하지 않고 PDF에서 텍스트를 제거하려면 어떻게 하나요?
일반적으로 PDF 편집기로 텍스트를 직접 삭제해도 배경에 영향을 주지 않습니다. 그러나 흰색 또는 검은색 사각형으로 텍스트를 가리면 배경 패턴이나 이미지도 가려질 수 있습니다.
4. PDF에서 텍스트를 영구적으로 사라지게 하려면 어떻게 하나요?
PDF 편집기를 사용하여 문서에서 텍스트를 삭제하세요. 흰색 또는 검은색 사각형으로만 가리면 원본 텍스트를 여전히 복구할 수 있습니다. 민감한 정보의 경우 교정 도구를 사용하여 콘텐츠를 영구적으로 제거하세요.
결론
데스크톱 편집기, Python 또는 온라인 도구를 사용하여 PDF에서 텍스트를 제거할 수 있습니다. Adobe Acrobat과 iLovePDF는 빠른 편집에 편리하고, Free Spire.PDF는 반복적인 텍스트 바꾸기를 자동화하는 데 유용합니다. 광범위한 변경이 필요하면 PDF를 Word로 변환하는 것이 또 다른 옵션이 될 수 있지만, 원본 레이아웃이 완전히 유지되지 않을 수 있습니다. 워크플로에 맞는 방법을 선택하여 PDF 편집을 더 빠르고 효율적으로 만드세요.